

Page 1
QUICK START GUIDE
Model: SB362An-F6E
VIZIO 36" 2.1 Sound Bar with Built-in Dual Subwoofers
Please read this guide before using the product.
Page 2

IMPORTANT SAFETY INSTRUCTIONS
Your Unit is designed and manufactured to operate within dened design limits, and misuse may result in electric shock or re. To prevent your Unit
from being damaged, the following rules should be observed for its installation, use, and maintenance. Please read the following safety instructions
before operating your Unit. Keep these instructions in a safe place for future reference.
• Read these instructions.
• Keep these instructions.
• Heed all warnings.
• Follow all instructions.
• Do not use this apparatus near water.
• Clean only with a dry cloth.
• Do not block any ventilation openings. Install in accordance with the manufacturer’s instructions.
• Do not install near any heat sources such as radiators, heat registers, stoves, or other apparatus (including ampliers) that produce heat.
• Do not defeat the safety purpose of the polarized or grounding-type plug. A polarized plug has two blades with one wider than the other. A
grounding type plug has two blades and a third grounding prong. The wide blade or the third prong are provided for your safety. If the provided
plug does not t into your outlet, consult an electrician for replacement of the obsolete outlet.
• Protect the power cord from being walked on or pinched, particularly at plugs, convenience receptacles, and the point where they exit from the
apparatus.
• Only use attachments/accessories specied by the manufacturer.
• Use only with the cart, stand, tripod, bracket, or table specied by the manufacturer, or sold with the apparatus. When a cart is used, use
caution when moving the cart/apparatus combination to avoid injury from tip-over.
• Unplug this apparatus during lightning storms or when unused for long periods of time.
• Refer all servicing to qualied service personnel. Servicing is required when the apparatus has been damaged in any way, such as when
the power supply cord or plug is damaged, liquid has been spilled or objects have fallen into the apparatus, the apparatus has been
exposed to rain or moisture, does not operate normally, or has been dropped.
• To reduce the risk of electric shock or component damage, switch o the power before connecting other components to your Unit.
• Unplug the power cord before cleaning your Unit. A damp cloth is sucient for cleaning. Do not use a liquid or a spray cleaner on your Unit. Do not
use abrasive cleaners.
• Always use the accessories recommended by the manufacturer to insure compatibility.
• When moving your Unit from an area of low temperature to an area of high temperature, condensation may form in the housing. Wait before
turning on your Unit to avoid causing re, electric shock, or component damage.
• Slots and openings in the back and bottom of the cabinet are provided for ventilation. To ensure reliable operation of your Unit and to protect it
from overheating, be sure these openings are not blocked or covered. Do not place your Unit in a bookcase or cabinet unless proper ventilation is
provided.
• Never push any object into the slots and openings on your Unit enclosure. Do not place any objects on the top of your Unit. Doing so could short
circuit parts causing a re or electric shock. Never spill liquids on your Unit.
• Do not block the subwoofer ports. Allow for 1-2 inches of space around all sides for ventilation.
• WARNING: Exposure to loud sounds can damage your hearing causing hearing loss and tinnitus (ringing or buzzing in the ears). With continued
exposure to loud noises, ears may become accustomed to the sound level, which may result in permanent damage to hearing without any
noticeable discomfort.
ENG - ii
Page 3
• When connected to a power outlet, power is always owing into your Unit. To totally disconnect power, unplug the power cord.
• Do not overload power strips and extension cords. Overloading can result in re or electric shock.
• The wall socket should be located near your Unit and be easily accessible
• Keep your Unit away from moisture. Do not expose your Unit to rain or moisture. If water penetrates into your Unit, unplug the power cord and
contact your dealer. Continuous use in this case may result in re or electric shock.
• Do not use your Unit if any abnormality occurs. If any smoke or odor becomes apparent, unplug the power cord and contact your dealer
immediately. Do not try to repair your unit yourself.
• Avoid using dropped or damaged appliances. If your Unit is dropped and the housing is damaged, the internal components may function abnormally.
Unplug the power cord immediately and contact your dealer for repair. Continued use of your Unit may cause re or electric shock.
• Do not install your Unit in an area with heavy dust or high humidity. Operating your Unit in environments with heavy dust or high humidity may
cause re or electric shock.
• Ensure that the power cord and any other cables are unplugged before moving your Unit.
• When unplugging your Unit, hold the power plug, not the cord. Pulling on the power cord may damage the wires inside the cord and cause re or
electric shock. When your Unit will not be used for an extended period of time, unplug the power cord.
• To reduce risk of electric shock, do not touch the connector with wet hands.
• Insert the remote control batteries in accordance with instructions. Incorrect polarity may cause the battery to leak which can damage the remote
control or injure the operator.
• See the important note and rating located on the back of the unit.
• WARNING - This equipment is not waterproof. To prevent a re or shock hazard, do not place any container lled with liquid near the equipment
(such as a vase or ower pot) or expose it to dripping, splashing, rain, or moisture.
• CAUTION - Danger of explosion or re if batteries are mistreated. Replace only with the same or specied type.
• Do not leave the batteries exposed to direct sunlight for a long period of time with doors and windows closed. Do not disassemble the batteries or
dispose of it in re.
• Where the MAINS plug or appliance coupler is used as the disconnect device, the disconnect device shall remain readily operable.
• No naked ame sources, such as lighted candles, should be placed on the apparatus.
• The ventilation should not be impeded by covering the ventilation openings with items such as newspapers, table-cloths, curtains, etc.
• The equipment shall be used at maximum of 35 degrees °C ambient temperature.
WARNING: To reduce the risk of re or electric shock, do not expose this apparatus to rain or moisture.
CAUTION
RISK OF ELECTRIC
SHOCK DO NOT OPEN
The lighting ash with arrowhead symbol
within an equilateral triangle is intended
to alert the user to the presence of not
isolated dangerous voltage within the
product that may be sucient magnitude
to constitute a risk of shock to persons.
The exclamation point within an equilateral
triangle is intended to alert the user to
the presence of important operating and
servicing instructions in the literature
accompanying the appliance.
Warning: This equipment is a Class II or
double insulated electrical appliance. It has
been designed in such a way that it does
not require a safety connection to electrical
earth.
ENG - iii
Page 4

TABLE OF CONTENTS
Package Contents .................................................................................................................................................5
Controls & Connections .......................................................................................................................................6
First-Time Setup....................................................................................................................................................8
Using the Remote ...............................................................................................................................................11
LED Indicators .....................................................................................................................................................13
Programming the Sound Bar ............................................................................................................................15
Using Button Combinations ..............................................................................................................................16
Bluetooth Audio Pairing .....................................................................................................................................17
Using Bluetooth Mode .......................................................................................................................................18
Advanced Setup ..................................................................................................................................................19
Wall-Mounting the Sound Bar ...........................................................................................................................20
Help & Troubleshooting .....................................................................................................................................22
Limited Warranty ................................................................................................................................................23
Specications ......................................................................................................................................................25
Legal & Compliance ............................................................................................................................................26
ENG - iv
Page 5
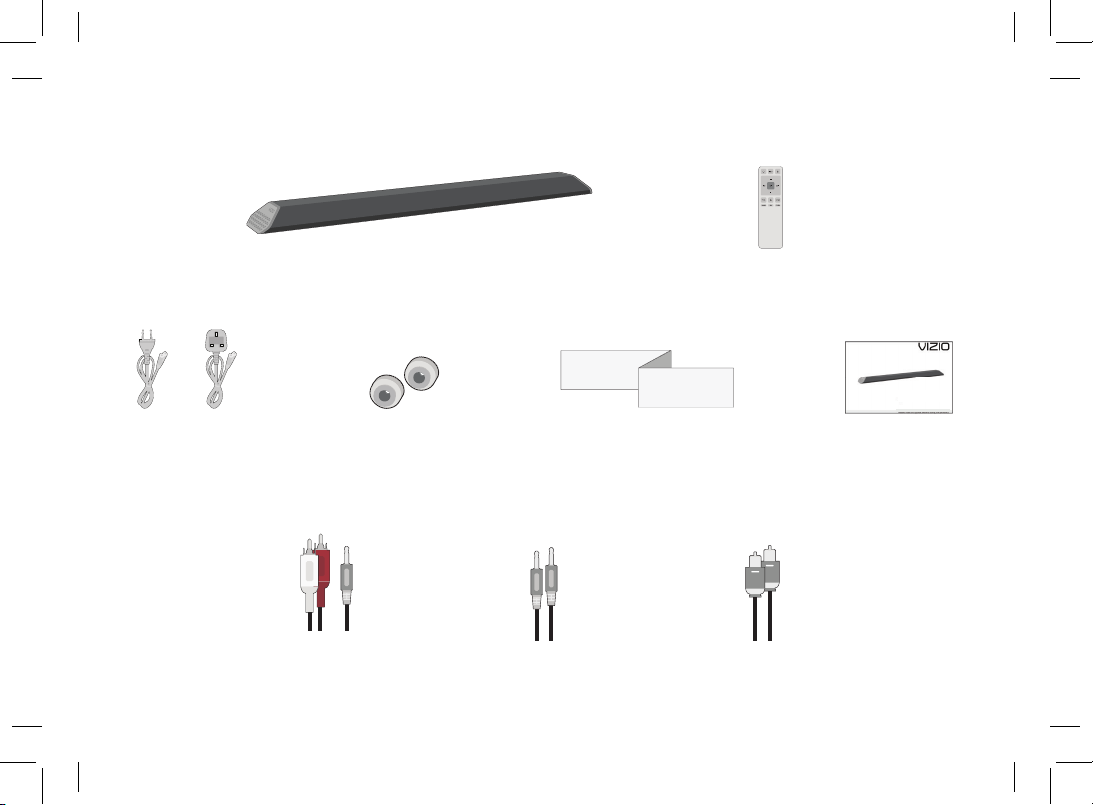
PACKAGE CONTENTS
Power Cable
2 x Wall Mount
Brackets (Sound Bar)
Stereo RCA to
3.5 mm Audio
Cable
VIZIO
Sound Bar
3.5 mm to 3.5 mm
Audio Cable
Wall Mount
Template
Remote Control
with 2x AAA Batteries
Quick Start
Guide
Digital Optical
Cable
ENG - 5
Page 6
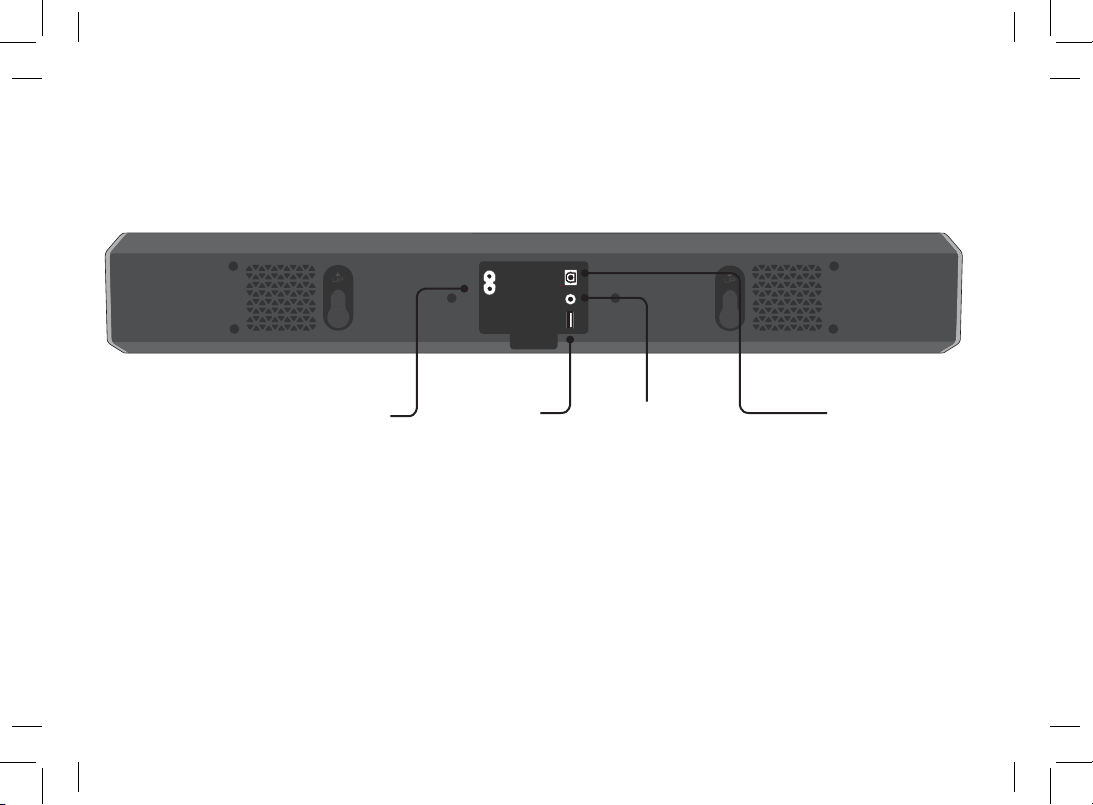
CONTROLS & CONNECTIONS
Front of Sound Bar
Bottom of Sound Bar
Power Port OPTICAL
* Supports .WAV and .MP3 le format playback only.
ENG - 6
USB*
USB In
AUX
Analog Audio In
(Stereo 3.5mm)
Digital Optical Audio In
Page 7
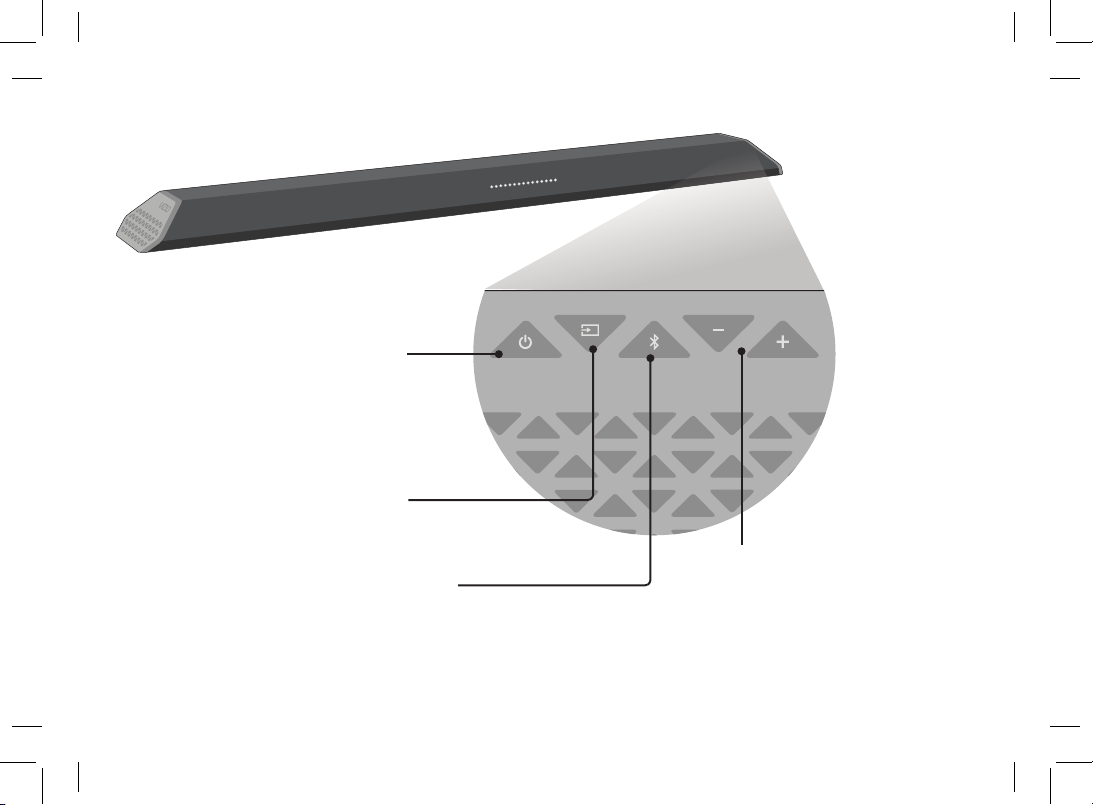
Front of Sound Bar
Power Press to turn
soundbar on or o .
Input Press to change
the audio source.
Bluetooth Input Hold to pair.
(See ‘Bluetooth Audio Pairing’
for more information.)
Right Side of
Sound Bar
Volume Increase or decrease
the loudness of the audio.
ENG - 7
Page 8
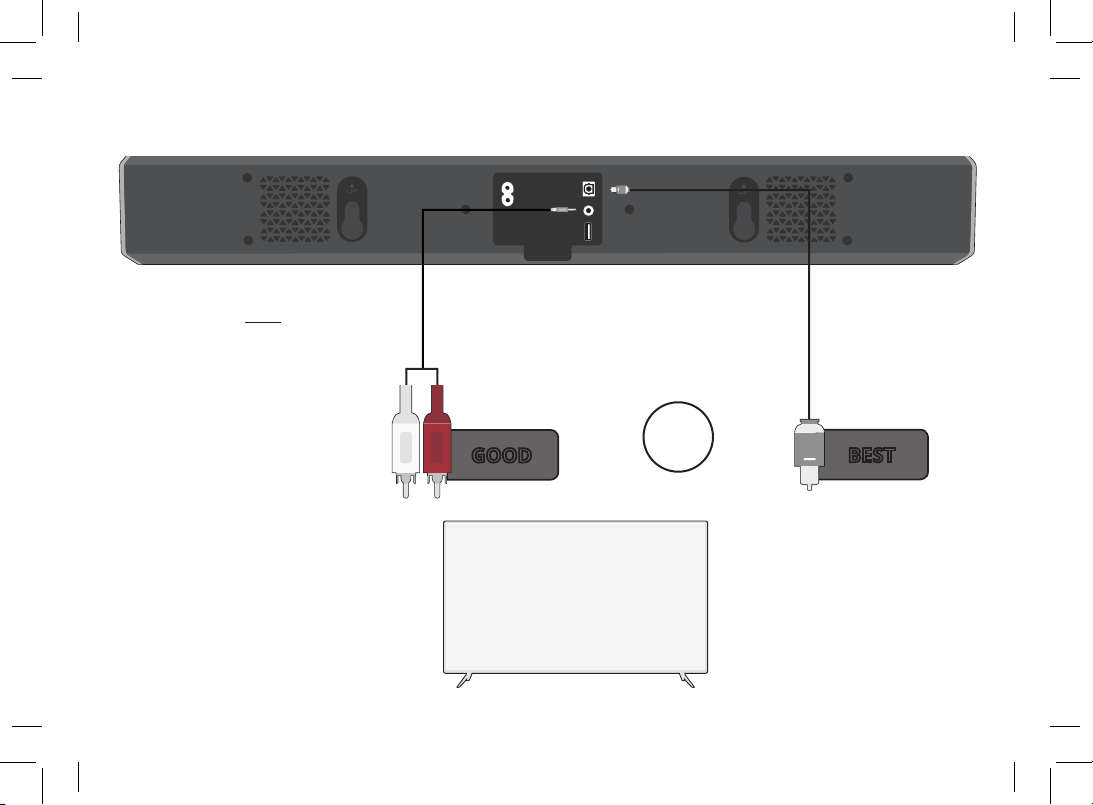
FIRST-TIME SETUP
HOME THEATER DISPLAY | QUICK START GUIDE
Installation Guide | Models:
Bottom of Sound Bar
CHOOSE ONE CABLE*
1
AND CONNECT
IT TO YOUR TV
* Not all TVs have the audio outputs shown
above. To connect the sound bar directly
to your other devices (Blu-Ray player,
game system, etc.) see your device’s user
manual.
ENG - 8
3.5MM TO
RCA CABLE
GOOD
OR
DIGITAL OPTICAL
†
CABLE
BEST
† When using the Digital input, if
there is no audio: (A) try setting
the TV output to PCM or (B)
Connect directly to your Blu-ray/
other source, some TVs do not
pass through digital audio.
Page 9
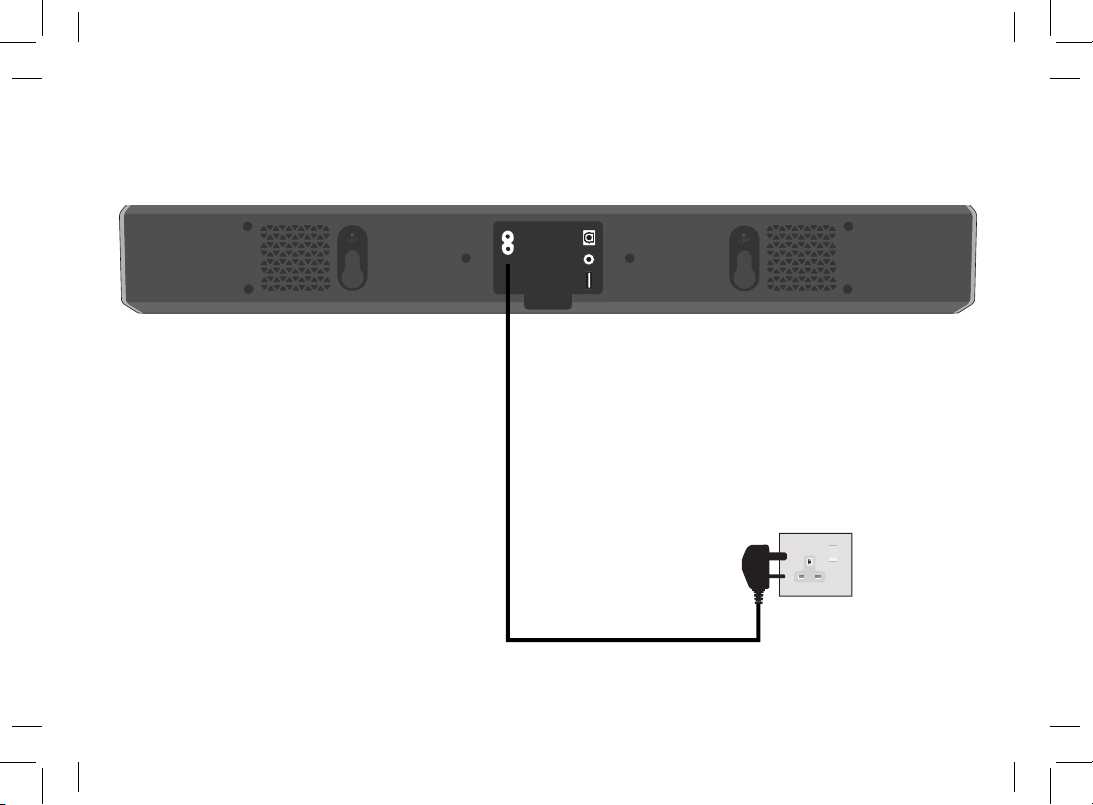
Connect the power cable to the sound bar AC IN as shown. Plug the power cable (suitable to your
2
region) into an electrical outlet.
Bottom of Sound Bar
ENG - 9
Page 10

Press to enable/disable
3
4
Top
Remove the battery cover by gently
sliding it away from the remote.
When needed, VIZIO recommends replacing the batteries that came
with this remote with two, new Duracell ‘AAA’ alkaline batteries.
Turn on your TV and sound bar. The sound bar will automatically
5
begin searching for an active input.*
The LED indicators on the front of the sound bar will begin cycling in
triplets through inputs until an audio source is detected.**
Tip: Pressing the INPUT button will stop the auto
detect function.
You can press the INPUT button to switch between audio sources.
For example, if you connected your TV to AUX , set the sound bar
to AUX .
*Occurs only during rst-time set up.
**Auto detect function only occurs once when the sound bar is rst powered on. To enable this feature again, you must
do a Factory Reset (see the Using Button Combinations section for more information) or press and hold the INPUT
button for 3 seconds.
ENG - 10
Top
Insert the included batteries and gently
slide the battery cover back into place.
InputPower
Page 11

Display
Displays Sound Bar Settings
USING THE REMOTE
Press to turn on or o .
Press to increase and decrease
Press to return to previous track.
(Changes audio settings in Menu)
Press to enable/disable
Press to enter bass adjustment
Press to mute/unmute
Long press of the Mute button for 5
seconds disables the power LED.
Power
Volume +/-
volume.
Previous
TruVolume
TruVolume.
Bass
mode.
Mute
Press to change the input source
Input
Bluetooth
Press to enter Bluetooth input.
(To enter force pair mode, press and
hold for 3 seconds).
Enter/Play/Pause
Press to select an option. Press to play
or pause.
Next
Press to skip to the next track.
(Changes audio settings in Menu)
Virtual:X
Press to enable/disable Virtual:X.
Treble
Press to enter treble adjustment
mode.
Equalizer
Press to toggle between two preset
settings, Music and Movie.
ENG - 11
Page 12

ENG - 12
Function LED Behavior Description
Input
Bluetooth
Pairing
DTS TruVolume
On/O
For the best surround sound experience, position the Sound Bar as shown.
The sound bar should be close to ear level (approx. 2-3 feet o the oor).
Sound bar is centered
below the TV.
(If your TV permits it, you can also slide
the sound bar underneath the TV.)
Page 13

LED INDICATORS
The LED Indicators will behave di erently with
each button on the remote control.
Function LED Behavior Description
Press the Input button on the remote to cycle through the available inputs:
•Analog Audio In - AUX Stereo 3.5mm
•Digital Optical Audio In - Optical
•Bluetooth
•USB In - USB
Press and hold the INPUT button on the remote control for 3 seconds to
enable the auto input detect function.
Press and hold the button on the remote. The sound bar will be
discoverable for 15 minutes. You can now search for the sound bar (VIZIO
SB362An) using your Bluetooth Device. The sound bar will power down if no
device is found.
Note: Set your Bluetooth device into pairing mode prior to the
sound bar.
Press the TVOL button to enable/disable TruVolume.
When enabled (On), TruVolume provides a consistent and comfortable volume
level for a more enjoyable listening experience
Input
Bluetooth
Pairing
DTS TruVolume
On/O
Analog Audio In - AUX
Digital Optical Audio In
Optical
Bluetooth
USB
(When searching for device)
Flash from left to right
continuously.
TruVolume On
TruVolume O
LED Indicators are located here.
ENG - 13
Page 14

Function LED Behavior Description
Equalizer
When a Dolby Audio
signal is detected.
ENG - 14
Mode
Treble
Level
Bass
Levels
Virtual X
Mode
Movie
Music
Three center LEDs
indicate Treble level 0.
Three center LEDs
indicate Bass level 0.
Enabled
Disabled
Dolby Audio
Indicator LED
Press the EQ button to toggle between two preset equalizer settings, Music
and Movie.settings, Movie, or Music. Note: Movie mode is on by default
Press the TREB button then press the Next/Previous button to increase/
decrease the treble level. The LED indicators will move right with increasing
levels and left with decreasing levels.
Press the BASS button then press the Next/Previous button to increase/
decrease the bass level. The LED indicators will move right with increasing
levels and left with decreasing levels . Decreasing the BASS level to the
lowest setting will reduce BASS and Subwoofer levels on the bar. This is
best for watching TV late at night in a quiet environment.
Press the VRT:X button to enable/disable Virtual X. When enabled (On), all
inputs will produce a virtual sound technology that simulates the eect of
having overhead sound. When disabled (O), all sources will playback in
stereo.
Dolby Digital is only available on the Digital Optical input. When a Dolby
Audio signal is detected, the Dolby Audio indicator LED will light up for 3
seconds before fading away.
Page 15

PROGRAMMING THE SOUND BAR
You can program the Sound Bar to accept TV remote IR commands.
Function LED Behavior Description
Press and hold the Play + Volume Down buttons to put the sound
Learn Volume Down
(Waiting to learn)
Flash from left to right
continuously.
Learn Volume Up
bar into learning mode. While the sound bar is in learning mode,
press and hold the Volume Down button on the TV remote control
while pointing the remote at the sound bar. All of the LED Indicators
on the sound bar will ash two times, indicating that it has successfully recognized the TV remote.
Press the Play + Volume Up button to put the sound bar into learn-
ing mode. While the sound bar is in learning mode, press the Volume
Up button on the TV remote control while pointing the remote at the
sound bar. All of the LED Indicators on the sound bar will ash two
times indicating that it has successfully recognized the TV remote.
Learn Mute
All of the LEDs will blink
twice to conrm.
Press the Play + Mute button to put the sound bar into learning
mode. While the sound bar is in learning mode, press the Mute but-
ton on the TV remote control while pointing the remote at the sound
bar. All of the LED Indicators on the sound bar will ash two times
indicating that it has successfully recognized the TV remote.
ENG - 15
Page 16

USING BUTTON
COMBINATIONS
There are 3 functions that are triggered by 3 dierent button combinations on the sound bar.
Function LED Behavior Description
Buttons are located on side of sound bar.
ENG - 16
Factory
Reset
VIZIO TV
Remote
Control
EcoPower
All 15 LEDs will
ash 3 times
Enabled
Enabled
Disabled
Disabled
Reset the sound bar to the factory default settings. To perform a Factory Reset,
Press and Hold the Bluetooth(
5 seconds.
Note: This will erase all settings and preferences that you have set.
Enable/disable the use of a VIZIO TV remote control to power on and adjust the
volume of the sound bar. To enable/disable this function, Press and Hold the
Power (
Note: This function is enabled by default.
When the EcoPower setting is enabled, the sound bar will automatically turn o
after a period of inactivity as a power saving feature. When disabled, the sound
bar will remain powered on until you turn it o. To enable/disable this function,
Press and Hold the Power (
Note: The EcoPower setting is enabled by default.
) and Volume Up ( + ) buttons for 5 seconds.
) and Volume Down (—) buttons for
) and Volume Down (—) buttons for 5 seconds.
Page 17

BLUETOOTH AUDIO PAIRING
To pair the Sound Bar with a Bluetooth device:
1. Press and hold the Bluetooth button
Bluetooth Pairing Mode, the LED Indicators on the front display panel will light up from left to right and
back again continuously.Once the device is paired, the LED Indicators will stop ashing.
2. You can now search for the sound bar (VIZIO SB362An) using your Bluetooth device. For more
information, refer to the user documentation that came with the device.
3. Play audio from your Bluetooth device. Volume can be controlled on your source device and
the sound bar.
on the sound bar for ve (5) seconds. When the sound bar is in
Side of Sound Bar
The Last Yard
Bluetooth
Device
ENG - 17
Page 18

USING BLUETOOTH MODE
Your sound bar supports music streaming from smartphones, tablets, and computers with Bluetooth
capability. Device compatibility will vary, see your device’s documentation for more information. Once you
have paired your source device to the sound bar, as long as you stay within range of the sound bar, your
device should remain paired. If the input is changed, the Bluetooth device will disconnect. If the source is
changed back to Bluetooth, any paired Bluetooth device will reconnect automatically.
Your sound bar is not equipped with a microphone,
so it cannot operate as a hands-free device for a
smartphone.
Maximizing Signal
A Bluetooth signal has a range of up to 9 meters. Keep in mind that Bluetooth is a compressed audio format,
so streamed music may lose some integrity when compared to a wired connection.
Try the following if your sound quality is less than optimal:
• If you hear any break-up or disconnect while streaming music from your device, move the source
device closer to the sound bar.
• Be sure that there are no solid obstructions in the line-of-sight between the sound bar and the
source device.
• Other wireless devices can a ect Bluetooth range, including wireless security cameras, wireless
video baby monitors, cordless phones, and microwave ovens. Turning o or moving these devices
may improve Bluetooth range.
Reduce the volume levels on your device and on the
sound bar before pressing Play. High volume levels
can damage your hearing.
ENG - 18
Page 19

HOME THEATER DISPLAY | QUICK START GUIDE
Installation Guide | Models:
ADVANCED SETUP
HOME THEATER DISPLAY | QUICK START GUIDE
Installation Guide | Models:
Bottom of Sound Bar
* Supports .WAV and .MP3
le format playback only.
GOOD
Tablet/MP3 Player/Laptop
USB Thumb Drive*
Game Console
BEST
Network Media Player
ENG - 19
Page 20

3
WALL-MOUNTING THE SOUND BAR
ENG - 20
1
Place the included wall mounting template against the wall under your TV. Mark the two bracket holes
using a pencil. Ensure there is enough space between the sound bar and your TV.
Install the wallmount brackets
2
Be sure your screws are attached to wood studs, drywall
anchors (for drywall), or concrete anchors (for brick/concrete
walls).
Screws for attaching the brackets to the wall are not
included. Choose the screw type and length appropriate to
your home’s construction. If in doubt, consult a professional
installer.
If you are unfamiliar with power tools or the layout of electrical
wiring in the walls of your home, consult a professional installer.
*Bracket Screw
NOT INCLUDED
WITH sound bar
Page 21

3
Bottom of Sound Bar
Note: When wall mounting the bar,
this arrow should point upwards.
Hang the sound bar on the wall mount
backets then slide down to lock in
place.
Wall-Mount Slots
ENG - 21
Page 22

HELP & TROUBLESHOOTING
• Press the POWER button on the remote control or on the side of your Sound Bar.
There is no power.
There is no sound.
• Ensure the power cord is securely connected.
• Plug a dierent device into the electrical outlet to verify that the outlet is working correctly.
• Increase the volume. Press Volume Up on the remote control or on the side of your Sound Bar.
• Press MUTE on the remote to ensure the Sound Bar is not muted.
• Press INPUT on the remote or on the side of your Sound Bar to select a dierent input source.
• When using the Digital Input, if there is no audio: (A) Try setting the TV output to PCM or (B)
Connect directly to your Blu-ray/other source, some TVs do not pass through digital audio.
• On the digital input, the input LEDs will ash rapidly if an unsupported format is present. Set the
source to output PCM.
• Your TV may be set to variable audio output. Conrm that the audio output setting is set to FIXED
or STANDARD, not VARIABLE. Consult your TV’s user manual for more detailed information.
• If using Bluetooth, ensure that the volume on your source device is turned up and that the device
is not muted.
I hear buzzing or
humming.
The remote
isn’t working.
ENG - 22
• Ensure all cables and wires are securely connected.
• Connect a dierent source device (TV, Blu-ray player, etc) to see if the buzzing persists. If it does
not, the problem may be with the original device.
• Connect your device to a dierent input on the Sound Bar.
• Replace the remote batteries with new ones.
• Point the remote directly at the center of the Sound Bar when pressing a button.
• If using a Bluetooth connection, some of the buttons on the remote may not be supported by the
streaming application. (e.g., Pandora doesn’t support the Back button.)
Page 23

LIMITED WARRANTY
PLEASE NOTE: This warranty is oered to you in addition to any rights and remedies that you may have under local consumer protection laws.
Nothing in this warranty limits or aects your legal rights including any rights:
• that cannot be lawfully changed or excluded under consumer law; or
• against the person who sold the VIZIO product to you if that person has breached their sales contract with you.
This warranty is oered by VIZIO, Inc. (“VIZIO”) and administered by Exertis (UK) Ltd (“Exertis”).
How Long This Warranty Lasts
For non-commercial use, VIZIO warrants the product on the terms set out below for two (2) years from the date of original purchase.
For commercial use, VIZIO warrants this product on the terms set out below for ninety (90) days from the date of original purchase.
What This Warranty Covers
VIZIO warrants the product against defects in materials and workmanship when the product is used normally in accordance with VIZIO’s user guides
and manuals.
Except where restricted by law, this warranty applies only to the original purchaser of a new product. The purchase must have been made from an
authorized retailer in the UK and Ireland.
How to Get Additional Help and Troubleshooting
Please visit www.vizioaudio.uk for additional help and troubleshooting, provided by Exertis, Technology House, Magnesium Way, Hapton, Burnley,
BB12 7BF, for technical support, please send an email to premiumaudio@exertis.co.uk.
Warranty Returns
To take advantage of the warranty during the warranty period, please return the product to the retailer where the product was purchased. When
you return a product to the retailer, you will need to provide your proof of purchase to the retailer who will then conrm that the product has been
returned within the warranty period. Your retailer will facilitate the return of the product to the manufacturer.
ALL USER DATA AND DOWNLOADED APPLICATIONS STORED ON A PRODUCT ARE AT RISK OF BEING DELETED IN THE COURSE OF A WARRANTY
SERVICE. Your product may be restored to its original state or you may receive a replacement product. Recovery and reinstallation of user data
and downloaded applications is not covered under this warranty. You must ensure that all user data and downloaded applications are backed up
before sending a product back to the retailer you purchased from. You will be responsible for restoring all applicable user data and downloaded
applications onto the product returned to you. In case of replacement, VIZIO cannot guarantee that you will receive the same model of product. If
your model is not available, a product of equal value and similar style will be provided, or you may request a refund of the original purchase price.
The warranty for the replacement product ends two (2) years from the date the replacement is received.
VIZIO recommends that you always clear all data from the product before it is sent to back to the retailer.
ENG - 23
Page 24

What This Warranty Does Not Cover
This warranty does not cover: (a) cosmetic damage; (b) normal wear and tear; (c) improper operation; (d) improper voltage supply or power surges;
(e) signal issues; (f) damage from shipping; (g) acts of God; (h) customer misuse, modications or adjustments; (i) installation, set-up, or repairs
attempted by anyone other than by a VIZIO authorized service center; (j) products with unreadable or removed serial numbers; (k) products
requiring routine maintenance; or (l) products sold “AS IS”, “CLEARANCE”, “FACTORY RECERTIFIED”, or by a non-authorized reseller.
Exclusions and Limitations
If you are a consumer and VIZIO fails to comply with these terms, to the extent permitted by law, VIZIO may be responsible for loss or damage
you suer that is a foreseeable result of VIZIO breaking the terms of this warranty or its failing to use reasonable care and skill, but VIZIO is not
responsible for any loss or damage that is not foreseeable.
If you are a business, to the greatest extent permitted by applicable law, any and all implied warranties, conditions or other terms including of
merchantability, satisfactory quality and tness for purpose are excluded. In addition, VIZIO will not be responsible for any loss of use, loss of
information or data, commercial loss, lost revenue or lost prots or indirect, special, incidental or consequential damages even if VIZIO has been
advised of the possibility of such damages.
Some countries, states, or provinces do not allow the exclusion of implied warranties or the limitation of incidental or consequential damages so the
above limitations and exclusions may be limited in their approach to you. When implied warranties may not be excluded in their entirety, they will
be limited to the duration of the applicable written warranty. This warranty gives you specic legal rights; you may have other rights that may vary
depending on local law. Your statutory rights are not aected.
General
No employee or agent of VIZIO may modify this warranty. If any term of this warranty is found to be unenforceable, that term will be severed from
this warranty and all other terms will remain in eect. This warranty applies to the maximum extent not prohibited by law.
ENG - 24
Page 25

Specications
Sound Bar: 1 x 6.78 cm Full Range Driver for Each Channel (1 for left, 1 for right)
Built-in
Dual Subwoofer:
Sound Pressure Level 97 dB
Frequency Response (System): 50 Hz - 20 KHz
Voltage: 100-240V~ 50/60Hz 60W
1 x 7.62 cm Subwoofer Driver (For each built-in subwoofer)
Inputs: 1 x 3.5 mm Stereo Audio
1 x Optical (Toslink)
1 x USB (Supports .WAV & .MP3 format only)
Bluetooth
ENG - 25
Page 26

LEGAL & COMPLIANCE
Declaration of Conformity (DoC)
Hereby, Vizio Inc declares that this product is
in compliance with the essential requirements
and other relevant provisions of Directive
2014/53/EU.
Eligible to bear the CE mark; Conforms to European Union
Low Voltage Directive 2014/35/EU; European Union EMC
Directive 2014/30/EU; European Union Restriction of
Hazardous Substances Recast (RoHS) Directive 2011/65/
EU; European Union WEEE Directive 2012/19/EU;European
Union Eco-Design Directive 2009/125/EC; European Union
Registration, Evaluation,Authorization and Restriction of
Chemicals (REACH) Directive 2006/121/EC; European Union
Radio Equipment Directive (RED), 2014/53/EU.
Type of wireless Frequency band Maximum power
Bluetooth
ENG - 26
®
2402 – 2480 MHz 3 dBm
(dBm E.I.R.P.)
Disposal of Old Equipment and Batteries
Only for European Union and countries with recycling
systems
These symbols on the products, packaging,
and/or accompanying documents mean that
used electrical and electronic products and
batteries must not be mixed with general
household waste. For proper treatment,
recovery and recycling of old products and
used batteries, please take them to applicable
collection points in accordance with your national legislation.
By disposing of them correctly, you will help to save valuable
resources and prevent any potential negative eects on human
health and the environment. For more information about
collection and recycling, please contact your local municipality.
Penalties may be applicable for incorrect disposal of this waste,
in accordance with national legislation.
Note for the battery symbol (bottom symbol):
This symbol might be used in combination with
a chemical symbol. In this case it complies with
the requirement set by the Directive for the
chemical involved.
Page 27

The Bluetooth
Inc. and any use of such marks by VIZIO,Inc. is under license. Other trademarks and trade names
are those of their respective owners.
Manufactured under license from Dolby Laboratories. Dolby, Dolby Audio, and the double-D
symbol are registered trademarks of Dolby Laboratories.
For DTS patents, see http://patents.dts.com. Manufactured under license from DTS, Inc. DTS,
the Symbol, DTS and the Symbol together, Virtual:X,and the DTS Virtual:X logo are registered
trademarks and/or trademarks of DTS, Inc. in the United Statesand/or other countries. ©DTS,
Inc. All Rights Reserved.
®
word mark and logos are registered trademarks owned by the Bluetooth SIG,
© 2018 VIZIO INC. ALL RIGHTS RESERVED.
181121SL
 Loading...