

Page 1
ACTIVE SPEAKER SYSTEM 5.1
WITH AM/FM RADIO
MODEL VT4026/4036 BN
www.vitekaus.com
INSTRUCTION MANUAL
4
9
14
19
4026.qxd 04.10.2005 11:31 Page 1
Page 2

DEVICE DESCRIPTION
BESCHREIBUNG DES GERÄTES
ОПИСАНИЕ УСТРОЙСТВА
ОПИС ПРИСТРОЮ
4026.qxd 04.10.2005 11:31 Page 2
Page 3

SUBWOOFER REAR PANEL
HINTERTAFEL DES SUBWOOFERS
ЗАДНЯЯ ПАНЕЛЬ САБВУФЕРА
ЗАДНЯ ПАНЕЛЬ САБВУФЕРА
REMOTE CONTROL UNIT
FERNBEDIENUNGSPULT
ПУЛЬТ ДИСТАНЦИОННОГО УПРАВЛЕНИЯ
ПУЛЬТ ДИСТАНЦІЙНОГО КЕРУВАННЯ
4026.qxd 04.10.2005 11:31 Page 3
Page 4

5.1 Active Speaker System
with AM/FM Tuner
Carefully read these instructions before installation.
PACKING LIST
The acoustical system includes the following components:
1. Subwoofer
2. Five satellite speakers with wires
3. Three audio cables
4. Remote control unit
5. Battery for remote control unit.
6. AM antenna
7. FM antenna
8. Operating instructions
DEVICE DESCRIPTION
1. Subwoofer
2. Satellite speaker
3. Center speaker
4. Signal line
5. Remote
REAR PANEL OF SUBWOOFER
1.2.1 audio input jacks
2.5.1 audio input jacks
3.Output jacks for front right and left satellite speakers (FR, FL)
4.Output jacks for rear right and left satellite speakers (RR, RL)
5.Output jack for center speaker (CEN)
6.FM antenna jack
7.AM antenna jack
8.Power switch
9.Fuse
10.Power cord
REMOTE CONTROL UNIT
1. Power on/off button (STANDBY)
2. MUTE button
3. Audio source selection button (INPUT)
4. 3D sound mode button
5. STEREO/MONO signal reception selection button
(ST/MN)
6. Volume control buttons for all channels (VOL+/)
7. Volume control buttons for frontleft channel (FL+/)
8. Volume control buttons for frontright channel (FR+/)
9. Volume control buttons for center channel (CEN+/)
10. Volume control buttons for subwoofer (SUB+/)
11. Volume control buttons for rearleft channel (SL+/)
12. Volume control buttons for rearright channel (SR+/)
13. Number entry buttons (09)
14. Button for entering number of 10 and higher (10+)
15. Button for programming radio stations into memory
(MEMORY)
16.Radio band selection button (AM/FM)
17.Manual tuning buttons (TUNE +/)
18.Button for automatic tuning of radio stations (SCAN)
ENGLISH
4
4026.qxd 04.10.2005 11:31 Page 4
Page 5
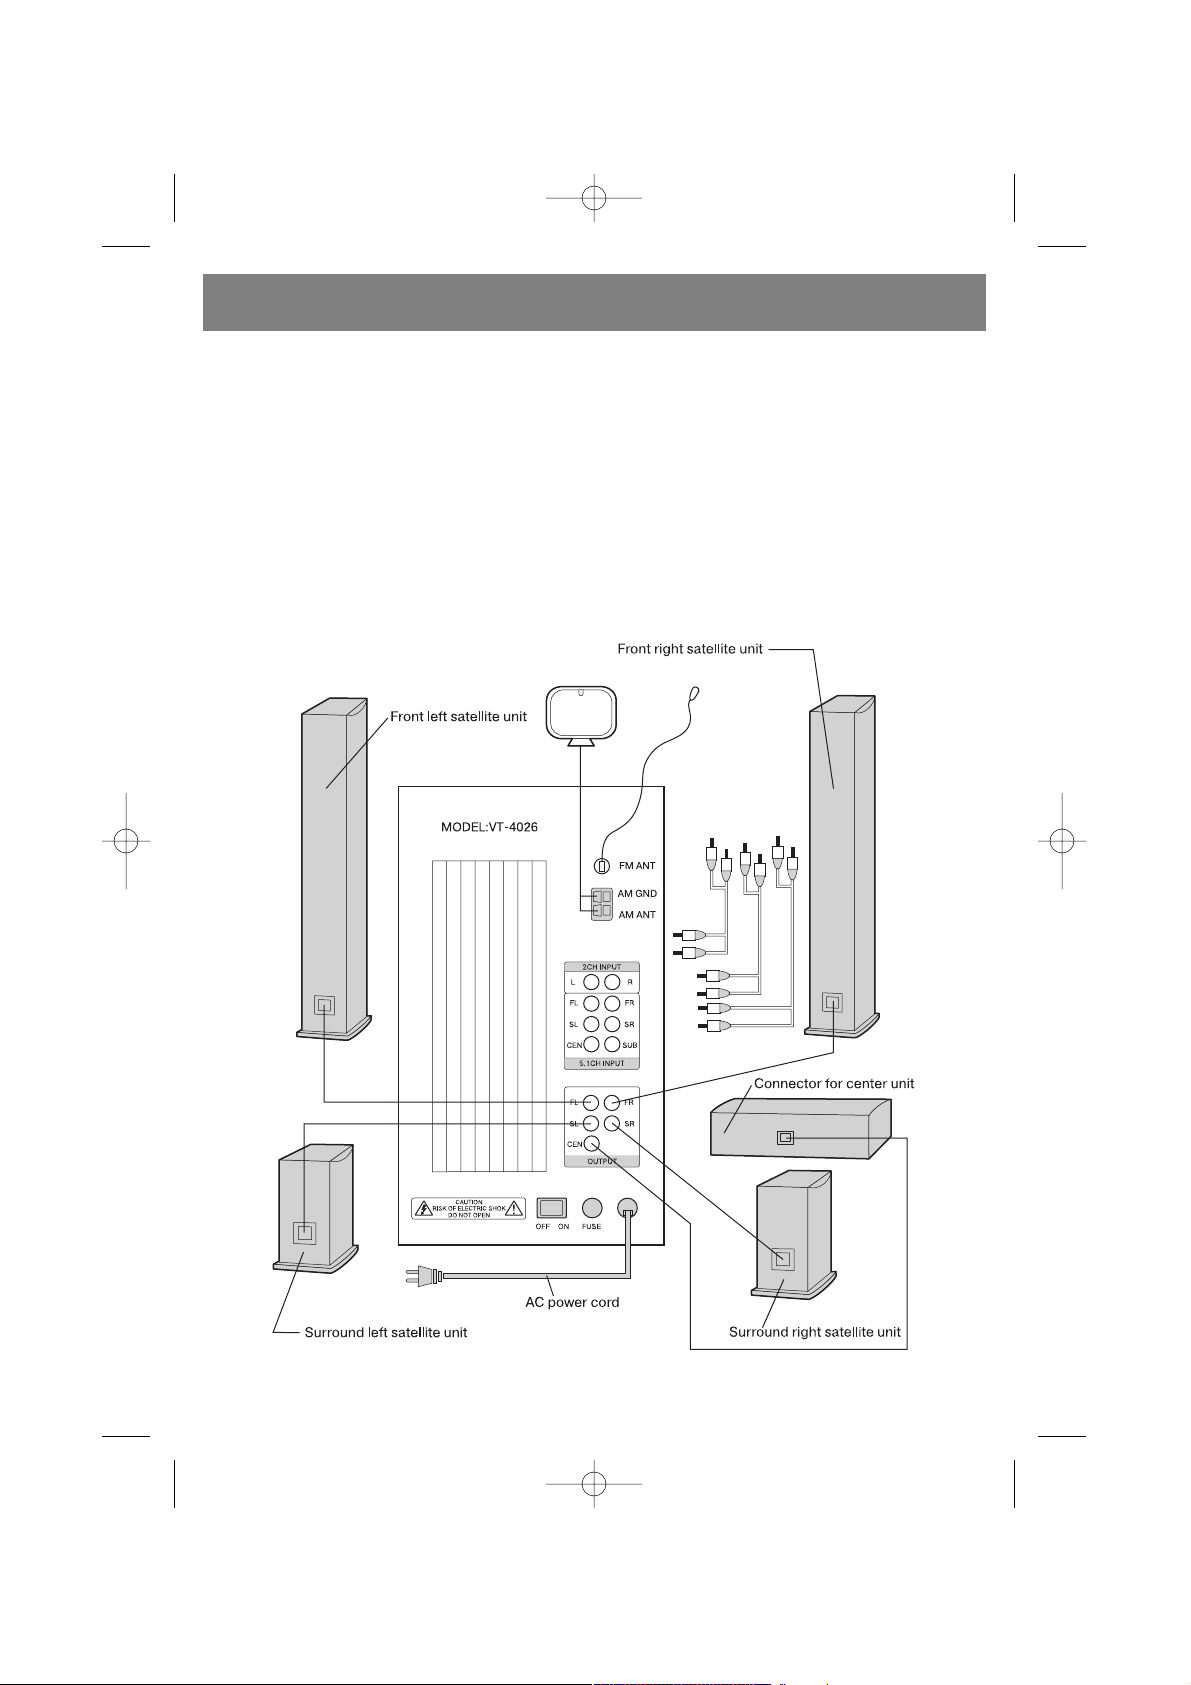
CONNECTION
Make sure that the device connected to the subwoofer (DVD player, for example) is turned off. Set the overall system volume
to a minimum before making connections.
1.Open the lid of the battery compartment on the remote control unit and insert the batteries, according to proper polarity.
2.Connect the wires from the front left and right satellite speakers, the central speaker, and the rear left and right satellite
speakers to the output jacks on the rear panel of the subwoofer marked FR, FL, CEN, RR, and RL.
3.Using an audio cable, connect any 2channel audio source (CD player, for example) to the 2.1 CH INPUT jacks and any 6
channel audio source (for example, a DVD player with builtin AC3/Dolby Digital decoder) to the 5.1 CH INPUT jacks on the
subwoofer.
4.Connect the AM and FM antennas to their respective jacks located on the rear panel of the subwoofer.
5.Connect the power cord to an electrical outlet and set the power switch, located on the rear panel of the subwoofer, to the
ON position. Start playback on the connected audio source and use the volume control, located on the remote control unit or
on the front panel of the subwoofer, to set the desired volume level.
ENGLISH
5
4026.qxd 04.10.2005 11:31 Page 5
Page 6

SYSTEM OPERATION
A. TURNING THE POWER ON / OFF
1. Make all the necessary connections in accordance with
the setup instructions before turning on the device.
2. Connect the system’s power cord to an electrical outlet.
(ATTENTION: The power source should conform to the
device’s power supply requirements).
3. Set the power switch, located on the rear panel of the
device, to the ON position. Press the STANDBY button,
located on the remote control unit or on the front panel
of the device, to turn on the device’s power.
B. VOLUME
1. Press the VOL + button on the remote control unit to
increase the overall system volume; the display on the
front panel will show the overall volume level of the sys
tem in a numerical format.
2. Press the VOL – button on the remote control unit to
decrease the overall system volume; the display on the
front panel will show the overall volume level of the sys
tem in a numerical format.
C. 3D SOUND MODE
1. Connect the center and rear speakers to the system.
2. Press the 3D button located on the remote control unit to
turn the 3D sound on or off.
D. CENTER SPEAKER
1. Press the CEN + button on the remote control unit to
increase the volume level on the central speaker; the dis
play on the front panel will show the volume level of the
central speaker in a numerical format.
2. Press the CEN – button on the remote control unit to
decrease the volume level on the central speaker; the
display on the front panel will show the volume level of
the central speakers in a numerical format.
E. REAR SPEAKERS
1. Press the REAR + button on the remote control unit to
increase the volume level on the rear speakers; the dis
play on the front panel will show the volume level of the
rear speakers in a numerical format.
2. Press the REAR – button on the remote control unit to
decrease the volume level on the rear speakers; the dis
play on the front panel will show the volume level of the
rear speakers in a numerical format.
F. FRONT SPEAKERS
1. Press the FRONT + button on the remote control unit to
increase the volume level on the front speakers; the dis
play on the front panel will show the volume level of the
front speakers in a numerical format.
2. Press the FRONT – button on the remote control unit to
decrease the volume level on the front speakers; the dis
play on the front panel will show the volume level of the
front speakers in a numerical format.
G. AUDIO SOURCE SELECTION 2.1 CH or 5.1 CH
1. Connect the system correctly to the audio source.
2. Press the CD/DVD button on the remote control unit or
on the front panel of the subwoofer to select the audio
source (2.1 CH or 5.1 CH).
H. MUTE FUNCTION
1. Press the MUTE button on the front panel or on the
remote control unit to turn off the sound.
2. The MUTE indicator will appear on the front of the sub
woofer.
3. Press the MUTE button again to turn on the sound.
I. AM/FM TUNER
Connect the AM and FM antennas to their respective
jacks located on the rear panel of the subwoofer.
1. Press the INPUT button on the remote control unit or on
the front panel until the subwoofer’s display shows the
“TUNE” indicator.
3. Use the FM/AM button located on the remote control unit
to choose the desired band (FM or AM).
4. Press the SCAN button on the remote control unit to acti
vate the automatic tuning function. The tuner will tune to
a radio station automatically.
5. Press the TUNE+ or TUNE button on the remote control
unit to tune to a radio station manually.
6. Press the ST/MN button on the remote control unit while
in the FM band to choose between stereo and mono
modes.
7. To save a chosen radio station into memory, press the
MEMORY button on the remote control unit and then
press the desired memory location number on the
numeric keypad and the station will be saved into memo
ry. To enter a number of ten or higher, first press the 10+
button and then a numeric button from 09.
NOTE: You can save up to 20 radio stations into memory.
RESOLVING MALFUNCTIONS
1. THERE IS NO SOUND AT ALL
(1) Make sure the system is connected properly.
(2) Increase the volume.
(3) Make sure the audio input is selected properly.
(4) Make sure the MUTE function has not been activated.
2. NO SOUND IS COMING FROM THE FRONTLEFT SPEAKER
(1) Make sure the frontleft speaker is properly connected to
the device.
(2) Make sure the device is properly connected to the audio
source.
ENGLISH
6
4026.qxd 04.10.2005 11:31 Page 6
Page 7

3. NO SOUND IS COMING FROM THE FRONTRIGHT
SPEAKER
(1) Make sure the frontright speaker is properly connected
to the device.
(2) Make sure the device is properly connected to the audio
source.
4. NO SOUND IS COMING FROM THE CENTRAL SPEAKER
(1) Make sure the central speaker is properly connected to
the device.
(2) Make sure the device is properly connected to the audio
source.
(3) Increase the volume of the central speaker.
5. NO SOUND IS COMING FROM THE REAR SPEAKERS
(1) Maker sure the rear speakers are connected properly.
(2) Make sure the device is properly connected to the audio
source.
NOTE: The central and rear speakers only work if the system
is connected to a sixchannel audio source (for example, a
DVD player with an AC3/Dolby Digital decoder) or, if in 3D
mode, when connected through the 2.1 CH audio input.
6. NO RADIO STATION RECEPTION
(1) Verify that the antennas are connected to their respective
jacks on the rear panel.
(2) In the FM band – make sure that the FM antenna is fully
extended.
(3) In the AM band – rotate the AM antenna for better signal
reception.
PRECAUTIONARY MEASURES:
Attention: Please carefully read the points listed below to
ensure safe use of the device.
1. Read the instructions The safety instructions and oper
ating rules should be read before using the device.
2. Save the instructions Save the instructions for future
use.
3. Follow the operating rules All of the safety instructions
should be followed.
4. Warning symbols Heed the indications of all warning
symbols located on the device's panels or in these
instructions.
5. Power source The device should only be connected to
a power source with the characteristics indicated on the
rear panel of the device or in these instructions.
6. Protecting the power cord The power cord should be
laid out in such a way that it will not be damaged by
external items or its surroundings.
7. Water and moisture Do not use the device near reser
voirs of water (for example, bath tubs, sinks, etc).
8. Ventilation Install the device in a well ventilated room.
Do not install the device on couches, beds or carpets
because the device's ventilation may be blocked.
9. The effects of heat Do not install the device near heat
sources (for example, radiators, kitchen stoves, etc).
10. Periods of nonuse if the device will not be used for a
long period of time, disconnect the power plug from the
electrical outlet.
11. The need for maintenance Utilize the services of quali
fied technicians if:
• The power cord is damaged; or
• The device body is damaged; or
• The device was subjected to rain; or
• The device is not functioning properly; or
• The device was subjected to shock.
12. Repair service The consumer should not attempt to
repair the device himself. Use only the services of a qual
ified technician.
13. Clean the device with a dry, soft clothe only.
14. Turn off the device during thunderstorms or when not in
use for a long period of time.
APPENDIX
When connecting the device to a DVD player with a builtin
DD/DTS decoder, verify the following:
1. When connected through the 5.1 CH. audio inputs, the 5.1
CH audio output should be chosen in the player's set
tings. Playback discs with AC3/Dolby Digital 5.1 CH
audio tracks.
2. To turn on the subwoofer, make sure that the speaker size
in the player’s settings for the front, central and rear
speakers is “Small” and that the subwoofer output is set
to “On.”
When connecting the device to DVD player, carefully read
the operating instructions for the DVD player.
ENGLISH
7
4026.qxd 04.10.2005 11:31 Page 7
Page 8

TECHNICAL CHARACTERISTICS
SUBWOOFER
Power supply: ~220230 V
Output power: 50 W (Subwoofer)
+ 5 x 30 W (Satellite speakers)
Subwoofer speaker: 6.5"/4 Om
Satellite speakers: 2"/8 Om
Channel separation: >45 dB
Signal/noise ratio: >87 dB
Frequency reproduction band:
40 Hz – 200 Hz (Subwoofer)
150 Hz – 20 KHz (Satellite speakers)
AM/FM Tuner
General FM tuner characteristics:
Frequency band: 87.00 MHz ~108.00 MHz
Frequency tuning step: 100 KHz
Intermediate frequency of oscillation:
10.7 MHz
Temperature range: 5 +70°C
Antenna input impedance: 75 Om
Signal/noise ratio: 45 dB
General AM tuner characteristics:
Frequency band: 520 KHz ~ 1620 KHz
Frequency tuning step: 10 KHz
Intermediate frequency of oscillation:
450 KHz
Temperature range: 5 +70°C
Signal/noise ratio: 45 dB
The technical characteristics of this device may be changed
without prior notice.
Service life – no less than 5 years.
Guarantee
Details regarding guarantee conditions can be obtained from
the dealer from whom the appliance was purchased. The bill
of sale or receipt must be produced when making any claim
under the terms of this guarantee.
This product conforms to the EMCRequirements as
laid down by the Council Directive 89/336/EEC and
to the Low Voltage Regulation (23/73 EEC)
ENGLISH
8
4026.qxd 04.10.2005 11:31 Page 8
Page 9

Aktives Akustiksystem 5.1 mit AM/FM Tuner
Lesen Sie vor dem Aufbau des Gerätes diese
Bedienungsanleitung aufmerksam durch.
Die technischen Kennwerte des Gerätes können ohne
Vorbescheid geändert werden.
LIEFERUMFANG
In das Akustiksystemset sind folgende Elemente
eingeschlossen:
1. Subwoofer
2. Fünf Satelliten mit Kabel
3. Drei AudioKabel
4. Fernbedienungspult
5. Batterie für Fernbedienungspult.
6. AM Antenne
7. FM Antenne
8. Bedienungsanleitung
BESCHREIBUNG DES GERÄTES
1. Subwoofer
2. Satelliten
3. Zentrallautsprecher
4. AudioKabel
5. Fernbedienungspult
HINTERTAFEL DES SUBWOOFERS
1. AudioEingangsbüchsen 2.1
2. AudioEingangsbüchsen 5.1
3. Ausgangsbüchsen für den rechten und den linken
Frontalsatellit (FR, FL)
4. Ausgangsbüchsen für den rechten und den linken
Hintersatellit (RR, RL)
5. Ausgangsbüchse des Zentralkanals (CEN)
6. Anschlussbüchse für FM Antenne
7. Anschlussbüchse für AM Antenne
8. Netzschalter
9. Netzsicherung
10. Netzschnur
FERNBEDIENUNGSPULT
1. Taste zum Ein und Ausschalten (STANDBY)
2. Stummschalttaste (MUTE)
3. Wahltaste für Audioquelle (INPUT)
4. Wahltaste für Raumklangbetrieb (3D)
5. Taste für Empfangsbetrieb STEREO/MONO (ST/MN)
6. Lautstärketasten für alle Kanäle (VOL+/)
7. Lautstärketasten für den linken Frontalkanal (FL+/)
8. Lautstärketasten für den rechten Frontalkanal (FR+/)
9. Lautstärketasten für den Zentralkanal (CEN+/)
10. Lautstärketasten für den Subwoofer (SUB+/)
11. Lautstärketasten für den linken Hinterkanal (SL+/)
12. Lautstärketasten für den rechten Hinterkanal (SR+/)
13. Zifferntasten (09)
14. Ziffernwahltaste ab 10 und höher (10+)
15. Speichertaste für Radiosender (MEMORY)
16. Wahltaste für Radioempfangsbereich (AM/FM)
17. Tasten zur manuellen Abstimmung des Radiosenders
(TUNE +/)
18. Taste zur automatischen Abstimmung des Radiosenders
(SCAN)
DEUTSCH
9
4026.qxd 04.10.2005 11:31 Page 9
Page 10

ANSCHLUSS
Überzeugen Sie sich davon, dass das an den Subwoofer anzuschließende Gerät (z.B., der DVDSpieler) ausgeschaltet ist.
Stellen Sie vor dem Anschließen die Lautstärke des Systems auf Minimum.
1. Öffnen Sie den Deckel des Batteriefachs des Fernbedienungspults und legen Sie die Batterien ein, beachten Sie dabei
die Polarität.
2. Schließen Sie die Kabel des linken und des rechten Frontallautsprechers, des Zentrallautsprechers, des linken und des
rechten Hinterlautsprechers an die Ausgangsbüchsen auf der Hintertafel des Subwoofers an, die mit FR, FL, CEN, RP, RL
markiert sind.
3. Schließen Sie mit dem AudioKabel eine Zweikanaltonquelle (z.B., einen CDSpieler) an den Eingang 2.1 CH INPUT, und
eine Sechskanaltonquelle (z.B., einen DVDSpieler mit eingebautem ACs/Dolby Digital Decoder) an den Eingang 5.1 CH
INPUT des Subwoofers an.
4. Schließen Sie die AM und FM Antennen an die entsprechenden Büchsen an, die sich auf der Hintertafel des Subwoofers
befinden.
5. Schließen Sie die Netzschnur an eine Steckdose an und stellen Sie den Speiseschalter, der sich auf der Hintertafel des
Subwoofers befindet, in die Position ON. Schalten Sie die Wiedergabe des angeschlossenen Gerätes ein und stellen Sie
mit den Lautstärkenreglertasten, die sich auf der Fernbedienung oder auf der Fronttafel des Subwoofers befinden, die
gewünschte Lautstärke ein.
DEUTSCH
10
4026.qxd 04.10.2005 11:31 Page 10
Page 11

BETRIEB DES SYSTEMS
A. EINSCHALTEN / AUSSCHALTEN DES SPEISUNG
1. Führen Sie vor dem Einschalten des Gerätes die
notwendigen Anschlüsse gemäß der Anschlussanleitung
durch.
2. Schließen Sie die Netzschnur des Systems an eine
Steckdose an.
(ACHTUNG: Die Speisequelle muss den Speisewerten
des Gerätes entsprechen).
3. Stellen Sie den Speiseschalter, der sich auf der
Hintertafel des Gerätes befindet, in die Position ON.
Pressen Sie die Taste STANDBY, die sich auf der
Fernbedienung oder auf der Fronttafel des Gerätes
befindet, u die Speisung des Gerätes einzuschalten.
B. LAUTSTÄRKE
1. Pressen Sie die Taste VOL+ , um die Lautstärke des
gesamtem Systems zu steigern, dabei wird auf dem
Display an der Fronttafel wird der allgemeine
Lautstärkenpegel des Systems in Ziffern angezeigt.
2. Pressen Sie die Taste VOL, um die Lautstärke des
gesamtem Systems zu senken, dabei wird auf dem
Display an der Fronttafel wird der allgemeine
Lautstärkenpegel des Systems in Ziffern angezeigt.
C. 3DRaumklangbetrieb
1. Schließen Sie an das Gerät den Zentrallautsprecher und
die Hinterlautsprecher an.
2. Pressen Sie die Taste 3D, die sich auf dem
Fernbedienungspult befindet, um den 3D
Raumklangbetrieb ein oder auszuschalten.
D. ZENTRALLAUTSPRECHER
1. Pressen Sie auf der Fernbedienung die Taste CEN+, um
die Lautstärke des Zentrallautsprechers zu steigern,
dabei wird auf dem Display an der Fronttafel der
Lautstärkenpegel des Zentrallautsprechers in Ziffern
angezeigt.
2. Pressen Sie auf der Fernbedienung die Taste CEN, um
die Lautstärke des Zentrallautsprechers zu senken, dabei
wird auf dem Display an der Fronttafel der
Lautstärkenpegel des Zentrallautsprechers in Ziffern
angezeigt.
E. HINTERLAUTSPRECHER
1. Pressen Sie auf der Fernbedienung die Taste REAR+, um
die Lautstärke der Hinterlautsprecher zu steigern, dabei
wird auf dem Display an der Fronttafel der
Lautstärkenpegel der Hinterlautsprecher in Ziffern
angezeigt.
2. Pressen Sie auf der Fernbedienung die Taste REAR, um
die Lautstärke der Hinterlautsprecher zu senken, dabei
wird auf dem Display an der Fronttafel der
Lautstärkenpegel der Hinterlautsprecher in Ziffern
angezeigt.
F. FRONTALLAUTSPRECHER
1. Pressen Sie auf der Fernbedienung die Taste FRONT +,
um die Lautstärke der Frontallautsprecher zu steigern,
dabei wird auf dem Display an der Fronttafel der
Lautstärkenpegel der Frontallautsprecher in Ziffern
angezeigt.
2. Pressen Sie auf der Fernbedienung die Taste FRONT ,
um die Lautstärke der Frontallautsprecher zu senken,
dabei wird auf dem Display an der Fronttafel der
Lautstärkenpegel der Frontallautsprecher in Ziffern
angezeigt.
G. WAHL DER TONQUELLE: 2.1 CH und 5.1 CH
1. chließen Sie das System korrekt an die Audioquelle an.
2. Pressen Sie auf der Fernbedienung oder auf der
Fronttafel des Subwoofers die Taste CD/DVD, um die
Tonquelle zu wählen (2.1 CH oder 5.1 CH).
H. STUMMSCHALTFUNKTION (MUTE)
1. Pressen Sie auf der Fernbedienung oder auf der Fronttafel die
Taste MUTE, um den Ton stumm zu schalten.
2. Auf der Fronttafel des Subwoofers wird das Zeichen
MUTE angezeigt.
3. Pressen Sie die Taste MUTE ein weiteres Mal, um den
Ton wieder einzuschalten.
I. AM/FM TUNER
Schließen Sie die AM und FM Antennen an die entsprechen
den Büchsen, die sich auf der Hintertafel des Subwoofers
befinden, an.
1. Pressen Sie auf dem Fernbedienungspult oder auf der
Fronttafel die Taste INPUT solange, bis auf dem Display
des Subwoofers die Aufschrift “TUNE” erscheint.
3. Wählen Sie mit der Taste FM/AM, die sich auf dem
Fernbedienungspult befindet, den gewünschten
Radioempfangsbereich aus (FM oder AM).
4. Pressen Sie auf dem Fernbedienungspult die Taste
SCAN, um die automatische Sendersuche einzuschalten.
Der Tuner wird sich automatisch auf einen Radiosender
einstellen.
5. Pressen Sie auf der Fernbedienung die Taste TUNE+
oder die Taste TUNE, um den Radiosender manuell
einzustellen.
6. Pressen Sie im FMBetrieb die Taste ST/MN, die sich auf
der Fernbedienung befindet, um die Radiosender im
Stereo oder Monobetrieb zu empfangen.
7. Um den gewählten Radiosender in den Speicher des
Gerätes einzutragen, pressen Sie auf dem
Fernbedienungspult die Taste MEMORY, pressen Sie
danach die Zifferntaste, unter deren Nummer der
gewählte Sender in den Speicher eingetragen wird. Um
Ziffern über 10 anzuwählen, pressen Sie zuerst die Taste
10+, pressen Sie danach eine der Tasten von 09.
ANMERKUNG: In den Speicher des Gerätes können höch
stens 20 Radiosender eingetragen werden.
DEUTSCH
11
4026.qxd 04.10.2005 11:31 Page 11
Page 12

STÖRUNGSBEHEBUNG
1. KEIN TON
(1) Prüfen Sie, ob das System korrekt angeschlossen ist.
(2) Steigern Sie die Lautstärke.
(3) Überzeugen Sie sich davon, dass der Audioeingang des
Systems richtig gewählt wurde.
(4) Überzeugen Sie sich davon, dass die Funktion MUTE
ausgeschaltet ist.
2. KEIN TON IM LINKEN FRONTALLAUTSPRECHER
(1) Prüfen Sie nach, ob der linke Frontallautsprecher korrekt
an das Gerät angeschlossen wurde.
(2) Prüfen Sie, ob das Gerät richtig an die Audioquelle
angeschlossen ist.
3. KEIN TON IM RECHTEN FRONTALLAURSPRECHER
(1) Prüfen Sie nach, ob der rechte Frontallautsprecher kor
rekt an das Gerät angeschlossen wurde.
(2) Prüfen Sie, ob das Gerät richtig an die Audioquelle
angeschlossen ist.
4. KEIN TON AUS DEM ZENTRALLAUTSPRECHER
(1) Prüfen Sie nach, ob der Zentrallautsprecher korrekt an
das Gerät angeschlossen wurde.
(2) Prüfen Sie, ob das Gerät richtig an die Audioquelle
angeschlossen ist.
(3) Steigern Sie die Lautstärke des Zentrallautsprechers.
5. KEIN TON IN DEN HINTERLAUTSPRECHERN
(1) Prüfen Sie nach, ob die Hinterlautsprecher korrekt an das
Gerät angeschlossen wurden.
(2) Prüfen Sie, ob das Gerät richtig an die Audioquelle
angeschlossen ist.
ANMERKUNG: Der Zentrallautsprecher und die
Hinterlautsprecher funktionieren nur in dem Fall, wenn das
System an eine Sechskanaltonquelle (z.B., DVDSpieler mit
AC3/Dolby Digital Decoder) angeschlossen ist, beim
Anschluss über den Audioeingang 2.1 CH INPUT funktion
ieren Sie nur im 3DBetrieb.
6. KEIN RADIOEMPFANG
(1) Prüfen Sie, ob die Antennen korrekt an die entsprechen
den Büchsen des Gerätes angeschlossen sind.
(2) Im FMBereich sollten Sie sich davon überzeugen, dass
die FM Antenne auf die volle Länge ausgezogen ist.
(3) Im AMBereich drehen Sie die Antenne, um ein stabiles
Signal zu empfangen.
ANHANG
Wenn das Gerät an einen DVDSpieler mit eingebautem
DD/DTS Decoder angeschlossen wird, sollten Sie sich in
den folgenden Punkten überzeugen:
1. Beim Anschluss über den Audioeingang 5.1 CH. wird in
den Einstellungen des Spielers der Audioausgang 5.1CH
gewählt. Benutzen Sie für die Wiedergabe eine Audiodisk
mit AC3/Dolby Digital 5.1 CH Track.
2. Um den Subwoofer einzuschalten, sollten Sie sich davon
überzeugen, dass in den Einstellungen des Spielers die
Größe der frontalen, der hinteren und des zentralen
Lautsprechers als “Klein” eingestellt ist, und der
Ausgang auf den Subwoofer sich in de Zustand “Ein”
befindet.
Wenn das Gerät an einen DVDSpieler angeschlossen wird,
sollten Sie die Bedienungsanleitung des DVDSpielers
aufmerksam durchlesen.
VORSICHTSMASSNAHMEN:
Achtung: Lesen Sie bitte die unten angeführten Punkte in
Zielen der Sicherheit bei der Anwendung des Gerätes
aufmerksam durch.
1. Lesen Sie die Anleitung – Die Anleitungen über die
Sicherheitsmassnahmen und die
Bedienungsvorschriften müssen vor der Anwendung des
Gerätes durchgelesen werden.
2. Bewahren Sie die Anleitung auf – Bewahren Sie die
Anleitung auf, um darauf zurückgreifen zu können.
3. Halten Sie alle Anwendungsvorschriften ein – Es müssen
alle Sicherheitsvorschriften eingehalten werden.
4. Warnzeichen – Halten Sie sich an die Anweisungen aller
Warnzeichen, die sich auf der Gerätetafel oder in dieser
Anleitung befinden.
5. Speisequelle – Das Gerät darf nur an Speisequellen
angeschaltet werden, die den Werten, die auf der
Hintertafel des Gerätes oder in dieser Anleitung befind
en, entsprechen.
6. Schutz der Netzschur – Die Netzschnur muss so aus
gelegt werden, dass sie nicht der Einwirkung von
anderen Gegenständen oder Umwelteinflüssen ausge
setzt wird.
7. Wasser und Feuchtigkeit – Benutzen Sie das Gerät nicht
in der Nähe von vollen Wasserbehältern (z.B.,
Badewanne, Waschbecken, Swimmingpools etc.).
8. Lüftung – Stellen Sie das Gerät in eine Raum mit guter
Lüftung auf. Stellen Sie das Gerät nicht auf Sofas, Betten
oder Teppichen auf, da das die Lüftung des Gerätes
behindern könnte.
9. Wärmeeinwirkung – Stellen Sie das Gerät nicht neben
Wärmequellen auf (z.B., Heizkörper, Küchenherde etc.).
10. Anwendungspause Wenn das Gerät innerhalb von einer
längeren Zeitspanne nicht benutzt wird, trennen Sie die
Steckgabel von der Steckdose.
11. Bedarf an Wartungsservice – Wenden Sie sich nur an
qualifiziertes Fachpersonal, wenn:
• Die Steckgabel beschädigt ist; oder
• Wenn das Gehäuse des Gerätes beschädigt ist; oder
DEUTSCH
12
4026.qxd 04.10.2005 11:31 Page 12
Page 13

• Wenn das Gerät unter die Einwirkung von Regen
gekommen ist; oder
• Wenn das Gerät nicht ordnungsgemäß funktioniert;
oder
• Wenn das Gerät unter Stoßeinwirkung gekommen ist.
12. Servicewartung – Der Benutzer sollte nicht versuchen
das Gerät selbstständig zu reparieren. Wenden Sie sich
nur an qualifiziertes Fachpersonal.
13. Reinigen Sie das Gerät nur mit einem trockenen,
weichen Stofftuch.
14. Schalten Sie das Gerät bei Gewitter oder wenn Sie es für
längere Zeit nicht benutzen immer von der Steckdose ab.
TECHNISCHE KENNDATEN
SUBWOOFER
Speisung: ~220230 Volt
Ausgangsleistung: 50 W (Subwoofer)
+ 5 x 30 W (Satelliten)
Subwooferlautsprecher: 6.5”/4 Ohm
Satellitenlautsprecher: 2”/8 Ohm
Kanaleinteilung: >45 dB
SignalRauschVerhältnis: >87 dB
Wiedergabefrequenzbereich:
40 Hz– 200 Hz (Subwoofer)
150 Hz – 20 KHz (Satelliten)
AM/FM Tuner
Allgemeine Kennwerte des FMTuners:
Bandbereich: 87.00 MHz ~108.00 MHz
Abstimmungsskala: 100 KHz
Überlagerungszwischenfrequenz: 10.7 MHz
Temperaturenbereich: 5 +70°C
Impedanz am Antenneneingang: 75 Ohm
SignalRauschVerhältnis: 45 dB
Allgemeine Kennwerte des AMTuners:
Frequenzbereich: 520 KHz~ 1620 KHz
Abstimmungsskala: 10 KHz
Überlagerungszwischenfrequenz: 450 KHz
Temperaturenbereich: 5 +70 °C
SignalRauschVerhältnis: 45dB
Die technischen Kennwerte des Gerätes können ohne
Vorbescheid geändert werden.
Die Lebensdauer des Gerätes beträgt nicht
weniger als 5 Jahre
Gewährleistung
Ausführliche Bedingungen der Gewährleistung kann man
beim Dealer, der diese Geräte verkauft hat, bekommen. Bei
beliebiger Anspruchserhebung soll man während der Laufzeit
der vorliegenden Gewährleistung den Check oder die
Quittung über den Ankauf vorzulegen.
Das vorliegende Produkt entspricht den
Forderungen der elektromagnetischen
Verträglichkeit, die in 89/336/EWG Richtlinie des
Rates und den Vorschriften 23/73/EWG über die
Niederspannungsgeräte vorgesehen sind.
DEUTSCH
13
4026.qxd 04.10.2005 11:31 Page 13
Page 14

Активная акустическая система 5.1
с AM/FMтюнером
Перед установкой устройства внимательно прочитайте
данную инструкцию.
КОМПЛЕКТ ПОСТАВКИ
В комплект акустической системы входят следующие
компоненты:
1. Сабвуфер
2. Пять сателлитов с проводами
3. Три аудиокабеля
4. Пульт дистанционного управления
5. Батарейка для пульта ДУ
6. Антенна диапазона AM
7. Антенна диапазона FM
8. Руководство по эксплуатации
ОПИСАНИЕ УСТРОЙСТВАCenter unit
1. Сабвуфер
2. Сателлиты
3. Центральная колонка
4. Аудиокабель
5. Пуль ДУ
ЗАДНЯЯ ПАНЕЛЬ САБВУФЕРА
1. Входные аудиоразъемы 2.1
2. Входные аудиоразъемы 5.1
3. Выходные разъемы для передних правого и левого
сателлитов (FR, FL)
4. Выходные разъемы для заднего правого и левого
сателлитов (RR, RL)
5. Выходной разъем центрального канала (CEN)
6. Разъем для подключения FMантенны
7. Разъем для подключения AMантенны
8. Сетевой выключатель
9. Сетевой предохранитель
10. Сетевой шнур
ПУЛЬТ ДИСТАНЦИОННОГО УПРАВЛЕНИЯ
1.Кнопка включения/выключения (STANDBY)
2.Кнопка выключения звука (MUTE)
3.Кнопка выбора источника аудио (INPUT)
4.Кнопка режима объемного звучания (3D)
5.Кнопка режима приема СТЕРЕО/MONO (ST/MN)
6.Кнопки уровня громкости всех каналов (VOL+/)
7.Кнопки уровня громкости переднего левого канала
(FL+/)
8.Кнопки уровня громкости переднего правого канала
(FR+/)
9.Кнопки уровня громкости центрального канала (CEN+/)
10.Кнопки уровня громкости сабвуфера (SUB+/)
11.Кнопки уровня громкости заднего левого канала
(SL+/)
12.Кнопки уровня громкости заднего правого канала
(SR+/)
13.Кнопки набора цифр (09)
14.Кнопка для набора цифр от 10 и выше (10+)
15.Кнопка занесения радиостанций в память (MEMORY)
16.Кнопка выбора диапазона радио (AM/FM)
17.Кнопки ручной настройки на радиостанцию (TUNE +/)
18.Кнопка автоматической настройки на радиостанцию
(SCAN)
РУССКИЙ
14
4026.qxd 04.10.2005 11:31 Page 14
Page 15

ПОДКЛЮЧЕНИЕ
Убедитесь, что подключаемое к сабвуферу устройство (например, DVDплеер) выключено. Перед подключением
установите уровень звука всей системы на минимум.
1. Откройте крышку батарейного отсека пульта ДУ и установите батарейки, соблюдая полярность.
2. Подключите провода передних левого и правого сателлитов, центральной колонки, задних левого и правого
сателлитов к выходным разъемам на задней панели сабвуфера, обозначенных FR, FL, CEN, RR, RL.
3. С помощью аудиокабеля подключите двухканальный источник звука (например, CD плеер) к входу 2.1 CH INPUT,
а шестиканальный источник звука (например, DVD плеер со встроенным декодером AC3/Dolby Digital) к входу
5.1 CH INPUT сабвуфера.
4. Подключите AM и FMантенны к соответствующим разъемам, расположенным на задней панели сабвуфера.
5. Подключите сетевой шнур к сетевой розетке и установите сетевой выключатель, расположенный на задней
панели сабвуфера, в положение ON. Включите воспроизведение подключенного устройства и с помощью кнопок
регулировки громкости, расположенных на пульте ДУ или на передней панели сабвуфера, установите желаемый
уровень громкости.
РУССКИЙ
15
4026.qxd 04.10.2005 11:31 Page 15
Page 16

РАБОТА СИСТЕМЫ
A. ВКЛЮЧЕНИЕ / ВЫКЛЮЧЕНИЕ ПИТАНИЯ
1. Перед включением устройства сделайте
необходимые подключения в соответствии с
инструкцией к подключению.
2. Подключите сетевой шнур системы к сетевой
розетке.
(ВНИМАНИЕ! Источник питания должен
соответствовать характеристикам питания
устройства).
3. Установите сетевой выключатель, расположенный на
задней панели устройства, в положение ON. Нажмите
кнопку STANDBY, расположенную на пульте ДУ или на
передней панели устройства, для включения питания
устройства.
B. ГРОМКОСТЬ
1. Нажмите кнопку VOL+ для увеличения уровня общей
громкости системы, при этом на дисплее передней
панели отобразится общий уровень громкости
системы в виде цифр.
2. Нажмите кнопку VOL для уменьшения уровня общей
громкости системы, при этом на дисплее передней
панели отобразится общий уровень громкости
системы в виде цифр.
C. РЕЖИМ ЗВУКА 3D
1. Подключите к устройству центральную колонку и
задние колонки.
2. Нажмите кнопку 3D, расположенную на пульте ДУ,
для включения/выключения режима объемного
звучания 3D.
D. ЦЕНТРАЛЬНАЯ КОЛОНКА
1. На пульте ДУ нажмите кнопку CEN+ для увеличения
уровня громкости центральной колонки, при этом на
дисплее передней панели отобразится уровень
громкости центральной колонки в виде цифр.
2. На пульте ДУ нажмите кнопку CEN для уменьшения
уровня громкости центральной колонки, при этом на
дисплее передней панели отобразится уровень
громкости центральной колонки в виде цифр.
E. ЗАДНИЕ КОЛОНКИ
1. На пульте ДУ нажмите кнопку REAR+ для увеличения
уровня громкости задних колонок, при этом на
дисплее передней панели отобразится уровень
громкости задних колонок в виде цифр.
2. На пульте ДУ нажмите кнопку REAR для уменьшения
уровня громкости задних колонок, при этом на
дисплее передней панели отобразится уровень
громкости задних колонок в виде цифр.
F. ПЕРЕДНИЕ КОЛОНКИ
1. На пульте ДУ нажмите кнопку FRONT + для
увеличения уровня громкости передних колонок, при
этом на дисплее передней панели отобразится
уровень громкости передних колонок в виде цифр.
2. На пульте ДУ нажмите кнопку FRONT для
уменьшения уровня громкости передних колонок,
при этом на дисплее передней панели отобразится
уровень громкости передних колонок в виде цифр.
G. ВЫБОР ИСТОЧНИКА: 2.1 CH или 5.1 CH
1. Правильно подключите систему к источнику аудио.
2. На пульте ДУ или на передней панели сабвуфера
нажмите кнопку CD/DVD для выбора аудиоисточника
(2.1 CH или 5.1 CH).
H. ФУНКЦИЯ ОТКЛЮЧЕНИЯ ЗВУКА (MUTE)
1. На пульте ДУ или на передней панели нажмите
кнопку MUTE для выключения звука.
2. На передней панели сабвуфера отобразится значок
MUTE.
3. Нажмите кнопку MUTE еще раз для включения звука.
I. AM/FMТЮНЕР
Подключите антенны AM и FMдиапазонов к
соответствующим разъемам, расположенным на
задней панели сабвуфера.
1. На пульте ДУ или на передней панели нажимайте
кнопку INPUT до появления на дисплее сабвуфера
надписи “TUNE”.
3. С помощью кнопки FM/AM, расположенной на пульте
ДУ, выберите желаемый диапазон радио (FM или
AM).
4. На пульте ДУ нажмите кнопку SCAN для включения
автоматической настройки на радиостанцию. Тюнер
настроится на радиостанцию автоматически.
5. На пульте ДУ нажимайте кнопку TUNE+ или кнопку
TUNE для настройки на радиостанцию вручную.
6. В режиме FM нажмите кнопку ST/MN,
расположенную на пульте ДУ, для выбора приема
радиостанции в режиме моно или стерео.
7. Для занесения выбранной радиостанции в память
устройства на пульте ДУ нажмите кнопку MEMORY,
после чего нажмите ту кнопку набора цифр, под
номером которой выбранная радиостанция будет
занесена в память. Для набора цифр 10 и более
сначала нажмите кнопку 10+, после чего нажмите
одну из кнопок 09.
ПРИМЕЧАНИЕ: в память устройства можно занести не
более 20 радиостанций.
РУССКИЙ
16
4026.qxd 04.10.2005 11:31 Page 16
Page 17

УСТРАНЕНИЕ НЕИСПРАВНОСТЕЙ
1. НЕТ ЗВУКА
(1) Проверьте правильность подключения системы.
(2) Увеличьте уровень громкости устройства.
(3) Убедитесь в правильности выбора аудиовхода
системы.
(4) Убедитесь, что функция MUTE выключена.
2. НЕТ ЗВУКА В ПЕРЕДНЕЙ ЛЕВОЙ КОЛОНКЕ
(1) Проверьте правильность подключения передней
левой колонки к устройству.
(2) Проверьте правильность подключения устройства к
источнику аудио.
3. НЕТ ЗВУКА В ПЕРЕДНЕЙ ПРАВОЙ КОЛОНКЕ
(1) Проверьте правильность подключения передней
правой колонки к устройству.
(2) Проверьте правильность подключения устройства к
источнику аудио.
4. НЕТ ЗВУКА В ЦЕНТРАЛЬНОЙ КОЛОНКЕ
(1) Проверьте правильность подключения центральной
колонки к устройству.
(2) Проверьте правильность подключения устройства к
источнику аудио.
(3) Увеличьте уровень громкости центральной колонки.
5. ЗАДНИЕ КОЛОНКИ НЕ ВОСПРОИЗВОДЯТ ЗВУК
(1) Проверьте правильность подключения задних
колонок.
(2) Проверьте правильность подключения устройства к
источнику аудио.
ПРИМЕЧАНИЕ: центральная и задние колонки работают
только в том случае, если система подключена к
шестиканальному источнику звука (например, DVD
плеер с декодером AC3/Dolby Digital), а при
подключении через аудиовход 2.1 CH INPUT только
в режиме 3D.
6. НЕТ ПРИЕМА РАДИОСТАНЦИЙ
(1) Проверьте правильность подключения антенн к
соответствующим разъемам устройства.
(2) В диапазоне FM убедитесь в том, что FMантенна
развернута на полную длину.
(3) В диапазоне AM вращайте AMантенну для более
уверенного приема сигнала.
ПРИЛОЖЕНИЕ
При подключении устройства к DVDплееру со
встроенным DD/DTSдекодером убедитесь в
следующем:
1. При подключении через аудиовход 5.1 CH. в
настройках плеера выбран аудиовыход
5.1 CH. Для воспроизведения используйте диск с
аудиодорожкой AC3/Dolby Digital 5.1 CH.
2. Прежде чем включить сабвуфер, убедитесь, что в
настройках плеера размер для передних,
центральной и задних колонок установлен “Малый”, а
выход на сабвуфер находится в состоянии “Вкл.”.
При подключении устройства к DVDплееру внимательно
изучите инструкцию по эксплуатации DVDплеера.
МЕРЫ ПРЕДОСТОРОЖНОСТИ
Внимание! Очень внимательно прочитайте
перечисленные ниже пункты в целях безопасности
эксплуатации устройства.
1. Прочитайте инструкцию Инструкции по мерам
безопасности и правилам эксплуатации должны быть
прочитаны перед началом использования
устройства.
2. Сохраните инструкцию Сохраните инструкцию,
чтобы использовать ее в будущем.
3. Соблюдайте правила эксплуатации Все инструкции
по правилам безопасности должны соблюдаться.
4. Значки предупреждения Придерживайтесь
указаний всех значков предупреждений,
размещенных на панели устройства или в данной
инструкции.
5. Источник питания Устройство должно подключаться
только к источникам питания с характеристиками,
указанными на задней панели устройства или в
данной инструкции.
6. Защита сетевого шнура Шнур сетевого питания должен
быть проложен так, чтобы он не подвергался воздействию
какихлибо предметов или окружающей среды.
7. Вода и влага Не эксплуатируйте устройство рядом
с резервуарами, наполненными водой (ванной,
раковиной, бассейном и т.д.).
8. Вентиляция Установите устройство в хорошо
проветриваемом помещении. Запрещается
устанавливать устройство на диванах, кроватях или
коврах, так как мягкие предметы (подушка, одеяло)
или ворс могут препятствовать вентиляции
устройства.
9. Воздействие тепла Не устанавливайте устройство вблизи
источников тепла (батареи, кухонные плиты, и т. д.).
10. Период длительного неиспользования если
устройство не будет использоваться в течение
длительного времени, отключите вилку сетевого
шнура от сетевой розетки.
11. Необходимость в сервисном обслуживании
Пользуйтесь услугами квалифицированного
персонала, когда:
РУССКИЙ
17
4026.qxd 04.10.2005 11:31 Page 17
Page 18

• повреждена вилка сетевого шнура;
• поврежден корпус устройства;
• устройство подверглось воздействию дождя;
• устройство не функционирует в нормальном
режиме;
• устройство подверглось воздействию удара.
12. Сервисное обслуживание Пользователь не должен
пытаться самостоятельно отремонтировать
устройство. Пользуйтесь услугами
квалифицированного персонала.
13. Чистите устройство только сухой мягкой тканью.
14. Отключайте устройство во время грозы, а также в
том случае, если не используете его в течение
длительного времени.
ТЕХНИЧЕСКИЕ ХАРАКТЕРИСТИКИ
САБВУФЕР
Питание: ~220230 Вольт
Выходная мощность: 50 Вт (Сабвуфер)
+ 5 x 30 Вт (Сателлиты)
Динамик сабвуфера: 6.5"/4 Ом
Динамики сателлитов: 2"/8 Ом
Разделение каналов: >45 дБ
Соотношение Сигнал/Шум: >87 дБ
Диапазон воспроизводимых частот:
40200 Гц (Сабвуфер)
150 Гц20 кГц (Сателлиты)
AM/FMтюнер
Общие характеристики FMтюнера:
Диапазон частот: 87.00 108.00 МГц
Шаг частоты настройки: 100 кГц
Промежуточная частота гетеродина: 10.7 МГц
Диапазон температур: 5 +70°С
Импеданс входа антенны: 75 Ом
Соотношение Сигнал/Шум: 45 дБ
Общие характеристики AMтюнера:
Диапазон частот: 520 1620 кГц
Шаг частоты настройки: 10 кГц
Промежуточная частота гетеродина: 450 кГц
Диапазон температур: 5 +70°С
Соотношение Сигнал/Шум: 45дБ
Производитель оставляет за собой право изменять
технические характеристики прибора без
предварительного уведомления.
Срок службы прибора не менее 5ти лет.
Данное изделие соответствует всем
требуемым европейским и российским
стандартам безопасности и гигиены.
Производитель: АНДЕР ПРОДАКТС ГмбХ, Австрия
Нойбаугюртель 38/7А, 1070 Вена, Австрия.
РУССКИЙ
18
4026.qxd 04.10.2005 11:31 Page 18
Page 19

Активна акустична система 5.1 з AM/FM
тюнером
Перед установкою пристрою уважно прочитайте дану
інструкцію.
КОМПЛЕКТ ПОСТАВКИ
У комплект акустичної системи входять наступні
компоненти:
1. Сабвуфер
2. П'ять сателітів із проводами
3. Три аудіокабелі
4. Пульт дистанційного керування
5. Батарейка для пульта ДК.
6. Антена діапазону AM
7. Антена діапазону FM
8. Посібник з експлуатації
ОПИС ПРИСТРОЮ
1. Сабвуфер
2. Сателіти
3. Центральна колонка
4. Аудіокабель
5. Пульт ДК
ЗАДНЯ ПАНЕЛЬ САБВУФЕРА
1. Вхідні аудіо роз’єми 2.1
2. Вхідні аудіо роз’єми 5.1
3. Вихідні роз’єми для передніх правого й лівого
сателіта (FR, FL)
4. Вихідні роз’єми для заднього правого й лівого
сателіта (RR, RL)
5. Вихідний роз’єм центрального каналу (CEN)
6. Роз’єм для підключення FM антени
7. Роз’єм для підключення AM антени
8. Мережний вимикач
9. Мережний запобіжник
10. Мережний шнур
ПУЛЬТ ДИСТАНЦІЙНОГО КЕРУВАННЯ
1. Кнопка включення/вимикання (STANDBY)
2. Кнопка вимикання звуку (MUTE)
3. Кнопка вибору джерела аудіо (INPUT)
4. Кнопка режиму об'ємного звучання (3D)
5. Кнопка режиму прийому СТЕРЕО/MONO (ST/MN)
6. Кнопки рівня голосності всіх каналів (VOL+/)
7. Кнопки рівня голосності переднього лівого каналу
(FL+/)
8. Кнопки рівня голосності переднього правого каналу
(FR+/)
9. Кнопки рівня голосності центрального каналу (CEN+/)
10. Кнопки рівня голосності сабвуфера (SUB+/)
11. Кнопки рівня голосності заднього лівого каналу
(SL+/)
12. Кнопки рівня голосності заднього правого каналу
(SR+/)
13. Кнопки набору цифр (09)
14. Кнопка для набору цифр від 10 і вище (10+)
15. Кнопка занесення радіостанцій у пам’ять (MEMORY)
16. Кнопка вибору діапазону радіо (AM/FM)
17. Кнопки ручного настроювання на радіостанцію
(TUNE +/)
18. Кнопка автоматичного настроювання на радіостанцію
(SCAN)
УКРАЇНЬСКИЙ
19
4026.qxd 04.10.2005 11:31 Page 19
Page 20

ПІДКЛЮЧЕННЯ
Переконайтеся, що пристрій, який підключається до сабвуфера (наприклад, DVD плеєр), виключений. Перед
підключенням установіть рівень звуку всієї системи на мінімум.
1. Відкрийте кришку батарейного відсіку пульта ДК й установіть батарейки, дотримуючи при цьому полярність.
2. Підключіть проводи передніх лівого й правого сателітів, центральної колонки, задніх лівого й правого сателітів до
вихідних роз’ємів на задній панелі сабвуфера, позначених FR, FL, CEN, RR, RL.
3. За допомогою аудіокабелю підключіть двоканальне джерело звуку (наприклад, CD плеєр) до входу 2.1 CH INPUT,
а шестиканальне джерело звуку (наприклад, DVD плеєр з убудованим декодером AC3/Dolby Digital) до входу 5.1
CH INPUT сабвуфера.
4. Підключіть AM і FM антени до відповідних роз’ємів, розташованих на задній панелі сабвуфера.
5. Підключіть мережний шнур до мережної розетки й установіть мережний вимикач, розташований на задній панелі
сабвуфера, з положення ON. Включіть відтворення підключеного пристрою й за допомогою кнопок регулювання
голосності, розташованих на пульті ДК або на передній панелі сабвуфера, установіть бажаний рівень голосності.
УКРАЇНЬСКИЙ
20
4026.qxd 04.10.2005 11:31 Page 20
Page 21

РОБОТА СИСТЕМИ
A. ВКЛЮЧЕННЯ / ВИМИКАННЯ ЖИВЛЕННЯ
1. Перед включенням пристрою зробіть необхідні
підключення відповідно до інструкції щодо
підключення.
2. Підключіть мережний шнур системи до мережної
розетки.
(УВАГА: Джерело живлення повинно відповідати
характеристикам живлення пристрою).
3. Установіть мережний вимикач, розташований на
задній панелі пристрою, у положення ON. Натисніть
кнопку STANDBY, розташовану на пульті ДК або на
передній панелі пристрою, для включення живлення
пристрою.
B. ГОЛОСНІСТЬ
1. Натисніть кнопку VOL+ для збільшення рівня
загальної голосності системи, при цьому на дисплеї
передньої панелі відобразиться загальний рівень
загальної голосності системи у вигляді цифр.
2. Натисніть кнопку VOL для зменшення рівня загальної
голосності системи, при цьому на дисплеї передньої
панелі відобразиться загальний рівень голосності
системи у вигляді цифр
C. Режим звуку 3D
1. Підключіть до пристрою центральну колонку й задні
колонки.
2. Натисніть кнопку 3D, розташовану на пульті ДК, для
включення / вимикання режиму об'ємного звучання
3D.
D. ЦЕНТРАЛЬНА КОЛОНКА
1. На пульті ДК натисніть кнопку CEN+ для збільшення
рівня голосності центральної колонки, при цьому на
дисплеї передньої панелі відобразиться рівень
голосності центральної колонки у вигляді цифр.
2. На пульті ДК натисніть кнопку CEN для зменшення
рівня голосності центральної колонки, при цьому на
дисплеї передньої панелі відобразиться рівень
голосності центральної колонки у вигляді цифр.
E. ЗАДНІ КОЛОНКИ
1. На пульті ДК натисніть кнопку REAR+ для збільшення
рівня голосності задніх колонок, при цьому на дисплеї
передньої панелі відобразиться рівень голосності
задніх колонок у вигляді цифр.
2. На пульті ДК натисніть кнопку REAR для зменшення
рівня голосності задніх колонок, при цьому на дисплеї
передньої панелі відобразиться рівень голосності
задніх колонок у вигляді цифр.
F. ПЕРЕДНІ КОЛОНКИ
1. На пульті ДК натисніть кнопку FRONT + для
збільшення рівня голосності передніх колонок, при
цьому на дисплеї передньої панелі відобразиться
рівень голосності передніх колонок у вигляді цифр.
2. На пульті ДК натисніть кнопку FRONT для
зменшення рівня голосності передніх колонок, при
цьому на дисплеї передньої панелі відобразиться
рівень голосності передніх колонок у вигляді цифр.
G. ВИБІР ДЖЕРЕЛА 2.1 CH і 5.1 CH
1. Правильно підключіть систему до джерела аудіо.
2. На пульті ДК або на передній панелі сабвуфера
натисніть кнопку CD/DVD для вибору аудіо джерела
(2.1 CH або 5.1 CH).
H. ФУНКЦІЯ ВІДКЛЮЧЕННЯ ЗВУКУ (MUTE)
1. На пульті ДК або на передній панелі натисніть кнопку
MUTE для вимикання звуку.
2. На передній панелі сабвуфера відобразиться значок
MUTE.
3. Натисніть кнопку MUTE ще раз для включення звуку.
I. AM/FM ТЮНЕР
Підключiть антени AM і FM діапазонів до відповідних
роз’ємiв, розташованих на задній панелі сабвуфера.
1. На пульті ДК або на передній панелі натискайте
кнопку INPUT до появи на дисплеї сабвуфера напису
“TUNE”.
3. За допомогою кнопки FM/AM, розташованої на пульті
ДК, виберiть бажаний діапазон радіо (FM або AM).
4. На пульті ДК натисніть кнопку SCAN для включення
автоматичного настроювання на радіостанцію. Тюнер
настроїться на радіостанцію автоматично.
5. На пульті ДК натискайте кнопку TUNE+ або кнопку
TUNE для настроювання на радіостанцію вручну.
6. У режимі FM натисніть кнопку ST/MN, розташовану на
пульті ДК, для вибору прийому радіостанції в моно
або стерео режимі.
7. Для занесення обраної радіостанції у пам’ять
пристрою, на пульті ДК натисніть кнопку MEMORY,
після чого натисніть кнопку набору цифр, під
номером якої обрана радіостанція буде занесена у
пам’ять. Для набору цифр 10 і більше, спочатку
натисніть кнопку 10+, після чого натисніть одну із
кнопок 09.
ПРИМІТКА: У пам’ять пристрою можна занести не більше
20 радіостанцій.
УСУНЕННЯ НЕСПРАВНОСТЕЙ
1. НЕМАЄ ЗВУКУ
(1) Перевірте правильність підключення системи.
(2) Збільште рівень голосності пристрою.
(3) Переконайтеся в правильності вибору аудіо входу
системи.
(4) Переконайтеся, що функція MUTE виключена.
УКРАЇНЬСКИЙ
21
4026.qxd 04.10.2005 11:31 Page 21
Page 22

2. НЕМАЄ ЗВУКУ В ПЕРЕДНІЙ ЛІВІЙ КОЛОНЦІ
(1) Перевірте правильність підключення передньої лівої
колонки до пристрою.
(2) Перевірте правильність підключення пристрою до
джерела аудіо.
3. НЕМАЄ ЗВУКУ В ПЕРЕДНІЙ ПРАВІЙ КОЛОНЦІ
(1) Перевірте правильність підключення передньої
правої колонки до пристрою.
(2) Перевірте правильність підключення пристрою до
джерела аудіо.
4. НЕМАЄ ЗВУКУ В ЦЕНТРАЛЬНІЙ КОЛОНЦІ
(1) Перевірте правильність підключення центральної
колонки до пристрою.
(2) Перевірте правильність підключення пристрою до
джерела аудіо.
(3) Збільште рівень голосності центральної колонки.
5. ЗАДНІ КОЛОНКИ НЕ ВІДТВОРЮЮТЬ ЗВУК
(1) Перевірте правильність підключення задніх колонок.
(2) Перевірте правильність підключення пристрою до
джерела аудіо.
ПРИМІТКА: Центральна й задня колонки працюють тільки
у випадку, якщо система підключена до шестиканального
джерела звуку (наприклад, DVD плеєр з декодером AC
3/Dolby Digital), а при підключенні через аудiо вхід 2.1 CH
INPUT тільки в режимі 3D.
6. НЕМАЄ ПРИЙОМУ РАДІОСТАНЦІЙ
(1) Перевірте правильність підключення антен до
відповідних роз’ємiв пристрою.
(2) У діапазоні FM переконайтеся в тому, що FM антена
розгорнута на повну довжину.
(3) У діапазоні AM обертайте AM антену для більш
впевненого прийому сигналу.
ДОДАТОК
При підключенні пристрою до DVD плеєра з убудованим
DD/DTS декодером переконайтеся в наступному:
1. При підключенні через аудіо вхід 5.1 CH., у
настроюваннях плеєра обраний аудіо вихід 5.1CH.
Для відтворення використовуйте диск із аудіо
доріжкою AC3/Dolby Digital 5.1 CH.
2. Для включення сабвуфера, переконайтеся, що в
настроюваннях плеєра розмір колонок для передніх,
центральної й задніх колонок установлений “Малий”,
а вихід на сабвуфер знаходиться в стані “Вкл.”.
При підключенні пристрою до DVD плеєра уважно
прочитайте інструкцію з експлуатації DVD плеєра.
ЗАПОБІЖНІ ЗАХОДИ:
Увага: Будь ласка, уважно прочитайте нижче
перераховані пункти з метою безпеки експлуатації
пристрою.
1. Прочитайте інструкцію Інструкції із заходів безпеки й
правил експлуатації повинні бути прочитані перед
початком використання пристрою.
2. Збережіть інструкцію Збережіть інструкцію для її
використання в майбутньому.
3. Дотримуйте правил експлуатації Усі інструкції із
правил безпеки повинні дотримуватися.
4. Значки попередження Дотримуйтеся вказівок усіх
значків попереджень, розміщених на панелі
пристрою або в даній інструкції.
5. Джерело живлення Пристрій повинен підключатися
тільки до джерел живлення з характеристиками,
зазначеними на задній панелі пристрою або в даній
інструкції.
6. Захист мережного шнура Шнур мережного живлення
повинен бути прокладений так, щоб він не піддавався
впливу зовнішніх предметів або навколишнього
середовища.
7. Вода й волога Не експлуатуйте пристрій поруч із
резервуарами, наповненими водою (наприклад,
ваннами, раковинами, басейнами й т.д.).
8. Вентиляція Установіть пристрій у добре
провітрюваному приміщенні. Не встановлюйте
пристрій на диванах, ліжках або килимах, тому що це
може перешкоджати вентиляції пристрою.
9. Вплив тепла Не встановлюйте пристрій поблизу
джерел тепла (наприклад, батареї, кухонні плити, і
т.д.).
10. Період тривалого невикористання якщо пристрій не
буде використовуватися протягом тривалого часу,
відключіть вилку мережного шнура від мережної
розетки.
11. Необхідність у сервісному обслуговуванні
Користуйтеся послугами кваліфікованого персоналу
коли:
• Ушкоджено вилку мережного шнура; або
• Ушкоджено корпус пристрою; або
• Пристрій піддався впливу дощу; або
• Пристрій не функціонує в нормальному режимі; або
• Пристрій піддався впливу удару.
12. Сервісне обслуговування Користувач не повинен
намагатися самостійно відремонтувати пристрій.
Користуйтеся тільки послугами кваліфікованого
персоналу.
13. Чистіть пристрій тільки сухою м'якою ганчіркою.
14. Відключайте пристрій під час грози або при
невикористанні протягом тривалого часу.
УКРАЇНЬСКИЙ
22
4026.qxd 04.10.2005 11:31 Page 22
Page 23

ТЕХНІЧНІ ХАРАКТЕРИСТИКИ
САБВУФЕР
Живлення: ~220230 Вольт
Вихідна потужність: 50 Вт (Сабвуфер)
+ 5 x 30 Вт (Сателіти)
Динамік сабвуфера: 6.5"/4 Ом
Динаміки сателітів: 2"/8 Ом
Розділення каналів: >45 дБ
Співвідношення Сигнал/Шум: >87 дБ
Діапазон відтворених частот: 40 Гц 200 Гц (Сабвуфер)
150 Гц 20 КГц (Сателіти)
AM/FM тюнер
Загальні характеристики FMтюнера:
Діапазон частот: 87.00 МГц 108.00 МГц
Крок частоти настроювання: 100 КГц
Проміжна частота гетеродина: 10.7 МГц
Діапазон температур: 5 +70°С
Імпеданс входу антени: 75 Ом
Співвідношення сигнал/шум: 45 дБ
Загальні характеристики АМтюнера:
Діапазон частот: 520 КГц ~ 1620 КГц
Крок частоти настроювання: 10 КГц
Проміжна частота гетеродина: 450 КГц
Діапазон температур: 5 +70°С
Співвідношення сигнал/шум: 45дБ
Технічні характеристики пристрою можуть бути змінені
без попереднього повідомлення.
Термін служби приладу не менш 5 років
Гарантія
Докладні умови гарантії можна отримати в дилера, що
продав дану апаратуру. При пред’явленні будьякої
претензії протягом терміну дії даної гарантії варто
пред’явити чек або квитанцію про покупку.
Даний виріб відповідає вимогам до
електромагнітної сумісності, що
пред’являються директивою 89/336/ЄЕС Ради
Європи й розпорядженням 23/73 ЄЕС по
низьковольтних апаратурах.
УКРАЇНЬСКИЙ
23
4026.qxd 04.10.2005 11:31 Page 23
Page 24

4026.qxd 04.10.2005 11:31 Page 24
 Loading...