


F U L L O N E Y E A R WA R R A N T Y
This VILLAWARE product is protected against defects in materials and workmanship for one year from the date of original purchase. If the product proves to be defective in materials or workmanship during this period, it will be repaired free of charge.
This warranty does not apply to damage resulting from misuse, accidents or alterations to the product, or to damages incurred in transit.
This warranty does not apply to cords or plugs.
All returns must be carefully packed and made transportation prepaid with a description of the claimed defect.
VillaWare Manufacturing Co.
3615 Superior Ave. #44
Cleveland, Ohio 44114
Other Fine VillaWare® Products...
Belgian & Classic Wa±e Makers |
Cookie Presses |
Pizzelle Bakers |
Pizza Stones |
Classic Electric Skillets |
One-Pot™ Pasta & Sauce Cooker |
UNO™ Classic 2 & 4 Slice Toasters |
Espresso Co≠ee Pots |
UNO™ Grills & Griddles |
Italian Style Gadgets & Utensils |
Classic Co≠ee Makers |
|
Classic Crepe Makers |
|
Power Grinder™ Electric Food Grinders |
|
Disney Licensed Series by VillaWare® |
...and hundreds more Classic Italian |
VillaWare® Food Strainer |
|
Imperia® & Al Dente™ Pasta Machines |
Kitchenware products from VillaWare® |
For additional information on the VillaWare product line, see your dealer or visit our website at www.villaware.com
© Copyright VillaWare Manufacturing Company, Cleveland, Ohio 44114. All rights reserved. No part of this booklet may be reproduced without the written consent of VillaWare Mfg. Co. VillaWare is a trademark of VillaWare Mfg. Co. Printed in China.
Power
Cookie Press
Cordless & Rechargeable
no. 5375
Directions & Recipes
IMPORTANT SAFEGUARDS
When using the Power Cookie Press, several safety precautions should always be followed:
1.READ ALL INSTRUCTIONS.
2.To prevent damage to the motor, do not immerse motor in water or other liquids.
3.Do not allow dough or batter to run into shaft, as damage to the motor may occur.
4.Do not operate Power Cookie Press with damaged batteries, motor, or after the appliance malfunctions or is dropped or damaged in any manner.
5.Use only with charger/power supply provided with the appliance.
6.Do not attempt to charge this appliance with any other charger.
7.Do not incinerate this appliance even if it is severely damaged. The batteries can explode in a fire.
8.Do not touch moving parts.
9.Carefully supervise this and any appliance being used by or near children.
10.FOR HOUSEHOLD USE ONLY.
F E AT U R E S O F YO U R P OW E R C O O K I E P R E S S
Now enjoy fast, effortless cookie making with your cordless and rechargeable Power Cookie Press. You’ll appreciate the ease of use compared to hand operated cookie guns. You need strong power to press cookie dough. Our AC rechargeable motor provides all the power required, considerably more when compared to light duty battery-operated models.
SSee-through cylinder, easy to check remaining dough
SQuiet operation, 5-step speed reduction gearing
S20 cookie discs assortment, perfect 2 1⁄8" cookie diameter
S4 funnels for icing, decorating and filling
SHandy storage box, keeps your 24 attachments together
SPowerful, makes up to 800 cookies on a single charge
SPrecise pulse switch operation for accurate application of cookie dough and icings
SEasily disassembles, fast clean up
SIncludes special brush for easy cleaning of dough cylinder interior
SHigh-torque, power DC motor
SAC adapter, recharge at any wall outlet
SCord free operation, unplug adapter wire once charged
SPlenty of power to make large batches of cookies without recharging
SNever needs batteries
S15" length overall
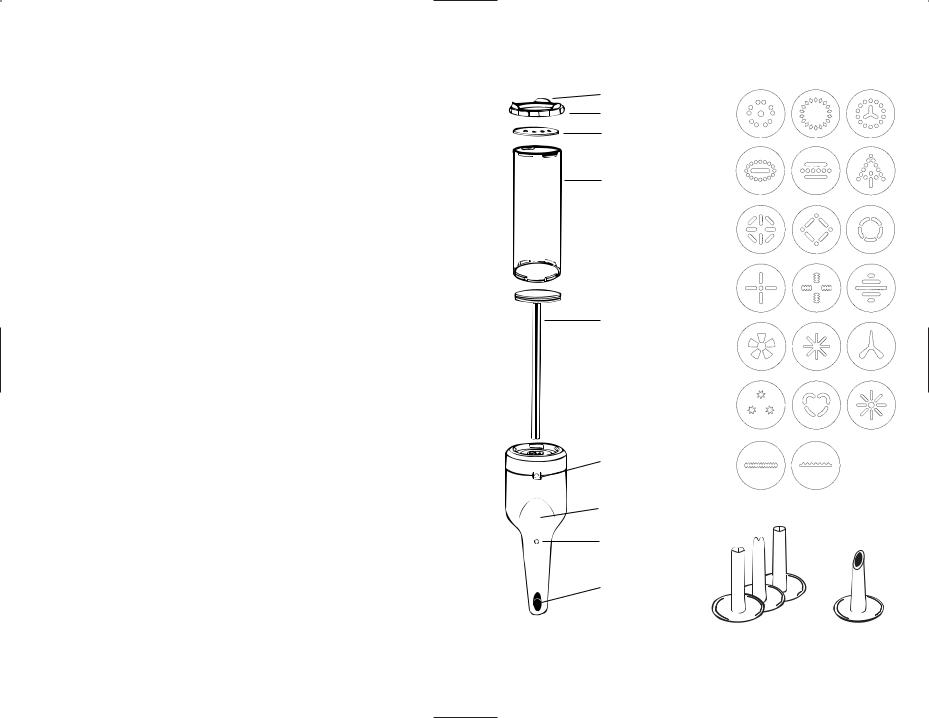
I M P O RTA N T PA RT S O F YO U R P OW E R C O O K I E P R E S S
ring nut feet |
|
|
|
ring nut |
|
|
|
cookie disc |
A |
B |
C |
dough tube |
|
|
|
|
D |
E |
F |
|
G |
H |
I |
pusher rod |
J |
K |
L |
|
|
|
|
|
M |
N |
O |
|
P |
Q |
R |
power plug socket |
|
|
|
|
S |
T |
|
power base |
|
|
|
power light |
|
|
|
power switch
3 decorator |
filler |
funnels |
funnels |
ACACACACACACACACACA 2 CACACACACACACACACACA |
ACACACACACACACACACA 3 CACACACACACACACACACA |

H OW T O U S E YO U R P OW E R C O O K I E P R E S S
T O C H A R G E
1.Plug the AC adaptor into wall outlet.
2.The long wire on the AC adaptor has a small plug on the end of it. Insert the small plug into the Power Plug Socket located on the Power Base.
3.The red Power Light will go ON, indicating that unit is charging. Light will stay ON until you unplug to stop charging.
4.Minimum recommended charging time is 2 hours. Unit may operate if charged for shorter periods, but the amount of cookies that can be made would be reduced accordingly.
5.You may charge longer, overnight for example. There is no limit on how long you can charge.
6.When unit is fully charged, up to 40 tubes of dough can be processed. Each tube of dough will make about 20 cookies, so up to 800 cookies can be made on full charge. These amounts may vary.
T O A S S E M B L E
1.Slide Pusher Rod all the way into the hole Power Base
2.Screw clear Dough Tube onto the Power Base.
3.Form cookie dough in a long tube-like shape and gently pack into the Dough Tube.
4.Put your selected Cookie Disc (or funnel) over open end of Dough Tube.
5.Screw on the Ring Nut, securing the cookie disc in position.
M A K I N G C O O K I E S
1.Stand up the cookie press on a cool, ungreased cookie sheet. The Ring Nut Feet should rest flat against the cookie sheet.
2.Hold the Dough Tube with one hand and press the Power Switch, using the thumb of your other hand.
3.You control the size of your cookie by how long you press the Power Switch. Pulse the switch on and off for precise control. Pulse longer for larger cookies, less pulsing for smaller size. You will very quickly become experienced in controlling your desired cookie size.
4.Move the cookie press to your next location on the cookie sheet, spacing cookies about 2 inches apart. Start extruding next cookie by pressing Power Switch as above.
W H E N C O O K I E D O U G H RU N S O U T
1.Remove the Ring Nut from the Dough Tube.
2.Remove the Dough Tube from the Power Base.
3.Go to “To Assemble” on page 3, to start new cookie batch.
C O O K I E M A K I N G H I N T S
SThe motor should easily extrude out the cookie dough. If the dough is not easily extruding, your dough is too hard and not of the right consistency.
SDon’t lift the cookie press from the cookie sheet before enough dough has been extruded out to completely form the cookie. Sometimes it is necessary to wait a moment to allow the dough to adhere to the sheet before lifting up the cookie press.
SThe cookie sheet should be cool and ungreased. When using some of the discs, like the star disc, it is OK to raise the cookie press up a little when extruding the dough instead on letting it rest flat against the cookie sheet.
SThe cookie dough should be soft and pliable, not hard, dry or crumbly. Test the dough consistency before adding all of the flour. Put a small amount of dough in the cookie press and extrude out. If the dough seems too stiff, add 1 egg yolk. If the dough is too soft, add 1 to 2 tablespoons of flour. Keep dough at room temperature, do not chill.
SBefore first use, and after each use, wash cookie press parts in hot soapy water and dry. The part with the long grip handle has the motor inside. Wipe this part clean, but never immerse it in water, which will cause damage to the appliance.
SBefore baking, cookies may be creatively decorated and arranged with nuts, candies, raisins, candied peel or fruit slices. Cookies may be sprinkled with regular or colored sugars, or chopped nuts. Cookies may be colored by adding a food coloring to the dough before mixing.
C L E A N I N G A N D C A R E
1.Fully disassemble.
2.All parts may be washed EXCEPT Power Base. Never immerse Power Base in water. Wipe clean.
3.Take care that no cookie dough gets into the Power Base, where the Pusher Rod inserts. In normal use, dough will never get close to this area where the Pusher Rod inserts.
4.Dishwasher is not recommended. Use hot soapy water.
5.While washing, use the included Dough Tube Brush to clean the inside threads of the Dough Tube.
6.Unit may be stored away in original package. The 20 discs and 4 funnels store away in the reusable plastic storage box.
ACACACACACACACACACA 4 CACACACACACACACACACA |
ACACACACACACACACACA 5 CACACACACACACACACACA |
 Loading...