


Instruction Manual
blender
Read All Instructions Before Use
FR Mode d’Emploi
blender
LireToutes les Instructions Avant Utilisation
ES Manual de Instrucciones
batidora
¡Lea las instrucciones antes de usarlo!
DE Bedienungsanleitung
mixer
Bitte lesen Sie vor dem Gebrauch erst alle Anleitungen sorgfältig durch
RU Инструкция для пользователя
миксер
Перед использованием прочитайте всю инструкцию
SV Instruktion Bok
mixer
Läs igenom alla instruktioner innan användning
model • modèle • modelo modell • модель • modell
BLVLLAZ05H

important safeguards
When using electrical appliances, basic safety precautions should always be followed including the following:
•Read all instructions before using your blender “
 ”.
”.
•Do not use appliance for other than intended use.
•If unit is operated in any manner other than indicated in this manual, it may cause material damages or personal injuries.
•Do not use outdoors.
•This appliance is not intended for use by persons (including children) with reduced physical, sensory or mental capabilities, or lack of experience and knowledge, unless they have been given supervision or instruction concerning use of the appliance by a person responsible for their safety.
•Close supervision is necessary when any appliance is used by or near children.
•Always use the blender on a dry, level surface.
•Always make sure the blender jar is completely assembled and mounted on the motor base before operating.
•Always make sure blender lid is securely in place before motor is turned on.
•Do not place your fingers, hands and utensils in the blender jar during operation to reduce the risk of severe injury or damage to the blender.A scraper may be used only when the blender is not running.
•Avoid contact with moving parts. The blade is sharp. Handle it carefully.
•Do not operate this appliance continuously for more than 5 minutes.
•The motor contains a resettable fuse to protect against overheating after continued heavy use. If the motor shuts off, turn blender off “O” and unplug it from the electrical outlet. After the blender has cooled, plug it into the electrical outlet and resume normal use.
•Be sure to turn switch to off position “O” after each use of your blender and before unplugging it from the outlet. Make sure the motor stops completely before removing the jar from the motor base.
•Switch off the appliance and unplug it from the electrical outlet before changing accessories, approaching parts that move, cleaning, assembling or removing parts and when not in use.
•The use of attachments not recommended or sold by the manufacturer may cause fire, electric shock or injury.
•Do not use the appliance if the blade is damaged.
•Do not operate any appliance with a damaged cord or plug or after the appliance malfunctions, or is dropped or damaged in any manner. Return appliance to the nearest Authorised Service Centre for examination, repair or electrical or mechanical adjustment.
•If supply cord is damaged, the manufacturer or an Authorised Service Centre must replace it in order to avoid a hazard.
•Do not place this appliance on or near a hot gas or electric burner, or where it could touch a heated oven.
•Do not let cord hang over edge of table or counter,or touch hot surfaces,including the stove.
•Hot Foods: Open feeder cap to vent steam. Make sure to tilt feeder cap away from you when opening it. Keep hands away from the lid opening to prevent possible burns. When working with hot liquids, remove feeder cap and start blending at a low speed then move to a faster speed.
THIS APPLIANCE IS FOR HOUSEHOLD USE ONLY.
SAVE THESE INSTRUCTIONS
1

power cord instructions
Please follow the instructions below to ensure the safe use of the power cord.
•Do not use an extension cord with this product.
•Do not pull, twist or otherwise abuse the power cord.
If supply cord is damaged, the manufacturer, an Authorised Service Centre or similarly qualified persons must replace it in order to avoid a hazard.
important product markings

 “Read Instructions” located on lid
 “Off”
“Off”  “Pulse”
2

for u.k. and ireland only
If the plug is not suitable for the socket outlets in your home, it can be removed and replaced by a plug of the correct type. Please refer to “Installation of a plug” below.
Installation of a plug applicable to U.K. and Ireland.
WARNING - THIS APPLIANCE MUST BE EARTHED
NOTE: If the terminals in the plug are not marked or if you are unsure or in doubt about the installation of the plug, please contact a qualified electrician. If a 13A 3-pin plug is fitted, it must be an ASTA approved plug, conforming to BS1363 standard.
Replacement 5A fuses must be BS1 or ASTA BS1362 approved.
 5 amp
5 amp
The wires in the mains lead are coloured as such:
GREEN ANDYELLOW - EARTH
BROWN - LIVE
BLUE - NEUTRAL
Please note that the colour of these mains wires may not correspond with the colour markings that identify the terminals in your plug.
Please proceed as follows:
The wire which is coloured GREEN ANDYELLOW must be connected to the terminal which is marked with the letter “E” or by the earth symbol “ ” or coloured GREEN AND YELLOW.
The BROWN coloured wire must be connected to the terminal, which is marked with the letter “L” or is coloured RED.
The BLUE coloured wire must be connected to the terminal, which is marked with the letter “N” or is coloured BLACK.
3
description of the appliance
1
7
2
3
4 |
8 |
|
|
5 |
9 |
|
10
11
12
6
13
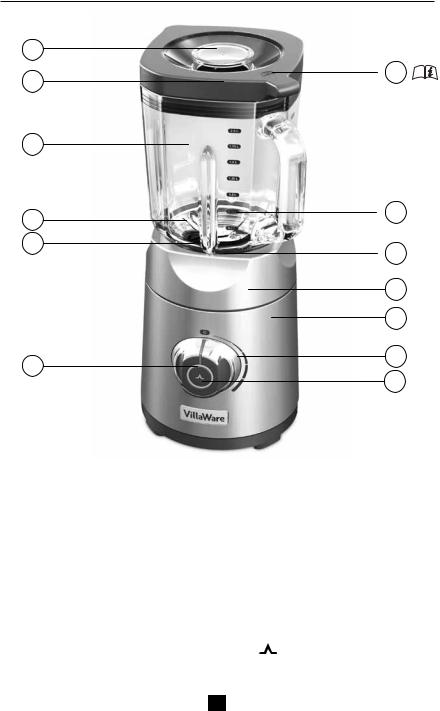
1. Feeder Cap – Allows you to add smaller ingredients and liquids while the blender is running.
2.Leak Proof Jar Lid
3.2L SquareThermo Shock Resistant Jar – Goes from boiling liquids to ice water without breaking.
4.4+2 Blade Assembly – Allows for precision, going from delicately chopping food to pulverizing ice.
5.Sealing Ring – Provides tight seal between the jar and the motor base.
6.Power On Indicator Light (Amber)
7.
 “Read Instructions” Symbol
8.Measurement Indicator Markings
9.Threaded Bottom Cap – Securely fastens blade assembly to jar.
10. Jar Skirt
11. Motor Base
12. Variable Speed Control Dial –
Seamlessly moves between speeds
to provide the power you need
during food preparation.
13. ( ) Pulse Button – Provides
short bursts of power.
4
before using your blender
•Before using yourVillaWare® Blender for the first time, follow the “after using your blender instructions” to disassemble the jar assembly and wash the lid, feeder cap, blade and threaded bottom cap in warm, soapy water or in the top rack of the dishwasher. Rinse and dry well.
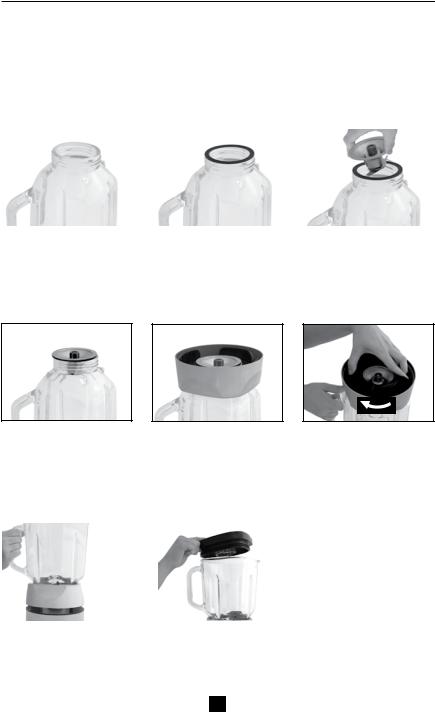
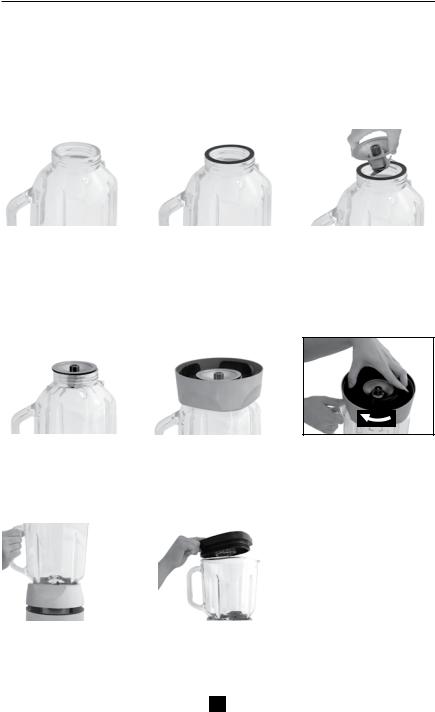
ASSEMBLY INSTRUCTIONS:
THE BLADES ARE EXTREMELY SHARP. HANDLE CAREFULLY.
Follow the assembling instructions listed below before using yourVillaWare® Blender:
Figure 1 |
|
Figure 2 |
|
Figure 3 |
|
|
|
|
|
•Turn jar upside down so that the small opening is at the top (Figure 1).
Figure 4
•Ensure secure fit of sealing ring between jar and blade assembly
(Figure 4).
•Put the sealing ring around the blade assembly (Figure 2).
Figure 5
•Place jar skirt facing down around jar (Figure 5).
•Place neck of blade assembly on the rim of the small jar opening. Tilt blades inside jar. NOTE:
Blades may drag slightly against jar. (Figure 3).
Figure 6
•Place threaded bottom cap over small jar opening and turn it clockwise to tighten
(Figure 6).
Figure 7 |
|
Figure 8 |
|
|
|
•Place jar assembly onto motor base (Figure 7). Curve on jar skirt will be centrally located over dial.
•Place lid with feeder cap on jar (Figure 8).
5

operating instructions
1. Prepare ingredients. |
Figure 9 |
|
2.Remove lid and place ingredients in the jar.
3.Your blender includes a feeder cap that allows you to add ingredients while blending (see Figure 9).
4. With the dial in the off position “O” plug the power cord into the |
|
|
Figure 10 |
||
electrical outlet. |
||
|
5.The variable speed dial lets you fully control the blending process (Figure 10). It seamlessly moves from low to high speeds so you can select the perfect power for you blending needs, from delicate chopping to finely shaved ice.
6. Turn the speed dial clockwise to increase power and speed or |
Figure 11 |
counter clockwise to reduce them. |
|
7.To pulse, keep the dial in the off position “O” and press the pulse button “ ” in the centre of the speed dial (Figure 11). Hold for 1-3 seconds and release.
IMPORTANT: Do not operate blender continuously for more than 5 minutes.
Reset Function
1.The motor contains a resettable fuse to protect against overheating.
2.If the unit stops after continuous use, turn the blender off “O” and unplug it from the electrical outlet.
3.Wait 5-10 minutes for the blender to cool down.
4.Plug the blender into the electrical outlet and resume normal use.
5.If the blender does not operate after instructions 1-4, repeat the above steps and wait a further 10 minutes before using again.
6

after using your blender
Before cleaning and storing your blender, follow the instructions below to disassemble the jar assembly:
• Turn blender off “O” and unplug it from the electrical outlet.
• Lift jar assembly straight up and remove it from the motor base.
• Remove the lid and empty jar. If necessary, use a rubber spatula to scrape foods away from the sides of the jar.
• Turn jar assembly upside down and place in sink to allow residue to drain.
• Unscrew threaded bottom cap by twisting counter clockwise and remove (Figure 12).
• Remove jar skirt.
•Grip blade assembly near blades pointing to base. Tilt blade assembly to remove (Figure 13).
NOTE: Blades may drag along side of jar.
•Remove sealing ring from around blade assembly.
BLADES ARE EXTREMELY SHARP. HANDLE CAREFULLY.
cleaning
Figure 12
Figure 13
•Turn blender off “O” and unplug it from the electrical outlet.
•Disassemble the jar assembly using the instructions in the “after using your blender” section. All parts of the jar assembly, except the jar skirt, are dishwasher safe. The glass jar, blade assembly and threaded bottom cap should be placed on the top shelf of the dishwasher. Place the sealing ring in the bottom basket of the dishwasher. These parts can also be washed in warm, soapy water. Rinse and dry well.
•Wipe the motor base and jar skirt with a damp or dry cloth.
•Do not immerse the motor base in water or any other liquid.
•Follow the instructions from the“before using your blender” section to assemble the jar unit.
storing
•Always reassemble the jar unit for storage.
•Leave the lid open a gap so no odours are retained.
WARNING: Never putthe jar, or any other part, in a microwave oven. Never store food or drink inthe jar.
7

tips and suggestions
•Put liquids in the jar first, unless a recipe states otherwise.
•Do not remove the lid while blender is in use. Remove the feeder cap to add smaller ingredients while blender is running.
•Cut all firm fruits and vegetables, cooked meats, fish and seafood into pieces. Cut all kinds of cheeses into pieces.
consumer affairs
Holmes Products (Europe) Ltd. 1 Francis Grove
London SW19 4DT England
Fax: +44 (0)20 8947 8272
Email: enquiriesEurope@jardencs.com
UK - Free phone Customer Service Helpline –0800 311 2198
To Register your product online visit - http://www.villaware.co.uk/ProductRegistration.aspx
8

recipes
Blackberry and Melon Smoothie
460 g blackberries
460 g white antibes melon
75 g sugar
Place all ingredients in the blender and puree.
Banana and Mango Smoothie
2 shots of rum (optional)
2 bananas
1 mango, pitted
250 ml unsweetened coconut milk
250 ml milk
28 g lime juice
3 ice cubes
Put all ingredients in blender in order shown. Blend until desired consistency.
Fruit Drink
20 cherries, pitted
1 apple, cut in 4 pieces
1 banana
1 kiwi
1 handful blueberries Apple juice
Put all ingredients, except apple juice, in blender. Blend. Add apple juice through filter cap to mix ingredients and reach desired consistency.
Vegetable Soup
400 g chicken broth
2 carrots pulp
1 zucchini pulp
1 bell pepper pulp (choose colour according to sweetness desired)
2 celery stalk pulp
To obtain pulp, pass vegetables through juice extractor. The juice can be used in a variety of recipes.
Mix pulp and broth in a blender, pulsing to reach desired consistency. Place in saucepan and bring to a boil.
Roasted Tomato Soup
4-5 large tomatoes, cored and cut into 4 pieces
1 large onion, peeled and cut into 4 pieces
4 unpeeled garlic cloves
2 small red peppers, cored and cut into 4 pieces
1 carrot with outer layer removed and cut into 4 pieces lengthwise
60 ml olive oil Salt to taste Pepper to taste 1 cinnamon stick
5 green cardamom pods
5 g coriander seed
5 g cumin seed
2.5 g mustard seed
Red pepper flakes to taste
475 ml water
2.5 g garam masala, if desired
1.25 g turmeric
Preheat oven to 190° C.
In large bowl, add all ingredients except water, garam masala and turmeric. Toss gently. Place in a smooth, single layer on large baking sheet. Roast in oven for 45 minutes.
Remove from oven and discard cardamom pods and the cinnamon stick.
Using something to protect your fingers, squeeze each garlic clove on one end to free the inside and place the creamy
portion in the blender jar. Discard the rest of the clove.
Place all remaining roasted ingredients and water in the blender jar. Puree. Remove the pulp by pouring through a mesh sieve.
Stir in garam masala and turmeric. Serve immediately.
Mango Coulis
1 soft, ripe mango – cubed
28 g brown sugar
28 g water
1 small lemon, peeled
2.5 g cardamom
Pass lemon through juice extractor. Add juice to all other ingredients in a blender and puree to desired consistency.
9
recipes (continued)
Blueberry Coulis
225 g blueberries
28-43 g icing sugar
Place blueberries in blender and pulse to break up fruit.
Add sugar and puree.
Pour into a container and chill.
Tangy Ginger Marinade
235 ml soy sauce
155 ml honey
155 ml oil
21 g white wine vinegar
3 crushed garlic cloves
14 g fresh chopped ginger
2 limes, peeled
Pass limes through juice extractor. Combine juice and all other ingredients in blender until well blended.
Marinate meat before cooking.
Chilli Marinade
140 g hot chillies
28 g rosemary
28 g basil
28 g thyme
28 g parsley
28 g mustard seed
1 small lime, peeled
1 small orange, peeled
9 g salt
28 g white vinegar
Pass lime through juice extractor. Measure out 60 ml of juice and place in blender.
Pass orange through juice extractor. Measure out 28 g and place in blender.
Add all other ingredients to blender and mix until smooth.
Marinates around 900 g of meat. Marinate for up to 24 hours depending on strength of flavouring desired.
Pineapple-Mango Salsa
½medium red pepper, cut in 4 pieces
½medium red onion, cut in 4 pieces
2.5 cm piece of ginger root, peeled, cut in 4 pieces
230 g pineapple chunks
230 g fresh mango chunks
14 g lime juice
230 g rinsed, drained black beans Tortilla chips
In the jar, place all ingredients, except beans and tortilla chips, in order listed above.
Turn dial slightly clockwise for low power. Chop to desired consistency.
Pour into bowl and stir in beans. Serve with tortilla chips.
Spinach and Pecan Pesto
60 g basil leaves
120 g baby spinach leaves
120 ml extra virgin olive oil
230 g pecans
75 g freshly shredded Parmesan cheese
2 garlic cloves, chopped
1.25 g salt
Salt to taste Pepper to taste
Lightly toast pecans.
Place all ingredients in blender jar. Pulse until smooth.
Avocado Dip
2 large ripe avocados
450 g sour cream
2 tomatoes
4 spring onions, with green
20 g lemon juice
Hot pepper sauce to taste
Peel and pit the avocados then cut into chunks. Core tomatoes,remove seeds then coarsely chop. Coarsely chop onions.
Place all ingredients in blender jar and pulse to desired consistency.
Place in separate dish, cover and chill for one hour before serving.
10

recipes (continued)
Andalusia Gazpacho
100 g day old bread
800 g ripe red tomatoes, peeled
1cucumber
2green peppers, seedless
1peeled garlic clove
100ml virgin olive oil
14g vinegar
750ml water Salt to taste
Fill a bowl with water and add bread. Soak.
Cut into pieces the tomatoes, cucumber and peppers; then place in the blender. Blend.
Add the garlic and blend.
Add the soaked bread, salt, vinegar and oil. Blend until homogenous. Add water
little by little until the desired consistency is reached.
Place in a separate container and chill in the refrigerator for at least 4 hours.
Gazpacho
690 g ripe, red tomatoes – seedless
690 g red pepper
460 g red onion
115 g celery
260 g cucumber
5 g minced garlic
60 ml red wine vinegar
475 ml vegetable juice
Cayenne to taste
5 g cumin
Dice red tomatoes, red peppers, red onions, celery and cucumber. Mix together in a large bowl. Separate in half, putting half in the blender.
Add garlic and vinegar to the blender and puree.
Add vegetable juice, cayenne and cumin to blender and blend.
Pour puree over remaining half of vegetables. Refrigerate overnight.
11

europe guarantee
Please keep your receipt, as this will be required for any claims under this guarantee.
This appliance is guaranteed for 3 years after your purchase as described in this document.
During this guaranteed period, if in the unlikely event the appliance no longer functions due to a design or manufacturing fault, please take it back to the place of purchase, with your till receipt and a copy of this guarantee.
The rights and benefits under this guarantee are additional to your statutory rights, which are not affected by this guarantee. Only Holmes Products (Europe) Ltd. (“Holmes”) has the right to change these terms.
Holmes undertakes within the guarantee period to repair or replace the appliance, or any part of appliance found to be not working properly free of charge provided that:
•you promptly notify the place of purchase or Holmes of the problem; and
•the appliance has not been altered in any way or subjected to damage, misuse, abuse, repair or alteration by a person other than a person authorised by Holmes.
Faults that occur through, improper use, damage, abuse, use with incorrect voltage, acts of nature, events beyond the control of Holmes, repair or alteration by a person other than a person authorised by Holmes or failure to follow instructions for use are not covered by this guarantee.Additionally, normal wear and tear, including, but not limited to, minor discoloration and scratches are not covered by this guarantee.
The rights under this guarantee shall only apply to the original purchaser and shall not extend to commercial or communal use.
If your appliance includes a country-specific guarantee or warranty insert please refer to the terms and conditions of such guarantee or warranty in place of this guarantee or contact your local authorised dealer for more information.
Waste electrical products should not be disposed of with Household waste. Please recycle where facilities exist. E-mail us at enquiriesEurope@jardencs.com for further recycling and WEEE information.
Holmes Products (Europe) Limited
1 Francis Grove
London
SW 19 4DT
UK
12

importantes mesures de sécurité
Au moment d'utiliser des appareils électriques, il est recommandé de prendre certaines précautions d'emploi, en particulier:
• |
Lire toute les instructions avant d’utiliser votre Blender “ |
”. |
• |
Ne pas utiliser l'appareil pour tout autre usage que celui |
pour lequel il a été conçu. |
•Si l’appareil est utilisé d’une façon différente à celle indiquée dans ce mode d’emploi, cela pourrait entrainer des dommages et blessures.
•Ne pas utiliser à l’extérieur.
•Cet appareil n'est pas destiné à être utilisé par des personnes (y compris des enfants) dont les capacités physiques, sensorielles ou mentales sont diminuées, ou qui ne disposent pas des connaissances ou de l'expérience nécessaire, à moins qu'elles n'aient été formées et encadrées pour l'utilisation de cet appareil par une personne responsable de leur sécurité.
•Les enfants doivent être surveillés lorsqu’ils utilisent l’appareil ou que l’appareil est utilisé à côté d’eux.
•Toujours utiliser le blender sur une surface sèche et plane.
•Toujours vous assurer que le bol est complet, bien assemblé et en position sur le socle moteur avant utilisation.
•Toujours vous assurer que le couvercle du blender est bien en place avant de mettre le moteur en marche.
•Pour éviter de vous blesser ou d’endommager l’appareil, ne pas plonger vos doigts, mains ou ustensiles dans le récipient pendant qu’il est en marche.Vous pouvez utilisez une spatule pour racler mais seulement si le mélangeur est à l’arrêt.
•Eviter tout contact avec les éléments en mouvement. La lame est coupante. Manipuler avec soin.
•Ne pas utiliser cet appareil de manière continue pendant plus de 5 minutes
•Le moteur contient un fusible que l'on peut remettre à jour et qui protége contre la surchauffe. Si l'appareil s'arrête, tourner le bouton sur la position “O” et débrancher. Une fois l’appareil refroidi, brancher le blender sur la prise murale et continuer l'utilisation normalement.
•Assurez-vous de bien arrêter l’appareil en le mettant sur la position “O” après chaque usage et avant de le débrancher de la prise.Assurez-vous que le moteur est totalement arrêté avant de retirer le bol du socle moteur.
•Eteindre l’appareil et le débrancher avant de changer d’accessoire, avant de s’approcher des éléments en mouvement, avant d’assembler ou de retirer des éléments et après utilisation.
•L'utilisation d'accessoires non recommandés ou vendus par le fabricant peut entraîner électrocution ou blessure.
•Ne pas utiliser l’appareil si la lame est endommagée.
•Ne pas utiliser l'appareil si le fil, la prise ou l'appareil est endommagé ou s'il est tombé. Faites-le vérifier, ajuster ou réparer au Centre Agréé de Service Après-vente le plus proche de chez vous.
•Si le fil électrique est endommagé, veuillez le faire remplacer par le fabricant ou vous adresser à un Centre de Service Après-vente Agréé, ceci afin d’éviter tout risque de blessures.
13

•Ne pas placer cet appareil sur ou à coté d'une plaque à gaz ou électrique chaude ou toute surface en contact avec un four en marche.
•Ne pas laisser le fil électrique dépasser du bord d'une table, d'un plan de travail ou être en contact avec des surfaces chaudes.
•Aliments chauds: ouvrir le couvercle pour faire échapper la vapeur. Assurez-vous de bien maintenir le capuchon loin de vous lorsque vous l’ouvrez. Ne pas mettre les mains sur l’ouverture du couvercle pour éviter de possible brûlures. Lorsque vous manipulez des liquides très chauds, retirer le capuchon d’alimentation et commencer à mélanger doucement puis accélérer la vitesse du blender.
CET APPAREIL EST CONCU UNIQUEMENT POUR UN USAGE DOMESTIQUE.
SAUVEGARDER CES INSTRUCTIONS
instructions concernant le fil électrique
Veuillez suivre les instructions suivantes pour assurer un usage en toute sécurité du fil électrique.
•Ne pas utiliser de rallonge avec cet appareil.
•Ne pas tirer sur, entortiller ou abuser le fil électrique.
Si le fil électrique est endommagé, il doit être remplacé par le fabricant, le Centre Agréé de Service Après-vente ou toute personne qualifiée pour éviter tout risque.
symboles importants

 “Lire les Instructions”, situé sur le couvercle
  “Arrêt”
 Fonction “Pulse”
14

description de l’appareil
1
7
2
3
4 |
8 |
|
|
5 |
9 |
|
10
11
12
6
13
1. Capuchon d’alimentation –Vous permet d’ajouter de petits ingrédients et du liquide pendant que le blender est en marche.
2.Couvercle hermétique
3.Bol en verre d’une capacité de 2L Résistant au choc thermique– Peut passer d’un liquide brulant à de l’eau glacée sans casser.
4.Ensemble de lames 4+2 –Pour plus de précision, peut aussi bien couper délicatement que pulvériser de la glace.
5.Anneau d’étanchéité – Maintient l’espace entre le bol et le socle moteur parfaitement étanche.
6.Voyant lumineux de marche (couleur ambre)
7.
 “Lire les Instructions”
8.Bol gradué pour mesurer
9.Capuchon du fond – Fixe les lames sur le bol en parfaite sécurité.
10. Base du bol
11. Socle moteur
12. Bouton de contrôle de vitesse modulable – Sans effort, vous permet de changer de vitesse pour donner la puissance nécessaire durant la préparation des aliments.
13. ( ) Bouton Pulse –Vous donne de courte poussée de puissance.
15
avant d’utiliser votre blender
•Avant d’utiliser votre blender VillaWare® pour la première fois, veuillez vous reporter au paragraphe intitulé “après utilisation”pour désassembler le bol et ses éléments et nettoyer le couvercle,le couvercle d’alimentation,les lames et le capuchon du fond à l’eau chaude savonneuse ou sur la partie supérieure du lave-vaisselle.Rincer et bien sécher.
INSTRUCTIONS:
LES LAMES SONT TRES COUPANTES. MANIPULER AVEC SOIN.
Suivre les instructions ci-dessous avant de commencer à utiliser votre Blender VillaWare®:
Schéma 1 |
|
Schéma 2 |
|
Schéma 3 |
|
|
|
|
|
• Retourner le bol de telle |
• Placer l’anneau d’étanchéité |
manière que l’ouverture |
autour de la base des lames |
la plus petite se trouve |
(Schéma 2). |
au dessus ( Schéma 1). |
|
Schéma 4 |
|
Schéma 5 |
|
|
|
• S’assurer que l’anneau |
• Placer la base autour du |
d’étanchéité est bien en |
bol tête en bas (Schéma 5). |
place entre le bol et la base |
|
des lames (Schéma 4). |
|
•Placer la base des lames au dessus de l’ouverture du bol. Pencher pour faire entrer les lames. REMARQUE: il est possible que les lames frottent un peu contre les parois du bol (Schéma 3).
Schéma 6
•Placer le capuchon du fond sur l’ouverture du bol et serrer en tournant dans le sens des aiguilles d’une montre (Figure 6).
Schéma 7 |
|
Schéma 8 |
|
|
|
•Placer l’ensemble du bol sur le socle moteur
(Schéma 7). La courbure de la base du bol doit se trouver aligner avec le cadran de contrôle.
•Mettre le couvercle et le capuchon d’alimentation sur le bol (Schéma 8).
16

mode d’emploi
1. Préparer les ingrédients.
2.Retirer le couvercle et mettre les ingrédients dans le bol.
3.Votre blender a un capuchon d’alimentation qui vous permet d’ajouter des ingrédients pendant que l’appareil est en marche (voir schéma 9).
4.Mettre le bouton de contrôle sur la position d’arrêt “O” et brancher le fil électrique sur la prise murale.
5.Le bouton de contrôle de vitesse vous permet de contrôler totalement la puissance (Schéma 10). Sans aucun effort, vous accélérez ou ralentissez en fonction de ce que vous mixez, vous pouvez aussi bien hacher délicatement qu’écraser de la glace.
6.Tourner le bouton de contrôle de vitesse dans le sens des aiguilles d’une montre pour accélérer et augmenter la puissance et dans le sens inverse des aiguilles d’une montre pour ralentir.
7.Pour utiliser la fonction pulse, maintenir le bouton de contrôle sur la position d’arrêt “O” et appuyer sur la touche “ ” qui se trouve au
centre du panneau de contrôle (Schéma 11 ). |
Maintenir pendant |
1-3 secondes et relâcher. |
|
Schéma 9
Schéma 10
Schéma 11
IMPORTANT: NE PAS UTILISER LE Blender DE MANIERE CONTINUE PENDANT PLUS DE 5 MINUTES.
FONCTION DE REMISE A JOUR
1. Le moteur contient un fusible que l'on peut remettre à jour et qui protège contre la surchauffe.
2.Si l'appareil s'arrête après une utilisation continue, tourner le bouton sur la position “O” et débrancher.
3.Attendre 5-10 minutes que le blender refroidisse.
4.Brancher le blender sur la prise murale et continuer l'utilisation normalement.
5.Si le blender ne se met toujours pas en marche, répéter l’opération et attendre 10 minutes de plus avant de l’utiliser.
17

après utilisation
Avant de nettoyer et ranger votre blender, veuillez suivre les instructions ci-dessous pour désassembler le bol et les lames.
•Eteindre le blender, tourner le bouton sur la position “O” et débrancher.
•Soulever le bol vers le haut et le retirer du socle moteur.
•Retirer le couvercle et vider le bol. Si nécessaire, utiliser une spatule en caoutchouc pour gratter les résidus alimentaires sur les bords du bol.
•Mettre le bol dans l’évier, tête en bas pour enlever tout résidu.
•Dévisser le capuchon du fond en tournant dans le sens inverse des aiguilles d’une montre et le retirer (Schéma 12).
•Retirer la base du bol.
•Saisir les lames par la base. Faire pencher pour retirer (Schéma 13). REMARQUE: il est possible que les lames frottent un peu la surface du bol.
•Retirer l’anneau d’étanchéité qui se trouve autour de la base des lames.
Schéma 12
Schéma 13
LES LAMES SONT EXTREMEMENT COUPANTES. MANIPULER AVEC SOIN.
nettoyage
•Eteindre le blender en tournant le bouton sur “O” et débrancher.
•Désassembler le bol en suivant les instructions qui se trouvent dans le paragraphe intitulé “après utilisation”. Tous les éléments du bol – à l’exception de la basesont résistants au lave-vaisselle. Le bol en verre,les lames et le capuchon du fond devraient aller sur la partie supérieure du lave-vaisselle.Mettre l’anneau d’étanchéité dans le bas du lave-vaisselle.Ces éléments peuvent aussi être lavés à l’eau chaude savonneuse.Rincer et bien sécher.
•Essuyer le socle moteur et la base du bol avec un chiffon humide ou sec.
•Ne pas plonger le socle moteur dans de l’eau ou tout autre liquide.
•Suivre les instructions qui se trouvent dans le paragraphe intitulé “avant d’utiliser votre blender” pour assembler le bol.
rangement
•Toujours assembler le bol avant de le ranger.
•Laisser le couvercle entr’ouvert pour qu’il ne reste aucune odeur.
ATTENTION: NE JAMAIS METTRE LE BOL, OU TOUT AUTRE ELEMENT, AU FOUR A MICRO-ONDES. NE PAS CONSERVER D’ALIMENTS OU DE LIQUIDE DANS LE BOL.
18

conseils et suggestions
•Commencer avec le liquide dans le bol, à moins que la recette le stipule différemment.
•Ne pas retirer le liquide pendant que le blender est en marche. Retirer le capuchon d’alimentation pour ajouter de petits ingrédients pendant que le blender est en marche.
•Couper tous les fruits et les légumes qui sont d’une consistance ferme. Faire cuire et couper la viande, le poisson et les fruits en morceaux. Couper tout type de fromage en morceaux.
service aux consommateurs
Holmes Products France 1015, Rue du Maréchal Juin Z.IVaux - Le - Pénil 77000 Melun – France Phone: +33 1 64 10 45 80 Fax: +33 1 64 10 02 32
FRANCE - SERVICE CONSOMMATEURS 0800 311 2198
Pour enregistrer votre produit en ligne, veuillez vous rendre sur - http://www.villaware.fr/ProductRegistration.aspx
19
recettes
Boisson à Base de Mûres et Melon
460 g de mûres
460 g de melon blanc des Antibes
75 g de sucre
Mettre tous les ingrédients dans le blender et mélanger jusqu'à la consistance d’une purée.
Boisson Glacée à Base de Bananes et Mangues
2 petits verre de rhum (optionnel)
2 bananes
1 mangue, dénoyautée
250 ml de lait de coco non sucré
250 ml de lait
28 g de jus de citron
3 glaçons
Mettre tous les ingrédients dans le blender dans l’ordre énoncé ci-dessus. Mélanger jusqu'à la consistance désirée.
Boisson aux Fruits
20 cerises, dénoyautées
1 pomme, coupée en 4
1 banane
1 kiwi
1 poignée de myrtilles
Du jus de Pomme
Mettre tous les ingrédients à l’exception du jus de pomme dans le blender. Mélanger.
Ajouter le jus de pomme en le versant dans l’orifice du capuchon, continuer de mélanger jusqu'à obtention de la consistance désirée.
Soupe aux Légumes
400 g de bouillon de poule La pulpe de 2 carottes
La pulpe d’1 courgette
La pulpe d’1 poivron (choisir la couleur en fonction du gout désiré)
La pulpe de 2 tiges de céleri
Pour obtenir la pulpe, passer les légumes à l’extracteur de jus. Le jus obtenu peut être utilisé dans une variété de recettes.
Mélanger la pulpe et le bouillon dans le blender, en utilisant la fonction pulse pour obtenir la consistance désirée. Verser dans une casserole et faire bouillir.
Soupe à la Tomate Grillée
4-5 grosses tomates, enlever le cœur et couper en 4
1 gros oignon, peler et couper en 4
4 gousses d’ail entières
2 petits poivrons, enlever le cœur et couper en 4
1 carotte, peler et couper en 4 dans le sens de la longueur
60 ml d’huile d’olive Sel à volonté Poivre à volonté
1 bâton de cannelle
5 cardamomes verts
5 g de graines de coriandre
5 g de graines de cumin
2.5 g de graines de moutarde Flocons de poivron rouge à volonté 475 ml d’eau
2.5 g de marsala, si désiré
1.25 g de safran Préchauffer le four à 190° C.
Dans un grand bol, ajouter tous les ingrédients à l’exception de l’eau, du marsala et du safran. Mélanger doucement. Etaler les ingrédients en une seule couche sur une grande plaque de cuisson. Faire griller au four pendant 45 minutes.
Retirer du four et enlever le cardamome et le bâton de cannelle.
Protéger d’abord vos doigts puis presser chaque gousse d’ail sur le bout pour libérer le contenu crémeux, et verser dans le bol du blender. Jeter ce qui reste de l’ail.
Mettre le reste des ingrédients que vous avez grillés ainsi que l’eau dans le bol du blender. En faire une purée. Pour retirer la pulpe, passer le mélange dans un tamis.
Ajouter le marsala et le safran et mélanger. Servir immédiatement.
Coulis de Mangue
1 mangue bien mûre, coupée en dés
28 g de sucre brun
28 g d’eau
1 petit citron, épluché
2.5 g de cardamome
Passer le citron à travers de l’extracteur de jus. Dans le blender ajouter le jus au reste des ingrédients et en faire une purée jusqu'à la consistance désirée.
20
 Loading...