

Page 1
Classic
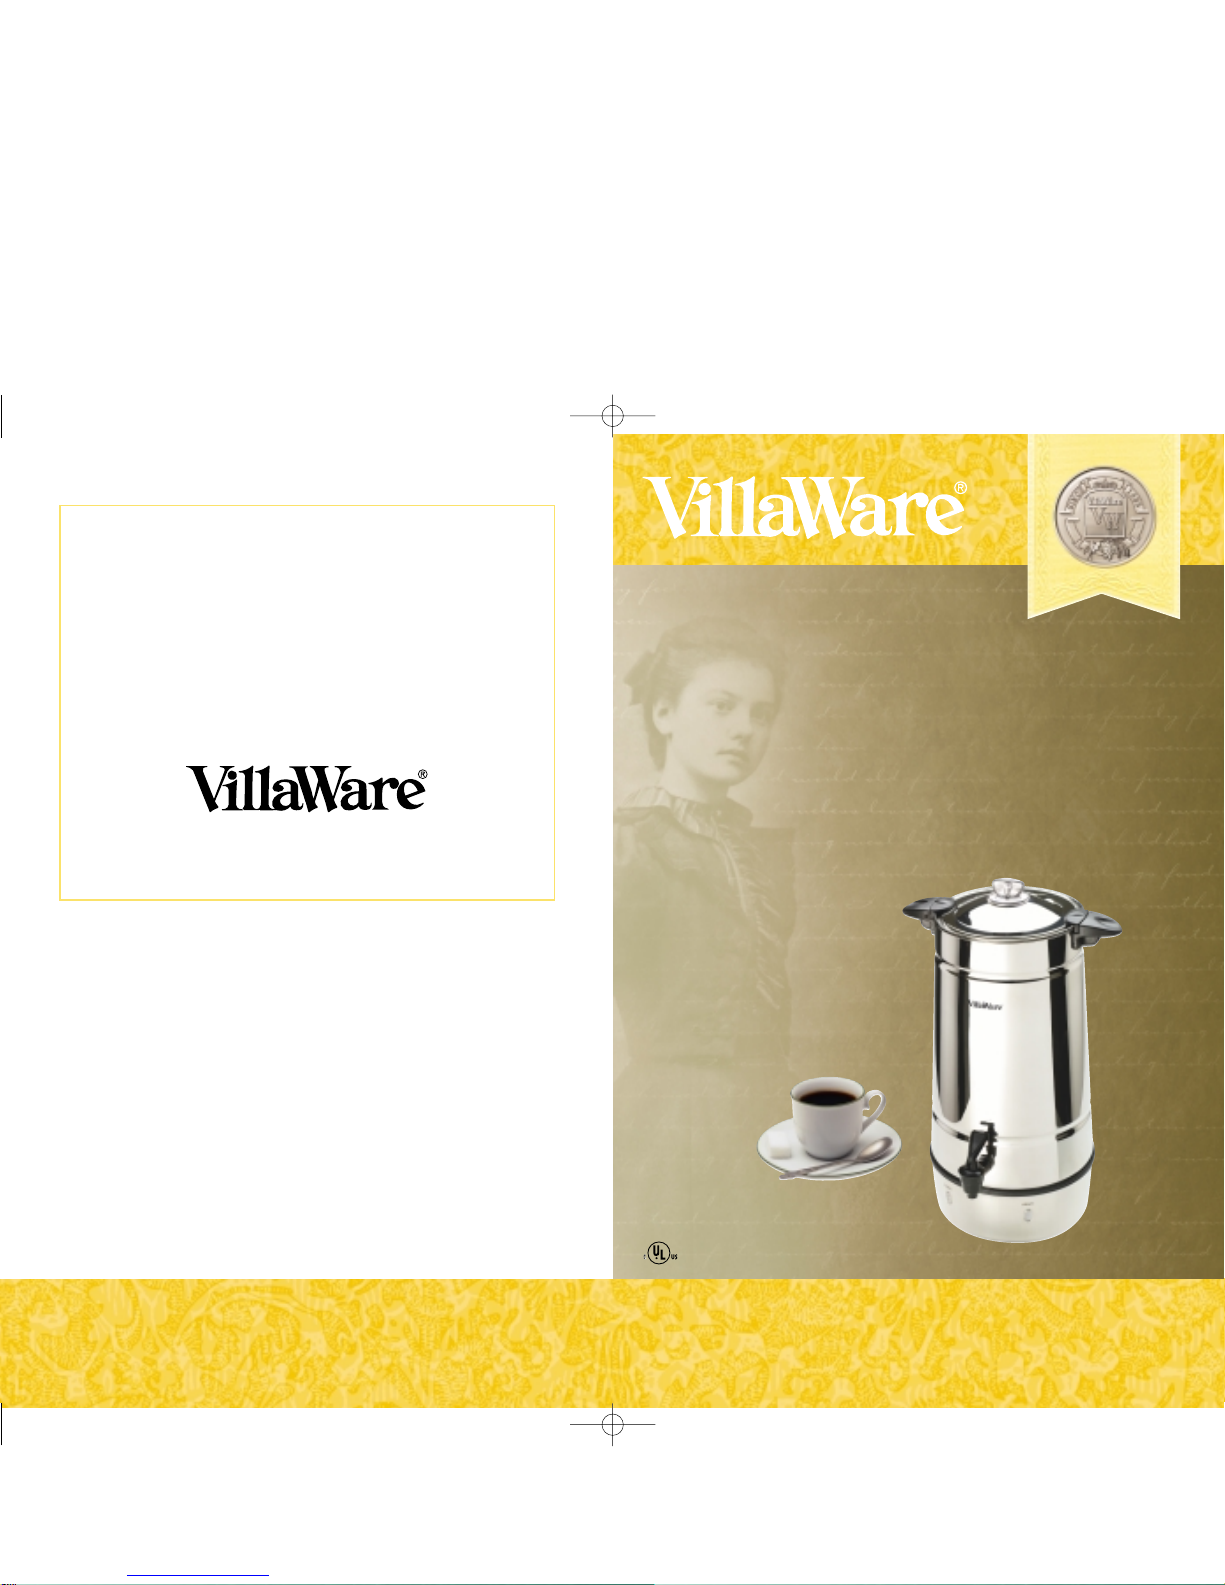
Coffee Urn
Serve freshly percolated coffee to guests in this
beautifully tapered stainless steel appliance.
no. 2375
FULL ONE YEAR WARRANTY
This VILLAWARE product is protected against defects in materials
and workmanship for one year from the date of original purchase. If the
product proves to be defective in materials or workmanship during this
period, it will be repaired free of charge.
This warranty does not apply to damage resulting from misuse, accidents
or alterations to the product, or to damages incurred in transit.
This warranty does not apply to cords or plugs.
All returns must be carefully packed and made transportation prepaid
with a description of the claimed defect.
Belgian & Classic Wa±e Makers
Pizzelle Bakers
Classic Electric Skillets
UNO
™
Classic 2 & 4 Slice Toasters
UNO
™
Grills & Griddles
Classic Co≠ee Makers
Classic Crepe Makers
Power Grinder
™
Electric Food Grinders
Disney Licensed Series by VillaWare
®
VillaWare®Food Strainer
Imperia
®
& Al Dente™Pasta Machines
Cookie Presses
Pizza Stones
One-Pot
™
Pasta & Sauce Cooker
Espresso Co≠ee Pots
Italian Style Gadgets & Utensils
...and hundreds more Classic Italian
Kitchenware products from VillaWare
®
For additional information on the VillaWare product line, see your dealer or visit our website
at www.villaware.com
Other Fine VillaWare®Products...
© Copyright VillaWare Manufacturing Company, Cleveland, Ohio 44114. All rights reserved.
No part of this booklet may be reproduced without the written consent of VillaWare Mfg. Co.
VillaWare is a trademark of VillaWare Mfg. Co. Printed in China.
VillaWare Manufacturing Co.
3615 Superior Ave. #44
Cleveland, Ohio 44114
Directions
2375_Booklet.qxd 8/23/02 10:11 AM Page 1
Page 2

17. Do not operate this appliance after it malfunctions or if the power cord or plug is damaged.
There are no user serviceable parts. The appliance must be returned to our VillaWare
Manufacturing Company for repair or replacement, as special tools are required.
18. Always operate the Coffee Urn from a power source of the same voltage, frequency and
rating as indicated on the Product Rating Plate.
19. Do not use appliance for other then intended use.
SAVE THESE INSTRUCTIONS
FOR HOUSEHOLD USE ONLY
SHORT CORD INSTRUCTIONS
CAUTION: A short power supply cord is provided to reduce the risk of personal injury
resulting from becoming entangled in or tripping over a longer cord. Extension cords are
available from local hardware stores and may be used if care is exercised in their use. If an
extension cord is required, special care and caution is necessary. Also, the marked electrical
rating of the extension cord should be at least as great as the electrical rating of the appliance;
the extension cord should be a grounded-type 3-wire cord and the cord should be arranged
so that it will not drape over the countertop or tabletop where it can be pulled on by children
or tripped over unintentionally.
GROUNDED TYPE PLUG: This appliance has a 3-prong grounded type plug. This plug
will only fit into an electrical outlet made for a 3-prong plug. This is a safety feature. If the
plug should fail to fit the outlet, contact a qualified electrician. Do not attempt to defeat
this safety feature.
ELECTRIC POWER: If the electric circuit is overloaded with other appliances, your
appliance may not operate properly. It should be operated on a separate electrical circuit
from other appliances.
ACACACACACACACACACA 3 CACACACACACACACACACA
When using electrical appliances, basic safety precautions should always be followed to reduce
the risk of fire, electric shock and injury to persons, including the following:
1. READ ALL INSTRUCTIONS. Keep the instructions handy for future reference.
2. To protect against electrical hazards, do not immerse the plug, power cord or Coffee Urn
in water or any other liquid. Do not use in the bathroom or near any source of water.
3. Do not use outdoors.
4. Do not touch hot surfaces. Use the handle or knobs.
5. Take care when operating the tap or removing the lid. This Coffee Urn generates heat
and steam at a high temperature which will escape immediately when the tap or lid is
opened. Do not remove the lid while water is being heated. Scalding may occur if the
lid is removed during the brewing cycles.
6. Water can remain hot for a considerable time after boiling and can present a scald
hazard. Keep the power cord and Coffee Urn away from the edge of worktops and
out of the reach of children.
7. Do not allow the power cord to hang over the edge of the table or worktop or
anywhere it may be accidentally caught or tripped over.
8. Do not operate the Coffee Urn on an inclined surface. Do not move the Coffee Urn
while it is switched ON. Failure to observe these cautions may result in damage to the
Coffee Urn.
9. Close supervision is necessary when any appliance is used by or operated near children
or handicapped persons. Young children should be supervised to ensure that they do not
play with the Coffee Urn. This Coffee Urn is not intended for use by young children
or handicapped persons.
10. Avoid leaving the Coffee Urn unattended when in use.
11. Unplug from the power socket when not in use, before repositioning and before cleaning.
Allow the Coffee Urn to cool down fully before cleaning and before storing away.
12. Ensure that the lid is fitted properly, otherwise the Coffee Urn will not function properly.
13. Do not allow the water level to rise above the highest cup mark. If the Coffee Urn is
overfilled, boiling water may be ejected.
14. Extreme caution must be used when moving the Coffee Urn containing hot water
or coffee. Use the carry handle and protective gloves or other similar articles when
moving the Coffee Urn.
15. Do not place the Coffee Urn or power cord on or near any hot surface, hotplate,
hot hob or burner.
16. Do not use the Coffee Urn for any purpose other than heating water to make coffee.
ACACACACACACACACACA 2 CACACACACACACACACACA
IMPORTANT SAFEGUARDS
2375_Booklet.qxd 8/23/02 10:11 AM Page 2
Page 3

HOW TO USE
TO PREPARE
1. Remove the lid by rotating counter clockwise. Remove pump tube, spreader lid and
basket. Check to see that spigot is closed.
2. Fill the Coffee Urn with the required amount of fresh cold water. Use only cold tap
water as this makes the best coffee plus the automatic brewing cycle is designed to be
used with cold water.
3. DO NOT OVERFILL OR UNDERFILL. Fill according to markings on inside of
Urn for number of cups desired. The capacity in cups is marked on the inside wall of
the Coffee Urn. Do not attempt to use the Coffee Urn if the water level is below the
4 cups mark and do not fill it above the highest cup mark. If the Coffee Urn is overfilled,
boiling water may be ejected, causing a scalding hazard.
4. Wet the basket to keep small particles of coffee from sifting through. Put the required
amount of ground coffee in the coffee basket. The basket markings correspond with the
cup markings on the water level indicator. The markings are given purely as a guide. You
will need to experiment to find the quantities necessary to suit the blend you use and your
own taste. Use regular or percolator grind, but do not use drip or finely ground coffee.
5. When filling the basket, put a finger over the center tube to prevent coffee grounds from
falling through the tube.
6. Lower the coffee basket on to the tube until the bottom of the basket rests on the spring.
7. Hold the tube and coffee basket together by the top of the tube and lower into the
Coffee Urn so that the bottom of the tube fits on the element hole at the center of the
inside base of the Coffee Urn.
8. Place the perforated cover on top of the coffee basket. Replace the lid by rotating
clockwise making sure it is securely locked. The two arrow heads on the right hand lid
tab handles must be aligned in its correct position.
9. NOTE: For the lid to close properly, the tube must be centered.
TO BREW
1. Check that there is sufficient water in the Coffee Urn. Plug into the wall socket. The
red power light comes ON. Take care not to spill any water.
2. The element will boil a small amount of water rapidly, forcing it up the tube and into
the lid knob where it will be directed down on to the basket lid and into the coffee.
While this water is percolating through the coffee, the element will boil more water
and force it up the tube.
3. Coffee brewing is faster than a cup a minute. If brewing a full urn of coffee, filled to 45 cups,
brewing will take about 40 minutes.
ACACACACACACACACACA 5 CACACACACACACACACACA
QUALITY FEATURES OF THE CLASSIC COFFEE URN
Serve freshly percolated coffee to guests in this beautifully tapered stainless steel appliance.
Brew a large batch of quality perked coffee and serve it without the institutional appearance
of other urns.
S
45 cup capacity
S
Heavy gauge 18/10 stainless steel construction
S
Cool touch handles
S
High polish exterior, sleek tapered design
S
All stainless steel internal coffee basket, basket filter lid and stem.
S
Secure locking lid for safety
S
Non-drip tap, 2-way flow lever
S
Automatic thermostat control
S
Boil dry shut off protection
S
Indicator light
S
Dimensions: 18" height, 8" base diameter
BEFORE USE
Before making coffee for the first time or if the Coffee Urn has been out of use for a long
time, it should be cleaned to remove dust, etc.
Remove the lid, coffee basket, cover and the tube and wash them in hot soapy water, then
rinse thoroughly in clean cold water.
Rinse the inside of the Coffee Urn with clean cold water but do not immerse.
GETTING TO KNOW YOUR COFFEE URN
ACACACACACACACACACA 4 CACACACACACACACACACA
LOCKING TABS
BASKET
SPRING
SIDE HANDLES
BODY
TAP
READY LIGHT (GREEN)
LID WITH CLEAR TOP KNOB
SPREADER LID
PUMP TUBE ASSEMBLY
TAP LEVER
POWER LIGHT (RED)
BASE HOUSING
2375_Booklet.qxd 8/23/02 10:11 AM Page 4
Page 4

4. When coffee brewing is complete, percolating will stop and the ready light will come
ON. The Coffee Urn automatically switches to the “Keep Warm” setting to preserve
fresh tasting coffee at hot, ready to serve temperature. In the Keep Warm mode, the red
power light on the base of the Coffee Urn will go OFF and the green ready light will go
ON, indicating that your coffee is ready. The green power light will stay ON and the
Coffee Urn will keep your coffee hot while it is plugged into the electrical outlet.
5. To control the flow of water from the tap, gently depress and hold the tap handle to
allow the water to continuously flow. Then lift the tap handle until it locks in an upright
position. Reset to the normal position to stop the flow of water.
6. This Coffee Urn is fitted with an automatic safety cut off, which will turn the element
OFF in case of a boil dry situation. If the safety cut off operates, the red power light will
go OFF. Unplug from the power socket, allow the Coffee Urn to cool for a few
minutes, then add a minimum of 2 quarts of cold water. Replace the lid and make sure
it is locked in its correct position. Wait 5 to 10 minutes more to give the Coffee Urn
element and cut off time to cool. Then reconnect the Coffee Urn to the Power Supply
for normal operation.
7. For best flavor remove the following internal parts when brewing is complete: coffee
basket, spreader lid and pump tube.
8. Unplug the Coffee Urn when only 1 or 2 cups of coffee remain.
9. To preserve taste it is not recommended to reheat coffee.
CARE AND CLEANING
1. After each use and before washing, unplug power cord from wall outlet.
2. Use tap to drain away any remaining coffee and allow the percolator to cool down fully.
Use caution, since any remaining coffee may still be hot.
3. Remove lid and all internal parts: coffee basket, spreader lid and percolator tube, carefully.
4. Discard used coffee grounds, using caution since they may still be hot.
5. Wash the lid, coffee basket, cover and tube in hot soapy water, rinse in clean cold water,
and dry thoroughly.
6. Rinse the inside of the Coffee Urn with clean cold water and dry thoroughly. Do not
let the detergent get inside the Coffee Urn. DO NOT IMMERSE THE BASE OF
THE COFFEE URN IN WATER.
7. All internal parts plus lid may be washed in the dishwasher. If any coffee grounds
become lodged inside of the pump tube, pass it under running water to remove or use
a wooden tooth pick or other small tool to remove.
ACACACACACACACACACA 6 CACACACACACACACACACA
8. Wipe outside of urn with damp cloth and dry with a towel. Do not use harsh or
abrasive cleaners, solvents, or pads on the outside. Use care in cleaning the inside and
the internal parts of the Coffee Urn as scratching can occur.
9. Assemble the Coffee Urn to store away. Leave the lid loose so air can circulate and dry
further, in case inside parts are still a little wet.
DESCALING
Scale build-up will cause the element to overheat, reducing its working life. It may also cause
the safety cut off to operate prematurely, switching the Coffee Urn OFF before the water
boils. To minimize scale build-up:
1. Empty the Coffee Urn after each use.
2. Do not allow water to stand in the Coffee Urn overnight.
3. Use filtered water instead of ordinary tap water.
4. Descale the Coffee Urn periodically. Brewing time may become longer as scaling builds
up on the heater well part. Also, there may be some coffee stains and accumulation of
oils that may cause a bitter taste after repeated use. To clean and descale, use a coffee
stain remover, following directions for the cleaner. Dip-It™is one such brand of this type
of special cleaning product. Note: Cleaning and descaling may be necessary as often as
once a month in areas of very hard water.
5. When descaling, follow the instructions on the package of the descaler. When descaling
has finished, empty the Coffee Urn and rinse it out several times with fresh water. Then
fill with fresh water, boil and discard the water. This should ensure that no chemical
residues are left in the Coffee Urn.
Thank you for purchasing your
Classic Coffee Urn.
ACACACACACACACACACA 7 CACACACACACACACACACA
2375_Booklet.qxd 8/23/02 10:11 AM Page 6
 Loading...