


VSD243
Quick Start Guide
Guide rapide de début
Guía de inicio rápido
Schnellstartanleitung
Инструкция по началу работы

Compliance Information
Please read before proceeding
• Use only the batteries and power adapter provided by the manufacturer. The use of unauthorized accessories may void
your warranty.
• Do not store your device in temperatures higher than 50°C (122°F).
• The operating temperature for this device is from 0°C (32°F) to 35°C (95°F).
Connect the power cord from the unit to a grounded AC outlet. Ensure that the power source is within the operating
voltage of the display. The operating voltage can be found on the device label. The device uses either 110 to 127 volts
alternating voltage or 220 to 240 volts alternating voltage and 50/60 Hz.
CAUTION: To avoid damage to the unit, be sure to use only the power cord that came with the unit.
CE Conformity for European Countries
The device complies with the relevant section of the EMC Directive 2014/30/EU, Low Voltage Directive 2014/35/
EC, Eco-Design Directive 2009/125/EC, RoHs Directive 2011/65/EU, WEEE Directive 2012/19/EU, and Radio
Equipment Directive 2014/53/EU
https://www.viewsonic.com/us/ifp2410.html#downloads
European Union Regulatory Conformance
The equipment complies with the RF Exposure Requirement 2014/53/EU, Council Recommendation of 12 June 2014 on
the limitation of exposure of the general public to electromagnetic elds (0-300 GHz). This equipment meets the following
conformance standards: EN301489-1, EN301489-17, EN55032/35, EN62368-1, EN300328.
Declaration of RoHS2 Compliance
This product has been designed and manufactured in compliance with Directive 2011/65/EU of the European Parliament
and the Council on restriction of the use of certain hazardous substances in electrical and electronic equipment (RoHS2
Directive) and is deemed to comply with the maximum concentration values issued by the European Technical Adaptation
Committee (TAC) as shown below:
Substance Proposed Maximum Concentration Actual Concentration
Lead (Pb) 0.1% < 0.1%
Mercury (Hg) 0.1% < 0.1%
Cadmium (Cd) 0.01% < 0.01%
Hexavalent Chromium (Cr
Polybrominated biphenyls (PBB) 0.1% < 0.1%
Polybrominated diphenyl ethers (PBDE) 0.1% < 0.1%
Bis(2-ethylhexyl) phthalate (DEHP) 0.1% < 0.1%
Butyl benzyl phthalate (BBP) 0.1% < 0.1%
Dibutyl phthalate (DBP) 0.1% < 0.1%
Diisobutyl phthalate (DIBP) 0.1% < 0.1%
Certain components of products as stated above are exempted under the Annex III of the RoHS2 Directives as noted below:
Examples of exempted components are:
1. Lead as an alloying element in aluminium containing up to 0.4% lead by weight.
2. Copper alloy containing up to 4% lead by weight.
3. Lead in high melting temperature type solders (i.e. lead-based alloys containing 85% by weight or more lead).
4. Electrical and electronic components containing lead in a glass or ceramic other than dielectric ceramic in capacitors,
e.g. piezoelectronic devices, or in a glass or ceramic matrix compound.
Product disposal at end of product life
ViewSonic respects the environment and is committed to working and living green. Thank you for being part of Smarter,
Greener Computing. Please visit ViewSonic website to learn more.
USA & Canada: http://www.viewsonic.com/company/green/recycle-program/
Europe: http://www.viewsoniceurope.com/eu/support/call-desk/
Taiwan: http://recycle.epa.gov.tw/
Copyright Information
Android, Google, Google Play, the Google Play logo and other marks are trademarks of Google Inc.
6+
) 0.1% < 0.1%
i

Caution
IC Caution:
This device complies with Industry Canada licence-exempt RSS standard(s).
Operation is subject to the following two conditions:
(1) This device may not cause interference, and
(2) This device must accept any interference,
including interference that may cause undesired operation of the device.
CAN ICES-003(B) / NMB-003(B)
FCC Caution:
This device complies with part 15 of the FCC Rules. Operation is subject to the condition that this device does not
cause harmful interference (1) this device may not cause harmful interference, and (2) this device must accept any
interference received, including interference that may cause undesired operation.
Any changes or modications not expressly approved by the party responsible for compliance could void the
user's right to operate the equipment.
NOTE: This equipment has been tested and found to comply with the limits for a Class B digital device, pursuant to
Part 15 of the FCC Rules. These limits are designed to provide reasonable protection against harmful interference
in a residential installation. This equipment generates, uses and can radiate radio frequency energy and, if not
installed and used in accordance with the instructions, may cause harmful interference to radio communications.
However, there is no guarantee that interference will not occur in a particular installation.
If this equipment does cause harmful interference to radio or television reception,
which can be determined by turning the equipment o and on, the user is encouraged to try to correct the
interference by one or more of the following measures:
1. Reorient or relocate the receiving antenna.
2. Increase the separation between the equipment and receiver.
3. Connect the equipment into an outlet on a circuit dierentfrom that to which the receiver is connected.
4. Consult the dealer or an experienced radio/TV technician for help.
The device has been evaluated to meet general RF exposure requirement. The device can be used in portable
exposure condition without restriction.
FCC ID: GSS-VS16340
ii
Informations de conformité
Veuillez lire la section suivante avant de continuer
• Utilisez seulement les batteries et l’adaptateur secteur fournis par le fabricant. L’utilisation d’accessoires non autorisés
peut annuler la garantie.
• Ne rangez pas votre téléphone dans des endroits où la température est plus de 50ºC ou 122ºF.
• La température recommandée pour cet appareil est entre 0°C (32°F) et 35ºC (95°F).
Branchez le cordon d'alimentation de l'appareil sur une prise secteur avec terre. Veillez à ce que la tension de la source
d'alimentation soit dans les limites de fonctionnement de l'écran. La tension de fonctionnement est indiquée sur l'étiquette de
l'appareil. Le dispositif utilise soit 110-127 VAC ou 220 à 240 V CA, 50/60 Hz.
ATTENTION: Pour éviter d'endommager l'appareil, utilisez uniquement le cordon d'alimentation qui est fourni avec l'appareil.
Conformité CE pour les pays européens
Cet appareil est conforme à la directive EMC 2014/30/UE et à la directive sur les basses tensions 2014/35/UE, de
la directive sur l'éco-conception 2009/125/CE, de la directive RoHS 2011/65/EU, de la directive DEEE 2012/19/UE
et de la directive relative aux équipements radioélectriques 2014/53/UE
https://www.viewsonic.com/us/ifp2410.html#downloads
Certicat de conformité dans l'Union Européenne
Cet appareil répond aux directives d'exposition RF 2014/53/UE, Recommandation du Conseil du 12 Juin 2014, sur la
limitation d'exposition du public général aux champs électromagnétiques (0-300 GHz). Cet appareil est conforme aux
normes de conformité suivantes : EN301489-1, EN301489-17, EN55032/35, EN62368-1, EN300328.
Déclaration de conformité RoHS2 (LSDEEE2)
Ce produit a été conçu et fabriqué dans le respect de la directive 2011/65/EU du Parlement Européen et du Conseil relative
à la limitation de l’utilisation de certaines substances dangereuses dans les équipements électriques et électroniques
(Directive RoHS2 - LSDEEE2) et il est déclaré respecter les valeurs de concentration maximum dénies par le Comité
technique d’adaptation (TAC) européen, qui sont les suivantes:
Substance Concentration maximale proposée Concentration réelle
Plomb (Pb) 0.1% < 0.1%
Mercure (Hg) 0.1% < 0.1%
Cadmium (Cd) 0.01% < 0.01%
Chrome hexavalent (Cr6+) 0.1% < 0.1%
Polybromobiphényle (PBB) 0.1% < 0.1%
Polybromodiphénylséthers (PBDE) 0.1% < 0.1%
Phtalate de bis (2-éthylhexyle) (DEHP) 0.1% < 0.1%
Phtalate de butyle et de benzyle (BBP) 0.1% < 0.1%
Phtalate de dibutyle (DBP) 0.1% < 0.1%
Diisobutyl phthalate (DIBP) 0.1% < 0.1%
Certains composants de produits mentionnés ci-dessus ne sont pas soumis à ces limitations, conformément aux dispositions
de l’Annexe III de la Directive RoHS2 (LSDEEE2). Il s’agit des composants suivants:
Exemples de composants exemptés:
1. Plomb en tant qu’élément d’alliage de l’aluminium jusqu’à 0,4 % du poids.
2. L’alliage de cuivre contient jusqu’à 4 % de plomb.
3. Soudures à haute température (les alliages basés sur le plomb contiennent du plomb à 85 % ou plus).
4. Composants électriques et électroniques contenant du plomb dans le verre ou des porcelaines. (appareils piézoélectriques ou dans un composant de matrice de verre ou de céramique).
Elimination du produit en n de vie
ViewSonic respecte l’environnement et fait des eorts allant dans le sens d’un environnement de travail et de vie
écologiques. Merci d’oeuvrer aussi pour une informatique plus intelligente et plus écologique. Pour en savoir plus, veuillez
visiter le site web de ViewSonic.
Etats-Unis et Canada: http://www.viewsonic.com/company/green/recycle-program/
Europe: http://www.viewsoniceurope.com/eu/support/call-desk/
Taiwan: http://recycle.epa.gov.tw/
Informations de copyright
Android, Google, Google Play, la Google Play logo et les autres marques sont des marques commerciales de Google Inc.
iii

Attention
IC Attention:
Cet appareil est conforme aux normes RSS exemptes de licence d'Industrie Canada.
L'exploitation est soumise aux deux conditions suivantes :
(1) Cet appareil ne doit pas provoquer d'interférences, et
(2) Cet appareil doit accepter toute interférence,
y compris les interférences susceptibles de provoquer un fonctionnement indésirable de l'appareil.
CAN ICES-003(B) / NMB-003(B)
FCC Caution:
Cet appareil est conforme à l’article 15 des Règlements FCC. Son utilisation est soumise aux deux conditions
suivantes : (1) cet appareil ne doit pas causer d’interférence nuisible et(2) cet appareil doit accepter toutes les
interférences reçues, y compris les interférences pouvant causer un fonctionnement non souhaité.
Tout changement ou modication non expressément approuvé par la partie responsable de la conformité pourrait
annuler le droit de l'utilisateur à utiliser l'équipement.
REMARQUE: Cet équipement a été testé et déclaré conforme aux limites pour un appareil numérique de classe
B, conformément à la section 15 de la réglementation de la FCC. Ces limitations sont stipulées aux ns de garantir
une protection raisonnable contre les interférences nuisibles en installation résidentielle. Cet équipement génère,
utilise et peut émettre des radiofréquences et, s'il n'est pas installé et utilisé conformément aux instructions, peut
provoquer des interférences nuisibles aux communications radio. Cependant, nous ne pouvons garantir que des
interférences ne se produiront pas dans une installation particulière.
Si cet appareil cause des interférences nuisibles à la réception de la radio ou de la télévision, ce que vous pouvez
facilement observer en éteignant et en rallumant l’appareil, nous vous encourageons à prendre une ou plusieurs
des mesures correctives suivantes :
1. Modier l’orientation ou la position de l’antenne de réception.
2. Augmenter l’espace entre l’équipement et le récepteur.
3. Brancher l’équipement sur une autre prise ou un autre circuit que celle/celui sur laquelle/lequel le récepteur est
branché.
4. Consulter le revendeur ou un technicien radio/télévision expérimenté pour obtenir de l’aide.
L'appareil a été évalué pour répondre aux exigences générales d'exposition aux RF. L'appareil peut être utilisé dans
des conditions d'exposition portable sans restriction.
FCC ID: GSS-VS16340
iv

Información de conformidad
Lea estas instrucciones antes de continuar
• Use exclusivamente las baterías y el adaptador de alimentación suministrados por el fabricante. El uso de accesorios no
autorizados puede invalidar la garantía.
• No almacene el teléfono en lugares con temperaturas superiores a 50 ºC o 122 ºF.
• La temperatura de funcionamiento para este dispositivo está comprendida entre 0 ºC (32°F) y 35 ºC (95°F).
Conecte el cable de alimentación desde la unidad a una toma de CA conectada a tierra. Asegúrese de que la fuente de
alimentación tenga el mismo intervalo del voltaje de funcionamiento que la pantalla. La tensión de alimentación está indicada en la
etiqueta del dispositivo. El dispositivo utiliza DE 110 a 127 VCA o 220 a 240 VCA, 50/60 Hz.
PRECAUCIÓN: Para evitar daños a la unidad, utilice únicamente el cable de alimentación que se incluye con el dispositivo
Certicación CE para países europeos
El dispositivo cumple con la Directiva EMC 2014/30/EU y la Directiva sobre baja tensión 2014/35/EU, la Directiva
de diseño ecológico 2009/125/CE, la Directiva RoHS 2011/65/UE, la Directiva WEEE 2012/19/UE y la Directiva de
equipos de radio 2014/53/UE
https://www.viewsonic.com/us/ifp2410.html#downloads
Cumplimiento de normativas de la Unión Europea
El equipo cumple el requisito de exposición a la radiofrecuencia 2014/53/UE, Recomendación del consejo de 12 de junio de 2014
sobre la limitación de exposición del público en general a los campos electromagnéticos (0-300 GHz). Este equipo cumple los
siguientes estándares de conformidad: EN301489-1, EN301489-17, EN55032/35, EN62368-1, EN300328.
Declaración de Cumplimiento de RoHS2
Este producto ha sido diseñado y fabricado cumpliendo la Directiva 2011/65/EU del Parlamento Europeo y el Consejo para
la restricción del uso de ciertas sustancias peligrosas en equipos eléctricos y electrónicos (Directiva RoHS2) y se considera
que cumple con los valores de concentración máximos publicados por el European Technical Adaptation Committee (Comité
Europeo de Adaptaciones Técnicas) (TAC) tal y como se muestra a continuación:
Sustancia Concentración Máxima Propuesta Concentración Real
Plomo (Pb) 0.1% < 0.1%
Mercurio (Hg) 0.1% < 0.1%
Cadmio (Cd) 0.01% < 0.01%
Cromo Hexavalente (Cr6+) 0.1% < 0.1%
Bifenilo Polibromado (PBB) 0.1% < 0.1%
Éteres de Difenilo Polibromado (PBDE) 0.1% < 0.1%
bis(2-ethylhexyl)ftalato (DEHP) 0.1% < 0.1%
Ftalato de butilbencilo (BBP) 0.1% < 0.1%
Escribe bien estúpido (DBP) 0.1% < 0.1%
Ftalato de diisobutilo (DIBP) 0.1% < 0.1%
Ciertos componentes de los productos indicados más arriba están exentos bajo el Apéndice III de las Directivas RoHS2 tal y
como se indica a continuación:
Ejemplos de los componentes exentos:
1. Plomo como elemento de aleación en aluminio que contenga hasta un 0,4 % de su peso en plomo.
2. Aleación de cobre que contenga hasta un 4 % de su peso en plomo.
3. Plomo en pastas de soldadura de alta temperatura de fusión (es decir, aleaciones de plomo que contengan en peso un
85 % de plomo o más).
4. Componentes eléctricos y electrónicos que contengan plomo en un vidrio o cerámica de un tipo distinto de la cerámica
dieléctrica de condensadores, por ejemplo, dispositivos piezoelectrónicos, o en un compuesto de matrices de vidrio o
cerámica.
Desecho del producto al nal de su vida útil
ViewSonic es respetuoso con el medioambiente y está comprometido a trabajar y vivir de una manera que sea respetuosa
con el medioambiente. Gracias por ser parte de una forma de Computación más Inteligente y más Verde. Visite el sitio web
de ViewSonic para saber más.
EE.UU. y Canadá: http://www.viewsonic.com/company/green/recycle-program/
Europa: http://www.viewsoniceurope.com/eu/support/call-desk/
Taiwán: http://recycle.epa.gov.tw/
Información del Copyright
Android, Google, Google Play, el Google Play logo y otras marcas son marcas comerciales de Google Inc.
v

Precaución
IC Precaución:
Este dispositivo cumple con los estándares RSS exentos de licencia de Industry Canada.
El funcionamiento está sujeto a las dos condiciones siguientes:
(1) Este dispositivo no puede causar interferencias y
(2) Este dispositivo debe aceptar cualquier interferencia,
incluidas las interferencias que pueden provocar un funcionamiento no deseado del dispositivo.
CAN ICES-003(B) / NMB-003(B)
FCC Caution:
Este dispositivo cumple el Apartado 15 de las normas FCC. El funcionamiento está sujeto a las siguientes dos
condiciones: (1) este dispositivo no deberá causar interferencias perjudiciales y (2) este dispositivo deberá aceptar
cualquier interferencia que reciba, incluidas interferencias que puedan causar un funcionamiento no deseado.
Cualquier cambio o modicación no aprobado expresamente por la parte responsable del cumplimiento podría
anular la derecho del usuario a operar el equipo.
NOTA: Este equipo se ha probado y se ha demostrado que cumple los límites de un dispositivo digital de Clase B,
de acuerdo con el Apartado 15 de la normativa FCC.
Estos límites están diseñados para proporcionar una protección razonable contra las interferencias perjudiciales en
una instalación residencial. Este equipo genera, utiliza y puede irradiar energía de radiofrecuencia y, si no se instala
y utiliza conforme a las instrucciones, puede causar interferencias perjudiciales para las comunicaciones de radio.
Sin embargo, no se puede garantizar que la interferencia no ocurrirá en una instalación en particular.
En el caso de que el equipo causara interferencias perjudiciales para la recepción de radio o TV, lo que puede
determinarse encendiendo y apagando dicho equipo, se sugiere que el usuario lleve a cabo una o varias de las
siguientes medidas para corregir dichas interferencias:
1. Reorientar o reubicar la antena receptora.
2. Aumentar la separación entre el equipo y el receptor.
3. Conectar el equipo a una toma de corriente de un circuito diferente al que está conectado el receptor.
4. Si es necesario, consultar al proveedor o a un técnico especialista en radio/televisión.
El dispositivo ha sido evaluado para cumplir con los requisitos generales de exposición a RF. El dispositivo se
puede utilizar en portátiles condición de exposición sin restricción.
FCC ID: GSS-VS16340
vi

Informationen zur Konformität
Bitte lesen, bevor Sie fortfahren
• Verwenden Sie nur die Batterien und das Netzteil, die vom Hersteller bereitgestellt wurden. Der Einsatz nicht autorisierter
Zubehörartikel kann Ihre Garantie erlöschen lassen.
• Bewahren Sie Ihr Gerät nicht bei Temperaturen von mehr als 50 °C auf.
• Die Betriebstemperatur für dieses Gerät beträgt 0 °C bis 35 °C.
Verbinden Sie das Netzkabel vom Gerät mit einer geerdeten Steckdose. Achten Sie darauf, dass sich die Stromquelle
innerhalb der Betriebsspannung des Displays bewegt. Die Betriebsspannung nden Sie auf dem Typenschild. Das Gerät
nutzt entweder 110 bis 127 V Wechselspannung oder 220 bis 240 Volt Wechselspannung und 50/60 Hz.
ACHTUNG: Vermeiden Sie Geräteschäden, indem Sie nur das mit dem Gerät gelieferte Netzkabel verwenden.
CE-Konformität für europäische Länder
Het apparaat voldoet aan de EMC-richtlijn 2014/30/EU en de Laagspanningsrichtlijn 2014/35/EU, Ökodesign-
Richtlinie 2009/125/EG, RoHS-Richtlinie 2011/65/EU, WEEE-Richtlinie 2012/19/EU und Richtlinie über
Funkanlagen 2014/53/EU überein
https://www.viewsonic.com/us/ifp2410.html#downloads
Europäische Union – Richtlinienkonformität
Das Gerät stimmt mit den Anforderungen zur HF-Belastung der Richtlinie 2014/53/EU, Empfehlung des Rates vom 12. Juni
2014 zur Begrenzung der Exposition der Bevölkerung gegenüber elektromagnetischen Feldern (0 bis 300 GHz) überein.
Dieses Gerät erfüllt die folgenden Konformitätsstandards: EN301489-1, EN301489-17, EN55022/24, EN60950-1, EN300328.
RoHS2-Konformitätserklärung
Dieses Produkt wurde in Übereinstimmung mit der Richtlinie 2011/65/EU des Europäischen Parlaments und des Rates zur
Beschränkung des Einsatzes bestimmter gefährlicher Stoe in Elektro- und Elektronikgeräte (RoHS2-Richtlinie) entwickelt
und hergestellt und gilt als mit den vom Ausschuss für die Anpassung der Richtlinien an den technischen Fortschritt
festgelegten maximalen Konzentrationen wie nachstehend gezeigt übereinstimmend:
Sto
Blei (Pb) 0,1% < 0,1%
Quecksilber (Hg) 0,1% < 0,1%
Cadmium (Cd) 0,01% < 0,01%
Sechswertiges Chrom (Cr
Polybromierte Biphenyle (PBB) 0,1% < 0,1%
Polybromierte Diphenylether (PBDE) 0,1% < 0,1%
Bis(2-ethylhexyl)phthalat (DEHP) 0,1% < 0,1%
Benzylbutylphthalat (BBP) 0,1% < 0,1%
Dibutylphthalat (DBP) 0,1% < 0,1%
Diisobutylphthalat (DIBP) 0,1% < 0,1%
Bestimmte Komponenten des Produktes sind, wie oben erklärt, unter Anhang III der RoHS2-Richtlinien wie nachstehend
angegeben ausgenommen:
Beispiele ausgenommener Komponenten:
1. Blei als Legierungselement in Aluminium mit bis zu 0,4% Gewichtsprozent.
2. Kupferlegierung mit bis zu 4% Gewichtsprozent.
3. Blei in Lötmitteln mit hohem Schmelzpunkt (z. B. bleibasierte Legierungen mit 85% Gewichtsprozent Blei oder mehr).
4. Elektrische und elektronische Komponenten mit Blei in Glas oder Keramik mit Ausnahme anderer dielektrischer Keramik
in Kondensatoren, z. B. piezoelektronischen Geräten, oder in Glas- oder Keramik-Matrix-Verbundwerkstoen.
Entsorgung zum Ende der Einsatzzeit
ViewSonic nimmt den Umweltschutz sehr ernst, verpichtet sich daher zu umweltfreundlichen Lebens- und Arbeitsweisen.
Vielen Dank für Ihre Mitwirkung an einem intelligenteren, umweltfreundlicheren Einsatz moderner Computertechnik. Mehr
dazu erfahren Sie auf den ViewSonic-Internetseiten.
USA und Kanada:http://www.viewsonic.com/company/green/recycle-program/
Europa: http://www.viewsoniceurope.com/eu/support/call-desk/
Taiwan:http://recycle.epa.gov.tw/
Hinweise zum Urheberrecht
Android, Google, Google Play, das Logo von Google Play und andere Marken sind Marken der Google Inc.
6+
) 0,1% < 0,1%
Empfohlene maximale
Konzentration
Tatsächliche
Konzentration
vii

Vorsicht
IC-Warnhinweis:
Dieses Gerät stimmt mit dem/den lizenzfreien RSS-Standard(s) von Industry Canada überein.
Der Betrieb unterliegt den folgenden beiden Voraussetzungen:
(1) Dieses Gerät darf keine Funkstörungen verursachen, und
(2) dieses Gerät muss jegliche empfangenen Störungen hinnehmen,
einschließlich Störungen, die zu unbeabsichtigtem Betrieb führen können.
CAN ICES-003(B) / NMB-003(B)
FCC-Warnhinweis:
Dieses Gerät erfüllt Teil 15 der FCC-Regularien. Der Betrieb unterliegt der Bedingung, dass dieses Gerät keine
Störungen verursacht: (1) dieses Gerät darf keine Störungen verursachen, und (2) dieses Gerät muss jegliche
empfangenen Störungen hinnehmen, einschließlich Störungen, die zu unbeabsichtigtem Betrieb führen können.
Jegliche Änderungen oder Modikationen, die nicht ausdrücklich von der für die Übereinstimmung verantwortlichen
Stelle zugelassen sind, können die Berechtigung des Anwenders zum Betrieb des Gerätes erlöschen lassen.
Hinweis: Dieses Gerät wurde getestet und als mit den Grenzwerten für Digitalgeräte der Klasse B gemäß Teil
15 der FCC-Regularien übereinstimmend befunden. Diese Grenzwerte wurden geschaen, um angemessenen
Schutz gegen Störungen beim Betrieb in Wohngebieten zu gewährleisten. Dieses Gerät erzeugt, verwendet und
kann Hochfrequenzenergie abstrahlen und kann – falls nicht in Übereinstimmung mit den Bedienungsanweisungen
installiert und verwendet – Störungen der Funkkommunikation verursachen. Allerdings ist nicht gewährleistet, dass
es in bestimmten Installationen nicht zu Störungen kommt.
Falls diese Ausrüstung Störungen des Radio- oder Fernsehempfangs verursachen sollte, was leicht durch Aus- und
Einschalten der Ausrüstung herausgefunden werden kann, wird dem Anwender empfohlen, die Störung durch eine
oder mehrere der folgenden Maßnahmen zu beseitigen:
1. Neuausrichtung oder Neuplatzierung der Empfangsantenne(n).
2. Vergrößern des Abstands zwischen Gerät und Empfänger.
3. Anschluss der Ausrüstung an einen vom Stromkreis des Empfängers getrennten Stromkreis.
4. Hinzuziehen des Händlers oder eines erfahrenen Radio/Fernsehtechnikers.
Das Gerät wurde entsprechend der Erfüllung allgemeiner Anforderungen an die HF-Aussetzung bewertet. Das
Gerät kann ohne Einschränkung bei mobiler Aussetzung genutzt werden.
FCC-Kennung: GSS-VS16340
viii
Информация о соответствии
Прочтите перед эксплуатацией
• Используйте только батареи и адаптер питания, поставляемые изготовителем. Применение не рекомендованных
принадлежностей может привести к аннулированию гарантии.
• Не храните данное устройство при температуре выше 50°C.
• Рабочая температура устройства от 0°C до 35°C.
Подключите кабель питания устройства к заземленной электрической розетке. Убедитесь, что характеристики
источника питания соответствуют рабочему напряжению монитора. Рабочее напряжение указывается на этикетке
устройства. Устройство работает от переменного тока 110-127 Вольт или 220-240 Вольт при частоте 50/60 Гц.
ВНИМАНИЕ! Во избежание повреждения устройства разрешается использовать только тот кабель питания, который
поставляется с устройством.
Соответствие стандартам ЕС для европейских стран
Устройство соответствует требованиям директивы по электромагнитной совместимости 2014/30/EU и
директивы по низковольтным устройствам 2014/35/EU, Директивы по экодизайну 2009/125/EC, Директивы
RoHS 2011/65/EU, Директивы WEEE 2012/19/EU и Директивы о радиоаппаратуре 2014/53/EU
https://www.viewsonic.com/us/ifp2410.html#downloads
Соответствие нормам Европейского Союза
Данное устройство соответствует требованиям на излучение энергии в диапазоне радиочастот стандарта 2014/53/
EU, Рекомендации Совета ЕС от 12 июня 2014 года по ограничению на электромагнитное излучение (на частоте 300
ГГц) на неограниченный круг лиц. Данное устройство отвечает следующим стандартам соответствия: EN301489-1,
EN301489-17, EN55022/24, EN60950-1, EN300328.
Заявление о соответствии стандартам RoHS2
Данный продукт разработан и изготовлен в соответствии с Директивой 2011/65/EU Европейского парламента
и Совета по ограничению использования определенных опасных веществ в электрическом и электронном
оборудовании (Директива RoHS2) и считается соответствующим максимальной концентрации, указанной
Европейским комитетом технической адаптации (TAC), как это показано ниже:
Вещество
Свинец (Pb) 0,1% < 0,1%
Ртуть (Hg) 0,1% < 0,1%
Кадмий (Cd) 0,01% < 0,01%
Шестивалентный хром (Cr
Полибромированный бифенил (PBB) 0,1% < 0,1%
Многобромистые дифениловые эфиры
(PBDE)
Бис (2-этилгексил) фталат (DEHP) 0,1% < 0,1%
Бутилбензилфталат (BBP) 0,1% < 0,1%
Дибутилфталат (DBP) 0,1% < 0,1%
Диизобутилфталат (DIBP) 0,1% < 0,1%
Некоторые компоненты, перечисленные выше, исключены из перечня опасных продуктов согласно Дополнению III к
Директиве RoHS2, как указано ниже:
Примеры исключенных компонентов:
1. Свинец в виде легирующего элемента в алюминии, содержащем до 0,4 % свинца от общего веса.
2. Медный сплав, содержащий до 4 % свинца от общего веса.
3. Свинец в припоях с высокой температурой плавления (то есть сплавы на основе свинца, содержащие не менее
85 % свинца от общего веса).
4. Электрические и электронные детали, содержащие свинец в стекле или керамике (кроме диэлектрической
керамики в конденсаторах), например пьезоэлектрические устройства, либо в стекле керамической матрицы.
Утилизация продукта после завершения срока использования
ViewSonic заботится об окружающей среде и сохраняет приверженность работе и жизни в экологически безопасной
среде. Благодарим вас за участие в программе Smarter, Greener Computing (Интеллектуальные экологичные
компьютерные системы). Посетите веб-сайт ViewSonic для получения дополнительной информации.
США и Канада: http://www.viewsonic.com/company/green/recycle-program/
Европа: http://www.viewsoniceurope.com/eu/support/call-desk/
Тайвань: http://recycle.epa.gov.tw/
Сведения об авторских правах
Android, Google, Google Play, логотип Google Play и другие знаки являются товарными знаками Google Inc.
6+
) 0,1% < 0,1%
Рекомендуемая максимальная
концентрация
0,1% < 0,1%
Фактическая
концентрация
ix

Осторожно!
Предупреждение IC:
Данное устройство соответствует промышленным RSS-стандартам Канады на нелицензионное
оборудование.
При использовании устройства должны соблюдаться два следующих условия:
(1) данное устройство не должно являться источником помех и
(2) данное устройство должно принимать любые помехи,
включая те, которые могут вызвать нарушения в его работе.
CAN ICES-003(B)/NMB-003(B)
Предупреждение FCC:
Данное устройство соответствует требованиям правил FCC, часть 15. При использовании устройства должно
соблюдаться условие о том, что устройство не должно являться источником помех (1) данное устройство не
должно являться источником помех и (2)данное устройство должно принимать любые помехи, включая те,
которые могут вызвать нарушения в его работе.
Внесение любых изменений или выполнение любых модификаций данного устройства, не получивших
четко выраженного одобрения изготовителя, может лишить пользователя права на использование данного
устройства.
ПРИМЕЧАНИЕ. Данное устройство прошло проверку и признано соответствующим ограничениям на
цифровые устройства класса B в соответствии с частью 15 правил FCC. Данные требования установлены
с целью обеспечения помехоустойчивости при установке оборудования в жилых помещениях. Данное
оборудование генерирует, использует и может излучать энергию в радиочастотном диапазоне, и при
нарушении указаний по установке или эксплуатации может создавать помехи для радиосвязи. Однако
даже при соблюдении инструкций по установке нет гарантии того, что в определенных условиях данное
устройство не станет источником помех.
Если данное устройство вызывает помехи при приеме радио- и телевизионных сигналов (что можно
проверить, выключив и включив прибор), пользователю рекомендуется попытаться устранить данные помехи
одним из следующих способов:
1. изменить ориентацию или местоположение приемной антенны;
2. увеличить расстояние между данным устройством и приемным устройством;
3. подключить данное устройство и приемное устройство к розеткам в раздельных цепях питания.
4. Обратитесь за помощью к продавцу или опытному специалисту по теле- и радиотехнике.
Устройство прошло оценку на соответствие общим требованиям по РЧ излучению. Устройство может
использоваться без ограничений по излучению для портативных устройств.
FCC ID: GSS-VS16340
x
Introduction
Thank you for purchasing this VSD243. This Start-up Guide describes how to operate and use
this product safely. Before operating, please read this guide carefully for important safety
information. Please also keep this guide handy as a quick reference should you encounter any
diculties when using this product.
You can nd the full user guide on the home screen of your device once powered on.
A. Getting Started
■ You can nd the full user guide on the home screen of your device once powered on.
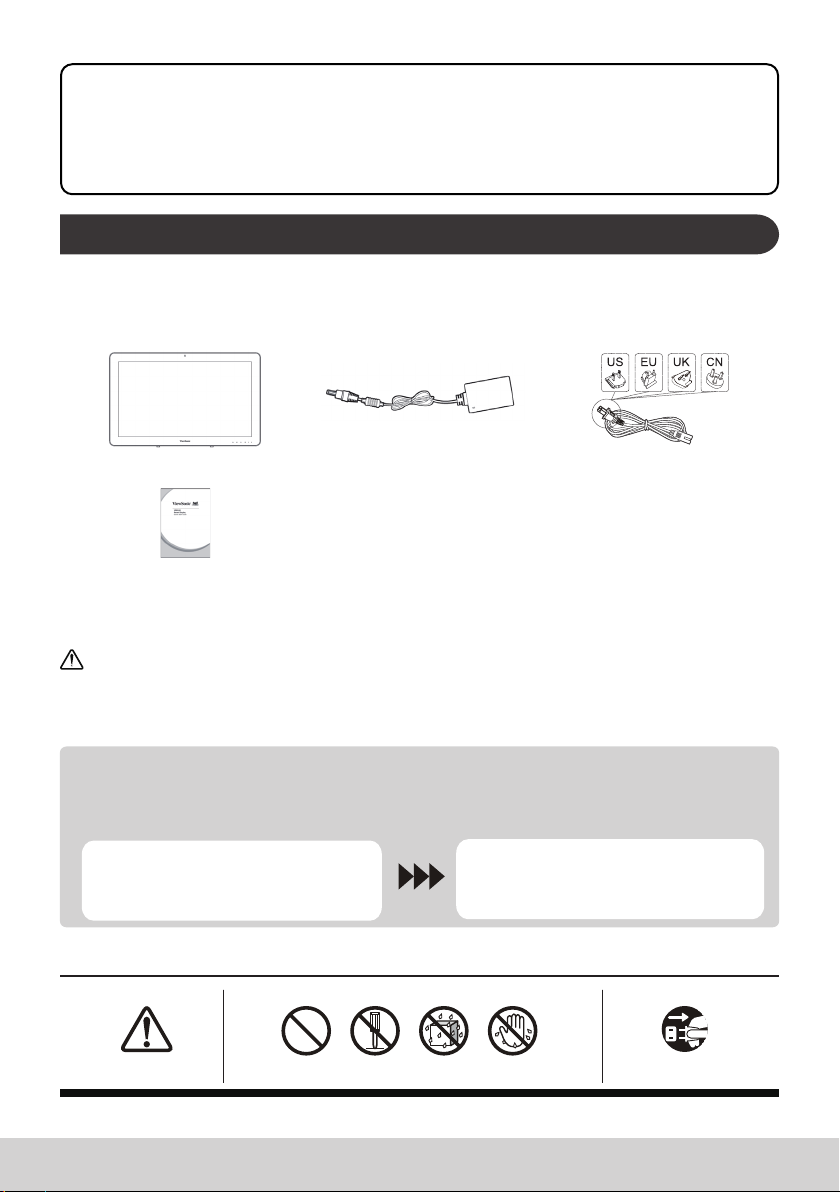
■ Before using this product, please ensure that the following items are included:
Main unit x 1 AC Adapter x 1
Quick Start Guide x 1
Items supplied with this product
■ Please ensure that the serial number on this product is identical to that on the product warranty.
■ If any parts are missing or broken, please contact your store of purchase.
Power cable
* Plug types by country
To use this product safely
Even though this product is designed with safety in mind, improper use of this product may cause re
or electric shock that can lead to injuries or death. To prevent such accidents, please comply with the
following recommendations:
■ Observe safety precautions
Please read and follow all safety precautions as indicated.
■ Stop using the product if it malfunctions
In the event of a malfunction, please contact ViewSonic Customer Care for support.
■ If the following events occur, then follow the recommendations
• Smoke is detected
• Strange sound or odor is observed
• If water gets inside this product
• This product is dropped or damaged
• Turn o the power
• Unplug the AC adapter cable and USB cable
• Please contact ViewSonic Customer Care
for service support.
Safety warning indications
Attention Sign Prohibition Signs Instruction Signs
Attention
Prohibited Disassembly is
prohibited
Keep dry Handle with dry
hands
Disconnect the
plug
11
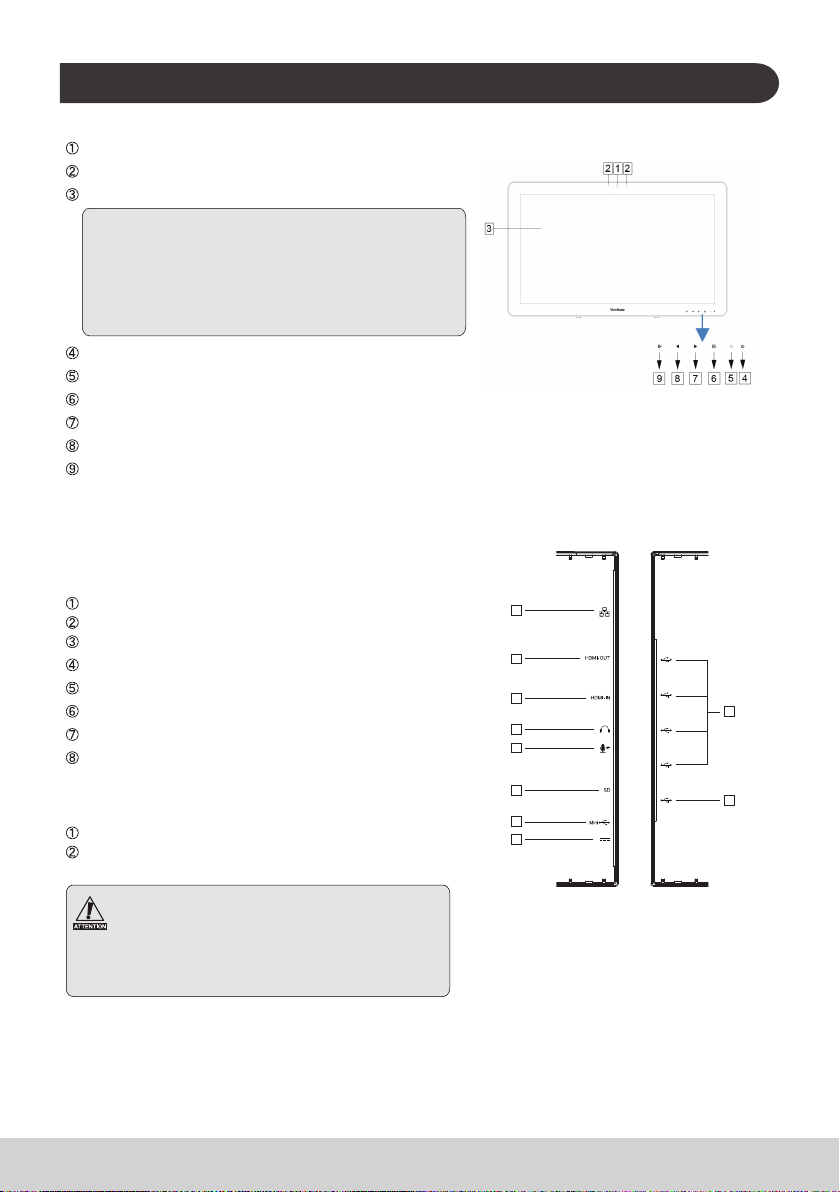
B. Product Overview
Basic Operations and Front View
Built-in Webcam (5.0MP)
Built-in Microphone
Display with touch panel function
About LCD display:
This product uses a TFT LCD display. Note that some
pixels may always appear o (black) while some are
always on (orange, green, or blue). Depending on the
viewing angle, uneven color or uneven brightness may be
observed. Please note that these are natural characteristics
of TFT LCD and should not be regarded as defects.
Power button
LED indicator
OSD Menu / Exit
Arrow Button (Up/Right)
Arrow Button (Down/Left)
Input Signal Switch / OSD Menu Select
Back View
LEFT SIDE
LAN port (RJ-45)
HDMI-OUT jack
HDMI-IN jack
Headset jack
Microphone IN
SD Card Slot
MiniUSB port (OTG)
DC-in jack
RIGHT SIDE
USB Type-A x 4
USB Type-B
Please do not use AC adapters other than the one
supplied in this product package to prevent re and
electric shock.
Please do not place objects on the AC adapter, or cover it
with anything. Overheating of the AC adapter may lead to a
re.
LEFT SIDE RIGHT SIDE
1
2
3
4
5
6
7
8
1
2
12
C. Installation precautions
Installation Environment
Health precautions
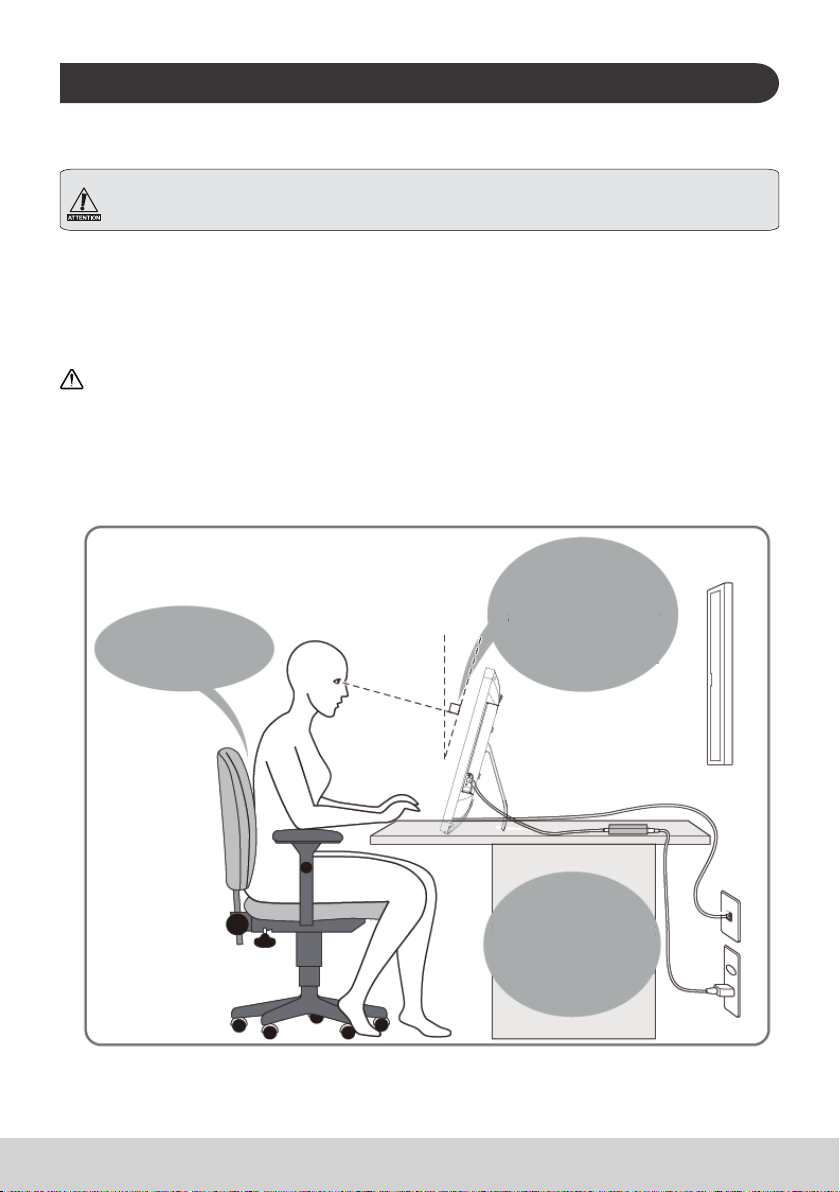
Viewing computer monitor displays for extended periods of time may result in tiredness, numbness in the
hands and feet, blurry vision,etc. Please see the picture below as a guide for extended use conditions.
Safety precautions
• Install this product in a well-ventilated location to eliminate exposure to high humidity conditions
that may lead to condensation on or in the product.
• For proper heat dissipation, allow a gap of at least 6" (15cm) between this product and the wall
during installation.
Regarding lightning hazards
Where lightning strikes are expected, it is advised to turn o the computer, and unplug any cable or
cord connected to this product
Ideal installation and proper posture
Adjust the screen so
that your viewing angle
is perpendicular and
Straighten your back
while seated
slightly higher than the
middle of the screen.
13
Make sure that the unit
is placed on a stable, at
surface.
D. Installation and Connection
.
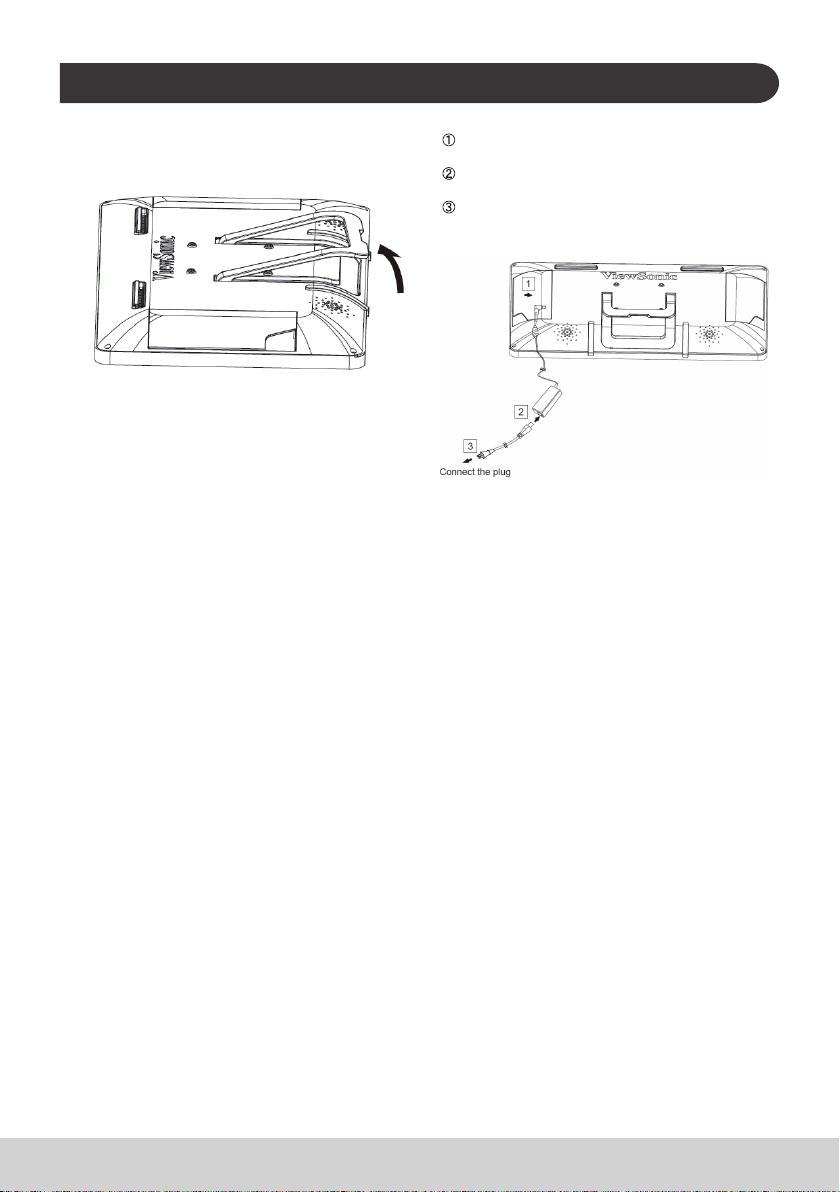
1) Open the stand in the direction of the arrow.
Place face down on a clean, at surface and avoid
any objects that could damage the display.
3) Place the unit upright on a stable, at surface.
2) Connect the power
Connect one end of the supplied AC adapter to
the DC-in jack at the back of the unit.
Connect the power cord to the other end of the
AC adapter.
Connect the power plug to the outlet.
14

E. Start-up and initial setting
Turn on the Power
1) Make sure the power cable and AC adapter are connected.
2) Press and hold the power switch until the status LED turns blue.
15

Shut Down
1) Press and hold the power button until you see “Power o”
appears on the screen.
2) When the screen appears as shown on the left, tap “OK” to
shut down the power.
If the power button is pressed quickly, the screen shuts o and goes into power saving mode.
When the power button is held down about 8 seconds, the product is forced to shut down.
F. Power saving mode and Returning to operation
Entering Power Saving Mode
While product is in operation, briey press the power button to put the unit into power saving mode.
Returning from Power Saving Mode
While the power LED is orange, briey press the power button to return from power saving mode
G. Basic Operation
Home Screen
After powering on the VSD243, the main display window is shown below.
The launcher page contains a main page with default apps which include the most commonly use
apps.
Aptoide: App store
Zoom: Cloud platform for video and audio conferencing
Chromium: Browser to access the Internet
16

H. Network Setting
Connecting to Wireless LAN
1) Tap “All applications” – “Settings”.
2) Turn “Wi-Fi” to ON by dragging “OFF” to the right.
3) When Wi-Fi is turned on, a list of all available wireless LAN access points will be shown on the right
side of the screen. Tap the desired Wireless LAN access point for the connection.
4) If a password is required, enter it and tap “Connect” to connect to the wireless LAN.
Connecting with RJ45
Simply plug in your Ethernet cable to the RJ45 port to connect to a LAN. No set-up or conguration is
required.
I. Restore to Factory
Resetting Your Smart Display
Restore to factory will delete all of your data created and installed apps after purchase (including system
and application settings, downloaded applications, etc.)
1) Tap “All applications” – “Settings”.
2) Tap “Back up & reset”.
3) Tap “Factory data reset".
4) Conrm all onscreen instructions and tap “reset”.
5) Again, conrm all onscreen instructions and tap “Delete All”. Restoring will begin shortly.
System will reboot several times during restore.
J. Use as HDMI Display
Depending on the mode selected, this product may be used as an HDMI display.
Android Mode Can be used as an Android device.
HDMI Mode Connect to HDMI source to use as a Monitor device.
Switching to HDMI Mode
1) Connect this display and an HDMI source with the HDMI cable. Optional accessory may not be
included with this product package in some regions.
2) Tap the SELECT icon
to switch to HDMI mode.
Switching to Android Mode
1) Tap the SELECT icon to switch to Android mode.
17

K. Troubleshooting and Q&A
Q. Power does not turn on.
A. ● Check if the AC adapter and power cord are properly connected.
● Reconnect the AC adapter and power cord, and turn the power on.
● Press and hold the power button for 8 seconds, and turn the power on again.
Q. I would like to receive support from application markets like Aptoide store for my
downloaded applications.
A. We do not provide any support. Please contact the developers of your downloaded applications for
assistance.
Q. “Compatible Zoom” is shown when an application is started.
A. “Compatible Zoom” is a feature that can enlarge the size of a xed size application.
Use Compatible Zoom to view your applications in enlarged sizes.
Q. The device is frozen.
A. “Power O” - Press and hold the power button 6~8 seconds to force Power O in the event of a
look-up caused by software error that prevents normal power o or restart.
18

Introduction
Nous vous remercions d'avoir acheté ce VSD243. Ce guide de démarrage explique comment opérer
et utiliser ce produit en toute sécurité. Avant de procéder, veuillez lire attentivement cette notice pour
les informations importantes relatives à la sécurité. Veuillez également conserver ce guide à portée
de main pour une consultation rapide si vous rencontrez des dicultés lors de l'utilisation de ce
produit.
Vous pouvez trouver le guide de l'utilisateur complet sur l'écran d'accueil de votre appareil une fois
mis sous tension.
A. Guide de mise en route
■ Vous pouvez trouver le guide de l'utilisateur complet sur l'écran d'accueil de votre appareil une
fois mis sous tension.
■ Avant d'utiliser ce produit, veuillez vérier que les éléments suivants sont inclus:
Unité principale x 1 Adaptateur AC x 1
Guide de démarrage rapide x 1
VSD242
Smart Display (Achage intelligent)
Guide de démarrage rapide
Éléments fournis avec ce produit
■ Veuillez-vous assurer que le numéro de série de ce produit est identique à celui de la garantie du produit.
■ Si des pièces sont manquantes ou brisées, s'il vous plaît contactez votre revendeur.
Cordon d'alimentation
* Types de che par pays
Pour utiliser ce produit en toute sécurité
Même si ce produit est conçu avec la sécurité à l'esprit, une mauvaise utilisation de ce produit peut
provoquer un incendie ou une électrocution pouvant entraîner des blessures ou la mort. Pour éviter
de tels accidents, veuillez respecter les recommandations suivantes :
■ Respectez les consignes de sécurité
S'il vous plaît lisez et suivez toutes les précautions de sécurité indiquées.
■ Cessez d'utiliser le produit en cas de dysfonctionnement
En cas de dysfonctionnement, veuillez contacter le service-clientèle de ViewSonic pour de l'aide.
■ Si les événements suivants se produisent, suivez les recommandations
• De la fumée est détectée
• Un son ou une odeur étrange est observé
• Si de l'eau pénètre dans cet appareil
• Ce produit est tombé ou est endommagé
• Coupez l'alimentation
• Débranchez l'adaptateur secteur et le câble USB
• Veuillez contacter le service-clientèle de
ViewSonic pour de l'aide et des réparations.
Indications d'avertissement de sécurité
Panneau
d'avertissement
Attention
Panneaux d'interdiction
Interdit Le démontage
est interdit
Conservez
au sec
Manipulez avec des
mains sèches
Panneaux d'instruction
Débranchez la
che
19

B. Présentation du produit
Opérations de base et Vue de face
Webcam intégrée (5,0MP)
Microphone intégré
Achage avec fonction écran tactile
À propos de l'achage à cristaux liquides:
Ce produit utilise un écran TFT LCD. Notez que certains
pixels apparaissent toujours désactivés (en noir ) alors
que certains sont toujours actifs (orange, vert ou bleu).
Selon l'angle d'observation, des couleurs inégales ou une
luminosité inégale peuvent être observées. Veuillez noter
que ce sont des caractéristiques naturelles du LCD TFT qui
ne doivent pas être considérées comme des défauts.
Bouton d'alimentation
Indicateur à DEL
Menu OSD / Quitter
Bouton èche (Haut / droite)
Bouton èche (Bas / gauche)
Interrupteur de signal d'entrée / Sélection Menu OSD
Vue arrière
CÔTÉ GAUCHE
Port LAN (RJ-45)
SORTIE HDMI
ENTRÉE HDMI
Prise casque
Entrée micro
Fente de carte SD
Port MiniUSB (OTG)
Connecteur entrée CC
CÔTÉ DROIT
USB Type-A x 4
USB Type-B
Veuillez ne pas utiliser d'adaptateurs secteur autre
que celui fourni dans ce emballage du produit pour
éviter un incendie ou un choc électrique.
Veuillez ne pas placer d'objets sur l'adaptateur secteur ou le
couvrir avec quoi que ce soit. La surchaue de l'adaptateur
secteur peut provoquer un incendie.
CÔTÉ GAUCHE CÔTÉ DROIT
1
2
3
4
5
6
7
8
1
2
20

C. Précautions d'installation
Environnement Installation
Précautions sanitaires
Le fait de regarder l'achage d'un moniteur d'ordinateur pendant des périodes de temps prolongées peut
entraîner de la fatigue, un engourdissement au niveau des mains et des pieds, une vision oue, etc.
Veuillez consulter l'image ci-dessous en tant que guide pour les conditions d'utilisation prolongée.
Consignes de sécurité
• Installez cet appareil dans un endroit bien ventilé pour éliminer l'exposition à des conditions
d'humidité qui peuvent aboutir à la formation de condensation sur ou dans le produit.
• Pour une dissipation de la chaleur correcte, laisser un espace d'au moins 15 cm (6") entre le
produit et le mur lors de l'installation.
En ce qui concerne les risques de foudre
Dans le cas où la foudre est prévisible, il est conseillé d' éteindre l'ordinateur et débrancher tout câble
ou cordon relié à cet appareil
Installation idéale et positionnement approprié
Réglez l'écran de
sorte que votre
angle de vue soit
Redressez votre dos
en position assise.
perpendiculaire et
légèrement supérieur
au milieu de l’écran.
21
Assurez-vous que
l'appareil soit placé sur
une surface plane et
stable.

D. Installation et Connexion
.
1) Ouvrir le support dans le sens de la èche.
Placer face vers le bas sur une surface plane
et propre en évitant tous objets qui pourraient
endommager l'écran.
2) Branchez l'alimentation
Branchez une extrémité de l'adaptateur secteur
fourni à la prise d'entrée CC au dos de l'appareil.
Branchez le cordon d'alimentation à l'autre
extrémité de l'adaptateur secteur.
Branchez le cordon d'alimentation à la prise
secteur.
3) Placez l’appareil sur une surface plane et stable.
Branchez la che
22

E. Mise en service et réglage initial
Allumez l'alimentation
1) Assurez-vous que le câble d'alimentation et l'adaptateur secteur sont connectés.
2) Maintenez enfoncé sur le bouton d'alimentation jusqu'à ce que la DEL devienne bleue.
23

Eteindre
1) Appuyez et maintenez enfoncé le bouton d'alimentation
jusqu'à ce que "Power o (Mise hors tension)" apparaîsse sur
l'écran.
2) Lorsque l'écran apparaît tel qu'indiqué sur la gauche, appuyez
sur "OK" pour l'éteindre.
Si le bouton est pressé rapidement, l'écran s'éteint et se met en mode d'économie d'énergie.
Lorsque le bouton est maintenu enfoncé pendant environ 8 secondes, l'appareil est contraint de
s'éteindre.
F. Mode économie d'énergie et Retour au fonctionnement
Passage en mode d'économie d'énergie
Tandis que le produit est en marche, appuyer brièvement sur le bouton d'alimentation de l'unité
instaure le mode d'économie d'énergie.
Revenir du mode d'économie d'énergie
Alors que la LED d'alimentation est orange, appuyez brièvement sur le bouton d'alimentation pour
quitter le mode d'économie d'énergie
G. Fonctionnement de base
Écran Accueil
Après avoir allumé le VSD243, la fenêtre principale d’achage est illustrée ci-dessous.
La page du lanceur contient une page principale avec les applications par défaut, qui comprennent
les applications les plus utilisées.
Aptoide : Magasin d'applications
Zoom : Plateforme Cloud pour les conférences vidéo et audio
Chromium : Navigateur pour accéder à Internet
24

H. Conguration réseau
Connexion à réseau local sans l
1) Appuyez sur "All applications (Toutes les applications)" - "Settings (Paramètres)".
2) Tourner "Wi-Fi " sur ON en faisant glisser "OFF" vers la droite.
3) Lorsque Wi-Fi est activé, une liste de tous les points d'accès LAN sans l disponibles sera achée
sur le côté droit de l'écran. Tapez le point d'accès LAN sans l souhaité pour la connexion.
4) Si un mot de passe est requis, entrez-le et appuyez sur "Connect (Connecter)" pour se connecter
au réseau local sans l.
Connexion avec RJ45
Il sut de brancher votre câble Ethernet au port RJ45 pour se connecter à un réseau local. Aucune
installation ou conguration supplémentaire n'est nécessaire.
I. Pour restaurer les réglages d'usine
Réinitialisation de votre Smart Display
A restauration d’usine supprimera toutes vos données créées et applications installées après l'achat ( y
compris les paramètres du système et des applications, les applications téléchargées, etc... )
1) Appuyez sur "All applications (Toutes les applications)" - "Settings (Paramètres)".
2) Appuyez sur "Back up & reset (Sauvegarder et réinitialiser)".
3) Appuyez sur "Factory data reset (Réinitialisation d'usine)".
4) Conrmez toutes les instructions à l'écran et appuyez sur "reset (re-paramétrer)".
5) De nouveau, conrmer toutes les instructions à l'écran et appuyez sur "Delete All (tout eacer)". La
restauration débutera sous peu.
Le système va redémarrer plusieurs fois pendant la restauration.
J. Utiliser comme achage HDMI
Selon le mode sélectionné, ce produit peut être utilisé comme un écran pris en charge par HDMI .
Mode Android Peut être utilisé comme un appareil Android.
Mode Achage Connectez à la source HDMI pour l'utiliser comme périphérique moniteur.
Passage au Mode HDMI
1) Reliez cet écran et une source HDMI avec le câble HDMI. Des accessoire en option peuvent ne
pas être inclus dans l'emballage du produit dans certaines régions.
2) Appuyez sur l'icône SÉLECTIONNER
Passage au Mode Android
1)Tapez sur l'icône SÉLECTIONNER pour permuter sur le mode Android.
pour passer en mode HDMI.
25

K. Dépannage et Q&R
Q. L'appareil ne s'allume pas.
R. ● Vériez si l'adaptateur secteur et le cordon d'alimentation sont correctement connectés.
● Reconnectez l'adaptateur secteur et le cordon d' alimentation, puis mettez l'appareil sous
tension.
● Appuyez et maintenez le bouton d'alimentation enfoncé pendant 8 secondes, puis remettez -le
sous tension.
Q. Je voudrais recevoir le support de marchés d'applications comme le magasin Aptoide pour
mes applications téléchargées.
R. Nous ne fournissons aucun support. Veuillez contacter les développeurs de vos applications
téléchargées pour de l’assistance.
Q :"Zoom compatible" s'ache lorsqu'une application est lancée.
R. “Zoom Compatible "est une fonctionnalité qui peut agrandir la taille d'une application de taille xe.
Utilisez la fonction Zoom Compatible pour visualiser vos applications dans des tailles agrandies.
Q :L'appareil est gelé.
R. “Power O (Arrêt)” - Maintenez enfoncé le bouton d'arrêt pendant 6~8 secondes pour forcer l'arrêt,
au cas où une fermeture aurait été causée par une erreur logicielle qui empêche un arrêt ou un
redémarrage normal.
26

Introducción
Gracias por comprar este VSD243. Esta Guía de inicio describe cómo operar y usar este producto de
manera segura. Antes de ponerlo a funcionar, lea esta guía atentamente para conocer la información
importante de seguridad. Igualmente, conserve esta guía a mano por si tiene cualquier inconveniente al
usar este producto.
Puede encontrar la guía del usuario en la página de inicio de su dispositivo al encenderlo.
A. Procedimientos iniciales
■ Puede encontrar la guía del usuario en la página de inicio de su dispositivo al encenderlo.
■ Antes de usar este producto, asegúrese de que se hayan incluido los siguientes elementos:
1 x unidad principal 1x adaptador de CA
1 x Guía de inicio
VSD242
Smart Display
Guía de inicio rápido
Elementos suministrados con este producto
■ Asegúrese de que el número de serie de este producto sea idéntico al incluido en la garantía del producto.
■ Si falta cualquier pieza o cualquier pieza está rota, póngase en contacto con la tienda en la que realizó
la compra.
Cable de alimentación
* Tipos de enchufes por país
Cómo usar este producto de manera segura
Aunque este producto fue diseñado tomando en cuenta la seguridad, el uso incorrecto del mismo podría
provocar incendios o descargas eléctricas que podrían provocar lesiones o la muerte. Para evitar dichos
accidentes, cumpla con las siguientes recomendaciones:
■ Observe las precauciones de seguridad
Lea y siga las precauciones de seguridad de la manera indicada.
■ Suspenda el uso del producto si no funciona correctamente
Si el producto no funciona correctamente, póngase en contacto con el Atención al Cliente de ViewSonic para obtener
soporte.
■ Si ocurren los siguientes eventos, entonces siga las recomendaciones
• Se detecta humo
• Se escucha un sonido u olor extraño
• Cae agua dentro del producto
• Se deja caer o se daña el producto
• Apague la unidad
• Desconecte el cable adaptador de CA y el cable
USB
• Póngase en contacto con Atención al Cliente de
ViewSonic para obtener soporte.
Indicaciones de advertencias de seguridad
Letrero de atención
Atención
Letreros de prohibiciones
Prohibido
Se prohíbe
desarmar la unidad
Mantener
seco
Manejar con las
manos secas
Letreros con instrucciones
Desconectar el
enchufe
27

B. Descripción del producto
Operaciones básicas y vista frontal
Cámara Web integrada (5,0 MP)
Micrófono integrado
Pantalla con función de panel táctil
Acerca de la pantalla LCD:
Este producto usa una pantalla LCD TFT. Tome en cuenta que
algunos píxeles podrían aparecer siempre apagados (negros),
mientras otros siempre estar encendidos (Naranja, verdes o
azules). Dependiendo del ángulo de visualización, podrían
observarse colores irregulares o brillo irregular. Tome en cuenta
que estas son características naturales de los monitores LCD
TFT y que no deben considerarse como defectos.
Botón de encendido y apagado
Indicador LED
Menú OSD / Salir
Botón de echa (arriba/derecha)
Botón de echa (abajo/izquierda)
Conmutador de señal de entrada / Selección de menú OSD
Vista posterior
LADO IZQUIERDO
Puerto LAN (RJ-45)
SALIDA HDMI
ENTRADA HDMI
Conector para auriculares
ENTRADA de micrófono
Ranura para tarjetas SD
Puerto MiniUSB (OTG)
Conector de entrada de CC
LADO DERECHO
USB Type-A x 4
USB Type-B
No use otros adaptadores de CA que no sean los
suministrados con este paquete de producto para evitar
incendios o descargas eléctricas.
No coloque objetos sobre el adaptador de CA ni lo cubra. El
sobrecalentamiento del adaptador de CA podría provocar un
incendio.
LADO IZQUIERDO LADO DERECHO
1
2
3
4
5
6
7
8
1
2
28

C. Precauciones sobre la instalación
Ambiente de instalación
Precauciones de salud
Ver pantallas de PC durante prolongados períodos de tiempo puede provocar cansancio, sensación de manos y
pies dormidos, visión borrosa, etc. Consulte la imagen siguiente como referencia para condiciones de uso
prolongado.
Precauciones de seguridad
• Instale este producto en una ubicación con una ventilación adecuada para eliminar la exposición a
condiciones de alta humedad que puedan provocar condensación sobre o dentro del producto.
• Para que haya una disipación de calor adecuada, durante la instalación, deje un espacio de separación
de al menos 15 cm (6") entre el producto y la pared.
Sobre los peligros por caída de rayos
En caso de que se esperen caídas de rayos, se aconseja apagar la computadora y desconectar cualquier
cable conectado a este producto.
Instalación ideal y posición propuesta
Ajuste la pantalla
de modo que el
ángulo de visión
Permanezca con
la espalda erguida
mientras esté sentado.
sea perpendicular y
ligeramente más alto
que el medio de la
pantalla.
29
Asegúrese de que la
unidad esté colocada
sobre una supercie
estable y plana.

D. Instalación y conexión
.
1) Abra la base en la dirección de la echa
Coloque la pantalla boca abajo sobre una supercie
limpia y plana, y evite cualquier objeto que pueda
dañar dicha pantalla.
3) Coloque la unidad en posición vertical sobre una
supercie estable y plana
2) Conecte la alimentación
Conecte un extremo del adaptador de CA suministrado
a la toma de entrada de CC de la parte posterior de la
unidad.
Conecte el cable de alimentación al otro extremo del
adaptador de CA.
Conecte el enchufe en el tomacorriente.
Conecte el enchufe
30

E. Inicio y conguración inicial
Encienda la unidad
1) Asegúrese de que el cable de alimentación y el adaptador de CC estén conectados.
2) Presione sin soltar el conmutador de alimentación hasta que el LED de estado se ilumine en azul.
31

Apagar
1) Pulse y mantenga pulsado el botón de encendido hasta que
"Power o (Apagar)" aparezca en la pantalla.
2) Cuando aparezca una pantalla como la que se muestra a la
izquierda, toque "OK (Aceptar)" para apagar la unidad.
Si el botón de alimentación se presiona rápidamente, la pantalla se apagará y pasará al modo de
ahorro de energía.
Si presiona el botón de alimentación durante 8 segundos, se fuerza el apagado del producto.
F. Modo de ahorro de energía y reanudación de funcionamiento
Cómo entrar al modo de ahorro de energía
Mientras el producto esté funcionando, presione brevemente el botón de alimentación para colocar la
unidad en modo de ahorro de energía.
Cómo salir del modo de ahorro de energía
Mientras el LED de alimentación se ilumine en color naranja, presione brevemente el botón de encendido
para salir del modo de ahorro de energía
G. Funcionamiento básico
Pantalla de inicio
Después de encender la pantalla VSD243, la ventana de visualización principal se mostrará como a
continuación.
La página de inicio de aplicaciones contiene una página principal con aplicaciones predeterminadas que
incluyen las aplicaciones que se usan con más frecuencia.
Aptoide: App Store.
Zoom: plataforma en la nube para conferencias de audio y vídeo.
Chromium: explorador para acceder a Internet.
32

H. Conguración de la red
Cómo conectarse al LAN inalámbrico
1) Toque "All applications (Todas las aplicaciones)" – "Settings (Conguración)".
2) Active el "Wi-Fi" al arrastrar "OFF (Desactivado)" hacia la derecha.
3) Cuando se active el Wi-Fi, aparecerá una lista de todos los puntos de acceso LAN inalámbricos a la
derecha de la pantalla. Toque el punto de acceso LAN inalámbrico para conectarse.
4) Si se necesita una contraseña, introdúzcala y toque "Connect (Conectar)" para conectar el LAN
inalámbrico.
Conexión con RJ45
Tan sólo conecte su cable Ethernet al puerto RJ45 para conectarse a la LAN. No se necesita una
conguración.
I. Restaurar valores de fábrica
Cómo reiniciar el Smart Display
La restauración de los valores de fábrica eliminará todos los datos creados y las aplicaciones instaladas
después de comprar la unidad (incluidos la conguración del sistema y de las aplicaciones, las aplicaciones
descargadas, etc.)
1) Toque "All applications (Todas las aplicaciones)" – "Settings (Conguración)".
2) Toque "Back-up & reset (Copia de seguridad y Reiniciar)".
3) Toque "Factory data reset (Restablecer datos de fábrica)".
4) Conrme las instrucciones que aparecen en la pantalla y toque "reset (reiniciar)".
5) Nuevamente, conrme las instrucciones que aparecen en la pantalla y toque "Delete All (Borrar todo)". La
restauración se iniciará poco después.
El sistema se reiniciará varias veces durante la restauración.
J. Usar como pantalla HDMI
Dependiendo del modo seleccionado, este producto puede usarse como una pantalla compatible con HDMI.
Modo Android Puede usarse como un dispositivo Android
Modo de visualización Conéctese a la fuente HDMI para usar como monitor.
Cómo cambiar a Modo de HDMI
1) Conecte esta pantalla y una fuente HDMI con el cable HDMI. Accesorio opcional; podría no estar incluido
con este paquete de producto en algunas regiones.
2) Toque el icono SELECCIONAR
Cómo cambiar al Modo Android
1) Toque el icono SELECCIONAR para cambiar al modo Android.
para cambiar al modo HDMI.
33

K. Resolución de problemas y Preguntas y Respuestas
P. La unidad no enciende.
R. ● Compruebe que el adaptador de CA y el cable de alimentación estén conectados correctamente.
● Vuelva a conectar el adaptador de CA y el cable de alimentación, y encienda la unidad.
● Pulse y mantenga pulsado el botón de encendido durante 8 segundos, y encienda la unidad
nuevamente.
P. Me gustaría recibir soporte técnico de mercados de aplicaciones como la tienda Aptoide para mis
aplicaciones descargadas.
R. No proporcionamos soporte técnico. Póngase en contacto con los desarrolladores de las aplicaciones
descargadas para obtener ayuda.
P. Aparece “Compatible Zoom (Zoom compatible)” cuando se inicia la aplicación.
R. “Compatible Zoom (Zoom compatible)” es una función que puede ampliar el tamaño de una aplicación de
tamaño jo. Use Compatible Zoom (Zoom compatible) para ver sus aplicaciones en tamaños ampliados.
P. El dispositivo está bloqueado.
R. “Apagar” - Presione sin soltar el botón de alimentación entre 6 y 8 segundos para forzar el apagado en el
caso de que el dispositivo esté bloqueado debido a un error de software que impida el apagado o reinicio
normales.
34

Einleitung
Vielen Dank für den Kauf des VSD243. Diese Schnellanleitung verrät Ihnen, wie Sie Ihr neues
Gerät problemlos und sicher bedienen können. Bitte lesen Sie diese Anleitung vor dem ersten
Einschalten gründlich durch. Sie enthält wichtige Sicherheitshinweise. Bewahren Sie diese
Anleitung am besten auf, damit Sie darin nachlesen können, falls einmal Schwierigkeiten bei der
Bedienung Ihres Gerätes auftreten sollten.
Nach dem Einschalten nden Sie die vollständige Bedienungsanleitung im Startbildschirm Ihres
Gerätes.
A. Erste Schritte
■ Nach dem Einschalten nden Sie die vollständige Bedienungsanleitung im Startbildschirm Ihres
Gerätes.
■ Bitte überzeugen Sie sich davon, dass folgende Artikel im Lieferumfang enthalten sind, bevor Sie
das Gerät verwenden:
Hauptgerät x 1 Netzteil x 1
Schnellstartanleitung x 1
* Stecker je nach Land unterschiedlich
Mitgelieferte Artikel
■ Bitte überzeugen Sie sich davon, dass die Seriennummer des Gerätes mit der in den
Garantieunterlagen angegebenen Seriennummer übereinstimmt.
■ Falls etwas fehlen oder beschädigt sein sollte, wenden Sie sich bitte an Ihren Händler.
So nutzen Sie das Gerät auf sichere Weise
Obwohl dieses Gerät auf höchste Sicherheit ausgelegt wurde, kann es bei falscher Bedienung zu
Bränden oder Stromschlägen und damit zu Verletzungen bis hin zum Tode kommen. Damit es nicht
zu solchen Unfällen kommt, halten Sie sich bitte unbedingt an die folgenden Empfehlungen:
■ Sicherheitshinweise beachten
Bitte machen Sie sich mit sämtlichen Sicherheitshinweisen gründlich vertraut, halten Sie sich stets daran.
■ Gerät bei Fehlfunktionen nicht weiter verwenden
Wenden Sie sich bei Fehlfunktionen bitte an den ViewSonic-Kundendienst.
■ Halten Sie sich in folgenden Fällen unbedingt an die Empfehlungen
• Rauch tritt aus
• Ungewöhnliche Geräusche oder Gerüche
• Wasser ist in das Gerät eingedrungen
• Das Gerät wurde fallen gelassen oder
anderweitig beschädigt
• Gerät ausschalten
• Netzteil und USB-Kabel trennen
• Bitte wenden Sie sich an den ViewSonic-
Kundendienst.
Netzkabel
Sicherheitssymbole
Achtung-Symbol
Achtung
Verboten
Verbotssymbole
Nicht zerlegen
35
Trocken halten
Mit trockenen
Händen bedienen
Anweisung-Symbole
Stecker trennen

B. Übersicht
Grundbedienung und Vorderansicht
Integrierte Webcam (5,0 MP)
Integriertes Mikrofon
Display mit Touchpanel
Das LC-Display:
Ihr Gerät ist mit einem TFT-LC-Display ausgestattet. Bitte
beachten Sie, dass es vorkommen kann, dass einige
wenige Pixel nicht oder ständig leuchten (orange, grün,
blau oder weiß). Je nach Betrachtungswinkel kann sich
eine etwas unregelmäßige Farb- oder Helligkeitsverteilung
einstellen. Beachten Sie bitte, dass dies zu den natürlichen
Eigenschaften von TFT-LC-Displays zählt und daher nicht
als Defekt angesehen werden sollte.
Ein-/Austaste
LED-Anzeige
OSD-Menü/Beenden
Pfeiltaste (Aufwärts/Rechts)
Pfeiltaste (Abwärts/Links)
Eingangssignalumschalter/OSD-Menüauswahl
Rückansicht
Linke Seite Rechte Seite
Linke Seite
LAN-Anschluss (RJ-45)
HDMI-Ausgang
HDMI-Eingang
Headset-Anschluss
Mikrofoneingang
SD-Kartensteckplatz
Mini-USB-Anschluss (OTG)
Netzanschluss
Rechte Seite
USB Type-A x 4
USB Type-B
Damit es nicht zu Bränden oder Stromschlägen
kommt, benutzen Sie ausschließlich das mit dem
Gerät gelieferte Netzteil.
Stellen Sie nichts auf das Netzteil, decken Sie das Netzteil
nicht ab. Andernfalls kann das Netzteil überhitzen und im
schlimmsten Fall einen Brand auslösen.
36
1
2
3
4
5
6
7
8
1
2

C. Warnhinweise zur Installation
Arbeitsumgebung
Wichtige Gesundheitshinweise
Längere Arbeit mit Computern kann zu Ermüdung, Taubheitsgefühl in Händen und Füßen, Sehstörungen
und anderen Problemen führen. Bitte beherzigen Sie bei längerer Arbeit die Abbildung unten.
Sicherheitshinweise
• Stellen Sie das Gerät an einem gut belüfteten Ort auf, meiden Sie Feuchtigkeit, die sich am oder
im Gerät niederschlagen kann.
• Damit im Betrieb entstehende Wärme richtig abgeleitet werden kann, achten Sie darauf, dass
zwischen Gerät und Wand stets ein Freiraum von mindestens 15 cm verbleibt.
Gefährdung durch Gewitter
Bei Gewitterlage empfehlen wir, den Computer abzuschalten und sämtliche Kabel und Leitungen vom
Gerät zu trennen.
Ideale Installation und angemessene Haltung
Passen Sie den
Bildschirm so an, dass
Sie lotrecht auf den
Bildschirm blicken
Halten Sie den Rücken
beim Sitzen gerade.
und Ihre Augenhöhe
geringfügig über der
Bildschirmmitte liegt.
37
Stellen Sie das Gerät
auf eine stabile, ebene
Unterlage.

D. Installation und Anschluss
.
1) Ständer in Pfeilrichtung önen
Legen Sie das Gerät mit der Bildseite nach unten auf
eine ache Unterlage, achten Sie darauf, dass das
Gerät nicht durch andere Gegenstände beschädigt
werden kann.
2) Stromversorgung herstellen
Schließen Sie den kleinen Netzteilstecker an den
Netzteilanschluss an der Rückseite des Gerätes an.
Schließen Sie das Netzkabel an den Netzeingang
des Netzteils an.
Stecken Sie den Netzstecker in die Steckdose.
3) Gerät aufrecht auf eine stabile, ache Unterlage
stellen.
38

E. Starten und Grundeinstellungen
Gerät einschalten
1) Vergewissern Sie sich, dass Netzkabel und Netzteil angeschlossen sind.
2) Halten Sie die Ein-/Austaste gedrückt, bis die Status-LED blau wird.
39

Herunterfahren
1) Halten Sie die Ein-/Austaste gedrückt, bis „Ausschalten“ auf
dem Bildschirm erscheint.
2) Wenn der links gezeigte Bildschirm erscheint, tippen Sie zum
Abschalten des Gerätes auf „OK“.
Bei nur kurzem Drücken der Ein-/Austaste schaltet sich der Bildschirm ab, das Gerät wechselt in den
Energiesparmodus.
Wenn Sie die Ein-/Austaste 8 Sekunden lang gedrückt halten, erzwingen Sie damit ein sofortiges
Abschalten des Gerätes.
F. Energiesparmodus aufrufen und wieder aufheben
Energiesparmodus aufrufen
Das Gerät wechselt in den Energiesparmodus, wenn Sie im laufenden Betrieb kurz auf die Ein-/
Austaste drücken.
Energiesparmodus aufheben
Wenn die Status-LED orange leuchtet, können Sie das Gerät durch kurzes Drücken der Ein-/Austaste
wieder aus dem Energiesparmodus aufwecken.
G. Grundbedienung
Startbildschirm
Nach Einschaltung des VSD243 erscheint die nachstehende Hauptanzeige.
Die Seite des Startprogrammes enthält eine Hauptseite mit Standard-Apps, zu denen die am
häugsten verwendeten Apps zählen.
Aptoide: App Store
Zoom: Cloud-Plattform für Video- und Audiokonferenzen
Chromium: Browser für Internetzugri
40

H. Netzwerkeinstellungen
Mit einem WLAN verbinden
1) Tippen Sie auf „Alle Anwendungen“ – „Einstellungen“.
2) Schalten Sie das „WLAN“ ein, indem Sie „Aus“ nach rechts ziehen.
3) Wenn die WLAN-Funktion eingeschaltet ist, erscheint eine Liste mit sämtlichen erreichbaren
WLAN-Zugangspunkten auf der rechten Seite des Bildschirms. Tippen Sie zum Verbinden auf den
gewünschten WLAN-Zugangspunkt.
4) Falls ein Kennwort erforderlich ist, geben Sie das Kennwort ein, anschließend tippen Sie zum
Verbinden mit dem WLAN auf „Verbinden“.
Mit RJ45 verbinden
Zur Verbindung mit einem lokalen Netzwerk (LAN) verbinden Sie das Netzwerkkabel einfach mit dem
RJ-45-Anschluss. Sie müssen nichts einrichten oder kongurieren.
I. Auf Werkszustand zurücksetzen
Smart Display rücksetzen
Beim Wiederherstellen des Werkszustands werden alle nach dem Kauf erstellten Daten und installierten
Apps gelöscht – dazu zählen auch System- und Anwendungseinstellungen, heruntergeladene
Anwendungen etc.
1) Tippen Sie auf „Alle Anwendungen“ – „Einstellungen“.
2) Tippen Sie auf „Sichern und rücksetzen“.
3) Tippen Sie auf „Rücksetzen auf werkseitige Daten“.
4) Bestätigen Sie sämtliche Anweisungen auf dem Bildschirm, tippen Sie dann auf „Rücksetzen“.
5) Bestätigen Sie nochmals sämtliche Anweisungen auf dem Bildschirm, tippen Sie dann auf „Alles
löschen“. Die Wiederherstellung beginnt in Kürze.
Während der Wiederherstellung startet das System mehrmals neu.
J. Als HDMI-Display verwenden
Je nach ausgewähltem Modus lässt sich das Gerät als HDMI-Display einsetzen.
Android-Modus Das Gerät kann als Android-Gerät eingesetzt werden.
HDMI Mode
(HDMI-Modus)
Zum HDMI-Modus wechseln
1) Verbinden Sie dieses Display und eine HDMI-Quelle mit dem HDMI-Kabel. Sonderzubehör, wird
nicht bei sämtlichen Geräten mitgeliefert.
2) Tippen Sie zum Umschalten in den HDMI-Modus auf das Auswahlsymbol
Zum Android-Modus wechseln
1) Tippen Sie zum Umschalten in den Android-Modus auf das Auswahlsymbol .
Verbinden Sie eine HDMI-Quelle zur Nutzung als Monitor.
.
41

K. Problemlösung und Fragen & Antworten
F. Das Gerät lässt sich nicht einschalten.
A: • Vergewissern Sie sich, dass Netzteil und Netzkabel richtig angeschlossen wurden.
• Schließen Sie Netzteil und Netzkabel noch einmal an, schalten Sie das Gerät anschließend ein.
• Halten Sie die Ein-/Austaste 8 Sekunden lang gedrückt, schalten Sie das Gerät danach erneut
ein.
F. Ich wünsche Support von Anwendungsmärkten, wie Aptoide-Store für meine
heruntergeladenen Anwendungen.
A: Wir bieten keine diesbezügliche Unterstützung. Bitte wenden Sie sich zur Unterstützung an die
Entwickler Ihrer heruntergeladenen Anwendungen.
F. Beim Starten einer Anwendung wird Kompatibler Zoom angezeigt.
A: „Kompatibler Zoom“ ist eine Funktion, mit der sich die Darstellung einer Anwendung fester Größe
vergrößern lässt.
Mit dem kompatiblen Zoom können Sie Ihre Anwendungen in angenehmer Größe betrachten.
F. Das Gerät reagiert nicht mehr.
A: „Abschalten“ – Falls sich das Gerät durch einen Software- oder Fehler aufhängt und nicht mehr
auf normale Weise abgeschaltet oder neu gestartet werden kann, können Sie das Abschalten
erzwingen, indem Sie die Ein-/Austaste 6 bis 8 Sekunden lang gedrückt halten.
42

Введение
Благодарим вас за приобретение VSD243! В настоящем кратком руководстве приведен
порядок безопасного использования и эксплуатации данного устройства. Внимательно
прочитайте инструкции по безопасной эксплуатации монитора перед началом его
использования. Храните это руководство под рукой на тот случай, если в будущем у вас
возникнут какие-либо трудности с использованием монитора.
После включения питания монитора полное руководство пользователя отображается на
главном экране.
А. Подготовка к работе
■ После включения питания монитора полное руководство пользователя отображается на
главном экране.
■ Перед началом эксплуатации монитора проверьте комплектность поставки:
Монитор х 1 Сетевой блок питания х 1
Краткое руководство х 1
* Штепсельные вилки для различных
Комплектность поставки монитора
■ Проверьте соответствие серийного номера монитора указанному в гарантии.
■ Если какие-либо части отсутствуют или повреждены, обратитесь в магазин, в котором был
приобретен монитор.
Безопасная эксплуатация монитора
Несмотря на то что этот монитор был разработан с учетом требований безопасности, его
ненадлежащая эксплуатация может привести к возгоранию или поражению электрическим
током, чреватыми травмой или смертельным исходом. Во избежание инцидентов подобного
рода соблюдайте следующие рекомендации:
■ Соблюдайте меры обеспечения безопасности
Прочитайте и соблюдайте все меры обеспечения безопасности, как указано.
■ Прекратите пользоваться монитором, если он неисправен
В случае неисправности обратитесь за поддержкой в центр обслуживания клиентов ViewSonic.
■ В случаях, приведенных ниже, следуйте приведенным рекомендациям
• Появился дым
• Появился странный звук или запах
• Вода попала вовнутрь монитора
• Монитор упал или поврежден
• Выключите питание.
• Отключите сетевой блок питания и кабель
USB.
• Обратитесь за поддержкой в центр
обслуживания клиентов ViewSonic.
Кабель питания
стран
Предупреждающие символы
Знак «Внимание!» Знаки запрета
Внимание!
Запрещено Разборка
запрещена
Не допускайте
попадания влаги
43
Только сухими
руками
Знаки инструкций
Отсоедините
вилку

В. Описание изделия
Основные операции и вид спереди
Встроенная веб-камера (5,0 Мп)
Встроенный микрофон
Монитор с сенсорной панелью
О ЖК-мониторе:
В этом мониторе используется дисплей на жидких
кристаллах TFT. Следует учитывать, что некоторые
пиксели всегда выключены (черного цвета), а некоторые
постоянно включены (оранжевого, зеленого или
синего цвета). В зависимости от угла обзора может
наблюдаться неравномерность цвета или яркости. Это
— естественные характеристики ЖК-монитора TFT и
дефектами не являются.
Кнопка питания
Светодиодный индикатор
Экранное меню / выход
Кнопка со стрелкой (вверх/вправо)
Кнопка со стрелкой (вниз/влево)
Переключатель входных сигналов / выбор экранного меню
Вид сзади
ВИД СЛЕВА
Порт ЛВС (RJ-45)
Выходной разъем HDMI
Входной разъем HDMI
Разъем для гарнитуры
Микрофонный вход
Гнездо для карты памяти SD
Порт Mini-USB (OTG)
Вход питания постоянного тока
ВИД СПРАВА
USB тип A x 4
USB тип B
Во избежание возгорания и поражения
электрическим током используйте только
поставляемый в комплекте сетевой блок питания.
Не ставьте на сетевой блок питания какие-либо
предметы и не накрывайте его. Перегрев сетевого блока
питания может привести к возгоранию.
ВИД
СЛЕВА
1
2
3
4
5
6
7
8
ВИД
СПРАВА
1
2
44

С. Меры предосторожности при установке
Условия установки
Мероприятия по охране здоровья
Просмотр компьютерного монитора в течение длительного времени может вызвать утомление,
онемение рук и ног, нарушение четкости зрения и др. Правильное положение при продолжительной
работе за монитором показано на следующем рисунке.
Меры обеспечения безопасности
• Устанавливайте монитор в хорошо проветриваемом месте, чтоб не допустить воздействия
на него высокой влажности, которая может привести к образованию конденсата.
• Для надлежащего рассеяния тепла устанавливайте монитор на расстоянии не менее 15 см
от стены.
Молниевая опасность
При опасности удара молнии рекомендуется выключить компьютер и отсоединить все кабели и
шнуры, подключенные к данному устройству.
Оптимальная установка и правильная поза
Отрегулируйте
положение экрана
так, чтобы ваш угол
обзора располагался
Держите спину прямо
перпендикулярно
и немного выше
середины экрана.
45
Установите монитор
на устойчивую ровную
поверхность.

D. Установка и подключение
.
1). Откройте подставку в направлении стрелки.
Положите монитор экраном вниз на чистую
ровную поверхность, без каких-либо предметов,
которые могли бы повредить экран.
2). Подключите питание.
Подключите один конец поставляемого сетевого
блока питания к входу питания постоянного тока
монитора.
Подключите кабель питания к другому концу
сетевого блока питания.
Вставьте вилку в розетку.
3) Установите монитор в вертикальном
положении на устойчивую ровную
поверхность.
46

E. Запуск и первоначальная настройка
Включение питания
1) Убедитесь, что кабель питания и сетевой блок питания подключены.
2) Нажмите и удерживайте кнопку питания до тех пор, пока индикатор состояния не
станет синим.
47

Выключение
1) Нажмите и удерживайте кнопку питания, пока на экране не
появится надпись «Power o (Выключение)».
2) Когда отобразится показанный на рисунке экран, нажмите
«ОК», чтобы выключить питание.
Краткое нажатие кнопки питания выключает экран и переводит монитор в режим
энергосбережения.
Если держать кнопку питания нажатой примерно 8 секунд, монитор будет принудительно
выключен.
F. Режим энергосбережения и возврат к работе
Переход в режим энергосбережения
В процессе работы устройства нажмите и отпустите кнопку питания для перевода устройства в
режим энергосбережения.
Выход из режима энергосбережения
Когда горит оранжевый индикатор, нажмите и отпустите кнопку питания, чтобы выйти из
режима энергосбережения.
G. Основные операции
Главный экран
После включения питания VSD243 отображается показанное ниже окно основного дисплея.
На странице запуска находится главная страница с приложениями по умолчанию, к которым
относятся наиболее часто используемые приложения.
Aptoide: App store
Zoom (Увеличение): Облачная платформа для осуществления видео и аудио конференц-связи
Chromium: Браузер для доступа к Интернету
48

H. Настройка сети
Подключение к беспроводной ЛВС
1) Нажмите «Все приложения» — «Настройки».
2) Установите параметр Wi-Fi на «ВКЛ.», перетащив «ВЫКЛ.» вправо.
3) При включенной сети Wi-Fi в правой части экрана отображается список всех доступных точек
доступа беспроводной ЛВС. Чтобы подключиться, нажмите необходимую точку доступа
беспроводной ЛВС.
4) При запросе введите пароль и нажмите «Подключиться», чтобы подключиться к
беспроводной ЛВС.
Подключение с помощью RJ45
Просто подключите кабель Ethernet к порту RJ45, чтобы подключиться к ЛВС. Выполнять
настройки не требуется.
I. Восстановление параметров по умолчанию
Возврат к исходным настройкам беспроводного монитора
При восстановлении параметров по умолчанию удаляются все созданные данные и установленные
приложения после покупки монитора (включая настройки системы и приложений, загруженные
приложения и т. д.).
1) Нажмите «Все приложения» — «Настройки».
2) Нажмите «Резервное копирование и восстановление».
3) Нажмите «Восстановление заводских настроек».
4) Подтвердите инструкции на экране и нажмите «Восстановление».
5) Подтвердите инструкции на экране и нажмите «Удалить все». Вскоре начнется
восстановление.
Во время восстановления система будет перезагружена несколько раз.
J. Использование в качестве монитора HDMI
В зависимости от выбранного режима это устройство можно использовать как монитор HDMI.
Режим Android Монитор можно использовать как устройство Android.
Режим HDMI При подключении к источнику сигнала HDMI можно использовать в качестве монитора.
Переключение в режим HDMI
1) Подключите монитор к источнику сигнала HDMI кабелем HDMI. Дополнительная
принадлежность может не входить в комплект поставки устройства в некоторых регионах.
2) Нажмите пиктограмму выбора режима,
Переключение в режим Android
1) Нажмите пиктограмму выбора режима, чтобы переключиться режим Android.
чтобы переключиться режим HDMI.
49

K. Поиск и устранение неисправностей, вопросы
и ответы
В. Питание не включается.
A. ● Проверьте правильность подключения сетевого блока питания и кабеля питания.
● Заново подключите сетевой блок питания и кабель питания, а затем включите питание.
● Нажмите и удерживайте кнопку питания в течение 8 секунд, а затем снова включите
питание.
В. Я хочу получать поддержку от таких магазинов приложений, как Aptoide, для
загруженных мною приложений.
A. Мы такую поддержку не предоставляем. За помощью обращайтесь к разработчикам
загруженных приложений.
В. При запуске приложения отображается надпись Compatible Zoom (Совместимое
масштабирование).
A. Функция Compatible Zoom предназначена для увеличения размера приложения с
фиксированного размера.
Используйте эту функцию для просмотра приложений с увеличением размера.
В. Устройство не отвечает.
A. Power O (Выключение) - Нажмите и удерживайте кнопку питания в течение 6-8 секунд
для принудительного выключения устройства в случае зависания, вызванного ошибкой
программного обеспечения, делающей невозможным стандартное выключение или
перезапуск устройства.
50

Open Source Licenses Notice
The rmware/software included in this product contains some copyrighted software that is licensed
under the GPL v2. A copy of that license is included in the product by going to Settings > About
Tablet > Legal Information > Open Source Licenses. You may obtain the complete Corresponding
Source code from us for a period of three years after our last shipment of this product, which will be
no earlier than 2016-09-30, by sending a money order or check for $5 to the following addresses and
an additional shipping charge which may vary from dierent areas shall be paid upon your receipt:
North America:
GPL Compliance Division
14035 Pipeline Ave. Chino, CA 91710, USA
Europe:
ViewSonic Europe Limited
Level 10, Tower 42, 25 Old Broad Street, London, EC2N 1HQ, UK
Rest countries:
Sequel Technology Inc.
ViewSonic_Parts Logistic Center Dept.
3F, No 38, Lane 148, Li-De St., Jhonghe Dist., New Taipei City 235, Taiwan. R.O.C.
Please write “source for VSD243” in the memo line of your payment.
You may also nd a copy of the source at
http://www.viewsonic.com/support/downloads/drivers/VSD243_Source_Code.zip
This oer is valid to anyone in receipt of this information.
51

Customer Service
For technical support or product service, see the
table below or contact your reseller.
NOTE: You will need the product’s serial
Country/ Region Website Country/ Region Website
Asia Pacic & Africa
Australia www.viewsonic.com/au/ Bangladesh www.viewsonic.com/bd/
中国 (China)
Hong Kong (English) www.viewsonic.com/hk-en/ India www.viewsonic.com/in/
Indonesia www.viewsonic.com/id/ Israel www.viewsonic.com/il/
日本 (Japan)
Malaysia www.viewsonic.com/my/ Middle East www.viewsonic.com/me/
Myanmar www.viewsonic.com/mm/ Nepal www.viewsonic.com/np/
New Zealand www.viewsonic.com/nz/ Pakistan www.viewsonic.com/pk/
Philippines www.viewsonic.com/ph/ Singapore www.viewsonic.com/sg/
臺灣 (Taiwan)
Việt Nam www.viewsonic.com/vn/ South Africa & Mauritius www.viewsonic.com/za/
Americas
United States www.viewsonic.com/us Canada www.viewsonic.com/us
Latin America www.viewsonic.com/la
Europe
Europe www.viewsonic.com/eu/ France www.viewsonic.com/fr/
Deutschland www.viewsonic.com/de/ Қазақстан www.viewsonic.com/kz/
Россия www.viewsonic.com/ru/ España www.viewsonic.com/es/
Türkiye www.viewsonic.com/tr/ Україна www.viewsonic.com/ua/
United Kingdom www.viewsonic.com/uk/
number.
www.viewsonic.com.cn
www.viewsonic.com/jp/ Korea www.viewsonic.com/kr/
www.viewsonic.com/tw/
香港 (繁體中文)
ประเทศไทย
www.viewsonic.com/hk/
www.viewsonic.com/th/
52

 Loading...