

Page 1
Smart Display
User Guide
Guide de l’utilisateur
Guía del usuario
Model No. VS16340
Page 2

Thank you for choosing ViewSonic
With over 25 years as a world leading provider of visual solutions, ViewSonic
is dedicated to exceeding the world’s expectations for technological evolution,
innovation, and simplicity. At ViewSonic, we believe that our products have the
ViewSonic product you have chosen will serve you well.
Once again, thank you for choosing ViewSonic !
2
Page 3
Compliance Information
Please read before proceeding
CE Conformity for European Countries
.
e
Following information is only for EU-member states:
W
U
T
i
.
Page 4
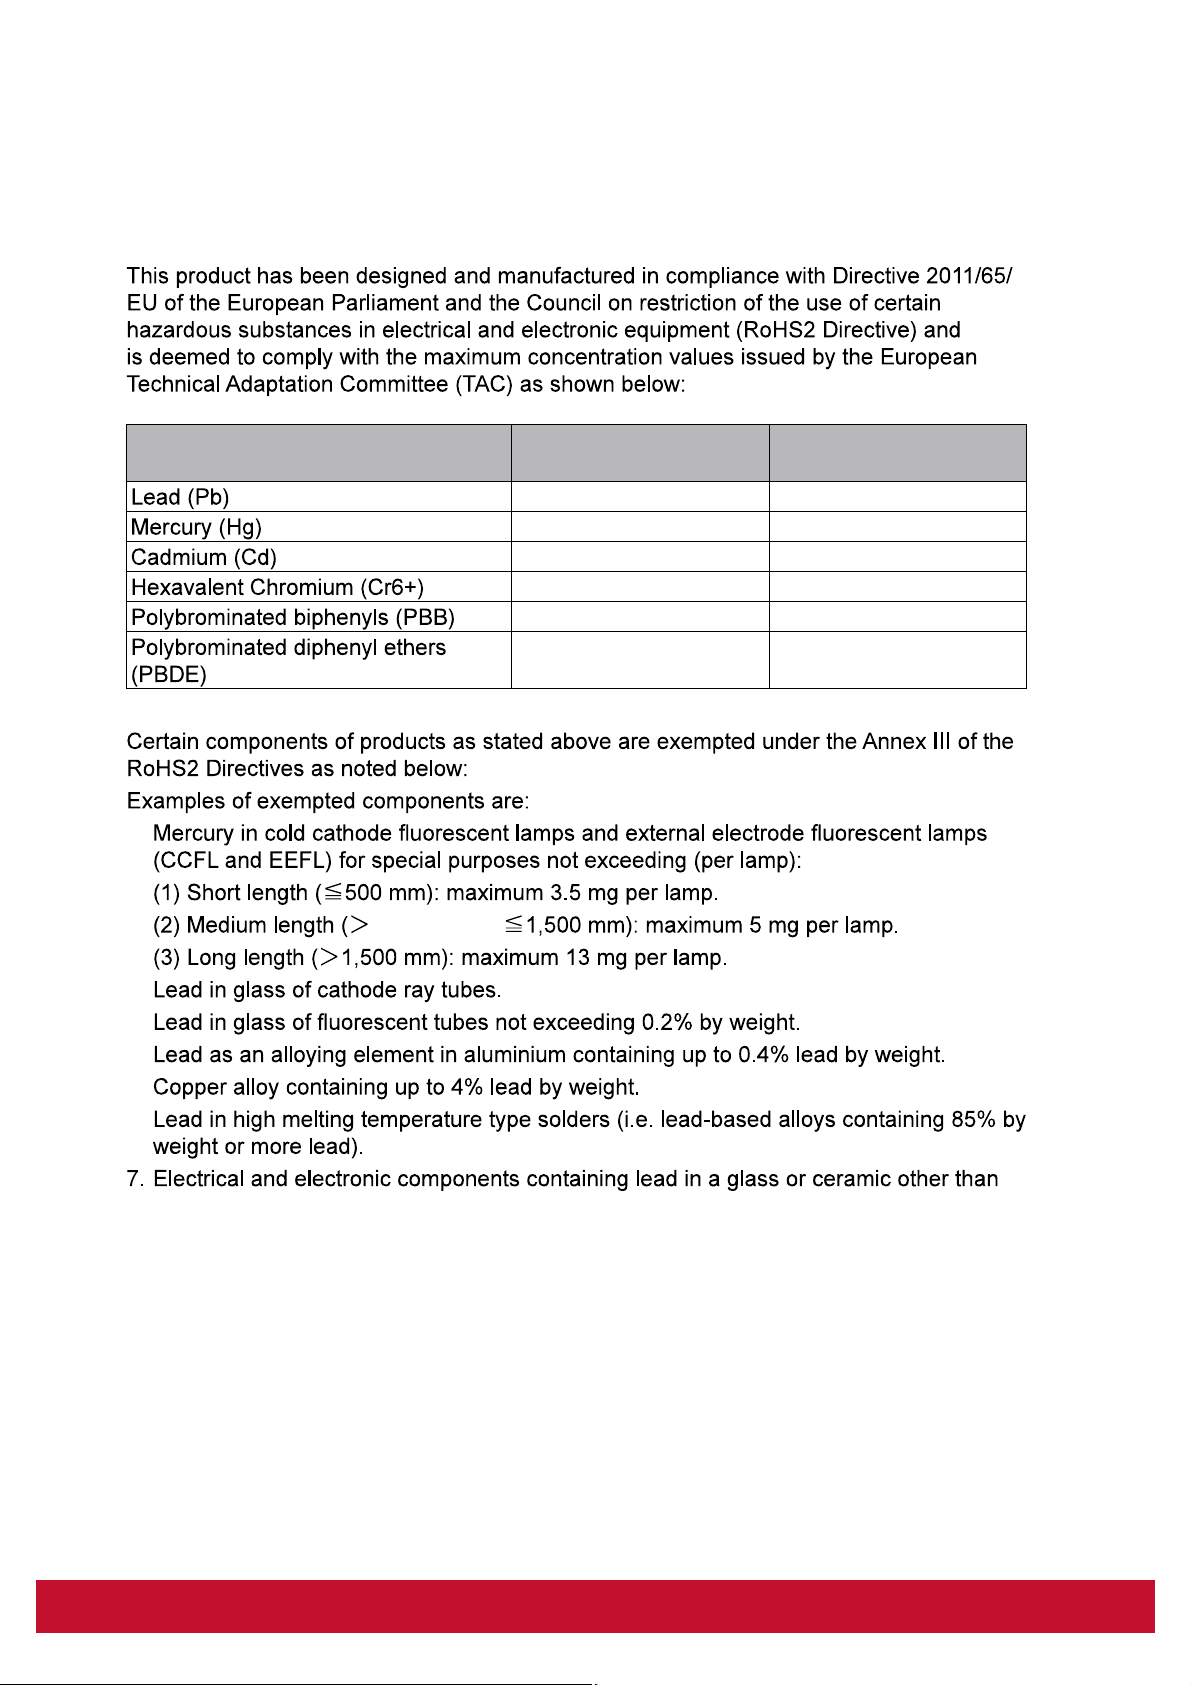
Declaration of RoHS2 Compliance
Substance
1.
2.
3.
4.
5.
6.
500 mm and
Proposed Maximum
Concentration
0.1% < 0.1%
0.1% < 0.1%
0.01% < 0.01%
0.1% < 0.1%
0.1% < 0.1%
0.1% < 0.1%
Actual Concentration
dielectric ceramic in capacitors, e.g. piezoelectric devices, or in a glass or ceramic
matrix compound.
ii
Page 5
Important Safety Instructions
1.
2.
3.
4.
5.
6.
it away from heat sources.
products.
device on your lap.
10.
manufacturer.
11.
12.
cleaning. Never use abrasives or cleaning solutions.
13.Always power off the device to install or remove external devices that do not support
14.
device.
15.
repair.
16.
device may become hot and malfunction as a result.
and shall be easily accessible.
iii
Page 6
Copyright Information
All products used in this device and trademarks mentioned herein are trademarks or
registered trademarks of their respective owners.
Alliance.
®
®
®
®
®
.
from furnishing this material, or the performance or use of this product.In the interest of
notice.
No part of this document may be copied, reproduced, or transmitted by any means, for
Intellectual Property Right Information
respective owners:
iv
Page 7
Product Registration
becomes available, please register your product on the Internet at: www.viewsonic.com.
For Your Records
Product Name:
Model Number:
Document Number:
Serial Number:
Purchase Date:
Product disposal at end of product life
more.
VS16340
v
Page 8

Table of Contents
Table of Contents
1 VS16340 Smart Display Features
2 Set Up Your VS16340 Smart Display
2.1 Connection .........................................................................2
2.2 Get Your Smart Display Ready for Use ..............................2
2.3 Power on Your Device ........................................................3
2.4 Power Off Your Device .......................................................4
3 About Your VS16340 Smart Display
3.1 Touch Screen .....................................................................5
3.2 Applications, Widgets and Shortcuts ..................................6
3.3 Home Screen .....................................................................6
3.4 Navigation buttons .............................................................8
3.5 Status Bar ...........................................................................9
3.5.1 Managing Status Menu ..........................................9
3.6 Customizing Your Home Screen ......................................10
3.6.1 Add an Item (Shortcut) ........................................10
3.6.2 Move an Item .....................................................10
3.6.3 Delete an Item ....................................................10
3.6.4 Change the Wallpaper ........................................10
3.7 Navigating the Applications ...............................................11
3.7.1 Apps screen ..........................................................11
3.7.2 Application Shortcuts ...........................................12
3.7.3 Recent Applications .............................................12
3.7.4 Screen Lock Wallpaper ........................................13
3.8 Connecting to HDMI-compliant Devices via HDMI Input ..14
4 OSD Menu
4.1 Adjustment Bars ...............................................................15
4.2 Functions items ................................................................16
4.3 OSD Notice.......................................................................17
4.4 OSD and Hot keys setting ................................................17
5 Troubleshooting
5.1 Touch Screen Problems ...................................................18
5.2 Other Problems ................................................................18
6 Appendix
.............................................................................19
vi
Page 9
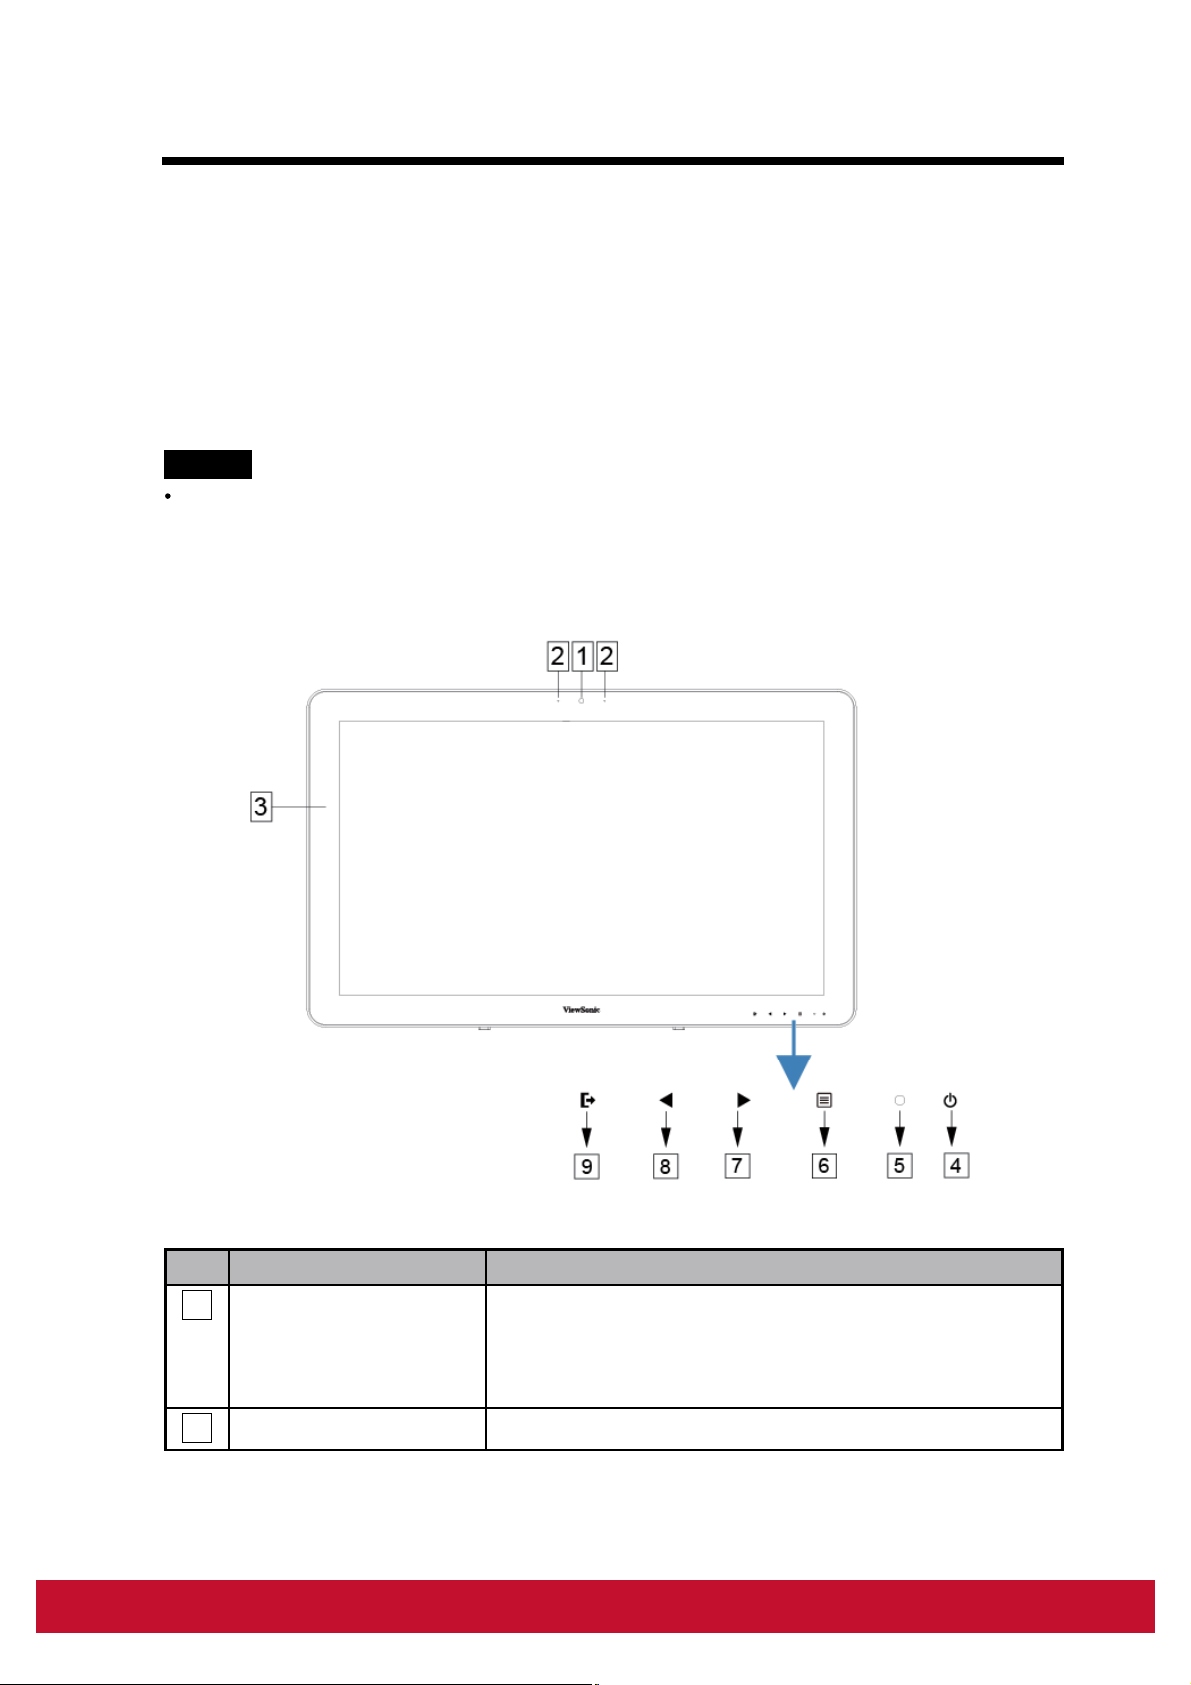
Table of Contents
VS16340 is a Smart Display with 23.6-inch quad-core display running on
Android 5.1 (Lollipop) Comes with 1920x1080p HD resolution, allow you to
work with HDMI, full-sized USB connectivity as well.
1 VS16340 Smart Display Features
This section introduces you to the features of your Smart Display.
NOTE
The features or applications described in this User’s manual may vary depended on the
device model purchased.
Front View
No.Components Descriptions
1
Front-Panel Camera
2 Microphone Used for receiving audio or audio input.
- Used for taking a front picture just the same as a
self-portrait.
- Used for making video calls with supportive web
applications.
1
Page 10
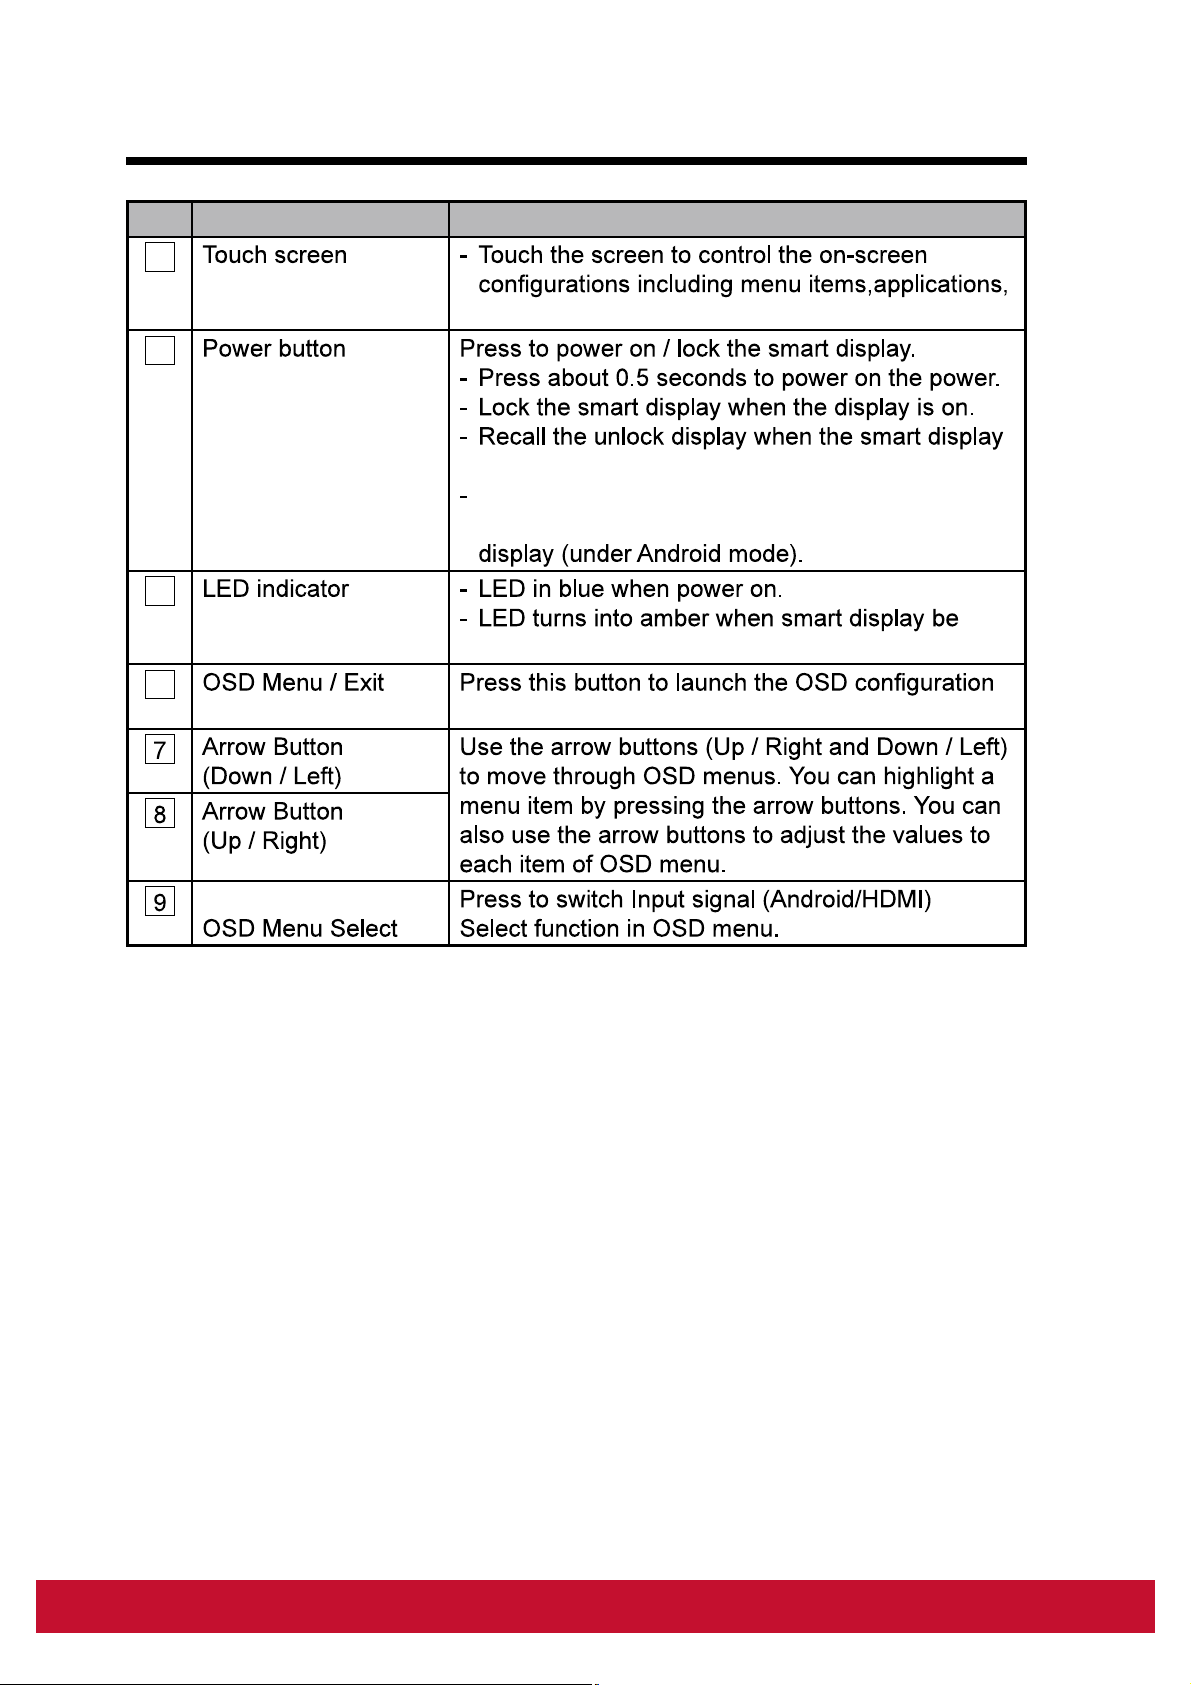
Table of Contents
No.Components Descriptions
3
buttons,keyboard and so on.
4
is locked.
When the display is on, press this button and
hold for about 3 seconds to shut down the smart
5
locked.
6
menu and press again to exit.
Input Signal Switch
2
2
Page 11
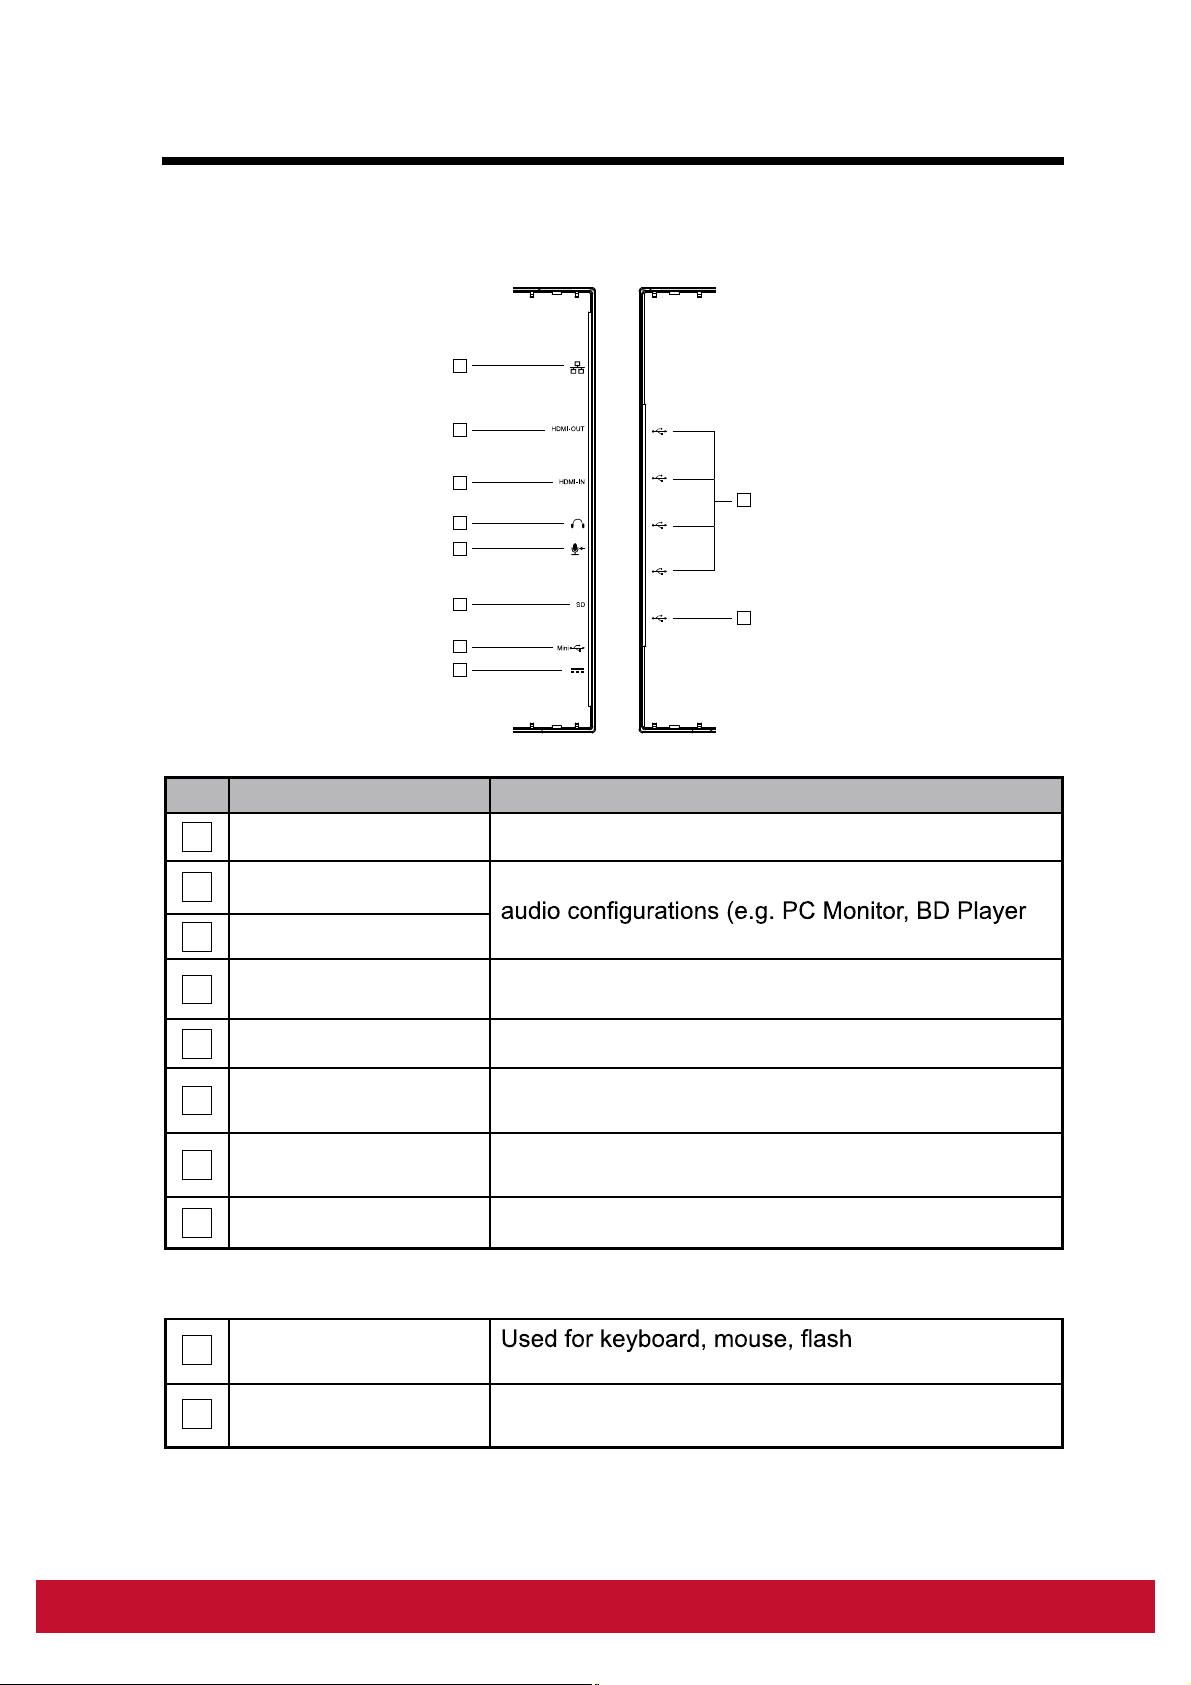
Back View
LEFT SIDE RIGHT SIDE
1
2
3
4
5
6
7
8
LEFT SIDE
No.Components Descriptions
RJ45 Connector Connect to a RJ45 cable for network connection.
1
HDMI OUT
2
HDMI IN
3
Headset Jack Connect to earphone or headset.
4
Microphone IN Plug a compatible microphone into the device.
5
Connect to digital high quality device for video and
OHP )
1
2
SD Card Slot
6
Mini USB Port (OTG)
7
DC in Port Connect to power adaptor.
8
RIGHT SIDE
1
USB type-A x4 (2.0)
2
USB type-B
Input SD card to extend storage capacity.
(Up to 32 GB)
Connect to windows computer for data transferring.
(Need MTP driver)
disk (supports
FAT32 format only) or printer connections.
External display mode for USB upstream Webcam
and Touch-screen control functionality.
33
Page 12

2 Set Up Your VS16340 Smart Display
2.1 Connection
LAN
HDMI OUT
HDMI IN
Headset
Microphone
SD
USB
Power
Wi-Fi Devices
PC Monitor
Notebook
External
Computer
DVD Player
Earphone
Microphone
SD Card
Phone U Disk
Outlet
2.2 Get Your Smart Display Ready for Use
Insert the SD card
Insert a SD card if desired and / or
1
available on the back of your smart
display.
Printer
USB Storage
Keyboard
Mouse
Computer
USB Type-A
USB Type-A
USB Type-A
USB Type-A
USB Type-B
4
Page 13

Connect the Power Cord
Connect the included power cord to
1
the power jack.
Connect the other end of the power cord to a suitable power outlet.
2
2.3 Power on Your Device
Press the power button gently to power on your device
Slide the lock icon to unlock the screen
(if the lock screen function with slide is enabled)
After connecting the power cord, you can press the power button about
1
0.5 seconds to power on your device.
Once powered-up, the LED indicator will show solid Blue.
2
The unlock display will appear after a short boot-up period. (If the lock
3
screen function is enabled).
5
Page 14

Touch and slide the lock icon to unlock the screen if necessary.
4
The device is ready for use when the Home screen is displayed.
5
2.4 Power Off Your Device
Press and hold the power button for about 3 seconds.
1
When the power off menu appears, touch OK.
2
6
Page 15

3 About Your VS16340 Smart Display
3.1 Touch Screen
surface of the screen directly. You can manipulate icons, buttons, menu
items, on-screen keyboard and other items on the touch screen with below
methods:
Methods Descriptions
- Act on items on the screen including application and settings
icons.
- Type letters and symbols using the on-screen keyboard.
- Press the on-screen buttons.
Touch and
Hold
Drag
Swipe or Slide
Zoom Out
Zoom In
NOTE
You can connect the dots three to zoom the entire display frequency, also with two
fingers to rotate and zoom the display for ex. Google MapsTM, as well as voice output
designed specifically for blind users and gesture mode navigation features.
Touch and hold an item on the screen by touching it without
reaching the target position.
- Move an item on the screen.
- Scroll through Home screens, web pages, lists, entries, photo
thumbnails, contacts and so on.
view of an image or web page.
image or web page.
7
Page 16

3.2 Applications, Widgets and Shortcuts
The soft buttons or icons offer a variety of functions and shortcuts. On the
Home screen, it is your starting point to access all the features on your
device. It displays application icons, widgets, shortcuts and so on.
Applications:
device, it is preloaded with a variety of applications already. You can also
download additional applications from the Google PlayTM Store.
Widgets: Widgets are applications that you can use directly on the Home
screen. Example: Analog clock, Bookmark, Picture frame, the GoogleTM
search bar and so on.
Shortcuts: A link that you can create on your Home screen to provide
quicker access to applications you have installed.
3.3 Home Screen
Once you power on your device, and unlock your screen, the central Home
Home button to go to
Home screen. On the Home screen, it allows you to access all the features
installed in your device.
shortcuts, and other items located on each screen panel. You can also add
shortcuts, widgets or change the desktop wallpaper on each screen panel.
8
Page 17

1 2
10
8
9
11
7
6
No. Items Descriptions
1 Google Search
2
3 Back Return to the previous screen or option.
4
5
6
7
Navigation
Area
Home
Recent
Applications
Screehshot
Apps
3 4 5
Use the Google Search application to search
the web faster and easier from Google.
Flick and drag the screen horizontally until
the desired Home screen is displayed.
This button will indicate you to go back to
central Home screen at any time.
Touch this button to show you a list of
images about the applications you have
accessed recently. You can touch the listed
image to open the applications.
Tap this button to capture an image of your
screen.
Touch the Apps button to launch all of the
applications installed on your device.
8
9
10
3:11
corner of the screen when you enable the
Time Display the current time.
Voice Input
Use voice input as an alternative to text
entry via keyboard.
9
Page 18

No. Items Descriptions
You can add an application shortcut to the
11
Shortcuts
Home screen and move it freely by touching
allows you to open a shortcut item quickly.
3.4 Navigation buttons
described as below:
Buttons Descriptions
- Touch this button to go back to the previous screen or
option.
Back
- If the on-screen keyboard is displayed, the button
changes to . Touch it to close the on-screen
keyboard.
Home
Recent Apps
Decreased
volume button
Increased
volume button
- Touch this button to go to the central Home screen
when viewing other Home screens.
- Touch this button to go back to the last Home screen
you have viewed when launching any functions on the
device. Or touch this button again to go back to central
Home screen.
A short-cut way for you to open recent application you
have accessed. Select and touch one of the images from
the list to open the application directly.
To adjust the volume(-) setting on the OSD menu.
To adjust the volume(+) setting on the OSD menu.
10
Page 19

3.5 Status Bar
(status bar).
Items Descriptions
Time Displays the current time.
Show you the enabled icon.
Status Menu
Show you the current state of your device just like Owner,
Brightness, Settings, and WIFI Settings.
3.5.1 Managing Status Menu
You can touch and drag down the Time area
on the status bar to appear the status menu.
Touch OWNER item to view people saved on your system.
Touch SETTINGS item to enter Settings menu that allows you to change
the display settings. For more information, please Refer to 6 Customizing
Your VS16340 Smart Display.
Touch WI-FI
Touch any other area of the screen to close the Status Menu.
11
Page 20

3.6 Customizing Your Home Screen
3.6.1 Add an Item (Shortcut)
Touch the Home button to go back the central Home screen.
Drag on the screen horizontally to select a Home screen where you want
to add the item.
Touch the Apps button located on the bottom of your screen.
On the Apps screen, touch APPS or WIDGETS tab to enter APPS or
Select one of APPS or WIDGETS item that you want to add.
Touch and hold the item to add it onto the selected Home screen.
3.6.2 Move an Item
On the Home screen, touch and hold the item that you want to move.
3.6.3 Delete an Item
On the Home screen, touch and hold the item that you want to delete such
as a widget or shortcut.
An “X Remove” will soon be displayed at the top of the Home screen.
Drag the item over the “X Remove”.
3.6.4 Change the Wallpaper
Long Touch (touch and hold) an empty space on the screen.
A “Choose wallpaper from .
(Wallpaper sources: ES File Explorer, Gallery, Live Wallpapers and
Wallpapers)
Tap on the desired wallpaper image. You can always exit by tapping .
Set wallpaper” to renew the
wallpaper of Home screen.
12
Page 21

Some wallpaper allows you to change the wallpaper color, ex. Magic
Smoke. If “Settings…” displays during the changing wallpaper. Touch it ,
and on the top of screen will display “Tap to change”, touch the screen to
colors.
You can touch Back button to go back previous screen without renew any
changed settings.
NOTE
All Home Screens share the same background. You cannot set different wallpapers to
individual Home Screen panel.
3.7 Navigating the Applications
3.7.1 Apps screen
Open the Apps screen
You can access Apps screen from any Home
screen by touching the Apps button
located on the bottom of your screen. The
Apps screen contains all of the applications
installed on the device including those you
have downloaded.
Navigate pages of applications
Flick the Apps screen horizontally and touch an application to launch it.
Close the Apps Screen
Touch the Home button on the system bar to go back the central Home
screen.
13
Page 22

3.7.2 Application Shortcuts
To quickly launch applications on the Home
screen, you can add shortcuts for frequentlyused application to the Home screen.
For more information, please Refer to 3.6
Customizing Your Home Screen.
Use the shortcut to open an application
Touch the Home button on the system bar.
1
If the desired application shortcut displays on the Home screen, touch
2
the shortcut to launch the application.
3.7.3 Recent Applications
Open a recently used application
Touch the Recent Applications
1
button to view the recently used
applications.
Scroll the list of recently used applications, and touch the desired
2
application thumbnail to launch the application.
Touch the Recent Applications button again to close the list of
3
recently used applications.
14
Page 23

3.7.4 Screen Lock Wallpaper
You can set the display to turn off automatically after a timeout period of
inactivity, or power it off manually by touching Power button. When you touch
the Power button to wake up the display, the screen lock wallpaper appears
to avoid unintentional touch of the screen. When the screen lock wallpaper
appears, touch and hold the lock icon, drag it to the edge of the larger circle
that surrounds it to unlock the screen. Refer to 2.3 Turn On Your Device.
NOTE
Set the duration of screen to remain on before entering sleeping mode, touch the Home
15
Page 24

3.8 Connecting to HDMI-compliant Devices via HDMI
Input
interface for transferring uncompressed digital audio/video data. You can
obtain the best user experience for video playback and gaming via HDMI.
VSD242 is equipped with a HDMI input for connection to an external HDMIcompliant device. You can connect your PC, notebook, Blu-ray player or any
.
How to begin
A type A (HDMI) to type A (HDMI) HDMI cable must be available.
1
Connect the Type A connector of the HDMI cable to the desired HDMI
2
compliant device.
Connect the Type A connector of the HDMI cable to the HDMI-IN port
3
located on the back of your VS16340 . Tap the SELECT icon to
VS16340
switch to HDMI- mode.
For PC or notebook connection, always set the appropriate resolution.
4
VSD242 supports with max. resolution of 1920*1080.
16
Page 25

4 OSD Menu
OSD Menu
C O N T R A S T / B R I G H T N E S S
C O N T R A S T
B R I G H T N E S S 8 0
7 0
Select the Menu/Exit button on side of your VS16340 to launch OSD
the Contrast/Brightness, Input Select, Audio Adjust, Color Adjust, Information,
Manual Image Adjust, Setup Menu and Memory Recall.
4.1 Adjustment Bars
Contrast/Brightness:
Contrast: Select and drag the slider on the Contrast bar to adjust the
contrast of screen display. Drag the slider to the right, the contrast is larger.
By default, the contrast is set to 70.
Brightness: Select and drag the slider on the Brightness bar to adjust the
brightness of your screen. Drag the slider to the right, the screen is brighter.
By default, the brightness is set to 100.
Audio Adjust:
Select and drag the slider on the Volume bar to adjust the volume. Drag the
slider to the right, the volume is louder. By default, the volume is set to 50.
Here you can also set the volume to Mute or View other sounds.
17
Page 26

OSD Menu
4.2 Functions items
Input Select: Select the input source comes from HDMI or Android.
Remember to check the HDMI connection is successful before you select the
or HDMI item.
Color Adjust: Include sRGB, Bluish, Cool, Native, Warm and user color
items.
Information: Select this item to show you the information about your
VS16340 including the Resolution, H.Frequency, V.Frequency, Pixel Clock,
Model Number and Website.
Manual Image Adjust: Include Sharpness, Dynamic Contrast, Aspect Ratio,
Overscan, ECO Mode, ViewMode and Blue Light Filter.
Setup Menu: Include Language Select, Resolution Notice, OSD Position,
OSD Time Out, OSD Background, Power Indicator, and Sleep.
Memory Recall:
Select the Memory Recall
factory settings.
NOTE
OSD language supports English, Deutsch (German), Francais (French), Italian,
Traditional Chinese.
ViewMode provides for “Standard, Game, Movie, Web, Text, and Mono” mode settings
for optimum image quality.
The Blue Light Filter setting allows for the user adjustable reduction of high energy blue
light for reduced eye strain.
A TO IMAGEADJUSTU
H VPOSITION/
H RIZONTALSIZEO
F NETUNEI
SARPNESSH
DNAMICCOY NRASTT
RSPONSE TE MEI
APECT TIORAS
DSPLAYMOI DE
EOMODEC
VEWMODEI
M NUAL IMAGEADJUSTA
BUELIGHT FILTEL R
S TUPMENUE
MMORYRECALLE
TCELT ESUPIN
TSUJO DAIDAU
TSUJR DAOLCO
NOIMR TAOFIN
TSUJDAEGAMA ILUNMA
SSENTHGIRB/R TSATNCO
A TO IMAGEADJUSTU
BUELIGHT FILTEL R
M NUAL IMAGEADJUSTA
S TUPMENUE
MMORYRECALLE
GIRB/R TSANC
TCELT ESUPIN
TSUJO DAIDAU
TSUJR DAOLCO
NOIMR TAOFIN
H
TNESSO
06
TSUJDAEGAMA ILUNMA
18
Page 27

4.3 OSD Notice
idling:
out value.
No signal:
4.4 OSD and Hot keys setting
OSD Lock:
buttons are pressed the message OSD Locked will display for 3 seconds.
OSD Unlock:
seconds.
Power Button Lock:
seconds. If the power button is pressed the message Power Button Locked
will display for 3 seconds. With or without this setting, after a power failure,
Power Button Unlock:
for 10 seconds.
DDC/CI enable/disable:
well as receive sensor data from the devices, over a bidirectional link.
Page 28

Troubleshooting
5 Troubleshooting
5.1 Touch Screen Problems
Problems Causes Solutions
Touch screen does
not respond to hand
gestures or render
them properly.
The touch function
on the VS16340
HDMI Mode does not
work properly when
the USB cable is
connected to the USB
B-type connector
power noise during
device turn on process
Water drop or spot above
the glass surface.
Pc screen resolution
settings of Multiple
Displays incorrectly
set to "duplicate these
displays."
5.2 Other Problems
Problems Solutions
If the LED does not light blue with the device booting-up then:
- Ensure that the power adaptor is plugged-in to a suitable
power socket
No power
- Ensure that the DC connector is fully inserted into the correct
socket on the rear of the VS16340 located under the cover
- Check the power socket with another device (i.e. table lamp)
- If there is still no power then contact ViewSonic support or
the Reseller from whom the device was purchased
Re-Plug the wire.
Clean and remove the water
drop then re-plug the USB
wire.
Change PC screen resolution
settings from "duplicate
these displays"to "show
desktop only on 2"(VS16340)
No display Check external HDMI device and connections.
Lock-up Restart
App doesn't
function
No network Check WiFi settings, try Ethernet if available.
No audio Check volume level setting.
Check with App author.
VS16340 device.
20
Page 29

6 Appendix
LCD Spec.
Size
Hardware
Appendix
2
Mic location
Speakers
21
Page 30

Appendix
Adaptor
Input: 110V~230V
Output: 12V, 4A (48W)
Physical 593mm x365x47(mm) 23.35x14.37x1.85(inches)
Weight
5.62Kg (Net)
8.12Kg (Gross)
SW
OS Android 5.1 (Lollipop)
System
CPU/SoC Rockchip RK3288
Speed 1.8GHz
Cores Quad-core
Graphic Embedded
Memory DDR3 2GB, Speed to 800Mbps
Storage eMMC (NAND), 16GB
WLAN 802.11b/g/n/a/ac
Environment
Temperature &
Humidity
Operation: 20%~90% @ 35oC Non-condensing
Storage: 90% R.H.
Altitude 0~2,000m
Accessories
Power cord (by region)
Power adaptor *1
Quick Start Guide *1
22
Page 31

Customer Support
Country/RegionWebsite
www.viewsonic.com.au
www.viewsonic.com
www.viewsoniceurope.com
www.hk.viewsonic.com
India www.in.viewsonic.com
T= Telephone
C = CHAT ONLINE
Email
Macau www.hk.viewsonic.com
Islands
South Africa
www.viewsonic.com
www.viewsonic.com.sg
www.viewsonic.com
21
Page 32

Limited Warranty
ViewSonic® Smart Display
What the warranty covers:
ViewSonic warrants its products to be free from defects in material and workmanship,
under normal use, during the warranty period. If a product proves to be defective in
material or workmanship during the warranty period, ViewSonic will, at its sole option,
covered by the balance of the time remaining on the customer’s original limited warranty.
installed by the customer.
How long the warranty is effective:
your country of purchase, for all parts including the light source and for all labor from the
ViewSonic is not responsible for any data loss.
Who the warranty protects:
What the warranty does not cover:
the product.
e. Normal wear and tear.
f. Any other cause which does not relate to a product defect.
when a static image is displayed on the product for an extended period of time.
How to get service:
provide your product’s serial number.
serial number of the product.
ViewSonic service center or ViewSonic.
contact ViewSonic.
22
Page 33

Limitation of implied warranties:
particular purpose.
Exclusion of damages:
ViewSonic’s liability is limited to the cost of repair or replacement of the product.
ViewSonic shall not be liable for:
business opportunity, loss of goodwill, interference with business relationships, or
other commercial loss, even if advised of the possibility of such damages.
3.Any claim against the customer by any other party.
OTA update disclaimer:
®
smart display. ViewSonic
assumes no liability for data loss or any damages caused as a result of any updates
for obtaining the necessary rights to access and use any third party content. ViewSonic
assumes no liability for the performance, availability and use of third party products and
23
Page 34

Page 35

 Loading...