


VKG 571
VKG 511-570-571-581 FKG 311-370-371
GB Instructionsforuse
DE Bedienungsanleitung
FR Moded’emploi
DK Brugsanvisning
ES Instruccionesparaeluso
IT Manualed’uso
RUS Instructionsforuse

GB
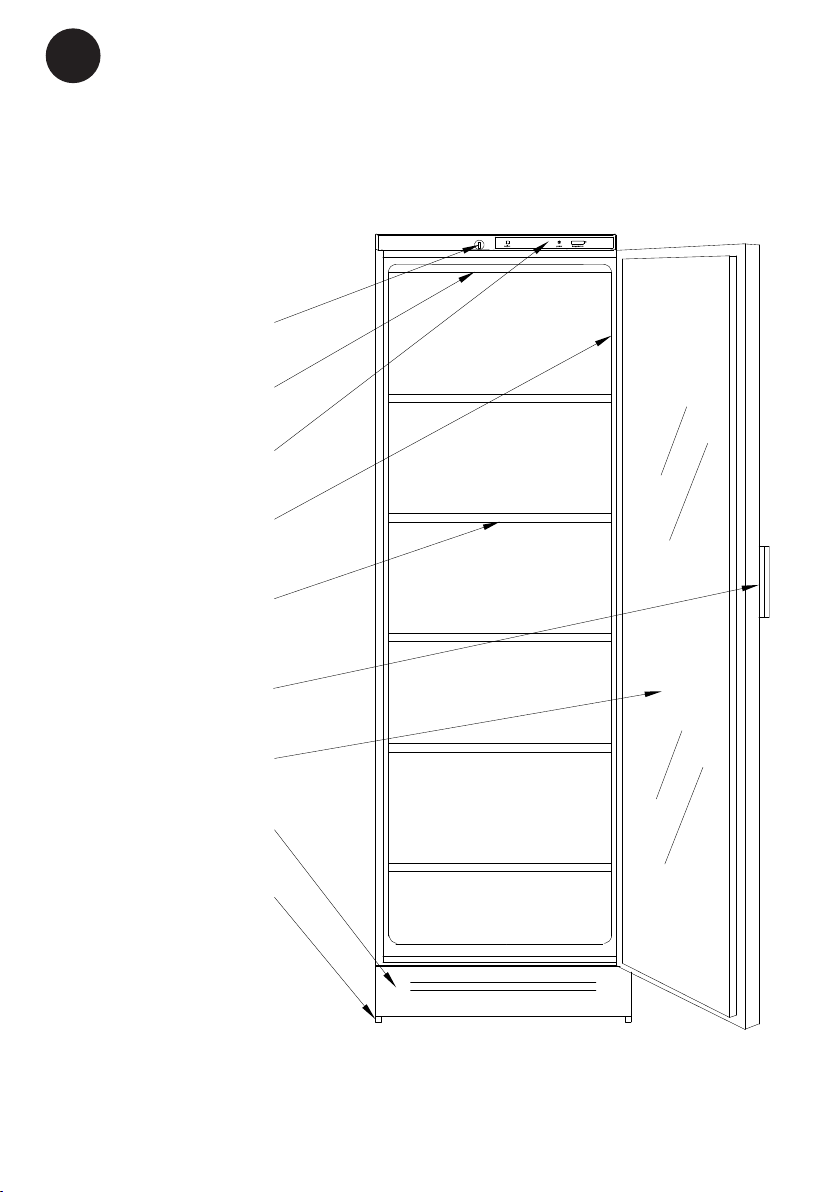
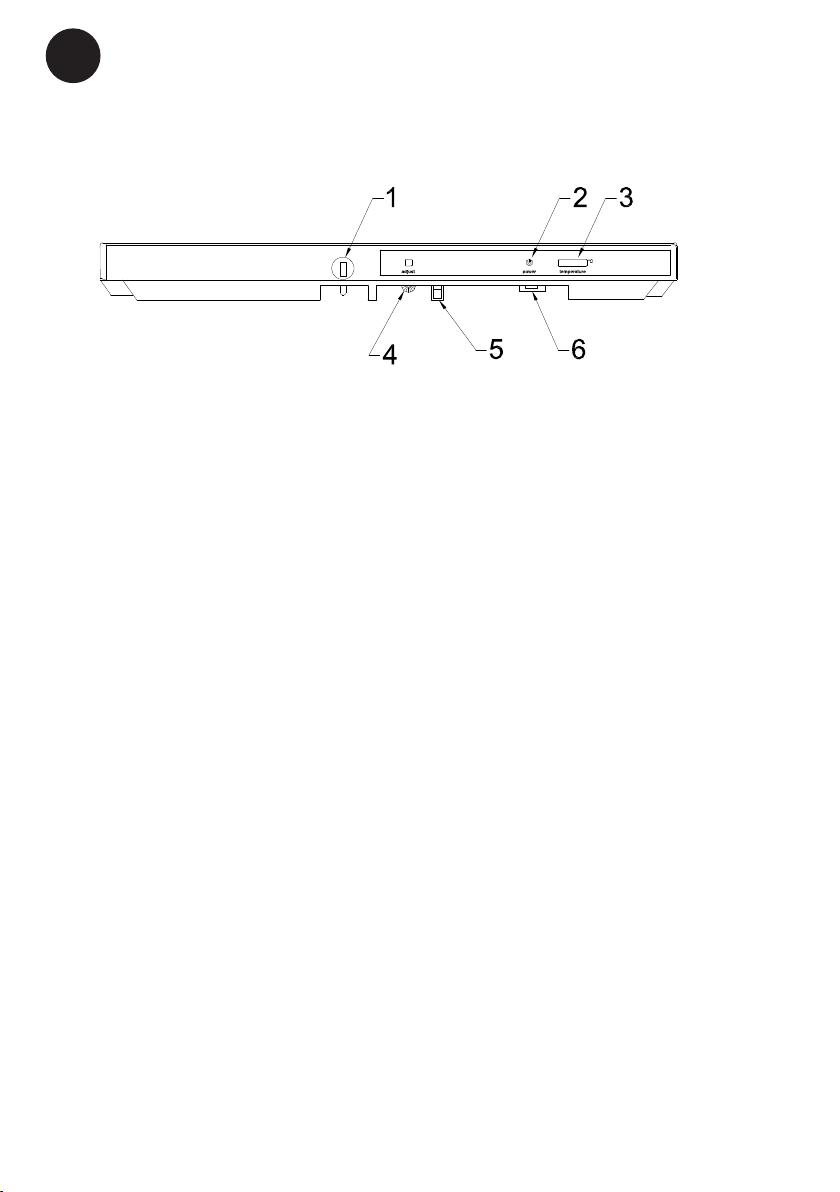
Gettoknowyourwineorbottlecooler:
Lock
Top lighting
Control panel
Rating plate
Shelf
Door handle
Glass door
Kick plate
Adjustable feet
2

Warning.
GB
In case this appliance contains hydrocarbon refrigerant please refer to guidelines
listed below.
As the appliance contains a ammable
refrigerant, it is essential to ensure that the
refrigerant pipes are not damaged.
Standard EN378 species that the room in
which you install your appliance must have
a volume of 1m³ per 8 g of hydrocarbon
refrigerant used in the appliances. This is
to avoid the formation of ammable gas/
air mixtures in the room where the appliance is located in the event of a leak in the
refrigerant circuit. The quantity of the refrigerant used in your appliance is indicated on
the rating plate.
WARNING: Keep ventilation openings in
the appliance’s cabinet or in
the built-in structure clear of
obstruction
WARNING: Do not use other mechanical
devices or other means to ac-
celerate the defrosting process
than those recommended by
the manufacturer
WARNING: Do not damage the refrigerant
system
WARNING: Do not use electricalappli-
ances inside the refrigerated
storage compartment, unless
they are of a type recommended by the manufacturer
WARNING: Do not expose the appliance
to rain
WARNING: This appliance is not intended
for use by young children or
inrm persons unless they have
been adequately supervised by
a responsible person to ensure
that they can use the appliance
safely. Young children should be
supervised to ensure that they
do not play with the appliance
● Always keep the keys in a separate place
and out of reach of children
● Before servicing or cleaning the appliance, unplug the appliance from the
mains or disconnect the electrical power
supply
● If the supply cord is damaged, it must be
replaced by the manufacturer, its service
agent, or similarly qualied persons in
order to avoid a hazard
● RelevantforAustralia: Supply cord
tted with a plug complies with AS/NZS
3112.
● Frost formation on the interior evaporator
wall and upper parts is a natural phenomenon. Therefore, the appliance should
be defrosted during normal cleaning or
maintenance
● Directions for replacing the illuminating
lamps are to be included in the instruction
● Please note that changes to the appliance construction will cancel all warranty
and product liability
● WINECOOLER-VKG: This appliance
is intended to be used exclusively for the
storage of wine
CLASS 1 LED PRODUCT
3

GB
Contents
Get to know ............................................2
Warning ..................................................3
Before starting the appliance ..................4
Maintenance ...........................................4
Has the appliance stopped working?......5
Technical data.........................................5
Installation ..............................................5
Control panel ..........................................6
Reversing the door .................................7
Ajustment of the door .............................9
Mounting of lock. ....................................9
Warranty, spare parts ...........................10
Disposal ................................................ 11
Beforestartingthe
appliance
Check that the cabinet is undamaged.
Please report any damage immediately to
your dealer. Wash the cabinet and inner
lining with a mild unscented detergent and
wipe it dry. Do not use abrasive scouring
powder, steel wool or similar.
Maintenance
Switch off the appliance and pull out the
plug when cleaning the cabinet.
Only use an unscented detergent when
clea ning the cabinet inside.
You may remove the top panel and wash it
when cleaning the cabinet inside.
The kick panel can be removed to faciliate a
vacuum-cleaning of the oor.
To make the cooling system work at its
optimum it is necessary from time to time
to clean the wire condensator and the compressor at the back of the cabinet by means
of a brush or a vacuum cleaner. Remember
to clean the drain.
4

GB
Hastheappliance
stoppedworking?
Before calling a repairman, check that
● The plug is properly plugged into the wall
socket.
● The fuse is intact.
● The power has not been cut off.
● All controls are correctly set.
● Switch off the cabinet for 15 minutes (for
instance at the thermostat). Switch it on
again and after 5 minutes check whether
frost has formed on the evaporator.
● Do not open the cabinet unnecessaryly.
Technicaldata.
This device complies with relevant EU
directives including Low Voltage Directive
2006/95 EEC. and Electromagnetic Compatibility Directive 2004/108/EC
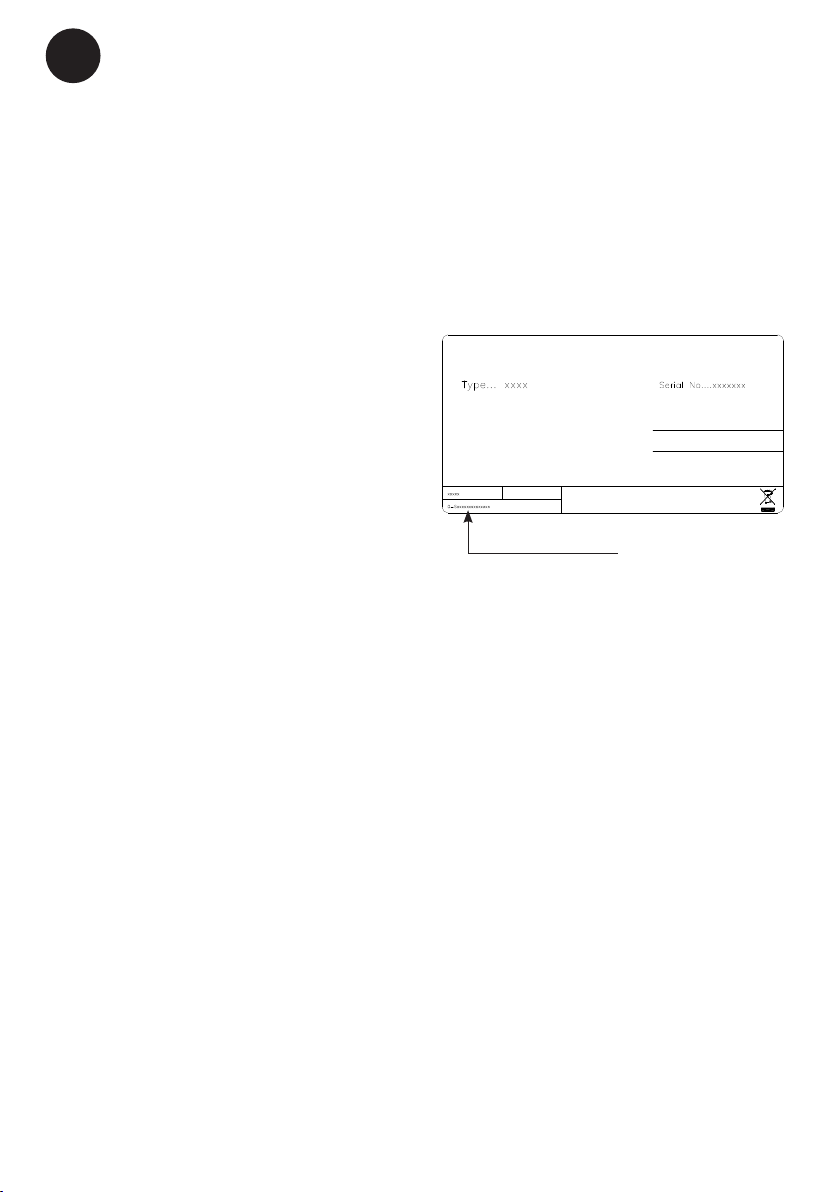
The rating plate provides various technical information as well as type and serial
number.
Installation.
See drawings - page A - C.
Install the cabinet in a dry place and so that
it is not exposed to direct sunlight or any
other sour ce of heat.
Place the cabinet in a level position. This is
easily achieved by adjusting the adjustable
feet at the front edge of the base.
The cabinet may not rest against a wall on
its hinged side. When placing the cabinet
on a carpet or on a wooden oor you should
adjust it once more after some time as the
cabinet might settle in soft foundati ons.
If you want to build the appliance into a
cupboard you must consider 3 factors:
1. There must be space above the appliance in order to make the cooling system
work satisfactorily.
2. When the door is opened the appliance
takes up more room in the width and
therefore the door must either be placed
outside the cupboard or there must be
a space of at least 1,5 cm at the hinge
side.
3. The distance to the wall at the hinge side
must be of a sufcient size.
.
Furthermore it is possible to build together
two appeliance. If one of these is a wine
cabinet please observe a min. distance of
25mm between the cabinet in order to keep
cooling performance intact.
It is safest to place the earthed wall socket
abo ve the appliance and at least 2.0 m
above the oor. Any local installation rules
for appliances of this kind must be observed.
5
GB
During a storm the electricity supply might
be cut off.
You should be aware of this when installing
the appliance in weekend cottages or elsewhere where you would not immediately
observe that the power has been cut off.
Construction and details in the accessories
are subject to alter ation without previous
notice.
Controlpanel.
Connect the appliance to the socket outlet.
A green light indicates that the appliance
has been switched on.
The thermostat knob is adjustable from 0
(stop) to 7 (coldest). Find the position of
the therm ostat which gives you the desired
temperature. Start at position 4.
1. Lock (Not all Appliances has lock in top,)
2. Green light indicating power on
3. Thermometer
4. Thermostat button.
5. Door switch for internal fan
6. Light switch
The switch (6) on the top right of the control
panel is for turning the top lighting on and
off.
6
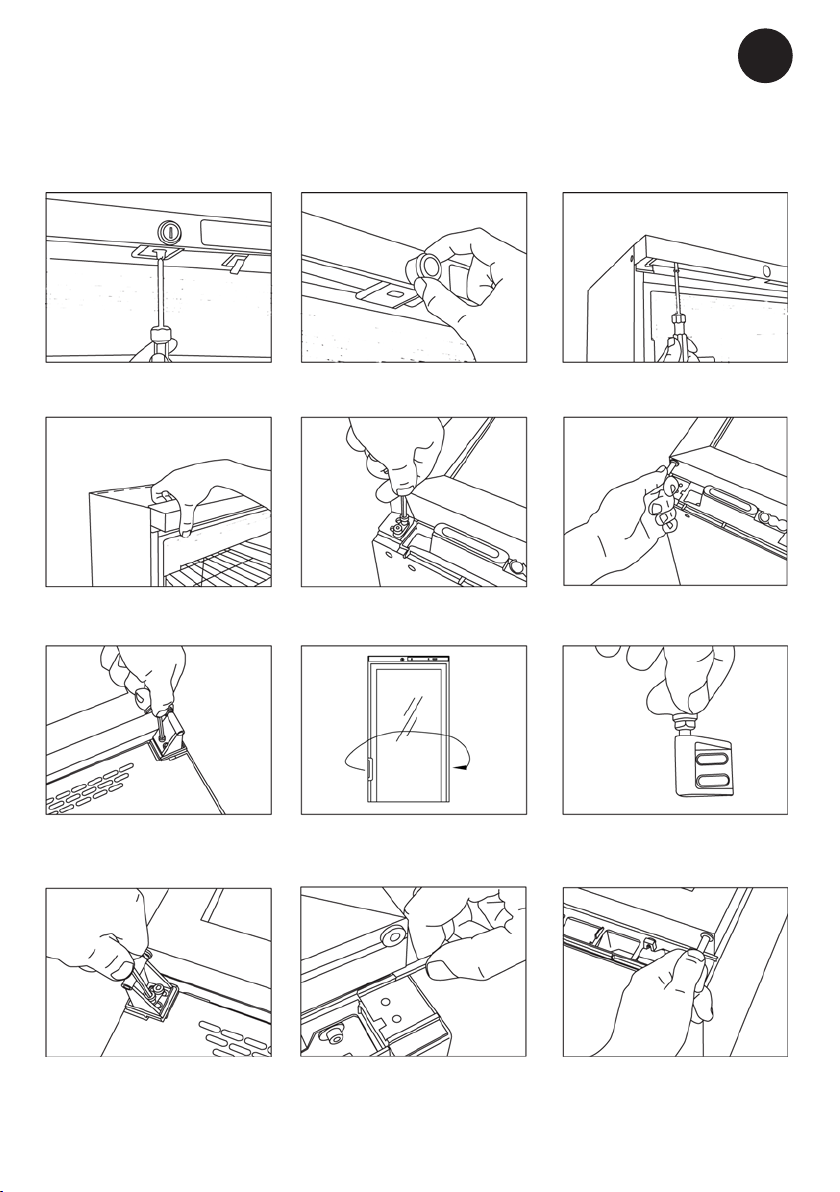
Reversingthedoor.
(Not all appliance have lock.)
GB
1. Remove the lock pin using a
at-headed screwdriver.
4. Tilt the top panel forwards to
remove it (it is secured in tree
places)
7. Remove the bottom hinge
using the hex key.
2. Remove the lock housing.
5. Lay the appliance on its back
and remove the upper hinge,
using the hex key.
8. Move the door handle to the
opposite side.
3. Loosen the top panel. Do not
remove the screws, just loosen
them.
6. Pull the torsion spring out
of the door together with the
hinge.
9. Move the hinge pin to the opposite side of the bottom hinge.
10. Ret the bottom hinge on
the opposite side.
11. Move the palstic door guard
to the opposite side.
7
12. Insert the hinge pin and
tosion spring into the the top of
the door on the opposite side.
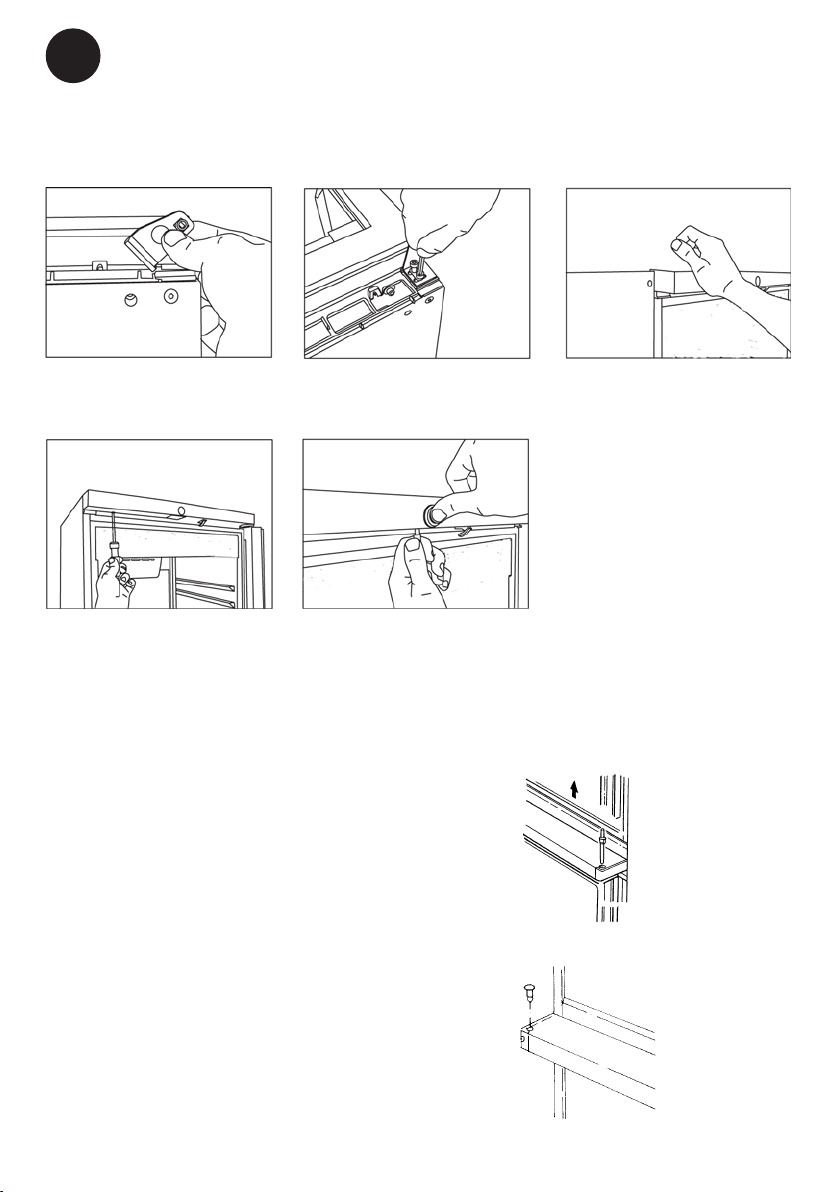
GB
13. Fit the left-side top hinge (available as extra). Tighten the tosion
spring approx. 1/2 turn (anticlockwise
on left side, clockwise on rigth.)
16. Retighten the top panel
screws using a screwdriver.
18. After reversing the door, it is important to check that the sealing strip provides a tight seal
all the way round. If it does not, carefully heat the strip all the way round using a hair dryer.
Then ease the strip outwards slightly so that it forms a tight seal against the cabinet. Be careful not to heat the strip so much that it melts!
14. Secure the top hinge in
position.
17. Ret the lock housing and
lock pin.
15. Raise the appliance into
uppight possion. Click the top
panel into place (it is secured in
three places.)
Reversingthedoorfor
appliancewith2doors.
● Dismount the middle hing pin and
bushing.
● Dismount the door
● Cover for hinge hole is dismounted an remounted in opposite site.
8
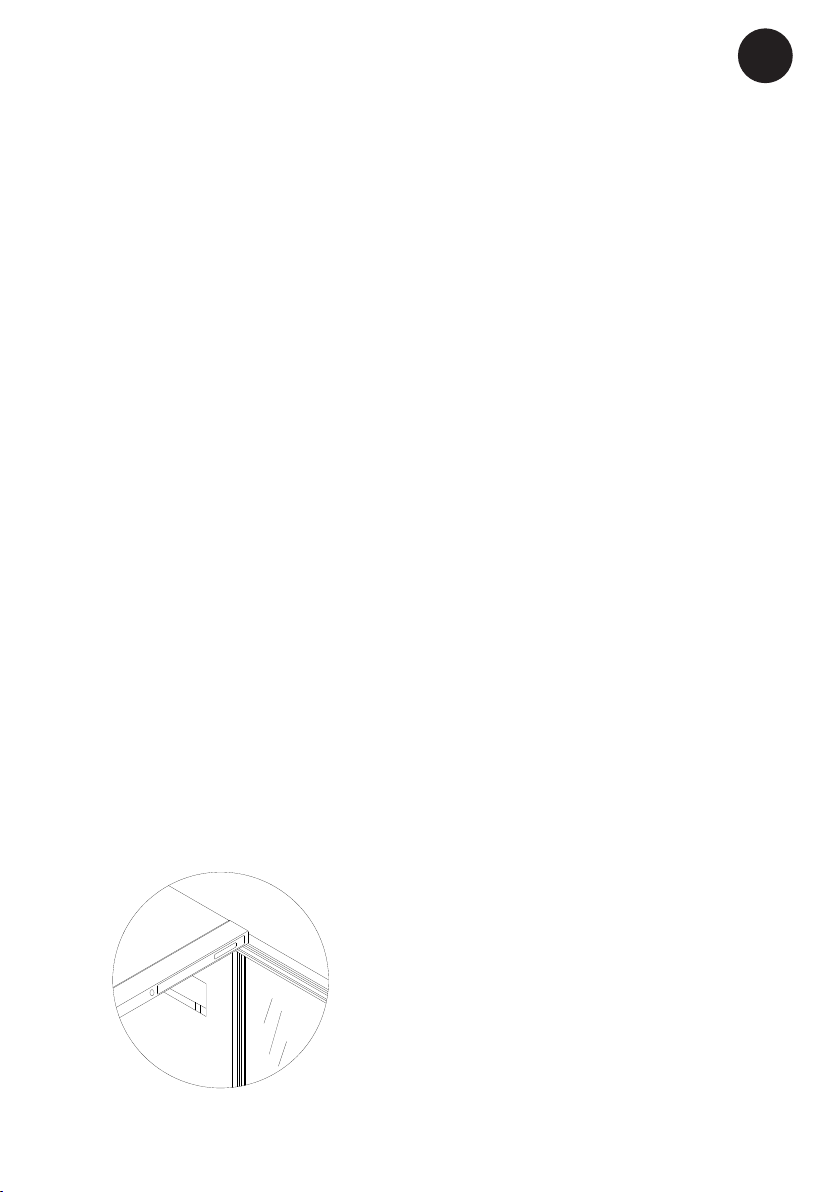
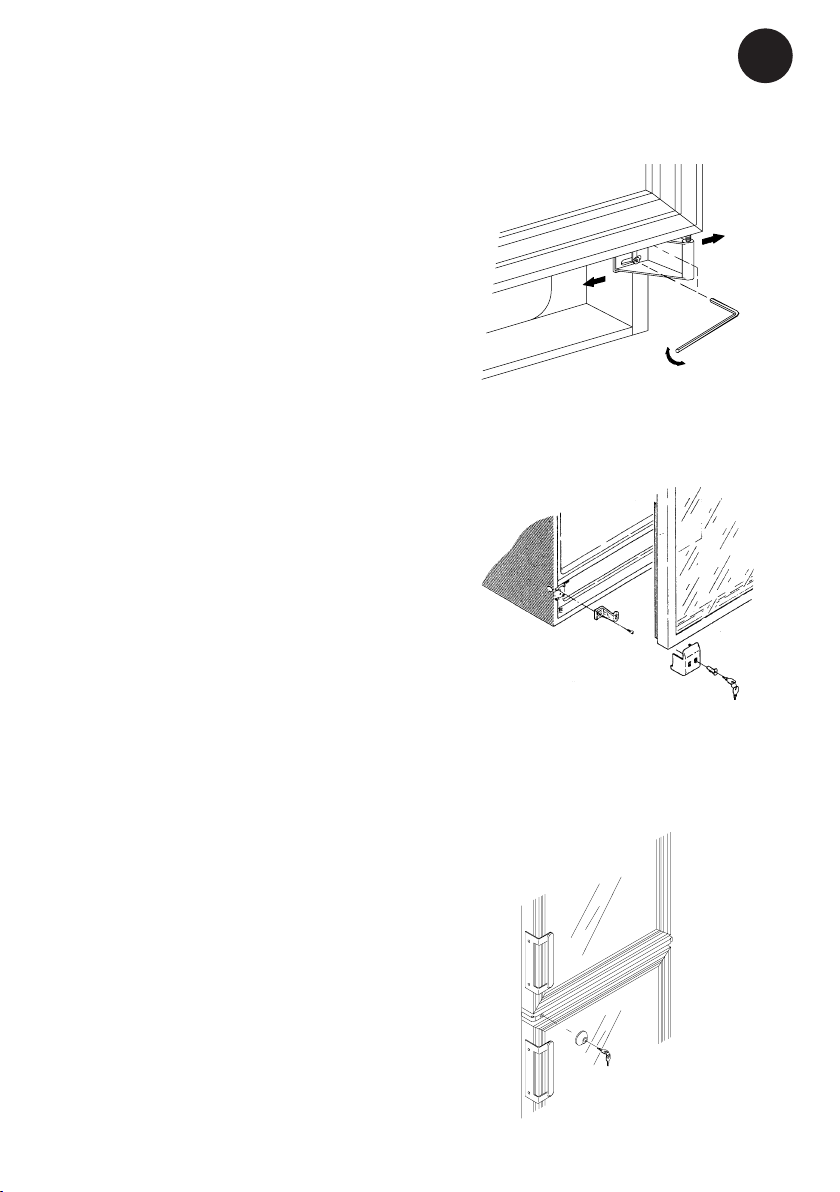
Adjustmentofthedoor.
GB
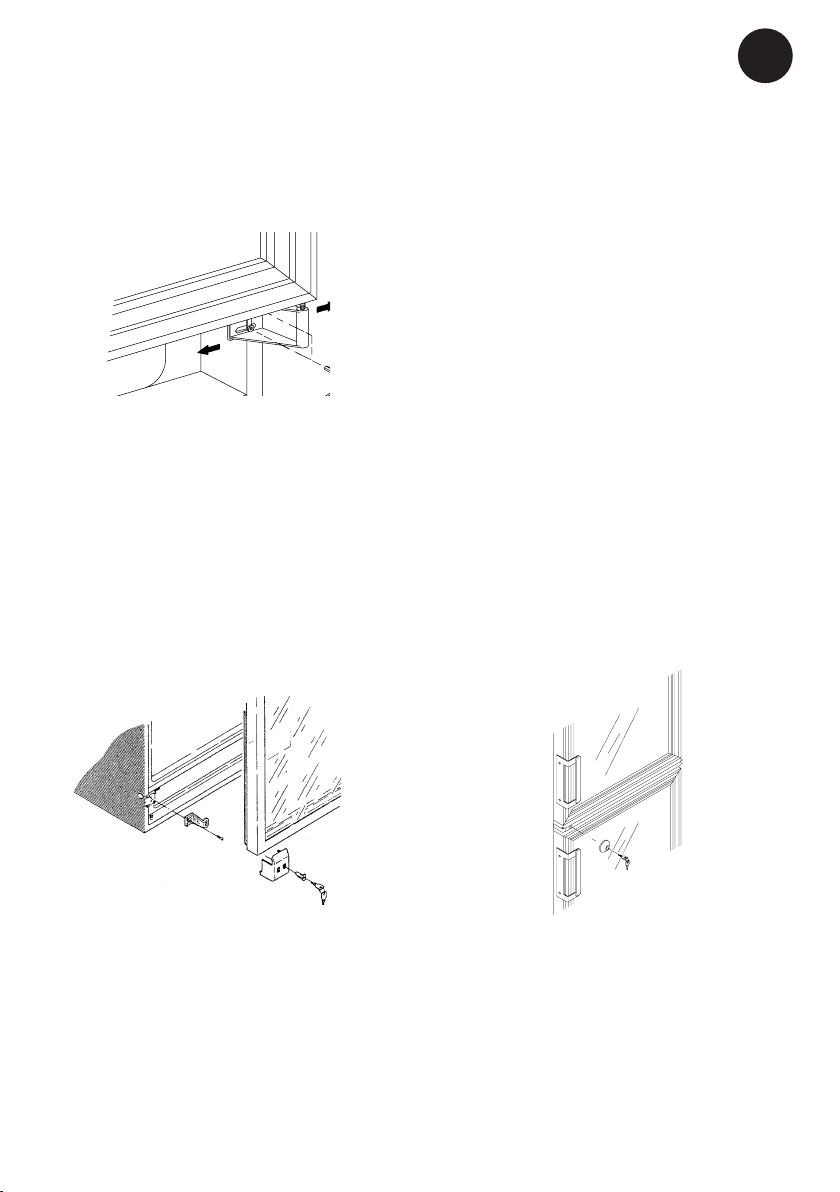
Mountingoflockfor
appliancewith1door.
(Optional extra.)
Mountingoflockfor
appliancewith2doors.
(Optional extra.)
9

GB
Warranty,sparepartsandservice.
Warrantydisclaimer
Faults and damage caused directly or
indirectly by incorrect operation, misuse,
insufcient maintenance, incorrect building,
installation or mains connection. Fire, accident, lightening, voltage variation or other
electrical interference, including defective
fuses or faults in mains installations.
Repairs performed by others than approved
service centres and any other faults and
damage that the manufacturer can substantiate are caused by reasons other than
manufacturing or material faults are not
covered by the warranty.
Please note that changes to the construction of the appliance or changes to the
component equipment of the appliance will
invalidate warranty and product liability, and
the appliance cannot be used lawfully. The
approval stated on rating plate will also be
invalidated.
Transport damage discovered by the buyer
is primarily a matter to be settled between
the buyer and the distributor, i.e. the distributor must ensure that such complaints
are resolved to the buyer’s satisfaction.
Before calling for technical assistance,
please check whether you are able to rectify
the fault yourself. If your request for assistance is unwarranted, e.g. if the appliance
has failed as a result of a blown fuse or
incorrect operation, you will be charged
the costs incurred by your call for technical
assistance.
Spareparts
When ordering spare parts, please state
the type, serial and product numbers of
your appliance. This information is given on
the rating plate. The rating plate contains
various technical information, including type
and serial numbers.
Product number.
10
Disposal
GB
Information for Users on Collection
and Disposal of Old Equipment and
used Batteries
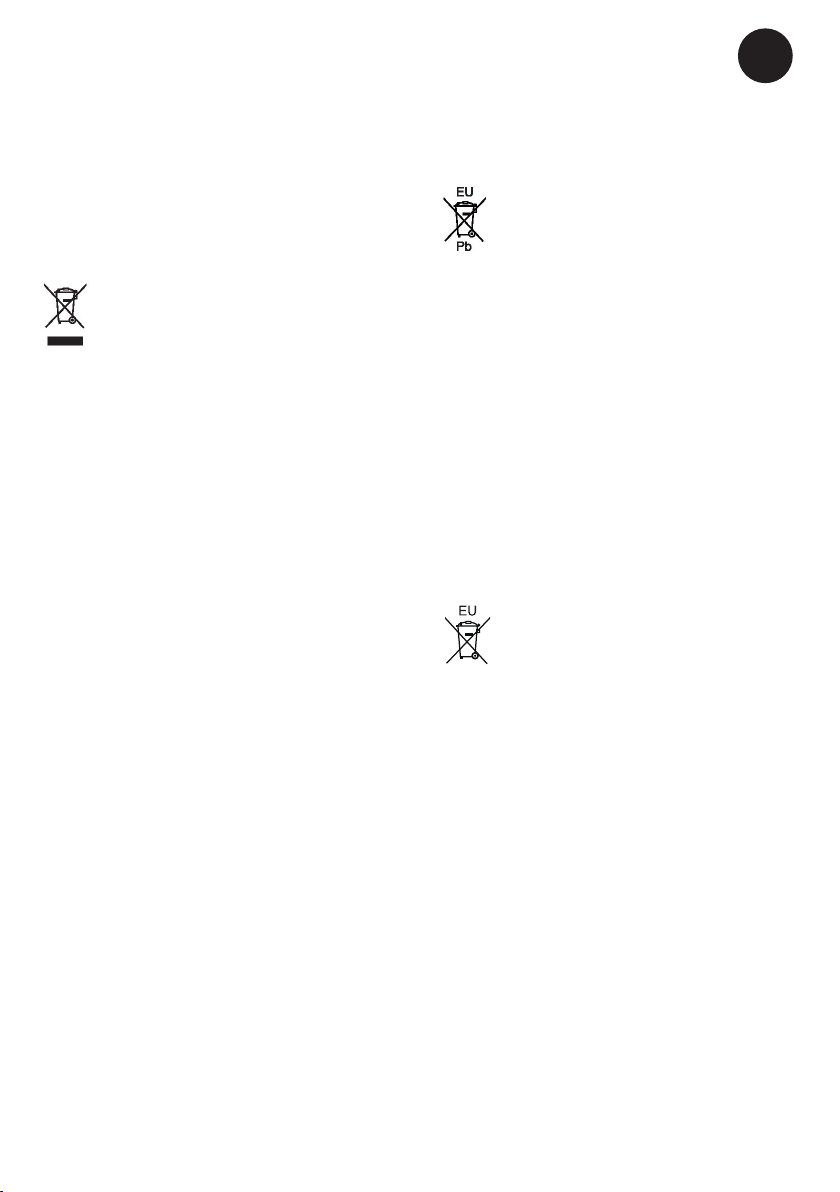
These symbols on the products,
packaging, and/or accompanying
documents mean that used electrical and electronic products and
batteries should not be mixed with
general household waste. For proper
treatment, recovery and recycling
of old products and used batteries,
please take them to applicable collection points, in accordance with your
national legislation and the Directives
2002/96/EC and 2006/66/EC.
By disposing of these products and
batteries correctly, you will help to
save valuable resources and prevent
any potential negative effects on
human health and the environment
which could otherwise arise from
inappropriate waste handling.
For more information about collection and recycling of old products and
batteries, please contact your local
municipality, your waste disposal
service or the point of sale where you
purchased the items.
Penalties may be applicable for incorrect disposal of this waste, in accordance with national legislation.
ForbusinessusersintheEuropeanUnion.
If you wish to discard electrical and
electronic equipment, please contact
your dealer or supplier for further
information.
[InformationonDisposalinother
CountriesoutsidetheEuropean
Union]
These symbols are only valid in the
European Union. If you wish to discard this product, please contact your
local authorities or dealer and ask for
the correct method of disposal.
Noteforthebatterysymbol(bottomtwosymbolexamples):
This symbol might be used in combination with a chemical symbol. In this
case it complies with the requirement
set by the Directive for the chemical
involved.
11
DE
BeginnenSie,IhreWein-oderFlaschenkühlerzu
kennen:
Schloss
Toplicht
Bedienungspanel
Typenschild
Fach
Griff
Glastür
Zeheaussparung
Justierbar Fuß
2

Warnung.
DE
Falls dieses Gerät Kohlenwasserstoff-Kältemittel enthält, sehen Sie bitte die untenstehenden Richtlinien.
Da ein brennbares Gas als Kältemittel in
diesem Gerät dient, ist es wichtig sicherzustellen, dass kein Teil des Kühlkreislaufs
oder der Röhren beschädigt ist.
Der Standard EN378 speziziert, dass der
Raum, in dem das Gerät installiert wird, ein
Volumen von 1m³ pro 8 g Kohlenwasser
stoff-Kältemittel, das im Gerät verwendet ist, haben soll. Dies ist zu beachten,
um die Bildung von leicht entzündlichen
Gasgemischen in dem Raum, wo das Gerät
installiert ist, zu vermeiden, falls eine Undichtigkeit des Kuhlkreislaufs entsteht. Die
Menge von Kältemittel im Gerät ist auf dem
Typenschild angegeben.
WARNUNG: Decken Sie die Lüftungsöffnun-
gen im Kabinett am Gerätes
oder am Einbaumodul nicht ab.
WARNUNG: Verwenden Sie keine anderen
mechanischen Geräte oder
Hilfsmittel um den Entfrostungsprozess zu beschleunigen, als die Geräte, die vom
Hersteller empfohlen sind.
WARNUNG: Beschädigen Sie nicht den
Kühlkreislauf.
WARNUNG: Verwenden Sie keine elektri-
schen Geräte im Gerät, es sei
denn, dass die Geräte vom
Hersteller empfohlen sind.
WARNUNG: Das Gerät nicht dem Regen
aussetzen.
WARNUNG: Das Gerät ist nicht für den
Gebrauch durch kleine Kinder
bestimmt, es sei denn, dass es
ausreichend von einer verantwortlichen Person überprüft ist,
dass sie das Gerät vertretbar
verwenden können. Kleine
Kinder müssen beaufsichtigt
werden, um sicherzustellen,
dass sie nicht mit dem Gerät
spielen. Der Schlüssel ist an
einer separaten Stelle und
unzugänglich für Kinder aufzubewahren.
● Vor Reparatur oder Reinigung des Gerätes den Netzstecker von der Steckdose
ziehen.
● Wenn die Anschlussleitung beschädigt
ist, muss sie nur vom Hersteller, dem
Serviceagent des Herstellers oder einem
anderen Fachmann ausgewechselt werden, um Gefahr zu vermeiden.
● Bildung von Reif auf der inneren Verdampferplatte und den obersten Teile
ist normal. In Verbindung mit Reinigung
oder Wartung muss das Gerät deshalb
entfrostet werden.
● Seien Sie bitte darauf aufmerksam, dass
Änderungen der Konstruktion dieses Gerätes zur Folge haben, dass die Garantie
und Produktenhaftung erlöschen.
● WEINKÜHLER-VKG: Dieses Gerät ist
ausschließlich zur Lagerung von Wein
bestimmt
CLASS 1 LED PRODUCT
3

DE
Inhaltsverzeichnis. Erstmalige
Inbetriebnahme.
Beginnen Sie ihre Kühler zu kennen ..... 2
Warnung ................................................3
Erstmalige Inbetriebnahme.................... 4
Wartung .................................................4
Betriebsstörungen .................................5
Technische Daten ..................................5
Aufstellen ............................................... 5
Bedienungspaneel ................................ 6
Wechsel des Türanschlags ...................7
Justierung der Tür. ................................. 9
Montierung vom Schloß......................... 9
Reklamation und Service..................... 10
Entsorgung .......................................... 11
Gerät auf eventuelle Transportschäden
untersuchen. Beschädigtes Gerät nicht in
Betrieb nehmen, im Zweifel beim Lieferanten rückfragen. Schrank und Türen außen
und innen mit mildem, nicht parfumiertem
Geschirrspülmittel reinigen und abtrocknen.
Keine scheuernden Mittel, Stahlwolle oder
dergleichen verwenden.
Wartung.
Während des Reinigens das Gerät abschalten und Netzstecker ziehen.
Zur Innenreinigung sollte nicht parfumiertes
Geschirrspülmittel verwendet werden. Dabei eventuell obere Abdeckung abneh men
und ebenfalls reinigen.
Die Bodenabdeckung kann abmontiert
wer den, wonach die Unterlage mit einem
Staub sau ger entstaubt werden kann.
Damit das Kühlsystem optimal funktionieren kann, müssen Sie von Zeit zu Zeit den
Draht kondensator und den Kompressor auf
der Schrankrückseite mit einer Bürste oder
einem Staubsauger reinigen.
4
Betriebsstörungen. Aufstellen.
DE
Bevor Sie sich an den Kundendienst wenden, kontrollieren Sie bitte folgendes:
● ob der Stecker richtig in der Steckdose
sitzt,
● ob die Sicherung durchgebrannt ist,
● ob der Strom ausgefallen ist,
● ob das Bedienfeld korrekt eingestellt ist,
● Stellen Sie das Gerät eventuell am Thermostat ab. Schalten Sie nach15 Minuten
wieder ein und kontrollieren Sie nach
weiteren 5 Minuten, ob sich am Verdampfer Reif gebildet hat.
● Den Schrank nicht unnötigerweise öffnen.
TechnischeDaten.
Dieses Gerät entspricht den einschlägigen
EU-Richtlinien einschließlich:
Niederspannungsrichtinie 2006/95/EEC
Elektromagnetische Kompatibilitätsrichtlinie
2004/108/EC
Das Typenschild, das sich im Gerät bendet, enthält verschiedene technische
Angaben sowie Typen- und Seriennummer.
Siehe Skizzen Seite A - C.
Das Gerät an einem trockenen Platz aufstellen und zwar so, daß es nicht direkter
Sonnenbestrahlung oder einer anderen
Wärmequelle ausgesetzt wird.
Das Gerät waagerecht aufstellen, was durch
die höhenverstellbaren Vorderfüße leicht
zu errei chen ist. Das Gerät darf mit der
Türanschlagse ite nicht an einer Mauer anliegen. Falls der Schrank auf einem Teppich
oder auf einem Holzfußboden aufgestellt
wird, sollte die Höhe nach einer gewissen
Zeit wieder eingestellt werden, da solches
Material meistens etwas nachgibt.
Wenn das Gerät in einen Schrank o.dgl.
eingebaut werden soll, müssen 3 Fakto ren
berücksichtigt werden:
1. Über dem Gerät muß für einen passenden Luftspalt gesorgt werden, damit das
Kühlsystem zufriedenstellend funktionieren
kann.
2. Wenn die Tür geöffnet wird, ist das Gerät
faktisch breiter. Das heißt, daß entweder die
Tür außerhalb eines Einbau schran kes sein
muß, oder an der Scharnier seite ein Abstand
zur Schrank wand von mindestens 1,5 cm
sein muß.
3. Zwischen dem Gerät und der Wand u.dgl.
muß in der Scharnierseite ein passender
Abstand sein.
Es besteht die Möglichkeit zwei Schränke
zusammen zu bauen.
Ist einer der beiden ein Weinkühler so ist zu
beachten, dass ein Abstand von min. 25mm
zwischen den beiden Schränken bestehen
muss um das Kühlsystem sicherzustellen.
Die Einbaumaße gehen aus den Skizzen
herv or. Bei Gewitter kann es zu Stromausfall kom men. Kontrollieren She danach die
korrekte Funktionweise
5
DE
Bedienungspanel.
Schließen Sie das Gerät an eine Steckdose
an.
Der Thermostatschalter ist von 0 (abgeschaltet) bis 7 (maximale Kälte) einstellbar.
Probieren Sie verschiedene Thermostateinstellungen aus, bis Sie die gewünschte
Temperatur erreichen. Bei Pos. 4 anfangen.
1. Schloss.
(Nicht alle Modelle haben ein Schloss )
2. Netzkontrolleuchte (grün).
3. Thermometer.
4. Thermostatknopf.
5. Türschalter für inneren Ventilator.
6. Lichtschalter.
6
WechseldesTüranschlages.
(Nicht alle Modelle haben ein Schloss in der oberen Gehäuseleiste)
DE
1. Entfernen Sie die Sperre mit
einem Schraubenzieher.
4. Neigen Sie die Oberseite nach
vorne, um die Gehäuseleiste zu entfernen.(an drei Positionen gesichert)
7. Entfernen Sie das untere Scharnier mit einem Sechskantschlüssel.
2. Entfernen Sie das Schloss.
5. Legen Sie das Gerät auf den Rücken
und entfernen Sie das obere Scharnier
mit einem Sechskantschlüssel.
8. Montieren Sie dan Türgriff auf der
gegenüberliegenden Seite.
3. Lösen Sie die obere Gehäuseleiste. Entfernen Sie nicht die
Schrauben, nur lösen.
6. Ziehen Sie die Torsionsfeder
zusammen mit dem Scharnier aus
der tür.
9. Montieren Sie den Scharnierstift
auf der gegenüberliegenden Seite
des unteren Scharnieres.
10. Montieren Sie das Scharnier auf
der gegenüberliegenden Seite
11.Montieren Sie die Plastiktürsicherung an der gegenüberliegenden
Seite.
7
12. Stecken Sie den Scharnierstift
und die Torsionsfeder auf der gegenüberliegenden Seite in die obere
Seite der Tür.

DE
13. Befestigen Sie das mitgelieferte
linksseitige obere Scharnier. Spannen Sie
die Drehfeder ca. 1/2 Umdrehung (im Uhrzeigensinn auf der rechten Seite, entgegen
dem Uhrzeigersinn auf der linken Seite)
16. Die beiden Schrauben für
die obere Gehäuseleiste wieder
festziehen.
18. Nach dem Umbau der Tür ist es wichtig zu überprüfen, ob das Dichtband sicher ringsherum abschliesst. Ist dies
nicht der Fall, bitte das Dichtband mit einem Haartrocker erwärmen. Dann das Dichtband leicht nach ziehen, so dass
es wieder einen sicheren Abschluss zum Gehäuse ergibt. Achten Sie darauf, nicht zu stark zu erwärmen, sodass der
Dichtru+ing schmilzt.
14. Das obere Scharnier wieder
festschrauben.
17. Schlüsselstift und Schloss
wieder einbauen.
15. Stellen Sie das Gerät wieder
aufrecht. Klicken Sie die obere
Gehäuseleiste wieder ein. (sie ist an
drei Stellen gesichert)
Bittebemerken!
Seitenanschlagwechsel-GerätmitzweiTüren
● Zapfen und Buchsen an der mittleren
Querleiste abmontieren.
● Untere Tür abmontieren..
● Blindstopfen an der Querlieste auf der
anderen Seite montieren.
8
JustierungderTür.
MontierungvomSchloss(miteinerTür.)
(Sonderzubehör)
DE
MontierungvomSchlss(mitzweiTüren.)
(Sonderzubehör)
9
DE
Reklamation,ErsatzteileundService.
Der Lieferant haftet nicht für Fehler oder
Schäden, die direkt oder indirekt durch
Fehlbedienung, Missbrauch, mangelhafte
Wartung, fehlerhaften Einbau, fehlerhafte
Aufstellung oder fehlerhaften Anschluss
sowie Feuer, Unfall, Blitzschlag, Spannungsänderungen oder andere elektrische
Störungen – wie z.B. defekte Sicherungen
oder Fehler in der Netzinstallation – sowie
von anderen als den von dem Lieferanten
vorgeschriebenen Reparaturbetrieben
ausgeführten Reparaturen verursacht
wurden, und allgemein nicht für Fehler und
Schäden, die der Lieferant nachweislich
auf andere Ursachen als Fabrikations- und
Materialfehler zurückführen kann. Diese
Fehler oder Schäden fallen nicht unter das
Reklamationsrecht.
Transportschäden, die der Anwender feststellt, sind primär eine Sache zwischen ihm
und dem Händler, d.h. der Händler hat den
Anwender zufrieden zu stellen.
Bevor Sie den Kundendienst rufen, prüfen
Sie bitte, ob Sie den Fehler selbst beheben
können (siehe Fehlersuche). Ist Ihr Hilfeverlangen unberechtigt, beispielsweise weil
das Versagen des Geräts auf eine defekte
Sicherung oder Fehlbedienung zurück zu
führen ist, gehen die Kosten für den Servicebesuch zu Ihren Lasten.
Ersatzteile
Bitte bei der Ersatzteilbestellung Typ- und
Seriennummer sowie Produktnummer angeben. Diese Angaben nden Sie auf dem
Typenschild an der Geräterückseite.
Product number.
Das Typenschild enthält verschiedene
technische Angaben, u.a. auch Typ- und
Seriennummer. Denken Sie daran! Stets
nur autorisierte Handwerker zu beauftragen, wenn ein Teil repariert oder ausgewechselt werden muss!
10
Entsorgung.
DE
Benutzerinformation zur Sammlung und
Entsorgung von veralteten Geräten und
benutzten Batterien.
Diese Symbole auf den Produkten,
Verpackungen und/oder Begleitdokumenten bedeuten, dass benutzte elektrische und elektronische
Produkte und Batterien nicht in den
allgemeinen Hausmüll gegeben werden sollen. Bitte bringen Sie diese
alten Produkte und Batterien zur
Behandlung, Aufarbeitung bzw. zum
Recycling gemäß IhrerLandesgesetzgebung und den Richtlinien 2002/96/
EG und 2006/66/EG zu Ihren zuständigen Sammelpunkten.
Indem Sie diese Produkte und Batterien ordnungsgemäß entsorgen, helfen Sie dabei, wertvolle Ressourcen
zu schützen und eventuelle negative
Auswirkungen auf die menschliche
Gesundheit und die Umwelt zu vermeiden, die anderenfalls durch eine
unsachgemäße Abfallbehandlung
auftreten können.
Wenn Sie ausführlichere Informationen zur Sammlung und zum Recycling alter Produkte und Batterien
wünschen, wenden Sie sich bitte an
Ihre örtlichen Verwaltungsbehörden,
Ihren Abfallentsorgungsdienstleister
oder an die Verkaufseinrichtung, in
der Sie die Gegenstände gekauft
haben.
Gemäß Landesvorschriften können
wegen nicht ordnungsgemäßer
Entsorgung dieses Abfalls Strafgelder
verhängt werden.
FürgeschäftlicheNutzerinder
EuropäischenUnion.
Wenn Sie elektrische oder elektronische Geräte entsorgen möchten,
wenden Sie sich wegen genauerer
Informationen bitte an Ihren Händler
oder Lieferanten.
[InformationenzurEntsorgungin
LändernaußerhalbderEuropäischenUnion]
Diese Symbole gelten nur innerhalb
der Europäischen Union. Bitte treten
Sie mit Ihrer Gemeindeverwaltung
oder Ihrem Händler in Kontakt,
wenn Sie dieses Produkt entsorgen
möchten, und fragen Sie nach einer
Entsorgungsmöglichkeit.
HinweiszumBatteriesymbol(untenzweiSymbolbeispiele):
Dieses Symbol kann in Kombination mit einem chemischen symbol
verwendet werden. In diesem Fall
erfüllt es die Anforderungen derjenigen Richtlinie, die für die betreffende
Chemikalie erlassen wurde.
11

FR
Finissezparconnaîtrevotrerefridisseurdevinou
debouteille:
Serrure
Lumière supérieure
Panneau de commande
Dactylographiez le plat
Ëtagère
Poignée de porte
Porte en verre
Cavité d’orteil
Pieds réglablest
2

Avertissement.
FR
Puisque l’appareil contient un réfrigérant
inammable, il est essentiel de s’assurer
que les conduits du uide réfrigérant ne
sont pas endommagés. La norme EN378
précise que la pièce dans laquelle vous
installez votre appareil doit posséder un
volume de 1 m³ par 8 g de réfrigérant avec
des hydrocarbures utilisés dans l’appareil
an d’éviter la formation de mélanges gaz/
air inammables dans la pièce où l’appareil
est installé dans le cas où il y aurait une
fuite dans le circuit du réfrigérant. La quantité de réfrigérant utilisée dans votre appareil
est indiquée sur la plaque signalétique.
AVERTISSEMENT: Gardez les ouvertures de
ventilation sur le boîtier
de l’appareil, ou sur la
structure incorporée,
libres de toute obstruction.
AVERTISSEMENT: Ne pas utiliser d’appareils
mécaniques ou autres
moyens pour accélérer la
décongélation sauf ce qui
est recommandé par le
fabricant.
AVERTISSEMENT: Ne pas endommager le
système de réfrigération.
AVERTISSEMENT: Ne pas utiliser d´appareils
électriques à l’intérieur
du compartiment de
stockage sauf s’ils sont
recommandéspar le fabricant.
exposé à la pluie.
AVERTISSEMENT: Cet appareil n’est pas
conçu pour une utilisation
par de jeunes enfants ou
des personnes handicapées sauf si elles sont
sous la surveillance dún
adulte responsable. Les
enfants ne doivent pas
jouer avec l’appareil.
● Conserver les clés dans un endroit hors
de portée des enfants.
● Avant de faire l’entretien ou le nettoyage
de l’appareil, débranchez-le de son
alimentation.
● Si le l d’alimentation est endommagé,
il doit être remplacé par le fabricant, des
représentants ou des professionnels
agrees an d’éviter les dangers.
● La formation de givre sur les parois
intérieures de l’évaporateur et les parties
supérieures est un phénomène naturel et
normal. Retirez le givre avec un chiffon
sec.
● Prenez note que toute modication de
l’appareil annulera toutes les garanties et
la responsabilité du fabricant.
● REFROIDISSEURSÁVIN-VKG:
Cet appareil est destiné uniquement au
stockage du vin
Produit équipé de diodes class 1,
sans danger pour les yeux.
AVERTISSEMENT: L’appareil ne doit pas être
3
 Loading...