


FZ ... W
UK |
Instructions for use |
DK |
Brugsanvisning |
DE |
Bedienungsanleitung |
NO |
Bruksanvisning |
FR |
Mode d’emploi |
NL |
Gebruiksaanwijzing |

GB
Warning.
In case this appliance contains hydrocarbon refrigerant please refer to guidelines listed below.
As the appliance contains a flammable refrigerant, it is essential to ensure that the refrigerant pipes are not damaged.
Standard EN378 specifies that the room in which you install your appliance must have a volume of 1m³ per 8 g of hydrocarbon refrigerant used in the appliances. This is to avoid the formation of flammable gas/ air mixtures in the room where the appliance is located in the event of a leak in the refrigerant circuit. The quantity of the refrigerant used in your appliance is indicated on the rating plate.
WARNING: Keep ventilation openings in the appliance’s cabinet or in the built-in structure clear of obstruction
WARNING: Do not use other mechanical devices or other means to accelerate the defrosting process than those recommended by the manufacturer
WARNING: Do not damage the refrigerant system
WARNING: Do not use electrical appliances inside the refrigerated storage compartment, unless they are of a type recommended by the manufacturer
WARNING: Do not expose the appliance to rain
WARNING: This appliance is not intended for use by young children or infirm persons unless they have been adequately supervised by a responsible person to ensure that they can use the appliance safely. Young children should be supervised to ensure that they do not play with the appliance
●● Always keep the keys in a separate place and out of reach of children
●● Before servicing or cleaning the appliance, unplug the appliance from the mains or disconnect the electrical power supply
●● If the supply cord is damaged, it must be replaced by the manufacturer, its service agent, or similarly qualified persons in order to avoid a hazard
●● Relevant for Australia: Supply cord fitted with a plug complies with AS/NZS 3112.
●● Frost formation on the interior evaporator wall and upper parts is a natural phenomenon. Therefore, the appliance should be defrosted during normal cleaning or maintenance
●● Please note that changes to the appliance construction will cancel all warranty and product liability
●● This appliance is intended to be used exclusively for the storage of wine
CLASS 1 LED PRODUCT
2
GB
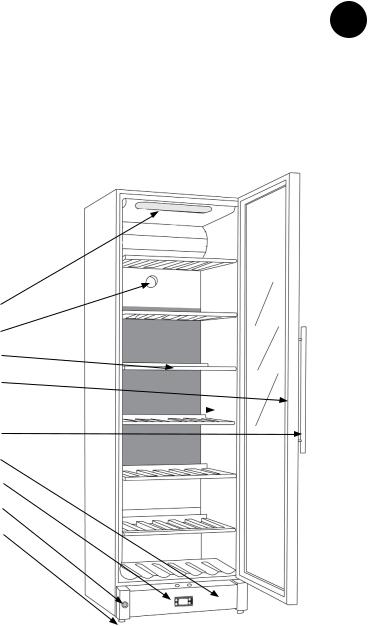
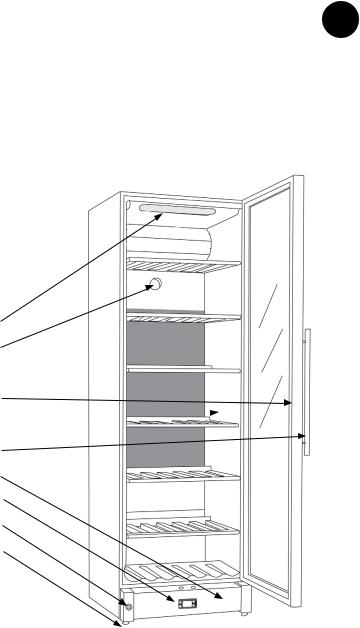
Get to know your wine cooler
Lighting
Charcoal filter
Wooden shelf
Sealing strip
Nameplate 
Door handle
Kick plate
Control panel
Lock
Adjustable feet
3

GB |
|
Contents |
|
Warning................................................... |
2 |
Get to know your wine cooler.................. |
3 |
Before use............................................... |
4 |
Installation and start-up........................... |
4 |
Technical data......................................... |
6 |
Reversible door....................................... |
7 |
Operation and function............................ |
8 |
Defrosting, cleaning and |
|
maintenance.......................................... |
10 |
Fault finding........................................... |
11 |
Warranty, spare parts and service......... |
12 |
Disposal................................................ |
13 |
Before use.
On receipt, check to ensure that the appliance has not been damaged during transport. Transport damage should be reported to the local distributor before the wine cooler is put to use.
Remove the packaging. Clean the inside of the cabinet using warm water with a mild detergent. Rinse with clean water and dry thoroughly (see cleaning instructions). Use a soft cloth.
If during transport the appliance has been laid down, or if it has been stored in cold surroundings (colder than +5°C), it must be allowed to stabilise in an upright position for at least an hour before being switched on.
Installation and start-up.
Placement.
For safety and operational reasons, the appliance must not be installed outdoors.
The appliance should be placed on a level surface in a dry, well ventilated room (max. 75% relative air humidity). Never place the appliance close to sources of heat such as cookers or radiators, and avoid placing it in direct sunlight.
Ambient temperature.
The climate class is stated on the nameplate (see page 3 and page 12). This specifies the optimum ambient temperature. Wine coolers with winter position, however, function at ambient temperatures as low as
5ºC.
Climate class |
Optimum room tem- |
|
perature |
SN |
+10 ºC to +32 ºC |
N |
+16 ºC to +32 ºC |
ST |
+18 ºC to +38 ºC |
T |
+18 ºC to +43 ºC |
Installation
The surface on which the appliance is to be placed must be level. Do not use a frame or similar.
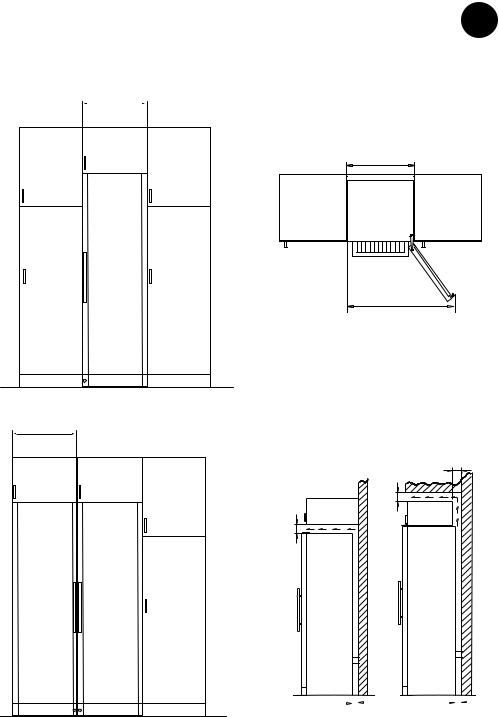
The appliance can be installed as a freestanding unit against a wall, built into a kitchen element, or lined up with other appliances (figs 2-3).
4
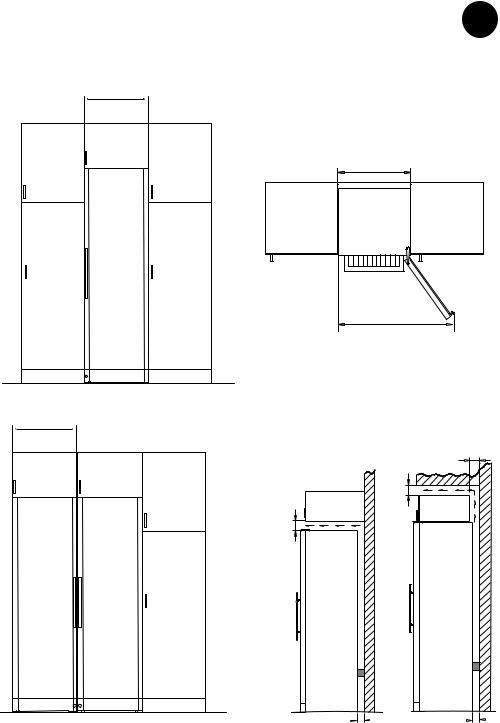
600 |
fig. 2 |
|
600 |
fig. 3 |
GB
The appliance viewed from above.
If the appliance is placed beside a wall, there must be sufficient room for its door to be opened wide enough to allow the shelves to be pulled out (fig. 4).
600
fig. 4
1075
Ventilation.
It is important that the appliance be well ventilated and that air can circulate unhindered above, below and around it.
The figures below illustrate how the necessary air circulation around the appliance
can be ensured (figs 5-6). |
100 |
100
100
fig. 5 |
min .30 |
fig. 6 |
min .30 |
5
GB
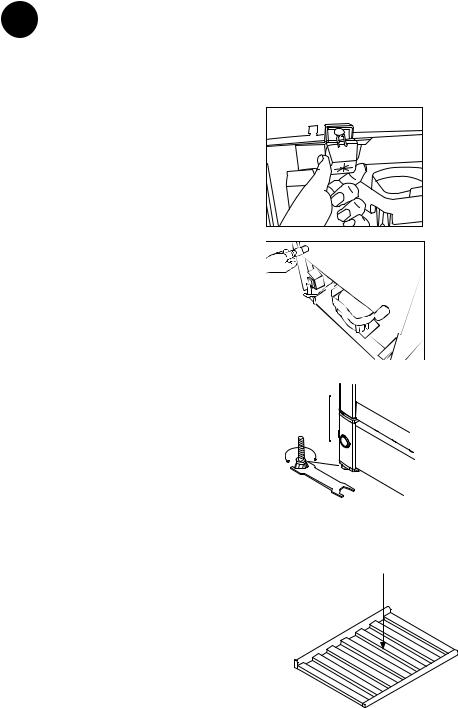
The distance pieces on the rear of the appliance ensure sufficient air circulation. Fit the two caps supplied with the appliance as shown in fig. 7.
(Two different models)
Setting up.
It is important that the appliance be absolutely level. It can be levelled by screwing the adjustable feet at the front of the appliance up or down (figs 8-9).
Use a spirit level to check that the appliance is absolutely level sideways.
Technical data.
This device complies with relevant EU directives including Low Voltage Directive 2006/95 EEC and Electromagnetic Compatibility Directive 2004/108/EC
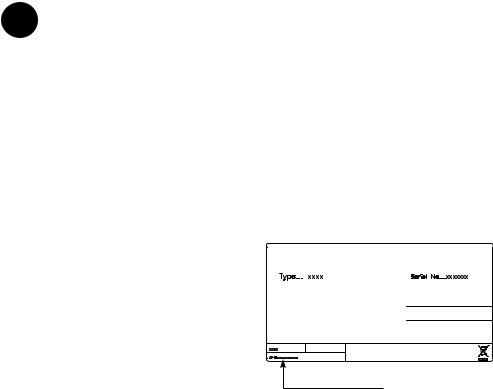
The rating plate provides various technical information as well as type and serial number.
fig. 7
fig. 8
Max. 85 kg.
6
GB
Reversible door.
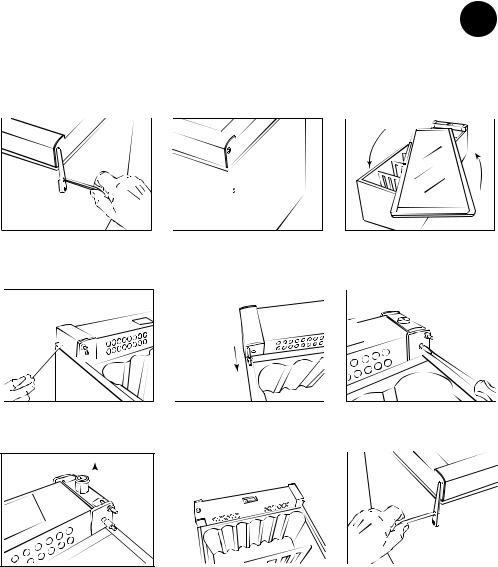
The door can be changed from right-hinged to left-hinged and vice versa as follows:
1 |
3. Rotate the glass door through 180° (on |
the upper hinge. |
FZ 295 W, pull the handle to loosen it |
|
on the inside from beneath the sealing |
|
strip). |
4
side of the plinth using a flat-headed screwdriver.
...and fit it on the opposite side. |
screwdriver. |
|
|
|
|
|
|
|
7.When the lock pin has been loosened completely, pull it up together with the lock cylinder and refit on opposite side.
8.Click the covers into place on the plinth sides on the opposite side.
9.Fit the door onto the bottom pin, fit the top hinge and tighten securely.
10.After reversing the door, it is important to check that the sealing strip provides a tight seal all the way round. If it does not, carefully heat the strip all the way round using a hair dryer. Then ease the strip outwards slightly so that it forms a tight seal against the cabinet. Be careful not to heat the strip so much that it melts!
OBS: You will need to remove the magnet on the underside of the door by unscrewing the two screws, pulling the magnet away from the door and mount it at the other end of the door. If there is a logo badge on the door you will have to remove it and possibly fit it at the other end of the door.
Remove the top and bottom bushes on the door frame (the bushes are the black, round plastic pieces which fit into the top and bottom hinges) and reverse them so that the bush which was at the top is now at the bottom and vice versa.
7

GB
Operation and function.
Electronic control
The electronic control ensures that the temperatures set at the top and at the bottom of the appliance are maintained. This is achieved by means of an advanced control of the refrigeration system, the heating element, and the fan. The set temperature will be stored in the event of power failure.
The electronic control has the following functions:
●● On/off switch ●● Light switch*
●● Temperature setting ●● Temperature indication
●● Alarm for too high and too low temperatures
●● Door alarm
* The light may either be turned on constantly or only when the door is open.
Temperature indication
The display shows the actual temperature.
The upper digits of the display indicate the temperature at the top of the appliance, and the lower digits of the display indicate the temperature at the bottom of the appliance.
fig. 9
The temperature indicator is equipped with a built-in filter which simulates the actual temperature in the bottles. Consequently, the indicator does not react on short-term fluctuations of the air temperature
Temperature setting
The thermostat is equipped with a child lock device. This device is activated by pushing the “up and down” buttons simultaneously. After approx. 3 seconds “Pof” flashes in the display. Then the actual temperatures are shown as usual. In addition, the set temperatures can be shown by pushing SET1 and SET2, respectively.
The child lock device is cancelled by pushing the “up and down” buttons simultaneously. After approx. 3 seconds “Pon” flashes in the display, and the temperature can be set.
Temperature setting at the top of the appliance
Push SET1. Then the temperature at the top of the appliance can be adjusted up and down by means of the “up and down” buttons. The temperature can be adjusted from 8 to 22°C, however so that the temperature cannot be set at a lower temperature than the actual set point for the bottom temperature sensor.
8

Temperature setting at the bottom of the appliance
Push SET2. Then the temperature at the bottom of the appliance can be adjusted up and down by means of the “up and down” buttons. The temperature can be adjusted from 5 to 22°C, however so that the temperature cannot be set at a higher temperature than the actual set point for the upper temperature sensor.
Alarm devices
There is a sub-alarm for the low-temper- ature sensor and an excess-alarm for the high-temperature sensor.


The alarm consists of a beeper and a warning on the display.
Alarm for high temperature: beep sound
+ alternating display of “HtA” and actual temperature
Alarm for low temperature: beep sound
+ alternating display of “LtA” and actual temperature
The alarm temperature depends on the set points.
The beep sound can be cancelled by pushing a random thermostat button. Push the on/off button to erase the display alarm, first for cancelling the alarm, then again for restarting the compressor.
Door alarm
When the door has been open for more than 2 min. the door alarm is activated.
GB
Light
To turn off the lights, press once 


Permanent lighting
For presentation purposes of your wine, you can turn the lights permanently. Please press the light switch image 


 twice. To switch off the lights press on


 again.
Two-zone setting for serving temperature
Typical serving temperature settings for the top and bottom sections are 16°C and 6°C respectively. With these settings, a suitable temperature gradient will be achieved in the cabinet for the storage of various types of wine distributed from top to bottom as follows:
●● heavy red wines +16 to +19°C
●● rosé and light red wines +12 to +16°C ●● white wines +10 to +12°C
●● champagne and sparkling wines +6 to +8°C
It is recommended that wine be served at a temperature which is a couple of degrees lower than the desired drinking temperature as the wine will be warmed slightly when it is poured into the glass.
Single-zone setting for longterm storage
For long-term wine storage, the top and bottom sections should both be set at 12°C.
With identical settings for the top and bottom sections, the controls will maintain an even temperature throughout the cabinet.
However, the temperature in the room will gradually affect the temperature in the cabinet through its door and sides, creating
9

GB
a slight temperature gradient from top to bottom. The controls will maintain the set temperature at the bottom of the cabinet, and any deviation from the setting will therefore occur at the top.
The difference will vary from 0 to 3°C, depending on the ambient temperature.
Defrosting, cleaning and maintenance.
Automatic defrosting.
The wine cooler is defrosted automatically.
Defrost water runs through a pipe and is collected in a tray above the compressor where the heat generated by the compressor causes it to evaporate. The defrost water tray should be cleaned at intervals.
Cleaning.
Before cleaning the appliance, unplug it from the main supply. The cabinet is best cleaned using warm water (max. 65°C) with a little mild detergent. Never use cleaning agents that scour. Use a soft cloth. Rinse with clean water and dry thoroughly. The defrost water channel, in which condensation from the evaporator runs, is located at the bottom of the rear inside wall of the cabinet and must be kept clean. Add a few drops of disinfectant, e.g. Rodalon, to the
defrost water drain a couple of times a year, and clean the drain using a pipe cleaner or similar. Never use sharp or pointed implements.
The sealing strip around the door must be cleaned regularly to prevent discolouration and prolong service life. Use clean water.
After cleaning the sealing strip, check that it continues to provide a tight seal.
Dust collecting on the condenser on the rear of the cabinet, the compressor and in the compressor compartment is best removed using a vacuum cleaner.
10
GB
Fault finding.
Fault |
Possible cause |
Remedy |
The appliance not |
The appliance is switched off. |
Press the on/off switch. |
working |
Power failure; the fuse is blown; |
Check that power is connected. |
|
||
|
the appliance is not plugged in |
Reset the fuse. |
|
correctly. |
|
Water collects in |
The defrost water pipe is |
Clean the defrost water channel |
the bottom of the |
blocked. |
and the drain hole on the rear |
cabinet. |
|
wall of the cabinet. |
Vibration or |
The appliance is not level. |
Level the appliance using a spirit |
bothersome noise. |
The appliance is resting against |
level. |
|
other kitchen elements. |
|
|
Containers or bottles inside the |
Move the appliance away from |
|
cabinet are rattling against one |
the kitchen elements or appli- |
|
another. |
ances it is in contact with. |
|
|
Move containers and/or bottles |
|
|
apart. |
Compressor runs |
High room temperature. |
Ensure adequate ventilation. |
continuously. |
|
|
P1 is shown on the |
The upper sensor is disconnect- |
Call for service. The temperature |
display. |
ed or short-circuited. |
within the entire cabinet is main- |
|
|
tained at the higher of the two |
|
|
setpoints until the fault has been |
|
|
corrected. |
P2 is shown on the |
The lower sensor is disconnected |
Call for service. The temperature |
display. |
or short-circuited. |
within the entire cabinet is main- |
|
|
tained at the higher of the two |
|
|
setpoints until the fault has been |
|
|
corrected. |
11
GB
Warranty, spare parts and service.
Warranty disclaimer
Faults and damage caused directly or indirectly by incorrect operation, misuse, insufficient maintenance, incorrect building, installation or mains connection. Fire, accident, lightening, voltage variation or other electrical interference, including defective fuses or faults in mains installations.
Repairs performed by others than approved service centres and any other faults and damage that the manufacturer can substantiate are caused by reasons other than manufacturing or material faults are not covered by the warranty.
Please note that changes to the construction of the appliance or changes to the component equipment of the appliance will invalidate warranty and product liability, and the appliance cannot be used lawfully. The approval stated on rating plate will also be invalidated.
Transport damage discovered by the buyer is primarily a matter to be settled between the buyer and the distributor, i.e. the distributor must ensure that such complaints are resolved to the buyer’s satisfaction.
Before calling for technical assistance, please check whether you are able to rectify the fault yourself. If your request for assistance is unwarranted, e.g. if the appliance has failed as a result of a blown fuse or incorrect operation, you will be charged
the costs incurred by your call for technical assistance.
Spare parts
When ordering spare parts, please state the type, serial and product numbers of your appliance. This information is given on the rating plate. The rating plate contains various technical information, including type and serial numbers.
Product numbers
12

Disposal
Information for Users on Collection and Disposal of Old Equipment and used Batteries
These symbols on the products, packaging, and/or accompanying documents mean that used electrical and electronic products and batteries should not be mixed with general household waste. For proper treatment, recovery and recycling of old products and used batteries,
please take them to applicable collection points, in accordance with your national legislation and the Directives 2002/96/EC and 2006/66/EC.
By disposing of these products and batteries correctly, you will help to save valuable resources and prevent any potential negative effects on human health and the environment which could otherwise arise from inappropriate waste handling.
For more information about collection and recycling of old products and batteries, please contact your local municipality, your waste disposal service or the point of sale where you purchased the items.
Penalties may be applicable for incorrect disposal of this waste, in accordance with national legislation.
GB
For business users in the European Union.
If you wish to discard electrical and electronic equipment, please contact your dealer or supplier for further information.
[Information on Disposal in other Countries outside the European Union]
These symbols are only valid in the European Union. If you wish to discard this product, please contact your local authorities or dealer and ask for the correct method of disposal.
Note for the battery symbol:
This symbol might be used in combi-  nation with a chemical symbol. In this
  case it complies with the requirement
 set by the Directive for the chemical
involved.
13

DE
Warnung.
Falls dieses Gerät Kohlenwasserstoff-Kälte- mittel enthält, sehen Sie bitte die untenstehenden Richtlinien.
Da ein brennbares Gas als Kältemittel in diesem Gerät dient, ist es wichtig sicherzustellen, dass kein Teil des Kühlkreislaufs oder der Röhren beschädigt ist.
Der Standard EN378 spezifiziert, dass der Raum, in dem das Gerät installiert wird, ein Volumen von 1m³ pro 8 g Kohlenwasser stoff-Kältemittel, das im Gerät verwendet ist, haben soll. Dies ist zu beachten, um die Bildung von leicht entzündlichen
Gasgemischen in dem Raum, wo das Gerät installiert ist, zu vermeiden, falls eine Undichtigkeit des Kuhlkreislaufs entsteht. Die Menge von Kältemittel im Gerät ist auf dem
Typenschild angegeben.
WARNUNG: Decken Sie die Lüftungsöffnungen im Kabinett am Gerätes oder am Einbaumodul nicht ab.
WARNUNG: Verwenden Sie keine anderen mechanischen Geräte oder Hilfsmittel um den Entfrostungsprozess zu beschleunigen, als die Geräte, die vom Hersteller empfohlen sind.
WARNUNG: Beschädigen Sie nicht den
Kühlkreislauf.
WARNUNG: Verwenden Sie keine elektrischen Geräte im Gerät, es sei denn, dass die Geräte vom Hersteller empfohlen sind.
WARNUNG: Das Gerät nicht dem Regen aussetzen.
WARNUNG: Das Gerät ist nicht für den
Gebrauch durch kleine Kinder bestimmt, es sei denn, dass es ausreichend von einer verantwortlichen Person überprüft ist, dass sie das Gerät vertretbar verwenden können. Kleine Kinder müssen beaufsichtigt werden, um sicherzustellen, dass sie nicht mit dem Gerät spielen. Der Schlüssel ist an einer separaten Stelle und unzugänglich für Kinder aufzubewahren.
●● Vor Reparatur oder Reinigung des Gerätes den Netzstecker von der Steckdose ziehen.
●● Wenn die Anschlussleitung beschädigt ist, muss sie nur vom Hersteller, dem Serviceagent des Herstellers oder einem anderen Fachmann ausgewechselt werden, um Gefahr zu vermeiden.
●● Bildung von Reif auf der inneren Verdampferplatte und den obersten Teile ist normal. In Verbindung mit Reinigung oder Wartung muss das Gerät deshalb entfrostet werden.
●● Beachten Sie bitte, dass Änderungen der
Konstruktion dieses Gerätes zur Folge haben, dass die Garantie und Produktenhaftung erlöschen.
●● Dieses Gerät ist ausschließlich zur Lagerung von Wein bestimmt
CLASS 1 LED PRODUCT
2
DE
Lernen Sie Ihren Weinschrank zu kennen.
Beleuchtung
Kohlefilter
Holzfach 
Dichtleiste
Typenschild 
Türgriff
Fußleiste
Bedienungselemente
Schloss
Einstellbare Füße
Abb.1
3

DE |
|
Inhalt. |
|
Warnung.................................................. |
2 |
Lernen Sie Ihren |
|
veinschrank kennen................................ |
3 |
Vor dem Gebrauch.................................. |
4 |
Inbetriebnahme und Installation.............. |
4 |
Technische Daten................................... |
6 |
Wendbare Tür......................................... |
7 |
Bedienung und Funktion......................... |
8 |
Abtauen, Reinigung und Wartung |
|
Fehlersuche.......................................... |
10 |
Fehlersuche.......................................... |
11 |
Ersatzteile und Service......................... |
12 |
Entsorgung............................................ |
13 |
Vor dem Gebrauch.
Kontrollieren Sie das Gerät sofort bei
Lieferung auf eventuelle Beschädigungen. Transportschäden sind dem Händler zu melden, bevor das Gerät in Gebrauch genommen wird.
Verpackung entfernen. Das Schrankinnere mit lauwarmem Wasser und etwas mildem Spülmittel reinigen. Mit klarem Wasser nachwischen und gründlich trocknen (siehe “Reinigung”). Verwenden Sie ein weiches
Tuch.
Falls das Gerät liegend transportiert wurde oder einer Temperatur von weniger als +5 °C ausgesetzt war, muss es vor dem Einschalten mindestens eine Stunde lang bei höherer Außentemperatur aufrecht stehen.
Inbetriebnahme und Installation.
Aufstellort.
Aus Sicherheitsund betriebstechnischen
Gründen darf das Gerät nicht im Freien aufgestellt werden.
Stellen Sie den Schrank auf einen ebenen Untergrund in einem trockenen, gut belüfteten Raum (max. 75 % relative Luftfeuchtigkeit). Stellen Sie den Schrank nicht in unmittelbarer Nähe von Wärmequellen wie Herden oder Heizkörpern auf, und vermeiden Sie direkte Sonneneinstrahlung oder Wärme von anderen Wärmequellen .
Umgebungstemperatur.
Die Klimaklasse finden Sie auf dem Typenschild (siehe Abb. 1 Seite 3 und Abb. 11 Seite 12). Sie gibt an, innerhalb welcher Umgebungstemperatur bereiche der Kühlschrank optimal arbeitet. Weinschränke mit Winterposition fungieren bis zu einer Umgebungstemperatur von 5 °C.
Klimaklasse |
Zulässige Raumtem- |
|
peratur |
SN |
+10 ºC bis +32 ºC |
N |
+16 ºC bis +32 ºC |
ST |
+18 ºC bis +38 ºC |
T |
+18 ºC bis +43 ºC |
Installation.
Die Unterlage zum Aufstellen des Schranks muss eben sein. Verwenden Sie keinen Rahmen o.ä.
Der Schrank kann frei an einer Wand stehen, in ein Küchenelement eingebaut werden oder neben anderen Schränken aufgestellt werden (Abb. 2-3).
4
|
|
DE |
|
|
Schrank in Draufsicht. |
|
|
Wird der Schrank an einer Wand aufge- |
600 |
Abb. 2 |
stellt, ist darauf zu achten, soviel Platz zu |
|
||
|
lassen, dass die Tür zum Herausziehen |
|
|
|
der Kühlschubladen weit genug geöffnet werden kann (Abb. 4).
600
1075
Abb. 4
Belüftung.
|
|
Der Schrank muss ausreichend belüftet |
|
|
|
sein, und die Luftzirkulation über und unter |
|
|
|
ihm sowie seitlich vom Schrank darf nicht |
|
|
|
behindert sein. |
|
600 |
|
Die folgenden Abbildungen zeigen, wie |
|
Abb. 3 |
die erforderliche Belüftung in der direkten |
||
|
Umgebung des Schranks sicherzustellen ist |
||
|
|
||
|
|
(Abb. 5-6). |
100 |
|
|
|
100 |
|
|
100 |
|
|
|
|
|
|
|
|
|
|
|
|
|
|
|
|
|
|
|
|
|
|
|
|
|
Abb. 5 min .30 |
Abb. 6 min .30 |
||||
5

DE
Die Abstandsstücke auf der Rückseite des Schranks sichern die erforderliche Luftzirkulation. Die beiden Abdeckungen montieren, die zusammen mit dem Schrank mitgeliefert werden (siehe Abb. 7)
(Zwei verschiedene Modelle)
fig. 7
Aufstellung.
Der Schrank muss waagerecht stehen. Der Schrank kann durch Drehen der einstellbaren Füße ausgerichtet werden (siehe Abb. 8).
Prüfen Sie mit einer Wasserwaage nach, ob der Schrank waagerecht steht.
Technische Daten.
Dieses Gerät entspricht den einschlägigen
EU-Richtlinien einschließlich: Niederspannungsrichtinie 2006/95/EEC Elektromagnetische Kompatibilitätsrichtlinie 2004/108/EC
Das Typenschild, das sich im Gerät be findet, enthält verschiedene technische Angaben sowie Typenund Seriennummer.
fig. 8
Max. 85 kg.
6

DE
Wendbare Tür.
Die Tür kann folgendermaßen von rechts angeschlagen auf links angeschlagen und umgekehrt umgebaut werden:
das obere Scharnier lösen.
4.Die Abdeckungen in den Sockelseiten vorsichtig mit einem flachen Schraubendreher demontieren.
7.Nach Lösen des Schlossriegels diesen gemeinsam mit dem Schlosszylinder herausziehen und auf der entgegengesetzten Seite wieder montieren.
5.Den Scharnierstift herausziehen…
…und auf der entgegengesetzten Seite montieren.
8.Die Abdeckungen in den Sockelseiten auf der entgegengesetzten Seite einrasten.
3.Die Glastüre umdrehen (beim FZ 295 W den Handgriff abnehmen, der innen unter der Dichtleiste zu lösen ist).
6.Den Schlossriegel mit einem flachen
Schraubendreher losschrauben.
9.Die Tür auf den Scharnierstift montieren, und das obere Scharnier montieren und festschrauben.
10.Nach dem Wechsel der Türanschlagseite ist zu prüfen, ob die Dichtleiste rundum dicht schließt. Tut sie das nicht, können Sie die Leiste vorsichtig mit einem Haarfön auf ihrer ganzen Länge erwärmen. Ziehen Sie die Leiste dann leicht aus der Tür heraus, sodass sie nach dem Schließen der Tür wieder dicht am Schrank anliegt. VORSICHT! Die Dichtleiste darf nicht zu stark erwärmt werden, da sie sonst schmelzen kann!
OBS Sie müssen den Magneten an der Unterseite der Tür durch Lösen der zwei Schrauben und an der anderen Seite der Tür montieren. Falls sich ein Logo an der Tür befindet tauschen Sie es wenn möglich zum anderen Ende der Tür.
Entfernen Sie die obere und untere Buchse am Türrahmen (die Buchsen sind die schwarzen runden Kunststoffteile, die in das obere und untere Scharnier passen) und tauschen Sie die Buchsen gegeneinander aus.
7

DE
Bedienung und Funktion.
Elektronische Steuerung.
Die elektronische Steuerung sorgt dafür dass die eingestellten Temperaturen oben und unten im Gerät gehalten werden. Dies wird mit der fortschrittlichen Steuerung im Zusammenspiel von Kühlsystem, Wärmeleitung und Ventilator erreicht.
Nach einem evt. Stromausfall kehrt das System automatisch zu den eingestellten Temperaturwerten zurück.
Abb. 9
Temperaturanzege.
Das Display zeigt die aktuelle Temperatur. Die obere Zahl im Display zeigt die Temperatur oben im Gerät, die untere Zahl die Temperatur unten im Gerät. Die Temperaturanzeige hat ein eingebautes Filter mit dem die Temperatur in den Flaschen
simuliert wird. Deshalb reagiert die Anzeige nicht auf kurzzeitige Änderungen der Lufttemperatur z.B nach dem Öffnen der Tür
Die elektronische Steuerung hat folgende Funktionen:
●● Ein/Aus Schalter
●● Lichtschalter*
●● Temperatureinstellung ●● Temperaturanzeige
●● Automatisches Abtauen
●● Alarmanzeige bei zu hoher oder niedriger Temperatur
●● Türalarm
* Das Licht kann entweder generell oder nur bei geöffneter Tür brennen.
Temperatureinstellung.
Der Termostat hat eine Kindersicherung. Sie wird durch gleichzeitiges drücken der Tasten „hoch und runter“ von ca. 3 sek. eingeschaltet. Im Display blinkt ”Pof”. Danach wird wieder die aktuelle Temperatur angezeigt. Ausserdem kann man durch Drücken von SET1 und SET2 die eingestellten Temperaturen sehen.
Die Kindersicherung wird durch gleichzeitiges Drücken von „hoch und runter“ von ca. 3 sek. wieder ausgeschaltet und im Display blinkt „Pon“. Danach können Temperaturen eingestellt werden.
8
Temperatureinstellung oben.
Drücke auf SET1. Danach kann die Temperatur oben im Gerät mit den Tasten „rauf und runter“ gewählt werden. Der Einstellbereich geht von 8 bis 22*C, jedoch kann kein Wert kleiner als der Temperaturwert für unten gewählt werden.
Temperatureinstellung unten.
Drücke auf SET2. Danach kann die Temperatur unten im Gerät mit den Tasten „rauf und runter“ gewählt werden. Der Einstellbereich geht von 5 bis 22*C, jedoch kann kein Wert höher als der Temperaturwert für oben gewählt werden.
Alarmfunktion.
Der Alarm wird durch einen Piepton und eine Anzeige im Display signalisiert. 


Alarm bei zu hoher Temperatur: Piepton und die Anzeige blinkt zwischen „HtA“ und aktueller Temperatur.
Alarm bei zu tiefer Temperatur: Piepton und die Anzeige blinkt zwischen „LtA“ und aktueller Temperatur.
Die Alarmtemperaturen sind abhängig von den eingestellten Temperaturwerten.
Der Piepton kann durch Drücken einer beliebigen Taste abgeschaltet werden.
Um die Alarmanzeige abzuschalten muss die on/off Taste 2mal gedrückt werden, zuerst um den Alarm zurückzusetzen und danach noch einmal um das Gerät neu zu starten.
Türalarm
Wenn die Tür länger als 2 min offen steht wird der Türalarm aktiviert.
DE
Beleuchtung.
So schalten Sie das Licht, drücken Sie einmal 


Zu Präsentationszwecken ihres Weines können sie die Beleuchtung auch dauerhaft einschalten. Dazu Lichtschalter 


 zweimal drücken. Zum Abschalten der Beleuchtung Lichtschalter


 erneut drücken.
Mehrzoneneinstellung für Serviertemperierung.
Typisch für diese Anwendung ist eine
Oberteil-/Boden-Einstellung von 16/6 °C. Mit dieser Einstellung verteilen sich die Temperaturen durch den Schrank zur Aufbewahrung verschiedener Weintypen gemäß folgender von oben nach unten gehender Reihenfolge:
●● schwere Rotweine +16 bis +19 °C
●● Rosé und leichte Rotweine +12 bis +16°C
●● Weißwein +10 bis +12 °C
●● Champagner und Schaumweine +6 bis +8°C
Es empfiehlt sich, die Weine ein paar Grade kälter als die gewünschte Trinktemperatur zu servieren, da sich der Wein beim Einschenken ins Glas rasch etwas erwärmt.
Einzoneneinstellung für Langzeitlagerung.
Zur Langzeitlagerung von Weinen empfiehlt sich eine Oberteil-/Boden-Einstellung von 12/12 °C.
Mit der gleichen Einstellung im Oberteil und Boden sorgt das Kühlsystem für
9

DE
eine gleichmäßige Temperatur im ganzen Schrank.
Jedoch drängt die Umgebungstemperatur langsam durch die Tür und Seiten des Schranks ein und verursacht einen kleinen Temperaturunterschied zwischen Oberteil und Boden. Der Schrank wird am Boden nach der eingestellten Temperatur gesteuert, weshalb Abweichungen im Oberteil auftreten.
Der Unterschied liegt zwischen 0–3 °C, abhängig von der Umgebungstemperatur.
Abtauen, Reinigung und Wartung.
Automatisches Abtauen des Kühlschranks.
Der Kühlschrank wird automatisch abgetaut, das Tauwasser läuft durch ein
Rohr in die Tauwasserschale, die sich auf dem Kompressor befindet. Das Wasser verdampft durch die Betriebswärme des Kompressors. Die Tauwasserschale ist gelegentlich zu reinigen.
Reinigung.
Zum Reinigen des Schrankinnern den Schrank am Ein-/Ausschalter ausschalten. Eine Mischung aus warmem Wasser und Spülmittel (max. 65 °C) ist dazu am besten geeignet). Verwenden Sie keine Reinigungsmittel, die Kratzer verursachen können. Verwenden Sie ein weiches Tuch. Mit klarem Wasser nachwischen und gut abtrocknen. Die Tauwasserrinne, durch die das Kondenswasser vom Verdampfer herab läuft, befindet sich innen an der Schrankrückwand. Sie ist stets sauber zu halten. Tropfen Sie mehrmals jährlich ein Desinfektionsmittel in den Tauwasserabfluss. Mit einem Pfeifenreiniger o.ä. reinigen. Niemals scharfkantige oder spitze Gegenstände verwenden.
Die Türdichtleiste muss regelmäßig gereinigt werden, um Verfärbungen zu vermeiden und lange Haltbarkeit zu gewährleisten. Klares Wasser verwenden. Nach der Reinigung der Türdichtleiste prüfen, ob sie dicht schließt.
Vom Rückwandverflüssiger, Kompressor und Kompressorraum den Staub am besten mit einem Staubsauger entfernen.
10

DE
Fehlersuche.
Fehler |
Mögliche Ursache |
Abhilfe |
Der Schrank re- |
Der Schrank ist abgeschaltet |
Ein-/Ausschalter betätigen. |
agiert nicht. |
Stromausfall; Sicherung hat |
Prüfen, ob der Strom ange- |
|
angesprochen; Netzstecker nicht |
schlossen ist. Die Sicherung |
|
richtig eingesteckt. |
muss intakt/eingeschaltet sein. |
Es läuft Wasser |
Das Tauwasserabflussrohr ist |
Tauwasserrinne und Abflussloch |
auf den Boden des |
verstopft. |
in der Rückwand reinigen. |
Kühlschranks. |
|
|
Vibrationen |
Der Schrank steht schief. |
Schrank mit einer Wasserwaage |
oder störende |
Der Schrank berührt andere |
ausrichten. |
Geräusche. |
Küchenelemente. |
Schrank von den Küchenelemen- |
|
Behälter oder Flaschen im |
ten oder Geräten abrücken, die |
|
Schrank berühren sich. |
er berührt. |
|
|
Für Abstände zwischen Flaschen |
|
|
und/oder Behältern sorgen. |
Der Kompressor |
Hohe Raumtemperatur. |
Für gute Belüftung sorgen. |
läuft ständig. |
|
|
Steuerung zeigt P1 |
Oberer Fühler ist unterbrochen |
Rufen Sie den Kundendienst. |
an |
oder kurzgeschlossen |
Der gesamte Schrank wird |
|
|
gemäß dem wärmsten Sollwert |
|
|
gesteuert, bis die Störung beho- |
|
|
ben ist. |
Steuerung zeigt P2 |
Unterer Fühler ist unterbrochen |
Rufen Sie den Kundendienst. |
an |
oder kurzgeschlossen. |
Der gesamte Schrank wird |
|
|
gemäß dem wärmsten Sollwert |
|
|
gesteuert, bis die Störung beho- |
|
|
ben ist. |
11
 Loading...