


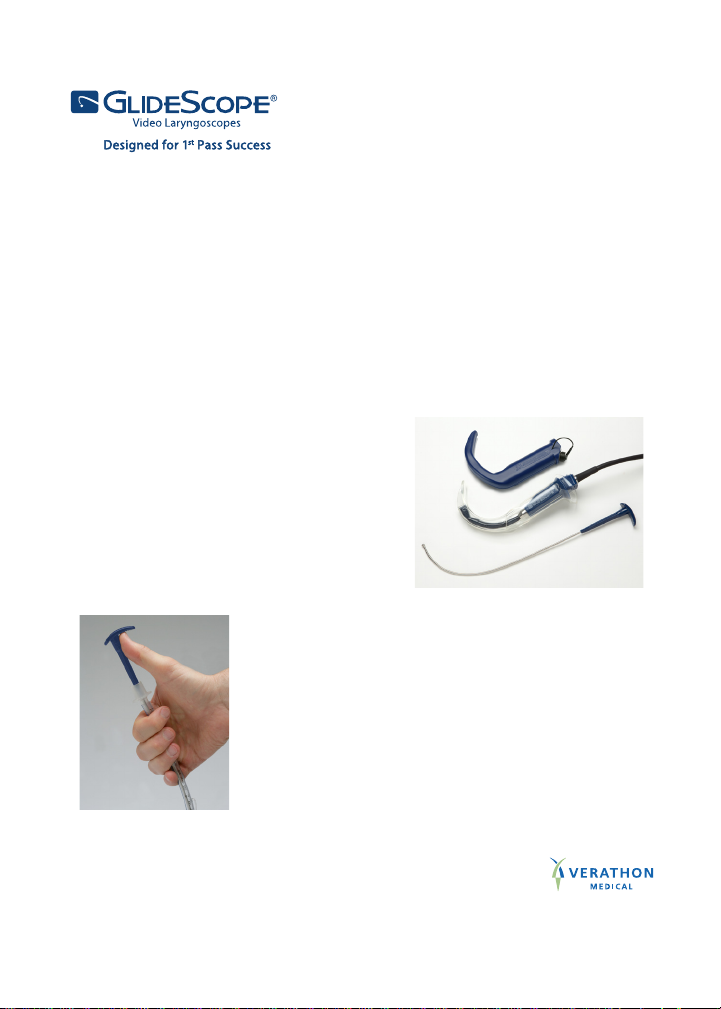
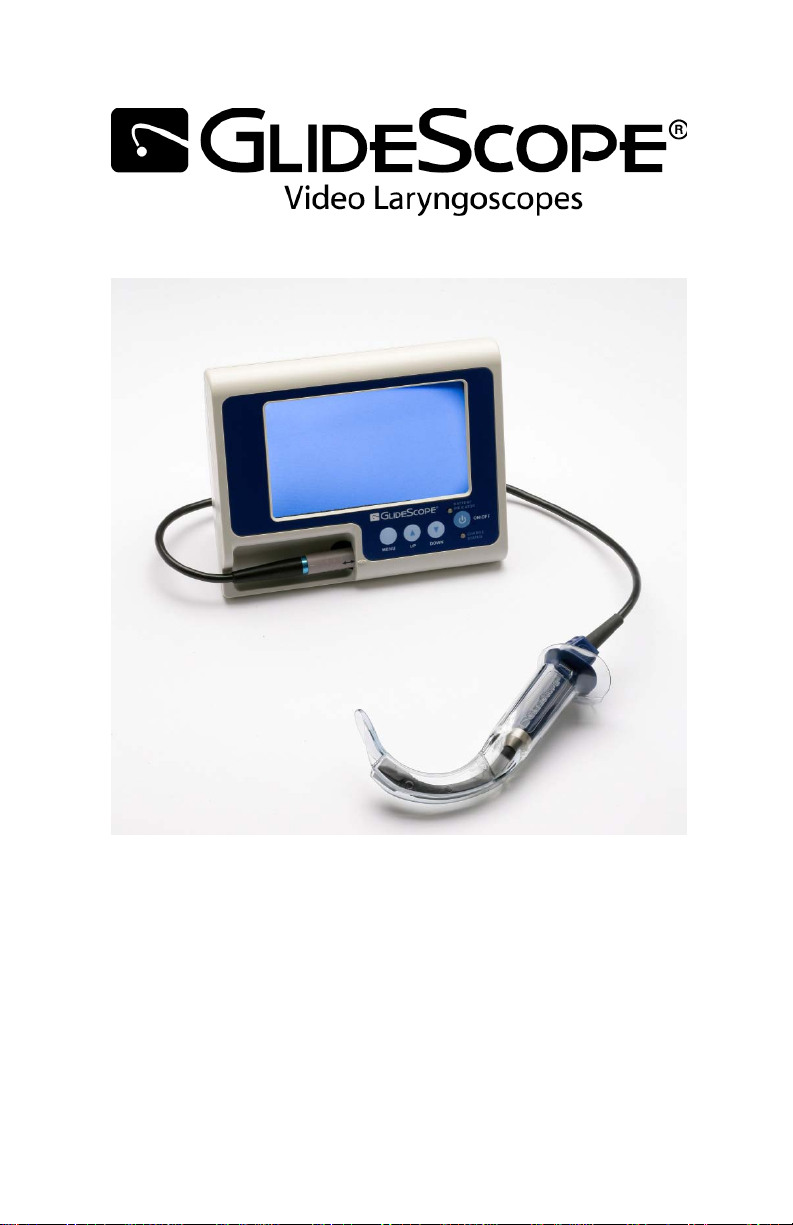
Glidescope GVL
Table of contents
 Loading...
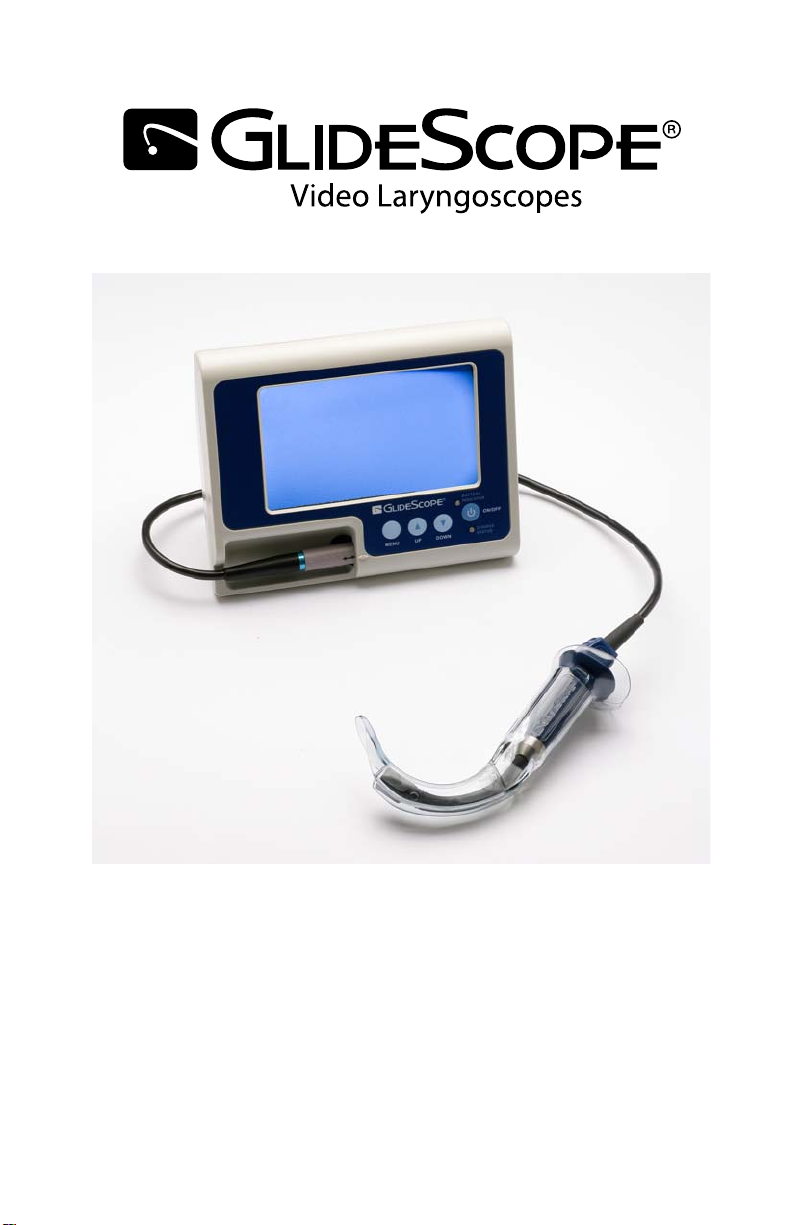
GlideScope GVL® and Cobalt
User’s Manual & Quick Reference Guide
0900-1204-07-20
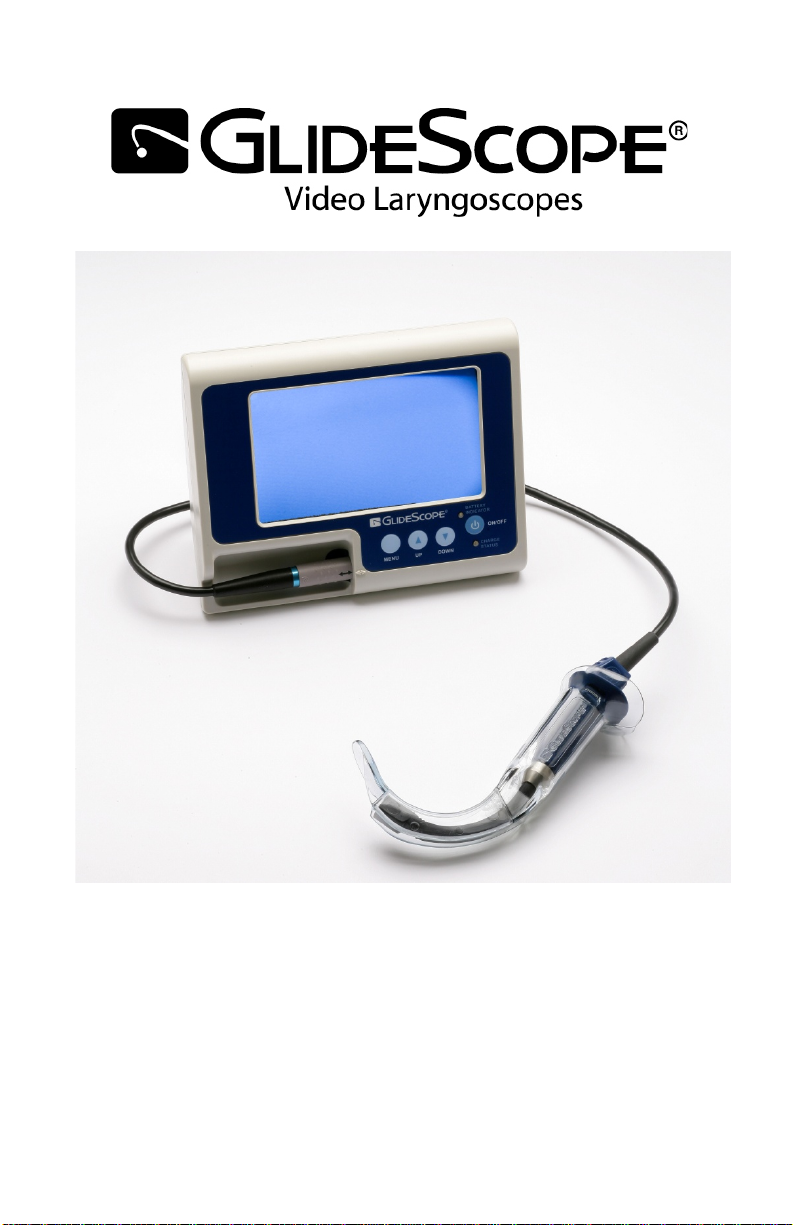
GlideScope GVL® and Cobalt
Quick Reference Guide
Linnaeusweg 11
3401 MS, IJsselstein
Corporate Headquarters:
Verathon Inc.
Verathon Medical (Europe) B.V.
20001 North Creek Parkway,
Bothell, WA 98011 USA
800.331.2313 (Canada and US)
425.867.1348
Fax: 425.883.2896
verathon.com
The Netherlands
+31.30.68.70.570
Fax: +31.30.68.70.512
verathon.eu
Manufacturer
Verathon Medical (Canada) ULC
2227 Douglas Road
Burnaby, BC V5C 5A9
Canada
604.439.3009
Fax: 604.439.3039
For additional contact information please visit verathon.com.
GlideScope, the GlideScope symbol, GlideRite, GVL, Verathon, and the
Verathon Torch symbol are trademarks of Verathon Inc. All other brand
and product names are trademarks of their respective owners.
®
The GlideScope
technology is covered under US Patents (6,655,377)
(6,543,447) as well as European Patent 1307131. Additional patents
pending.
Information in this User’s Manual and Quick Reference Guide may
change at any time without notice. For the most up-to-date information,
see the online manuals on verathon.com.
GlideScope
video laryngoscope systems are CE marked in accordance
with the Medical Device Directive, and the Verathon Inc. quality system
is Quality System Certified to ISO 13485:2003 standards.
–2011 Verathon Inc. No part of this manual may be copied or
© 2009
transmitted by any method without the express written consent of
Verathon Inc.
PN 0900-2100-05-20
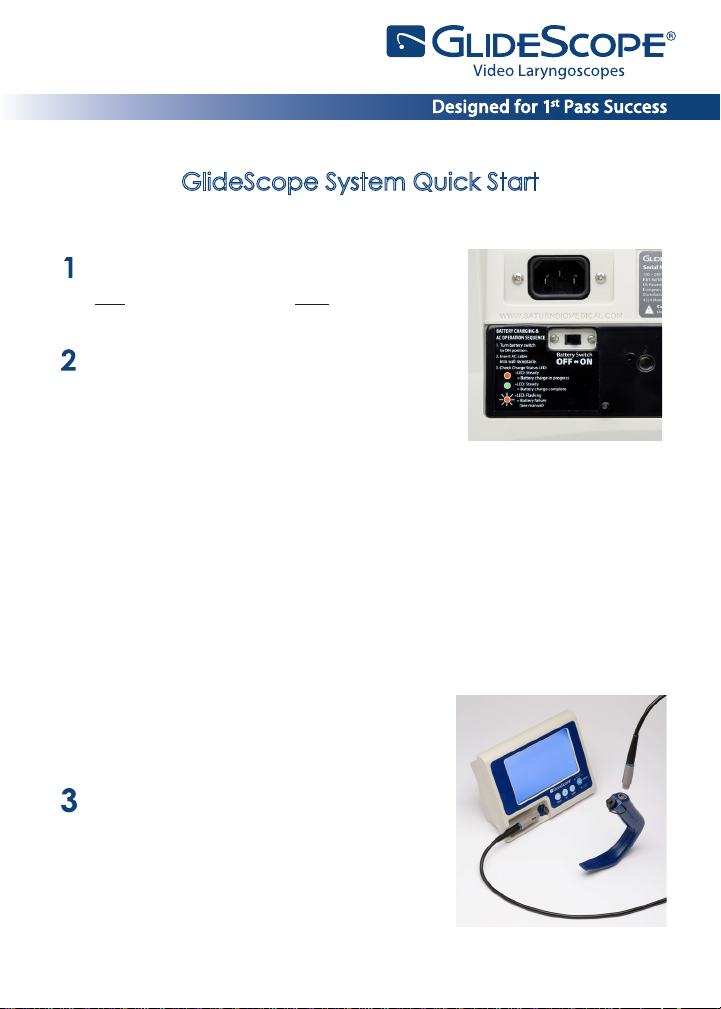
GlideScope System Quick Start
The monitor may be used immediately by
plugging it into an AC power source, or by
fully charging the battery prior to rst use.
To ensure proper charging, follow these steps
in order:
• Make sure the AC power cord is
disconnected and the power switch is in
the OFF position.
• Slide the power switch at the back of the monitor to the ON position.
• Plug the monitor into an AC power source:
Insert the female end of the power cord into the port on the back
◦
of the monitor.
• The charge status LED will turn orange, indicating that the recharging
cycle has begun.
• When charging is complete, the status LED will turn green. At this
point the unit is fully functional on battery power.
If the AC power cord is inserted before
the power switch is in the ON position, the
charge status LED will ash orange.
Connect the video laryngoscope to the
monitor.
• If using the GVL®:
Connect either end of the video cable
to the GVL connector. Connect the
video cable to the monitor connector.
GlideScope System Quick Start
• If using the Cobalt system:
Connect the video baton
Stat Video
baton
to the monitor as shown in
step #3. Then slide a singleuse GVL Stat over the video
baton.
To detach a GVL Stat from a Cobalt video baton, grasp the base of
the video baton and pull rmly.
IMPORTANT! A used GVL Stat is a biohazard and should be disposed of in
compliance with local protocols.
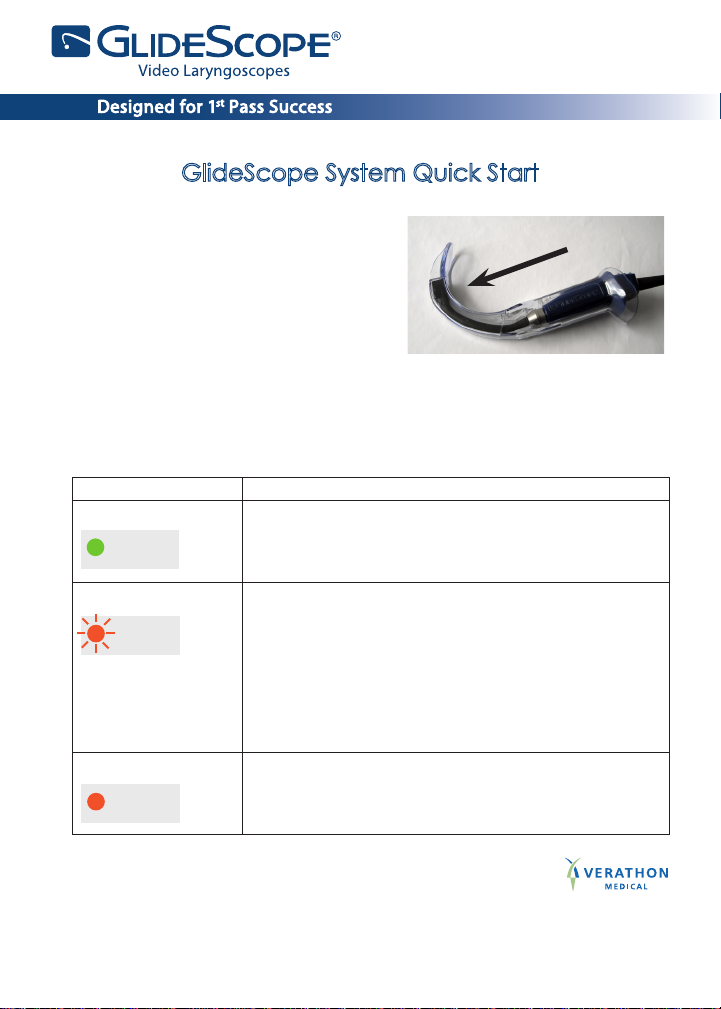
LED State Meaning
Steady green
The battery is fully charged and ready for use.
CHARGE
STATUS
Flashing orange Flashing orange can indicate two states:
CHARGE
STATUS
• If the AC power is connected and the power
switch is off ("O" - to the left), the CHARGE
STATUS LED will ash orange. The monitor will still
function but the battery will not charge.
• If the AC power is NOT connected and the
CHARGE STATUS LED ashes orange, the battery
is malfunctioning.
Steady orange Charging in progress
CHARGE
STATUS
Corporate Headquarters:
Verathon Inc.
20001 North Creek Parkway
Bothell, WA 98011, USA
Tel: 800.331.2313 (US and Canada only)
Tel: 425.867.1348 Fax: 425.883.2896
GlideScope, the GlideScope symbol, GVL, Verathon and the Verathon Torch symbol are trademarks of Verathon Inc. © 2008, 2010, 2011 Verathon
Inc. GlideScope video laryngoscope systems are CE marked in accordance with the Medical Device Directive, and the Verathon Inc. quality
system is Quality System Certied to ISO 13485:2003 standards.
M
Manufacturer:
Verathon Medical (Canada) ULC
2227 Douglas Road
Burnaby, British Columbia
Canada, V5C 5A9
P
EC Representative:
Verathon Medical (Europe) B.V.
Linnaeusweg 11
3401 MS IJsselstein Netherlands
Tel: +31.30.68.70.570
verathon.com
0900-2077-04-60
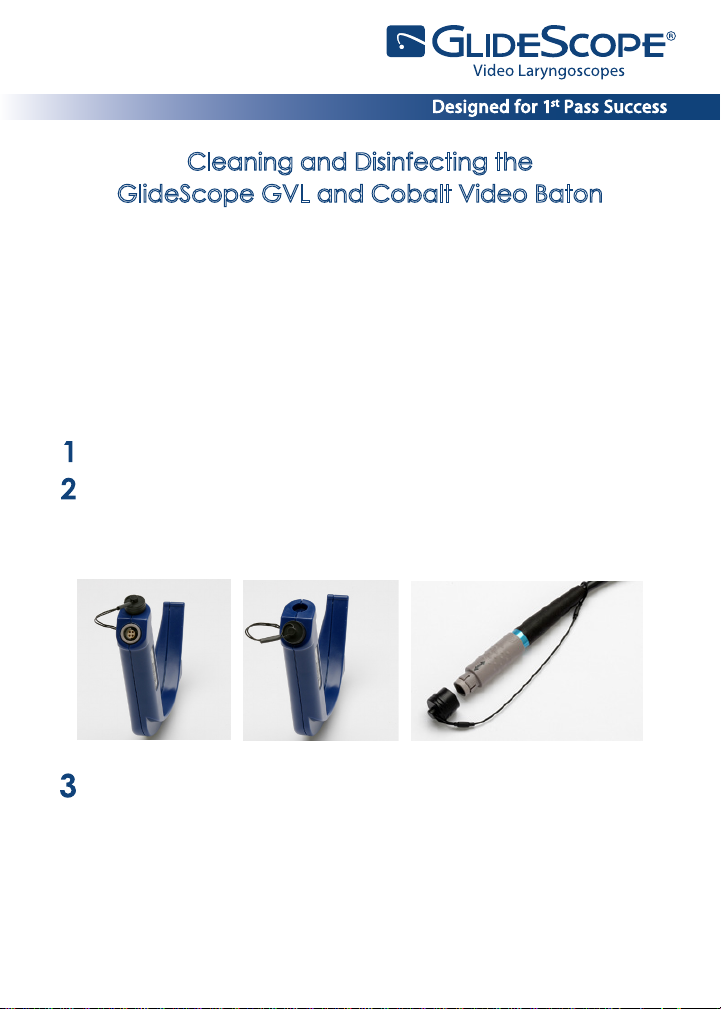
Cleaning and Disinfecting the
GlideScope GVL and Cobalt Video Baton
• DONOTexposetotemperaturesabove60oC(140oF).
Do not disinfect using devices such as autoclaves, ultrasonic cleaners or pasteurizers.
• The GlideScope GVL® is a nonsterile, reusable device. It is required that the GlideScope GVL
is cleaned and disinfected after every patient use using a High Level Disinfectant method.
• The GlideScope Cobalt video baton is a nonsterile, reusable device. When used as
intended, it is protected from direct contact with the patient by the sterile, single-use GVL
Stat. Low Level Disinfection is recommended for the video baton after every patient use.
High Level Disinfection is required for the GlideScope Cobalt video baton when it is visibly
soiled.
Disconnect the GVL or video baton from the monitor.
Place the cleaning cap over the connector as shown.
• During cleaning, the protective cap must be inserted as shown to protect the
cable connector.
GVL
Correct
cleaning
position
Cobalt video baton
GlideScope® Cobalt
Cleaning Cap
Video baton
cleaning cap
Wash the GVL or video baton manually to remove all foreign material from the
surface of the device.
• Chemical compatibility and disinfection methods are detailed in the user’s manual.
• To clean the exterior of the monitor and the video cables, wipe with IPA (70%
isopropyl alcohol) bleach (100ppm) or a mild detergent and water.
• Wipe the cradle with a standard hospital-grade surface cleaning product.
FormoredetailedcleaninginstructionsseetheGlideScopeGVL/CobaltUser’sManual.
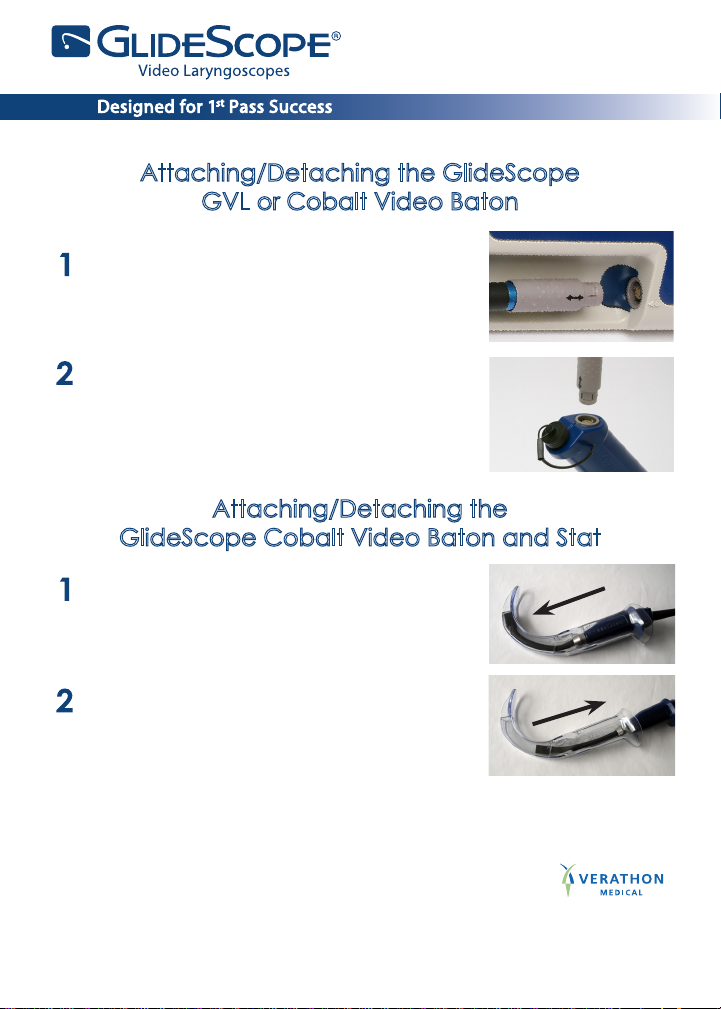
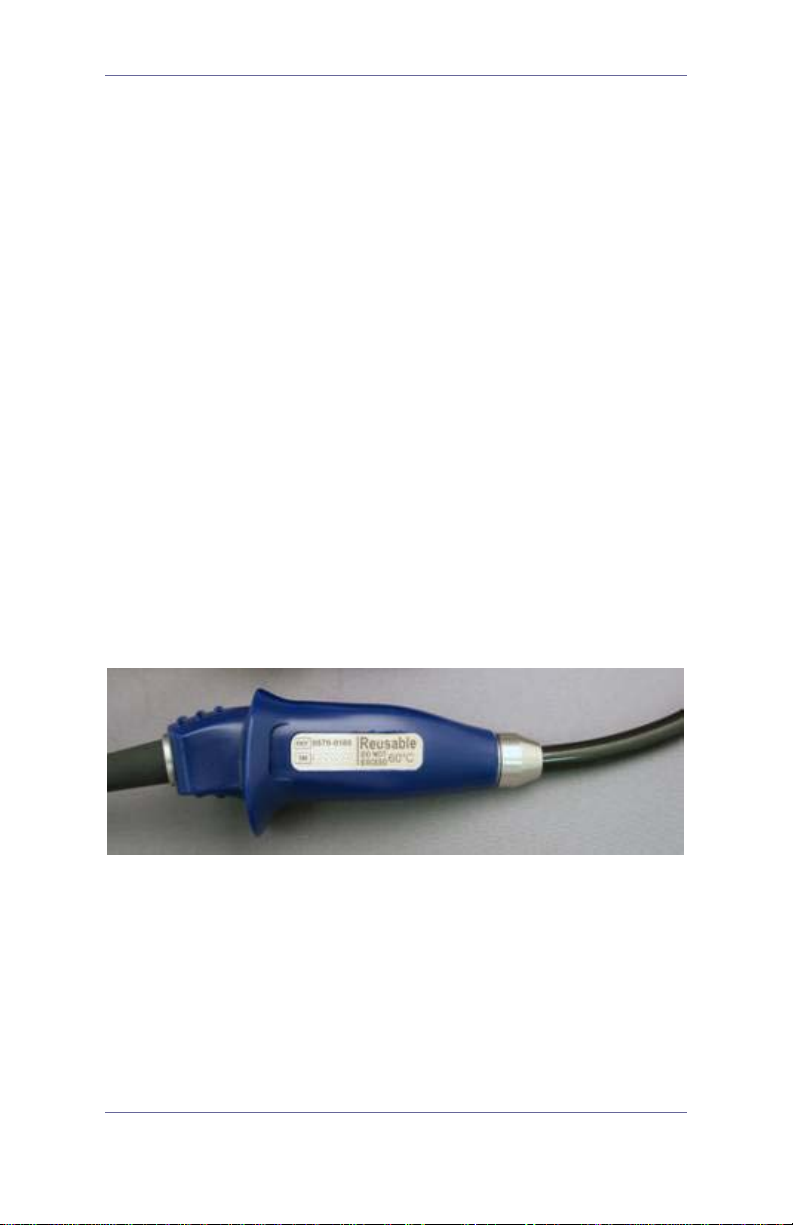
Attaching/Detaching the GlideScope
GVL or Cobalt Video Baton
Insert the GVL® or Cobalt video baton cable into
the port located on the face of the monitor so that
the arrows on the cable and the monitor line up.
For GVL only: Attach the opposite end of the
video cable to the port located on the GVL.
Note: When connecting and disconnecting the cable,
grasp the connector by the gray sleeve.
Attaching/Detaching the
GlideScope Cobalt Video Baton and Stat
Insert the Cobalt video baton into the sterile,
single-use GVL Stat until it clicks into place.
Ensure proper insertion by matching the
GlideScope logo on the side of the video
baton and the GVL Stat.
Detach the video baton from the GVL Stat
by grasping the base of the video baton and
pulling rmly.
Stat
Video
baton
IMPORTANT!A used GVL Stat is a biohazard and should be disposed
of in a manner consistent with local directives in the user’s jurisdiction.
CorporateHeadquarters:
VerathonInc.
20001 North Creek Parkway
Bothell, WA 98011, USA
Tel: 800.331.2313 (US and Canada only)
Tel: 425.867.1348 Fax: 425.883.2896
GlideScope, the GlideScope symbol, GVL, Verathon and the Verathon Torch symbol are trademarks of Verathon Inc. © 2008, 2010, 2011 Verathon Inc.
GlideScope video laryngoscope systems are CE marked in accordance with the Medical Device Directive, and the Verathon Inc. quality system is
Quality System Certied to ISO 13485:2003 standards.
M
Manufacturer:
VerathonMedical(Canada)ULC
2227 Douglas Road
Burnaby, British Columbia
Canada, V5C 5A9
P
ECRepresentative:
VerathonMedical(Europe)B.V.
Linnaeusweg 11
3401 MS IJsselstein Netherlands
Tel: +31.30.68.70.570
Fax: +31.30.68.70.512t
verathon.com
0900-2013-07-60
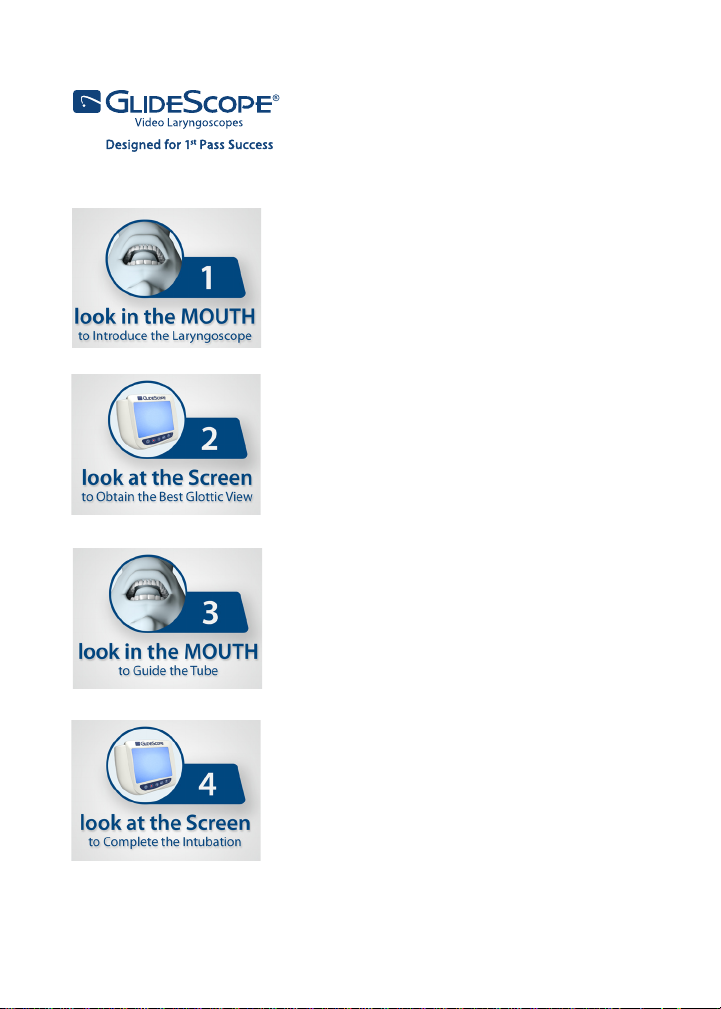
The GlideScope
4-Step Technique
Looking directly into the patient’s mouth
and with the GlideScope in the left hand,
introduce the video laryngoscope into the
midline of the oral pharynx.
With the laryngoscope inserted, look to
the monitor to identify the epiglottis, then
manipulate the scope to obtain the best
glottic view.
Looking directly into the patient’s mouth,
not at the screen, carefully guide the
distal tip of the tube into position near the
tip of the laryngoscope.
It is important to look into the mouth at this step to
avoid injuring the tonsils or soft palate.
Look to the monitor to complete the
intubation; gently rotate or angle the tube
to redirect as needed.
GlideScope video laryngoscope systems are CE marked in accordance with the Medical Device Directive, and the Verathon Inc. quality system
is Quality System Certied to ISO 13485:2003 standards.
Tips for GlideScope
Video Laryngoscope Insertion
• Verathon® recommends inserting the GlideScope video
laryngoscope down the midline of the tongue to the epiglottis.
• The GlideScope video laryngoscope may be used to produce a
Macintosh indirect lift of the epiglottis or a Miller lift.
• Intubations using GlideScope video laryngoscopes require
approximately 0.5–1.5 kg of lifting force.
• Use of an endotracheal tube stylet
is recommended. The GlideRite®
Rigid Stylet is designed to
complement the angle of the
GlideScope video laryngoscope to
facilitate intubation. A malleable
stylet may be used with a 60– 90°
angle.
• To aid the passage of the endotracheal
tube, withdraw the stylet (approx. 5 cm)
while gently advancing the ETT. A 1 cm
adjustment (withdrawal) of the laryngoscope
also may be benecial to reduce the viewing
angle and allow the glottis to drop.
Corporate Headquarters:
Verathon Inc.
20001 North Creek Parkway
Bothell, WA 98011, USA
Tel: 800.331.2313 (US and Canada only)
Tel: 425.867.1348 Fax: 425.883.2896
GlideScope, the GlideScope symbol, GVL, GlideRite, Verathon, and the Verathon Torch symbol are trademarks of
Verathon Inc. © 2009, 2010, 2011 Verathon Inc.
M
Verathon Medical (Canada) ULC
2227 Douglas Road
Burnaby, British Columbia
Canada, V5C 5A9
P
Verathon Medical (Europe) B.V.
Linnaeusweg 11
3401 MS lJsselstein Netherlands
Tel: +31.30.68.70.570
Fax: +31.30.68.70.512
verathon.com
0900-1436-10-60
GlideScope® System
Important Information
Statement of Presc ription
Federal (USA) law restricts this device for sale by or on the order
of a physician.
The GlideScope video laryngoscope system should be used only
by individuals who have been trained and auth or i zed by a
physician, or by health care providers who have been trained
and authorized by the institution providing patient care.
Intended Use
GlideScope video laryngos copes are intend ed f or use b y
qualified medical professionals to obtain a clear, unobstructed
view of the vocal cords for medical procedures.
Warnings and Cautions
Caution. Risk of permanent equipment dam age.
Do not expose GlideScope video laryngoscopes or Cobalt video
batons to temperatures above 140° F (60° C). Do not disinfect
GlideScope video laryngoscopes or Cobalt video batons using
devices such as autoclaves, ultrasonic cleaners, or pasteurizers.
Use of such methods will cause permanent device damage and
void the warranty
.
Equipment Caution: Electrical sho ck hazard. Refer servicing
to qualified personnel.
This equipment has been tested and found to comply with the
standards listed in the Approvals section of this manual. These
limits are designed to provide reasonable protection against
harmful interference in typical medical installations.
CAUTION: Risk of equipment damage.
Failure to cover the cable connector port with the protective cap
prior to cleaning may result in water ingress and potential device
failure.
Bleach can be used on the baton but with special attention to the
connector. Bleach may corrode the stainless steel inserts and
damage the connector pins.
CAUTION: Potential interference with other devices.
GlideScope video laryngoscopes must be used with the supplied
cables to maintain electromagnetic interference (EMI) within
certified limits.
Quick Reference Guide 1
GlideScope® System
GlideScope
Reusable
GlideRite®
Reusable Cobalt
Single-use
GlideRite
GlideScope
GlideScope GVL and Cobalt S ystems
GlideScope GVL System
non-glare color
video monitor
Video cable
GVL® (4 sizes)
Rigid Stylet
GlideScope Cobalt System
Quick Reference Guide 2
non-glare color
video monitor
video batons
(2 sizes)
GVL Stats
(5 sizes)
Rigid Stylet
GlideScope® System
Power cord
connector
Power
switch
NTSC
Video cable
Press UP/DOWN to
GREEN
low
Press MENU to
Press ON/OFF to
GlideScope Video Monitor Rear Panel
Video Out
Connector
(external
monitor)
Mounting
point for
mobile stand,
ON/OFF
IV pole, or
hard shell
case
GlideScope Video Monitor Front Panel
view display
setting options
connector
Quick Reference Guide 3
battery power
: Monitor is operating on
FLASHING GREEN: Battery is
move between menu
options or to
increase/decrease
setting values
power up the
GlideScope
GREEN: Battery is fully charged
ORANGE: Battery is charging
FLASHING ORANGE: Monitor is
plugged in but battery is not
charging
System
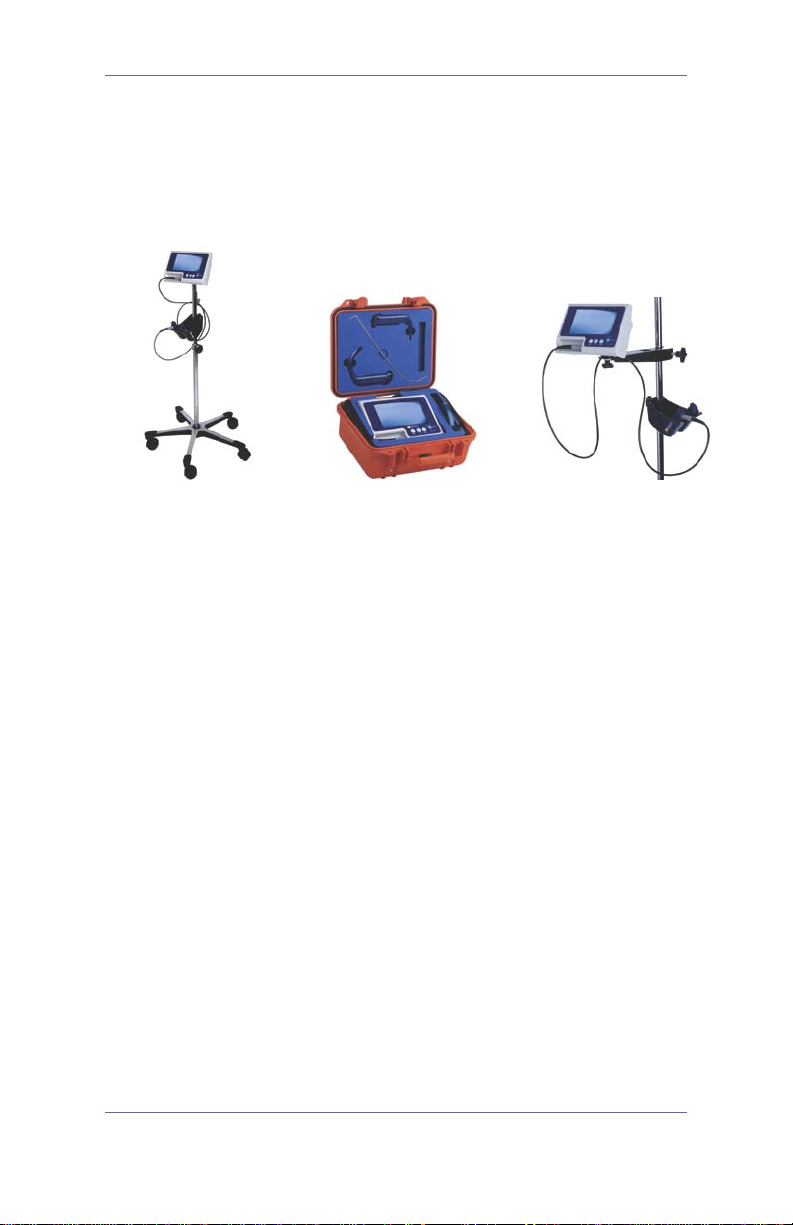
GlideScope® System
Mobile Stand
Hard Shell Case
Mounted on an IV Pole
GlideScope System Configurations
The GlideScope system may be configured in one of three ways
to best meet the needs of individual practices. Please refer to the
User’s Manual for complete assembly and setup information.
Preparing for First Use
Prior to using the GlideScope system for the first time, perform
the following steps:
1. Charge the monitor battery.
2. Set up the GlideScope system in your preferr ed
configuration.
3. Attach a video laryngoscope or video baton to the
monitor.
4. Connect the monitor to an external source such as a TV
screen (optional).
5. Perform a functional check.
a. Connect a GlideScope video laryngoscope to the
monitor (GVL
b. Turn the system on by pressing the
located on the face of the monitor.
c. Observe the monitor screen to verify that an image
is being received from the GlideScope.
®
or Cobalt video baton + GVL Stat).
ON/OFF button
Quick Reference Guide 4
GlideScope® System
If the GlideScope GVL®, video baton, or Stat are stored in cold
conditions, additional warming time may be required for optimal
performance of the anti-fog feature.
Cleaning, Disinfecti ng, and Maintenance
To ensure patient safety, users should perform a routine
inspection of the GlideScope video laryngoscope before every
use to ensure that all endoscopic components are free of
unintended rough surfaces, sharp edges, protrusions, or cracks.
If inspection reveals any faults in the components, contact
Verathon Medical Customer Care or your local GlideScope
representative. All repairs must be performed by an authorized
Verathon Medical Service Center .
CAUTION: Risk of permanent device damage!
Do not expose GlideScope video laryng o scopes or Cobalt
video batons to temperatures above 14 0° F (60°C).
Note: GlideScope GVL and Cobalt video baton laryngoscopes
designed to better withstand vaporized hydrogen peroxide are
identified by the metal label.
Quick Reference Guide 5
GlideScope® System
General Cleaning and Disi nf ec ti on Information
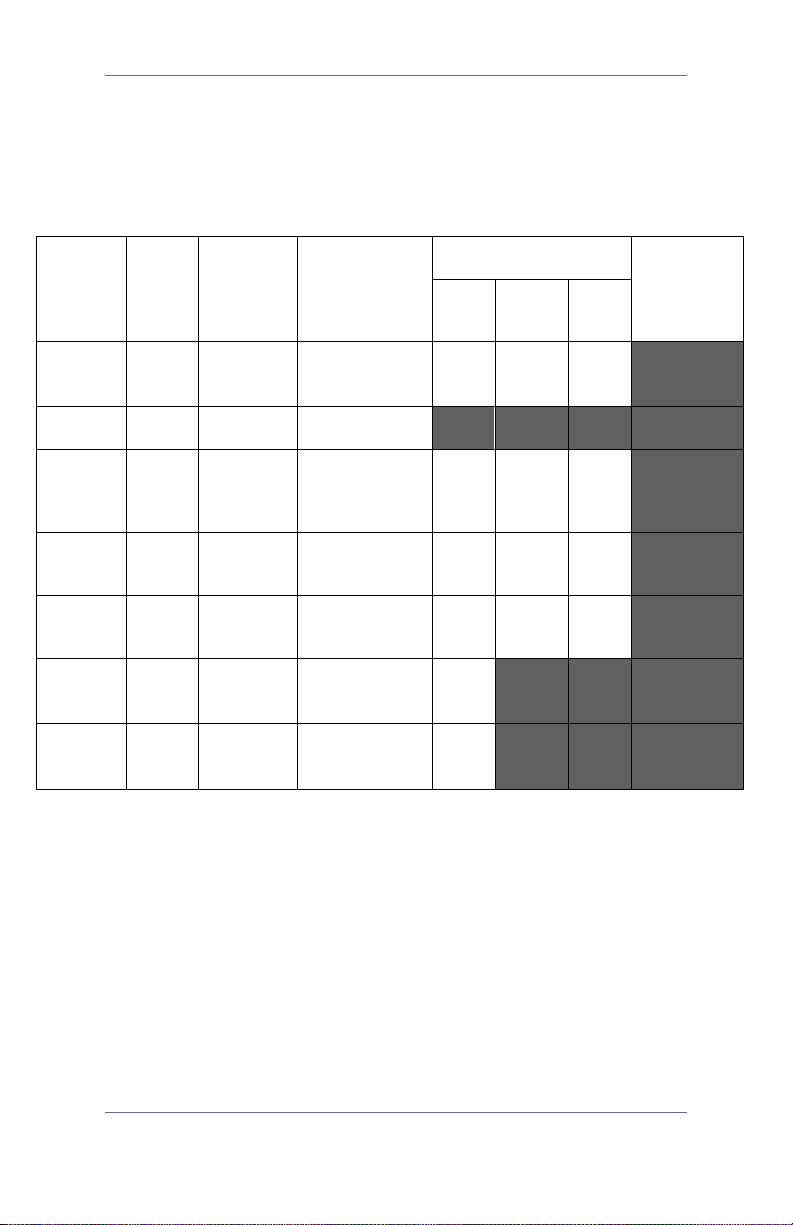
Table 1: Risk Assessment
Low
Level
Disinfection
Int.
Level
High
Level
Sterilization
Device Sterile Use
GVL®
GVL Stat Sterile Single use Semicritical
Cobalt
video
baton*
Video
cables
Stylet
Monitor#
Cradle#
Non-
sterile
Non-
sterile
Non-
sterile
Non-
sterile
Non-
sterile
Non-
sterile
Reusable Semicritical X
Reusable Noncritical X
Reusable Noncritical X
Reusable Semicritical X
Reusable Noncritical X
Reusable Noncritical X
Spaulding’s
CDC
Classification
It is understood that all items in this chart will be used as intended
Quick Reference Guide 6

GlideScope® System
Key:
* The Cobalt video baton is a nonsterile, reusable device
which is protected from contact with mucous membranes
and nonintact skin by the Stat (sterile, single-use) when used
as intended. Low Level Disinfection is recommended for the
Cobalt video baton after every patient us e. High Level
Disinfection is required for the video baton when it is visibly
soiled.
# Disinfect monitor and cradle when they are visibly soiled and
on a regular basis as per a schedule established by the
medical care facility or provider.
– Shaded areas - not required/not compatible with device
materials.
– Checked boxes (x) show minimum requirement.
– Unshaded areas show permissible levels of disinfection
based on compatibility with device m ater ials.
Warning: Disinfectants and cleaning methods listed are
recommended by Verathon
®
based on compatibility with product
materials. Refer to the label instructions for guidance on
disinfection efficacy and appropriate clinical uses.
Caution:
Meticulous cleaning must precede any disinfection
process, to ensure all foreign matter is removed from the surface
of the device. This allows the active ingredients of the chosen
process to reach all the surfaces of the device.
Availability of cleaning products varies by country, and we are
unable to test products in every market. Please use the list of
recommended chemicals in this manual to compare with
products available locally.
Quick Reference Guide 7
GlideScope® System
Active
Disinfection
Caution/
Enzymatic
Surface cleaning
Isopropyl
70% used to wipe down
7.5% – exp osure for 30
2.0% – exp osure for
0.55% – exposure for 12
0.2% – exp osure for
Corrosive for
Note: When using any of the chemicals listed below, read and
comply with product use instruc tions in all app lica tio ns.
Table 2: Chemical Compatibility and Disinfection
Methods for GVL®, Cobalt Video Batons and Video
Cables
Ingredient
debridement
agent/
detergent
Alcohol
Solution
Hydrogen
Peroxide
Vaporized
Hydrogen
Peroxide
Glutaraldehyde Up to 3.4%
Ortho-
Phthalaldehyde
Peracetic Acid 0.2%
Compatibility Conditions
General
hospital grade
70%
Up to 7.5%
90% 90% / 42 min
0.55%
As per instructions N/A
with minimum 1 minute
exposure
minutes at ≥ 20°C or as per
manufacture’s instructions
minimum 20 minutes at
20°C or as per
manufacturer’s instructions
minutes at 20°C or as p er
manufacturer’s instructions
minimum 12 minutes at 50
to 56°C or as per
manufacturer’s instructions
Level
Low
High
See
comments
on right
systems for ease
High
High
See
comments
on right
Comments
only in
preparation for
disinfectant
Compatibility
has been
established in
vaporized
hydrogen
peroxide
sterilization
of use
Classified as
a chemical
sterilant
Bleach
(Sodium
Hypochlorite)
Quick Reference Guide 8
Up to
8000ppm
5000ppm – exposure for 10
minutes at 20°C
500ppm – used to wipe
down with minimum 1
minute e x posure
High
Low
connector pins
and SS ring
Noncorrosive at
≤ 500ppm
GlideScope® System
Table 3: Chemical Compatibility and Disinfection
Methods for GlideRite® Rigid Stylet
Active
Ingredient
Glutaraldehyde Up to 3.4%
Ortho-
Phthalaldehyde
Peracetic Acid 0.2%
Isopropyl
Alcohol Solution
Bleach (Sodium
Hypochlorite)
Compatibility Conditions
0.55%
70%
≤ 500ppm
2.0% – exposure
for minimum 20
minutes at 20°C or
as per
manufacturer’s
instructions
0.55% – exposure
for 12 minutes at
20°C or as per
manufacturer’s
instructions
0.2%
– exposure
for minimum 12
minutes at 50 to
56°C or as per
manufacturer’s
instructions
70% – exposure for
10 minutes at 20°C
70% used to wipe
down with
minimum 1 minute
exposure
500ppm – used to
wipe down with
minimum 1 minute
exposure
Disinfection
Level
High
High
See
comments
on right
Intermediate
Low
Low
Caution/
Comments
Classified as a
chemical sterilant
Noncorrosive
at ≤ 500ppm
Enzymatic
debridement
agent/
detergent
N/A
Quick Reference Guide 9
General
hospital grade
Tested in
autoclave
(steam cycle)
As per instructions N/A
Minimum 4 minute
132°C pre-vacuum
steam sterilization
cycle
See
comments
on right
Surface cleaning
only in preparation
for disinfectant
Based on requests
from users, an
autoclave cycle has
been established
for the stylet for
ease of use

GlideScope® System
Cleaning and Disinfecting the GVL and Cobalt Video Baton
Caution: Meticulous cleaning must precede any disinfection
process, to ensure all foreign matter is removed from the surface
of the device. This allows the active ingredients of the chosen
process to reach all the surfaces of the device.
®
The GlideScope GVL
required that the GlideScope GVL
after every patient use, using a High Level Disinfectant method.
The Cobalt video baton is a nonsterile, reusable device which is
protected from direct contact with the patient by the Stat (sterile,
single-use) when used as intended, Low Level Disinfect ion is
recommended for the Cobalt video baton after every patient use.
High Level Disinfection is required for the Cobalt video baton
when it is visibly soiled.
CAUTION: Risk of equipment damage.
Bleach can be used on the baton but with special attention to the
connector. Bleach may corrode the stainless steel inserts and
damage the connector pins.
is a nonsterile reusable device. It is
is cleaned and disinfected
Availability of disinfection products varies by country, and we are
unable to test products in every market. Please use the list of
recommended disinfectants in the User's Manual to compare
with products available locally.
For more detailed cleaning instructions see the GlideScope
System User's Manual or visit glidescope.com.
Quick Reference Guide 10

GlideScope® System
Battery Replacement and Device Repair
Under normal operating conditions, the monitor battery will last
2 - 3 years; or approximately 500 charge/discharge cycles.
The battery is not user-replaceable. In case of battery malfunction,
do not attempt to replace the monitor battery. Any attempts to
replace the battery by unauthorized serv ice tech nic ians may
cause serious harm to the user and will void the warranty.
Please contact your Verathon Medical Customer Care
Representative for more information on battery replacement.
Device Disposal
Disposal of this device can be coordinated through your
Verathon Medical Service Center in acc or dance w ith WEEE
requirements.
Quick Reference Guide 11

GlideScope® System
Specifications
General Specifications
Classification: Electrical Class I, Applied Part BF
Line Voltage Range: 100 – 240 VAC, 50 & 60 Hz
Line Current: MAX 0.50 A
Power Plug: Hospital Grade
Line Protection: 2A Fuse, Internal
Operation and Storage Conditions
Operating Conditions
Temperature:………………………………………...…10°C to 40°C
Relative Humidity:………………………………………......0 to 95%
Atmospheric Pressure:…………………………….440 to 1060 hPa
Shipping and Storage Conditions
Temperature:……………………………..……………-20°C to 45°C
Relative Humidity:………………………………………......0 to 95%
Atmospheric Pressure:…………………………….440 to 1060 hPa
Charging Conditions
Temperature:………………………………………….…0°C to 40°C
Relative Humidity:………………………………………......0 to 95%
Atmospheric Pressure:…………………………….440 to 1060 hPa
Quick Reference Guide 12
GlideScope® System
Standards and Approvals
CMDCAS ISO 13485, Certificate No. 9235, EC Certificate for
Class I sterile Stats, Certificate No. 41315937, MDD
Requirements met for Class I and Class I sterile devices, CSA
Requirements met (Master Contract # 213281), CSA Certificates
issued, CB Scheme requirements met (CB Bulletin 112a), CB
Test Certificates issued, CAN/CSA C22.2 No 601.1-M90,
CAN/CSA C22.2 No. 60601-2-18-01, UL Std No 60601-1, IEC
60601-2-18, CE Mark EMC Directive, IEC 60601-1-2, CISPR 11,
VCCI Technical V-3
Symbol Directory
The following international regulatory symbols are found on the
GlideScope video laryngoscope and/or GlideScope video
monitor and indicate compliance with international regulatory
standards:
Symbol Meaning
Type BF equipment
CE marking in accordance with the Medical Device
Directive (
Canadian Standards Association (CSA) mark of
certification to applicable standards for electromedical equipment
0413 for Sterile Devices)
Tested to Federal Communications Commission
Requirements
Attention – consult accompanying documents. Read
instructions before connecting or operating
Subject to WEEE (Waste of Electronic Electrical
Equipment) regulations
Quick Reference Guide 13
GlideScope GVL® and Cobalt
User’s Manual

Linnaeusweg 11
3401 MS, IJsselstein
Corporate Headquarters:
Verathon Inc.
Verathon Medical (Europe) B.V.
20001 North Creek Parkway,
Bothell, WA 98011 USA
800.331.2313 (Canada and US)
425.867.1348
Fax: 425.883.2896
verathon.com
The Netherlands
+31.30.68.70.570
Fax: +31.30.68.70.512
verathon.eu
Manufacturer
Verathon Medical (Canada) ULC
2227 Douglas Road
Burnaby, BC V5C 5A9
Canada
604.439.3009
Fax: 604.439.3039
For additional contact information please visit verathon.com.
GlideScope, the GlideScope symbol, GlideRite, GVL, Verathon, and the
Verathon Torch symbol are trademarks of Verathon Inc. All other brand
and product names are trademarks of their respective owners.
®
The GlideScope
technology is covered under US Patents (6,655,377)
(6,543,447) as well as European Patent 1307131. Additional patents
pending.
Information in this User’s Manual and Quick Reference Guide may
change at any time without notice. For the most up-to-date information,
see the online manuals on verathon.com.
GlideScope
video laryngoscope systems are CE marked in accordance
with the Medical Device Directive, and the Verathon Inc. quality system
is Quality System Certified to ISO 13485:2003 standards.
–2011 Verathon Inc. No part of this manual may be copied or
© 2009
transmitted by any method without the express written consent of
Verathon Inc.
PN 0900-2101-05-60


GlideScope® System Contents
Contents
Important Information ............................................................... 6
Product Description ........................................................ 6
Intended Use .................................................................. 6
Statement of Prescription ......................................................... 6
Intended Use ............................................................................ 6
Notice to All Operators ................................................... 7
Cautions .......................................................................... 7
Introducing the GlideScope System ........................................ 9
GlideScope System Components ................................. 10
GlideScope GVL® System ...................................................... 10
Cobalt Single-Use System ..................................................... 11
GlideScope System Setup Optio ns .............................. 12
Displays, Controls, and Indicators ........................................ 15
Monitor Back Panel ...................................................... 15
Monitor Front Panel ...................................................... 16
Monitor Front Panel LEDs ...................................................... 18
Getting Started ......................................................................... 20
Initial Inspection ............................................................ 20
Preparing for First Use ................................................. 21
1. Charging the Monitor Battery ............................................. 21
2. Setting up the GlideScope System
Setting up the GlideSc ope Syste m on th e Mobile Stand ................ 24
Setting up the Gl ideScope S ystem in the har dshell case ............... 29
Setting up the GlideScope System on an IV pole ................ 31
3. Attaching and Detaching the GlideScope GVL or Cobalt
Video Baton and GVL Stat ................................................ 31
................................. 24
Attaching the GlideScope GVL to the Monitor.............. 31
Selecting the Correct Video Baton and Stat ................. 33
Attaching the Cobalt Video Baton to the Monitor ......... 33
Inserting the Video Baton into the Stat ......................... 33
GlideScope Anti-Fog Feature ....................................... 35
User’s Manual page 3

Contents GlideScope® System
4. Connecting the Monitor to an External Video Device
(Optional) ........................................................................ 36
5. Performing a Functional Check .......................................... 37
Optional Accessory ....................................................... 38
GlideScope DVR for GVL®/Cobalt ......................................... 38
Recording ............................................................................... 38
Playback ................................................................................ 39
Troubleshooting ..................................................................... 39
Cleaning ................................................................................. 40
Clinical Application Tips ................................................ 41
The GlideScope 4-Step Technique ........................................ 41
Tips for Working with Endotracheal Tubes ................... 42
Cleaning, Disinfecting, and Maintaining the
GlideScope GVL and Cobalt Systems ................................... 44
Cleaning, Disinfecting and Mai nta in ing
GlideScope GVL and Cobalt Systems.......................... 44
General Maintenance Information ................................ 44
General Cleaning and Disinfection Information ............ 45
Table 1: Risk Assessment ................................................ 45
Table 2: Chemical Compatibility and Disinfection
Methods for GVL, Cobalt Video Batons and Video Cables ... 47
Table 3: Chemical Compatibility and Disinfection
Methods for GlideRite® Rigid Stylet ................................... 48
Cleaning and Disinfecting the GlideScope GVL and
Cobalt Systems............................................................. 49
Cleaning the GlideScope GVL ...................................... 49
Disinfecting the GlideScope GVL ................................. 50
Cleaning the GlideScope
Cobalt Video Baton .............. 50
Disinfecting the GlideScope Cobalt Video Baton ......... 51
Cleaning the Video Cables ........................................... 52
Cleaning the Monitor .................................................... 52
Cleaning the Cradle ...................................................... 52
®
Cleaning and Disinfecting the GlideRite
Rigid Stylet .. 53
Replacing the Monitor Battery ...................................... 53
O-Ring Replacement .................................................... 54
Transportation and Storage .......................................... 55
page 4 User’s Manual
Loading...