

Page 1
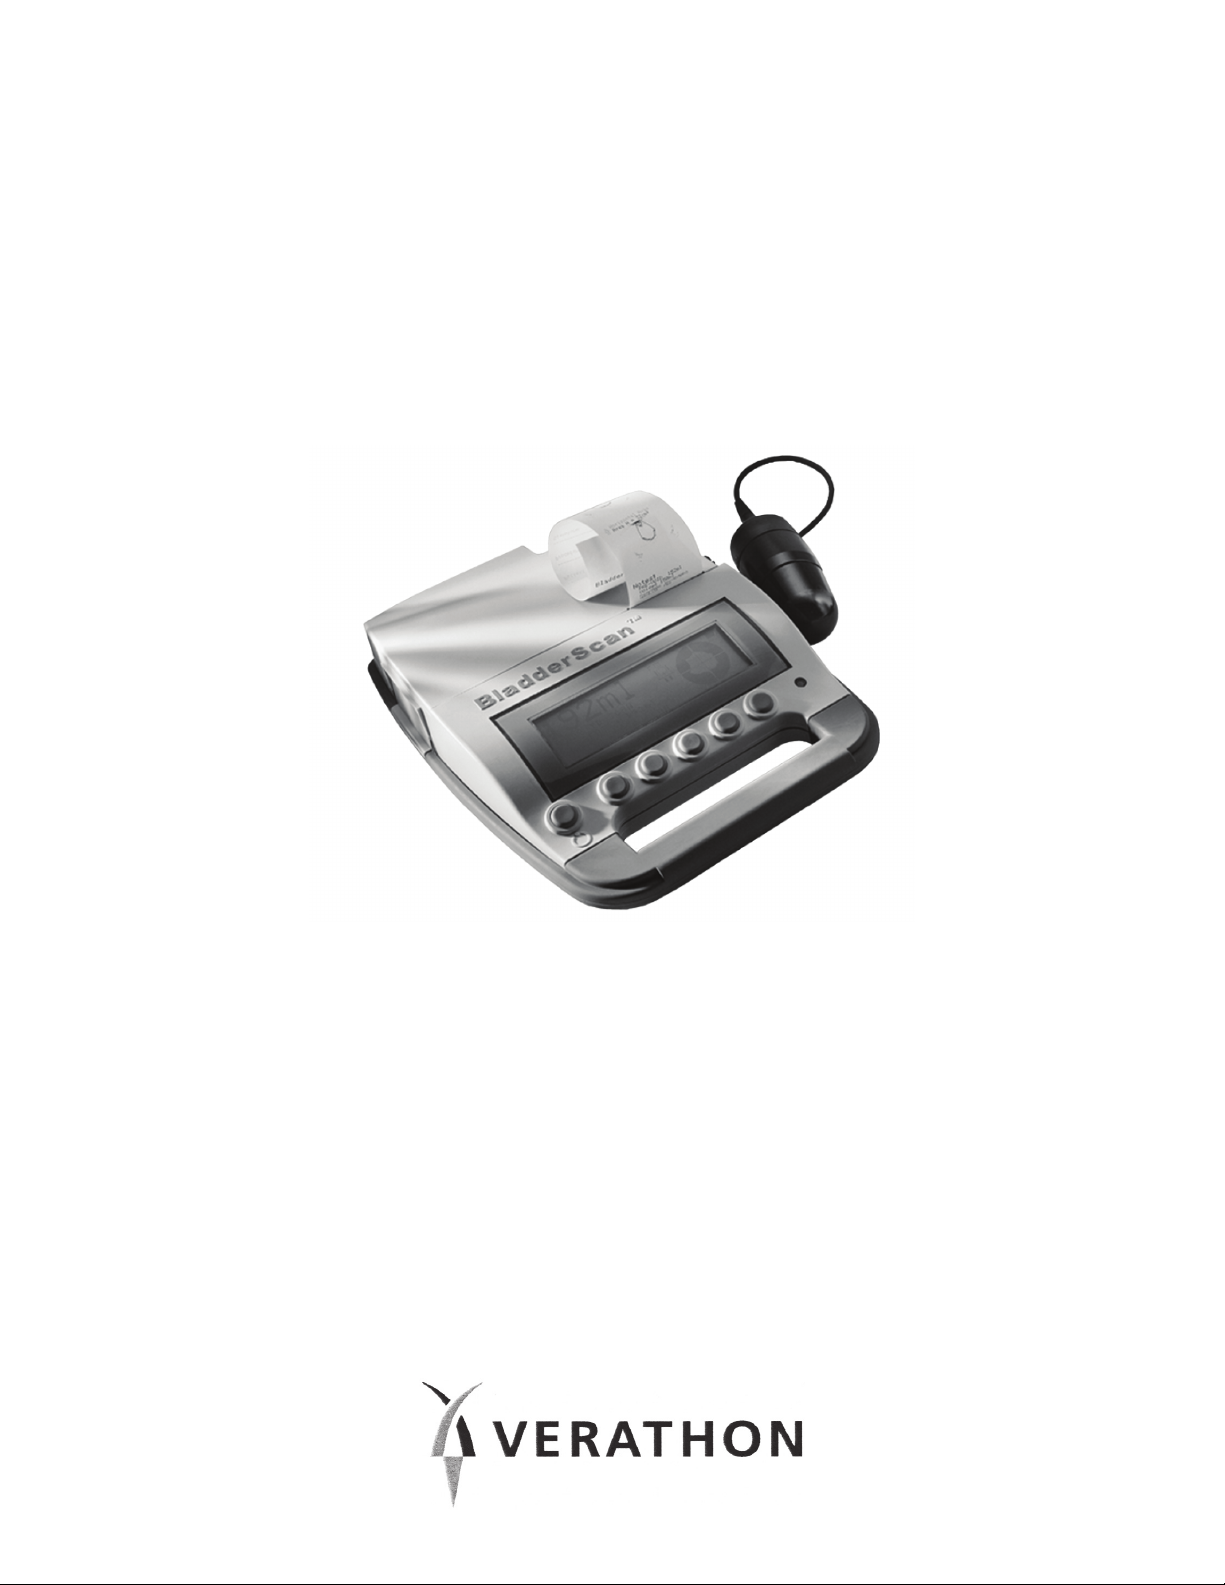
BladderScan® BVI 3000
Bladder Volume Instrument
Operator’s Manual
Page 2

Page 3

BladderScan® BVI 3000
Bladder Volume Instrument
Operator’s Manual
Page 4

Copyright © 2007, 2010 by Verathon Inc
All rights reserved. No part of this Operator’s Manual may be copied or transmitted by any method without the express written
consent of Verathon Inc.
BladderScan, Sontac, and Verathon are trademarks of Verathon Inc.
Other products and companies named in this Operator’s Manual may be trademarks of their respective companies.
The BladderScan instrument documented in this manual is protected by U.S. Patent Number 5,235,985. Other international
patents pending.
This Operator’s Manual is Verathon Part No. 0900-0383.
Information in this Operator’s Manual may change at any time without notice. Examples described or illustrated in this User’s
Guide are ctitious and do not in any way represent real patient or exam data.
Verathon Inc.
20001 North Creek Parkway
Bothell, WA 98011 USA
800.331.2313 (US and Canada only)
425.867.1348
Fax: 425.883.2896
Verathon Medical (Europe) B.V.
Linnaeusweg 11
3401 MS IJsselstein
The Netherlands
+31.30.68.70.570
Fax: +31.30.68.70.512
For additional contact information, please visit our web site at www.verathon.com.
0900-0383-11-60
Page 5

Table of Contents
Important Information .................................................................................................................6
BladderScan
Description of the BladderScan
®
BVI 3000 Components ........................................................................................7
®
BVI 3000 ...............................................................................8
Preparation For Use ....................................................................................................................8
Customizing the BladderScan
Operating the BladderScan
®
BVI 3000 ................................................................................11
®
BVI 3000 .....................................................................................13
Verifying Aim ..............................................................................................................................15
Printing Results .........................................................................................................................17
Histogram of Cost Savings .......................................................................................................18
Adding a Patient ID and Notes .................................................................................................19
Print Options ..............................................................................................................................20
Adjusting Preferences ..............................................................................................................21
Additional Features ...................................................................................................................23
Regular Inspections and Maintenance ....................................................................................24
Troubleshooting ........................................................................................................................25
Warranty and Disclaimer Information ......................................................................................26
Contacting Verathon
®
................................................................................................................27
Safety and Performance Summary ..........................................................................................28
Parts and Accessories ..............................................................................................................29
Technical Description ...............................................................................................................29
Technical Description: Battery Charger ..................................................................................31
Symbol Directory .......................................................................................................................33
Page 5BVI 3000 Operator’s Manual
Page 6

Important Information
Product Description
Notice to All
Operators
Biological Safety
The BladderScan® BVI 3000 is a B-mode ultrasonic instrument, portable
and battery operated, intended for the noninvasive measurement of
urinary bladder volume. A mechanical sector scanning transducer
provides cross-sectional images of the bladder from twelve scan planes.
Based on these images, the BladderScan automatically calculates the
estimated bladder volume in milliliters and displays it on a screen.
The BladderScan BVI 3000 should be used only by individuals who have
been trained and authorized by a physician or the institution providing
patient care. All operators should read this manual prior to using the BVI
3000. Failure to comply with these instructions may compromise the
performance of the instrument.
To date, exposure to pulsed diagnostic ultrasound has not been shown
to produce adverse effects. However, ultrasound should be used only
by medical professionals when clinically indicated, using the lowest
exposure times possible commensurate with clinical utility.
The ultrasonic output power of the BladderScan BVI 3000 is not useradjustable and is limited to the minimum level necessary for effective
performance. Data on acoustic output levels can be found in the section
titled “Technical Description,” beginning on page 29.
Statement of
Prescription
Statement of
Intended Use
Cautions
Caution: United States Federal law restricts this instrument to use by or
on the order of a physician.
The BladderScan BVI 3000 projects ultrasound energy through the lower
abdomen of the nonpregnant patient to obtain an image of the bladder,
which is used to determine bladder volume noninvasively.
Warning: Not intended for fetal use.
Warning: Not intended for use on pregnant patients.
Warning: There is the hazard of possible explosion if the BVI 3000
instrument is used in the presence of ammable anesthetics.
The BVI 3000 should not be used on a patient with open skin or wounds
in the suprapubic region.
The patient should not have a catheter in his/her bladder. This could
affect the accuracy of the instrument.
Use care with suprapubic/pelvic surgery patients. Scar tissue, incisions,
sutures and staples affect ultrasound transmission and reection.
Accuracy may be affected for patients with ascites or free oating uid
in the peritoneum.
Page 6 BVI 3000 Operator’s Manual
Page 7
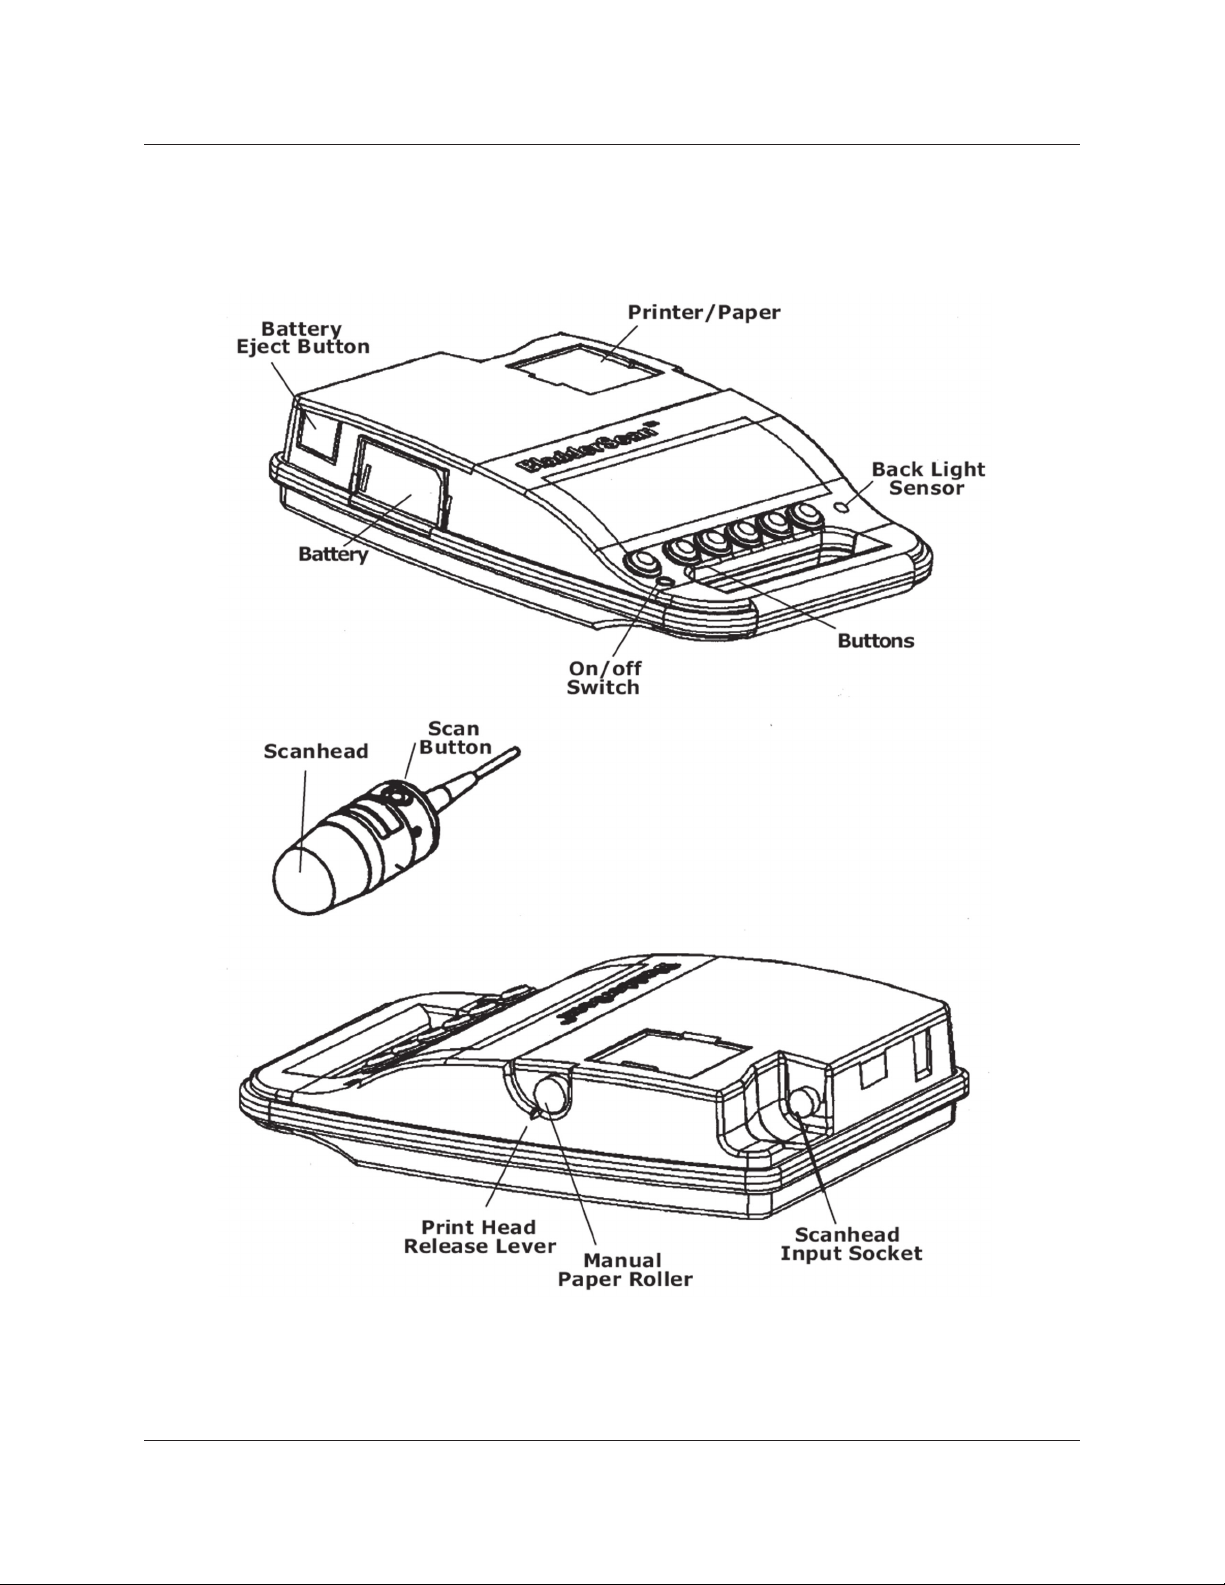
BladderScan® BVI 3000 Components
Page 7BVI 3000 Operator’s Manual
Page 8
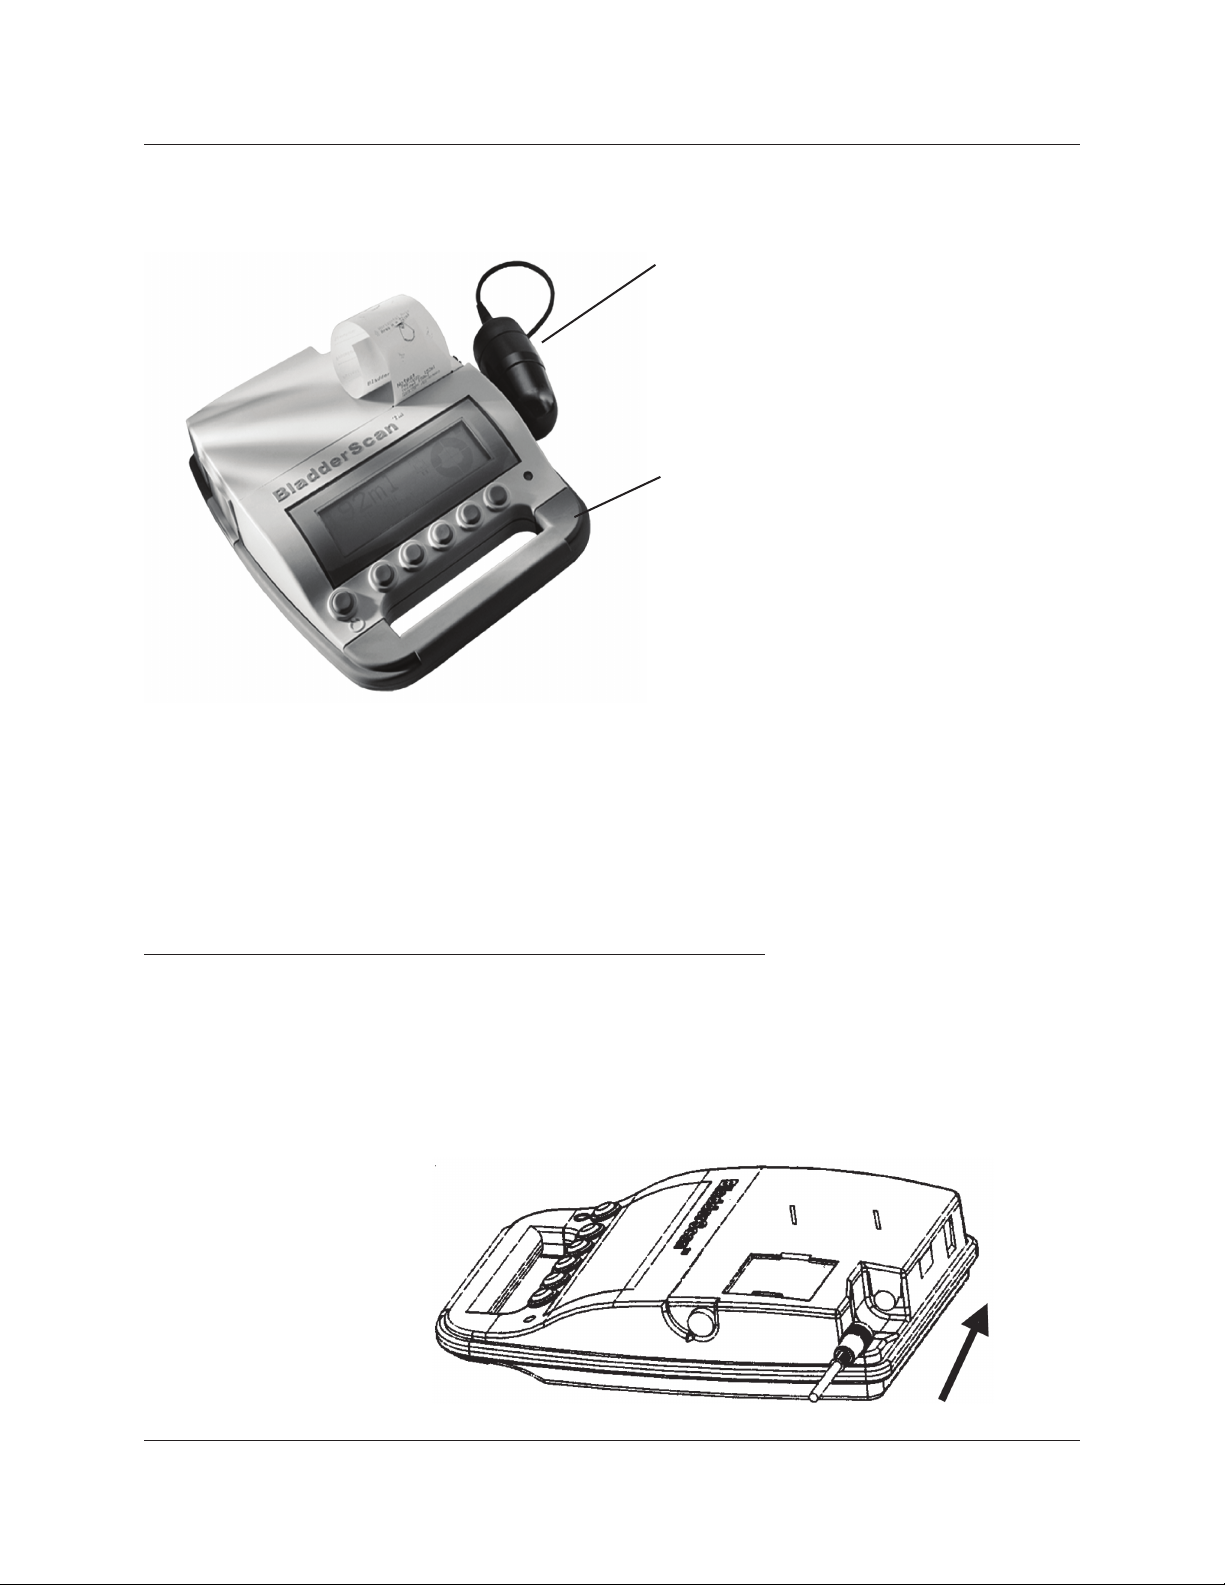
Description of the BladderScan® BVI 3000
The BladderScan BVI 3000 consists of 4 main components: The Scanhead, Control Unit, Rechargeable
Battery, and the Battery Charger.
Scanhead
The scanhead transmits and receives
ultrasound, automatically moving its internal
transducer 360º to scan twelve planes and
produce a three-dimensional image of the
urinary bladder. The scanhead is connected to
the control unit by means of a cable.
Control Unit
The control unit provides all operating controls
for the scanning procedure by means of six
soft keys. The measured bladder volume and a
target-shaped aiming icon are clearly displayed
on the LCD screen, helping the operator to
achieve accurate measurement results.
Batteries & Charger
Two NiMH rechargeable batteries are included with the BladderScan BVI 3000. One battery can be
recharged in the battery charger while the other is being used to power the BVI 3000. This ensures that
there is no instrument downtime. The charger brings the battery to a full charge in 6 hours or less.
(See picture and instructions for charging the battery on the following page.)
Preparation For Use
Connecting the
Scanhead
Connect the scanhead to the input socket at the back of the instrument
by aligning the tabs on the scanhead plug with the matching slots on the
instrument socket. Press the plug straight in until you hear a click.
To remove the plug, grasp the black plastic ring and pull straight out. Do
not twist.
Page 8 BVI 3000 Operator’s Manual
Page 9
Preparation For Use
To charge a battery, plug the charger into an electrical outlet. Remove the
label covering the battery contacts and slip the battery into the recess on
the top of the charger Fully charging the battery may take up to 6 hours.
Batteries may be stored in the charger. There is no danger of
overcharging the battery.
Rechargeable Battery and Battery Charger
Check the color indicator lights on top of the battery charger to determine
the battery’s power status while charging.
Solid Green: When the battery is low on charge, charging begins in the
fast charge mode. During fast charge mode, the green light is solid. For a
fully discharged battery, fast charge mode lasts about two to three hours.
Quickly Blinking Green: When the battery reaches 80% of its charge
level, the charger starts to “top off” the charge and the green light
blinks quickly. At this point, you can use the battery in the BVI 3000
instrument.
Amber Light: In some cases the charger displays an amber light.
The amber light means the battery temperature is stabilizing before
recharging can begin. This may occur when the battery is taken from a
very cold or warm environment, or if the battery is defective. If the light
remains amber for over an hour, the battery is defective and must be
replaced.
Charging the
Batteries
Note: Battery life is extended
if you wait for about three
hours until the battery is fully
charged. Verathon recommends
that you store your spare
battery in the charger to
prevent instrument downtime
due to discharged batteries.
Note: Plugging and
unplugging the charger while
a battery is inserted causes no
damage. There is no danger
when the charger is plugged in
without the battery inserted.
Slowly Blinking Green Light: If the green light blinks slowly upon
inserting a battery, then the battery level is too low for fast charging. The
charger trickle charges the battery until the power level is high enough to
begin fast charging. At this point, fast charging begins automatically.
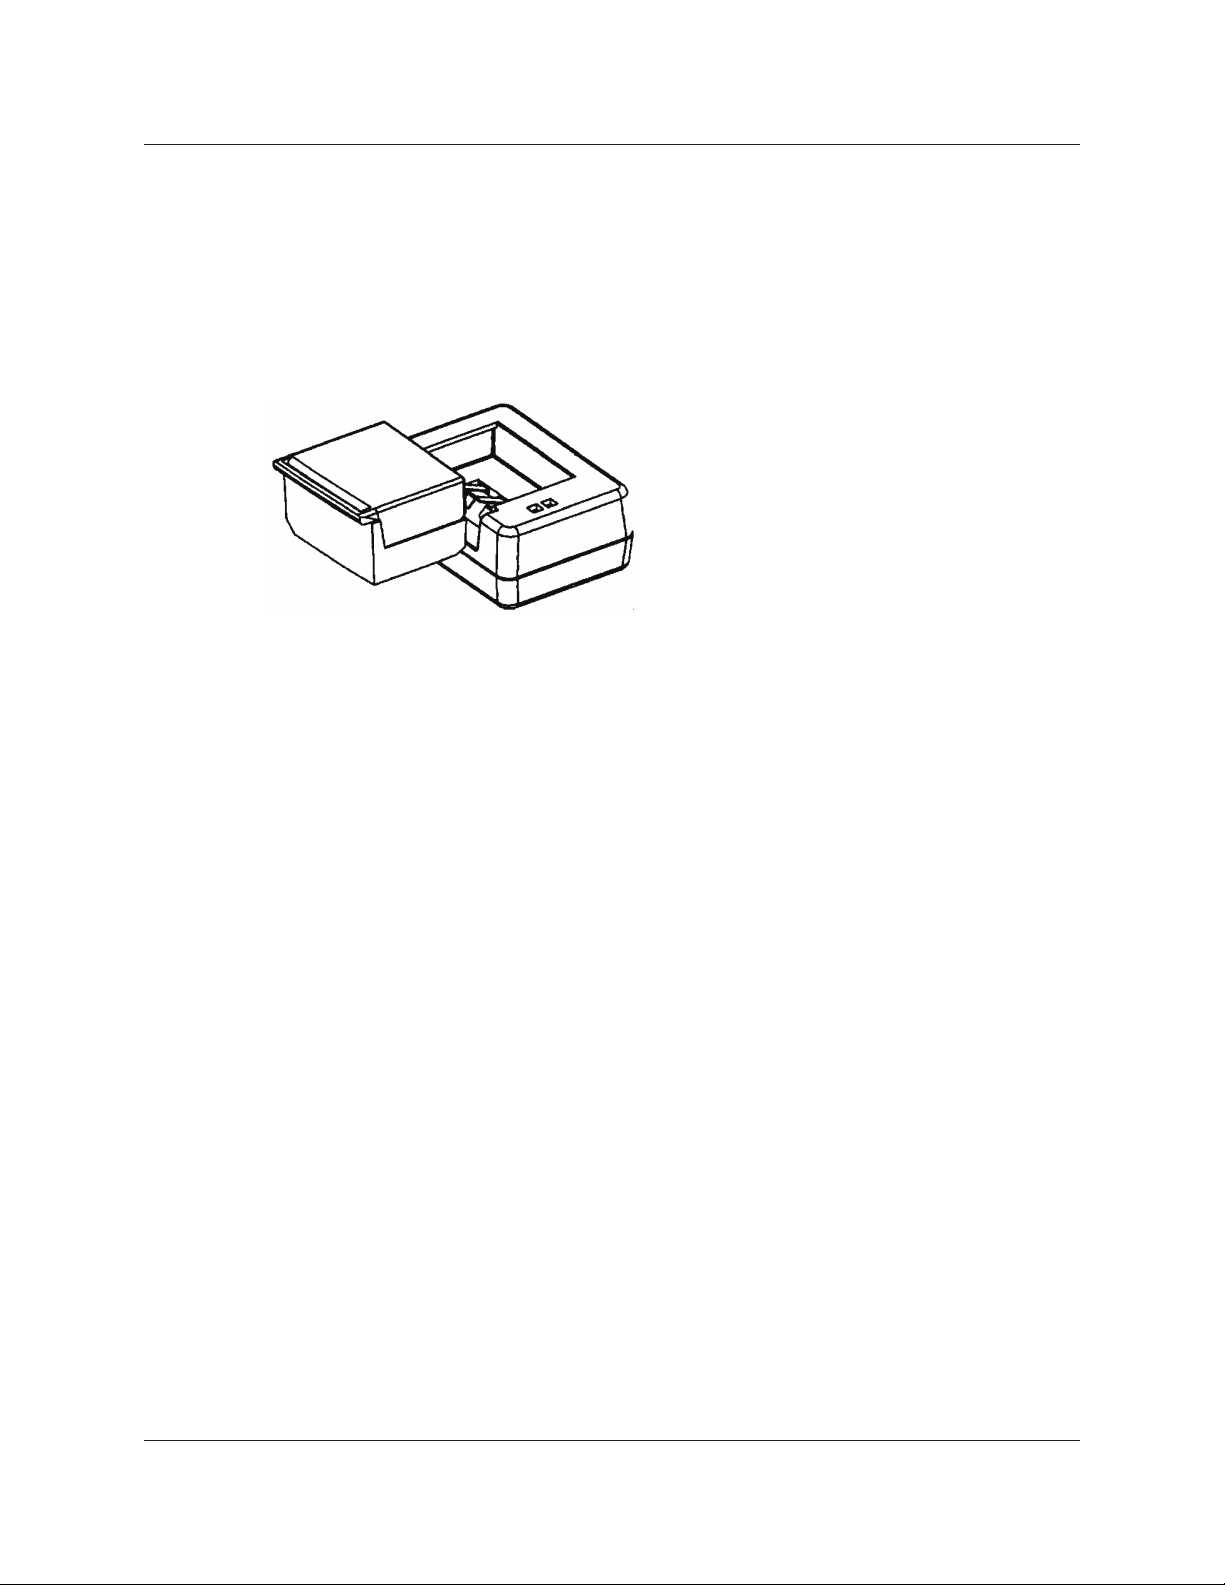
When the battery has been properly charged, install it in the BVI 3000 as
demonstrated in the illustration below.
Installing a Battery
Page 9BVI 3000 Operator’s Manual
Page 10
Preparation For Use
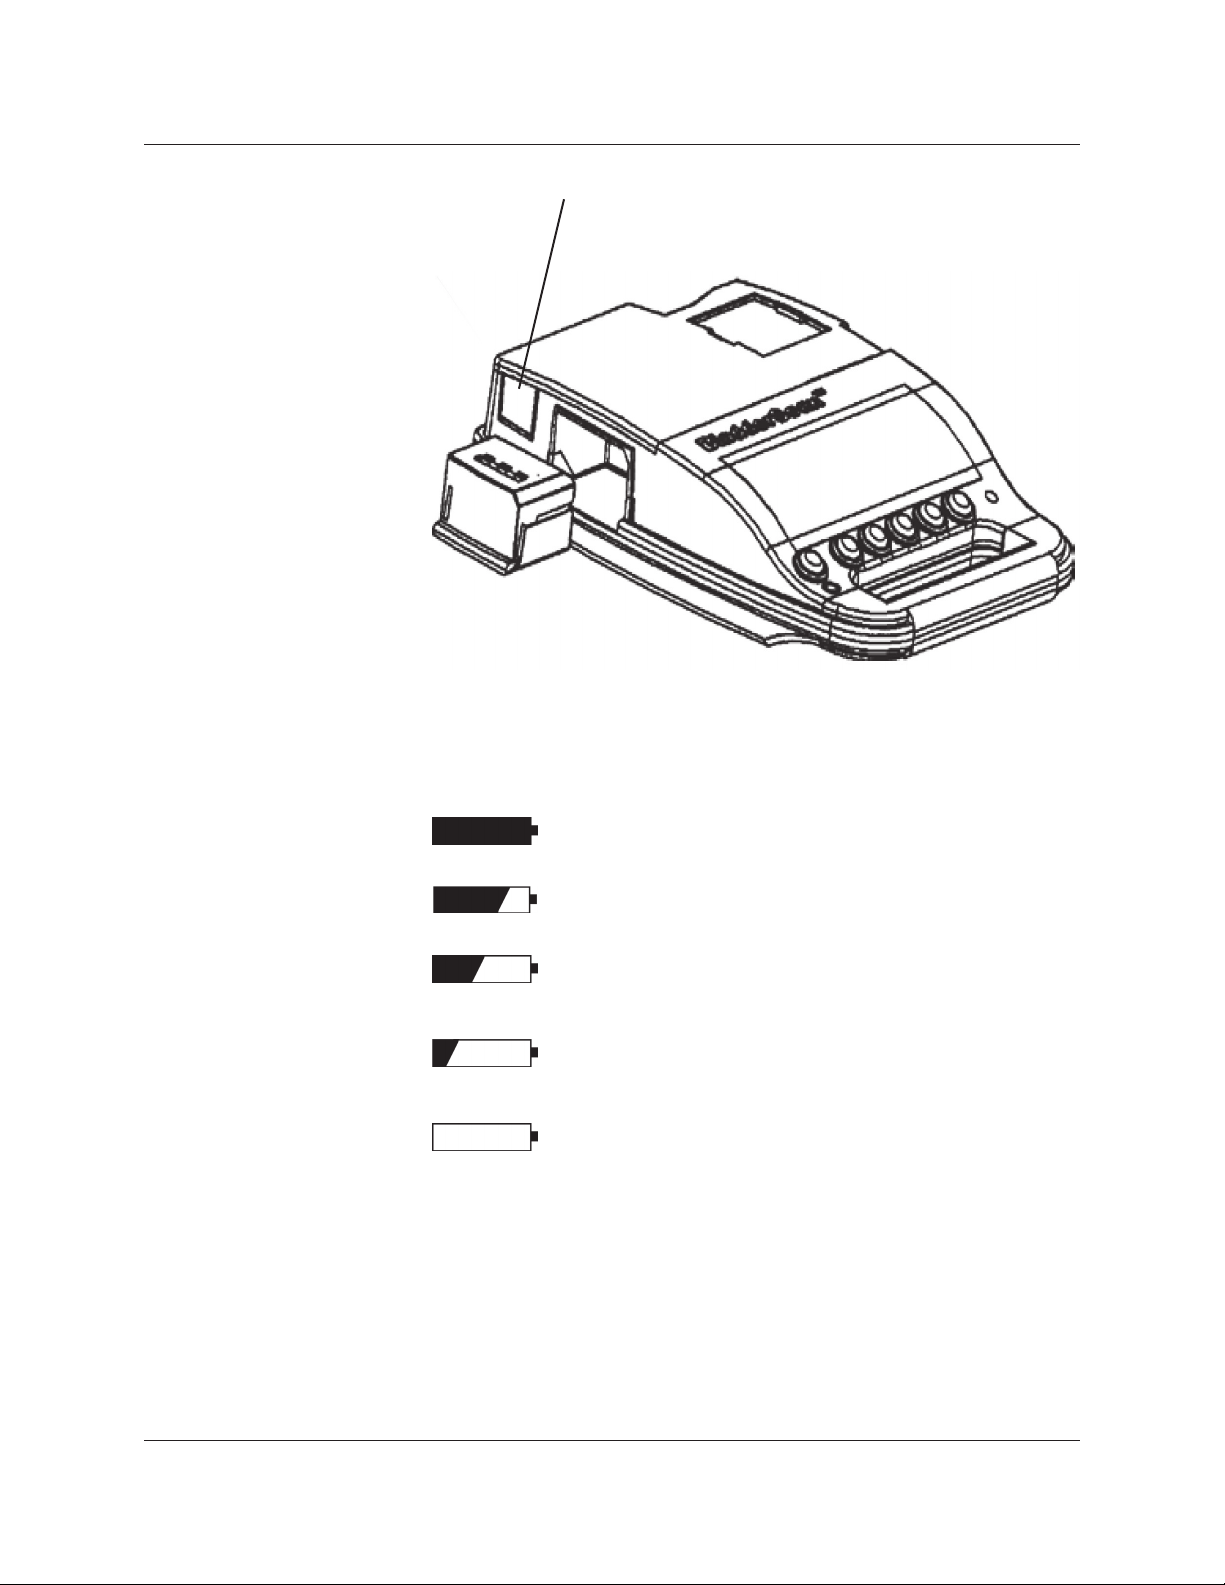
Battery release button. To remove the battery,
press the battery release button.
Battery Icon
Battery Care
The battery icon, located in the upper right corner of the LCD screen,
indicates the power status of the battery currently installed in your
instrument. Read the battery icon as follows:
A fully darkened battery icon indicates that the battery is
100%
The BladderScan® BVI 3000 draws very little power when it is turned
off; however, if you do not plan to use your instrument for several weeks,
you should remove the battery to prevent it from becoming discharged.
fully charged and ready for use.
A battery icon that is almost full indicates a partially
discharged battery.
75%
When the battery icon is half-darkened, the battery is
partially discharged. This is the most common display,
50%
shown during the majority of the battery’s charge life.
An almost empty battery icon indicates that the battery
is nearly discharged. While a few more scans can still be
25%
performed, the battery should be replaced at this point.
When the battery is fully discharged, the battery icon is
completely clear and the BVI 3000 does not work. The
0%
discharged battery must be replaced with a charged one.
The battery that is not in use should be stored in the charger so it remains
fully charged.
Page 10 BVI 3000 Operator’s Manual
Page 11
Customizing the BladderScan® BVI 3000
You can customize the BladderScan BVI 3000 instrument by entering
your facility name and the current date and time. This information will
subsequently be included on all printouts of exam results. To customize
the BVI 3000:
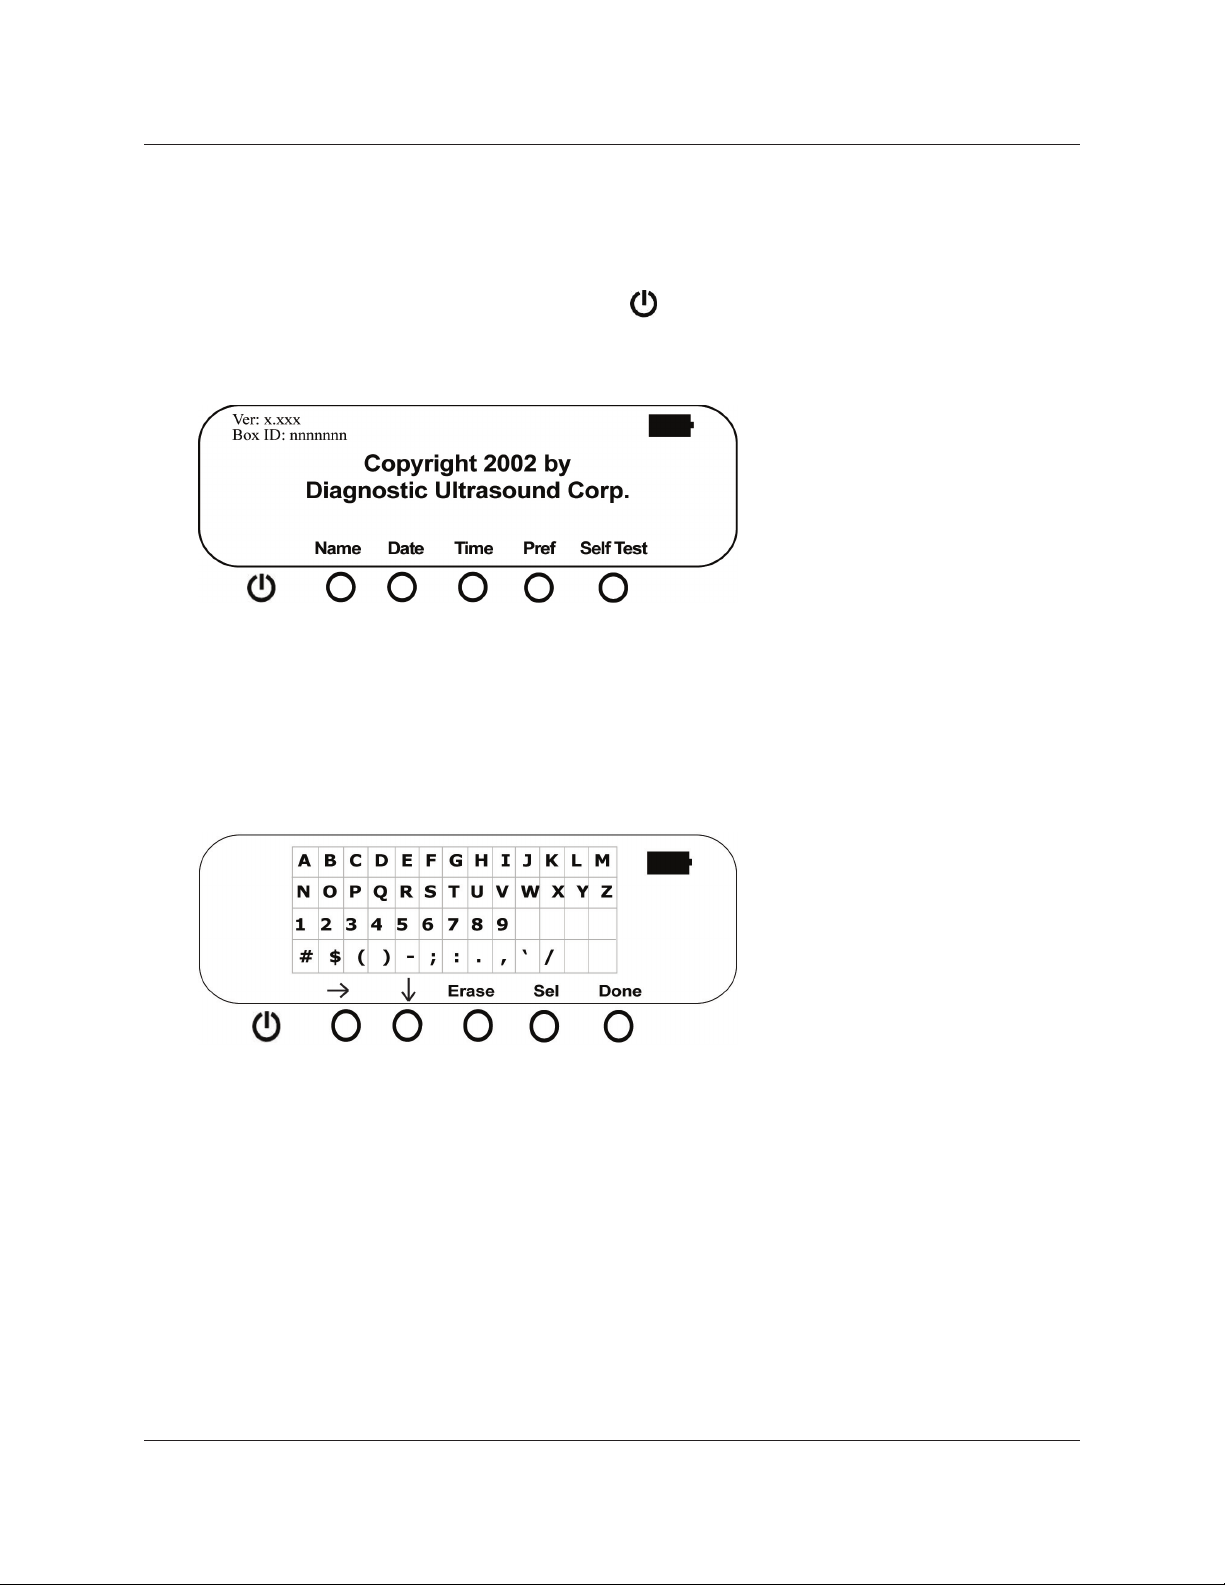
• Turn the BVI 3000 on by pressing the on/off button
• On the Main Menu screen, press the ALT button to display the
Alternate Menu screen, illustrated below.
Important: If your BVI 3000 came with the PIN code option enabled, you must
enter your PIN code before you can access the Alternate Menu. The default PIN
code is “0000.” For information about how to personalize the PIN code, see the
section titled, “Adjusting Preferences,” on page 21.
• Press the NAME button. The Name Preset screen, with a 4 x 13
grid containing alphabetic, numeric, and punctuation characters, is
displayed.
Programming the
Facility Name
Note: Diagnostic Ultrasound
Corp. is now called
Verathon Inc.
Note: You may use any
combination of up to 27
characters when entering the
facility name. For example,
you can enter the name of the
hospital, clinic, or physician
supervising use of the
BVI 3000.
• Use the “arrow right” à and “arrow down” â buttons to highlight the
rst character you want to enter.
• When the desired character is highlighted, press the SEL button to
select it. The character(s) you have selected are displayed below the
character grid.
• Continue to use the “arrow right,” “arrow down,” and SEL buttons to
enter all the characters in your facility’s name. If you make a mistake,
use the ERASE button to delete the last character entered.
• When you are nished, press DONE to return to the Main Menu. The
programmed facility name will now be displayed on the Main Menu
screen.
Note: You can use the empty
character as a space to
separate words.
Note: When the arrow buttons
are held down, the cursor
moves one character a second.
When the cursor reaches the
end or bottom of the grid of
characters, it wraps around to
the rst character again.
Page 11BVI 3000 Operator’s Manual
Page 12

Customizing the BladderScan® BVI 3000
Setting the Date
Note: Once set, the BVI 3000
clock recognizes the number of
days in each month, including
February during leap years. It
has its own lithium battery and
maintains the correct date and
time for at least ten years, even
if the rechargeable battery is
removed.
• On the Main Menu screen, press the ALT button to access the
Alternate Menu (if prompted, enter your PIN number). Then press the
DATE button.
• The Date Preset screen displays the current setting for the date, in
U.S. format (two digits each for the month, day, and year).
• Press the MM button until the correct month is displayed. Only values
from 01 to 12 are allowed (12 is followed by 01).
• Press the DD button until the correct day is displayed. Only values
from 01 to 31 are allowed (31 is followed by 01).
• Press the YY button until the correct year is displayed. Only values
from 97 to 19 (for 1997 to 2019) are allowed.
Setting the Time
Note: Enter the time in 24hour format (“military time”).
To convert standard clock time
to 24-hour format, after 12noon add 12 hours to the clock
time (Example: 3:00 pm + 12
hours = 15:00 hours).
• Press âá to toggle between the following options: 1) values are
increased, or 2) values are decreased, when the month, day, and year
buttons are pressed.
• When the date is set, press DONE to return to the Main Menu screen.
• On the Main Menu screen, press the ALT button (and then enter
your PIN code, if required) to access the Alternate menu. Next, press
the TIME button. The Time Preset screen displays the time that is
currently set.
• Press the HH â or HH á to set the hour.
• Press the MM â or MM á buttons to set the minutes.
• When the time is set, press DONE to return to the Main Menu screen.
Page 12 BVI 3000 Operator’s Manual
Page 13

Operating the BladderScan® BVI 3000
Note to First Time Users: Verathon® advises new operators to use the
BladderScan BVI 3000 on patients with moderately full bladders, rather
than initially attempting to locate nearly empty bladders. An in-service
training video has been supplied with your BVI 3000. We recommend
that you view the video to supplement the information in this manual with
an actual demonstration of BVI 3000 use.
• Turn the BVI 3000 on by pressing the on/off button
• The Main Menu screen is displayed.
• From the Main Menu, press the SCAN button to go to the Scanning
screen.
Turning On the
BVI 3000
Note: If the calibration
due date for your BVI 3000
has passed, the message
“Calibration Due” will
appear every time you turn
on the instrument. You can
still measure bladder volume;
however, this message will
continue to appear until
an authorized Verathon
Service Center calibrates
the instrument. Press OK to
continue.
Note: The Scanning screen
may also be selected by
pressing the scan button on the
scanhead. This is especially
practical when the scanhead
is already positioned on the
patient’s abdomen.
• Press the Male/Female button to select the patient gender. The LCD
screen shows a male or a female icon to indicate the gender that is
selected. Use the female option ONLY for women who have NOT
undergone a hysterectomy (the “Female” option allows the instrument
to exclude the uterus from the measurement, which may resemble the
bladder ultrasonically). For all other patients, use the “Male” option.
• Clean the rounded end of the scanhead by wiping it gently with a
cleaning pad dampened in isopropyl alcohol or a hospital disinfectant
solution.
Selecting Gender
Preparing the
Scanhead
Page 13BVI 3000 Operator’s Manual
Page 14

Operating the BladderScan® BVI 3000
Applying Ultrasound
Gel
Measuring Bladder
Volume
Have the patient lie in the supine
position with abdominal muscles
relaxed. Palpate the patient’s
symphysis pubis (pubic bone). Place
an ample amount of gel midline on
the patient’s abdomen approximately
one inch (3 cm) above the symphysis
pubis.
• Locate the patient icon on the scanhead and make sure the head
of the icon will point toward the head of the patient when you place
the scanhead on the patient’s abdomen.
• Place the scanhead on the gel on the patient’s abdomen.
View from patient’s right side View from the patient’s feet
Note: While scanning, avoid
making any changes in the
position, angle or pressure of
the scanhead.
• Aim the scanhead so that the ultrasound is projected toward the
expected location of the bladder. For most patients, this means aiming
the tip of the scanhead toward the patient’s coccyx.
• Press and release the scan button located on the scanhead.
• Hold the scanhead steady throughout the scan. The scanhead
clicks once at each scan plane. When the scanhead beeps, the scan is
complete. The Aiming screen is then displayed.
Page 14 BVI 3000 Operator’s Manual
Page 15

Verifying Aim
The greatest measured bladder volume is displayed in large type in the
upper left-hand corner of the Aiming screen. Also displayed are the
target-shaped Aiming Icon, the instrument status (READY TO SCAN),
and the current volume measurement.
The BVI 3000 always displays two volumes; the largest volume
measured and the current volume.
®
Verathon
maximum accuracy. The BVI 3000 assumes that the largest volume
measured is the true bladder volume, because in most cases the largest
volume is the most accurate. Exceptions occur when the operator moves
the probe during the scan, or fails to select the female gender when
required. In these situations, the largest volume measurement may be
higher than the actual bladder volume, and the operator should clear the
aiming screen before rescanning the patient.
recommends that you take several measurements to ensure
Aiming Screen
Largest Volume and
Current Volume
To clear the scan results screen, press the clear button, which is labeled
with an “X” on the LCD screen. If your instrument does not have a clear
button, clear the screen by pressing the DONE button and then pressing
the SCAN button to start over. Then rescan your patient. In the following
section, we explain how to ensure maximum accuracy by adjusting your
aim.
The light area inside the target-shaped Aiming Icon represents the
position of the bladder relative to the scanhead. Accurate results are
obtained when the bladder image is centered on the crosshairs of the
Aiming Icon. If the bladder is not centered, re-aim the scanhead and
rescan the patient. Repeat until the image is properly centered
(see Figure 1).
The Aiming Icon displays the bladder as viewed when looking down on
the patient’s abdomen. To adjust your aim, slightly move or angle the
scanhead toward the direction of the bladder image on the Aiming Icon
(target). For example, if the bladder image is located on the right side of
the icon, aim the scanhead so the ultrasound will be projected further to
the right.
Clearing the Screen
The Aiming Icon
Adjusting Aim
Page 15BVI 3000 Operator’s Manual
Page 16

Verifying Aim
In Figure 1, the bladder image is centered on the crosshairs of the Aiming
Icon. This indicates that the scanhead was properly aimed and the
bladder volume measurement is accurate.
In Figure 2, the bladder image is not centered on the crosshairs; the
bladder overlaps one side of the Aiming Icon. This indicates that the
scanhead was not properly aimed and part of the bladder was outside its
eld of vision. In such cases, the measured volume is lower than the true
bladder volume. The BVI 3000 recognizes this condition and displays
a > (greater than) symbol before the bladder volume measurement.
To achieve an accurate measurement, the operator should re-aim the
scanhead toward the bladder image and repeat the scan.
In Figure 3, the bladder overlaps two sides of the Aiming Icon. This
indicates that the bladder is too large to be fully contained within the
scanhead’s eld of vision. The BVI 3000 recognizes this condition
and displays a > (greater than) symbol before the bladder volume
measurement. In such cases, repositioning or re-aiming the scanhead
will do little to improve accuracy; however, this situation arises almost
exclusively in patients with very large bladder volumes. At these high
volumes, measurements are clinically useful even if they underestimate
the true bladder volume.
The Scan Results
Screen
Note: The longitudinal scan
plane is marked by a gender
icon bisected by a vertical
line. The horizontal scan plane
is marked by a gender icon
bisected by a horizontal line.
The Scan Results Screen displays the longitudinal and horizontal scan
planes from the largest image taken during the exam. The light areas
represent the bladder. The dark, triangular surfaces, called scan planes,
represent the scanhead’s eld of vision. The volume measurement is
accurate when the light colored bladder images are completely contained
within the dark, triangular scan planes.
If the light surface in either scan plane is overlapping the edge of the
black area, or appears to be cut off, then part of the bladder was not
contained in the scanhead’s eld of vision and the measurement may
underestimate the patient’s bladder volume. Press the SCAN button
to clear the results of the last scan and return to the Scanning screen.
Reposition the scanhead and repeat the scanning procedure.
When the bladder images are completely contained in both scan planes,
the measurement results are accurate. Pressing either the PRINT
or MAIN button completes the scanning procedure and stores the
measurement results in the instrument’s memory.
Page 16 BVI 3000 Operator’s Manual
Page 17

Printing Results
To print the scan results, press the PRINT button to open the Print Menu
shown below.
Press PRINT to obtain a printout of the most recent exam. Printing takes
about one minute. See Figure 4 for an illustration of the printout.
More information about printing can be found in the “Print Options”
section on page 20.
To stop a print in progress, press the ABORT PRINT button.
Figure 4
Printing Results
Note: If the facility name, date,
and time have not been set,
those lines will be skipped on
the printout. The BVI 3000
prints on thermal paper. Over
time, the thermal printout will
fade. For maximum storage
life, Verathon® recommends
that you photocopy the
printout.
Page 17BVI 3000 Operator’s Manual
Page 18

Histogram of Cost Savings
Note: The default settings can
be changed in the Preference
screen to reect the rates
and costs at your facility.
For more information, see
the section titled, “Adjusting
Preferences,” beginning on
page 21.
Note: For reference articles
on UTI Rate and UTI Costs,
please visit our web site at
www.verathon.com.
Each volume measurement from a completed scanning procedure is
stored in the instrument’s memory. Measurement data is stored in one
of eleven volume ranges (each with a 100 ml increment). This data is
analyzed and can be printed at any time in a Histogram of Cost Savings
(see Figure 5).
Cost savings are calculated based on the following criteria:
• Catheterizations Avoided - Urinary catheterization below a certain
volume is deemed unnecessary. Thus, by using the BVI 3000, these
catheterizations are avoided. The default setting (for volume below
which catheterization is unnecessary) is 200 ml.
• UTI’s Avoided - Studies indicate that a certain percentage of
catheterizations lead to urinary tract infections (UTI’s). By
avoiding unnecessary catheterizations, the resulting UTI’s may
be prevented. The default setting (for percent of catheterizations
leading to UTI’s) is 3%.
Associated Costs:
• Cost of UTI’s Avoided - Literature suggests that the additional
costs associated with treating UTI amount to $680.00 per patient
infection. The default setting is $680.00.
• Cost of Catheter Kits - The default setting is $3.00 (per kit).
Total Cost Savings as a Result of Using the BVI 3000:
• (Caths Avoided x Catheter Costs) + (UTI’s Avoided x UTI Costs)
Figure 5
HISTOGRAM
Volume
000-099
100-199
200-299
300-399
400-499
500-599
600-699
700-799
800-899
900-999
>1000
# of Scans
870
1,219
589
488
252
176
154
87
69
5
4
Catheterizations
Avoided: 2089
UTIs Avoided 63
Savings $49,107
Page 18 BVI 3000 Operator’s Manual
Page 19

Adding a Patient ID and Notes
A patient ID number (maximum 10 digits) can be added to the scan
result and will be included on the printout. To add a patient ID number,
press the # button on the Scan Results screen. The screen displays
0000000000.
• Use the ß (arrow left) and à (arrow right) buttons to select the digit
you want to change (the selected digit is underlined).
• Use the + (plus) or -- (minus) buttons to select the correct number.
• Continue to use the ß (arrow left) and à (arrow right) buttons and the
+ (plus) or -- (minus) buttons to enter all the digits of the patient ID
number.
• When the patient ID number has been entered, press the DONE button
to return to the Scan Results screen.
The patient ID number will now be included on the printout of the scan.
After a scanning procedure has been completed, it is possible to annotate
the measurement results. Press the button marked NOTES on the Scan
Results screen. When the Notes option is selected, notes appear on the
printout of the exam data.
Adding a Patient ID
Number
Note: Only press the button
marked # when a patient ID
number is required. If the #
button is used and no patient
ID number is entered, the BVI
3000 will assume a patient
ID number was entered and
0000000000 will be printed on
the printout.
Adding Notes
The operator can change the following settings to annotate the exam:
Exam Type
Default settings:
• If the measured bladder volume is less than 100 ml, the BVI 3000
assumes the measurement was taken after patient voiding and
“POSTVOID” is displayed on the screen.
• If the measured bladder volume is between 100 ml and 400 ml,
the BVI 3000 assumes the measurement was taken prior to patient
voiding and “PREVOID” is displayed on the screen.
• If the measured bladder volume is greater than 400 ml, the BVI 3000
assumes the measurement was taken prior to patient voiding and the
bladder was lled to maximum capacity. “CAPACITY” is displayed
on the screen.
• If the default does not apply, the Exam Type setting can be changed
by pressing the EXAM TYPE button to toggle between options. The
selected exam type will appear on the right side of the LCD screen.
Page 19BVI 3000 Operator’s Manual
Page 20

Adding a Patient ID and Notes
Adding Notes
(continued)
Print Options
Action Taken
Using the SEL â button, you can also note the action taken as a result of
the current bladder volume measurement. Possible selections are:
No Action: The default selection
Patient Voided: The patient was able to void
Patient
Catheterized:
Allowed to Fill: The patient’s bladder was not as
The patient’s bladder was emptied
using a urinary catheter
full as desired and voiding was
postponed
Adjusting Volume Approximation
The instrument assumes that the amount of urine voided or catheterized
is equal to the volume measured by the BVI 3000 (rounded to the nearest
10 ml). This value can be adjusted up or down using the + and -- buttons.
The Print screen can be accessed by selecting PRINT, either from
the Main Menu screen or from the Scan Results screen after a scan is
completed. The following table describes the different print options.
From the Print screen, use the SEL button to select a print option. An X
appears in front of the option selected.
Option Description
Last
Image
Cost
Savings
Test
Print
This option prints the most recent measurement data on the
built-in thermal printer. Different types of images can be
selected from the Preference screen, using the “Printout”
option. (The default is B-mode grayscale images with
highlighted bladder walls).
This option is used to print a Histogram of Cost Savings
based on the volume history of the instrument. Cost savings
are calculated based on the catheter and UTI costs avoided
due to BVI 3000 use. For details, see the section titled,
“Histogram of Cost Savings,” in this manual. Histogram
settings can be changed in the Preference Menu (for
instructions, see the section titled, “Adjusting Preferences,”
in this manual).
Select this option to test if the built-in thermal printer works.
Alphanumeric characters and a simple grayscale test pattern
are printed out.
Page 20 BVI 3000 Operator’s Manual
Page 21

Print Options
The BVI 3000 has an automatic paper loading mechanism. To load a
new roll of paper, open the paper well door at the top of the instrument
and insert the end of a new paper roll, with the thermal side down, into
the paper input slot. The BVI 3000 senses the presence of the paper and
feeds automatically (paper is forwarded through the paper eject slot in
the top of the instrument).
It is important that you feed a straight edge into the paper feed
mechanism. Cut off the rst inch of a new paper roll before loading the
paper.
Caution: To avoid paper jams, never fold the end of the paper roll or cut
it diagonally or to a point.
Caution: If the paper does not advance, or it appears to be stuck in
the printer, turn off the instrument. Lower the printhead release lever,
located adjacent to the paper advance thumb wheel. Gently pull the
paper backward while moving the thumb wheel counterclockwise. If the
®
paper jam is inaccessible, contact your authorized Verathon
Service
Center or local Verathon distributor for service.
Loading Paper
Tip: To verify that you are
loading the paper with the
thermal side down, ick your
nail over the paper. If a black
mark appears, this is the
thermal side.
Adjusting Preferences
Various BVI 3000 operating parameters can be customized for individual
use via the preference screen. To access the Preference screen and adjust
your instrument settings, go to the Main Menu and then press “ALT” to
access the Alternate Menu. (If required, enter your PIN code to access the
Alternate Menu. See the section below titled, “The PIN Code Option,”
for more information.) Then press the “PREF” button.
On the Preference screen, a list of adjustable parameters is displayed.
Use the SEL â and SEL á buttons to select a parameter. Use the “+”
and “-” buttons to adjust the parameter value. Press DONE to save the
new setting. For a description of the adjustable parameters, see the table
below.
If the PIN code option is enabled, users must enter a PIN code in order to
access the Alternate Menu and change instrument settings. This prevents
unauthorized users from changing the instrument settings. The default
PIN code is “0000.” Enter this default code the rst time you access the
Alternate Menu.
To personalize your PIN code, select the change PIN option on the
Preference screen. The current PIN is displayed. Enter a new PIN and
then press DONE.
Important: Remember your PIN code. If your existing PIN code is
forgotten, only a qualied Verathon Service Center can reset the PIN
code.
The PIN Code Option
Personalizing the
PIN Code
Page 21BVI 3000 Operator’s Manual
Page 22

Adjusting Preferences
Parameter Range & Value Descriptions
Backlight AUTO (default)
ON
OFF
Beep Volume 0-9 (default = 5) Allows user to adjust sound volume (lower values are
Language ENGLISH (default),
DANISH, DUTCH,
FINNISH, FRENCH,
GERMAN, ITALIAN,
NORWEGIAN,
PORTUGUESE, SPANISH,
SWEDISH, TURKISH
Date MM/DD/YY (default)
DD/MM/YY
YY/MM/DD
Printout ADD_WALLS (default) ADD_WALLS - Print grayscale B-mode images with
NO_IMAGES NO_IMAGES = Do not print any B-mode images.
RAW_ONLY RAW_ONLY = Print grayscale B-mode images without
WALLS_ONLY WALLS_ONLY = Bladder outline only.
12_PLANES 12_PLANE = All 12 scan planes, printed as in the ADD_
UTI_rate 0-1000 (default = 3%) Percentage of catheterizations which result in UTI; used in
UTI_cost 0-2000 (default = $680) Cost to treat a UTI; used in cost savings calculations
Cath_cost 0-20 (default = $3) Cost of a catheter; used in cost savings calculations
Cath_vol 0-1000 ml (default = 3000
ml)
Flash ON (default) ON = Flash memory enabled and scan results are saved
Time Zone GMT ± 0-12 This function is currently not used.
Contrast
Adjust
Note: An immediate effect is seen only when adjusting the contrast volume up. Adjusting the contrast
volume down becomes visible when the instrument is turned off and on again.
30-63 (default = 57) Adjust display contrast ratio; the higher the value, the
AUTO = Backlight turns on and off automatically,
depending on ambient light conditions.
ON = Backlight always on
OFF = Backlight always off
quieter)
Species the language used for displays and printouts.
Select the date format (order of month, day, year)
bladder walls highlighted.
identifying.
WALLS mode.
cost savings calculations.
Bladder volume below which catheterization in
unnecessary; used in cost savings calculations
even is power is removed.
OFF = Scan results are not saved if instrument is turned
off; however, processing time is slightly faster.
darker the background.
Page 22 BVI 3000 Operator’s Manual
Page 23

Adjusting Preferences
Parameter Range & Value Descriptions
Currency $ € £ ¥ (default = blank) Set the currency for calculating cost savings. Choose US
Dollars, Euros, Pounds, or Yen. When a different currency
is selected, the calculations are not affected.
Scan Count
Screen
Reset
Histogram
Change PIN Select this option to personalize or change the PIN code.
Number of scans performed Select this option to monitor instrument use. There are two
scan counters: one is resettable, one is not. “Clear Count”
to clear the resettable counter to zero. To reset the nonresettable counter, contact an authorized Verathon
center.
Reset the histogram to being a new analysis of cost savings.
The current PIN is displayed. Enter the desired PIN and
press DONE.
Important: Remember your PIN code! If your existing PIN
is lost or forgotten, you must contact a Verathon Service
Center to reset the PIN code.
®
service
To perform an instrument test, go to the Main Menu and press the ALT
button (enter the PIN code if required) to access the Alternate Menu.
From the Alternate Menu, press the SELF TEST button. The instrument
then performs the following tests:
ROM TEST - Program Memory
BUS TEST - Microprocessor Bus
NVRAM TEST - Non-Volatile Battery Backed Memory
SRAM TEST - Main Memory
FLASH TEST - Flash Memory
Additional Features
Self-Test
Page 23BVI 3000 Operator’s Manual
Page 24

Regular Inspections and Maintenance
Weekly Inspections
Monthly Accuracy
Check
Caution: In the event of
changes in the performance of
the instrument, discontinue use
and contact your authorized
Verathon Service Center
or your local Verathon
distributor.
Verathon® recommends that the BVI 3000 be certied by an authorized
Verathon Service Center once a year. Certication service includes
a comprehensive inspection and testing of the instrument, to ensure
accurate measurement performance. For more information, please
contact your Verathon Service Center or your local Verathon distributor.
Once a week, you should inspect the scanhead and cable for physical
faults or cracks. Cracks that allow the leakage or ingress of uid may
affect the performance of the instrument. Any apparent faults or cracks
must be referred to your authorized Verathon Service Center or your
local Verathon distributor.
Each month, or whenever accuracy assessment is desired, the accuracy of
the BVI 3000 should be tested using the following procedure:
• Take a pre-void measurement of bladder volume.
• Void or catheterize into a measurement beaker.
• Take a post-void measurement of bladder volume to check for postvoid residual (PVR).
• Subtract the post-void measurement from the pre-void measurement
and compare to the voided volume.
• The measured volume should be within a range of ± 20%, ± 20 ml of
the voided volume for volumes less than 699 ml, or ± 25%, ± 25 ml
for volumes larger than 699 ml.
Care, Cleaning and
Disinfecting
The BVI 3000 instrument may be cleaned with a soft cloth dampened in
isopropyl alcohol.
• The round, black, plastic dome of the scanhead can be disinfected
®
with any liquid disinfecting agent suitable for use with Lexan
polycarbonate. In the United States, Cidex® and Cidex 7 are FDAcleared for this purpose. Follow the instructions provided by the
manufacturer of the disinfecting agent.
• Do not immerse any part of the scanhead or the control unit in a
cleaning or disinfecting solution.
• Do not use Cidex Plus, as it is not recommended for use with Lexan
polycarbonate.
• Do not subject any part of the BVI 3000 instrument to steam
sterilization or ethylene oxide sterilization.
Page 24 BVI 3000 Operator’s Manual
Page 25

Troubleshooting
If the instrument does not turn on, this is usually due to a dead or
discharged battery and can be xed simply by replacing the dead battery
with a charged one. Check the battery icon in the upper-right corner of
the LCD screen. If the battery icon is clear (empty), replace the battery.
When the battery’s charge is too low to allow normal operation (but
not too low to permit operation of the internal circuitry) the BVI 3000
displays the following message: BATTERY CHARGE LEVEL IS TOO
LOW FOR INSTRUMENT OPERATION. RECHARGE BEFORE
NEXT USE. In this event, the battery must be recharged or replaced with
a charged one.
This image is displayed if the user presses
the SCAN button when the scanhead is not
connected to the control unit.
• When the scanhead is connected, this
image disappears and the instrument will
operate normally.
The BVI 3000 displays this image when the
printer is out of paper:
Instrument Does Not
Turn On
Battery Recharge
Message
No Scanhead
Message
No Paper
• For instructions on how to load the paper,
see the section titled, “Loading Paper,” on
page 21.
The BVI 3000 senses when the print head is
disengaged and displays the following image
until the print head release lever is positioned
up as far as it can go:
The BVI 3000 displays the message “TOO HOT” if the print head
overheats. When this message appears, turn off the BVI 3000. This
condition may be the result of a paper jam (see the following section for
more information).
If the paper will not advance through the printer, lower the print head
release lever (located adjacent to the paper advance thumb wheel).
Gently pull the paper backward, while moving the thumb wheel
counterclockwise, to clear the paper jam.
Caution: If the paper jam is inaccessible, do not try to disassemble the
printer. Contact your authorized Verathon
Verathon distributor for service.
®
Service Center or your local
Disengaged Print
Head
Too Hot
Clearing a Paper Jam
Page 25BVI 3000 Operator’s Manual
Page 26

Warranty and Disclaimer Information
Warranty
Verathon® warrants the BladderScan® BVI 3000 against defects in
material and workmanship for one (1) year from the date of purchase
from Verathon Inc. This warranty is given only to the original purchaser
of the BladderScan instrument.
Pursuant to this warranty, a service center authorized by Verathon Inc.
will repair or replace products which prove to be defective during the
warranty period.
This warranty does not cover equipment sold as used.
This warranty does not apply if the product has been damaged by
misuse or as the result of service or modication by anyone other than
a service center authorized by Verathon. The instrument shall be used in
accordance to the instructions contained in this Operator’s Manual.
Consumable items shall be used in conformance with Verathon product
specications. Consumable items are not covered under this warranty.
Warranty conditions may differ in some countries. Contact your local
distributor for warranty terms.
Warranty extensions are available. For more information, please talk
to your local Verathon Medical representative, or contact the Verathon
Medical Customer Care department using the contact information on
page 27.
Disclaimer of
Additional Warranties
There are no understandings, agreements, representations of warranties
expressed or implied (including warranties of merchantability or tness
for a particular purpose) other than those set forth in the preceding
Warranty section. The contents of this Operator’s Manual do not
constitute a warranty.
Some states disallow certain limitations on applied warranties. The
purchaser, user and patient should consult state law if there is a question
regarding this disclaimer.
The information, descriptions, recommendations, and safety notations
in this Operator’s Manual are based upon Verathon experience and
judgment, as of March 2010, with respect to the BladderScan BVI 3000
instrument. This product involves a relatively new area of medical
technology. The contents of this Operator’s Manual should not be
considered to be all inclusive or covering all contingencies.
The physician(s) at your institution directing the use of the BVI 3000
instrument is responsible for keeping current with developments in the
literature on bladder volume. Please direct any questions or problems
concerning bladder volume, the use of the instrument, or interpretation of
data, to the responsible physician(s).
Page 26 BVI 3000 Operator’s Manual
Page 27

The team at Verathon Inc. is committed to modernizing healthcare
delivery by putting patients rst. Our products support healthcare
professionals by providing the highest level of accuracy, utility, and
excellence. For additional product and company information, visit the
®
Verathon
web site at www.verathon.com. If you have any questions or
comments about Verathon products and services, please contact us at:
Contacting Verathon
Verathon Inc.
20001 North Creek Parkway
Email:
customerservice@verathon.com
Bothell, WA 98011 USA
800.331.2313 (US and Canada only)
425.867.1348
Fax: 425.883.2896
Verathon Medical (Europe) B.V.
Email:
customerserviceEU@verathon.nl
Linnaeusweg 11
3401 MS IJsselstein
The Netherlands
+31.30.68.70.570
Fax: +31.30.68.70.512
For additional contact information, please visit our web site at www.verathon.com.
Page 27BVI 3000 Operator’s Manual
Page 28

Safety and Performance Summary
• The BladderScan® BVI 3000 computes the volume of the urinary
bladder based upon twelve, cross-sectional ultrasound images. For
maximum accuracy, be sure to hold the scanhead motionless while
scanning.
• The most accurate measurements are obtained when the patient rests
quietly in the supine position.
• Accuracy is compromised if the user does not obtain an optimal,
repeatable image.
• Errors in usage tend to result in the underestimation of bladder
volume, except in cases where the scanhead is moved during
scanning. In this case, the measurement may overestimate the
patient’s bladder volume.
• The BladderScan BVI 3000 is not intended for use on pregnant
patients.
• The patient being scanned should not have a catheter in his or her
bladder. This could create micro bubbles in the bladder, which affect
the accuracy of the measurement.
• Do not use the BVI 3000 on patients with open skin or wounds in the
suprapubic region.
• Use care when scanning suprapubic and pelvic surgery patients. Scar
tissue, surgical incisions, sutures, and staples can affect ultrasound
transmission and reection.
• To conserve power, the BladderScan BVI 3000 turns off automatically
when not in use.
®
• Verathon
recommends that new operators rst use the BVI 3000 on
patients with moderately full bladders, rather than initially attempting
to locate a bladder with a low volume.
Warning: There is the possible hazard of explosion if the BVI 3000 is
used in the presence of ammable anesthetics.
Page 28 BVI 3000 Operator’s Manual
Page 29

Part Number Description
®
0570-0090 BladderScan
BVI 3000 Instrument
0570-0091 Dome Scanhead Assembly
0400-0036 Battery Charger
0400-0039 Battery, 7.2 V
0800-0166 Carrying Case
0800-0167 Rolling Cart
0800-0005 Acoustic Coupling Gel, 0.25 liter
0800-0042 Printer Paper (5 rolls)
0900-0383 Operator’s Manual
0900-0396 Training Video
Parts and Accessories
Technical Description
Verathon® certies that the BladderScan® BVI 3000 is in compliance
with all applicable international and national standards and regulations,
including, but not limited to, IEC-601-1 (EN60601-1) and EN 60601-12; MDD 93/42/EEC Annex 1, CSA22.2 No. 125 (Risk class 2) (LR
76129-1), and UL544. Per the provisions of IEC-601-1, this device is
classied as:
Protection Class II, INTERNALLY POWERED
EQUIPMENT
TYPE BF, suitable for CONTINUOUS USE
Per the MDD, the BladderScan BVI 3000 is a Class IIa device.
Temporal Average Power: 1 mW maximum
Focal 20 dB Beam-Area: 1.4 cm
2
Transducer Dimension: 3 mm diameter
Working Frequency: 2 MHz
2
Peak Instantaneous Intensity: 14 W/cm
maximum
Pulse Repetition Frequency: 180 pulses/second
Compliance With
Standards
Scanning
Specications
Scanning Specications
Technical performance assessment (for example, in an acoustic
laboratory) may require partial immersion of the scanhead. Immerse the
black plastic dome no further than the point at which it connects to the
black body.
Page 29BVI 3000 Operator’s Manual
Page 30

Technical Description
Scanning Accuracy
Note: The accuracy that an
individual achieves using the
BVI 3000 depends on properly
aiming the scanhead so that
the bladder falls entirely within
the measurement cone.
Environmental
Conditions for
Storage
Environmental
Conditions for Use
Given the tremendous variation of healthy and compromised human
anatomy, a guaranteed accuracy specication for the instrument used
on humans would be difcult. For this reason, the following accuracy
specication assumes usage per instructions, scanning a Verathon
Equivalent Phantom:
Bladder Volume Range: 0 to 999 ml
Accuracy: 0 to 699 ml ± 20%, ± 20 ml
700 to 999 ml ± 25%, ± 25 ml
Ambient temperature -4° - 140° F (-20° - 60° C)
Relative humidity 20% - 95%, non-condensing
Atmospheric pressure 500 hPa - 1060 hPa
Ambient temperature 50° - 104° F (10° - 40° C)
Relative humidity 30% - 75%, non-condensing
Atmospheric pressure 700 hPa - 1060 hPa
®
Tissue
Clock/Calendar
Avoiding or
Identifying and
Resolving Adverse
Electromagnetic
Effects
The internal clock is accurate to better than one minute per month at
25 degrees Celsius. It will operate for at least 10 years from an internal
lithium battery. It knows the number of days in each month and will
correctly handle February in a leap year.
There are no restrictions for the use of the BladderScan® BVI 3000 due
to its electromagnetic characteristics. Both the emissions from the BVI
3000, and the susceptibility of the BVI 3000 to interference from other
sources, are within prescribed limits of all applicable standards at the
date of manufacture. The emissions test procedure used is that specied
in EN55011: 1991 for Group 1, Class A equipment (per EN60601-1-2,
36.201.1.7).
The BVI 3000 is suitable for use in ISM (industrial, scientic and
medical) environments, and in domestic environments under the
jurisdiction of a health care professional. An indication of adverse
electromagnetic effects from the BVI 3000 on another electronic device
would be a degradation of performance in that other device when the
BVI 3000 is operated simultaneously.
If such interference is suspected, separate the two devices as much as
possible, or discontinue simultaneous operation, if practical, and contact
Verathon.
Page 30 BVI 3000 Operator’s Manual
Page 31

Technical Description
The BVI 3000 will operate normally in the proximity of other potential
interference sources, and has demonstrated immunity at a eld strength
of 3 V/m (per EN60601-1-2, 36.202.2.1). In addition, the BVI 3000
detects outside interference and will display “RESCAN” instead of a
volume measurement if detected interference is of sufcient magnitude
to possibly compromise measurement accuracy. If this “RESCAN”
display occurs repeatedly, attempt to locate and disable or remove the
interference source, or use the BVI 3000 away from the interference
source. If these efforts do not restore normal operation, contact the
distributor.
No other precautions need be taken regarding exposure in reasonably
foreseeable environmental conditions to magnetic elds, pressure or
variations in pressure, acceleration, or thermal ignition sources.
Verathon Inc., upon written request, will make available circuit
diagrams and other technical documentation which will assist the user’s
appropriately qualied technical personnel to repair this equipment. This
information is deemed condential and proprietary and its use is limited
solely to such repair applications. Repair should be performed only by
Verathon® or a Verathon authorized service organization.
Avoiding or
Identifying and
Resolving Adverse
Electromagnetic
Effects
(continued)
Technical
Documentation
Technical Description: Battery Charger
The battery charger (Verathon Part No. 0400-0036) can be used with an
input of 100-250 V ~ sat 47 to 63 Hz. Its output is 9 V at 1 Amp.
Use only the battery charger supplied. Use of any other charger may
damage the battery pack.
The battery charger used with the BVI 3000 is tested to IEC 601-1
requirements and is in compliance with UL and CSA equivalent
standards.
The power supply is not intended for direct patient contact. The batteries
used in the BVI 3000 are charged separate from the control unit and not
during patient use.
The battery charger and batteries are designed to operate under the
following conditions:
Input Voltage
Input frequency
100-120 VAC/North American (LZA-) units, 200250 VAC/European (LZE-) units, 100-250 VAC/
Universal (LZU-) units
50-60 Hz
Battery Charger
Specications
Certication
Technical
Specications
Page 31BVI 3000 Operator’s Manual
Page 32

Technical Description: Battery Charger
Technical
Specications
(continued)
Environmental
Conditions For Use
Input Current
Output
Input Connection
Insulation
Indoor use
Temperature
Transient
overvoltage
Pollution degree
Atmospheric
pressure
Relative humidity
Ventilation
Earth Terminal
Fuses
Cleaning
0.39 A/North American (LZA-) units. 0.25/
European (LZE-) units. 0.38 A/Universal (LZU-)
units
No load to full load at rated voltage. Refer to unit
label
The power supply employs a direct plug in AC
prongs for wall plug in units
The power supply is Class I with basic insulation
to each terminal
50° - 104° F (10° - 40° C)
Category II
II
70 hPa to 106 hPa
30% to 75%, non-condensed
The power supply is designed to operate with free
air convection.
The earth terminal provided in this unit is a
functional earth terminal, as indicated by the
ground symbol on the unit. It is not utilized in the
power supply to provide earth protection. Various
ground options are available upon request.
The fuses used in the power supply are rated at
250 VAC, 2 A, quick acting.
No cleaning is needed. If desired, a dry or slightly
damp cloth may be used to clean the surface of
the power supply while it is disconnected from
the AC source. In no instance should water be
allowed to enter the unit
Page 32 BVI 3000 Operator’s Manual
Page 33

The following symbols appear on the BladderScan® BVI 3000, Battery
Charger, or in this Operator’s Manual.
Class II Equipment
Type BF applied part. To identify a type BF applied part
with IEC-60601-1
CE mark in accordance to the Medical Device Directive
Canadian CSA Symbol
Attention, consult accompanying documents
Battery Pack Reference Part Number
Symbol Directory
Ambient Temperature, storage conditions
Atmospheric Pressure, storage conditions
Relative Humidity, storage conditions
Ground Symbol, Earth Terminal
Page 33BVI 3000 Operator’s Manual
Page 34

Page 35

Page 36

Your local BladderScan distributor is:
 Loading...