

Page 1

FloPoint® Elite Uroflow System Managing Exam Results in ScanPoint® with QuickPrint
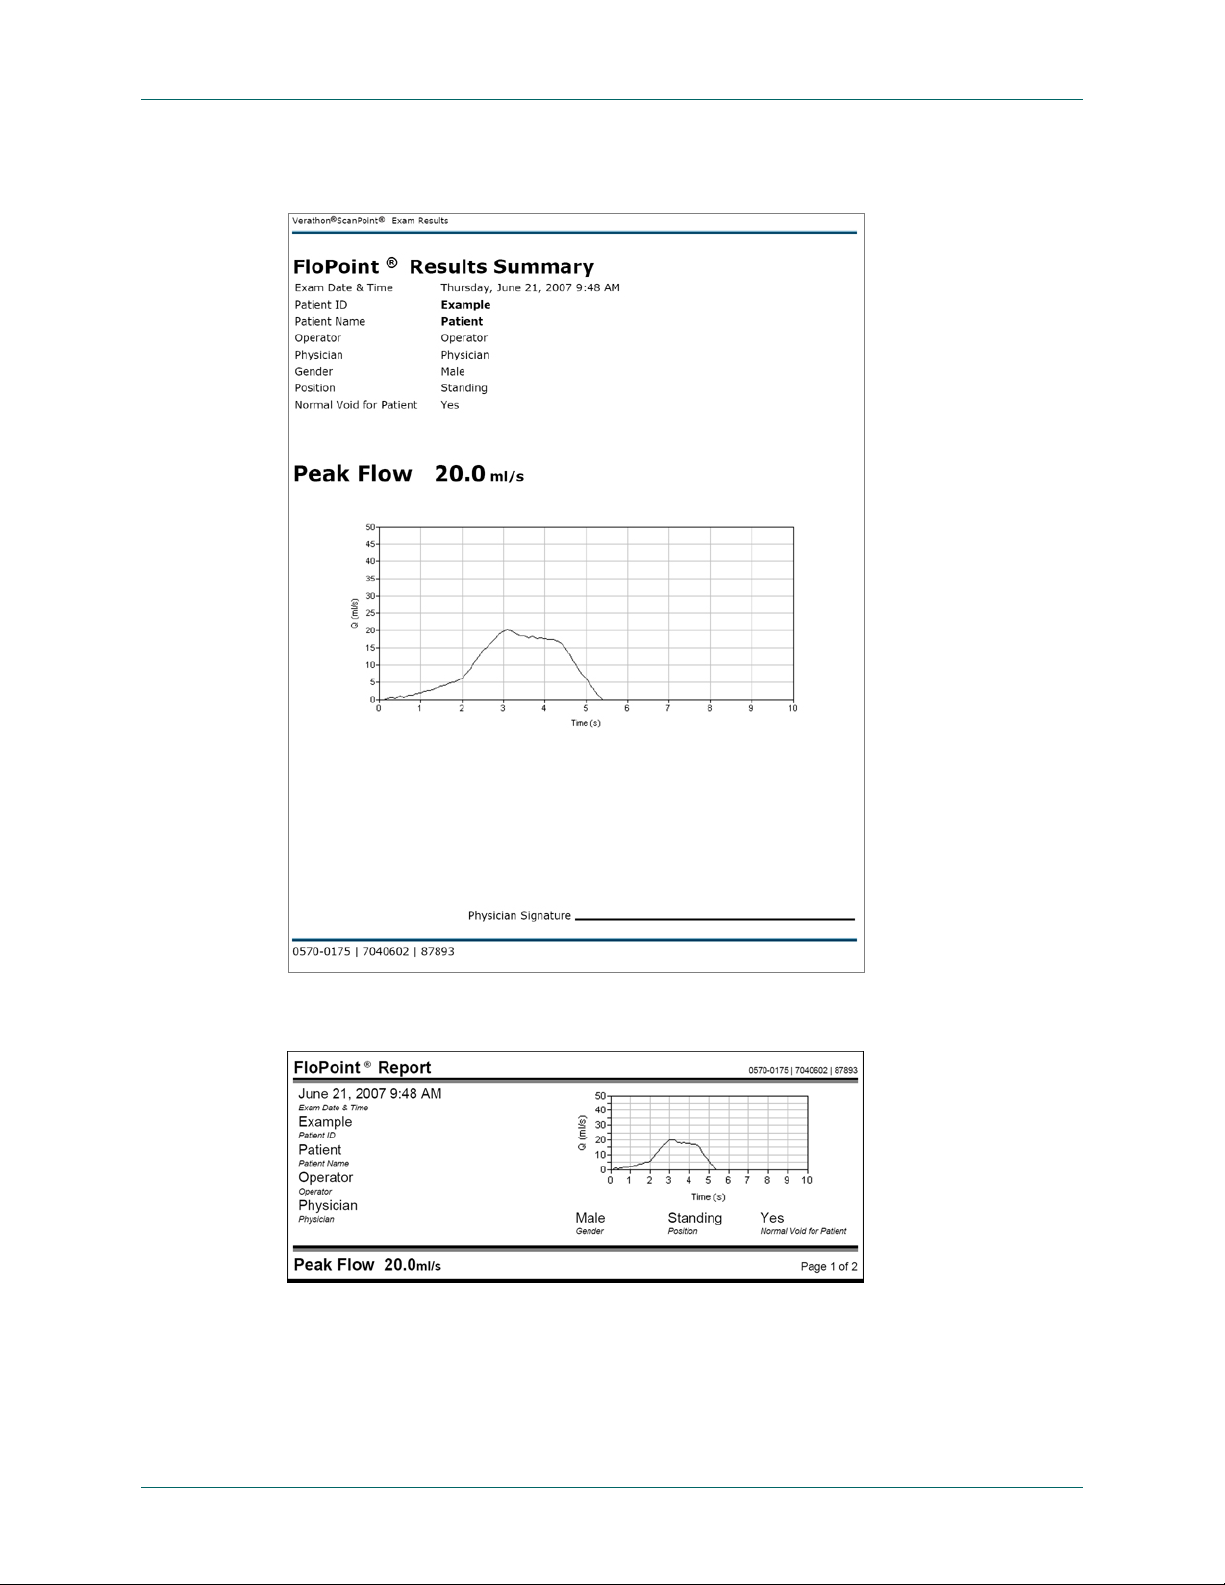
Report Type Samples
There are two different styles of reports provided by the FloPoint® Elite system:
A summary report that provides only the peak flow measurement.
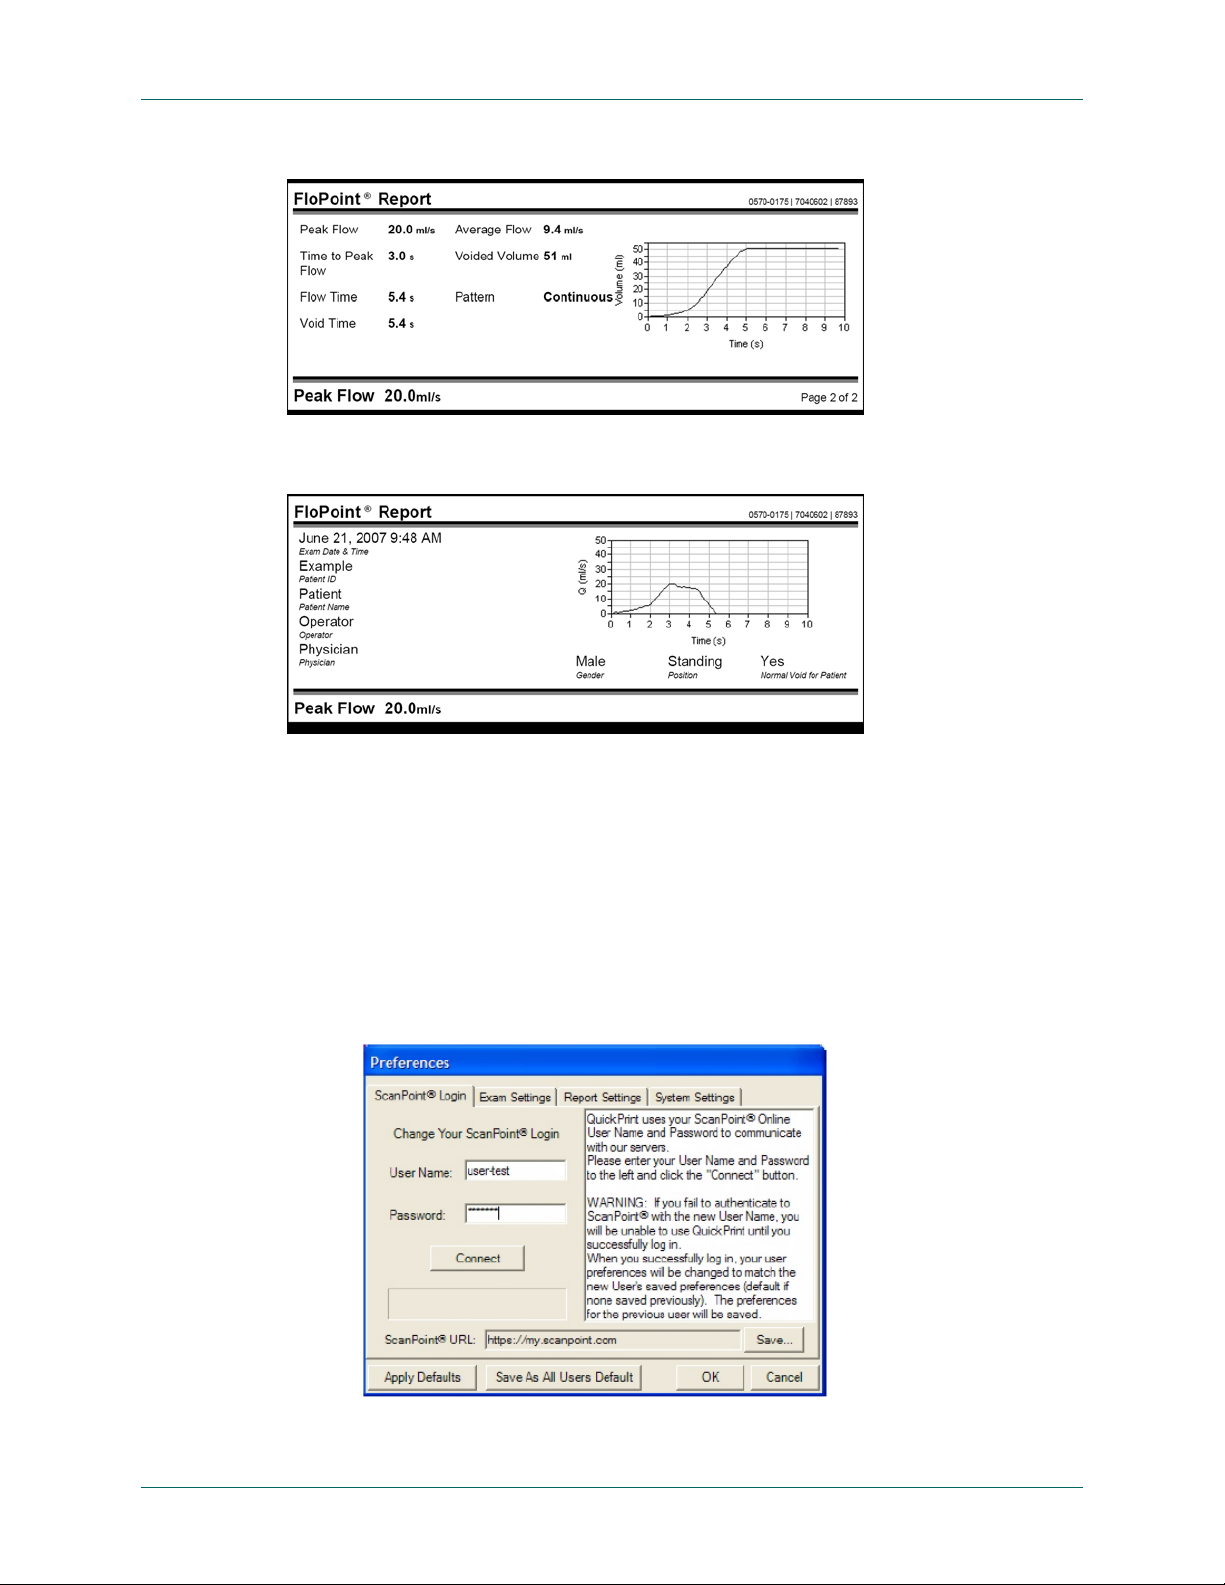
A detailed report that provides all measurements described above.
Past Exams and Voice Annotated Exams
Past exams and voice annotated exams must be printed through the ScanPoint
interface. Both the summary and the detailed reports have been formatted to fit on a
sheet of 8.5”x11” paper in portrait orientation (Figure 19).
To print a past exam or voice annotated exam:
1. After opening the exam results, click on either the Summary or the Detail links to
open a preview of the printed report.
2. Once the preview is open, click on the Print This Page link to print the report to
your printer.
Exams Without Voice Annotation
®
On-Line
Exams without voice annotation may be printed directly through QuickPrint to a sheet of
8.5” x 11” on your local or network printer, or to labels available with the ScanPoint
®
Label Writer (Figure 24). Your QuickPrint preference settings will let you select which
report format you want to print and what printer to use.
NOTE: The Label Report cannot be printed from ScanPoint
®
Online.
Printing Results from the Last Exam Performed
The last exam performed by your FloPoint
®
Elite may be re-printed through the
QuickPrint interface by clicking the PRINT LAST EXAM button. QuickPrint reports may be
printed to a sheet of 8.5” x 11” on your local or network printer, or to labels available with
the ScanPoint
®
Label Writer. Use QuickPrint preference settings to select the desired
report format and printer.
User’s Manual page 71
Page 2
Managing Exam Results in ScanPoint® with QuickPrint FloPoint® Elite Uroflow System
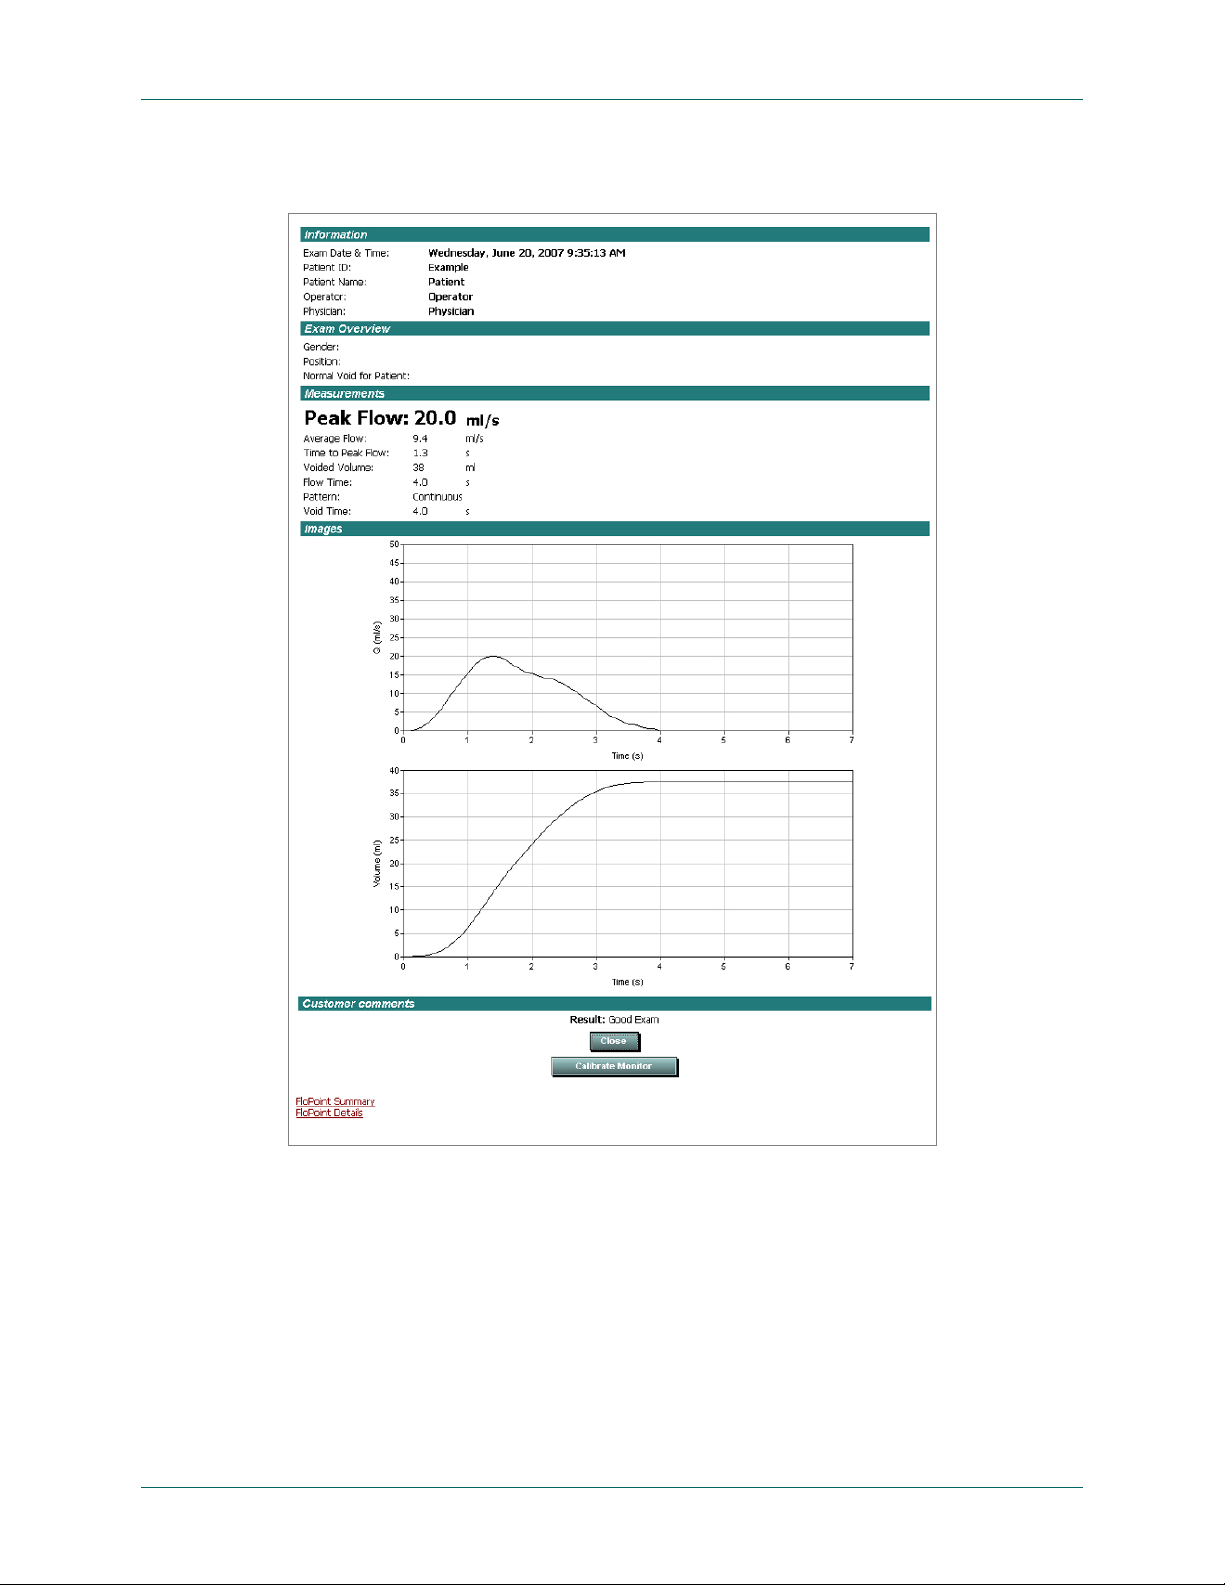
Figure 19. ScanPoint® Online Detail Report
page 72 User’s Manual
Page 3
FloPoint® Elite Uroflow System Managing Exam Results in ScanPoint® with QuickPrint
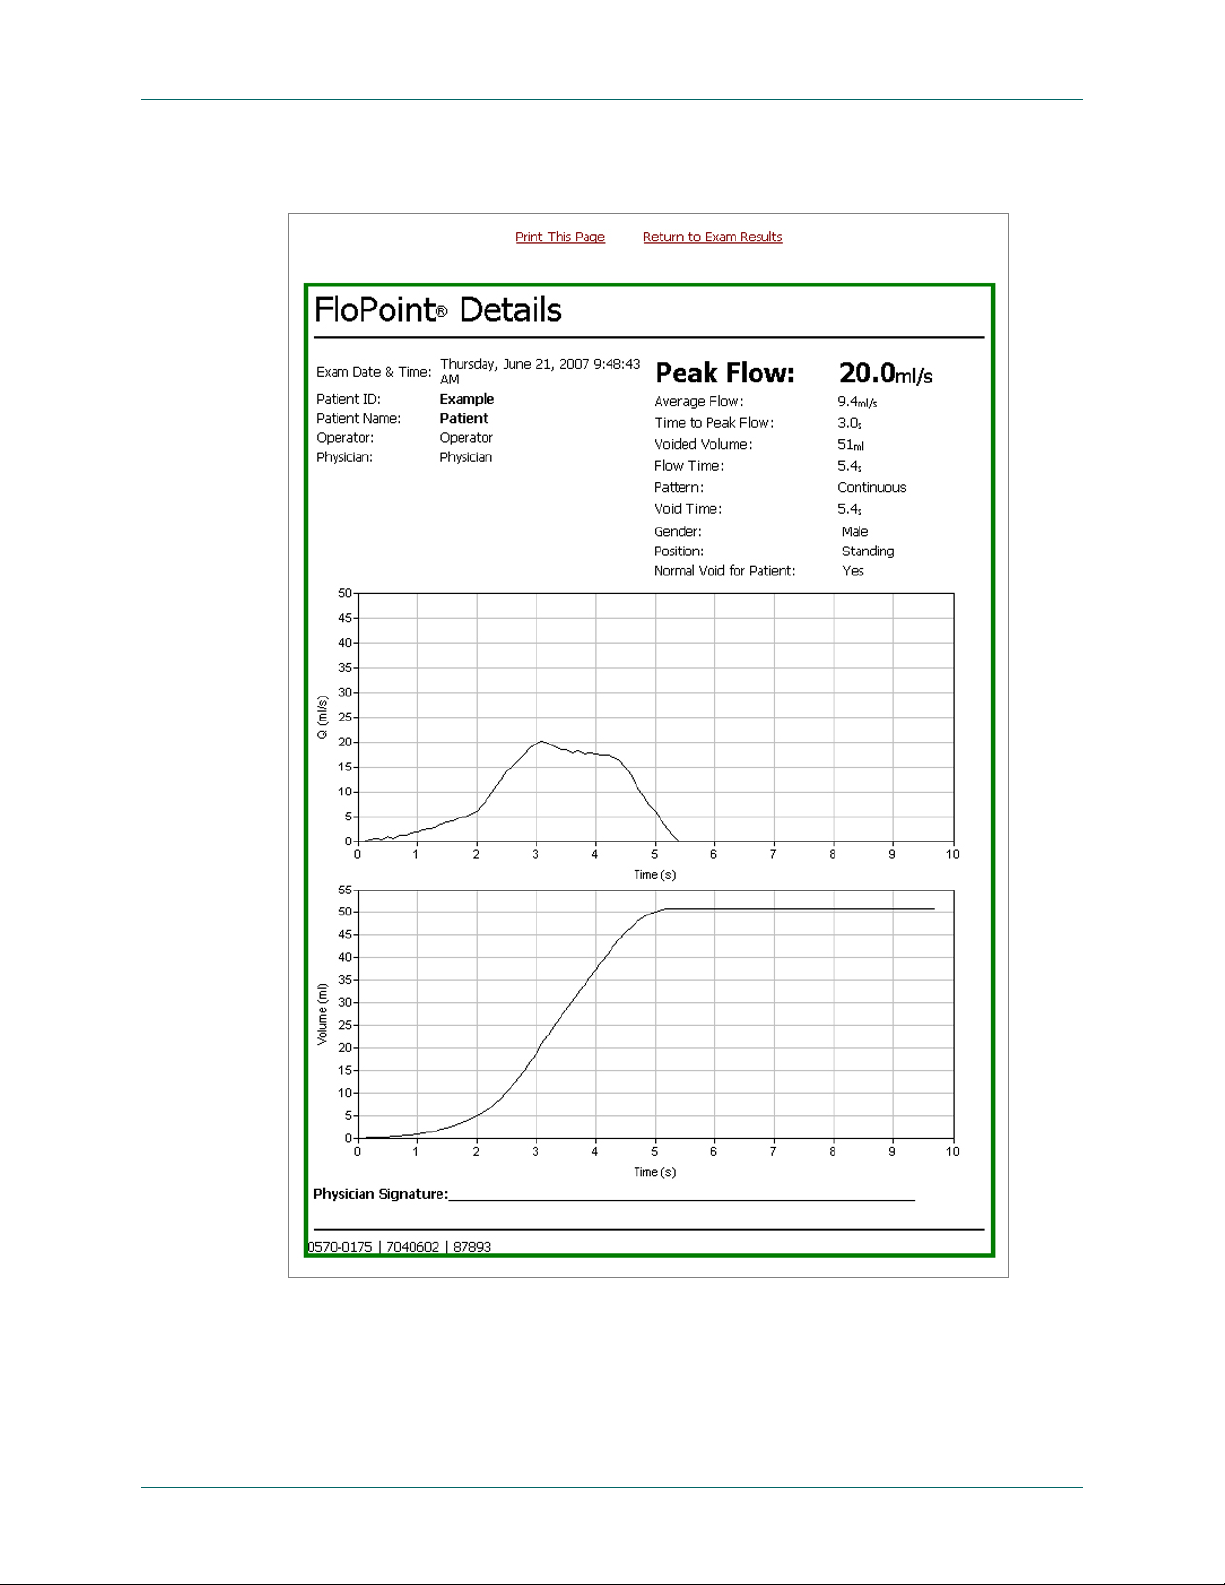
Figure 20. ScanPoint® Online Detail Report Preview
User’s Manual page 73
Page 4
Managing Exam Results in ScanPoint® with QuickPrint FloPoint® Elite Uroflow System
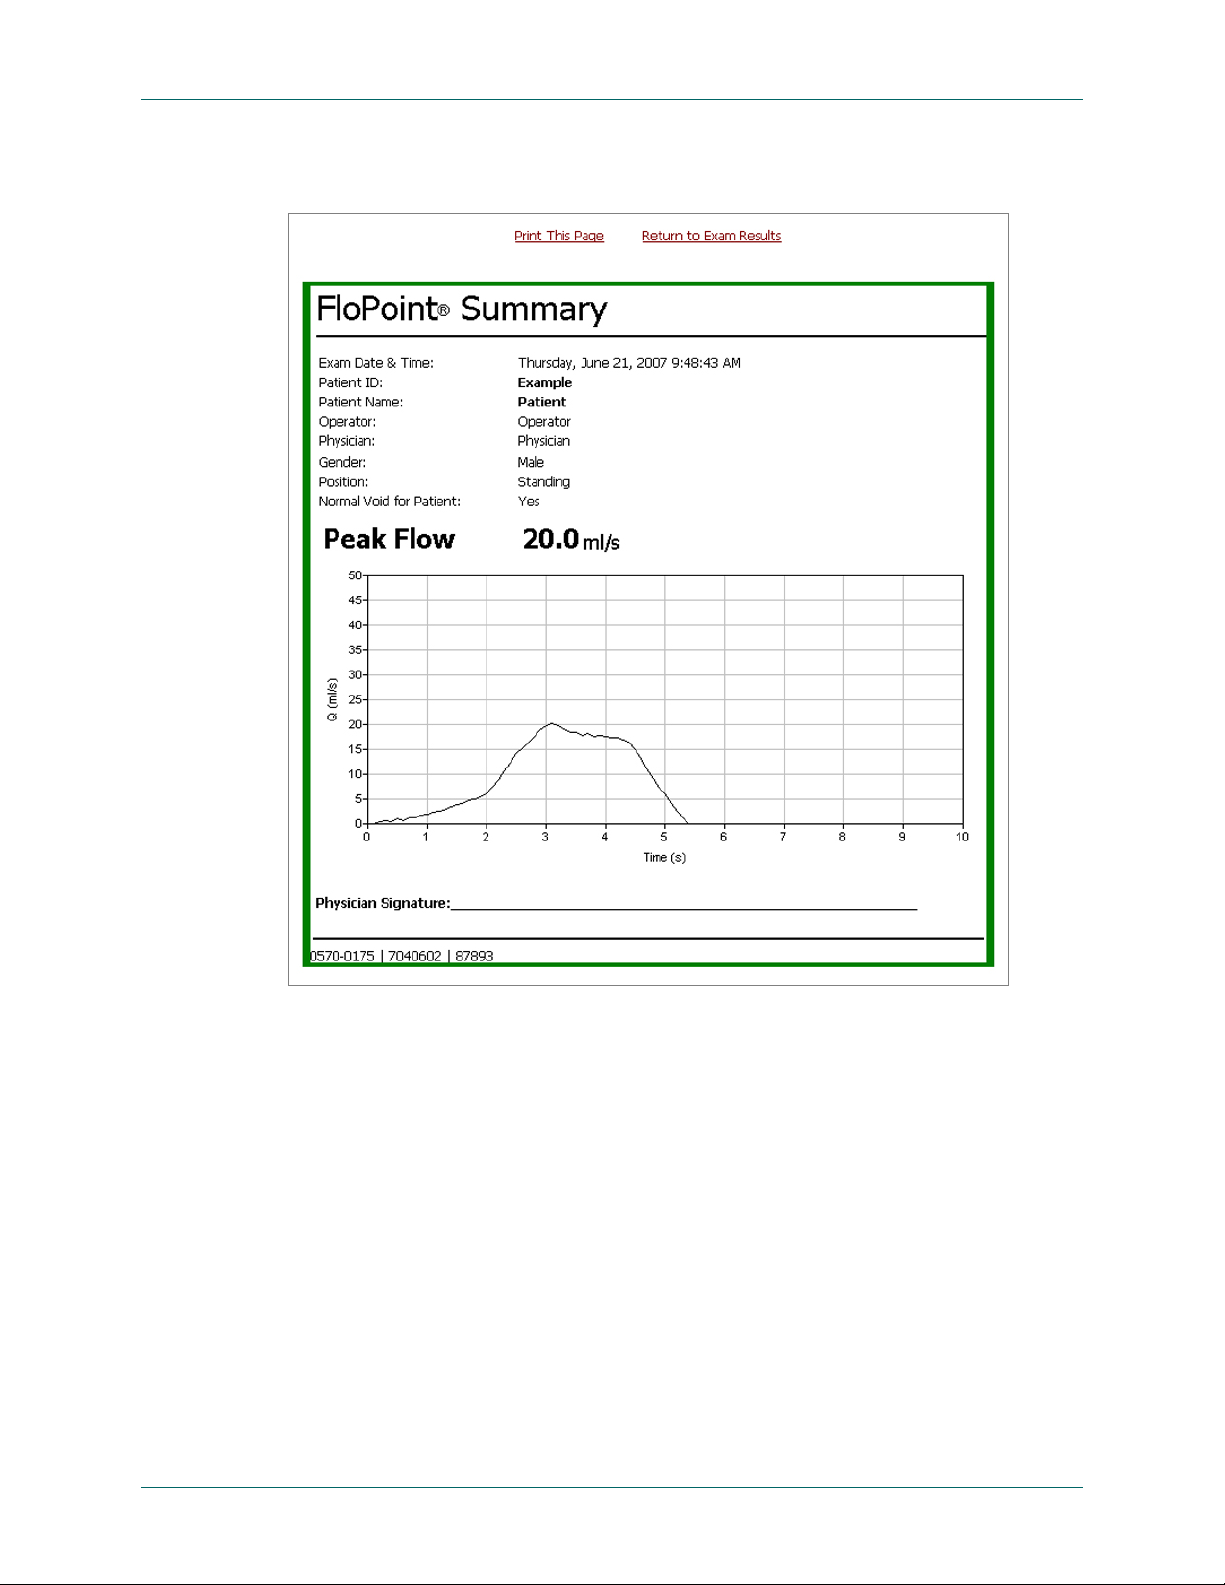
Figure 21. ScanPoint® Online Summary Report Preview
page 74 User’s Manual
Page 5
FloPoint® Elite Uroflow System Managing Exam Results in ScanPoint® with QuickPrint
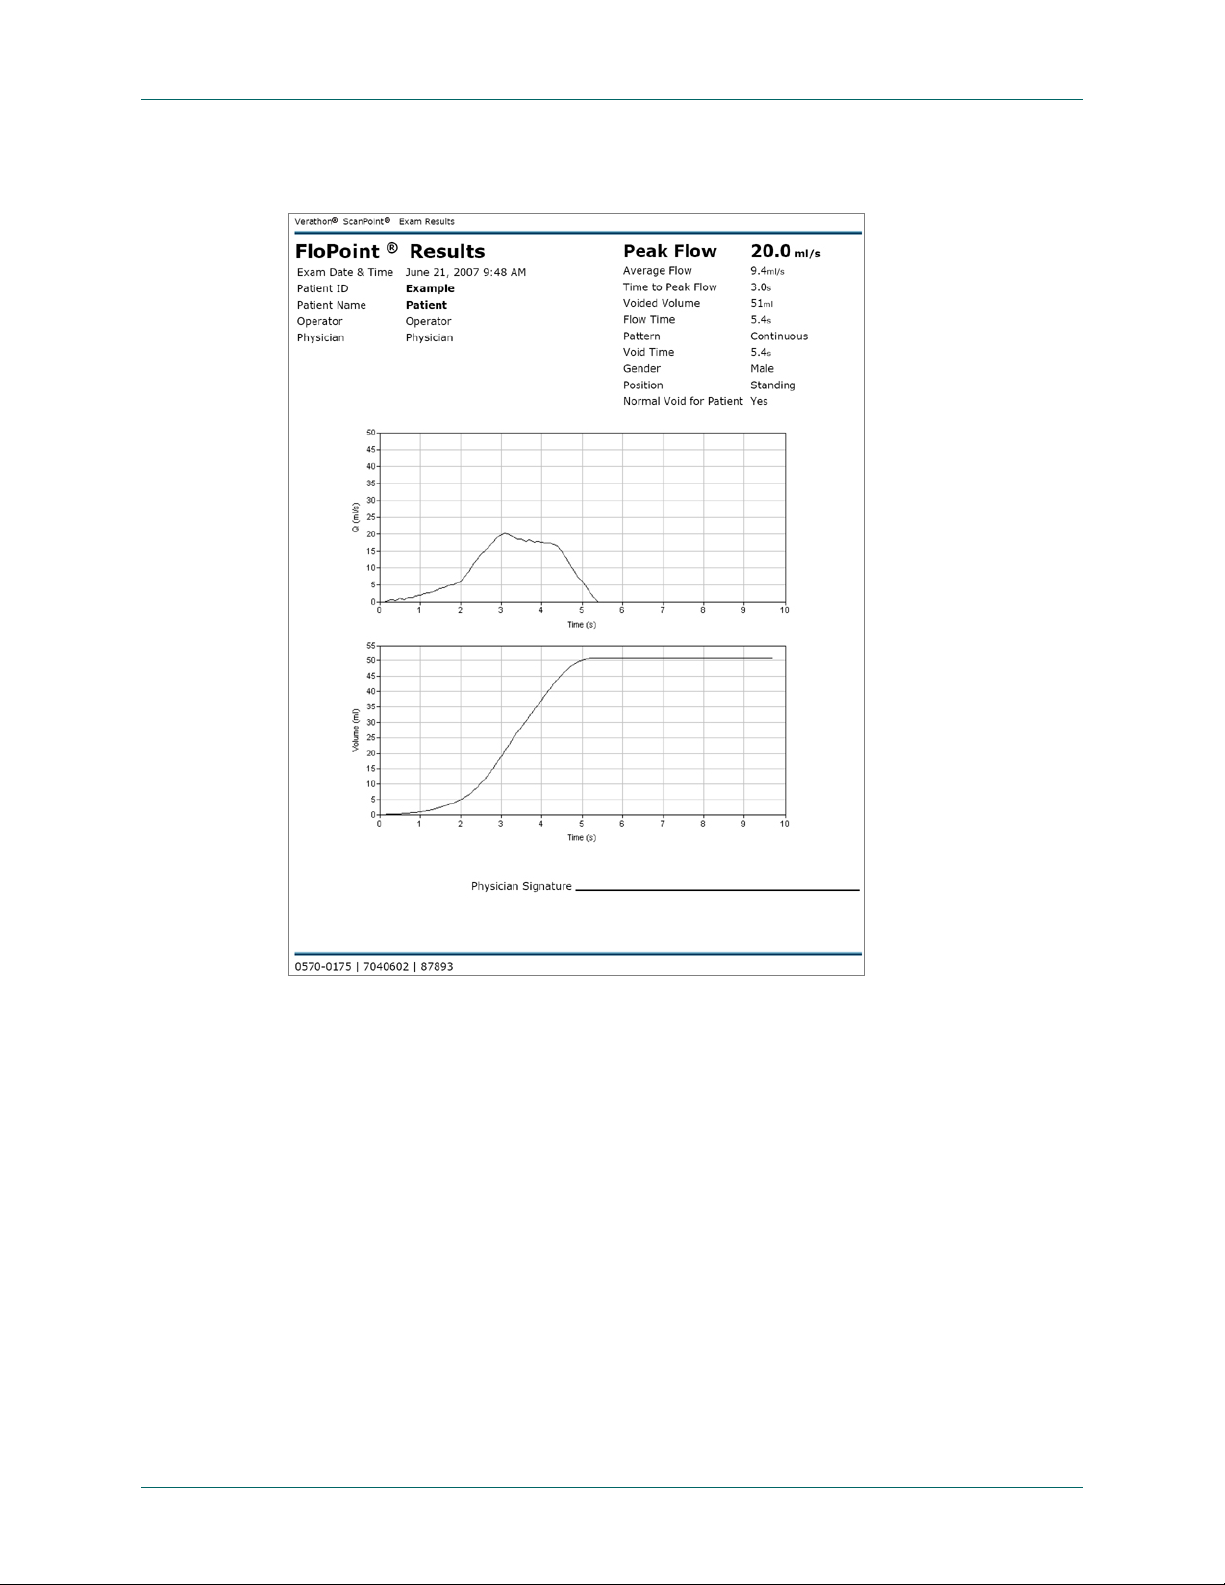
Figure 22. QuickPrint Full Page Detail Report
User’s Manual page 75
Page 6
Managing Exam Results in ScanPoint® with QuickPrint FloPoint® Elite Uroflow System
Figure 23. Quick Print Full Page Summary Report
Figure 24. QuickPrint Detail Label Report
page 76 User’s Manual
Page 7
FloPoint® Elite Uroflow System Managing Exam Results in ScanPoint® with QuickPrint
Figure 25. QuickPrint Summary Label Report
Changing Your Preferences
The Preferences dialog box allows you to set your ScanPoint® login information,
QuickPrint prompts, default information and print settings, and preferred warnings.
You can also use the Preferences Wizard to set many of your preference s — see “Step
5: Setting ScanPoint
1. From the Tools menu, choose Preferences. The Preferences dialog box is
displayed.
®
User Preferences” on page 33.
User’s Manual page 77
Page 8

Managing Exam Results in ScanPoint® with QuickPrint FloPoint® Elite Uroflow System
2. Consult the following table for the Preferences you can set up or change. When
you are finished setting your preferences, click the OK button to save your
changes and exit the Preferences dialog box, or:
Click the A
PPLY DEFAULTS button to reset all your Preferences to their
default settings.
Click the
SAVE AS ALL USERS button to set the Preferences settings for all
users on your computer.
Click C
ANCEL to cancel any changes you have made.
To Do this
Log in to ScanPoint
change from one user
profile to another.
®
or
1. Click the ScanPoint® Login tab.
2. Enter the User Name and Password assigned to
you by Verathon
3. Click C
NOTE: This ScanPoint
will apply every time you log in to Windows using your
current user account. There is no time-out period: the
User Name and Password you enter will remain active
until you change them.
Change the URL of the
ScanPoint
®
Web site.
NOTE: Do not perform this procedure unless
instructed to do so by the Verathon® Customer Care
Department.
ONNECT.
®
.
®
User Name and Password
Have QuickPrint prompt
you for exam details after
each exam.
1. Click the Exam Settings tab.
2. Indicate which prompts you want displayed for
each exam by placing a check mark in the
appropriate check boxes.
3. If desired, in the Default Operator text box, enter
the name you want to automatically appear in the
Operator text box.
4. If desired, in the Physician text box, enter the
name you want to automatically appear in the
Physician text box.
NOTE: You can always overwrite these default
names for a particular exam
5. Choose a default printer for printing exams.
NOTE: You will be able to change printers for a
particular exam only if you place a checkmark in
the Prompt for Printer check box.
page 78 User’s Manual
Page 9

FloPoint® Elite Uroflow System Managing Exam Results in ScanPoint® with QuickPrint
To Do this
Specify default names for
the Operator and Physician
text boxes in the Exam
Details dialog box.
Specify a default printer.
Have ScanPoint® with
QuickPrint prompt you to
save a PDF (a printable
copy of the exam) after
each exam.
1. Click the Exam Settings tab.
2. Place a check mark in the Prompt for Exam
Details check box.
3. In the Default Operator text box, enter the name
you want to automatically appear in the Operator
text box.
4. In the Physician text box, enter the name you
want to automatically appear in the Physician text
box.
NOTE: You can always overwrite these default
names for a particular exam.
1. Click the Exam Settings tab.
2. Click the down arrow () on the right side of the
Default Printer check box and choose the printer
you want.
3. If you do not place a check mark in the Prompt for
Printer check box, this printer will be used every
time you print a new exam.
1. Click the Exam Settings tab.
2. Place a check mark in the Prompt to Save Exam
PDF check box.
3. If desired, enter a default location for saving
exams in the Default Save Location text box. You
will always be able to override this setting for a
specific exam.
Have ScanPoint® with
QuickPrint prompt you for a
report type.
1. Click the Report Settings tab.
2. Place a check mark in the Prompt for Report Type
check box.
3. To specify a default report type for each
FloPoint
®
Elite device you have available, click the
down arrow () to the right of the text box and
select the appropriate type.
View sample report types.
1. Click the Report Settings tab.
2. Click the View Report Type Samples link.
You can also view report samples in this manual,
starting on page 71.
User’s Manual page 79
Page 10

Managing Exam Results in ScanPoint® with QuickPrint FloPoint® Elite Uroflow System
To Do this
Specify a default report for
each exam type.
1. Click the Report Settings tab.
2. Click the down arrow () to the right of the
appropriate instrument text box and select the
appropriate report type.
If you do not place a check mark in the Prompt for
Report Type check box, these report types will be
used every time you print a new exam.
Change the location for
updates to ScanPoint
®
QuickPrint.
with
NOTE: Do not perform this procedure unless
instructed to do so by an authorized Verathon®
representative.
1. Click the System Settings tab.
2. In the Update URL text box, enter the new Web
site location given to you by Verathon
Turn on or turn off specific
warning messages.
1. Click the System Settings tab.
2. Place a check mark in the check box(es) next to
the warning(s) you want to receive.
Exiting QuickPrint or Hiding the QuickPrint Window
®
.
You can close the QuickPrint window without exiting the program, or you can exit
QuickPrint completely.
®
Closing the QuickPrint Window without Closing ScanPoint
To hide the QuickPrint window, do one of the following:
Click the minimize button in the upper right corner of the QuickPrint window.
Go to the File menu and select C
ScanPoint
®
icon visible in your system tray indicates that the program is still
LOSE. The QuickPrint window closes. The
running.
To Exit QuickPrint Completely
If a QuickPrint dialog box is currently displayed, go to the File menu and
select E
XIT.
If a QuickPrint dialog box is not currently displayed, right-click the QuickPrint
icon in the system tray and select E
XIT.
A dialog box appears asking you to confirm that you want to exit QuickPrint.
Click
OK.
page 80 User’s Manual
Page 11

FloPoint® Elite Uroflow System Calibration
Calibration
Calibration
To make sure the FloSensor® is providing accurate measurements, it must be calibrated
at prescribed intervals.
The entire calibration process takes approximately 15 minutes.
You can calibrate the FloSensor as often as you like; you do not have to wait for the next
scheduled calibration date. However, at a minimum, you must calibrate the FloSensor
every 12 months.
NOTE: If your facility has signed up for the ScanPoint
®
Online Service Plan, you will
automatically receive the Calibration Fluid 4-pack and a Calibration Quick Reference
Card approximately 30 days before your FloSensor requires calibration (Figure 26).
Figure 26. FloPoint® Elite Calibration Fluid and Calibration Quick Reference Card.
Calibration Fluid Pouch
Pouch containing unique fluid for use in calibrating the
FloPoint
®
Elite.
0800-0331
FloPoint
®
Elite Calibration Quick Reference Card:
Provides instructions for the FloPoint
procedure.
0900-1444
Determining the Number of Days Until Required Calibration
1. Clear the Remote of saved exam data by placing it in the ScanPoint® Docking
Station and saving the exam data to ScanPoint
2. Remove the Remote from the ScanPoint
the Start button for at least five seconds. The LCD screen displays the “setting
®
.
®
Docking Station. Press and hold down
®
Elite calibration
User’s Manual page 81
Page 12

Calibration FloPoint® Elite Uroflow System
sun” icon and the number of days until the required calibration date - 120 in the
illustration below.
NOTE: When the Remote displays
and 000 calibration is required.
When there are 20 days remaining before the next required calibration, a warning
message appears in ScanPoint
®
with QuickPrint (Figure 27).
Figure 27. ScanPoint® Calibration Warning Message
To view the date for the next scheduled calibration:
1. Place the Remote in the ScanPoint® Docking Station.
2. In ScanPoint
®
with QuickPrint, go to the View menu and select INSTRUMENT
DETAILS. The Instrument Details dialog will open (Figure 28).
page 82 User’s Manual
Page 13

FloPoint® Elite Uroflow System Calibration
Figure 28. Instrument Details Dialog
The last two lines of information in the dialog provide the date of the last
calibration and the date of the next required calibration.
3. Click the green R
ETURN TO INSTRUMENT OVERVIEW button to close the dialog and
return to the Instrument Overview (Prepare New Exam) pane.
Calibrating the FloSensor using ScanPoint® with QuickPrint
1. Place the Remote in the ScanPoint® Docking Station.
When the ScanPoint
click the “Calibrate Instrument” menu item.
2. The Calibrate Instrument screen will open. Click the C
dialog to begin configuring the Remote for the calibration procedure.
3. When the Remote is configured, take it, along with a paper funnel, the pouches
containing the Calibration Fluid (available from Verathon
(with FloSensor inside) to the toilet.
Place the Remote, funnel, and Calibration Fluid on the counter. Place the
FloCharger gently on the floor.
®
QuickPrint window opens, select the “Tools” menu and
ALIBRATE button on this
®
), and the FloCharger
User’s Manual page 83
Page 14

Calibration FloPoint® Elite Uroflow System
r
4. Put on a pair of gloves. Remove
the FloSensor from the FloCharger
and hang it in the toilet bowl just
as you would for an exam.
Place the funnel on top of the
FloSensor and push the tabs
under the handles to hold it
securely in place.
5. Pick up the Remote and press the button once to start
recording an exam. The Remote will play a “tune up”
chirp indicating that the FloSensor is ready to measure
the calibration flow.
6. Slowly pour the contents of one of the Calibration Fluid
Ready to calibrate
pouches onto the side of the funnel closet to the front of the toilet. The flow rate
should not exceed 10ml/s as measured by the Remote.
7. When the pouch is empty, click the Start button once to end the exam.
Depending on what appears on the Remote display, the calibration was either
successful (go to step 8), or unsuccessful (go to step 10).
If the Calibration was Successful
8. If the calibration is successful, four arrows and “3 - 3”
are displayed. The Remote plays a “siren” chirp
indicating that it needs to be placed back in the
ScanPoint
®
Docking Station to complete the calibration
process.
9. When you have performed a successful calibration - or when three calibration
flows have been attempted - return the FloSensor to the FloCharger and flush
the toilet.
Remove your gloves and return the Remote to the ScanPoint
®
Docking Station
for re-configuration.
If the Calibration was Unsuccessful
10. The Remote will emit an error beep.
A maximum of three calibration flows can be conducted
during a calibration exam.
Return to step 6 to repeat a calibration flow.
Completing Calibration
11. When you have performed a successful calibration - or
page 84 User’s Manual
The display shows the
current attempt numbe
and the total allowable
number of attempts
possible, in this case,
“one out of three.”
Page 15

FloPoint® Elite Uroflow System Calibration
when three calibration flows have been attempted - return the FloSensor to the
FloCharger and flush the toilet.
Remove your gloves and return the Remote to the ScanPoint
®
Docking Station
for re-configuration.
NOTE: If calibration was unsuccessful after three attempts: Return to ScanPoint
and complete the Calibration Exam. You may continue to use your FloPoint
or contact Verathon Medical
®
Customer Care for assistance at 1.800.331.2313.
®
Elite
®
12. Return the Remote to the ScanPoint
the calibration data to ScanPoint
®
Docking Station. The Remote will upload
®
. ScanPoint® verifies the calibration and
assigns a new expiry date to the FloSensor. This should take only a minute.
13. ScanPoint
®
completes the calibration process by re-installing the Remote
software so the Remote can perform patient exams.
14. If desired, select P
Figure 29. Calibration Report
RINT to print a Calibration Report (Figure 29).
User’s Manual page 85
Page 16

Troubleshooting FloPoint® Elite Uroflow System
Troubleshooting
Troubleshooting
Help Resources
Verathon® provides an extensive array of customer care resources, described in the table
below.
You can obtain copies of this manual, Quick Reference Cards, and clinical studies and
view training videos by accessing the Verathon
contacting your Verathon Medical
information is provided on page 21.
Resource Description
FloPoint
Reference Cards
This manual
The Verathon® Web site The Verathon® Web site (www.verathon.com)
®
Elite Quick
®
®
representative. A complete listing of contact
Web site at www.verathon.com or by
Summary of procedures for using the FloPoint® Elite
Uroflow System.
Refer to the troubleshooting suggestions that begin
on page 88 for solutions to common problems.
provides the latest user manuals, quick reference
cards, clinical studies, and training videos.
To find the latest FloPoint
the Verathon
®
Home page, select “FloPoint® Elite.”
®
Elite information, from
ScanPoint® with QuickPrint
ScanPoint® with QuickPrint software.
Software Install CD
FloPoint® Elite In-Service CD Includes FloPoint® Elite User’s Manual and Quick
Reference Cards.
ScanPoint® Help From your ScanPoint® application, select Help from
the toolbar at the top of the ScanPoint
®
window.
ScanPoint® Online ScanPoint® Online provides:
Access to real-time troubleshooting from
Verathon
®
.
The ability to calibrate and certify their
devices online anytime they wish .
Automatic software upgrades.
Automatic data backup and archiving
(HIPAA compliant).
page 86 User’s Manual
Page 17

FloPoint® Elite Uroflow System Troubleshooting
Resource Description
®
ScanPoint
Diagnostics
Figure 30. ScanPoint® Diagnostics
This ScanPoint
®
tool checks your system and lets
you know of any problems or needed updates
(Figure 30).
To access this information, from the ScanPoint
menu select Tools > Diagnostics.
®
Resource Description
Premium Warranty Total
Customer Care
Plan
A Verathon® insurance plan that provides all the
benefits of ScanPoint
paragraph) plus:
Instrument insurance: A perpetual warranty
against outdated technology with free
upgrade / replacement when your device is
no longer manufactured.
Free loaner program.
Free shipping.
Phone support
In North America, call: 1.800.331.2313.
International customers, please refer to the list of
Customer Care phone numbers on page 21.
®
Online (preceding
User’s Manual page 87
Page 18

Troubleshooting FloPoint® Elite Uroflow System
Diagnosing Problems
ScanPoint® Problems
Issue / Problem Answer
How can I improve my
system’s security and
privacy?
When I insert the
ScanPoint
®
disk into the
CD drive, the installation
screen does not appear.
To view recommended security and privacy practices,
from the ScanPoint
®
Help menu and select “Security
Best Practices.”
If the installation screen does not automatically open
when you insert the ScanPoint® CD, you can start
installation this way:
1. On the Windows taskbar, click Start > Run. The
Run dialog will open.
2. Type: D:\setup.exe (where D is the name assigned
to the CD drive) and click Ok.
I can’t access the
ScanPoint
®
Web site.
Check your Internet connection.
I can’t start ScanPoint®. Exit all open Internet Explorer windows and restart the
program.
I can’t log onto
ScanPoint
®
.
You may have mistyped your login name and password.
Try entering them again making sure that they are
spelled correctly and that you are using upper and lower
case letters as appropriate.
If you can’t remember your login name or password,
click Get help with sign in.
My ScanPoint® session
has expired.
Why do some text boxes
have red asterisks (*)?
Your ScanPoint® session has timed out because it was
idle for over 12 hours. You must log in again.
A red asterisk indicates that the text box cannot be left
blank. You are required to enter text in any field marked
with a red asterisk.
I can’t find the exam
results I want.
Make sure the exam was transmitted to your account
and not someone else’s. If it was transmitted to your
account but you still can’t find it, one of the following
conditions may apply:
ScanPoint
®
may not have validated the exam
yet. Wait a few minutes and try again.
The exam results may have already been
viewed. If so, go to the Past Exams menu and
request the results again.
page 88 User’s Manual
Page 19

FloPoint® Elite Uroflow System Troubleshooting
Issue / Problem Answer
A security warning
appeared on my screen.
Why do I get an error
message saying that I
must enter a positive
number?
An error message
appeared on the
ScanPoint
®
screen.
My account has expired.
I can’t access some menu
options.
®
ScanPoint
Remote Problems
You may be trying to run an outdated version of
ScanPoint
®
, or the driver ScanPoint® needs is not
available. If either is true, click Yes in the security
warning dialog box.
A minus sign ( – ) cannot be the first character in any
ScanPoint
®
text box. Re-enter the digits without the
minus sign.
Click the H
ELP button on any ScanPoint
®
screen and
follow the directions provided.
If you still have questions, contact the Verathon
Medical
®
Customer Care Department at
1.800.331.2313.
Contact Verathon
®
at 1.800.331.2313 to reactivate your
account.
You can access only the features for which you have
signed up.
Issue / Problem Answer
The Remote does not
recognize the FloSensor.
Or, the FloSensor is not
communicating with the
Make sure you are within 3 meters of the FloSensor.
Make sure the FloSensor battery is charged and the
Remote battery is charged.
Remote.
The Remote does not turn
on.
The Remote battery may need to be charged.
1. Place the Remote in the ScanPoint
Station (make sure the computer is turned on) for up
to 8 hours.
2. If the scrolling battery icon does not appear after 2
hours, press the Reset button on the rear of the
Remote.
3. For more information about charging the Remote,
see “Charging the ScanPoint
page 44.
®
Docking
®
Remote Battery” on
User’s Manual page 89
Page 20

Troubleshooting FloPoint® Elite Uroflow System
Issue / Problem Answer
The ScanPoint
®
Remote
isn’t working.
The ScanPoint® Remote
won’t communicate with
ScanPoint
®
.
The ScanPoint® Remote
beeped.
Make sure the Remote is seated properly in the
ScanPoint
®
Docking Station.
Make sure the Remote battery is charged.
If the Remote is charged but still won’t turn on, press
the Reset button on the back of the Remote using
the activation tool provided with you FloPoint
®
Elite
system.
If the Remote is still not functioning properly, contact
Verathon Medical
®
Customer Care at
1.800.331.2313.
®
Check the connections between the ScanPoint
Docking
Station and the USB connector on your computer.
If the Remote is still not functioning properly, contact
Verathon Medical
®
Customer Care at 1.800.331.2313.
It is normal for the Remote to beep when:
It is beginning or ending a process.
It is entering sleep mode to conserver battery life.
Press any button to “wake up” the Remote.
Battery power is low and the Remote needs to be
recharged. (See “Charging the ScanPoint
®
Remote
Battery” on page 44.)
Radio contact is weak. Move the Remote closer to
the ScanPoint
Error Messages
Message Answer
User’s comments may
Enter a reason for the rejection in the Reason text box.
not be empty during
exam rejection.
Exam already has exam
data uploaded. Please
You have already transmitted the results of the exam.
You may conduct a new exam, if desired.
start another exam.
This field may not be
empty.
You must make an entry into the appropriate text box. It
cannot remain blank.
®
Docking Station.
page 90 User’s Manual
Page 21

FloPoint® Elite Uroflow System Troubleshooting
Message Answer
You must enter a positive
number.
A minus sign ( – ) cannot be the first character in any
ScanPoint
®
text box. Re-enter the digits without the
minus sign.
Error Codes
Code Meaning Resolution
Err 1
FloSensor did not respond to SelfTest Request from ScanPoint
®
Charge the FloSensor.
Remote.
Err 2
FloSensor did not respond to a stop
exam request from ScanPoint
®
Reset FloSensor by placing it on
the FloCharger.
Remote. Exam information is
complete and a new exam could be
started.
Err 3
The calibration exchange between the
FloSensor and the ScanPoint
®
Remote failed.
Repeat the calibration. If it still
fails, upload data to ScanPoint®
and call Verathon Medical
Customer Care.
Err 4
At least 1 second of continuous data
was lost due to a radio
communication failure.
Alert on ScanPoint
indicates loss of radio data.
Move ScanPoint
to the FloSensor during an
exam. If alert comes after patient
has completed voiding, there will
be no impact on exam result.
®
®
Remote
®
Remote closer
Err 5
Err 6
Err 7
The ScanPoint
write a value to the FloSensor flash.
The ScanPoint
a value from the FloSensor flash.
The FloSensor battery has insufficient
®
Remote failed to
®
Remote failed to read
Repeat the operation. (Not a
function performed by
customers. Call Verathon
Medical
®
Customer Care.)
Repeat the operation. (Not a
function performed by
customers. Call Verathon
Medical
®
Customer Care.)
Charge the FloSensor.
charge to perform and exam.
User’s Manual page 91
Page 22

Troubleshooting FloPoint® Elite Uroflow System
Code Meaning Resolution
Err 8
Err 9
Err 10
The FloSensor motor is moving too
slowly and could no longer be
controlled.
The FloSensor is requiring too much
current to control the speed.
The FloSensor internal temperature is
too high.
Check the FloSensor for
something blocking the motor. If
necessary, remove the funnel
retainer and clean the FloSensor
(see page 56). Re-assemble and
attempt the exam again. If the
problem persists, contact
Verathon Medical
®
Customer
Care.
Either the flow rate is too high or
there is something preventing
the motor from moving. Remove
the funnel retainer and clean the
FloSensor (see page 56). Re-
assemble and attempt the exam
again. If the problem persists,
contact Verathon Medical
®
Customer Care.
Let the FloSensor cool off and
attempt to perform another
exam. If the problem persists,
contact Verathon Medical
®
Customer Care.
Application Log
If you are experiencing problems, the Customer Care Department at Verathon Medical®
may send you a message requesting permission to view your application log (Figure 31).
page 92 User’s Manual
Page 23

FloPoint® Elite Uroflow System Troubleshooting
Figure 31. Application Log Request
®
The application log is a record of all the actions ScanPoint
has performed. No patient
data is included. You can preview your application log by going to the View menu and
selecting Application Log. Figure 32 shows a typical application log
Figure 32. Application Log Data
User’s Manual page 93
 Loading...