

Page 1
VTLAN6
NETWORK CABLE (LA N) TESTER
LA N TE S TER
TE S TE U R L A N
COM PR OBADOR DE C ABLE LAN
LAN-TESTE R
TESTADO R DE CABOS L AN
TE STER SI ECI LAN
for - voor - pou r - para - fü r – do:
R J 45 (8P8C )
R J 12 (6P6C )
R J 11 (6P2C )
R J 10 (4P4C )
USER MANUAL 3
GEBR UI KERSHANDLEIDING 7
MODE D'EMP LOI 12
MANUAL DEL USU ARIO 17
BEDIENUNGSANLEITUNG 22
MANUAL DO UTIL IZ A D O R 27
INSTR UKCJA OBSŁUGI 32
Page 2
VTLAN6
V. 01 – 07/10/2013 2 ©Velleman nv
Page 3
VTLAN6
Never use the tester on live wires; this will damage the
splashing and dripping liquids. Never put objects filled with liquids
USER MAN UAL
1. Introduction To all residents of the European Union
Important environmental information about this product
Th is symb ol on the de vi ce o r the packag e i ndi ca tes tha t
disposal of the device after its lifecycle could harm the
environment. Do not dispose of the unit (or batteries) as
unso rted m unicipal waste; it should be taken to a
spe cia lize d com pa n y for recycl i ng. Thi s de vice sh oul d be
ret urned to your dis tri bu to r or t o a local rec ycling service . Re sp ec t
the local environ mental r u le s.
If in doubt, contact your local waste disposal authorities.
Tha nk you for choos ing Ve l leman! Ple as e rea d the manu a l tho ro ughl y
before bringing this device into service. If the device was damaged in
transit, don't install or use it and contact yo u r d ealer.
2. Safety Instr u c tions
tester.
Th ere are no u ser -servi ce a ble parts ins i de the de v i ce .
Re fe r to an a uthori ze d dea ler for service and/or spare
pa rts.
Refer to the Vell eman ® S ervic e and Qua lity Warra nty on the last
page s of th is ma nual.
• Indoor use only. Keep this device away from rain, moisture,
on top of or close to the device.
• Keep this de vi ce a way from dust and extreme tem peratures.
• Pro tect this de vi ce f rom sh ock s and abuse . Avoi d brute fo rce whe n
operating the device.
• Familiarise yourself with the functions of the device before actually
using i t .
• All modificat io ns of the device are forb idden for safety reasons.
Dam age caused by user mo d ifications to t he de vice i s no t co ve red
by the warranty.
V. 01 – 07/10/2013 3 ©Velleman nv
Page 4
VTLAN6
Only use the device for its intended purpose. Using the device in
Mast er
Remote
5
ca b le tes t i nd ica to r s
•
an unauthorised way will void the warranty.
• Damage caused by disregard of certain guidelines in this manual
is no t cove red by the warranty a nd the dealer will no t accept
resp onsi bi l i t y for any e n s u i ng defec t s or probl ems.
• Keep this manual for future reference.
3. Features
This Network Cable (LAN) tester for various cable types is
in d is pe ns a b le i n ne twor k i n s ta l la t io n a n d m a in te n a nce a ctiv itie s. Th is
compact device can be used for testing network or telephone cables
(8 P 8 C (R J45) , 6P6C (R J12), 6P 2C (R J11), 4P 4C (R J10)) a nd for m os t
types of computer cables.
• LED indication
• advanced design for easy testing
• ab ility to test cab le s from a d istan ce and in places tha t are not
ea sily acce ssible
• automatically runs all tests and checks for continuity, open,
sho rte d a nd cross ed wire pai rs
• slow and fast test switch
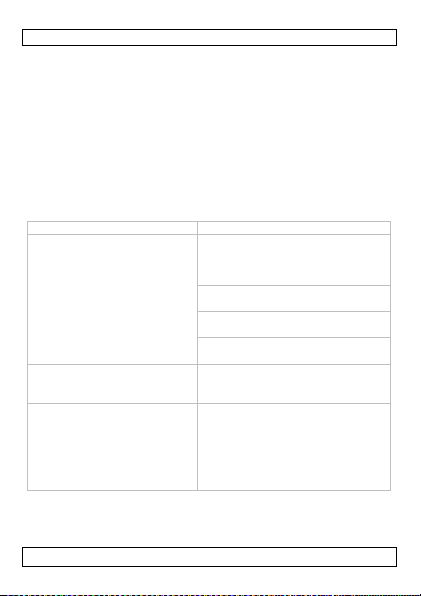
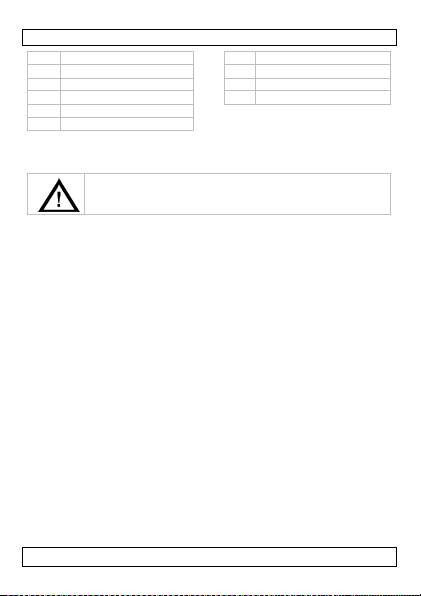
4. Overview
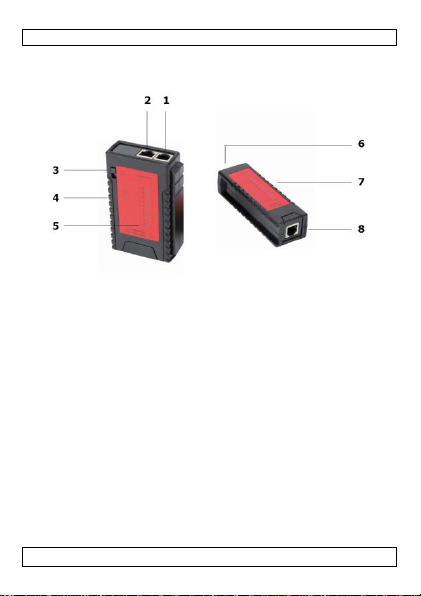
Refer to the illustrations on pag e 2 of this man ua l .
1 RJ11/R J12 socket 6 RJ 45 s o ck e t
2 R J45 socke t 7 ca b le te s t in d ica tors
3 on/ off switc h 8 RJ11 /RJ12 socket
4 power indicator
5. Ope ration
Never use the tester on live wires; this will damage the
meter.
V. 01 – 07/10/2013 4 ©Velleman nv
Page 5
VTLAN6
To execute the test at a slower pace, set the on/off switch in the
After testing, remove the cable from master and remote and set
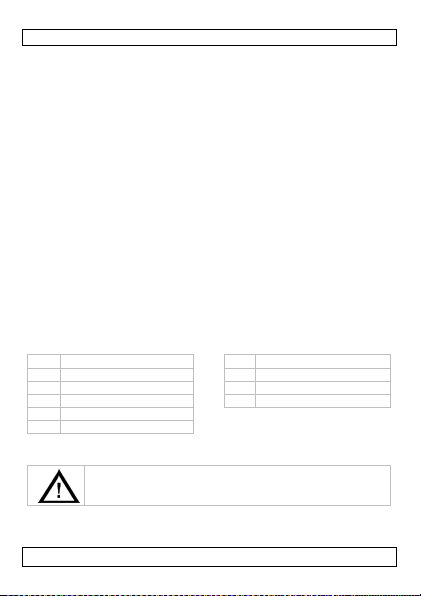
Description
Sequence
1 2 3 4 5 6 7 8 G
(8P8C)
remote:
1 2 3 4 (6 P 4C )
remote:
1 2 (6P2C)
indicator 2 does not light up on
do not light up on master and
If less than two wires in
the cable are connected, none
remote:
1 2 3 4 5 6 7 8
1. Set the on/off switch [2 ] in the O N position. The indicator [1]
blinks.
S (‘slow’) position. The indicator blinks slower.
2. In sert one e nd of the cab le under test into the socket in the
ma s te r: [ 3] for RJ45, [4] for R J11/ R J 1 2.
3. Insert the other end of the cable into the socket in the remote
[7] for RJ45, [8] for RJ 1 1/RJ 1 2.
The cable test lights on the master [5] a nd on the remo te [6]
light up in se quence.
4.
the on/off switch in the O FF position.
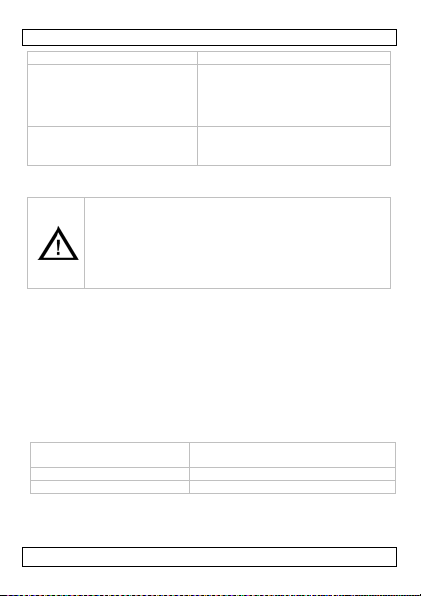
5.2 Test results: examples
ma s te r:
Good connection: all indicators
light up in se quence.
Note: Indicator G lights up
only for cables with a ground
(GND).
remote:
ma s te r: 1 2 3 4 5 6 (6 P6 C)
remote: 1 2 3 4 5 6 (6P6 C)
ma s te r: 1 2 3 4 (6 P 4C )
1 2 3 4 5 6 7 8 G
(8P8C)
ma s te r: 1 2 (6P2C)
Open circuit: wire 2 is broken,
ma s ter and remote.
Open circuits: wires 2 and 5
are broken, indicat ors 2 and 5
remote.
Note:
ma s te r: 1 2 3 4 5 6 7 8
remote: 1 2 3 4 5 6 7 8
ma s te r: 1 2 3 4 5 6 7 8
of the indicators lights up.
V. 01 – 07/10/2013 5 ©Velleman nv
Page 6
VTLAN6
Description
Sequence
Sho rt-circuit between wires 2
i nd i cators on master
ma s te r:
1 2 3 4 5 6 7 8
remote:
1 2 3 4 5 6 7 8
hargeable batteries
regulations. Keep batteries away f rom child ren.
R J 11 /12 cable s
power supply
9 V battery 6LR61C (not incl.)
and 4: all
light up in se quence, indicators
2 and 4 do not light up on
remote.
W i re s 2 an d 3 a re con ne ct e d in
the wron g orde r: in d icato r 3
lights up first on remote.
ma s te r: 1 2 3 4 5 6 7 8
remote: 1 3 2 4 5 6 7 8
6. Battery
Warning
• Do not puncture batt eries or throw them in fire as they
may explode.
• Do no t attempt to recharge non-rec
(alkaline).
• Dispose of batte ri e s in acco rd a nce with lo ca l
Notes
• Replace the bat tery as soon as the lights on the device become
weaker. A lo w b a ttery powe r m a y produce false rea din gs .
• Rem ove the b attery from the device if it will not be used for a long
time . Old ba tteri e s can beg in to lea k an d damage the de vice.
• To replace the battery
1. Slide ope n the ba ttery co ver a t the back an d repla ce the battery
(9 V, 6LR61C). Re spe ct the polarity.
2. Clo se th e ba t tery co ver.
7. Technical Specificati ons
te s ts RJ-45, 10BASE-T, To k en Ri ng,
max. cab le length fo r tes ting 100 m
Use this de vice with orig ina l a ccessor ies on ly. Vellema n nv
cannot be held respons ible in the event of damage or injury
resulting from (incorrect) use of this device. For more info
V. 01 – 07/10/2013 6 ©Velleman nv
Page 7
VTLAN6
naar een lokaal recyclagepunt brengen. Respecteer de plaatselijke
Er zijn geen door de gebruiker vervangbare onderdelen in
dit toestel. Voor onderhoud en/of reserveonderdelen,
concern ing this product a nd the latest version of this m anual,
please visit our website www.velleman.eu. The information in
this ma nua l is su bject to change witho ut prior n otice.
© COP YRI GHT NOTICE
The co pyright to this manual is o wned by Ve lleman nv. All
worldwide rights reserved. No part of this manual may be copied,
rep rodu ced, translated or reduced to a ny electronic me dium or
otherwise witho u t the prio r written co nse n t of the cop yrig h t holde r.
GEBRUIKERSHANDLEIDING
1. Inle idin g
Aan alle ingezeten en van de Europese Unie
Be la n gr ijk e m ilie u-informatie betreffende dit product
Dit symbool op het toestel of de verpakking geeft aan dat,
als het na zijn le venscyclus wordt wegge worpen, dit toestel
scha d e k an toebrengen aan het mili eu. Gooi dit toest el ( e n
eventuele bat terijen ) niet bij h et g ewon e hu ishoudelijke
afval; het moet bij ee n g esp ecialise erd b edrijf
terechtkomen voor recyclage. U moet dit toestel naar uw verdeler of
milieuwetgeving.
Hebt u vrag en, contac tee r d an de plaatselijke autori teite n
betreffende de verwij deri n g .
Dank u vo o r uw aa nko o p! Lee s de ze ha ndlei di n g gro ndig voor u het
toes tel in gebru ik neem t. Werd he t toeste l beschadigd tijdens het
transport, installeer het dan niet en raadpleeg uw dealer.
2. Veilighe ids inst ructies
Gebruik di t toes tel nooi t op kab els die on der str oom
staan; dit zal de tester beschadigen.
con tac teer uw dealer.
V. 01 – 07/10/2013 7 ©Velleman nv
Page 8

VTLAN6
tegen regen, vochtigheid en opspattende vloeistoffen. Plaats geen
De garantie geld t niet voor schad e door het neg eren van be paald e
Ra ad pleeg de Velleman® service- en kwaliteitsgara ntie
achteraan deze handleiding.
• Gebrui k het toestel enkel binnens huis. Bescherm het toestel
objecten gevuld met vloeistof op of naast het toestel.
• Bescherm dit toestel tegen stof en extreme temperaturen.
• Bescherm tegen schokken. Vermijd brute kracht tijdens de
bediening.
• Leer eerst de functies van het toestel kennen voor u het gaat
gebruiken.
• Om veiligheidsredenen mag u geen wijzigingen aanbrengen.
Sc hade door wijzigin gen die de gebr uiker heeft aange bracht aan
het toestel valt niet on d er de garantie.
• Gebruik het toestel enkel waarvoor het gemaakt is. De garantie
verva lt automatisch bij ongeoorloofd gebruik.
•
richtlijnen in deze handle iding en uw dealer zal de
verantwoordelijkheid afwijzen voor defecten of problemen die hier
rechtstreeks verband mee houden.
• Bewa ar deze handleiding voor verdere raadpleging.
3. Eigenschappen
Deze LA N-t ester voor ver schillend e kabelty pes is een onmi sbaar
ins t rumen t voor de installati e en het ond erhou d v a n netwerke n. U
kunt dit compacte toeste lle tje gebruik en om ne twerkk abels,
te le foo nk abe ls ( 8P 8C (RJ 45) , 6P6C (R J12), 6P 2C (R J1 1) , 4P4C
(RJ10)) en de m eeste computerkab els te testen .
• LED-indicatie
• geavanceerd ontwerp maakt het testen eenvoudig
• u kunt kabels testen van op a fstan d en op m oeilijk bereikbare
plaats en
• voert automatisch alle testen uit voor continuïteit, open,
kortges loten en gekruiste bedrading
• schakelaar voor trage en snelle test
4. Omschrijving
Ra ad pleeg de afbee ldingen op pag ina 2 van deze ha ndle i di n g.
V. 01 – 07/10/2013 8 ©Velleman nv
Page 9
VTLAN6
Mast er-modus
Remote
1
RJ11/R J12-aansluiting
6 RJ45-aansluiting
2
RJ45-aansluiting
7 testleds
3
aan/uit-schakelaar
8 RJ11/R J12-aansluiting
Verbind het an der e ui tein de van de kabel met de aans luiti n g van
4 voedingsled
5 testleds
5. Gebruik
Gebruik di t t oestel nooit op kabels die onder st room
st aa n; dit zal de meter beschadigen.
1. Ze t de a a n/uit-schakelaar [2] o p O N. D e L ED-indicator [1]
knip pe rt.
Om te test uit te voeren aan een trager tempo, zet de aan/uits c h ak e la a r o p S (‘ s lo w’) . D e LED-indicator knippert eveneens
trager.
2. Verbind een ui tein de van de te testen kabel met de aansluiting
van het master-toestel [3] voor RJ45, [4] voor RJ11/RJ12.
3.
de remote tester [7] voor RJ45, [8] voor RJ11/RJ12.
De testleds op het master-toeste l [5] en op de remo te tes ter
[6] lichten achtereenvolgens op.
4. Na de test, verwijder de kabel uit het master-t oestel en d e
remote tester en zet de aan/uit -schakelaar op OFF.
V. 01 – 07/10/2013 9 ©Velleman nv
Page 10

VTLAN6
1 2 3 4 5 6 7 8 G
tester:
(8P8C)
ma s te r:
1 2 3 4 5 6 (6 P6 C)
ma s te r:
1 2 3 4 (6P4C)
remote
ma s te r:
1 2 (6P2C)
remote
Ope n circui t: draad 2 is
ma s te r:
1 2 3 4 5 6 7 8
Kortsluiting tussen draad 2 en
tester:
tester:
5.2 Tes tresultaten: voorbeelden
Omschrijving Weergave
ma s te r:
remote
Goede verbinding: alle LEDindicators lichten
ach tereenvolgen s op.
Opmerking: de LED-indicator
G licht enkel op voor kabels
met aa rding (GND).
remote
tester:
tester:
tester:
onder broken, de LED -indicator
2 op h e t m as te r-toestel en op
de remo te tes te r lich t n iet op.
Open circuits: draad 2 en 5
zijn onderbroken, de LEDin d icat o rs 2 e n 5 op he t
ma s te r-toe s tel en de re m ote
tester lichten niet op.
Opmerking: Ind ien er minder
dan 2 drade n in de ka be l
verbonden zijn, licht geen
enkele LED-indicator op.
4:alle LED-indicators o p het
ma s te r-toestel lichten
ach te ree nvolgens op, de L ED ind icators 2 en 4 op d e remo te
tester lichten niet op.
Draad 2 e n 3 zi jn in de
verkee rd e vo lgorde ve rbonden:
de L ED -indi ca tor 3 o p de
remote tester li cht eers t op.
V. 01 – 07/10/2013 10 ©Velleman nv
remote
tester:
ma s te r: 1 2 3 4 5 6 7 8
remote
tester:
ma s te r: 1 2 3 4 5 6 7 8
remote
ma s te r: 1 2 3 4 5 6 7 8
remote
(8P8C)
1 2 3 4 5 6 7 8 G
1 2 3 4 5 6 (6 P6 C)
1 2 3 4 (6 P 4C )
1 2 (6P2C)
1 2 3 4 5 6 7 8
1 2 3 4 5 6 7 8
1 2 3 4 5 6 7 8
1 3 2 4 5 6 7 8
Page 11
VTLAN6
doorboren of in het vuur gooien
milieuwetgevi ng. Ho u d batterijen uit het berei k van
niet gebruikt wordt. Oude batterijen kunnen lekken en het toestel
batterij 6LR6 1C (ni et meegelev . )
max. lengte van de te testen
6. Batterij
Waarschuwing
• U m ag batterijen nooit
(ex plosiegevaar).
• Her laad ge en alkalinebatteri jen.
• Gooi batterijen weg volgens de plaatselijke
kindere n.
Opmerkingen
• Vervang de batterij wanneer de leds van het toestel zwa kker
branden. Ee n lage batterijspanning kan leiden to t onjuiste
meetresultaten.
• Verwi jder de batterij als het toestel gedurende een langere tijd
beschadigen.
• De batterij vervang en
1. Schuif het b atterijdeksel aan de ac hterk a nt op en en vervang de
b a tte rij ( 9 V , 6LR6 1C). Respecteer de po lar i teit.
2. Sluit het batterij deks el.
7. Technische specif icat ies
test RJ-45, 10 Base-T, Token Ring ,
voeding 9 V-
kabel
Gebrui k dit toestel enkel met origin ele accessoires. Velleman
nv is niet aansprakelijk voor schade of k wet suren b ij
(verkeerd ) g ebruik van dit toestel . Voor meer informatie over
dit product en de laatste versie van deze handleidin g, z ie
www.ve lleman.eu. De informatie in deze ha nd leid ing ka n te
allen tijde worden gewijzigd zonder voorafgaande
kennisgevin g.
RJ11/12-ka be ls
100 m
V. 01 – 07/10/2013 11 ©Velleman nv
Page 12
VTLAN6
om deze h andlei ding o f ged e elten er van over te ne m en, te ko p iëre n,
© AUTEURSRECHT
Velleman nv heeft het a uteursrecht voor deze handleiding.
Alle wereldwijde rechten voorbehouden. Het is niet toe ges taan
te vertalen, te bewerken en op te slaan o p een elektronisch medium
zonder voorafgaande schriftelijke toestem m ing van de
rechthebbende.
MODE D' EM PLOI
1. Introduction
Aux résidents de l'Unio n européenne
Informations enviro nneme ntales imp ortantes concernant ce
produit
Ce symbole sur l'appa reil ou l'em ballage indique que
l'élimination d'un appareil en fin de vie peut polluer
l'e nv iron ne m ent. Ne pa s jeter un appareil électrique ou
él ectron i que (et des piles éven tuell es) parmi les déch ets
mun i cipaux non sujets au tri sél ectif; u ne déch èterie
traitera l'appareil en question. Renvoyer cet appareil à votre
fournisseur ou à un service de recyc lage local. Il convient de
respecter la réglementation locale relative à la protection de
l'environnement.
En cas de questions, contacter les autorit és loca les pour
élim ination.
Nous vous remercions de votre achat ! Lire le présent mode d'emploi
atten tiv eme nt avant la mise en se rvice de l'appareil. Si l'appareil a
été endommagé pendant le transport, ne pas installer et consulter
votre revendeur.
2. Consig nes de sécurité
Ne jamais utiliser le testeur sur les fils sous tension ; ce l a
pourrait endommager le testeur.
V. 01 – 07/10/2013 12 ©Velleman nv
Page 13
VTLAN6
Commander des pièces de rechange éventuelles chez
votre revendeur.
Ce testeur LAN pour différents types de câbles est indispensable pour
Il n’y a aucune pièce réparable par l’utilisateur.
Se référer à la garantie de service et de qualité Velleman® en
fin de ce mod e d'emploi.
• Utili s er cet appareil uniq u ement à l'intérieur. Protéger de la
pluie, de l’humidité et des projections d’eau. Ne jamais placer
d’objets contenant du liquide sur l’appareil.
• Protéger contre la poussière et les températures extrêmes.
• Pro tége r l’ap pa reil des ch o cs. Tra iter l 'appare il a ve c ci rco nspe ctio n
pen dant l’opé ration.
• Se familiariser avec le fonctionnement de l'appareil avant de
l'utiliser.
• Il est i n terdi t de modifi er l' app areil p our d es raisons de sécur ité.
Les dommages o ccasio nnés pa r des mod i fication s par le cl ient ne
tom bent pas sous la garanti e.
• N’utiliser vo tr e lumineux qu’à sa fo nct i o n prév ue . Un us age
im propre an nule d'office la garanti e.
• Les dommages occasionnés par des modifications à l'appareil par
le client, ne tombent pas sous la garantie et votre revendeur
d é cl ine ra tou te res po ns a bili té po ur les pro blèmes et les défauts
qui en ré sultent.
• Garder ce mode d'emploi pour toute référence ultérieure.
3. Cara cté rist iques
l'installation et le maintien de réseaux. Utiliser cet appareil compact
pour tester des câbles réseau, des câbles téléphoniques (8P8C
(RJ45), 6P6C (RJ12), 6P2C (R J11), 4P4C (RJ10)) et la plupart de
câ b le s i nf o rma tiqu es.
• indication LED
• des ign mod erne facil ite le s tests
• possibilité de tester des câbles à distance et de tester des câbles à
des en droits peu ac cessibl es
• exécute automatiquement les tests pour la continuité du câble,
câb lage ou vert, court-circuité e t croisé
• interrupteur de test rapide et lent
V. 01 – 07/10/2013 13 ©Velleman nv
Page 14

VTLAN6
1
conn e xion RJ11/ RJ 12
6 conn e xion RJ45
2
conn e xion RJ45
7 LEDs de te st
3
interrupteu r
8 conn e xion RJ11/ RJ 12
4
indicateur
4. Description
Se référer aux illustrations en page 2 de ce mode d'emploi.
Mode maître Remote
marche/arrêt
d'alimenta tion
5 LEDs de te s t
5. Emploi
Ne jamais utiliser le testeur sur les fils sous tension ; ce la
pourrait endommager le testeur.
1. Ré g ler l'inte rru pteu r m a rche /arrê t [2] sur ON. L'indicateur LED
[1] clignote.
Po ur effe c tue r le t es t plus lentem e nt , rég ler l'inte rru pte u r
ma rch e /arrêt s ur S (‘s lo w’) . L'indica teu r L ED clig no te également
plus le ntement.
2. Insé re r u ne ex trém ité du câble à l'essai dans la fiche de
l'appareil maîtr e [3] pour RJ4 5, [4] p our RJ11/ RJ12.
3. Insé re r l'autre extrémité d u câble dan s la fiche du testeu r
'remote' [7] pour RJ45, [8] pour RJ1 1/RJ 12.
Les LEDs de test de l'appareil maître [5] et d u testeu r 'remo te '
[6] s'all ument en séqu en ce.
4. Après le test, déconnecter le câble de l'appareil maître et du
te s teu r ' remote ' et régle r l'in terrup teur ma rche /arrêt sur OFF.
V. 01 – 07/10/2013 14 ©Velleman nv
Page 15

VTLAN6
1 2 3 4 5 6 7 8 G
‘remote’ :
(8P8C)
maître :
1 2 3 4 5 6 (6 P6 C)
maître :
1 2 3 4 (6 P 4C )
testeur
maître :
1 2 (6P2C)
testeur
Ci rc u it ouv e rt : f il 2 e s t
maître :
1 2 3 4 5 6 7 8
Court-circuit entre les fils 2 et
maître :
1 2 3 4 5 6 7 8
5.2 Résultats d'essa i
Description Affichage
Bonne connexion : tous les
indicateurs LED s'allument en
séquence.
Remarque : L'ind ica teur LED
G n e s' a llume que p ou r les
câb les avec masse (GND).
in te rrom pu, l'i nd ica teur L ED 2
de l'appareil maître et du
testeur 'remote' ne s'allument
pas.
Circuits ouverts : le s f i ls 2 e t 5
sont interrompus, les
indicateurs LED 2 et 5 de
l'ap pareil m aître et du testeur
'remote' ne s ' all ument pas.
Remarque : Si moins de 2 fils
sont conne ctés dan s le câb l e ,
aucun indicateur LED ne
s'allume.
4 : to us les i nd ica te urs LED de
l'appareil maître s'allument en
séq ue n ce, les indicateurs LED
2 et 4 du testeur 'remote' ne
s'allument pas.
maître :
testeur
testeur
‘remote’ :
‘remote’ :
‘remote’ :
testeur
‘remote’ :
maître : 1 2 3 4 5 6 7 8
testeur
‘remote’ :
testeur
‘remote’ :
(8P8C)
1 2 3 4 5 6 7 8 G
1 2 3 4 5 6 (6 P6 C)
1 2 3 4 (6 P 4C )
1 2 (6P2C)
1 2 3 4 5 6 7 8
1 2 3 4 5 6 7 8
1 2 3 4 5 6 7 8
V. 01 – 07/10/2013 15 ©Velleman nv
Page 16

VTLAN6
Description
Affichage
Les fils 2 e t 3 sont conne ctés
maître :
1 2 3 4 5 6 7 8
Ne jamais perforer les piles et ne pas les jeter au feu
RJ11/12
lon gueur max. du câble à
100 m
dans le mauvais o rdre :
l'indicateur LED 3 du testeur
'remot e' s'allume en premier.
testeur
‘remote’ :
1 3 2 4 5 6 7 8
6. Les piles
Avertissement
•
(dan ge r d ’exp losion).
• Ne ja ma is recha rge r des piles alcalines.
• Se déba rr asser des pil es en resp ectant la
ré g le m enta ti on lo ca le re la ti ve à la p ro t e c t io n de
l’environnement. Gard e r les p iles ho rs de la po rtée de s
enf ants.
Remarques
• Re mp la ce r la pi le lo rsq ue le s L ED s de l 'appa r e il s 'af f a ib lisse n t. U ne
pile faible peut conduire à des résultats incorrects.
• Retirer la pile si l'appareil n'est pas utilisé durant une longue
durée. De s pil es u sées peuvent fui r et end omm ager l' app areil.
• Re mp la ce r la p ile
1. Ouvrir le couvercle du logement à pile au dos de l'appareil et
re mp lace r la pi le (9 V, 6 LR61C). Res pecter la polari té.
2. Fermer le compar tim ent à pile.
7. Spécificat ions techniques
permet de tester câb le s R J -4 5, 10 B a se -T, Toke n Ring,
alimentation pile de 9 V 6LR61C (non incl.)
l'es sai
N' emplo yer cet appareil qu' avec des accessoires d'origin e. La
SA Velleman ne peut, dans la mesure conforme au droit
applic able êtr e tenue responsable d es dommages ou lésions
(directs ou in directs ) pouva nt rés ulter de l’ uti lisat ion de cet
appare il. Pour p lus d'i nformation co ncernant ce t article et la
V. 01 – 07/10/2013 16 ©Velleman nv
Page 17

VTLAN6
ambiente. No tire este aparato (ni las pilas, si las hubiera)
stribuidor o a la unidad de reciclaje local. Respete las leyes locales
e usar el aparato. Si el aparato ha sufrido algún daño
dernière version de ce mode d'emploi , consul ter notr e site
www .vell eman.eu. Les spéci fi cation s et le contenu de ce
mode d'emploi peu vent être modifiés sans avis préalable.
© D ROITS D’A U TEUR
SA Velleman est l’ayant droit des droits d’auteur pour ce
mode d'emploi. Tous droits mondiaux réservés. T o ute
reproduction, traduction, copie ou diffusion, intégrale ou partielle, du
conte nu de ce mode d'empl oi par quelque procé dé ou sur tout
support é lectro nique qu e ce soit est interdite s ans l’ accor d préalable
écrit de l ’ayan t dro it.
MANUAL DEL USUARIO
1. Introducción A los c iudadanos de la U nión Europea
Importantes in formac iones sobre el medio ambi ente
concer niente a este producto
Est e símb olo en e ste aparato o el embalaj e ind i ca que, si
tira la s mue stras inservibles, podrían dañar el medio
en l a bas ura dom és t i ca; debe i r a una emp re sa
especial izada en r ecicl aje. Devu el va est e aparato a su
di
en r elación c on el medio ambiente.
Si tiene dudas, contacte con las autoridades locales para
residuos.
¡Gracias por elegir Vell eman! Lea atentament e las instrucciones del
manual antes d
en el transporte no lo instale y póngase en contacto con su
distribuidor.
2. Instrucciones de seguridad
V. 01 – 07/10/2013 17 ©Velleman nv
Nun ca use el co m probador para comp ro bar cab les bajo
tensión; esto da ñará el comp robador.
Page 18

VTLAN6
pi eza s de recam b io .
No agite el aparato. Evite usar excesiva fuerza durante el manejo
El u s uario n o h abr á de efec tuar el manten imiento de
ninguna pieza. Contacte con su distribuidor si necesita
Véase la Garantía de s ervicio y calidad Velleman® al final de
es te manual del us uario.
• Util ice el aparato sólo en interiores. No ex ponga es te equipo a
lluvia, humedad ni a ningún tipo de salpicadura o goteo. Nunca
pong a un o bjeto con líq ui do en el aparato.
• No ex po nga este eq uipo a po l vo ni te m pe ra tu ras ex t rem a s .
•
y la instalación.
• Familiarícese con el funcionam iento del aparato antes de utilizarlo.
• Por razones de seguridad , las modificacio nes no autorizadas del
aparato están pro hibidas. Los daños causados por modificaciones
no au t oriza das, no están cu biertos por l a garantía.
• Utilice sólo el aparato para las aplicaciones descr it as en este
manual. Su uso incorrecto anula la garantía completamente.
• Los daños causados por descuido de las instrucciones de
seguri dad de este man ual invalidarán su gar a ntía y su di st ribui dor
no será responsable de ningún daño u otros problemas
resultantes.
• Guarde este manual del us uario pa ra cuando ne cesite cons ultarlo.
3. Características
Este comprobador de cable (LAN) para diferentes tipos de cables de
re d es im p re s c i nd ib le pa ra la insta la ci ó n y e l mantenimiento de
redes. Este dispositivo compacto sirve para comprobar cables en la
re d , cab les telefóni co s (8P8C (R J4 5), 6P6C (RJ 12) , 6P2C (R J11 ) ,
4P4C (RJ 10 )) y casi to do s los ca bles info rm á ticos.
• indicación LED
• diseño modern o facilita las pruebas
• posibilida d de com p roba r ca bles a dis ta ncia y ca bles en luga re s de
difícil acceso
• comprueba automáticamente la continuidad del cable, cables
ab ierto s, corto circu i t a dos y cru zado s
• in te rrup tor de prueba ráp id o y lento
V. 01 – 07/10/2013 18 ©Velleman nv
Page 19

VTLAN6
1
conexión R J11/RJ12
6 conexión RJ4 5
2
conexión RJ4 5
7 LE D s de estado
3
interruptor O N/O FF
8 conexión R J11/RJ12
Introduzca el otro extremo del cable en la conexión del aparato
Después del test, quite el cable del aparato ‘master’ y ‘remote’ y
4. Descripción
Vé as e la s f ig u ra s en la pá g in a 2 de es te manual del us uario.
maestro Remote
4 LE D d e a li m en ta ció n
5 LEDs de te s t
5. Funcionamiento
Nun ca use e l com p rob ad or para comprobar cables bajo
tensión; e s to dañará el aparato.
1. Coloque el interruptor O N/OFF [2] en la posición ON. El LED [1]
parpadea.
Para realizar el test más lentamente, coloque el interruptor
ON/OFF en la posición S (‘slow’). El LED parpadea de maner a
má s l e n t a.
2. Intr oduzca un extrem o de l ca ble que quiere co mpr o bar en l a
conexión del aparato ‘master’: [3] para RJ45, [4] para
RJ11/R J12.
3.
‘remote’: [ 7] para RJ4 5, [ 8] para RJ11/RJ12 .
Los LEDs de t es t del aparato ‘ master’ [5] y del aparato ‘ remote’
[6] se iluminan uno tras otro.
4.
coloque el int err uptor ON/OFF en la posición OFF.
V. 01 – 07/10/2013 19 ©Velleman nv
Page 20

VTLAN6
1 2 3 4 5 6 7 8 G
(8P8C)
ma s te r:
1 2 3 4 5 6 (6 P6 C)
remote:
1 2 (6P2C)
del aparato ‘m aster’ y ‘remot e’
es tá in te rr u m pi do .
ma s te r:
1 2 3 4 5 6 7 8
remote:
1 2 3 4 5 6 7 8
remote:
1 2 3 4 5 6 7 8
Cortocircuito:Todos los LEDs
n° 4 del aparato ‘remote’ no se
ma s te r:
1 2 3 4 5 6 7 8
remote:
1 2 3 4 5 6 7 8
Conexión incorrecta: El LED n°
aparato ‘remote’ si los hilos n°
5.2 Los resultados: ejemplos
Descripción Visua lización
Buena conexión: Todos los
LED s se ilumi na n uno t ra s o t ro .
Nota: El LED ‘G’ se ilumina
sólo para cables con tierra
(GND).
ma s te r:
remote:
remote: 1 2 3 4 5 6 (6P6 C)
ma s te r: 1 2 3 4 (6 P 4C )
remote: 1 2 3 4 (6P 4C )
ma s te r: 1 2 (6P2C)
(8P8C)
1 2 3 4 5 6 7 8 G
Circuito abierto: El LED n° 2
no se ilu mina si el hilo n° 2
Circuitos abiertos: Los LEDs n°
2 y n ° 5 del apara to ‘m aster’ y
‘remote’ no se iluminan si los
hilos n° 2 y n° están
interrum pidos.
Nota: No se ilumina ningún
LED si e stán conectado s menos
que dos hilos en el c able.
del aparato ‘m aster’ s e
iluminan uno tras otro si el hilo
n°2 y el hilo n° 4 causan un
corto circu i to . Lo s L ED s n° 2 y
iluminan.
3 se ilumina primero en el
2 y n ° 3 han s ido co ne c ta do s
de m anera incorrecta .
ma s te r: 1 2 3 4 5 6 7 8
ma s te r: 1 2 3 4 5 6 7 8
remote: 1 3 2 4 5 6 7 8
V. 01 – 07/10/2013 20 ©Velleman nv
Page 21

VTLAN6
Respete las leyes locales en relación con el medio
alimentación
pila de 9 V 6LR61C (no incl.)
lon gi t ud máx. del cable qu e
100 m
6. Batería
Advertencia
• Nun ca pe rfo re las pilas y no las eche al fuego (peligro
d e exp lo s ió n) .
• Nunca recargue pilas alcalinas.
•
am bie n te al ti ra r la s pila s . Mantenga las pi la s le jo s de l
alcance de niños.
Observaciones
• Re em p la ce la p i la en cua n to los LEDs se vuelva n menos
lum i no sos. Una pila ba ja pued e cau sa r resultados i n correct o s.
• Quite la pila si no va a utilizar el apar ato durante un l argo períod o
de t i em po . Pi la s a go tada s puede n tene r fu gas y dañ a r el apara to.
• Re em p la za r la pila
1. Ab ra el co mpa rtim ento de pila s de l a p arte tr asera al desliza rlo y
reemplace la pila (9 V , 6 LR61C) . Re spe te la po larida d.
2. Ci erre el comparti mient o de pila s .
7. Especificac iones
permite comprobar RJ-45, 10 Base-T, To ke n Rin g, cable s
quiere probar
Util ice est e aparato sólo con los accesorios orig ina les.
Vell eman NV no será responsable de daños ni lesiones
causados por un uso (indebido ) de este aparato. Para más
información sobre este producto y l a versi ón más reciente de
este manual del usuario, vis ite nuestra página
www.ve lleman.eu. Se pue den modif icar las espec ificaciones y
el contenido de este manual sin previo aviso.
V. 01 – 07/10/2013 21 ©Velleman nv
RJ11/12
Page 22

VTLAN6
Es gib t keine zu wart ende n Teil e. Bestellen Sie eve n tu el le
© DERECHOS DE AUTOR
Velleman NV dispone de los derechos de a utor para este
manual del usuario. Todos los derechos mund iales
reservados. Está estrictamente p rohibido reproducir, traducir,
cop iar, edi tar y guar dar este manu al del usu ari o o partes de ello sin
previo permiso escrito del derecho habiente.
BEDIENUNGSANLEITUNG
1. Einführung
An alle Einwohner der Europäischen Unio n
Wichtige Umweltinformationen über dieses Produkt
Die ses S ymbol auf dem P rodu kt oder der Ve rpa ck ung zeig t
an, dass die En tsorgu ng die se s Prod uktes na ch sei ne m
Leben sz ykl us de r Um welt Schade n zu füge n kann.
Entsorgen Sie die Einheit (oder verwendeten Batterien)
nicht als unsortiertes Hausmü ll; die Einheit oder
verwendeten Batter i en mü ssen von einer speziali sierten Firma
zwecks Recycl ing entsorgt werden . Diese Ei nheit muss an den
Hä nd le r oder ein örtliches Recycling-Unternehmen retourniert
wer den . Res pektiere n Sie die ö rtlichen U mweltvors chrif ten.
Falls Z weifel bestehe n, wenden Sie sic h f ür
Entsorgungsrichtlinien an Ihre örtliche Be hörde.
Vielen Dank, dass Sie sich für Velleman entschieden haben! Lesen
Sie diese Be dienungsanleitung vor Inbetriebnahme sorgfältig durch.
Überprüfen Sie, ob Transportschäden vorliegen. Sollte dies der Fall
sein, verwenden Sie das Gerät nicht und wenden Sie sich an Ihren
Hä nd le r.
2. Sicherheitshinwe ise
Verwenden Sie niemal s die Tester a uf st romführend e
Lei t unge n , d ies wird den Tester bes ch ädigen.
Ersa tz te i l e be i Ihrem Fachhändler.
V. 01 – 07/10/2013 22 ©Velleman nv
Page 23

VTLAN6
Tester für verschiedene Kabeltypen ist unverzichtbar bei
Siehe Velleman® Service- und Qua litätsgara ntie am Ende dieser
Bedienungsanleitung.
• Verw enden Sie das Gerät nur im Innenbereich. Schütze n Sie
das Gerät vor R egen und Feuchte. Setzen Sie das Gerät keiner
Flüssigkeit wie z.B. Tropf- oder Spritzwasser, aus. Stellen Sie
keine mit Flüssigkeit befüllten Gegenstände auf das Ge rä t.
• Schützen Sie das Gerät vor Staub und extremen Temperaturen.
• Vermeiden Sie Erschütterungen. Wenden Sie bei der Bedienung
keine Gewalt an.
• N ehmen Sie d as Gerät erst in Betrieb, nac hdem Sie s i ch mit
se i ne n Fu nk tio ne n ve rtraut gema cht ha b en .
• Eigenmächtige Veränderungen sind aus Sicherheitsgründen
verboten. Bei Schäden verursacht durch eigenmächtige
Änd er ung en erlischt d er Garanti e anspruc h.
• Verwenden Sie das G er ät nur f ür Anwend ungen beschrieben in
dies er Be dien ungsanl eitung sonst k ann dies zu Sc hä den am
Produkt führ e n und erlischt d er Gara ntiea nspruc h.
• Bei Schäden, die durch Nichtbeachtung der Bedienungsanleitung
ve ru rsa cht werd e n, erl isch t de r Garan tiea nspru ch . Für da ra us
resultierende Folgeschäden übernimmt der Hersteller keine
Haftung.
• Bewahren Sie diese Bedienungsanleitung für künftige
Einsich tnahme auf.
3. Eigenschaften
Dieser LANNet zwer kinstallation und -Wartung. Dieses kom pakte Gerät kann
verwendet werden, um Netzwerk- und Telefon k a bel ( 8P8C (RJ45),
6P 6C (RJ12 ), 6P2C (R J11), 4P 4C (RJ10)) und die me isten
Computer k a bel zu prüfen.
• LED-Anzeige
• fortgesc h ritt enes Design für einfaches Testen
• mö g li ch um Kabe l aus einer En tfe rnu ng und au ch a n schwe r
• macht au tomatisch al le Tests für Durchgang, offene und
• Sc halt er für langsamen un d sc hnellen Te st
zugänglichen Stellen zu prüfen
kurz g esc hlossene Le i t ungen un d Ader nvertausc hung
V. 01 – 07/10/2013 23 ©Velleman nv
Page 24

VTLAN6
1
RJ11/R J12-Buchse
6 RJ45-Buchse
2
RJ45-Buchse
7 Status-LEDs
3
EIN/AUS-Schalter
8 RJ11/R J12-Buchse
LEDs zur Sta tusanzeige
Verbinden Sie das andere Ende des zu prüfenden Kabels mit der
4. Beschreibung
Siehe Abbildungen, Seite 2 dieser Bedienungsanleitung.
Mast er Remote
4 Stromversorgungs-LED
5
5. Betrieb
Verwenden Sie nie m als die Te st er a uf st romf ühr ende
Lei t unge n , d ies wird den Tester bes ch ädigen.
1. Stellen Sie den ON/OFF-Scha lte r [2] a u f ON . D ie P o we r -Anzeige
[1] blinkt.
Möchten Si e d en Test l ang s amer durc hführen, dann stellen Si e
de n ON/OFF-Schalter auf S (‘slow’). Die LEDs blinken langsamer.
2. Verbinden Sie das eine Ende des zu prüfenden Kabels m it der
Buchse der Master-E inheit : [ 3] für RJ45, [ 4] für RJ11/RJ12.
3.
Buchse der Remote-Ein heit: [ 7] für RJ45; [8] f ür RJ11/RJ12.
LEDs z ur Statusan zeige der Master-Einheit [5] und der
Re mote-Einheit
4. Nach dem Testen, trennen Sie das Kabel vom Master- und
Re mote-Ei nheit und st e l len Si e d en ON /OFF-Schalter auf OFF.
V. 01 – 07/10/2013 24 ©Velleman nv
Page 25

VTLAN6
1 2 3 4 5 6 7 8 G
(8P8C)
Mas ter:
1 2 3 4 5 6 (6 P6 C)
Remote:
1 2 (6P2C)
unterbrochen ist, leuchtet LED
auf der Remote-Einheit.
Mas ter:
1 2 3 4 5 6 7 8
Remote:
1 2 3 4 5 6 7 8
sind, leuchten die Lichte r Nr2
Remote:
1 2 3 4 5 6 7 8
Mas ter:
1 2 3 4 5 6 7 8
Remote:
1 2 3 4 5 6 7 8
5.2 Tes terg ebniss e: Beis piele
Beschreibung Anzeige
Gute Verbindung: Alle LEDs
leuchten na che ina nde r a u f.
Bemerkung: ‘G’ leuchtet nur
fü r K ab els mit ei ner Masse
(GND).
Mas ter:
Remote:
Remote: 1 2 3 4 5 6 (6P6 C)
Mas ter: 1 2 3 4 (6P4C )
Remote: 1 2 3 4 (6P 4C )
Mas ter: 1 2 (6P2C)
(8P8C)
1 2 3 4 5 6 7 8 G
Unterbrechung: Wenn Ader 2
2 weder auf der Master-, noc h
Unterbrec hungen : Wenn Ader
Nr. 2 u nd Nr. 5 unte rbro chen
und 5 weder auf der Master-,
noch auf d er Remote-Einheit.
Bemerkung: Wenn weniger
als zwe i A de rn ve rbund en s i nd ,
leuchtet keine der LEDs.
Ku rzschluss :Ve ru rsa che n Ade r
Nr. 2 u nd A de r Nr. 4
Kur zsc hl uss, da nn l e uchten alle
LEDs auf der Master-Einheit
nacheinander auf. LED Nr. 2
und Nr. 4 auf der RemoteEi nheit leucht en nicht.
Fa l s che Be leg u n g : s in d Ader
Nr. 2 u nd A de r Nr. 3 falsch
au fgelegt, so leuchtet LED Nr.
3 zuerst auf der Re m oteEinheit.
Mas ter: 1 2 3 4 5 6 7 8
Mas ter: 1 2 3 4 5 6 7 8
Remote: 1 3 2 4 5 6 7 8
V. 01 – 07/10/2013 25 ©Velleman nv
Page 26

VTLAN6
Durchbohren Sie nie die Batterien und werfen Sie diese
Entsorgen der Batterien. Halten Sie die Batterien vo n
Öffnen Sie das Batteriefach auf der Rückseite und ersetzen Sie
6. Batterie
Achtung
•
nicht ins Fe uer (Exp losionsgefahr).
• Laden Sie keine Alkalibatterien.
• Respe kt iere n Sie die örtlichen Um weltvorschriften beim
Kindern fern.
Bemerkungen
• Führen Sie einen Batterie wechsel durch sobald die Lichter
schwächer leuchten. Eine fast leere Batterie kann falsche
Erge bnisse ve rursa che n.
• En tfernen Sie die Batterie bei l änger em Nicht gebrau ch aus dem
Gerät. Alte Batterien können auslaufen und das Gerät
beschädigen.
• Ei nen Batteriew ec hsel durc hf ühre n
1.
die Batterie (9 V, 6L R61 C). Beachten Sie die richtige Po larität.
2. Schließen Sie das Batteriefach.
7. Techn ische Daten
Tests RJ-45, 10 Base-T, Token Ring ,
Netzteil 9V-Ba tterie 6LR61C (nicht mitgeliefert)
max. Länge de s gep rü fte n
Ka be ls
Verw enden Sie dieses Gerät nur mit origine lle n Z ube hörteilen.
Vell eman NV übernimmt keine Haftung für Schaden oder
Verletzungen bei (fal s ch er) Anwendung di eses Gerätes. Für
mehr Informationen zu diesem Produkt und die neueste
Versi on dieser Bedi enungsanl eitung, siehe www.velleman.eu.
Alle Ä nderun gen ohne vorherige Ankündigung vorbehalten.
RJ11/12-Ka bel
100 m
V. 01 – 07/10/2013 26 ©Velleman nv
Page 27

VTLAN6
Con tacte o seu d i s tribu idor caso necessite de p eças de
© URHEBERRECHT
Velleman NV besitzt das Urheberrecht für diese
Bedienu ngsa nle itung. Alle welt weit en Rechte vor behalten.
Ohne vorherige schriftliche Genehmigung des Urhebers ist es nicht
ges tatte t, diese Bedi en ungsanl eitung ganz o der i n Te i len zu
repr o duzier en, zu kopi er en, zu über setze n, zu be arbeit e n od er zu
speichern.
MANUAL DO UTILIZADOR
1. Introdução Aos cidadãos da União Europeia
Importantes in formaç ões sob r e o meio ambi en te no que
respei ta a este produto
Este símbo lo no ap arelho ou na em balagem indica que,
enq uanto d esperdícios, pode rão cau sar danos no meio
ambient e. N ão deite o aparelho (nem as p i lhas, se as
houv er) no lixo doméstico; dirija-se a um a emp re sa
especializada em re ciclagem. Devolva o aparelho ao seu
distribuidor ou ao posto de reciclagem local. Respeite a legislação
lo ca l relativa ao m eio ambiente.
Em caso de dúvi das , contacte com as autoridades locais para
os resíduos.
Agradecemos o facto de ter adquirido este aparelho. Leia
atentamente as instruções do manual antes de usar o aparelho. Caso
o aparelho tenha sofrido algum dano durante o transporte não o
inst ale e entre em cont acto co m o seu dist ri buidor .
2. Instruções de segurança
Nun ca uti l ize este tes t ado r pa ra testar cabos sob ten sã o
pois danifica o aparelho.
O util izad o r não terá de fazer a manutenção da s peças.
substituição.
V. 01 – 07/10/2013 27 ©Velleman nv
Page 28

VTLAN6
indispensável nas instalações de rede e operações de manutenção.
Este aparelho compacto pode se r usado para testar cabos de rede ou
Consul te a Garanti a d e servi ço e qualidade Velleman® na parte
final deste manual do utilizador.
• Usar apenas em interiores . Proteger o aparelho contra a chuva
e h umidade ou qua lque r tipo de salpicos o u go tas . Nunca coloque
reci p ien te s com líq u id o s em cima do a pa rel ho .
• Não exponha o equipamento ao pó nem a tempera tu ras extremas.
• Proteja o ap arel ho de quedas e má utilização. Evite usar força
excessiva ao utilizar o aparel h o.
• Familiarize-se c om o func ionamento do aparelh o antes de o
utilizar.
• Po r razõe s de segu rança, e stão p roí bidas qua isquer modi ficaçõe s
do aparelho desde que não au toriza das. Os danos provocados por
modific ações nã o au torizadas, n ão estão cobertos p ela gar antia.
• Utilize o apar elho apenas para as aplicações descrit as neste
manual. Uma utilização incorrecta anula a garantia
completamente.
• Da no s causa dos pe lo não cumpri m en to das no rma s de segurança
ref erida s neste m anual anu lam a garanti a e o seu distribui dor não
se rá responsá vel por qualquer danos ou outros problemas daí
resultantes.
• Guarde est e ma n ual para q ue o poss a con su l tar se mpr e que
necessário.
3. Características
Este tes tador para Cabo de Rede ( LAN), pa ra vá rios tipos de ca bos, é
ca b os te lefó nicos (8P8C (R J 45 ), 6P 6C (R J1 2 ), 6P2C (RJ 11) , 4P4C
(RJ10)) e para a maior parte dos tipos de cabos de computador.
• indicador LED
• design avançado para testes mais fáceis
• capacid ade para testar ca b os à distânc i a e em locais de d i f í cil
acesso
• te sta automa ticam e nte a co ntinui da de do s cab os, ca bos abert o s,
curto -circuitos e cabos cruza do s
• b o tã o p a r a te s te rá p i do ou len to
4. Descrição
Ver as fi gur as da página 2 deste man ual do utilizador.
V. 01 – 07/10/2013 28 ©Velleman nv
Page 29

VTLAN6
1
6
cab o
Principal Remoto
tomada RJ11/RJ12
2 tomada RJ45 7 i n dicadores de teste de
3 in te rrup tor on /o ff 8 to mada RJ11/RJ12
4 in dicador de co rrent e
5 ind icado res de tes te de
cab o
tomada RJ45
5. Util ização
Nun ca uti l ize este tes t ado r pa ra testar cabos sob ten sã o
pois danifica o aparelho.
1. Col oqu e o i nterr u ptor on/off [2] na posição ON. O indicator [1]
pis ca .
Para executar o teste mais lentamente, coloque o interruptor
on/off na posição S (‘slow’). O indicador pisca lentamente.
2. Insi ra uma das extremidad es do cabo a testar na f icha do
dispositivo principal: [3] para RJ45, [4] para RJ11/ RJ12.
3. Insira a outra extrem idade na ficha do dispositivo remoto [7]
par a RJ45, [8] p ar a RJ 11/RJ 12.
Os LEDs indica dores de e stado do dispositivo principal [5] e do
dispositivo remoto [6] acendem um a seguir ao outro.
4. Após fazer o teste , retire os cabos do dispositivo principal e do
dispositivo remot o e col oqu e o i nterruptor na po si ção OFF.
V. 01 – 07/10/2013 29 ©Velleman nv
Page 30

VTLAN6
apenas para cabos com ligação
1 2 3 4 5 6 7 8 G
(8P8C)
principal:
1 2 3 4 5 6 (6 P6 C)
remoto:
1 2 (6P2C)
2 dispositivos.
principal:
1 2 3 4 5 6 7 8
remoto:
1 2 3 4 5 6 7 8
remoto:
1 2 3 4 5 6 7 8
principal:
1 2 3 4 5 6 7 8
remoto:
1 2 3 4 5 6 7 8
dispositivo remoto.
principal:
1 2 3 4 5 6 7 8
remoto:
1 3 2 4 5 6 7 8
5.2 Resul tad os do teste: exemplos
Descrição Sequência
principal:
Boa l i gação: todos os
indicadores luminosos
acendem em sequênci a.
Nota: O i n d ica to r G ace nde
à terra ( G ND ) .
Cir cuito a berto: s e o fio 2
estiver danificado, o indic ador
2 não ace nde em nenhum do s
Circuitos abe rtos: se o s fios 2
e 5 estiverem danifica do s, os
ind icado res 2 e 5 não a cendem
em nenh um dos 2 dis po sitivos .
Nota: S e est i ve re m liga do s
me no s de do i s f io s do cabo ,
nenhum do s indi ca dores
acende.
Cu rto-circuito entre os fios 2 e
4:tod os os ind i cado re s do
dispositivo principal acendem
em sequênci a, os ind i ca d o res 2
e 4 não acendem no
dispositivo remoto.
Os fios 2 e 3 não estão ligados
na ordem corre cta: o indicador
3 acende primeiro no
V. 01 – 07/10/2013 30 ©Velleman nv
remoto:
remoto: 1 2 3 4 5 6 (6P6C)
principal: 1 2 3 4 (6P4C )
remoto: 1 2 3 4 (6P4C )
principal: 1 2 (6P2C)
principal: 1 2 3 4 5 6 7 8
(8P8C)
1 2 3 4 5 6 7 8 G
Page 31

VTLAN6
6. A bateria interna
Advertência
• Nunca perfura as pilhas nem jogá-la s no fogo, pois elas
podem explodir.
• Não ten te re carregar p ilhas nã o re ca rregáve is
(alcalino).
• Descart e a s baterias de acor do com as
reg ulame ntaçõ e s locais. Man te nha as pilhas for a do
alcance das crianças.
Notas
• Subst i tua as pil h a s assi m qu e ver i f i car que as l uzes do di spositivo
es tão fra cas . Pil has f racas podem origina r lei tu ras incorrectas.
• Retire as pilhas do aparelho caso não tencione utilizá-lo po r um
long o período de tempo. As pilhas velhas podem derramar e
danificar o apar elho.
• Para substituir as pilhas
1. Faça deslizar a tampa do compartimento das pilhas e substitua-
as (9 V, 6LR61C). Respe ite a polaridade.
2. Fechar o compartimento das pilhas.
7. Especificaç ões
te s ta cabos RJ-45, 10 Base-T, Token Rin g,
alimentação pilha de 9 V 6LR61C (não incl.)
compriment o máx. do cabo a
te s ta r
Util ize est e apare lho ape nas com acess órios o rig ina is. A
Velleman NV não será responsável por quaisquer danos ou
lesões causados pelo uso (ind evido) do aparelho. Para mais
informação sobr e este produto e para aceder à versão mais
recente deste m anual do utiliza dor, v isite a nossa pág ina
www .vell eman.eu. Podem alterar -se as especificações e o
conteúdo deste ma nual sem aviso p révio.
RJ11/12
100 m
V. 01 – 07/10/2013 31 ©Velleman nv
Page 32

VTLAN6
serwisowane przez użytkownika. W celu uzyskania części
© D IREITO S DE AUTO R
A Velleman NV detém os direitos de autor deste manual do
util izad o r. To dos o s d ir e it o s m un d ia is re ser v a dos. É
es trita m e nte p roi b ido rep rodu zi r, t radu zi r, co piar, e di t a r e gra va r
este manual do utili zador ou p artes d este se m prévia au toriz ação
es crita po r pa rt e d a detentora do s di re i to s .
INSTRUKCJA OBSŁUGI
1. Wstęp
Pr zezna czona d la m ieszk a ńcó w Uni i E urope jskiej .
Ważne inf ormacje dotyczące ś rodowiska.
Ten symbol umieszczony na urządzeniu bądź opakowaniu
wskazuje, że usuwanie pro duktu może być szkodliwe dla
środowiska. Nie należy usuwać urządzenia lub baterii do
zb iorcze go śm ie tnika , tylko do spe cjaln ie prze zn aczon ych
do teg o pojemnikó w na urządzenia elektro niczne lub
skontaktować się z firmą zajmującą się recyklingiem. Urządzenie
można oddać dystrybutorowi lub firmie zajmującej się recyklingiem.
Pos tę puj z godnie z zasa dami be zpiecz eństwa doty czącym i
środowiska.
W ra zie wąt pli wośc i na leży sk onta kto wać się z fir mą
zaj mują cą się ut yliza cją od padó w.
Dziękujemy za wybór produktu firmy Velleman ! Prosim y o dok ła dne
zapoznanie się z instrukcją obsługi przed użyciem. Jeśli urządzenie
zostało uszkodzone podczas transportu, prosimy o nie korzysta nie z
niego i skontak to wan ie się ze s przedawcą.
2. Instrukcje bezpieczeństwa
Nie na le ży używać testera, gdy przewody są pod
napięciem; tester ulegnie uszkodzeniu.
W urządzeniu nie występują części, które mogą być
serwisowych lub zamiennych należy skontaktować się z
autoryzowanym sprzedawcą.
V. 01 – 07/10/2013 32 ©Velleman nv
Page 33

VTLAN6
bezpieczeństwa. Należy pamiętać, że uszkodzenia spowodowane
Pros zę zapo zna ć się z info rma cjam i w czę ści Us ługi i g warancja
jakości Velleman® na końcu niniejszej instrukcji.
• Wy łączn ie do uży tku wew nątrz po mie szcze ń. Chronić
urządzenie przed deszczem, wilgocią, rozpryskami i ściekającymi
cie czam i. Ni gdy nie sta wia ć przedmiotów wypełnionych cieczą na
urządzeniu.
• Chronić urządzenie przed zbyt wysoką temperaturą i pyłem.
• Chronić urządzenie przed wstrząsami i użytkować wyłącznie
zgo dnie z p rzeznacze niem. Pod czas o bsług i urzą dzen ia un ikać
stosowania siły.
• Prze d rozp oczę ciem pracy z urządzeniem należy zapoznać się z
je g o fu nk cjam i.
• Wprowadzanie zmian w urządzeniu jest zabronio ne ze względów
przez zmiany wprowadzone przez użytkownika nie są objęte
gwarancją.
• Urz ądzenie należy używać jedynie zgodnie z przeznaczeniem.
Używa nie urządzenia niezgodnie z przeznaczeniem spowo duje
unieważnienie gwarancji.
• Gwarancja nie obejmuje uszkodzeń spowodowanych w wyniku
nieprzestrzegania niniejszej instrukcji, a sprzedawca nie ponosi
odpowiedzialności za wynikłe uszkodzenia lub problemy.
• Za chowa j daną ins trukcję na p rzysz łość.
3. Cechy
Op isywan y tester kabl i sieciowych (LAN) u żywany do testowania
wielu rodzajów kabli jest bardzo przydatny w pracach związanych z
instalacją i konserwacją sprzętu. To kompaktowe urządzenie nadaje
się do sp rawdzania kabli sieciowych, telefonicznych (8P8C (RJ45),
6P 6C (RJ 12), 6P2C (R J11) , 4P4C ( RJ1 0)) o raz wię kszoś ci prze wo dó w
komputerowych.
• kon tro lka L ED
• u le ps zo ne wz or n ic two d la ł a twi e js ze go t es to wa n ia
• możliwość testowania kabli na odległość lub w m iejscach ciężko
dostępnych
• automatyczne wykonywanie testów oraz sprawdzanie ciągłości,
prz erw, z warć ora z s krz yżowań prze wodó w
• przełączniki wolnego i szybkiego trybu testowania
V. 01 – 07/10/2013 33 ©Velleman nv
Page 34

VTLAN6
1
gwint R J11/RJ12
6 gwin t RJ 4 5
4
kon tro lka L ED
4. Przegląd
Pa trz ry sunki na stro nie 2 ninie jsze j inst ruk cji .
Jednostka głó wna Jednostka zdalna
2 gwin t RJ 4 5 7 ws k a źn iki wyn ik ó w
3 prz ycisk włącz /wyłącz 8 gwint R J11 /RJ12
5 ws k a źn ik i wyn ik ów
te s to wa n i a
te s to wa n i a
5. Zastosowanie
Nie należ y używać tes tera, gdy prze wod y są pod
napięciem; tester zosta nie uszkodzony.
1. Ustaw przełącznik on/off [2] w po z ycji O N. Ko n trolka [1] zapali
s ię.
Ab y pr ze p rowa d z ić te sto wa n ie w wo ln ym te m p ie , u st awi ć
przełącznik on/off [2] w pozycji S (‘slow’). Wskaźnik będzie
m iga ć wo ln ie j.
2. Włożyć jedną końcówkę kabla do gniazda w jednostce głównej:
([3] dlaRJ45, [4] dla RJ 11/RJ12.
3. Włożyć drugą końcówkę kabla do gniazda w jednostce zdalnej:
([7] dla RJ45, [8] dla RJ11/RJ12.
Indykator zaświeci się w jednostce główn e j [5] , a następnie w
jednostce zdalnej [6]
4. Po wyko naniu testów usunąć kabel z jednostki głównej i zdalnej
oraz wyłączyć urządzenie poprzez ustawienie przełącznika on/off
w po z ycji OFF.
V. 01 – 07/10/2013 34 ©Velleman nv
Page 35

VTLAN6
Indykator G zaświeca
je dno stka
1 2 3 4 5 6 7 8 G
zdalna:
(8P8C)
je dno stka
je dno stka
je dno stka
g łó wn a :
Przerwany obwód: przewó d 2
zdalna:
Prz erwane obwody : przewód 2
jednostce głównej ani zdalnej.
s ię nie za pa li.
je dno stka
Zwarcie m iędzy przewodem 2 i
jednostce głównej zapalają się
zapalają się.
je dno stka
je dno stka
5.2 Wy niki te sto wania : prz ykł ady
Opis Kole jność
Dobre połączenie: wszystkie
indykatory zapalają się w
kolejności.
Uwaga:
się jedynie dla kabli GND
(masa).
g łó wn a :
je dno stka
g łó wn a :
zdalna:
je dno stka
g łó wn a :
je dno stka
zdalna:
(8P8C)
1 2 3 4 5 6 7 8 G
1 2 3 4 5 6 (6 P6 C)
1 2 3 4 5 6 (6 P6 C)
1 2 3 4 (6 P 4C )
1 2 3 4 (6 P 4C )
1 2 (6P2C)
je dno stka
zdalna:
jes t prze rwan y , i nd ykator 2 nie
zapala się na jednostce
głównej ani zdalnej.
i 5 jes t prze rwa ny, in dykatory
2 i 5 nie zapalają się na
Uwaga: je że li m nie j niż dwa
przewody w kablu są
podłączone, żaden indykator
4:wszys tk ie indykatory w
w ko lejności, indykatory 2 i 4
w jednostce zdalnej nie
V. 01 – 07/10/2013 35 ©Velleman nv
je dno stka
g łó wn a :
je dno stka
g łó wn a :
je dno stka
zdalna:
g łó wn a :
zdalna:
1 2 (6P2C)
1 2 3 4 5 6 7 8
1 2 3 4 5 6 7 8
1 2 3 4 5 6 7 8
1 2 3 4 5 6 7 8
1 2 3 4 5 6 7 8
1 2 3 4 5 6 7 8
Page 36

VTLAN6
Opis
Kole jność
Przewody 2 i 3 zostały
podłączone w nieprawidłowej
kolejności: indykator 3 zapala
je dno stka
zdalna:
Uwaga
nadaje się do sprawdzania
RJ-45, 10 Base-T, Token Ring, kable
1 2 3 4 5 6 7 8
1 3 2 4 5 6 7 8
się pierwsz y na jednostce
zdalnej.
g łó wn a :
je dno stka
6. Bateria
• Nie przebijać i nie wrzu cać baterii do ognia ponieważ
mogą one eksplodować.
• Nie ładować bate rii, które nie są akumulatorkami
(alkaliczne).
• Utylizować baterie zgodnie z lokalnymi przepisami.
Trzymać baterie z dala od dzieci.
Uwagi
• Wymienić baterię , gd y kontrolka i indyka to ry za czną słabiej
świecić. Niski poziom naładowania baterii może spowodować
błędne odczyty.
• Usunąć baterię z przyrządu, jeżeli nie będzie ono używane przez
dłuższy czas. Stare baterie mogą przeciekać i uszkodzić
urz ądze nie.
• Aby wymie nić baterię
1. Przesunąć klapkę baterii znajdującą się na tyle urządzenia i
wymienić bate rię (9 V, 6LR61C). Zwrócić u wag ę na bie gunowość
przy um iesz czan iu no wej baterii.
2. Zamknąć klapkę baterii.
7. Specyfikacja techniczna
zasilanie ba teri a 6 LR61C 9 V (b ra k w z es t a wi e )
maks długość kabla do
przeprowadzania testów
Należy uży wać t ylko oryg inalny ch ak ceso riów. Vellema n NV
nie m oże być p ociąg nięt y do odp ow ied zia lnoś ci w przy padk u
V. 01 – 07/10/2013 36 ©Velleman nv
RJ11/12
100 m
Page 37

VTLAN6
uszkodze ń lub obrażeń wyn ikających z (błędnego )
korzysta nia z niniejsze go urządze nia. A by uzyskać więcej
informa cj i dot yczących teg o pro dukt u i najno wszą wersję
inst ruk cji, na leży od wiedzić na szą stro nę inter neto wą
www.ve llema n.eu. Inf orm a c je zawarte w ni niejs zej inst r ukcj i
obsług i mo gą ulec zmia nie bez wcze śnie jsze go
powiadomie nia.
© INF ORMA CJA O P RA WACH WŁA SNO ŚCI
Niniejsza instrukc ja jest własnośc ią fir my V elle man NV i je st
chro niona pr aw ami au tors kim i. Ws zyst kie pr awa są
zas trze żone na ca ły m św iecie . Żad na część tej instrukcji nie może
być kopiowana, przedruk owywana, tłumaczona lub konwertowana na
wszelkie nośniki elektroniczne lub w inny sp o sób, b ez uprzedniej
pi semne j zgod y wła ścici ela praw a utorsk ich.
V. 01 – 07/10/2013 37 ©Velleman nv
Page 38

Velleman® Service and Quality Warranty
Since its foundation in 1972, Velleman®
acquired extensive experience in the
electronics world and currently distributes its
products in over 85 countries.
All our products fulfil strict quality requirements
and legal stipulations in the EU. In order to
ensure the quality, our products regularly go
through an extra quality check, both by an
internal quality department and by specialized
external organisations. If, all precautionary
measures notwithstanding, problems should
occur, please make appeal to our warranty
(see guarantee conditions).
General Warranty Conditions Concerning
Consumer Products (for EU):
• All consumer products are subject to a 24month warranty on production flaws and
defective material as from the original date of
purchase.
• Velleman® can decide to replace an article
with an equivalent article, or to refund the retail
value totally or partially when the complaint is
valid and a free repair or replacement of the
article is impossible, or if the expenses are out
of proportion.
You will be delivered a replacing article or a
refund at the value of 100% of the purchase
price in case of a flaw occurred in the first year
after the date of purchase and delivery, or a
replacing article at 50% of the purchase price
or a refund at the value of 50% of the retail
value in case of a flaw occurred in the second
year after the date of purchase and delivery.
• Not covered by warranty:
- all direct or indirect damage caused after
delivery to the article (e.g. by oxidation,
shocks, falls, dust, dirt, humidity...), and by the
article, as well as its contents (e.g. data loss),
compensation for loss of profits;
- consumable goods, parts or accessories that
are subject to an aging process during normal
use, such as batteries (rechargeable, nonrechargeable, built-in or replaceable), lamps,
rubber parts, drive belts... (unlimited list);
- flaws resulting from fire, water damage,
lightning, accident, natural disaster, etc.…;
- flaws caused deliberately, negligently or
resulting from improper handling, negligent
maintenance, abusive use or use contrary to
the manufacturer’s instructions;
- damage caused by a commercial,
professional or collective use of the article (the
warranty validity will be reduced to six (6)
months when the article is used
professionally);
- damage resulting from an inappropriate
packing and shipping of the article;
- all damage caused by modification, repair or
alteration performed by a third party without
written permission by Velleman®.
• Articles to be repaired must be delivered to
your Velleman® dealer, solidly packed
(preferably in the original packaging), and be
completed with the original receipt of purchase
and a clear flaw description.
• Hint: In order to save on cost and time,
please reread the manual and check if the flaw
is caused by obvious causes prior to
presenting the article for repair. Note that
returning a non-defective article can also
involve handling costs.
• Repairs occurring after warranty expiration
are subject to shipping costs.
• The above conditions are without prejudice
to all commercial warranties.
The above enumeration is subject to
modification according to the article (see
article’s manual).
Velleman® service- en kwaliteitsgarantie
Velleman® heeft sinds zijn oprichting in 1972
een ruime ervaring opgebouwd in de
elektronicawereld en verdeelt op dit moment
producten in meer dan 85 landen. Al onze
producten beantwoorden aan strikte
kwaliteitseisen en aan de wettelijke bepalingen
geldig in de EU. Om de kwaliteit te
waarborgen, ondergaan onze producten op
regelmatige tijdstippen een extra
kwaliteitscontrole, zowel door onze eigen
kwaliteitsafdeling als door externe
gespecialiseerde organisaties. Mocht er
ondanks deze voorzorgen toch een probleem
optreden, dan kunt u steeds een beroep doen
op onze waarborg (zie waarborgvoorwaarden).
Page 39

Algemene waarborgvoorwaarden
consumentengoederen (voor Europese
Unie):
• Op alle consumentengoederen geldt een
garantieperiode van 24 maanden op
productie- en materiaalfouten en dit vanaf de
oorspronkelijke aankoopdatum.
• Indien de klacht gegrond is en een gratis
reparatie of vervanging van een artikel
onmogelijk is of indien de kosten hiervoor
buiten verhouding zijn, kan Velleman®
beslissen het desbetreffende artikel te
vervangen door een gelijkwaardig artikel of de
aankoopsom van het artikel gedeeltelijk of
volledig terug te betalen. In dat geval krijgt u
een vervangend product of terugbetaling ter
waarde van 100% van de aankoopsom bij
ontdekking van een gebrek tot één jaar na
aankoop en levering, of een vervangend
product tegen 50% van de kostprijs of
terugbetaling van 50 % bij ontdekking na één
jaar tot 2 jaar.
• Valt niet onder waarborg:
- alle rechtstreekse of onrechtstreekse schade
na de levering veroorzaakt aan het toestel (bv.
door oxidatie, schokken, val, stof, vuil,
vocht...), en door het toestel, alsook zijn
inhoud (bv. verlies van data), vergoeding voor
eventuele winstderving.
- verbruiksgoederen, onderdelen of
hulpstukken die onderhevig zijn aan
veroudering door normaal gebruik zoals bv.
batterijen (zowel oplaadbare als nietoplaadbare, ingebouwd of vervangbaar),
lampen, rubberen onderdelen,
aandrijfriemen... (onbeperkte lijst).
- defecten ten gevolge van brand,
waterschade, bliksem, ongevallen,
natuurrampen, enz.
- defecten veroorzaakt door opzet, nalatigheid
of door een onoordeelkundige behandeling,
slecht onderhoud of abnormaal gebruik of
gebruik van het toestel strijdig met de
voorschriften van de fabrikant.
- schade ten gevolge van een commercieel,
professioneel of collectief gebruik van het
apparaat (bij professioneel gebruik wordt de
garantieperiode herleid tot 6 maand).
- schade veroorzaakt door onvoldoende
bescherming bij transport van het apparaat.
- alle schade door wijzigingen, reparaties of
modificaties uitgevoerd door derden zonder
toestemming van Velleman®.
• Toestellen dienen ter reparatie aangeboden
te worden bij uw Velleman®-verdeler. Het
toestel dient vergezeld te zijn van het
oorspronkelijke aankoopbewijs. Zorg voor een
degelijke verpakking (bij voorkeur de originele
verpakking) en voeg een duidelijke
foutomschrijving bij.
• Tip: alvorens het toestel voor reparatie aan
te bieden, kijk nog eens na of er geen voor de
hand liggende reden is waarom het toestel niet
naar behoren werkt (zie handleiding). Op deze
wijze kunt u kosten en tijd besparen. Denk
eraan dat er ook voor niet-defecte toestellen
een kost voor controle aangerekend kan
worden.
• Bij reparaties buiten de waarborgperiode
zullen transportkosten aangerekend worden.
• Elke commerciële garantie laat deze rechten
onverminderd.
Bovenstaande opsomming kan eventueel
aangepast worden naargelang de aard van
het product (zie handleiding van het
betreffende product).
Garantie de service et de qualité
Velleman®
Depuis 1972, Velleman® a gagné une vaste
expérience dans le secteur de l’électronique et
est actuellement distributeur dans plus de 85
pays.
Tous nos produits répondent à des exigences
de qualité rigoureuses et à des dispositions
légales en vigueur dans l’UE. Afin de garantir
la qualité, nous soumettons régulièrement nos
produits à des contrôles de qualité
supplémentaires, tant par notre propre service
qualité que par un service qualité externe.
Dans le cas improbable d’un défaut malgré
toutes les précautions, il est possible
d’invoquer notre garantie (voir les conditions
de garantie).
Conditions générales concernant la
garantie sur les produits grand public
(pour l’UE) :
• tout produit grand public est garanti 24 mois
contre tout vice de production ou de matériaux
à dater du jour d’acquisition effective ;
• si la plainte est justifiée et que la réparation
ou le remplacement d’un article est jugé
impossible, ou lorsque les coûts s’avèrent
Page 40

disproportionnés, Velleman® s’autorise à
remplacer ledit article par un article équivalent
ou à rembourser la totalité ou une partie du
prix d’achat. Le cas échéant, il vous sera
consenti un article de remplacement ou le
remboursement complet du prix d’achat lors
d’un défaut dans un délai de 1 an après l’achat
et la livraison, ou un article de remplacement
moyennant 50% du prix d’achat ou le
remboursement de 50% du prix d’achat lors
d’un défaut après 1 à 2 ans.
• sont par conséquent exclus :
- tout dommage direct ou indirect survenu à
l’article après livraison (p.ex. dommage lié à
l’oxydation, choc, chute, poussière, sable,
impureté…) et provoqué par l’appareil, ainsi
que son contenu (p.ex. perte de données) et
une indemnisation éventuelle pour perte de
revenus ;
- toute pièce ou accessoire nécessitant un
remplacement causé par un usage normal
comme p.ex. piles (rechargeables comme non
rechargeables, intégrées ou remplaçables),
ampoules, pièces en caoutchouc, courroies…
(liste illimitée) ;
- tout dommage qui résulte d’un incendie, de
la foudre, d’un accident, d’une catastrophe
naturelle, etc. ;
- out dommage provoqué par une négligence,
volontaire ou non, une utilisation ou un
entretien incorrect, ou une utilisation de
l’appareil contraire aux prescriptions du
fabricant ;
- tout dommage à cause d’une utilisation
commerciale, professionnelle ou collective de
l’appareil (la période de garantie sera réduite à
6 mois lors d’une utilisation professionnelle) ;
- tout dommage à l’appareil qui résulte d’une
utilisation incorrecte ou différente que celle
pour laquelle il a été initialement prévu comme
décrit dans la notice ;
- tout dommage engendré par un retour de
l’appareil emballé dans un conditionnement
non ou insuffisamment protégé.
- toute réparation ou modification effectuée par
une tierce personne sans l’autorisation
explicite de SA Velleman® ; - frais de
transport de et vers Velleman® si l’appareil
n’est plus couvert sous la garantie.
• toute réparation sera fournie par l’endroit de
l’achat. L’appareil doit nécessairement être
accompagné du bon d’achat d’origine et être
dûment conditionné (de préférence dans
l’emballage d’origine avec mention du défaut) ;
• tuyau : il est conseillé de consulter la notice
et de contrôler câbles, piles, etc. avant de
retourner l’appareil. Un appareil retourné jugé
défectueux qui s’avère en bon état de marche
pourra faire l’objet d’une note de frais à charge
du consommateur ;
• une réparation effectuée en-dehors de la
période de garantie fera l’objet de frais de
transport ;
• toute garantie commerciale ne porte pas
atteinte aux conditions susmentionnées.
La liste susmentionnée peut être sujette à
une complémentation selon le type de
l’article et être mentionnée dans la notice
d’emploi.
Garantía de servicio y calidad Velleman®
Desde su fundación en 1972 Velleman® ha
adquirido una amplia experiencia como
distribuidor en el sector de la electrónica en
más de 85 países. Todos nuestros productos
responden a normas de calidad rigurosas y
disposiciones legales vigentes en la UE. Para
garantizar la calidad, sometemos nuestros
productos regularmente a controles de calidad
adicionales, tanto a través de nuestro propio
servicio de calidad como de un servicio de
calidad externo. En el caso improbable de que
surgieran problemas a pesar de todas las
precauciones, es posible recurrir a nuestra
garantía (véase las condiciones de garantía).
Condiciones generales referentes a la
garantía sobre productos de venta al
público (para la Unión Europea):
• Todos los productos de venta al público
tienen un período de garantía de 24 meses
contra errores de producción o errores en
materiales desde la adquisición original;
• Si la queja está fundada y si la reparación o
sustitución de un artículo no es posible, o si
los gastos son desproporcionados, Velleman®
autoriza reemplazar el artículo por un artículo
equivalente o reembolsar la totalidad o una
parte del precio de compra. En este caso,
usted recibirá un artículo de recambio o el
reembolso completo del precio de compra si
encuentra algún fallo hasta un año después
de la compra y entrega, o un artículo de
Page 41

recambio al 50% del precio de compra o el
reembolso del 50% del precio de compra si
encuentra un fallo después de 1 año y hasta
los 2 años después de la compra y entrega.
Por consiguiente, están excluidos entre
otras cosas:
- todos los daños causados directa o
indirectamente al aparato (p.ej. por oxidación,
choques, caída,...) y a su contenido (p.ej.
pérdida de datos) después de la entrega y
causados por el aparato, y cualquier
indemnización por posible pérdida de
ganancias;
- partes o accesorios, que estén expuestos al
desgaste causado por un uso normal, como
por ejemplo baterías (tanto recargables como
no recargables, incorporadas o
reemplazables), bombillas, partes de goma,
etc. (lista ilimitada);
- defectos causados por un incendio, daños
causados por el agua, rayos, accidentes,
catástrofes naturales, etc.;
- defectos causados a conciencia, descuido o
por malos tratos, un mantenimiento
inapropiado o un uso anormal del aparato
contrario a las instrucciones del fabricante;
- daños causados por un uso comercial,
profesional o colectivo del aparato (el período
de garantía se reducirá a 6 meses con uso
profesional);
- daños causados por un uso incorrecto o un
uso ajeno al que está previsto el producto
inicialmente como está descrito en el manual
del usuario;
- daños causados por una protección
insuficiente al transportar el aparato.
- daños causados por reparaciones o
modificaciones efectuadas por una tercera
persona sin la autorización explícita de
Velleman®;
- se calcula gastos de transporte de y a
Velleman® si el aparato ya no está cubierto
por la garantía.
• Cualquier artículo que tenga que ser
reparado tendrá que ser devuelto a su
distribuidor Velleman®. Devuelva el aparato
con la factura de compra original y
transpórtelo en un embalaje sólido
(preferentemente el embalaje original). Incluya
también una buena descripción del fallo;
• Consejo: Lea el manual del usuario y
controle los cables, las pilas, etc. antes de
devolver el aparato. Si no se encuentra un
defecto en el artículo los gastos podrían correr
a cargo del cliente;
• Los gastos de transporte correrán a carga
del cliente para una reparación efectuada
fuera del período de garantía.
• Cualquier gesto comercial no disminuye
estos derechos.
La lista previamente mencionada puede ser
adaptada según el tipo de artículo (véase el
manual del usuario del artículo en
cuestión).
Velleman® Service- und Qualitätsgarantie
Seit der Gründung in 1972 hat Velleman®
sehr viel Erfahrung als Verteiler in der
Elektronikwelt in über 85 Ländern aufgebaut.
Alle Produkte entsprechen den strengen
Qualitätsforderungen und gesetzlichen
Anforderungen in der EU. Um die Qualität zu
gewährleisten werden unsere Produkte
regelmäßig einer zusätzlichen
Qualitätskontrolle unterworfen, sowohl von
unserer eigenen Qualitätsabteilung als auch
von externen spezialisierten Organisationen.
Sollten, trotz aller Vorsichtsmaßnahmen,
Probleme auftreten, nehmen Sie bitte die
Garantie in Anspruch (siehe
Garantiebedingungen).
Allgemeine Garantiebedingungen in Bezug
auf Konsumgüter (für die Europäische
Union):
• Alle Produkte haben für Material- oder
Herstellungsfehler eine Garantieperiode von
24 Monaten ab Verkaufsdatum.
• Wenn die Klage berechtigt ist und falls eine
kostenlose Reparatur oder ein Austausch des
Gerätes unmöglich ist, oder wenn die Kosten
dafür unverhältnismäßig sind, kann
Velleman® sich darüber entscheiden, dieses
Produkt durch ein gleiches Produkt zu
ersetzen oder die Kaufsumme ganz oder
teilweise zurückzuzahlen. In diesem Fall
erhalten Sie ein Ersatzprodukt oder eine
Rückzahlung im Werte von 100% der
Kaufsumme im Falle eines Defektes bis zu
1 Jahr nach Kauf oder Lieferung, oder Sie
bekommen ein Ersatzprodukt im Werte von
50% der Kaufsumme oder eine Rückzahlung
im Werte von 50 % im Falle eines Defektes im
zweiten Jahr.
Page 42

• Von der Garantie ausgeschlossen sind:
- alle direkten oder indirekten Schäden, die
nach Lieferung am Gerät und durch das Gerät
verursacht werden (z.B. Oxidation, Stöße, Fall,
Staub, Schmutz, Feuchtigkeit, ...), sowie auch
der Inhalt (z.B. Datenverlust), Entschädigung
für eventuellen Gewinnausfall.
- Verbrauchsgüter, Teile oder Zubehörteile, die
durch normalen Gebrauch dem Verschleiß
ausgesetzt sind, wie z.B. Batterien (nicht nur
aufladbare, sondern auch nicht aufladbare,
eingebaute oder ersetzbare), Lampen,
Gummiteile, Treibriemen, usw. (unbeschränkte
Liste).
- Schäden verursacht durch Brandschaden,
Wasserschaden, Blitz, Unfälle,
Naturkatastrophen, usw.
- Schäden verursacht durch absichtliche,
nachlässige oder unsachgemäße Anwendung,
schlechte Wartung, zweckentfremdete
Anwendung oder Nichtbeachtung von
Benutzerhinweisen in der
Bedienungsanleitung.
- Schäden infolge einer kommerziellen,
professionellen oder kollektiven Anwendung
des Gerätes (bei gewerblicher Anwendung
wird die Garantieperiode auf 6 Monate
zurückgeführt).
- Schäden verursacht durch eine
unsachgemäße Verpackung und
unsachgemäßen Transport des Gerätes.
- alle Schäden verursacht durch unautorisierte
Änderungen, Reparaturen oder
Modifikationen, die von einem Dritten ohne
Erlaubnis von Velleman® vorgenommen
werden.
• Im Fall einer Reparatur, wenden Sie sich an
Ihren Velleman®-Verteiler. Legen Sie das
Produkt ordnungsgemäß verpackt
(vorzugsweise die Originalverpackung) und
mit dem Original-Kaufbeleg vor. Fügen Sie
eine deutliche Fehlerbeschreibung hinzu.
• Hinweis: Um Kosten und Zeit zu sparen,
lesen Sie die Bedienungsanleitung nochmals
und überprüfen Sie, ob es keinen auf de Hand
liegenden Grund gibt, ehe Sie das Gerät zur
Reparatur zurückschicken. Stellt sich bei der
Überprüfung des Gerätes heraus, dass kein
Geräteschaden vorliegt, könnte dem Kunden
eine Untersuchungspauschale berechnet.
• Für Reparaturen nach Ablauf der
Garantiefrist werden Transportkosten
berechnet.
• Jede kommerzielle Garantie lässt diese
Rechte unberührt.
Die oben stehende Aufzählung kann
eventuell angepasst werden gemäß der Art
des Produktes (siehe Bedienungsanleitung
des Gerätes).
Velleman ® usługi i gwarancja jakości
Od czasu założenia w 1972, Velleman®
zdobył bogate doświadczenie w dziedzinie
światowej elektroniki. Obecnie firma
dystrybuuje swoje produkty w ponad 85
krajach.
Wszystkie nasze produkty spełniają surowe
wymagania jakościowe oraz wypełniają normy
i dyrektywy obowiązujące w krajach UE. W
celu zapewnienia najwyższej jakości naszych
produktów, przechodzą one regularne oraz
dodatkowo wyrywkowe badania kontroli
jakości, zarówno naszego wewnętrznego
działu jakości jak również wyspecjalizowanych
firm zewnętrznych. Pomimo dołożenia
wszelkich starań czasem mogą pojawić się
problemy techniczne, prosimy odwołać się do
gwarancji (patrz warunki gwarancji).
Ogólne Warunki dotyczące gwarancji:
• Wszystkie produkty konsumenckie podlegają
24-miesięcznej gwarancji na wady
produkcyjne i materiałowe od daty zakupu.
• W przypadku, gdy usterka jest niemożliwa do
usunięcia lub koszt usunięcia jest nadmiernie
wysoki Velleman ® może zdecydowa
wymianie artykułu na nowy, wolny od wad lub
zwrócić zapłaconą kwotę. Zwrot gotówki może
jednak nastąpić z uwzględnieniem poniższych
warunków:
- zwrot 100% ceny zakupu w przypadku, gdy
wada wystąpiła w ciągu pierwszego roku od
daty zakupu i dostawy
- wymiana wadliwego artykułu na nowy, wolny
od wad z odpłatnością 50% ceny detalicznej
lub zwrot 50% kwoty ceny nabycia w
przypadku gdy wada wystąpiła w drugim roku
od daty zakupu i dostawy.
• Produkt nie podlega naprawie
gwarancyjnej:
- gdy wszystkie bezpośrednie lub pośrednie
szkody spowodowane są działaniem
czynników środowiskowych lub losowych (np.
ć o
Page 43

przez utlenianie, wstrząsy, upadki, kurz, brud,
...), wilgotności;
- gwarant nie ponosi odpowiedzialności za
szkody wynikających z utraty danych;
- produkty konsumenckie, części zamienne lub
akcesoria podatne na process starzenia,
wynikającego z normalnego użytkowania, np:
baterie (ładowalne, nieładowalne, wbudowane
lub wymienne), żarówki, paski napędowe,
gumowe elementy napędowe...
(nieograniczona lista);
- usterka wynika z działania pożaru, zalania
wszelkimi cieczami, uderzenia pioruna,
upadku lub klęski żywiołowej, itp.;
- usterka wynika z zaniedbań
eksploatacyjnych tj. umyślne bądź nieumyślne
zaniechanie czyszczenia, konserwacji,
wymiany materiałów ekspolatacyjnych,
niedbalstwa lub z niewłaściwego obchodzenia
się lub niezgodnego użytkowania z instrukcją
producenta;
- szkody wynikające z nadmiernego
użytkowania gdy nie jest do tego celu
przeznaczony tj. działalność komerycjna,
zawodowa lub wspólne użytkowanie przez
wiele osób - okres obowiązywania gwarancji
zostanie obniżony do 6 (sześć) miesięcy;
- Szkody wynikające ze
wysyłki produktu;
- Wszelkie szkody spowodowane przez
nieautoryzowaną naprawę, modyfikację,
przeróbkę produktu przez osoby trzecie jak
również bez pisemnej zgody firmy Velleman
®.
• Uszkodzony produkt musi zostać
dostarczony do sprzedawcy ® Velleman,
solidnie zapakowany (najlepiej w oryginalnym
opakowaniu), wraz z wyposażeniem z jakim
produkt został sprzedany. W przypadku
wysyłki towaru w opakowaniu innym niż
oryginalnym ryzyko usterki produktu oraz tego
skutki przechodzą na właściciela produktu.
Wraz z niesprawnym produktem należy
dołączyć jasny i szczegółowy opis jego usterki,
wady;
• Wskazówka: Aby zaoszczędzić na kosztach i
czasie, proszę szczegółowo zapoznać się z
instrukcja obsługi; czy przyczyną wady są
okoliczności techniczne czy też wynikaja
wyłącznie z nieznajomości obsługi produktu.
W przypadku wysyłki sprawnego produktu do
serwisu nabywca może zostać obciążony
kosztmi obsługi oraz transportu.
źle zabezpieczonej
• W przypadku napraw pogwarancyjnych lub
odpłatnych klient ponosi dodatkowo koszt
wysyłki produktu do i z serwisu.
wymienione wyżej warunki są bez uszczerbku
dla wszystkich komercyjnych gwarancji.
Powyższe postanowienia mogą podlegać
modyfikacji w zależności od wyrobu (patrz
art obsługi).
Garantia de serviço e de qualidade
Velleman®
Desde a sua fundação em 1972 Velleman®
tem adquirido uma amplia experiencia no
sector da eletrónica com uma distribuição em
mais de 85 países.
Todos os nossos produtos respondem a
exigências rigorosas e a disposições legais
em vigor na UE. Para garantir a qualidade,
submetemos regularmente os nossos
produtos a controles de qualidade
suplementares, com o nosso próprio serviço
qualidade como um serviço de qualidade
externo. No caso improvável de um defeito
mesmo com as nossas precauções, é possível
invocar a nossa garantia. (ver as condições de
garantia).
Condições gerais com respeito a garantia
sobre os produtos grande público (para a
UE):
• qualquer produto grande público é garantido
24 mês contra qualquer vício de produção ou
materiais a partir da data de aquisição
efectiva;
• no caso da reclamação ser justificada e que
a reparação ou substituição de um artigo é
impossível, ou quando os custo são
desproporcionados, Velleman® autoriza-se a
substituir o dito artigo por um artigo
equivalente ou a devolver a totalidade ou
parte do preço de compra. Em outro caso,
será consentido um artigo de substituição ou
devolução completa do preço de compra no
caso de um defeito no prazo de 1 ano depois
da data de compra e entrega, ou um artigo de
substituição pagando o valor de 50% do preço
de compra ou devolução de 50% do preço de
compra para defeitos depois de 1 a 2 anos.
• estão por consequência excluídos:
- todos os danos directos ou indirectos depois
da entrega do artigo (p.ex. danos ligados a
Page 44

oxidação, choques, quedas, poeiras, areias,
impurezas…) e provocado pelo aparelho,
como o seu conteúdo (p.ex. perca de dados) e
uma indemnização eventual por perca de
receitas;
- consumíveis, peças ou acessórios sujeitos a
desgaste causado por um uso normal, como
p.ex. pilhas (recarregáveis, não recarregáveis,
incorporadas ou substituíveis), lâmpadas,
peças em borracha correias… (lista ilimitada);
- todos os danos que resultem de um
incêndio, raios, de um acidente, de una
catastrophe natural, etc.;
- danos provocados por negligencia, voluntária
ou não, uma utilização ou manutenção
incorrecta, ou uma utilização do aparelho
contrária as prescrições do fabricante;
- todos os danos por causa de uma utilização
comercial, profissional ou colectiva do
aparelho ( o período de garantia será reduzido
a 6 meses para uma utilização profissional);
- todos os danos no aparelho resultando de
uma utilização incorrecta ou diferente daquela
inicialmente prevista e descrita no manual de
utilização;
- todos os danos depois de uma devolução
não embalada ou mal protegida ao nível do
acondicionamento.
- todas as reparações ou modificações
efectuadas por terceiros sem a autorização de
SA Velleman®;
- despesas de transporte de e para
Velleman® se o aparelho não estiver coberto
pela garantia.
• qualquer reparação será fornecida pelo local
de compra. O aparelho será obrigatoriamente
acompanhado do talão ou factura de origem e
bem acondicionado (de preferência dentro da
embalagem de origem com indicação do
defeito ou avaria);
• dica: aconselha-mos a consulta do manual e
controlar cabos, pilhas, etc. antes de devolver
o aparelho. Um aparelho devolvido que estiver
em bom estado será cobrado despesas a
cargo do consumidor;
• uma reparação efectuada fora da garantia,
será cobrado despesas de transporte;
• qualquer garantia comercial não prevalece
as condições aqui mencionadas.
A lista pode ser sujeita a um complemento
conforme o tipo de artigo e estar
mencionada no manual de utilização.
Legen Heirweg 33, 9890 Gavere, Belgium
Made in PRC
Imported by Velleman nv
www.velleman.eu
 Loading...