

Page 1
GZ
B
T
E
T
D
Y
O
M
E
A
N
A
M
T
E
N
E
D
A
Z
X
EVEN
TENT
FEEST
CENA
PART
TOLD
8
SHELTER
D'ÉVÉNE
ENT
OR PARA
-PAVILLO
PARA EV
ENT
VENTOS
NTOS
440
440 X
233cm
USER
NOTIC
GEBRU
MANU
BEDIE
MANU
ANUAL
D’EMPLOI
IKERSHAN
L DEL USU
UNGSANLE
L DO UTILI
LEIDING
RIO
ITUNG
ADOR 1
4
5
6
8
9
1
Page 2
GZB8
accessories (optional, not incl.)- accessoires (options, pas livrées) -
toebehoren (opties, niet meegelev.) - accesorios opcionales (no incl.) -
Zubehör (Option, nicht mitgeliefert) - acessórios opcionais (não incl.)
GZB8/SP1 GZB8/SP2
20.12.2011 ©Velleman nv
2
Page 3
GZB8
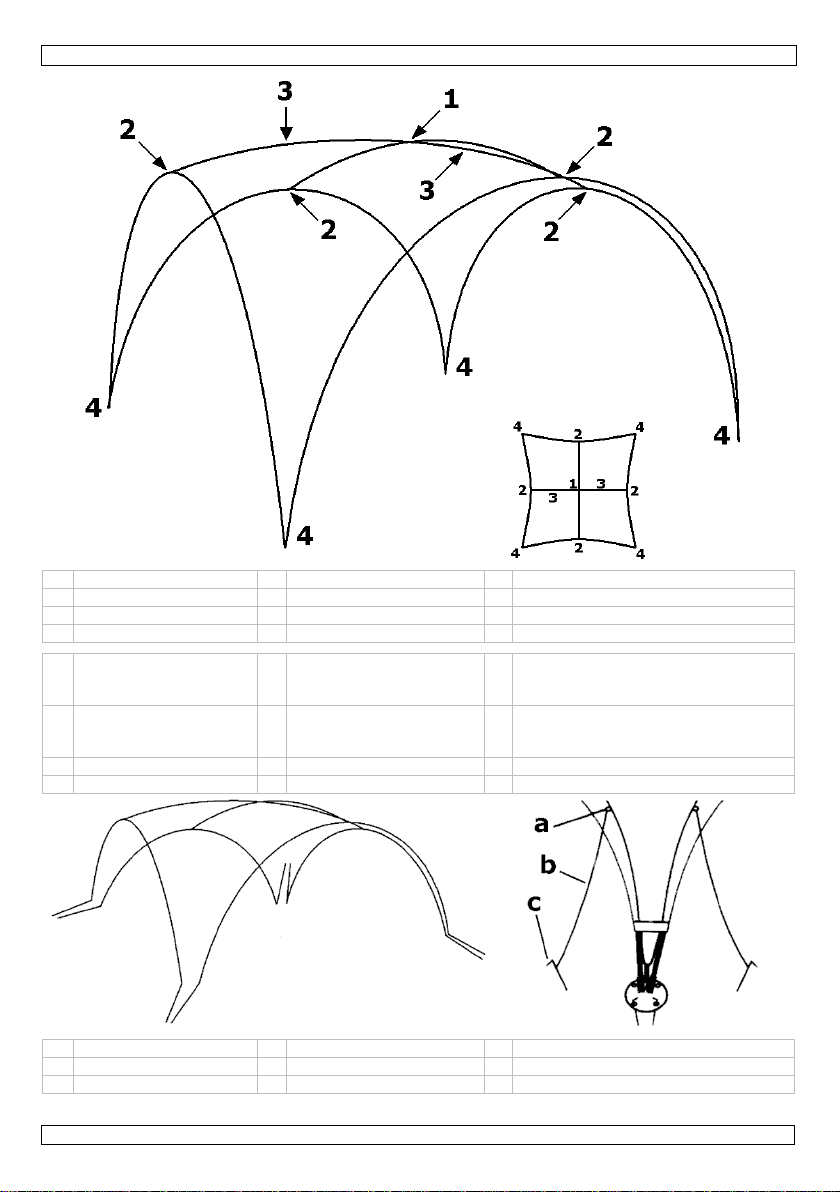
1 peak pole with hub 1 nokstok met koppelstuk 1 mât de faîte avec pièce de jonction
2 leg with hub 2 steunstok met koppelstuk 2 mât de support avec pièce de jonction
3 peak pole 3 nokstok 3 mat de faîte
4 pad foot 4 steunvoet 4 pied de support
1 varilla central con pieza
de acoplamiento central
1 Aufstellstange mit
zentralem
1 vareta central com peça de montagem
central
Verbindungsstück
2 varilla exterior con pieza
de acoplamiento
transversal
2 Aufstellstange mit
transversalem
Verbindungsstück
2 vareta exterior com peça de
montagem transversal
3 varilla central 3 Aufstellstange 3 vareta central
4 pie 4 Füß 4 pé
a ojal a Öse a olhal
b viento b Abspannleine b cabo
c piqueta c Hering c estaca
20.12.2011 ©Velleman nv
3
Page 4
0
n
y
a
m
m
mdea
e
e
t
r
Vand
e
o
s
e
o
m
o
c
e
h
c
e
tavo
e
t
f
e
v
a
h
e
e
n
u
e
b
h
h
m
e
t
v
d
p
o
d
f
r
e
w
h
e
c
s
e
m
c
]
p
h
e
e
h
a
f
d
h
s
t
k
r
h
n
o
r
f
c
c
b
8
n
o
a
r
t
c
d
a
e
e
GZB
e
b
t
d
u
t
S
e
w
e
g
n
r
w
e
[
a
a
d
s
r
o
b
w
e
s
a
e
m
f
4
c
T
e
r
f
t
o
c
e
s
a
i
/
e
k
w
r
t
n
s
n
y
e
t
a
l
k
n
e
s
p
e
8
1. I
Thank
dealer.
2. S
• Fa
• All
the
• Da
• Ke
3. G
• Pro
• Onl
wa
• NE
4. F
• cov
• PU
• Col
• incl
• in
• opt
5. S
Refer t
Locate
It is i
the c
• Pla
• Ext
will
• Un
• Pla
Set up
• Ass
pol
• Par
• Ins
on
• Un
• Full
• Loc
• Ins
• Dri
• Wr
tig
• At
the
• Wh
20.12.2
troductio
ou for choosing
fety Instr
Follow thes
Set up and
Make sure t
down the s
The cover
near the sh
iliarise yourself
odifications of
device is not co
age caused by
ler will not acce
p this manual f
neral gui
ect the shelter
y use the shelte
ranty.
ER store the sh
mildew, which
atures
er in 160gr/m²
coating and anti
ur: warm grey
uding 8 guy rop
trong polyester
ional accessorie
tting up
the illustrations
corners
portant that th
rner locator to
e the metal hoo
nd metal hooks
be 19.8’ (±604
ook the metal h
e a pad foot [4
the shelter
emble the peak
s.
ially assemble t
id problems wh
rt the peak pol
op of the ridge
old the canopy
y assemble the
ate the hook an
rt the ends of t
e pegs through
p the web strap
ten.
ach corner, atta
canopy.
n necessary, at
11
Perel! If the pac
ctions
instructions ca
reak down requ
e weather cond
elter.
aterial of this s
lter.
with the functio
he device are f
ered by the wa
isregard of cert
t responsibility
r future referen
elines
rom shocks and
for its intended
lter unless it is
ill rot natural fi
igh density poly
UV-coating 30+
s and 16 pegs
arrying bag
: side wall GZB
on pages 2 and
four pad feet [
ark the locatio
k of the corner l
B and C out; m
m).
ook from corner
at every corne
oles [3] and at
e four leg poles
n installing the
s [3] into the ri
ub.
nd pull over the
our leg poles [2
loop fasteners
e four leg poles
the holes in the
around the pol
ch the hook end
ach the guy lin
User m
age was damag
efully.
ires two adult p
itions are suitabl
elter is flammab
s of the device
rbidden for safe
ranty.
ain guidelines in
or any ensuing
e.
abuse. Avoid br
purpose. Using
ompletely dry.
ers, damage th
ester
/SP1, side wall
3 of this manua
4] form a squar
s (see figure pa
cator at positio
ke sure they fo
A and move it d
, angle facing in
ach them to th
with ridge hub
anopy – see im
ge hubs [2] of
frame (loop and
].
nd wrap them
[2] into the pa
pad feet [4] to
s at the four co
of the canopy t
s [b] to the we
4
anual
ed in transit, do
rsons.
e (e.g. not too
le. DO not mak
efore actually u
y reasons. Dam
this manual is n
efects or proble
te force when d
he shelter in an
toring when da
coating to the
ith 2 windows a
l.
with sides of 1
e 2).
A. Mark the lo
m a 90° angle.
iagonally to find
ard (toward th
centre hub [1]
2] (do not inse
ge).
the legs. Make s
hook fasteners
round the poles.
feet [4].
ecure them.
ners and close
a hole in the fo
loops [a] and
not install or us
indy) for setting
open fires (e.g.
ing it.
ge caused by u
ot covered by th
ms.
ploying, folding
unauthorised w
ped allows the
abric and leave
nd 1 door GZB8
’ (±427cm). Us
ation with a sta
he distance bet
corner D.
other pad feet)
following the ar
t the lowest par
ure the metal pi
acing down).
he snap-in buckl
t and pull down
onnect them to
it and contact
up or breaking
barbeque) und
er modifications
e warranty and
up or during us
y will void the
formation of mo
ndelible stains.
SP2
the metal hoo
e.
een points B a
.
ow markings on
s of the poles y
s lock into the
es. Pull the stra
the strap to str
takes [c].
©Velleman
our
r or
to
he
ge.
d
s on
d C
the
t to
lots
s to
tch
v
Page 5
0
Breaki
n
b
k
e
e
Y
a
e
m
n
o
e
o
f
umod
g
v
r
i
t
t
i
a
c
e
e
é
e
e
e
m
c
h
e
s
o
o
e
n
u
E
g
t
n
e
e
s
l
g
s
e
p
d
é
u
a
q
h
U
1
e
s
4
a
é
r
s
o
n
c
b
y
m
w
N
é
d
N
r
n
o
e
e
r
g
6
x
d
3
o
c
i
p
n
4
l
e
o
s
e
m
e
f
’
e
d
i
s
u
U
o
4
n
s
e
t
m
t
i
d
o
e
n
o
e
m
t
n
d
s
r
.
,
n
e
t
e
r
n
i
u
o
n
m
e
o
n
v
u
e
c
e
l
n
c
u
u
• To
• Ma
6. T
Use thi
of dam
For mo
websit
The inf
© COP
This m
rights r
mediu
g down the s
eak down and
e sure the shelt
chnical sp
dimen
headr
frame
weight
s device with
age or injury r
re info concer
www.perel.e
ormation in thi
RIGHT NOTIC
nual is copyri
served. No part
or otherwise wi
elter
store the shelte
is completely
ecification
ions
om
riginal access
sulted from (i
ing this produ
.
s manual is su
hted. The cop
of this manual
hout the prior
GZB
, follow the setu
dry before placi
4.40 x
232 cm
steel po
17kg
ries only. Vell
correct) use
t and the late
ject to chang
right to this
ay be copied, r
ritten consent o
8
procedure in r
g it inside the s
.40m
(centre) / 190c
e, ø19 x 0.8mm
man nv canno
f this device.
t version of th
without prior
anual is owne
produced, trans
the copyright h
versed order.
orage bag!
(sides)
be held respo
s user manual
notice.
by Velleman
lated or reduced
lder.
nsible in the e
please visit o
v. All worldwid
to any electroni
ent
r
1. I
Nous v
l’appar
2. C
• Se
• To
• La
et
• Ga
3. D
• Pro
• N’u
• Ne
mo
4. C
• bâ
• av
• cou
• av
• livr
• acc
5. M
Consult
Localis
Il est i
Utiliser
page 2)
• Pla
20.12.2
troductio
us remercions d
il. Si l’appareil a
nsignes d
Suivre les in
Il est conseil
Monter et de
la tente par
La bâche n’e
amiliariser avec
te modification
ifications par le
arantie ne s’ap
otre revendeur
der cette notice
rectives g
éger la tente co
iliser la tente q
JAMAIS ranger l
sissures qui pou
ractéristi
he en polyester
c revêtement P
leur: gris chaud
c 8 haubans et
e avec housse
ssoires (option
ontage
r les illustration
r les coins
portant que les
les crochets mét
.
er le crochet m
11
votre achat ! L
été endommag
sécurité
tructions dans c
é de monter et
démonter la ten
rand vent.
t pas ignifuge.
le fonctionneme
st interdite pou
client ne tombe
lique pas aux d
éclinera toute r
pour toute référ
nérales
ntre les chocs et
’à sa fonction p
tente avec une
rront endomma
ues
aute densité (1
et résistant au
6 piquets
n polyester soli
): paroi GZB8/S
s en pages 2 et
pieds de supp
lliques sur le lo
tallique du local
otice d
ire la présente n
pendant le tran
ette notice.
e démonter la t
te dans des con
e jamais faire d
nt avant l’emplo
des raisons de
t pas sous la ga
mmages surven
sponsabilité po
nce ultérieure.
la traiter avec c
évue. Un usage
bâche humide.
er les fibres et f
0g/m²)
rayons UV 30+
e
P1, paroi avec 2
de cette notice
rt de la tente [
alisateur de coi
sateur de coins
5
emploi
otice attentivem
sport, ne pas l’i
nte à deux.
itions météorol
e feu ni de barb
.
écurité. Les do
rantie.
us en négligean
r les problèmes
irconspection pe
impropre annule
ne bâche humi
rmer des tache
fenêtres et 1 po
d'emploi.
] forment un ca
s pour marquer
ur la position A
nt avant la mis
staller et consul
giques favorabl
cue sous ou à p
mages occasio
certaines direct
et les défauts q
dant l’installati
d'office la gara
e favorise la for
.
rte GZB8/SP2
ré avec des bas
les positions (v
Marquer la posi
en service de
er votre revend
s. Ne jamais uti
oximité de la te
nés par des
ves de cette not
i en résultent.
n et l’opération.
tie.
ation de
s de 14’ (±427
ir l'illustration s
tion avec un piq
©Velleman
ur.
iser
te.
ice
m).
r la
et.
v
Page 6

0
• Dé
p
n
c
p
r
o
a
p
r
p
u
h
n
u
s
p
d
etp
m
w
o
I
o
u
n
b
e
e
a
e
w
t
m
e
3
r
e
r
a
a
p
c
r
n
n
e
m
n
o
é
d
p
n
n
u
n
o
e
n
v
t
e
)
c
c
m
e
e
r
s
s
c
m
u
m
o
c
r
d
n
e
b
e
w
e
d
e
q
e
g
è
2
r
t
t
n
c
s
c
t
o
n
a
o
u
a
i
b
b
e
n
n
n
o
u
e
c
e
g
l
r
d
e
e
d
e
w
u
k
c
a
o
s
c
a
r
o
q
a
p
n
a
e
u
t
n
l
u
u
s
e
i
e
s
b
r
u
poi
• Dé
• Pos
su
Monte
• Ass
les
• Ass
les
• Enf
fix
• Dé
• Ass
• Util
• Int
• Ta
• To
lani
• A c
lani
• Si
Piler la
• Po
• S'a
6. S
N’empl
respon
d’infor
web w
sans n
© DRO
SA Vell
Tous dr
conten
l’accord
loyer les croche
ts B et C sera d
rocher le croche
er un pied de su
port).
la tente
embler les mâts
mâts.
embler partielle
pièces inférieur
ncer les mâts [
tion métalliques
lier la bâche et
embler complèt
iser les autoagg
oduire les bouts
er les piquets d
rner les lanières
ères pour serrer
aque coin, ratt
ère vers le bas
écessaire, ratta
tente
r piler et stocke
surer que la te
écificatio
imensions
space pour la tê
rame
oids
oyer cet appar
sable de dom
ation concer
w.perel.eu. T
tification préa
TS D’AUTEUR
eman est l’aya
its mondiaux r
de cette notice
préalable écrit
s métalliques B
e 9.8’ (±604cm
t métallique du
pport [4] dans
de faîte [3] et r
ent les quatre
s des mâts pour
] dans les pièc
soient bien fixé
ecouvrir la tram
ment les quatre
ipants pour fixe
des quatre mât
ns les trous dan
autour des mât
.
cher le bout du
our tendre la bâ
her les haubans
la tente, il faut
te est complète
s techniq
te
il qu’avec des
ages ou lésion
ant cet article
utes les infor
lable.
nt droit des dr
servés. Toute re
par quelque pro
e l’ayant droit.
et C; s'assurer
.
oin A et déplac
haque coin, l'an
attacher-les à la
âts de support
éviter des probl
s de jonction [
s dans les ouve
e (autoagrippan
mâts de suppor
aux mâts.
de support [2]
s les pieds de su
des quatre coi
rochet de la bâ
che.
[b] aux boucle
suivre les instru
ent sèche avan
es
accessoires d’
s survenus à u
et la version l
ations présen
its d’auteur p
production, trad
édé ou sur tout
GZB
8
u'ils forment un
r diagonalement
le dirigé vers l'i
pièce de jonctio
avec pièce de jo
mes d'installati
] des mâts de s
tures au-dessus
s dirigés vers le
[2].
dans les pieds d
pport [4] pour l
s et fermer ave
he au trou dans
[a] et connect
tions de monta
de la ranger da
4.40 x 4.40m
232 cm (milieu)
armature, ø19 x
17kg
rigine. SA Vel
usage (incor
plus récente
tées dans cett
ur cette notic
ction, copie ou
support électron
angle de 90°. L
pour localiser c
térieur (vers le
suivant les flè
ction [2] (ne p
n de la bâche –
pport. S'assure
de la pièce de j
bas).
e support [4].
s fixer.
les boucles encl
les pieds de sup
r les avec les pi
e par ordre inve
ns la housse!
/ 190cm (côtés)
0.8mm
eman ne sera
ect) de cet ap
e cette notice,
notice peuve
.
iffusion, intégr
ique que se soit
distance entre
in D.
autres pieds de
hes marquées s
s encore introd
voir image).
que les cheville
nction.
iquetées. Tirer l
port [4] et tirer
uets [c].
rse.
ucunement
areil. Pour plu
visitez notre s
t être modifié
le ou partielle, d
est interdite san
s
u
es
la
te
r
ire
de
s
s
Geb
1. I
leiding
Dank u
voor uw aankoo
eschadigd tijde
toestel
2. V
• Lee
• Om
• De
• Be
20.12.2
he
de
me
iligheidsi
Volg de instr
Het opstelle
Stel de tent
te veel wind.
Het dekzeil v
de tent.
r eerst de functi
veiligheidsrede
ft aangebracht
garantie geldt ni
ler zal de veran
houden.
aar deze handl
11
! Lees deze han
s het transport,
structies
cties in de han
en het afbreke
p en breek opni
an deze tent is
s van het toest
en mag u geen
alt niet onder d
et voor schade
woordelijkheid a
iding voor verd
uikersh
dleiding grondig
installeer het d
leiding zorgvuld
van de tent ge
uw af bij gunsti
randbaar. Maak
l kennen voor u
ijzigingen aan
garantie.
oor het negeren
fwijzen voor def
re raadpleging.
6
andleidi
voor u het toest
n niet en raadpl
g op.
eurt best met t
ge weersomstan
geen vuur of ho
het gaat gebrui
rengen. Schade
van bepaalde ri
cten of problem
ng
el in gebruik ne
eg uw dealer.
ee personen.
digheden. Gebr
d geen barbecu
en.
door wijzigingen
htlijnen in deze
en die hier rech
mt. Werd het
ik de tent nooit
e onder of dicht
die de gebruike
handleiding en
streeks verband
©Velleman
bij
ij
w
v
Page 7

GZB8
3. Algemene richtlijnen
• Bescherm de tent tegen schokken. Vermijd brute kracht tijdens het opstellen en het afbreken.
• Gebruik de tent enkel waarvoor zij gemaakt is. Bij onoordeelkundig gebruik vervalt de garantie.
• Laat een vochtig dekzeil eerst volledig drogen alvorens de tent op te bergen. Een vochtig dekzeil is de
ideale kweekvijver voor schimmels die op hun beurt de natuurlijke vezels en de coating aantasten.
4. Eigenschappen
• polyester dekzeil met hoge dichtheid (160g/m²)
• met PU-coating en UV-bestendig 30+
• kleur: warm grijs
• met 8 tuikabels en 16 haringen
• geleverd met een sterke polyester draagtas
• toebehoren (opties): zijwand GZB8/SP1, zijwand met 2 ramen en 1 deur GZB8/SP2
5. Opstellen
Raadpleeg de afbeeldingen op pagina 2 en 3 van dez e handlei di ng.
Hoeken bepalen
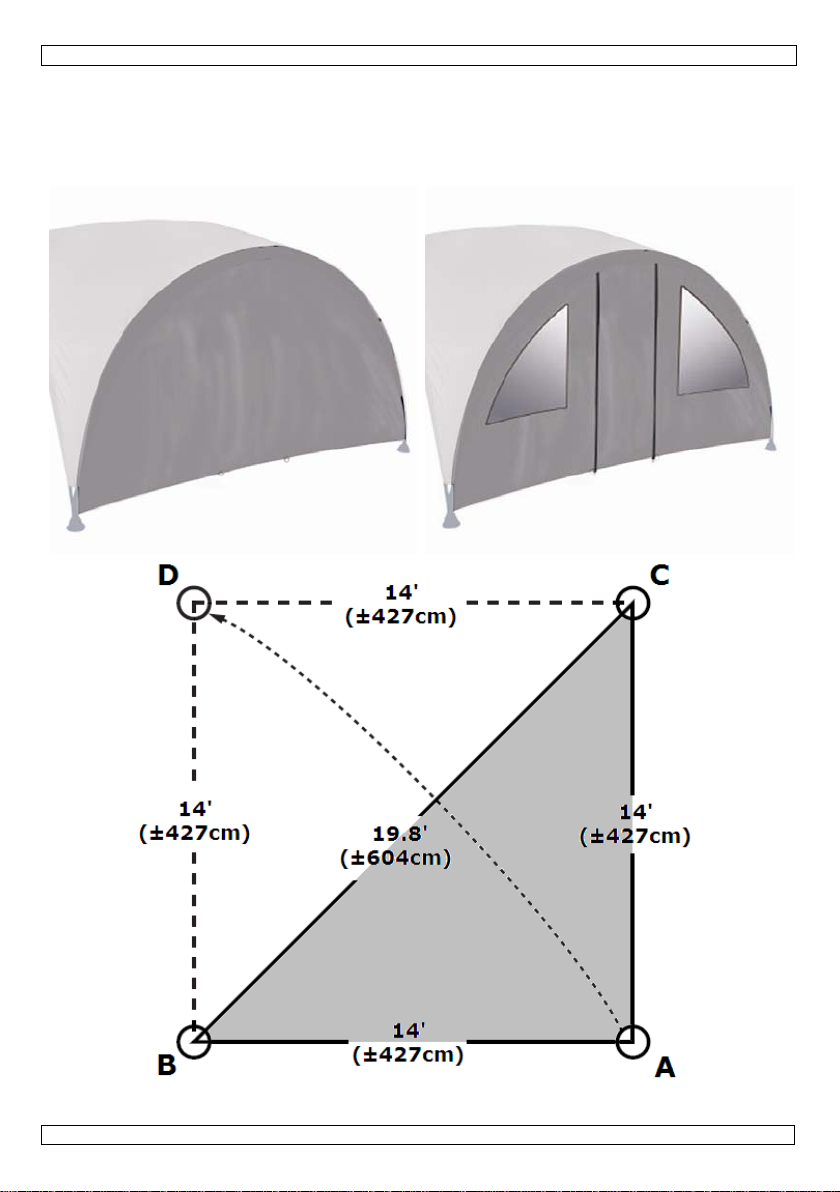
Het is belangrijk dat de vier steunvoeten [4] een vierkant vormen met zijden van 14’ (±427cm). Gebruik
de metalen haken op de hoekbepaler om de plaats van de hoeken aan te duiden (zie afbeelding pagina 2).
• Plaats de metalen haak op de hoekbepaler op positie A. Duidt de plaats aan met een haring.
• Verplaats de metalen haken B en C zodat dat ze een hoek van 90° vormen. De afstand tussen de punten
B en C bedraagt 19.8' (±604cm).
• Maak de metalen haak los van hoek A en verplaats deze diagonaal om hoek D te bepalen.
• Plaats een steunvoet [4] op iedere hoek, de eindbuizen gericht naar binnen (gericht naar de andere
steunvoetjes).
Tent opstellen
• Monteer de nokstokken [3] en verbindt ze met het koppelstuk [1] volgens de pijltjes gemarkeerd op de
tentstokken.
• Monteer de vier steunstokken met koppelstuk [2] gedeeltelijk (de onderste delen van de tentstokken niet
insteken om problemen te vermijden bij het bevestigen van het tentzeil – zie afbeelding).
• Steek de nokstokken [3] in de koppelstukken [2] van de steunstokken. Zorg ervoor dat de metal en
pinnen goed vastzitten in de openingen bovenop het koppelstuk.
• Ontvouw het tentzeil en trek deze over het frame (klittenband gericht naar beneden).
• Monteer de vier steunstokken helemaal [2].
• Draai het klittenband rond de tentstokken.
• Steek de uiteinden van de vier steunstokken [2] in de steunvoetjes [4].
• Klop de haringen door de gaten in de steunvoeten [4] om ze goed vast te zetten.
• Draai de riempjes rond de tentstokken op de vier hoeken en klik de gespen dicht. Trek de riempje s aan.
• Bevestig het uiteinde van de haak van het tentzeil met een opening in de steunvoet [4] en trek naar
beneden om het tentzeil op te spannen.
• Indien nodig, maak de tuikabels [b] vast aan de lussen
Tent afbreken
• Om de tent af te breken en op te bergen, volg de montage-instructies in omgekeerde volgorde.
• Zorg ervoor dat de tent helemaal droog is alvorens de tent in de opberghoes te steken!
[a] en verbindt ze met de haringen [c].
6. Technische specificaties
afmetingen
ruimte
frame
gewicht 17kg
Gebruik dit toestel enkel met originele accessoires. Velleman nv is niet aansprakelijk voor schade
of kwetsuren bij (verkeerd) gebruik van dit toestel. Voor meer informatie over dit product en de
meest recente versie van deze handleiding, zie www.perel.eu. De informatie in deze handleiding
kan te allen tijde worden gewijzigd zonder voorafgaande kennisgeving.
© AUTEURSRECHT
Velleman nv heeft het auteursrecht voor deze handleiding.
Alle wereldwijde rechten voorbehouden. Het is niet toegestaan om deze handleiding of gedeelten ervan over
te nemen, te kopiëren, te vertalen, te bewerken en op te slaan op een elektronisch medium zonder
voorafgaande schriftelijke toestemming van de rechthebbende.
4.40 x 4.40m
232 cm (midden) / 190cm (zijkanten)
tentstok, ø19 x 0.8mm
20.12.2011 ©Velleman nv
7
Page 8

0
1. I
n
s
n
m
ñ
d
a
o
m
e
a
a
o
e
e
m
o
n
i90°
q
o
r
r
n
a
o
imet
i
o
v
r
v
r
l
n
p
n
e
o
m
m
o
u
i
r
e
e
.
o
c
d
p
e
g
n
c
4
s
a
A
s
b
e
s
o
s
a
f
a
L
s
r
t
s
r
o
d
a
s
a
o
b
s
G
é
s
u
e
e
a
e
p
c
4
e
e
e
b
a
d
o
e
u
n
s
e
a
n
o
o
0
y
o
a
a
c
y
d
a
o
s
n
u
n
f
c
a
s
a
±
u
e
n
a
r
g
l
r
d
o
e
c
n
f
n
i
v
e
b
[
n
e
d
n
e
a
.
o
ó
a
a
o
¡Gracia
aparato
2. I
• Fa
• Por
cau
• Da
su
• Gu
3. N
• No
• Util
co
• As
cau
4. C
• tej
• con
• col
• con
• se
• acc
5. M
Véase la
Deter
Es imp
cintas n
• Po
• Ext
• Sa
D.
• Col
Monta
• Int
• Co
Sig
• Ah
var
• Ext
• Ah
• En
• Int
• Pas
• En
• Int
de
• Si f
20.12.2
troducció
por haber com
ha sufrido algú
struccion
Siga cuidad
Necesite sie
Monte y des
si hay much
La lona es in
iliarícese con el
razones de seg
sados por modif
os causados po
istribuidor no s
rde este manua
rmas gen
agite el cenador
ice sólo el cenad
pletamente.
gúrese de que e
sar moho que p
racterísti
do de poliéster
revestimiento P
r: gris cálido
8 vientos y 16
ntrega con fund
sorios opcional
ontar
s figuras en la pá
inar las esqui
rtante que los 4
egras para marc
ga el gancho de
enda otras dos
. La distancia en
ue el gancho qu
que cada pie [
el cenador
oduzca 4 varilla
ecte 4 otras var
las flechas en l
ra, introduzca v
llas inferiores.
al encajen en la
enda la lona so
ra, monte las d
uelva las varilla
oduzca las varill
e las piquetas p
uelva las varilla
oduzca el ganch
a cinta hacia ab
uera necesario,
11
M
rado el GZB8!
daño en el tran
s de segu
samente las ins
pre dos adulto
onte el cenado
viento.
flamable. Nunca
funcionamiento
ridad, las modifi
caciones no aut
descuido de las
rá responsable
l del usuario par
rales
Evite usar exce
or para las aplic
l cenador esté c
dría dañar las fi
as
e alta densidad
U y a prueba de
iquetas
a de transporte
s: lona lateral
ina 2 y 3 de este
as
pies [4] formen
ar la posición (v
una de las cinta
intas y ponga s
tre punto B y C
e se encuentra
] en una esquin
[3] en la pieza
illas [3] en las v
as varillas.
rillas [2] en las
sí, evitará probl
ranuras de la
re el armazón (
más varillas.
con las cintas c
as en los pies [
r los agujeros d
con las cintas d
o del extremo d
jo para extend
ije los vientos [
GZB
nual de
ea atentamente
porte no lo inst
idad
rucciones de est
para montar y
en condiciones
encienda un fue
del aparato ante
caciones no aut
rizadas, no está
instrucciones d
e ningún daño
cuando necesit
iva fuerza dura
ciones descrita
mpletamente s
ras y la tela.
(160gr/m²)
rayos UV 30+
ólida (poliéster)
ZB8/SP1, lona l
manual del usuar
un cuadrado co
ase fig., p. 2)
negras en la p
gancho en la p
s de 19.8’ (±6
n la posición A
. Asegúrese de
de acoplamient
arillas [2] que y
piezas de acopl
mas al instalar l
ieza de acoplam
on los ojales y l
on cierre de gan
].
los pies [4] pa
e cada esquina
la lona en uno
r la lona.
] a los ojales [
8
8
l usuari
las instruccione
le y póngase e
e manual del us
esmontar el ce
meteorológicas
go ni una barba
s de utilizarlo.
rizadas del apar
n cubiertos por l
seguridad de e
otros problema
e consultarlo.
te el manejo y l
en este manual
co antes de alm
teral con 2 vent
io
.
lados de 14’ (
sición A y marq
sición B y C. As
4cm).
muévala diago
que el ángulo m
central [2].
a ha conectado
miento transve
a lona (véase fi
iento transversa
s cintas con cie
ho y bucle.
ra fijarlos.
cierre las hebill
e los agujeros
] y conéctelos c
del manual ant
contacto con su
ario.
ador.
avorables. Nunc
oa bajo o cerca
ato están prohib
garantía.
te manual invali
s resultantes.
a instalación.
. Su uso incorre
cenarlo. Una lo
anas y 1 puerta
427cm). Utilice
e esta posición
gúrese de que
almente para e
ire hacia el inter
la pieza de aco
sales pero toda
.). Asegúrese d
.
re de gancho y
as. Tire de las ci
el pie para enga
n las piquetas
s de usarlo. Si
distribuidor.
a utilice el cena
del cenador.
idas. Los daños
darán su garantí
to anula la gara
a húmeda pued
GZB8/SP2
los ganchos de l
con una piqueta
ormen un ángul
contrar la posici
or (el otro pie).
lamiento centr
ía no introduzc
que los pins de
ucle hacia abaj
tas para tensar
nchar la lona y t
c].
©Velleman
l
or
a y
tía
s 4
l.
las
).
.
ire
de
n
v
Page 9

0
Desmo
a
e
s
sarpe
o
p
E
a
o
r
i
Ü
n
i
h
e
e
Gar
w
l
r
s
e
i
y
b
f
b
r
c
e
o
ó
p
e
O
l
e
o
c
h
n
n
e
t
e
F
R
h
e
c
e
e
g
n
S
e
e
s
d
8
d
n
S
S
e
p
ä
a
d
u
i
r
n
t
m
/
e
p
8
a
e
x
m
i
a
m
v
gs
s
s
ü
a
s
p
n
h
e
e
n
e
e
n
n
n
c
N
m
s
e
d
e
t
n
g
S
F
u
t
d
n
t
n
o
ó
g
m
c
a
t
l
d
a
e
k
n
n
a
8
n
ñ
v
r
f
d
e
P
• Par
• ¡As
6. E
Utilice
ni lesi
produc
www.
aviso.
© DER
Vellem
Todos l
guarda
1. E
Wir bed
durch.
nicht u
2. S
• Ne
• Eig
eig
• Bei
• Be
3. A
• Ver
Ga
• Ver
erli
• Las
ist
4. E
• Pol
• mit
• Far
• mit
• Lie
• Zu
di
e
ntar el cenado
desmontar el
gúrese de que
pecificaci
mensiones
pacio
mazón
so
este aparato s
nes causados
to y la versión
erel.eu. Se pu
CHOS DE AUT
n NV dispone
s derechos mun
este manual de
nführung
anken uns für d
berprüfen Sie,
d wenden Sie si
cherheits
Befolgen Sie
Montieren u
Montieren u
Sie den Gart
Die Abdeckpl
Grillparty un
men Sie das Ge
nmächtige Verä
nmächtige Änd
Schäden, die du
antieanspruch.
ahren Sie diese
lgemeine
meiden Sie Ersc
tenpavillons.
wenden Sie den
cht der Garanti
sen Sie eine feu
in idealer Zucht
genschaft
ester-Dach hoh
PU-Beschichtun
e: warmgrau
8 Abspannleine
erung in solider
ehör (Option):
enador y almac
l cenador esté c
nes
lo con los acc
or un uso (ind
más reciente d
den modificar
de los derecho
diales reservado
usuario o parte
Be
n Kauf des GZB
b Transportschä
h an Ihren Hän
inweise
die Anweisunge
d demontieren
d demontieren
npavillon nie b
ane vom Garten
er oder in der N
rät erst in Betrie
nderungen sind
rungen erlischt
rch Nichtbeacht
ür daraus result
Bedienungsanle
ichtlinien
ütterungen. Ve
Gartenpavillon
anspruch.
hte Plane zuers
teich für Schim
n
r Dichte (160gr
und UV-bestän
und 16 Hering
Polyester-Trans
eitenwand GZB
GZB
narlo, siga los p
ompletamente s
4.40
232 c
varilla
17kg
sorios original
ebido) de este
e este manual
las especificac
s de autor par
s. Está estricta
de ello sin pre
ienun
! Lesen Sie die
den vorliegen. S
ler.
der Bedienung
ie den Gartenpa
ie den Gartenpa
i starkem Wind.
avillon ist entz
he des Gartenp
b, nachdem Sie
us Sicherheitsg
er Garantieans
ng der Bedienu
ierende Folgesc
tung für künftig
meiden Sie roh
ur für Anwendu
völlig trocknen
el, die natürlich
m²)
dig 30+
n
orttasche
/SP1, Seitenwa
8
sos para el mo
co antes de po
4.40m
(centro) / 190
de acero, ø19 x
es. Velleman
aparato. Para
del usuario, vi
ones y el cont
este manual
ente prohibido r
io permiso escri
anleitu
e Bedienungsan
ollte dies der Fal
anleitung.
villon zu zweit.
villon bei günsti
ndbar. Machen
villons.
ich mit seinen
ründen verboten
ruch.
gsanleitung ver
äden übernimm
Einsichtnahme
Gewalt währen
gen beschriebe
he Sie den Gar
n Fasern und di
d mit 2 Fenster
taje en orden in
erlo en la funda
m (lados)
0.8mm
V no será resp
ás informaci
ite nuestra pá
nido de este
el usuario.
producir, tradu
o del derecho h
leitung vor Inbe
l sein, verwende
en Wetterverhä
ie kein Feuer o
unktionen vertr
. Bei Schäden v
rsacht werden,
der Hersteller
auf.
der Installation
in dieser Bedie
enpavillon lager
e Beschichtung
und 1 Tür GZB
verso.
de transporte!
nsable de da
n sobre este
ina
anual sin pre
ir, copiar, edita
biente.
riebnahme sorg
n Sie das Gerät
tnissen. Verwen
er geben Sie kei
ut gemacht hab
rursacht durch
erlischt der
eine Haftung.
und Bedienung
ungsanleitung s
. Eine feuchte
ngreifen.
/SP2
os
io
y
ältig
en
ne
n.
des
onst
lane
20.12.2
11
9
©Velleman
v
Page 10

GZB8
5. Montage
Siehe Abbildungen, Seite 2 und 3 dieser Bedienungsanleitung.
Die Ecken bestimmen
Es ist wichtig, dass die vier Füße [4] ein Quadrat mit Seiten von 14’ (±427cm) bilden. Verwenden Sie die
Haken der 4 schwarzen Bänder, um die Position zu markieren (siehe Abb., Seite 2).
• Legen Sie den Haken von einem der 4 Bänder auf Position A. Markieren Sie diese Position mit einem
Hering.
• Rollen Sie zwei andere Bänder aus und legen Sie den einen Haken auf Position B und den anderen Haken
auf Position C. Beachten Sie, dass Sie einen Winkel von 90° haben. Der Abstand zwischen Punkt B und C
ist 19.8’ (±604cm).
• Machen Sie den Haken von Ecke A los und bewegen Sie ihn diagonal, um Ecke D zu finden.
• Installieren Sie einen Fuß [4] in jeder Ecke. Beachten Sie, dass der Winkel nach innen (in Richtung des
anderen Fußes) gerichtet ist.
Den Pavillon aufbauen
• Verbinden Sie vier Aufstellstangen mit dem zentralen Verbindungsstück.
• Stecken Sie vier anderen Aufstellstangen in die Stangen, die Sie schon mit dem zentralen
Verbindungsstück verbunden haben. Beachten Sie die Pfeil e auf den
• Stecken Sie jetzt Aufstellstangen in
Aufstellstangen aber noch nicht, um Probleme beim Befestigen der Abdeckplane zu vermeiden (siehe
Abb.). Beachten Sie, dass die Metallpins in die Schlitze der transversalen Verbindungsstücke eingerastet
sind.
• Entfalten Sie die Abdeckplane und ziehen Sie diese über die Struktur (mit den Ösen und
Klettverschlüssen nach unten).
• Montieren Sie jetzt die übrigen Aufstellstangen.
• Wickeln Sie die Klettverschlüsse um die Aufstellstangen.
• Stecken Sie die Aufstellstangen in die Füße.
• Stecken Sie Heringe durch die Löcher der Füße, um diese festzumachen.
• Wickeln Sie die Bänder um die Aufstellstangen und schließen Sie den Schnappverschluss. Spannen Sie die
Bänder straff.
• Stecken Sie die Haken am Ende der Abdeckplane in eines der Löcher im Fuß und spannen Sie auch die
Riemen an, indem Sie diese nach unten ziehen.
• Wenn nötig, befestigen Sie die Abspannleinen [b] an den Ösen [a] und verbinden Sie diese mit den
Heringen [c].
Den Pavillon abbauen
• Beim Abbau des Pavillons machen Sie es wie beim Aufbauen, nur umgekehrt.
• Beachten Sie, dass der Pavillon ganz trocken ist, bevor Sie es in die Transporttasche stecken!
•
die transversalen Verbindungsstücke. Montieren Sie die unteren
Stangen.
6. Technische Daten
Abmessungen
Raum
Frame
Gewicht 17kg
Verwenden Sie dieses Gerät nur mit originellen Zubehörteilen. Velleman NV übernimmt keine
Haftung für Schaden oder Verletzungen bei (falscher) Anwendung dieses Gerätes. Für mehr
Informationen zu diesem Produkt und die neueste Version dieser Bedienungsanleitung, siehe
www.perel.eu. Alle Änderungen ohne vorherige Ankündigung vorbehalten.
© URHEBERRECHT
Velleman NV besitzt das Urheberrecht für diese Bedienungsanleitung.
Alle weltweiten Rechte vorbehalten. Ohne vorherige schriftliche Genehmigung des Urhebers ist es nicht
gestattet, diese Bedienungsanleitung ganz oder in Teilen zu reproduzieren, zu kopieren, zu übersetzen, zu
bearbeiten oder zu speichern.
4.40 x 4.40m
232 cm (Mitte) / 190cm (Seiten)
Aufstellstangen aus Stahl, ø19 x 0.8mm
20.12.2011 ©Velleman nv
10
Page 11

0
1. I
n
o
i
n
m
d
m
d
a
e
o
o
ecom
r
o
a
m
m
f
m
o
i
m
o
r
r
t
e
eenc
e
v
r
v
r
a
a
d
o
a
o
r
p
a
t
o
a
f
c
a
s
2
a
u
e
o
t
v
z
o
u
c
s
c
d
n
ç
o
o
a
b
s
p
o
r
c
e
e
a
a
o
Z
a
u
r
s
q
c
u
t
s
m
a
s
d
a
e
e
m
s
o
t
t
r
m
ç
o
o
v
i
v
f
o
e
o
b
a
e
f
n
a
a
±
e
p
8
n
m
h
o
o
o
q
t
o
e
a
a
B
m
a
a
i
a
n
n
h
d
s
4
)
Obrigad
aparelh
distribu
2. I
• Fa
• Por
Os
• Util
co
• Os
gar
• Ke
3. N
• Nã
• Us
• Ce
bol
4. C
• teci
• co
• cor
• co
• incl
• ace
5. M
Veja as
Deter
É impor
cintas n
• Col
• Est
for
• Ret
• Col
Monta
• Int
• Ins
var
• De
inf
• Est
• Em
• En
• Int
• Pas
• En
• Int
par
20.12.2
trodução
a por ter adquiri
tenha sofrido
dor.
struções
Siga cuidad
Monte e des
Monte e des
muito vento
A lona é infl
ilarize-se com
razões de segu
anos causados
ize o aparelho a
pletamente a g
anos causados
ntia e o seu dis
p this manual f
rmas ger
abane o toldo.
apenas o toldo
pletamente.
tifique-se que o
r e poderá dani
racterísti
do em poliester
revestimento P
: cinza claro
cabos e 16 est
ui estojo de tran
ssórios opcionai
ontar
iguras da página
inar as esquin
tante que os 4 p
egras para marc
que o gancho d
que as outras d
am um ângulo
ire o gancho qu
que cada um d
o toldo
oduza as 4 vare
ale as outras 4
tas.
seguida, introdu
riores. Deste m
aixam nas ranh
nda a lona sobr
seguida, instale
olva as varetas
oduza as vareta
se as estacas pe
olva as varetas
oduza o gacho
baixo para esti
11
Ma
do o GZB8! Leia
lgum dano dura
e seguran
samente as isnt
monte o toldo c
monte o toldo c
.
mável. Nunca f
funcionamento
ança, estão proí
por modificaçõe
enas para as a
rantia.
pelo não respeit
ribuidor não se
r future referen
is
Evite usar força
para as aplicaçõ
toldo está compl
icar as fibras e
as
de alta densidad
U e à prova de r
cas
sporte sólido (p
: lona lateral G
e 3 deste manu
s
és [4] formem
ar a posição (ve
e uma das cinta
as cintas e colo
de 90°. A distân
se encontra na
s pés [4] numa
as na peça de j
aretas nas vare
a as varetas na
do evitará probl
ras da peça de
e a armação (co
as outras varet
om as cintas co
nos pés.
los furos dos pé
om as cintas de
a extremidade
car a lona.
GZB
nual do
atentamente as
te o transporte
a
ruções deste ma
m a ajuda a du
m condições m
ça fogueiras ou
do aparelho ant
idas quaisquer
não autorizada
licações descrita
das instruções
á responsável p
e.
xcessiva duran
s descritas nest
etamente seco a
tela.
e (160gr/m²)
ios UV 30+
liester)
B8/SP1, lona la
l do utilizado
m quadrado co
fig. pág. 2)
negras na posi
ue os respectiv
ia entre o pont
posição A e mo
esquina.
nção central.
as que introduz
peças de junçã
emas ao montar
ontagem trans
m as anilhas e a
s.
m fecho de ganc
para os fixar.
cada esquina e
a lona num dos
.
11
8
utilizad
instruções do m
não o instale e
nual do utilizado
s pessoa.
teorológicas fav
churrascos por
s de o usar.
odificações ao
, não estão cob
s neste manual.
de segurança re
r qualquer dano
e o manuseame
e manual. O uso
ntes de o guard
eral com 2 janel
lados de 14’ (
ão A e marque
s ganchos nas
B e C é de 19.
a-o na diagonal
u na peça de ju
o transversais
a lona (ver fig.)
ersal.
s cintas com fec
ho.
feche as fivelas.
uros do pé para
r
anual antes de
ntre em contact
r.
ráveis. Nunca u
aixo ou perto d
parelho desde
rtos pela garan
O uso incorrect
eridas neste ma
ou outros probl
to e instalação.
indevido anula
r. A lona húmid
s e 1 porta GZ
427cm). Utilice
sta posição co
osições B e C. C
’ (±604cm).
para encontrar
ção central. Sig
as sem introduz
. Verifique se os
o de gancho vir
Puxe as cintas p
enganchar a lo
usar. Caso o
com o seu
e o toldo caso
toldo.
ue não autoriza
ia.
anula
nual anulam a
mas resultante
garantia
pode provocar
8/SP2
os ganchos das
uma estaca.
ertifique-se que
posição D.
as setas na
r as varetas
pins de metal
das para baixo
ara as esticar.
a e puxe a cinta
©Velleman
aja
as.
.
.
v
Page 12

• Caso seja necessário, fixe os cabos [b] aos olhais [a] e junte-os com as estacas [c].
Desmontar o toldo
• Para desmontar o toldo e guardá-lo, siga os passos indicados para a montagem mas na ordem inversa.
• Certifique-se que o toldo está completamente seco antes de o guardar na bolsa de transporte!
6. Especificações
dimensões 4.40 x 4.40m
espaço 232 cm (centro) / 190cm (lados)
estrutura varetas em aço, ø19 x 0.8mm
peso 17kg
Utilize este aparelho apenas com os acessórios originais. A Velleman NV não será responsável por
quaisquer danos ou lesões causadas pelo uso (indevido) do aparelho. Para más información sobre
este producto e para consultar a versão mais recente deste manual do utilizador, visite nuestra
página www.perel.eu. Podem alterar-se as especificações e o conteúdo deste manual sem aviso
prévio.
© DIREITOS DE AUTOR
A Velleman NV detem os direitos de autor deste manual do utilizador.
Todos os direitos mundiais reservados. É estrictamente proíbido reproduzir, traduzir, copiar, editar e gravar
este manual do utilizador ou partes deste sem prévia autorização escrita por parte da detentora dos direitos.
GZB8
20.12.2011 ©Velleman nv
12
Page 13

Velleman® Service and Quality Warranty
Velleman® has over 35 years of experience in the
electronics world and distributes its products in
more than 85 countries.
All our products fulfil strict qu ality requirements and
legal stipulations in the EU. In order to ensure the
quality, our products regularly go through an extra
quality check, both by an internal quality
department and by specialized external
organisations. If, all precautionary measures
notwithstanding, problems should occur, please
make appeal to our warranty (see guarantee
conditions).
General Warranty Conditions Concerning
Consumer Products (for EU):
• All consumer products are subject to a 24-month
warranty on production flaws and defective material
as from the original date of purchase.
• Velleman® can decide to replace an article with
an equivalent article, or to refund the retail value
totally or partially when the complaint is valid and a
free repair or replacement of the article is
impossible, or if the expenses are out of proportion.
You will be delivered a replacing article or a refund
at the value of 100% of the purchase price in case
of a flaw occurred in the first year after the date of
purchase and delivery, or a replacing article at 50%
of the purchase price or a refund at the value of
50% of the retail value in case of a flaw occurred in
the second year after the date of purchase and
delivery.
• Not covered by warranty:
- all direct or indirect damage caused after delivery
to the article (e.g. by oxidation, shocks, falls, dust,
dirt, humidity...), and by the article, as well as its
contents (e.g. data loss), compensation for loss of
profits;
- frequently replaced consumable goods, parts or
accessories such as batteries, lamps, rubber parts,
drive belts... (unlimited list);
- flaws resulting from fire, water damage, lightning,
accident, natural disaster, etc. …;
- flaws caused deliberately, negligently or resulting
from improper handling, negligent maintenance,
abusive use or use contrary to the manufacturer’s
instructions;
- damage caused by a commercial, professional or
collective use of the article (the warranty validity
will be reduced to six (6) months when the article is
used professionally);
- damage resulting from an inappropriate packing
and shipping of the article;
- all damage caused by modification, repair or
alteration performed by a third party without
written permission by Velleman®.
• Articles to be repaired must be delivered to your
Velleman® dealer, solidly packed (preferably in the
original packaging), and be completed with the
original receipt of purchase and a clear flaw
description.
• Hint: In order to save on cost and time, please
reread the manual and check if the flaw is caused
by obvious causes prior to presenting the article for
repair. Note that returning a non-defective article
can also involve handling costs.
• Repairs occurring after warranty expiration are
subject to shipping costs.
• The above conditions are without prejudice to all
commercial warranties.
The above enumeration is subject to
modification according to the article (see
article’s manual).
Garantie de service et de qualité Velleman®
Velleman® jouit d’une expérience de plus de 35 ans
dans le monde de l’électronique avec une
distribution dans plus de 85 pays.
Tous nos produits répondent à des exigences de
qualité rigoureuses et à des dispositions légales en
vigueur dans l’UE. Afin de garantir la qualité, nous
soumettons régulièrement nos produits à des
contrôles de qualité supplémentaires, tant par notre
propre service qualité que par un serv ice qualité
externe. Dans le cas improbable d’un défaut malgré
toutes les précautions, il est possible d’invoquer
notre garantie (voir les conditions de garantie).
Conditions générales concernant la garantie
sur les produits grand public (pour l’UE) :
• tout produit grand public est garanti 24 mois
contre tout vice de production ou de matériaux à
dater du jour d’acquisition effective ;
• si la plainte est justifiée et que la réparation ou le
remplacement d’un article est jugé impossible, ou
lorsque les coûts s’avèrent disproportionnés,
Velleman® s’autorise à remplacer ledit article par
un article équivalent ou à rembourser la totalité ou
une partie du prix d’achat. Le cas échéant, il vous
sera consenti un article de remplacement ou le
remboursement complet du prix d’achat lors d’un
défaut dans un délai de 1 an après l’achat et la
livraison, ou un article de remplacement moyennant
50% du prix d’achat ou le remboursement de 50%
du prix d’achat lors d’un défaut après 1 à 2 ans.
• sont par conséquent exclus :
- tout dommage direct ou indirect survenu à l’article
après livraison (p.ex. dommage lié à l’oxydation,
choc, chute, poussière, sable, impureté…) et
provoqué par l’appareil, ainsi que son contenu
(p.ex. perte de données) et une indemnisat ion
éventuelle pour perte de revenus ;
- tout bien de consommation ou accessoire, ou
pièce qui nécessite un remplacement régulier
comme p.ex. piles, ampoules, pièces en
caoutchouc, courroies… (liste illimitée) ;
- tout dommage qui résulte d’un incendie, de la
foudre, d’un accident, d’une catastrophe naturelle,
etc. ;
- out dommage provoqué par une négligence,
volontaire ou non, une utilisation ou un entretien
incorrect, ou une utilisation de l’appareil contraire
aux prescriptions du fabricant ;
Page 14

- tout dommage à cause d’une utilisation
commerciale, professionnelle ou collective de
l’appareil (la période de garantie sera réduite à 6
mois lors d’une utilisation professionnelle) ;
- tout dommage à l’appareil qui résulte d’une
utilisation incorrecte ou différente que celle pour
laquelle il a été initialement prévu comme décrit
dans la notice ;
- tout dommage engendré par un retour de
l’appareil emballé dans un conditionnement non ou
insuffisamment p ro t ég é.
- toute réparation ou modification effectuée par une
tierce personne sans l’autorisation explicite de SA
Velleman® ; - frais de transport de et vers
Velleman® si l’appareil n’est plus couvert sous la
garantie.
• toute réparation sera fournie par l’endroit de
l’achat. L’appareil doit nécessairement être
accompagné du bon d’achat d’origine et être
dûment conditionné (de préférence dans
l’emballage d’origine avec mention du défaut) ;
• tuyau : il est conseillé de consulter la notice et de
contrôler câbles, piles, etc. avant de retourner
l’appareil. Un appareil retourné jugé défectueux qui
s’avère en bon état de marche pourra faire l’objet
d’une note de frais à charge du consommateur ;
• une réparation effectuée en-dehors de la période
de garantie fera l’objet de frais de transport ;
• toute garantie commerciale ne porte pas atteinte
aux conditions susmentionnées.
La liste susmentionnée peut être sujette à une
complémentation selon le type de l’article et
être mentionnée dans la notice d’emploi.
Velleman® service- en kwaliteitsgarantie
Velleman® heeft ruim 35 jaar ervaring in de
elektronicawereld en verdeelt in meer dan 85
landen.
Al onze producten beantwoorden aan strikte
kwaliteitseisen en aan de wettelijke bepalingen
geldig in de EU. Om de kwaliteit te waarborgen,
ondergaan onze producten op regelmatige
tijdstippen een extra kwaliteitscontrole, zowel door
onze eigen kwaliteitsafdeling als door externe
gespecialiseerde organisaties. Mocht er ondanks
deze voorzorgen toch een probleem optreden, dan
kunt u steeds een beroep doen op onze waarborg
(zie waarborgvoorwaarden).
Algemene waarborgvoorwaarden
consumentengoederen (voor Europese Unie):
• Op alle consumentengoederen geldt een
garantieperiode van 24 maanden op productie- en
materiaalfouten en dit vanaf de oorspronkelijke
aankoopdatum.
• Indien de klacht gegrond is en een gratis reparatie
of vervanging van een artikel onmogelijk is of indien
de kosten hiervoor buiten verhouding zijn, kan
Velleman® beslissen het desbetreffende artikel te
vervangen door een gelijkwaardig artikel of de
aankoopsom van het artikel gedeeltelijk of volledig
terug te betalen. In dat geval krijgt u een
vervangend product of terugbetaling ter waarde van
100% van de aankoopsom bij ontdekking van een
gebrek tot één jaar na aankoop en levering, of een
vervangend product tegen 50% van de kostprijs of
terugbetaling van 50 % bij ontdekking na één jaar
tot 2 jaar.
• Valt niet onder waarborg:
- alle rechtstreekse of onrechtstreekse schade na de
levering veroorzaakt aan het toestel (bv. door
oxidatie, schokken, val, stof, vuil, vocht...), en door
het toestel, alsook zijn inhoud (bv. verlies van
data), vergoeding voor eventuele winstderving.
- verbruiksgoederen, onderdelen of hulpstukken die
regelmatig dienen te worden vervangen, zoals bv.
batterijen, lampen, rubberen onderdelen,
aandrijfriemen... (onbeperkte lijst).
- defecten ten gevolge van brand, waterschade,
bliksem, ongevallen, natuurrampen, enz.
- defecten veroorzaakt door opzet, nalatigheid of
door een onoordeelkundige behandeling, slecht
onderhoud of abnormaal gebruik of gebruik van het
toestel strijdig met de voorschriften van de
fabrikant.
- schade ten gevolge van een commercieel,
professioneel of collectief gebruik van het apparaat
(bij professioneel gebruik wordt de garantieperiode
herleid tot 6 maand).
- schade veroorzaakt door onvoldoende
bescherming bij transport van het apparaat.
- alle schade door wijzigingen, reparaties of
modificaties uitgevoerd door derden zonder
toestemming van Velleman®.
• Toestellen dienen ter reparatie aangeboden te
worden bij uw Velleman®-verdeler. Het toestel
dient vergezeld te zijn van het oorspronkelijke
aankoopbewijs. Zorg voor een degelijke verpakking
(bij voorkeur de originele verpakking) en voeg een
duidelijke foutomschrijving bij.
• Tip: alvorens het toestel voor reparatie aan te
bieden, kijk nog eens na of er geen voor de hand
liggende reden is waarom het toestel niet naar
behoren werkt (zie handleiding). Op deze wijze kunt
u kosten en tijd besparen. Denk eraan dat er ook
voor niet-defecte toestellen een kost voor controle
aangerekend kan worden.
• Bij reparaties buiten de waarborgperiode zullen
transportkosten aangerekend worden.
• Elke commerciële garantie laat deze rechten
onverminderd.
Bovenstaande opsomming kan eventueel
aangepast worden naargelang de aard van het
product (zie handleiding van het betreffende
product).
Garantía de servicio y calidad Velleman®
Velleman® disfruta de una experiencia de más de
35 años en el mundo de la electrónica con una
distribución en más de 85 países. Todos nuestros
productos responden a normas de calidad rigurosas
y disposiciones legales vigentes en la UE. Para
garantizar la calidad, sometemos nuestros
productos regularmente a controles de calidad
adicionales, tanto a través de nuestro propio
Page 15

servicio de calidad como de un servicio de calidad
externo. En el caso improbable de que surgieran
problemas a pesar de todas las precauciones, es
posible recurrir a nuestra garantía (véase las
condiciones de garantía).
Condiciones generales referentes a la garantía
sobre productos de venta al público (para la
Unión Europea):
• Todos los productos de venta al público tienen un
período de garantía de 24 meses contra errores de
producción o errores en materiales desde la
adquisición original;
• Si la queja está fundada y si la reparación o
sustitución de un artículo no es posible, o si los
gastos son desproporcionados, Velleman® autoriza
reemplazar el artículo por un artículo equivalente o
reembolsar la totalidad o una parte del precio de
compra. En este caso, usted recibirá un artículo de
recambio o el reembolso completo del precio de
compra si encuentra algún fallo hasta un año
después de la compra y entrega, o un artículo de
recambio al 50% del precio de compra o el
reembolso del 50% del precio de compra si
encuentra un fallo después de 1 año y hasta los 2
años después de la compra y entrega.
Por consiguiente, están excluidos entre otras
cosas:
- todos los daños causados directa o indirectamente
al aparato (p.ej. por oxidación, choques, caída,...) y
a su contenido (p.ej. pérdida de datos) después de
la entrega y causados por el aparato, y cualquier
indemnización por posible pérdida de ganancias;
- partes o accesorios que deban ser reemplazados
regularmente, como por ejemplo baterías,
lámparas, partes de goma, etc. (lista ilimitada)
- defectos causados por un incendio, daños
causados por el agua, rayos, accidentes, catástrofes
naturales, etc.;
- defectos causados a conciencia, descuido o por
malos tratos, un mantenimiento inapropiado o un
uso anormal del aparato contrario a las
instrucciones del fabricante;
- daños causados por un uso comercial, profesional
o colectivo del aparato (el período de garantía se
reducirá a 6 meses con uso profesional);
- daños causados por un uso incorrecto o un uso
ajeno al que está previsto el producto inicialmente
como está descrito en el manual del usuario;
- daños causados por una protección insuficiente al
transportar el aparato.
- daños causados por reparaciones o modificaciones
efectuadas por una tercera persona sin la
autorización explícita de Velleman®;
- se calcula gastos de transporte de y a Velleman®
si el aparato ya no está cubierto por la garantía.
• Cualquier artículo que tenga que ser reparado
tendrá que ser devuelto a su distribuidor
Velleman®. Devuelva el aparato con la factura de
compra original y transpórtelo en un embalaje
sólido (preferentemente el embalaje original).
Incluya también una buena descripción del fallo;
• Consejo: Lea el manual del usuario y controle los
cables, las pilas, etc. antes de devolver el aparato.
Si no se encuentra un defecto en el artículo los
gastos podrían correr a cargo del cliente;
• Los gastos de transporte correrán a carga del
cliente para una reparación efectuada fuera del
período de garantía.
• Cualquier gesto comercial no disminuye estos
derechos.
La lista previamente mencionada puede ser
adaptada según el tipo de artículo (véase el
manual del usuario del artículo en cuestión).
Velleman® Service- und Qualitätsgarantie
Velleman® hat gut 35 Jahre Erfahrung in der
Elektronikwelt und vertreibt seine Produkte in über
85 Ländern.
Alle Produkte entsprechen den strengen
Qualitätsforderungen und gesetzlichen
Anforderungen in der EU. Um die Qualität zu
gewährleisten werden unsere Produkte regelmäßig
einer zusätzlichen Qualitätskontrolle unterworfen,
sowohl von unserer eigenen Qualitätsabteilung als
auch von externen spezialisierten Organisationen.
Sollten, trotz aller Vorsichtsmaßnahmen, Probleme
auftreten, nehmen Sie bitte die Garantie in
Anspruch (siehe Garantiebedingungen).
Allgemeine Garantiebedingungen in Bezug auf
Konsumgüter (für die Europäische Union):
• Alle Produkte haben für Material- oder
Herstellungsfehler eine Garantieperiode von 24
Monaten ab Verkaufsdatum.
• Wenn die Klage berechtigt ist und falls eine
kostenlose Reparatur oder ein Austausch des
Gerätes unmöglich ist, oder wenn die Kosten dafür
unverhältnismäßig sind, kann Velleman® sich
darüber entscheiden, dieses Produkt durch ein
gleiches Produkt zu ersetzen oder die Kaufsumme
ganz oder teilweise zurückzuzahlen. In diesem Fall
erhalten Sie ein Ersatzprodukt oder eine
Rückzahlung im Werte von 100% der Kaufsumme
im Falle eines Defektes bis zu 1 Jahr nach Kauf oder
Lieferung, oder Sie bekommen ein Ersatzprodukt im
Werte von 50% der Kaufsumme oder eine
Rückzahlung im Werte von 50 % im Falle eines
Defektes im zweiten Jahr.
• Von der Garantie ausgeschlossen sind:
- alle direkten oder indirekten Schäden, die nach
Lieferung am Gerät und durch das Gerät verursacht
werden (z.B. Oxidation, Stöße, Fall, Staub,
Schmutz, Feuchtigkeit, ...), sowie auch der Inhalt
(z.B. Datenverlust), Entschädigung für eventuellen
Gewinnausfall.
- Verbrauchsgüter, Teile oder Zubehörteile, die
regelmäßig ausgewechselt werden, wie z.B.
Batterien, Lampen, Gummiteile, Treibriemen, usw.
(unbeschränkte Liste).
- Schäden verursacht durch Brandschaden,
Wasserschaden, Blitz, Unfälle, Naturkatastrophen,
usw.
- Schäden verursacht durch absichtliche,
nachlässige oder unsachgemäße Anwendung,
schlechte Wartung, zweckentfremdete Anwendung
oder Nichtbeachtung von Benutzerhinweisen in der
Page 16

Bedienungsanleitung.
- Schäden infolge einer kommerziellen,
professionellen oder kollektiven Anwendung des
Gerätes (bei gewerblicher Anwendung wird die
Garantieperiode auf 6 Monate zurückgeführt).
- Schäden verursacht durch eine unsachgemäße
Verpackung und unsachgemäßen Transport des
Gerätes.
- alle Schäden verursacht durch unautorisierte
Änderungen, Reparaturen oder Modifikationen, die
von einem Dritten ohne Erlaubnis von Velleman®
vorgenommen werden.
• Im Fall einer Reparatur, wenden Sie sich an Ihren
Velleman®-Verteiler. Legen Sie das Produkt
ordnungsgemäß verpackt (vorzugsweise die
Originalverpackung) und mit dem OriginalKaufbeleg vor. Fügen Sie eine deutliche
Fehlerbeschreibung hinzu.
• Hinweis: Um Kosten und Zeit zu sparen, lesen Sie
die Bedienungsanleitung nochmals und überprüfen
Sie, ob es keinen auf de Hand liegenden Grund gibt,
ehe Sie das Gerät zur Reparatur zurückschicken.
Stellt sich bei der Überprüfung des Gerätes heraus,
dass kein Geräteschaden vorliegt, könnte dem
Kunden eine Untersuchungspauschale berechnet.
• Für Reparaturen nach Ablauf der Garantiefrist
werden Transportkosten berechnet.
• Jede kommerzielle Garantie lässt diese Rechte
unberührt.
Die oben stehende Aufzählung kann eventuell
angepasst werden gemäß der Art des
Produktes (siehe Bedienungsanleitung des
Gerätes).
Garantia de serviço e de qualidade Velleman®
Velleman® tem uma experiência de mais de 35
anos no mundo da electrónica com uma distribuição
em mais de 85 países.
Todos os nossos produtos respondem a exigências
rigorosas e a disposições legais em vigor na UE.
Para garantir a qualidade, submetemos
regularmente os nossos produtos a controles de
qualidade suplementares, com o nosso próprio
serviço qualid ade como um serviço de qualidade
externo. No caso improvável de um defeito mesm o
com as nossas precauções, é possível invocar a
nossa garantia. (ver as condições de garantia).
Condições gerais com respeito a garantia
sobre os produtos grande público (para a UE):
• qualquer produto grande público é garantido 24
mês contra qualquer vício de produção ou materiais
a partir da data de aquisição efectiva;
• no caso da reclamação ser justificada e que a
reparação ou substituição de um artigo é
impossível, ou quando os custo são
desproporcionados, Velleman® autoriza-se a
substituir o dito artigo por um artigo equivalente ou
a devolver a totalidade ou parte do preço de
compra. Em outro caso, será consentido um artigo
de substituição ou devolução completa do preço de
compra no caso de um defeito no prazo de 1 ano
depois da data de compra e entrega, ou um artigo
de substituição pagando o valor de 50% do preço
de compra ou devolução de 50% do preço de
compra para defeitos depois de 1 a 2 anos.
• estão por consequência excluídos :
- todos os danos directos ou indirectos depois da
entrega do artigo (p.ex. danos ligados a oxidação,
choques, quedas, poeiras, areias, impurezas…) e
provocado pelo aparelho, como o seu conteúdo
(p.ex. perca de dados) e uma indemnização
eventual por perca de receitas ;
- todos os bens de consumo ou acessórios, ou peças
que necessitam uma substituição regular e normal
como p.ex. pilhas, lâmpadas, peças em borracha,
correias… (lista ilimitada) ;
- todos os danos que resultem de um incêndio,
raios, de um acidente, de una catastrophe natural,
etc. ;
- danos provocados por negligencia, voluntária ou
não, uma utilização ou manutenção incorrecta, ou
uma utilização do aparelho contrária as prescrições
do fabricante ;
- todos os danos por causa de uma utilização
comercial, profissional ou colectiva do aparelho ( o
período de garantia será reduzido a 6 meses para
uma utilização profissional);
- todos os danos no aparelho resultando de uma
utilização incorrecta ou diferente daquela
inicialmente p revista e descrita no manual de
utilização ;
- todos os danos depois de uma devolução não
embalada ou mal protegida ao nível do
acondicionamento.
- todas as reparações ou modificações efectuadas
por terceiros sem a autorização de SA Velleman®;
- despesas de transporte de e para Velleman® se o
aparelho não estiver coberto pela garantia.
• qualquer reparação será fornecida pelo local de
compra. O aparelho será
obrigatoriamente acompanhado do talão ou factura
de origem e bem acondicionado (de
preferência dentro da embalagem de origem com
indicação do defeito ou avaria) ;
• dica : aconselha-mos a consulta do manual e
controlar cabos, pilhas, etc. antes de
devolver o aparelho. Um aparelho devolvido que
estiver em bom estado será cobrado despesas a
cargo do consumidor ;
• uma reparação efectuada fora da garantia, será
cobrado despesas de transporte ;
• qualquer garantia comercial não prevalece as
condições aqui mencionadas.
A lista pode ser sujeita a um complemento
conforme o tipo de artigo e estar mencionada
no manual de utilização.
 Loading...