

Page 1
CS9000 1 VELLEMAN
CS9000 – PROFESSIONAL METAL DETECTOR
1. Introduction & Features
Thank you for buying the CS9000! Please read the manu al thor oughly befor e br i nging this device into service.
If the device was damaged in transit, don't install or use i t and contact your dealer.
This high-quality metal detector offers value for money and uses the latest technological developments. Read the
manual carefully as it will enable you to enjoy the full range of possibilities this device has to offer. We advise you to
experiment with objects you have buried yourself. This is a very efficient way of getting to know the behaviour of your
detector and the different types of signals.
Always remember that becoming a proficient user requires many hours of practice.
2. Safety Instructions
• Damage caused by user modifications or disregard of certain guidelines in this manual is not covered by the
warranty and the dealer will not accept responsibility for any ensuing defects or problems.
• Do not switch the device on immediately after it has been exposed to changes in temperature. Protect the device
against damage by leaving it switched off until it has reached room temperature.
• Familiarise yourself with the functions of the device before actually using it. Do not allow operation by unqualified
people. Any damage that may occur will most probably be due to unprofessional use of the device.
• Use the original packaging if the device is to be transported.
• All modifications of the device are forbidden for safety reasons.
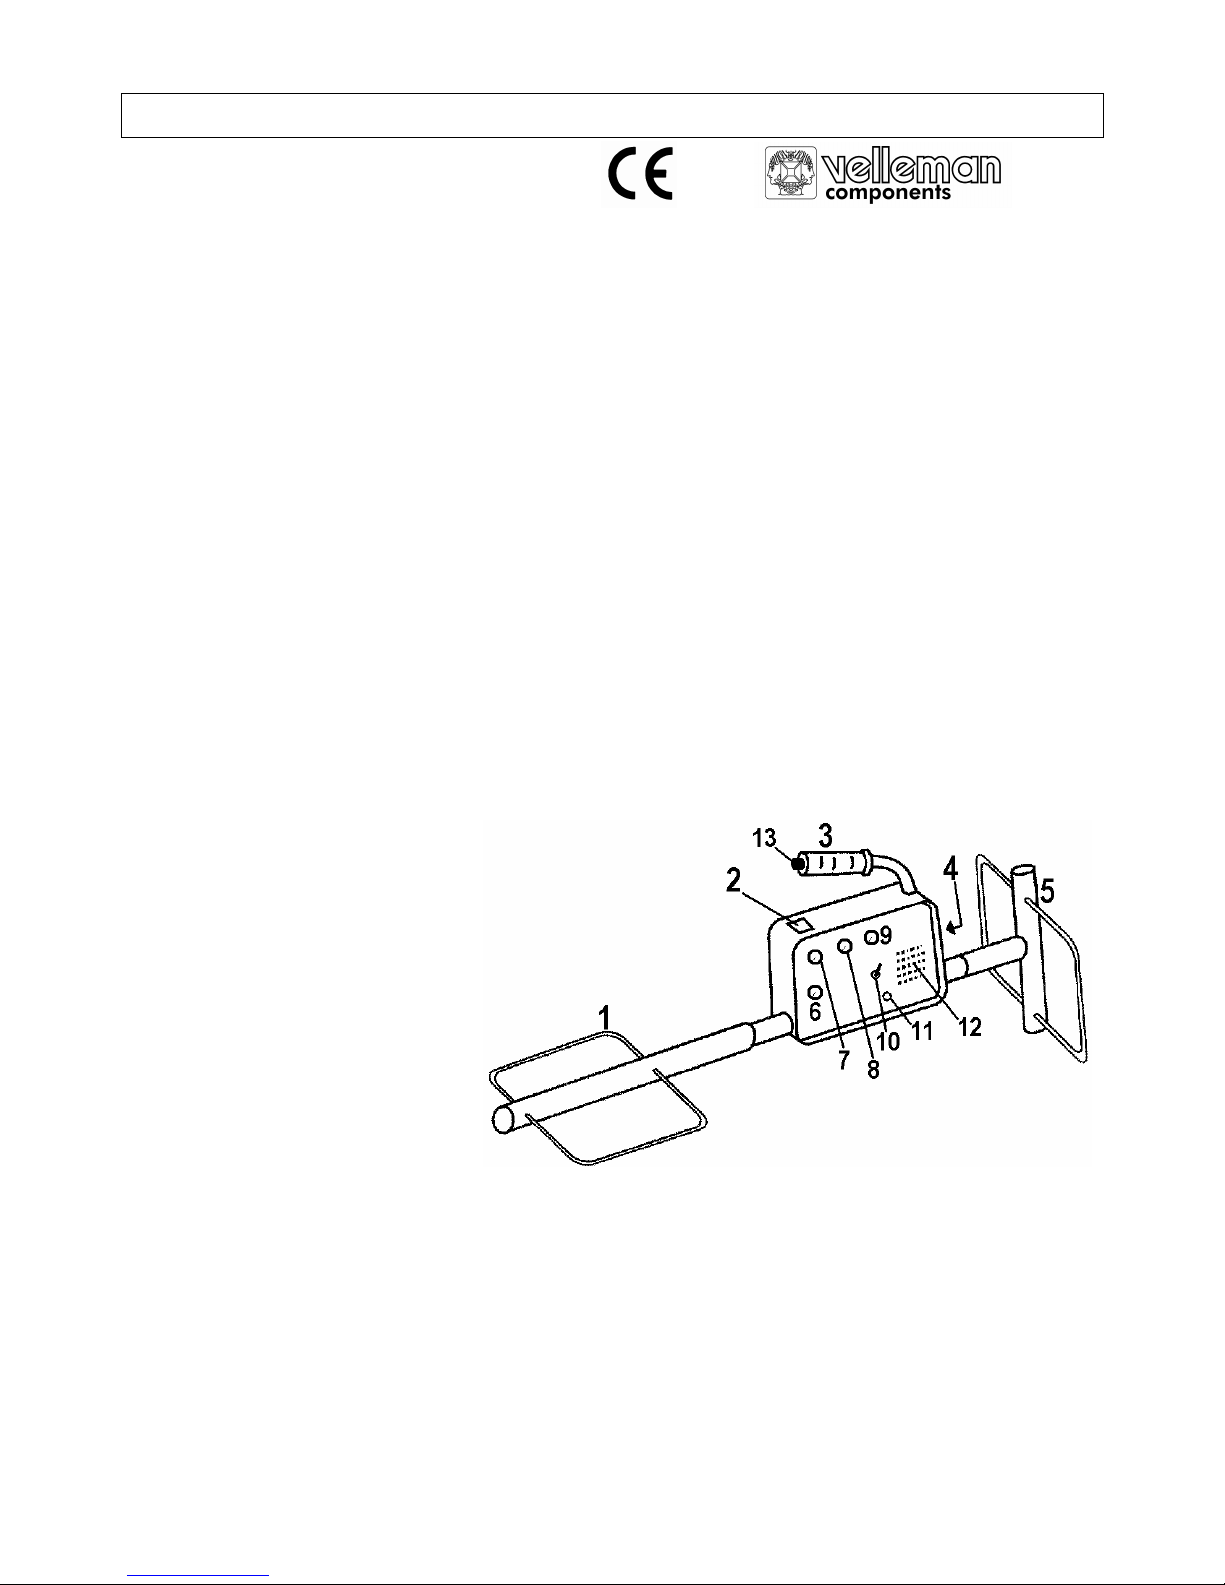
3. Assembly and Parts Denomination
Assemble the device as shown in the figure below:
1. Receive antenna
2. Meter
3. Handle
4. Battery compartment
5. Transmit antenna
6. Signal balance control
7. Ground balance control
8. Threshold control
9. Mode selector
10. Automatic threshold on/off selector
11. 6.35mm headphones socket
12. Built-in speaker
13. Thumb button
4. Battery replacement
• Make sure the Mode selector (#9 in the figure above) is set to “OFF”.
• Open the battery compartment (#4) by simply pulling the knob.
• Tilt the metal detector so the battery holder slides out.
• Open the battery holder by pressing the 2 locking tabs on one side until they unlock and then pressing the 2
locking tabs on the other side until the lid slips off.
• Place or replace the batteries with new batteries of the same type and rating.
• Close the battery holder, slide it in its compartment and close the battery compartment by first closing the lid
completely and then pressing the knob to lock it.
Page 2

CS9000 2 VELLEMAN
5. Controls
a. Mode Switch (p.1 #9)
This button switches between these functions:
• OFF (power off): Set the button to this position when you are not using the CS9000.
• METAL: in this mode the ground balance is operating and all metal objects such as gold, silver, coins, or even a
septic tank lid can be detected. The metal mode allows of the greatest ground penetration.
• CAVE: in this mode the ground balance is not operating, and the detector responds to all ground mineralisation
changes. Because voids such as holes or caves have a distinct absence of mineralisation, the CS9000 responds
by an increase in sound. Generally, a sound decrease indicates an increase of mineralisation.
This mode allows detection of caves and other voids where treasures may be hidden. The use of this mode
requires a very carefully planned search pattern, paying particular attention to broad changes in the sound.
• BAT CHK: in this mode you can read the condition of the batteries on the meter (P.1 #2).
b. Signal Balance (p.1 #6)
This control adjusts the signal balance or detection depth of the detector. The best position is in the NORMAL range
for most searching conditions. This will provide more than adequate depth with optimal stability. If ground or
interfering radio/electrical signals cause erratic behaviour (extreme fluctuations of the threshold tone), the signal
balance control should be set towards the MIN setting. If greater depths are required, the signal balance control may
be advanced further clockwise. Caution should be exercised when increasing beyond the NORMAL range. If the
detector operates erratically because of a higher setting, the response of deeper targets may be missed. The
NORMAL range offers the optimum setting for smooth operation allowing deep targets to be heard clearly.
c. Ground Balance (p.1 #7)
This control is only operational when the METAL mode is selected. It is adjusted to cancel out the mineralisation in
the ground and allow for maximum penetration. This allows the detection of objects that would otherwise not be able
to be detected because of the presence of mineral in the soil. To start out, put the ground balance control in the
NORMAL range. For higher mineralisation the control is rotated towards the (+) sign and subsequently towards the () sign for reduced mineralisation. Make sure that the automatic threshold control (P.1 #10) is set to NO-AUTO when
adjusting the ground balance control. The method to use for adjusting this control is covered under the section on
OPERATION.
d. Threshold (p.1 #8)
This control adjusts the audio tone volume of the background noise, commonly called 'threshold'. To adjust this
optimally, the sound should barely be audible. It may be necessary to use a higher setting when using the device in a
noisy environment. Generally, the lower the setting, the deeper the detection.
e. Automatic Threshold (p.1 #10)
This feature is a 'self-adjusting' threshold, often referred to as 'motion mode', that maintains a smooth operating
threshold, or background 'hum', when the detector is operated. This hum may drift up or down because of ground
mineralisation changes that are present from one place to another during searching. Even though large changes in
ground mineralisation will still require adjustment of the ground balance control, the smaller variations can be
overcome with the automatic threshold feature. If the sound is permitted to drift too far from the proper setting, the
depth performance of the instrument will decrease somewhat leaving some targets undetected. To activate the
Automatic Threshold feature, simply move the switch to AUTO. It is necessary to keep the detector in motion while
the automatic threshold is in operation. Standing still over a target will result in the signal slowly fading away.
With the switch set to NO-AUTO, the ground balance is the only control compensating for ground mineralisation.
Page 3

CS9000 3 VELLEMAN
f. Headphones Socket (p.1 #11)
The speaker is automatically disconnected as soon as the headphones are plugged in. Use of a headphone will
produce maximum detection depth and longest battery life. The headphones have to be equipped with a 6.35mm
(1/4") plug and preferably with a stereo/mono switch.
g. Thumb Set (p.1 #13)
The thumb set control is located at the tip of the handle. Its use will be explained below.
6. Operation
a. Ground Balance Metal Mode
1. Set the signal balance (p.1 #6), ground balance (#7) and threshold (#8) control knobs to the centre of the normal
range. Set the automatic threshold control (#10) to auto
2. Turn the mode control (#9) to BAT CHK and check the meter (#2) to determine the condition of the battery pack.
Then turn the mode control to the METAL position. For most locations this setting is suitable. However, if further
adjustment is needed for ground mineralisation, proceed as follows:
b. Ground Balance Procedure
1. Set the automatic threshold switch (#10) to NO-AUTO. Make sure the detector is well away from all large metal
objects such as cars, pipes etc.
2. Remove all metal objects from your person such as belt buckles, car keys, watches, knives etc.
3. Hold the detector at arms length by your side in a comfortable carrying position, resulting in a distance of
approximately 18 inches from the ground. Keeping the instrument level, press the thumb set control (#13) and
release. The threshold tone is heard and the meter will indicate approx. 20. Slowly raise the device approx. 6
inches. If the tone changes little or none, the setting is adequate for searching that area.
Activate the automatic threshold (#10) and begin searching. If the tone should not change significantly during the
search, switch the automatic threshold back off and proceed in the following manner:
4. If the tone and meter reading went down when the instrument was raised, the ground balance control needs to be
moved slightly in the counterclockwise (-) direction. Lower the detector back to arm's length, press the thumb set
control (#13) to re-tune, release and again slowly raise the detector by 6 inches. If the tone continues to go down,
repeat the procedure until the tone and the meter reading remain more or less the same in both positions. If the
tone and meter reading go up when the CS9000 is raised, the ground balance (#7) is too far toward the (-) and
must be turned clockwise.
The ground balance procedure becomes more critical as the signal balance is increased. The signal balance control
(#6) does not need to be advanced past the NORMAL range for most applications. If the ground balance procedure
cannot be accomplished as outlined above, try a different location as you may stand above a buried metal object.
c. Locating Buried Metal Objects
The most efficient way to search an area is to use a grid-like pattern over the selected area. To minimise the chance
of missing objects the maximum distance between grid lines should be no more than 6 feet. Making several passes
in one direction then covering the same space at a right angle to your original direction is the best system not to miss
a buried object.
It is normal for a fluctuating background noise to be heard with the signal from a target coming through much more
loudly. Sometimes deeper targets will appear toward the rear of the device. However the difference will usually be no
more than 3 or 4 inches from the front loop, even for the deepest target.
The volume will increase and the me ter will read higher as the CS9000 is passed over a buried metal object.
Remember to keep the detector in motion when trying to locate the centre of a target.
Page 4

CS9000 4 VELLEMAN
d. Pinpointing
In the automatic threshold off position, a surface target can appear to be very large, which is normal. Now the target
must be 'narrowed down' to determine its location more accurately. Start to pass over the target from one direction,
when the meter goes 'off scale' press the thumb set control briefly to bring the meter back on scale. Continue to
cross the target in the same direction and repea t the pressing of the switch. There will be a point where the meter
reading and speaker tone will 'peak out' and start to drop back down. It is at this peak that the front loop is over the
buried metal object. Pressing and relea s ing the thumb set control will cause the target to appear to shrink, making
pinpointing easier. The automatic threshold allows the pinpointing to take place automatically.
e. Locating Caves and Other Voids
1. Set the mode switch to the CAVE position and set the signal balance, ground balance and threshold controls to
the normal range. The signal balance control may be readjusted to optimise for the location you are hunting in just
as described under "6a. Ground Balance Metal Mode" on p.3.
2. The automatic threshold may be on or off, whichever gives you the smoothest performance and is the most
comfortable. If there are rapid ground changes and there is difficulty maintaining a threshold, the best choice is to
activate it. If you are an experienced user, you may prefer to leave it off. Always keep the device at the same
distance from the surface in order to avoid false indications.
It is not recommended that you search in this mode unless you are looking for changes in ground density.
Operation in the CAVE mode will produce a positive sound for all non-ferrous metals such as gold or silver, and will
produce the same response for voids, such as a cave. When a ferrous target such as iron is encountered, or when
there is heavy iron mineralisation, the sound will respond by going quiet.
Since the ground balance is not affected in the CAVE mode, leave the ground balance control at the normal range.
Because ground mineralisation is not cancelled, the CAVE mode does not achieve the same depth as the METAL mode.
7. The Importance of the Right Approach
Treasure hunting can be a profitable and rewarding activity for the patient and diligent user. Time spent researching
to locate a worthwhile site for a search can become time wasted if your search is hasty and erratic. Plan your
approach to each individual site beforehand. Working slowly and methodically will enable you to hear the faintest of
signals, thereby increasing the number of finds. Keep the detector head as close to the ground as possible. The
antenna should 'iron' the ground in order to keep the loss of detection range down to a minimum.
The technique of getting the best out of your detector is not learnt overnight. You need as much experience as
possible to learn to recognise every kind of signal.
8. Storage and Maintenance
Store your detector in a warm and dry environment when not in use. Remove the batteries to prevent leakage if the
device is not be used for a length of time. Clean the exterior parts of the housing whenever you have used your
detector in a hostile environment (salt water, sand, etc.).
Make sure that the antennae fit on the shaft stubs in a snug manner.
9. Troubleshooting
a. The Detector is not Operating
• Check the condition of the batteries using the meter and replace them if necessary.
• Interchange the batteries and check if the connections are correct and secure. Battery life can vary tremendously
between makes: your “new” batteries may already lack the power to run your detector.
• Make sure that the antennae are properly attached to the control box.
Page 5

CS9000 5 VELLEMAN
b. Oscillating Signal & Fluctuating Meter / Intermittent Sound from Speaker
• This could be due to poor battery connections. Reinstall the batteries carefully.
• A radio transmission from a passing taxi or vehicle may cause interference. Reduce the signal balance or, if this
doesn’t work, wait until the transmission in question has ended.
• The connection between the antennae and the control box may be loose.
c. Detector Drifts out of Tune
• Temperature drift caused by change in air temperature when a machine is moved from a house or car into the
open. The greater the change in temperature, the more the drift, and in severe conditions up to 30 minutes may
be needed for the electronic circuitry to acclimatise itself.
• Sometimes battery drain can cause drift of signal. Replace batteries ; this should help to maintain a stable signal.
d. None of the Above Helps
When you have tried all the above suggestions and have replaced the batteries but your detector still does not
operate correctly, return it to your dealer with a letter giving full details of fault.
10. Technical Specifications
Operating frequency 12.5 kHz (nominal)
Operating Temperature -5 to +55°C
Battery type and life 4 x C-size 1.5V cells, approx. 20 hours use.
The information in this manual is subject to change without prior notice.
CS9000 – PROFESSIONELE METAALDETECTOR
1. Inleiding en kenmerken
Dank u voor uw aankoop! Lees deze handleiding grondig voor u het toestel in gebruik neemt. Ga na of het toestel
niet werd beschadigd tijdens het transport. Zo ja, stel dan de installatie van het toestel uit en raadpleeg uw dealer.
Dit toestel biedt waar voor uw geld en is uitgerust met de nieuwste technologische snufjes. Lees de handleiding
aandachtig zodat u alle mogelijkhe den van uw metaaldetector kunt benutten. We raden u aan om te oefenen met
voorwerpen die u zelf heeft begraven. Dit is een zeer efficiënte manier om de verschillende soorten signalen en het
gedrag van uw detector te leren kennen. De succesvolle gebruiker is immers een geoefende gebruiker.
2. Veiligheidsinstructies
• Schade door wijzigingen die de gebruiker heeft aangebracht en door het negeren van de richtlijnen in deze
handleiding vallen niet onder de ga rantie en uw dealer zal de verantwoorde lijkheid voor deze schade afwijzen.
• Om beschadiging te vermijden, zet u het toestel best niet aan onmiddellijk nadat het werd blootgesteld aan
temperatuurschommelingen. Wacht tot het toestel op kamertemperatuur gekomen is.
• Leer eerst de functies van het toestel kennen voor u het gaat gebruiken. Ongeschoolde personen mogen dit
toestel niet gebruiken. Meestal is beschadiging het gevolg van onprofessioneel gebruik.
• Gebruik de oorspronkelijke verpakking wanneer u het toestel vervoert.
• Om veiligheidsredenen mag de gebruiker geen wijzigingen aanbrengen aan het toestel.
Page 6
CS9000 6 VELLEMAN
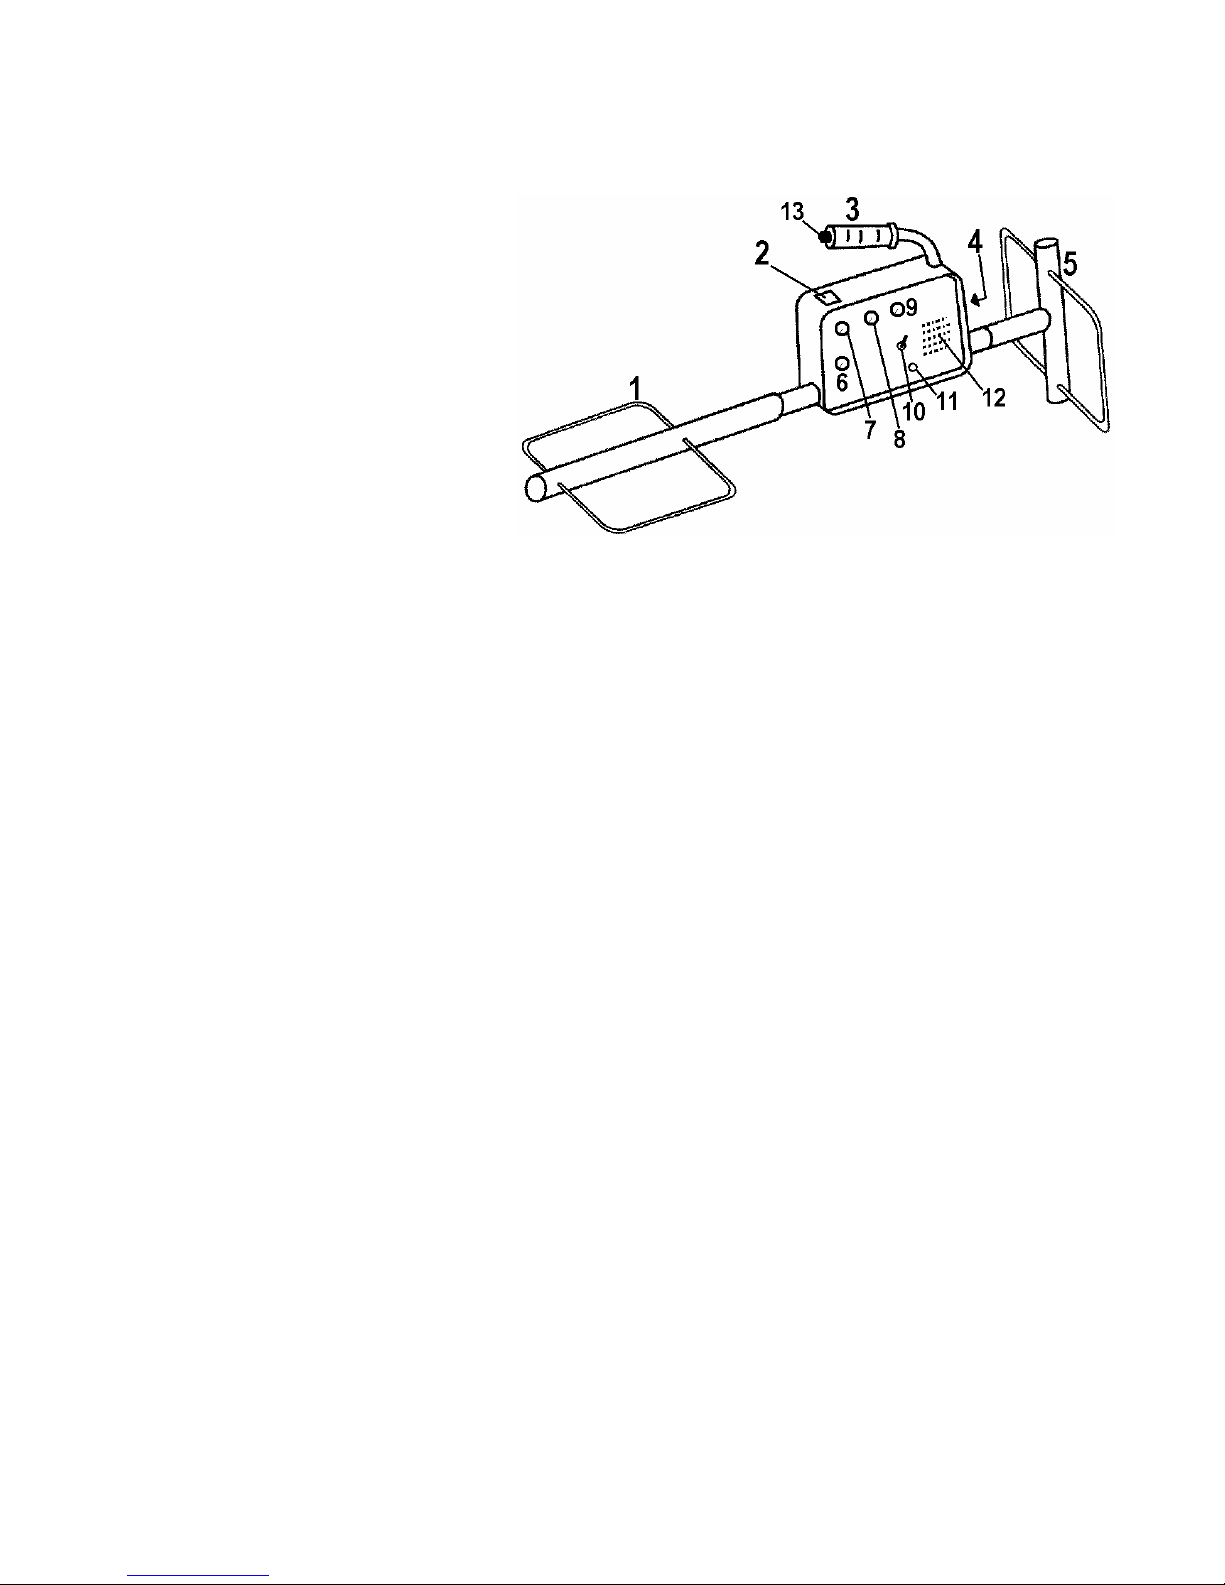
3. Montage en de benaming van onderdelen
Monteer het toestel zoals hieronder aangegeven:
1. Ontvangstantenne
2. Meter
3. Handgreep
4. Batterijvak
5. Zendantenne
6. Signaalbalans regeling
7. Grondbalans regeling
8. Threshold regeling (basistoon)
9. Mode keuzeschakelaar
10. Automatische basistoonschakelaar
11. 6.35mm hoofdtelefoonaansluiting
12. Ingebouwde luidspreker
13. Duimknop
4. Batterijen vervangen
• Verzeker u ervan dat de Mode keuzeschakelaar (#9 in de figuur hierboven) op “OFF” staat.
• Open het batterijvak (#4) door aan de knop te trekken.
• Kantel de metaaldetector zodat de batterijhouder eruit glijdt.
• Open de batterijhouder: druk de 2 lipjes aan 1 kant in tot het deksel langs die kant omhoog komt, en druk
vervolgens de 2 lipjes aan de andere kant in tot het deksel er volledig af springt.
• Plaats de batterijen of vervang ze door nieuwe batterijen van hetzelfde type en met dezelfde capaciteit.
• Sluit de batterijhouder, schuif hem terug in het batterijvak en sluit het batterijvak door eerst het deksel volledig
dicht te drukken en vervolgens de knop in te drukken om het te sluiten.
5. Regelknoppen
a. Mode keuzeschakelaar (figuur hierboven #9)
Deze keuzeschakelaar schakelt tussen de volgende functies:
• OFF: Zet de schakelaar in deze stand als u uw CS9000 niet gebruikt.
• METAL: in deze mode ligt de grondbalans aan en worden alle metalen voorwerpen zoals goud, zilver,
muntstukken of zelfs deksels van septische putten gedetecteerd. Deze mode heeft de grootste grondpenetratie.
• CAVE: in deze mode ligt de grondbalans NIET aan en reageert de detector op alle veranderingen in
grondmineralisatie. Omdat leemtes zoals holen of grotten een opvallende afwezigheid van mineralisatie vertonen,
reageert de CS9000 met een geluidstoename. Doorgaans wijst een geluidsafname op een toename in
mineralisatie.
Deze mode laat u toe grotten en andere leemtes op te sporen waarin mogelijks schatten verborgen kunnen zitten.
Om deze mode efficiënt te gebruiken tekent u best eerst een zorgvuldig gepland zoekpatroon uit, waarbij u vooral
let op opvallende geluidsveranderingen.
• BAT CHK: in deze mode kunt u de staat van de batterijen aflezen van de meter (#2).
b. Signaalbalans (figuur #6)
Deze knop regelt de signaalbalans of detectiediepte van de detector. Voor de meeste opzoekingen is de beste stand
ergens in het 'NORMAL'-bereik. Dit zal u een optimale verhouding zoekdiepte/stabiliteit opleveren. Als u door de
samenstelling van de bodem of door storende radio- of elektronische signalen verkee rde uitlezingen krijgt (de
drempeltoon die sterkt varieert), draait u de signaalbalansknop in de MIN richting (tegenwijzerzin). Als u geen last
Page 7

CS9000 7 VELLEMAN
hebt van storingen en een grotere zoekdiepte wenst, kunt u de knop in wijzerzin draaien. Wees voorzichtig als u
boven het 'NORMAL'-bereik gaat: door de grotere gevoeligheid kan teveel storing optreden waardoor u het signaal
van dieper gelegen voorwerpen kunt missen. Het 'NORMAL'-bereik biedt u de ideale instelling voor een vlotte
zoektocht waarbij u ook diepere voorwerpen duidelijk kunt horen.
c. Grondbalans (figuur blz. 6 #7)
Deze knop werkt alleen als het toestel in METAL mode staat. Deze regeling laat u toe de mineralisatie in de grond te
negeren en zo een maximale penetratie te verkrijgen. Zo kunt u voorwerpen detecteren die u anders niet had
gedetecteerd door de hoge mineralisatiegraad van de grond. Begin met de knop in het 'NORMAL' bereik. Voor een
bodem met hoge mineralisatie draait u deze knop verder in wijzerzin ; voor een bodem met een lagere mineralisatie
in tegenwijzerzin. Zorg er ook voor dat de automatische drempelinstelling op 'NO-AUTO' staat als u de grondbalans
aan het regelen bent. Onder het hoofdstuk "Bediening" vindt u hoe u deze knop heel precies kunt afregelen.
d. Threshold regeling (basistoon - #8)
Met deze knop regelt u de geluidssterkte van het achtergrondgeruis, gemeenzaam 'basistoon' genoemd. Als deze
knop perfect afgeregeld is mag u de basistoon nauwelijks horen. In een lawaaierige omgeving zult u deze waarde
waarschijnlijk hoger moeten instellen. Doorgaans krijgt u een diepere penetratie bij een lage basistoon.
e. Automatische basistoonschakelaar (#10)
Dit is een "zelfregelende" basistoon, ook wel "motion mode" genoemd. Deze zorgt voor een gepaste basistoon
volgens de ondergrond. Deze basistoon kan wat stijgen of zakken door de verandering in mineralisatie van de
bodem. Let wel dat het aanpassingsbereik van deze functie beperkt is: voor grote verschillen in mineralisatie zult u
nog steeds de "Threshold"-knop moeten bijregelen. Als de verschillen te groot zijn loopt u het risico bepaalde
voorwerpen te missen als u de basistoon niet zelf wat bijregelt.
Om deze functie te activeren, zet u de schakelaar op AUTO. Zorg ervoor dat u de detector steeds blijft bewegen als
deze functie geactiveerd is. Als u de detector stil houdt boven een voorwerp zal het signaal afnemen. Als deze
schakelaar op NO-AUTO staat, wordt de mineralisatie van de bodem enkel gecompenseerd door de grondbalans.
f. Hoofdtelefoonaansluiting (#11)
De luidspreker wordt automatisch uitgeschakeld wanneer er een hoofdtelefoon aangesloten wordt. Als u een hoofdtelefoon gebruikt, zult u een maximale zoekdiepte verkrijgen en zullen uw batterijen ook langer meegaan. De hoofdtelefoon moet voorzien zijn van een 6.35mm-aansluiting en bij voorkeur ook van een mono/stereo schakelaar.
g. Duimknop (#13)
De duimknop zit op het uiteinde van de handgreep. Zijn gebruik wordt in het volgende hoofdstuk uitgelegd.
6. Bediening
a. Grondbalans metaalmode
1. Zet de signaalbalans (blz. 6 #6), grondbalans (#7) en basistoon (#8) regelingen in het midden van het NORMAL
bereik. Set de automatische basistoonschakelaar (#10) op AUTO.
2. Zet de modeschakelaar (#9) op BAT CHK en controleer de staat van de batterijen op de meter (#2). Zet
vervolgens de modeschakelaar op METAL. Deze instelling is geschikt voor de meeste locaties. Mocht het
evenwel toch nodig zijn het toestel verder te regelen owv. grondmineralisatie, volg dan deze stappen:
Page 8

CS9000 8 VELLEMAN
b. Grondbalans procedure
1. Zet de automatische basistoonschakelaar op NO-AUTO. Zorg ervoor dat de detector zich niet vlakbij grote
metalen voorwerpen zoals auto's e.d. bevindt.
2. Zorg ervoor dat u geen metalen voorwerpen bij u hebt, zoals autosleutels, zakmes, uurwerk, riemgesp etc.
3. Draag de detector op armlengte naast uw lichaam, zodat u het toestel gemakkelijk kunt dragen op een afstand
van ongeveer 45cm van de bodem. Hou het toestel vlak en druk even op de duimknop (#13). U zult de basistoon
horen en de meter zal ongeveer 20 aangeven. Hef het toestel langzaam ongeveer een vijftiental cm hoger. Als de
basistoon weinig of niet verandert, is de instelling geschikt voor dat gebied.
Activeer de automatische basistoon (#10) en begin te zoeken. Als de toon geen verandering van betekenis
ondergaat tijdens uw zoektocht, schakelt u best de automatische basistoon uit en zoekt op deze manier verder:
4. Als de toon en de meter afnemen als u het toestel hoger heft, moet u de grondbalans (#7) bijregelen door deze
een beetje in tegenwijzerzin te draaien. Laat de detector terug zakken tot op armlengte en dr uk even op de
duimknop (#13) om het toestel opnieuw af te stellen. Hef het toestel opnieuw 15cm hoger. Als het signaal nog
altijd afneemt, herhaal dan de vorige stap tot het signaal ongeveer even sterk blijft in beide posities. Als het
signaal versterkt terwijl u de CS9000 opheft, is de grondbalans te ver naar de (-) gedraaid en moet u deze in
wijzerzin bijregelen.
De grondbalans procedure wordt belangrijker naarmate u de signaalbalans (#6) hoger instelt. Voor de meeste
toepassingen dient deze niet hoger dan het NORMAL bereik ingesteld te worden. Als de grondbalans procedure niet
kan worden uitgevoerd zoals hierboven beschreven, probeer het dan op een andere plaats omdat u misschien boven
een begraven metalen voorwerp staat.
c. Begraven metalen voorwerpen zoeken
De efficiëntste manier om een gebied af te tasten, is een rooster-patroon op het gebied toe te passen. Om het risico
voorwerpen te missen te vermijden, mogen de roosterlijnen niet meer dan 2m uit elkaar liggen. Het terrein eerst in 1
richting en vervolgens haaks op de vorige richting afwerken is het beste systeem om geen voorwerpen te missen.
Het is normaal dat u de basistoon ook luider hoort als een voorwerp gedetecteerd wordt. Dieperliggende voorwerpen
worden doorgaans iets later gedetecteerd (als het toestel er verder overheen is). Dit verschil bedraagt echter meestal
slechts een tiental cm.
Het volume zal toenemen en de meter zal een hogere waarde uitlezen als de CS9000 over een begraven voorw erp
passeert. Denk eraan dat u de detector in beweging moet houden om het midden van een doel te bepalen.
d. Een voorwerp precies lokaliseren
Als de automatische basistoon uit staat, kan de oppervlakte waaronder een voorwerp ligt heel groot lijken. Dit is
normaal. Om het voorwerp precies te lokaliseren gaat u in een bepaalde richting over het voorwerp. Als u een sterk
signaal krijgt drukt u op de duimknop om de waarde te resetten. Op een bepaald punt zult u het sterkste signaal
krijgen ; dit merkt u wanneer de toon en de meter terug beginnen te vallen. Op dit punt bevindt de voorste antenne
zich boven het voorwerp. De duimknop maakt het dus mogelijk een bepaalde waarde a ls referentie te nemen en op
die manier een voorwerp heel precies te gaan lokaliseren. De automatische basistoon heeft een vergelijkbare
werking, maar dan op kleinere schaal.
e. Grotten en andere leemtes zoeken
1. Zet de modeschakelaar op CAVE en de signaalbalans, grondbalans en basistoon regelknoppen in het NORMAL
bereik. Stem de signaalbalans eventueel af op de omgeving waar u gaat zoeken zoals aangegeven onder "6a.
Grondbalans metaalmode" op blz. 7.
2. U kunt de automatische basistoon aan of uit zetten zoals het u belieft. Als de bodemsamenstelling vaak
verandert, zet u hem best aan. Als u een gevorderde gebruiker bent, kunt u verkiezen hem af te laten. Hou het
toestel altijd op dezelfde afstand van de grond om foute uitlezingen te vermijden.
Page 9

CS9000 9 VELLEMAN
Het is niet aangeraden in deze mode te zoeken, tenzij u zoekt naar veranderingen in de bodemdichtheid.
In de CAVE mode zult u signalen horen voor niet-ijzerhoudende metalen zoals goud of zilver, en ook voor holtes,
zoals een grot. Als een ijzerhoudend voorwerp wordt gedetecteerd, of als er ijzerhoudende mineralisatie aanwezig is,
zal het signaal afnemen.
Gezien de grondbalans geen rol speelt in de CAVE mode, laat u de grondbalansrelegaar best in het NORMAL
bereik. Omdat de mineralisatie van de grond een rol speelt, zult u in CAVE mode niet even diep kunnen zoeken als
in METAL mode.
7. Het belang van de juiste zoekmethode
Schattenjagen kan een winstgevende activiteit zijn waar de geduldige en ijverige gebruiker ook veel voldoening uit
kan halen. Al uw opzoekingwerk om een goede graafsite te vinden wordt vergeefse moeite indien u slordig of
overhaast zoekt. Plan elke zoektocht op voorhand. Werk traag en methodisch zodat u ook de zwakste signalen hoort
en dus meer voorwerpen vindt. Hou de zoekantenne zo dicht mogelijk bij de grond: ze moet de grond "strijken" zodat
het detectiebereik optimaal blijft.
8. Onderhoud
Berg uw detector op in een droge en warme omgeving wanneer u hem niet gebruikt. Verwijder de batterijen om
lekken te voorkomen indien u het toestel een tijdje niet zal gebruiken. Reinig de buitenkant van de behuizing
wanneer u de detector in een vijandige omgeving heeft gebruikt (zout water, zand, enz.).
Zorg ervoor dat de antennes goed aansluiten op de controlebox.
9. Problemen en oplossingen
a. De detector werkt niet meer
• Controleer de staat van de batterijen en vervang ze indien nodig.
• Verwissel de batterijen van plaats en ga na of ze goed zijn aangesloten. De levensduur van de batterijen is sterk
merkgebonden : het is dus mogelijk dat uw “nieuwe” batterijen reeds onvoldoende vermogen hebben om uw
detector te voeden.
• Ga na of de antennes goed zijn aangesloten op de cont r olebox.
b. Oscillerend signaal en onregelmatige uitlezing meter / Storing in het signaal
• Dit kan te wijten zijn aan slechte batterijverbindingen. Verwijder de batterijen en herinstalleer ze.
• Een radiosignaal van een voorbijrijdende taxi of een ander voertuig kan storing veroorzaken. Verlaag de
gevoeligheid of, indien dit niet werkt, wacht gewoon tot het signaal verdwenen is.
• Er is geen goede verbinding tussen de controlebox en de antennes.
c. Detector wijkt constant af
• Te groot temperatuursverschil als het toestel van binnenshuis naar buiten gebracht wordt. Het kan tot 30 minuten
duren voor de elektronica zich geacclimatiseerd heeft.
• Dit kan ook veroorzaakt worden doordat de batterijen bijna leeg zijn. Vervang de batterijen: dit zou u terug een
stabiel signaal moeten opleveren.
d. Bovenstaande tips helpen niet
Wanneer u bovenstaande lijst doorlopen hebt en ook de batterijen vervangen hebt maar uw detector werkt nog altijd
niet correct, breng hem dan terug naar uw verde ler met een schriftelijke omschrijving van het probleem.
Page 10

CS9000 10 VELLEMAN
10. Technische specificaties
Werkfrequentie 12.5kHz (nominaal)
Werktemperatuur -5 tot +55°C
Type batterij en levensduur 4 x C-formaat 1.5V batterijen, gaan ongeveer 20 uren mee.
De informatie in deze handleiding kan te allen tijde worden gewijzigd zonder voorafgaande kennisgeving.
CS9000 – DETECTEUR DE METAUX PROFESSIONNEL
1. Introduction et caractéristiques
Nous vous remercions de votre achat ! Lisez le présent manuel attentivement avant la mise en service de l'appareil.
Vérifiez l’état de l’appareil. Remettez l'installation à plus tard et consultez votre revendeur si l’appareil a été
endommagé pendant le transport.
L'appareil vous garantit un rapport qualité/prix exceptionnel et il est pourvu des dernières nouveautés
technologiques. Lisez la notice attentive ment afin de pouvoir profiter de toutes les possibilités de votre détecteur.
Nous vous conseillons de commencer par la détection de quelques objets que vous avez enterré vous-même. Cet
exercice constitue la façon idéale d’apprendre à identifier les différents signaux et le comportement de votre
détecteur en général.
Retenez également cette astuce importante : un utilisateur réussi e st un u t ilisateur expérimenté.
2. Prescriptions de sécurité
• La garantie ne s'applique pas aux dommages survenus en négligeant certaines directives de ce manuel ou par
des modifications par l'utilisateur et votre revendeur déclinera toute responsabilité pour ces dommages.
• N'allumez pas l'appareil après exposition à des variations de température. Afin d’éviter des dommages, attendez
jusqu’à ce que l'appareil ait atteint la température ambiante avant de l'utiliser.
• Familiarisez-vous avec le fonctionnement de l'appareil avant de l’utiliser. Ne permettez pas aux personnes non
qualifiées d'opérer cet appareil. La plupart des dégâts sont causés par un usage non professionnel.
• Transportez l'appareil dans son emballage originel.
• Toute modification de l’appareil est interdite pour des raisons de sécurité.
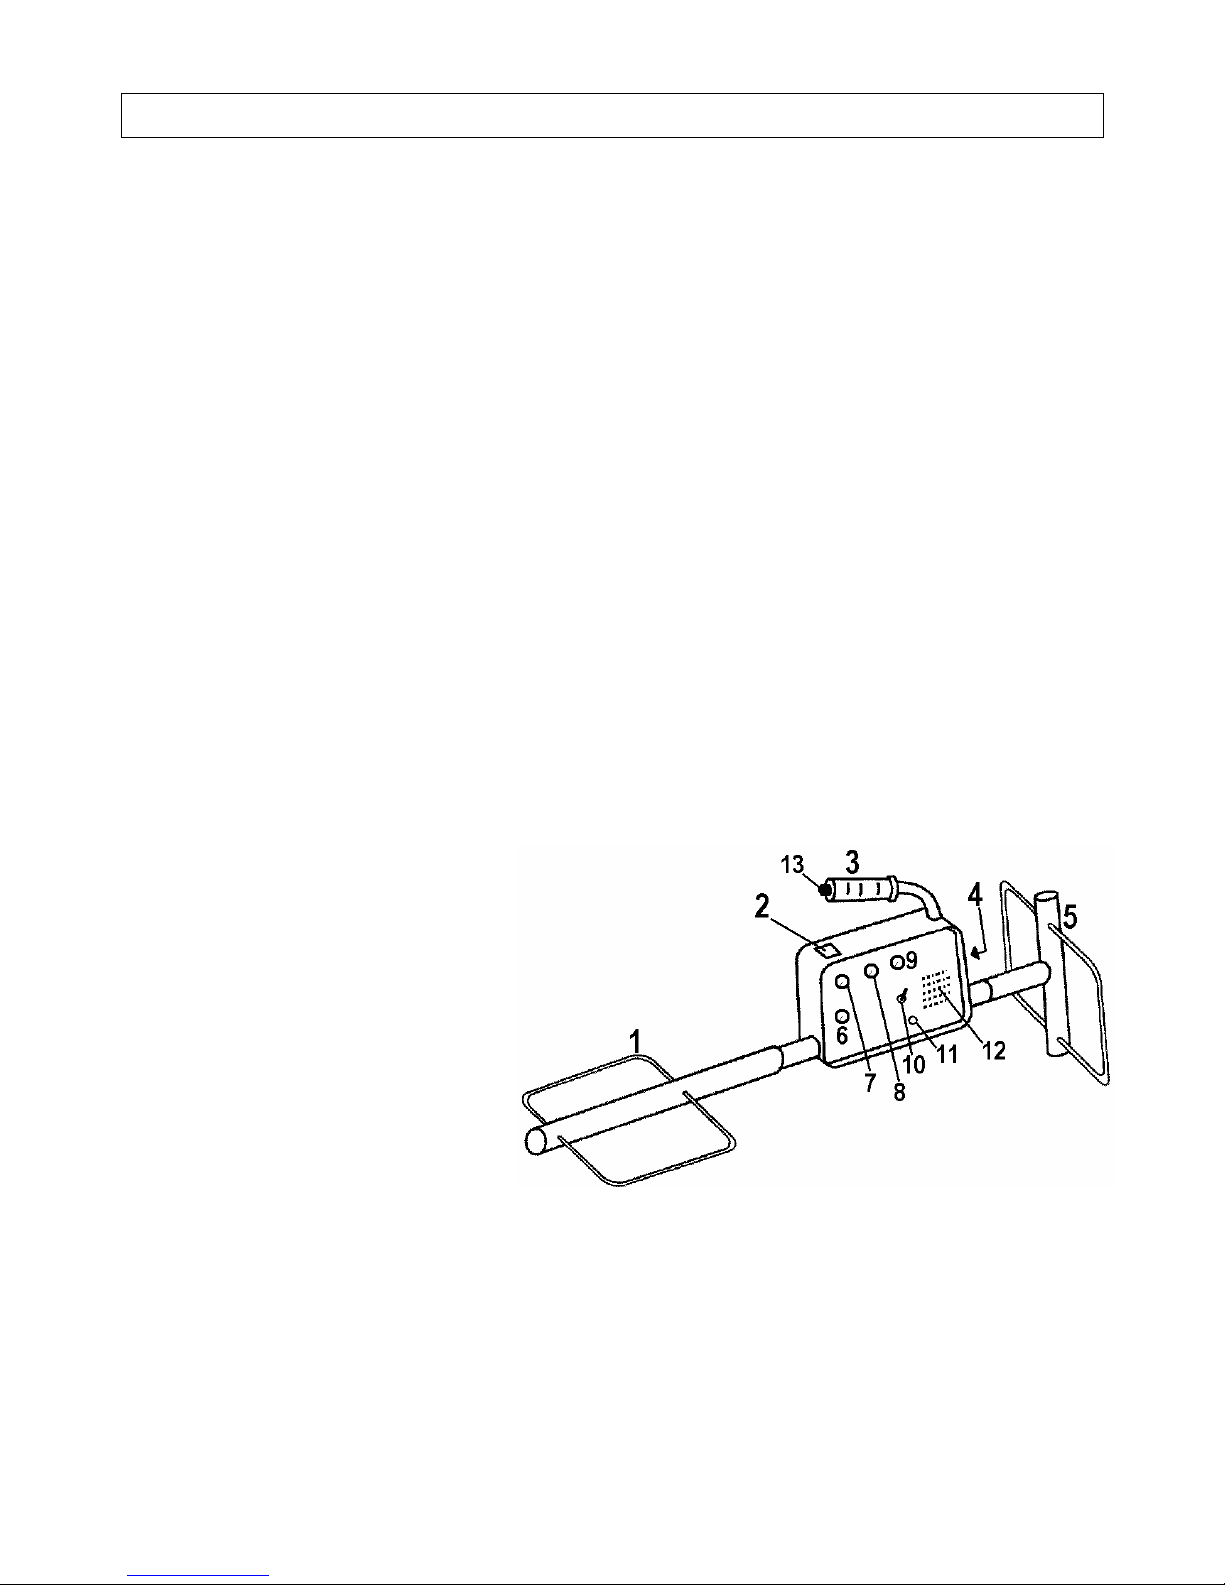
3. Assemblage et dénomination des parties
Assemblez l'appareil comme indiqué ci-dessous:
1. Antenne de réception
2. Mètre
3. Poignée
4. Compartiment des piles
5. Antenne émettrice
6. Réglage balance signal
7. Réglage balance du sol
8. Réglage Threshold (seuil)
9. Sélecteur mode
10. Sélecteur seuil automatique
11. Connexion casque 6.35mm
12. haut-parleur incorporé
13. Bouton pouce
Page 11

CS9000 11 VELLEMAN
4. Remplacement des piles
• Assurez-vous du fait que le sélecteur mode (p.10 #9) est positionné sur “OFF”.
• Ouvrez le compartiment des piles (#4) en tirant le bouton.
• Basculez le détecteur de manière que le porte-piles sort.
• Ouvrez le porte-piles en pressant les deux lèvres d'un côté jusqu'à ce qu'ils décrochent et puis de l'autre côté
jusqu'à ce que le couvercle sort.
• Mettez ou remplacez les piles (utilisez des piles comme indiqué dans "10. Spécifications Techniques" p.14).
• Fermez le porte-piles, mettez-le dans son compartiment, fermez le couvercle du compartiment des piles et fixez
le couvercle en appuyant le bouton de fermeture.
5. Réglages
a. Sélecteur mode (figure p.10 #9)
Ce sélecteur vous permet de sélectionner les fonctions suivantes:
• OFF: Mettez le sélecteur dans cette position quand vous n'utilisez pas votre CS9000.
• METAL: dans ce mode la balance de sol est activée et tous les objets métalliques comme de l'or, de l'argent, des
pièces ou même des couvercles de fosses septiques sont détectés. Ce mode a la meilleure pénétration du sol.
• CAVE: dans ce mode, la balance de sol n'est pas activée et le détecteur réagit sur tout changement de
minéralisation du sol. Parce que des cavités comme des cavernes ou des grottes démontrent une absence
remarquable de minéralisation, le CS9000 réagit par une augmentation du son. Normalement une baisse du son
indique une augmentation de minéralisation.
Ce mode vous permet de détecter des grottes et d'autres cavités où peuvent se trouver des trésors. Afin
d'effectivement utiliser ce mode, vous faites mieux de dessiner soigneusement un patron de recherche, pendant
lequel vous faites particulièrement attention aux changements du ton.
• BAT CHK: dans ce mode vous pouvez vérifier l'état des piles sur le mètre (#2).
b. Balance du signal (#6)
Ce bouton règle la balance du signal ou la profondeur de détection du détecteur. Pour la plupart des recherches, la
position idéale se trouve dans la portée 'NORMAL'. Ceci vous donnera un rapport profondeur/stabilité optimal.
Quand vous percevez un comportement erratique dû à la composition du sol ou aux signaux électroniques
perturbantes (le seuil varie fort), tournez le bouton de balance du signal dans la direction du (-). Si vous ne
découvrez pas de perturbations et vous désirez une plus grande profondeur de recherche, vous pouvez tourner el
bouton vers le (+). Soyez prudent quand vous dépassez la portée 'NORMAL': la plus grande sensibilité peut
entraîner trop de perturbation, ce qui vous causera de manquer des objets à plus grande profondeur. La portée
'NORMAL' vous fournit un réglage idéal pour une recherche aisée avec une perception claire d'objets profonds.
c. Balance du sol (#7)
Ce bouton marche uniquement lorsque l'appareil se trouve en mode METAL. Ce réglage vous permet d'ignorer la
minéralisation du sol et d'obtenir ainsi une pénétration maximale. Il vous permet de détecter des objets que vous
n'aviez normalement pas trouvés à cause du degré de minéralisation du sol. Démarrez avec le réglage dans la
portée 'NORMAL'. Pour un sol à haute minéralisation, tournez ce bouton vers le (+) ; pour un sol à basse
minéralisation, tournez-le vers le (-). Veille z à ce que le seuil automatique se trouve dans la position ' NO-AUTO'
quand vous êtes en train de régler la balance du sol. Sous le chapitre "Opération", vous trouvez comment vous
pouvez régler de bouton très fin.
Page 12

CS9000 12 VELLEMAN
d. Réglage threshold (seuil - #8)
Ce bouton vous permet de régler le seuil: un réglage parfait résulte dans un seuil à peine audible. Vous devrez lever
le seuil dans un environnement bruyant. Normalement la pénétration est plus profonde lors d'un seuil bas.
e. Seuil automatique (#10)
Ceci est un seuil "autorégulant", également appelé "motion mode". Il adapte le seuil au type de sol. Ce seuil peut
légèrement varier selon le changement de la minéralisation du sol. Attention: la portée d'adaptation de ce seuil
automatique est limitée: vous devrez toujours régler le bouton "Threshold" lors de grande variations. Si vous ne le
faites pas, vous risquez de manquer certains objets.
Pour activer cette fonction: mettez le sélecteur sur AUTO. Veillez à ce que le détecteur soit constamme nt bougé
quand cette fonction est active. Si vous stabilisez l'appareil au-dessus d'un objet, le signal diminuera. Quand se
sélecteur est positionné sur NO-AUTO, la minéralisation du sol est uniquement compensé par la balance du sol.
f. Connexion casque d'écoute (#11)
Le haut-parleur est automatiquement débranché quand un casque d'écoute est connecté. Quand vous utilisez un
casque d'écoute, vous obtiendrez une profondeur de recherche optimale et vos piles vont durer plus longtemps. Le
casque doit être équipé d'une connexion 6.35mm et de préférence d'un sélecteur mono/stéréo.
g. Bouton pouce (#13)
Le bouton pouce se trouve au bout de la poignée. Son utilisation est expliquée dans le chapitre suivant.
6. Opération
a. Balance du sol en mode METAL
1. Mettez les balances de signal (p.10 #6) et de sol (#7) et le réglage du seuil (#8) au milieu de la portée NORMAL.
Mettez le sélecteur de seuil automatique (#10) sur AUTO.
2. Mettez le sélecteur de mode (#9) sur BAT CHK et vérifiez l'état des piles sur le mètre (#2). Ensuite, mettez le
sélecteur de mode sur METAL. Ce réglage convient pour la plupart des localisations. Toutefois, s'il est nécessaire
de règles l'appareil davantage à cause de minéralisation du sol, suivez les étapes suivantes:
b. Procédure de balance du sol
1. Mettez le sélecteur de seuil automatique sur NO-AUTO. Veillez à ce que le détecteur ne se trouve pas près de
grands objets métalliques tels que des voitures etc.
2. Veillez à ce que vous ne portez pas d'objets métalliques sur vous, comme de s clefs, une montre etc.
3. Portez le détecteur à bout de bras à côté de votre corps, de manière que vous puissiez le porter confortablement
à une distance d'environ 45cm du sol. Tenez l'appareil horizontalement et pressez brièvement le bouton pouce
(#13). Vous entendrez le seuil et le mètre indiquera 20 environ. Levez l'appareil une quinzaine de centimètres. Si
le seuil ne change pas ou que très peu, le réglage est adéquat pour cet endroit.
Activez le seuil automatique (#10) et commencez à chercher. Si le seuil ne subit pas de changement signifiant
pendant votre recherche, vous faites mieux de désactiver le seuil automatique et de refaire votre recherche.
4. Si le seuil et le mètre diminuent quand vous levez l'appareil, vous devez régler la balance du sol (#7) en la
tournant un peu vers le (-). Baissez le détecteur jusqu'à bout de bras et pressez le bouton pouce (#13) pour
réinitialiser l'appareil. Levez l'appareil de nouveau une quinzaine de centimètres. Si le signal diminue toujours,
répétez les étapes précédentes jusqu'à ce que le signal reste égale dans les deux positions. Si le signal
augmente pendant que vous levez le CS9000, la balance du sol est tourné trop vers le (-) et vous devez le régler
légèrement vers le (+).
Page 13

CS9000 13 VELLEMAN
La procédure de la balance du sol devient plus importante selon que vous augmentez la balance du signal (#6). Pour
la plupart des applications, elle ne doit pas être mise hors de la portée NORMAL. Si la procédure de balance du sol
ne peut pas être exécuté comme décrit ci-dessus, déplacez-vous un peu parce qu'il se peut que vous vous trouviez
juste au-dessus d'un objet enterré.
c. Chercher des objets métalliques enterrés
La manière la plus efficace pour chercher un endroit, c'est d'appliquer un patron de grille sur le terrain. Afin de
diminuer le risque de manquer des objets, les lignes de la grille ne peuvent pas être séparés de plus de 2m.
Parcourez le terrain d'abord en une direction et puis perpendiculairement sur la première direction. C'est la meilleure
méthode pour ne pas manquer des objets.
Il est normal que vous entendez le seuil plus clairement lorsque vous détectez un objet. Normalement, un objet plus
profond est détecté un peu plus tard (quand l'antenne de détection l'est déjà passée). La différence ne sera guère
plus de 10cm.
Le volume augmentera et le mètre affichera une valeur plus élevée quand le CS9000 passe au-dessus d'un objet
enterré. Faites attention de garder le détecteur en mouvement pour déterminer le centre d'un objet.
d. Localisation précise d'un objet
Quand le seuil automatique n'est pas activé, la surface sous lequel se trouve un objet peut paraître très grand. C'est
normal. Afin de faire une localisation précise, vous passez au-dessus de l'objet. Quand vous recevez un signal fort,
vous pressez le bouton pouce pour réinitialiser la valeur. A un certain point vous obtiendrez le signal le plus fort ;
vous l'apercevrez quand le signal commence à retomber. A ce moment-là, l'antenne de réception se trouve juste audessus de l'objet. Le bouton pouce vous permet donc de prendre une certaine valeur comme valeur de référence et
ainsi de localiser précisément un objet. Le seuil automatique fonctionne similairement, mais à moindre degré.
e. Chercher des grottes et d'autres cavités
1. Mettez le sélecteur de mode sur CAVE et les balances du signal et du ton, et le réglage threshold dans la portée
NORMAL. Eventuellement vous pouvez accorder la balance du signal sur le terrain que vous allez examiner
comme indiqué dans "6a. Balance du sol en mode METAL" à la p.12.
2. Vous pouvez activer ou désactiver le seuil automatique comme vous voulez. Si la composition du sol change
régulièrement, vous faites mieux de l'activer. Si vous êtes un utilisateur expérimenté, vous pouvez préférer de le
désactiver. Tenez l'appareil toujours à une même distance du sol afin d'éviter des signaux erronés.
Il n'est pas conseillé de chercher dans ce mode, sauf si vous voulez détecter des changements de la densité du sol.
Dans le mode CAVE, vous entendrez des signaux pour des métaux non ferriques comme l'or ou l'argent, et
également pour des cavités, comme une grotte. Quand un objet ferrique est détecté, ou quand il y a de la
minéralisation ferrique, le signal diminuera.
Comme le réglage de balance du sol ne joue aucun rôle dans le mode CAVE, vous pouvez le laisser dans la portée
NORMAL. Mais comme la minéralisation du sol n'est pas ignorée en mode CAVE, vous ne pourrez pas faire des
recherches si profondes qu'en mode METAL.
7. L’importance de la bonne méthode de balayage
La prospection peut être un passe-temps lucratif et satisfaisant pour les amateurs patients. Toutes vos recherches
deviennent vaines si vous cherchez de façon nonchalante ou précipitée. Préparez chacune de vos sorties! Si vous
procédez lentement et méthodiquement vous entendrez même le signal le plus faible, ce qui vous permettra de
trouver davantage d’objets.
La position de la tête de détection est très importante. Elle doit effleurer le sol pour maximiser la plage de détection.
NE PRECIPITEZ PAS LES CHOSES. Vous ne trouverez rien si vous ne prenez pas le temps de fouiller chaque site
à votre aise.
Page 14

CS9000 14 VELLEMAN
8. Stockage et entretien
Stockez votre détecteur dans un environnement sec et chaud. Enlevez les piles pour éviter des fuites en cas d’une
inactivité de plusieurs jours. Essuyez l’extérieur du bo îtier chaque fois que le détecteur a été utilisé dans un
environnement hostile (eau salée, sable, etc.).
Assurez-vous du fait que les antennes sont bien attachées à la boîte de contrôle.
9. Problèmes et solutions
a. Le détecteur ne marche plus.
• Contrôlez l’état de charge des piles et remplacez-les si nécessaire.
• Interchangez les piles et vérifiez si elles sont bien connectées. La vie des piles dépend très fort de la marque de
piles : il est donc possible que vos piles "neuves" soient déjà trop faibles pour alimenter votre détecteur.
• Vérifiez si les antennes sont bien connectées à la boîte de contrôle.
b. Signal oscillant & Mètre fluctuant / Bruit de l'haut-parleur
• Ceci peut être causé par des piles mal connectées. Enlevez les piles et replacez-les.
• Un signal radioélectrique d’un taxi passant ou d’un autre véhicule peut perturber le fonctionnement de votre
détecteur de métaux. Diminuez la sensibilité ou, si ça ne marche pas, attendez à ce que le signal ait disparu.
• Les connexions entre la boîte de contrôle et les antennes sont mauvaises.
c. Fonctionnement constamment erroné
• La différence en température est trop grande quand l'appareil est sorti de l'intérieur (bâtiment, voiture) en plein
air. Il se peut que l'électronique a besoin de 30 minutes pour s'acclimater.
• Ceci peut également être cause par des piles faibles. Remplacez les piles: normalement vous devriez obtenir un
signal plus stable.
d. Le problème n'est toujours pas résolu
Quand vous avez passé par les étapes précédentes et vous avez remplacé les piles mais le détecteur ne marche
toujours pas convenablement, retournez-le à votre distributeur avec une description écrite et précise du problème.
7. Spécifications techniques
Fréquence de travail 12.5kHz (nominal)
Température de travail -5 à +55°C
Type de piles et vie 4 x piles format C 1.5V, vie environ 20 heures.
Toutes les informations présentées dans ce manuel peuvent être modifiées sans notification préalable.
Page 15
CS9000 15 VELLEMAN
CS9000 – DETECTOR DE METALES PROFESIONAL
1. Introducción & Características
¡Gracias por haber comprado el CS9000! Lea cuidadosamente las instrucciones del manual antes de usarlo.
Verifique si el aparato ha sufrido algún daño en el transporte antes de la puesta en marcha. Si es el caso, no
conecte el aparato a la red y póngase en contacto con su distribuidor.
De calidad superior y diseñado según las últimas tecnologías, este detector de metales le ofrece sobre todo una
excelente relación calidad / precio. Para poder beneficiar de todas las ventajas relacionadas con este detector lea
cuidadosamente todas las instrucciones de este manual. Someta el detector a prueba al aire libre usando objetos de
ensayo para aprender como reacciona a los diferentes tipos de metales.
Recuerde también este consejo importante : un usuario experto es un usuario experimentado.
2. Instrucciones de seguridad
• Daños causados por descuido de las instrucciones de seguridad de este manual invalidarán su garantía y su
distribuidor no será responsable por ningún daño u otros problemas resultantes.
• No conecte el aparato si ha estado expuesto a grandes cambios de temperatura. Espere hasta que el aparato
llegue a la temperatura ambiente.
• Familiarícese con el funcionamiento del aparato. Sólo personas calificadas pueden operar este aparato. La
mayoría de los daños se causan por un uso inadecuado.
• Transporte el aparato en su embalaje original.
• Por razones de seguridad, las modificaciones no autorizadas del aparato están prohibidas.
3. Montaje y denominación de los componentes
Monte el aparato como se indica a continuación:
1. Antena de recepción
2. Medidor
3. Mango
4. Compartimiento de pilas
5. Antena emisora
6. Ajuste balanza de la señal
7. Ajuste balanza del suelo
8. Ajuste threshold (umbral)
9. Selector modo
10. Selector threshold automático on/off
11. Conexión auriculares de 6.35mm
12. Altavoz incorporado
13. Botón para el pulgar
Page 16

CS9000 16 VELLEMAN
4. Reemplazar las pilas
• Asegúrese de que el selector modo (p.15 #9) esté en la posición “OFF”.
• Abra el compartimiento de pilas (#4) tirando el botón.
• Incline el detector de manera que el portapilas salga.
• Abra el portapilas apretando las dos lengüetas hacia un lado hasta que se abra la tapa y luego hacia el otro lado
hasta que se abra completamente.
• Coloque o reemplace las pilas (véase "10. Especificaciones", p.19).
• Cierre el portapilas, colóquelo en su compartimiento, cierre la tapa del compartimiento de pilas y fija la tapa
apretando el botón para cerrar l a.
5. Ajustes
a. Selector modo (figura p.15 #9)
Este selector le permite seleccionar las siguientes funciones :
• OFF: coloque el selector en esta posición si no usa el CS9000.
• METAL: en este modo está activado la balanza del suelo y se detectan todos los objetos metálicos como oro,
plata, monedas o incluso tapas de fosas sépticas. Este modo tiene la mejor penetración del suelo.
• CAVE: en este modo, no está activado la balanza del suelo y el detector reacciona ante todo cambio de
mineralización del suelo. Porque cavidades y túneles tienen una ausencia notable de mineralización, el CS9000
reacciona con un aumento de la señal sonora. Normalmente, una disminución de la señal sonora indica un
aumento de mineralización.
Este modo le permite detectar cavidades y otros hoyos donde se pueden encontrar tesoros. A fin de usar este
modo efectivamente, haga un patrón de búsqueda, prestando particularmente atención a los cambios de la señal
sonora.
• BAT CHK: en este modo, es posible controlar el estado de la pilas en el medidor (#2).
b. Balanza de la señal (#6)
Este botón ajusta la balanza de la señal o la profundidad de detección del detector. Para la mayoría de las
búsquedas, la posición ideal se encuentra en el alcance 'NORMAL'. Esto le dará una relación
profundidad/estabilidad óptima. Si el suelo o las señales electrónicas (el suelo varía fuertemente) causan
interferencias, gire el botón de balanza de la señal en la dirección de (-). Si no hay interferencias y si quiere una
profundidad de búsqueda más grande, gire el botón hacia (+). Cuidado al sobrepasar el alcance 'NORMAL': una
sensibilidad más grande puede causar demasiadas interferencias, lo que causará la pérdida de objetos a una
profundidad más grande. El alcance 'NORMAL' le ofrece el ajuste ideal para una buena búsqueda con percepción
clara de los objetos profundos.
c. Balanza del suelo (#7)
Este botón sólo funciona cuando el aparato se encuentra en modo METAL. Este ajuste le permite no sólo ignorar la
mineralización del suelo sino también obtener de esa manera una penetración máxima. Le permite detectar objetos
que normalmente no encuentra a causa del grado de mineralización del suelo. Para empezar, coloque el ajuste en la
posición 'NORMAL'. Para un suelo con alta mineralización, gire este botón hacia (+) ; Para un suelo con baja
mineralización, gire este botón hacia (-). Asegúrese de que el ajuste threshold automático se encuentre en la
posición 'NO-AUTO' si está ajustando la balanza del suelo (véase 6. Operación, par a el ajuste de este botón) .
Page 17

CS9000 17 VELLEMAN
d. Ajuste threshold (umbral - #8)
Este botón le permite ajustar el umbral: un ajuste perfecto da como resultado un umbral apenas audible. Aumente el
umbral en un ambiente con mucho ruido. Normalmente, cuanto más baja el ajuste más profunda la penetración.
e. Ajuste threshold automático (#10)
Este es un umbral "autoajustable", que se llama también "motion mode". El threshold se adapta al tipo de suelo.
Este umbral puede variar ligeramente según el cambio de la mineralización del suelo. Cuidado: el alcance de
adaptación del umbral automático está limitado: siempre ajuste el botón threshold si hay grandes variaciones. Si no
lo haga, corre el riesgo de perder algunos objetos.
Para activar esta función: coloque el selector en AUTO. Asegúrese de que el detector mueva constantemente si está
activada esta función. Si estabiliza el aparato encima de un objeto, la señal disminuirá. Si este selector se encuentra
en la posición NO-AUTO, la mineralización del suelo sólo se compensa por la balanza del suelo.
f. Conexión auriculares (#11)
El altavoz incorporado se desactiva automáticamente si usa auriculares. Usando auriculares, obtendrá una
profundidad de búsqueda óptima y alargará la duración de vida de las pilas. Los auriculares deben ser equipados
con una conexión de 6.35mm y de preferencia con un selector mono/estéreo.
g. Botón para el pulgar (#13)
El botón para el pulgar se encuentra en el extremo del mango. Su uso se explica a continuación.
6. Operación
a. Balanza del suelo en modo METAL
1. Coloque las balanzas de la señal (p.15 #6) y del suelo (#7) y el ajuste de threshold (#8) en el medio del alcance
NORMAL. Coloque el selector de threshol d aut om áti co ( #10) en la posici ón AUTO.
2. Coloque el selector de modo (#9) en BAT CHK y controle el estado de las pilas (#2). Luego, coloque el selector
de modo en METAL. Este ajuste es apto para la mayoría de las localizaciones. No obstante, si es necesario
ajustar el aparato aun más a causa de la mineralización del suelo, siga los siguientes pasos:
b. Procedimiento de la balanza del suelo
1. Coloque el selector de threshold automático en NO-AUTO. Asegúrese de que el detector no se encuentre cerca
de grandes objetos metálicos como p.ej. coches etc.
2. Asegúrese de que Ud. no lleve objetos metálicos, como p.ej. llaves, un reloj etc.
3. Mantenga el detector a largo del brazo al lado de su cuerpo, de manera que pueda mantenerlo confortablemente
a una distancia de aproximadamente 45cm del suelo. Mantenga el aparato horizontalmente y apriete el botón
para el pulgar (#13) brevemente. Oirá el threshold y el medidor indica aproximadamente 20. Levante el aparato
unos 15 centímetros. Si (casi) no cambia el threshold, el ajuste es apto para este lugar.
Active el threshold automático (#10) y empiece a buscar. Si no ocurren cambios significantes durante la
búsqueda, es mejor desactivar el threshold automático y volver a buscar.
4. Si el threshold y el medidor disminuyen al levantar el apar ato, aj ust e la bala nza del suel o (#7) girán dol o un poco
hacia (-). Vuelva a bajar el detector hasta el largo de brazo y apriete el botón para el pulgar (#13) para
reinicializar el aparato. Vuelva a levantar el aparato unos 15cm. Si la señal continúa disminuyendo, repita los
pasos precedentes hasta que la señal se quede más o menos estable en ambas posiciones. Si la señal aumenta
durante que levanta el CS9000, ha girado la balanza de suelo demasiado hac ia (-). P or lo tanto, ajústelo hacia
(+).
Page 18

CS9000 18 VELLEMAN
El procedimiento de la balanza del suelo se vuelve más importante aumentando la balanza de la señal (#6). Para la
mayoría de las aplicaciones, no es necesario colocarla fuera del rango NORMAL. Si no es posible ejecutar el
procedimiento de balanza del suelo (véase arriba), desplácese un poco porque es posible que Ud. se encuentre
justo encima de un objeto enterrado.
c. Buscar objetos metálicos enterrados
La manera más fácil para buscar un lu gar, es aplicar un patrón de rejilla en el terreno. A fin de disminuir el riesgo de
perder objetos, haga líneas de máx. 2m. Primero, avance en una dirección y luego perpendicularmente a la primera
dirección. Esto es el mejor método para no perder objetos.
Es normal que oiga el threshold más claramente al detectar un objeto. Suele detectar un objeto más profundo un
poco más tarde (si la antena de detección ya lo ha pasado). La diferencia no será más de 10cm.
El volumen aumentará y el medidor visualizará un valor más elevado si el CS9000 pasa encima de un objeto
enterrado. No se olvide de mantener el detector en movimiento para determinar el centro de un objeto.
d. Localización precisa de un objeto
Si no está activado el threshold automático, la superficie debajo la que se encuentra un objeto puede parecer muy
grande. Esto es normal. A fin de hacer una localización precisa, pase encima del objeto. Al recibir una fuerte señal,
apriete el botón del pulgar para reinicializar el valor. En un momento dado recibirá la señal más fuerte ; lo notará
cuando la señal va disminuyéndose. En este momento, la antena de recepción se encuentra justo encima del objeto.
El botón para el pulgar le permite tomar un cierto valor como valor de referencia y localizar de esta manera un objeto
precisamente. El threshold automático le permite localizar el objeto automáticamente.
e. Buscar cuevas y otras cavidades
1. Coloque el selector de modo en CAVE y las balanzas de la señal y del ajuste threshold en el alcance NORMAL.
Eventualmente, puede reajustar la balanza de la señal en el terreno que Ud. va a examinar (véase "6a. Balanza
del suelo en modo METAL" en la p.17).
2. Puede activar o desactivar el threshold automático como quiere. Si la composición del suelo cambia
regularmente, es mejor activarlo. Es posible que un usuario experimentado prefiera desactivarlo. Siempre
mantenga el aparato a una misma distancia del suelo a fin de evitar señales erróneas.
No es aconsejable buscar en este modo, salvo si Ud. quiere detectar cambios en la densidad del suelo.
En el modo CAVE, oirá señales para metales no ferrosos como el oro o la plata y también para cavidades, como una
cueva. Si se detecta un objeto ferroso o si hay una mineralización ferrosa, la señal disminuirá.
Como no se afecta el ajuste de balanza del suelo en el modo CAVE, déjelo en el alcance NORMAL. Pero como no
se anula la mineralización del suelo en el modo CAVE, no es posible hacer búsquedas tan profundas como en modo
METAL.
7. La importancia de un uso correcto
La caza de tesoros puede resultar un pasatiempo realmente rentable y gratificante, si lo haces con paciencia y
persistencia. El tiempo dedicado a la localización de un sitio que vale la pena puede ser sinónimo de tiempo perdido
si la búsqueda se hace rápidamente y de manera irregular. Para obtener un máximo de resultados, es importante
determinar el lugar de antemano antes de empezar la búsqueda.
Es muy importante la posición del cabezal. Sería ideal que "planchara" el suelo con el cabezal para no perder nada
del rango de detección. ¡NO LO HAGA DE PRISA! Si Ud. trabaja lentamente y cuidadosamente aumentará el
número de sus hallazgos y no perderá objetos.
Page 19

CS9000 19 VELLEMAN
8. Almacenamiento y mantenimiento
Mantenga el detector en un lugar seco y caliente. Si no usa el detector durante cierto tiempo, quite las pilas. Los
productos de las mismas pueden dañar los componentes electrónicos de su detector. Limpie el exterior de la caja
cada vez que ha usado el detector en un ambiente hostil (agua salada, arena, etc.). Asegúrese de que las antenas
estén conectadas correctamente a la caja de control.
9. Solución de problemas
a. El detector no funciona.
• Controle el estado de carga de las pilas y reemplácelas si necesario.
• Intercambie las pilas y controle si están bien conectadas. La vida de las pilas depende fuertemente de la marca
de pilas : por lo tanto, es posible que pilas ‘nuevas’ no contengan bastante energía para hacer funcionar el
detector.
• Verifique que las antenas están conectadas correctamente a la caja de control.
b. Señal & Medidor oscilante / Ruido del altavoz
• Puede ser que las pilas no hayan sido conectadas correctamente. Quite las pilas y reemplácelas.
• Interferencias causadas por un coche equipado con un radio emisor o por una fuente electromagnética
estacionaria – Si ocurre, disminuya la sensibilidad. Si el problema persiste, e s mejor esperar hasta que se
termine la transmisión.
• Las conexiones entre la caja de control y las antenas no están correctas.
c. Desarreglo del detector
• Desarreglo de la temperatura a causa de las variaciones de temperatura ambiente al sacar el aparato de la casa
o del coche. Cuanto mayor sea el cambio de la temperatura, mayor será el desarreglo del aparato. El tiempo de
aclimatación del circuito electrónico puede durar hasta 30 minutos.
• Pilas agotadas pueden perturbar la señal. Cambie las pilas. Esto debería contribuir al mantenimiento de una
señal estable.
d. En cualquier otro caso
Si el detector todavía no funciona correctamente después de haber intentado todos los pasos anteriores y después
de haber reemplazado las pilas, devuélvalo a su distribuidor, con una descripción detallada de los problemas.
10. Especificaciones
Frecuencia de trabajo 12.5kHz (nominal)
Temperatura de funcionamiento de -5 a +55°C
Tipo de pilas y vida 4 x pilas de 1.5V tipo C, vida aproximadamente 20 horas.
Se pueden modificar las especificaciones y el contenido de este manual sin previo aviso.
Page 20

CS9000 20 VELLEMAN
CS9000 – PROFESSIONELLER METALLDETEKTOR
1. Einführung und Eigenschaften
Wir danken Ihnen für den Kauf des CS9000! Bitte lesen Sie vor Inbetriebnahme des Geräts diese Bedienungsa nl eitung
sorgfältig durch. Prüfen Sie, ob Transportschäden vorli egen, soll te di es der Fal l sein, verwenden Si e das Ger ät ni cht
und wenden Sie sich an Ihren Händler.
Dieser hochwertige Metalldetektor bietet ein gutes Preis-/Qualitätsverhältnis und verwendet die letzten
technologischen Entwicklungen. Les en Sie aufm er ksam die Bedienungsanleitung, denn di ese ermögl i cht Ihn en di e
breite Palette von Möglichkeiten dieses Geräts zu genießen. Wir empfehlen, dass Sie mit Objekten, die Sie selber
verborgen haben, üben. Diese Methode ist sehr effizient um das 'Verhalten' des Detektors und die verschiedene
Signatypen kennen zu lernen.
Denken Sie daran: Übung macht den Meister.
2. Sicherheitsvorschriften
• Bei Schäden, die durch Nichtbeachtung der Bedienungsanleitung verursacht werden, erlischt der
Garantieanspruch. Für daraus resultierende Folgeschäden übernimmt der Hersteller keine Haftung.
• Schalten Sie das Gerät nicht direkt ein wenn es Temperaturschwankungen ausgesetzt wurde. Um Schaden zu
vermeiden, schalten Sie das Gerät nicht an bevor es Zimmertemperatur erreicht hat.
• Machen Sie sich mit den Funktionen des Metalldetektors vertraut. Erlauben Sie nicht, dass unbefugte Personen
das Gerät verwenden. Die meisten Schadensfälle werden durch falschen Gebrauch verursacht.
• Verwenden Sie zum Transport die Originalverpackung.
• Alle eigenmächtigen Modifikationen sind aus Sicherheitsgründen verboten.
3. Montage und Teile bezeichnung
Montieren Sie das Gerät so wie in der Abbildung gezeigt wird.
1. Empfangsantenne
2. Messer
3. Handgriff
4. Batteriefach
5. Sendeantenne
6. Regelung für Signalbalance
7. Regelung für Bodenbalance
8. Regelung Grundton
9. Modus-Wahlschalter
10. Automatischer Grundton-
Wahlschalter EIN/AUS
11. 6.35mm-Buchse für Kopfhörer
12. eingebauter Lautsprecher
13. Daumenknopf
4. Batterie wechseln
• Achten Sie darauf, dass der Modus-Schalter (#9 in der Abbildung oben) auf 'OFF' (aus) steht.
• Öffnen Sie das Batteriefach (#4), indem Sie an den Knopf ziehen.
• Kippen Sie den Detektor, sodass der Batteriehalter aus dem Detektor gleitet.
• Öffnen Sie den Batteriehalter: drücken Sie auf die beiden Laschen auf der einen Seite des Deckels, sodass diese
aufschließen und drücken Sie nachher auf die beiden anderen Laschen bis der Deckel aufschnappt.
•
Schließen Sie den Batteriehalter, schieben Sie ihn in das Batteriefach und schließen Sie das Fach, indem Sie den
Deckel ganz schließen und zum Verschließen auf den Knopf drücken.
Page 21

CS9000 21 VELLEMAN
5. Bedienelemente
a. Modus-Wahlschalter (S.20 #9)
Mit dieser Taste können Sie zwischen diesen Funktionen wählen:
• OFF (Strom aus): Stellen Sie den Schalter auf diese Position wenn Sie den CS9000 nicht verwenden.
• METAL: (Metall) in diesem Modus ist die Bodenbalance in Betrieb und werden alle Metallarten, wie z.B. Gold,
Silber, Münzen und sogar den Deckel einer Jauchegrube detektiert. Dieser Modus hat das größte
Eindringungsvermögen in den Boden.
• CAVE:(Höhle) in diesem Modus funktioniert die Bodenbalance nicht und reagiert der Detektor auf alle
Änderungen in Bodenmineralisierung. Weil es in Hohlräumen wie Höhlen und Grotten einen deutlichen Mangel an
Mineralisierung gibt, wir d de r CS9000 ein lautes Signal ertönen. Wenn die Lautstärke abnimmt, deutet das auf
eine stärkere Mineralisierung hin.
Dieser Modus ermöglicht das Orten von Höhlen und Grotten, in denen sich Schätze befinden könnten. Wenn Sie
diesen Modus verwenden wollen, brauchen Sie ein gründlich geplantes Suchmuster und müssen Sie vor allem
auf beträchtliche Klangänderungen achten.
• BAT CHK: (Batterietest) in diesem Modus können Sie auf dem Messer den Zustand der Batterien prüfen. (S.20
#2).
b. Signalbalance (S.20 #6)
Dieser Knopf regelt die Signalbalance oder die Suchtiefe des Detektors. Die beste Position für die meisten
Suchbedingungen ist im 'NORMAL'-Bereich. In diesem Bereich ist die Suchtiefe ausreichend und ist die Stabilität
optimal. Wenn der Boden oder störende elektrische Signale oder Radiostrahlung unregelmäßige Ergebnisse
(extreme Schwankungen des Grundtons (Treshold tone)) auslösen, müssen Sie den Knopf der Signalbalance nach
MIN. (gegen den Uhrzeigersinn) drehen. Wenn Sie eine größere Suchtiefe benötigen (und es keine Störungen gibt),
müssen Sie die Signalbalance weiter im Uhrzeigersinn drehen. Seien Sie vorsichtig wenn Sie den NORMAL-Bereich
überschreiten. Wenn der Detektor wegen einer höheren Einstellung unregelmäßig funktioniert, könnten Sie die
Signale eines Ziels in größerer Tiefe verpassen. Der NORMAL-Bereich bietet die beste Einstellung für eine
problemlose Suche, bei der Sie auch Objekte in größerer Tiefe deutlich hören können.
c. Bodenbalance (S.20 #7)
Diesen Knopf können Sie nur im METALL-Modus verwenden. Dieser ignoriert die Mineralisierung im Boden und
ermöglicht ein maximales Eindringungsvermögen; so können Sie Objekte orten, die Sie sonst wegen der
Mineralisierung nie lokalisieren hätten können. Zum Anfangen, stellen Sie die Bodenbalance auf den NORMALBereich. Bei einer höheren Mineralisierung müssen Sie den Knopf im Uhrzeigersinn (+) drehen und bei geringer
Mineralisierung gegen den Uhrzeigersinn (-). Achten Sie darauf, dass der automatische Grundton-Wahlschalter auf
(S.20 #10) auf NO-AUTO steht wenn Sie die Bodenbalance regeln. Im Abschnitt 'BEDIENUNG' (6) können Sie
finden wie Sie diesen Knopf abstimmen müssen.
d. Grundton (S.20 #8)
Dieser Knopf regelt die Lautstärke des Grundgeräusches, auch 'Grundton' genannt. Um diesen abzustimmen dürfen
Sie den Grundton kaum hören. Es könnte sein, dass Sie einen höheren Einstellwert wählen müssen wenn Sie sich in
einer lauten Umgebung befinden. Im Allgemeinen, je niedriger der Einstellwert, desto tiefer ist die Detektion.
Page 22

CS9000 22 VELLEMAN
e. Automatischer Grundton (S.20 #10)
Diese Eigenschaft ist ein 'selbstregelnder Grundton', und wird auch als 'Bewegungsmodus' bezeichnet . Dieser sorgt
für den richtigen Grundton, abhängig vom Boden. Dieser Grundton kann erhöhen oder vertiefen wegen der
Mineralisierung im Boden, die während der Suche je nach der Stelle variieren kann. Obwohl große Änderungen der
Bodenmineralisierung mit der Bodenbalance geregelt werden müssen, können kleinere Schwankungen mit dem
automatischen Grundton ausgeglichen werden. Wenn der Ton zu viel von der Einstellung abweicht, ist es möglich,
dass das Eindringungsvermögen des Detektors verringert und dass er manche Ziele nicht detektiert. Um diese
Funktion zu aktivieren, stellen Sie den Schalter auf AUTO. Es ist wichtig, dass Sie den Detektor in Bewegung halten
während diese Funktion aktiviert ist. Wenn Sie über einem Ziel stehen bleiben, wird das Signal abnehmen. Wenn der
Schalter auf NO-AUTO steht, ist die Bodenbalance die einzige Funktion, die die Bodenmineralisierung ausgleicht.
f. Buchse für Kopfhörer (S.20 #11)
Der Lautsprecher wird sofort abgeschaltet sobald die Kopfhörer angeschlossen werden. Die Anwendung eines
Kopfhörers bietet eine maximale Eindringtiefe und eine längere Lebensdauer der Batterien. Die Kopfhörer müssen
mit einem 6.35mm-Klinkenstecker und vorzugsweise mit einem Stereo/Mono-Switch ausgestattet sein.
g. Daumenknopf (S.20 #13)
Der Daumenknopf befindet sich an der Spitze des Handgriffs. Die Bedienung wird unten erklärt.
6. Bedienung
a. Bodenbalance Metall-Modus
3. Stellen Sie die Signalbalance- (S.20 #6), Bodenbalance- (#7) und den Grundton- (#8) Knöpfe in die Mitte des
NORMAL-Bereichs. Setzen Sie den Schalter für automatischen Grundton auf AUTO (#10).
4. Setzen Sie den Modus-Schalter auf (#9) BAT CHK und prüfen Sie den Messer (#2) um den Zustand der
Batterien zu prüfen. Setzen Sie dann den Modusschalter auf die Metall-Position. Diese Einstellung ist geeignet für
die meisten Suchgebiete. Wäre es jedoch erforderlich, das Gerät wegen Mineralisierung weiter abzustimmen,
gehen Sie wie unten beschrieben vor.
b. Bodenbalance-Verfahren
5. Stellen Sie den Grundton-Schalter auf (#10) NO-AUTO. Achten Sie darauf, dass der Metalldetektor sich nicht in
der Nähe von Metallobjekten (wie Autos, Rohren) befindet.
6. Legen Sie alle Metallobjekte wie Gurtschlösser, Autoschlüssel, Armbanduhren, Messer usw. ab.
7. Halten Sie den Detektor entspannt auf Armlänge neben Ihrer Seite und in einer Höhe von ungefähr 45 cm über
dem Boden. Halten Sie das Gerät horizontal, drücken Sie auf den Daumenknopf (#13) und lassen Sie ihn los.
Sie können den Grundton hören und der Messer wird ± 20 anzeigen. Heben Sie den Detektor ± 15 cm höher.
Wenn sich der Ton nur wenig oder nicht ändert, ist die Einstellung ausreichend um dieses Gebiet abzusuchen.
Aktivieren Sie den automatischen Grundton (#10) und fangen Sie mit der Suche an. Wenn sich während der
Suche der Ton nicht bedeutsam geändert hat, schalten Sie den automatischen Grundton aus und gehen Sie wie
unten weiter.
8. Wenn der Ton und die Anzeige abnahmen wenn der Detektor hochgehoben wurde, müssen Sie die
Bodenbalance etwas gegen den Uhrzeigersinn (-) drehen. Bringen Sie den Detektor wieder auf Armlänge und
drücken Sie erneut auf den Daumenknopf (#13) zur neuen Abstimmung und heben Sie den Detektor ± 15cm
höher. Wenn der Ton wieder abnimmt, wiederholen Sie diese Methode bis der Ton und der Messer ungefähr
gleich bleiben. Wenn der Ton und die Anzeige zunehmen wenn der CS9000 hochgehoben wird, ist die
Bodenbalance (#7) zu niedrig (-) und müssen Sie den Knopf im Uhrzeigersinn drehen.
Page 23

CS9000 23 VELLEMAN
Die Bodenbalance wird wichtiger je nachdem die Signalbalance erhöht wird. Die Signalbalance (#6) muss für die
meisten Applikationen nicht höher als der NORMAL-Bereich eingestellt werden. Wenn die Bodenbalance nicht wie
oben beschrieben abgestimmt werden kann, versuchen Sie dann an einer anderen Stelle, denn Sie können über
einem Metallobjekt stehen.
c. Begrabene Metallobjekte suchen
Die effizienteste Methode um ein Gebiet abzusuchen ist das Unterteilen des gewählten Gebiets in ein Raster. Um die
Möglichkeit, dass Sie Ziele verpassen, zu verringern sollten die Linien nicht mehr als 1.80 m von einander entfernt
sein. Das Gebiet in einer bestimmten Richtung und später rechtwinklig auf dieser ersten Richtung absuchen ist die
beste Methode.
Es ist normal, dass Sie den Grundton lauter hören wenn Sie das Ziel detektiert haben. Tiefere Objekte werden
meistens etwas später detektiert (wenn die Suchsonde fast an dem Ziel vorbei ist). Aber der Unterschied beträgt
meistens weniger als 10cm.
Die Lautstärke wird zunehmen und der Messer wird einen höheren Wert anzeigen wenn der CS9000 ein begrabenes
Metallobjekt passiert. Denken Sie daran, dass Sie den Detektor bewegen müssen um die Mitte eines Objekts
feststellen zu können.
d. Ein Objekt genau bestimmen
Wenn der automatische Grundton ausgeschaltet ist, erscheint die Oberfläche, unter der ein Objekt begraben ist, sehr
groß. Das ist normal. Jetzt müssen Sie dieses 'Gebiet' eingrenzen. Um die Stelle eines Objektes genau zu
bestimmen bewegen Sie den Detektor in eine bestimmte Richtung. Wenn Sie ein starkes Signal bekommen, drücken
Sie auf den Daumenknopf um den Wert rückzusetzen. Wiederholen Sie das verschiedene Male. Es wird einen Punkt
geben, an dem Sie das stärkste Signal bekommen und der Messer wird einen Spitzenwert anzeigen, während der
Ton ein Höhepunkt erreicht und nachher wieder abnimmt. Es ist an diesem Punkt, dass sich die Empfangsantenne
über dem Ziel befindet. Wenn Sie auf den Daumenknopf drücken und ihn wieder loslassen, 'schrumpft' das Ziel und
können Sie es genau orten. Der Grundton ermöglicht eine automatische Ortung.
e. Höhlen und andere Hohlräume lokalisieren
3. Setzen Sie den Modusschalter auf CAVE und die Signalbalance, Grundbalance und den Grundton auf den
NORMAL-Bereich. Es ist möglich, dass Sie die Signalbalance der Umgebung wie unter "6a. Bodenbalance
Metall-Modus " auf Seite 22 anpassen müssen.
4. Der automatische Grundton kann ein- oder ausgeschaltet sein, was immer die besten Ereignisse erzielt und das
bequemste ist. Wenn die Bodenzusammensetzung veränderlich ist und ist es empfehlenswert ihn zu aktivieren.
Wenn Sie ein erfahrener Benutzer sind, bevorzugen Sie vielleicht, ihn nicht zu aktivieren. Halten Sie das Gerät
immer in der gleichen Entfernung vom Boden, dies um falsche Angaben zu vermeiden.
Es ist nicht empfehlenswert, dass Sie in diesem Modus suchen außer, wenn Sie Änderungen in Bodendichte
aufspüren wollen. Dieser CAVE-Modus wird ein positives Signal für alle Nichteisenmetalle wie Gold und Silber
erzeugen. Wenn ein eisenhaltiges Objekt entdeckt wird, oder wenn es starke Mineralisierung gibt, wird der Ton
leiser. Der CAVE-Modus beeinflusst die Bodenbalance nicht, also können Sie die Grundbalance im normalen
Bereich lassen. Weil der Bodenmineralisierung nicht abgeglichen wird, hat der CAVE-Modus ein geringeres
Eindringungsvermögen als der METALL-Modus.
7. Die Wichtigkeit ein er richtigen Suchmethode
Schatzsuche ist ein lukratives und sich lohnendes Hobby, wenn Sie geduldig und sorgfältig vorgehen. Die
aufgewendete Zeit zur Ortung eines geeigneten Suchgebietes kann verlorene Zeit sein wenn die Suche schnell und
unregelmäßig ist. Um die besten Ergebnisse zu bekommen, ist es wichtig, dass Sie die Vorgehensweise für jedes
spezifische Gebiet im Voraus planen.
Eine langsame und methodische Vorgehensweise ermöglicht Ihnen, die schwächeren Signale zu hören und so mehr
Objekte zu orten. Halten Sie die Suchantenne möglichst dicht am Boden. Sie soll den Boden 'streichen' um den
Page 24

CS9000 24 VELLEMAN
Detektionsverlust möglichst viel zu minimieren. Übung macht den Meister und es braucht Zeit, alle Signaltypen zu
erkennen.
8. Wartung und Pflege
Lagern Sie den Detektor in einem warmen und trockenen Raum. Entfernen Sie, wenn Sie den Detektor nicht eine
Weile verwenden, die Batterien um Leckage zu vermeiden. Nachdem Sie den CS9000 in einer unfreundlichen
Umgebung (Salzwasser, Sand) verwendet haben, müssen Sie die Außenteile mit Süßwasser reinigen. Sorgen Sie
dafür, dass die Antennen gut an die Bedienkonsole angeschlossen sind.
9. Pröblemlösung
a. Der Detektor funktioniert nicht
• Prüfen Sie den Zustand der Batterien mithilfe des Messers und wechseln Sie die Batterien falls nötig.
• Vertauschen Sie die Batterien und prüfen Sie, ob die Anschlüsse korrekt und sicher hergestellt sind.
• Prüfen Sie, ob die Antennen gut an die Bedienkonsole angeschlossen sind.
b. Vibrierendes Signal & veränderlicher Messer / unterbrochener Ton vom Lautsprecher
• Die Batterien könnten schlecht angeschlossen sein. Prüfen Sie ob die Verbindungen richtig hergestellt und die
Batterien korrekt eingelegt sind.
• Störung verursacht durch ein Fahrzeug ausgestattet mit einem Funksender oder wahrscheinlich eine stationäre
Quelle von elektromagnetischer Strahlung. Mindern Sie die Empfindlichkeit des Detektors. Wenn das Problem
andauert, können Sie nur warten bis die Störung aufhört.
• Eine Verbindung zwischen Antenne und Bedienkonsole ist vielleicht unterbrochen.
c. Gestörtes Signal
• Das könnte durch Temperaturschwankungen verursacht werden. Je größer die Temperaturschwankung, desto
stärker ist die Störung. Unter extremen Umständen, kann es bis zu 30 Min. dauern bis die elektronische
Beschaltung akklimatisiert ist.
• Manchmal auch durch leere Batterien verursacht. Wenn Sie die Batterien wechseln werden Sie normalerweise
ein stabiles Signal bekommen.
d. In allen anderen Fällen
Wenn Sie ohne Erfolg die oben erwähn ten Ratschl äge ver s ucht hab en un d die Bat t er i en gewechselt haben, bringen
Sie den Detektor zu Ihrem Händler zusammen mit einer geschriebenen Umschreibung der Probleme.
10. Technische Daten
Betriebsfrequenz 12.5 kHz (nominal)
Betriebstemperatur -5 bis +55°C
Batterietyp und Lebensdauer 4 x C-Format 1.5V Zellen, ± 20 Stunden.
Änderungen vorbehalten.
 Loading...