

Page 1
CS200
METAL DETECTOR
METAALDETECTOR
DÉTECTEUR DE MÉTAUX
DETECTOR DE METALES
METALLDETEKTOR
USER MANUAL
GEBRUIKERSHANDLEIDING
NOTICE D’EMPLOI
MANUAL DEL USUARIO
BEDIENUNGSANLEITUNG
Page 2

CS200 – METAL DETECTOR
1. Features & Applications
To all residents of the European Union
Important environmental information about this product
This symbol on the device or the package indicates that disposal of the device after its lifecycle could harm
the environment. Do not dispose of the unit (or batteries) as unsorted municipal waste; it should be taken to
a specialized company for recycling. This device should be returned to your distributor or to a local recycling
service. Respect the local environmental rules.
If in doubt, contact your local waste disposal authorities.
Thank you for buying the CS200 metal detector. Read this manual carefully before bringing the device into service.
With your CS200 metal detector, you can search for coins, relics, jewellery, gold, and silver just about everywhere.
The detector is easy to use. Its features include:
LCD Display : indicates the probable type of metal with an arrow, the depth of the target,
DISC/NOTCH range, the level of sensitivity, the operating mode, and low
battery indication.
Three Tone Audio Discrimination : sounds distinctive tones for different types of metals.
Notch : ignores junk metal and finds valuable items by setting the disc and notch
range.
Headphone Jack : lets you connect headphones (not supplied) and operate without trouble
Waterproof Search Coil : use the detector even if you must put it under water.
Note: Your metal detector requires two 9-volt alkaline batteries (not supplied)
2. Preparation
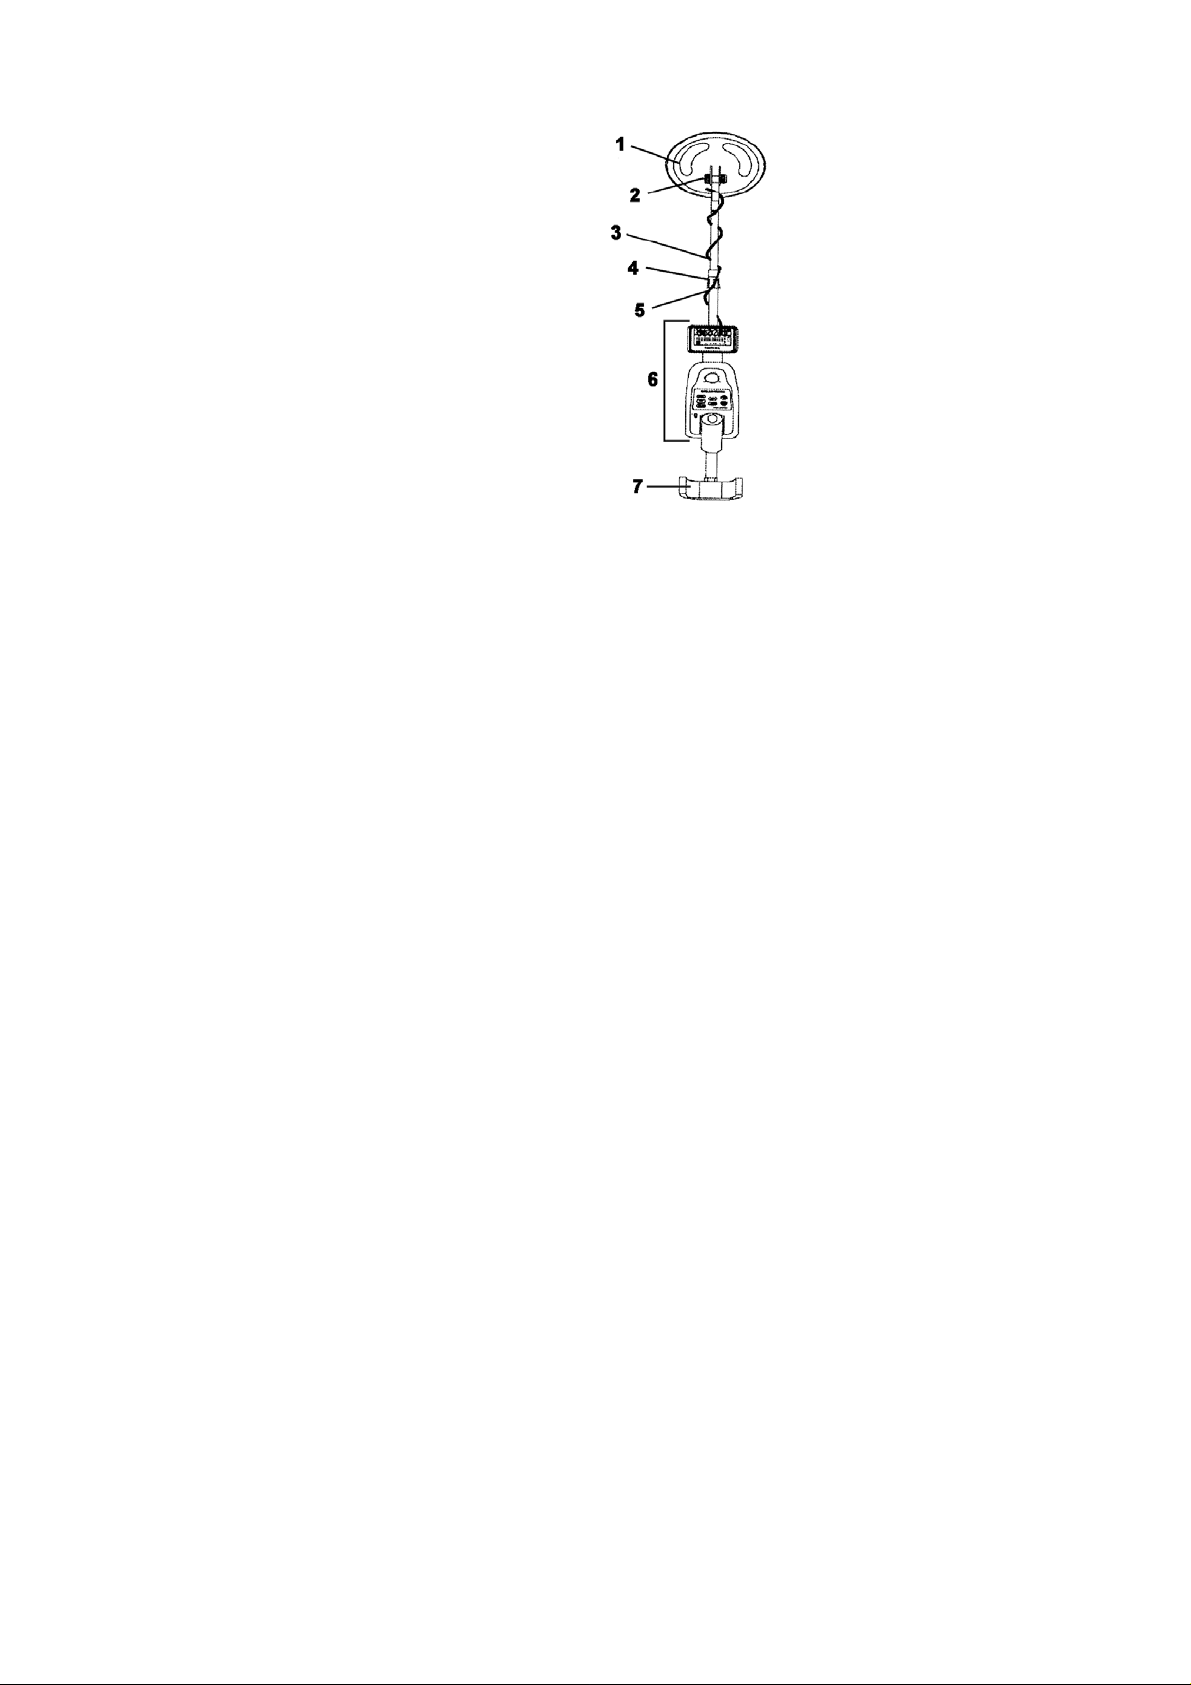
a) Assembling the detector
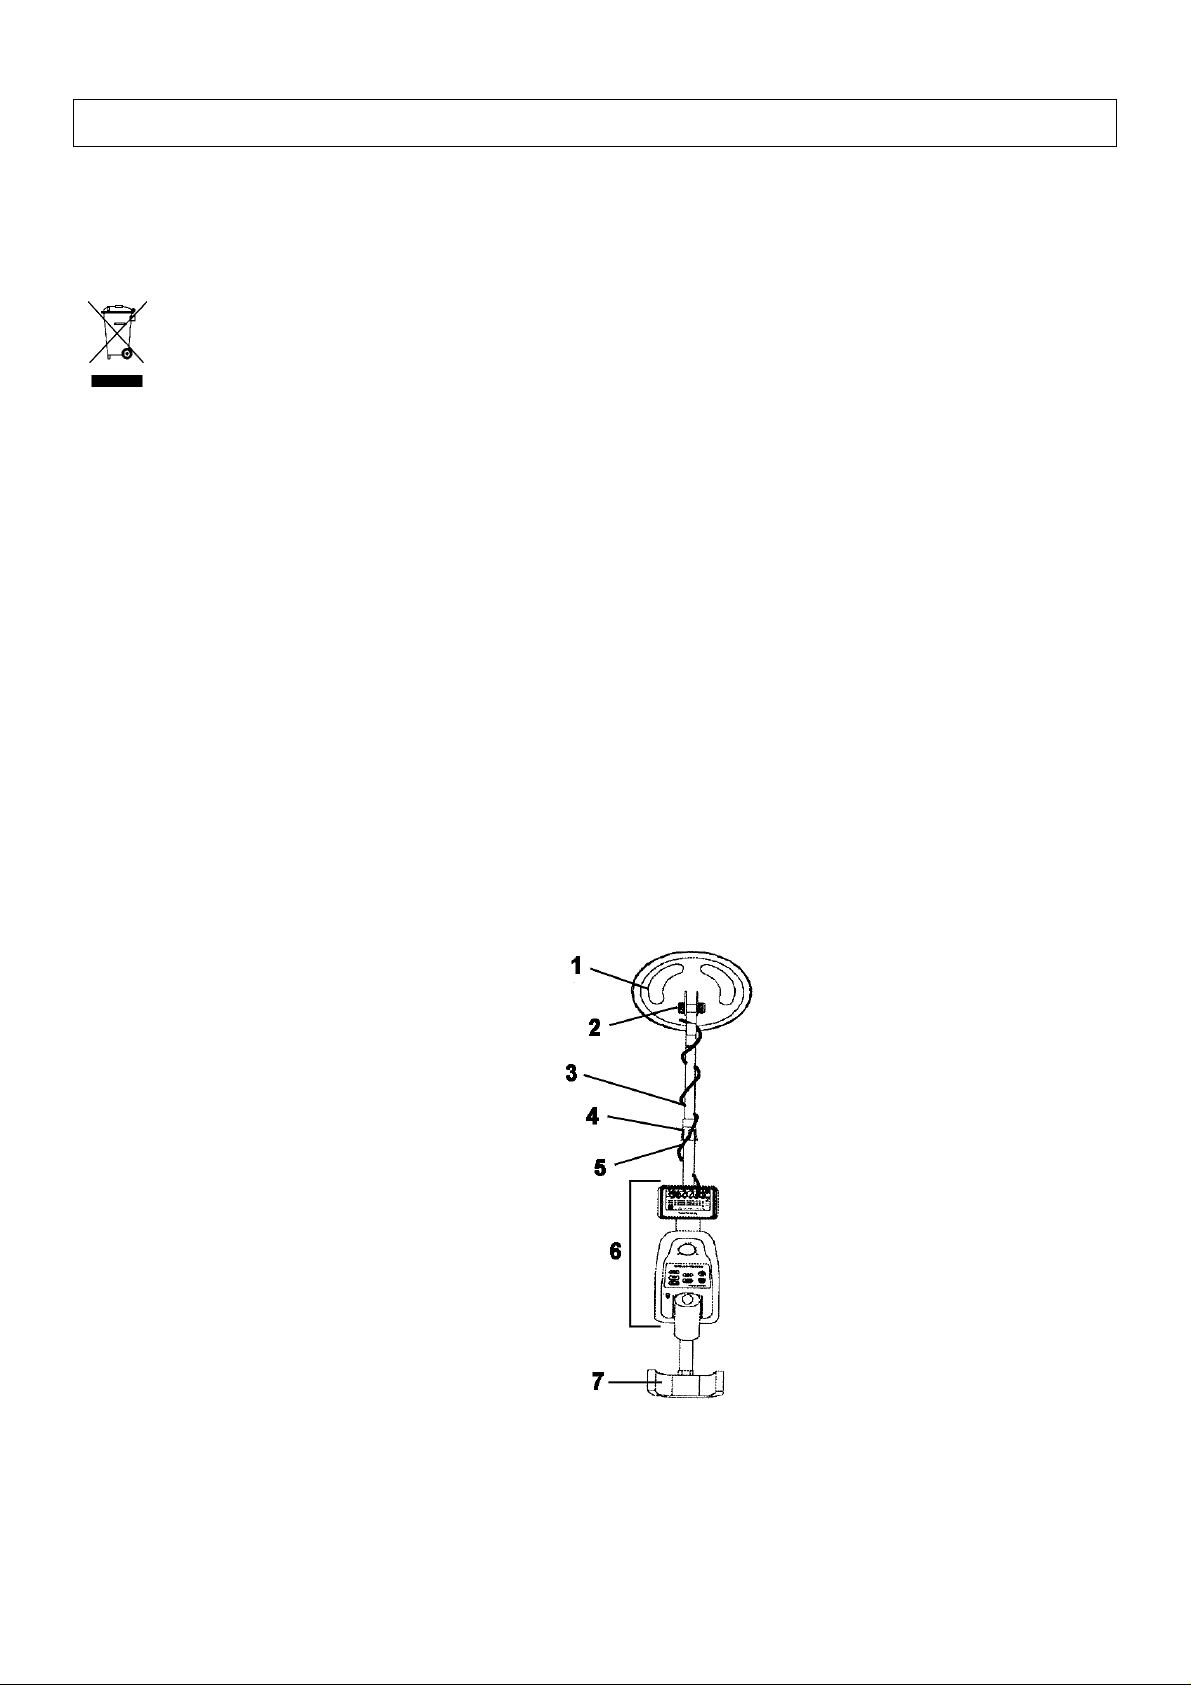
1- search coil
2- search coil fixation system
3- stem
4- lock nut
5- cable
6- control housing
7- arm support
Assembling your detector is easy and requires no special tools. Just follow these steps:
1. Remove the fixation system of the search coil (nut and bolt system). Insert the stem and align the holes on the
search coil bracket and the stem. Push the bolt through the holes and tighten with the nut knob.
CAUTION: Do not tighten the search coil fixation too hard. Don’t use tools such as pliers to tighten it.
2. Insert the arm support into the end of the stem and tighten the lock screw at the back of the control housing.
3. Turn the stem’s lock nut clockwise until it loosens.
4. Adjust the stem length to have the search coil level with and about ½ to 2 inches above the ground when you
stand upright with the detector in your hand, your arm relaxed at your side.
5. Turn the stem’s lock nut counter-clockwise to lock it in place.
CS200_v2 VELLEMAN
2
Page 3
6. Wind the search coil cable around the stem. Leave enough slack in the cable. Insert the search coil’s plug into
the search coil jack on the detector’s control housing.
CAUTION: The search coil’s plug fits into the jack only one way. Don’t force the plug or you could damage it.
7. Loosen the search coil fixation knob, adjust the search coil to the desired angle and tighten the nut knob.
b) Installing the batteries
1. Make sure the POWER switch is turned off.
2. At the back of the control housing, slide the battery covers off away from the middle.
3. Place a 9V battery in each battery compartment matching the polarity symbols (+ and -) marked inside.
4. Slide the battery covers back on.
About batteries
- Use only fresh alkaline batteries of required size & voltage
- Do not mix old and new batteries or different types of batteries
- If you don’t plan to use the device for a week or longer, remove the batteries.
Batteries can leak chemicals that can destroy electronic parts.
- To extend battery life, switch the left and right battery after 3-4 hours of operation.
- Dispose of old batteries promptly and properly. Never bury or burn them.
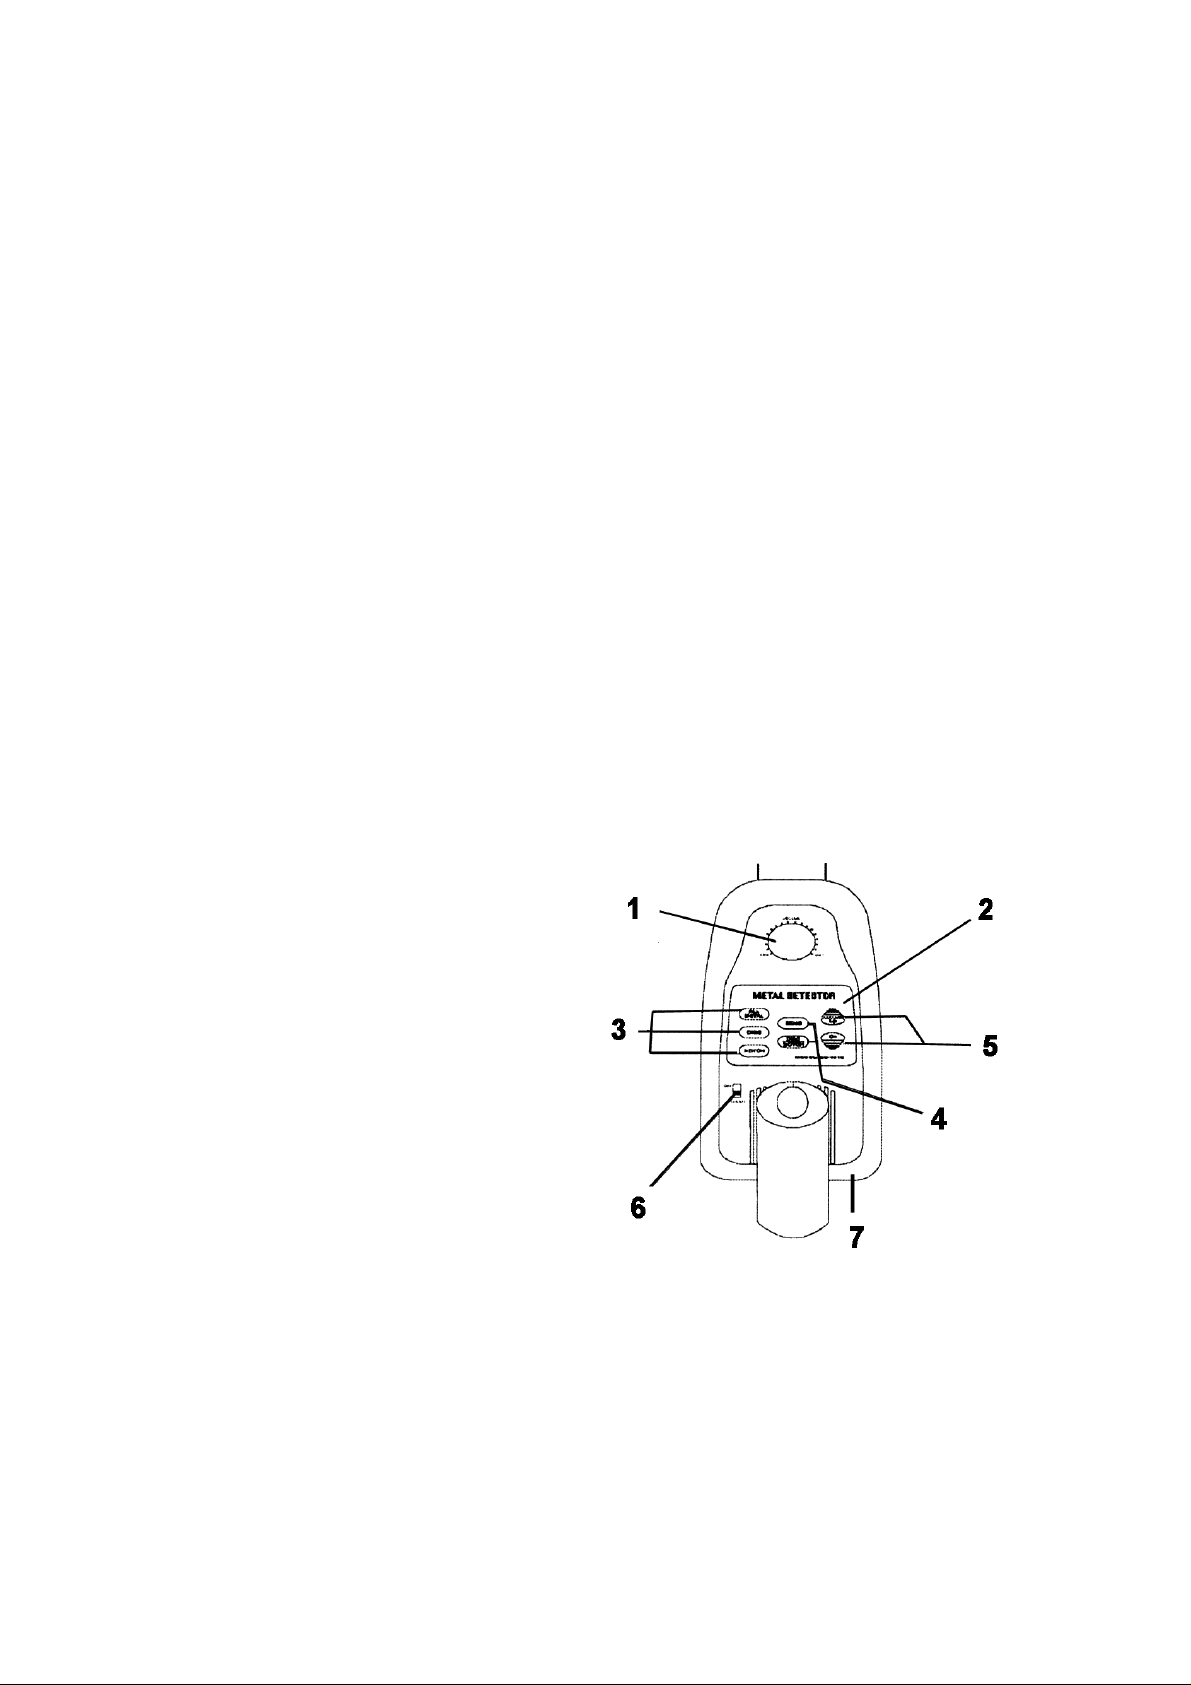
3. Functions and indications
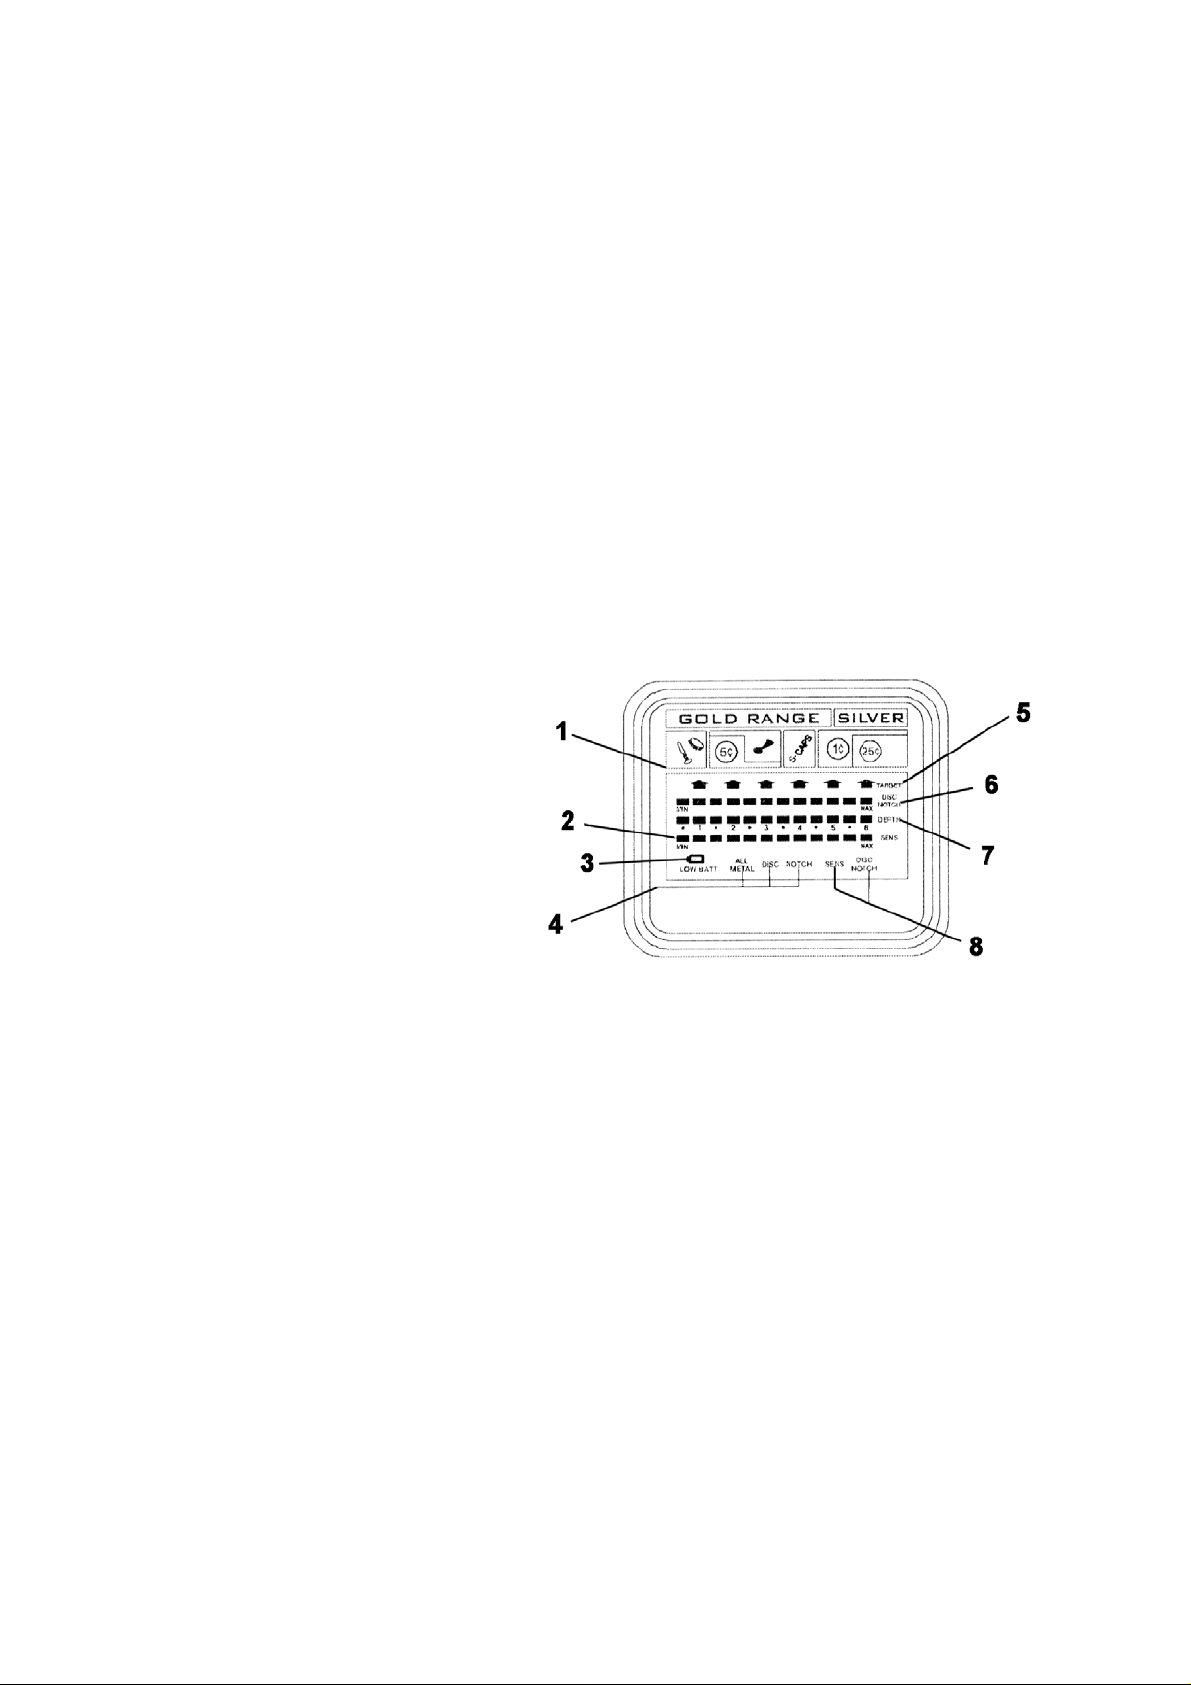
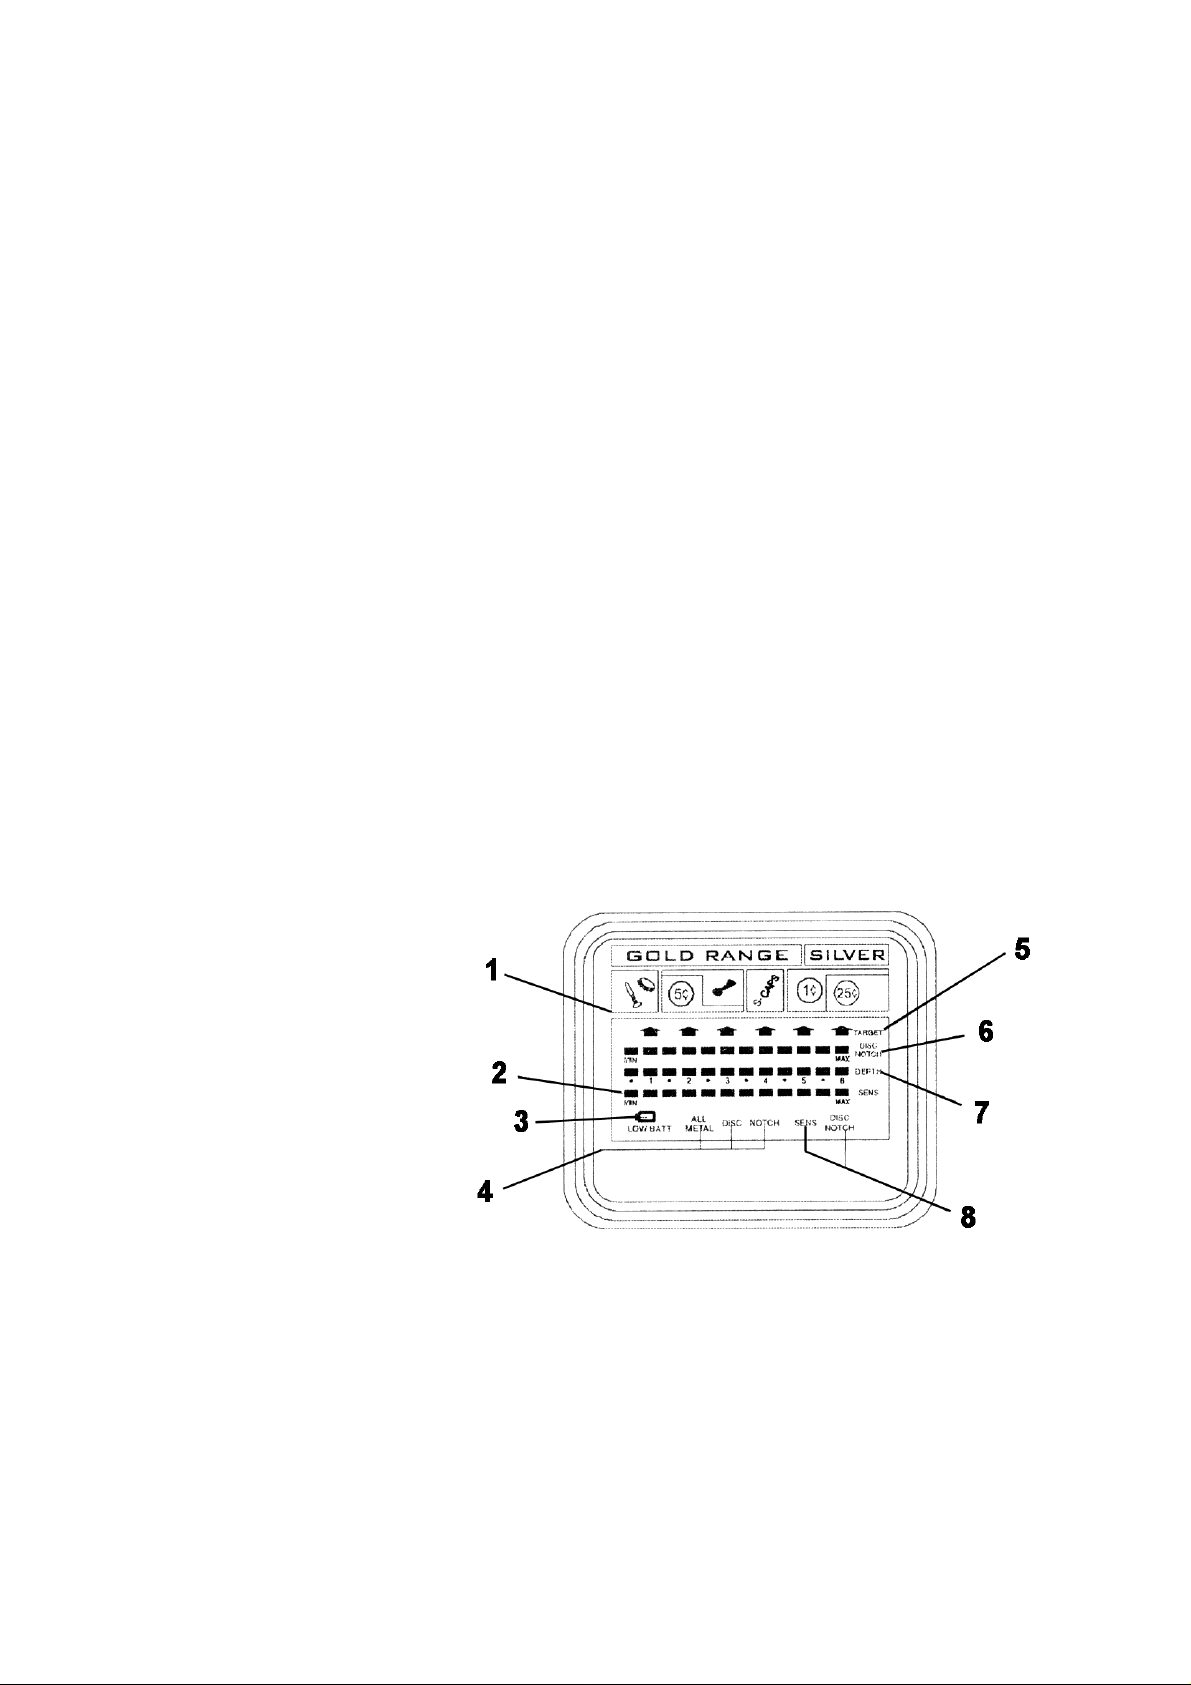
a) display
1- metal icons
2- sensitivity level
3- low-battery indicator
4- operation mode indicators
5- target indicators
6- disc/notch range
7- depth indicator
8- sensitivity or disc/notch control indication
The target indicator consists of an LCD display and target icons. When the detector locates an object, an arrow
appears below the target icon of the type of material that’s probably being detected. The depth of the target is
also displayed.
- If the detector receives a strong signal, the arrow appears steadily. If the signal is weak, the arrow blinks or
does not appear.
- If detecting ceases for about 5 seconds, the arrow will disappear.
- The target icons are only visual references to help you decide whether or not an item is worth investigating.
GOLD RANGE:
- Iron/foil (screw icon): indicates that the target is probably iron or foil. Some oxidized iron might actually register
somewhere within the SILVER range.
- Nickel (5¢ icon): indicated that the target is probably a nickel coin.
- Pull tab (pull tab icon): indicated that the target is probably a pull tab from an aluminium can. Some rough gold
items might register within the pull tab category.
- S-CAPS: indicates that the target is probably a type of metal like a bottle cap with whorl. Some small gold
items might register within this category.
- Zinc/copper (1¢ icon): indicated that the target might be a zinc or copper coin. Some larger gold items might
register within the 1¢ category.
CS200_v2 VELLEMAN
3
Page 4

SILVER RANGE (1¢/25¢ icon):
indicates that the object is probably a silver coin. Some large aluminium objects might register within the 25¢/1¢
category.
b) tones
If the detector is set to the ALL METAL mode, it sounds a single tone when it detects any type of metal.
If you set the detector to the DISC or NOTCH modes, the built-in audio identification system sounds a unique
audio tone for each of the three categories of metal. This makes it easier to identify the metal being detected.
- The detector sounds a low tone when it detects small gold objects, a nail, a bottle cap or nickel.
- The medium tone is for aluminium pull tabs, zinc or copper items. Depending on the alloys used to make them,
about 15 percent of gold rings cause the detector to sound a medium tone.
- A high tone is for brass or silver items. Highly oxidized iron may generate a medium or high tone.
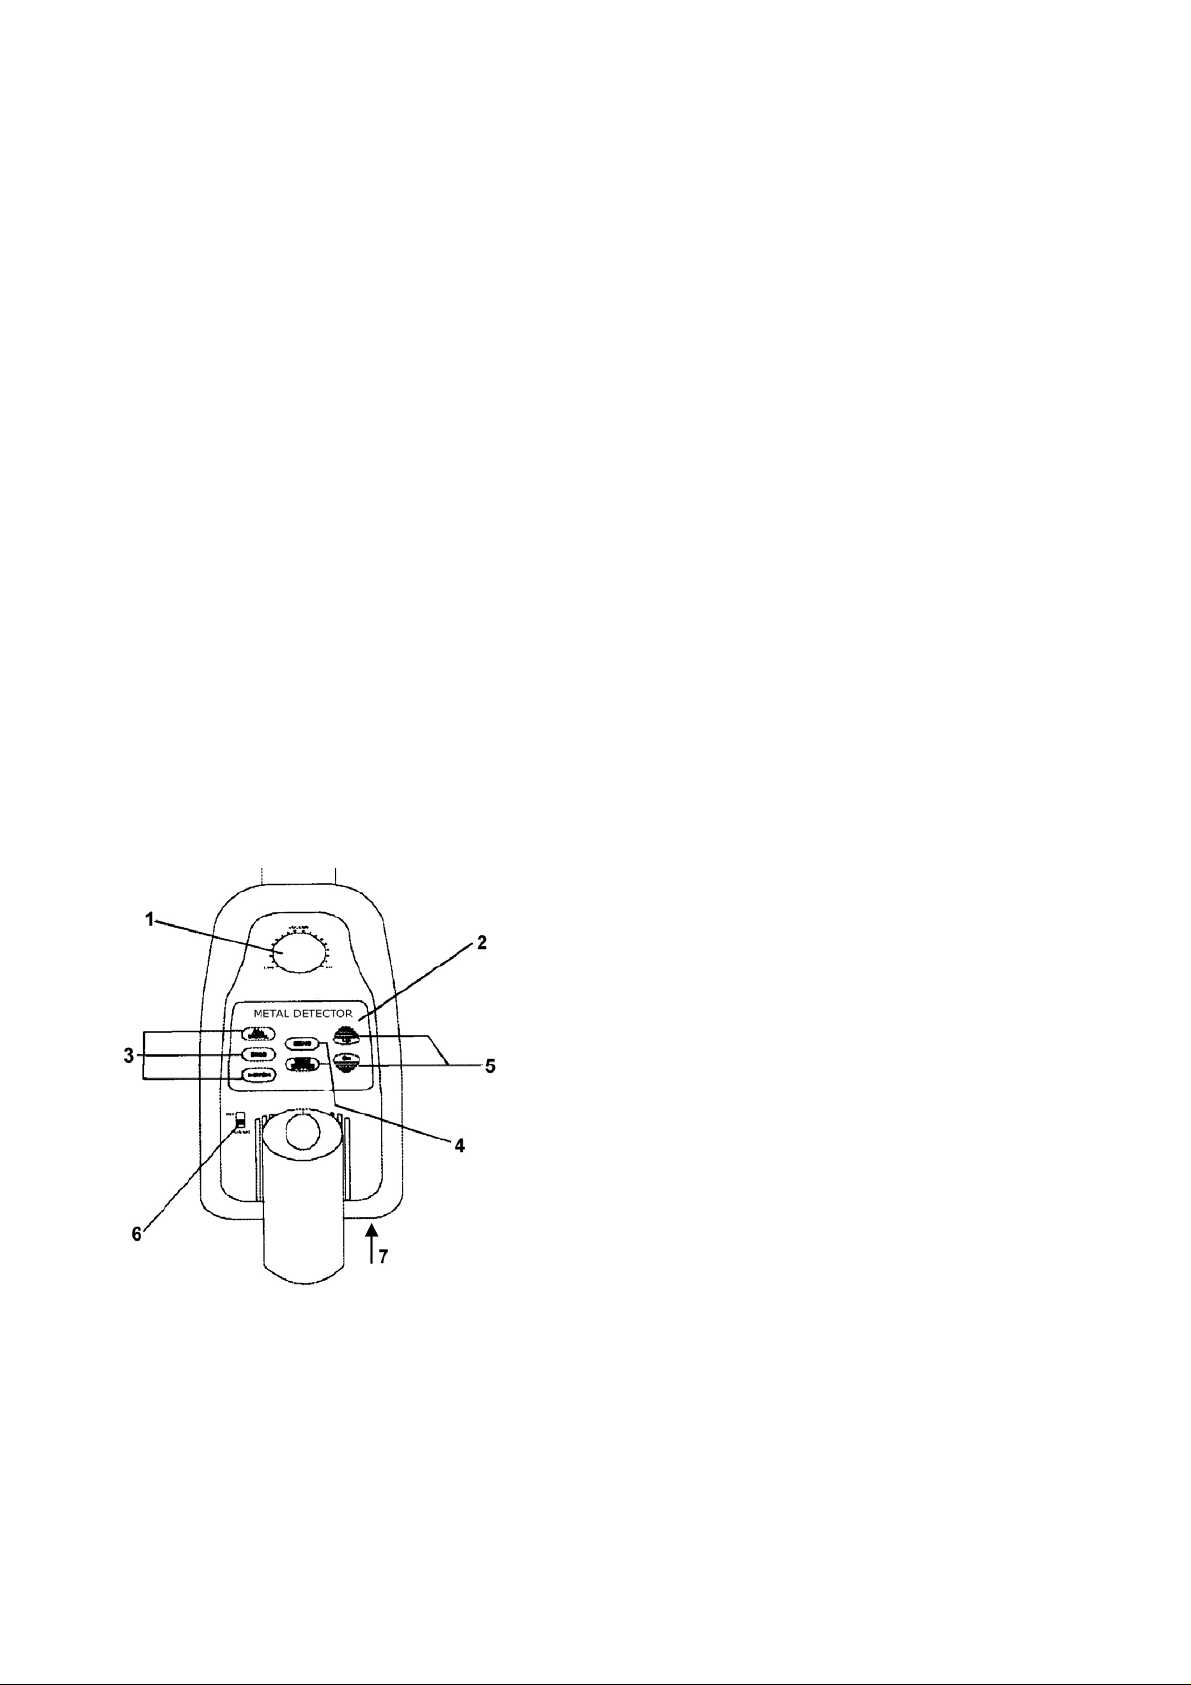
4. Operation
1- volume knob
2- function panel
3- operation mode buttons
4- regulation mode buttons
5- regulation buttons: ‘Up’ and ‘Dn’ (down)
6- power switch
7- headphones jack
a) Turning on the detector
First turn the volume knob (1) to 12 o’clock (halfway between min and max).
Slide the power switch (6) to ON. All symbols are displayed on the LCD screen. The detector sounds a high,
medium and low tone respectively.
After about 2 seconds, the detector automatically goes ALL METAL mode, with the regulation buttons (5)
available for the sensitivity (SENS) adjustment. The standard value of SENS is 5.
b) Setting the operating mode
The detector has three operating modes: ALL METAL, DISC and NOTCH. You can select the desired mode by
pressing the corresponding key (3) at the left of the function panel. Whatever the mode, upon detecting
something, the detector will always sound a tone and indicate the probable type of metal by means of an arrow
underneath the icons, and also indicate the depth of the object.
- ALL METAL: used for detecting any type of metal. In this mode, only the SENS value can be adjusted.
- DISC: used for target discrimination. You can set the target range by pressing the DISC/NOTCH regulation
mode button (4) and then the UP or DOWN button (5). The detector can detect the metal type indicated on the
display. All other metal types are rejected. For example, if you set the DISC level 4 segments from MAX to
MIN, the detector can detect S-CAPS, 1¢ or 25¢ whilst other types of metal are rejected. The detection range
can only be extended from silver towards gold.
- NOTCH: used to detect purer types of silver or gold. When you press the NOTCH operation mode button (3),
the detector will only detect purer silver and gold objects, discarding most alloys. Pressing the DISC/NOTCH
button and then the Up button will result in less pure objects being detected. This mode works from the ‘pure’
metals on both sides towards the middle.
CS200_v2 VELLEMAN
4
Page 5

c) Testing and using the detector
To learn how the detector reacts to different metals, you should test it before you use it the first time. You can test
the detector indoors and outdoors.
- INDOOR testing and use
NOTE: Never test the detector on a floor inside a building. Most buildings have metal of some kind in the floor,
which might interfere with the objects you’re testing, or mask the signal completely.
1. Slide the POWER switch to ON.
2. Select the operating mode.
3. Place the detector on a wooden or plastic table, and remove any watches, rings or metal jewellery you are
wearing.
4. Adjust the search coil so the flat part points towards the ceiling.
5. Slowly sweep a sample of the material you want the detector to find (such as a gold ring or a coin) 2-3
inches above the face of the search coil. When the detector detects any metal within the selected range, it
sounds a tone and an arrow appears below the target icon. The LCD displays the depth of the target.
NOTE: if you are using a coin, the detector will detect it more easily if you hold it so that a flat side is
parallel with the flat side of the search coil. A sweep with the side of the coin over the search coil might
cause false indication and unstable display of the arrow.
- OUTDOOR testing and use
1. Slide the POWER switch to ON.
2. Select the operating mode.
3. Find an area on the ground outside where there is no metal.
4. Place the material you want the detector to find (such as a gold ring or a coin) on the ground.
NOTE: If you are using a valuable metal sample such as gold to test the detector, mark the area where you
placed the item, to help you retrieve it later. Do not place it in tall grass or weeds.
5. Hold the search coil level to the ground about 1-2 inches above the surface, slowly move the search coil
over the area where you placed the sample, sweeping the search coil in a side-to-side motion.
6. If the detector detects the item, it sounds a tone, and an arrow and the depth appear on the display below
the target icon.
7. If the detector does not detect the item, make sure that the target mode is set correctly for the type of metal
you’re searching for. Also make sure that you’re moving the search coil correctly.
d) Search coil sweeping hints
- Never sweep the search coil as if it were a pendulum. Raising the search coil while sweeping or at the end of a
sweep will cause false readings.
- Sweep slowly. Hurrying will cause you to miss targets.
- It’s better you sweep the search coil from side to side in a straight line and keep the s earch coil parallel with the
ground.
- The detector responds with a signal when it detects most valuable metal objects. If a signal does not repeat after
you’ve swept the search coil over the target a few times, the target is probably junk metal.
- False signals can be caused by trashy ground, electrical interference, or large irregular pieces of junk metal.
- False signals are usually broken or non-repeatable.
e) Adjusting sensitivity
After you’ve become familiar with how your detector works, it’s important to fine tune the sensitivity to get a good
result. Press the touch button SENS on the panel. Then press Up or Dn to increase or decrease the sensitivity.
The level on the segment will be displayed form high to low position.
NOTE: in order to detect a target deeply buried, you can adjust the SENS to a high position. But don’t set the
SENS lever to MAX, because the detector will receive interference and false signal from broadcast antennae and
other electronic lines. The detector will have unstable arrow and irregular tone indications.
CS200_v2 VELLEMAN
5
Page 6

f) Pinpointing a target
Accurately pinpointing a target makes digging it up easier, but it takes practice. We suggest you practise finding
sample on your own property before you start searching other locations.
Follow these steps to pinpoint a target:
1. When the detector detects a buried target, continue sweeping the search coil over the target in a narrowing
side-to-side motion.
2. Make a visual note of the exact spot on the ground where the detector beeps.
3. Stop the search coil directly over this point on the ground. Then move the search coil straight forward away
from you and straight back towards you a couple of times and make another visual note.
4. Repeat steps 1-3 at a right angle to the previous search line. Make an “X” mark on the ground. The target
will be directly below the “X” at the point of the beep response.
g) Factors that affect the detecting
It’s difficult to have an accurate detecting result. Sometimes the detecting may be restricted by some factors:
- the angle of the object buried in the soil
- the depth of the target
- the level of oxidization of the target
- the size of the target
- electro-magnetic and electrical interference surrounding the object.
If you detect patiently and correctly and practise several times, you’ll get satisfactory results.
h) Using headphones
1. Make sure your headphones have a 3.5mm plug.
2. Set the VOLUME knob to zero.
3. Insert the headphones’ plug into the PHONE jack. The internal speaker will automatically disconnect.
4. Set the VOLUME knob to the desired setting. Do not listen at extremely high volume levels, as it may lead to
partial or permanent hearing loss.
5. Care & Maintenance
Your CS200 metal detector is an example of superior design and craftsmanship. The following suggestions will help
you take care of your metal detector so you can enjoy it for years.
- Handle the detector gently and carefully. Dropping it can damage circuit boards and cases and can
cause the detector to work improperly.
- Use the detector only in normal temperature environments. Temperature extremes can shorten the life
of electronic devices, or damage the detector’s exterior.
- Keep the detector away from dust and dirt, which can cause premature wear of parts.
- Wipe the detector with a damp cloth occasionally to keep it looking new. Do not use harsh chemicals,
cleaning solvents or strong detergents to clean the detector.
CS200_v2 VELLEMAN
6
Page 7
CS200 – METAALDETECTOR
1. Eigenschappen & toepassingen
Aan alle ingezetenen van de Europese Unie
Belangrijke milieu-informatie betreffende dit product
Dit symbool op het toestel of de verpakking geeft aan dat, als het na zijn levenscyclus wordt weggeworpen,
dit toestel schade kan toebrengen aan het milieu. Gooi dit toestel (en eventuele batterijen) niet bij het
gewone huishoudelijke afval; het moet bij een gespecialiseerd bedrijf terechtkomen voor recyclage. U moet
dit toestel naar uw verdeler of naar een lokaal recyclagepunt brengen. Respecteer de plaatselijke
milieuwetgeving.
Hebt u vragen, contacteer dan de plaatselijke autoriteiten betreffende de verwijdering.
Dank u voor uw aankoop! Lees deze handleiding aandachtig voor u uw CS200 metaaldetector in gebruik neemt.
Met uw CS200 metaaldetector kunt u zowat overal op zoek gaan naar munten, juwelen, goud en zilver.
Deze metaaldetector is veelzijdig en gemakkelijk te gebruiken. De belangrijkste eigenschappen zijn:
LCD scherm : geeft weer welk metaal waarschijnlijk gedetecteerd wordt, hoe diep het voorwerp
zich bevindt, het DISC/NOTCH bereik, het gevoeligheidsniveau, de
bedieningsmode en of de batterijen bijna leeg zijn.
Drietoons geluidsdiscriminator : voor verschillende metalen worden verschillende tonen weergegeven.
Disc/Notch : negeer schroot en detecteer waardevolle zaken wél door discriminatie of
zuiverheidsgradatie.
Hoofdtelefoonaansluiting : laat u toe een hoofdtelefoon (niet meegeleverd) te gebruiken en zo rustig te
werken.
Waterdichte zoekspoel : u kunt de metaaldetector zelfs gebruiken als u de zoekspoel onder water moet
steken.
Opmerking: Uw metaaldetector werkt op twee 9-volt alkalinebatterijen (niet meegeleverd).
2. Voorbereiding
a) De detector monteren
1- zoekspoel
2- bevestiging zoekspoel
3- steel
4- borgmoer
5- kabel
6- bedieningspaneel
7- armsteun
U kunt uw detector gemakkelijk zelf in elkaar steken, zonder speciale werktuigen. Voer gewoon deze stappen uit:
1. Verwijder het bevestigingssysteem (2) van de zoekspoel (bout-en-moer systeem). Steek het uiteinde van de
steel in de steunbeugel op de zoekspoel zodat de gaten in elkaars verlengde liggen. Steek de bout door de
gaten en span het bevestigingssysteem aan met de moerknop.
LET OP: span het bevestigingssysteem niet te hard aan ; gebruik ook geen tang of een ander werktuig.
CS200_v2 VELLEMAN
7
Page 8
2. Steek de armsteun (7) in het uiteinde van de steel en span de schroef achteraan het bedieningspaneel aan.
3. Draai de borgmoer (4) in wijzerzin tot de steel los komt te zitten.
4. Pas de lengte van de steel aan zodat de zoekspoel evenwijdig met, en op zo’n 5 cm van de grond komt te
hangen als u het toestel vasthoudt met uw arm ontspannen langs uw lichaam.
5. Span de borgmoer (4) terug aan door ze in wijzerzin te draaien.
6. Wind de kabel van de zoekspoel losjes rond de steel. Steek de stekker aan het uiteinde van de kabel in de
daartoe voorziene contactbus aan de achterkant van het LCD scherm.
LET OP: De stekker past slechts op 1 manier in het contact. Forceer de stekker niet ; zo beschadigt u hem.
7. Draai de zoekspoelbevestiging los, pas de helling van de zoekspoel aan, en span de bevestiging weer aan.
b) De batterijen plaatsen
1. Verzeker u ervan dat het toestel uitgeschakeld is.
2. Haal, achteraan het bedieningspaneel, de dekseltjes van de batterijvakjes (van het midden weg schuiven).
3. Plaats een 9V batterij in elk vakje en zorg ervoor dat de polariteit (+ en -) klopt.
4. Schuif de deksels terug op.
Omtrent batterijen
- Gebruik enkel verse alkalinebatterijen van het juiste formaat en de juiste spanning.
- Gebruik geen oude en nieuwe batterijen noch verschillende types batterijen door elkaar.
- Als u het toestel gedurende een week (of langer) niet zult gebruiken, haal er de batterijen dan uit.
Batterijen kunnen chemicaliën lekken, die de elektronica kunnen beschadigen.
- Om ze langer te laten meegaan wisselt u de linker- en rechterbatterij best na elke 3 à 4 uur gebruik.
- Ontdoe u op de gepaste manier van oude batterijen. Ze verbranden of begraven kan gevaarlijk zijn.
3. Functies en aanduidingen
a) het scherm
1- metaal-icoontjes
2- gevoeligheidsniveau
3- batterijverklikker
4- aanduidingen gebruiksmode
5- voorwerpaanduidingen
6- disc/notch bereik
7- dieptemeter
8- aanduiding gevoeligheid of disc/notch
De voorwerpaanduiding bestaat uit een LCD-scherm en voorwerp-icoontjes. Als de detector een voorwerp
bespeurt, verschijnt er een pijl onder het icoon van het type materiaal dat waarschijnlijk gedetecteerd wordt. Hoe
diep het voorwerp zich bevindt wordt ook weergegeven.
- Als de detector een sterk signaal ontvangt, verschijnt de pijl vast. Bij een zwak signaal knippert de pijl of
verschijnt hij niet.
- Als er 5 seconden niets gedetecteerd wordt, verdwijnt de pijl.
- De voorwerpicoontjes zijn slechts visuele referentiepunten om u te helpen beslissen of een voorwerp al dat
niet de moeite waard is.
CS200_v2 VELLEMAN
8
Page 9
GOUD-BEREIK (GOLD):
- ijzer/bladmetaal (schroef-icoon): betekent dat het voorwerp wellicht ijzer of bladmetaal is. Sommige verroeste
ijzeren voorwerpen worden evenwel soms in het ZILVER-bereik aangeduid.
- nikkel (5¢-icoon): betekent dat het voorwerp wellicht een nikkel munt is.
- blik-lipje (lipje-icoon): betekent dat het voorwerp wellicht een lipje is van een aluminium blikje. Sommige ruwe
gouden voorwerpen kunnen in het lipjes-bereik aangeduid worden.
- S-CAPS: betekent dat het voorwerp wellicht een metalen voorwerp is in de aard van een schroefdop.
Sommige kleine gouden voorwerpen worden soms in deze categorie aangeduid.
- Zink/koper (1¢-icoon): betekent dat het voorwerp een zink of koper munt kan zijn. Sommige grotere gouden
voorwerpen worden in deze categorie aangeduid.
ZILVER-BEREIK (1¢/25¢-icoon):
Betekent dat het voorwerp wellicht een zilveren munt is. Sommige grotere aluminium voorwerpen kunnen in deze
categorie worden aangeduid.
b) tonen
In de ALL METAL mode geeft de detector een enkel geluidssignaal als hij gelijk welk metaal detecteert.
Als u de detector in de DISC of NOTCH mode zet, geeft het ingebouwde audio identificatiesysteem een unieke
toon voor elk van de 3 metaalcategorieën. Dit maakt het voor u gemakkelijker het metaaltype te bepalen.
- De detector produceert een lage toon bij een klein gouden voorwerp, een nagel, en kroonkurk of nikkel.
- De middentoon is voor aluminium lipjes, zink of koperen voorwerpen. Afhankelijk van hun legering
veroorzaken ongeveer 15% van de gouden ringen een middentoon.
- Een hoge toon is voor messing of zilver. Erg verroest ijzer kan aanleiding geven tot een midden- of hoge toon.
4. Bediening
1- volumeknop
2- knoppenpaneel
3- knoppen gebruiksmode
4- knoppen regelmode
5- regelknoppen: ‘Up’ en ‘Dn’ (down)
6- stroomschakelaar
7- hoofdtelefoonaansluiting
a) De detector aanzetten
Zet eerst de volumeknop (1) op 12 uur (half open)
Zet de stroomschakelaar (6) aan. Alle symbolen verschijnen op het LCD-scherm, en de detector produceert
respectievelijk een hoge, midden- en lage toon.
Na ongeveer 2 seconden schakelt de detector automatisch over naar de ALL METAL mode, met de regelknoppen
(5) beschikbaar voor de gevoeligheidsregeling. De standaard gevoeligheidswaarde is 5.
CS200_v2 VELLEMAN
9
Page 10

b) De werkingsmode bepalen
De detector heeft drie gebruiksmodes: ALL METAL, DISC and NOTCH. U kunt de mode bepalen door op de
overeenkomstige knop (3) links op het knoppenpaneel te drukken. In alle gebruiksmodes zal de detector bij een
detectie een toon produceren, met een pijl het vermoedelijke metaaltype aangeven, en de diepte aangeven.
- ALL METAL: voor alle metaaltypes. In de ALL METAL mode kunt u alleen de gevoeligheid regelen.
- DISC: om te discrimineren. U kunt het doelbereik regelen door de DISC/NOTCH knop (4) in te drukken,
gevolgd door UP of DOWN (5). De detector kan het bereik detecteren dat aangegeven wordt op de display.
Andere metaaltypes worden niet weergegeven. Bijvoorbeeld: met het DISC-niveau op 4 zal de detector in het
bereik 25¢, 1¢ en S-CAPS detecteren ; andere metalen worden genegeerd. Het bereik kan enkel vergroot
worden van zilver (rechts) naar goud (links) toe.
- NOTCH: om zuiverdere vormen van zilver of goud te vinden. Als u op de NOTCH gebruiksmodeknop (3) drukt,
zal het scherm enkel een blokje helemaal links en helemaal rechts op het bereik tonen. De detector zal enkel
vrij zuivere vormen van zilver en goud detecteren, en de meeste legeringen negeren. Als u nu op de knop
DISC/NOTCH drukt, gevold door de ‘Up’ knop, zal het bereik aan beide kanten vergroten en zullen ook minder
zuivere voorwerpen gedetecteerd worden. Deze gebruiksmode werkt dus van beide kanten van het
detectiespectrum naar het midden toe.
c) De detector testen en gebruiken
Om te leren hoe de detector reageert op verschillende metaalsoorten, doet u er goed aan het toestel goed te
testen voor u het de eerste keer gaat gebruiken. U kunt het toestel zowel binnen als buiten testen.
- BINNEN testen en gebruiken
OPMERKING: Test het toestel nooit op een vloer in een gebouw. Bij de meeste gebouwen zit er wel een of
andere soort metaal in de vloer, waardoor de resultaten van de voorwerpen die u eigenlijk wil testen, vervormd
worden of zelfs helemaal verkeerd uitgelezen worden.
1. Zet de stroomschakelaar (POWER) op ON.
2. Selecteer de gebruiksmode.
3. Plaats de detector op een houten of plastic tafel, en leg alle ringen, uurwerken of andere metalen juwelen
of voorwerpen die u op zich draagt even aan de kant.
4. Kantel de zoekspoel zodanig dat het vlakke zoekoppervlak naar bov en gekeerd is.
5. Beweeg het testmateriaal (bvb een gouden ring of een munt) langzaam een tiental centimeter boven de
zoekspoel. Als de detector een metaal binnen het geselecteerde bereik bespeurt, produceert hij een toon
en verschijnt er een pijl onder een metaal-icoon. Hij geeft ook weer hoe diep het voorwerp zich bevindt.
OPMERKING: als u een muntstuk gebruikt, zal de detector het gemakkelijker bespeuren als u het zodanig
houdt dat een vlakke zijde naar de zoekspoel is gekeerd. Als u het muntstuk met de smalle kant naar de
zoekspoel houdt, kan dat aanleiding geven tot een foutief resultaat of een onduidelijke detectie.
- BUITEN testen en gebruiken
1. Zet de stroomschakelaar (POWER) op ON.
2. Selecteer de gebruiksmode.
3. Zoek een stuk grond waar geen metaal in zit.
4. Plaats het testmateriaal (bijvoorbeeld een gouden ring of een muntstuk) op de grond.
OPMERKING: Als u waardevol testmateriaal (goud) gebruikt, duid dan duidelijk aan waar u het gelegd hebt
om het achteraf gemakkelijk terug te vinden. Let het in alle geval niet tussen hoog gras of onkruid.
5. Hou de zoekspoel evenwijdig met en zo’n 5 cm boven de grond. Beweeg de zoekspoel langzaam zijwaarts
over het gebied waar u het testmateriaal gelegd hebt.
6. Als de detector het voorwerp detecteert, zal hij een toon produceren en zal er op het LCD-scherm een pijl
verschijnen onder het toepasselijke metaal-icoon. Ook hoe diep het voorwerp zit, wordt aangegeven.
7. Als de detector het voorwerp niet detecteert, controleer dan of de gebruiks- en regelingsmodes correct zijn
ingesteld voor het type metaal dat u wilt zoeken. Zorg er ook voor dat u de zoekspoel correct beweegt.
CS200_v2 VELLEMAN
10
Page 11

d) Efficiënt zoeken
- Beweeg de zoekspoel niet zoals een pendel. De zoekspoel hoger heffen tijdens of op het einde van een zwaai,
kan aanleiding geven tot foutieve resultaten.
- Beweeg de detector langzaam. Door te vlug te bewegen kunt u voorwerpen missen.
- De ideale beweging met de zoekspoel is zijwaarts en in een rechte lijn, waarbij u de zoekspoel steeds op
eenzelfde afstand van de bodem houdt.
- De detector produceert een toon als hij waardevolle metalen voorwerpen detecteert. Als een toon niet herhaald
wordt wanneer u met de zoekspoel enkele keren over hetzelfde punt gaat, is het metaal wellicht waardeloos.
- Vervuilde grond, elektrische interferentie of grote stukken schroot kunnen valse signalen veroorzaken.
- Valse signalen zijn doorgaans onregelmatig of niet reproduceerbaar.
e) De gevoeligheid (SENS) aanpassen
Wanneer u de basistechnieken onder de knie heeft, is het belangrijk de detector fijn af te stellen om zo een goed
resultaat te verkrijgen. Druk op de SENS regelmodeknop. Druk vervolgens of ‘Up’ of ‘Dn’ om de gevoeligheid bij
te stellen. Het gevoeligheidsniveau kunt u aflezen op de onderste blokjesbalk op het LCD-scherm.
OPMERKING: om voorwerpen diep in de grond te vinden moet u de gevoeligheid hoog instellen. Zet de gevoeligheid nooit op het maximum, want dan zal de detector storing en valse signalen ondervinden van zendmasten en
andere elektronische leidingen. De detector zal onregelmatige aanduidingen en tonen produceren.
f) Een positie precies bepalen
De exacte positie van een voorwerp bepalen, maakt het opgraafwerk een stuk makkelijker, maar oefening baart
nog altijd kunst. Wij raden u dan ook aan eerst op uw eigen grondgebied ervaring op de doen alvorens op andere
locaties te gaan werken. Volg deze stappen om een voorwerp precies te lokaliseren:
1. Als de detector een begraven voorwerp bespeurt, verklein dan de reikwijdte van uw zijwaartse beweging.
2. Kijk nauwkeurig boven welke plaats de detector een signaal geeft.
3. Hou de zoekspoel stil vlak boven dat punt op de grond. Beweeg de zoekspoel vervolgens enkele keren vooren achterwaarts, en kijk opnieuw waar precies de detector zijn signaal geeft.
4. Herhaal de stappen 1 tot 3, iedere keer haaks op de laatste beweging. Duid de precieze locatie op de grond
aan met een kruis (X). Het voorwerp zal zich recht onder het punt X bevinden.
g) Factoren die de detectie kunnen beïnvloeden
Het is moeilijk om een precies zoekresultaat te behalen. Deze factoren kunnen het zoeken bemoeilijken:
- de hoek waaronder het voorwerp zich in de grond bevindt
- hoe diep het voorwerp zich bevindt
- in welke mate het voorwerp verroest is
- de grootte van het voorwerp
- elektromagnetische en elektrische storingsvelden rond het voorwerp
Als u geduldig en correct zoekt, en vooral veel oefent, zult u zeker bevredigende resultaten behalen.
h) Een hoofdtelefoon gebruiken
1. Verzeker u ervan dat uw hoofdtelefoon een 3.5mm stekker heeft.
2. Zet de volumeknop op nul.
3. Steek de stekker van de hoofdtelefoon in het PHONE contact. De ingebouwde luidspreker zal automatisch
uitgeschakeld worden.
4. Regel het volume naar uw believen. Draai de volumeknop nooit helemaal open ; dit kan leiden tot gedeeltelijk
of permanent gehoorverlies.
CS200_v2 VELLEMAN
11
Page 12

5. Zorg en onderhoud
Uw CS200 metaaldetector is een toonbeeld van topdesign en vakmanschap. Deze suggesties zullen u helpen uw
CS200 in goede staat te houden, zodat u hem nog jaren probleemloos zult kunnen gebruiken.
- Behandel de detector voorzichtig en met zorg. Als hij valt kan de elektronica of de behuizing beschadigd
worden, waardoor de detector niet meer naar behoren zal werken.
- Gebruik de detector alleen bij normale temperaturen. Extreme temperaturen kunnen de levensduur van
elektronische apparaten inkorten, of de behuizing beschadigen.
- Hou de detector vuil- en stofvrij. Stof of vuil kan vroegtijdige sleet veroorzaken op bepaalde onderdelen.
- Maak de detector af en toe schoon met een vochtige doek. Zo blijft hij er gloednieuw uitzien. Gebruik
geen bijtende chemische producten, reinigingsmiddelen of sterke detergenten om de detector te
reinigen.
CS200 – DÉTECTEUR DE MÉTAUX
1. Caractéristiques & applications
Aux résidents de l'Union européenne
Des informations environnementales importantes concernant ce produit
Ce symbole sur l'appareil ou l'emballage indique que l’élimination d’un appareil en fin de vie peut polluer
l'environnement. Ne pas éliminer un appareil électrique ou électronique (et des piles éventuelles) parmi les
déchets municipaux non sujets au tri sélectif ; une déchèterie traitera l’appareil en question. Renvoyer les
équipements usagés à votre fournisseur ou à un service de recyclage local. Il convient de respecter la
réglementation locale relative à la protection de l’environnement.
En cas de questions, contacter les autorités locales pour élimination.
Nous vous remercions de votre achat ! Lisez le manuel attentivement avant de prendre votre CS200 en service..
Avec votre détecteur de métaux CS200, vous pouvez rechercher des pièces de monnaie, des bijoux, de l’or ou de
l’argent où vous voulez.
Le détecteur est facile à utiliser. Les caractéristiques principales sont :
Ecran LCD : indique par moyen d’une flèche quel type de métal a été détecté, à quelle
profondeur l’objet se trouve, la gamme DISC/NOTCH, le niveau de sensibilité, la
mode d’utilisation, et un témoin d’usure des piles.
Discrimination audio à 3 sons : pour de différents métaux, l’appareil produit de différents sons.
Disc/Notch : ignorez de la ferraille, mais détectez des choses précieuses en sélectionnant ou
éliminant des métaux.
Sortie casque d’écoute : vous permet d’utiliser un casque d’écoute (non fourni) et donc de travailler
tranquillement.
Tête de détection étanche : permet l'utilisation du détecteur même avec la tête de détection sous l'eau.
Remarque: Votre détecteur de métaux nécessite deux piles alcalines 9V (non fournis).
CS200_v2 VELLEMAN
12
Page 13
2. Préparation
a) Assemblage du détecteur
1- tête de détection
2- fixation de la tête de détection
3- tige
4- écrou de fixation
5- câble
6- panneau de commande
7- appuie-bras
L'assemblage du détecteur est facile et ne requiert aucun outil particulier. Suivez simplement cette procédure:
1. Dévissez et enlevez la fixat ion (2) de la tête de détection. Mettez le bout de la tige dans le support de la tête de
détection, et alignez les trous. Mettez le boulon à travers les trous et serrez le bouton écrou.
ATTENTION: Ne forcez pas le système de fixation. N’utilisez pas non plus des tenailles ou un autre outil.
2. Insérez l’appuie-bras (7) dans l’autre bout de la tige, et tendez la vis de serrage.
3. Dévissez légèrement l’écrou de fixation (4), vous permettant d’allonger la tige (3).
4. Ajuster la longueur de la tige de façon que la tête de détection se trouve à environ cinq centimètres du sol quand
vous tenez le détecteur à votre côté de manière détendue.
5. Resserrez l’écrou de fixation (4).
6. Enroulez le câble de la tête de détection autour de la tige. Laissez suffisamment de mou dans le câble. Insérez la
fiche à la fin du câble dans la prise à l’arrière de l’écran LCD. Veillez à ce que les contacts de la fiche
correspondent bien aux trous de la prise.
ATTENTION: La fiche de la tête de détection ne rentre que d'une seule façon dans le connecteur. Ne forcez pas
la fiche, car vous risquez de l'endommager.
7. Desserrez la fixation de la t ête de détection, adapter l’angle de la tête de détection, et resserrez la fixation.
b) Installation des piles
1. Assurez-vous du fait que l’appareil soit éteint.
2. Enlevez les couvercles des logements à piles à l’arrière du panneau de commande.
3. Mettez une pile 9V dans chaque compartiment, en respectant la polarité indiquée (+ et -).
4. Remettez les couvercles des logements à piles.
A propos de piles
- N'utilisez que des piles alcalines neuves du format et du voltage recommandé.
- Ne mélangez pas de piles nouvelles et utilisées, ni de différents types de piles.
- Si vous n’allez pas utiliser l’appareil pendant une semaine ou plus, retirez les piles.
Des produits chimiques, qui nuisent à des circuits électroniques, peuvent s’écouler de piles non utilisés.
- Afin de prolonger la durée de vie des piles, il vaut mieux les changer de côté après 3 ou 4 heures de service.
- Débarrassez-vous correctement des piles utilisées. Les enterrer ou brûler peut être nocif.
CS200_v2 VELLEMAN
13
Page 14

3. Fonctions et indications
a) l’écran
1- icônes
2- niveau de sensibilité
3- témoin d’usure des piles
4- indication mode d’utilisation
5- indication d’objet
6- champ disc/notch
7- bathymètre
8- indication sensibilité ou disc/notch
L’indication d’objet consiste d’un écran LCD et des icônes. Du moment que le détecteur détecte un objet, une
flèche apparaîtra sous l’icône du type de métal probable. La profondeur de l’objet est également indiquée.
- Si le détecteur capte un signal fort, il affichera une flèche fixe. Lors d’un signal faible, la flèche va clignoter ou
ne pas apparaître du tout.
- Après 5 secondes sans détection, la flèche disparaîtra.
- Les icônes ne sont que des points de référence visuels pour vous aider à déterminer si oui ou non un objet
vaut la peine d’une recherche plus profonde.
CHAMP OR (GOLD):
- fer/métal en feuilles (icône de vis): l’objet est probablement du fer ou du métal en feuilles. Certains objets en
fer rouillé peuvent causer une détection dans le champ ARGENT (SILVER).
- nickel (icône 5¢): l’objet est probablement une pièce en nickel.
- languette de cannette (icône languette): l’objet est probablement la languette d’une cannette alu. Certains
objet en or brut peuvent causer une détection dans ce champ.
- S-CAPS: l’objet ressemble un bouchon à vis. Certains petits objets en or peuvent causer une détection dans
ce champ.
- Zinc/cuivre (icône 1¢): L’objet peut être une pièce en zinc ou en cuivre. Certains grands objets en or peuvent
causer une détection dans ce champ.
CHAMP ARGENT (icône 1¢/25¢):
l’objet est probablement une pièce en argent. Certains grands objets en alu peuvent causer une détection dans
ce champ.
b) sons
Dans la mode ALL METAL, le détecteur émet un seul son quand il détecte n’importe quel métal.
Si vous utilisez le détecteur dans la mode DISC ou NOTCH, le système audio incorporé émet un son unique pour
chacune des trois catégories de métaux. Ceci vous permet de déterminer plus facilement le type de métal.
- Le détecteur émet un son grave pour un petit objet en or, un clou, une capsule ou du nickel.
- La tonalité moyenne indique des languettes en alu, ou des objets en zinc ou en cuivre. Dépendant de la
composition de leur alliage, environ 15% des bagues en or provoquent un son moyen.
- Un son aigu indique de l’argent ou du laiton. Du fer rouillé peut causer un son moyen ou aigu.
CS200_v2 VELLEMAN
14
Page 15

4. Emploi
1- bouton volume
2- panneau de boutons
3- boutons mode d’utilisation
4- boutons mode de réglage
5- boutons de réglage: ‘Up’ en ‘Dn’ (down)
6- interrupteur d’alimentation
7- sortie casque d’écoute
a) Allumer le détecteur
D’abord, mettez le bouton volume sur 12h (à moitié ouvert).
Allumez l’interrupteur d’alimentation (6). Tous les symboles apparaissent sur l’écran LCD, et le détecteur émet un
son respectivement aigu, moyen et grave.
Après 2 secondes environ, le détecteur passe en mode ALL METAL, avec les boutons de réglage (5) disponibles
pour le niveau de sensibilité (SENS). La valeur standard de la sensibilité est 5.
b) Déterminer la mode d’utilisation
Le détecteur a trois modes d’utilisation: ALL METAL, DISC et NOTCH. Vous pouvez déterminer la mode en
appuyant sur le bouton correspondant (3) sur le côté gauche du panneau de boutons. Dans tous les modes, lors
d’une détection, le détecteur va émettre un son, indiquer le type de métal probable par moyen d’une flèche, et
indiquer la profondeur de l’objet.
a. ALL METAL: pour tous types de métal. Dans ce mode, seulement la sensibilité peut être réglée.
b. DISC: vous permet de discriminer. Vous pouvez régler le champ cible en appuyant le bouton DISC/NOTCH
(4), suivi par Up ou Dn (5). Le détecteur peut détecter dans le champ indiqué sur l’écran. Tout autre type de
métal n’est pas signalé. Par exemple: avec le niveau DISC sur 4, l’appareil va détecter dans le champ 25¢, 1¢
et S-CAPS ; d’autres types de métal sont ignorés. Le champ peut seulement être agrandi d’argent (à droite)
vers or (à gauche).
c. NOTCH: pour trouver des formes assez pures d’argent ou d’or. Lorsque vous poussez sur le bouton NOTCH
(3), l’appareil affichera un bloc à droite et un bloc à gauche du champ. Le détecteur va donc seulement
détecter des formes assez pures d’argent et d’or, et ignorer la plupart des alliages. Si, ensuite, vous poussez
sur le bouton DISC/NOTCH (4), suivi par le bouton Up (5), le champ va augmenter des deux côtés. Des objets
moins purs seront également détectés. Ce mode travaille donc des deux côtés du champ de détection vers le
centre.
c) Tester et utiliser le détecteur
Pour apprendre la réaction du détecteur sur de différents types de métaux, vous faites mieux de bien tester
l’appareil avant de l’utiliser pour la première fois. Vous pouvez tester l’appareil à l’intérieur comme à l’extérieur.
- tester et utiliser A L’INTERIEUR
REMARQUE: Ne testez jamais l’appareil sur un sol dans un bâtiment. Dans la plupart des bâtiments, il y a tel
ou tel type de métal dans le sol, ce qui peut distordre les résultats de vos objets de test.
1. Mettez l’interrupteur d’alimentation (POWER) sur ON.
CS200_v2 VELLEMAN
15
Page 16

2. Sélectionnez le mode d’utilisation.
3. Placez le détecteur sur une table en bois ou en plastic. Mettez de côté tous bagues, montres ou autres
objets métalliques que vous portez sur vous.
4. Réglez l'angle du disque de manière que la partie plane de la tête de détection soit dirigée vers le plafond.
5. Bougez lentement l’objet de test (par exemple une bague en or ou une pièce de monnaie) à environ cinq
centimètres au-dessus de la tête de détection. Quand le détecteur détecte un métal dans le champ
sélectionné, il émet un son, en une flèche apparaît sous l’icône applicable. Le détecteur indique également
la profondeur de l’objet.
REMARQUE: si vous utilisez une pièce de monnaie, le détecteur la détectera plus facilement quand vous
la présentez côté plat face à la tête de détection. Quand vous la tenez avec le bord vers la tête de
détection, vous risquez d’obtenir une détection fautive ou imprécise.
- tester et utiliser A L’EXTERIEUR
1. Mettez l’interrupteur d’alimentation (POWER) sur ON.
2. Sélectionnez le mode d’utilisation.
3. Cherchez un terrain où il n’y a pas de métal dans le sol.
4. Placez l’objet de test (par exemple une bague en or ou une pièce de monnaie) sur le sol.
REMARQUE : Quand vous utilisez un objet précieux (en or, par exemple), marquez clairement l’endroit
exact où vous l’avez placé. Ne le placez jamais dans d’hautes ou de mauvaises herbes.
5. Balayez lentement et latéralement la zone où vous avez placé l'échantillon, en tenant la tête de détection à
environ 2 à 5 cm au-dessus du sol.
6. Quand le détecteur détecte un métal dans le champ sélectionné, il émet un son, en une flèche apparaît
sous l’icône applicable. Le détecteur indique également la profondeur de l’objet.
7. Si le détecteur ne détecte pas l’objet de test, vérifiez si les modes d’utilisation et de réglage sont bien
adaptés au type de métal que vous voulez trouver. Vérifiez également si vous balayez correctement.
d) chercher efficacement
- Ne bougez pas la tête de détection comme une pendule. Si vous le soulevez pendant ou à la fin d'un balayage,
vous risquez d'obtenir de fausses indications.
- Ne balayez pas trop vite afin de ne pas manquer des objets.
- Le mouvement idéal de la tête de détection est latéral et en ligne droite, en maintenant la même distance du sol.
- Le détecteur émet un signal sonore lorsqu’il détecte des objets métalliques. Si un son n’est pas répété après
plusieurs passages au-dessus du même point, l’objet ou le métal est probablement sans valeur.
- Du sol contaminé, de l’interférence électrique ou beaucoup de ferraille peuvent causer de faux signaux.
- Des signaux fautifs sont souvent irréguliers ou non reproductibles.
e) régler la sensibilité (SENS)
Quand vous maîtrisez les techniques de base, il est important de bien pouvoir régler la sensibilité afin de localiser
les objets ou métaux que vous désirez. Poussez le bouton de mode de réglage SENS. Ensuite, poussez les
boutons ‘Up’ ou ‘Dn) pour modifier le niveau de sensibilité. Le niveau de sensibilité se lit en bas de l’écran LCD.
REMARQUE: afin de trouver des objets profondément enterrés, vous sélectionnez un niveau élevé de sensibilité.
Cependant, n’utilisez jamais le niveau max, car le détecteur éprouvera de la perturbation et de faux signaux
d’antennes émettrices et d’autres lignes électriques. Le détecteur produira des indications et tonalités irrégulières.
f) déterminer une position précise
Un positionnement exacte d’un objet facilite bien sûr le déterrement, mais ce n'est qu’en forgeant qu'on devient
forgeron. Dès lors, nous vous conseillons d’acquérir de l’expérience sur votre propre territoire, avant d’aller
travailler sur d’autres terrains. Suivez cette procédure pour faire une localisation exacte:
1. Quand le détecteur détecte un objet enterré, diminuez la portée de votre balayage latéral.
CS200_v2 VELLEMAN
16
Page 17

2. Notez visuellement l'endroit exact du terrain où le détecteur émet un son.
3. Stabilisez la tête de détection exactement au-dessus de cet endroit sur le sol. Ensuite, bougez la tête en avant
et en arrière pour faire une localisation exacte sous un autre angle.
4. Répétez les points 1 à 3, chaque fois perpendiculairement au dernier balayage. Marquez l’endroit exacte sur
le sol avec une croix (X). L’objet se trouve exactement sous le point X.
g) Eléments pouvant influencer la détection
Il est difficile d’obtenir un résultat précis. Voici quelques éléments qui peuvent influencer votre recherche:
- L'angle de l'objet dans le sol
- La profondeur de l'objet
- La rouillure de l'objet
- La taille de l'objet
- des champs de perturbation électromagnétique et électrique autour de l’objet.
Si vous cherchez patiemment et correctement, et surtout si vous vous entraînez régulièrement, vous allez
certainement obtenir des résultats satisfaisants.
h) Utiliser un casque d’écoute
1. Vérifiez si votre casque d’écoute est équipé d’une fiche 3.5mm.
2. Mettez le bouton de contrôle de volume sur zéro.
3. Insérez la fiche dans la sortie PHONE. L’haut-parleur incorporé sera débranché automatiquement.
4. Réglez le volume comme ça vous convient. N’utilisez jamais le volume maximum ; ceci peut entraîner une
perte partielle ou permanente de l’audition.
5. Précaution et entretien
Votre détecteur de métaux CS200 est un modèle de design supérieur et de savoir-faire. Ces suggestions vous
aideront à tenir votre CS200 en bonne condition, vous permettant de l’utiliser sans problèmes pendant des années.
a. Utilisez le détecteur avec douceur et précaution. S’il tombe, les circuits et boîtiers peuvent être
endommagés, ce qui peut provoquer un dysfonctionnement de l'appareil.
b. N'utilisez le détecteur qu'à des températures normales. Des températures extrêmes peuvent
diminuer la durée de vie des pièces électroniques, ou endommager les parties en plastique.
c. Gardez le détecteur à l'abri de poussière et de saleté. Ceux-ci peuvent provoquer une usure
prématurée de certaines pièces.
d. De temps en temps, nettoyez le détecteur au moyen d'un chiffon humide pour qu'il garde l’air neuf.
N'utilisez pas d'agents chimiques agressifs ni de solvants ou de détergents puissants pour nettoyer
le détecteur.
CS200_v2 VELLEMAN
17
Page 18

CS200 – DETECTOR DE METALES
1. Características & Aplicaciones
A los ciudadanos de la Unión Europea
Importantes informaciones sobre el medio ambiente concerniente este producto
Este símbolo en este aparato o el embalaje indica que, si tira las muestras inservibles, podrían dañar el
medio ambiente. No tire este aparato (ni las pilas eventuales) en la basura doméstica; debe ir a una
empresa especializada en reciclaje. Devuelva este aparato a su distribuidor o un lugar de reciclaje local.
Respete las leyes locales en relación con el medio ambiente.
Si tiene dudas, contacte las autoridades locales para eliminación.
¡Gracias por haber comprado el CS200! Lea cuidadosamente las instrucciones del manual antes de montarlo.
Con el detector de metales CS200 puede detectar monedas, joyas, oro y plata en casi todos los tipos de suelos.
Es un dispositivo versátil y fácil de manejar. Las características principales son :
Pantalla LCD : le enseña mediante una flecha que tipo de metal ha sido encontrado, la
profundidad del objeto, la gama DISC/NOTCH, el nivel de sensibilidad y
el modo operativo. Indicador de batería baja.
Discriminación audible de 3 tonos : diferentes tonos para diferentes tipos de metal permiten una fácil
identificación.
Disc/Notch : omite la chatarra. Detecte objetos preciosos seleccionando
o eliminando metales.
Salida para auriculares : le permite conectar auriculares (no incluidos) y trabajar tranquilamente.
Cabezal de detección estanco : le permite también buscar objetos bajo el agua.
Observación : Su detector de metales funciona con dos pilas alcalinas de 9V (no incluidas).
2. Preparación
a) Montaje del detector
1- cabezal de detección
2- fijación para el cabezal de detección
3- barra
4- tuerca de seguridad
5- cable
6- panel de controles
7- soporte del brazo
El CS200 se caracteriza por un fácil montaje. No necesita herramientas especiales. Sólo siga las siguientes
instrucciones :
1. Destornille y quite el sistema de fijación (2) del cabezal de detección. Introduzca la barra y alinee los agujeros en
el soporte del cabezal y la barra. Pase el tornillo por los agujeros y apriete el botón.
CUIDADO : No tense el sistema de fijación demasiado y no use herramientas como por ejemplo alicates.
2. Introduzca el soporte del brazo (7) en la barra y apriete el tornillo en la parte posterior del panel de controles.
3. Gire la tuerca de seguridad (4) de la barra en el sentido de las agujas del reloj hasta que se suelte.
4. Alargue o acorte la barra hasta que esté derecha. Mantenga el detector en su mano y los brazos relajados al lado
del cuerpo. El cabezal tiene que encontrarse más o menos entre 1 y 5cm encima del suelo.
CS200_v2 VELLEMAN
18
Page 19

5. Gire la tuerca de seguridad (4) en el sentido contrario al de las agujas del reloj.
6. Enrolle el cable del cabezal alrededor de la barra. Deje bastante espacio entre el cable y la barra. Introduzca el
conector al final del cabezal en la toma detrás de la pantalla LCD. Asegúrese de que los pins de la toma encajen en
los agujeros del jack.
CUIDADO : La toma del cabezal encaja exactamente en el jack. Nunca intente forzarla, para no dañarla.
7. Afloje el botón al final del cabezal para ajustar el ángulo deseado. Asegúrese de que el cabezal esté paralelo al
suelo. Ahora, apriete el botón pero procurando que el cabezal pueda continuar oscilando.
b) Colocar las pilas
1. Asegúrese de que el aparato esté apagado.
2. Quite las tapas del compartimiento de pilas (parte posterior del panel de control).
3. Coloque una pila de 9V en cada compartimiento respetando la polaridad correcta (+ y -).
4. Cierre la tapa deslizando del compartimiento.
Advertencias
- Use sólo pilas alcalinas del tipo requerido y de la tensión requerida.
- No mezcle pilas nuevas, usadas, ni de tipos diferentes.
- Si no usa el detector durante una semana o más, quite las pilas.
Tire siempre las pilas usadas o descargadas. Los productos de las mismas pueden dañar los
componentes electrónicos de su detector.
- Si quiere alargar la duración de la vida de las baterías, cámbielas de lado después de cada 3 o 4 horas de
uso.
- Las baterías agotadas deben tirarse en los correspondientes depósitos de eliminación de residuos.
3. Funciones e indicaciones
a) la pantalla
1- iconos
2- nivel de sensibilidad
3- indicador de batería baja
4- indicador modo operativo
5- indicador del objeto
6- rango disc/notch
7- indicador de la profundidad
8- indicador sensibilidad o disc/notch
El indicador del objeto consiste en una pantalla LCD e iconos. Al detectar un objeto una flecha aparece bajo el
icono indicando la naturaleza del metal. Se indica también la profundidad del objeto.
- Si el detector recibe una señal fuerte, visualiza una flecha fija. Si recibe una señal floja, la flecha parpadea o
no aparece en absoluto.
- Después de 5 segundos sin detección, la flecha desparece.
- Los iconos sólo son puntos de referencia visuales para ayudarle determinar si vale la pena o no de intensificar
la búsqueda.
CS200_v2 VELLEMAN
19
Page 20
RANGO ORO (GOLD):
- hierro/metal en hoja (icono de tornillo): se trata probablemente de hierro o de metal en hoja. Algunos objetos
de hierro oxidado pueden detectarse en el rango PLATA (SILVER).
- níquel (icono 5¢): se trata probablemente de una pieza niquelada.
- tapas de botellas (icono tapa): se trata probablemente de una tapa de botellas de aluminio. Algunos objetos
de oro duro pueden detectarse en este rango.
- S-CAPS: se trata probablemente de una tapa de rosca. Algunos pequeños objetos de oro pueden detectarse
en este rango.
- zinc/cobre (icono 1¢): se trata probablemente de una pieza de zinc o de cobre. Algunos grandes objetos de
oro pueden detectarse en este rango.
RANGO PLATA (icono 1¢/25¢):
Se trata probablemente de una pieza de plata. Algunos grandes objetos de aluminio pueden detectarse en este
rango.
b) señales
En el modo ALL METAL, el detector emite una sola señal si detecta cualquier metal.
Si usa el detector en el modo DISC o NOTCH, el sistema audio incorporado emite una señal especifica para
cada uno de las tres categorías de metales, lo que le permite determinar más fácilmente el tipo de metal.
- El detector emite un sonido grave para un objeto pequeño de oro, un tornillo, una tapa o para níquel.
- El sonido medio indica tapas de aluminio u objetos de zinc o de cobre. Dependiendo de la composición de la
aleación, aproximadamente el 15% de los anillos de oro provocan un sonido medio.
- Un sonido agudo indica monedas o latón. Hierro oxidado puede causar un sonido medio o agudo.
6. Uso
1- botón de volumen
2- panel de botones
3- botones modo operativo
4- botones modo de ajuste
5- botones de ajuste: ‘Up’ y ‘Dn’ (down)
6- interruptor de alimentación
7- salida auriculares
a) Encender el detector
Primero, coloque el botón de volumen en la posición “12 horas” (a mitad entre mín. y máx.).
Coloque el interruptor de alimentación (6) en la posición ON. Todos los símbolos aparecen en la pantalla LCD y
el detector emite respectivamente una señal aguda, media y grave.
Después de aproximadamente 2 segundos, el detector pasa al modo ALL METAL, mediante los botones de
ajuste (5) disponibles para el ajuste de la sensibilidad (SENS). El valor estándar de la sensibilidad es 5.
CS200_v2 VELLEMAN
20
Page 21

b) Determinar el modo operativo
El detector tiene tres modos operativos: ALL METAL, DISC y NOTCH. Es posible determinar el modo pulsando el
botón correspondiente (3) en el lado izquierdo del panel de botones. En todos los modos, el detector no sólo
emite una señal sonora al detectar un objeto, sino también indica el probable tipo de metal mediante una flecha y
la profundidad del objeto.
a. ALL METAL: para todos los tipos de metal. En este modo, puede sólo ajustar la sensibilidad.
b. DISC: le permite una discriminación. Puede ajustar el rango del objeto pulsando el botón DISC/NOTCH (4),
seguido por Up o Dn (5). El detector puede detectar el rango indicado en la pantalla. No se visualizan otros
tipos de metal. Por ejemplo: con el nivel DISC en 4, el aparato detectará el rango 25¢, 1¢ y S-CAPS ; No se
detectan otros tipos de metal. Sólo puede extender el rango de plata (a la derecha) a oro (a la izquierda).
c. NOTCH: para encontrar tipos de plata o de oro más puros. Al pulsar el botón NOTCH (3), el detector visualiza
un bloque a la derecha y un bloque a la izquierda del rango. Por lo tanto, el detector sólo detecta objetos de
plata y de oro bastante puros desechando la mayoría de las aleaciones. Si luego pulsa el botón DISC/NOTCH
(4), seguido por el botón Up (5), se detectan también objetos menos puros. Este modo funciona de ambos
lados del rango hacia el centro.
c) Probar y usar el detector
Someta el detector a prueba antes de usarlo por primera vez para aprender cómo reacciona a los diferentes tipos
de metales. Puede probarlo tanto en el interior como al aire libre.
- probar y usar el detector EN INTERIORES
OBSERVACIÓN : Nunca pruebe el detector sobre el suelo dentro de un edificio ya que se usa algún tipo de
metal en la mayoría de los edificios. Esto puede causar interferencias con los objetos a prueba o puede cubrir
la señal completamente.
1. Coloque el interruptor de alimentación (POWER) en la posición ON.
2. Seleccione el modo operativo.
3. Coloque el detector en una mesa de madera o de plástico. Quítese cualquier objeto como relojes, anillos
etc.
4. Coloque el cabezal de manera que la parte plana del cabezal esté a ras del techo.
5. Mueva el objeto (como un anillo de oro o una moneda) a una altura de más o menos 5cm encima del
cabezal. Detectando un metal en el rango seleccionado, suena un tono y la flecha aparece bajo el icono
aplicable. El detector indica también la profundidad del objeto.
OBSERVACIÓN: El det e c t o r d e t e c t a r á l a m oneda más fácilmente si se muestra el anverso o reverso de ésta a
ras del cabezal. Si se muestra el canto, esto puede causar una detección falsa o imprecisa.
- probar y usar el detector AL AIRE LIBRE
1. Coloque el interruptor de alimentación (POWER) en la posición ON.
2. Seleccione el modo operativo.
3. Busque un lugar libre de metal.
4. Coloque el objeto (como un anillo de oro o una moneda) en el suelo.
OBSERVACIÓN: si usa un material valioso como oro, marque el sitio para no olvidárselo. Evite hierbas
altas o malas hierbas.
5. Ponga el cabezal horizontalmente a una altura entre 2 y 5 cm del suelo y mueva el cabezal lentamente de
un lado a otro sobre el lugar donde se encuentra el objeto metálico.
6. Al encontrar el objeto, suena un tono y la flecha aparece bajo el icono aplicable. El detector indica también
la profundidad del objeto.
7. Si el detector no detecta ningún objeto de prueba, verifique si los modos operativos y de ajuste están bien
adaptados al tipo de metal que quiere encontrar. Asegúrese también de que mueva el cabezal
correctamente.
CS200_v2 VELLEMAN
21
Page 22

d) buscar eficazmente
- Nunca use el detector como si fuera un péndulo. Levantar el detector durante el vaivén lateral podría causar
interpretaciones falsas.
- Mueva el cabezal lentamente de un lado a otro – ¡No lo haga de prisa! Esto podría hacerle perder objetos.
- El movimiento ideal del cabezal de detección es lateral y en línea recta, manteniéndolo paralelo al suelo.
- El detector emite una señal sonora detectando objetos metálicos. Si se trata de un objeto sin valor se atenúa la
señal, incluso después de haber movido el cabezal varias veces encima del objeto.
- Un suelo contaminado, interferencias eléctricas o grandes piezas de metal pueden causar señales falsas.
- Reconocerá las señales falsas porque están rotas o no se repiten.
e) ajustar la sensibilidad (SENS)
Una vez familiarizado con las técnicas de base, es importante ajustar bien la sensibilidad a fin de localizar los
objetos o metales deseados. Apriete el botón de modo de ajuste SENS. Entonces, apriete el botón ‘Up’ o ‘Dn
para modificar el nivel de sensibilidad que se visualiza en la pantalla LCD (inferior).
OBSERVACIÓN: a fin de encontrar objetos profundamente enterrados, seleccione un nivel de sensibilidad
elevado. Sin embargo, nunca use el nivel máximo porque el detector recibe interferencias y señales falsas de
antenas de radiodifusión y de otras líneas eléctricas. El detector tendrá una flecha inestable y sonidos
irregulares.
f) localizar un objeto
Una localización exacta del objeto facilita el desenterramiento, pero exige alguna práctica. Aconsejamos
practicar, buscando y desenterrando pequeños objetos en su propiedad antes de empezar a detectar otros
lugares. Siga los siguientes pasos para localizar el objeto:
1. Al detectar un objeto, continúe moviendo el cabezal encima del objeto disminuyendo poco a poco los
movimientos oscilatorios y laterales.
2. Marque el lugar exacto donde el detector produzca una señal sonora.
3. Pare el cabezal inmediatamente encima del lugar. Mueva el cabezal en un movimiento hacia adelante, ida y
vuelta. Repita este movimiento algunas veces. Vuelva a marcar el lugar exacto donde se oye la señal sonora.
4. Repita los pasos 1 a 3 en un ángulo de 90° con respecto a la dirección de la búsqueda original. Haga una
figura en forma de X. El objeto se encuentra directamente debajo de la X donde la señal sonora es más
intensa.
g) Elementos que pueden influenciar la detección
Ningún detector de metales es 100% preciso. Su reacción depende de muchos factores:
- El ángulo en el que el objeto se encuentra en el suelo
- La profundidad del objeto
- La parte de hierro en el objeto
- El tamaño del objeto
- Interferencias electromagnéticas y eléctricas alrededor del objeto.
Con mucha paciencia y muchas horas de entrenamiento puede obtener un máximo de resultados.
h) Usar auriculares
1. Verifique si están equipados de un conector de 3.5mm.
2. Ponga el volumen al mínimo.
3. Conecte el conector a la salida PHONE. El altavoz interno se apaga automáticamente.
CS200_v2 VELLEMAN
22
Page 23

4. Ajuste sólo el volumen a un nivel cómodo. Evite niveles de volumen extremadamente altos. Estos volúmenes
elevados pueden causar la pérdida de la capacidad auditiva.
7. Mantenimiento
El CS200 es un ejemplo de diseño y fabricación insuperable. Las siguientes sugerencias le ayudarán al cuidarlo
para que lo aproveche durante años.
a. Manipule el detector de metales con mucho cuidado. Las caídas y los golpes podrían dañar sus
circuitos impresos y ser el resultado de un funcionamiento inapropiado.
b. Use y mantenga el detector sólo bajo condiciones normales de temperatura. Las temperaturas
extremas, podrían acortar la vida útil de los componentes electrónicos y deformar o derretir sus
componentes de material plástico.
c. Mantenga el detector de metales alejado de polvo y grasas. Estos elementos podrían causar el
desgaste prematuro de sus componentes.
d. Limpie, ocasionalmente, el detector de metales con un paño húmedo. Evite el uso de químicos
abrasivos, disolventes para limpieza o detergentes concentrados.
CS200 – METALLDETEKTOR
1. Eigenschaften & Applikationen
An alle Einwohner der Europäischen Union
Wichtige Umweltinformationen über dieses Produkt
Dieses Symbol auf dem Produkt oder der Verpackung zeigt an, dass die Entsorgung dieses Produktes nach
seinem Lebenszyklus der Umwelt Schaden zufügen kann. Entsorgen Sie die Einheit (oder verwendeten
Batterien) nicht als unsortiertes Hausmüll; die Einheit oder verwendeten Batterien müssen von einer
spezialisierten Firma zwecks Recycling entsorgt werden. Diese Einheit muss an den Händler oder ein örtliches
Recycling-Unternehmen retourniert werden. Respektieren Sie die örtlichen Umweltvorschriften.
Falls Zweifel bestehen, wenden Sie sich für Entsorgungsrichtlinien an Ihre örtliche Behörde.
Wir danken Ihnen für den Kauf des CS200-Metalldetektors. Lesen Sie sorgfältig diese Bedienungsanleitung bevor
Sie das Gerät benutzen.
Mit Ihrem CS200 Metalldetektor können Sie fast überall nach Geldstücken, Relikten, Schmuckwaren, Gold und Silber
suchen.
Der Detektor ist sehr benutzerfreundlich. Die Eigenschaften sind:
LCD-Display : zeigt mit einem Pfeil den wahrscheinlichen Metalltyp, die Tiefe des Objektes,
den DISC/NOTCH-Bereich, die Empfindlichkeit, den Betriebsmodus und die
"Lo-Bat"-Anzeige an.
Audio-Diskriminator mit 3
verschiedenen Tönen : unterschiedliche Töne für unterschiedliche Metallarten.
'Notch' : filtert kleine Eisenteile wie Nägel, Flaschendeckel usw. aus und meldet nur
Edelmetall und wertvolle Objekte dank dem Diskriminator und der Anpassung
des 'Disc' und 'Notch'-Bereiches.
Kopfhörer-Anschluss : zum Anschließen des Kopfhörers (nicht mitgeliefert) mit der Absicht ruhig
arbeiten zu können
Wasserdichte Suchsonde : Sie können die Suchsonde sogar unter Wasser verwenden
CS200_v2 VELLEMAN
23
Page 24

Anmerkung: Der Metalldetektor benötigt zwei 9-Volt Alkaline-Batterien (nicht mitgeliefert)
2. Vorbereitung
a) Detektor montieren
1- Suchsonde
2- Befestigungssystem für Suchsonde
3- Stiel
4- Sicherungsmutter
5- Kabel
6- Bedienungskonsole
7- Armstütze
Die Montage des Detektors ist einfach und Sie benötigen keine Spezialwerkzeuge. Folgen Sie nur diesen Schritten:
1. Demontieren Sie das Befestigungssystem (2) der Suchsonde (Mutter und Bolzen-System). Bringen Sie den
Stiel an der Suchsonde an und bringen Sie die Löcher des Stiels und der Suchsonde in eine Linie. Stecken
Sie die Bolzen durch die Löcher und schrauben Sie mit der Mutter fest.
ACHTUNG: Ziehen Sie die Befestigung nicht zu fest an. Benutzen Sie zum Anziehen keine Werkzeuge wie
z.B. eine Zange.
2. Befestigen Sie die Armstütze (7) am Ende des Stiels und ziehen Sie die Schrauben an der Rückseite der
Bedienungskonsole an.
3. Drehen Sie die Mutter (4) des Stiels im Uhrzeigersinn bis er sich löst.
4. Passen Sie die Länge des Stiels so an, dass sich die Suchsonde parallel zu und ungefähr 5 cm über dem
Boden befindet wenn Sie das Gerät festhalten, Arm entspannt an der Seite entlang.
5. Drehen Sie zum Verschließen die Kontermutter des Stiels gegen den Uhrzeigersinn.
6. Wickeln Sie das Kabel der Suchsonde locker um den Stiel. Stecken Sie den Stecker am Ende des Kabels in
die Buchse auf der Rückseite der Bedienungskonsole.
ACHTUNG: Der Stecker passt nur auf eine Weise in die Buchse. Forcieren Sie ihn nicht, so könnten Sie ihn
beschädigen.
7. Lösen Sie die Befestigung der Suchsonde, passen Sie die Neigung der Suchsonde an und ziehen Sie die
Befestigung wieder an.
b) Batterien einlegen
1. Achten Sie darauf, dass der Stromschalter ausgestaltet ist.
2. Machen Sie auf der Rückseite der Bedienungskonsole den Deckel des Batteriefachs offen (von der Mitte
wegschieben).
3. Legen Sie eine 9V-Batterie in jedes Batteriefach ein. Achten Sie auf die Polarität (+/-).
4. Legen Sie den Deckel wieder auf.
Über Batterien:
- Verwenden Sie nur neue Alkaline-Batterien der richtigen Größe und Spannung.
- Mischen Sie keine alten und neuen Batterien oder verschiedenen Batterie-Typen.
- Wenn Sie das Gerät eine Woche nicht verwenden, entfernen Sie die Batterien.
- Batterie können Chemikalien, die Elektronikteile beschädigen können, lecken.
CS200_v2 VELLEMAN
24
Page 25

- Um die Lebensdauer der Batterien zu verlängern, wechseln Sie die linke und die rechte Batterie nach einem
Betrieb von 3 bis 4 Stunden.
- Entsorgen Sie alte Batterien sofort und unter Beachtung der gängigen Vorschri ften. Verbrennen Sie ni e Batterien!
3. Funktionen und Anzeigen
a) Display
1- Metallikonen
2- Empfindlichkeit
3- "Lo-Bat"-Anzeige
4- Anzeigen für Betriebsmodi
5- Ziel-Anzeigen
6- DISC/NOTCH-Bereich
7- Tiefenanzeige
8- Empfindlichkeit oder DISC/NOTCH-Regelung
Die Ziel-Anzeige umfasst ein LCD-Display und Ziel-Ikonen. Wenn der Metalldetektor ein Objekt ortet, dann
erscheint ein Pfeil unter der Ziel-Ikone des Materialtyps, der wahrscheinlich detektiert wird. Die Tiefe des Ziels
wird auch angezeigt.
8. Wenn der Detektor ein starkes Signal empfängt, erscheint der Pfeil ununterbrochen. Wenn das Signal
schwach ist, blinkt der Pfeil oder erscheint er nicht.
9. Wenn die Detektion 5 Sekunden aufhört, dann wird der Pfeil verschwinden.
10. Die Ziel-Anzeigen sind nur visuelle Hinweise: so können Sie entscheiden ob es sich lohnt, das Objekt weiter
zu erkunden.
GOLD-BEREICH
11. Eisen/Blech (Schrauben-Ikone): zeigt an, dass das Ziel wahrscheinlich Eisen oder Blech ist. Manches
oxidierte Eisen wird im SILBER-Bereich angezeigt.
12. Nickel (5¢-Ikone): zeigt an, dass das Ziel wahrscheinlich ein Fünfcentstück ist.
13. Aufreißlasche (Aufreißlasche-lkone): zeigt an, dass das Ziel wahrscheinlich eine Aufreißlasche einer
Aluminiumdose ist. Manche Objekte aus grobem Gold werden in der 'Aufreißlasche-Kategorie' angezeigt.
14. S-CAPS: zeigt an, dass das Ziel wahrscheinlich ein Metalltyp ist wie z.B. ein Flaschenverschluss mit
Windungen. Manche kleinen Objekte aus Gold könnten in dieser Kategorie angezeigt werden.
15. Zink/Kupfer (1¢-Ikone): zeigt an, dass das Ziel ein kupfernes oder ein Geldstück aus Zink sein könnte. Manche
größeren Objekte aus Gold könnten in dieser Kategorie angezeigt werden.
SILBER-RANGE (1¢/25¢-Ikone):
zeigt an, dass das Objekt wahrscheinlich eine Silbermünze ist. Manche größeren Objekte aus Aluminium könnten
in dieser Kategorie angezeigt werden.
b) Töne
Wenn der Detektor auf 'ALL METAL' Modus eingestellt ist, wird nur ein Signal für alle Metalltypen ertönen.
Wenn der Detektor auf DISC oder NOTCH Modus eingestellt ist, wird das eingebaute Audio-Identifikationssystem
für jeden der 3 Metalltypen einen einzigartigen Ton ertönen lassen. So wird es leichter die Metalle zu bestimmen.
16. Wenn kleine Goldobjekte, Nägel, Flaschenverschlüsse oder Nickel geortet werden, wird ein niedriger Ton
hörbar sein.
CS200_v2 VELLEMAN
25
Page 26

17. Ein mittlerer Tön ertönt wenn Aufreißlaschen aus Aluminium oder Objekte aus Kupfer oder Zink detektiert
werden. Abhängend von den Legierungen, mit denen sie gemacht wurden, lösen 15 % der Goldringe einen
mittleren Ton aus.
18. Ein hoher Ton signalisiert Objekte aus Messing oder Silber. Stark oxidiertes Eisen könnte einen mittleren
oder einen hohen Ton auslösen.
4. Betrieb
1- Knopf für Lautstärkenregelung
2- Tastenfeld
3- Tasten für Betriebsmodus
4- Tasten für Regelmodus
5- Up und Down-Tasten
6- Stromschalter
7- Kopfhörer-Buchse
a) Metalldetektor einschalten
Setzen Sie den Knopf für die Lautstärkenregelung auf 12 Uhr (in der Mitte, zwischen Min. und Max.)
Stellen Sie den Stromschalter (6) auf ON. Alle Symbole erscheinen auf dem LCD-Display. Der Detektor erzeugt
einen hohen, mittleren, und niedrigen Ton.
Nach ungefähr zwei Sekunden wird der Detektor automatisch auf den ALL METALL-Modus, mit den Up (oben)
und Down (unten)-Tasten (5) für die Regelung der Empfindlichkeit (SENS) umschalten. Der Standardwert für die
Empfindlichkeit ist 5.
b) Betriebsmodus einstellen
Der Detektor hat drei Betriebsmodi: ALL METAL, DISC und NOTCH. Sie können den gewünschten Modus
wählen, indem Sie auf die entsprechende Taste auf der linken Seite des Tastenfeldes drücken (3). Egal um
welchen Modus es sich handelt, wenn der Detektor etwas detektiert, wird er immer einen Ton erzeugen und
den wahrscheinlichen Metalltyp mittels der Pfeile unter den Ikonen anzeigen. Auch wird er die Tiefe des
Objektes angeben.
- ALL METAL: zum Detektieren von jedem Metalltyp. In diesem Modus kann nur den SENS-Wert angepasst
werden.
- DISC: zur 'Zielunterscheidung'. Sie können den Zielbereich einstellen, indem Sie auf die DISC/NOTCH-Taste
und (4) auf die UP oder DOWN-Taste drücken (5). Der Detektor kann die Metalltypen, die auf dem Display
stehen, orten, alle anderen Typen werden nicht angezeigt. Z.B. wenn Sie den DISC-Bereich auf 4 einstellen,
wird der Detektor im Bereich S-CAPS, 1¢ oder 25¢ detektieren während die anderen Metalltypen ignoriert
werden. Sie können den Bereich nur von Silber auf Gold vergrößern.
- NOTCH: zum Detektieren von reineren Silber- oder Goldtypen. Wenn Sie auf die Taste für den NOTCHBetriebsmodus drücken, wird nur im Bereich ganz links oder ganz rechts angezeigt werden. Der Detektor wird
nur ziemlich reine Silber- oder Goldtypen orten und die meisten Legierungen ignorieren. Indem Sie auf den
DISC/NOTCH-Taste und dann die Up-Taste drücken, wird der Bereich vergrößern und werden auch
CS200_v2 VELLEMAN
26
Page 27

unreineren Objekte detektiert. Dieser Modus geht von den Reinmetallen an beiden Seiten des
Detektionsbereiches auf die Mitte zu.
c) Detektor prüfen und verwenden
Um herauszufinden wie der Detektor auf verschiedene Metalltypen reagiert, empfehlen wir, dass Sie das Gerät
vor der ersten Anwendung mal prüfen. Sie können ihn im und außer Hause prüfen.
- Im INNENBEREICH prüfen und verwenden:
ANMERKUNG: Prüfen Sie den Detektor nie auf dem Fußboden eines Gebäudes. Die meisten Gebäude haben
irgendeinen Metalltyp im Boden, der Störung verursachen oder das Signal sogar völlig maskieren kann.
1. Stellen Sie den Stromschalter auf ON.
2. Selektieren Sie den Betriebsmodus.
3. Legen Sie den Detektor auf einen Tisch aus Holz oder Kunststoff und legen Sie mögliche Uhren, Ringe
oder Schmuckwaren ab.
4. Kippen Sie die Suchsonde so, dass die Suchfläche nach oben gerichtet ist.
5. Bewegen Sie langsam ein Muster des Materials (z.B. einen goldenen Ring oder eine Münze), das Sie
prüfen wollen, in einer Höhe von ungefähr 10 cm über der Suchsonde. Wenn der Detektor ein Objekt im
gewählten Bereich feststellt, dann ertönt ein Signal und erscheint bei der 'Zielikone' ein Pfeil. Das LCD
zeigt die Tiefe des Ziels an.
ANMERKUNG: Wenn Sie eine Münze verwenden, wird der Detektor sie leichter orten können, wenn Sie
die Flache Seite der Münze parallel zu der flachen Seite der Suchsonde halten. Der dünne Rand der
Münze könnte ein falsches Ergebnis und eine instabile Wiedergabe des Pfeils verursachen.
- Im AUßENBEREICH prüfen und verwenden
1. Stellen Sie den Stromschalter auf ON.
2. Selektieren Sie den Betriebsmodus.
3. Suchen Sie draußen eine metallfreie Zone.
4. Legen Sie das Material, das der Detektor orten soll (z.B. einen goldenen Ring oder eine Münze), auf den
Boden.
ANMERKUNG: Wenn Sie ein wertvolles Objekt wie z.B. Gold verwenden, markieren Sie die Zone wo Sie
das Objekt gelegt haben, so können Sie es später wieder zurückfinden.
5. Halten Sie die Suchsonde in einer Höhe von ungefähr 5cm parallel zu dem Boden. Bewegen Sie den
Detektor langsam hin und her über der Zone, wo sie das Objekt gelegt haben.
6. Wenn der Detektor das Objekt gefunden hat, ertönt ein Audiosignal und werden ein Pfeil und die Tiefe auf
dem Display unter der 'Zielikone' erscheinen.
7. Wenn der Detektor das Objekt nicht orten kann, vergewissern Sie sich, dass der Bereich korrekt für den zu
suchenden Metalltyp eingestellt ist. Achten Sie auch darauf, dass Sie die Suchsonde korrekt bewegen.
d) Hinweise für das Bewegen der Suchsonde
- Bewegen Sie die Suchsonde nie, als wäre sie ein Pendel. Die Suchsonde in einem Schwung oder am Ende
hochheben führt zu falschen Messergebnissen.
- Langsam bewegen (schwingen). Wenn Sie zu schnell bewegen können Sie Objekte verfehlen.
- Es ist empfehlenswert, die Suchsonde in einer geraden Linie und parallel zu dem Boden hin und her zu
schwingen.
- Der Detektor erzeugt ein Audiosignal wenn er wertvolle Objekte detektiert. Wenn sich das Signal nicht wiederholt
wenn Sie verschiedene Male über das Ziel bewegen, dann ist das Ziel wahrscheinlich Schrott.
- Falsche Signale können durch verschmutzten Boden, elektrische Störung oder große Stücke Schrott verursacht
werden.
- Falsche Signale sind meistens unregelmäßig oder nicht reproduzierbar.
CS200_v2 VELLEMAN
27
Page 28

e) Empfindlichkeit anpassen
Wenn Sie mit dem Gerät vertraut sind, ist es wichtig die Empfindlichkeit fein abzustimmen, mit der Absicht die
besten Ergebnisse zu bekommen. Drücken Sie auf die SENS-Taste und drücken Sie auf 'Up' oder 'Down' um die
Empfindlichkeit zu erhöhen oder zu mindern. Die Empfindlichkeitsstufe können Sie vom Display (hoch-niedrig)
ablesen. ANMERKUNG: um ein Objekt, das sich tief im Boden befindet, detektieren zu können, müssen Sie die
SENS auf 'hoch' einstellen. Aber stellen Sie die Empfindlichkeit nicht auf MAX ein, denn das Gerät wird Störung
und falsche Signale von Sendemasten und anderen elektronischen Leitungen empfangen. Die Audiosignale
werden unregelmäßig sein und der Pfeil wird unstabil sein.
f) Ziel haargenau orten
Ein Ziel haargenau orten, vereinfacht das Aufgraben wesentlich. Aber das erfordert Übung. Wir empfehlen, dass
Sie üben und versuchen Objekte auf Ihrem Eigentum zu suchen, bevor Sie an anderen Orten suchen.
Folgen Sie diesen Schritten um ein Objekt zu orten:
1. Wenn der Detektor ein verdecktes Objekt findet, bewegen Sie die Suchsonde nach wie vor in einer immer
kleiner werdenden Bewegung.
2. Merken Sie sich die exakte Stelle am Boden, an der der Detektor gepiepst hat.
3. Halten Sie die Suchsonde exakt über dieser Stelle. Bewegen Sie die Suchsonde verschiedene Male vorund rückwärts und merken Sie sich erneut wo der Detektor ein Signal erzeugt.
4. Wiederholen Sie Schritte 1-3, immer rechtwinklig auf der letzten Bewegung. Markieren Sie diese Stelle mit
'X' . Das Objekt wird sich senkrecht unter dem X befinden.
g) Faktoren die das Detektieren beeinflussen
Es ist schwierig ein exaktes Ergebnis zu bekommen. Diese Faktoren erschweren die Detektion:
- der Winkel, unter dem das Objekt im Boden vergräbt ist
- die Tiefe des Objektes
- der Oxidationsgrad des Objektes
- die Größe des Objektes
- elektromagnetische und elektrische Störung in der Nähe des Objektes.
Wenn Sie geduldig und korrekt detektieren und verschiedene Male üben, werden Sie befriedigende Ergebnisse
bekommen.
h) Kopfhörer benutzen
1. Vergewissern Sie sich, dass der Kopfhörer einen 3.5mm -Stecker hat.
2. Stellen Sie den Knopf für die Lautstärkenregelung auf 0.
3. Stecken Sie den Stecker der Kopfhörer in die Buchse. Der interne Lautsprecher wird automatisch
abgeschaltet.
4. Stellen Sie die Lautstärkenregelung in die gewünschte Position. Hören Sie nie bei voller Lautstärke, es könnte
zu partiellen oder permanenten Gehörschäden führen.
CS200_v2 VELLEMAN
28
Page 29

5. Wartung & Pflege
Ihr CS200 Metalldetektor ist ein Beispiel ausgezeichneten Designs und handwerklichen Könnens. Die folgenden
Hinweise werden Ihnen helfen, Ihren Metalldetektor zu warten und zu pflegen, so dass Sie ihn jahrelang genießen
können.
- Gehen Sie vorsichtig mit dem Gerät um. Fallen kann die Leitungen und das Gehäuse beschädigen und
kann dazu führen, dass der Metalldetektor nicht mehr korrekt funktioniert.
- Verwenden Sie den Detektor nur in einer normalen Umgebungstemperatur. Extreme Temperaturen
können die Lebensdauer elektronischer Geräte kürzen oder das Gehäuse beschädigen. Von Staub und
Schmutz fernhalten. Staub und Schmutz können frühzeitigen Verschleiß verursachen.
- Machen Sie den Detektor manchmal sauber mit einem feuchten Tuch. So sieht er immer neu aus.
Verwenden Sie keine Chemikalien, Lösemittel oder starke Reinigungsmittel.
CS200_v2 VELLEMAN
29
Page 30

Velleman® Service and Quality Warranty
Velleman® has over 35 years of experience in the electronics world and distributes its products in more than 85 countries.
All our products fulfil strict quality requirements and legal stipulations in the EU. In order to ensure the quality, our products regularly go through an extra quality
check, both by an internal quality department and by specialized external organisations. If, all precautionary measures notwithstanding, problems should occur, please
make appeal to our warranty (see guarantee conditions).
General Warranty Conditions Concerning Consumer Products (for EU):
• All consumer products are subject to a 24-month warranty on production flaws and defective material as from the original date of purchase.
• Velleman® can decide to replace an article with an equivalent article, or to refund the retail value totally or partially when the complaint is valid and a free repair or
replacement of the article is impossible, or if the expenses are out of proportion.
You will be delivered a replacing article or a refund at the value of 100% of the purchase price in case of a flaw occurred in the first year after the date of purchase and
delivery, or a replacing article at 50% of the purchase price or a refund at the value of 50% of th e retail value in case of a flaw occurred in the second year after the
date of purchase and delivery.
• Not covered by warranty:
- all direct or indirect damage caused after delivery to the article (e.g. by oxidation, shocks, falls, dust, dirt, humidity...), and by the article, as well as its contents (e.g.
data loss), compensation for loss of profits;
- frequently replaced consumable goods, parts or accessories such as batteries, lamps, rubber parts, drive belts... (unlimited list);
- flaws resulting from fire, water damage, lightning, accident, natural disaster, etc. …;
- flaws caused deliberately, negligently or resulting from improper handling, negligent maintenance, abusive use or use contrary to the manufacturer’s instructions;
- damage caused by a commercial, professional or collective use of the article (the warranty validity will be reduced to six (6) months when the article is used
professionally);
- damage resulting from an inappropriate packing and shipping of the article;
- all damage caused by modification, repair or alteration performed by a third party without written permission by Velleman®.
• Articles to be repaired must be delivered to your Velleman® dealer, solidly packed (preferably in the original packaging), and be completed with the original receipt
of purchase and a clear flaw description.
• Hint: In order to save on cost and time, please reread the manual and check if the flaw is caused by obvious causes prior to presenting the article for repair. Note
that returning a non-defective article can also involve handling costs.
• Repairs occurring after warranty expiration are subject to shipping costs.
• The above conditions are without prejudice to all commercial warranties.
The above enumeration is subject to modification according to the article (see article’s manual).
Velleman® service- en kwaliteitsgarantie
Velleman® heeft ruim 35 jaar ervaring in de elektronicawereld en verdeelt in meer dan 85 landen.
Al onze producten beantwoorden aan strikte kwaliteitseisen en aan de wettelijke bepalingen geldig in de EU. Om de kwaliteit te waarborgen,
ondergaan onze producten op regelmatige tijdstippen een extra kwaliteitscontrole, zowel door onze eigen kwaliteitsafdeling als door externe gespecialiseerde
organisaties. Mocht er ondanks deze voorzorgen toch een probleem optreden, dan kunt u steeds een beroep doen op onze waarborg (zie waarborgvoorwaarden).
Algemene waarborgvoorwaarden consumentengoederen (voor Europese Unie):
• Op alle consumentengoederen geldt een garantieperiode van 24 maanden op productie- en materiaalfouten en dit vanaf de oorspronkelijke aankoopdatum.
• Indien de klacht gegrond is en een gratis reparatie of vervanging van een artikel onmogelijk is of indien de kosten hiervoor buiten verhouding zijn, kan Velleman®
beslissen het desbetreffende artikel te vervangen door een gelijkwaardig artikel of de aankoopsom van het artikel gedeeltelijk of volledig terug te betalen. In dat geval
krijgt u een vervangend product of terugbetaling ter waarde van 100% van de aankoopsom bij ontdekking van een gebrek tot één ja ar na aankoop en levering, of een
vervangend product tegen 50% van de kostprijs of terugbetaling van 50 % bij ontdekking na één jaar tot 2 jaar.
• Valt niet onder waarborg:
- alle rechtstreekse of onrechtstreekse schade na de levering veroorzaakt aan het toestel (bv. door oxidatie, schokken, val, stof, vuil, vocht...), en door het toestel,
alsook zijn inhoud (bv. verlies van data), vergoeding voor eventuele winstderving.
- verbruiksgoederen, onderdelen of hulpstukken die regelmatig dienen te worden vervangen, zoals bv. batterijen, lampen, rubberen onderdelen, aandrijfriemen...
(onbeperkte lijst).
- defecten ten gevolge van brand, waterschade, bliksem, ongevallen, natuurrampen, enz.
- defecten veroorzaakt door opzet, nalatigheid of door een onoordeelkundige behandeling, slecht onderhoud of abnormaal gebruik of gebruik van het toestel strijdig
met de voorschriften van de fabrikant.
- schade ten gevolge van een commercieel, professioneel of collectief gebruik van het apparaat (bij professioneel gebruik wordt de garantieperiode herleid tot 6
maand).
- schade veroorzaakt door onvoldoende bescherming bij transport van het apparaat.
- alle schade door wijzigingen, reparaties of modificaties uitgevoerd door derden zonder toestemming van Vellema n®.
• Toestellen dienen ter reparatie aangeboden te worden bij uw Velleman®-verdeler. Het toestel dient vergezeld te zijn van het oorspronkelijke aankoopbewijs. Zorg
voor een degelijke verpakking (bij voorkeur de originele verpakking) en voeg een duidelijke foutomschrijving bij.
• Tip: alvorens het toestel voor reparatie aan te bieden, kijk nog eens na of er geen voor de hand liggende reden is waarom het toestel niet naar behoren werkt (zie
handleiding). Op deze wijze kunt u kosten en tijd besparen. Denk eraan dat er ook voor niet-defecte toestellen een kost voor controle aangerekend kan worden.
• Bij reparaties buiten de waarborgperiode zullen transportkosten aangerekend worden.
• Elke commerciële garantie laat deze rechten onverminderd.
Bovenstaande opsomming kan eventueel aangepast worden naargelang de aard van het product (zie handleiding van het betreffende product).
Garantie de service et de qualité Velleman®
Velleman® jouit d’une expérience de plus de 35 ans dans le monde de l’électronique avec une distribution dans plus de 85 pays.
Tous nos produits répondent à des exigences de qualité rigoureuses et à des dispositions légales en vigueur dans l’UE. Afin de garantir la qualité, nous soumettons
régulièrement nos produits à des contrôles de qualité supplémentaires, tant par notre propre service qualité que par un service qualité externe. Dans le cas improbable
d’un défaut malgré toutes les précautions, il est possible d’invoquer notre garantie (voir les conditions de garantie).
Conditions générales concernant la garantie sur les produits grand public (pour l’UE) :
• tout produit grand public est garanti 24 mois contre tout vice de production ou de matériaux à dater du jour d’acquisition effective ;
• si la plainte est justifiée et qu e la réparation ou le remplacement d’un article est jugé impossible, ou lorsque l es coûts s’avèrent disproportionnés, Velleman®
s’autorise à remplacer ledit article par un article équivalent ou à rembourser la totalité ou une partie du prix d’achat. Le cas échéant, il vous sera consenti un article de
remplacement ou le remboursement complet du prix d’achat lors d’un défaut dans un délai de 1 an après l’achat et la livraison, ou un article de remplacement
moyennant 50% du prix d’achat ou le remboursement de 50% du prix d’achat lors d’un défaut après 1 à 2 ans.
• sont par conséquent exclus :
- tout dommage direct ou indirect survenu à l’article après livraison (p.ex. dommage lié à l’oxydation, choc, chute, poussière, sable, impureté…) et provoqué par
l’appareil, ainsi que son cont enu (p.ex. perte de données) et une indemnisation éventuelle pour perte de rev enus ;
- tout bien de consommation ou accessoire, ou pièce qui nécessite un remplacement régulier comme p.ex. piles, ampoules, pièces en caoutchouc, courroies… (liste
illimitée) ;
- tout dommage qui résulte d’un incendie, de la foudre, d’un accident, d’une catastrophe naturelle, etc. ;
- out dommage provoqué par une négligence, volontaire ou non, une utilisation ou un entretien incorrects, ou une utilisation de l’appareil contraire aux prescriptions du
fabricant ;
- tout dommage à cause d’une utilisation commerciale, professionnelle ou collective de l’appareil (la période de garantie sera réduite à 6 mois lors d’une utilisation
professionnelle) ;
- tout dommage à l’appareil qui résulte d’une utilisation incorrecte ou différente que celle pour laquelle il a été initialement prévu comme décrit dans la notice ;
- tout dommage engendré par un retour de l’appareil emballé dans un conditionnement non ou insuffisamment protégé.
- toute réparation ou modification effectuée par une tierce personne sans l’autorisation explicite de SA Velleman® ; - frais de transport de et vers Velleman® si
l’appareil n’est plus couvert sous la garantie.
• toute réparation sera fournie par l’endroit de l’achat. L’appareil doit nécessairement être accompagné du bon d’achat d’origine et être dûment conditionné (de
préférence dans l’emballage d’ origine avec mention du défaut) ;
• tuyau : il est conseillé de consulter la notice et de contrôler câbles, piles, etc. avant de retourner l’appareil. Un appareil retourné jugé défectueux qui s’avère en bon
état de marche pourra faire l’objet d’une note de frais à charge du consommateur ;
• une réparation effectuée en-dehors d e la période de garantie fera l’objet de frais de transport ;
• toute garantie commerciale ne porte pas atteinte aux conditions susmentionnées.
La liste susmentionnée peut être sujette à une complémentation selon le type de l’article et être mentionnée dans la notice d’emploi.
CS200_v2 VELLEMAN
30
Page 31

Velleman® Service- und Qualitätsgarantie
Velleman® hat gut 35 Jahre Erfahrung in der Elektronikwelt und vertreibt seine Produkte in über 85 Ländern.
Alle Produkte entsprechen den strengen Qualitätsforderungen und gesetzlichen Anforderungen in der EU. Um die Qualität zu gewährleisten werden unsere Produkte
regelmäßig einer zusätzlichen Qualitätskontrolle unterworfen, sowohl von unserer eigenen Qualitätsabteilung als auch von externen spezialisierten Organisationen.
Sollten, trotz aller Vorsichtsmaßnahmen, Probleme auftreten, nehmen Sie bitte die Garantie in Anspruch (siehe Garantiebedingungen).
Allgemeine Garantiebedingungen in Bezug auf Konsumgüter (für die Europäische Union):
• Alle Produkte haben für Material- oder Herstellungsfehler eine Garantieperiode von 24 Monaten ab Verkaufsdatum.
• Wenn die Klage berechtigt ist un d falls eine kostenlose Reparatur oder ein Austausch des Gerätes unmöglicht ist, oder wenn die Kosten dafür unverhältnismäßig sind,
kann Velleman® sich darüber entscheiden, dieses Produkt durch ein gleiches Produkt zu ersetzen oder die Kaufsumme ganz oder teilweise zurück zuzahlen. In diesem
Fall erhalten Sie ein Ersatzprodukt oder eine Rückzahlung im Werte von 100% der Kaufsumme im Falle eines Defektes bis zu 1 Jahr nach Kauf oder Lieferung, oder Sie
bekommen ein Ersatzprodukt im Werte von 50% der Kaufsumme oder eine Rückzahlung im Werte von 50 % im Falle eines Defektes im zweiten Jahr.
• Von der Garantie ausgeschlossen sind:
- alle direkten oder indirekten Schäden, die nach Lieferung am Gerät und durch das Gerät verursacht werden (z.B. Oxidation, Stöße, Fall, Staub, Schmutz, Feuchtigkeit,
...), sowie auch der Inhalt (z.B. Datenverlust), Entschädigung für eventuellen Gewinnausfall.
- Verbrauchsgüter, Teile oder Zubehörteile, die regelmäßig ausgewechselt werden, wie z.B. Batt erien, Lampen, Gummiteile, Treibriemen, usw. (unbeschränkte Liste).
- Schäden verursacht durch Brandschaden, Wasserschaden, Blitz, Unfälle, Naturkatastrophen, usw.
- Schäden verursacht durch absichtliche, nachlässige oder unsachgemäße Anwendung, schlechte Wartung, zweckentfremdete Anwendung oder Nichtbeachtung von
Benutzerhinweisen in der Bedienungsanleitung.
- Schäden infolge einer kommerziellen, professionellen oder kollektiven Anwendung des Gerätes (bei gewerblicher Anwendung wird die Garantieperiode auf 6 Monate
zurückgeführt).
- Schäden verursacht durch eine unsachgemäße Verpackung und unsachgemäßen Transport des Gerätes.
- alle Schäden verursacht durch unautorisierte Änderungen, Reparaturen oder Modifikationen, die von einem Dritten ohne Erlaubnis von Velleman® vorgenommen
werden.
• Im Fall einer Reparatur, wenden Sie sich an Ihren Velleman®-Verteiler. Legen Sie das Produkt ordnungsgemäß verpackt (vorzugsweise die Originalverpackung) und
mit dem Original-Kaufbeleg vor. Fügen Sie eine deutliche Fehlerumschreibung hinzu.
• Hinweis: Um Kosten und Zeit zu sparen, lesen Sie die Bedienungsanleitung nochmals und überprüfen Sie, ob es keinen auf de Hand liegenden Grund gibt, ehe Sie das
Gerät zur Reparatur zurückschicken. Stellt sich bei der Überprüfung des Geräts heraus, dass kein Geräteschaden vorliegt, könnte dem Kunden eine
Untersuchungspauschale berechnet.
• Für Reparaturen nach Ablauf der Garantiefrist werd en Transportkosten berechnet.
• Jede kommerzielle Garantie lässt diese Rechte unberührt.
Die oben stehende Aufzählung kann eventuell angepasst werden gemäß der Art des Produktes (siehe Bedienungsanleitung des Gerätes).
Garantía de servicio y calidad Velleman®
Velleman® disfruta de una experien cia de más de 35 años en el mundo de la electrónica con una distribución en más de 85 países.
Todos nuestros productos responden a normas de calidad rigurosas y disposiciones legales vigentes en la UE. Para garantizar la calidad, sometimos nuestros productos
regularmente a controles de calidad adicionales, tanto por nuestro propio servicio de calidad como por un servicio de calidad externo. En el caso improbable de que
surgieran problemas a pesar de todas las precauciones, es posible apelar a nuestra garantía (véase las condiciones de garantía).
Condiciones generales referentes a la garantía sobre productos de venta al público (para la Unión Europea):
• Todos los productos de venta al público tienen un período de garantía de 24 meses contra errores de producción o errores en materiales desde la adquisición original;
• Si la queja está fundada y si la reparación o la sustitución de un artículo es imposible, o si los gastos son desproporcionados, Velleman® autoriza reemplazar el
artículo por un artículo equivalente o reembolsar la totalidad o una parte del precio de compra. En este caso, recibirá un artículo de recambio o el reembolso completo
del precio de compra al descubrir un defecto hasta un año después de la compra y la entrega, o un artículo de recambio al 50% del precio de compra o la sustitución de
un 50% del precio de compra al descubrir un defecto después de 1 a 2 años.
• Por consiguiente, están excluidos entre otras cosas:
- todos los daños causados directamente o indirectamente al aparato y su contenido después de la entrega (p.ej. por oxidación, choques, caída,...) y causados por el
aparato, al igual que el contenido (p.ej. pérdida de datos) y una indemnización eventual para falta de ganancias;
- partes o accesorios que deban ser reemplazados regularmente, como por ejemplo baterías, lámparas, partes de goma, ... (lista ilimitada)
- defectos causados por un incendio, daños causados por el agua, rayos, accidentes, catástrofes naturales, etc. ;
- defectos causados a conciencia , descuido o por malos tratos, un mantenimiento inapropiado o un us o anormal del aparato contrario a las instrucciones del fabricante;
- daños causados por un uso comercial, profesional o colectivo del aparato (el período de garantía se reducirá a 6 meses con uso profesional) ;
- daños causados por un uso incorrecto o un uso ajeno al que est está previsto el producto inicialmente como está descrito en el manual del usuario ;
- daños causados por una protección insuficiente al transportar el aparato.
- daños causados por reparaciones o modificaciones efectuadas por una tercera persona sin la autorización explicita de SA Velleman® ;
- se calcula gastos de transporte de y a Velleman® si el aparato ya no está cubierto por la garantía.
• Cualquier reparación se efectuará por el lugar de compra. Devuelva el aparato con la factura de compra original y transpórtelo en un embalaje sólido
(preferentemente el embalaje original). Incluya también una buena descripción del defecto ;
• Consejo: Lea el manual del usuario y controle los cables, las pilas, etc. antes de devolver el aparato. Si no se encuentra un defecto en el artículo los gastos podrían
correr a cargo del cliente;
• Los gastos de transporte correrán a carga del cliente para una reparación efectuada fuera del periode de garantía.
• Cualquier gesto comercial no disminuye estos derechos.
La lista previamente mencionada puede ser adaptada según el tipo de artículo (véase el manual del usuario del artículo en cuestión)
CS200_v2 VELLEMAN
31
Page 32

R&TTE Declaration of Conformity
R&TTE Verklaring van overeenstemming
éclaration de conformité
R&TTE Konformitätserklärung
Declaración de conformidad R&TTE
Wir / Nostros
Declare on our own responsibility that the finished product(s) :
Verklaren op eigen verantwoordelijkheid dat het afgewerkte product :
Déclarons sous notre propre responsabilité que
Erklären voll verantwortlich dass nachfolgendes Produkt
bajonuestrasolaresponsabilidadque elproductomencionado a continuación
Brand / M
andelsnaam /
Metal detector with LCD display
Metaaldetector met LCD display
Detecteur de metaux avec afficheur LCD
Metalldetektor mit LCD display
Detector de metales con display LCD
ype of model /
commerciale / Markenname /
ype oumodèle / Typoder Modell /
D
We / Wij / Nous /
Velleman NV
Legen Heirweg, 33
9890 Gavere (België)
Declaramos
Trade name / H
Type or model / T
R&TTE
le produit fini :
:
erk / Marque / Marke / Marca :
VELLEMAN
Denomination
commercial:
T
CS200
:
Denominación
Tipo o modelo :
Page 33

Constituting the subject of this declaration, conforms with the essential requirements and
other relevant stipulations of the R&TTE Directive (1999/5/EC).
Die het voorwerp uitmaakt van deze verklaring, voldoet aan de essentiële vereisten en
andere relevante bepalingen van de R&TTE Richtlijn (1999/5/EC).
Faisant l’objet de la présente déclaration, satisfait aux exigences essentielles et toute
autre stipulation pertinente de la directive R&TTE Directive (1999/5/EC).
Auf das sich diese Erklärung bezieht, den grundlegenden Anforderungen und anderen
relevanten Vereinbarungen der R&TTE-Richtlinie (1999/5/EC) entspricht.
Cumple los requisitos esenciales y las otras estipulaciones relevantes de la Directiva
R&TTE (1999/5/EC).
The product is in conformity with the following standards:
Het product voldoet aan de volgende normen:
Le produit est conforme aux normes suivantes:
Das Produkt entspricht den folgenden Normen:
Es conforme a las siguientes normas:
EN 300 330-2 V1.3.1
EN 301 489-01 V1.8.1
EN 301 489-03 V1.4.1
Based on intertek report for CS100N and CS130 which are practical identic
Technical data are available and can be obtained from :
Les données techniques sont disponibles et peuvent être obtenues chez :
Technische gegevens zijn beschikbaar en kunnen worden aangevraagd bij :
Die technische Dokumentation zu den oben gennanten Produkten wird geführt bei:
Los datos técnicos están disponibles y pueden ser solicitados a:
Velleman NV
Legen Heirweg, 33
9890 Gavere (België)
Place and date of issue / Plaats en datum van uitgifte / Place et date d’émission / Ort und
Datum der Ausstellung / Lugar y fecha de emisión :
Gavere, 15/10/2009 (revised)
Authorisedsignatoryforthecompany / Bevoegdeondertekenaarvoor de firma /
Signataireautorisé(e) de la société / BevollmächtigtePerson/ Responsable de la empresa:
Vince Van Balberghe - QC Manager
 Loading...