

Page 1

COMP1
ELECTRONIC / DIGITAL COMPASS
ELEKTRONISCH / DIGITAAL KOMPAS
BOUSSOLE ÉLECTRONIQUE / NUMÉRIQUE
BRÚJULA ELECTRÓNICA/DIGITAL
ELEKTRONISCHER / DIGITALER KOMPASS
USER MANUAL
GEBRUIKERSHANDLEIDING
NOTICE D’EMPLOI
MANUAL DEL USUARIO
BEDIENUNGSANLEITUNG
Page 2

COMP1_v2 VELLEMAN
2
Page 3
COMP1_v2 VELLEMAN
3
COMP1 – ELECTRONIC / DIGITAL COMPASS
1. Introduction
To all residents of the European Union
Important environmental information about this product
This symbol on the device or the package indicates that disposal of the device after its lifecycle could harm
the environment.
Do not dispose of the unit (or batteries) as unsorted municipal waste; it should be taken to a specialized
company for recycling.
This device should be returned to your distributor or to a local recycling service.
Respect the local environmental rules.
If in doubt, contact your local waste disposal authorities.
Thank you for buying the COMP1! If the device was damaged in transit, don't install or use it and contact your dealer.
2. Safety Instructions
• Damage caused by disregard of certain guidelines in this manual is not covered by the warranty and the dealer will
not accept responsibility for any ensuing defects or problems.
• Avoid exposing the COMP1 to water, severe shock or extreme temperatures: <0°C (32°F) or >60°C (140°F).
• Avoid contact with corrosive materials such as perfume, alcohol or cleaning agents.
• Only use the device for its intended purpose. Using the device in an unauthorised way will void the warranty.
• Do not use the COMP1 in or near places or objects with a lot of metal/steel (vehicles, buildings…) or that contain
high voltage (power plants, any electrical appliance) as they generate a magnetic field that may affect the COMP1.
• Note that damage caused by user modifications to the device is not covered by the warranty.
• Keep the device away from children and unauthorised users.
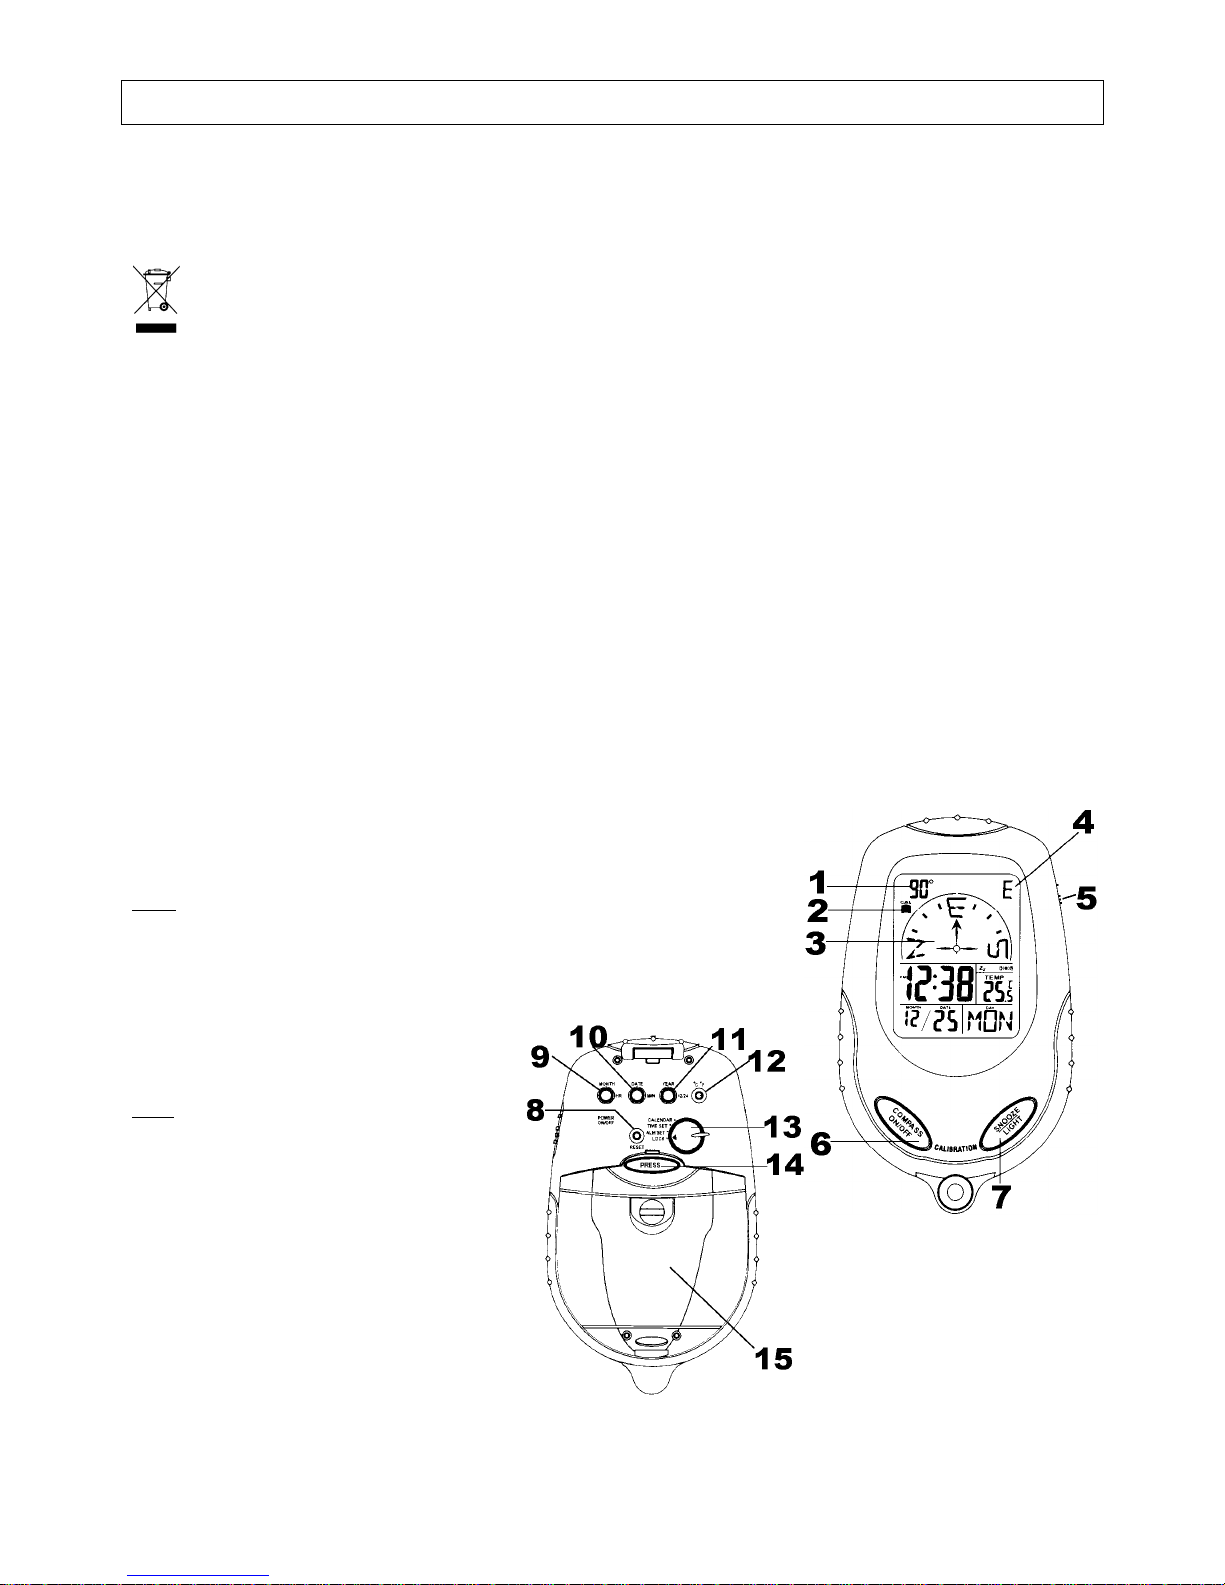
3. Parts of the Device
Front
1. Numeric heading
2. Calibration mode icon
3. Compass arrow
4. Heading in cardinal points (N, NE, E, SE, S, SW, W, NW)
5. Snooze / Alarm ON/OFF switch
6. Compass ON/OFF button
7. Snooze/Light button
Back
8. Reset button
9. HR (hour) / Month button
10. MIN (minute) / Day button
11. 12/24 HR / YEAR button
12. °C/°F button
13. Time/alarm/calendar set / Lock selector
14. Protection plate release button
15. Battery compartment
Page 4
COMP1_v2 VELLEMAN
4
4. Batteries
The COMP1 operates on 2 AAA type batteries (not included).
Installation / replacement procedure: Loosen the screw of the battery compartment (#16), open the battery
compartment cover, take the exhausted batteries out (if applicable), insert 2 fresh AAA batteries (respect the polarity
indications), put the cover back and fasten the screw.
Do not mix old and new batteries as this may cause batteries to start leaking.
Replace the batteries when the "low battery" indicator comes on (just below the heading in cardinal points).
5. Use
a. General
• The compass can be switched on and off separately by pressing button #6. Switch the compass off when you
don't need it to save energy. If the compass is not switched off manually, it will auto switch off after a certain time.
• Press the Light button (#7) to switch the backlight on for 4 seconds. To avoid unnecessary battery drain, use the
backlight feature only when necessary.
• Press the °C/°F button (#13) to switch the temperature readout from °C to °F and vice versa.
b. Compass
• Keep the compass completely horizontal to get a precise readout. The COMP1 is held horizontally when the air
bubble in the level at the bottom of the device is located in the middle of the circle on the level.
• There are three readouts of the compass: the numeric heading (#1), the heading in cardinal points (#4) and the arrow
heading (also with cardinal points). The numeric heading is precise up to 1°, the arrow heading changes in 22.5° steps.
c. Compass calibration
1. Press and hold 'Snooze/Light' (#7) and press and hold 'Compass on/off' (#6) for 2 seconds until you hear a ’beep'
sound. The numeric heading (#1) and the calibration icon (#7) will start blinking.
2. Keep the COMP1 level and press 'Snooze/Light' (#7) to start the calibration. If you want to set the 'TRUE
NORTH' angle, execute step 3 ; if not, jump to step 4.
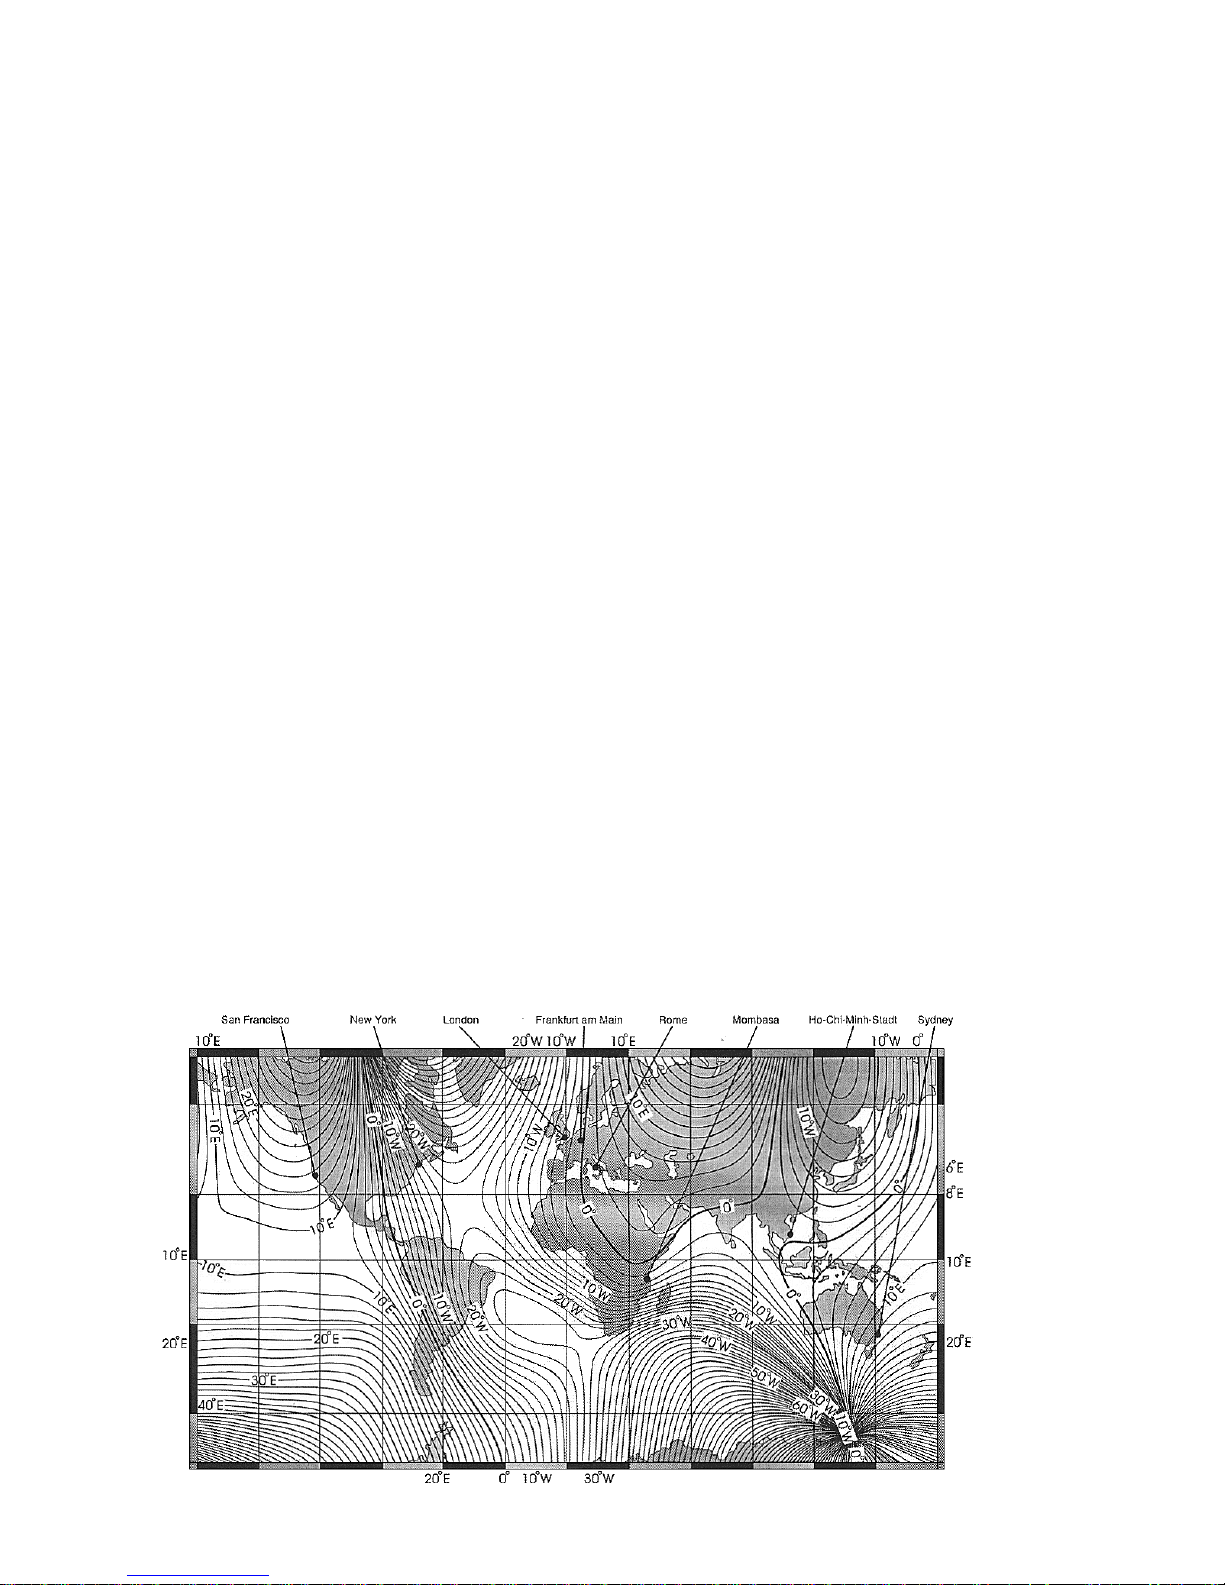
3. The TRUE NORTH option allows you to eliminate the difference between the magnetic north and the true north
heading. Check your location on the map below and write down the degree number (each line represents a 2°
difference) and direction (E=east ; W=west) of the line closest to your location. Then set those values on the
compass by pressing the Hr (#10) and Min (#11) buttons on the back of the device.
Page 5
COMP1_v2 VELLEMAN
5
Some examples: San Francisco=14°E ; New York=14°W ; Rome=2°E ; London=4°W ; Sydney=12°E.
4. Turn the compass 180° horizontally, press 'Snooze/Light' again to finish the calibration. The numeric heading and
the calibration icon become static.
5. If the calibration did not succeed, the numeric heading and the calibration icon keep blinking. Go to another
location, press the reset button (#9) and restart the calibration procedure.
d. Setting Time, Date & Alarm
• Date: set the selector (#14) to 'Calendar' and press the month (#10), date (#11) and year (#12) buttons.
• Time: set the selector (#14) to 'Time set' and press the hour (#10) and minute (#11) buttons. You can also set the
time to AM/PM or 24-hour display by pressing the 12/24 button (#12).
• Alarm: set the selector (#14) to 'Alm set' and press the hour (#10) and minute (#11) buttons.
Set the slide switch (#5) to 'Alm on' to activate the alarm (the alarm icon appears on the display) and set it to 'Snz'
(the 'Zz' icon appears as well) to allow yourself to use the snooze function: a 5 minute delay when the alarm goes
off and you press the Light/Snooze button (#7). Slide the switch (#5) to 'off' to switch the alarm off.
• After changing the settings, set the selector (#14) to 'Lock' to avoid unwanted changes to time, date and alarm.
For more info concerning this product, please visit our website www.velleman.eu.
The information in this manual is subject to change without prior notice.
COMP1 – ELEKTRONISCH / DIGITAAL KOMPAS
1. Inleiding
Aan alle ingezetenen van de Europese Unie
Belangrijke milieu-informatie betreffende dit product
Dit symbool op het toestel of de verpakking geeft aan dat, als het na zijn levenscyclus wordt weggeworpen,
dit toestel schade kan toebrengen aan het milieu.
Gooi dit toestel (en eventuele batterijen) niet bij het gewone huishoudelijke afval; het moet bij een
gespecialiseerd bedrijf terechtkomen voor recyclage.
U moet dit toestel naar uw verdeler of naar een lokaal recyclagepunt brengen.
Respecteer de plaatselijke milieuwetgeving.
Hebt u vragen, contacteer dan de plaatselijke autoriteiten inzake verwijdering.
Dank u voor uw aankoop! Lees deze handleiding grondig voor u het toestel in gebruik neemt. Als het toestel werd
beschadigd tijdens het transport, installeer het dan niet en raadpleeg uw dealer.
2. Veiligheidsinstructies
• De garantie geldt niet voor schade door het negeren van bepaalde richtlijnen in deze handleiding en uw dealer zal
de verantwoordelijkheid afwijzen voor defecten of problemen die hier rechtstreeks verband mee houden.
• Stel de COMP1 niet bloot aan water, ernstige schokken of extreme temperaturen: <0°C (32°F) of >60°C (140°F).
• Vermijd contact met agressieve stoffen zoals parfum, alcohol of reinigingsmiddelen.
• Gebruik de COMP1 niet in of bij plaatsen of voorwerpen met veel metaal of staal (voertuigen, gebouwen…) of die
hoge spanningen bevatten (elektriciteitscentrales, elektrische toestellen). Deze creëren een magnetisch veld dat
de werking van de COMP1 kan verstoren.
• Gebruik het toestel enkel waarvoor het gemaakt is. Bij onoordeelkundig gebruik vervalt de garantie.
• Schade door wijzigingen die de gebruiker heeft aangebracht aan het toestel vallen niet onder de garantie.
• Houd dit toestel uit de buurt van kinderen en onbevoegden.
Page 6

COMP1_v2 VELLEMAN
6
3. Onderdelen van het toestel
(zie figuren)
Voorzijde
1. Numerieke richtingweergave
2. Icoon voor ijkingmode
3. Kompaspijl
4. Richtingweergave in kardinale punten
(N, NE, E, SE, S, SW, W, NW)
5. Snooze / Alarm ON/OFF schuifschakelaar
6. Kompas ON/OFF toets
7. Snooze/lichttoets
Achterzijde
8. Resettoets
9. HR (uur)/month (maand) toets
10. MIN (minuut) / day (dag) toets
11. 12/24 HR / YEAR toets
12. °C/°F toets
13. Draaischakelaar voor tijd/alarm/kalender / vergrendeling
14. Ontgrendelingknop voor beschermplaatje toetsenbord
15. Batterijvak
4. Batterijen
De COMP1 werkt op 2 AAA batterijen (niet meegeleverd). Batterijen plaatsen/vervangen: draai de schroef van het
batterijvak (#16) los, open het deksel van het batterijvak, verwijder (desgevallend) de uitgeputte batterijen, plaats 2
andere AAA batterijen (let op de polariteit), plaats het deksel van het batterijvak terug en draai de schroef vast.
Gebruik geen oude en nieuwe batterijen door elkaar; dit kan batterijen doen lekken.
Vervang de batterijen wanneer het "low battery"-icoon verschijnt (net onder de richtingweergave in kardinale punten).
5. Gebruik
a. Algemeen
• Het kompas kan apart worden in- en uitgeschakeld met toets #6. Zet het uit wanneer u het niet nodig heeft om de
batterijen te sparen. Als het kompas niet manueel wordt uitgeschakeld, zal het na een bepaalde tijd automatisch
worden uitgeschakeld.
• Druk op de lichttoets (#7) om de achtergrondverlichting gedurende 4 seconden aan te zetten. Gebruik deze
verlichtingsfunctie enkel wanneer nodig om onnodig energieverbruik te vermijden.
• Druk op de '°C/°F'-toets (#13) om de temperatuuruitlezing te wijzigen van °C naar °F en vice versa.
b. Kompas
• Hou het kompas volledig vlak om een nauwkeurige uitlezing te krijgen. U houdt de COMP1 horizontaal wanneer
de luchtbel in het waterpas onderaan het toestel zich in het cirkeltje op het waterpas bevindt.
• Er zijn drie kompasuitlezingen: numeriek (#1), in kardinale punten (#4) en een naalduitlezing (ook met kardinale
punten). De numerieke uitlezing gebeurt tot op 1°, de naalduitlezing gebeurt in stappen van 22.5°.
c. Het kompas ijken
1. Hou de 'Snooze/Light'-toets (#7) en de 'Compass on/off'-toets (#6) gedurende 2 seconden ingedrukt tot u een
pieptoon hoort. De numerieke uitlezing (#1) en het ijkingicoon (#7) zullen knipperen.
2. Hou de COMP1 waterpas en druk op 'Snooze/Light' (#7) om de ijking te starten. Wilt u de afwijking tov. het 'ware
noorden' (true north) instellen, voer dan stap 3 uit. Wilt u dit niet, ga dan direct naar stap 4.
3. De TRUE NORTH-optie laat u toe het verschil tussen het magnetische en het ware noorden te elimineren. Kijk op
de kaart op blz.2 waar u zich bevindt, en noteer het aantal graden (iedere lijn betekent een verschil van 2°) en de
richting (E=oost ; W=west) van de lijn het dichtst bij waar u zich bevindt. Stel deze waarden dan in op het kompas
door middel van de knoppen Hr (#10) en Min (#11) achteraan het toestel.
Enkele voorbeelden: San Francisco=14°E ; New York=14°W ; Rome=2°E ; London=4°W ; Sydney=12°E.
4. Draai het kompas 180° horizontaal en druk nog eens op 'Snooze/Light' om de ijking te beëindigen. De numerieke
uitlezing en het ijkingicoon knipperen niet meer.
5. Wanneer de ijking niet gelukt is, blijven de numerieke uitlezing en het ijkingicoon knipperen. Ga op een andere
plaats staan, druk op de resetknop (#9) en herbegin de ijkingprocedure.
Page 7
COMP1_v2 VELLEMAN
7
d. Tijd, datum & alarm instellen
• Datum: zet de draaischakelaar (#14) op 'Calendar' en stel de datum in door middel van de toetsen voor maand
(#10), datum (#11) en jaar (#12).
• Tijd: zet de draaischakelaar (#14) op 'Time set' en druk op de toetsen voor uur (#10) en minuut (#11). U kunt ook
kiezen voor een tijdsweergave in AM/PM of in 24 uren door op de '12/24' toets (#12) te drukken.
• Alarm: zet de draaischakelaar (#14) op 'Alm set' en stel het alarm in met de toetsen voor uur (#10) en minuut (#11).
Zet de schuifschakelaar (#5) op 'Alm on' om het alarm te activeren (het alarmicoon verschijnt op het scherm) of zet
hem op 'Snz' (ook het 'Zz'-icoon verschijnt) om het gebruik van de snooze-functie toe te laten: een uitstel van 5
minuten wanneer het alarm afgaat en u op de 'Light/Snooze'-toets (#7) drukt. Zet de schakelaar (#5) op 'off' om
het alarm uit te schakelen.
• Bent u klaar met de instellingen, zet de draaischakelaar (#14) dan op 'Lock' om ongewilde wijzigingen te voorkomen.
Voor meer informatie omtrent dit product, zie www.velleman.eu.
De informatie in deze handleiding kan te allen tijde worden gewijzigd zonder voorafgaande kennisgeving.
COMP1 – BOUSSOLE ÉLECTRONIQUE / NUMÉRIQUE
1. Introduction
Aux résidents de l'Union européenne
Des informations environnementales importantes concernant ce produit
Ce symbole sur l'appareil ou l'emballage indique que l’élimination d’un appareil en fin de vie peut polluer
l'environnement.
Ne pas éliminer un appareil électrique ou électronique (et des piles éventuelles) parmi les déchets
municipaux non sujets au tri sélectif ; une déchèterie traitera l’appareil en question.
Renvoyer les équipements usagés à votre fournisseur ou à un service de recyclage local.
Il convient de respecter la réglementation locale relative à la protection de l’environnement.
En cas de questions, contacter les autorités locales pour élimination.
Nous vous remercions de votre achat ! Lisez le présent manuel attentivement avant la mise en service de l'appareil.
Si l’appareil a été endommagé pendant le transport, ne l'installez pas et consultez votre revendeur.
2. Prescriptions de sécurité
• La garantie ne s'applique pas aux dommages survenus en négligeant certaines directives de ce manuel et votre
revendeur déclinera toute responsabilité pour les problèmes et les défauts qui en résultent.
• Evitez d'exposer l'appareil à l'eau, des chocs sévères ou des températures extrêmes: <0°C (32°F) ou >60°C (140°F).
• Evitez le contact avec les matériaux corrosifs comme le parfum, l'alcool ou des détergents.
• N’utilisez l'appareil qu’à sa fonction prévue. Un usage impropre annule d'office la garantie.
• N'utilisez pas le COMP1 dans ou près d'objets ou lieux avec beaucoup de métal/acier (véhicules, bâtiments…) ou
qui contiennent d'hauts voltages (centrale électrique, tout appareil électrique) comme ils créent un champ
magnétique qui peut perturber le fonctionnement du COMP1.
• Les dommages occasionnés par des modifications à l'appareil par le client, ne tombent pas sous la garantie.
• Gardez votre COMP1 hors de la portée de personnes non qualifiées et de jeunes enfants.
Page 8

COMP1_v2 VELLEMAN
8
3. Parties de l'appareil
(voir ill.)
Face avant
1. Cap numérique
2. Icône de calibrage
3. Aiguille de boussole
4. Cap en points cardinaux
(N, NE, E, SE, S, SW, W, NW)
5. Glisseur 'Snooze / Alarm ON/OFF'
6. Touche 'Compass ON/OFF'
7. Touche 'Snooze/Light'
Face arrière
8. Touche 'Reset' (réinitialisation)
9. Touche heure/mois
10. Touche minute/jour
11. Touche 12/24 HR / année
12. Touche °C/°F
13. Sélecteur temps/alarme/calendrier/verrouillage
14. Touche de déverrouillage de la plaque protectrice
15. Compartiment de piles
4. Piles
Le COMP1 marche sur 2 piles LR03 (pas inclus).
Procédure d'installation/remplacement: dévissez la vis du compartiment de piles (#16), ouvrez le couvercle du
compartiment, enlevez les piles épuisées (si applicable), introduisez 2 piles LR03 fraîches (respectez la polarité),
remettez le couvercle et serrez la vis.
Ne mélangez pas de nouvelles et vieilles piles comme ceci peut causer les piles à couler.
Remplacez les piles quand l'indicateur piles faibles apparaît (juste au-dessous du cap en points cardinaux).
5. Emploi
a. Général
• La boussole s'allume et s'éteint séparément au moyen de la touche #6. Eteignez la boussole quand vous n'en
avez pas besoin. Si la boussole n'est pas éteint manuellement, elle s'éteindra automatiquement après un certain
temps.
• Pressez la touche 'Light' (#7) pour allumer l'éclairage de fond pendant 4 secondes. Pour éviter l'épuisement inutile
des piles, utilisez la fonction d'éclairage uniquement quand vous en avez véritablement besoin.
• Pressez la touche '°C/°F' (#13) pour changer l'affichage de la température de °C en °F et vice versa.
b. Boussole
• Tenez la boussole tout à fait horizontalement pour obtenir un résultat correct. Le COMP1 est positionné
horizontalement quand la bulle d'air dans le niveau en bas de l'appareil se trouve au milieu du cercle sur le niveau.
• Il y a trois affichages du cap: l'affichage numérique (#1), en points cardinaux (#4) et par aiguille (également avec des
oints cardinaux). Le cap numérique est exacte à 1°, l'affichage par aiguille est en étapes de 22.5°.
c. Calibrage
1. Pressez 'Snooze/Light' (#7) et 'Compass on/off' (#6) simultanément pendant 2 secondes jusqu'à ce que l'appareil
produit un bip sonore. Le cap numérique (#1) et l'icône de calibrage (#7) commenceront à clignoter.
2. Gardez le COMP1 horizontalement et pressez 'Snooze/Light' (#7) pour démarrer le calibrage. Si vous voulez
introduire la déviation du 'nord véritable' (true north), exécutez l'étape 3. Sinon, allez immédiatement à l'étape 4.
3. La fonction TRUE NORTH vous permet d'éliminer la différence entre le nord magnétique et le nord véritable.
Regardez sur la carte à la p.2 où vous vous trouvez et notez le nombre de degrés (chaque ligne démarque une
différence de 2°) et la direction (E=est ; W=ouest) de la ligne la plus proche de votre position. Introduisez ces
valeurs sur la boussole au moyen des boutons Hr (#10) et Min (#11) à l'arrière de l'appareil.
Quelques exemples: San Francisco=14°E ; New York=14°W ; Rome=2°E ; London=4°W ; Sydney=12°E.
4. Tournez la boussole 180° horizontalement et pressez 'Snooze/Light' encore une fois pour terminer le calibrage. Le
cap numérique et l'icône de calibrage arrêtent de clignoter.
5. Si le calibrage n'est pas réussi, le cap numérique et l'icône de calibrage continueront à clignoter. Essayez une autre
location, pressez la touche 'reset' (#9) et redémarrez la procédure de calibrage.
Page 9

COMP1_v2 VELLEMAN
9
d. Réglage heure, date & alarme
• Date: mettez le sélecteur (#14) sur 'Calendar' et pressez les touches pour mois (#10), date (#11) et année (#12).
• Time: mettez le sélecteur (#14) sur 'Time set' et pressez les touches pour heures (#10) et minutes (#11). Vous
pouvez également mettre l'affichage de l'heure en mode AM/PM ou 24-heures en pressant la touche 12/24 (#12).
• Alarme: mettez le sélecteur (#14) sur 'Alm set' et pressez les touches pour heures (#10) et minutes (#11).
Mettez le glisseur (#5) sur 'Alm on' pour activer l'alarme (l'icône d'alarme apparaît sur l'écran) et mettez-le sur 'Snz'
(l'icône 'Zz' apparaît également) pour vous permettre d'utiliser la fonction 'snooze': un délai de 5 minutes quand
l'alarme sonne et vous pressez la touche 'Light/Snooze' (#7). Mettez le glisseur (#5) sur 'off' pour éteindre l'alarme.
• Après la modification des réglages, mettez le sélecteur (#14) sur 'Lock' pour éviter que des modifications
involontaires soient faites à l'heure, la date ou l'alarme.
Pour plus d’information concernant cet article, visitez notre site web www.velleman.eu.
Toutes les informations présentées dans ce manuel peuvent être modifiées sans notification préalable.
COMP1 – BRÚJULA ELECTRÓNICA / DIGITAL
1. Introducción
A los ciudadanos de la Unión Europea
Importantes informaciones sobre el medio ambiente concerniente a este producto
Este símbolo en este aparato o el embalaje indica que, si tira las muestras inservibles, podrían dañar el
medio ambiente.
No tire este aparato (ni las pilas, si las hubiera) en la basura doméstica; debe ir a una empresa
especializada en reciclaje. Devuelva este aparato a su distribuidor o a la unidad de reciclaje local.
Respete las leyes locales en relación con el medio ambiente.
Si tiene dudas, contacte con las autoridades locales para residuos.
¡Gracias por haber comprado la COMP1! Lea atentamente las instrucciones de este manual antes de usarla.
Si el aparato ha sufrido algún daño en el transporte no lo instale y póngase en contacto con su distribuidor.
2. Instrucciones de seguridad
• Daños causados por descuido de las instrucciones de seguridad de este manual o por modificaciones no autorizadas
invalidarán su garantía y su distribuidor no será responsable de ningún daño ni de otros problemas resultantes.
• No exponga el aparato a agua, choques graves o temperaturas extremas: <0°C (32°F) o >60°C (140°F).
• Evite el contacto con materiales corrosivos como perfume, alcohol o detergentes.
• Utilice el aparato sólo para su función prevista. Un uso inapropiado anula la garantía.
• No utilice la COMP1 en o cerca de lugares u objetos con mucho metal/acero (vehículos, edificio…) o que
contienen altas tensiones (central eléctrica, cualquier aparato electrónico). Crean un campo magnético que podría
perturbar el funcionamiento de la COMP1.
• Los daños causados por modificaciones no autorizadas no están cubiertos por la garantía.
• Mantenga la COMP1 lejos del alcance de personas no autorizadas y niños.
3. Piezas del aparato
(véase figuras)
Panel frontal
1. Visualización numérica del rumbo
2. Icono de calibración
3. Flecha de la brújala
4. Visualización del rumbo en puntos cardinales
(N, NO, O, SO, S, SE, E, NE)
5. Deslizador 'Snooze / Alarm ON/OFF'
6. Tecla 'Compass ON/OFF'
7. Tecla 'Snooze/Light'
Panel trasero
8. Tecla 'Reset' (reinicialización)
9. Tecla hora/mes
10. Tecla minuto/día
11. Tecla 12/24 HR / año
12. Tecla °C/°F
13. Selector hora/alarma/calendario/bloqueo
14. Tecla de desbloqueo de la placa protectora
15. Compartimiento de pilas
Page 10

COMP1_v2 VELLEMAN
10
4. Pilas
La COMP1 funciona con 2 pilas AAA (no incl.).
Instalar/reemplazar las baterías: desatornille el tornillo del compartimiento de pilas (#16), abra la tapa del
compartimiento, saque las pilas agotadas (si es aplicable), introduzca 3 pilas AAA nuevas (respete la polaridad),
vuelva a poner la tapa y apriete el tornillo.
No mezcle pilas agotadas y nuevas para evitar que tengan fugas.
Reemplace las pilas si el indicador de pilas bajas aparece (justo debajo de la visualización del rumbo en puntos
cardinales).
5. Funcionamiento
a. General
• Es posible activar y desactivar la brújula por separado con la tecla #6. Desactive la brújula si no la necesita. Si no
apaga la brújula manualmente, se desactivará automáticamente después de algún tiempo.
• Pulse la tecla 'Light' (#7) para activar la retroiluminación durante 4 segundos. Utilice la función de retroiluminación
sólo si fuera necesario para evitar un consumo innecesario de energía de las pilas.
• Pulse la tecla '°C/°F' (#13) para cambiar la visualización de la temperatura de °C a °F y viceversa.
b. Brújula
• Mantenga la brújula de forma horizontal para obtener un resultado correcto. La COMP1 está nivelada si la burbuja
de aire en el nivel de la parte inferior del aparato se encuentra en el medio del círculo del nivel.
• Hay tres visualizaciones del rumbo: numérica (#1), en puntos cardinales (#4) y por flecha (también con puntos
cardinales). La visualización numérica del rumbo está a 1° exacta, la visualización por flecha se hace en pasos de
22.5°.
c. Calibración
1. Pulse 'Snooze/Light' (#7) y 'Compass on/off' (#6) simultáneamente durante 2 segundos hasta que el aparato
produzca un bip sonoro. La visualización numérica del rumbo (#1) y el icono de calibración (#7) empezarán a
parpadear.
2. Mantenga la COMP1 de forma horizontal y pulse 'Snooze/Light' (#7) para empezar con la calibración. Si quiere
introducir la declinación del 'verdadero norte ' (true north), ejecute el paso 3. Si no, va inmediatamente al paso 4.
3. La función TRUE NORTH le permite eliminar la diferencia entre el norte magnético y el norte verdadero. Mire en
el mapa en la p.2 para ver donde está y apunte el número de grados (cada línea indica una diferencia de 2°) y la
dirección (E=este ; W=oeste) de la línea más cerca de su posición. Introduzca estos valores en la brújula con los
botones Hr (#10) y Min (#11) en la parte trasera del aparato.
Algunos ejemplos: San Francisco=14°E ; Nueva York=14°W ; Roma=2°E ; Londres=4°W ; Sidney=12°E.
4. Gire la brújula 180° horizontalmente y vuelva a pulsar 'Snooze/Light' para terminar la calibración. La visualización
numérica del rumbo y el icono de calibración para de parpadear.
5. Si la calibración no ha salido bien, la visualización numérica del rumbo y el icono de calibración continuarán
parpadeando. Intente otro lugar, pulse la tecla 'reset' (#9) y vuelva a empezar con el procedimiento de calibración.
d. Ajustar la hora, la fecha & la alarma
• Fecha: coloque el selector (#14) en 'Calendar' y pulse las teclas para el mes (#10), el día (#11) y el año (#12).
• Hora: coloque el selector (#14) en 'Time set' y pulse las teclas para las horas (#10) y los minutos (#11). También
es posible colocar la visualización de la hora en modo AM/PM o 24 horas al pulsar la tecla 12/24 (#12).
• Alarma: coloque el selector (#14) en 'Alm set' y pulse las teclas para las horas (#10) y los minutos (#11).
Coloque el deslizador (#5) en 'Alm on' para activar la alarma (el icono de la alarma aparece en la pantalla) y
colóquelo en 'Snz' (el icono 'Zz' aparece también) para permitirle utilizar la función 'snooze': una temporización de 5
Page 11
COMP1_v2 VELLEMAN
11
minutos si la alarma suena y al pulsar la tecla 'Light/Snooze' (#7). Coloque el deslizador (#5) en 'off' para desactivar
la alarma.
• Después de haber modificado los ajustes, coloque el selector (#14) en 'Lock' para evitar que se hagan
modificaciones involuntarias de la hora, la fecha o la alarma.
Para más información sobre este producto, visite nuestra página web www.velleman.eu.
Se pueden modificar las especificaciones y el contenido de este manual sin previo aviso.
COMP1 – ELEKTRONISCHER / DIGITALER KOMPASS
1. Einführung
An alle Einwohner der Europäischen Union
Wichtige Umweltinformationen über dieses Produkt
Dieses Symbol auf dem Produkt oder der Verpackung zeigt an, dass die Entsorgung dieses Produktes nach
seinem Lebenszyklus der Umwelt Schaden zufügen kann.
Entsorgen Sie die Einheit (oder verwendeten Batterien) nicht als unsortiertes Hausmüll; die Einheit oder
verwendeten Batterien müssen von einer spezialisierten Firma zwecks Recycling entsorgt werden.
Diese Einheit muss an den Händler oder ein örtliches Recycling-Unternehmen retourniert werden.
Respektieren Sie die örtlichen Umweltvorschriften.
Falls Zweifel bestehen, wenden Sie sich für Entsorgungsrichtlinien an Ihre örtliche Behörde.
Danke für Ihren Ankauf! Lesen Sie diese Bedienungsanleitung vor der Inbetriebnahme sorgfältig durch. Überprüfen
Sie, ob Transportschäden vorliegen. Sollte dies der Fall sein, verwenden Sie das Gerät nicht und wenden Sie sich an
Ihren Händler.
2. Sicherheitsvorschriften
• Bei Schäden, die durch Nichtbeachtung der Bedienungsanleitung verursacht werden, erlischt der
Garantieanspruch. Für daraus resultierende Folgeschäden übernimmt der Hersteller keine Haftung.
• Schützen Sie COMP1 vor Wasser, Stößen und extremen Temperaturen: <0°C (32°F) oder >60°C (140°F).
• Vermeiden Sie Kontakt mit aggressiven Substanzen wie Parfum, Alkohol oder Reinigungsmitteln.
• Verwenden Sie COMP1 nicht in der Nähe von Metall oder Stahl (Fahrzeugen, Gebäuden…) oder hohen
Spannungen (Elektrizitätswerken, elektrischen Geräten). Diese erzeugen ein Magnetfeld, das den Betrieb des
COMP1 stören kann.
• Verwenden Sie das Gerät nur wozu es konzipiert worden ist. Bei unsachgemäßem Gebrauch erlischt die Garantie.
• Eigenmächtige Änderungen sind aus Sicherheitsgründen verboten und fallen nicht unter die Garantie.
• Von Kindern und Unbefugten fern halten.
3. Teile des Gerätes
(siehe Abb.)
Frontseite
1. Numerische Richtungsangabe
2. Symbol für Kalibrierungsmodus
3. Kompasspfeil
4. Richtungsangabe in Kardinal-Richtungen
(N, NE, E, SE, S, SW, W, NW)
5. Snooze / Alarm EIN/AUS-Schiebeschalter
6. Kompass EIN/AUS-Taste
7. Snooze/Light (Taste Hintergrundbeleuchtung)
Rückseite
8. Reset-Taste
9. HR (Stunden)/month (Monat)-Taste
10. MIN (Minute) / day (Tag)-Taste
11. 12/24 HR / YEAR-Taste
12. °C/°F-Taste
13. Drehschalter für Zeit/Alarm/Kalender/Verriegelung
14. Entriegelung für Schutzplatte Tastatur
15. Batteriefach
Page 12

COMP1_v2 VELLEMAN
12
4. Batterien
Der COMP1 benötigt 2 AAA-Batterien (nicht mitgeliefert).
Batterien einlegen/wechseln: drehen Sie die Schraube des Batteriefachs (#16) los, öffnen Sie den Deckel des
Batteriefachs, entfernen Sie (eventuell) die leeren Batterien und legen Sie 2 neue AAA-Batterien (achten Sie auf die
Polarität) ein. Drehen Sie die Schraube wieder fest.
Verwenden Sie keine alten und neuen Batterien durcheinander, sie könnten lecken.
Ersetzen Sie die Batterien wenn die "Lo-Bat"-Symbol erscheint (unter der Kardinal-Richtungsangabe)
5. Gebrauch
a. Allgemeines
• Der Kompass kann mit Taste #6 ein- und ausgeschaltet werden. Schalten Sie den Kompass wenn Sie ihn nicht
benötigen aus. So schönen Sie die Batterien. Wenn der Kompass nicht manuell ausgeschaltet wird, wird er sich
nach einiger Zeit automatisch ausschalten.
• Drücken Sie die Taste der Hintergrundbeleuchtung (#7) um die Hintergrundbeleuchtung während 4 Sekunden zu
aktivieren. Verwenden Sie diese Hintergrundbeleuchtung nur wenn nötig um Energieverschwendung zu
vermeiden.
• Drücken Sie die '°C/°F'-Taste (#13) um die Temperaturanzeige zwischen °C und °F zu wechseln.
b. Kompass
• Halten Sie den Kompass ganz flach um eine genaue Anzeige zu bekommen. Sie halten den COMP1 horizontal
wenn sich die Luftblase im Kreis der Wasserwaage befindet.
• Es gibt 3 Kompassanzeigen: numerisch (#1), in Kardinal-Richtungen (#4) und eine Kompassnadel auch mit
Kardinal-Richtungen. Die numerische Anzeigegenauigkeit beträgt 1°, die Genauigkeit bei der Nadelanzeige 22.5°.
• Kompass eichen: halten Sie die 'Snooze/Light'-Taste eingedrückt (#7) und halten Sie inzwischen auch die
'Kompass EIN/AUS'-Taste (#6) 2 Sekunden eingedrückt bis ein Piepston ertönt. Die numerische Anzeige (#1) und
das Kalibrierungssymbol (#7) werden blinken. Halten Sie den COMP1 waagerecht und drücken Sie 'Snooze/Light'
(#7) um mit dem Kalibrieren anzufangen. Drehen Sie den Kompass 180° horizontal und drücken Sie nochmals
'Snooze/Light' um die Kalibrierung zu beenden. Die numerische Anzeige und das Kalibrierungssymbol blinken
nicht mehr.
Wenn das Kalibrieren nicht gelungen ist, blinken die Anzeige und das Kalibrierungssymbol nach wie vor. Stellen
Sie sich irgendwo anders und drücken Sie auf 'Reset' (#9) und fangen Sie erneut an.
c. Kompass kalibrieren
1. Halten Sie 'Snooze/Light' (#7) und 'Compass on/off' (#6) zwei Sekunden gedrückt bis Sie einen Piepston hören.
Die numerische Anzeige (#1) und das Kalibrierungssymbol (#7) werden blinken.
2. Halten Sie den COMP1 horizontal und drücken Sie 'Snooze/Light' um mit der Kalibrierung anzufangen. Wenn Sie
den 'TRUE NORTH' Winkel einstellen wollen, führen Sie Schritt 3 aus; falls nicht machen Sie Schritt 4.
3. Die TRUE NORTH-Option ermöglicht Ihnen, den Unterschied zwischen dem echten Norden und dem
magnetischen Norden zu eliminieren. Kontrollieren Sie Ihre Lage auf der Karte (siehe Seite 2) und notieren Sie
die Gradzahl (jede Linie ist 2°) und die Richtung (E= Osten, W= Westen) der Linie am nähesten zu Ihrer Position.
Stellen Sie diese Daten im Kompass ein mit den Tasten Hr (#10) und Min (#11) auf der Rückseite des Gerätes.
Einige Beispiele: San Fransico=14°E, New York=14°W, Rome=2°E, London=4°W, Sydney=12°E.
4. Drehen Sie den Kompass 180° horizontal, drücken Sie nochmals 'Snooze Light' um die Kalibrierung zu beenden.
Die numerische Anzeige und das Kalibrierungssymbol blinken nicht mehr.
5. Wenn die Kalibrierung nicht gelungen ist, werden die numerische Anzeige und das Kalibrierungssymbol nach wie
vor blinken. Gehen Sie zu einer anderen Stelle, drücken Sie die Reset-Taste (#9) und starten Sie erneut das
Kalibrierungsverfahren.
Page 13

COMP1_v2 VELLEMAN
13
d. Zeit, Datum & Alarm einstellen
• Datum: stellen Sie den Drehschalter (#14) auf 'Calendar' und stellen Sie das Datum mithilfe der Tasten für Monat
(#10), Datum (#11) und Jahr ein (#12).
• Zeit: stellen Sie den Drehschalter (#14) auf 'Time set' und drücken Sie die Tasten für Stunden (#10) und Minuten
(#11). Sie können auch eine Zeitangabe in AM/PM oder in 24 Stunden bekommen, indem Sie auf die 12/24-Taste
(#12) drücken.
• Alarm: stellen Sie den Drehschalter (#14) auf 'Alm set' und stellen Sie den Alarm mit den Tasten für Stunden (#10)
und Minuten ein (#11).
Stellen Sie den Schiebeschalter (#5) auf 'Alm on' um den Alarm zu aktivieren (das Alarmsymbol erscheint auf dem
Schirm) oder setzen Sie ihn auf 'Snz' (auch das 'Zz'-Symbol erscheint) um die Snooze-Funktion zu aktivieren: eine
Verzögerung von 5 Minuten wenn der Alarm ertönt und Sie auf die 'Light/Snooze'-Taste (#7) drücken. Stellen Sie
den Schalter (#5) auf 'off' um den Alarm auszuschalten.
• Sind Sie mit den Einstellungen fertig, dann stellen Sie den Drehschalter (#14) auf 'Lock' um ungewünschte
Änderungen zu vermeiden.
Für mehr Informationen zu diesem Produkt, siehe www.velleman.eu.
Alle Änderungen vorbehalten.
 Loading...