

Page 1

D
D
Ô
O
D
M
E
A
N
E
V
R
E
D
A
O
É
N
B
N
CHL
RGB LE
RGB LE
CONTR
CONTR
RGB LE
USER
GEBRU
NOTIC
MANU
BEDIE
SC1
CONTROLL
CONTROLLE
LEUR LED R
LADOR LED
-CONTROLL
ANUAL
IKERSHAN
D’EMPLOI
L DEL USU
UNGSANLE
R WITH REM
R MET AFSTA
B AVEC TÉL
GB CON MA
R MIT FERN
LEIDING
RIO
ITUNG
TE CONTRO
NDSBEDIENI
COMMANDE
DO A DISTA
EDIENUNG
4
8
12
16
20
L
G
NCIA
Page 2
CHLSC1
09.09.2009 ©Velleman nv
2
Page 3
CHLSC1
09.09.2009 ©Velleman nv
3
Page 4
s
n
b
u
h
u
s
f
T
n
h
d
s
u
a
h
t
t
r
t
y
a
r
e
p
r
s
e
d
s
a
d
o
1
n
b
p
o
y
a
c
m
e
n
t
a
i
e
t
o
c
c
e
o
n
t
z
u
i
m
c
e
v
s
v
n
t
r
1. Int
To all re
Importa
If in dou
Thank yo
bringing t
install or
guidelines
accept re
2. Sa
roduction
idents of the E
t environment
This symbol on t
the device after i
dispose of the un
should be taken
This device shoul
recycling service.
t, contact your
for choosing Vel
is device into se
se it and contac
in this manual is
ponsibility for an
ety Instruct
CHLSC
User ma
ropean Union
l information a
e device or the
s lifecycle could
it (or batteries) a
o a specialized c
d be returned to
Respect the loca
local waste dis
leman! Please re
vice. If the devi
your dealer. Da
not covered by t
ensuing defects
ions
ual
out this produ
ackage indicates
harm the environ
s unsorted muni
mpany for recycl
our distributor o
l environmental r
posal authoriti
d the manual th
e was damaged i
age caused by d
he warranty and
or problems.
t
that disposal of
ment. Do not
ipal waste; it
ing.
r to a local
ules.
s.
roughly before
transit, don' t
isregard of certai
he dealer will no
3. Ge
Refer to t
this manu
• Familia
• All mo
• Only u
09.09.2009
unauth
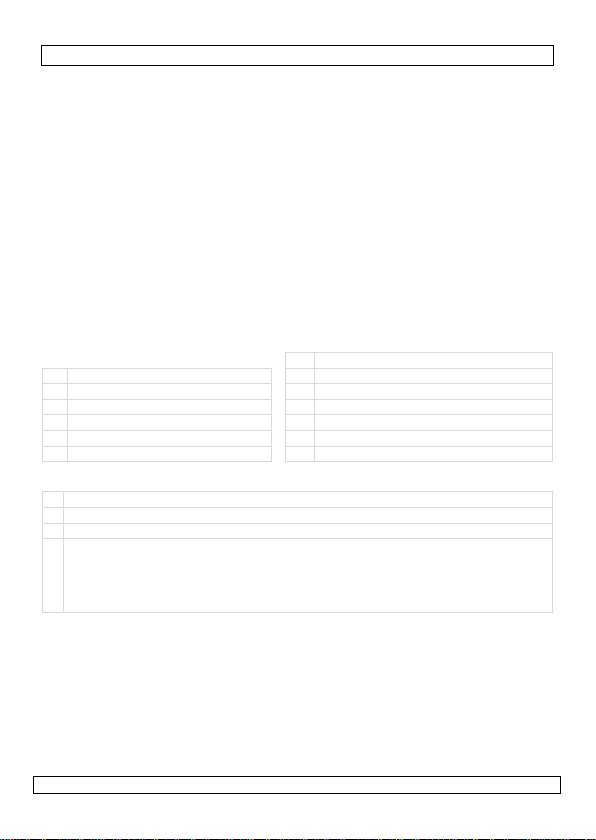
Keep this device
Risk of electros
can cause life-th
before making or
Dry location us
splashing and dri
here are no use
the housing yo ur
spare parts.
eral Guideli
e Velleman® S
al.
Keep this
the device
Protect thi
when oper
rise yourself with
ifications of the
e the device for i
orised way will v
way from childr
hock when openi
eatening electros
changing any co
only. Keep this
ping liquids.
-serviceable par
elf. Refer to an
nes
rvice and Qual
evice away from
in a well ventilat
device from sho
ting the device.
the functions of
evice are forbidd
ts intended purp
id the warranty.
4
n and unauthori
ng the cover. To
hocks. Always d
nections.
device away fro
s inside the devi
uthorized dealer
ty Warranty on
dust and extrem
d area.
cks and abuse. A
he device before
en for safety rea
se. Using the de
ed users.
ching live wires
sconnect power
rain, moisture,
e. Do not open
for service and/o
the last pages of
heat. Only use
oid brute force
actually using it.
ons.
ice in an
©Velleman
nv
Page 5
CHLSC1
• Damage caused by disregard of certain guidelines in this manual is not covered by
the warranty and the dealer will not accept respo nsibili ty for a ny ensui ng defe cts or
problems.
• Do not use outside the technical specifications (see §10).
4. Features
• for CHLS-series
• 4-line, 3-loop RGB controller with remote control
• controlled by push switch on the unit or through infrared remote (incl.)
• 20 pre-progr amm ed o ut pu t mo de s (s ing le co lo ur s , fl a sh , st r o be, fa de ,… )
• high load capacity
• comes with screws and self adhesive strip on the backside for easy
installation
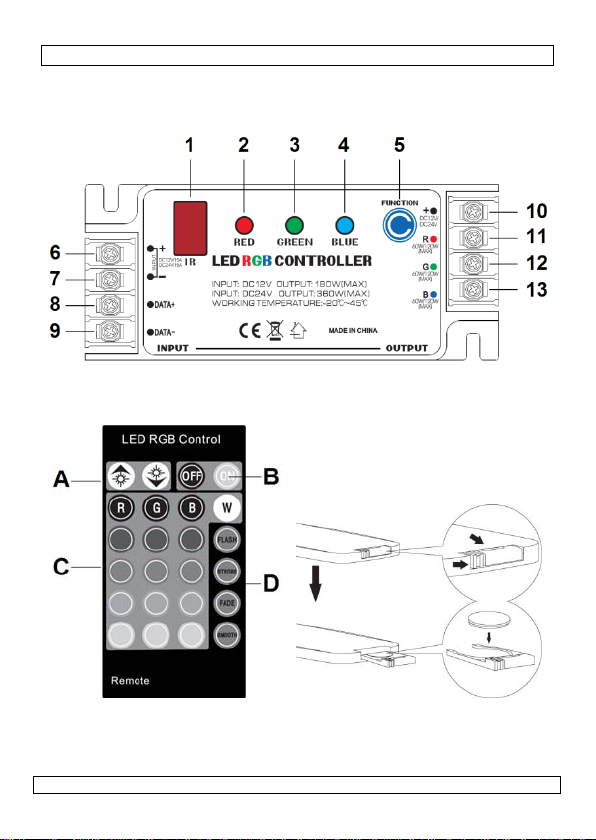
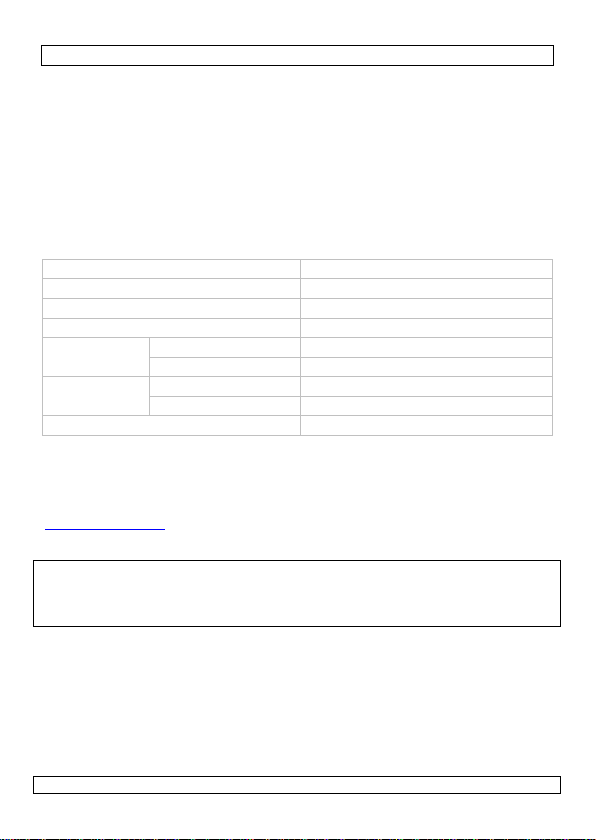
5. Overview and use
Refer to the illustrations on pages 2 and 3 of this manual.
LED Controller 7 DC in “-”
1 IR receiver 8 Data port “+”
2 RED status LED 9 Data port “-”
3 GREEN status LED 10 Output common “+”
4 BLUE status LED 11 Output RED “-”
5 Function select button 12 Output GREEN “-”
6 DC in “+” (12V or 24V) 13 Output BLUE “-”
Remote contr ol
A Brightness adjustment (3 levels)
B On/Off button
C Light colour sele c tio n ke y s
D Mode selection keys:
• FLASH: 7 colours flashing
• STROBE: R, G, B - 3 colours “strobe-mode” alternately
• FADE: 7 colours fading out and in
• SMOOTH: 7 colours f a din g ou t a nd i n sm o ot hly
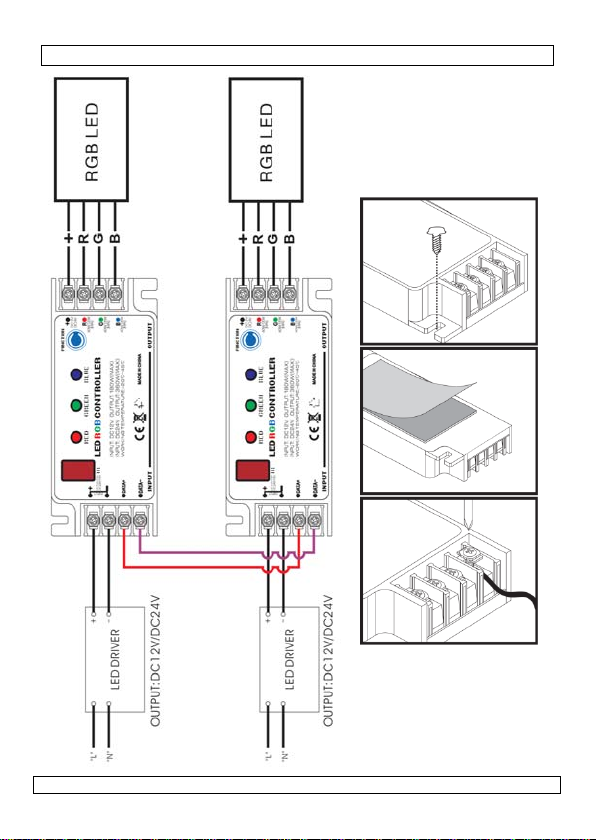
6. Installation
LED strips
• It is possible to connect either one RGB LED strip or 1 to 3 single colour strips
(red, green and blue). The LED strips can be either 12VDC or 24VDC driven.
Do not mix!
• First make sure all LED strips (not incl.) are securely in place.
• Mount the controller by using the adhesive tape on the back and the included
screws. Only install the device in a dry and easily accessible location with
sufficient ventilation. Note that the IR receiver [1] must be visible to use the
remote control.
• Connect the LED strip(s) to the controller outputs. It is recommended to use
at least AWG 12 wire (Ø2.053mm). In case of an RGB-LED strip, connect the
common [10], the red [11], the green [12] and the blue [13] outputs to
09.09.2009 ©Velleman nv
5
Page 6
a
b
l
t
t
u
w
t
s
T
t
e
n
a
t
o
y
a
g
a
o
r
k
u
k
s
h
t
h
r
y
p
e
y
n
m
1
o
d
s
i
g
r
c
n
b
1
.
s
h
h
p
t
s
s
n
e
t
a
e
l
t
g
a
a
e
Ø
h
n
D
t
e
t
h
a
e
e
a
the app
strips,
applica
cut the
Linking c
• Multip
one of
connec
• Simply
well as
Notes:
Power s
• The po
connec
• Depend
power
IMPOR
• Connec
termina
7. Op
• Switch
• The co
button
• The st
resp. [
8. Ba
• Refer t
batter
• Insert
markin
• Reinst
9. Tr
• Cont
Chec
Press
• Stat
Chec
09.09.2009
ropriate term i na l
lways connect t
le colour output.
outputs.
ontrollers
e controllers can
he controllers wi
ed controllers.
link the data por
the data port “-”
Maximum lengt
Each controller
Never link cont
Press any key o
pply
er supply (not in
ions are made. M
ing on the used t
upply to the cont
ANT: the used
the positive sid
l [7]. Use AWG 1
ration
the power suppl
troller output ca
[5] or via the re
tus LEDs [2], [3
11], [12] and [
tery
the illustration
holder from the
new CR2025 Lit
s on the battery
ll the battery hol
WARNING:
Do not punc
explode. Di
regulations.
Keep batter
ubleshootin
oller is not wo
the input conne
the ON-button o
s LEDs are OK
the output conn
CHLSC
of the LED strip
e common [10]
Do not connect
be linked using t
ll automatically c
“+” [8] termina
[9] terminals us
of the data bus
equires its own
roller outputs.
n the remote con
cl.) should only b
ake sure there is
pe of LED str ip (
roller.
ower supply mu
to the “+” term i
2 wire (Ø2.053m
on.
be selected eith
ote control (see
] and [4] indicat
3].
n page 2 for ins
remote control.
hium battery in a
holder.
er into the remo
ture or throw b
pose of batteri
es away from c
king, no LEDs
tions and contro
the remote con
ut no output.
ections and cont r
6
When using sin
to the LED strip
trips in parallel
e data bus. Sele
ange the setting
ls of the controll
ing an AWG 18 (
is 50m.
ower supply.
rol to start sync
e connected whe
no power on the
), connect a 12V
t match the conn
al [6] and nega
m).
er by pressing th
§5).
the status of th
ructions on how
ccordance with t
te control.
tteries in fire
s in accordanc
hildren.
ler input voltage.
rol.
oller input voltag
le colour LED
s well as the
nd never short-
cting a setting on
on all the other
rs to each other
1.024mm) wire.
ronizing.
all other
wires.
C or 24VDC
ected LED-strips!
ive side to the “-
e function select
output ports
o remove the
e polarity
s they might
with local
.
©Velleman
s
”
nv
Page 7
CHLSC1
• Output brightness too low
Check the output connections and controller input voltage.
• Overheating of the controller
Make sure the controllers’ input voltage is not too high and check whether
there is sufficient ventilation.
• In linked mode, controllers don’t work synchronously.
Check the data terminals and the length of the data bus. Press any key on
the remote control to start synchronizing.
• Remote control is not working
Point the remote control straight towards the IR receiver, check the
distance (<7m). Replace the battery.
10. Technical specifications
input v o l t age 12 or 24VDC
output power 180W (12VDC) or 360W (24VDC)
max. output for each loop 60W (12VDC) or 120W (24VDC)
IR remote control working distance 7m
dimensions
Weight
power supply remote control 3V lithium CR2025, incl.
Use this device with original accessories only. Velleman nv cannot be held
responsible in the event of damage or injury resulted from (incorrect) use
of this device.
For more info concerning this product, please visit our website
www.hqpower.eu
The information in this manual is subject to change without prior notice.
© COPYRIGHT NOTICE
This manual is copyrighted. The copyright to this manual is owned by Velleman nv. All
worldwide rights reserved. No part of this manual may be copied, reproduced, translated or
reduced to any electronic medium or otherwise without the prior written consent of the copyright
holder.
Controller 121 x 51 x 26mm
IR remote control 90 x 49 x 7mm
Controller ±110gr
IR remote control ±22gr
.
09.09.2009 ©Velleman nv
7
Page 8
e
i
e
r
j
o
e
o
m
v
e
U
n
m
e
h
n
e
L
o
t
z
r
b
a
o
r
s
r
n
l
e
e
n
t
n
1
d
e
p
i
r
s
d
e
n
n
s
o
t
m
N
c
n
b
e
t
r
s
e
e
n
a
n
t
h
a
r
e
s
n
1. Inl
Aan alle
Belangrij
toestel na
de plaats
Hebt u v
de verwi
Dank u v
gebruik n
dan niet e
negeren v
verantwo
verband
2. Vei
GEBR
iding
ngezetenen v a
ke milieu-infor
Dit symbool op h
zijn levenscyclus
toebrengen aan
niet bij het gewo
gespecialiseerd b
ar uw verdeler of
lijke milieuwetge
agen, contacte
dering.
or uw aankoop!
emt. Werd het t
n raadpleeg uw d
an bepaalde rich
rdelijkheid afwij
ee houden.
ligheidsinst
CHLSC
IKERSHA
de Europese U
atie betreffen
t toestel of de v
wordt weggewor
et milieu. Gooi d
e huishoudelijke
edrijf terechtkom
naar een lokaal
ving.
r dan de plaat
ees deze handlei
estel beschadigd
ealer. De garanti
lijnen in deze ha
en voor defecten
ucties
NDLEIDI
nie
e dit product
rpakking geeft a
en, dit toestel s
t toestel (en ev e
afval; het moet
en voor recyclag
ecyclagepunt bre
elijke autoritei
ing grondig voo
tijdens het trans
geldt niet voor
dleiding en uw d
of problemen di
G
an dat, als het n
hade kan
tuele batterijen)
ij een
. U moet dit
ngen. Respectee
en betreffende
u het toestel in
port, installe e r h
chade door het
aler zal de
hier rechtstreek
t
3. Alg
Raadpleeg
handleidin
•
09.09.2009
Leer e
Houd buiten het
Elektrocutiegev
aan die onder str
Ontkoppel eerst h
sluiten.
Enkel voor geb
ochtigheid en op
U mag geen onde
reserveonderdele
emene richt
de Velleman® s
g.
Bescherm t
goed geve
Bescherm
bediening.
rst de functies va
ereik van kindere
ar bij het openen
om staan om dod
et toestel van het
uik binnenshui
pattende vloeist
delen vervangen.
bij uw dealer.
ijnen
rvice- en kwali
gen stof en extre
tileerde ruimte.
egen schokken. V
het toestel kenn
8
en onbevoegde
van het toestel. R
elijke elektroshoc
lichtnet alvorens
. Bescherm tege
ffen.
Bestel eventuele
eitsgarantie ach
e hitte. Gebruik
ermijd brute krac
en voor u het gaa
.
ak geen kabels
ks te vermijden.
het toestel aan te
regen,
eraan deze
het toestel in ee
t tijdens de
t gebruiken.
©Velleman
nv
Page 9
CHLSC1
• Om veiligheidsredenen mag u geen wijzigingen aanbrengen.
• Gebruik het toestel enkel waarvoor het gemaakt is. Bij onoordeelkundig gebruik
vervalt de garantie.
• De garantie geldt niet voor schade door het negeren van bepaalde richtlijnen in
deze handleiding en uw dealer zal de verantwoordelijkheid afwijzen voor
defecten of problemen die hier recht streeks verband mee houden.
• Overschrijd nooit de waarden vermeld in de technische specificaties (zie:
§10).
4. Eigenschappen
• voor CHLS-reeks
• RGB-controller (4 uitgangen, 3 lussen) met afstandsbediening
• bediening via drukknop op controller of via IR afstandsbediening (meegelev.)
• 20 preset uitgangmodi (enkel kleur, flash, stroboscoop, fade…)
• hoge capaciteit
• geleverd met schroeven en zelfklevende strip
5. Omschrijving
Raadpleeg de figuren op pagina 2 en 3 van deze handleiding.
ledcontroller 7 DC-ingang ‘-’
1 IR ontvanger 8 datapoo rt ‘+’
2 statusled (rood) 9 datapoor t ‘-’
3 statusled (groen) 10 uitgang gemeenschappelijk ‘+’
4 statusled (blauw) 11 uitgang rood ‘-’
5 functieknop 12 uitgang groen ‘-’
6 DC-ingang ‘+’ (12 V of 24 V) 13 uitgang blauw ‘-’
afstandsbediening
A instelknop helderheid (3 niveaus)
B aan-uitschakelaar
C kleurselectie
D modusknoppen:
• FLASH: 7-kleurige flitsen
• STROBE: RGB – 3-kleurige stroboscoop
• FADE: 7-kleurige fade-in en fade-out
• SMOOTH: trage, 7-kleurige fade-in en fade-out
6. Installatie
Ledstrips
• Deze controller biedt de mogelijkheid om ofwel een RGB ledstrip ofwel 1 tot 3
enkelkleurige ledstrips (rood, groen en blauw) aan te sluiten. Koppel de strip
aan een 12VDC- of een 24VDC-voeding. Gebruik geen twee voedingen
met een verschillende spanning!
• Monteer alle ledstrips (niet meegeleverd).
• Monteer de controller met behulp van de tape en de schroeven op een droge
en goed geventileerde plaats. Plaats de controller zodat de ontvanger [1]
zichtbaar is.
09.09.2009 ©Velleman nv
9
Page 10

a
g
t
e
d
k
d
k
d
b
e
5
s
e
e
d
0
n
j
s
l
e
a
e
n
h
e
m
n
m
I
o
1
e
a
a
v
G
b
o
s
d
n
m
t
v
2
s
b
b
e
e
m
a
2
k
e
e
p
t
e
t
• Sluit de
dikte v
[11], d
toepass
een de
kleuruit
kortslui
Controll
• U kunt
van de
control
• Verbin
behulp
Opmer
Voeding
• Koppel
verricht
• Gebrui
• Koppel
‘-’-term
(Ø 2,05
7. Ge
• Schake
• Select
(zie: §
• De led
aan.
8. De
• Open h
pagina
• Plaats
polarit
• Steek
ledstrips aan de
n AWG 12 (Ø 2,
e groene [12] e
elijke terminals v
emeenschappeli
gang. U mag led
en.
rs koppelen
controllers aan e
controllers word
lers in de serie.
onderling alle d
van kabels met
ingen:
De maximale le
Elke controller
Koppel de contr
Druk op een to
starten.
e voeding (niet
hebt.
, afhankelijk van
e positieve pool
inal [7]. Gebruik
3 mm).
ruik
l het toestel in .
er de uitgang me
).
[2], [3] en [4]
batterij
et batterijvak va
2.
en nieuwe lithiu
itaanduidingen.
e batterijhouder
WAARSCHUW
in het vuur. H
CHLSC
controlleruitgang
53 mm). Sluit de
de blauwe [13]
an een RGB ledst
ke uitgang [10]
trips nooit in par
kaar koppelen vi
n automatisch o
tabussen ‘+’ [8]
en dikte van AW
gte van de data
eeft een eigen v
olleruitgangen no
ts op de afstand
eegeleverd) na
het type ledstrip,
aan de ‘+’-termi
hiervoor kabels
t knop [5] of me
geven de status
de afstandsbedi
batterij type CR
opnieuw in de af
NG: Doorboor
ud batterijen
n. Gebruik hierv
gemeenschappe l
uitgangen van d
rip. Sluit een enk
en aan de toepas
llel koppelen en
de databus. De
ergedragen naa r
en alle databuss
18 (Ø 1,024 m
us is 50 m.
eding nodig.
oit aan elkaar.
bediening om de
at u alle andere
een 12VDC- of
al [6] en de neg
et een dikte van
behulp van de a
an uitgang [11]
ening. Raadpleeg
025 volgens de
tandsbediening.
atterijen nooit
uiten het berei
oor kabels met e
ijke [10], de rod
controller aan d
elkleurige ledstri
selijke
de uitgangen nie
instellingen op e
de andere
n ‘-’ [9] met
).
synchronisati e t e
ansluitingen
4VDC-voeding.
atieve pool aan d
AWG 12
fstandsbediening
, [12] en [13]
de figuur op
en gooi ze nooi
van kinderen.
n
e
n
e
09.09.2009
10
©Velleman
nv
Page 11

CHLSC1
9. Problemen en oplossingen
• Controller functioneert niet, leds branden niet
Controleer de ingangaansluitingen en de voedingspanning.
Druk op ON op de afstandsbediening.
• Statusleds branden maar controller functioneert niet
Controleer de uitgangaansluitingen en de voedingspanning.
• Lichtuitgang onvoldoende helder
Controleer de uitgangaansluitingen en de voedingspanning.
• Oververhitting van de controller
Zorg voor een correcte ingangspanning en een goede ventilatie.
• Gekoppelde controllers werken niet synchroon
Controleer de terminals en de lengte van de databus. Druk op een toets op
de afstandsbediening om de synchronisatie te starten.
• Afstandsbediening functioneert niet
Richt de afstandsbediening naar de ontvanger (max. afstand van 7 m).
Vervang de batterij.
10. Technische specificaties
ingangspanning 12 of 24 VDC
vermogen 180 W (12 VDC) of 360 W (24 VDC)
max. vermogen voor elke lus 60 W (12 VDC) of 120 W (24 VDC)
bereik IR afstandsbediening 7 m
afmetingen
gewicht
voeding afstandsbediening 3 V lithiumbatterij CR2025, meegelev.
Gebruik dit toestel enkel met originele accessoires. Velleman nv is niet
aansprakelijk voor schade of kwetsuren bij (verkeerd) gebruik van dit
toestel. Voor meer informatie over dit product, zie www.hqpower.eu. De
informatie in deze handleiding kan te allen tijde worden gewijzigd
zonder voorafgaande kenni sgevi ng.
© AUTEURSRECHT
Velleman nv heeft het auteursrecht voor deze handleiding.
Alle wereldwijde rechten voorbehou den. Het is niet toegestaan om deze
handleiding of gedeelten ervan over te nemen, te kopiëren, te vertalen, te
bewerken en op te slaan op een elektronisch medium zonder voorafgaande
schriftelijke toestemming van de rechthebbende.
controller 121 x 51 x 26 mm
IR afstandsbediening 90 x 49 x 7 mm
controller ± 110 g
IR afstandsbediening ± 22 g
09.09.2009 ©Velleman nv
11
Page 12

d
r
e
s
m
c
s
n
e
i
T
m
O
n
r
n
j
e
é
s
e
o
e
g
d
u
é
c
p
è
g
é
o
o
n
t
1
E
m
p
l
m
r
é
p
e
n
u
t
v
o
a
z
u
n
a
i
e
q
e
e
u
s
g
e
é
r
ê
o
i
e
l
T
e
n
e
1. Int
Aux rési
Des info
recyclage
protection
En cas d
Nous vou
avant la
transport,
s’applique
cette noti
problème
2. Co
N
roduction
ents de l'Union
mations enviro
Ce symbole su
d’un appareil e
eter un appar
éventuelles) pa
sélectif ; une d
équipements u
local. Il convie n t
de l’environnem
questions, con
remercions de v
ise en service d
ne pas l’inst al le r
pas aux domma
e et votre reven
et les défauts q
signes de s
CHLSC
TICE D’
européenne
nementales im
l'appareil ou l'e
fin de vie peut
il électrique ou é
rmi les déchets
chèterie tra ite r a
agés à votre fou
de respecter la r
nt.
tacter les autor
tre achat ! Lire l
l’appareil. Si l’a
et consulter votr
es survenus en
eur déclinera to
i en résultent.
curité
MPLOI
portantes conc
ballage indique
olluer l'environn
ectronique (e t d
unicipaux non s
l’appareil en que
nisseur ou à un
glementation loc
ités locales pou
a présente notice
pareil a été endo
revendeur. La
égligeant certain
te responsabilité
rnant ce produ
ue l’élimination
ment. Ne pas
s piles
jets au tri
stion. Renvoyer l
ervice de
ale relative à la
r élimination.
attentivement
mmagé pendant
arantie ne
es directives de
pour les
t
s
e
3. Dir
Se référer
•
Se fam
•
oute
occasio
09.09.2009
Garder hors de la
Risque d’électro
sous tension peut
l’alimentation ava
Pour usage à l’i
l’humidité et des
Il n’y a aucune pi
pièces de rechan
ctives gén
à la garantie de
Protéger c
dans un en
Protéger c
l’opération.
liariser avec le fo
odification est in
nnés par des mod
portée des enfan
ution lors de l’ou
causer des électr
nt d’établir les br
ntérieur unique
rojections d’eau.
ce maintenable p
e éventuelles che
rales
service et de q
ntre la poussière
droit bien ventilé.
ntre les chocs et l
ctionnement ava
erdite pour des r
ifications par le cl
12
s et des personn
erture du boîtier.
chocs mortels. D
nchements.
ment. Protéger d
ar l’utilisateur. Co
votre revendeu
alité Velleman
et la chaleur extr
e traiter avec circ
t l’emploi.
isons de sécurité.
ent ne tombent p
s non autorisées.
oucher un câble
connecter
e la pluie, de
mmander des
.
®
en fin de notice.
me. N’utiliser qu
nspection penda
Les dommages
as sous la garanti
©Velleman
t
.
nv
Page 13

CHLSC1
• N’utiliser qu’à sa fonction prévue. Un usage impropre annule d'office la
garantie.
• La garantie ne s’applique pas aux dommages survenus en négligeant certaines
directives de cette notice et votre revendeur déclinera toute responsabilité pour
les problèmes et les défauts qui en résultent.
• Respecter les valeurs décrites sous les spécifications techniques (voir §10).
4. Caractéristiques
• pour la série CHLS
• module de contrôle RVB (4 sorties, 3 boucles) avec télécommande
• pilotage depuis poussoir sur le module ou depuis la télécommande IR incluse
• 20 modes de sortie préprogrammés (simple couleur, éclats, stroboscope,
fade…)
• haute capacité
• livré avec vis et adhésif autocollant
5. Description
Se référer aux illustrations en pages 2 et 3 de cette notice.
Module de contrôle 7 entrée CC -
1 récepteur IR 8 po r t de do nné e s « + »
2 DEL d’état ROUGE 9 port de données « – »
3 DEL d’état VERTE 10 sortie commune « + »
4 DEL d’état BLEUE 11 sortie ROUGE « - »
5 sélecteur de fonction 12 sortie VERTE « - »
6 entrée CC + (12 V ou 24 V) 13 sortie BLEUE « - »
Télécommande
A réglage de luminosité (3 niveaux)
B bouton marche/arrêt
C sélecteurs de couleur
D sélecteurs de mode
• FLASH : éclats 7 couleurs
• STROBE : RVB – stroboscope 3 couleurs
• FADE : fondu en ouverture et en fermeture 7 couleurs
• SMOOTH : fondu en ouverture et en fermeture lent 7 couleurs
6. Installation
Flexibles DEL
• Il est possible de connecter soit un flexible DEL RVB soit 1 à 3 flexibles
unicolores (rouge, vert ou bleu) 12 VCC ou 24 VCC. Ne pas utiliser les deux
types simultanément.
• Installer d’abord les flexibles.
• Monter le module dans un endroit sec et bien ventilé à l’aide du ruban adhésif
et des vis inclus. S’assurer que le récepteur [1] soit visible et accessible aux
rayons IR.
• Connecter le(s) flexible(s) au module à l’aide de câbles d’une épaisseur de
AWG 12 (Ø 2,053 mm). Connecter les bornes d’un flexible RVB aux sorties
09.09.2009 ©Velleman nv
13
Page 14

n
r
n
n
s
e
2
q
t
n
t
7
r
o
5
L
p
e
r
é
r
1
m
e
u
d
m
c
u
e
r
1
e
a
»
e
o
p
m
q
C
0
r
d
S
a
c
n
c
s
e
e
G
m
f
e
g
e
s
n
e
N
s
n
2
e
commu
unicolo
pas con
Intercon
• Interco
fonctio
tous le
• Interco
donné
(Ø 1,0
Remar
L’alimen
• Ne con
connexi
• Utiliser
• Connec
« - » [
7. Em
• Allume
• Sélecti
(voir §
• Les DE
[13].
8. La
• Retirer
de cett
• Insére
polarit
• Réinsé
e [10], rouge [
e à la sortie co m
necter les flexibl
exion de modu
nnecter des mod
sur un des mod
modules.
nnecter les ports
s « - » [9] à l’ai
4 mm).
ue :
Longueur maxi
Chaque module
Ne jamais inter
Enfoncer un bo
synchronisation
ation
ecter l’alimentati
on.
une alimentation
er le pôle positif
] à l’aide de câbl
ploi
le module.
nner le mode à l
).
[2], [3] et [4]
ile
le porte-pile de la
notice.
une nouvelle pil
.
er le porte-pile d
AVERTISSEME
au feu. Garde
CHLSC
1], verte [12]
une [10] et à l
s en parallèle et
les
les en reliant les
ules ; la fonction
de données « +
e de câbles d’un
ale du bus de d
nécessite sa pro
onnecter les sort
ton sur la téléco
.
on (non incluse)
12 VCC ou 24 V
à la borne « + »
es AWG 12 (Ø 2,
’aide du sélecte u
indiquent l’état
télécommande.
au lithium de ty
ans la télécomm
NT : Ne pas per
la pile hors de
t bleue [13]. Co
sortie de la coul
ne jamais court-
ports de donnée
sera automatiq u
[8] tout comm
épaisseur d’AW
nnées de 50 m.
re alimentation.
ies d’un module .
mande pour dé
u’après avoir ef
C selon le type d
[6] et le pôle né
53 mm).
[5] ou depuis la
es ports de sorti
e référer aux illu
pe CR2025 selon
nde.
er la pile et ne
la portée des e
necter un flexibl
eur appropriée.
ircuiter les sortie
. Sélectionner u
ment adoptée su
les ports de
18
arrer la
ectué toute autre
flexibles utilisé.
atif à la borne
télécommande
[11], [12] et
trations en page
les indications d
jamais la jeter
fants.
e
.
e
r
09.09.2009
14
©Velleman
nv
Page 15

CHLSC1
9. Problèmes et solutions
• Le module ne fonctionne pas, les DEL ne s’allument pas
Contrôler les connexions d’entrée et la tension d’entrée.
Allumer le module avec bouton marche/arrêt sur la télécommande.
• Les DEL s’allument mais le module ne fonctionne pas
Contrôler les connexions de sortie et la tension d’entrée.
• Luminosité trop faible des flexibles connectés
Contrôler les connexions de sortie et la tension d’entrée.
• Surchauffe du module
Vérifier la tension d’entrée et assurer une ventilation adéquate.
• Les modules interconnectés ne fonctionnent pas synchroniquement
Vérifier l’interconnexion des bus de données et la longueur de la connexion.
Enfoncer un bouton sur la télécommande pour démarrer la synchronisation.
• La télécommande ne fonctionne pas
Pointer la télécommande vers le récepteur IR (distance < 7 m). Remplacer
la pile.
10. Spécifications techniques
tension d’entrée 12 ou 24 VCC
puissance 180 W (12 VCC) ou 360 W (24 VCC)
puissance max. pour chaque boucle 60 W (12 VCC) ou 120 W (24 VCC)
portée télécommande IR 7 m
dimensions
poids
alimentation télécommande IR pile au lithium de 3 V type CR2025, incl.
N’employer cet appareil qu’avec des accessoires d’origine. SA Velleman ne
sera aucunement responsable de dommages ou lésions survenus à un
usage (incorrect) de cet appareil. Pour plus d’information concernant cet
article, visitez notre site web www.hqpower.eu. Toutes les informations
présentées dans cette notice peuvent être modifiées sans notification
préalable.
© DROITS D’AUTEUR
SA Velleman est l’ayant droit des droits d’auteur pou r cette notice.
Tous droits mondiaux réservés. Toute reproduction, traduction, copie ou diffusion,
intégrale ou partielle, du contenu de cette notice par quelque procédé ou sur tout
support électronique que se soit est interdite sans l’accord préalable écrit de
l’ayant droit.
module de contrôle 121 x 51 x 26 mm
télécommande IR 90 x 49 x 7 mm
module de contrôle ± 110 g
télécommande IR ± 22 g
09.09.2009 ©Velleman nv
15
Page 16

d
n
d
o
d
o
n
y
d
y
s
s
r
r
N
n
t
í
u
a
e
e
d
a
r
a
e
o
g
r
c
a
r
c
1
d
u
e
e
a
a
f
r
l
d
c
r
N
a
m
o
i
a
a
e
a
e
r
s
e
a
v
o
o
e
n
e
a
e
o
n
o
s
1. Int
A los ciu
Importa
este pro
Este símb
Si tiene
Gracias p
manual a
lo instale
descuido
garantía
problema
2. In
3. No
Véase la G
usuario.
•
Familia
09.09.2009
MA
roducción
adanos de la U
tes informacio
ucto
lo en este apara
inservibles, podr
las pilas, si las h
empresa especia
distribuidor o a l
en relación con
udas, contacte
r haber comprad
tes de usarlo . Si
póngase en con
e las instruccion
su distribuidor n
resultantes.
trucciones
Mantenga el apar
niños.
Riesgo de desca
peligrosa descarg
eléctrica. Descon
conexiones.
Sólo para el us
humedad ni a nin
El usuario no hab
Contacte con su d
mas genera
arantía de servi
No expong
temperatu
aireados.
No agite el
y la instala
ícese con el funci
CHLSC
UAL DEL
nión Europea
es sobre el me
o o el embalaje i
an dañar el medi
biera) en la bas
lizada en reciclaj
unidad de recicl
l medio ambient
con las autorid
o el CHLSC1! Le
el aparato ha su
tacto con su dist
s de seguridad d
o será responsab
e segurida
to lejos del alcan
gas eléctricas al
eléctrica al toca
cte el aparato de
en interiores.
ún tipo de salpic
á de efectuar el
istribuidor si nece
les
io y calidad Vel
este equipo a p
as extremas. Util
aparato. Evite us
ión.
onamiento del ap
16
USUARIO
io ambiente co
ndica que, si tira
o ambiente. No ti
ra doméstica; d
. Devuelva este
aje local. Respet
.
des locales pa
atentamente la
rido algún daño
ibuidor. Daños c
e este manual in
e de ningún dañ
e de personas n
abrir la caja Pued
un cable conecta
la red eléctrica a
o exponga este
dura o goteo.
antenimiento de
sita piezas de rec
leman ® al final d
lvo. No exponga
ce el aparato sól
r excesiva fuerza
rato antes de util
ncerniente a
las muestras
re este aparato (
be ir a una
parato a su
las leyes locales
a residuos.
instrucciones de
n el transporte n
usados por
alidarán su
u otros
capacitadas y
sufrir una
do a la red
tes de realizar la
quipo a lluvia,
ninguna pieza.
mbio.
e este manual del
ste equipo a
en lugares bien
durante el manej
izarlo.
©Velleman
i
l
o
nv
Page 17

CHLSC1
• Por razones de seguridad, las modificaciones no autorizadas del aparato
están prohibidas. Los daños causados por modificaciones no autorizadas, no
están cubiertos por la garantía.
• Utilice sólo el aparato para las aplicaciones descritas en este manual. Su uso
incorrecto anula la garantía completamente.
• Daños causados por descuido de las instrucciones de seguridad de este manual
invalidarán su garantía y su distribuidor no será responsable de ningún daño u
otros problemas resultantes.
• Respete los valores descritas en las especificaciones (véase §10).
4. Características
• para la serie CHLS
• controlador RGB (4 salidas, 3 bucles) con mando a distancia
• se controla por el pulsador del controlador o el mando a distancia IR (incl.)
• 20 modos de salida preprogramados (color sencillo, flash, estroboscopio,
fade, etc.)
• alta capacidad
• se entrega con tornillos y cinta autoadhesiva
5. Descripción
Véase las figuras en la página Error! Bookmark not defined. y 3 de este manual
del usuario.
Módulo de control 7 entrada CC -
1 receptor IR 8 p uer t o de dat o s « + »
2 LED de esta do ROJO 9 p ue r to de da to s « – »
3 LED de estado V ERD E 10 salida común « + »
4 LED de estado AZ UL 11 salida ROJO « - »
5 selector de función 12 salida VERDE « - »
6 entrada CC + (12 V o 24 V) 13 salida AZUL « - »
Mando a distancia
A Ajuste de la luminosidad (3 niveles)
B botón ON/OFF
C selectores de color
D selectores de modo
• FLASH : destellos 7 colores
• STROBE : RVB – estroboscopio 3 colores
• FADE : fade-in y fade-out de 7 colores
• SMOOTH : fade-in y fade-out lento de 7 colores
6. Instalación
Cintas autoadhesivas con LEDs
• Es posible conectar una cinta autoadhesiva con LEDs RGB o de 1 a 3 cintas
autoadhesivas con LEDs unicolores (rojo, verde o azul) 12 VCC o 24 VCC. No
utilice ambos tipos simultáneamente.
• Primero, instale las cintas autoadhesivas con LEDs.
09.09.2009 ©Velleman nv
17
Page 18

e
e
r
h
3
o
e
n
o
9
n
e
n
u
a
e
7
o
e
o
D
p
e
u
q
,
R
c
o
c
o
s
ó
u
d
e
e
d
(
d
a
G
e
m
p
1
1
D
m
c
p
n
W
d
a
e
a
s
V
m
p
o
R
n
e
n
c
u
1
c
c
o
s
d
a
v
o
y
a
.
r
• Instale
incluido
IR.
• Conect
espeso
autoad
azul [1
salida d
paralel
Intercon
• Interco
funció
todos l
• Interco
« - » [
Nota:
La alime
• Conect
otra co
• Utilice
utilizad
• Conect
« - » [
7.
Us
• Active
• Selecci
§5).
• Los LE
[12] y
8.
La
• Saque
• Introd
• Vuelva
l módulo en un l
s. Asegúrese de
la(s) cinta(s) ad
de AWG 12 (Ø 2
esiva con LEDs
]. Conecte una
el color adecuad
y nunca cortocir
xión de módul
necte los módulo
en uno de los m
s módulos.
necte tanto los p
] con los cables
Longitud máx.
Cada módulo n
Nunca intercon
Pulse un botón
tación
la alimentación
exión.
na alimentación
.
el polo positivo
] con cables AW
l módulo.
ne el modo con
s [2], [3] y [4]
[13].
ila
l portapilas del
zca una nueva pi
a introducir el po
¡OJO!: Nunca
embalaje. Man
CHLSC
ugar seco y bien
ue el receptor [
hesiva(s) con LE
053 mm). Conec
GB a la salida co
inta adhesiva uni
. No conecte las
uite las salidas.
s
al conectar los
dulos; la funció
ertos de datos «
de un espesor A
el bus de datos
cesita su propia
cte las salidas d
el mando a dist
no incl.) sólo de
e 12 VCC o 24
l borne « + » [6
12 (Ø 2,053m
l selector [5] o
indican el estad
ando a distancia.
la de litio, tipo C
rtapilas en el ma
erfore las pilas.
tenga las pilas l
aireado con la ci
] sea visible y a
s al module con
te los bornes de
ún [10], roja [
color a la salida
intas adhesivas
uertos de datos.
se adaptará aut
+ » [8] como lo
G 18 (Ø 1,024m
e 50m.
limentación.
un módulo.
ncia para activar
pués de haber ef
CC según el tipo
] y el polo negati
).
or el mando a di
de los puertos d
Véase las figuras
2025. Respete l
do a distancia.
Respete las ad
jos del alcance
ta y los tornillos
cesible a los ray
los cables de un
na cinta
1], verde [12]
omún [10] y a l
on LEDs en
Seleccione una
máticamente a
puertos de dato
m).
la sincronización
ectuado cualquie
e cinta adhesiva
vo al borne
stancia (véase
e salida [11],
en la página 2.
polaridad.
ertencias del
de niños.
s
s
09.09.2009
18
©Velleman
nv
Page 19

CHLSC1
9. Solución de problemas
• El módulo no funciona, los LEDs no se iluminan
Controle las conexiones de entrada y la tensión de entrada.
Active el módulo con el botón ON/OFF del mando a distancia.
• Los LEDs se iluminan pero el módulo no funciona
Controle las conexiones de salida y la tensión de entrada.
• Luminosidad demasiado débil de las cintas adhesivas conectadas
Controle las conexiones de salida y la tensión de entrada.
• Sobrecalentamiento del módulo
Controle la tensión de entrada y asegúrese de que hay una ventilación
adecuada.
• Los módulos interconectados no funcionan de manera sincrónica
Controle la interconexión de los bus de datos y la longitud de la conexión.
Pulse un botón del mando a distancia para activar la sincronización.
• El mando a distancia no funciona
Apunte el mando a distancia al receptor IR (distancia < 7 m). Reemplace la
pila.
10. Especificaciones
tensión de entrada 12 ó 24 VCC
potencia 180 W (12 VCC) o 360 W (24 VCC)
potencia máx. para cada bucle 60 W (12 VCC) o 120 W (24 VCC)
alcance del mando a distancia IR 7 m
dimensiones
peso
Alimentación del mando a distancia pila de litio de 3V, tipo CR2025, incl.
Utilice este aparato sólo con los accesorios originales. Velleman NV no
será responsable de daños ni lesiones causados por un uso (indebido) de
este aparato. Para más información sobre este producto, visite nuestra
página www.hqpower.eu. Se pueden modificar las especificaciones y el
contenido de este manual sin previo aviso.
© DERECHOS DE AUTOR
Velleman NV dispone de los derechos de autor para este manual del
usuario.
Todos los derechos mundiales reservados. Está estrictamente prohibido reproducir,
traducir, copiar, editar y guardar este manual del usuario o partes de ello sin
previo permiso escrito del derecho habiente.
controlador 121 x 51 x 26 mm
mando a distancia IR 90 x 49 x 7 mm
controlador ± 110 g
mando a distancia IR ± 22 g
09.09.2009 ©Velleman nv
19
Page 20

f
i
m
e
n
g
s
g
s
h
g
g
E
u
a
o
e
e
B
w
K
n
n
s
s
w
a
ä
h
e
u
w
n
h
T
e
1
e
s
s
e
c
t
r
i
i
m
o
e
n
n
e
a
S
r
g
G
n
s
u
n
s
c
e
k
n
t
e
F
u
d
i
G
e
e
e
a
z
1. Ein
An alle E
Wichtige
Dieses Sy
Falls Zw
Ihre örtli
Wir beda
Bedienun
Transport
Bedienun
daraus re
2. Sic
BEDI
ührung
nwohner der E
Umweltinform
bol auf dem Pr
Entsorgung di
Schaden zufüg
verwendeten
oder verwende
zwecks Recycli
Händler oder e
werden. Respe
ifel bestehen,
che Behörde.
ken uns für den
sanleitung vor I
chäden vorliege
sanleitung verur
ultierende Folge
erheitshin
CHLSC
NUNGSA
ropäischen Uni
tionen über die
dukt oder der Ve
ses Produktes n a
n kann. Entsorg
atterien) nicht al
ten Batterien mü
ng entsorgt werd
in örtliches Recy
ktieren Sie die ör
enden Sie sich
auf des CHLSC1
betriebnahme so
. Bei Schäden, d
acht werden, erl
chäden übernim
eise
NLEITUN
on
ses Produkt
rpackung zeigt a
ch seinem Leben
n Sie die Einheit
unsortiertes Ha
sen von einer sp
n. Diese Einheit
ling-Unternehme
lichen Umweltvo
für Entsorgung
! Lesen Sie diese
gfältig durch. Üb
e durch Nichtbea
scht der Garanti
t der Hersteller
, dass die
zyklus der Umw
(oder
smüll; die Einhei
ezialisierten Firm
muss an den
retourniert
rschriften.
richtlinien an
erprüfen Sie, ob
htung der
anspruch. Für
eine Haftung.
lt
t
3. All
Siehe Vell
Bedienun
09.09.2009
Halten Sie Kinder
Stromschlaggef
unter Spannung s
elektrischen Schl
ehe Sie die Ansc
Nur für die Anw
vor Regen und Fe
z.B. Tropf- oder S
Es gibt keine zu
bei Ihrem Fachhä
emeine Ric
eman® Service-
sanleitung.
Schützen S
extremen
gelüfteten
Vermeiden
während d
und Unbefugte v
hr beim Öffnen d
tehenden Leitung
gen führen. Tren
lüsse machen.
ndung im Inne
chte. Setzen Sie
pritzwasser, aus.
artenden Teile. B
dler.
tlinien
und Qualitätsg
ie das Gerät vor
emperaturen. Ve
Räumen.
Sie Erschütterun
r Installation und
20
m Gerät fern.
es Gehäuses. Das
n könnte zu lebe
en Sie das Gerä
bereich. Schütz
das Gerät keiner
stellen Sie event
rantie am Ende
taub. Schützen S
wenden Sie das
en. Vermeiden Si
Bedienung des G
Berühren von
sgefährlichen
immer vom Net
n Sie das Gerät
lüssigkeit wie
elle Ersatzteile
ieser
e das Gerät vor
erät nur in gut
rohe Gewalt
rätes.
©Velleman
nv
Page 21

CHLSC1
• Nehmen Sie das Gerät erst in Betrieb, nachdem Sie sich mit seinen Funktionen
vertraut gemacht haben.
• Eigenmächtige Veränderungen sind aus Sicherheitsgründen verboten. Bei
Schäden verursacht durch eigenmächtige Änderungen erlischt der
Garantieanspruch.
• Verwenden Sie das Gerät nur für Anwendungen beschrieben in dieser
Bedienungsanleitung sonst kann dies zu Schäden am Produkt führen und
erlischt der Garantieanspruch.
• Bei Schäden, die durch Nichtbeachtung der Bedienungsanleitung verursacht
werden, erlischt der Garantieanspruch. Für daraus resulti eren de Folgeschäden
übernimmt der Hersteller keine Haftung.
• Überschreiten Sie nie die Werte (siehe: Technische Daten §10).
4. Eigenschaften
• für CHLS-Serie
• RGB-Controller (4 Ausgänge, 3 Schleifen) mit Fernbedienung
• Bedienung über Druckknopf des Controllers oder IR-Fernbedienung
(mitgeliefert)
• 20 vorprogrammierte Ausgangsmodi (nur Farbe, Flash, Stroboskop, Fade, etc.)
• hohe Kapazität
• Lieferung mit Schrauben und selbstklebendem Streifen
5. Umschreibung
Siehe Abbildungen, Seite Error! Bookmark not defined. und 3 dieser
Bedienungsanleitung.
LED-Steuergerät 7 DC-Eingang ‘-’
1 IR-Empfänger 8 Datenport ‘+’
2 Status-LED (rot) 9 Datenport ‘-’
3 Status-LED (grün) 10 Ausgang gemeinsam ‘+’
4 Status-LED (blau) 11 Ausgang rot ‘-’
5 Funktionstaste 12 Ausgang grün ‘-’
6 DC-Eingang ‘+’ (12 V of 24 V) 13 Ausgang blau ‘-’
Fernbedienung
A Einstelltaste Helligkeit (3 Niveaus)
B EIN/AUS-Schalter
C Farbauswahl
D Modustasten:
• FLASH: 7-farbige Blitze
• STROBE: RGB – 3-farbiges Stroboskop
• FADE: 7-farbige Fade-in und Fade-out
• SMOOTH: langsam, 7-farbige Fade-in und Fade-out
6. Installation
LED-Streifen
• Dieses Steuergerät bietet die Möglichkeit, obwohl einen RGB-LED-Streif en
obwohl 1 bis 3 einfarbige LED-Streifen (rot, grün und blau) anzuschließen.
09.09.2009 ©Velleman nv
21
Page 22

e
e
e
r
p
e
d
e
u
D
s
e
l
r
g
d
e
k
r
e
n
d
e
e
d
2
w
D
n
e
S
n
t
e
n
r
f
t
b
n
g
1
e
n
g
b
b
ä
e
a
e
m
4
h
c
1
2
z
e
e
s
e
m
f
g
u
t
)
i
g
t
m
n
S
r
t
n
C
e
e
o
e
g
n
u
r
a
-
g
d
n
m
e
r
e
n
n
Verbind
Stromv
verschi
• Montier
• Installie
einem t
der Em
• Verbind
Verwen
Verbind
den bla
RGB-LE
gemein
LED-Str
kurzsch
Steuerge
• Sie kön
Einstell
Steuer
• Verbin
mit ein
Bemer
Stromve
• Verbind
andere
• Verwen
Stromv
• Verbind
Pol mit
AWG 1
7. An
• Schalte
• Wählen
• Die LE
[13] a
8. Di
• Öffnen
• Legen
• Stecke
n Sie den LED-S
rsorgung. Verw
edener Spannu
n Sie alle LED-St
ren Sie das Steue
ockenen gut gelü
fänger [1] sichtb
n Sie den LED-S
en Sie hierfür Ka
n Sie den gemei
en [13] Ausgan
-Streifen. Verbin
amen Ausgang [
ifen nie in Parall
ießen.
äte anschließe
nen Steuergeräte
ungen der Steuer
eräte der Serie ü
en Sie alle Daten
r Dicke von AWG
ungen:
Die max. Länge
Jedes Steuerger
Verbinden Sie di
Drücken Sie zue
Synchronisation
sorgung
n Sie die Stromv
Anschlüsse gem
en Sie, abhängig
rsorgung.
n Sie den positiv
em ‘-’-Anschluss
(Ø 2,053 mm).
endung
n Sie das Gerät ei
Sie den Ausgang
s [2], [3] und [
.
Batterie
Sie das Batteriefa
ie eine neue Lithi
Sie den Batterie
ACHTUNG: Bea
Sie die Batterie
CHLSC
reifen mit einer 1
nden Sie keine
g!
eifen (nicht mitg
rgerät mit dem Kl
teten Ort. Installi
ar ist.
reifen mit den Au
el mit einer Dick
samen [10], den
des Controllers
den Sie einen ein
0] und dem geei
l und beachten Si
über den Datenb
eräte werden au
ertragen.
usse ‘+’ [8] und
18 (Ø 1,024 mm
des Datenbusses
t braucht eine ei
e Ausgänge der S
rst auf eine Taste
zu starten.
rsorgung (nicht
cht haben.
vom LED-Streife
n Pol mit dem ‘+
[7]. Verwenden
n.
it Taste [5] ode
] zeigen den Sta
ch der Fernbedie
umbatterie, Typ
alter wieder in d
hten Sie die Wa
n von Kindern f
VDC- oder einer
wei Stromvers
liefert).
beband und den
eren Sie das Steu
gängen des Steu
von AWG 12 (Ø
roten [11], den
it den geeignete
arbigen LED-Strei
neten Farbausga
e, dass Sie die A
s miteinander ve
omatisch auf die
alle Datenbusse ‘
.
st 50 m.
ene Stromversor
euergeräte nie m
der Fernbedienun
itgeliefert) nach
typ, eine 12VDC-
’-Anschluss [6] u
ie hierfür Kabel
über die Fernbedi
us des Ausgangs
ung. Siehe Abbild
R2025. Beachten
r Fernbedienung.
rnungen der Ve
rn.
24VDC-
rgungen mit
Schrauben an
ergerät so, dass
rgerätes.
2,053 mm).
rünen [12] und
Anschlüssen ein
fen mit dem
ng. Verbinden Sie
sgänge nicht
binden. Die
nderen
’ [9] über Kabel
ung.
iteinander.
g um die
em Sie alle
oder 24VDC-
d den negativen
it einer Dicke vo
nung (siehe: §5)
[11], [12] und
ung, Seite 2.
Sie die Polarität.
packung. Halte
s
.
09.09.2009
22
©Velleman
nv
Page 23

CHLSC1
9. Problemlösung
• Das Steuergerät funktioniert nicht, LEDs leuchten nicht
Überprüfen Sie die Eingangsanschlüsse und die Eingangsspannung.
Drücken Sie auf ON der Fernbedienung.
• Status-LEDs leuchte aber das Steuergerät funktioniert nicht
Überprüfen Sie die Ausgangsanschlüsse und die Eingangsspannung.
• Lichtausgang ist ungenügend hell
Überprüfen Sie die Ausgangsanschlüsse und die Eingangsspannung.
• Überhitzung des Steuergerätes
Sorgen Sie für eine richtige Eingangsspannung und eine gute Ventilation.
• Angeschlossene Steuergeräte funktionieren nicht synchron
Überprüfen Sie die Anschlüsse und die Länge des Datenbusses. Drücken Sie
eine Taste der Fernbedienung, um die Synchronisation zu starten.
• Fernbedienung funktioniert nicht
Richten Sie die Fernbedienung auf den Empfänger (max. Abstand von 7 m).
Ersetzen Sie die Batterie.
10. Technische Daten
Eingangspan nung 12 oder24 VDC
Leistung 180 W (12 VDC) oder 360 W (24 VDC)
max. Leistung für jede Schleife 60 W (12 VDC) oder 120 W (24 VDC)
Bereich IR-Fernbedienung 7 m
Abmessungen
Gewicht
Stromversor gung Fernbedi enung 3V-Lithiumbatterie CR2025, mi tg el i efert
Verwenden Sie dieses Gerät nur mit originellen Zubehörteilen. Velleman
NV übernimmt keine Haftung für Schaden oder Verletzungen bei
(falscher) Anwendung dieses Gerätes. Für mehr Informationen zu
diesem Produkt, siehe www.hqpower.eu
vorherige Ankündigung vorbehalten.
© URHEBERRECHT
Velleman NV besitzt das Urheberrecht für diese Bedienungsanleitung.
Alle weltweiten Rechte vorbehalten. Ohne vorherige schriftliche Genehmigung des
Urhebers ist es nicht gestattet, diese Bedienungsanleitung ganz oder in Teilen zu
reproduzieren, zu kopieren, zu übersetzen, zu bearbeiten oder zu speich ern.
Steuergerät 121 x 51 x 26 mm
IR-Fe rnbedienung 90 x 49 x 7 mm
Steuergerät ± 110 g
IR-Fernbedienung ± 22 g
. Alle Änderungen ohne
09.09.2009 ©Velleman nv
23
Page 24

Velleman® Service and Quality Warranty
Velleman® has over 35 years of experience in
the electronics world and distributes its
products in more than 85 countries.
All our prod ucts fulfil strict quality
requirements and legal stipulations in the EU.
In order to ensure the quality, our products
regularly go through an extra quality check,
both by an internal quality department and by
specialized external organisations. If, all
precautionary measures notwithstanding,
problems should occur, please make appeal to
our warranty (see guarantee conditions).
General Warranty Conditions Concerning
Consumer Products (for EU):
• All consumer products are subject to a 24-
month warranty on production flaws and
defective material as from the original date of
purchase.
• Velleman® can decide to replace an article
with an equivalent article, or to refund the
retail value totally or partially when the
complaint is valid and a free repair or
replacement of the article is impossible, or if
the expenses are out of proportion.
You will be delivered a replacing article or a
refund at the value of 100% of the purchase
price in case of a flaw occurred in the first year
after the date of purchase and delivery, or a
replacing article at 50% of the purchase price
or a refund at the value of 50% of the retail
value in case of a flaw occurred in the second
year after the date of purchase and delivery.
• Not covered by warranty:
- all direct or indirect damage caused after
delivery to the article (e.g. by oxidation,
shocks, falls, dust, dirt, humidity...), and by
the article, as well as its contents (e.g. data
loss), compensation for loss of profits;
- frequently replaced consumable goods, parts
or accessories such as batteries, lamps, rubber
parts, drive belts... (unlimited list);
- flaws resulting from fire, water damage,
lightning, accident, natural disaster, etc. …;
- flaws caused deliberately, negligently or
resulting from improper handling, negligent
maintenance, abusive use or use contrary to
the manufacturer’s instructions;
- damage caused by a commercial, professional
or collective use of the article (the warranty
validity will be reduced to six (6) months when
the article is used professionally);
- damage resulting from an inappropriate
packing and shipping of the article;
- all damage caused by modification, repair or
alteration performed by a third party without
written permission by Velleman®.
• Articles to be repaired must be delivered to
your Velleman® dealer, solidly packed
(preferably in the original packaging), and be
completed with the original receipt of purchase
and a clear flaw description.
• Hint: In order to save on cost and time,
please reread the manual and check if the flaw
is caused by obvious causes prior to presenting
the article for repair. Note that returning a
non-defective article can also involve handling
costs.
• Repairs occurring after warranty expiration
are subject to shipping costs.
• The above conditions are without prejudice to
all commercial warranties.
The above enumeration is subject to
modification according to the article (see
article’s manual).
Velleman® service- en kwaliteitsgarantie
Velleman® heeft ruim 35 jaar ervaring in de
elektronicawereld en verdeelt in meer dan 85
landen.
Al onze producten beantwoorden aan strikte
kwaliteitseisen en aan de wettelijke bepalingen
geldig in de E U. Om de kwaliteit te
waarborgen,
ondergaan onze producten op regelmatige
tijdstippen een extra kwaliteitscontrole, zowel
door onze eigen kwaliteitsafdeling als door
externe gespecialiseerde organisaties. Mocht er
ondanks deze voorzorgen toch een probleem
optreden, dan kunt u steeds een beroep doen
op onze waarborg (zie waarborgvoorwaarden).
Algemene waarborgvoorwaarden
consumentengoederen (voor Europese
Unie):
• Op alle consumentengoederen geldt een
garantieperiode van 24 maanden op productieen materiaalfouten en dit vanaf de
oorspronkelijke aankoopdatum.
• Indien de klacht gegrond is en een gratis
reparatie of vervanging van een artikel
onmogelijk is of indien de kosten hiervoor
buiten verhouding zijn, kan Velleman®
beslissen het desbetreffende artikel te
vervangen door een gelijkwaardig artikel of de
aankoopsom van het artikel gedeeltelijk of
volledig terug te betalen. In dat geval krijgt u
een vervangend product of terugbetaling ter
waarde van 100% van de aankoopsom bij
ontdekking van een gebrek tot één jaar na
aankoop en levering, of een vervangend
product tegen 50% van de kostprijs of
terugbetaling van 50 % bij ontdekking na één
jaar tot 2 jaar.
• Valt niet onder waarborg:
Page 25

- alle rechtstreekse of onrechtstreekse schade
na de levering veroorzaakt aan het toestel (bv.
door oxidatie, schokken, val, stof, vuil,
vocht...), en door het toestel, alsook zijn
inhoud (bv. verlies van data), vergoeding voor
eventuele winstderving.
- verbruiksgoederen, onderdelen of
hulpstukken die regelmatig dienen te worden
vervangen, zoals bv. batterijen, lampen,
rubberen onderdelen, aan drijfriemen...
(onbeperkte lijst).
- defecten ten gevolge van brand,
waterschade, bliksem, ongevallen,
natuurrampen, enz.
- defecten veroorzaakt door opzet, nalatigheid
of door een onoordeelkundige behandeling,
slecht onderhoud of abnormaal gebruik of
gebruik van het toestel strijdig met de
voorschriften van de fabrikant.
- schade ten gevolge van een commercieel,
professioneel of collectief gebruik van het
apparaat (bij professioneel gebruik wordt de
garantieperiode herleid tot 6 maand).
- schade veroorzaakt door onvoldoende
bescherming bij transport van het apparaat.
- alle schade door wijziginge n, reparaties of
modificaties uitgevoerd door derden zonder
toestemming van Velleman®.
• Toestellen dienen ter reparatie aangeboden
te worden bij uw Velleman®-verdeler. Het
toestel dient vergezeld te zijn van het
oorspronkelijke aankoopbewijs. Zorg voor een
degelijke verpakking (bij voorkeur de originele
verpakking) en voeg een duideli j ke
foutomschrijving bij.
• Tip: alvorens het toestel voor reparatie aan
te bieden, kijk nog eens na of er geen voor de
hand liggende reden is waarom het toestel niet
naar behoren werkt (zie handleiding). Op deze
wijze kunt u kosten en tijd besparen. Denk
eraan dat er ook voor niet-defecte toestellen
een kost voor controle aangerekend kan
worden.
• Bij reparaties buiten de waarborgperiode
zullen transportkosten aangerekend worden.
• Elke commerciële garantie laat deze rechten
onverminderd.
Bovenstaande opsomming kan eventueel
aangepast worden naargelang de aard van
het product (zie handleiding van het
betreffende product).
Garantie de service et de qualité
Velleman®
Velleman® jouit d’une expérience de plus de
35 ans dans le monde de l’électronique avec
une distribution dans plus de 85 pays.
Tous nos produits répondent à des exigences
de qualité rigoureuses et à des dispositions
légales en vigueur dans l’UE. Afin de garantir la
qualité, nous soumettons régulièrement nos
produits à des contrôles de qualité
supplémentaires, tant par notre propre service
qualité que par un service qualité externe.
Dans le cas improbable d’un défaut malgré
toutes les précautions, il est possible
d’invoquer notre garantie (voir les conditions
de garantie).
Conditions générales concernant la
garantie sur les produits grand public
(pour l’UE) :
• tout produit grand public est garanti 24 mois
contre tout vice de production ou de matériaux
à dater du jour d’acquisition effective ;
• si la plainte est justifiée et que la réparation
ou le remplacement d’un article est jugé
impossible, ou lorsque les coûts s’avèrent
disproportionnés, Velleman® s’autorise à
remplacer ledit article par un article équivalent
ou à rembourser la totalité ou une partie du
prix d’achat. Le cas échéant, il vous sera
consenti un article de remplacement ou le
remboursement complet du prix d’achat lors
d’un défaut dans un délai de 1 an après l’achat
et la livraison, ou un article de remplacement
moyennant 50% du prix d’achat ou le
remboursement de 50% du prix d’achat lors
d’un défaut après 1 à 2 ans.
• sont par conséquent exclus :
- tout dommage direct ou indirect survenu à
l’article après livraison (p.ex. dommage lié à
l’oxydation, choc, chute, poussière, sable,
impureté…) et provoqué par l’appareil, ainsi
que son contenu (p.ex. perte de données) et
une indemnisation éventuelle pour perte de
revenus ;
- tout bien de consommation ou accessoire, ou
pièce qui nécessite un remplacement régulier
comme p.ex. piles, ampoules, pièces en
caoutchouc, courroies… (liste illimitée) ;
- tout dommage qui résulte d’un incendie, de la
foudre, d’un accident, d’une catastrophe
naturelle, etc. ;
- out dommage provoqué par une négligence,
volontaire ou non, une utilisation ou un
entretien incorrects, ou une utilisation de
l’appareil contraire aux prescriptions du
fabricant ;
- tout dommage à cause d’une utilisation
commerciale, professionnelle ou collective de
l’appareil (la période de garantie sera réduite à
6 mois lors d’une utilisation professionnelle) ;
- tout dommage à l’appareil q ui résulte d’une
utilisation incorrecte ou différen t e qu e celle
Page 26

pour laquelle il a été initialement prévu comme
décrit dans la notice ;
- tout dommage engendré par un retour de
l’appareil emballé dans un conditionnement
non ou insuffisamment protégé.
- toute réparation ou modification effectuée par
une tierce personne sans l’autorisation explicite
de SA Velleman® ; - frais de transport de et
vers Velleman ® si l’appar eil n’est plus couvert
sous la garantie.
• toute réparation sera fournie par l’endroit de
l’achat. L’appareil doit nécessairement être
accompagné du bon d’achat d’origine et être
dûment conditionné (de préférence dans
l’emballage d’origine avec mention du défaut) ;
• tuyau : il est conseillé de consulter la notice
et de contrôler câbles, piles, etc. avant de
retourner l’appareil. Un appareil retourné jugé
défectueux qui s’avère en bon état de marche
pourra faire l’objet d’une note de frais à charge
du consommateur ;
• une réparation effectuée en-dehors de la
période de garantie fera l’objet de frais de
transport ;
• toute garantie commerciale ne porte pas
atteinte aux conditions sus mentionnées.
La liste susmentionnée peut être sujette à
une complémentation selon le type de
l’article et être mentionnée dans la notice
d’emploi.
Velleman® Service- und Qualitätsgarantie
Velleman® hat gut 35 Jahre Erfahrung in der
Elektronikwelt und vertreibt seine Produkte in
über 85 Ländern.
Alle Produkte entsprechen den strengen
Qualitätsforderungen und gesetzlichen
Anforderungen in der EU. Um die Qualität zu
gewährleisten werden unsere Produkte
regelmäßig einer zusätzlichen
Qualitätskontrolle unterworfen, sowohl von
unserer eigenen Qualitätsabteilung als auch
von externen spezialisierten Org an isationen.
Sollten, trotz aller Vorsichtsmaßnahmen,
Probleme auftreten, nehmen Sie bitte die
Garantie in An spruch (siehe
Garantiebedingungen).
Allgemeine Garantiebedingungen in Bezug
auf Konsumgüter (für die Europäische
Union):
• Alle Produkte haben für Material- oder
Herstellungsfehler eine Garantieperiode von 24
Monaten ab Verkaufsdatum.
• Wenn die Klage berechtigt ist und falls eine
kostenlose Reparatur oder ein Austausch des
Gerätes unmöglicht ist, oder wenn die Kosten
dafür unverhältnismäßig sind, kann Velleman®
sich darüber entscheiden, dieses Produkt durch
ein gleiches Produkt zu ersetzen oder die
Kaufsumme ganz oder teilweise
zurückzuzahlen. In diesem Fall erhalten Sie ein
Ersatzprodukt oder eine Rückzahlung im Werte
von 100% der Kaufsumme im Falle eines
Defektes bis zu 1 Jahr nach Kauf oder
Lieferung, oder Sie bekommen ein
Ersatzprodukt im Werte von 50% der
Kaufsumme oder eine Rückzahlung im Werte
von 50 % im Falle eines Defektes im zweiten
Jahr.
• Von der Garantie ausgeschlossen sind:
- alle direkten oder indirekten Schäden, die
nach Lieferung am Gerät und durch das Gerät
verursacht werden (z.B. Oxidation, Stöße, Fall,
Staub, Schmutz, Feuchtigkeit, ...), sowie auch
der Inhalt (z.B. Datenverlust), Entschädigung
für eventuellen Gewinnausfall.
- Verbrauchsgüter, Teile oder Zubehörteile, die
regelmäßig ausgewechselt werden, wie z.B.
Batterien, Lampen, Gummiteile, Treibriemen,
usw. (unbeschränkte Liste).
- Schäden verursacht durch Brandschaden,
Wasserschaden, Blitz, Unfälle,
Naturkatastrophen, usw.
- Schäden verursacht durch absichtliche,
nachlässige oder unsachgemäße Anwendung,
schlechte Wartung, zweckentfremdete
Anwendung oder Nichtbeachtung von
Benutzerhinweisen in der Bedienungsanleitung.
- Schäden infolge einer kommerziellen,
professionellen oder kollektiven Anwendung
des Gerätes (bei gewerblicher Anwendung wird
die Garantieperiode auf 6 Monate
zurückgeführt).
- Schäden verursacht durch eine
unsachgemäße Verpackung und
unsachgemäßen Transport des Gerätes.
- alle Schäden verursacht durch unautorisierte
Änderungen, Reparaturen oder Modifikationen,
die von einem Dritten ohne Erlaubnis von
Velleman® vorgenommen werden.
• Im Fall einer Reparatur, wenden Sie sich an
Ihren Velleman®-Verteiler. Legen Sie das
Produkt ordnungsgemäß verpackt
(vorzugsweise die Originalverpackung) und mit
dem Original-Kaufbeleg vor. Fügen Sie eine
deutliche Fehlerumschreibung hinzu.
• Hinweis: Um Kosten und Zeit zu sparen,
lesen Sie die Bedienungsanleitung nochmals
und überprüfen Sie, ob es keinen auf de Hand
liegenden Grund gibt, ehe Sie das Gerät zur
Reparatur zurückschicken. Stellt sich bei der
Überprüfung des Geräts heraus, dass kein
Geräteschaden vorliegt, könnte dem Kunden
eine Untersuchungspauschale berechnet.
• Für Reparaturen nach Ablauf der Garantiefrist
werden Transportkosten berechnet.
Page 27

• Jede kommerzielle Garantie lässt diese
Rechte unberührt.
Die oben stehende Aufzählung kann
eventuell angepasst werden gemäß der
Art des Produktes (siehe
Bedienungsanleitung des Gerätes).
Garantía de servicio y calidad Velleman®
Velleman® disfruta de una experiencia de más
de 35 años en el mundo de la electrónica con
una distribución en más de 85 países.
Todos nuestros productos responden a normas
de calidad rigurosas y disposiciones le gales
vigentes en la UE. Para garantizar la calidad,
sometimos nuestros productos regularmente a
controles de calidad adicionales, tanto por
nuestro propio servicio de calidad como por un
servicio de calidad externo. En el caso
improbable de que surgier an problemas a
pesar de todas las precauciones, es posible
apelar a nuestra garantía (véase las
condiciones de garantía).
Condiciones generales referentes a la
garantía sobre productos de venta al
público (para la Unión Europea):
• Todos los productos de venta al público
tienen un período de garantía de 24 meses
contra errores de producción o errores en
materiales desde la adquisición original;
• Si la queja está fundada y si la reparación o
la sustitución de un artícu lo es imposible, o si
los gastos son desproporcionados, Velleman®
autoriza reemplazar el artículo por un artículo
equivalente o reembolsar la totalidad o una
parte del precio de compra. En este caso,
recibirá un artículo de recambio o el reembolso
completo del precio de compra al descubrir un
defecto hasta un año después de la compra y
la entrega, o un artículo de recambio al 50%
del precio de compra o la sustitución de un
50% del precio de compra al descubrir un
defecto después de 1 a 2 años.
• Por consiguiente, están excluidos entre
otras cosas:
- todos los daños causados directamente o
indirectamente al aparato y su contenido
después de la entrega (p.ej. por oxidación,
choques, caída,...) y causados por el aparato,
al igual que el contenido (p.ej. pérdida de
datos) y una indemnización eventual para falta
de ganancias;
- partes o accesorios que deban ser
reemplazados regularmente, como por ejemplo
baterías, lámparas, partes de goma, ... (lista
ilimitada)
- defectos causados por un incendio, daños
causados por el agua, rayos, accidentes,
catástrofes naturales, etc. ;
- defectos causados a conciencia , descuido o
por malos tratos, un mantenimiento
inapropiado o un uso anormal del aparato
contrario a las instrucciones del fabricante;
- daños causados por un uso comercial,
profesiona l o colectivo del aparato (el período
de garantía se reducirá a 6 meses con uso
profesional) ;
- daños causados por un uso incorrecto o un
uso ajeno al que est está previsto el producto
inicialmente como está descrito en el manual
del usuario ;
- daños causados por una protección
insuficiente al transportar el aparato.
- daños causados por reparaciones o
modificaciones efectuadas por una tercera
persona sin la autorización explicita de SA
Velleman® ;
- se calcula gastos de transporte de y a
Velleman® si el aparato ya no está cubierto
por la garantía.
• Cualquier reparación se efectuará por el lugar
de compra. Devuelva el aparato con la factura
de compra original y transpórtelo en un
embalaje sólido (preferentemente el embalaje
original). Incluya también una buena
descripción del defecto ;
• Consejo: Lea el manual del usuario y controle
los cables, las pilas, etc. antes de devolver el
aparato. Si no se encuentra un defecto en el
artículo los gastos podrían correr a cargo del
cliente;
• Los gastos de transporte correrán a carga del
cliente para una reparación efectuada fuera del
periode de garantía.
• Cualquier gesto comercial no disminuye estos
derechos.
La lista previamente mencionada puede
ser adaptada según el tipo de artículo
(véase el manual del usuario del artículo
en cuestión)
 Loading...