

Page 1
CCTVSETW1
WIRELESS TOU CH S C RE EN SECURI T Y SYSTEM AND NET WORK FUNCTION
DRAADLOOS BEVE ILIGIN GSSYST EEM MET AANRAAKS CH ERM E N
SY ST È M E DE VID É OSURVEILLANCE SANS FIL AVEC MONITEUR TACTILE
SISTEMA DE VIGILANCIA INALÁMBRICO CON PAN TALLA TÁCTIL Y
DRAHTLOSE S ÜBE R W ACHUNG S SYST EM M I T B ER Ü HR UNGSBILDSCHIRM
SISTEMA DE SEGU R ANÇA COM ECRÃ TÁCTIL SEM FIOS L I GAÇA O À REDE
NETWERKAANSLUITING
ET CONNEXION RÉS EAU
CONEXIÓN DE RED
UND NETZWERKA NSCHLUSS
INSTALLATION AND QUICK START 5
INSTALLATIE EN SNELSTART 11
INSTALLATION ET DÉMARRAGE RAPIDE 17
INSTALACIÓN Y COMIENZO RÁP IDO 23
INSTALLATION UND SCHNELLEINSTIEG 29
INSTALAÇÃO E INÍCIO RÁPIDO 35
Page 2
CCTVSETW1
V. 02 – 07/01/2014 2 ©Velleman nv
Page 3
CCTVSETW1
V. 02 – 07/01/2014 3 ©Velleman nv
Page 4
CCTVSETW1
V. 02 – 07/01/2014 4 ©Velleman nv
Page 5
CCTVSETW1
INS T AL L AT I O N AN D QU I C K START
1. Introduction
To all residents of the European Union
Important environmental information about this product
Thank you for choosing Perel! Please read the manual thoroughly before bringing this device into ser vice.
If the device was damaged in transit, don't install or use it and contact your dealer.
2. Available documentation
This document describes the installation and basic instructions on using the camera. For detail ed
information about the use of this device, please refer to the full manual (English only) available on
www.v elleman. eu (search for product code CCTVSETW1).
3. Safety Instructions
This symbol on the device or the package indicates that disposal of the d evice after i ts l ifecycle
could harm the environment. Do not dispose of the unit (or batteries) as unsorted municipal
waste; it should be taken to a specialized company for recycling. This device sho uld be
returned to your distributor or to a local recycling service. Respect the local enviro nmental
rules.
If in do u bt, co nta ct yo u r loca l w a s te dis p o s al autho rit ies.
Keep the device away from children and unauthorised users.
Risk of electroshock when opening the cover. Touching live wires can cause lifethreaten ing electroshocks.
Always disconnect mains power when the device is not in use or when servicing or
main tenance acti vities are perf ormed. Handle the power c ord b y the plug only.
4. General Guidel ines
Refer to the Velleman® Service and Quality Warranty on the last pages of this manual.
Keep th is device away from dust.
Keep th is device away from extre me h eat.
Make sur e the ventilation openi ngs are clear at a ll times.
Protect this device from shocks and abuse. Avoid bru te force when operating the devi ce.
• Familiarise yourself with the functions of the device before actually using it.
• All modi f ications of the device are forbidden for safety reason s.
• Only use the device for its intended purpose. Using the device in an unauthorised way will void the
warranty.
• Damage caused by disregard of certain guidelines in this manual is not covered by the warranty and
the dealer will not accept responsibility for any ensuing defects or problems.
• Do not use this product to violate privacy laws or perform other illegal activities.
V. 02 – 07/01/2014 5 ©Velleman nv
Page 6

CCTVSETW1
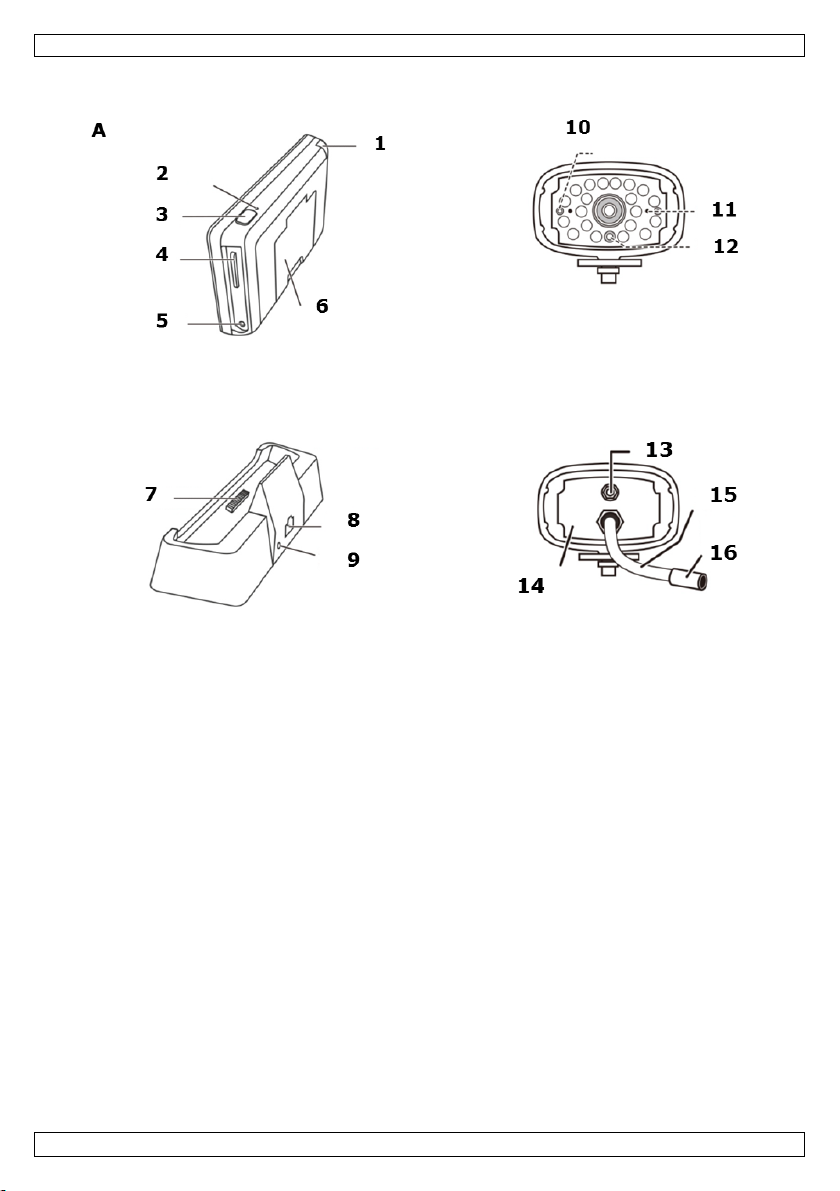
1
antenna slot
2
reset button
3
po we r on / of f
4
SD slot
5
AC power connection
6
camera st an d
7
power dock
8
RJ45 network connection
9
AC power connection
10
power s tatus
11
link status
12
light sensor
13
antenna connector
14
microphone
15
power cable
16
power/pair button
• Keep th is manual f or future refer ence.
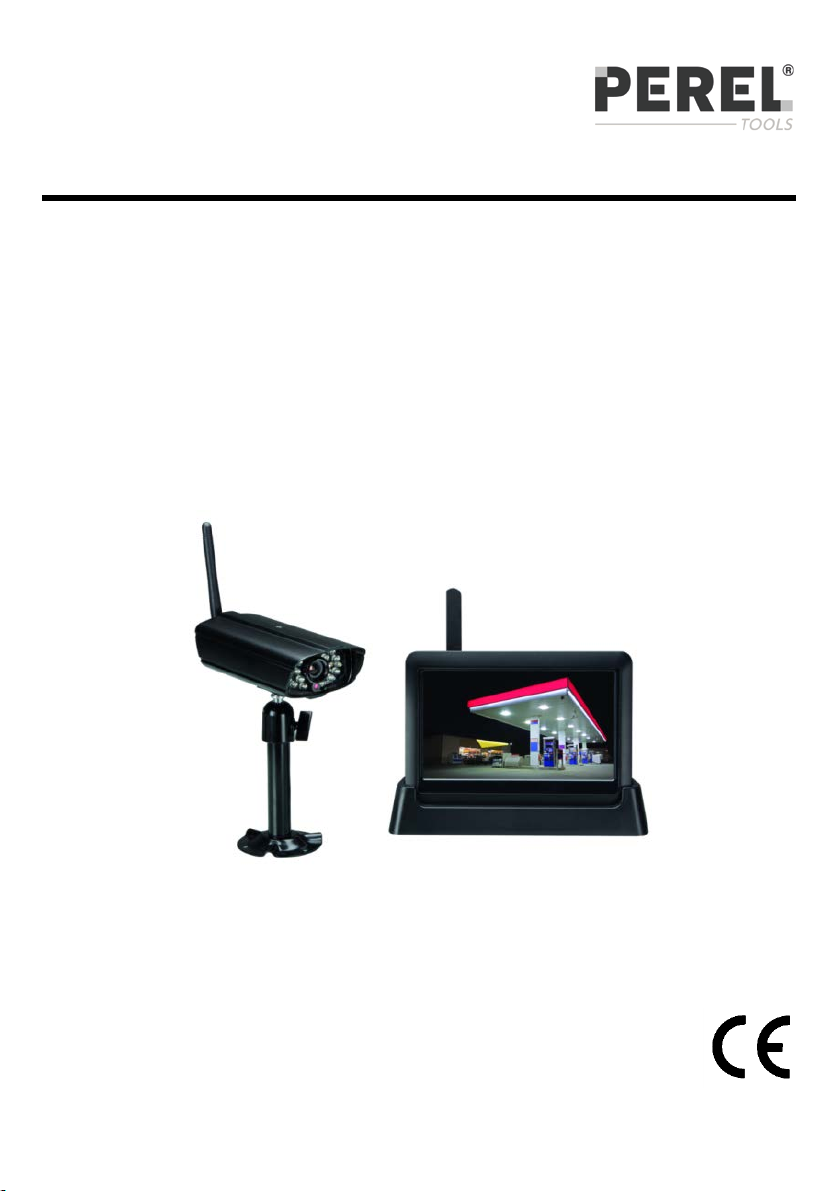
5. Overview
Refer to the illustrations on page 2 of this manual.
Monitor (ba ck panel)
Cradle
Camera (front)
Camera (back)
6. Camera Installation
Required tools
• electric drill
• 5 mm masonry drill bit
• 15 mm masonry drill bit
• no. 2 Philips screwdriver
Guidelines
• It i s r eco mmended to test th e camera before moun ting it on its final spot.
• Mount the camera at about 2.5 m from the floor.
• Avoid positioning the camera so that it is facing directly at the sun as this will impair the picture
quality viewed.
• Avoid pointing the camera lens directly through clear glass as the night v ision LEDs will cause a
blurred image at night.
• Avoid pointing the camera directly at any bushes, tree branches or moving objects that might
naturally move due to winds. This is also because if you need to use the motion detection feature in
the PC software to record movement the software might record unnecessarily.
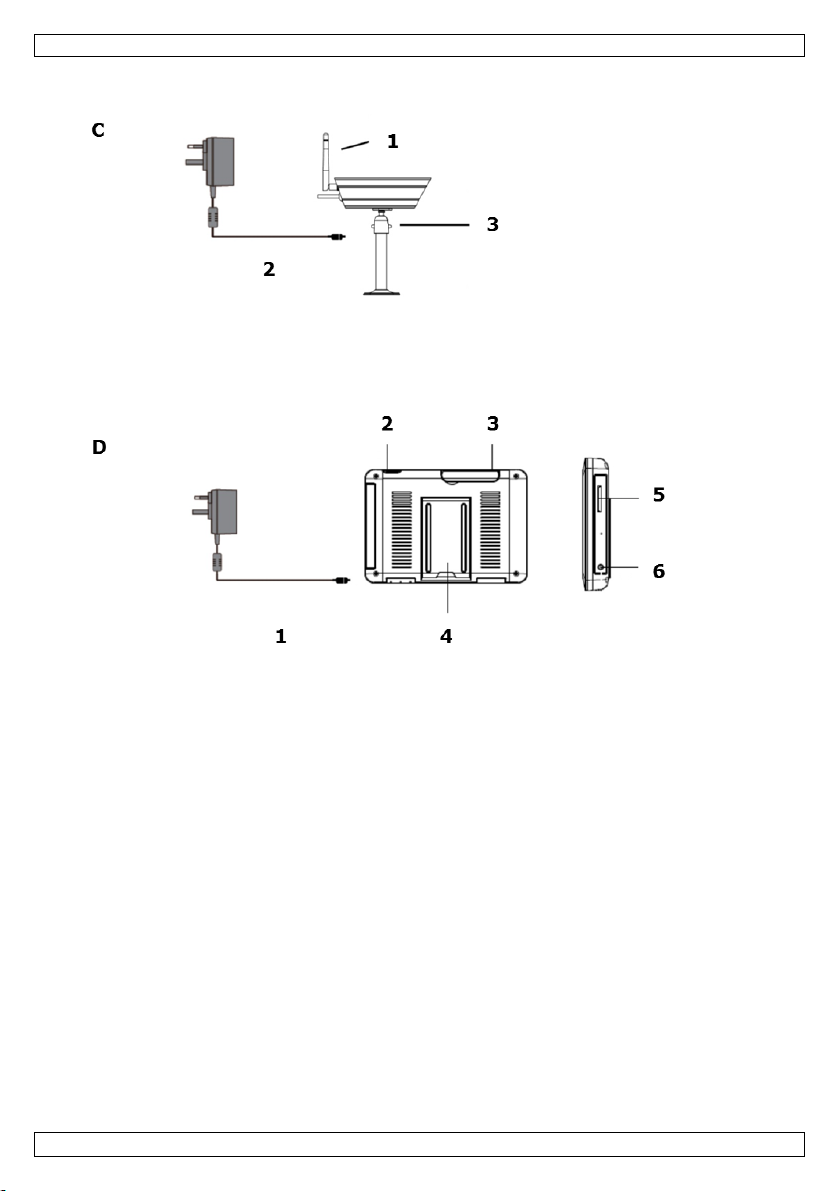
Setting up the camera
See i mage C on page 4.
1. Extend the antenna.
2. Connect the po wer ad apter to the camera and then to a wall outlet.
3. Plug the po wer adapter into a wall outlet.
Setting up the monitor
See i mage D on page 4.
V. 02 – 07/01/2014 6 ©Velleman nv
Page 7
CCTVSETW1
1. Insert an SD card into the monitor [5] (up to 32 Gb).
2. Connect the power adapter to the monitor and then to a wall outlet [1].
3. Flip out the camera stand [4].
4. Press and hold the power button for about 3-4 seco nds [2].
A Welcome screen appears for a few sec onds, then the came ra view app ears.
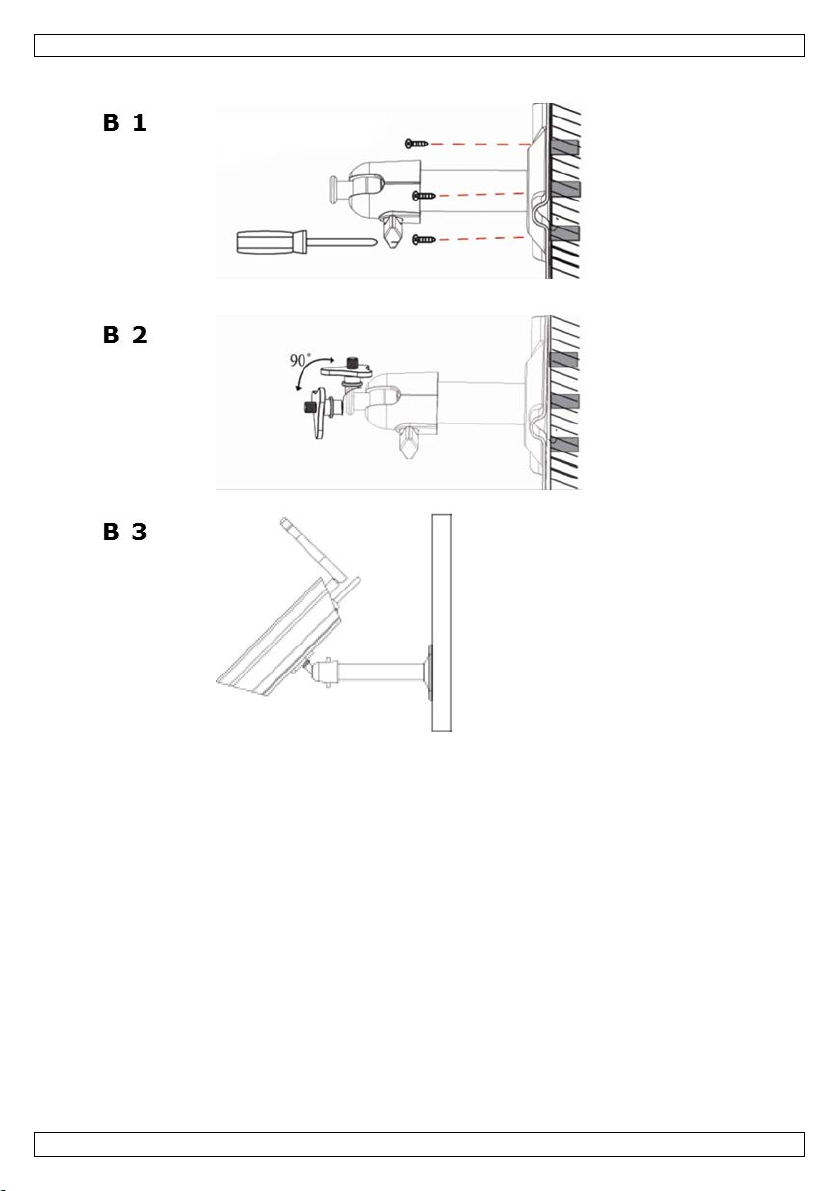
Mounting the camera
See i mages B1 to B3 on p age 3.
1. A ttach th e camera mount at about 2.5 m from the floor.
2. Loosen up the thumb screw.
3. Choose a proper viewing angle and secure the joint.
4. Mount the camera onto the bracket
Note: SD card
• If you are planning to record long videos, it is recommended to use a SD card with high capacity.
• Always turn off the display before removing an SD card.
7. Use
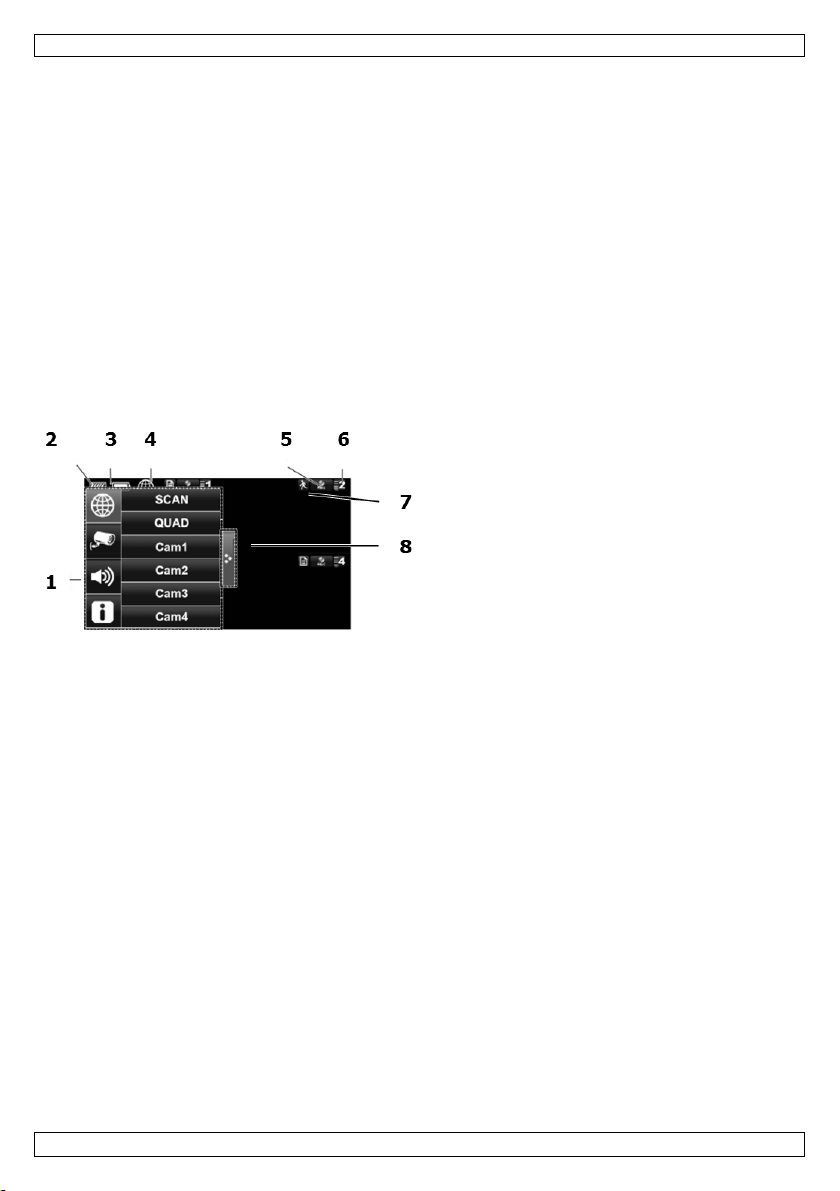
Parts of the screen
1 pop-up menus
2 SD card status
3 battery status
4 internet connection status
5 record status
6 camera number - signal strength
7 motion indicator
8 pop-up menu tab
Turn on the the display
• Press and hold the Power button for about 3-4 se conds.
A Welcome screen appears f or a few seconds, th en the camera view appears.
Turn off the display
• Press and hold the Power button until the display shuts off.
Camera modes: quad view and full screen
• When you switch on the display, the display shows the quad view (up to 4 cameras in a single
screen).
• Tap one of the camera views to disp lay it full screen.
• Tap on the full view to return to quad view.
Zooming
• Zooming only works in full screen view.
• If the display is in quad view, tap a camera view to set it full screen.
• Tap the Zoom icon.
• Select the area you want to zoom in.
o Tap the zoom out icon to turn off zoom.
o Tap again to return to full screen view.
Manually recording v ideo
• In quad view, tap the Record icon.
• The icon flashes during recording.
• Tap the icon again to stop recording.
V. 02 – 07/01/2014 7 ©Velleman nv
Page 8
CCTVSETW1
Icon
Name
Function
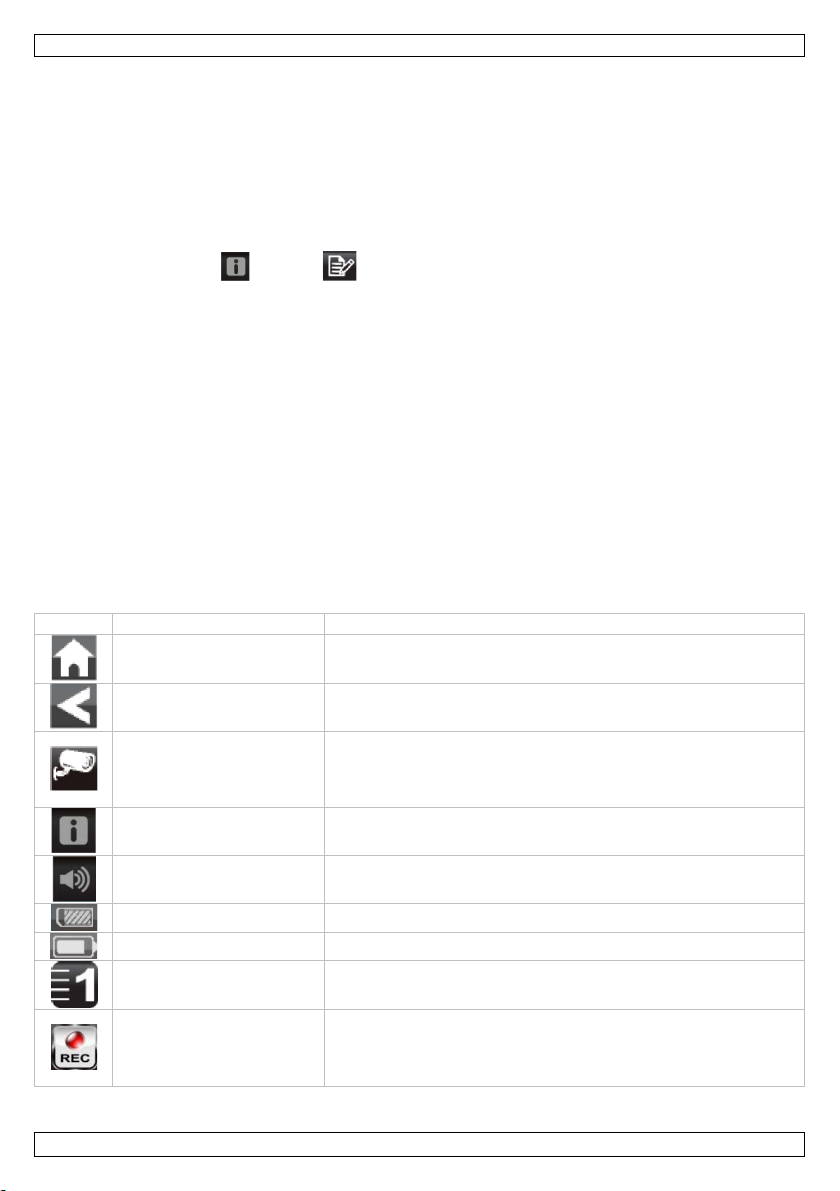
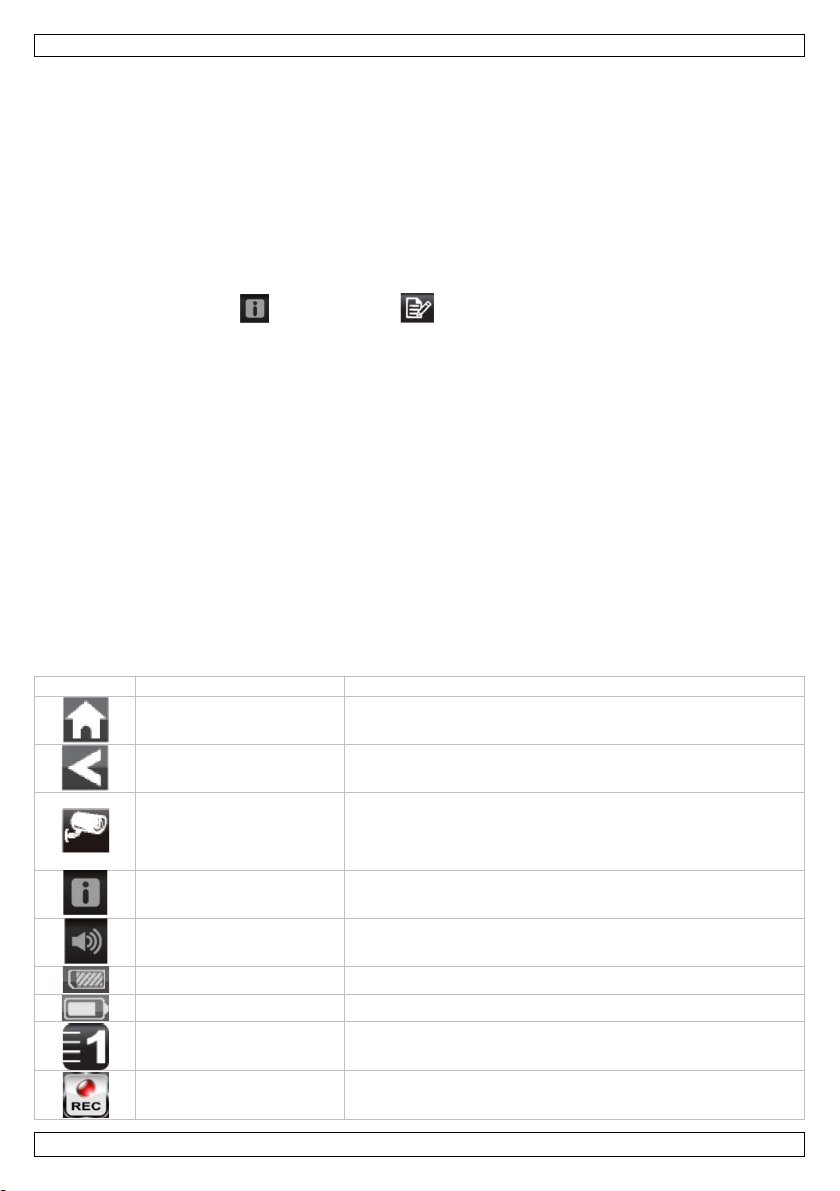
Home
In a menu: Tap to go back to main screen
Back
In a menu: Tap to go back one level
Camera mode
Tap to select between ca mera m ode s:
Battery level
Shows battery level
Camera number
Displays the number of the camera and the signal strength
Rec ord status
Tap to start manual recording.
You can also schedule video recording. See the full manual on www.velleman.eu for details (search for
product code CCTVSETW1).
Using the menu
The display has an on screen display menu (OSD).
This menu gives acces s to the device settings.
To show or hide the menu, sh ortly press the power button.
The menu rem a ins displayed for 3 0 seconds.
Playback
To view recorded vide o:
1. On the display, tap and then .
2. Select the day you want to view on the calendar.
The days containing video are highlighted.
3. If necessary, use the scroll bar on the right to browse through the recordings.
4. Tap on the recording you want to view.
The recording displays on the screen.
o Tap any empty area of the screen to bring up the progress bar.
o Drag the progress bar to fast forward or rewind the video.
o Tap any empty area of th e screen to hide the progress bar.
Remote surveillance
• You can use access the camera remotely from your mobi le device with the OMGuar d app (avai lable
for iPhone, iPod, iPad and Android devices).
• Remote viewing only works of the monitor is in the cradle and if the Internet connection type is set to
"Connect to Internet".
• See the full manual on www.velleman.eu for details (search for product code CCTVSETW1).
Icons and buttons
The screen has several icons and buttons:
- scan m ode
System settings Tap to access sys te m setti n gs
Volume Tap to ad just the volu me level of the camera
SD capacity Shows available space on SD car d
V. 02 – 07/01/2014 8 ©Velleman nv
- quad view
- full screen
The button has a status light:
- Always on: not recording
- Flashing: reco rding
Page 9
CCTVSETW1
Icon
Name
Function
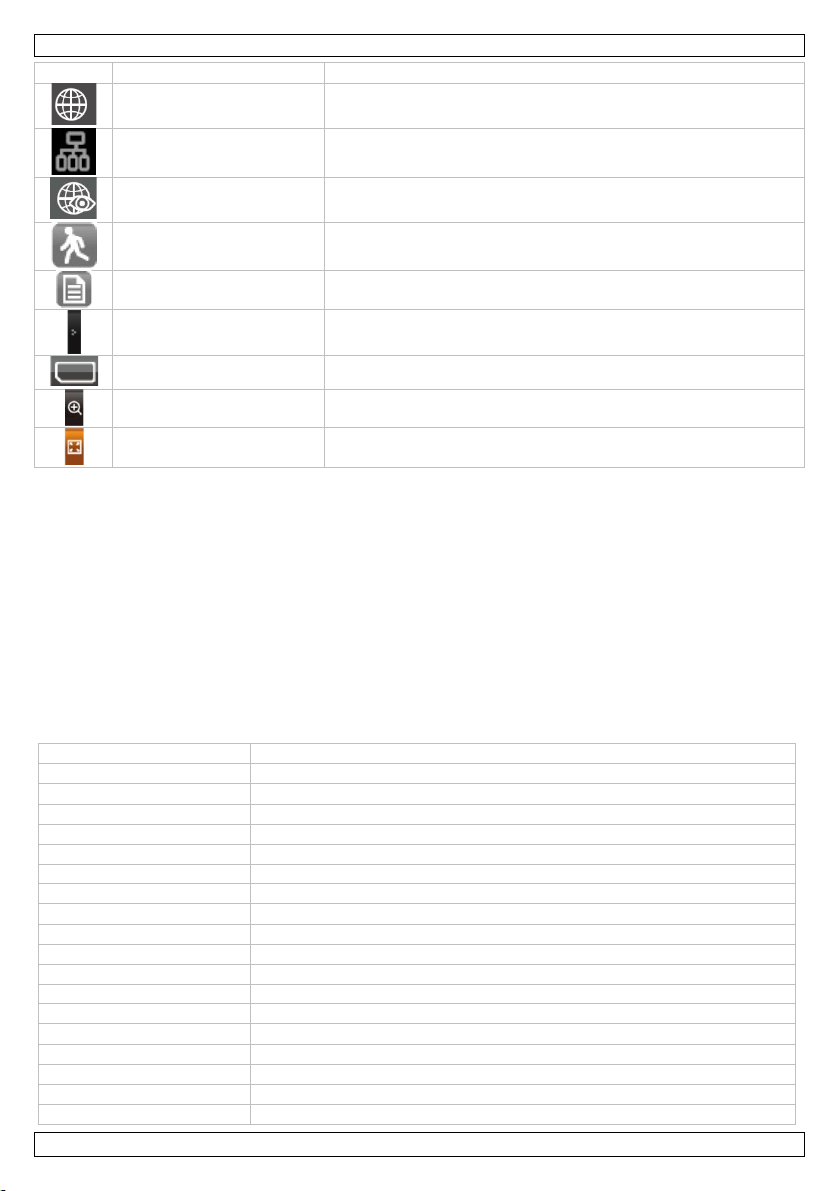
Connected to the internet
Appears when device is connected to the internet
Connected to the intranet
Appears when device is connected to the intranet
Remote V iewing
Appears when remote viewing is in progress
M otion detection
Flashes when devi ce r ecords after detectin g motion detection
Scheduled recording
Appears when scheduled recording is in progress
Pop up menu tab
Tap t o open or c lose pop u p m enus
Zoom in
Tap to zoom in on a subject
video f ormat
PAL
camera
pick-up element: 1/4" CMOS sensor
l en s: 3.6 mm
lens angle: 64°
night vision: 20 IR LEDs (8 m range)
multiple cameras: 320 x 240 pixels (QVGA) (25 FPS)
monitor battery
capacity: 1800 mAh Li-ion (3.7 V)
oper ating ti me : maximum 1.5 h
monitor size
7" touch screen
recording
on SDHC card (not in cl.) (max. 32 GB)
audio
built-in microphone
network connection
via do cking station
remote surveillance: plug and play via smart phone applications
digital zoom
2x
No SD card Appears when SD card is missin g or damaged.
Zoom out Tap to zoom out on a subject
See the full manual on www.velleman.eu for details (search for product code CCTVSETW1).
8. Advan ced settin gs
The Settings menu contains settings for:
• Camera setup (pairing, camera on, brightness)
• Recorder setup (m otion detection, sch eduled r ecording)
• Network setup (internet setup, security code, network information)
• Alarm setup (period, melody)
• System setup (power saving, screen auto lock, time, format storage, system upgrade, language)
See the full manual on www.velleman.eu for details (search for product code CCTVSETW1).
9. Technical Specifications
video compressio n H.264
video transmission 2.4 GHz encrypted digita l transmission
IP rating: IP66
maximum recording rate single camera: 640 x 480 pixels (VGA) (25 FPS)
recording mode manual / timer / motion
V. 02 – 07/01/2014 9 ©Velleman nv
Page 10

CCTVSETW1
video loss detection
yes
power source (docking and
5 Vd c / 1 A
dimensions
cam er a: 15 1 x 7 4 x 49 mm
camera)
monitor: 184 x 128 x 28 mm
weight 1600 g
Use this device with original a ccessories only. Velleman nv cannot be held respons ible in the
event of damage or injury resulting from (incorrect) use of this device.
For more info concerning this product and the latest version of this manual, please visit our
website www.perel.eu.
The information in this manual is subject to change without prior notice.
Windows, Windows XP, Windows 2000, Windows Vista, Windows Aero, Windows 7, Windows 8, Windo ws
Mobi le, Windows Server are registered trade mar ks of Microsoft Corporati on in the United States and
other countries.
iPad, iPod, iPod touch, iPhone, Mac, iMac, MacBook, PowerBook, Power Mac, Mac OS are trademarks of
Apple Inc . , registered in the U.S. and other countries.
Android is a trademark of Google Inc.
© COPYRIGHT NOTICE
The copyright to this manual is owned by Velleman nv. All worldwide rights reserved. No part
of this manual may be c opied, reproduced, translated or reduced to any electroni c medium or otherwise
without the prior written consent of the copyright holder.
V. 02 – 07/01/2014 10 ©Velleman nv
Page 11
CCTVSETW1
INSTALLATI E EN S NEL START
1. Inleiding
Aan alle ingezetenen van de Europese Unie
Belangrijke milieu-informatie betreffende dit product
verwijdering.
Dank u voor uw aankoop! Lees deze hand leiding grondig voor u het toestel in gebruik neemt. Wer d het
toestel beschadigd tijdens het transport, i nstall eer het dan niet en raadpleeg uw dealer.
2. Beschikbare documentatie
Dit document beschrijft de installatie en basis instructies voor het g ebruik van de camera. V oor meer
informati e o ver het gebruik van dit toestel, raadpl eeg de uitgebr eide handleidi ng (all een in het Engels) op
www.v elleman. eu (artikelcode CCTVS ETW1).
3. Veiligheidsinstructies
Dit symboo l op het toestel of de verpakking geef t aan dat, al s h et na zij n leven scyclus wordt
weggeworpen, dit toestel schade kan toebreng en aan h et milieu. Gooi dit toestel (en eventuele
batterijen) niet bij het gewone huishoudelijke afval; het moe t b ij een gespecialiseerd bedrijf
terechtkomen v oor r ecyclage. U moet d it toestel naa r uw verdeler of naar e en lokaal
recycla g epunt bren g en. Respecteer de plaatselijke milieuwetgeving.
Hebt u vragen, contacteer dan de pl aa tselijke autoriteiten betreffende de
Houd dit toestel u it de buurt van kinderen en onbevoegden.
Elektrocutiegevaar bij het openen van het toestel. Raak geen kabels aan die onder
stro om staan, om dodel ijke elektr osch o kken te vermijden.
Trek de stekker uit het stopcontact wanneer het toestel niet in gebruik is of voordat u het
toestel reinigt. Houd de voeding skab el altij d vast b ij de stekker en niet bij d e kab el.
4. Algemene ri ch tlijn en
Raadpleeg de Velleman® service- en kwa liteitsgarantie achteraan deze handleiding.
Bescherm dit toestel tegen stof.
Bescherm dit toestel tegen extr eme hitte.
Zorg dat de verluchtingsopeningen niet verstopt geraken.
Bescherm tegen schokken. Ver mijd bru te kr a ch t tijdens de b edienin g .
• Leer eerst d e functies van het toestel kennen voor u het gaat geb ruiken.
• Om veili gh eidsred enen mag u geen wijzigingen aanbrengen.
• Gebruik het toestel enkel waarvoor het gemaakt is. D e g arantie vervalt automatisch bij ongeoorloofd
gebruik.
• De gar a ntie geldt niet voor s ch a d e door het negeren van b epaalde richtlijnen in deze hand leidi ng en
uw deal er zal de verantwoordelijkheid af wijzen v o or def ecten of problemen die hier rech tstr eeks
verband mee houden.
V. 02 – 07/01/2014 11 ©Velleman nv
Page 12

CCTVSETW1
2
resetknop
3
aan/uit-knop
4
SD-kaartslot
5
AC-voedingsaansluiting
6
camerahouder
7
laadstation
8
RJ45-netwerkaansluiting
10
voedingsstatus
15
voedingskabel
16
verbindingsknop
• Installeer en gebruik deze camera NIET voor illegale praktijken en resp ecteer ieders privacy.
• Bewaar deze handleiding voor verdere raadpleging.
5. Omschrijving
Raadpleeg de afbeeldingen op pagina 2 van deze handleiding.
Monitor (achterpaneel)
1 antenne-ingang
Houder
9 AC-voedingsaansluiting
Camera (voorkant)
11 verbindingsstatus
12 lichtsensor
Camera (achterkant)
13 antenneconnector
14 microfoon
6. De camera installeren
Benodigd gereedschap
• elektr ische boor
• 5 mm s teenboor
• 15 mm steen b oor
• Phillips-schroevendraaier nr. 2
Richtlijnen
• Voor u het toestel def initief in stal leert, rad en wij u aan om de camera te testen.
• Installeer de camer a op ongeveer 2.5 m van de grond.
• Richt de camera niet o p direct zonlicht, hierdoor kan de beeldkwalitei t af nemen.
• Ri cht de cameralens niet rechtstr eeks op transparant glas omdat de l ed s voor nachtzicht een
onscherp beeld vormen 's nachts.
• Ri cht de camera ni et r echtstreeks op struiken , takken of be wegen de voorwerpen die op natuu r l ijke
wijze kunnen bewegen door de wind. Ook als u de b eweging sd etectie in de software g eb ruikt om
bewegingen op te nemen, dan kan de software onnodig beg innen met opnemen.
De ca mera installeren
Zie afb. C op pagina 4.
1. Trek de antenne uit.
2. Sluit de voedingsadapter aan op de camera en vervolg ens in een stopc ontact.
3. Sluit de voedingsadapter aan op een stopcontact.
V. 02 – 07/01/2014 12 ©Velleman nv
Page 13

CCTVSETW1
De monitor installeren
Zie afb. D op pagina 4.
1. Steek een SD -kaar t in de m onitor [5] (t ot 32 Gb ).
2. Sluit de voedingsadapter aan op de monitor en vervolgens in een stopcon tact [1].
3. K lap de camerahouder [4] open.
4. Houd de aan/uit-knop [2] gedurende 3-4 seconden ingedrukt.
Een wel komscherm verschijnt enkele sec onden, daarna ver sch ijnt het camerabeeld.
De ca mera monter en
Zie afb. B1 tot B3 op pagina 3.
1. Bevestig de camerabeugel op ongeveer 2.5 m van de grond.
2. Draai de duimschroef los.
3. Kies de jui ste kijkhoek en draai het gewricht vast.
4. Monteer de camera op de beugel.
Opmerking: SD-kaart
• Voor lange video-opnames moet u een SD-kaar t met hoge capaciteit gebruiken.
• Schakel het toestel altijd uit voor u de SD-kaart verwijdert.
7. Gebruik
Schermonderdelen
1 pop-up menu's
2 SD-kaartstatus
3 batterijniveau
4 status internetverbinding
5 opnamestatus
6 cameranummer - signaalsterkte
7 bewegingsindicator
8 pop-up menubalk
Het scherm inschakelen
• Houd de aan/uit-knop gedurende 3-4 seconden ingedrukt.
Een wel komscherm verschijnt enkele sec onden, daarna ver sch ijnt het camerabeeld.
Het scherm uitschakelen
• Houd de aan/uit-knop ingedrukt tot het scherm wordt uitgeschakeld.
Cameramodi: quad- en volledige schermweergave
• Wanneer u het scherm inschakelt, verschijnt het beeld in quad-weergave (tot 4 camera's w orden
geli jkti jdig weergegeven op 1 scher m).
• Ti k op één van de camerabeelden o m h et b eeld weer te geven over het volledige scherm.
• Ti k op het camerabeeld om terug te ker en naar qua d -weergavemodus
In-/uitzoomen
• In-/uitzo omen werkt al leen in voll edige schermweergave.
• Ti k op het camerabeeld om over te sch akelen naar volledige schermweergave.
• Tik op inzoomen.
• Sel ecteer het gebied wa a r op u wilt inzoomen .
o Tik op uitzoomen.
o Tik nogmaals o m terug te keren naar de vol ledige scher mweergave.
Manuele video-opname
• In quad-weergavemodus, tik op het opnamepictogram.
V. 02 – 07/01/2014 13 ©Velleman nv
Page 14
CCTVSETW1
Pictogram
Benaming
Functie
Home
In een menu: Naar het hoofdscherm terugkeren
Terug
In een menu: Naar het vorige niveau terugkeren
Cameramodus
Een cameramodus selecteren :
Systeeminstellingen
Naar de systeeminstellingen gaan
Volume
Het geluidsniveau van de camera instellen
SD-capaciteit
De beschikbare opslagruimte op SD-kaart weergeven
Batterijniveau
Het batterijni veau weergeven
Cameranummer
Het camer anummer en signaalsterkte weergeven
Opnamestatus
De manu ele opname s tarten.
• Het pictogram knippert tijdens het opnemen.
• Tik nogmaals om de opname te stoppen.
U kunt de video-opname ook programmeren. Raadpleeg de uitgebreide handleiding op www.velleman.eu
voor me er informatie (zoek op artikelcode CCTVS ETW1).
Het menu gebru iken
Het scherm is voorzien van een OSD-menu (On Screen Display).
Dit menu geeft toegang tot de apparaatinstellingen.
Druk kort op de aan/uit-knop om het menu weer te geven of te verber gen.
Het men u wordt g edurende 30 seconden weergegeven.
Afspelen
Opgenomen beel d en bekijken ::
1. Op het scherm, tik op en verv ol g ens op .
2. Selecteer de datum di e u wil t b ekijken op de kal ender.
De dagen met videobeelden zijn gehighlight.
3. Gebruik indien nodig de schuifbalk rechts om door de opnames te bladeren.
4. Tik op de opname die u wilt bekijken.
De opname verschijnt op het scherm.
o Tik op een lege plaats in het scherm om de voortg angsbalk weer te geven.
o Ver sleep de vo ortgangsbalk om de video snel voorui t of achteruit te spoel en.
o Tik op een lege plaats in het scherm om de voortg angsbalk te verbergen.
Bewaking op afstand:
• Met de OMGuard-app kunt u de cam er a vanop afstand aan stu r en met uw mobi ele toestel
(beschikbaar voor iPhone, iPod, iPad en Andro id-toestellen).
• U kunt alleen beelden op afstand bekijken als de monitor in de houder staat en het
internetverbindingstype ingesteld staa t op "Connect to Internet".
• Raadp leeg de uitg ebreide h a ndlei ding op www.vell eman .eu voor meer detail s (zoek op artikelcode
CCTVSETW1).
Pictogrammen en knoppen
Op het scherm staan verschillende pictogrammen en knoppen:
- scanmodus
V. 02 – 07/01/2014 14 ©Velleman nv
- quad-weergave
- volledige scherm
De knop is uitger ust met een led-indicator:
Page 15

CCTVSETW1
Pictogram
Benaming
Functie
- Altijd aan: geen opname
Internetverbinding
Het toe stel is met het internet verbonden.
Intranetverbinding
Het t oestel is met het intran et verbonden.
Beel d en bekijken op
Beel d en bekijken op afstand is acti ef
Bewegingsdetectie
Knippert bij opname na bewegingsdetectie.
Opname programmeren
Gepr ogrammeerde opname is actief .
Pop-up menubalk
Pop-up menu's openen of sluiten
Geen SD-kaart
Geen SD-k aart of SD-kaart beschadigd
Uitzoomen
Op een voorwerp u itzoomen
video -overdracht
2.4 GHz digitaal gecodeerde overdracht
camera
opneem el ement: 1/4" CMOS -sensor
l en s: 3.6 mm
lenshoek: 64°
IP-norm: IP66
max. opnamefrequentie
1 camera: 640 x 480 pixels (VGA) (25 FPS)
meerdere camera' s: 320 x 240 pi xels (QVGA) (25 FPS)
batterij (monitor)
capaciteit: 1800 mAh Li-ion (3.7 V )
aut onomie max imum 1.5 u
opname
op SDHC-kaa r t (niet meegelev.) (max. 32 GB )
- Knippert: opname actief
afstand
Inzoomen Op een voorwerp inzoomen
Raadp leeg de uitg ebreide h a ndlei ding op www.vell eman .eu voor meer detail s (zoek op artikelcode
CCTVSETW1).
8. Geavanceerde instellingen
Het instellingenmenu bestaat uit:
• Camera-instellingen (camera koppelen, helderheid)
• Opname-instellingen (b ewegingsdetec tie, gepr ogrammeerde opname)
• Netwerkinstellingen (internetverbin ding, veilig heid scode, n etwerki nforma tie)
• Alarminstellingen (duur, melodie)
• Systeeminstellingen (energi eb esp a r ing, schermvergrendel ing, tij d, opslagformaat, systeem-upgrade,
taal)
Raadp leeg de uitg ebreide h a ndlei ding op www.vell eman .eu voor meer detail s (zoek op artikelcode
CCTVSETW1).
9. Technische specificaties
videoformaat PAL
formaat videocompressie H.264
nachtzicht: 20 IR-leds (8 m bereik)
monitor 7" aanraaks ch er m
V. 02 – 07/01/2014 15 ©Velleman nv
Page 16

CCTVSETW1
opnamemodus
manueel / timer / bewegingsdetectie
audio
ingebouwde microfoon
netwerkverbinding
via do ckingstation
bewaking op afstand: plug-and-play via smartphoneapplicaties
digitale zoom
2x
detecti e b eeldverlies
ja
voeding (dockingstation en
5 Vd c / 1 A
afmetingen
cam er a: 15 1 x 7 4 x 49 mm
monitor: 184 x 128 x 28 mm
camera)
gewicht 1600 g
Gebruik dit toestel enkel met origi nele a ccessoires. Velleman nv is niet aansprakelijk voor
schade of kwetsuren bij (verkeerd) g ebruik van dit toestel.
Voor meer informatie over dit product en de l aa tste versie van deze handleiding, zi e
www.perel.eu.
De informatie in deze handleiding k an te allen tijde worden gewijzigd zonder voorafgaande
kennisgeving.
Windows, Windows XP, Windows 2000, Windows Vista, Windows Aero, Windows 7, Windows 8, Windows
Mobi le, Windows Server zijn geregistreer d e handel smerken va n Microsoft Corporati on in de Veren igde
Staten en in andere landen.
iPad, iPod, iPod touch, iPhone, Mac, iMac, MacBook, PowerBook, Power Mac, Mac OS zijn handelsmerken
van Apple Inc. , geregistreerd in de V.S. en andere landen.
Android is een handelsmerk van Google Inc.
© AUTEURSRECHT
Velleman nv heef t het auteursr echt voor deze handleiding. Alle wereld wijde rechten
voorbehouden. Het i s n iet toegestaan om deze handleiding of ged eelten ervan ov er te nemen, te
kopiëren, te vertalen, te bewerk en en op te sl aan op e en elektroni sch mediu m zonder voorafgaande
schriftelijke toestemming van de rechth eb bende.
V. 02 – 07/01/2014 16 ©Velleman nv
Page 17

CCTVSETW1
Toujour s d éconnecter l'appareil l orsque l'appareil n'est pas utilisé ou avant de le nettoyer.
INSTALLATION ET DÉMARRAGE RAPIDE
1. Introduction
Aux résidents de l'Union européenne
Informations environnementales importantes concernant ce produit
En cas de doute, contacter les autorités locales pour élimination.
Nous vous re mer cions d e votre ach a t ! Lire le présent mode d' emploi atten tivement avan t la mise en
servi ce d e l'appareil. Si l'appar ei l a été endommag é pendant le transport, ne p as instal ler et consulter
votre reven d eur.
2. Documentation disponible
Ce document décrit l'installation et les instructions de base pour la caméra. Pour plus d'informations sur
l'emploi de cet appareil, consulter le mode d'emploi détaillé (en anglais uniquement) sur
www.v elleman. eu (référence CCTV S ETW1).
3. Consignes de sécurité
Ce symbole sur l'appareil o u l'emballage indique que l'é limination d'un appareil en fin de vie
peut polluer l' environn emen t. Ne pas jeter un appareil électrique ou électronique (et des piles
éventuelles) parmi les déch ets municipaux non sujets au tr i sélectif; une déchèter ie trai tera
l'appareil en question. Ren voyer cet apparei l à votre fournisseur ou à un ser vice de rec yclage
local. Il convient de respecter la réglementation locale relative à la protection de
l'environnement.
Garder votre apparei l hors de la portée de jeunes enfants et de pers onn es non qualifiées.
risque d’électrocution lors de l’ouverture du boîtier. Toucher un câble sous tension peut
causer des électrochocs mortels.
Tirer sur la fiche pour débrancher l'appareil ; non pas sur le câble.
4. Directives générales
Se référ er à la garanti e de servic e et de qualité Velleman ® en fin de ce mode d'emploi.
Protéger cet appareil contre la poussière.
Protéger cet appareil contre la chaleur extrême.
Veiller à ce que les fentes de ventilation ne s oi ent pas bloquées.
Protéger l’appareil des chocs. Traiter l'appareil avec circonspection pendant l’opération.
• Se familiariser avec le fo nctio nnement de l'appareil avant de l'utiliser.
• Il est interdit de modifi er l'appareil pour des raisons de sécurité.
• N’utiliser l'appareil qu’à sa fonction prévue. Un usage impropre annule d'office la garantie.
• Les dommages occasionnés par des modifica tions à l' a p pareil pa r le cl ient, ne to mb e nt pas sous la
garan tie et votre revend eur déclinera toute responsabilité pour les problèmes et l es d éf a uts qui en
résultent.
V. 02 – 07/01/2014 17 ©Velleman nv
Page 18

CCTVSETW1
2
bouton de réinitialisation
3
bou ton on / of f
4
slot pour carte SD
5
connexion d'alimentation
6
support de caméra
7
station d' accueil
8
connexion réseau RJ45
9
connexion d'alimentation
10
état d'alimentation
11
état de lia iso n
12
capteur lumineux
13
connecteur d'antenne
14
microphone
15
câble d’alimentation
• Installer et utiliser la caméra en respectant la légi slation et la vie privée des tiers.
• Garder ce mode d'emploi pour t oute référence u ltérieure.
5. Description
Se référ er aux fig ures en page 2 de ce mode d'emploi.
Moniteur (panneau arrière)
1 entrée d'antenne
CA
Support
CA
Caméra (partie frontale)
Caméra (partie arrière)
16 bouton
d'alimentation/jumelage
6. Ins tallation de la caméra
Outils requis
• perceuse électriq ue
• mèche à p ierre de 5 m m
• mèche à p ierre de 15 mm
• tournevis Philips n°2
Dire ctives
• Il est cons eillé d e tester la caméra avant le montage d éf ini tif .
• Installer la caméra à environ 2.5 m du sol.
• Eviter de diriger la caméra dir ectement vers le solei l, cela nui ra à la qualité de l 'i mag e af fichée.
• Évi ter de diriger l 'objectif de l a caméra directement à travers du verre transp arent, les L EDs pour
vision nocturne peuvent engendrer une image floue dans la nuit.
• Eviter de diriger la caméra directement vers des buissons, des arbres, ou des objets qui peuvent se
déplacer naturel lement par le vent. C'est au ssi parce que si vous utilisez la détection de mouv ement,
le logiciel pourrait enregistrer inutilement.
Inst alle r la cam é r a
Voir fi g. C à l a page 4.
1. Déployer l ' antenne.
2. Connect er l'adaptateur à la caméra et puis à une prise murale.
V. 02 – 07/01/2014 18 ©Velleman nv
Page 19

CCTVSETW1
numéro de l a caméra - force du
3. Brancher l'adaptateur sur une prise murale.
Installer le moniteur
Voir fig. D à la page 4.
1. Insérer une carte SD dans le moniteur [5] (jusqu'à 32 Go).
2. Connecter l'adaptateur au moniteur et puis à une prise murale [1].
3. Déployer l e support de la caméra [4].
4. Maintenir le bouton on/off enfoncé durant environ 3-4 secondes [2].
Un écran d'accueil s'affiche durant quelques secondes, puis l'image de la caméra apparaît.
Monter la caméra
Voir fig. B1-B3 à la page 3.
1. Fixer le su pport de caméra à envi r on 2.5 m du s ol .
2. Desserrer l a vis à ailettes.
3. Choisir un angl e d e vue approprié et sécuriser le joint.
4. Fixer la caméra au sup port
Note : Carte SD
• En ca s d'enregi strements de longu e d urée, utiliser une carte SD à haute capacité.
• Toujour s éteind r e l 'a p pareil avan t d e r etirer la carte SD.
7. Usage
Parties de l'éc ran
1 menus contextuels
2 état de la carte SD
3 état de la pile
4 état de la connexion internet
5 état d'enr egistre men t
6
signal
7 indicateur de mouvement
Allumer l'écran
• Maintenir le bouton on/off enfoncé durant environ 3-4 seconde s.
Un écran d'accueil s'affiche durant quelques secondes, puis l'image de la caméra apparaî t.
Eteindre l'écran
• Maintenir le bouton on/off enfoncé jusqu'à ce que l'écran s'éteigne.
Modes de caméra : affichage en quadravision et plei n écran
• En allumant l'écran, l'image s'affiche en quadravision (jusqu'à 4 caméras affichées simultanément sur
un écran).
• Taper sur une des images pour un affichage en plein écran.
• Taper sur l'image pour revenir à l'affichage en quadravis ion.
Agrandissement
• L'agrandissement foncti onne uniquement en mode plein écran.
• Si l'écran est en mode quadravision, taper sur une image pour un affichage en plein écran.
• Taper sur l'icone d'agrandissement.
• Sélectionner la zone que vous souhaitez agrandir.
o Tap er sur l'icone zo om ar rière pour quitter le mode d'ag randissement.
o Taper de nouveau pour revenir à l'affichage en plein écran.
8 barre de menu contextuelle
V. 02 – 07/01/2014 19 ©Velleman nv
Page 20

CCTVSETW1
Icone
Nom
Fonction
Accueil
Dans un menu : Revenir à l'affichage principal
Retour
Dans un menu : Revenir au niveau précédent
Mode de c améra
Sél ectionner entre les modes de caméra :
Configuration du système
Accéder aux réglages du systè me
Volume
Ajuster le niveau son ore de la caméra
Capacité de la carte SD
Afficher l'espace disponible sur la carte SD
Niveau de pile
Afficher le niveau de la pile
Numéro de la caméra
Afficher le numéro de l a caméra et la force du signal
Enr egistrement manuel de vidéo
• En mode quadravision, taper sur l'icone d'enregistrement.
• L'icone cli gnote durant l'enregistrement.
• Taper de nouveau sur l'icone p our arrêter l'enregistremen t.
Il est également p o ssible d e p rogram mer l'enregistrement vidéo. Consulter le mode d'emploi détaillé sur
www.velleman.eu pour plus d'informations (référence CCTVSETW1).
Utiliser le menu
L'écran comporte un menu à l'écran (OSD).
Ce menu vous permet d'accéder aux réglages de l'appareil.
Appuyer brièvement sur le bouton on/off pour afficher ou masquer le menu.
Le menu reste affiché durant 30 secondes.
Lecture
Pour regarder une vidéo enregi str ée :
1. Sur l'écran, taper sur et puis sur .
2. Sélectionn er le jour que vous souhaitez afficher sur le calendrier.
Les jours contenant vidéo sont mis en surbrillance.
3. Si nécessai re, utiliser la barre de d éfilement à droite, p our naviguer dans les en registrements.
4. Taper sur l'enregistremen t q ue vous s ouh a itez regarder.
L'enregistrement s'affiche à l'écran.
o Taper sur une zone vide quelconque dans l'écran, pour afficher la barre de progression.
o Déplacer la barre de progression, pour avanc er ou recu ler rapidement la vidéo.
o Taper sur une zone vide quelconque dans l'écran, pour masquer la barre de progression.
Surveillance à distance
• Il est possible d'accéder la caméra à distance depuis votre appareil mobile avec l'application
OMGuard (disponible pour iPhone, iPod, iPad et appareils Android).
• La visualisation à distance fo nctio nne uniq uement si l e moniteur est installé dans le support et si l e
type de connexion internet est réglé sur "Connect to Internet".
• Consulter le mode d' emploi détaillé sur www.velleman .eu pour plus d'informations (référence
CCTVSETW1).
Icones et boutons
L'écran comporte plusieurs icones et boutons :
- mode bal ayage
V. 02 – 07/01/2014 20 ©Velleman nv
- mode quadravision
- mode plein écran
Page 21

CCTVSETW1
Icone
Nom
Fonction
Etat d'en registrement
Démarrer l'enregistrement ma nuel.
Connexion à l'Intranet
L'app areil est connecté à l'Intranet
Visualisation à distance
La visu al isation à distance est activée
Détecti on de mouvem ent
Clignote lo rsque l'appareil démarre l 'enregistr emen t ap rès la
Enregistrement
L'enr egistrement programmé est activé
Barre de menu
Ouvrir ou fermer l es men us contex tuels
Pas de carte S D
S'affiche lorsqu'il n'y a pas de carte SD ou la carte SD est
Zoom avant
Effectuer un zoom avant sur un objet
Zoom arrière
Effectuer un zoom arrière sur un objet
fo rmat vidéo
PAL
compression de vidéo
H.264
transmission de vidéo
transmission numérique cryptée de 2.4 GHz
caméra
capteur : capteur C MOS d e 1/4"
objectif : 3.6 mm
vision nocturne : 20 LEDs IR (portée de 8 m)
indi ce IP : IP66
fréquence d'enreg istrement
1 caméra : 64 0 x 480 p ixels (VGA) (2 5 IPS )
plusi e urs ca méras : 320 x 240 p ixels (QVGA) (25 IP S)
batterie (moniteur)
capacité : 1800 mAh Li-ion (3.7 V)
Le bouton est doté d'un indicateur d'état :
Connexion à l'Internet L'appareil est connecté à l'Intern et
- Toujours allumé : pas d'enregistrement
- Clignotant : enregistrement
programmé
contextuelle
Consulter le mode d' emploi détaillé sur www.velleman .eu pour plus d'informations (référence
CCTVSETW1).
détection de mouvement.
endommagée.
8. Réglages avancés
Le menu de réglages contient les options suivantes :
• Configurer la caméra (jumeler la caméra, luminosité)
• Configurer l'enregistrement (détection de mouvement, enregistrem ent programmé)
• Configurer le réseau (connexion à l'Internet, code de sécurité, information de réseau)
• Configurer l'al arme (durée, mél odie)
• Configuration du système (consommation d'énergie, verrouillage d'écran automatique, l'heure,
format de stockage, mise à jour du système, langue)
Consulter le mode d' emploi détaillé sur www.velleman .eu pour plus d'informations (référence
CCTVSETW1).
9. Spécifications techniques
angle de vue : 64°
max.
V. 02 – 07/01/2014 21 ©Velleman nv
Page 22

CCTVSETW1
aut onomie : ma x imum 1.5 h
moniteur
7", écran tactile
enregistrement
sur carte SDHC (non incl.) (max. 32 Go)
mode d'enregistrement
manuel / minuter ie / détection de mou vement
audio
microphon e incorp oré
connexion réseau
avec stati on d'a ccuei l
surveillance à distance : plug-and-play avec les app lications smartphone
zoom numérique
2x
détection de perte de
oui
dimensions
caméra : 151 x 74 x 49 m m
mon iteur : 18 4 x 128 x 28 mm
poids
1600 g
l'image
ali men tation (station
5 Vcc / 1 A
d'accueil et caméra)
N'employer cet appareil qu'avec des accessoires d'origine. La SA Velleman ne peut, dans la
mesure conforme au droit applicable être tenue responsable des dommages ou lésions
(directs ou indirects) pouvant résulter de l’utilisation de cet appareil.
Pour pl us d’info rmation concernant cet ar ticle et la dernière version de ce mode d'emploi,
visiter notre site web www.perel.eu.
Les spécifications et le contenu de ce mode d'emploi peuvent être modifiés sans avis
préalable.
Windows, Windows XP, Windows 2000, Windows Vista, Windows Aero, Windows 7, Windows 8, Windows
Mobi le, Windows Server sont des marques commerciales enregi str ées d e Microsoft Corporation aux EtatsUnis et d'autres pays.
iPad, iPod, iPod touch, iPhone, Mac, iMac, MacBook, Power Book, P o wer Mac, Mac OS sont d es marques
d'Apple Inc., déposées aux États-Uni s e t dans d'au t res pays.
Android est une marque de Google Inc.
© DROITS D’AUTEUR
SA Velleman est l’ayant droit des droits d’auteur pour ce mode d'emploi. Tous droits mondiaux
réservés. Toute reproduction, traduction, copie ou diffusion, intégrale ou partielle, du contenu de ce
mode d'emploi par quelque procédé ou sur tout sup p ort électroni que que ce soit est interd ite sans
l’acco rd préalable écrit de l’ayant droit.
V. 02 – 07/01/2014 22 ©Velleman nv
Page 23

CCTVSETW1
ri esgo de descargas eléctri cas al abrir la caja. Puede sufrir una p eligrosa descarg a eléctrica
Desconecte siempre el apara to si no va a usarl o du rante un largo periodo d e tiempo o ante s
INSTALACI ÓN Y COM IENZO RÁPIDO
1. Introducción
A los ciudadanos de la Unión Europea
Importantes informaciones sobre el medio ambiente concerniente a este pr oducto
¡Gracias por elegir Pere l! Lea atentamente las instrucciones del manual antes de usar el aparato. Si el
aparato ha sufrido algún daño en el transporte no lo instale y póngase en contacto con su distribuidor.
2. Documentación disponible
Este d ocu mento i n cluye la instalación y las instr u cciones bási cas para utilizar la cámara. P ar a más
información sobre el uso de este aparato, consulte el manual completo (só lo dispo nible en inglés) en
www.v elleman. eu (referencia: CCTVSE TW1).
3. Instrucciones de seguridad
4. Norma s gene ra les
Véase la Garantía de servicio y calidad Velleman® al final de este manual del usuario.
Este símbolo en este aparato o el embalaje indica que, si tira las muestras inservibles, podrían
dañar el medio ambiente. No tire este aparato (ni las pilas, si las hubiera) en la basura
doméstica; debe ir a una empresa e sp eciali zada en reciclaje. Devu elva este aparato a su
distribuidor o a la unidad de reciclaje local. Respete las leyes locales en relación con el medio
ambiente.
Si tiene dudas, contacte con las autoridades loca les para residuos.
Mantenga el aparato lejos del alcance de per sonas no capacitadas y niñ os.
al tocar un cab le con ectado a la red eléctri ca.
de limpiarlo. Tire siempre del enchufe para desconectar el cable de red, nunca del propio
cable.
No exponga este equipo a polvo.
No exponga este equipo a temper aturas ex tremas.
Asegúr ese d e q ue los orificios de ventilación no estén bloqueados.
No agite el aparato. Evite usar excesiva fuerza duran te el manejo y l a instalación.
• Familiarícese con el funcionamiento del aparato antes de utilizarlo.
• Por razones de seguridad, las modificaciones no aut orizadas del aparato están prohibidas.
• Utilice sólo el aparato para las aplicaciones des cr itas en este manual. Su uso incorrecto anula la
garantía completamente.
• Los daños causados p or descuido de las instrucciones de seguridad de este manual invalidarán su
garantía y su distribuidor no será responsable de ningún daño u otros problemas resultantes.
• Instale y utilice la cámara al respetar la legi slación et la vida p rivada de terceros.
V. 02 – 07/01/2014 23 ©Velleman nv
Page 24

CCTVSETW1
1
ranura para la antena
2
botó n de reinic ialización
3
interruptor ON/OFF
4
ranura para tarjeta SD
5
conexión del adaptador
6
soporte de cámara
7
esta ción dock
8
conexión RJ45
9
conexión del adaptador
10
estado de alimentación
11
estado de enl ace
13
conexión para la antena
16
botón de
• Guarde este manual del usuario para cuando necesite consultarlo.
5. Descripción
Véase las figuras en la página 2 de este manual d el usuario.
Monitor (parte trasera)
(reset)
de red AC
soporte
de red AC
Cámara (parte frontal)
12 sensor luminoso
Cámara (parte trasera)
14 micrófono
15 cable de alimentación
alimentación/enlace
6. Instalar la cámara
Herramientas necesarias
• taladro eléctrico
• broca de 5mm
• broca de 15mm
• destornillador con punta Philips, nº 2
Normas generales
• Someta la cámara a prueba antes de instalarla en su lugar defini tivo.
• Monte la cámara en un un a altura de apr oximadamente 2.5m.
• Instale la cámara de tal manera que no le dé la luz solar directa en la óptica porque esto disminuiría
la calidad de las imágenes.
• Para grab ar de noch e no dirija la cámara haci a un cristal transp ar ente porque d isminuiría la calidad
de l a s imágenes.
• No apunte la cámara hacia arbustos, ramas u objetos que se puedan mover en caso de viento. Si no,
el aparato podría activarse aut omáticamente y realizar grabaciones innecesarias si está en el modo
de detección de movimientos.
Conectar la cámara
Consulte la imagen C en la página 4.
1. Extienda la anten a.
2. Conecte el adaptador de red a la cámara.
V. 02 – 07/01/2014 24 ©Velleman nv
Page 25

CCTVSETW1
estado de la memori a d e la tarjeta
número de l a cámara – intensidad
indicador de detección de
3. Enchufe el aparato a una toma eléctrica adecuada.
Conectar el monitor
Consulte la imagen D en la página 4.
1. Introduzca una tarjeta SD en el monitor [5] (máx. 32 Gb).
2. Conecte el ad aptador de red al monitor y enchufe el aparato a una toma el éctr ica adecuada.
3. Despliegue el pie de l a cámar a [4].
4. Mantenga pulsado el botón ON/OFF unos 3-4 segundos [2].
Una pantalla de bienvenid a se visualizará unos segu n dos. Luego, apare cer á la visualización en
directo.
Montaje d e la cámara
Consul te las imágenes de B1 a B3 en la página 3.
1. Fije el soporte de la cám ar a a u na altura de ap roximadamente 2.5 m.
2. Desatornille e l to rnillo moleteado.
3. Seleccione el ángulo de visión deseado y fije la junta.
4. Fije la cámara al sop orte.
Observación: tarjeta SD
• Si quier e g rabar vídeos largos, uti lice una tarjeta SD d e alta capacidad.
• Desacti ve siempre el monitor antes de quitar la tarjeta SD.
7. Uso
Visualización en pantalla
1 menús desplegables
2
SD
3 estado de l a b ater ía
4 estado de la conexión internet
5 estado de l a g r abación
6
de la señ al
Activar el monitor
• Mantenga pulsado el botón ON/OFF unos 3-4 segundos.
Una pantalla de bienvenid a se visualizará unos segu n dos. Luego, apare cer á la visualización en
directo.
Desactivar el monitor
• Mantenga pu lsado el botón ON/OFF hasta que la pantalla se desactive.
Modos de visualización: « quad view » y « full screen »
• Al activar el monitor, se activa el modo « quad view » (visualiz ación simultánea de las imágenes de
máx. cuatro cámaras).
• Toque una de las imágenes para con mutar al modo « full screen » (pantalla completa).
• Toque la imagen para v ol ver al mod o « quad view »
La función « zoom » (acercar/al ejar)
• Esta opción sólo funciona en el modo « full screen ».
• Si el moni tor está en el modo « quad view », toque una de las imágenes para conmutar al modo «
full screen ».
• Toque el icono de acer car /alejar.
7
movimiento
8 pestaña del menú desplegable
V. 02 – 07/01/2014 25 ©Velleman nv
Page 26

CCTVSETW1
Icono
Nombre
Función
Configuración
Toque este icono para entrar en el menú de configuración
Volumen
Toque e ste icono para aj ustar el volumen de la cámara.
• Sel eccione la zona q ue quier e a cer car.
o Toque el icono de alejar p ar a desactivar la opción.
o Vuelva a tocar p ara volver al modo « fu l l screen ».
Grabación manu al
• En el modo « quad view », toque el icono de grabación.
• El icono parpadea durante la grabaci ón.
• Vuelva a tocar el icono para desactivar la grabación.
También es posible programar una grabación. Para más información, consulte el manual completo en
www.v elleman. eu (referencia: CCTVSE TW1).
El menú
El monitor incluye un menú en pantalla (OSD).
Este men ú le permite configurar el ap a r a to.
Para mostrar u ocultar el menú, toque brevemente el botón ON/OFF.
El menú se visualizará durante unos 30 segundos.
Reproducción
Para vi su alizar un vídeo grabado:
1. En l a p antalla, toque y luego .
2. Seleccione el día que quiere visualizar en el calendario.
Los días con el vídeo resaltan.
3. S i fuera necesario, utilice la barra de desplazamient o de la parte derecha para d esplazarse por las
grabaciones.
4. Toque la grabación que desee visualizar.
La grab ación se vi su aliza en la pantalla.
o Toque cualquier zona vací a en la pantalla para visuali zar l a b arra de progreso.
o Arrastre la barra de progreso para avanzar o retroceder de forma rápida.
o Toque cualquier zona vací a en la pantalla para ocultar la barra de progreso.
Vigilancia a distancia
• Puede acced er a la cámara desde su teléfono móvil con l a aplicación OMGuard (disponible para
iPhone, iPod, iPad y dispositivos Android).
• Esto sólo funciona si el monitor está en la estación dock y si ha activado la opción "Connect to
Internet".
• Para más información, consulte el manual completo en www.velleman.eu (referencia: CCTVSETW1).
Iconos y botones
La pantalla incluye unos iconos y botones:
Pantalla de inicio En un menú: Toque este icono para v olver a la pantalla de
Volver En un menú: Toque este icono para retroceder un nivel en el
M odo c ámara Toque est e icono para selec cionar uno de los modos de
V. 02 – 07/01/2014 26 ©Velleman nv
inicio.
menú.
funcionamiento:
- sc an mode (modo de exploración)
- quad view (visualización simultánea de las imágenes de hasta
cuatro cámaras)
- full screen (pantalla completa)
Page 27

CCTVSETW1
Icono
Nombre
Función
Capacidad SD
Visualiza el espacio disponible en la tarjeta SD.
Estad o de la batería
Visualiza el nivel de la batería.
Estado de grabación
Toque e ste icono para acti var la grabaci ón de maner a manual.
Conexión a internet
Se visu aliza si el aparato está conectado a i nternet.
Conexión a intranet
Se visualiza si el aparato está conectado a intranet.
Visualización a distancia
Se visu aliza si la visu al ización rem o ta está activada.
Detección de movimiento
Parpadea si el aparato está grabando después de la detección de
Grabación programado
Se visu aliza si una grabaci ón pr ogramada está activada.
Pestaña del menú
Toque este icono para abrir o cerrar menús desplegables.
No incorp ora una tarjeta
Se visu aliza si la tarjeta SD falta o está dañ ad a.
Acercar
Toque este icono para acercar una i magen .
Alejar
Toque este icono para alejar una imagen .
sistema de vídeo
PAL
forma to de com p r es i ón
H.264
transmisión de vídeo
transmisión digital codif icada de 2.4 GHz
cámara
element o de imagen: sens or CMOS de 1/4"
ópti ca : 3. 6 m m
ángulo de visión: 64°
visión nocturna: 20 LEDs IR (alcance: 8m)
grado de pro tecció n IP: IP66
Númer o de la cámara Visu ali za el n úmero de la cámara y la intensidad de l a señ al.
está equipado con luz de estado:
desplegable
SD
- luz encendida: no está grabando
- luz intermitente: está grabando
movimiento.
Para más información, consulte el manual completo en www.velleman.eu (referencia: CCTVSETW1).
8. Ajuste s avanzados
Este menú incluye ajustes para:
• La configuración de la cámara (enlazar, activación de la cámara, bri llo)
• La grabación (detección de movimiento, grabación programada)
• La configuración de la red (internet, código de seguridad, información sobre la red)
• La al ar ma (du r ación, melodía)
• La configuración del sistema (ah orro de energía, bloqueo auto mático de la pantalla, instalación de
una versió n mejorada, idioma)
Para más información, consulte el manual completo en www.velleman.eu (referencia: CCTVSETW1).
9. Especificaciones
vídeo
V. 02 – 07/01/2014 27 ©Velleman nv
Page 28

CCTVSETW1
frecuencia de grabación
1 cámara: 64 0 x 480 p íxeles (V GA) (25 FPS )
varias cámaras 320 x 240 píxel es (QVGA) (25 FPS)
batería (monitor)
capacidad: 1800 mAh Li-ion (3.7 V)
grabación
en tarjeta SD HC (no incl. ) (máx. 32 GB)
modo de grabación
manual / temporizador / sensor de movimiento
audio
micrófono incorporado
conexión de red
con estación dock
detección de pérdida de la
sí
alimentación (estación
5 Vd c / 1 A
dimensiones
cám ar a: 15 1 x 7 4 x 49 mm
monitor: 184 x 128 x 28 mm
peso
1600 g
máx.
autonomía: máx. 1.5 h
monitor 7", pantalla táctil
vigilancia a distancia plug-and-play con las aplicaciones smartph one
zoom digital 2x
señal
dock)
Util ice este aparato sólo con los accesorios o riginales. Velleman NV no será respo nsable de
daños ni lesiones causados por un uso (indebido) de este aparato.
Para más info rmación sobre este producto y la versión más reciente d e este manual del
usuario, visite nuestra página www.perel.eu.
Se pued en modificar las especificaciones y el contenido de este manual sin previo aviso.
Windows, Windows XP, Windows 2000, Windows Vista, Windows Aero, Windows 7, Windows 8, Windows
Mobile, Windows Server son marcas registrad as de Mi crosoft Corporation en los Estados Unidos y otros
países.
iPad, iPod, iPod touch, iPhone, Mac, iMac, MacBook, PowerBook, Power Mac, Mac OS son marcas
comerciales de App le Inc., registrad a s en EE.U U. y otros países.
Android es una marca comercial de Google Inc.
© DERECHOS DE AUTOR
Velleman NV dispone de los derechos de autor para este manual del usuario. Todos los
derechos mundiales reservados. Está estrictamente prohibido reproducir, traducir, copiar, editar y
guardar este manual del usuario o partes de ello sin previo permiso escrito del d erecho habien te.
V. 02 – 07/01/2014 28 ©Velleman nv
Page 29

CCTVSETW1
INSTALLATI ON UND S CH NELLEINSTIEG
1. Einführung
An alle Einwohner der Europäischen Union
Wichtige Umweltinformationen über dieses Produkt
Falls Zweifel bestehen, wenden Sie sich für Entsorgungsrichtlinien an Ihre örtliche Behörde.
An alle Einwohner der Europäischen Union Lesen Sie diese Bedienungsanleitung vor Inbetriebnahme
sorgfältig durch. Überprüfen Sie, ob Tran sp ortschäden v orliegen . Soll te dies der Fall sein, verwenden Sie
das Gerät nicht und wenden Sie sich an Ihren Händler.
2. Verfügbare Dokumentation
Dieses Dokument enthält die Installation und grundlegende Hinweise, um die Kamera zu verwenden. Für
mehr Informationen ü ber die A nwendu ng des Gerätes, lesen Si e b itte die vollständig e
Bedienungsanleitung (nur auf Englisch): www.vell eman.eu (Bestell-Nr. CCTVSETW1).
3. Sicherheitshinweise
Dieses Symbol auf d em Produkt oder d er Verpackung zeigt an, dass die Entsorgung dieses
Produktes nach seinem Lebenszyklus der Umwelt Schaden zufügen kann. Entsorgen Sie die
Einheit (oder verwendeten B a tter ien) nicht als unsorti ertes Hausmüll; die Einheit oder
ver wend eten Batterien müssen von einer sp ezi a l isierten Firma zwe cks Recycling entsorg t
werden. Diese Einheit muss an den Händler oder ein örtliches Recycling-Unternehmen
retourniert werden. Respekti eren Sie di e örtlichen U mweltvorschriften.
Halten Sie Kinder und Unbefugte vom Gerät fern.
Stromschlaggefahr beim Öffnen des Gehäuses. Das Berühren von unter Spannung
stehenden Leitungen könnte zu lebensgefährlichen elektrischen Schlägen führen.
Trennen Sie das Gerät bei Nichtbenutzung und vor jeder Reinigung vom Netz. Fassen Sie
dazu den Netzstecker an der Grifffläche an und ziehen Sie nie an der Netzleitung.
4. All g e me ine Richtlinien
Siehe Velleman® Service- und Qualitätsgarantie am Ende dieser Bedienungsanleitung.
Schützen Sie das Gerät vor Staub.
Schützen Sie das Gerät vor extremen Temperatu r en.
Beachten Sie, dass die Lüftungsschlitze nicht blockiert werden.
Vermei den Sie E rschütterun g en. Wenden Sie bei der B edienung keine Gewalt an.
• Nehmen Sie das Gerät erst in Betrieb, nachdem Sie sich mit seinen Funktionen vertraut gemacht
haben.
• Eigenmächtige Veränderungen sind aus Sicherheitsgründen verboten.
• Verwenden Sie das Gerät nur für Anwendungen beschrieben in dieser Bedienungsanleitung sonst
kann dies zu Schäden am Produkt führen und erlischt der Garantieanspruch.
• Bei Schäden, die durch Nichtbeachtung der Bedienungsanleitung verursacht werden, erlischt der
V. 02 – 07/01/2014 29 ©Velleman nv
Page 30

CCTVSETW1
1
Schlitz für Antenne
2
Reset-Taste
3
EIN/AUS-Taste
4
Schlitz für SD-Karte
5
Anschluss f ür das AC7
Spannungsversorgung
10
Stromversorgungs-Status
11
Link-Status
12
Lichtsensor
13
Antennenanschluss
14
Mikrofon
15
Stromkabel
16
Power/Pairing-Taste
Garantieanspruch. Für da r a us resultierende Folgesch ä d en übernimmt der Herst eller keine Haftung .
• Installieren und verwenden Sie das Gerät nicht für illegale Praktiken und beachten Sie die
Intimsphäre aller
• Bewahren Sie diese Bedienungsanleitung für künftige Einsichtnahme auf.
5. Beschreibung
Si ehe Abbildu ngen, Seite 2 dieser B edienungsanlei tung.
Monitor (Rückseite)
(Rücksetzung)
Netzteil
6 Standfuß für die Kamera
Halterung
8 RJ45-Netzwerkanschluss
9 Anschluss f ür das AC-
Netzteil
Kamera (Vorderseite)
Kamera (Rückseite)
6. Die Kamera installieren
Die notwendigen Werkzeuge
• Elektrische Bohrmaschine
• 5 mm-Bo hrer
• 15 mm-Bohrer
• Kreuzschlitzschraubendreher, Nr. 2
Richtlinien
• Überprüfen Sie die Kamera bevor Sie diese an der gewünschten S telle monti er en.
• Installieren Sie die Kamera in einer Höhe von etwa 2.5 m.
• Die Kamera sollte so montiert werden, dass kei n di r ektes Sonnenlicht auf das Obj ektiv fällt,
ansonsten kann die Bildqualität beeinträchtigt werden.
• Richten Sie die Kamera für die nächtliche Aufnahme nicht durch ein Fensterglas, da hierdurch das
Bild gestört werden kann.
• Ri chten Sie die Kamera nicht auf Sträucher, Ä ste oder Objekte, d ie sich i m Wind bewegen können.
Ansonsten kann das Gerät im Bewegungserfassungsmode automatisch eingeschaltet werden und
unnötige Aufnahmen machen.
Die Kamera anschließen
Siehe Abb. C, Seite 4.
V. 02 – 07/01/2014 30 ©Velleman nv
Page 31

CCTVSETW1
1. Ziehen Sie die Antenne aus.
2. Verbin den Sie das Netzteil mit der K amera und danach mit einer S teckdose.
3. Stecken Sie das Netzteil in ein e geeignete Steckdose.
Den Monitor anschließeb
Siehe Abb. D, Seite 4.
1. Stecken Sie eine SD-Karte in den Monitor [5] (bis zu 32 Gb).
2. Verbin den Sie das Netzteil mit dem Monitor und d anach mit einer Steckdose [ 1].
3. Klappen Sie den Standfuß aus [4].
4. Halten Sie die EIN/AUS-Taste et w a 3-4 Sekunden gedrückt [2].
Ein Begrüßungsbildschirm erscheint einige Sekunden. Danach erscheint das Kamerabild.
Di e Kamera monti eren
Si ehe Abbildu ngen B1 bis B3, Seite 3.
1. Installieren Sie di e K a merahalteru ng in ein er Höhe von etwas 2.5 m.
2. Lockern Sie die Rändelmu tter .
3. Richten Sie die Kamera aus und fixieren Sie die Verbindung.
4. Befestigen S ie die Kamera an der Hal terung.
Bemerkung: SD-Karte
• Möchten Sie lange Aufnahmen machen, dann verwenden Sie eine SD-Karte hoher Kapazität.
• Schalten Sie den Monitor immer aus, bevor Si e d ie SD-Kar te entfernen.
7. Anwendung
Bildschirmanzeigen
1 Popup-Menüs
2 SD-Speicher-Status
3 Akku-Ladeanzeige
4 Status der Internetverbindung
5 Aufnahme-Status
6 Kameranummer - Signalstärke
7 Anzeige Bewegungserkennung
8 Popup-Menü-Tab
Den Monitor einschalten
• Halten S ie die EIN/AUS-Taste etwa 3-4 Sekunden gedrückt.
Ein Begrüßungsbildschirm erscheint einige Sekunden. Danach erscheint das Kamerabild.
Den Monitor ausschalten
• Halten S ie die EIN/AUS-Taste gedrückt bis der Bildschirm ausgeht.
Kameramodi: Quadmodus und Vollbildmodus
• Beim Einschalten wird der Quadmodus aktiviert (gleichzeitige Anzeige von max. 4 Kameras).
• Tippen Sie auf ein Kamerabild, um in den Vollbildmodus zu gelangen.
• Tippen Sie erneut auf das Kamerabild, um wieder in den Quadmodus zu gelangen.
Die Zoom-Funktion
• Diese Option funktioniert nur im Vollbildmodus.
• Im Quadmodus tippen Sie auf ein Kamerabild, um in den Vollbildmodus zu gelangen.
• Tippen Sie auf das Zoom-Symbol.
• Wählen Sie den Bereich, den Sie heranzoomen möchten, aus.
o Tippen Sie auf das Zoom out-Symbol, um diese Option auszuschalten.
o Tippen Sie wieder auf das Symbol, um in den Vollbildmodus zu gelangen.
V. 02 – 07/01/2014 31 ©Velleman nv
Page 32

CCTVSETW1
Symbol
Name
Funktion
Home
In einem Menü: Tippen Sie, um zum Hauptbildschirm
Zurück
In einem Menü: Tippen Sie, um eine Ebene zurückzugehen
Kameramodus
Tippen Sie, um zwischen den Kameramodi zu schalten:
Systemeinstellungen
Ti p pen Sie, um in die Systemeinstellungen zu gel angen
Lautstärke
Ti p pen Sie, um di e L a utstärke der Kamera zu regeln
Kapazität der SD-Karte
Der f r eie Speicher platz wi rd angezeigt
Batteriezustand
Der Batteriezustand wird angezeigt
Kameranummer
Die Kameranummer und die Signalstär ke werd en angezeigt
Manuelle Aufnahme
• Im Quadmodus, Tippen Sie auf das Aufnahmesymbol.
• Das Symbol blinkt während der Aufnahme.
• Tippen Sie wieder auf das Symbol, um die Aufnahme zu stoppen.
Si e könn en eine Au fnahme ebenfal ls programmieren. Für meh r Informationen, lesen Sie bi tte d ie
vollständige Bedienungsanleitung: www.velleman.eu (Bestell-Nr. CCTVSETW1).
Das Menü
Der Monitor verfügt über ein OSD-Anzeigemenü (OSD).
In diesem Menü f inden Sie die Geräteeinstellungen.
Um das Menü ein- und auszublenden, drücken Sie kurz die EIN/AUS-Taste.
Das Menü wird etwa 30 Sekunden angezeigt.
Wiedergabe
Eine Aufnahme anschauen:
1. I m Display, Tippen Sie auf und danach .
2. Wählen Sie den gewünschten Tag im Kalender aus.
Die Tage, die eine Aufnahme enthalten sind werden gehighlighted.
3. Wenn nötig, verwenden Sie den Scrollbalken (rechts), um durch die Aufnahmen zu blättern.
4. Tippen Sie auf die gewünschte Aufnahme.
Die Auf nahme w ird auf dem Bildschirm angezeigt.
o Tippen Sie auf einen leeren Bereich im Bildschirm, um den Ladebalken anzuzeigen.
o Ziehen Sie den Ladebalken für einen schnellen Vor- oder Rücklauf.
o Tippen Sie auf einen leeren Bereich im Bildschirm, um den Ladebalken auszublenden.
Fernüberwachung
• Mit der OMGuard-App (für iPhone, iPod, iPad und Android-Geräte verfü gbar) können S ie über
Smartphone auf die Kamera zugr eifen.
• Dies funktioniert nur wenn der Monitor in der Dockingstation steht und wenn Sie die Option "Connect
to Internet" eingeschaltet haben.
• Für mehr Informationen, lesen Sie bitte die vollständige Bedienungsanle itung: www.velleman.eu
(Bestell-Nr. CCTVSETW1).
Symbole und Tasten
Der B ildschirm ha t ver sch iedene Symbol e und Tasten:
zurückzukehren
- Scanmodus
V. 02 – 07/01/2014 32 ©Velleman nv
- Quadmodus
- Vollbildmodus
Page 33

CCTVSETW1
Symbol
Name
Funktion
Aufnahmestatus
Tippen Sie, um die Aufnahme manuell zu starten.
Mit de m Intranet
Wird angezeigt wenn das Gerät mit dem Intranet verbunden ist
Remote V iewing
Wir d angezeigt wenn R emote Viewing eingeschaltet ist.
Bewegungserkennung
Blinkt wenn das Gerät nach Bewegungserkennung eine
Programmierte Aufnahme
Wir d angezeigt wenn die program mierte Aufn ahme
Tab des Popup-Menüs
Tippen Sie, um die Popup-Menüs zu öffnen oder zu schließen.
Kei ne SD-Karte
Wir d angezeigt wenn Sie kein e S D-Karte ein geleg t haben oder
Heranzoomen
Tippen Sie, um ein Objekt heranzuzoomen.
Herauszoomen
Tippen Sie, um ein Objekt herauszuzoomen.
Videosystem
PAL
Videokompressionsformat
H.264
Video-Übertragung
2.4 GHz digital verschlüsselte Übertragung
Kamera
Aufnahme-Element: 1/4" CMOS-Sensor
Objekti v: 3.6 mm
Nachtsi ch t: 20 IR -LED s (Reichwei te: 8m)
IP-Schutzart: IP66
maximale
1 Kamera : 640 x 480 Pixel (VGA ) (25 FPS)
mehrere K ameras: 32 0 x 240 Pixel (QVGA) (25 FPS)
Akku (Monitor)
Kapazität: 1800 mAh Li-ion ( 3.7 V)
Diese Taste hat ein Leuchte:
Mit dem Internet
verbunden
verbunden
- Immer eingeschaltet: keine Aufnahme
- Blinken: Aufnahme
Wir d angezeigt wenn da s Gerät mit dem Intern et verbunden ist
Für mehr Informationen, l esen S ie bitte die vollständige Bedienungsanleitun g : www.v elleman.eu (BestellNr. CCTVSETW1).
Aufnahme macht.
eingeschaltet ist.
wenn diese beschädigt ist.
8. Erw eite rte Einstel lu ngen
Dieses Menü enthält:
• Kamera-Einstellungen (Pairing, Kamera ein, He lligkeit)
• Rekorder-Ei nstellungen (Bewegungserkennung, programmierte Aufnahme)
• Netzwerk-Einstellungen (Interneteinstellung, Sicherheitscode, Netzwerkinformation)
• Alarm-Einstellungen (Dauer, Melodie)
• Systemeinstellungen (Strom sparen, automatische Display-Sperre, Zeit, S peich er , System Upgrade,
Sprache)
Für mehr Informationen, l esen S ie bitte die vollständige Bedienungsanleitun g : www.v elleman.eu (BestellNr. CCTVSETW1).
9. Technische Daten
Blickwinkel: 64°
Aufnahmefrequenz
V. 02 – 07/01/2014 33 ©Velleman nv
Page 34

CCTVSETW1
Autonomie: max. 1. 5 Std.
Monitor
7" Berührungsbildschirm
Aufnahme
auf SDHC-Karte (nicht mitgeliefert) (max. 32 GB)
Aufnahmemodus
manuell / Timer / Bewegungssensor
Audio
eingebautes Mikr ofon
Netzverbindung
über Dockingstation
Fernüberwachung Plug-and-Play über Smartphone-Apps
digitaler Zoom
2x
Detektion Bildverlust
ja
Stromversorgung
5 Vd c / 1 A
Monitor: 184 x 128 x 28 mm
Gewicht
1600 g
(Dockingstation)
Abmessungen Kam e ra: 151 x 74 x 4 9 mm
Verwenden Sie dieses Gerät nur mit or iginellen Zubehö rteilen. Velleman NV über nimmt keine
Haftung für Schaden oder Verletzungen bei (falscher) Anwendung dieses Gerätes.
Für mehr Informationen zu diesem Produkt und die neueste Version dieser
Bedienungsanleitung, siehe www.perel.eu.
Alle Änderungen ohne vorherige Ankündigung vorbehalten.
Windows, Windows XP, Windows 2000, Windows Vista, Windows Aero, Windows 7, Windows 8, Windows
Mobi le, Windows Server sind eingetrag ene Warenzeich en von Microsoft Corporation in den VS und
anderen Ländern.
iPad, iPod, iPod touch, iPhone, Mac, iMac, MacBook, PowerBook, Power Mac, Mac OS sind Warenzeichen
von Apple Inc., eingetragen in den USA und anderen Ländern.
Android i st ein eingetr a g enes Warenzeich en von Googl e Inc.
© URHEBERRECHT
Velleman NV besitzt das Urheberrec ht für diese Bedienu ngsanleitung. Alle weltweiten Rechte
vorbehalten. Ohne vorherige schri f tli che Genehmigu ng des Urheb er s ist es nich t gestattet, diese
Bedienungsanleitung ganz oder in Teilen zu reprodu zieren, zu kopieren, zu übersetzen, zu bearbeiten
oder zu speichern.
V. 02 – 07/01/2014 34 ©Velleman nv
Page 35

CCTVSETW1
INSTALAÇÃO E INÍCIO RÁPIDO
1. Introdução
Aos cidadãos da União Europeia
Importantes informações sobre o meio ambiente no qu e respeita a este produto
Agradecemos o facto de t er escolhido a Perel! Leia atentament e as instruções d o man ual antes de usar o
aparelho. Caso o aparelho tenha sofrido algum dano durante o transporte não o instale e entre em
c on ta c t o com o seu dist r ibu i d or .
2. Documentaçã o d is pon ível
Este d ocu mento de screve a instalação e as i nstruções bási cas par a utilização da câmara. Para i n f ormação
mais detalhada sobre a utilização deste di spo sitivo, por favor con su lte o man u al (apenas em Inglês)
disponível em www.velleman.eu (pesquisa pelo código do produto CCTVSETW1).
3. Instruções de segurança
4. Normas gerais
Consulte a Garantia de servi ço e qualidade Velleman® na parte final deste manual do utilizador.
Este sím bolo no apar el ho ou na em balagem indica que, enquanto desperdíci os, poderão causar
danos no meio ambiente. Não d ei te o apa relh o (nem as pilhas, s e as houver) no lixo
doméstico; dirija-se a uma empresa especializada em reciclagem. Devolva o aparelho ao seu
distribuidor ou ao posto de reciclagem local. Respeite a legislação local relativa ao meio
ambiente.
Em caso de dúvidas, contacte com as autoridades locais para os resíduos.
Mantenha o aparelho fora do alcance de crianças e pes s oas não aut orizadas.
Risco de choque eléctrico ao tentar abrir o aparelho. Tocar em cabos l igados à corrente
pode pr ovocar choqu es el éctricos mortai s.
Desligue sempre o apar elho da tomada eléctrica se este não vai ser utilizado ou antes de
quaisquer operações de manutenção. Segure sempre na ficha para o desligar o cabo da
rede, nunca no próprio cabo.
Mantenha o aparelho protegido do p ó.
Mantenha o aparelho protegido de temperaturas extremas.
Certifique-se sempre que os orifícios de ventilação não se encontram bloquead os.
Proteja o aparelho de quedas e má utili zação. Evite usar força exces siva ao utilizar o
aparelho.
• Familiarize-se com o funcionamento do aparelho antes de o utilizar.
• Por razões de segurança, estão proíbidas quaisquer modificações do aparelho desde que não
autorizadas.
• Utilize o aparelho apenas para as aplicações descritas neste manual. Uma utilização incorrecta anula
a garantia completamente.
• Danos causados pelo nã o cu mpr imento das normas de segurança referidas neste manual anulam a
garantia e o seu distribuidor não será responsável por qualquer danos ou outros problemas daí
V. 02 – 07/01/2014 35 ©Velleman nv
Page 36

CCTVSETW1
1
entrada de antena
2
botão de reinicia liz ação
3
interruptor on/off
5
conexã o de al i mentaçã o
6
suporte da câmara
7
entrada para energia
8
conexã o de r ede RJ45
9
conexã o de al i mentaçã o
12
Sensor de luz
14
microfone
15
cabo de al imentação
16
botão para li gar
resultantes.
• Nunca utilize este aparel ho para violar as l eis de p rivacidade ou levar a cabo quaisquer actividad es
ilega is.
• Guarde este manual para que o possa consultar sempre que necessário.
5. Descrição
Ver as figuras da págin a 2 deste manual do uti l izador.
Monitor (pa inel traseiro)
4 entrada do cartão SD
AC
Suporte
AC
Câmara (frente)
10 estado da al imentação
11 estad o da ligação
Câmara (traseira)
13 conector de antena
6. Instalação d a Câmara
Ferramentas necessárias
• berbequim el éctr ico
• broca de alvenaria de 5 m m
• broca de alvenaria d e 15 mm
• chave Philips nr. 2
Normas gerais
• Recomenda-se que teste a câmara antes de a instalar n o local d ef initivo.
• Instale a câmara a cerca de 2.5 m do ch ão.
• Evi te posicionar a câmara de forma a que fique virada directamente para o sol visto que isso
prejudica a qualidade da imagem.
• Evi te apontar a lente da câmara directamente para um vidro transparente uma vez que os LEDs para
visão noctu rna provocarã o uma imagem desf ocad a d urante a noi te.
• Evi te apontar a câmara na direcção de arbustos, ra mos de á r v or e ou ob j ect os em m ov i me n to qu e s e
possa m mover naturalmente por causa do ven to. Isto é também por que s e necessitar de usar a
opçã o de detecção de movimento presente n o s of tware do PC para gravar movimen to, este p oderá
fazer gravaçõe s desnecessárias.
Instalar a câmara
Veja a i magem C na página 4.
V. 02 – 07/01/2014 36 ©Velleman nv
Page 37

CCTVSETW1
1. Estique a antena.
2. Ligue o adaptador à câmara e d epois à tomada de corrente na pared e.
3. Ligue o adaptador a uma to mada de corrente na p ar ede.
Instalar o monitor
Veja a i magem D na página 4.
1. Introduza um cart ão SD no monit or [ 5] (até 32 Gb).
2. Ligue o adaptador ao monit or e depois à tomada de corrente na parede [1].
3. V ire o suporte da câmara p ara o lado de fora [4 ].
4. Mantenha o botão de ligar pressionado durante cerca de 3-4 segundos [2].
O ecrã de Boa s-Vindas aparece durante alguns segu ndos, depoi s aparece a i magem da câmara.
Montag em da câmara
Veja as imagen s B1 a B3 na página 3.
1. Fixe o sup orte da câmara a cerca de 2.5 m do chã o.
2. D esaperte o parafuso
3. Escolha o ângulo de visão ap ropriado e aperte o suporte.
4. Coloque a câmara no sup orte
Nota: cartão SD
• Se estiver a planea r gravar víd eos l ongos, recom enda-se a uti lização de um car tão SD d e elevada
capacidade.
• Desligue sempre o dispositivo ant es de retirar o ca r tão SD.
7. Utilização
Partes do ecrã
1 menus pop-up
2 es tado do cart ão S D
3 estado da bateria
4 estado da l igação à internet
5 estado da gravação
6 número da câmara - força d o sin al
7 indicador de movimento
8 barra de menus pop-up
Ligue o ecrã
• Mantenha o botão de li gar pressionado durante cerca de 3-4 segundos.
O ecrã de Boa s-Vindas aparec e d urante algu ns segundos, depois ap ar ece a imagem da câmara.
Desligue o ecrã
• Mantenha o botão de ligar pressionado até o ecrã desli gar.
Modos da câmara: visão em quadrúpla e ec rã total.
• Quando liga o ecrã, a image m apar ece em quadrúpla (até 4 câmara s n u m ú nico ecrã).
• Toque em uma das câmaras par a visualizar a imagem em ecr ã total.
• Toque na i magem para voltar à visualizaçã o em quadrúpla.
Ampliação
• A ampliação fun ciona apen as no modo ecrã total.
• Se o ecrã esti ver no m odo imagem em quadrúp la, toque na câmara p r eten d ida para ver em e cr ã
total.
• Toque n o ícone de Zoom (ampl ia ção).
• Sel eccione a ár ea q ue pretende ampliar.
V. 02 – 07/01/2014 37 ©Velleman nv
Page 38

CCTVSETW1
A visua li zação remota só f unciona s e o monit or estive r no ap oio e se o tipo de ligação à interne t f or
Ícone
Nome
Função
Home
Num menu: Toque para voltar ao ecrã principal
Voltar
Num menu: Toque para retroceder um nível
Modo da câmara
Toque para sel eccionar o modo da câmara:
Confirgu ração do sistema
Toque p a ra aceder às configu rações do sistema
Capacidade
Toque para aju star o volume da câmara
Capacidade do cartão SD
M os t r a o es p a ço disponível no cartão SD
Estad o da bateria
Indica q u al o estado da bateria
o Toque no í cone zoom out para desl igar a ampli ação.
o Toque mai s u ma v ez para voltar ao mod o ecrã total.
Gravação manual de um vídeo
• Na imagem em quadrúpla, toque no ícone Record (gravar).
• O ícone fica intermitente enquanto decorrer a gravação.
• Toque n o í cone novamente para par ar a g r avação.
Poderá também agendar a gravação de vídeo. Consulte o manual completo em www.vel l eman. eu para
mais informação (pesquisa pelo código do produto C CTVSETW1).
Usar o menu
O ecrã tem um menu que aparece no próprio ecrã (OSD).
Este menu permite aceder às configu raçõe s do disposit ivo.
Para exibir ou esconder o menu, pressione brevemente o botão de ligação.
O menu p ermanece visível durante 30 segundos.
Reprodução
Para vi su alizar um vídeo gravado:
1. No ecrã, sel eccione e em segui d a .
2. Seleccione no calendário o dia q ue pretende visualizar.
Os dias que contêm vídeo aparecem d estacados.
3. Cas o seja n ecessário, use a b ar ra deslizante do lado direito para se deslocar p elas várias gravações.
4. Toque na gravação que pretende visualizar.
A gravaçã o aparece no ecrã.
o Toque e m qualquer espaço vazio d o ecrã para trazer de vol ta a b ar r a de progresso.
o Arraste a barra de progresso para avançar ou retoceder rapidamente o vídeo.
o Toque em qualquer espaço vazio do ecrã para esconder a barra de progresso.
Vigilância à distância
• Pode aceder à câmara r emotamente a partir d e um dispositivo móvel com a aplicação OM Guard
(disponível para iPho ne, iPod, iPad e Andro id)
•
"Ligado à Internet".
• Consulte o manual co mpleto em www.velleman.eu para mais informação (pesquisa pelo código do
produto CCTVSETW1).
Ícones e botões
O ecrãa tem vários ícones e botões:
- modo digitaliz ação
V. 02 – 07/01/2014 38 ©Velleman nv
- vista em quadrúpla
- ecrã total
Page 39

CCTVSETW1
Ícone
Nome
Função
Númer o da câ mara
Mostra o número da câmara e a força do sinal
Estad o da gr avação
Toque para iniciar a g r avação manual.
Ligado à internet
Aparece quando o dispositivo está ligado à internet
Ligado à intranet
Aparece quando o dispositivo está ligado à intranet
Visualização Remota
Aparece qu an do está a decorrer a visualização remota
Detecção de Movimen to
Pi sca sempre que o disposi tivo estiver a grav ar após detecçã o
Gravação agendada
Aparece qu an do estiver a ser f eita uma gravação que foi
Aparece a barra de menus
Tocar para abrir ou fechar os menus
Sem cartão SD
Aparece qu an do não existe car tão SD ou está d anificado.
Mais zoom
Cli car p ara aumentar o zoom nu m objecto
Menos zoom
Clicar para diminuir o zoom num objecto
formato de vídeo
PAL
compressão de vídeo
H.264
tran smissão d e vídeo
transmissão digital encriptada de 2.4 GHz
camera
element o de imagem: sens or CMOS 1/4"
len tes: 3.6 mm
ângulo da lente: 64°
visão noturna: 20 IR LEDs (8 m alcance)
grau de protecção IP: IP66
velocidade máxima de
uma só câmara: 640 x 480 píxeis (VGA) (25 FPS)
O botão tem uma luz indicadora do estado:
Consulte o manual co mpleto em www.velleman.eu para mais informação (pesquisa pelo código do
produto CCTVSETW1).
- Constante: não está a gravar
- I n ter mitente: a gravar
de movimento
agendada
8. Configurações avançadas
O menu Configurações inclui opções para:
• Configuração da câmara (e mpar elhamento d a câmara, brilho)
• Configuração da gravação (detecção de movimento, gravação programada)
• Configuração de rede (ligação à internet, código de segurança, informação da rede)
• Configuração do alarme (tempo, melodia)
• Configuraçã o do s istema (poupanç a de energ ia , bloqueio do ecrã, hora, format o de armazenamento,
actualização do sistema, idioma)
Consulte o manual co mpleto em www.velleman.eu para mais informação (pesquisa pelo código do
produto CCTVSETW1).
9. Especificações
gravaçao
V. 02 – 07/01/2014 39 ©Velleman nv
Page 40

CCTVSETW1
várias câmaras: 320 x 240 pí xeis (QVGA) (25 FPS)
bateria do monitor
capacidade: 1800 mAh Li-ion (3.7 V)
tempo de funcionamento: no máximo 1.5 h
ta m a n h o d o m on itor
ecrã táctil 7"
gravação
em cartão SDHC (não incl.) (máx. 32 GB )
modo de gravação
manual / temporizado / movimento
áudio
microfone in corpor ad o
conexã o de r ede
através de estação de acopl amento
vigil ância à distânci a: lig ação e uti lização atrav és de ap licações para smart
fonte de ali mentaçã o
5 Vd c / 1 A
monitor: 184 x 128 x 28 mm
peso
1600 g
zoom digital 2x
phone
detecção de perda de vídeo sim
(estaçã o de acoplament o e
câmara)
dimensões cam er a: 15 1 x 7 4 x 49 mm
Util ize este aparelho apenas com acessórios originais. A Velleman NV não ser á responsável
por quaisquer danos ou lesões causados pelo uso (indevido) d o aparelho.
Para mai s informação sobre este produto e para aceder à versão mais recente deste manual
do utilizador, visite a nossa página www.perel.eu.
Podem alterar-se as especificações e o conteúdo deste manual sem aviso pr évio.
Windows, Windows XP, Windows 2000, Windows Vista, Windows Aero, Windows 7, Windows 8, Windows
Mobile, Wi ndows Server são marcas da Microsoft Corporation r e gistadas ta nto no s Estado s Unidos como
em outros paí ses. iPad, iPod, iPod touch, iPhone, Mac, iMac, MacBook, PowerBook, Power Mac, Mac OS
são ma rcas da A pple I nc., registadas nos U .S. e em outros países.
iPad, iPod, iPo d táctil, iP hone, Mac, iMac, MacBook, PowerBook, Power Mac, Mac OS são marca s
registadas da Apple Inc., registadas n os E.U.A. e em outros países.
Android é uma marca registada da Google I nc.
© DIREITOS DE AUTOR
A Velleman NV detém os di reitos de autor deste manual d o utilizador. Todos os direitos
mundiais reservados. É estritamente proibido reproduzir, traduzir, copiar, editar e gravar este manual
do utilizador ou partes deste sem prévia autorização escrita por parte da detentora dos direitos.
V. 02 – 07/01/2014 40 ©Velleman nv
Page 41

Velleman® Service and Quality Warranty
Since its foundation in 1972, Velleman® acquired extensive experience in the
electronics world and currently distributes its products in over 85 countries.
All our products fulfil strict quality requirements and legal stipulations in the EU. In
order to ensure the quality, our products regularly go through an extra quality
check, both by an internal quality department and by specialized external
organisations. If, all precautionary measures notwithstanding, problems should
occur, please make appeal to our warranty (see guarantee conditions).
General Warranty Conditions Concerning Consumer Products (for EU):
• All consumer products are subject to a 24-month warranty on production flaws
and defective material as from the original date of purchase.
• Velleman® can decide to replace an article with an equivalent article, or to refund
the retail value totally or partially when the complaint is valid and a free repair or
replacement of the article is impossible, or if the expenses are out of proportion.
You will be delivered a replacing article or a refund at the value of 100% of the
purchase price in case of a flaw occurred in the first year after the date of purchase
and delivery, or a replacing article at 50% of the purchase price or a refund at the
value of 50% of the retail value in case of a flaw occurred in the second year after
the date of purchase and delivery.
• Not covered by warranty:
- all direct or indirect damage caused after delivery to the article (e.g. by oxidation,
shocks, falls, dust, dirt, humidity...), and by the article, as well as its contents (e.g.
data loss), compensation for loss of profits;
- consumable goods, parts or accessories that are subject to an aging process
during normal use, such as batteries (rechargeable, non-rechargeable, built-in or
replaceable), lamps, rubber parts, drive belts... (unlimited list);
- flaws resulting from fire, water damage, lightning, accident, natural disaster,
etc.…;
- flaws caused deliberately, negligently or resulting from improper handling,
negligent maintenance, abusive use or use contrary to the manufacturer’s
instructions;
- damage caused by a commercial, professional or collective use of the article (the
warranty validity will be reduced to six (6) months when the article is used
professionally);
- damage resulting from an inappropriate packing and shipping of the article;
- all damage caused by modification, repair or alteration performed by a third party
without written permission by Velleman®.
• Articles to be repaired must be delivered to your Velleman® dealer, solidly
packed (preferably in the original packaging), and be completed with the original
receipt of purchase and a clear flaw description.
• Hint: In order to save on cost and time, please reread the manual and check if the
flaw is caused by obvious causes prior to presenting the article for repair. Note that
returning a non-defective article can also involve handling costs.
• Repairs occurring after warranty expiration are subject to shipping costs.
• The above conditions are without prejudice to all commercial warranties.
The above enumeration is subject to modification according to the article
(see article’s manual).
Velleman® service- en kwaliteitsgarantie
Velleman® heeft sinds zijn oprichting in 1972 een ruime ervaring opgebouwd in de
elektronicawereld en verdeelt op dit moment producten in meer dan 85 landen. Al
onze producten beantwoorden aan strikte kwaliteitseisen en aan de wettelijke
bepalingen geldig in de EU. Om de kwaliteit te waarborgen, ondergaan onze
producten op regelmatige tijdstippen een extra kwaliteitscontrole, zowel door onze
eigen kwaliteitsafdeling als door externe gespecialiseerde organisaties. Mocht er
ondanks deze voorzorgen toch een probleem optreden, dan kunt u steeds een
beroep doen op onze waarborg (zie waarborgvoorwaarden).
Algemene waarborgvoorwaarden consumentengoederen (voor Europese
Unie):
• Op alle consumentengoederen geldt een garantieperiode van 24 maanden op
productie- en materiaalfouten en dit vanaf de oorspronkelijke aankoopdatum.
• Indien de klacht gegrond is en een gratis reparatie of vervanging van een artikel
onmogelijk is of indien de kosten hiervoor buiten verhouding zijn, kan Velleman®
beslissen het desbetreffende artikel te vervangen door een gelijkwaardig artikel of
de aankoopsom van het artikel gedeeltelijk of volledig terug te betalen. In dat geval
krijgt u een vervangend product of terugbetaling ter waarde van 100% van de
aankoopsom bij ontdekking van een gebrek tot één jaar na aankoop en levering, of
een vervangend product tegen 50% van de kostprijs of terugbetaling van 50 % bij
ontdekking na één jaar tot 2 jaar.
• Valt niet onder waarborg:
- alle rechtstreekse of onrechtstreekse schade na de levering veroorzaakt aan het
toestel (bv. door oxidatie, schokken, val, stof, vuil, vocht...), en door het toestel,
alsook zijn inhoud (bv. verlies van data), vergoeding voor eventuele winstderving.
- verbruiksgoederen, onderdelen of hulpstukken die onderhevig zijn aan
veroudering door normaal gebruik zoals bv. batterijen (zowel oplaadbare als nietoplaadbare, ingebouwd of vervangbaar), lampen, rubberen onderdelen,
aandrijfriemen... (onbeperkte lijst).
- defecten ten gevolge van brand, waterschade, bliksem, ongevallen,
natuurrampen, enz.
- defecten veroorzaakt door opzet, nalatigheid of door een onoordeelkundige
behandeling, slecht onderhoud of abnormaal gebruik of gebruik van het toestel
strijdig met de voorschriften van de fabrikant.
- schade ten gevolge van een commercieel, professioneel of collectief gebruik van
het apparaat (bij professioneel gebruik wordt de garantieperiode herleid tot 6
maand).
- schade veroorzaakt door onvoldoende bescherming bij transport van het
apparaat.
- alle schade door wijzigingen, reparaties of modificaties uitgevoerd door derden
zonder toestemming van Velleman®.
• Toestellen dienen ter reparatie aangeboden te worden bij uw Velleman®verdeler. Het toestel dient vergezeld te zijn van het oorspronkelijke aankoopbewijs.
Zorg voor een degelijke verpakking (bij voorkeur de originele verpakking) en voeg
een duidelijke foutomschrijving bij.
• Tip: alvorens het toestel voor reparatie aan te bieden, kijk nog eens na of er geen
voor de hand liggende reden is waarom het toestel niet naar behoren werkt (zie
handleiding). Op deze wijze kunt u kosten en tijd besparen. Denk eraan dat er ook
voor niet-defecte toestellen een kost voor controle aangerekend kan worden.
• Bij reparaties buiten de waarborgperiode zullen transportkosten aangerekend
worden.
• Elke commerciële garantie laat deze rechten onverminderd.
Bovenstaande opsomming kan eventueel aangepast worden naargelang de
aard van het product (zie handleiding van het betreffende product).
Garantie de service et de qualité Velleman®
Depuis 1972, Velleman® a gagné une vaste expérience dans le secteur de
l’électronique et est actuellement distributeur dans plus de 85 pays.
Tous nos produits répondent à des exigences de qualité rigoureuses et à des
dispositions légales en vigueur dans l’UE. Afin de garantir la qualité, nous
soumettons régulièrement nos produits à des contrôles de qualité supplémentaires,
tant par notre propre service qualité que par un service qualité externe. Dans le
cas improbable d’un défaut malgré toutes les précautions, il est possible d’invoquer
notre garantie (voir les conditions de garantie).
Conditions générales concernant la garantie sur les produits grand public
(pour l’UE) :
• tout produit grand public est garanti 24 mois contre tout vice de production ou de
matériaux à dater du jour d’acquisition effective ;
• si la plainte est justifiée et que la réparation ou le remplacement d’un article est
jugé impossible, ou lorsque les coûts s’avèrent disproportionnés, Velleman®
s’autorise à remplacer ledit article par un article équivalent ou à rembourser la
totalité ou une partie du prix d’achat. Le cas échéant, il vous sera consenti un
article de remplacement ou le remboursement complet du prix d’achat lors d’un
défaut dans un délai de 1 an après l’achat et la livraison, ou un article de
remplacement moyennant 50% du prix d’achat ou le remboursement de 50% du
prix d’achat lors d’un défaut après 1 à 2 ans.
• sont par conséquent exclus :
- tout dommage direct ou indirect survenu à l’article après livraison (p.ex.
dommage lié à l’oxydation, choc, chute, poussière, sable, impureté…) et provoqué
par l’appareil, ainsi que son contenu (p.ex. perte de données) et une indemnisation
éventuelle pour perte de revenus ;
- toute pièce ou accessoire nécessitant un remplacement causé par un usage
normal comme p.ex. piles (rechargeables comme non rechargeables, intégrées ou
remplaçables), ampoules, pièces en caoutchouc, courroies… (liste illimitée) ;
- tout dommage qui résulte d’un incendie, de la foudre, d’un accident, d’une
catastrophe naturelle, etc. ;
- out dommage provoqué par une négligence, volontaire ou non, une utilisation ou
un entretien incorrect, ou une utilisation de l’appareil contraire aux prescriptions du
fabricant ;
- tout dommage à cause d’une utilisation commerciale, professionnelle ou
collective de l’appareil (la période de garantie sera réduite à 6 mois lors d’une
utilisation professionnelle) ;
- tout dommage à l’appareil qui résulte d’une utilisation incorrecte ou différente que
celle pour laquelle il a été initialement prévu comme décrit dans la notice ;
- tout dommage engendré par un retour de l’appareil emballé dans un
conditionnement non ou insuffisamment protégé.
- toute réparation ou modification effectuée par une tierce personne sans
l’autorisation explicite de SA Velleman® ; - frais de transport de et vers Velleman®
si l’appareil n’est plus couvert sous la garantie.
• toute réparation sera fournie par l’endroit de l’achat. L’appareil doit
nécessairement être accompagné du bon d’achat d’origine et être dûment
conditionné (de préférence dans l’emballage d’origine avec mention du défaut) ;
• tuyau : il est conseillé de consulter la notice et de contrôler câbles, piles, etc.
avant de retourner l’appareil. Un appareil retourné jugé défectueux qui s’avère en
bon état de marche pourra faire l’objet d’une note de frais à charge du
consommateur ;
• une réparation effectuée en-dehors de la période de garantie fera l’objet de frais
de transport ;
• toute garantie commerciale ne porte pas atteinte aux conditions susmentionnées.
La liste susmentionnée peut être sujette à une complémentation selon le type
de l’article et être mentionnée dans la notice d’emploi.
Garantía de servicio y calidad Velleman®
Desde su fundación en 1972 Velleman® ha adquirido una amplia experiencia
como distribuidor en el sector de la electrónica en más de 85 países. Todos
nuestros productos responden a normas de calidad rigurosas y disposiciones
legales vigentes en la UE. Para garantizar la calidad, sometemos nuestros
productos regularmente a controles de calidad adicionales, tanto a través de
nuestro propio servicio de calidad como de un servicio de calidad externo. En el
caso improbable de que surgieran problemas a pesar de todas las precauciones,
es posible recurrir a nuestra garantía (véase las condiciones de garantía).
Condiciones generales referentes a la garantía sobre productos de venta al
público (para la Unión Europea):
• Todos los productos de venta al público tienen un perìodo de garantìa de 24
meses contra errores de producción o errores en materiales desde la adquisición
original;
• Si la queja está fundada y si la reparación o sustitución de un artìculo no es
posible, o si los gastos son desproporcionados, Velleman® autoriza reemplazar el
artículo por un artículo equivalente o reembolsar la totalidad o una parte del precio
de compra. En este caso, usted recibirá un artículo de recambio o el reembolso
Page 42

completo del precio de compra si encuentra algún fallo hasta un año después de la
compra y entrega, o un artículo de recambio al 50% del precio de compra o el
reembolso del 50% del precio de compra si encuentra un fallo después de 1 año y
hasta los 2 años después de la compra y entrega.
Por consiguiente, están excluidos entre otras cosas:
- todos los daños causados directa o indirectamente al aparato (p.ej. por oxidación,
choques, caída,...) y a su contenido (p.ej. pérdida de datos) después de la entrega
y causados por el aparato, y cualquier indemnización por posible pérdida de
ganancias;
- partes o accesorios, que estén expuestos al desgaste causado por un uso
normal, como por ejemplo baterías (tanto recargables como no recargables,
incorporadas o reemplazables), bombillas, partes de goma, etc. (lista ilimitada);
- defectos causados por un incendio, daños causados por el agua, rayos,
accidentes, catástrofes naturales, etc.;
- defectos causados a conciencia, descuido o por malos tratos, un mantenimiento
inapropiado o un uso anormal del aparato contrario a las instrucciones del
fabricante;
- daños causados por un uso comercial, profesional o colectivo del aparato (el
período de garantía se reducirá a 6 meses con uso profesional);
- daños causados por un uso incorrecto o un uso ajeno al que está previsto el
producto inicialmente como está descrito en el manual del usuario;
- daños causados por una protección insuficiente al transportar el aparato.
- daños causados por reparaciones o modificaciones efectuadas por una tercera
persona sin la autorización explícita de Velleman®;
- se calcula gastos de transporte de y a Velleman® si el aparato ya no está
cubierto por la garantía.
• Cualquier artìculo que tenga que ser reparado tendrá que ser devuelto a su
distribuidor Velleman®. Devuelva el aparato con la factura de compra original y
transpórtelo en un embalaje sólido (preferentemente el embalaje original). Incluya
también una buena descripción del fallo;
• Consejo: Lea el manual del usuario y controle los cables, las pilas, etc. antes de
devolver el aparato. Si no se encuentra un defecto en el artículo los gastos podrían
correr a cargo del cliente;
• Los gastos de transporte correrán a carga del cliente para una reparación
efectuada fuera del período de garantía.
• Cualquier gesto comercial no disminuye estos derechos.
La lista previamente mencionada puede ser adaptada según el tipo de
artículo (véase el manual del usuario del artículo en cuestión).
Velleman® Service- und Qualitätsgarantie
Seit der Gründung in 1972 hat Velleman® sehr viel Erfahrung als Verteiler in der
Elektronikwelt in über 85 Ländern aufgebaut.
Alle Produkte entsprechen den strengen Qualitätsforderungen und gesetzlichen
Anforderungen in der EU. Um die Qualität zu gewährleisten werden unsere
Produkte regelmäßig einer zusätzlichen Qualitätskontrolle unterworfen, sowohl von
unserer eigenen Qualitätsabteilung als auch von externen spezialisierten
Organisationen. Sollten, trotz aller Vorsichtsmaßnahmen, Probleme auftreten,
nehmen Sie bitte die Garantie in Anspruch (siehe Garantiebedingungen).
Allgemeine Garantiebedingungen in Bezug auf Konsumgüter (für die
Europäische Union):
• Alle Produkte haben für Material- oder Herstellungsfehler eine Garantieperiode
von 24 Monaten ab Verkaufsdatum.
• Wenn die Klage berechtigt ist und falls eine kostenlose Reparatur oder ein
Austausch des Gerätes unmöglich ist, oder wenn die Kosten dafür
unverhältnismäßig sind, kann Velleman® sich darüber entscheiden, dieses Produkt
durch ein gleiches Produkt zu ersetzen oder die Kaufsumme ganz oder teilweise
zurückzuzahlen. In diesem Fall erhalten Sie ein Ersatzprodukt oder eine
Rückzahlung im Werte von 100% der Kaufsumme im Falle eines Defektes bis zu 1
Jahr nach Kauf oder Lieferung, oder Sie bekommen ein Ersatzprodukt im Werte
von 50% der Kaufsumme oder eine Rückzahlung im Werte von 50 % im Falle
eines Defektes im zweiten Jahr.
• Von der Garantie ausgeschlossen sind:
- alle direkten oder indirekten Schäden, die nach Lieferung am Gerät und durch
das Gerät verursacht werden (z.B. Oxidation, Stöße, Fall, Staub, Schmutz,
Feuchtigkeit, ...), sowie auch der Inhalt (z.B. Datenverlust), Entschädigung für
eventuellen Gewinnausfall.
- Verbrauchsgüter, Teile oder Zubehörteile, die durch normalen Gebrauch dem
Verschleiß ausgesetzt sind, wie z.B. Batterien (nicht nur aufladbare, sondern auch
nicht aufladbare, eingebaute oder ersetzbare), Lampen, Gummiteile, Treibriemen,
usw. (unbeschränkte Liste).
- Schäden verursacht durch Brandschaden, Wasserschaden, Blitz, Unfälle,
Naturkatastrophen, usw.
- Schäden verursacht durch absichtliche, nachlässige oder unsachgemäße
Anwendung, schlechte Wartung, zweckentfremdete Anwendung oder
Nichtbeachtung von Benutzerhinweisen in der Bedienungsanleitung.
- Schäden infolge einer kommerziellen, professionellen oder kollektiven
Anwendung des Gerätes (bei gewerblicher Anwendung wird die Garantieperiode
auf 6 Monate zurückgeführt).
- Schäden verursacht durch eine unsachgemäße Verpackung und
unsachgemäßen Transport des Gerätes.
- alle Schäden verursacht durch unautorisierte Änderungen, Reparaturen oder
Modifikationen, die von einem Dritten ohne Erlaubnis von Velleman®
vorgenommen werden.
• Im Fall einer Reparatur, wenden Sie sich an Ihren Velleman®-Verteiler. Legen
Sie das Produkt ordnungsgemäß verpackt (vorzugsweise die Originalverpackung)
und mit dem Original-Kaufbeleg vor. Fügen Sie eine deutliche Fehlerbeschreibung
hinzu.
• Hinweis: Um Kosten und Zeit zu sparen, lesen Sie die Bedienungsanleitung
nochmals und überprüfen Sie, ob es keinen auf de Hand liegenden Grund gibt, ehe
Sie das Gerät zur Reparatur zurückschicken. Stellt sich bei der Überprüfung des
Gerätes heraus, dass kein Geräteschaden vorliegt, könnte dem Kunden eine
Untersuchungspauschale berechnet.
• Für Reparaturen nach Ablauf der Garantiefrist werden Transportkosten
berechnet.
• Jede kommerzielle Garantie lässt diese Rechte unberührt.
Die oben stehende Aufzählung kann eventuell angepasst werden gemäß der
Art des Produktes (siehe Bedienungsanleitung des Gerätes).
Garantia de serviço e de qualidade Velleman®
Desde a sua fundação em 1972 Velleman® tem adquirido uma amplia experiencia
no sector da eletrónica com uma distribuição em mais de 85 países.
Todos os nossos produtos respondem a exigências rigorosas e a disposições
legais em vigor na UE. Para garantir a qualidade, submetemos regularmente os
nossos produtos a controles de qualidade suplementares, com o nosso próprio
serviço qualidade como um serviço de qualidade externo. No caso improvável de
um defeito mesmo com as nossas precauções, é possível invocar a nossa
garantia. (ver as condições de garantia).
Condições gerais com respeito a garantia sobre os produtos grande público
(para a UE):
• qualquer produto grande público é garantido 24 mês contra qualquer vício de
produção ou materiais a partir da data de aquisição efectiva;
• no caso da reclamação ser justificada e que a reparação ou substituição de um
artigo é impossível, ou quando os custo são desproporcionados, Velleman®
autoriza-se a substituir o dito artigo por um artigo equivalente ou a devolver a
totalidade ou parte do preço de compra. Em outro caso, será consentido um artigo
de substituição ou devolução completa do preço de compra no caso de um defeito
no prazo de 1 ano depois da data de compra e entrega, ou um artigo de
substituição pagando o valor de 50% do preço de compra ou devolução de 50% do
preço de compra para defeitos depois de 1 a 2 anos.
• estão por consequência excluídos:
- todos os danos directos ou indirectos depois da entrega do artigo (p.ex. danos
ligados a oxidação, choques, quedas, poeiras, areias, impurezas…) e provocado
pelo aparelho, como o seu conteúdo (p.ex. perca de dados) e uma indemnização
eventual por perca de receitas;
- consumíveis, peças ou acessórios sujeitos a desgaste causado por um uso
normal, como p.ex. pilhas (recarregáveis, não recarregáveis, incorporadas ou
substituìveis), lâmpadas, peças em borracha correias… (lista ilimitada);
- todos os danos que resultem de um incêndio, raios, de um acidente, de una
catastrophe natural, etc.;
- danos provocados por negligencia, voluntária ou não, uma utilização ou
manutenção incorrecta, ou uma utilização do aparelho contrária as prescrições do
fabricante ;
- todos os danos por causa de uma utilização comercial, profissional ou colectiva
do aparelho ( o período de garantia será reduzido a 6 meses para uma utilização
profissional);
- todos os danos no aparelho resultando de uma utilização incorrecta ou diferente
daquela inicialmente prevista e descrita no manual de utilização;
- todos os danos depois de uma devolução não embalada ou mal protegida ao
nível do acondicionamento.
- todas as reparações ou modificações efectuadas por terceiros sem a autorização
de SA Velleman®;
- despesas de transporte de e para Velleman® se o aparelho não estiver coberto
pela garantia.
• qualquer reparação será fornecida pelo local de compra. O aparelho será
obrigatoriamente acompanhado do talão ou factura de origem e bem
acondicionado (de preferência dentro da embalagem de origem com indicação do
defeito ou avaria);
• dica: aconselha-mos a consulta do manual e controlar cabos, pilhas, etc. antes
de devolver o aparelho. Um aparelho devolvido que estiver em bom estado será
cobrado despesas a cargo do consumidor;
• uma reparação efectuada fora da garantia, será cobrado despesas de transporte;
• qualquer garantia comercial não prevalece as condições aqui mencionadas.
A lista pode ser sujeita a um complemento conforme o tipo de artigo e estar
mencionada no manual de utilização.
Imported for PEREL by Velleman nv
Legen Heirweg 33, 9890 Gavere, Belgium
Made in PRC
www.perel.eu
Page 43

R&TTE Declaration of Conformity
We, Velleman NV Address:
Legen Heirweg, 33
9890 Gavere
Belgium
declare on our own responsibility that the finished product:
Brand:
Perel
Trade name:
WIRELESS TOUCH-SCREEN SECURITY SYSTEM WITH
RECORDING AND NETWORK
Type or model:
CCTVSETW1
constituting the subject of this declaration, conforms with the essential requirements and
other relevant stipulations of the R&TTE Directive (2011/65/EU).
The product is in conformity with the following standards:
GPSD:
EN 60950-1:2006 +A11:2009 +A1:2010 +A12:2011
EMC:
EN 301 489-1 V1.9.2
EN 301 489-14 V2.2.1
R&TTE:
EN 300 328 V1.7.1
Power supply model nr. : KSAS0060500100VED
LVD:
EN 60950-1:2006 +A11:2009 +A1:2010 +A12:2011
EMC:
EN55013:2001 +A1:2003 +A2:2006
EN 55020:2007 +A11:2011
EN 55022:2010
EN 55024:2010
EN 61000-3-2:2006 +A1:2009 +A2:2009
EN 61000-3-3:2008
Technical data are available and can be obtained from the address above.
Place and date of issue:
Gavere, 20/12/2013
Authorised signatory for the company:
Vince Van Balberghe - Quality Manager
R&TTE Verklaring van overeenstemming
Wij, Velleman NV A dres:
Legen Heirweg, 33
9890 Gavere
België
verklaren op eigen verantwoordelijkheid dat het afgewerkte product:
Merk:
Perel
Handelsnaam:
DRAADLOOS BEVEILIGINGSSYSTEEM MET
AANRAAKSCHERM, OPNAMEFUNCTIE EN
NETWERKAANSLUITING
Type of model:
CCTVSETW1
dat het voorwerp uitmaakt van deze verklaring, voldoet aan de essentiële vereisten en
andere relevante bepalingen van de R&TTE Richtlijn (2011/65/EU).
Het product voldoet aan de volgende normen:
GPSD:
EN 60950-1:2006 +A11:2009 +A1:2010 +A12:2011
EMC:
EN 301 489-1 V1.9.2
EN 301 489-14 V2.2.1
R&TTE:
EN 300 328 V1.7.1
Voeding model nr. : KSAS0060500100VED
LVD:
EN 60950-1:2006 +A11:2009 +A1:2010 +A12:2011
EMC:
EN55013:2001 +A1:2003 +A2:2006
EN 55020:2007 +A11:2011
EN 55022:2010
EN 55024:2010
EN 61000-3-2:2006 +A1:2009 +A2:2009
EN 61000-3-3:2008
Technische gegevens zijn beschikbaar en kunnen worden aangevraagd via bovenstaand
adres.
Plaats en datum van uitgifte:
Gavere, 20/12/2013
Bevoegde ondertekenaar voor de firma:
Vince Van Balberghe - Quality Manager
Page 44

Déclaration de conformité R&TTE
Nous, Velleman NV Adresse :
Legen Heirweg, 33
9890 Gavere
Belgique
déclarons sous notre propre responsabilité que le produit fini :
Marque :
Perel
Denomination commerciale :
SYSTÈME DE VIDÉOSURVEILLANCE SANS FIL AVEC
MONITEUR TACTILE, FONCTION D'ENREGISTREMENT
ET CONNEXION RÉSEAU
Type ou modèle :
CCTVSETW1
faisant l’objet de la présente déclaration, satisfait aux exigences essentielles et toute autre
stipulation pertinente de la directive R&TTE Directive (2011/65/EU).
Le produit est conforme aux normes suivantes :
GPSD:
EN 60950-1:2006 +A11:2009 +A1:2010 +A12:2011
EMC:
EN 301 489-1 V1.9.2
EN 301 489-14 V2.2.1
R&TTE:
EN 300 328 V1.7.1
Alimentation modèle no. : KSAS0060500100VED
LVD:
EN 60950-1:2006 +A11:2009 +A1:2010 +A12:2011
EMC:
EN55013:2001 +A1:2003 +A2:2006
EN 55020:2007 +A11:2011
EN 55022:2010
EN 55024:2010
EN 61000-3-2:2006 +A1:2009 +A2:2009
EN 61000-3-3:2008
Les données techniques sont disponibles et peuvent être obtenues à l'adresse ci-dessus.
Place et date d’émission :
Gavere, 20/12/2013
Signataire autorisé de la société :
Vince Van Balberghe - Quality Manager
R&TTE Konformitätserklärung
Wir, Velleman NV Adresse:
Legen Heirweg, 33
9890 Gavere
Belgien
erklären voll verantwortlich dass nachfolgendes Produkt:
Marke:
Perel
Markenname:
DRAHTLOSES ÜBERWACHUNGSSYSTEM MIT
BERÜHRUNGSBILDSCHIRM, AUFNAHME-FUNKTION UND
NETZWERKANSCHLUSS
Typ oder Modell:
CCTVSETW1
auf das sich diese Erklärung bezieht, den grundlegenden Anforderungen und anderen
relevanten Vereinbarungen der R&TTE-Richtlinie (2011/65/EU) entspricht.
Das Produkt entspricht den folgenden Normen:
GPSD:
EN 60950-1:2006 +A11:2009 +A1:2010 +A12:2011
EMC:
EN 301 489-1 V1.9.2
EN 301 489-14 V2.2.1
R&TTE:
EN 300 328 V1.7.1
Stromversorgung KSAS0060500100VED
LVD:
EN 60950-1:2006 +A11:2009 +A1:2010 +A12:2011
EMC:
EN55013:2001 +A1:2003 +A2:2006
EN 55020:2007 +A11:2011
EN 55022:2010
EN 55024:2010
EN 61000-3-2:2006 +A1:2009 +A2:2009
EN 61000-3-3:2008
Die technische Dokumentation zu den oben gennanten Produkten wird bei oben erwähnter
Adresse geführt.
Ort und Datum der Ausstellung:
Gavere, 20/12/2013
Bevollmächtigte Person:
Vince Van Balberghe - Quality Manager
Page 45

Declaración de conformidad R&TTE
Nosotros, Velleman NV Dirección:
Legen Heirweg, 33
9890 Gavere
Bélgica
declaramos bajo nuestra sola responsabilidad que el producto mencionado a
continuación:
Marca:
Perel
Denominación comercial:
SISTEMA DE VIGILANCIA INALÁMBRICO CON
PANTALLA TÁCTIL, FUNCIÓN DE GRABACIÓN Y
CONEXIÓN DE RED
Tipo o modelo:
CCTVSETW1
cumple los requisitos esenciales y las otras estipulaciones relevantes de la Directiva
R&TTE (2011/65/EU).
Es conforme a las siguientes normas:
GPSD:
EN 60950-1:2006 +A11:2009 +A1:2010 +A12:2011
EMC:
EN 301 489-1 V1.9.2
EN 301 489-14 V2.2.1
R&TTE:
EN 300 328 V1.7.1
Alimentación: KSAS0060500100VED
LVD:
EN 60950-1:2006 +A11:2009 +A1:2010 +A12:2011
EMC:
EN55013:2001 +A1:2003 +A2:2006
EN 55020:2007 +A11:2011
EN 55022:2010
EN 55024:2010
EN 61000-3-2:2006 +A1:2009 +A2:2009
EN 61000-3-3:2008
Los datos técnicos están disponibles y pueden ser solicitados a la dirección de arriba.
Lugar y fecha de emisión:
Gavere, 20/12/2013
Responsable de la empresa:
Vince Van Balberghe - Quality Manager
Declaração de conformidade R&TTE
Nós, Velleman NV Endereço:
Legen Heirweg, 33
9890 Gavere
Bélgica
declaramos a nossa responsabilidade relativamente ao produto abaixo mencionado:
Marca:
Perel
Designação comercial:
SISTEMA DE SEGURANÇA COM ECRÃ TÁCTIL SEM
FIOS, GRAVAÇÃO E LIGAÇAO À REDE
Tipo ou modelo:
CCTVSETW1
cumpre com os requisitos essenciais e quaisquer outras disposições relevantes as
Directiva R&TTE (2011/65/EU).
Este produto está conforme a normas a seguir indicadas:
GPSD:
EN 60950-1:2006 +A11:2009 +A1:2010 +A12:2011
EMC:
EN 301 489-1 V1.9.2
EN 301 489-14 V2.2.1
R&TTE:
EN 300 328 V1.7.1
Alimentação : KSAS0060500100VED
LVD:
EN 60950-1:2006 +A11:2009 +A1:2010 +A12:2011
EMC:
EN55013:2001 +A1:2003 +A2:2006
EN 55020:2007 +A11:2011
EN 55022:2010
EN 55024:2010
EN 61000-3-2:2006 +A1:2009 +A2:2009
EN 61000-3-3:2008
Os dados técnicos estão disponíveis e podem ser solicitados através do endereço acima.
Local e data de emissão:
Gavere, 20/12/2013
Responsável da empresa:
Vince Van Balberghe - Quality Manager
 Loading...