

Page 1

CCTVPROM7
ALL-ROUND SECURITY SET
MULTIFUNCTIONELE BEVEILIGINGSSET
ENSEMBLE VIDÉOSURVEILLANCE MULTIFONCTIONNEL
JUEGO DE VIDEOVIGILANCIA MULTIFUNCIÓN
UNIVERSELLER ÜBERWACHUNGSSATZ
USER MANUAL 3
GEBRUIKERSHANDLEIDING 13
NOTICE D’EMPLOI 23
MANUAL DEL USUARIO 33
BEDIENUNGSANLEITUNG 43
Page 2
CCTVPROM7
14/07/2010 ©Velleman nv
2
Page 3
CCTVPROM7
14/07/2010 ©Velleman nv
3
User manual
1. Introduction
To all residents of the European Union
Important environmental information about this product
This symbol on the device or the package indicates that disposal of the device after its lifecycle could
harm the environment. Do not dispose of the unit (or batteries) as unsorted municipal waste; it should
be taken to a specialized company for recycling. This device should be returned to your distributor or
to a local recycling service. Respect the local environmental rules.
If in doubt, contact your local waste disposal authorities.
Thank you for choosing Velleman! Please read the manual thoroughly before bringing this device into service. If
the device was damaged in transit, do not install or use it and contact your dealer. Damage caused by
disregard of certain guidelines in this manual is not covered by the warranty and the dealer will not accept
responsibility for any ensuing defects or problems.
Package content:
• 1 x DVR with built-in SATA hard disk
• 4 x IR colour CMOS cameras
• 4 x 18m camera cables (video + power)
• 1x power adaptor 100~240VAC/50~60Hz to 12VDC + power cable
• IR remote control + CR2025 battery
• PS/2 mouse
• USB cable (±65cm)
• 1x CD-ROM containing the full user manual
2. Safety Instructions
Keep the device away from children and unauthorised users.
Risk of electroshock when opening the cover. Touching live wires can cause life-threatening
electroshocks.
Always disconnect mains power when the device is not in use or when servicing or maintenance
activities are performed. Handle the power cord by the plug only.
3. General Guidelines
Refer to the Velleman® Service and Quality Warranty on the last pages of this manual.
Indoor use only. Keep this device away form rain, moisture, splashing and dripping liquids.
Never put objects filled with liquid on top.
Keep this device away from dust and extreme temperatures. Make sure the ventilation
openings are clear at all times. For sufficient air circulation, leave at least 1” (±2.5 cm) in
front of the openings.
Protect this device from shocks and abuse. Avoid brute force when operating the device.
• Familiarise yourself with the functions of the device before actually using it.
• All modifications of the device are forbidden for safety reasons.
• Only use the device for its intended purpose. Using the device in an unauthorised way will void the warranty.
• Damage caused by disregard of certain guidelines in this manual is not covered by the warranty and the
dealer will not accept responsibility for any ensuing defects or problems.
• Do not use this product to violate privacy laws or perform other illegal activities.
4. Features
DVR
• MJPEG recording
• recording via motion trigger, manual and timer
• backup function: USB backup
• OSD menu: English
• user manual: English, French, German, Spanish and Dutch
• SATA Hard disk built-in
• system auto recovery after power reconnected
• DVR Control: DVR buttons, IR remote control and PS/2 mouse
Camera (4x)
• CMOS colour camera
• with B/W night vision (IR LEDs)
5. Overview
Refer to the illustrations on page 2 of this manual.
Page 4
CCTVPROM7
14/07/2010 ©Velleman nv
4
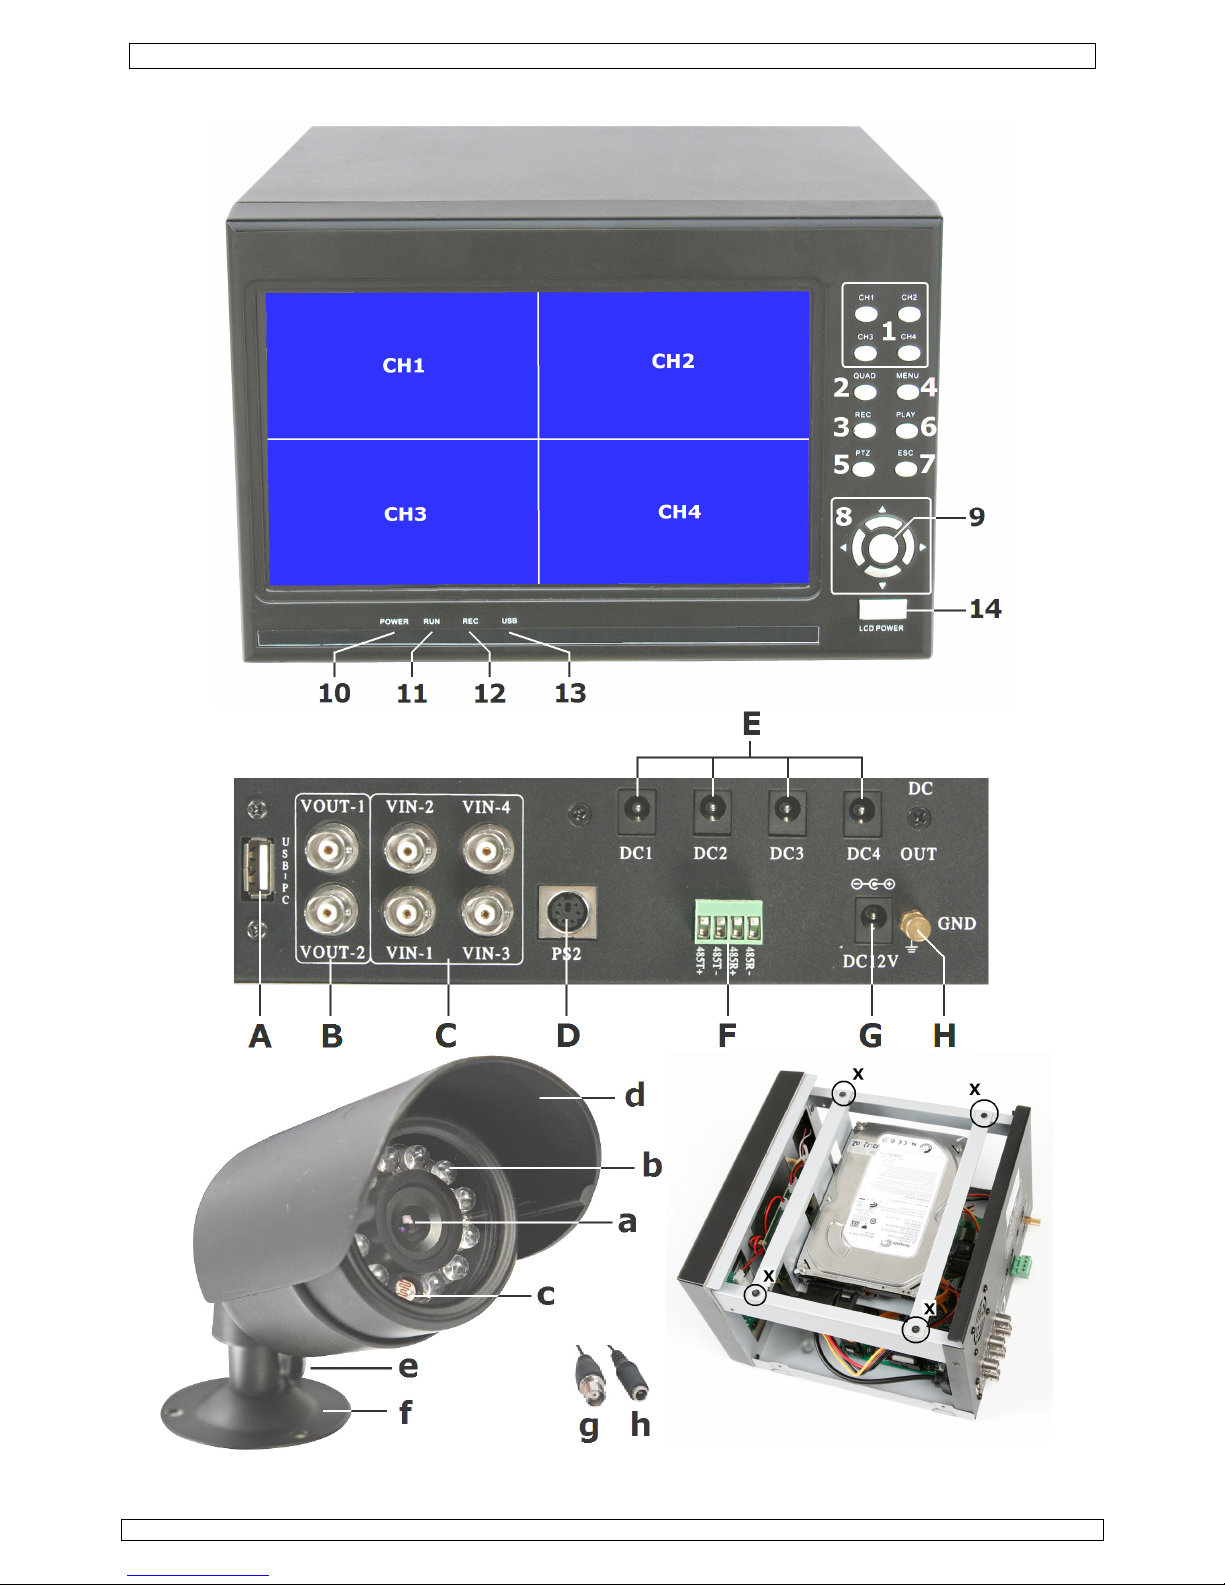
Front panel
1 channel selectors 8 arrow buttons
2 quadruple screen selector 9 confirmation button (OK)
3 manual record button 10 power LED
4 menu button 11 system LED
5 PTZ control button 12 recording LED
6 playback button 13 USB status LED
7 escape button 14 LCD power switch
Rear panel
A USB-port E DC outputs DC1~DC4
B output signals V
OUT
-1/V
OUT
-2 (BNC) F PTZ/RS-485 connector
C input signals VIN1~VIN4 (BNC) G 12 VDC input
D PS2 input H ground connector
Camera
a lens e position bolt
b IR LEDs f mounting bracket
c light sensor g Video output connector
d sunshield h DC 12V input terminal
Remote control
MULTI Switch to quadruple view or full screen sequential view of each camera image for ±5s.
1 2 3 4 Select channel
PTZ enter PTZ control menu
CLEAR clear entry field
MENU enter OSD menu
REC enter recording menu
arrow keys to scroll through OSD
OK confirmation button
ESC escape
playback control buttons
FN display PIP (Picture in Picture): a small image of CH1 is shown inside the full screen image of CH2
Note: other keys on the remote control have no function programmed for this DVR.
6. Hardware setup
Refer to the illustrations on page 2 of this manual.
• The DVR comes with a HDD installed. To replace it, refer to §8)
• Make sure the device is unplugged from the mains before making any connections and do not touch any
electronic circuitry to avoid electrostatic discharge.
Connecting the cameras
• Choose a location for the camera, keeping following guidelines in mind:
• do not install the camera in locations where extremely high or low temperatures or excessive vibrations
may occur.
• avoid mounting the camera near high electro-magnetic fields.
• do not aim the camera at the sun or other extremely bright objects or reflections (e.g. metal doors).
• The included signal/power cables are 18m each.
• Use the mounting bracket [f] to determine the location of the mounting holes. Drill the holes and secure the
bracket [f] using 3 screws.
• Attach the camera to the mounting bracket [f] with the camera bolt (rear).
• Point the camera towards the field of interest and tighten the position bolt [e].
• Connect the power [h] and BNC [g] connector to the signal/power cable.
• Connect the other end of the signal/power cable to the DVR. The channel number is indicated above the BNC
connector [C]. It determines the position of the image on the screen. Make sure to use the matching DCoutput [E] to facilitate any troubleshooting.
Connecting the mouse
• Plug the PS2-mouse connector into the PS2 input [D].
Connecting a PTZ camera/serial line
• Connect the PTZ data line to terminals 485T- and 485T+ of the PTZ connector [F]. Use a suitable small
screwdriver to tighten the wires.
Page 5

CCTVPROM7
14/07/2010 ©Velleman nv
5
•
When connecting a serial line, use all 4 terminals (485T-, 485T+, 485R+ and 485R-).
Connecting ground
• Connecting the ground connector [H] to earth might resolve any image interference problems. Do not
connect when the image is fine.
Connecting the power supply
• Plug the DC output connector of the included power adaptor into the 12VDC power input [G] at the back of
the DVR.
WARNING: only use the included adaptor.
• Plug the included power cable into the adaptor input connector and plug the other end into the mains. The
DVR initializes immediately.
Connecting a backup computer
• Plug the included USB cable into the USB port [A] and plug the other end into the USB port of a suitable
computer.
Note: Prior to connecting the DVR player to a personal computer, the application software must be installed
on the PC (refer to §7.4 backup).
7. Operation
Note: the functions, navigation and options of the DVR are accessible via the front panel, the remote control
or by using the mouse.
• When plugging the power cable into the mains, the DVR and all cameras start up. It takes about 5 seconds
for the initialization to complete. Hardware and software versions are displayed and the presence of hard
disk and mouse are verified.
• After start-up, the power LED [10] is on and the display shows the 4 camera channels simultaneously. Date
and time is shown in the top left area of the display. Should one of the images remain blank, check the
camera and cabling of that channel.
• Press the LCD power switch [14] to switch the LCD screen on or off. This does not interrupt the recording
operation of the DVR!
7.1 General menu guidelines
• Enter the menu of the DVR by either pushing the MENU-button on the front panel [4] or remote control, or
move the mouse pointer towards the bottom of the screen and left-click on MENU.
• There are several types of fields in the menu:
o Menu field: these are highlighted and selecting them will open a new menu. Use the arrow keys or
mouse to move between menu fields. Click on a menu field or press enter to open the underlying menu.
o Check box: select X to activate or empty to deactivate (disable) the option. Use the arrow up or down
to change the setting or left-click in the field.
o Combo field: select content from a range of options – only one is possible. Use arrow up/down or mouse
click to select the appropriate option.
o List: a list is displayed (e.g. after a search). Left-click on an item of the list to select it or highlight it
using the arrow up/down keys and press enter.
o Edit field: any string of character can be entered. Use the up/down key to change the value of the
character above the blinking cursor or left-click on it. Use the left/right arrows to move to the
previous/next character. Press enter to exit the field.
7.2 Screen image
• Front panel controls:
Press on one of the channel selectors [1] to see a channel in full screen. Press on the quadruple screen
selector [2] to display all four screens again.
• Remote control:
o Press on a numbered channel button to see that channel full screen. Press the MULTI button to return to
the quadruple display.
o Press the FN button to get a PIP (Picture In Picture) image, refer to the configuration menu for
settings. Press the MULTI button to return to the quadruple display or any numbered button to switch to
that channel.
o When in quadruple view, press the MULTI button to sequentially display all channels in full screen mode,
with an adjustable interval (via configuration menu). Press again to return to quadruple view.
• Mouse control:
o Left-click on any channel to display that channel full screen. Click again to return to quadruple view.
o Move the mouse pointer to the bottom of the screen and click on the
-icon to get a PIP (Picture In
Picture) image, refer to the configuration menu for settings. Click anywhere on the screen to return to
quadruple view.
o Move the mouse pointer to the bottom of the screen and click on the
-icon to sequentially display all
channels in full screen mode, with an adjustable interval (via configuration menu). Click anywhere on
the screen to return to quadruple view.
Page 6
CCTVPROM7
14/07/2010 ©Velleman nv
6
7.3 Menu options
• Following menu options are available:
HDD – Record – PlayBack – Motion – PTZ – PTZCtrl – Log – System
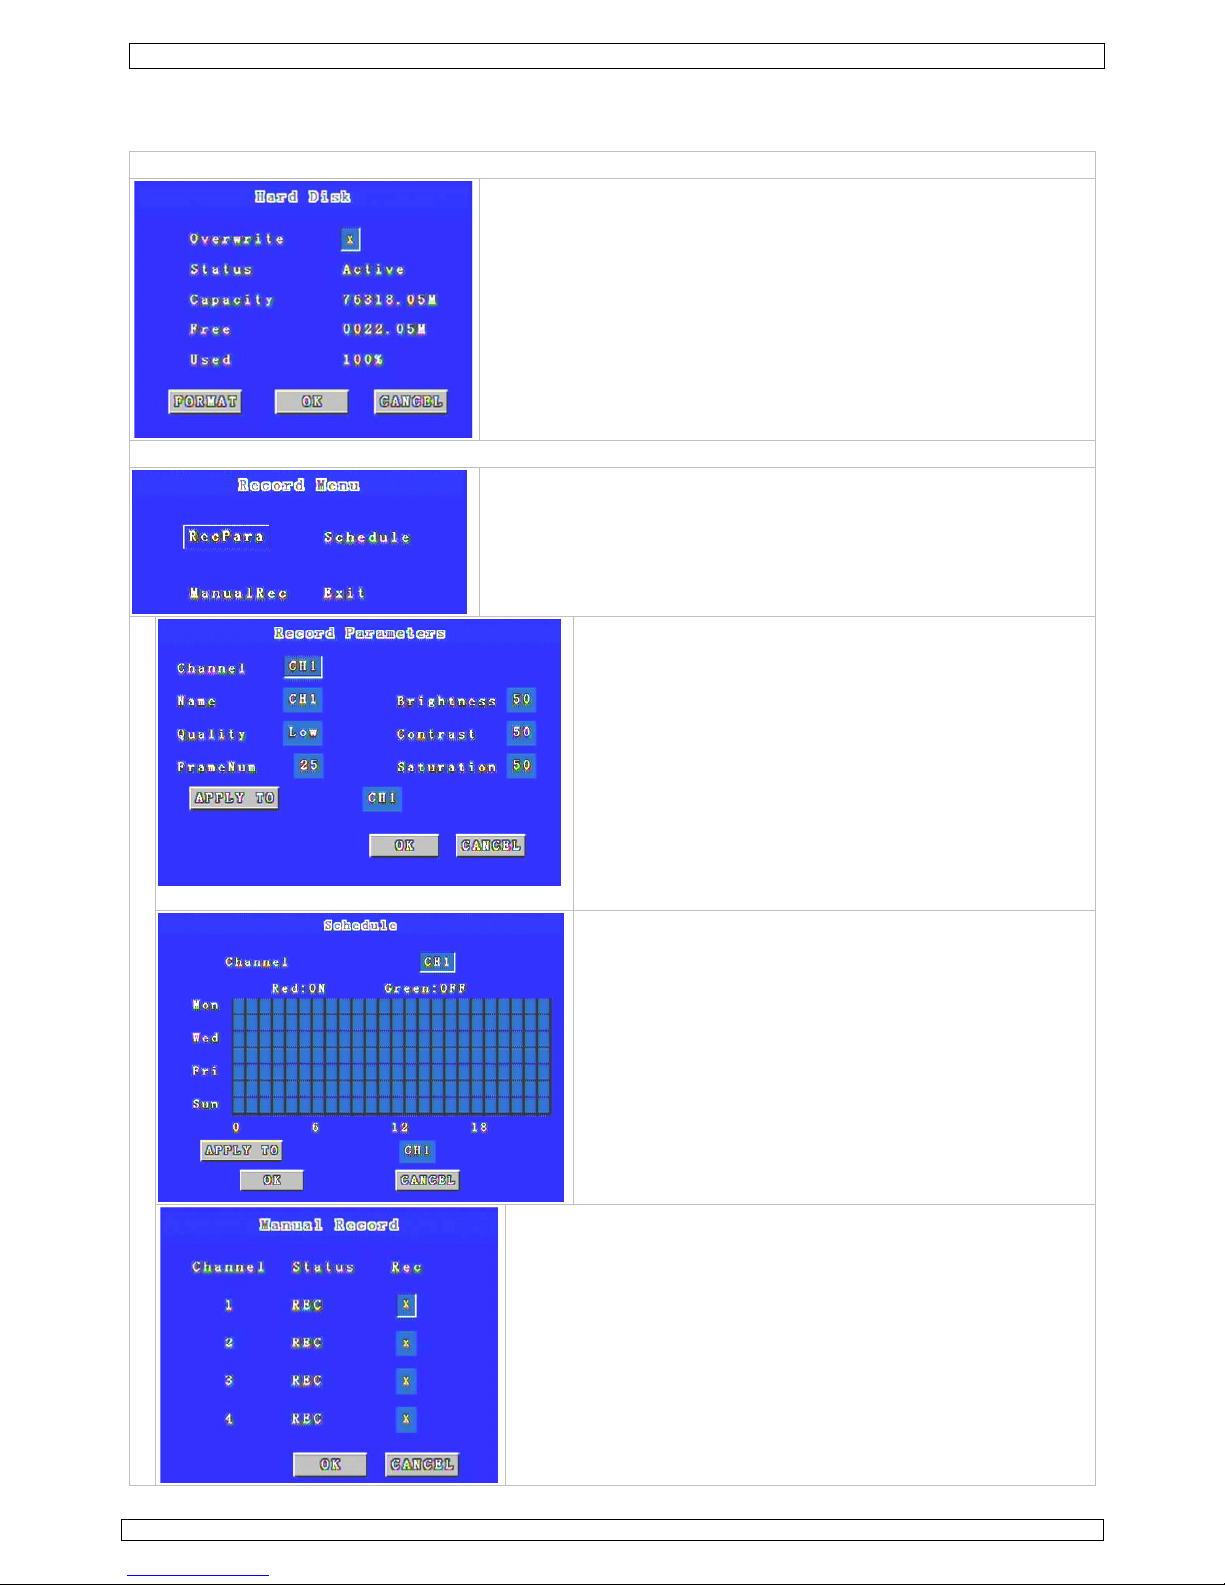
HDD
• Select ‘Overwrite’ (X) to automatically overwrite the oldest data
when the disk is full. Deselect (empty) to disable this function.
• The status and capacity of the hard disk are shown.
• Select OK to save and exit, select CANCEL to leave the hard disk
menu without making changes.
• Select FORMAT to clear all data on the hard disk. A warning is
displayed that all data will be lost. Press OK to continue or CANCEL
to exit.
Note: format will not work when the DVR is recording.
Record
There are 3 submenus under the record menu.
• Select the channel to set-up.
• When desired, customize the channels name (up to 8
characters).
• Set the channel quality: lowest, low, middle, high or
highest.
• Set the number of frames per second: 1, 3, 5, 8, 13 or
25.
• Set the brightness, contrast and saturation: 0~99
(default = 50).
• Click on ‘APPLY TO’ to apply the setting to the indicated
channel. Select a different channel to apply the same
settings to that channel.
• When finished, click OK to save or CANCEL to exit
without saving.
• Select the channel for which to schedule continuous
recording.
• The grid is divided into 24 hours (horizontal) and 7 week
days (vertical). E.g. when the 4
th
square on the second
row is selected (red) than the indicated channel will be
recorded continuously every Tuesday from 3AM until
4AM.
• Click on ‘APPLY TO’ to apply the setting to the indicated
channel. Select a different channel to apply the same
settings to that channel.
• When finished, click OK to save or CANCEL to exit
without saving.
• Set the status of a channel to ‘X’ to manually start recording the
images of that channel. Set to ‘empty’ to stop recording
manually. During recording, a red dot is shown at the bottom of
the channel.
• Note that manual recording will not start when the hard disk is
full or not present or not formatted.
• When finished, click OK to save or CANCEL to exit without
saving.
Page 7

CCTVPROM7
14/07/2010 ©Velleman nv
7
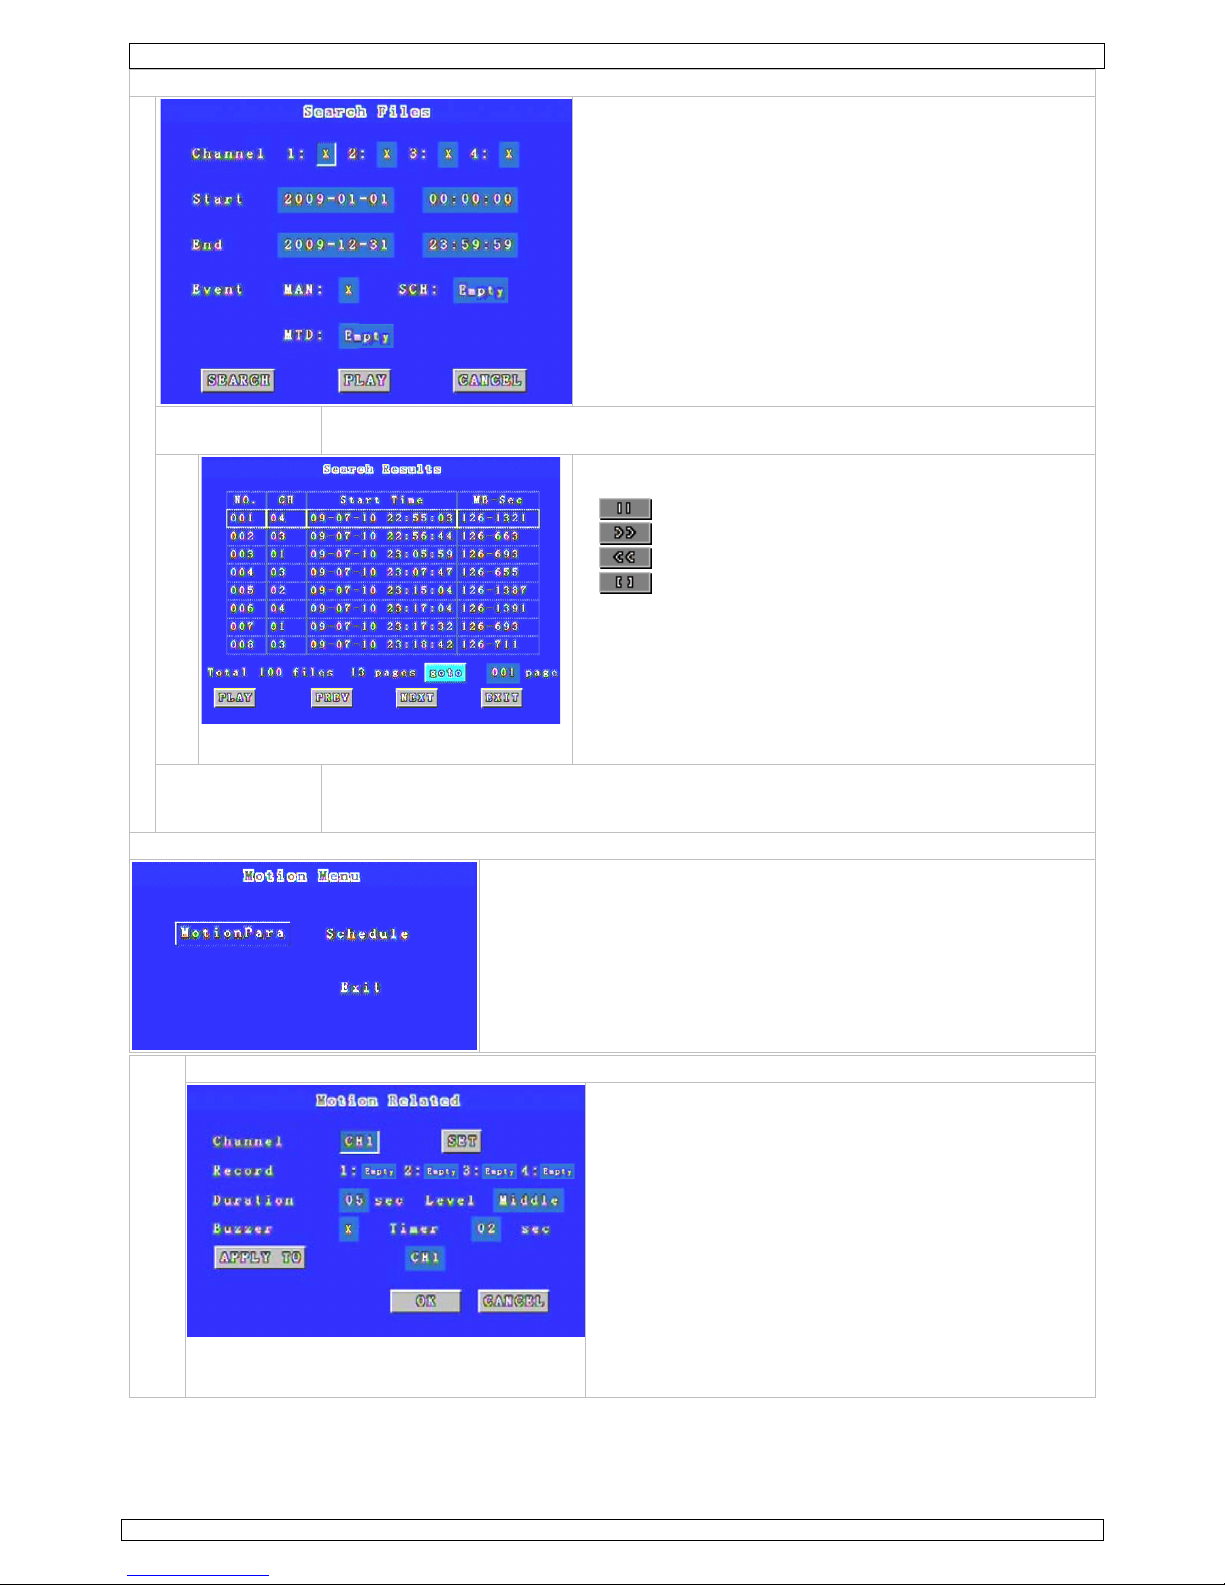
Playback
• Select the channel(s) for which to look up recorded files.
• Set start and end date and time for the search function.
• Select the type of recording (manual, scheduled, motion
triggered).
• Press on SEARCH to display a list of found recordings
(see below) or press on PLAY to immediately start
playing all found files (see below).
SEARCH Note: when more than 100 files are found, only the 100 oldest are shown. Adjust the
search settings to get less files.
• Select a file and press PLAY to show the video.
• Controls:
Play/pause
(fast) forwards: 2x 4x 8x ½x ¼x 1/8 x 1x
(fast) reverse): 2x 4x 8x ½x ¼x 1/8 x 1x
exit to overview
• Use the right mouse button to display or hide the
controls.
• When controls are hidden, left-click on the display to
show the playback video in the centre of the screen in
front of the 4 live channels. Click again to return to full
screen playback mode.
• Use the PREV and NEXT buttons to scroll through the
pages. EXIT to return to the previous menu.
PLAY • When pressing the PLAY-button, the DVR shows the found recordings sequentially.
Recordings from CH1 are shown in the top left area, CH2 in the top right area and so
on. Controls affect all images simultaneously.
Motion detect
• Set the motion parameters or the motion schedule.
Motion parameters
• Select the channel and press the SET button to set the
detection area. The screen is divided into a grid of 16
wide by 12 high. Select the squares in which a
movement will trigger recording. Right-click or press
ESC and save the set motion detection area.
• Set the recording duration (5~99s)
• Set the sensitivity level: lowest, low, middle, high,
highest.
• Select buzzer to hear a beep when motion is detected
and set the timer to determine how long the buzzer will
continue beeping after the last motion was detected.
• Click on ‘APPLY TO’ to apply the setting to the
indicated channel. Select a different channel to apply
the same settings to that channel.
• When finished, click OK to save or CANCEL to exit
without saving.
Page 8

CCTVPROM7
14/07/2010 ©Velleman nv
8
Motion schedule
• Select the channel for which to schedule motion
recording.
• The grid is divided into 24 hours (horizontal) and 7
week days (vertical). E.g. when the 4
th
square on the
second row is selected (red) than the indicated channel
will be recorded when motion is detected every Tuesday
from 3AM until 4AM.
• Click on ‘APPLY TO’ to apply the setting to the
indicated channel. Select a different channel to apply
the same settings to that channel.
• When finished, click OK to save or CANCEL to exit
without saving.
PTZ (Pan Tilt Zoom)
• Select the video channel to set-up.
• Set the PTZ communication address (00~99).
• Select the PTZ protocol: Pelco-D, Pelco-P, B01, Samsung etc. ….
• Select the baud rate: 1200, 2400, 4800, 9600, 19200, 38400, 57600
or 115200.
• Click on ‘APPLY TO’ to apply the setting to the indicated channel.
Select a different channel to apply the same settings to that channel.
• When finished, click OK to save or CANCEL to exit without saving.
PTZ controls
• Select the video channel.
• Select Direction, Focus, Zoom, Iris or Automatic.
Depending on the selection options change.
• Use the Up/Down/Left/Right buttons to move the
camera.
•
Set the speed of the camera: slow, normal or fast.
Log management
• Select the type of log: Operation or Alarms
• Set start and end date and time for the search function.
• Click on SEARCH. An overview of all logs is shown.
• Use the PREV and NEXT buttons to scroll through the
pages. CANCEL to return to the previous menu.
• Press CANCEL again to exit log management.
System settings
• There are 6 submenus:
o Configure
o Password
o Date&Time
o Default
o Reset
o About
Page 9

CCTVPROM7
14/07/2010 ©Velleman nv
9
Configure
• Select the ‘Video Loss’ option to get an audible
warning when one of the video signals is lost.
• The AutoSwitch timer set the timer interval of the
sequential view mode. Value: 1~99s.
• PIPConfig sets the Picture-in-Picture settings. The first
channel is the inserted picture, the second channel is
the main (background) picture.
• Select the VGA resolution settings: 1024x768/60Hz,
1280x1024/60Hz or 800x600/75Hz.
• Enable or disable password protection. Set the
password via the password menu.
• LockTime is the timeout for the password to become
active. When no user activity is detected during locking
time, a password will be required to operate the DVR.
Set to 1, 2, 5, 10, 15 or 30 minutes or 1 hour. Setting
will only take effect when password is enabled.
Password
• To change the password, first enter the old password.
Default password is 888888.
• Enter a new password. Only use the numbers on the
bottom of the screen.
• Confirm the new password and press OK.
Date & Time
• Set the date and time of the DVR. Date format is month
– day – year (MM-DD-YYYY), time format: hours –
minutes – seconds.
Note: changing the time is not possible during
recording.
• When finished, click OK to save or CANCEL to exit
without saving.
Note: reset the system (see below) for the new
date/time to take effect.
Default configuration
• Click OK to set the DVR back to factory defaults.
Reset • Click OK to restart the DVR.
About • Show system information e.g. hardware and software versions.
Page 10
CCTVPROM7
14/07/2010 ©Velleman nv
10
7.4 Playback & Backup
• Before connecting the DVR to a computer, first install the necessary playback/backup software on that
computer.
7.4.1 Software installation
• Locate the file “DVR_ClientSetupCHS” on the included CD-ROM and double click it to install the required
backup software.
• Follow the instructions on the screen.
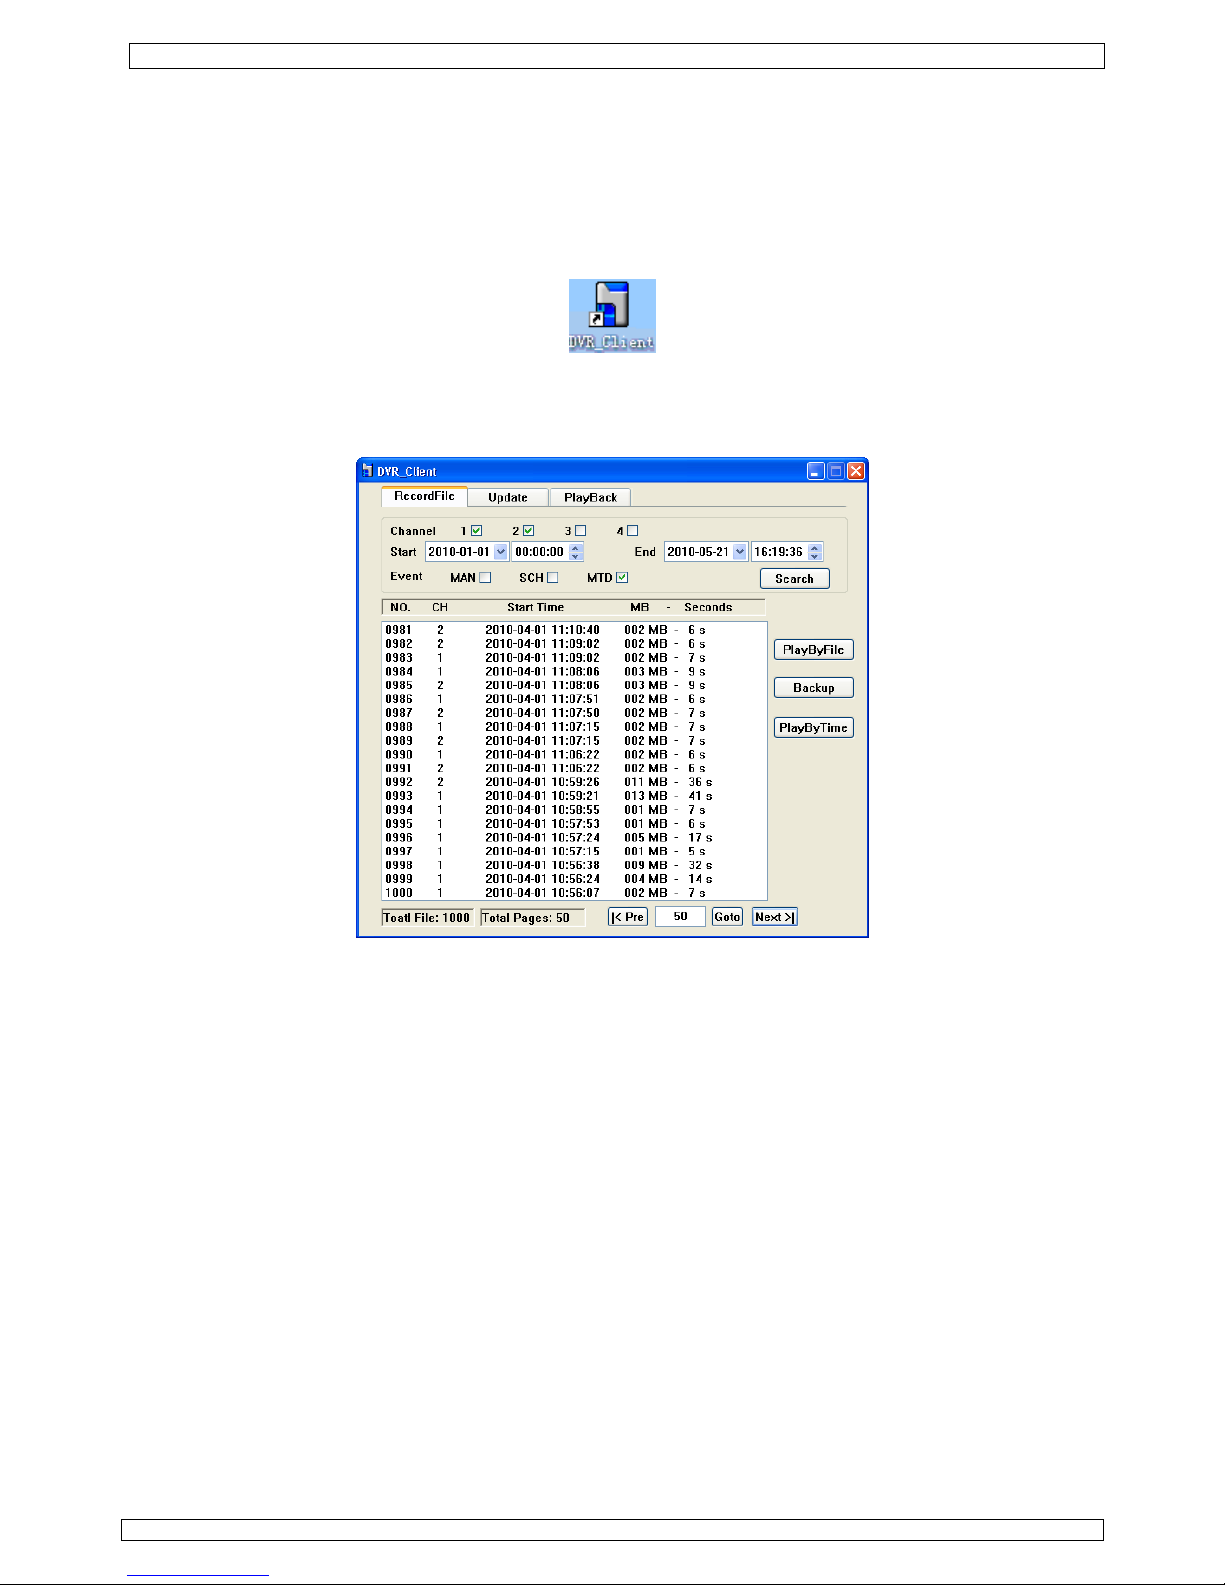
• When installation is completed, locate the DVR Client shortcut icon and double click on it to start using
the software.
7.4.2 Hardware connection
• Plug the included USB cable into the USB port [A] and plug the other end into a free USB port of a
computer running the DVR client software. The USB LED [13] lights up.
7.4.3 Searching records
• Select the desired recording channel.
• Set start and end date and time for the search function.
• Select the event that triggered the recording (Manual, Scheduled or Motion Detected).
• Press the Search button to retrieve the file overview.
• Scroll through the pages using the |<Pre or Next>| buttons or enter a page number and press Goto.
7.4.4 PlayByFile
• Select a file and press the PlayByFile button. The video will start to play in the PlayBack tab (refer to
§7.4.7).
7.4.5 Backup
• Press the Backup button to save a copy of the current video on the computer.
• Choose a backup location, name and type (MJPEG or AVI). Note that it will take some time to save files
as they need to be converted into the desired format.
7.4.6 PlayByTime
• To use the PlayByTime option only one channel may be included in the search function (to avoid
overlapping recordings). When selecting PlayByTime all videos that are found will be played
sequentially.
• The video(s) are also played in the PlayBack tab (see §7.4.7).
Page 11

CCTVPROM7
14/07/2010 ©Velleman nv
11
7.4.7 PlayBack Tab
• The playback tab opens when the PlayByFile or PlayByTime button is pressed in the RecordFile tab.
However, it is also possible to go directly to the playback tab without selecting a file. Press the Open
button to browse the computer for previously saved files.
• Press the Pause button to freeze the image. Press the Play button to continue.
• Press the Step button to advance one step at a time.
• Select the speed of the playback using the drop down menu.
• Press the Snap button to take a snapshot of the display. Select the desired name and storing location.
• Press the Cancel button to quit playback and return to the RecordFile tab.
8. HDD replacement
• To replace the hard disk, unplug the DVR from the mains and disconnect all cabling.
• Release the 6 screws (3 on either side) that hold the cover in place.
• Release the 4 screws (marked with X in the illustration on page 2) that hold the HDD bracket in place.
• Disconnect power supply and data bus.
• Release the screws that hold the HDD is place and remove the HDD.
• Place a new SATA HDD in the bracket and tighten it with 4 screws. The drive must be formatted as FAT32.
• Connect the data bus and power supply and place the mounting bracket back. Tighten the 4 screws (marked
with X).
• Close the cover and reseat the 6 screws.
9. Battery
• The remote control uses 1 battery type 3V lithium CR2025 (included)
• To (re)place the battery, press on the side of the battery holder [1] and pull
[2] to slide it open.
• Insert the battery with the right polarity (+ facing up in battery holder) and
close the battery compartment by pushing it back into the housing of the
remote control until it snaps into place.
WARNING: handle batteries with care, observe warnings on battery casing. Dispose of
batteries in accordance with local regulations.
Keep batteries away from children.
10. Technical specifications
DVR
video format PAL
video compression MJPEG (CIF)
video input 4 channels, composite video signal 1Vpp / 75 ohms BNC
video output 2x composite video signal 1Vpp / 75 ohms BNC
maximum recording rate (PAL) CIF 352 × 288 pixels @ 100 IPS (PAL)
image quality setting lowest - low - middle - high - highest
hard disk storage built-in SATA type, support 1x HDD (included)
recording mode manual / timer / motion
refresh rate 100 IPS for PAL
motion detection area 16 x 12 grids per channel
motion detection sensitivity 1 parameter with 5 sensitivity levels (lowest - low - middle - high - highest)
backup device USB PC connection
PTZ control RS-485
key lock yes
video loss detection yes
camera title up to 8 characters
video adjustments contrast / brightness / saturation
date display format MM-DD-YY
Page 12

CCTVPROM7
14/07/2010 ©Velleman nv
12
power supply 12VDC
power consumption < 30W
operating temperature 10°C ~ 40°C (50°F ~ 104°F)
system recovery system auto recovery after power reconnected
dimensions 200 x 210 x 130mm
weight 2250g
Camera (4x)
scanning system PAL
pick-up element CMOS sensor
number of pixels 628 (H) x 582 (V) - PAL
resolution 380 TV lines
min. illumination 0.2 lux (IR off)
IR LEDs 11
interlace 2:01
video output 1.0Vpp composite, 75 ohms
gamma correction 0.45
built-in lens 6mm
lens angle 39.8°
power supply 12VDC
dimensions Ø45 x 55mm
weight 290g
Use this device with original accessories only. Velleman nv cannot be held responsible in the event
of damage or injury resulted from (incorrect) use of this device.
For more info concerning this product and the latest version of this user manual, please visit our
website www.velleman.eu.
The information in this manual is subject to change without prior notice.
© COPYRIGHT NOTICE
The copyright to this manual is owned by Velleman nv. All worldwide rights reserved.
No part of this manual or may be copied, reproduced, translated or reduced to any electronic medium or
otherwise without the prior written consent of the copyright holder.
Page 13
CCTVPROM7
14/07/2010 ©Velleman nv
13
GEBRUIKERSHANDLEIDING
1. Inleiding
Aan alle ingezetenen van de Europese Unie
Belangrijke milieu-informatie betreffende dit product
Dit symbool op het toestel of de verpakking geeft aan dat, als het na zijn levenscyclus wordt
weggeworpen, dit toestel schade kan toebrengen aan het milieu. Gooi dit toestel (en eventuele
batterijen) niet bij het gewone huishoudelijke afval; het moet bij een gespecialiseerd bedrijf
terechtkomen voor recyclage. U moet dit toestel naar uw verdeler of naar een lokaal recyclagepunt
brengen. Respecteer de plaatselijke milieuwetgeving.
Hebt u vragen, contacteer dan de plaatselijke autoriteiten betreffende de verwijdering.
Dank u voor uw aankoop! Lees deze handleiding grondig voor u het toestel in gebruik neemt. Werd het toestel
beschadigd tijdens het transport, installeer het dan niet en raadpleeg uw dealer.
Inhoud:
• 1x DVR met interne SATA-harddisk
• 4x IR CMOS kleurencamera’s
• 4x kabels van 18 m (video + voeding)
• 1x voedingsadapter 100 ~ 240 VAC/50 ~ 60 Hz naar 12 VDC + voedingskabel
• IR afstandsbediening + CR2025-batterij
• PS/2-muis
• USB-kabel (± 65 cm)
• 1x cd-rom met volledige gebruikershandleiding
2. Veiligheidsinstructies
Houd buiten het bereik van kinderen en onbevoegden.
Elektrocutiegevaar bij het openen van het toestel. Raak geen kabels aan die onder stroom staan
om dodelijke elektroshocks te vermijden.
Trek de stekker uit het stopcontact (trek niet aan de kabel!) voordat u het toestel reinigt en als u
het niet gebruikt.
3. Algemene richtlijnen
Raadpleeg de Velleman® service- en kwaliteitsgarantie achteraan de handleiding.
Enkel voor gebruik binnenshuis.
Bescherm dit toestel tegen regen, vochtigheid en opspattende vloeistoffen. Plaats geen object
gevuld met vloeistof op het toestel.
Bescherm tegen stof. Bescherm tegen extreme hitte. Zorg dat de verluchtingsopeningen niet
verstopt geraken. Voorzie een ruimte van minstens 2,5 cm tussen het toestel en elk ander
object.
Bescherm tegen schokken en vermijd brute kracht tijdens de bediening.
• Leer eerst de functies van het toestel kennen voor u het gaat gebruiken.
• Om veiligheidsredenen mag u geen wijzigingen aanbrengen.
• Gebruik het toestel enkel waarvoor het gemaakt is. Bij onoordeelkundig gebruik vervalt de garantie.
• De garantie geldt niet voor schade door het negeren van bepaalde richtlijnen in deze handleiding en uw
dealer zal de verantwoordelijkheid afwijzen voor defecten of problemen die hier rechtstreeks verband mee
houden.
• Leef bij gebruik van dit toestel de wetgeving betreffende de privacy na.
4. Eigenschappen
DVR
• MJPEG-opname
• opname: handmatige start, via bewegingswaarneming, geprogrammeerd
• back-upfunctie: USB
• OSD-menu: Engels
• gebruikershandleiding: Engels, Frans, Duits, Spaans en Nederlands
• interne SATA-harddisk
• automatisch systeemherstel na stroomonderbreking
• bediening DVR: DVR, afstandsbediening en PS/2-muis
Camera (4x)
• CMOS kleurencamera
• zwart-wit nachtzicht (met infraroodleds)
Page 14
CCTVPROM7
14/07/2010 ©Velleman nv
14
5. Omschrijving
Raadpleeg de figuren op pagina 2 van deze handleiding.
Frontpaneel
1 keuzetoets kanaal 8 pijltjestoetsen
2 keuzetoets viervoudig scherm 9 bevestigingstoets (OK)
3 opnametoets 10 voedingsled
4 menutoets 11 systeemled
5 PTZ-knop 12 opnameled
6 afspeeltoets 13 USB-led
7 escapetoets 14 aan-uitschakelaar lcd-scherm
Achterste paneel
A USB-poort E DC-uitgangen DC1~DC4
B uitgangen V
OUT
-1/V
OUT
-2 (BNC) F PTZ/RS-485-aansluiting
C ingangen VIN1~VIN4 (BNC) G 12VDC-ingang
D PS2-ingang H aarding
Camera
a lens e instelschroef
b infraroodleds f montagebeugel
c lichtsensor g aansluiting video-uitgang
d zonnekap h 12VDC-ingang
Afstandsbediening
MULTI keuzetoets viervoudig scherm of enkelvoudig scherm (sequentieel beeld)
1 2 3 4 keuzetoets kanaal
PTZ keuzetoets PTZ-menu
CLEAR wistoets
MENU keuzetoets OSD-menu
REC keuzetoets opnamemenu
pijltjestoetsen OSD-menu
OK bevestigingstoets
ESC escapetoets
afspeeltoetsen
FN PIP-weergave (picture-in-picture): klein venster (kanaal 1) in volledig scherm (kanaal 2)
Opmerking: andere toetsen op de afstandsbediening hebben geen functie.
6. Aansluiting
Raadpleeg de figuren op pagina 2 van deze handleiding.
• De harddisk is al in de DVR geïnstalleerd. Raadpleeg §8 indien u de harddisk wilt vervangen.
• Zorg dat de DVR niet op het lichtnet is aangesloten en raak het elektronische circuit niet aan om
elektrostatische ontlading te vermijden.
Aansluiting van de camera’s
• Kies de montageplaats voor de camera. Houd rekening met volgende punten:
• Installeer de camera niet op een extreem warme of koude plaats, of een plaats onderhevig aan trillingen.
• Installeer de camera niet in de buurt van een elektromagnetisch veld.
• Richt de camera niet naar de zon of een ander lichtgevend/reflecterend voorwerp (bv. metalen deur).
• De meegeleverde voedingskabels hebben elk een lengte van 18 m.
• Gebruik de montagebeugel [f] en markeer de ligging van elk schroefgat. Boor de schroefgaten en bevestig
de beugel [f] met 3 schroeven.
• Bevestig de camera aan de beugel [f] met de bout (achteraan).
• Richt de camera en span de instelschroef [e] aan.
• Koppel de voeding- [h] en BNC-stekker [g] aan de voedingskabel.
• Koppel nu de voedingskabel aan de DVR. Het kanaalnummer staat bovenaan of onderaan de BNC-
aansluiting [C] weergegeven. De aansluiting van de BNC-stekkers bepaalt de weergave van de kanalen op
het scherm. Gebruik ook de correcte DC-uitgang [E].
Aansluiting van de muis
• Steek de stekker van de PS2-muis in de PS2-ingang [D].
Page 15

CCTVPROM7
14/07/2010 ©Velleman nv
15
Aansluiting van een PTZ-camera/seriële lijn
• Sluit de datalijn aan op terminals 485T- en 485T+ van de PTZ-aansluiting [F]. Schroef de kabels vast met
behulp van een kleine schroevendraaier.
• Gebruik alle 4 terminals bij het aansluiten van een seriële lijn (485T-, 485T+, 485R+ en 485R-).
Aansluiting van de aarding
• De aardingaansluiting [H] kan storingsproblemen met het beeld oplossen. Sluit niet aan de aarding indien
het beeld geen storingen vertoont.
Aansluiting van de voeding
• Steek de DC-stekker van de meegeleverde voedingsadapter in de 12VDC-ingang [G] achteraan de DVR.
WAARSCHUWING: Gebruik enkel de meegeleverde adapter.
• Steek de voedingskabel in de voedingsadapter en steek de voedingsadapter daarna in het stopcontact. De
DVR wordt ingeschakeld.
Aansluiting op een back-upcomputer
• Koppel de DVR [A] aan een USB-poort met behulp van de meegeleverde aansluitkabel.
Opmerking: Installeer de software op de computer alvorens de DVR aan te sluiten (zie §7.4 Back-up).
7. Gebruik
Opmerking: Alle functies en opties van de DVR zijn beschikbaar vanaf het frontpaneel, de
afstandsbediening of de muis.
• De DVR en de camera’s worden automatisch ingeschakeld van zodra u de stekker in het stopcontact hebt
gestoken. Op het scherm verschijnen de hardware- en softwareversie, de aanwezigheid van een muis en de
harde schijf wordt gecontroleerd.
• Na het opstarten licht de voedingsled [10] op en geeft het scherm simultaan de 4 camera’s weer. De datum
en het uur worden in de linkerbovenhoek van het scherm weergegeven. Controleer de bedrading van de
desbetreffende camera indien het schermpje geen beeld weergeeft.
• Schakel het lcd-scherm in of uit met de aan-uitschakelaar [14]. Een opname afgebroken indien u het
scherm uitschakelt.
7.1 Algemene richtlijnen voor het menu
• Druk op MENU op het frontpaneel [4] of de afstandsbediening of klik met de muis op MENU onderaan het
scherm om het menu weer te geven.
• Het menu is opgesplitst in meerdere delen:
o Menuveld: Een menuveld staat gemarkeerd en verschijnt in een nieuw venster indien u het aanklikt.
Scroll doorheen de menuvelden met de pijltjestoetsen of de muis. Klik op een menuveld of druk op de
bevestigingstoets om het submenu te openen.
o Vinkhokje: Vink een hokje aan om de functie in te schakelen of vink het hokje uit om de functie uit te
schakelen. Vink aan of uit met de pijltjestoetsen of klik in het veld.
o Comboveld: Selecteer een optie met de pijltjestoetsen of met de muis.
o Lijst: Klik met de linkermuisknop op een item uit de lijst of scroll naar het item met de pijltjestoetsen en
druk op de bevestigingstoets om te selecteren.
o Wijzigingsveld: Geef met de pijltjestoetsen of met de muis een karakter in. Druk op de
bevestigingstoets om het veld te verlaten.
7.2 Schermweergave
• Bediening via het frontpaneel:
Druk op een keuzetoets [1] om het desbetreffende kanaal op het volledige scherm weer te geven; druk op
de keuzetoets voor het viervoudige scherm [2] om het scherm in vier op te splitsen.
• Bediening via de afstandsbediening:
o Druk de cijfertoets in om het desbetreffende kanaal op het volledige scherm weer te geven; druk op
MULTI om het scherm in vier op te splitsen.
o Druk op FN om de PIP-functie (picture-in-picture) in te schakelen. Raadpleeg het configuratiemenu
voor meer informatie. Druk de cijfertoets in om het desbetreffende kanaal op het volledige scherm weer
te geven; druk op MULTI om het scherm in vier op te splitsen.
o Druk in viervoudige weergavemodus op MULTI om elk beeld achtereenvolgens op het volledige scherm
weer te geven. Regel het interval bij via het configuratiemenu. Druk opnieuw op MULTI om naar de
viervoudige weergavemodus terug te keren.
• Bediening via de muis:
o Klik met de linkermuisknop op een beeld om het desbetreffende kanaal op het volledige scherm weer te
geven. Klik opnieuw om naar de viervoudige weergavemodus terug te keren.
o Klik op
onderaan het scherm om de PIP-functie in te schakelen. Raadpleeg het configuratiemenu
voor meer informatie. Druk de cijfertoets in om het desbetreffende kanaal op het volledige scherm weer
te geven. Klik in het scherm om naar de viervoudige weergavemodus terug te keren.
o Klik op
onderaan het scherm om elk beeld achtereenvolgens op het volledige scherm weer te geven.
Regel het interval bij via het configuratiemenu. Klik in het scherm om naar de viervoudige
weergavemodus terug te keren.
Page 16

CCTVPROM7
14/07/2010 ©Velleman nv
16
7.3 Menuopties
• Volgende menuopties zijn beschikbaar:
HDD – Record – PlayBack – Motion – PTZ – PTZCtrl – Log – System
HDD (harde schijf)
• Vink OVERWRITE aan om de oudste data automatisch te
overschrijven bij een volle harde schijf. Vink uit om de functie uit te
schakelen.
• Dit submenu geeft de status en de capaciteit van de harde schijf
weer.
• Selecteer OK om de wijzigingen op te slaan en het menu te
verlaten; selecteer CANCEL om de wijzigingen niet op te slaan.
• Selecteer FORMAT om de harde schijf te formatteren.
Opmerking: De harde schijf kan niet geformatteerd worden tijdens
een opname.
Record (opname)
Het menu RECORD bevat 3 submenu’s.
• Selecteer het kanaal dat u wenst in te stellen.
• Geef het kanaal een naam indien gewenst (tot 8
karakters).
• Stel de beeldkwaliteit in: LOWEST, LOW, MIDDLE, HIGH
of HIGHEST.
• Stel het aantal frames per seconde in: 1, 3, 5, 8, 13 of
25.
• Stel de helderheid, het contrast en de intensiteit in:
0~99 (standaard = 50).
• Klik op APPLY TO om de wijzigingen voor het kanaal toe
te passen.
• Klik op OK om te bewaren of op CANCEL om het menu te
verlaten.
• Selecteer het kanaal waarvoor u de opname wenst te
programmeren.
• De horizontale as van de rooster stelt de uren voor; de
verticale as stelt de dagen voor. Klik het vakje aan
wanneer u op dat tijdstip wenst op te nemen. Voorbeeld:
Het 4
e
vakje op de 2e rij is aangevinkt (rood). De camera
voor het geselecteerde kanaal start de opname om
03u00 en stopt de opname om 04u00.
• Klik op APPLY TO om de wijzigingen voor het kanaal toe
te passen.
• Klik op OK om te bewaren of op CANCEL om het menu te
verlaten.
• Vink REC aan voor het gewenste kanaal om de opname op dit
kanaal handmatig te starten. Vink uit om de opname stil te
zetten. Tijdens de opname verschijnt een rood bolletje onderaan
het scherm van het desbetreffende kanaal.
• De opname zal niet starten indien de harde schijf vol is of nog
niet geformatteerd werd.
• Klik op OK om te bewaren of op CANCEL om het menu te
verlaten.
Page 17
CCTVPROM7
14/07/2010 ©Velleman nv
17
Playback (afspelen)
• Selecteer het kanaal waarvan u files wenst op te zoeken.
• Stel begin- en einddatum en -tijd in.
• Selecteer het type opname (handmatig,
geprogrammeerd, na bewegingswaarneming).
• Klik op SEARCH om de lijst met resultaten weer te geven
of klik op PLAY om de files onmiddellijk af te spelen.
SEARCH Opmerking: De lijst geeft enkel de 100 oudste files weer. Wijzig de zoekparameters om
de lijst in te korten.
• Selecteer een file en klik op PLAY om de file af te spelen.
• Bedieningen:
afspelen/pauzeren
doorspoelen: 2x 4x 8x ½x ¼x 1/8 x 1x
terugspoelen: 2x 4x 8x ½x ¼x 1/8 x 1x
menu verlaten
• Verberg de bedieningstoetsen of geef ze weer met de
rechtermuisknop.
• Als de bedieningstoetsen verborgen zijn, klik met de
linkermuisknop op de display om de afgespeelde file op
de voorgrond te plaatsen. Klik opnieuw om naar de
normale schermweergave terug te keren.
• Klik op PREV of op NEXT om door de lijst te bladeren.
Klik op EXIT om naar jet vorige menu terug te keren.
PLAY • Klik op PLAY om de gevonden files achtereenvolgens weer te geven. De opnames door
kanaal 1 verschijnen linksboven, die van kanaal 2 rechtsboeven, enz. De bedieningen
beïnvloeden alle beelden gelijktijdig.
Motion detect (bewegingswaarneming)
• Stel de parameters in.
Motion parameters (parameters bewegingswaarneming)
• Selecteer het kanaal en klik op SET om de
bewakingszone in te stellen. Op het scherm verschijnt
een rooster (16 x 12 vakjes). Klik de gewenste vakjes
aan en bepaal zo de bewakingszone. Klik met de
rechtermuisknop of klik op ESC om te bewaren.
• Stel de opnameduur in (5~99s).
• Stel het gevoeligheidsniveau in: lowest, low, middle,
high, highest.
• Vink BUZZER aan indien u een pieptoon wilt horen
indien een beweging werd waargenomen. Stel ook de
duur van de pieptoon in.
• Klik op APPLY TO om de instellingen voor het kanaal toe
te passen.
• Klik op OK om te bewaren of op CANCEL om het menu
te verlaten.
Page 18

CCTVPROM7
14/07/2010 ©Velleman nv
18
Motion schedule (geprogrammeerde bewegingswaarneming)
• Selecteer het kanaal waarvoor u de opname wenst te
programmeren.
• De horizontale as van de rooster stelt de uren voor; de
verticale as stelt de dagen voor. Klik het vakje aan
wanneer u op dat tijdstip wenst op te nemen.
Voorbeeld: Het 4
e
vakje op de 2e rij is aangevinkt
(rood). De camera voor het geselecteerde kanaal start
de opname om 03u00 en stopt de opname om 04u00.
• Klik op APPLY TO om de wijzigingen voor het kanaal toe
te passen.
• Klik op OK om te bewaren of op CANCEL om het menu
te verlaten.
PTZ (Pan-Tilt-Zoom)
• Selecteer het kanaal.
• Stel het PTZ-adres in (00~99).
• Selecteer het PTZ-protocol: Pelco-D, Pelco-P, B01, Samsung, enz.
• Stel de baudsnelheid in: 1200, 2400, 4800, 9600, 19200, 38400,
57600 of 115200.
• Klik op APPLY TO om de wijzigingen voor het kanaal toe te passen.
• Klik op OK om te bewaren of op CANCEL om het menu te verlaten.
PTZ controls (PTZ-bediening)
• Selecteer het kanaal.
• Selecteer Direction, Focus, Zoom, Iris of Automatic.
• Verplaats de camera met U/D/L/R.
• Stel de snelheid van de camera in: slow, normal of
fast.
Log management (filebeheer)
• Selecteer het type: Operation of Alarms.
• Stel begin- en einddatum en -tijd in.
• Klik op SEARCH om een overzicht weer te geven.
• Scroll door de pagina’s mat PREV en NEXT, keer terug
naar het vorige menu met CANCEL.
• Verlaat het menu met CANCEL.
System settings (systeeminstellingen)
• Er zijn 6 submenu’s:
o Configure
o Password
o Date&Time
o Default
o Reset
o About
Page 19

CCTVPROM7
14/07/2010 ©Velleman nv
19
Configure (instellingen)
• Selecteer VIDEO LOSS indien u een pieptoon wenst re
horen bij verlies van een videosignaal.
• Stel het interval in tussen twee opeenvolgende beelden
onder AUTOSWITCH. Waarde: 1~99s.
• Stel de PIP-instellingen in onder PIPCONFIG. Het eerste
kanaal is het beeld op de voorgrond, het tweede kanaal
is het beeld op de achtergrond.
• Stel de VGA-resolutie in: 1024x768/60Hz,
1280x1024/60Hz of 800x600/75Hz.
• Schakel de paswoordbeveiliging in of uit. Stel het
paswoord in via het paswoordmenu.
• Stel de uitlogduur in onder LOCKTIME. Eens de
ingestelde tijd verstreken is, moet u het paswoord
opnieuw ingeven. Stel in op 1, 2, 5, 10, 15 of 30
minuten of op 1 uur. Deze instelling wordt enkel
ingeschakeld indien het paswoord geactiveerd is.
Password (paswoord)
• Om het paswoord te wijzigen, geef eerst het oude
paswoord in (standaard paswoord: 888888).
• Geef het nieuwe paswoord in met de toetsen onderaan
het scherm.
• Bevestig het paswoord met OK.
Date & Time (datum en tijd)
• Stel datum en tijd in (formaat datum: maand – dag –
jaar [MM-DD-YYYY], formaat tijd: uren – minuten –
seconden).
Opmerking: U kunt de tijd niet wijzigen tijdens een
opname.
• Klik op OK om te bewaren of op CANCEL om het menu
te verlaten.
Opmerking: Herstart het systeem (zie hieronder) om
de nieuwe datum en tijd te activeren.
Default configuration (fabrieksinstellingen)
• Klik op OK om de fabrieksinstellingen opnieuw in te
stellen.
Reset • Klik op OK om het systeem te herstarten.
About • Systeeminformatie (hardware- en softwareversie).
Page 20

CCTVPROM7
14/07/2010 ©Velleman nv
20
7.4 Playback en back-up
• Installeer eerst de nodige software op de aan te sluiten computer.
7.4.1 Installatie van de software
• Dubbelklik op [DVR_ClientSetupCHS] op de cd-rom.
• Volg de instructies op het scherm.
• Dubbelklik, eens de installatie voltooid is, op de nieuwe icoon om de software te openen.
7.4.2 Aansluiting van de hardware
• Steek de USB-stekker van de meegeleverde kabel in de USB-poort [A] en een vrije USB-poort van de
computer. De USB-led [13] licht op.
7.4.3 Files zoeken
• Selecteer het gewenste kanaal.
• Stel start- en einddatum en -tijd in.
• Selecteer de gebeurtenis die de opname heeft gestart (manueel, geprogrammeerd of na
bewegingswaarneming).
• Klik op SEARCH om de lijst met opnames weer te geven.
• Scroll doorheen de lijst met <PRE of NEXT> of geef een paginanummer in en klik op GOTO.
7.4.4 PlayByFile
• Selecteer een file en klik op PLAYBYFILE. De beelden verschijnen in het PLAYBACK-venster (zie §7.4.7).
7.4.5 Back-up
• Klik op BACKUP om een kopie van de file op de computer te bewaren.
• Kies een doelmap, een naam en het type file (MJPEG of AVI). Wacht tot de file naar het gewenste
formaat werd geconverteerd.
7.4.6 PlayByTime
• Kies een enkel kanaal indien u deze functie wilt gebruiken (om overlappende files te vermijden). Alle files
worden achtereenvolgens afgespeeld.
• Ook hier verschijnen de beelden in het PLAYBACK-venster (zie §7.4.7).
7.4.7 PLAYBACK-venster
Page 21

CCTVPROM7
14/07/2010 ©Velleman nv
21
• Het venster verschijnt wanneer u voor PLAYBYFILE of PLAYBYTIME kiest onder RECORDFILE. U kunt het
venster ook direct openen zonder eerst een file te openen. Klik op OPEN om doorheen de eerder
opgeslagen files te bladeren.
• Klik op PAUSE om het beeld stil te leggen, klik op PLAY om de file verder af te spelen.
• Klik op STEP om de file frame per frame af te spelen
• Selecteer de afspeelsnelheid uit het dropdownmenu.
• Klik op SNAP om een snapshot van het beeld te nemen. Selecteer de naam en de doelmap.
• Klik op CANCEL om naar het RECORDFILE-venster terug te keren.
8. Vervangen van de harde schijf
• Ontkoppel de DVR van het lichtnet en van alle randapparatuur.
• Draai de 6 schroeven (3 aan elke zijde) van de behuizing los.
• Draai de 4 schroeven (X op afbeelding op pagina 2) van de montagebeugel los.
• Ontkoppel de voeding en de databus.
• Draai de schroeven van de harde schijf los en verwijder de harde schijf.
• Plaats een nieuwe SATA harde schijf in de beugel en schroef vast. Formatteer de harde schijf als FAT32.
• Koppel de databus en de voeding, en plaats de montagebeugel terug op zijn plaats. Draai de 4 schroeven
(X) opnieuw vast.
• Sluit de DVR.
9. De batterijen
• De afstandsbediening wordt gevoed door 1x CR2025-lithiumbatterij van 3 V
(meegeleverd).
• Druk op de zijkant van de batterijhouder [1] en trek [2].
• Plaats de batterij met de positieve pool naar boven en steek de batterijhouder terug
in de afstandsbediening.
WAARSCHUWING: Ga voorzichtig met batterijen om. Volg de veiligheidsvoorschriften op de
verpakking. Gooi batterijen weg volgens de plaatselijke milieuwetgeving. Houd batterijen
uit de buurt van kinderen.
10. Technische specificaties
DVR
videoformaat PAL
videocompressie MJPEG (CIF)
video-ingang 4 kanalen, composiet videosignaal 1 Vpp / 75 Ω BNC
video-uitgang 2x composiet videosignaal 1 Vpp / 75 Ω BNC
max. opnamesnelheid (PAL) CIF 352 × 288 pixels @ 100 IPS (PAL)
beeldkwaliteit lowest - low - middle - high - highest
opslagcapaciteit harde schijf interne SATA, 1x harde schijf (meegelev.)
opnamemodus manueel / geprogrammeerd / na bewegingswaarneming
beeldsnelheid 100 IPS voor PAL
zone bewegingswaarneming 16 x 12 vakjes per kanaal
gevoeligheid bewegingswaarneming 1 parameter met 5 niveaus (lowest - low - middle - high - highest)
back-up USB-aansluiting
PTZ-bediening RS-485
toetsvergrendeling ja
waarneming verlies videosignaal ja
cameranaam tot 8 karakters
video-instellingen contrast/helderheid/intensiteit
datumweergave MM-DD-YY
voeding 12 VDC
verbruik < 30 W
bedrijfstemperatuur 10°C ~ 40°C
systeemherstel automatisch systeemherstel na herinschakeling van de voeding
afmetingen 200 x 210 x 130 mm
gewicht 2250 g
Camera (4x)
scansysteem PAL
opneemelement CMOS
aantal pixels 628 (H) x 582 (V) - PAL
resolutie 380 tv-lijnen
min. verlichting 0,2 lux (IR uitgeschakeld
IR-leds 11
interlacing 2:01
video-uitgang 1,0 Vpp composiet, 75 Ω
gammacorrectie 0,45
ingebouwde lens 6 mm
Page 22

CCTVPROM7
14/07/2010 ©Velleman nv
22
lenshoek 39,8°
voeding 12 VDC
afmetingen Ø 45 x 55 mm
gewicht 290 g
Gebruik dit toestel enkel met originele accessoires. Velleman nv is niet aansprakelijk voor schade of
kwetsuren bij (verkeerd) gebruik van dit toestel.
Voor meer informatie over dit product en de meest recente versie van deze handleiding, zie
www.velleman.eu
.
De informatie in deze handleiding kan te allen tijde worden gewijzigd zonder voorafgaande
kennisgeving.
© AUTEURSRECHT
Velleman nv heeft het auteursrecht voor deze handleiding. Alle wereldwijde rechten voorbehouden.
Het is niet toegestaan om deze handleiding of gedeelten ervan over te nemen, te kopiëren, te vertalen, te
bewerken en op te slaan op een elektronisch medium zonder voorafgaande schriftelijke toestemming van de
rechthebbende.
Page 23

CCTVPROM7
14/07/2010 ©Velleman nv
23
NOTICE D’EMPLOI
1. Introduction
Aux résidents de l'Union européenne
Des informations environnementales importantes concernant ce produit
Ce symbole sur l'appareil ou l'emballage indique que l’élimination d’un appareil en fin de vie peut
polluer l'environnement. Ne pas jeter un appareil électrique ou électronique (et des piles
éventuelles) parmi les déchets municipaux non sujets au tri sélectif ; une déchèterie traitera
l’appareil en question. Renvoyer les équipements usagés à votre fournisseur ou à un service de
recyclage local. Il convient de respecter la réglementation locale relative à la protection de
l’environnement.
En cas de questions, contacter les autorités locales pour élimination.
Nous vous remercions de votre achat ! Lire la présente notice attentivement avant la mise en service de
l’appareil. Si l’appareil a été endommagé pendant le transport, ne pas l’installer et consulter votre revendeur.
Contenu :
• 1x enregistreur numérique avec disque dur SATA interne
• 4x caméra couleur IR CMOS
• 4x câble de 18 m (vidéo + alimentation)
• 1x bloc secteur 100 ~ 240 VCA/50 ~ 60 Hz vers 12 VCC + câble d’alimentation
• télécommande IR + pile CR2025
• souris PS/2
• câble USB (± 65 cm)
• 1x cédérom avec la notice non abrégée
2. Consignes de sécurité
Garder hors de la portée des enfants et des personnes no autorisées.
Risque d’électrocution lors de l’ouverture du boîtier. Toucher un câble sous tension peut causer
des électrochocs mortels.
Débrancher l’appareil s’il n’est pas utilisé ou pour le nettoyer. Tirer la fiche pour débrancher
l'appareil ; non pas le câble.
3. Directives générales
Se reporter à la garantie de service et de qualité Velleman® en fin de notice.
Pour usage à l’intérieur uniquement.
Protéger contre la pluie, l’humidité et les projections d’eau. Ne jamais placer d’objet contenant
un liquide sur l’enregistreur.
Protéger contre la poussière. Protéger contre la chaleur extrême. Veiller à ce que les fentes de
ventilation ne soient pas bloquées. Laisser une distance de minimum 2,5 cm entre
l’enregistreur et tout autre objet.
Protéger contre les chocs. Traiter l’appareil avec circonspection pendant l’opération.
• Se familiariser avec le fonctionnement avant l’emploi.
• Toute modification est interdite pour des raisons de sécurité.
• N’utiliser qu’à sa fonction prévue. Un usage impropre annule d'office la garantie.
• La garantie ne s’applique pas aux dommages survenus en négligeant certaines directives de cette notice et
votre revendeur déclinera toute responsabilité pour les problèmes et les défauts qui en résultent.
• Utiliser cet appareil en respectant les directives sur la protection de la vie privée.
4. Caractéristiques
Enregistreur numérique
• enregistrement au format MJPEG
• enregistrement : après détection de mouvement, départ manuel, programmé
• fonction de sauvegarde : USB
• menu à l’écran : anglais
• notice : anglais, français, allemand, espagnol et néerlandais
• disque dur SATA interne
• rétablissement automatique du système après remise sous tension
• pilotage : panneau frontal, télécommande IR, souris PS/2
Caméra (4x)
• caméra couleur CMOS
• vision nocturne noir/blanc (LED infrarouges)
Page 24

CCTVPROM7
14/07/2010 ©Velleman nv
24
5. Description
Se référer aux illustrations en page 2 de cette notice.
panneau frontal
1 sélecteurs de canal 8 boutons directionnels
2 sélecteur plein écran/écran quadruple 9 bouton de confirmation (OK)
3 bouton d’enregistrement manuel (REC) 10 LED d’alimentation
4 bouton d’accès au menu 11 LED de système
5 bouton de pilotage PTZ 12 LED d’enregistrement
6 bouton de lecture (PLAY) 13 LED d’état USB
7 bouton d’échappement (ESC) 14 interrupteur marche/arrêt
panneau arrière
A port USB E sorties DC1~DC4
B sorties V
OUT
-1/V
OUT
-2 (BNC) F bornier de connexion PTZ/RS-485
C prises VIN1~VIN4 (BNC) G entrée 12 VCC
D prise PS2 H connexion de mise à la terre
caméra
a objectif e écrou de positionnement
b LED IR f étrier de montage
c capteur de lumière g sortie vidéo
d pare-soleil h entrée 12 VCC
télécommande
MULTI commutation quadruple écran/plein écran
1 2 3 4 sélecteurs de canal
PTZ bouton d’accès au menu PTZ
CLEAR effacement de la saisie
MENU bouton d’accès au menu OSD
REC bouton d’accès au menu d’enregistrement
boutons directionnels du menu OSD
OK bouton de confirmation
ESC bouton d’échappement
bouton de lecture
FN affichage PIP (picture-in-picture) : affichage d’une image (canal 1) dans l’image (canal 2)
Remarque : Les boutons restants n’ont aucune fonction.
6. Connexion
Se référer aux illustrations en page 2 de cette notice.
• Le disque dur est préinstallé dans l’enregistreur numérique. Pour le remplacement, voir §8.
• Veiller à ce que l’enregistreur numérique soit déconnecté du réseau électrique avant toute connexion. Ne pas
toucher le circuit électronique afin d’éviter les décharges électrostatiques.
Connexion des caméras
• Choisir un emplacement pour la caméra. Veiller à :
• ne pas installer la caméra dans un endroit trop chaud ou trop froid, ou sujet à des vibrations excessives.
• ne pas installer la caméra à proximité d’un champ magnétique.
• ne pas pointer la caméra en direction du soleil ou d’un autre objet lumineux/réfléchissant (p.ex. une
porte métallique).
• tenir compte de la longueur des câbles d’alimentation (18 m).
• Marquer l’emplacement des trous de fixation à l’aide de l’étrier [f]. Percer les trous et fixer l’étrier [f] avec 3
vis.
• Fixer la caméra à l’étrier [f] à l’aide de l’écrou à l’arrière de la caméra.
• Pointer la caméra vers la zone de surveillance et serrer l’écrou de positionnement [e].
• Connecter les fiches d’alimentation [h] et BNC [g] au câble d’alimentation.
• Connecter le câble à l’enregistreur. Le chiffre au haut ou au bas de la prise BNC [C] indique le canal. L’ordre
de connexion des fiches BNC détermine le mode d’affichage des canaux à l’écran. Veiller à utiliser la sortie
CC [E] appropriée pour chaque caméra.
Page 25

CCTVPROM7
14/07/2010 ©Velleman nv
25
Connexion de la souris
• Connecter la souris PS2 à la prise PS2 [D].
Connexion d’une caméra PTZ/ligne série
• Connecter la ligne de données PTZ aux bornes 485T- et 485T+ du bornier de connexion PTZ [F]. Serrer les
câbles avec un petit tournevis.
• En connectant une ligne série, utiliser les 4 bornes (485T-, 485T+, 485R+ et 485R-).
Mise à la terre
• La mise à la terre [H] peut résoudre des problèmes d’interférence dans l’image. Éviter de mettre à la terre
lorsque l’image ne présente aucun problème.
Connexion de l’alimentation
• Insérer la fiche du bloc secteur inclus dans la prise 12 VCC [G] à l’arrière de l’enregistreur numérique.
Remarque : N’utiliser que le bloc secteur inclus.
• Insérer le bloc secteur dans une prise de courant. L’enregistreur numérique s’initialise.
Connexion à un ordinateur de sauvegarde
• Connecter l’enregistreur numérique [A] à un ordinateur à l’aide du câble USB inclus.
Remarque : Installer préalablement le logiciel de sauvegarde sur l’ordinateur (se référer au chapitre §7.4).
7. Emploi
Remarque : Les fonctions et options de l’enregistreur sont accessibles depuis le panneau frontal, la
télécommande ou la souris.
• L’enregistreur numérique et les caméras sont automatiquement enclenchés après connexion au réseau
électrique. L’écran LCD affiche les versions de la matière dure et du logiciel, et le système vérifie la présence
de la souris et du disque dur.
• Après mise en marche du système, la LED de [10] s’allume et l’écran affiche simultanément l’image des 4
caméras. La date et l’heure sont affichées en haut à gauche de l’écran. Vérifier le câblage de la caméra en
question si un des écrans n’affiche pas d’image.
• Éteindre et allumer l’écran avec l’interrupteur [14]. Un enregistrement en cours ne sera pas interrompu
après extinction de l’écran.
7.1 Directives générales concernant le menu
• Afficher le menu avec le bouton d’accès au menu sur le panneau frontal [4] ou sur la télécommande, ou
cliquer l’option MENU au bas de l’écran avec la souris.
• Les types de champ du menu :
o Champ menu : Champ en surbrillance qui s’affiche dans une nouvelle fenêtre lorsqu’on le sélectionne.
Faire défiler les champs avec les boutons directionnels ou la souris. Cliquer sur un champ ou cliquer le
bouton de confirmation pour ouvrir le sous-menu.
o Champ à (dé)cocher : Cocher la case pour activer la fonction, découcher la case pour désactiver la
fonction. Utiliser les boutons directionnels ou cliquer dans le champ.
o Champ combo : Sélectionner une option avec les boutons directionnels ou la souris.
o Liste : Sélectionner un élément de la liste avec cliquant avec le bouton gauche de la souris ou naviguer
vers l’élément avec les boutons directionnels et cliquer le bouton de confirmation.
o Champ d’édition : Entrer un caractère avec les boutons directionnels ou sélectionner le caractère avec
la souris. Quitter le champ en cliquant le bouton de confirmation.
7.2 Modes d’affichage de l’écran
• Sélection du mode d’affichage depuis le panneau frontal :
Enfoncer un sélecteur de canal [1] pour afficher le canal en question en plein écran ; enfoncer le sélecteur
de l’écran quadruple [2] pour fractionner l’écran.
• Sélection du mode d’affichage depuis la télécommande :
o Enfoncer un sélecteur de canal pour afficher le canal en question en plein écran ; enfoncer le bouton
MULTI pour fractionner l’écran.
o Enfoncer le bouton FN pour activer le mode d’affichage PIP (picture-in-picture). Se reporter au menu de
configuration pour le réglage. Enfoncer un sélecteur de canal pour afficher le canal en question en plein
écran ; enfoncer le bouton MULTI pour fractionner l’écran.
o En mode d’affichage quadruple, enfoncer le bouton MULTI pour afficher chaque canal en plein écran de
manière séquentielle. Régler l’intervalle sous le menu de configuration. Renfoncer le bouton MULTI pour
fractionner l’écran.
• Sélection du mode d’affichage depuis la souris :
o Cliquer sur un canal avec le bouton gauche de la souris pour afficher le canal en question en plein écran.
Recliquer pour fractionner l’écran.
o Cliquer sur
au bas de l’écran pour activer le mode d’affichage PIP. Se reporter au menu de
configuration pour le réglage. Recliquer dans l’image pour fractionner l’écran.
o Cliquer sur
au bas de l’écran pour afficher chaque canal en plein écran de manière séquentielle.
Régler l’intervalle sous le menu de configuration. Recliquer dans l’image pour fractionner l’écran.
Page 26

CCTVPROM7
14/07/2010 ©Velleman nv
26
7.3 Les options du menu
• Le menu principal affiche les options suivantes :
HDD – Record – PlayBack – Motion – PTZ – PTZCtrl – Log – System
HDD (disque dur)
• Cocher la case OVERWRITE pour écraser automatiquement les
données les plus anciennes en cas de mémoire pleine. Décocher la
case pour désactiver la fonction.
• Le menu affiche l’état et la capacité du disque dur.
• Sélectionner OK pour sauvegarder la configuration et pour quitter le
menu, ou sélectionner CANCEL pour quitter le menu sans
sauvegarde des modifications.
• Sélectionner FORMAT pour formater le disque dur.
Remarque : Le disque dur ne peut pas être formaté lorsqu’un
enregistrement est en cours.
Record (enregistrement)
Le menu RECORD contient 3 sous-menus.
• Sélectionner le canal à configurer.
• Entrer un nom si nécessaire (jusqu’à 8 caractères).
• Sélectionner une qualité d’image : LOWEST, LOW,
MIDDLE, HIGH ou HIGHEST.
• Sélectionner le nombre d’images par secondes : 1, 3, 5,
8, 13 ou 25.
• Configurer l’intensité, le contraste et la saturation : 0~99
(standard = 50).
• Cliquer sur APPLY TO pour activer les modifications.
• Sélectionner OK pour sauvegarder la configuration ou
sélectionner CANCEL pour quitter le menu sans
sauvegarde des modifications.
• Sélectionner le canal à programmer.
• La grille représente les 7 jours de la semaine (axe
verticale) divisés en 24 heures (axe horizontal).
Exemple : La 4
ième
case sur la 2
ième
rangée cochée
(rouge) indique l’enregistrement est programmé entre
03h00 et 04h00 pour la caméra du canal sélectionné.
• Cliquer sur APPLY TO pour activer les modifications.
• Sélectionner OK pour sauvegarder la configuration ou
sélectionner CANCEL pour quitter le menu sans
sauvegarde des modifications.
• Cocher la case REC pour démarrer manuellement
l’enregistrement sur le canal sélectionné ; décocher la case pour
interrompre l’enregistrement. Un enregistrement en cours est
indiqué par une pastille rouge au bas de l’écran du canal en
question.
• L’enregistrement ne démarre pas en cas de disque dur plein ou
non formaté.
• Sélectionner OK pour sauvegarder la configuration ou
sélectionner CANCEL pour quitter le menu sans sauvegarde des
modifications.
Page 27

CCTVPROM7
14/07/2010 ©Velleman nv
27
Playback (lecture)
• Sélectionner le canal dans lequel vous souhaitez
rechercher des fichiers.
• Configurer les dates et l’heure de début et de fin de
l’enregistrement.
• Sélectionner le type d’enregistrement (manuel,
programmé, après détection de mouvement).
• Cliquer SEARCH pour afficher la liste de enregistrements
ou PLAY pour lire les enregistrements.
SEARCH Remarque : La liste n’affichera que les 100 fichiers les plus anciens. Ajuster les
paramètres de recherche pour afficher moins de fichiers.
• Sélectionner un fichier et cliquer sur PLAY pour lire le
fichier.
• Commandes :
lecture/pause
avance rapide : 2x 4x 8x ½x ¼x 1/8 x 1x
recul rapide : 2x 4x 8x ½x ¼x 1/8 x 1x
quitter
• Masquer ou afficher les boutons de commande avec le
bouton droit de la souris.
• Lorsque les boutons de commande sont masqués, cliquer
avec le bouton gauche de la souris dans l’image pour
afficher le fichier au centre de l’écran. Recliquer pour
revenir au mode d’affichage normal.
• Feuilleter à travers la liste avec PREV ou NEXT. Cliquer
sur EXIT pour revenir au menu précédent.
PLAY • Cliquer sur PLAY pour afficher tous les fichiers l’un après l’autre. Les enregistrements
de canal 1 s’affichent en haut à gauche, ceux de canal 2 en haut à droite, etc. Les
boutons de commandes influencent simultanément toutes les images.
Motion detect (détection de mouvement)
• Configurer les paramètres.
Motion parameters (paramètres détection de mouvement)
• Sélectionner le canal et cliquer sur SET pour déterminer
la zone de surveillance. Déterminer la zone en
sélectionnant les cases dans la grille (16 x 12 cases).
Cliquer avec le bouton droit de la souris ou cliquer sur
ESC pour sauvegarder les paramètres.
• Configurer la durée de l’enregistrement (5~99s).
• Configurer le niveau de sensibilité : lowest, low, middle,
high, highest.
• Cocher la case BUZZER pour entendre une tonalité dès
la détection d’un mouvement. Configurer également la
durée de la tonalité.
• Cliquer sur APPLY TO pour activer les modifications.
• Sélectionner OK pour sauvegarder la configuration ou
sélectionner CANCEL pour quitter le menu sans
sauvegarde des modifications.
Page 28

CCTVPROM7
14/07/2010 ©Velleman nv
28
Motion schedule (détection de mouvement programmée)
• Sélectionner le canal à programmer.
• La grille représente les 7 jours de la semaine (axe
verticale) divisés en 24 heures (axe horizontal).
Exemple : La 4
ième
case sur la 2
ième
rangée cochée
(rouge) indique l’enregistrement est programmé entre
03h00 et 04h00 pour la caméra du canal sélectionné.
• Cliquer sur APPLY TO pour activer les modifications.
• Sélectionner OK pour sauvegarder la configuration ou
sélectionner CANCEL pour quitter le menu sans
sauvegarde des modifications.
PTZ (Pan-Tilt-Zoom)
• Sélectionner le canal.
• Configurer l’adresse de communication PTZ (00~99).
• Sélectionner le protocole PTZ : Pelco-D, Pelco-P, B01, Samsung, etc.
• Sélectionner la vitesse baud : 1200, 2400, 4800, 9600, 19200,
38400, 57600 ou 115200.
• Cliquer sur APPLY TO pour activer les paramètres.
• Sélectionner OK pour sauvegarder la configuration ou sélectionner
CANCEL pour quitter le menu sans sauvegarde des modifications.
PTZ controls (pilotage PTZ)
• Sélectionner le canal.
• Sélectionner Direction, Focus, Zoom, Iris ou
Automatic.
• Déplacer la caméra avec U/D/L/R.
• Configurer la vitesse de déplacement de la caméra :
slow, normal ou fast.
Log management (gestion des fichiers)
• Sélectionner le type : Operation ou Alarms.
• Configurer les dates et l’heure de début et de fin de
l’enregistrement.
• Cliquer sur SEARCH pour afficher un aperçu.
• Naviguer dans les pages avec PREV ou NEXT, revenir au
menu précédent avec CANCEL.
• Cliquer sur CANCEL pour quitter le menu.
System settings (paramètres du système)
• Il y a 6 sous-menus :
o Configure
o Password
o Date&Time
o Default
o Reset
o About
Page 29

CCTVPROM7
14/07/2010 ©Velleman nv
29
Configure (configuration)
• Activer VIDEO LOSS pour entendre une tonalité lors
d’une perte de signal vidéo.
• Configurer l’intervalle entre deux images sous
AUTOSWITCH. Valeur : 1~99s.
• Configurer les paramètres du mode PIP sous
PIPCONFIG. Le premier canal est l‘image en premier
plan, le deuxième canal est l’image en arrière-plan.
• Sélectionner la résolution VGA : 1024x768/60Hz,
1280x1024/60Hz ou 800x600/75Hz.
• Activer ou désactiver la protection par mot de passe.
Configurer le mot de passe depuis le menu PASSWORD.
• Configurer le délai de déconnexion sous LOCKTIME. Une
fois ce délai écoulé, il faudra ressaisir le mot de passe.
Sélectionner 1, 2, 5, 10, 15 ou 30 minutes ou 1 heure.
Cette option n’est activée que lorsque le mot de passe
est activé.
Password (mot de passe)
• Pour modifier le mot de passe, entrer d’abord l’ancien
mot de passe (mot de passe par défaut : 888888).
• Entrer le nouveau mot de passe avec les boutons en
bas de l’écran.
• Confirmer avec OK.
Date & Time (date et heure)
• Configurer la date et l’heure (format de la date : mois –
jour – année [MM-DD-YYYY], format de l’heure : heure
– minutes – secondes).
Remarque : Il n’est pas possible de modifier la date et
l’heure pendant un enregistrement.
• Sélectionner OK pour sauvegarder la configuration ou
sélectionner CANCEL pour quitter le menu sans
sauvegarde des modifications.
Remarque : Redémarrer le système (voir ci-dessous)
pour activer les modifications.
Default configuration (paramètres d’usine)
• Cliquer sur OK pour rétablir les paramètres d’usine.
Reset • Cliquer sur OK pour redémarrer le système.
About • Affichage des données du système (versions de la matière dure et du logiciel).
7.4 Lecture et sauvegarde
• Préinstaller le logiciel nécessaire sur l’ordinateur à connecter.
Page 30

CCTVPROM7
14/07/2010 ©Velleman nv
30
7.4.1 Installation du logiciel
• Cliquer double sur [DVR_ClientSetupCHS] sur le cédérom inclus pour lancer l’installation du logiciel.
• Suivre les instructions sur l’écran.
• Une fois l’installation terminée, cliquer double sur l’icône pour lancer le logiciel.
7.4.2 Connexion du périphérique
• Insérer le câble USB dans le port USB [A] et un port USB libre de l’ordinateur. La LED USB [13]
s’allume.
7.4.3 Recherche de fichiers
• Sélectionner le canal.
• Configurer les dates et l’heure de début et de fin de l’enregistrement.
• Sélectionner le type d’enregistrement (manuel, programmé, après détection de mouvement).
• Cliquer sur SEARCH pour afficher la liste des enregistrements.
• Faire défiler la liste avec <PRE ou NEXT> ou entrer le numéro de la page et cliquer sur GOTO.
7.4.4 PlayByFile
• Sélectionner un fichier et cliquer sur PLAYBYFILE. Le fichier s’affiche dans la fenêtre PLAYBACK (voir
§7.4.7).
7.4.5 Sauvegarde
• Cliquer sur BACKUP pour sauvegarder une copie du fichier sur ordinateur.
• Sélectionner le dossier de destination, le nom et le type (MJPEG ou AVI). Patienter jusqu’à ce que le
fichier soit convertit au format sélectionné.
7.4.6 PlayByTime
• Pour utiliser cette option, veiller à ne sélectionner qu’un seul canal (afin d’éviter le recouvrement de
fichiers). Tous les fichiers seront lus en mode séquentiel.
• Les fichiers s’afficheront également dans la fenêtre PLAYBACK (voir §7.4.7).
7.4.7 Fenêtre PLAYBACK
Page 31

CCTVPROM7
14/07/2010 ©Velleman nv
31
• La fenêtre s’ouvre en sélectionnant l’option PLAYBYFILE ou PLAYBYTIME sous RECORDFILE. La fenêtre est
également accessible sans avoir à sélectionner un fichier. Cliquer OPEN pour naviguer vers le fichier
préalablement sauvegardé.
• Cliquer sur PAUSE pour arrêter l’image, cliquer sur PLAY pour continuer.
• Cliquer sur STEP pour avancer image par image.
• Sélectionner la vitesse de lecture dans le menu déroulant.
• Cliquer sur SNAP pour faire une capture d’image. Sélectionner le nom et le dossier de destination.
• Cliquer sur CANCEL pour revenir à la fenêtre RECORDFILE.
8. Remplacement du disque dur
• Déconnecter l’enregistreur du réseau électrique et de tout périphérique.
• Desserrer les 6 vis (3 de chaque côté) du couvercle.
• Desserrer les 4 vis (marquées X sur l’illustration en page 2) de l’étrier contenant le disque dur.
• Déconnecter l’alimentation et le bus de données.
• Desserrer les vis maintenant le disque dur en place et retirer le disque dur.
• Installer le nouveau disque dur SATA dans l’étrier et fixer. Formater le disque dur au format FAT32.
• Connecter le bus de données et l’alimentation, et replacer l’étrier de montage. Resserrer les 4 vis (X).
• refermer l’enregistreur numérique.
9. Les piles
• La télécommande est alimentée par 1 pile au lithium de 3 V type CR2025 (incluse).
• Enfoncer la languette du support de la pile [1] et tirer [2].
• Insérer la pile dans le support, le pôle positif vers le haut, et réinsérer le support
dans la télécommande.
AVERTISSEMENT : Manier les piles avec précaution. Respecter les consignes de sécurité sur
l’emballage. Écouler les piles usagées en respectant la réglementation locale concernant la
protection de l’environnement. Maintenir les piles à l’écart des enfants.
10. Spécifications techniques
DVR
format vidéo PAL
compression vidéo MJPEG (CIF)
entrée vidéo 4 canaux, signal vidéo composite 1 Vpp / 75 Ω BNC
sortie vidéo 2x signal vidéo composite 1 Vpp / 75 Ω BNC
vitesse d’enregistrement max. (PAL) CIF 352 × 288 pixels @ 100 IPS (PAL)
qualité d’image min. - bas - moyen - haut - max.
capacité disque dur type SATA intégré, 1x HDD (disque incl.)
modes d’enregistrement manuel, programmé, par détection de mouvement
vitesse d’image 100 IPS (PAL)
zone de détection de mouvement grille 16 x 12 par canal
sensibilité zone de détection de
mouvement
1 paramètre avec 5 niveaux de sensibilité (min. - bas - moyen - haut -
max.)
mode de sauvegarde connexion USB vers PC
pilotage PTZ RS-485
verrouillage des touches oui
détection perte de signal vidéo oui
nom de la caméra jusqu’à 8 caractères
réglages vidéo contraste/clarté/intensité
format d’affichage date MM-DD-YY
alimentation 12 VCC
consommation < 30 W
température de service 10°C ~ 40°C
rétablissement du système auto-rétablissement du système après la remise sous tension
dimensions 200 x 210 x 130 mm
poids 2250 g
Camera (4x)
balayage PAL
capteur CMOS
nombre de pixels 628 (H) x 582 (V) - PAL
résolution 380 lignes TV
éclairage min. 0,2 lux (IR éteint)
LED IR 11
entrelacement 2:01
sortie vidéo 1,0 Vpp composite, 75 Ω
correction gamma 0,45
objectif intégré 6 mm
angle de l’objectif 39,8°
Page 32

CCTVPROM7
14/07/2010 ©Velleman nv
32
alimentation 12 VDC
dimensions Ø 45 x 55 mm
poids 290 g
N’employer cet appareil qu’avec des accessoires d’origine. SA Velleman ne sera aucunement
responsable de dommages ou lésions survenus à un usage (incorrect) de cet appareil.
Pour plus d’information concernant cet article et la version la plus récente de cette notice, visiter
notre site web www.velleman.eu
.
Toutes les informations présentées dans cette notice peuvent être modifiées sans notification
préalable.
© DROITS D’AUTEUR
SA Velleman est l’ayant droit des droits d’auteur pour cette notice. Tous droits mondiaux réservés.
Toute reproduction, traduction, copie ou diffusion, intégrale ou partielle, du contenu de cette notice par quelque procédé ou
sur tout support électronique que se soit est interdite sans l’accord préalable écrit de l’ayant droit.
Page 33

CCTVPROM7
14/07/2010 ©Velleman nv
33
MANUAL DEL USUARIO
1. Introducción
A los ciudadanos de la Unión Europea
Importantes informaciones sobre el medio ambiente concerniente a este producto
Este símbolo en este aparato o el embalaje indica que, si tira las muestras inservibles, podrían dañar el
medio ambiente. No tire este aparato (ni las pilas, si las hubiera) en la basura doméstica; debe ir a una
empresa especializada en reciclaje. Devuelva este aparato a su distribuidor o a la unidad de reciclaje
local. Respete las leyes locales en relación con el medio ambiente.
Si tiene dudas, contacte con las autoridades locales para residuos.
¡Gracias por haber comprado el CCTVPROM7! Lea atentamente las instrucciones del manual antes de usarlo.
Si el aparato ha sufrido algún daño en el transporte no lo instale y póngase en contacto con su distribuidor.
Incluye:
• 1x videograbadora digital con disco duro SATA incorporado
• 4x cámara IR CMOS a color
• 4x cable de 18 m (vídeo + alimentación)
• 1x adaptador de red de 100~240VAC/50~60Hz a 12VDC + cable de alimentación
• mando a distancia IR + pila CR2025
• ratón PS/2
• cable USB (± 65 cm)
• 1x CD-ROM con el manual del usuario completo
2. Instrucciones de seguridad
Mantenga el aparato lejos del alcance de personas no capacitadas y niños.
Riesgo de descargas eléctricas al abrir la caja. Puede sufrir una peligrosa descarga eléctrica al
tocar un cable conectado a la red eléctrica.
Desconecte siempre el aparato si no va a usarlo durante un largo período de tiempo o antes de
limpiarlo. Tire siempre del enchufe para desconectar el cable de red, nunca del propio cable.
3. Normas generales
Véase la Garantía de servicio y calidad Velleman® al final de este manual del usuario.
Sólo para el uso en interiores.
No exponga este equipo a lluvia, humedad, ni a ningún tipo de salpicadura o goteo. Nunca
ponga un objeto con líquido, p.ej. un florero, en el aparato.
No exponga este equipo a polvo. No exponga este equipo a temperaturas extremas.
Asegúrese de que los orificios de ventilación no estén bloqueados. Deje una distancia de
mín. 2,5cm entre el aparato y cualquier otro objeto.
No agite el aparato. Evite usar excesiva fuerza durante el manejo y la instalación
• Familiarícese con el funcionamiento del aparato antes de utilizarlo.
• Por razonas de seguridad, las modificaciones no autorizadas del aparato están prohibidas.
• Utilice sólo el aparato para las aplicaciones descritas en este manual. Su uso incorrecto anula la garantía
completamente.
• Los daños causados por descuido de las instrucciones de seguridad de este manual invalidarán su garantía y
su distribuidor no será responsable de ningún daño u otros problemas resultantes.
• Respete la legislación en relación con la protección de la vida privada al utilizar este aparato.
4. Características
DVR
• grabaciones en el formato MJPEG
• grabaciones: grabaciones programadas, manuales o después de la detección de movimientos
• función copia de seguridad: USB
• menú en pantalla (OSD): inglés
• manual del usuario: inglés, neerlandés, francés, español, alemán
• disco duro SATA incorporado
• recuperación automática del sistema después de haber activado la alimentación de nuevo
• control: panel de control, mando a distancia IR, ratón PS/2
Cámara (4x)
• cámara CMOS a color
• visión nocturna B/N (por LEDs IR)
Page 34

CCTVPROM7
14/07/2010 ©Velleman nv
34
5. Descripción
Véase las figuras en la página 2 de este manual del usuario.
panel frontal
1 selectores de canal 8 botones direccionales
2 selector pantalla completa/pantalla cuádruple 9 botón de confirmación (OK)
3 botón de grabación manual (REC) 10 LED de alimentación
4 botón de acceso al menú 11 LED de sistema
5 botón de control PTZ 12 LED de grabación
6 botón de reproducción (PLAY) 13 LED de estado USB
7 botón escape (ESC) 14 interruptor ON/OFF
panel trasero
A puerto USB E salidas DC1~DC4
B salidas V
OUT
-1/V
OUT
-2 (BNC) F conexión PTZ/RS-485
C entradas VIN1~VIN4 (BNC) G entrada 12 VCC
D entrada PS2 H masa
cámara
a lente e tornillo de ajuste
b LEDs IR f soporte de montaje
c sensor de luz g salida de vídeo
d capa antisolar h entrada 12 VCC
mando a distancia
MULTI conmutación pantalla cuádruple / pantalla completa
1 2 3 4 selectores de canal
PTZ botón de acceso al menú PTZ
CLEAR botón para borrar datos
MENU botón de acceso al menú OSD
REC botón de acceso al menú de grabación
botones direccionales del menú OSD
OK botón de confirmación
ESC botón escape
botón de reproducción
FN visualización PIP (picture-in-picture) : visualización de una imagen (canal 1) en una imagen (canal
2)
Observación: Los botones restantes no tienen función.
6. Conexión
Véase las figuras en la página 2 de este manual del usuario.
• El disco duro está preinstalado en la videograbadora digital. Para reemplazarlo, véase §8.
• Asegúrese de que la videograbadora digital esté desconectada de la red eléctrica antes de cualquier
conexión. No toque el circuito electrónico para evitar las descargas eléctricas.
Conectar las cámaras
• Seleccione un lugar de montaje para la cámara. Asegúrese de que:
• nunca instale la cámara en un lugar donde esté expuesta a temperaturas extremas ni vibraciones.
• nunca instale la cámara cerca de campos electromagnéticos.
• nunca dirija la cámara al sol o un objeto reflectante (p.ej. puerta metálica).
• tenga en cuenta la longitud de los cables de alimentación (18 m).
• Marque la posición de los agujeros de fijación con el soporte [f]. Taladre los agujeros y fije el soporte [f]
con 3 tornillos.
• Fije la cámara con el tornillo de la parte trasera de la cámara al soporte [f].
• Apunte la cámara a la zona que quiere vigilar y apriete el tornillo de ajuste [e].
• Conecte el conector de alimentación [h] y el conector BNC [g] al cable de alimentación.
• Conecte el cable a la videograbadora. La cifra de la parte inferior o superior de la entrada BNC [C] indica el
canal. El orden de conexión de los conectores BNC determina el modo de visualización de los canales en la
pantalla. Asegúrese de que utilice la salida CC [E] adecuada para cada cámara.
Page 35

CCTVPROM7
14/07/2010 ©Velleman nv
35
Conectar el ratón
• Conecte el ratón PS2 a la entrada PS2 [D].
Conectar una cámara PTZ/línea serie
• Conecte la línea de datos PTZ a los bornes 485T- y 485T+ del borne de conexión PTZ [F]. Fije los cables con
un pequeño destornillador.
• Al conectar una línea serie, utilice los 4 bornes (485T-, 485T+, 485R+ y 485R-).
Puesta a tierra
• La masa [H] puede resolver interferencias en la imagen. No efectúe una puesta a tierra si no tiene
problemas de interferencia.
Conectar la alimentación
• Introduzca el conector del adaptador de red incluido a la entrada de 12 VCC [G] de la parte trasera de la
videograbadora digital.
Observación: Utilice sólo el adaptador de red incluido.
• Introduzca el adaptador de red al enchufe. La videograbadora digital se inicializa.
Conexión a un ordenador de recambio
• Conecte la videograbadora digital [A] a un ordenador con el cable USB incluido.
Observación: Instale el software de backup de antemano en el ordenador (véase §7.4).
7. Uso
Observación: Las funciones y las opciones del aparato son accesibles por el panel frontal, el mando a
distancia o el ratón.
• La videograbadora digital y las cámaras se activan automáticamente después de la conexión a la red
eléctrica. La pantalla LCD visualiza la versión del hardware y el software, y el sistema controla la presencia
del ratón y el disco duro.
• Después de haber activado el sistema, el LED de alimentación [10] se activa y la pantalla visualiza
simultáneamente la imagen de las 4 cámaras. La fecha y la hora se visualizan en la parte superior izquierda
de la pantalla. Contrôle el cableado de la cámara en cuestión si una de las pantallas no visualiza una
imagen.
• Desactive y active la pantalla con el interruptor [14]. Una grabación no se interrumpirá después de haber
desactivado la pantalla.
7.1 Normas generales sobre el menú
• Visualice el menú con el botón de acceso al menú del panel frontal [4] o el mando a distancia, o haca clic
con el ratón en la opción menú de la parte inferior de la pantalla.
• Los tipos de campo del menú:
o Campo menú: El campo menú está marcado y se visualiza en una nueva pantalla al seleccionarlo.
Desplace los campos con los botones direccionales o el ratón. Haga clic en un campo o haga clic en el
botón de confirmación para abrir el submenú.
o Campo (des)marcar: Marque la casilla para activar la función, desmarque la casilla para desactivar la
función. Utilice los botones direccionales o haga clic en el campo.
o Campo combo: Seleccione une opción con los botones direccionales o el ratón.
o Lista: Seleccione un elemento de la lista con el botón izquierdo del ratón o navegue hacia el elemento
con los botones direccionales y haga clic en el botón de confirmación.
o Campo editar: Introduzca un carácter con los botones direccionales o seleccione el carácter con el ratón.
Salga del campo al hacer clic en el botón de confirmación.
7.2 Modos de visualización de la pantalla
• Seleccionar el modo de visualización por el panel frontal:
Pulse un selector de canal [1] para visualizar el canal en cuestión en pantalla completa; pulse le selector de
la pantalla cuádruple [2] para fraccionar la pantalla.
• Seleccionar el modo de visualización por el mando a distancia:
o Pulse un selector de canal para visualizar el canal en cuestión en pantalla completa; pulse el botón MULTI
para fraccionar la pantalla.
o Pulse el botón FN para activar el modo de visualización PIP (picture-in-picture). Véase el menú de
configuración para el ajuste. Pulse un selector de canal para visualizar el canal en cuestión en pantalla
completa; pulse le botón MULTI para fraccionar la pantalla.
o En el modo de visualización cuádruple, pulse le botón MULTI para visualizar cada canal de manera
secuencial en pantalla completa. Ajuste el intervalo en el menú de configuración. Vuelva a pulsar el botón
MULTI para fraccionar la pantalla.
• Seleccionar el modo de visualización por el ratón:
o Haga clic en un canal con el botón izquierdo del ratón para visualizar el canal en cuestión en pantalla
completa. Vuelva a hacer clic para fraccionar la pantalla.
o Haga clic en
de la parte inferior de la pantalla para activar el modo de visualización PIP. Véase el
menú de configuración para el ajuste. Vuelva a hacer clic en la imagen para fraccionar la pantalla.
o Haga clic en
de la parte inferior de la pantalla para visualizar cada canal de manera secuencial en
pantalla completa. Ajuste el intervalo en el menú de configuración. Vuelva a hacer clic en la imagen para
fraccionar la pantalla.
Page 36

CCTVPROM7
14/07/2010 ©Velleman nv
36
7.3 Las opciones del menú
• El menú principal visualiza las siguientes opciones:
HDD – Record – PlayBack – Motion – PTZ – PTZCtrl – Log – System
HDD (disco duro)
• En caso de memoria llena marque la casilla OVERWRITE para sobre-
escribir automáticamente los datos más antiguos. Desmarque la
casilla para desactivar la función.
• El menú visualiza el estado y la capacidad del disco duro.
• Seleccione OK para guardar la configuración y para salir del menú,
o seleccione CANCEL para salir del menú sin guradar las
modificaciones.
• Seleccione FORMAT para formatear el disco duro.
Observación: No es posible formatear el disco duro si el aparato está
grabando.
Record (grabación)
El menú RECORD incluye 3 submenús.
• Seleccione el canal que quiere configurar.
• Introduzca un nombre si fuera necesario (hasta 8
caracteres).
• Seleccione una calidad de imagen: LOWEST, LOW,
MIDDLE, HIGH o HIGHEST.
• Seleccione el número de imágenes por segundo: 1, 3, 5,
8, 13 ó 25.
• Ajuste la intensidad, el contraste y la saturación : 0~99
(estándar = 50).
• Haga clic en APPLY TO para activar las modificaciones.
• Seleccione OK para guardar la configuración o seleccione
CANCEL para salir del menú sin guardar las
modificaciones.
• Seleccione el canal que quiere programar.
• La rejilla representa los 7 días de la semana (eje vertical)
divididos en 24 horas (eje horizontal). Ejemplo: La
cuarta casilla de la segunda hilera marcada (rojo) indica
que la grabación está programada entre las 03h00 y
04h00 para la cámara del canal seleccionado.
• Haga clic en APPLY TO para activar las modificaciones.
• Seleccione OK para guardar la configuración o seleccione
CANCEL para salir del menú sin guardar las
modificaciones.
• Marque la casilla REC para activar la grabación del canal
seleccionado de manera manual; desmarque la casilla par
interrumpir la grabación. Una grabación en curso está indicada
por un punto rojo en la parte inferior de la pantalla del canal en
cuestión.
• La grabación no se activa en caso de disco duro lleno o no
formateado.
• Seleccione OK para guardar la configuración o seleccione
CANCEL para salir del menú sin guardar las modificaciones.
Page 37

CCTVPROM7
14/07/2010 ©Velleman nv
37
Playback (reproducción)
• Seleccione el canal en el que quiere buscar ficheros.
• Ajuste los datos y la hora inicial y la hora final de la
grabación.
• Seleccione el tipo de grabación (manual, programada,
después de la detección de movimientos).
• Haga clic en SEARCH para visualizar la lista de
grabaciones o PLAY para reproducir las grabaciones.
SEARCH Observación: La lista sólo visualiza los 100 ficheros más antiguos. Ajuste los
parametros de búsqueda para visualizar menos ficheros.
• Seleccione un fichero y haga clic en PLAY para reproducir
el fichero.
• Controles:
reproducción/pausa
avanzar de manera rápida: 2x 4x 8x ½x ¼x 1/8 x
1x
retroceder de manera rápida: 2x 4x 8x ½x ¼x 1/8
x 1x
salir
• Esconde o visualice los botones de control con el botón
derecho del ratón.
• Si los botones de control están escondidos, haga clic en
con el botón izquierdo del ratón en la imagen para
visualizar el fichero en el medio de la pantalla. Vuelva a
hacer clic para volver al modo de visualización normal.
• Hojee a través de la lista con PREV o NEXT. Haga clic en
EXIT para volver al menú anterior.
PLAY • Haga clic en PLAY para visualizar todos los ficheros uno tras otro. Las grabaciones de
canal 1 se visualizan en la parte superior izquierda, los ficheros de canal 2 en la parte
superior derecha, etc. Los botones de control afectan simultáneamente todas las
imágenes.
Motion detect (detección de movimientos)
• Ajustar los parámetros.
Motion parameters (parámetros detección de movimientos)
• Seleccione el canal y haga clic en SET para determinar
la zona de vigilancia. Determine la zona al seleccionar
las casillas en la rejilla (16 x 12 casillas). Haga clic con
el botón derecho del ratón o haga clic en ESC para
guardar los parámetros.
• Ajuste la duración de la grabación (5~99s).
• Ajuste el nivel de sensibilidad: lowest, low, middle,
high, highest.
• Marque la casilla BUZZER para recibir una señal
acústica en cuanto se detecta un movimiento. Ajuste
también la duración de la señal acústica.
• Haga clic en APPLY TO para activar las modificaciones.
• Seleccione OK para guardar la configuración o
seleccione CANCEL para salir del menú sin guardar las
modificaciones.
Page 38

CCTVPROM7
14/07/2010 ©Velleman nv
38
Motion schedule (detección de movimientos programada)
• Seleccione el canal que quiere programar.
• La rejilla representa los 7 días de la semana (eje
vertical) divididos en 24 horas (eje horizontal).
Ejemplo: La cuarta casilla de la segunda hilera marcada
(rojo) indica que la grabación está programada entre
las 03h00 y 04h00 para la cámara del canal
seleccionado.
• Haga clic en APPLY TO para activar las modificaciones.
• Seleccione OK para guardar la configuración o
seleccione CANCEL para salir del menú sin guardar las
modificaciones.
PTZ (Pan-Tilt-Zoom)
• Seleccione el canal.
• Ajuste la dirección de comunicación PTZ (00~99).
• Seleccione le protocole PTZ: Pelco-D, Pelco-P, B01, Samsung, etc.
• Seleccione la velocidad en baudios: 1200, 2400, 4800, 9600, 19200,
38400, 57600 ó 115200.
• Haga clic en APPLY TO para activar los parámetros.
• Seleccione OK para guardar la configuración o seleccione CANCEL
para salir del menú sin guardar las modificaciones.
PTZ controls (pilotage PTZ)
• Seleccione el canal.
• Seleccione Direction, Focus, Zoom, Iris o Automatic.
• Desplace la cámara con U/D/L/R.
• Ajuste la velocidad de desplazamiento de la cámara:
slow, normal o fast.
Log management (gestion des ficheros)
• Seleccione el tipo: Operation o Alarms.
• Ajuste los datos y la hora inicial y la hora final de la
grabación.
• Haga clic en SEARCH para visualizar una vista general.
• Navegue por las páginas con PREV o NEXT, vuelva al
menú anterior con CANCEL.
• Haga clic en CANCEL para salir del menú.
System settings (parámetros del sistema)
• Hay 6 submenús :
o Configure
o Password
o Date&Time
o Default
o Reset
o About
Page 39

CCTVPROM7
14/07/2010 ©Velleman nv
39
Configure (configuración)
• Active VIDEO LOSS para recibir una señal acústica en
cuanto se pierda la señal de vídeo.
• Ajuste el intervalo entre dos imágenes bajo
AUTOSWITCH. Valor: 1~99s.
• Ajuste los parámetros del modo PIP bajo PIPCONFIG. El
primer canal es la imagen en primer plano, el segundo
canal es la imagen en segundo plano.
• Seleccione la resolución VGA: 1024x768/60Hz,
1280x1024/60Hz o 800x600/75Hz.
• Active o desactive la protección por contraseña. Ajuste
la contraseña por el menú PASSWORD.
• Ajuste el tiempo de desconexión bajo LOCKTIME.
Después de que se haya transcurrido este tiempo, es
necesario volver a introducir la contraseña. Seleccione
1, 2, 5, 10, 15 ó 30 minutos o 1 hora. Esta opción sólo
está activada si la contraseña está activada.
Password (contraseña)
• Para modificar la contraseña, introduzca primero la
antigua contraseña (contraseña por defecto: 888888).
• Introduzca la nueva contraseña con los botones de la
parte inferior de la pantalla.
• Confirme con OK.
Date & Time (date et heure)
• Ajuste la fecha y la hora (formato de la fecha: mes –
día – año [MM-DD-YYYY], formato de la hora: hora –
minutos – segundos).
Observación: No es posible modificar la fecha y la
hora durante una grabación.
• Seleccione OK para guardar la configuración o
seleccione CANCEL para salir del menú sin guardar las
modificaciones.
Observación: Vuelva a activar el sistema (véase
abajo) para activar las modificaciones.
Default configuration (ajustes de fábrica)
• Haga clic en OK para restaurar los ajustes de fábrica.
Reset • Haga clic en OK para volver a activar el sistema.
About • Visualización de los datos del sistema (versión del hardware y software).
7.4 Reproducción y copia de seguridad
• Preinstale el software necesario en el ordenador que quiere conectar.
Page 40

CCTVPROM7
14/07/2010 ©Velleman nv
40
7.4.1 Instalar el software
• Haga clic dos veces en [DVR_ClientSetupCHS] del CD-ROM incluido para iniciar la instalación del
software.
• Siga las instrucciones de la pantalla.
• Después de que se haya terminada la instalación, haga clic dos veces en el icono para iniciar el software.
7.4.2 Conectar hardware
• Introduzca el cable USB en el puerto USB [A] y un puerto USB libre del ordenador. El LED USB [13] se
ilumina.
7.4.3 Buscar ficheros
• Seleccione el canal.
• Ajuste los datos y la hora inicial y la hora final de la grabación.
• Seleccione el tipo de grabación (manual, programada, después de la detección de movimientos).
• Haga clic en SEARCH para visualizar la lista de las grabaciones.
• Faire desplazarse por la lista con <PRE o NEXT> o introduzca el número de la página y haga clic en
GOTO.
7.4.4 PlayByFile
• Seleccione un fichero y haga clic en PLAYBYFILE. El fichero se visualiza en la pantalla PLAYBACK (véase
§7.4.7).
7.4.5 Copia de seguridad
• Haga clic en BACKUP para guardar une copia del fichero en el ordenador.
• Seleccione la carpeta de destino, el nombre y el tipo (MJPEG o AVI). Espere hasta que el fichero se haya
convertido en el formato seleccionado.
7.4.6 PlayByTime
• Para utilizar esta opción, asegúrese de que seleccione sólo un canal (para evitar que los ficheros se
traslapen). Todos los ficheros se reproducen en modo secuencial.
• Los ficheros se visualizan también en la pantalla PLAYBACK (véase §7.4.7).
7.4.7 Pantalla PLAYBACK
Page 41

CCTVPROM7
14/07/2010 ©Velleman nv
41
• La pantalla se abre al seleccionar la opción PLAYBYFILE o PLAYBYTIME bajo RECORDFILE. La pantalla
también es accesible sin seleccionar un fichero. Haga clic en OPEN para ir al fichero guardado de
antemano.
• Haga clic en PAUSE para parar la imagen, haga clic en PLAY para continuar.
• Haga clic en STEP para avanzar imagen por imagen.
• Seleccione la velocidad de reproducción en el menú desplegable.
• Haga clic en SNAP para hacer una captura de imagen. Seleccione el nombre y la carpeta de destino.
• Haga clic en CANCEL para volver a la pantalla RECORDFILE.
8. Reemplazar el disco duro
• Desconecte el aparato de la red eléctrica y todos los aparatos periféricos.
• Desatornille los 6 tornillos (3 de cada lado) de la caja.
• Desatornille los 4 tornillos (marcados X en la figura de la página 2) del soporte.
• Desconecte la alimentación y el bus de datos.
• Desatornille los tornillos del disco duro y sáquelo.
• Instale el nuevo disco duro SATA en el soporte y fíjelo. Formatee el disco duro al formato FAT32.
• Conecte el bus de datos y la alimentación, y vuelva a instalar el soporte de montaje. Atornille los 4 tornillos
(X).
• Cierre la videograbadora digital.
9. Las pilas
• El mando a distancia funciona con 1 pila de litio de 3V, tipo CR2025 (incl.).
• Pulse la lengüeta del portapilas [1] y tire [2].
• Introduzca la pila con el polo positivo hacia arriba en el portapilas y vuelva a
introducir el portapilas en el mando a distancia.
ADVERTENCIA: Sea cuidadoso al manejar las pilas. Respete las advertencias del embalaje.
Respete las leyes locales en relación con el medio ambiente al tirar la pila. Mantenga las
pilas lejos del alcance de niños.
10. Especificaciones
DVR
formato de vídeo PAL
formato de compresión vídeo MJPEG (CIF)
entrada de vídeo 4 canales, señal de vídeo compuesto 1Vpp / 75 ohm BNC
salida de vídeo 2x señal de vídeo compuesto 1 Vpp / 75 Ω BNC
velocidad de grabación máx. (PAL) CIF 352 × 288 píxeles @ 100 IPS (PAL)
calidad de imagen mín. - bajo - central - alto - máx.
capacidad disco duro tipo SATA incorporado, 1x HDD (disco incl.)
modos de grabación manual, programada, por detección de movimientos
frecuencia de actualización de las
imágenes
100 IPS (PAL)
zona de detección de movimientos rejilla 16 x 12 por canal
sensibilidad zona de detección de
movimientos
1 parámetro con 5 niveles de sensibilidad (mín. - bajo - central - alto -
máx.)
copia de seguridad conexión USB a PC
control PTZ RS-485
bloqueo del teclado sí
detección de pérdida de la señal sí
nombre de la cámara hasta 8 caracteres
ajustes de vídeo contraste / brillo / intensidad
formato de la visualización del
tiempo
MM-DD-YY
alimentación 12 VCC
consumo < 30 W
temperatura de funcionamiento 10°C ~ 40°C
restablecimiento del sistema restablecimiento automático del sistema después de haber activado la
alimentación de nuevo
dimensiones 200 x 210 x 130 mm
peso 2250 g
Cámara (4x)
sistema de exploración PAL
sensor CMOS
número de píxeles 628 (H) x 582 (V) - PAL
resolución 380 líneas TV
iluminación mínima 0.2 lux (IR desactivado)
LEDs IR 11
entrelazado 2:01
salida de vídeo 1.0Vpp compuesto, 75 ohm
Page 42

CCTVPROM7
14/07/2010 ©Velleman nv
42
corrección de contraste (gama) 0,45
óptica incorporada 6 mm
ángulo de visión 39,8°
alimentación 12 VDC
dimensiones Ø 45 x 55 mm
peso 290 g
Utilice este aparato sólo con los accesorios originales. Velleman NV no será responsable de daños ni
lesiones causados por un uso (indebido) de este aparato.
Para más información sobre este producto y la versión más reciente de este manual del usuario,
visite nuestra página www.velleman.eu.
Se pueden modificar las especificaciones y el contenido de este manual sin previo aviso.
© DERECHOS DE AUTOR
Velleman NV dispone de los derechos de autor para este manual del usuario. Todos los derechos
mundiales reservados.
Está estrictamente prohibido reproducir, traducir, copiar, editar y guardar este manual del usuario o partes de
ello sin previo permiso escrito del derecho habiente.
Page 43

CCTVPROM7
14/07/2010 ©Velleman nv
43
BEDIENUNGSANLEITUNG
1. Einführung
An alle Einwohner der Europäischen Union
Wichtige Umweltinformationen über dieses Produkt
Dieses Symbol auf dem Produkt oder der Verpackung zeigt an, dass die Entsorgung dieses Produktes
nach seinem Lebenszyklus der Umwelt Schaden zufügen kann. Entsorgen Sie die Einheit (oder
verwendeten Batterien) nicht als unsortiertes Hausmüll; die Einheit oder verwendeten Batterien
müssen von einer spezialisierten Firma zwecks Recycling entsorgt werden. Diese Einheit muss an den
Händler oder ein örtliches Recycling-Unternehmen retourniert werden. Respektieren Sie die örtlichen
Umweltvorschriften.
Falls Zweifel bestehen, wenden Sie sich für Entsorgungsrichtlinien an Ihre örtliche Behörde.
Wir bedanken uns für den Kauf des CCTVPROM7! Lesen Sie diese Bedienungsanleitung vor Inbetriebnahme
sorgfältig durch. Überprüfen Sie, ob Transportschäden vorliegen. Sollte dies der Fall sein, verwenden Sie das
Gerät nicht und wenden Sie sich an Ihren Händler.
Lieferumfang:
• 1x DVR mit eingebauter SATA-Festplatte
• 4x CMOS IR-Farbkameras
• 4x Netzkabel 18m (Video + Stromversorgung)
• 1x Netzteil 100 ~ 240 VAC/50 ~ 60 Hz auf 12 VDC + Netzkabel
• IR-Fernbedienung + CR2025-Batterie
• PS/2-Maus
• USB-Kabel (± 65 cm)
• 1x CD-ROM mit kompletter Bedienungsanleitung
2. Sicherheitshinweise
Halten Sie Kinder und Unbefugte vom Gerät fern.
Stromschlaggefahr beim Öffnen des Gehäuses. das Berühren von unter Spannung stehenden
Leitungen könnte zu lebensgefährlichen elektrischen Schlägen führen.
Trennen Sie das Gerät bei Nichtbenutzung und vor jeder Reinigung vom Netz. Fassen Sie dazu den
Netzstecker an der Grifffläche an und ziehen Sie nie an der Netzleitung
3. Allgemeine Richtlinien
Siehe Velleman® Service- und Qualitätsgarantie am Ende dieser Bedienungsanleitung.
Nur für die Anwendung im Innenbereich.
Schützen Sie das Gerät vor Regen und Feuchte. Setzen Sie das Gerät keiner Flüssigkeit wie
z.B. Tropf- oder Spritzwasser, aus. Stellen Sie keine mit Flüssigkeit befüllten Gegenstände,
wie z.B. eine Vase, auf das Gerät.
Schützen Sie das Gerät vor Staub. Schützen Sie das Gerät vor extremen Temperaturen.
Beachten Sie, dass die Lüftungsschlitze nicht blockiert werden. Beachten Sie eine minimale
Entfernung von 2.5cm zwischen dem Gerät und jedem anderen Gegenstand.
Vermeiden Sie Erschütterungen. Vermeiden Sie rohe Gewalt während der Installation und
Bedienung des Gerätes.
• Nehmen Sie das Gerät erst in Betrieb, nachdem Sie sich mit seinen Funktionen vertraut gemacht haben.
• Eigenmächtige Veränderungen sind aus Sicherheitsgründen verboten.
• Verwenden Sie das Gerät nur für Anwendungen beschrieben in dieser Bedienungsanleitung sonst kann dies
zu Schäden am Produkt führen und erlischt der Garantieanspruch.
• Bei Schäden, die durch Nichtbeachtung der Bedienungsanleitung verursacht werden, erlischt der
Garantieanspruch. Für daraus resultierende Folgeschäden übernimmt der Hersteller keine Haftung.
• Respektieren Sie die Gesetzgebung hinsichtlich der Intimsphäre bei Anwendung dieses Gerätes.
4. Eigenschaften
DVR
• MJPEG-Aufnahme
• Aufnahme: Aufnahmen nach Bewegungserfassung, nach Programmierung oder nach manueller Einschaltung
• Backup-Funktion: USB
• OSD-Menü: Englisch
• Bedienungsanleitung: Englisch, Niederländisch, Französisch, Spanisch, Deutsch
• eingebaute SATA-Festplatte
• automatische Systemwiederherstellung nach Stromunterbrechung
• Bedienung DVR: DVR, Fernbedienung und PS/2-Maus
Page 44

CCTVPROM7
14/07/2010 ©Velleman nv
44
Kamera (4x)
• CMOS-Farbkamera
• S/W-Nachtsicht (über IR-LEDs)
5. Umschreibung
Siehe Abbildungen, Seite 2 dieser Bedienungsanleitung.
Frontplatte
1 Wahltaste Kanal 8 Pfeiltasten
2 Wahltaste Vierfachbild 9 Bestätigungstaste (OK)
3 Aufnahmetaste 10 Stromversorgungs-LED
4 Menütaste 11 System-LED
5 PTZ-Taste 12 Aufnahme-LED
6 Wiedergabetaste 13 USB-LED
7 Escapetaste 14 EIN/AUS-Schalter LCD-Display
Rückseite
A USB-Anschluss E DC-Ausgänge DC1~DC4
B Ausgänge V
OUT
-1/V
OUT
-2 (BNC) F PTZ/RS-485-Anschluss
C Eingänge VIN1~VIN4 (BNC) G 12VDC-Eingang
D PS2-Eingang H Masse
Kamera
a Objektiv e Einstellschraube
b IR-LEDs f Montagebügel
c Lichtsensor g Anschluss Video-Ausgang
d Sonnenblende h 12VDC-Eingang
Fernbedienung
MULTI Wahltaste Vierfachbild oder Vollbild (sequenzielles Bild)
1 2 3 4 Wahltaste Kanal
PTZ Wahltaste PTZ-Menü
CLEAR Löschtaste
MENÜ Wahltaste OSD-Menü
REC Wahltaste Aufnahmemenü
Pfeiltasten OSD-Menü
OK Bestätigungstaste
ESC Escapetaste
Wiedergabetasten
FN PIP-Wiedergabe (picture-in-picture): kleines Fenster (Kanal 1) in Vollbild (Kanal 2)
Bemerkung andere Tasten der Fernbedienung haben keine Funktion.
6. Anschluss
Siehe Abbildungen, Seite 2 dieser Bedienungsanleitung.
• Die Festplatte wurde schon im DVR installiert. Siehe §8 wenn Sie die Festplatte ersetzen möchten.
• Beachten Sie, dass der DVR nicht mit dem Netz verbunden ist und berühren Sie den elektronischen Kreis
nicht, um elektrostatische Entladung zu vermeiden.
Anschluss der Kameras
• Wählen Sie einen geeigneten Montageort für die Kamera und beachten Sie Folgendes:
• Achten Sie bei der Wahl des Installationsortes darauf, dass das Gerät keinen extremen Temperaturen und
Vibrationen ausgesetzt werden;
• Montieren Sie die Kamera nie in der Nähe von elektromagnetischen Feldern;
• Richten Sie die Kamera nie auf die Sonne oder andere reflektierende Gegenstände (z.B. Metalltür).
• Die mitgelieferten Netzkabel haben je eine Länge von 18m.
• Verwenden Sie den Montagebügel [f] und markieren Sie die die Position von jedem Schraubloch. Bohren Sie
die Schraublöcher und befestigen Sie den Montagebügel [f] mit 3 Schrauben.
• Befestigen Sie die de Kamera mit dem Bolzen am Montagebügel [f] (auf der Rückseite).
• Richten Sie die Kamera und spannen Sie die Einstellschraube [e] an.
• Verbinden Sie den Stromversorgungs- [h] und BNC-Stecker [g] mit dem Netzkabel.
Page 45

CCTVPROM7
14/07/2010 ©Velleman nv
45
•
Verbinden Sie nun das Netzkabel mit dem DVR. Die Kanalnummer befindet sich oben oder unten am BNCAnschluss [C]. Der Anschluss der BNC-Stecker bestimmt die Wiedergabe der Kanäle im Bildschirm.
Verwenden Sie auch den korrekten DC-Ausgang [E].
Anschluss der Maus
• Stecken Sie den Stecker der PS2-Maus in den PS2-Eingang [D].
Anschluss einer PTZ-Kamera/serielle Linie
• Verbinden Sie die Datenleitung mit den Anschlüssen 485T- und 485T+ des PTZ-Anschlusses [F]. Schrauben
Sie die Kabel mit dem kleinen Schraubendreher fest.
• Verwenden Sie die 4 Anschlüsse beim Anschließen einer seriellen Leitung (485T-, 485T+, 485R+ en 485R-).
Anschluss der Masse
• Der Massenanschluss [H] kann Interferenzen im Bild lösen. Verbinden Sie nicht mit der Masse wenn das Bild
keine Interferenzen aufweist.
Anschluss der Stromversorgung
• Stecken Sie den DC-Stecker des mitgelieferten Netzteils in den 12VDC-Eingang [G] auf der Rückseite des
DVR.
WARNUNG: Verwenden Sie nur das mitgelieferte Netzteil.
• Stecken Sie das Netzkabel in das Netzteil und stecken Sie das Netzteil danach in die Steckdose. Der DVR
wird eingeschaltet.
Anschluss an einen Ersatzrechner
• Verbinden Sie den DVR [A] über das mitgelieferte Anschlusskabel mit einem USB-Anschluss.
Bemerkung Installieren Sie die Software auf dem Rechner, ehe Sie den DVR anschließen (siehe §7.4).
7. Anwendung
Bemerkung Alle Funktionen und Optionen des DVR sind über die Frontplatte, die Fernbedienung oder die
Maus verfügbar.
• Der DVR und die Kameras werden automatisch eingeschaltet, sobald Sie den Stecker in die Steckdose
stecken. Im Bildschirm erscheint die Hardware- und Softwareversion, die Anwesenheit einer Maus und die
Festplatte werden überprüft.
• Nach dem Starten leuchtet die Stromversorgungs-LED [10] und zeigt den Schirm simultan die 4 Kameras
an. Das Datum und die Uhrzeit werden oben links im Bildschirm angezeigt. Überprüfen Sie die Verdrahtung
der entsprechenden Kamera wenn das Display kein Bild anzeigt.
• Schalten Sie das LCD-Display mit dem EIN/AUS-Schalter [14] ein oder aus. Die Aufnahme wird nicht
unterbrochen wenn Sie den Bildschirm ausschalten.
7.1 Allgemeine Richtlinien für das Menü
• Drücken Sie MENU auf der Frontplatte [4] oder der Fernbedienung oder klicken Sie mit der Maus auf MENU
unten im Schirm, um das Menü anzuzeigen.
• Das Menü ist in mehreren Teilen aufgeteilt:
o Menüfeld: Ein Menüfeld steht markiert und erscheint in einem neuen Fenster wenn Sie es anklicken.
Blättern Sie mit den Pfeiltasten oder der Maus durch die Menüfelder. Klicken Sie ein Menüfeld an oder
drücken Sie die Bestätigungstaste, um das Submenü zu öffnen.
o Markierkästchen: Markieren Sie ein Kästchen, um die Funktion einzuschalten oder entmarkieren Sie
das Kästchen, um die Funktion auszuschalten. Markieren oder entmarkieren Sie mit den Pfeiltasten oder
klicken Sie im Feld.
o Combofeld: Wählen Sie eine Option mit den Pfeiltasten oder der Maus.
o Liste: Klicken Sie mit der linken Maustaste auf ein Item der Liste oder gehen Sie mit den Pfeiltasten zum
Item und drücken Sie die Bestätigungstaste um auszuwählen.
o Änderungsfeld: Geben Sie mit den Pfeiltasten oder der Maus ein Zeichen ein. Drücken Sie die
Bestätigungstaste, um das Feld zu verlassen.
7.2 Bildschirmwiedergabe
• Bedienung über die Frontplatte:
Drücken Sie eine Wahltaste [1] um den entsprechenden Kanal in Vollbild anzuzeigen; drücken Sie die
Wahltaste für das Vierfachbild [2] um den Bildschirm in vier aufzuteilen.
• Bedienung über die Fernbedienung:
o Drücken Sie die Ziffertaste, um den entsprechenden Kanal in Vollbild anzuzeigen; drücken Sie MULTI um
den Bildschirm in vier aufzuteilen.
o Drücken Sie FN um die PIP-Funktion (picture-in-picture) einzuschalten. Siehe Konfigurationsmenü für
mehr Information. Drücken Sie die Ziffertaste, um den entsprechenden Kanal in Vollbild anzuzeigen;
drücken Sie MULTI um den Bildschirm in vier aufzuteilen.
o Drücken Sie im vierfachen Wiedergabemodus auf MULTI um jedes Bild nacheinander im Vollbild
anzuzeigen. Regeln Sie das Intervall über das Konfigurationsmenü. Drücken Sie wieder auf MULTI um
zum vierfachen Wiedergabemodus zurückzukehren.
• Bedienung über die Maus:
o Klicken Sie mit der linken Maustaste auf ein Bild, um den entsprechenden Kanal in Vollbild anzuzeigen.
Klicken Sie wieder, um zum vierfachen Wiedergabemodus zurückzukehren.
Page 46

CCTVPROM7
14/07/2010 ©Velleman nv
46
o Klicken Sie auf unten im Display, um die PIP-Funktion einzuschalten. Siehe Konfigurationsmenü für
mehr Information. Drücken Sie die Ziffertaste, um den entsprechenden Kanal in Vollbild anzuzeigen.
Klicken Sie im Display, um zum vierfachen Wiedergabemodus zurückzukehren.
o Klicken Sie auf
unten im Display um jedes Bild nacheinander im Vollbild anzuzeigen. Regeln Sie das
Intervall über das Konfigurationsmenü. Klicken Sie auf den Schirm, um zum vierfachen
Wiedergabemodus zurückzukehren.
7.3 Menüoptionen
• Folgende Menüoptionen sind verfügbar:
HDD – Record – PlayBack – Motion – PTZ – PTZCtrl – Log – System
HDD (Festplatte)
• Kreuzen Sie OVERWRITE an, um die ältesten Daten bei voller
Festplatte automatisch zu überschreiben. Entmarkieren Sie, um
die Funktion auszuschalten.
• Dieses Submenü zeigt den Status und die Kapazität der Festplatte
an.
• Wählen Sie OK, um die Änderungen zu speichern und das Menü zu
verlassen; wählen Sie CANCEL um die Änderungen nicht zu
speichern.
• Wählen Sie FORMAT, um die Festplatte zu formatieren.
Bemerkung Die Festplatte kann während einer Aufnahme nicht
formatiert werden.
Record (Aufnahme)
Das Menü RECORD enthält 3 Submenüs.
• Wählen Sie den Kanal, den Sie einstellen möchten.
• Geben Sie den Kanal einen Namen wenn nötig (bis 8
Zeichen).
• Stellen Sie die Bildqualität ein: LOWEST, LOW, MIDDLE,
HIGH oder HIGHEST.
• Stellen Sie die Anzahl Bilder pro Sekunde ein: 1, 3, 5, 8,
13 oder 25.
• Stellen Sie die Helligkeit, den Kontrast und die Intensität
ein: 0~99 (Standard = 50).
• Klicken Sie auf APPLY TO um die Änderungen für den
Kanal anzuwenden.
• Klicken Sie auf OK um zu speichern oder auf CANCEL um
das Menü zu verlassen.
• Wählen Sie den Kanal, für den Sie die Aufnahme
programmieren möchten.
• Die horizontale Achse des Gitters zeigt die Stunden an;
die vertikale Achse stellt die Tagen vor. Klicken Sie das
Kästchen an wenn Sie den Zeitpunkt aufnehmen
möchten. Beispiel: Das vierte Kästchen der zweiten
Reihe ist angekreuzt (rot). Die Kamera für den gewählten
Kanal startet die Aufnahme, um 03u00 und stoppt die
Aufnahme um 04u00.
• Klicken Sie auf APPLY TO um die Änderungen für den
Kanal anzuwenden.
• Klicken Sie auf OK um zu speichern oder auf CANCEL um
das Menü zu verlassen.
Page 47

CCTVPROM7
14/07/2010 ©Velleman nv
47
• Kreuzen Sie REC für den gewünschten Kanal an, um die
Aufnahme in diesem Kanal manuell zu starten. Entmarkieren Sie,
um die Aufnahme zu stoppen. Während der Aufnahme erscheint
ein roter Punkt unten im Display des entsprechenden Kanal.
• Die Aufnahme wird nicht starten wenn die Festplatte voll ist oder
noch nicht formatiert wurde.
• Klicken Sie auf OK um zu speichern oder auf CANCEL um das
Menü zu verlassen.
Playback (abspielen)
• Wählen Sie den Kanal, deren Dateien Sie suchen
möchten.
• Stellen Sie Anfangs- und Enddatum und -Zeit ein.
• Wählen Sie den Typ Aufnahme (nach
Bewegungserfassung, nach Programmierung oder nach
manueller Einschaltung).
• Klicken Sie auf SEARCH um die Liste mit Ergebnissen
anzuzeigen oder klicken Sie auf PLAY um die Dateien
sofort abzuspielen.
SEARCH Bemerkung Die Liste zeigt nur die 100 ältesten Dateien an. Ändern Sie die
Sucheinstellungen, um die Liste zu kürzen.
• Wählen Sie eine Datei und klicken Sie auf PLAY um die
Datei abzuspielen.
• Bedienungen:
abspielen/pausieren
durchspülen: 2x 4x 8x ½x ¼x 1/8 x 1x
zurückspülen: 2x 4x 8x ½x ¼x 1/8 x 1x
Menü verlassen
• Verbergen Sie die Bedienungstasten oder zeigen Sie
diese mit der rechten Maustaste an.
• Sind die Bedienungstasten verborgen, so klicken Sie mit
der linken Maustaste im Display, um die abgespielte
Datei in den Vordergrund zu stellen. Klicken Sie wieder,
um zum normalen Bildschirmwiedergabe
zurückzukehren.
• Klicken Sie auf PREV oder auf NEXT um durch die Liste
zu blättern. Klicken Sie auf EXIT um zum vorigen Menü
zurückzukehren.
PLAY • Klicken Sie auf PLAY um die gefundenen Dateien nacheinander anzuzeigen. Die
Aufnahmen durch Kanal 1 erscheinen links oben, die von Kanal 2 rechts oben, usw.
Die Bedienungen beeinflussen alle Bilder gleichzeitig.
Motion detect (Bewegungserfassung)
• Stellen Sie die Parameter ein.
Page 48

CCTVPROM7
14/07/2010 ©Velleman nv
48
Motion parameters (Parameter Bewegungserfassung)
• Wählen Sie den Kanal und klicken Sie auf SET um die
Überwachungszone einzustellen. Im Bildschirm
erscheint ein Gitter (16 x 12 Kästchen). Klicken Sie die
gewünschten Kästchen an und bestimmen Sie so die
Überwachungszone. Klicken Sie mit der rechten
Maustaste oder klicken Sie auf ESC um zu speichern.
• Stellen Sie die Aufnahmedauer ein (5~99s).
• Stellen Sie den Empfindlichkeitspegel ein: min. - niedrig
- mitten - hoch - max.
• Kreuzen Sie BUZZER an wenn Sie bei
Bewegungserfassung ein akustisches Signal hören
möchten. Stellen Sie auch die Dauer des akustischen
Signals ein.
• Klicken Sie auf APPLY TO um die Einstellungen für den
Kanal zu verwenden.
• Klicken Sie auf OK um zu speichern oder auf CANCEL
um das Menü zu verlassen.
Motion schedule (geprogrammeerde Bewegungserfassung)
• Wählen Sie den Kanal, für den Sie die Aufnahme
programmieren möchten.
• Die horizontale Achse des Gitters zeigt die Stunden an;
die vertikale Achse stellt die Tagen vor. Klicken Sie das
Kästchen an wenn Sie den Zeitpunkt aufnehmen
möchten. Beispiel: Das vierte Kästchen der zweiten
Reihe ist angekreuzt (rot). Die Kamera für den
gewählten Kanal startet die Aufnahme, um 03u00 und
stoppt die Aufnahme um 04u00.
• Klicken Sie auf APPLY TO um die Änderungen für den
Kanal anzuwenden.
• Klicken Sie auf OK um zu speichern oder auf CANCEL
um das Menü zu verlassen.
PTZ (Pan-Tilt-Zoom)
• Wählen Sie den Kanal.
• Stellen Sie die PTZ-Adresse ein (00~99).
• Wählen Sie das PTZ-Protokoll: Pelco-D, Pelco-P, B01, Samsung, usw.
• Stellen Sie die Baudrate ein: 1200, 2400, 4800, 9600, 19200, 38400,
57600 oder 115200.
• Klicken Sie auf APPLY TO um die Änderungen für den Kanal
anzuwenden.
• Klicken Sie auf OK um zu speichern oder auf CANCEL um das Menü
zu verlassen.
PTZ controls (PTZ-Bedienung)
• Wählen Sie den Kanal.
• Wählen Sie Direction, Focus, Zoom, Iris oder
Automatic.
• Bewegen Sie die Kamera mit U/D/L/R.
• Stellen Sie die Geschwindigkeit der Kamera ein:
slow, normal oder fast.
Log management (filebeheer)
• Wählen Sie den Typ: Operation oder Alarms.
• Stellen Sie das Anfangs- und Enddatum und die -Zeit ein.
• Klicken Sie auf SEARCH um eine Übersicht anzuzeigen.
• Blättern Sie mit PREV und NEXT durch die Seiten, kehren
Sie mit CANCEL zum vorigen Menü zurück.
• Verlassen Sie das Menü mit CANCEL.
Page 49

CCTVPROM7
14/07/2010 ©Velleman nv
49
System settings (systeeminstellingen)
• Es gibt 6 Submenüs:
o Configure
o Password
o Date&Time
o Default
o Reset
o About
Configure (instellingen)
• Wählen Sie VIDEO LOSS wenn Sie ein akustisches
Signal bei Verlust eines Videosignals hören möchten.
• Stellen Sie das Intervall zwischen zwei
aufeinanderfolgenden Bildern unter AUTOSWITCH ein.
Wert: 1~99s.
• Stellen Sie die PIP-Einstellungen unter PIPCONFIG ein.
Der erste Kanal ist das Bild im Vordergrund, der zweite
Kanal ist das Bild im Hintergrund.
• Stellen Sie die VGA-Auflösung ein: 1024x768/60Hz,
1280x1024/60Hz oder 800x600/75Hz.
• Schalten Sie den Passwortschutz ein oder aus. Stellen
Sie het Passwort über das Passwortmenü ein.
• Stellen Sie das Time-out unter LOCKTIME ein. Nachdem
die eingestellte Zeit vergangen ist, müssen Sie das
Passwort wieder eingeben. Stellen Sie auf 1, 2, 5, 10,
15 oder 30 Minuten oder 1 Stunde ein. Diese
Einstellung wird nur eingeschaltet wenn das Passwort
aktiviert ist.
Password (Passwort)
• Um das Passwort zu ändern, geben Sie zuerst das alte
Passwort ein (Standard-Passwort: 888888).
• Geben Sie das neue Passwort mit den Tasten unten im
Display ein.
• Bestätigen Sie das Passwort mit OK.
Date & Time (Datum und Uhrzeit)
• Stellen Sie das Datum und die Uhrzeit ein (Format
Datum: Monat – Tag – Jahr [MM-DD-YYYY], Format
Uhrzeit: Stunden – Minuten – Sekunden).
Bemerkung: Sie können die Uhrzeit während der
Aufnahme nicht ändern.
• Klicken Sie auf OK um zu speichern oder auf CANCEL
um das Menü zu verlassen.
Bemerkung: Starten Sie das System neu (siehe
unten) um das neue Datum und die Uhrzeit zu
aktivieren.
Page 50

CCTVPROM7
14/07/2010 ©Velleman nv
50
Default configuration (Werkseinstellungen)
• Klicken Sie auf OK um die Werkseinstellungen wieder
einzustellen.
Reset • Klicken Sie auf OK um das System neu zu starten.
About • Systeminformation (Hardware- und Softwareversion).
7.4 Wiedergabe und Sicherungskopie
• Installieren Sie zuerst die notwendige Software auf dem Rechner, den Sie anschließen möchten.
7.4.1 Installation der Software
• Klicken Sie zweimal auf [DVR_ClientSetupCHS] im CD-ROM.
• Befolgen Sie die Hinweise im Bildschirm.
• Klicken Sie zweimal, wenn die Installation beendet ist, auf die neue Ikone, um die Software zu öffnen.
7.4.2 Anschluss der Hardware
• Stecken Sie den USB-Stecker des mitgelieferten Kabels in den USB-Anschluss [A] und einen freien USB-
Anschluss des Computers. Die USB-LED [13] leuchtet.
7.4.3 Dateien suchen
• Wählen Sie den gewünschten Kanal.
• Stellen Sie das Anfangs- und Enddatum und die -Zeit ein.
• Wählen Sie das Ereignis, das die Aufnahme ausgelöst hat (manuell, programmiert oder nach
Bewegungserfassung).
• Klicken Sie auf SEARCH um die Liste mit Aufnahmen anzuzeigen.
• Blättern Sie mit <PRE oder NEXT> durch die Liste oder geben Sie eine Seitennummer ein und klicken Sie
auf GOTO.
7.4.4 PlayByFile
• Wählen Sie eine Datei und klicken Sie auf PLAYBYFILE. Die Bilder erscheinen im PLAYBACK-Fenster (siehe
§7.4.7).
7.4.5 Sicherungskopie
• Klicken Sie auf BACKUP um eine Kopie der Datei im Computer zu speichern.
• Wählen Sie einen Zielordner, einen Namen und den Typ Datei (MJPEG oder AVI). Warten Sie bis die Datei
zum gewünschten Format konvertiert worden ist.
Page 51

CCTVPROM7
14/07/2010 ©Velleman nv
51
7.4.6 PlayByTime
• Wählen Sie nur einen einzigen Kanal wenn Sie diese Funktion verwenden möchten (um überlappende
Dateien zu vermeiden). Alle Dateien werden nacheinander wiedergegeben.
• Auch hier erscheinen die Bilder im PLAYBACK-Fenster (siehe §7.4.7).
7.4.7 PLAYBACK-Fenster
• Das Fenster erscheint wenn Sie PLAYBYFILE oder PLAYBYTIME wählen unter RECORDFILE. Sie können
das Fenster auch direkt öffnen ohne zuerst eine Datei zu öffnen. Klicken Sie auf OPEN um durch die
früher schon gespeicherten Dateien zu blättern.
• Klicken Sie auf PAUSE um das Bild einzufrieren, klicken Sie auf PLAY um die Datei weiter abzuspielen.
• Klicken Sie auf STEP um die Datei Bild pro Bild wiederzugeben
• Wählen Sie die Wiedergabegeschwindigkeit mit dem
Aufklappmenü aus.
• Klicken Sie auf SNAP um einen Schnappschuss des Bildes zu nehmen. Wählen Sie den Namen und den
Zielordner.
• Klicken Sie auf CANCEL um zum RECORDFILE-Fenster zurückzukehren.
8. Die Festplatte ersetzen
• Trennen Sie das Gerät vom Netz und von allen Zusatzgeräten.
• Lockern Sie die 6 Schrauben (3 an jeder Seite) vom Gehäuse.
• Lockern Sie die 4 Schrauben (X auf Abbildung, Seite 2) vom Montagebügel.
• Trennen Sie das Netzteil und den Datenbus.
• Lockern Sie die Schrauben der Festplatte und entfernen Sie die Festplatte.
• Stecken Sie eine neue SATA Festplatte in den Montagebügen und schrauben Sie fest. Formattieren Sie die
Festplatte als FAT32.
• Verbinden Sie den Datenbus und das Netzteil, und installieren Sie den Montagebügel wieder. Schrauben Sie
die 4 Schrauben (X) wieder fest.
• Schließen Sie den DVR.
9. Die Batterien
• Die Fernbedienung funktioniert mit 1x CR2025-Lithiumbatterie von 3 V
(mitgeliefert).
• Drücken Sie die Seite des Batteriehalters [1] und ziehen Sie [2].
• Legen Sie die Batterie mit dem positiven Pol nach oben ein und stecken Sie den
Batteriehalter wieder in die Fernbedienung.
WARNUNG: Behandeln Sie die Batterien sehr vorsichtig und beachten Sie die Warnungen
der Verpackung. Respektieren Sie die örtlichen Umweltvorschriften beim Entsorgen der
Batterie. Halten Sie die Batterien von Kindern fern.
10. Technische Daten
DVR
Videosystem PAL
Videokompressionsformat MJPEG (CIF)
Video-Eingang 4 Kanäle, Komposit-Videosignal 1Vpp / 75 Ohm BNC
Video-Ausgang 2x "composite" Videosignal 1Vpp / 75 Ohm BNC
max. Aufnahmegeschwindigkeit
(PAL)
CIF 352 × 288 Pixel @ 100 IPS (PAL)
Bildeinstellungen min. - niedrig - mitten - hoch - max.
Festplattenspeicherplatz SATA (eingebaut), 1x Festplatte (mitgeliefert)
Aufnahmemodus manuell / programmiert/ nach Bewegungserfassung
Bildwiederholrate 100 IPS für PAL
Erfassungsbereich 16 x 12 Kästchen pro Kanal
Empfindlichkeit 1 Parameter mit 5 Empfindlichkeitspegeln (min. - niedrig - mitten - hoch -
Page 52

CCTVPROM7
14/07/2010 ©Velleman nv
52
Bewegungserfassung max.)
Sicherungskopie USB-Anschluss
PTZ-Bedienung RS-485
Tastenverriegelung ja
Detektion Bildverlust ja
Kameraname bis zu 8 Zeichen
Video-Einstellungen Kontrast / Helligkeit / Intensität
Datumwiedergabe MM-DD-JJ
Stromverorgung 12 VDC
Stromverbrauch < 30 W
Betriebstemperatur 10°C ~ 40°C
Systemwiederherstellung automatische Systemwiederherstellung nach Stromunterbrechung
Abmessungen 200 x 210 x 130 mm
Gewicht 2250 g
Kamera (4x)
Abtastsystem PAL
Bildsensor CMOS
Pixelanzahl 628 (H) x 582 (V) - PAL
Auflösung 380 TV-Zeilen
Mindestbeleuchtung 0,2 lux (IR ausgeschaltet)
IR-LEDs 11
Zeilensprung 2:01
Video-Ausgang 1.0Vpp komposit, 75 Ohm
Gammakorrektur 0,45
eingebautes Objektiv 6 mm
Blickwinkel 39,8°
Stromversorgung 12 VDC
Abmessungen Ø 45 x 55 mm
Gewicht 290 g
Verwenden Sie dieses Gerät nur mit originellen Zubehörteilen. Velleman NV übernimmt keine
Haftung für Schaden oder Verletzungen bei (falscher) Anwendung dieses Gerätes.
Für mehr Informationen zu diesem Produkt und die neueste Version dieser Bedienungsanleitung,
siehe www.velleman.eu
.
Alle Änderungen ohne vorherige Ankündigung vorbehalten.
© URHEBERRECHT
Velleman NV besitzt das Urheberrecht für diese Bedienungsanleitung. Alle weltweiten Rechte
vorbehalten.
ohne vorherige schriftliche Genehmigung des Urhebers ist es nicht gestattet, diese Bedienungsanleitung ganz
oder in Teilen zu reproduzieren, zu kopieren, zu übersetzen, zu bearbeiten oder zu speichern.
Page 53

Velleman® Service and Quality Warranty
Velleman® has over 35 years of experience in the electronics world
and distributes its products in more than 85 countries.
All our products fulfil strict quality requirements and legal stipulations
in the EU. In order to ensure the quality, our products regularly go
through an extra quality check, both by an internal quality
department and by specialized external organisations. If, all
precautionary measures notwithstanding, problems should occur,
please make appeal to our warranty (see guarantee conditions).
General Warranty Conditions Concerning Consumer Products
(for EU):
• All consumer products are subject to a 24-month warranty on
production flaws and defective material as from the original date of
purchase.
• Velleman® can decide to replace an article with an equivalent
article, or to refund the retail value totally or partially when the
complaint is valid and a free repair or replacement of the article is
impossible, or if the expenses are out of proportion.
You will be delivered a replacing article or a refund at the value of
100% of the purchase price in case of a flaw occurred in the first year
after the date of purchase and delivery, or a replacing article at 50%
of the purchase price or a refund at the value of 50% of the retail
value in case of a flaw occurred in the second year after the date of
purchase and delivery.
• Not covered by warranty:
- all direct or indirect damage caused after delivery to the article (e.g.
by oxidation, shocks, falls, dust, dirt, humidity...), and by the article,
as well as its contents (e.g. data loss), compensation for loss of
profits;
- frequently replaced consumable goods, parts or accessories such as
batteries, lamps, rubber parts, drive belts... (unlimited list);
- flaws resulting from fire, water damage, lightning, accident, natural
disaster, etc. …;
- flaws caused deliberately, negligently or resulting from improper
handling, negligent maintenance, abusive use or use contrary to the
manufacturer’s instructions;
- damage caused by a commercial, professional or collective use of
the article (the warranty validity will be reduced to six (6) months
when the article is used professionally);
- damage resulting from an inappropriate packing and shipping of the
article;
- all damage caused by modification, repair or alteration performed by
a third party without written permission by Velleman®.
• Articles to be repaired must be delivered to your Velleman® dealer,
solidly packed (preferably in the original packaging), and be
completed with the original receipt of purchase and a clear flaw
description.
• Hint: In order to save on cost and time, please reread the manual
and check if the flaw is caused by obvious causes prior to presenting
the article for repair. Note that returning a non-defective article can
also involve handling costs.
• Repairs occurring after warranty expiration are subject to shipping
costs.
• The above conditions are without prejudice to all commercial
warranties.
The above enumeration is subject to modification according to
the article (see article’s manual).
Velleman® service- en kwaliteitsgarantie
Velleman® heeft ruim 35 jaar ervaring in de elektronicawereld en
verdeelt in meer dan 85 landen.
Al onze producten beantwoorden aan strikte kwaliteitseisen en aan de
wettelijke bepalingen geldig in de EU. Om de kwaliteit te waarborgen,
ondergaan onze producten op regelmatige tijdstippen een extra
kwaliteitscontrole, zowel door onze eigen kwaliteitsafdeling als door
externe gespecialiseerde organisaties. Mocht er ondanks deze
voorzorgen toch een probleem optreden, dan kunt u steeds een
beroep doen op onze waarborg (zie waarborgvoorwaarden).
Algemene waarborgvoorwaarden consumentengoederen (voor
Europese Unie):
• Op alle consumentengoederen geldt een garantieperiode van 24
maanden op productie- en materiaalfouten en dit vanaf de
oorspronkelijke aankoopdatum.
• Indien de klacht gegrond is en een gratis reparatie of vervanging
van een artikel onmogelijk is of indien de kosten hiervoor buiten
verhouding zijn, kan Velleman® beslissen het desbetreffende artikel
te vervangen door een gelijkwaardig artikel of de aankoopsom van
het artikel gedeeltelijk of volledig terug te betalen. In dat geval krijgt
u een vervangend product of terugbetaling ter waarde van 100% van
de aankoopsom bij ontdekking van een gebrek tot één jaar na
aankoop en levering, of een vervangend product tegen 50% van de
kostprijs of terugbetaling van 50 % bij ontdekking na één jaar tot 2
jaar.
• Valt niet onder waarborg:
- alle rechtstreekse of onrechtstreekse schade na de levering
veroorzaakt aan het toestel (bv. door oxidatie, schokken, val, stof,
vuil, vocht...), en door het toestel, alsook zijn inhoud (bv. verlies van
data), vergoeding voor eventuele winstderving.
- verbruiksgoederen, onderdelen of hulpstukken die regelmatig dienen
te worden vervangen, zoals bv. batterijen, lampen, rubberen
onderdelen, aandrijfriemen... (onbeperkte lijst).
- defecten ten gevolge van brand, waterschade, bliksem, ongevallen,
natuurrampen, enz.
- defecten veroorzaakt door opzet, nalatigheid of door een
onoordeelkundige behandeling, slecht onderhoud of abnormaal
gebruik of gebruik van het toestel strijdig met de voorschriften van de
fabrikant.
- schade ten gevolge van een commercieel, professioneel of collectief
gebruik van het apparaat (bij professioneel gebruik wordt de
garantieperiode herleid tot 6 maand).
- schade veroorzaakt door onvoldoende bescherming bij transport van
het apparaat.
- alle schade door wijzigingen, reparaties of modificaties uitgevoerd
door derden zonder toestemming van Velleman®.
• Toestellen dienen ter reparatie aangeboden te worden bij uw
Velleman®-verdeler. Het toestel dient vergezeld te zijn van het
oorspronkelijke aankoopbewijs. Zorg voor een degelijke verpakking
(bij voorkeur de originele verpakking) en voeg een duidelijke
foutomschrijving bij.
• Tip: alvorens het toestel voor reparatie aan te bieden, kijk nog eens
na of er geen voor de hand liggende reden is waarom het toestel niet
naar behoren werkt (zie handleiding). Op deze wijze kunt u kosten en
tijd besparen. Denk eraan dat er ook voor niet-defecte toestellen een
kost voor controle aangerekend kan worden.
• Bij reparaties buiten de waarborgperiode zullen transportkosten
aangerekend worden.
• Elke commerciële garantie laat deze rechten onverminderd.
Bovenstaande opsomming kan eventueel aangepast worden
naargelang de aard van het product (zie handleiding van het
betreffende product).
Garantie de service et de qualité Velleman®
Velleman® jouit d’une expérience de plus de 35 ans dans le
monde de l’électronique avec une distribution dans plus de 85
pays.
Tous nos produits répondent à des exigences de qualité
rigoureuses et à des dispositions légales en vigueur dans l’UE.
Afin de garantir la qualité, nous soumettons régulièrement nos
produits à des contrôles de qualité supplémentaires, tant par
notre propre service qualité que par un service qualité externe.
Dans le cas improbable d’un défaut malgré toutes les
précautions, il est possible d’invoquer notre garantie (voir les
conditions de garantie).
Conditions générales concernant la garantie sur les
produits grand public (pour l’UE) :
• tout produit grand public est garanti 24 mois contre tout vice
de production ou de matériaux à dater du jour d’acquisition
effective ;
• si la plainte est justifiée et que la réparation ou le
remplacement d’un article est jugé impossible, ou lorsque les
coûts s’avèrent disproportionnés, Velleman® s’autorise à
remplacer ledit article par un article équivalent ou à rembourser
la totalité ou une partie du prix d’achat. Le cas échéant, il vous
sera consenti un article de remplacement ou le remboursement
complet du prix d’achat lors d’un défaut dans un délai de 1 an
après l’achat et la livraison, ou un article de remplacement
moyennant 50% du prix d’achat ou le remboursement de 50%
du prix d’achat lors d’un défaut après 1 à 2 ans.
• sont par conséquent exclus :
- tout dommage direct ou indirect survenu à l’article après
livraison (p.ex. dommage lié à l’oxydation, choc, chute,
poussière, sable, impureté…) et provoqué par l’appareil, ainsi que
son contenu (p.ex. perte de données) et une indemnisation
éventuelle pour perte de revenus ;
- tout bien de consommation ou accessoire, ou pièce qui
nécessite un remplacement régulier comme p.ex. piles,
ampoules, pièces en caoutchouc, courroies… (liste illimitée) ;
- tout dommage qui résulte d’un incendie, de la foudre, d’un
accident, d’une catastrophe naturelle, etc. ;
- out dommage provoqué par une négligence, volontaire ou non,
une utilisation ou un entretien incorrects, ou une utilisation de
l’appareil contraire aux prescriptions du fabricant ;
- tout dommage à cause d’une utilisation commerciale,
professionnelle ou collective de l’appareil (la période de garantie
sera réduite à 6 mois lors d’une utilisation professionnelle) ;
- tout dommage à l’appareil qui résulte d’une utilisation
incorrecte ou différente que celle pour laquelle il a été
initialement prévu comme décrit dans la notice ;
Page 54

- tout dommage engendré par un retour de l’appareil emballé
dans un conditionnement non ou insuffisamment protégé.
- toute réparation ou modification effectuée par une tierce
personne sans l’autorisation explicite de SA Velleman® ; - frais
de transport de et vers Velleman® si l’appareil n’est plus couvert
sous la garantie.
• toute réparation sera fournie par l’endroit de l’achat. L’appareil
doit nécessairement être accompagné du bon d’achat d’origine et
être dûment conditionné (de préférence dans l’emballage
d’origine avec mention du défaut) ;
• tuyau : il est conseillé de consulter la notice et de contrôler
câbles, piles, etc. avant de retourner l’appareil. Un appareil
retourné jugé défectueux qui s’avère en bon état de marche
pourra faire l’objet d’une note de frais à charge du
consommateur ;
• une réparation effectuée en-dehors de la période de garantie
fera l’objet de frais de transport ;
• toute garantie commerciale ne porte pas atteinte aux conditions
susmentionnées.
La liste susmentionnée peut être sujette à une
complémentation selon le type de l’article et être
Garantía de servicio y calidad Velleman®
Velleman® disfruta de una experiencia de más de 35 años en el
mundo de la electrónica con una distribución en más de 85
países.
Todos nuestros productos responden a normas de calidad
rigurosas y disposiciones legales vigentes en la UE. Para
garantizar la calidad, sometimos nuestros productos
regularmente a controles de calidad adicionales, tanto por
nuestro propio servicio de calidad como por un servicio de calidad
externo. En el caso improbable de que surgieran problemas a
pesar de todas las precauciones, es posible apelar a nuestra
garantía (véase las condiciones de garantía).
Condiciones generales referentes a la garantía sobre
productos de venta al público (para la Unión Europea):
• Todos los productos de venta al público tienen un período de
garantía de 24 meses contra errores de producción o errores en
materiales desde la adquisición original;
• Si la queja está fundada y si la reparación o la sustitución de un
artículo es imposible, o si los gastos son desproporcionados,
Velleman® autoriza reemplazar el artículo por un artículo
equivalente o reembolsar la totalidad o una parte del precio de
compra. En este caso, recibirá un artículo de recambio o el
reembolso completo del precio de compra al descubrir un defecto
hasta un año después de la compra y la entrega, o un artículo de
recambio al 50% del precio de compra o la sustitución de un
50% del precio de compra al descubrir un defecto después de 1 a
2 años.
• Por consiguiente, están excluidos entre otras cosas:
- todos los daños causados directamente o indirectamente al
aparato y su contenido después de la entrega (p.ej. por
oxidación, choques, caída,...) y causados por el aparato, al igual
que el contenido (p.ej. pérdida de datos) y una indemnización
eventual para falta de ganancias;
- partes o accesorios que deban ser reemplazados regularmente,
como por ejemplo baterías, lámparas, partes de goma, ... (lista
ilimitada)
- defectos causados por un incendio, daños causados por el agua,
rayos, accidentes, catástrofes naturales, etc. ;
- defectos causados a conciencia , descuido o por malos tratos,
un mantenimiento inapropiado o un uso anormal del aparato
contrario a las instrucciones del fabricante;
- daños causados por un uso comercial, profesional o colectivo
del aparato (el período de garantía se reducirá a 6 meses con uso
profesional) ;
- daños causados por un uso incorrecto o un uso ajeno al que est
está previsto el producto inicialmente como está descrito en el
manual del usuario ;
- daños causados por una protección insuficiente al transportar el
aparato.
- daños causados por reparaciones o modificaciones efectuadas
por una tercera persona sin la autorización explicita de SA
Velleman® ;
- se calcula gastos de transporte de y a Velleman® si el aparato
ya no está cubierto por la garantía.
• Cualquier reparación se efectuará por el lugar de compra.
Devuelva el aparato con la factura de compra original y
transpórtelo en un embalaje sólido (preferentemente el embalaje
original). Incluya también una buena descripción del defecto ;
• Consejo: Lea el manual del usuario y controle los cables, las
pilas, etc. antes de devolver el aparato. Si no se encuentra un
defecto en el artículo los gastos podrían correr a cargo del
cliente;
• Los gastos de transporte correrán a carga del cliente para una
reparación efectuada fuera del periode de garantía.
• Cualquier gesto comercial no disminuye estos derechos.
La lista previamente mencionada puede ser adaptada
según el tipo de artículo (véase el manual del usuario del
artículo en cuestión)
mentionnée dans la notice d’emploi.
Velleman® Service- und Qualitätsgarantie
Velleman® hat gut 35 Jahre Erfahrung in der Elektronikwelt und
vertreibt seine Produkte in über 85 Ländern.
Alle Produkte entsprechen den strengen Qualitätsforderungen
und gesetzlichen Anforderungen in der EU. Um die Qualität zu
gewährleisten werden unsere Produkte regelmäßig einer
zusätzlichen Qualitätskontrolle unterworfen, sowohl von unserer
eigenen Qualitätsabteilung als auch von externen spezialisierten
Organisationen. Sollten, trotz aller Vorsichtsmaßnahmen,
Probleme auftreten, nehmen Sie bitte die Garantie in Anspruch
(siehe Garantiebedingungen).
Allgemeine Garantiebedingungen in Bezug auf
Konsumgüter (für die Europäische Union):
• Alle Produkte haben für Material- oder Herstellungsfehler eine
Garantieperiode von 24 Monaten ab Verkaufsdatum.
• Wenn die Klage berechtigt ist und falls eine kostenlose
Reparatur oder ein Austausch des Gerätes unmöglicht ist, oder
wenn die Kosten dafür unverhältnismäßig sind, kann Velleman®
sich darüber entscheiden, dieses Produkt durch ein gleiches
Produkt zu ersetzen oder die Kaufsumme ganz oder teilweise
zurückzuzahlen. In diesem Fall erhalten Sie ein Ersatzprodukt
oder eine Rückzahlung im Werte von 100% der Kaufsumme im
Falle eines Defektes bis zu 1 Jahr nach Kauf oder Lieferung, oder
Sie bekommen ein Ersatzprodukt im Werte von 50% der
Kaufsumme oder eine Rückzahlung im Werte von 50 % im Falle
eines Defektes im zweiten Jahr.
• Von der Garantie ausgeschlossen sind:
- alle direkten oder indirekten Schäden, die nach Lieferung am
Gerät und durch das Gerät verursacht werden (z.B. Oxidation,
Stöße, Fall, Staub, Schmutz, Feuchtigkeit, ...), sowie auch der
Inhalt (z.B. Datenverlust), Entschädigung für eventuellen
Gewinnausfall.
- Verbrauchsgüter, Teile oder Zubehörteile, die regelmäßig
ausgewechselt werden, wie z.B. Batterien, Lampen, Gummiteile,
Treibriemen, usw. (unbeschränkte Liste).
- Schäden verursacht durch Brandschaden, Wasserschaden, Blitz,
Unfälle, Naturkatastrophen, usw.
- Schäden verursacht durch absichtliche, nachlässige oder
unsachgemäße Anwendung, schlechte Wartung,
zweckentfremdete Anwendung oder Nichtbeachtung von
Benutzerhinweisen in der Bedienungsanleitung.
- Schäden infolge einer kommerziellen, professionellen oder
kollektiven Anwendung des Gerätes (bei gewerblicher
Anwendung wird die Garantieperiode auf 6 Monate
zurückgeführt).
- Schäden verursacht durch eine unsachgemäße Verpackung und
unsachgemäßen Transport des Gerätes.
- alle Schäden verursacht durch unautorisierte Änderungen,
Reparaturen oder Modifikationen, die von einem Dritten ohne
Erlaubnis von Velleman® vorgenommen werden.
• Im Fall einer Reparatur, wenden Sie sich an Ihren Velleman®Verteiler. Legen Sie das Produkt ordnungsgemäß verpackt
(vorzugsweise die Originalverpackung) und mit dem OriginalKaufbeleg vor. Fügen Sie eine deutliche Fehlerumschreibung
hinzu.
• Hinweis: Um Kosten und Zeit zu sparen, lesen Sie die
Bedienungsanleitung nochmals und überprüfen Sie, ob es keinen
auf de Hand liegenden Grund gibt, ehe Sie das Gerät zur
Reparatur zurückschicken. Stellt sich bei der Überprüfung des
Geräts heraus, dass kein Geräteschaden vorliegt, könnte dem
Kunden eine Untersuchungspauschale berechnet.
• Für Reparaturen nach Ablauf der Garantiefrist werden
Transportkosten berechnet.
• Jede kommerzielle Garantie lässt diese Rechte unberührt.
Die oben stehende Aufzählung kann eventuell angepasst
werden gemäß der Art des Produktes (siehe
Bedienungsanleitung des Gerätes).
 Loading...