

Page 1

CONTENTS
GENERAL INFORMATION
Explanation of symbols · · · · · · · · · · · · · · · · · · · · · · · · 4
For your safety! · · · · · · · · · · · · · · · · · · · · · · · · · · · · 4
Important – the correct system software! · · · · · · · · · · · · · · 6
Maintenance and care · · · · · · · · · · · · · · · · · · · · · · · · · 6
Functions of your navigation system · · · · · · · · · · · · · · · · · 6
Range of functions · · · · · · · · · · · · · · · · · · · · · · · · · 6
System expansion · · · · · · · · · · · · · · · · · · · · · · · · · · 7
Distance indications · · · · · · · · · · · · · · · · · · · · · · · · · 7
Operating restrictions (country-specific) · · · · · · · · · · · · · · 7
GPS reception · · · · · · · · · · · · · · · · · · · · · · · · · · · · 7
Start-up characteristics · · · · · · · · · · · · · · · · · · · · · · · 7
Automatic route re-calculation · · · · · · · · · · · · · · · · · · · 7
Areas with limited road information · · · · · · · · · · · · · · · · 8
Switching on / off · · · · · · · · · · · · · · · · · · · · · · · · · · · 8
Remote control· · · · · · · · · · · · · · · · · · · · · · · · · · · · · 8
Stand-by· · · · · · · · · · · · · · · · · · · · · · · · · · · · · · · · 10
Inserting/changing the map DVD/CD · · · · · · · · · · · · · · · · 10
C-IQ - Your key to map, traffic and travel information· · · · · · · 11
Activation options · · · · · · · · · · · · · · · · · · · · · · · · · 11
Reading the Navi ID · · · · · · · · · · · · · · · · · · · · · · · · 12
Code input · · · · · · · · · · · · · · · · · · · · · · · · · · · · · 12
C-IQ SMS list · · · · · · · · · · · · · · · · · · · · · · · · · · · · 13
My C-IQ · · · · · · · · · · · · · · · · · · · · · · · · · · · · · · · 13
Prepaid C-IQ · · · · · · · · · · · · · · · · · · · · · · · · · · · · 13
Preview · · · · · · · · · · · · · · · · · · · · · · · · · · · · · · · 14
Configuration· · · · · · · · · · · · · · · · · · · · · · · · · · · · 14
C-IQ Service · · · · · · · · · · · · · · · · · · · · · · · · · · · · · 15
Screen menu types · · · · · · · · · · · · · · · · · · · · · · · · · · 15
Popup menu · · · · · · · · · · · · · · · · · · · · · · · · · · · · 15
Pull-down menu (functions list) · · · · · · · · · · · · · · · · · · 16
List screen · · · · · · · · · · · · · · · · · · · · · · · · · · · · · · 16
Settings – adjusting the navigation system · · · · · · · · · · · · · 17
Day / night colours · · · · · · · · · · · · · · · · · · · · · · · · · 17
Screen configuration · · · · · · · · · · · · · · · · · · · · · · · · 18
Message selection · · · · · · · · · · · · · · · · · · · · · · · · · 19
Route criteria · · · · · · · · · · · · · · · · · · · · · · · · · · · · 19
Dynamic route · · · · · · · · · · · · · · · · · · · · · · · · · · · 20
Speed warning · · · · · · · · · · · · · · · · · · · · · · · · · · · 21
Remote control · · · · · · · · · · · · · · · · · · · · · · · · · · · 22
Favourite function · · · · · · · · · · · · · · · · · · · · · · · · · 22
General Settings · · · · · · · · · · · · · · · · · · · · · · · · · · 23
Language · · · · · · · · · · · · · · · · · · · · · · · · · · · · · · 23
Audible settings · · · · · · · · · · · · · · · · · · · · · · · · · · 23
Measuring units · · · · · · · · · · · · · · · · · · · · · · · · · · 24
1
Page 2

CONTENTS
Device configuration · · · · · · · · · · · · · · · · · · · · · · · · 25
Shut-Down timer · · · · · · · · · · · · · · · · · · · · · · · · · · 26
System configuration· · · · · · · · · · · · · · · · · · · · · · · · 26
Info Points · · · · · · · · · · · · · · · · · · · · · · · · · · · · · 27
Default settings· · · · · · · · · · · · · · · · · · · · · · · · · · · 28
NAVIGATION
Destination input · · · · · · · · · · · · · · · · · · · · · · · · · · · 30
Direct address input · · · · · · · · · · · · · · · · · · · · · · · · 30
Function “List” · · · · · · · · · · · · · · · · · · · · · · · · · · · 31
Special destinations · · · · · · · · · · · · · · · · · · · · · · · · 31
Points of interest · · · · · · · · · · · · · · · · · · · · · · · · · · 31
Junction · · · · · · · · · · · · · · · · · · · · · · · · · · · · · · · 32
All streets (Quick Access) · · · · · · · · · · · · · · · · · · · · · · 32
Address book (see also chapter Address book) · · · · · · · · · 33
Destination map · · · · · · · · · · · · · · · · · · · · · · · · · · 33
Via points (intermediate destinations) · · · · · · · · · · · · · · 34
Stop guidance · · · · · · · · · · · · · · · · · · · · · · · · · · · 35
Travel info· · · · · · · · · · · · · · · · · · · · · · · · · · · · · · · 35
Points of interest · · · · · · · · · · · · · · · · · · · · · · · · · · 36
Travel symbols · · · · · · · · · · · · · · · · · · · · · · · · · · · 37
Screen displays · · · · · · · · · · · · · · · · · · · · · · · · · · · · 38
Guidance display · · · · · · · · · · · · · · · · · · · · · · · · · · 38
Map display · · · · · · · · · · · · · · · · · · · · · · · · · · · · · 39
Split screen · · · · · · · · · · · · · · · · · · · · · · · · · · · · · 39
Guidance in non-digitised areas · · · · · · · · · · · · · · · · · · 40
Guidance in partly digitised areas · · · · · · · · · · · · · · · · · 40
Audible messages · · · · · · · · · · · · · · · · · · · · · · · · · 40
Plan Alternative Route · · · · · · · · · · · · · · · · · · · · · · · 40
TMC traffic information · · · · · · · · · · · · · · · · · · · · · · · 41
Pay TMC· · · · · · · · · · · · · · · · · · · · · · · · · · · · · · · 42
In the map display · · · · · · · · · · · · · · · · · · · · · · · · · 42
On the guidance display · · · · · · · · · · · · · · · · · · · · · · 43
TMC detail information · · · · · · · · · · · · · · · · · · · · · · 43
Graphic display of a road obstruction · · · · · · · · · · · · · · · 44
Bypassing a road obstruction · · · · · · · · · · · · · · · · · · · 44
Concurrent dynamic route guidance · · · · · · · · · · · · · · · 45
TMC symbols · · · · · · · · · · · · · · · · · · · · · · · · · · · · 46
“Info” menu · · · · · · · · · · · · · · · · · · · · · · · · · · · · · 47
The address book · · · · · · · · · · · · · · · · · · · · · · · · · · · 48
Store addresses · · · · · · · · · · · · · · · · · · · · · · · · · · · 48
Delete address · · · · · · · · · · · · · · · · · · · · · · · · · · · 48
Delete previous destinations· · · · · · · · · · · · · · · · · · · · 48
Store vehicle position in address book · · · · · · · · · · · · · · 49
Retrieve address from the destination memory · · · · · · · · · 49
2
Page 3

CONTENTS
TELEPHONE
CI 3000 · · · · · · · · · · · · · · · · · · · · · · · · · · · · · · · · 50
CIX 3000 Blue · · · · · · · · · · · · · · · · · · · · · · · · · · · · · 50
Linking of mobile phone with CIX 3000 Blue · · · · · · · · · · · · 51
Driver software for the CI 3000 · · · · · · · · · · · · · · · · · · · 51
Loading phone book · · · · · · · · · · · · · · · · · · · · · · · · · 52
Telephone functions · · · · · · · · · · · · · · · · · · · · · · · · · 53
Calling · · · · · · · · · · · · · · · · · · · · · · · · · · · · · · · · · 54
Volume of call · · · · · · · · · · · · · · · · · · · · · · · · · · · · 54
Dialling · · · · · · · · · · · · · · · · · · · · · · · · · · · · · · · 54
Dialling via numeric buttons· · · · · · · · · · · · · · · · · · · · 54
Call list · · · · · · · · · · · · · · · · · · · · · · · · · · · · · · · 54
Calls from the phone book · · · · · · · · · · · · · · · · · · · · 55
Retrieving an entry from the phone book · · · · · · · · · · · · 55
Deleting an entry· · · · · · · · · · · · · · · · · · · · · · · · · · 56
Adding an entry (only on SIM card) · · · · · · · · · · · · · · · · 56
SMS (Short Message Service) · · · · · · · · · · · · · · · · · · · · · 56
Receiving SMS messages · · · · · · · · · · · · · · · · · · · · · · 57
Reading SMS messages· · · · · · · · · · · · · · · · · · · · · · · 57
Writing SMS messages · · · · · · · · · · · · · · · · · · · · · · · 58
Sending SMS messages · · · · · · · · · · · · · · · · · · · · · · · 58
Direct dialling of displayed phone numbers · · · · · · · · · · · · 58
Telephone Settings · · · · · · · · · · · · · · · · · · · · · · · · · · 59
Phone Info · · · · · · · · · · · · · · · · · · · · · · · · · · · · · 59
Phone book · · · · · · · · · · · · · · · · · · · · · · · · · · · · · 59
Storing a mailbox no · · · · · · · · · · · · · · · · · · · · · · · · 60
SW download· · · · · · · · · · · · · · · · · · · · · · · · · · · · 60
Bluetooth · · · · · · · · · · · · · · · · · · · · · · · · · · · · · · 60
USEFUL EXTRAS
Trip computer· · · · · · · · · · · · · · · · · · · · · · · · · · · · · 61
Emergency · · · · · · · · · · · · · · · · · · · · · · · · · · · · · · 62
Entering an assistance number · · · · · · · · · · · · · · · · · · 63
TROUBLESHOOTING
Troubleshooting · · · · · · · · · · · · · · · · · · · · · · · · · · · 64
3
Page 4

GENERAL INFORMATION
Explanation of symbols
The following symbols are used in this manual:
This symbol is used to indicate safety instructions and warnings.
!
These contain important information for the safe use of the unit.
Failure to observe this information may result in a risk of damage
or injury. Therefore, please observe this information with
particular care.
Identifies an action to be performed.
u
Identifies useful tips and information for the operation of the
t
system.
A bullet before the text identifies an enumeration.
•
Text in quotation marks identifies a screen menu option.
“
For your safety!
The use of the navigation system by no means relieves the driver of
!
his/her responsibilities. Always observe the applicable traffic regulations
and take the current traffic conditions into consideration. You always
have priority over the information provided by the navigation system if
the actual traffic situation and the information from the navigation
system conflict.
!
The system does not take the relative safety of the suggested routes
into consideration. Road blocks, building sites, height or weight
restrictions, traffic or weather conditions or other influences which
affect the route safety or travel time are not taken into consideration
for the suggested routes. Use your own discretion in order to decide on
the suitability of the suggested routes. Use the “Alternative Route”
function to receive better routing suggestions, or simply follow your
preferred route and the automatic routing recalculation will plan the
route for the remainder of your journey.
!
In the interests of road safety, only perform inputs to the navigation
system and the phone prior to commencing your journey or when the
vehicle is stationary.
4
Page 5

GENERAL INFORMATION
The current statutory speed limit on the road always takes priority over
!
the values stored on the data CD/DVD. It is impossible to provide an
assurance that the speed values of the navigation system will always
match those of the current traffic regulations in every situation.
In certain areas one-way streets, turn off and entry restrictions (e.g. to
!
pedestrian zones) have not been surveyed. In areas such as these the
navigation system will issue a warning. Pay particular attention to
one-way streets, turn off and entry restrictions.
Please make certain that all persons using your multimedia system have
!
access to this manual, and that they read the instructions and suggestions
for the use of the system prior to using it.
If your screen is installed on a flexible support, adjust it so that you can
!
see the screen contents quickly and easily, and reflections and dazzle or
glare are avoided. Find a suitable spot to stop the vehicle prior to
performing adjustments.
If your monitor is installed on a fixed support, check that your dealer
!
has installed it in accordance with the above recommendations. The
screen must not be installed in a position where it obstructs the view of
any items necessary for the safe operation of the vehicle (e.g. road,
mirrors, instruments, surroundings). In addition, the monitor may not
be installed within deployment range of the airbag.
!
Only look at the monitor if it is safe to do so. Find a suitable place to
stop should you need to look at the screen for a longer period of time.
!
Always store the remote control in a safe place.
!
The values displayed on the system’s “Trip computer” giving the current
speed, driving time and the elapsed distance, are calculated values.
Accuracy cannot always be guaranteed. In the case of speed, the vehicle
speedometer must always be given priority.
!
Do not rely exclusively on the navigation system when attempting to
locate an emergency service (police, fire service, etc.). It cannot be
guaranteed that all available emergency services in your vicinity are
stored in the database. Use your own discretion and abilities to secure
help in such situations.
!
Making a phone call while driving can greatly reduce your level of
awareness and distract you from the traffic situation. In order to avoid
endangering the occupants and other road users, the driver should not
make phone calls while driving. Observe the local regulations relating
to making phone calls in the vehicle.
5
Page 6

GENERAL INFORMATION
Switch off the telephone at petrol stations, chemical plants, fuel depots
!
or similar facilities, or leave it switched off.
Operation of the telephone can cause malfunction of medical
!
equipment in the vicinity of the GSM antenna, such as pacemakers or
hearing aids.
Do not touch the GSM antenna during a call.
!
Important – the correct system software!
As of spring 2004 software version MO 5595 will be available for your
navigation system. This version must be loaded onto your system if you
wish to use the map CD/DVD 2004/2. If your system does not show the
correct version, please contact your dealer or the C-IQ Service Centre
(00800 99 33 33 33). To find out which version of the software is installed
on your system proceed as follows:
Select “System config.” under “Settings”, and press the OK key.
u
Now select “Configuration”, and press the OK key. Now select the
u
“SW Number:” option. It must be 0950 or higher.
Maintenance and care
Do not use cleaning fluid, alcohol or other solvents. A damp cloth is best
suited.
Functions of your navigation system
By buying this Multimedia System you have purchased a
high-performance instrument which has been designed to assist drivers in
daily traffic. Simply enter the destination prior to setting off, activate
“Guidance” and you are ready to go. The navigation system will provide
driving instructions in audible and visual form. With the mobile phone
connected, you increase the safety and ease with which calls can be made
from within the vehicle. The system is simple to use, because of the small
number of operating elements and its clear menu structure.
Range of functions
Some of the functions described in this manual are only to be used in
conjunction with optional accessories. It may also be that use cannot be
made of certain functions in some countries because the data has not
been surveyed. Due to the large range of functions a conscious decision
was taken not to allow all the settings to be used in any combination in
the interests of ensuring ease of use and functionality.
6
Page 7

GENERAL INFORMATION
System expansion
In conjunction with a TMC expansion, the system will show the current
traffic situation along your route, and will guide you around road
obstructions if desired. Numerous system expansions are available to
upgrade to an information and entertainment system.
Distance indications
On main roads, the distances to exits indicated by the system deviate from
those on road signs. The road signs on main roads refer to the start of the
exit, while the navigation system always indicates the distance to the end
of the slip road. This is the point where the driving lanes fork (separate).
Operating restrictions (country-specific)
If a symbol depicting a crossed out hand appears in the bottom status line
it means that only limited operating options are available whilst driving.
Whether or not this function is activated will depend upon the prevailing
national regulations.
GPS reception
The system has been designed to remain operational even when there is
poor GPS reception. However, positional accuracy may be impaired.
Start-up characteristics
If the vehicle has been parked for some time, the satellites will have
continued on their orbits. As a result, once the ignition has been switched
on, it may take several minutes before a sufficient number of satellites
are being received and the system can start analysing their signals.
Adequate reception (three-dimensional position) is indicated by the black
satellite symbol on the display. The satellite symbol remains red if GPS
reception is inadequate.
During the start-up process, the navigation system may report the
message: “Please proceed to the planned route”. The system assumes that
the vehicle is located off a stored road. If other roads exist in this area,
the navigation system may issue incorrect messages. The system assumes
that the vehicle is located on a different road.
Automatic route re-calculation
If you do not follow the instructions of the system, the system will
automatically plan a new route.
7
Page 8

GENERAL INFORMATION
Areas with limited road information
In some areas, not all road information may be available on the map
DVD/CD. Thus, for example, turn-off prohibitions, information on the
direction of travel in a one-way street or prohibited entry into a
pedestrian zone may be missing. The navigation system will display a
warning if you drive into such an area.
Information concerning the functions of the navigation system can be
t
found on the internet at www.vdodayton.de.
Switching on / off
The multimedia system is switched on and off along with the ignition. If
the system was not switched to stand-by prior to switching off, a title
screen will be displayed. This is followed by information on how to
operate the system. Confirm this by pressing the OK key. After a few
seconds, the system will be functional.
Remote control
If you wish to use the remote control outside the cradle, batteries will be
required and these will have to be replaced if the system no longer
responds when the buttons are pressed or if the battery symbol appears
in the status line. Please remember that the remote control must not be
exposed to direct sunlight if batteries have been inserted. The system can
always be used whenever the remote control is inside its wired cradle; for
this no batteries are required.
Some buttons and keys have two functions, which are activated
respectively either by pressing them briefly for less than a second or by
pressing and holding them down for more than a second.
Depending on the scope of supply, various remote controls might be
used. Full functionality can only be ensured if the correct remote control
is activated. To do this, select “Remote control” under “Settings” and
activate the desired remote control by pressing the OK key.
8
Page 9
GENERAL INFORMATION
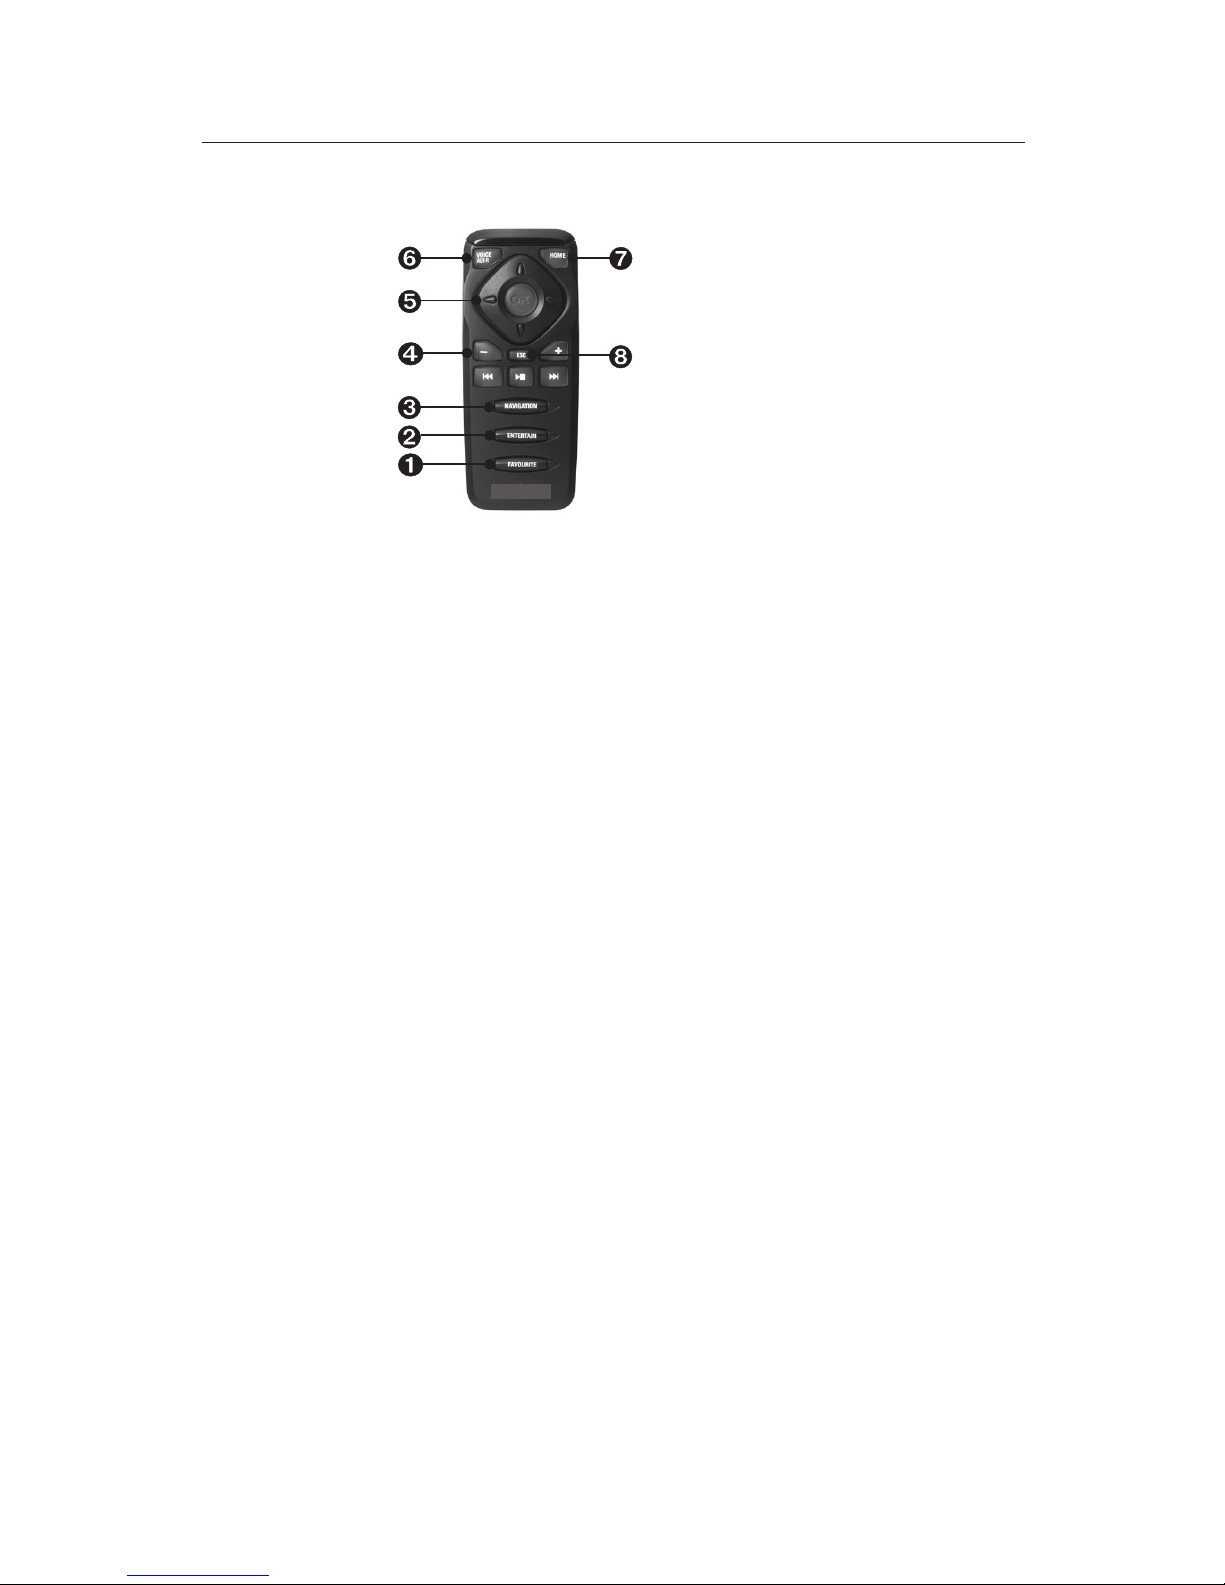
RC 5400
FAVOURITE - This button is freely programmable to provide direct
Ê
access to selected functions. (See also the section entitled “Settings”).
ENTERTAIN - Press the button < 1 second to access the entertainment
Ë
source last used.
NAVIGATION - Press the button < 1 second to switch between the
Ì
route guidance screens. Press the button > 1 second to directly access
the Start menu.
Í
Set the volume.
Î
Cursor keys as well as OK confirmation key.
Ï
VOICE / ALT-R - Press the button < 1 second to call up the current
audible route guidance information. Press the button > 1 second to
plan an alternative route.
Ð
HOME - If your own address is saved press the HOME button
< 1 second to call up this address. Press the button > 1 second to load
the address which is saved under “Work”.
Ñ
ESC - Press ESC < 1 second to access the previous menu. Press it
> 1 second to directly access the Main menu.
9
Page 10

GENERAL INFORMATION
RC 5000
MAP - Switch between the route guidance screens.
Ê
MENU - Call up the Main menu.
Ë
Set the volume.
Ì
Cursor keys as well as OK confirmation key.
Í
ALT-R - Plan an alternative route.
Î
REP - Call up the current audible route guidance information.
Ï
Stand-by
You can switch the system to stand-by from the Main menu. Select
stand-by and press the OK key. The screen will switch off but the audible
navigation information will continue if external loudspeakers are
connected. If you wish to stop navigation, press the OK key while one of
the navigation screens is displayed. Select “Stop Navigation” and press
OK.
Inserting/changing the map DVD/CD
u
If the Power LED is illuminated, press the Eject key on the
navigation computer once (ignition must be switched on).
u
If the Power LED is not illuminated, press the Eject key twice. The
DVD/CD is ejected.
u
Remove the DVD/CD and insert the new map DVD/CD into the
drive carefully with the lettering facing upward, until it is drawn
in. After changing the map DVD/CD, the system will require several
seconds to initialise.
10
Page 11
GENERAL INFORMATION
Important: Only use original discs with a diameter of 12 cm. Do not
!
insert 8 cm or specially shaped CDs. This could cause damage to the
system.
C-IQ - Your key to map, traffic and travel
information
Together with your system, you will have received a DVD/CD with current
map, traffic and other travel information. The information on the
DVD/CD is encrypted and can be partially activated or activated in its
entirety for a defined period by means of an access code. Your
advantages:
You only pay for the information that you actually use.
•
You are only required to pay for the period that you require.
•
Following initial activation you will automatically receive the free
•
automatic C-IQ Update Service. You will receive updated CD/DVDs at
least once a year. Customers with unlimited activation will not receive
the C-IQ Update Service. Unlimited activation means that the products
concerned can only be used in conjunction with the activated DVD/CD
version number.
You are always in possession of the latest information.
•
The necessary registration and activation process can be carried out
•
conveniently via Internet (www.C-IQ.net) or by dialling telephone
number 00800 99 33 33 33.
Activation options
The DVD/CD contains all the road data that has already been recorded for
the region. Where available, travel information, hotel and restaurant
guides for individual countries are also included, as well as TMC traffic
information for those countries that provide this service. You can activate
•
individual countries
•
individual travel guides and if required
•
traffic information
11
Page 12
GENERAL INFORMATION
for a specific period of time (see also the preview and Prepaid C-IQ in this
chapter). Your C-IQ Service will be happy to provide more information
about the various access options available.
Reading the Navi ID
Please have your Navi ID and your software code ready when establishing
contact. To display the identification:
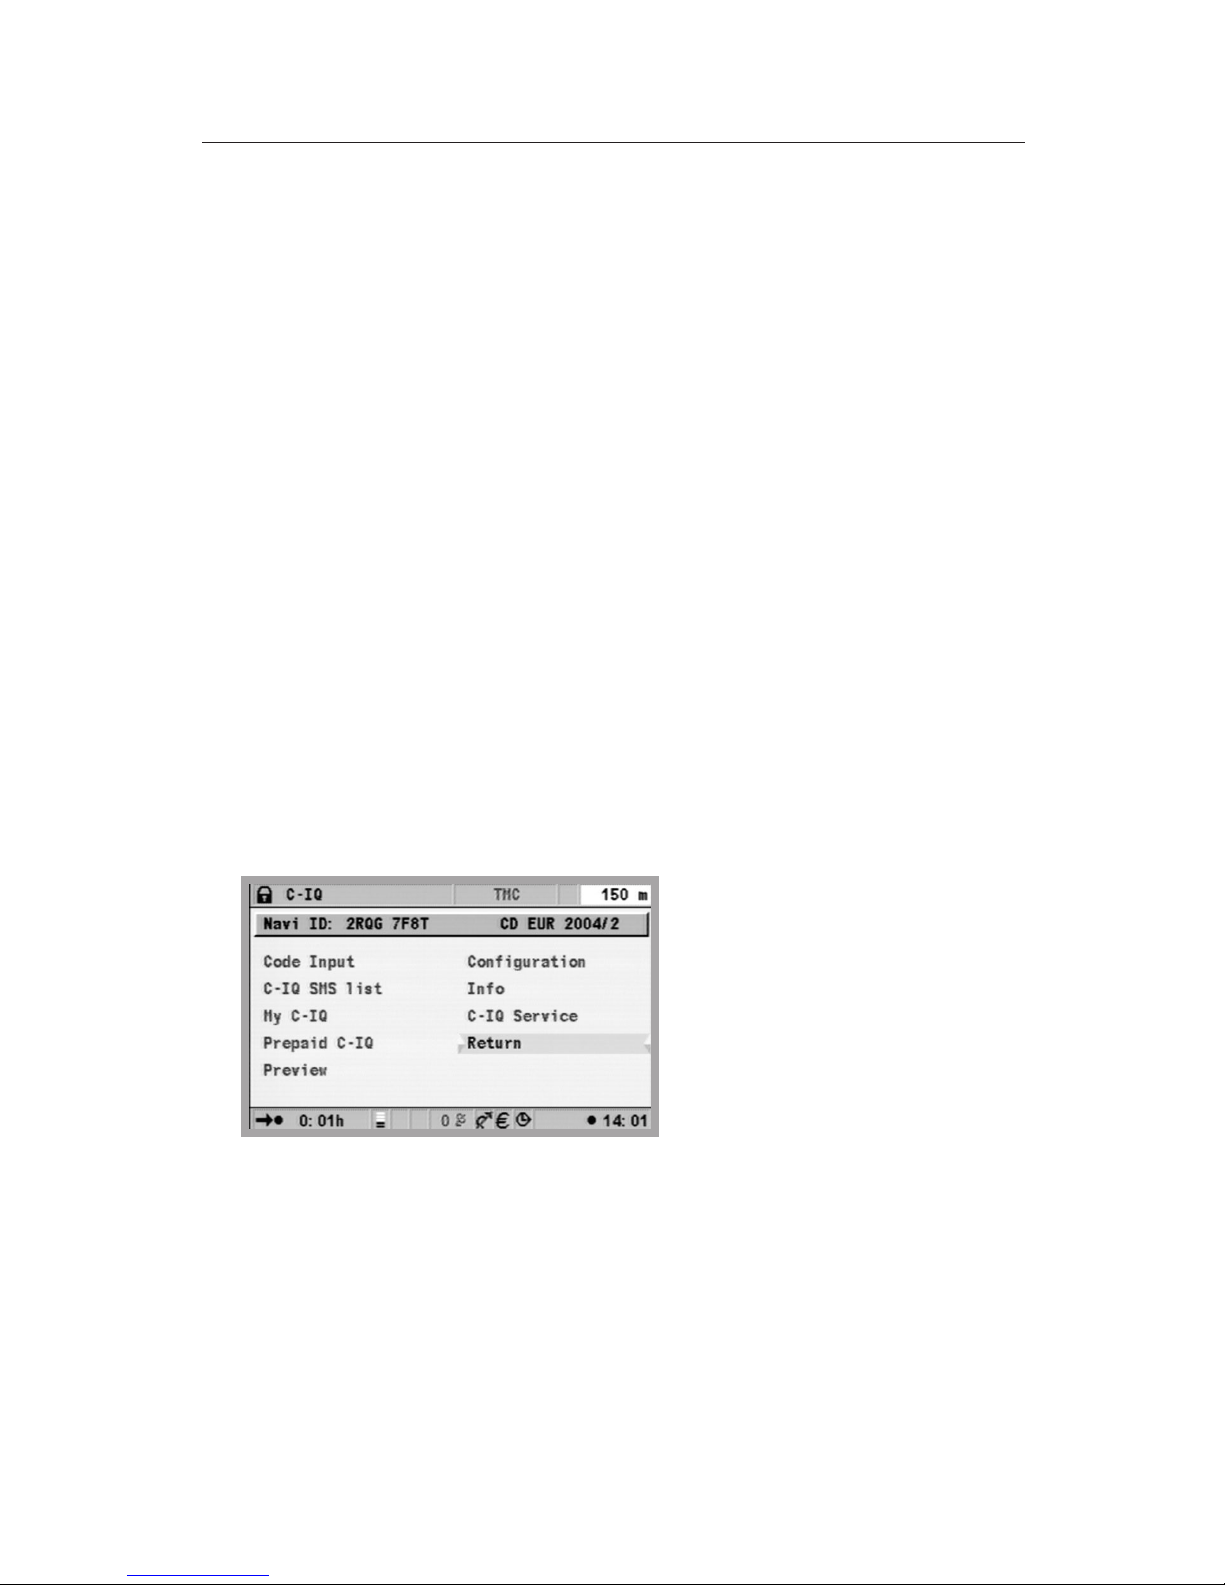
Select ”C-IQ” in the start menu and press the OK key.
u
Read the 8 digit code next to Navi ID. To the right of it, you will
u
find the map information. It is helpful to note both on a sheet of
paper.
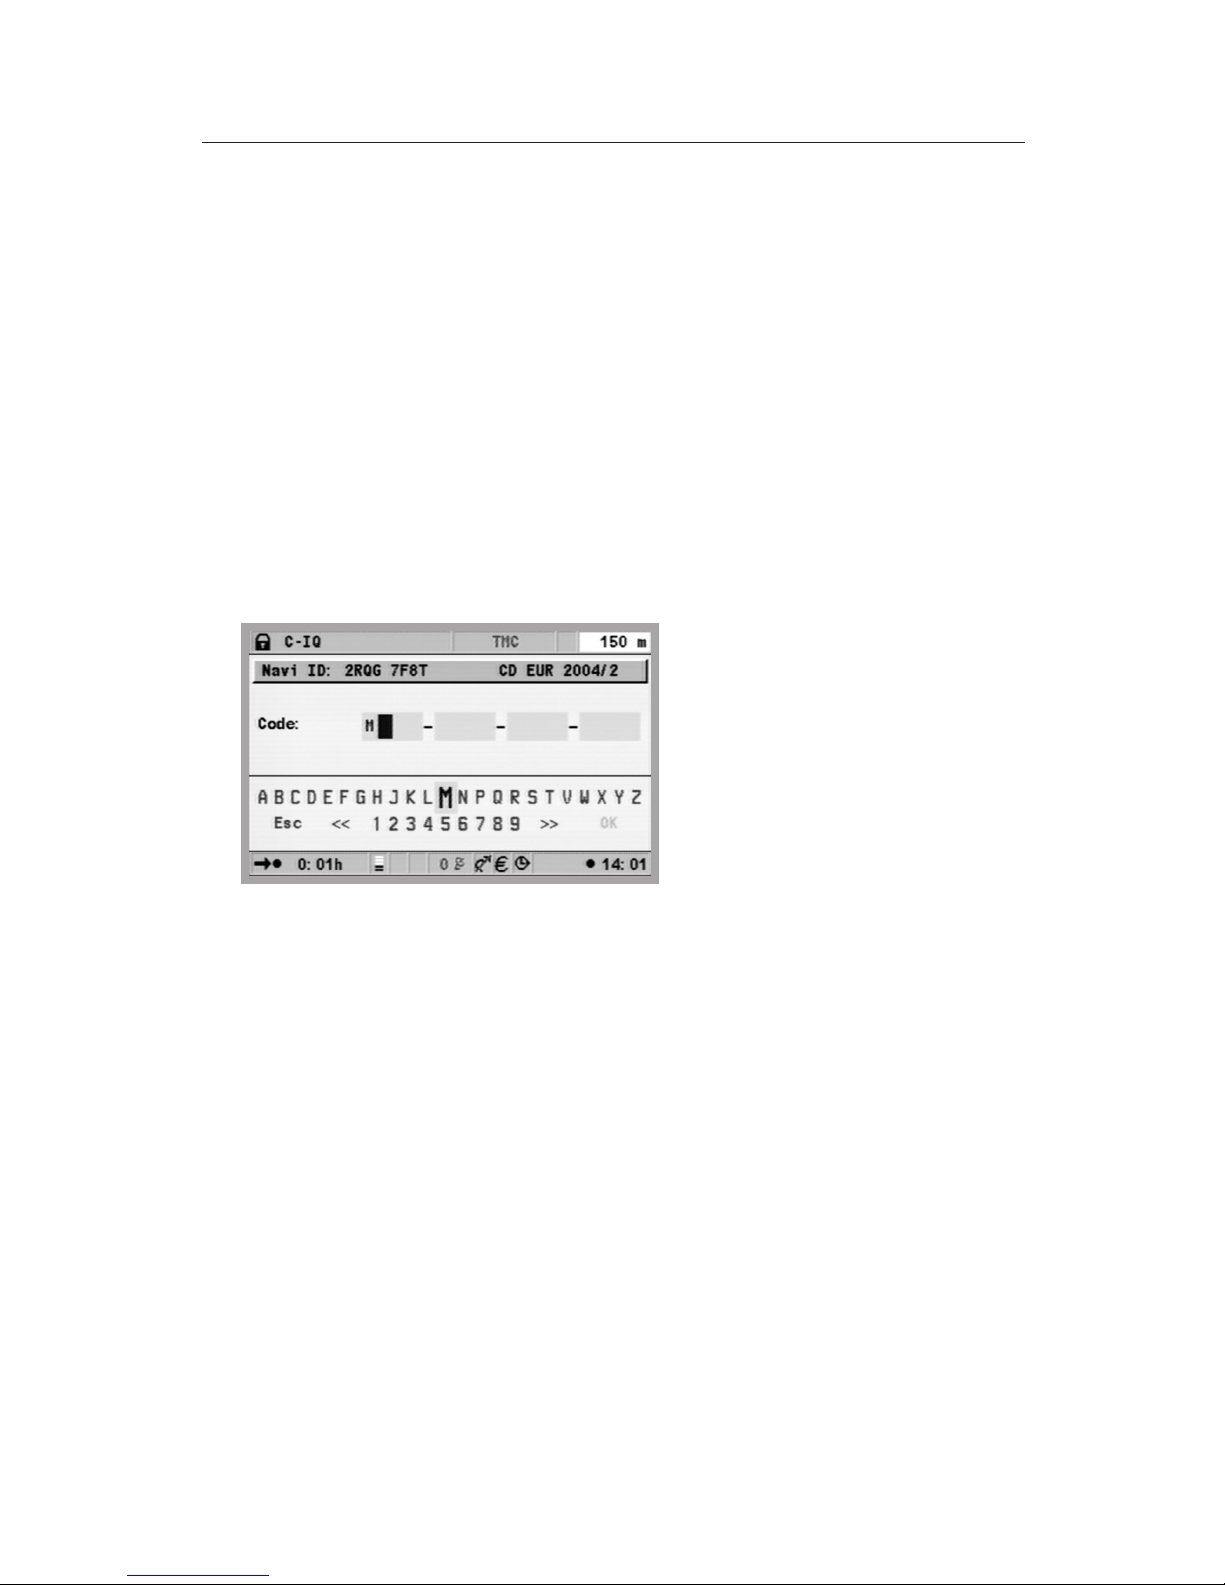
You will also find the Navi ID in the “Code Input” menu under ”C-IQ”
t
Code input
After you have received your code, enter it into the system.
u
In the start menu, activate ”C-IQ”, then ”Code Input”. Press the
OK key after selecting each option.
u
Move the cursor to the desired letters, symbols or numbers and
confirm your selection in each case by pressing the OK key.
u
If the code is complete, the cursor will automatically move to OK.
Press the OK button. The system will inform you if an incorrect
code has been entered, and/or if your system software is not
capable of processing the encrypted information.
u
If this is the case, select either ”OK” or ”C-IQ Service”, if you wish
to establish contact, and press the OK key.
!
Activation by the code only works if the system’s date is valid. For this
to be the case, at least one GPS satellite must transmit a date on a
single occasion or every time that the supply voltage has been
disconnected.
12
Page 13

GENERAL INFORMATION
The system can be operated in the 1000 km scale without activation.
t
Destinations can be entered but navigation information will only be
provided for activated areas and for activated services.
C-IQ SMS list
The system has been prepared to process the C-IQ Code by SMS. To use
this function a suitable phone module is required.
My C-IQ
You are able to access information about your activation status at any
time.
Select “My C-IQ” under “C-IQ”. Press the OK key.
u
Select “Active” and confirm by pressing the OK key, if you wish to
u
receive details concerning the products you have activated.
Select “Starting soon” and confirm by pressing the OK key, if you
u
wish to see details about software already received.
Select “Expiring soon”, and confirm by pressing the OK key, if you
u
wish to see which service products you are currently using, and
find out how long they will remain available.
Select “Revocated products” and press the OK key to receive a
u
summary of previously activated products.
u
By pressing the OK key under “Quit” you can return to the
previous menu.
If you do not make any selection, the system will automatically return you
to the previous menu after a short time.
Prepaid C-IQ
You can purchase country maps for navigation and/or travel info products
(e.g. hotel and restaurant guides) at a flat rate and in advance for use on
a daily basis, but without having to specify the actual days concerned.
This means that you can always have the correct data at your fingertips
for making short trips abroad or taking a weekend trip. With the
“prepaid” service the information must be activated on the calendar day
on which it is to be used. Once you have purchased your prepaid days
from the C-IQ Service (www.C-IQ.net or 00800 99 33 33 33) they can be
activated in the navigation system in the normal manner by means of an
access code. Please ensure that the corresponding map CD/DVD has been
inserted. For more detailed information concerning this option contact
the C-IQ Service.
13
Page 14

GENERAL INFORMATION
If you have paid to access travel information and/or road maps and want
to activate them:
Select “Prepaid C-IQ” under “C-IQ” and press the OK key.
u
Select “Prepaid Map” or “Prepaid Travel Info”, and press the OK
u
key. The screen shows how many prepaid days are still available.
Select “Proceed” to access the list of products available (country
u
maps or travel info products).
Select the product required. Press the OK key.
u
Preview
With every new CD/DVD update you are given the opportunity to test
two country maps and two travel info products for two calendar days
each, free of charge (free C-IQ Update Service does not apply to
customers with unlimited activation). Please ensure that the
corresponding map CD/DVD has been inserted.
Select “Preview” under “C-IQ”, and press the OK key. The status of
u
your preview options will be displayed. This shows you how many
map and travel information products are still available for you to
view free of charge.
Select “Proceed” and press the OK key to access the list of
u
products available.
u
Select the product required. Press the OK key.
u
Select “C-IQ Service” and press the OK key, if you wish to establish
contact.
u
Selecting “Return” and pressing the OK key will take you back to
the ”C-IQ” menu.
Configuration
Set up your system to inform you in good time and automatically of the
status of your activated products:
u
Select “Configuration” in the “C-IQ” menu, and press the OK key.
u
Activate or deactivate “Expiring soon” and “Starting soon” by
pressing the OK key. “Don’t Show” means that no automatic
information will ensue. “Show” will keep you informed.
u
Select the number of days you wish to be informed in advance to a
value between 1 and 10. Select “.. days” and press the OK key.
Press the and key to set the desired value. Press the OK key.
u
Select “Return” and press the OK key to return to the previous
menu.
14
Page 15
GENERAL INFORMATION
C-IQ Service
Here you will find the contact details for your C-IQ Service.
Select “C-IQ Service” in the “C-IQ” menu. Press the OK key. Phone
u
number and Internet address will be displayed.
Select “OK” and press the OK key to return to the previous menu.
u
The “Call C-IQ” option will only be active if a communication interface
module and a mobile phone have been connected to the navigation
system or if a mobile phone has been registered via Bluetooth.
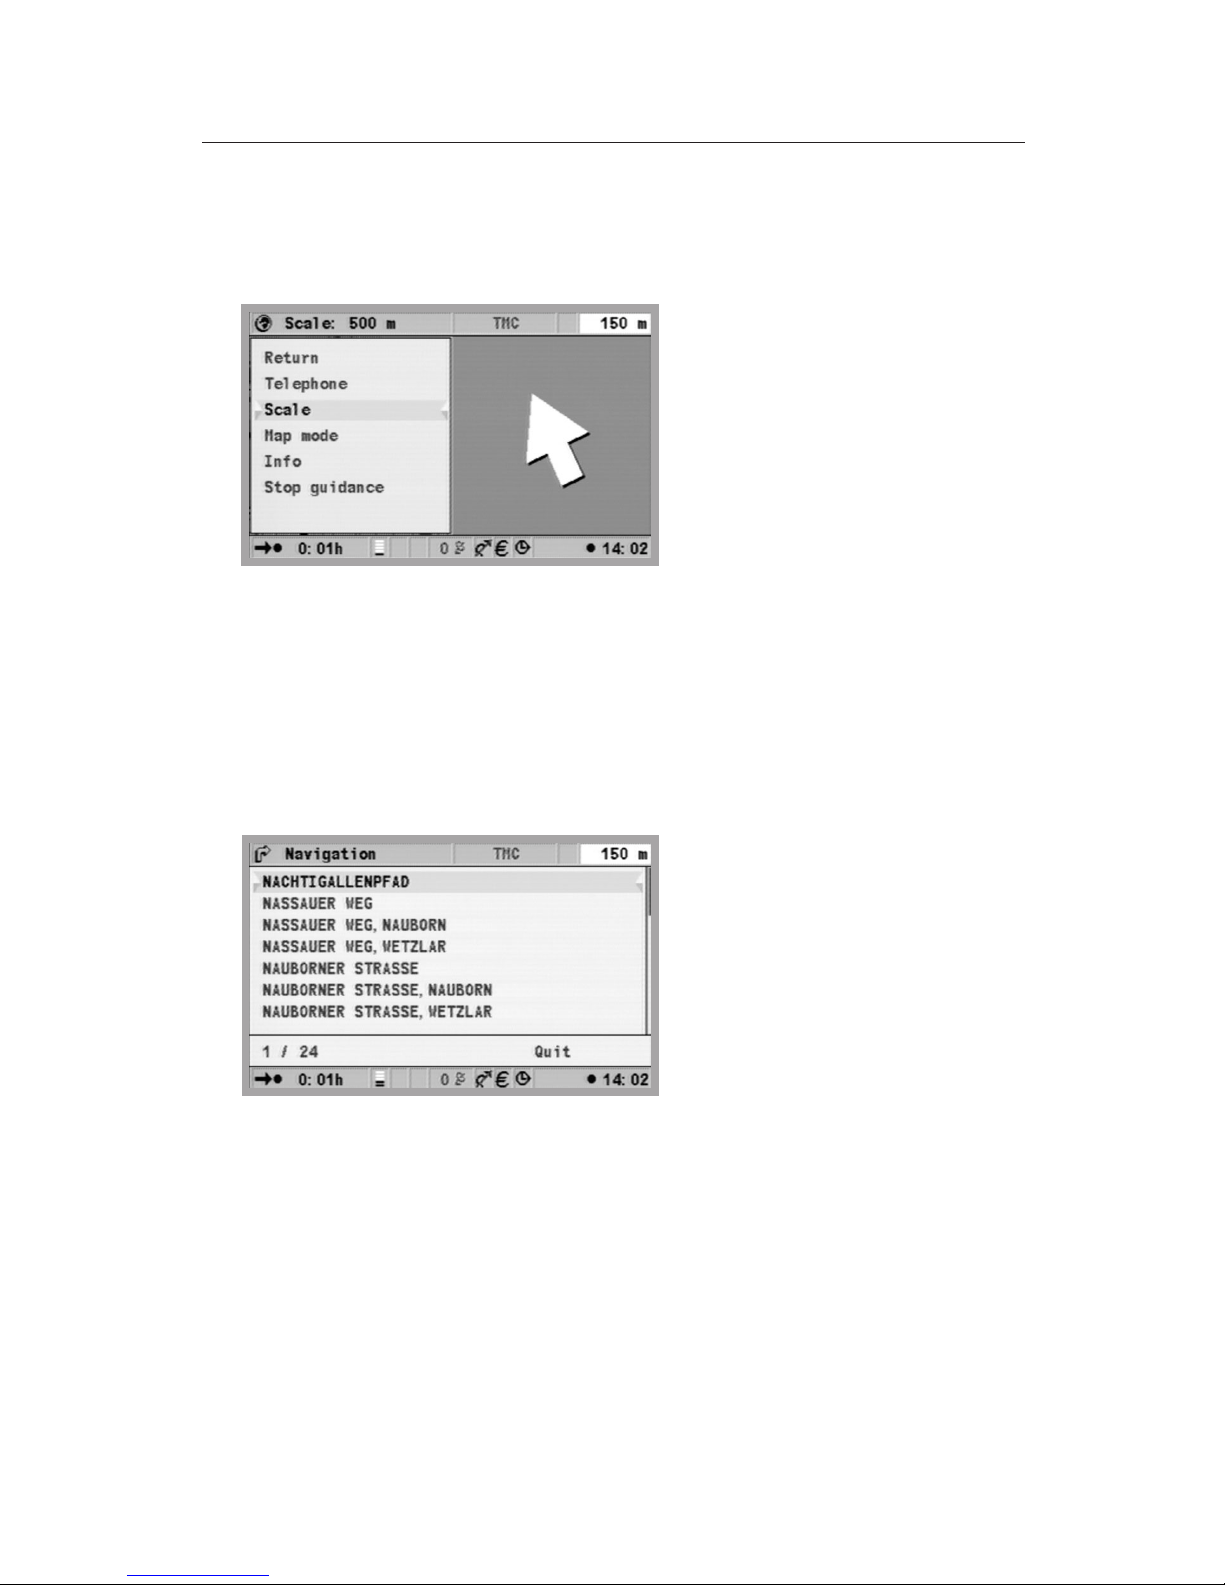
Screen menu types
The navigation system uses three menu types: the popup, pull-down and
the list menu. The respective current cursor position is identified by
arrows to the left and to the right of the function to be selected.
Functions that can be selected are always displayed in bold type.
Functions that are currently not available are displayed in grey and are
skipped by the cursor.
To select a function, move the cursor with the cursor keys
u
to the desired option/function and press the OK key.
Popup menu
Once a function has been selected, a popup menu may be displayed with
additional options. Pressing the cursor key will close the popup menu
again without an option/function (return branch) having been selected.
15
Page 16
GENERAL INFORMATION
Pull-down menu (functions list)
In guidance mode, “Function” will be displayed on the screen. Once the
OK key has been pressed, the selectable functions will be displayed. If no
function is selected, the menu will close after several seconds.
List screen
For several options, a list will be displayed on the right-hand side of the
screen. If it is not possible to show all list entries, the cursor can be used
to scroll down, e.g. by pressing the cursor key at the lower end of the
list. It is possible to scroll back up by pressing the cursor key once you
have reached “Quit” in the list. If it is possible to display further
information for a particular list entry, “” will be displayed to the right
of the list entry. To display this information, press the cursor key .
Pressing the OK key, cursor key or selecting the “Quit” option will take
you back to the previous menu without any list entry having been
selected.
16
Page 17
GENERAL INFORMATION
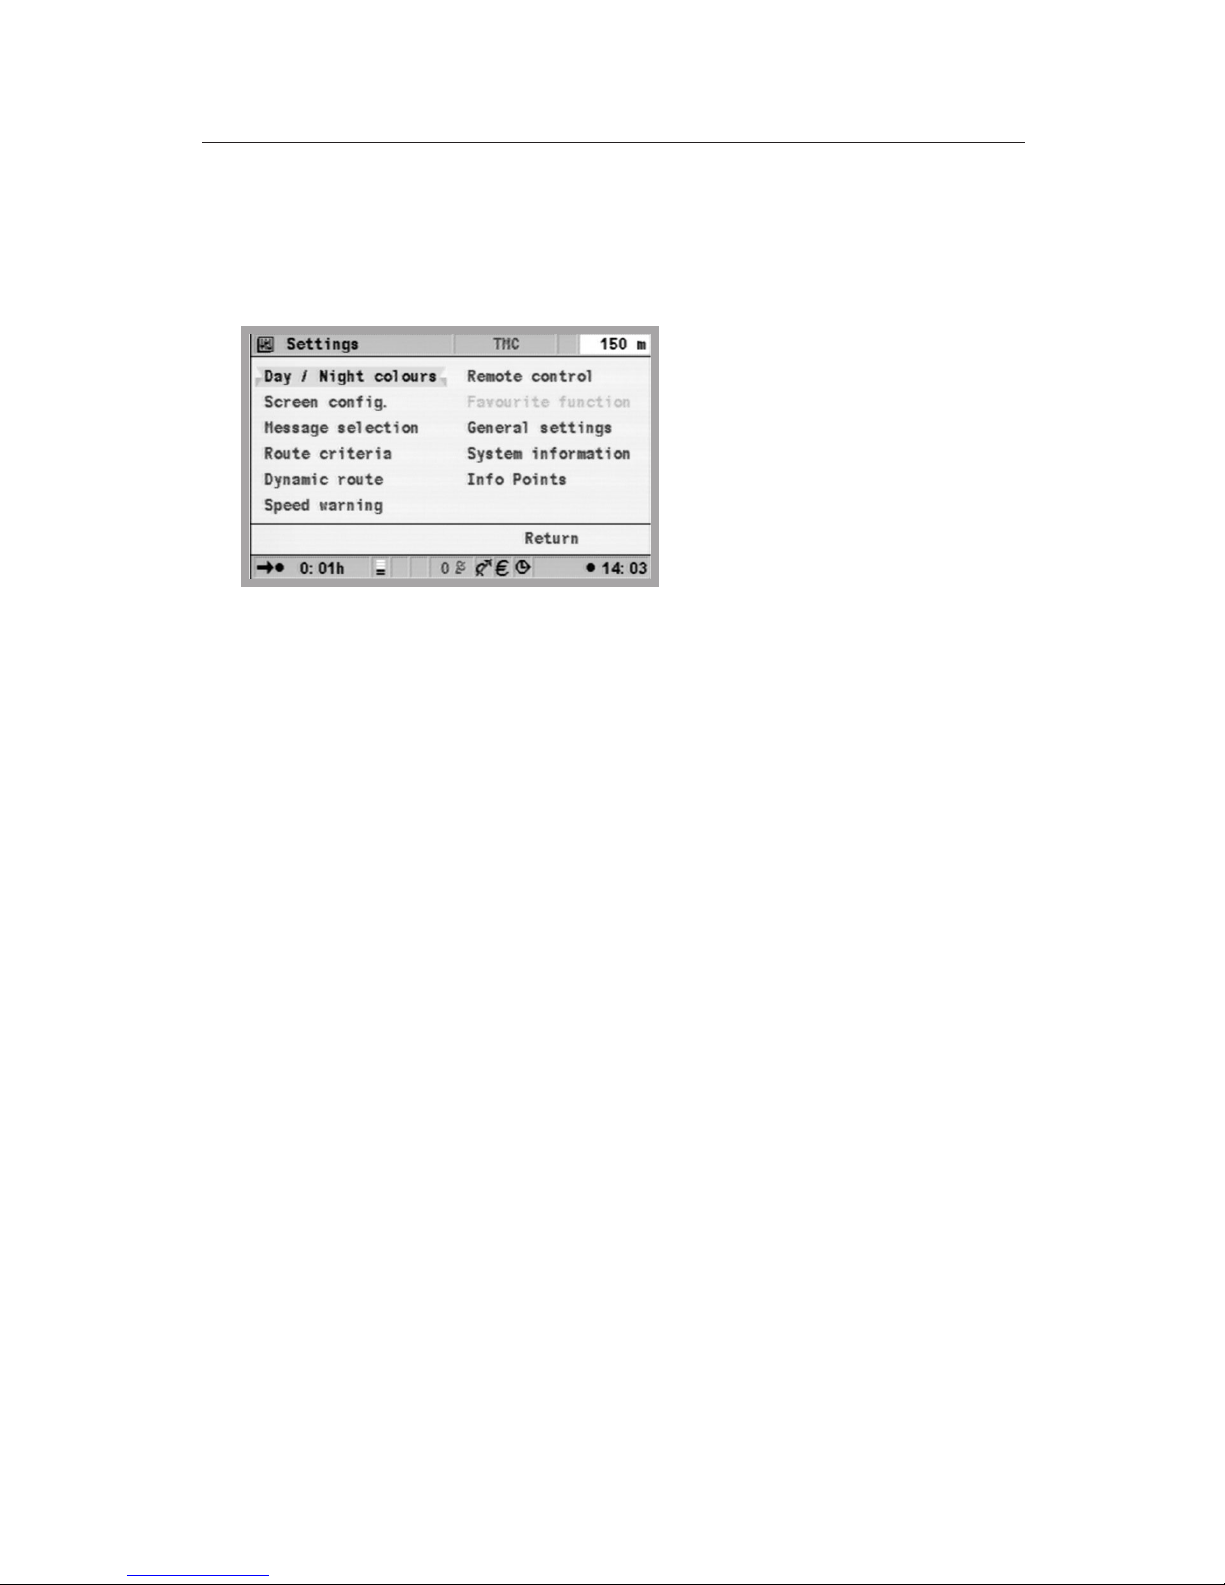
Settings – adjusting the navigation system
You can change several settings to adapt the navigation system to meet
your personal requirements. The following functions are available in the
“Settings” menu and can be selected from the Start menu:
Day / night colours
•
Screen config.
•
Message selection
•
Route criteria
•
Dynamic route
•
• Speed warning
•
Remote control
•
Favourite function
•
General settings
•
System config.
•
Info Points
Day / night colours
Selection of options:
•
Automatic switching of day and night colours, whereby the night
colour is selected whenever the headlights of the vehicle are switched
to low beam.
•
Always day colour
•
Always night colour
u
Select “Day / night colours” in the “Settings” menu, and press the
OK key.
u
Select one of the three options and press the OK key.
The brightness of the screen can be adjusted on the monitor.
17
Page 18

GENERAL INFORMATION
Screen configuration
Here different colour combinations can be selected for the screen display,
and the status line can also be configured:
“Day colour”: This setting is active if the headlights are switched off.
•
Optimum contrast in daylight is provided by blue, red and green.
“Night colour”: is active with the headlights switched on. Optimum
•
legibility at night is provided by dark blue, dark red and dark green.
“Status line left”, “Status line right” or “Status line top”: For display of
•
information in the respective lower corners or in the centre at the top
of the screen:
None
Display of the current time
Date
Remaining travel time: The calculated remaining time until arrival
at the next via point or destination.
Remaining dynamic travel time (including delays due to stationary
traffic)
Estimated time of arrival: Calculated time of arrival at the next via
point or destination.
Estimated dynamic arrival time (including delays due to stationary
traffic)
Entire delay on route
Distance to next via point or destination
Geographical elevations, elevation above sea level To use this
function the system must be receiving signals from at least 4
satellites.
Current speed
TMC
Speed limit. It should be pointed out here that the speed limits
issued by the navigation system are not always current. It is
imperative that the currently applicable speed limit be observed.
•
“Map colour”: allows day/night colours to be selected.
One value can be selected for display:
u
Select “Screen config.” in the “Settings” menu. Press the OK key.
u
Select the function to be set. Press the OK key.
u
Select your option and press the OK key. The cursor will
automatically move to the previous menu.
18
Page 19

GENERAL INFORMATION
The navigation system uses an average cruising speed to calculate the
remaining travel time and the estimated time of arrival. If required, this
speed can be adapted to your actual average speed by means of the
option “System information/Speed correction”.
Message selection
After this function has been selected, a list will be displayed, from which a
selection can be made as to which TMC information is to be displayed.
TMC information can only be displayed if a suitable TMC source is
connected, and the map DVD/CD contains TMC data.
Select “Traffic info” in the “Settings” menu. Press the OK key.
u
Select the options to be set, and activate or deactivate them by
u
pressing the OK key.
Select “Store” and press the OK key.
u
Select “Deselect all” and press the OK key to deactivate all options
u
in this menu.
Route criteria
Various criteria can be selected for route calculation:
Fast: suited to all situations.
•
Short: recommended for trips within cities.
•
Main roads: recommended if you prefer routes that use freeways
•
(motorways).
•
No main roads: recommended if you wish to avoid routes that use
freeways (motorways).
•
Minimize toll roads.
•
Minimize ferry usage.
•
Minimize tunnel usage.
•
Traffic Info: switches dynamic route guidance on and off.
The symbol for the selected route criterion is displayed in the status line.
Adjust/change route criterion:
u
Select “Route criteria” in the “Settings” menu, and press the OK
key. A list with the route criteria is displayed.
u
Select the desired route criterion and confirm by dressing the OK
key. The symbol for the newly selected route criterion is displayed
in the status line
Only activate the “Minimize toll roads” option if you wish to use as few
toll roads as possible. Note concerning toll roads, ferries and tunnels:
These functions can only be used if the corresponding information is
available on the map CD.
19
Page 20
GENERAL INFORMATION
Activate the Traffic Info option if you wish to be automatically routed
around road obstructions (see also section TMC traffic information and
Dynamic route in this chapter). If traffic information is not activated, the
system will suggest detours. The driver must confirm these manually.
The route criteria can also be changed in the “Navigation” menu under
t
“Route criteria”.
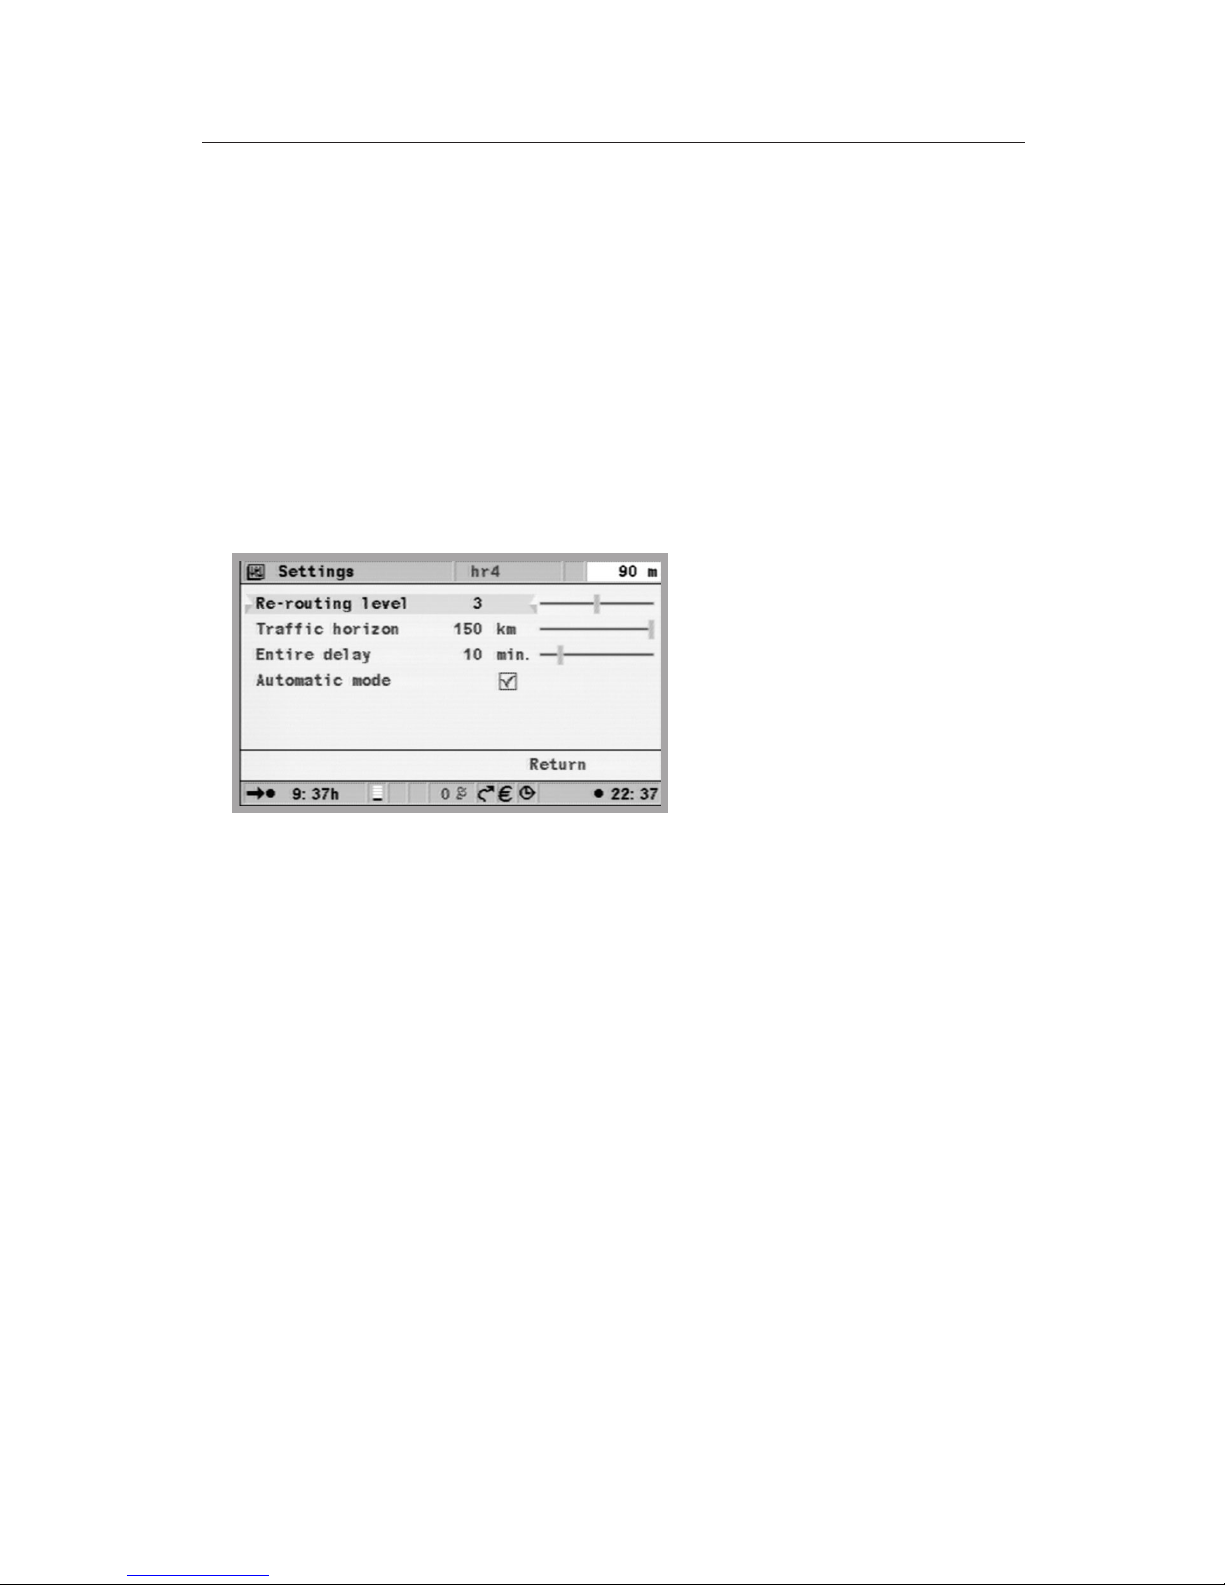
Dynamic route
With the integration of the TMC traffic information (see also chapter TMC
traffic information) you have the option of specifying criteria for the
system which influence the automatic detour of road obstructions.
Settings in the “Dynamic route” menu can only be made if the “Traffic
Info” option under “Route criteria” has been activated.
•
Re-routing level defines whether or not the system will plan a detour.
Numerous factors are integrated into the decision process. These
include, for example, the conditions on the alternate route, such as the
road category or the number of townships to be driven through. The
probability of high traffic density on the alternate route also plays a
part. Five levels are available. The lowest level means that, depending
on the conditions, the original route with the stationary traffic can
often be given preference. If the highest level is selected, an alternate
route is always planned.
•
Traffic horizon: the maximum distance that will be considered for a
detour suggestion around road obstructions.
•
Entire delay: takes into account the maximum delay the driver will
accept before he is willing to receive a detour suggestion.
•
Automatic mode: will automatically route you around stationary traffic.
There will be no further prompting of the driver.
20
Page 21

GENERAL INFORMATION
Select “Dynamic route” in the “Settings” menu. Press the OK key.
u
Select the criterion to be adjusted and press the OK key.
u
Set the desired value with the cursor keys and . Press the OK
u
key.
Select “Return” if all criteria have been adjusted as desired, and
u
press the OK key.
To activate automatic mode:
Select “Route criteria” under “Settings” and activate the Traffic
u
inform. option.
In the “Dynamic route” menu, also under “Settings”, activate
u
“Automatic mode” so that the system automatically guides you
around road obstructions.
Speed warning
In this menu, speed limit and vehicle speed warning can be adjusted.
With regard to the speed limit, the system will access data stored on the
map CD/DVD. You can set a warning limit of up to 50 km/h above the
speed limit that is stored in the system. Depending on the value set,
relevant warnings will appear in the status line. For these warnings to
appear, you have to have the speed limit displayed in one of the status
bars (see under Screen configuration in this chapter).
The current status can be seen from the colour of the symbol for the
speed limit depending on the values set.
•
If the symbol is black and does not display a value, there is either no
data available on the CD/DVD or there is no speed limit on this road.
•
If the symbol and the value appear in black, you are driving below the
current speed limit.
•
If the symbol is yellow you are driving above the permitted speed but
still below the set tolerance value.
•
A red symbol means that you are exceeding both the permitted speed
and the tolerance value you have set.
21
Page 22

GENERAL INFORMATION
In the case of the vehicle speed warning you can enter an absolute
value. If this value is reached, an audible signal is emitted and a popup
screen appears, provided that you have activated this option. The vehicle
speed warning is not based on the speed indicated by the speedometer
but on the vehicle speed determined by the navigation system.
Select “Speed warning” in the “Settings” menu. Press the OK key.
u
Move the cursor to the “Warning … km/h over limit” field. Select
u
“Warning … km/h” to set the absolute vehicle speed value. Press
the OK key after selecting each option.
Use the cursor keys to set the warning threshold, press the
u
OK key.
To switch the audible warning on / off select “Car speed warning
u
on/off”. Press the OK key.
The current status (on/off) is indicated by the colour of the square (red:
off / green: on). Each press of the OK key toggles the speed warning on or
off.
Remote control
There are various remote controls for your system. The respective remote
control used must be activated under “Remote control”.
u Select “Remote control” in the “Settings” menu. Press the OK key.
u
Move the cursor to the desired option. Press the OK key to toggle
between active þ and inactive ¨.
u
Select “Store”, and press the OK key.
Favourite function
This button on the remote control is programmed so that specific
functions are activated when you press it briefly or press it and hold it
down. Please note that this function is only available in conjunction with
the RC 5400 remote control.
u
Select “Favourites function” in the “Settings” menu. Press the OK
key.
u
Press the Favourites button briefly or press and hold the Favourites
button, depending on the assignment required, and press the OK
key.
u
Select the desired assignment, select “Store” and press the OK key.
22
Page 23

GENERAL INFORMATION
General Settings
The following functions are available in the General settings:
Language
•
Audible settings
•
Measuring units
•
Device configuration
•
Shut-Down timer
•
Language
Selection of the national language for audible information and menu
texts in the display. Currently, the following languages featuring a variety
of male and female voices are available on the system software CD:
British English
•
American English
•
French
•
German
•
Dutch
•
Italian
•
Spanish
•
Danish
•
Swedish
•
Finnish with English voice output
•
Two languages are available in the system at the same time. If necessary,
other languages can be downloaded from the system software CD or the
languages CD.
u
Select “General settings” in the “Settings” menu. Press the OK key.
u
Select “Language”. Press the OK key.
u
Select “Other language” in the list that is displayed and press the
OK key. And now follow the on-screen instructions.
A “Software Update” will be performed. After the download has been
completed, the CD/DVD must be removed by pressing the Eject key.
Confirmation with the OK key restarts the navigation system.
Audible settings
The following options can be selected in the “Volume” menu:
•
SDVC: To select a control curve for the speed-dependent volume
increase. To compensate for environmental noise, the volume is
increased as a function of the speed. Test the various SDVC curves in
order to determine the one that is most suitable.
•
Volume.
23
Page 24

GENERAL INFORMATION
Audible info.: To switch announcements on or off. With the audible
•
announcements switched off, the respective symbol will be displayed in
the status line.
“Turn now” instruction. To switch this announcement on or off. If you
•
want to reduce the number of driving instructions, switch off the last
“Turn now” instruction now. Select “General settings” in the
“Settings” menu. Press the OK key.
Select “Audible settings”. Press the OK key.
u
Select the option to be adjusted and press the OK key.
u
Select the desired value or the desired option and press the OK
u
key. The volume or SDVC setting is set via the remote control
cursor keys and by pressing the OK key.
Select “Audible info on/off” or “Turn now” and press the OK key
u
to activate (green) or deactivate (red) these functions.
Select “Return” and press the OK key to return to the previous
u
menu.
Measuring units
The following options are available:
Time format
•
• Date format
•
Measuring units
•
Time zone
u
Select “General settings” in the “Settings” menu. Press the OK key.
u
Select “Measuring units”. Press the OK key. Setting the measuring
unit affects the screen display and voice output.
u
Select the required unit of measurement and press the OK key
(repeatedly if required), to get to the desired setting.
24
Page 25
GENERAL INFORMATION
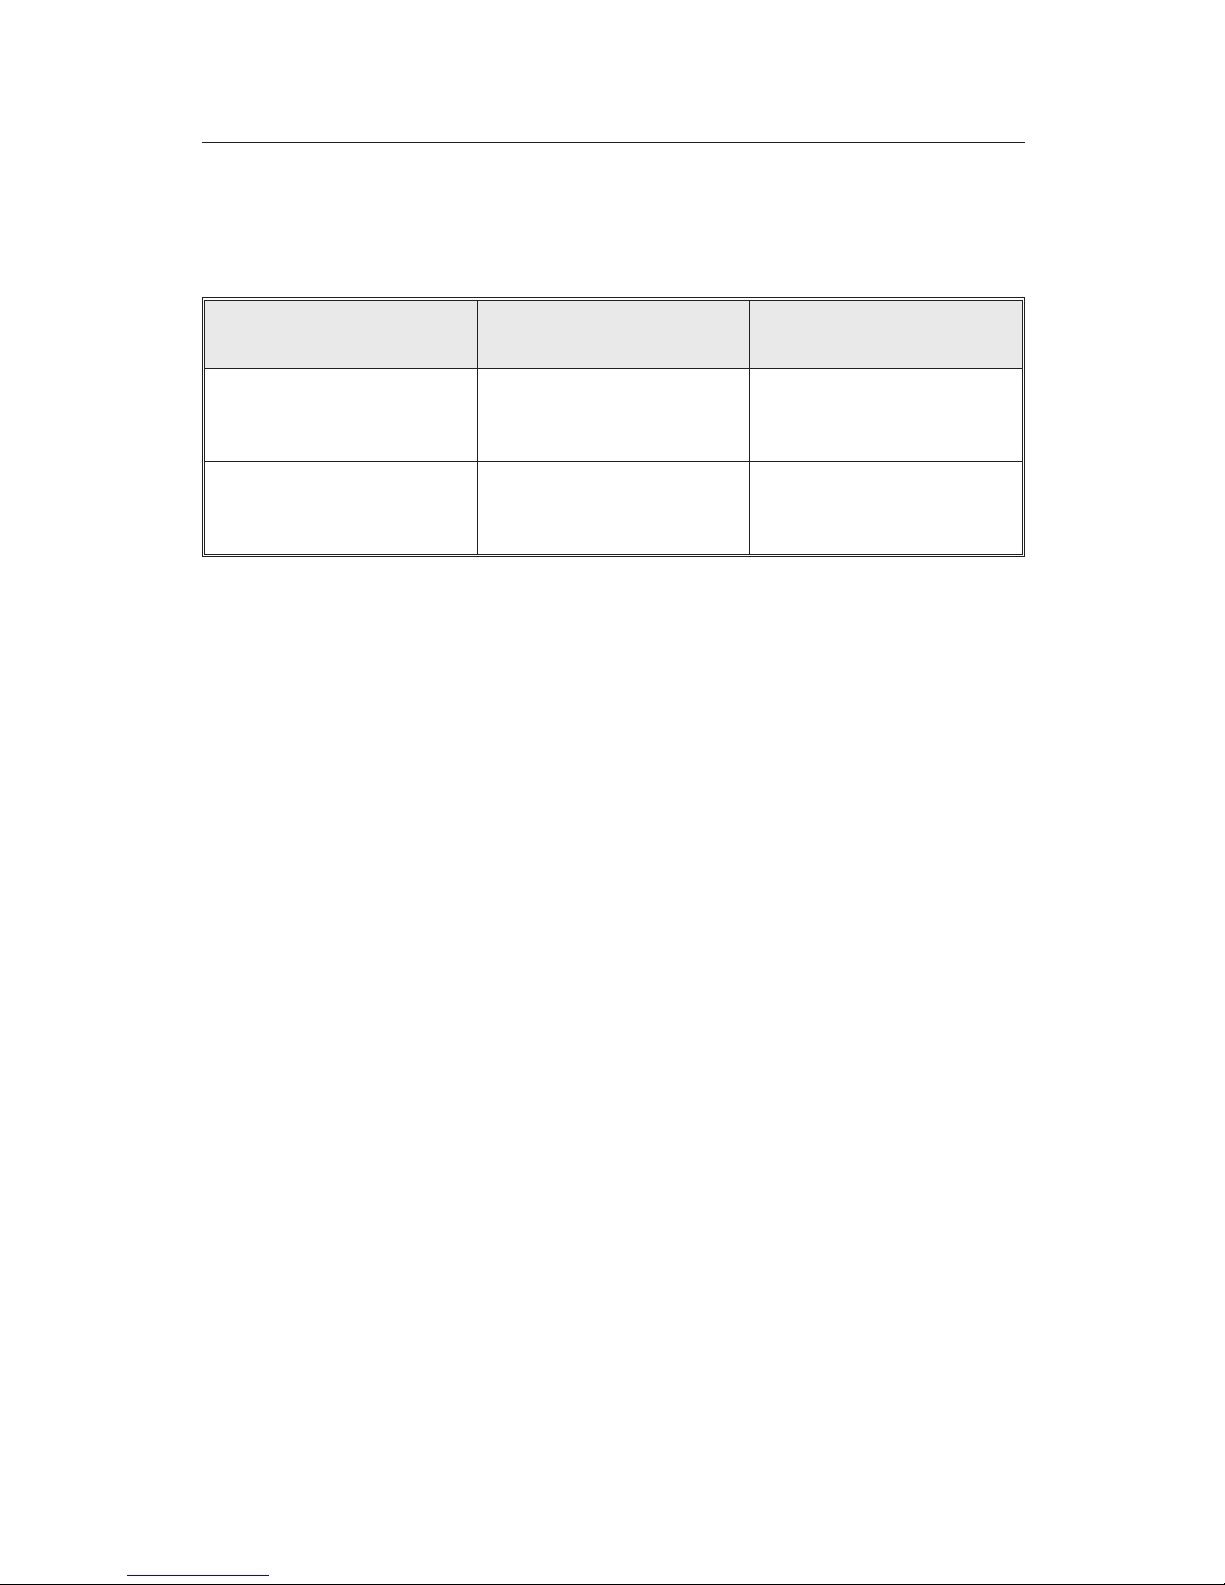
Select “Time zone”, and press the OK key. Increase or decrease the
u
value using the cursor keys . Confirm by pressing the OK
key.
Time zone Standard time Daylight saving time
Central European Time
+ 1:00 + 2:00
(Paris, Berlin)
Greenwich Mean Time
0:00 + 1:00
(London)
Device configuration
If a multimedia box, a TV tuner or a reversing camera is installed, the
respective option “Multimedia box connected”, “TV Tuner connected” or
“Rear view camera connected” must be activated. To switch options
on/off:
Select “General settings” in the “Settings” menu. Press the OK key.
u
u Select “Device config.”. Press the OK key.
u
Move the cursor to the desired option. Press the OK key to toggle
between active and inactive. When the “Multimedia box
connected” and/or “TV Tuner connected” options are active, the
function “TV/Video” will be displayed in the Start menu. This can
be used to switch from navigation to multimedia operation.
(Operation, ref. Operating Manual of the Multimedia box and the
TV tuner).
u
If a CI 3000/MG 3000 is connected this will be detected
automatically and will be shown here as activated. It does not
have to be selected.
u
Select “Store”, and press the OK key.
If the rear view camera has been connected correctly, and the setting
“Rear view camera connected” selected, the image from the reversing
camera will be displayed automatically, as soon as reverse gear is selected.
When the system is started the change-over to the reversing camera may
be subject to a delay.
25
Page 26

GENERAL INFORMATION
Shut-Down timer
You can determine how long it takes for the system to shut down. This
means that when making short stops, it is possible to maintain the current
device status for up to 10 minutes. The system will only switch itself off
after this time has elapsed. The monitor will always switch itself off
immediately.
Select “General settings” in the “Settings” menu. Press the OK key.
u
Select “Shut-Down timer”. Press the OK key.
u
Press the OK key, then press the buttons on the remote
u
control to set the shut-down timer (in minutes).
Confirm by pressing the OK key.
u
Please remember that the load on the car battery increases when the
multimedia system is used with the engine switched off. Therefore use
the timer function sparingly.
System configuration
The “System config.” menu provides the following functions:
“Diagnosis”: for the analysis of hard and software problems (code
•
protected – only for authorised service personnel).
“Default settings”: to restore the factory settings in place of the
•
options selected under the “Settings” menu (see next paragraph).
•
“Configuration”: Software and hardware data for service purposes.
•
Speed correction: to set the average speed, which is used to calculate
the estimated time of arrival and the remaining travel time.
u
Select “System config.” in the “Settings” menu. Press the OK key.
u
Select “Speed correction”, and press the OK key.
u
Press the cursor keys to correct the speed and press the OK
key.
26
Page 27

GENERAL INFORMATION
Info Points
Different providers of travel and traffic information have optimised these
specifically for navigation systems. This includes information about fixed
speed camera installations or other safety relevant information (e.g.
schools, kindergartens, etc.) and places of interest to tourists. If a user has
activated such information by means of a C-IQ access code the Info Points
function can be switched on or off.
Select “Info Points” in the “Settings” menu. Press the OK key.
u
Activate þ or deactivate ¨ “Alert near points of interest” by
u
pressing the OK key. If an audible message can be activated, a
speaker symbol will also be shown.
Select “Store”, and press the OK key.
u
Using the Info Points function in conjunction with the fixed speed camera
information will help you increase your awareness as you drive through
areas which have been classified by the authorities as particularly relevant
to safety. Although every care has been taken, comprehensive coverage
cannot be guaranteed.
27
Page 28

GENERAL INFORMATION
Default settings
This function is used to reset all settings to the factory default values.
Select “System information” in the “Settings” menu. Press the OK
u
key.
Select “Default settings”, and press the OK key.
u
Select “Yes” or “No”, and press the OK key.
u
Settings for Factory-adjusted value
Time zone 0
Time format 24-hour format
Date format Day.month.year
Measuring units Km/m
Audible info. On
Volume Middle position = 0
SDVC Off
Day colour Blue
Night colour Dark blue
Map colour Automatic switching
Map mode Northwards
Status line left Remaining travel time
Status line right Estimated time of arrival
Status line top TMC
Route criteria Fast
Minimize toll roads Deactivated
28
Page 29

GENERAL INFORMATION
Settings for Factory-adjusted value
Minimize ferry usage Deactivated
Minimize tunnel usage Deactivated
Traffic info Activated
Re-routing level Medium
Delay time Low
Automatic mode Off
Speed correction 100%
Info Points Deactivated
Device config. Multimedia box deactivated
TV tuner deactivated
Rear view camera deactivated
Remote control RC 5400
29
Page 30
NAVIGATION
Destination input
The following types of destination input can be used:
Direct address input, including postal code, Quick Access (QXS) and List
•
Input of special destinations
•
Transfer from the address book
•
Entry by means of the destination map
•
Input of co-ordinates
•
Transfer from the travel infos
•
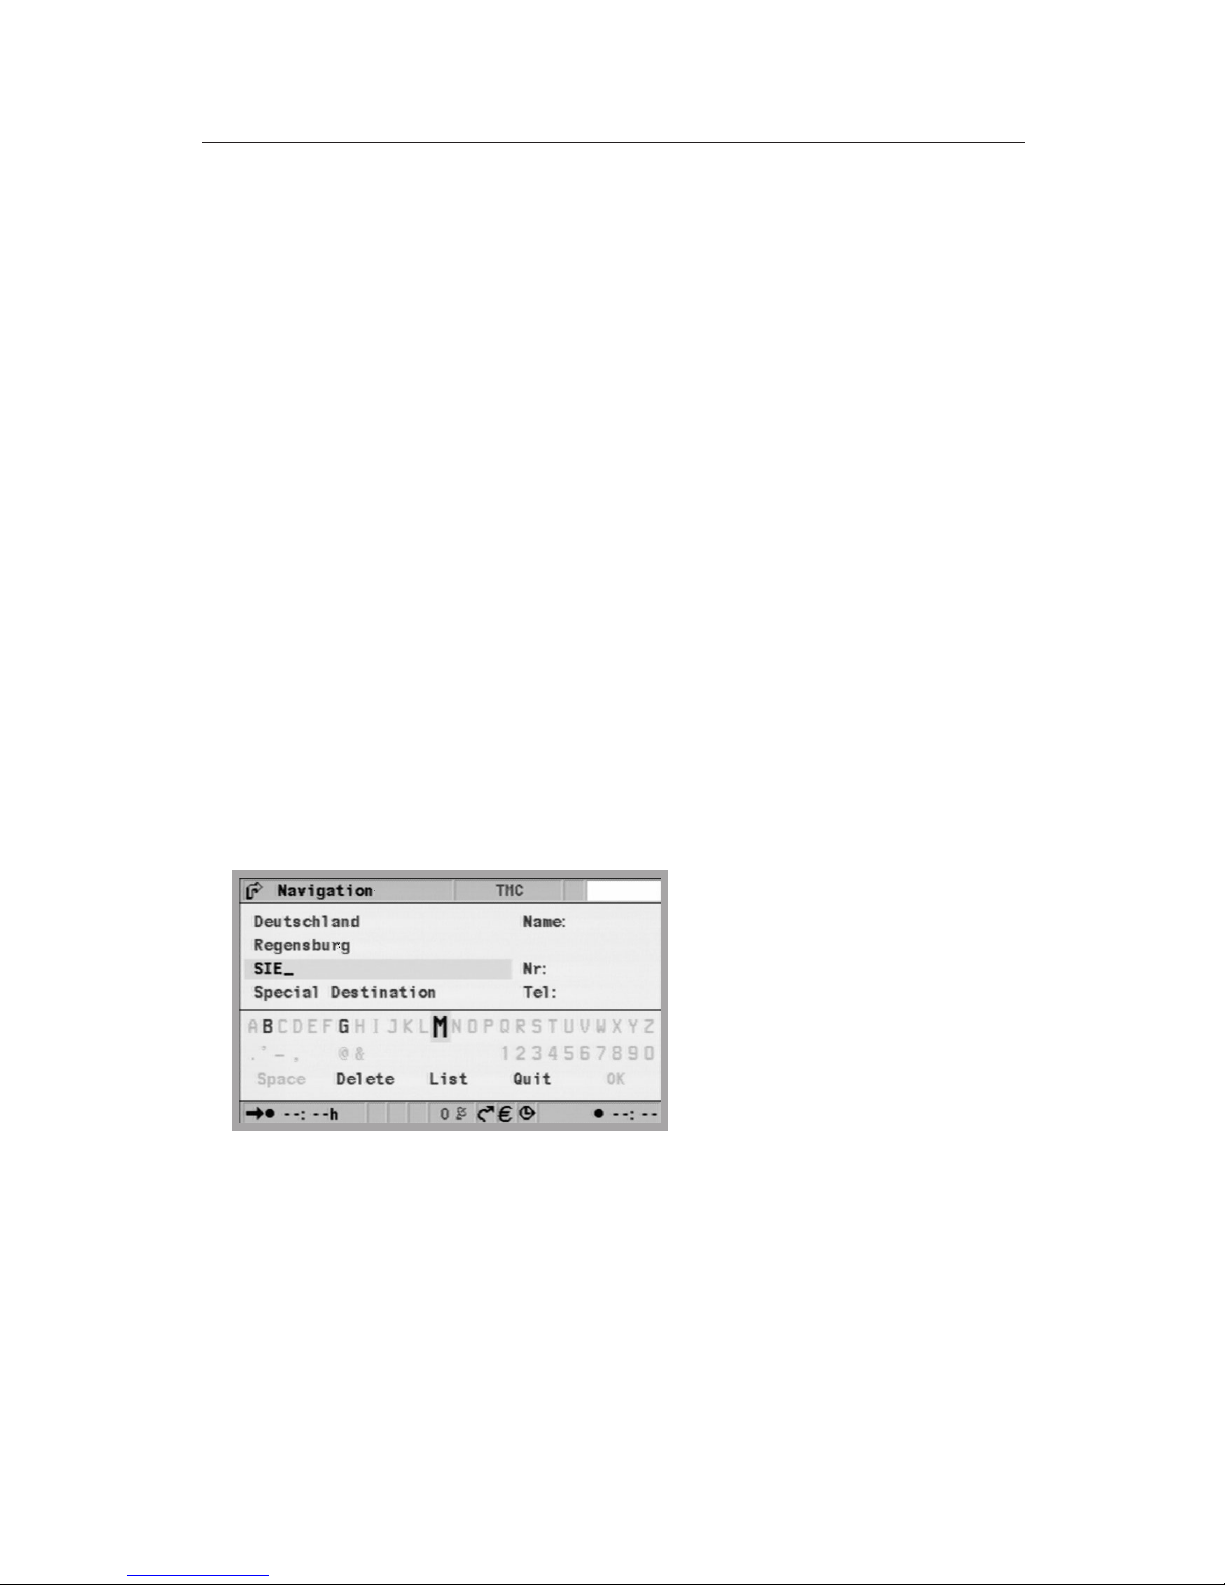
Direct address input
Select the option “Navigation” from the ”Start menu”. Press the
u
OK button
Using the keypad, enter the destination address under ”Country:”,
u
City/ZIP:”, ”Road:” and if required, ”Special Destination”, and, if
available, the ”Nr:”. Confirm each letter with the OK button. Enter
“Name” and ”Telephone” if the destination is to be stored. (See
chapter Address book)
To enter a blank, select ”Blank” and confirm with the OK button.
u
The character last entered can be deleted with ”Delete”, the
complete line with ”Quit”.
Character sequences for which no names exist cannot be selected. If a
character sequence is clear, the input is automatically completed.
After inputting the postal code, use ”List” to display all corresponding
parts of town. Select the desired location and confirm with OK. The town
name is also sufficient for a destination. The navigation system will then
route you to the town border. A unique input is made by means of the
postal code and the town name. Please note, however, that the
availability of postal codes depends on the data stored on the map
CD/DVD.
30
Page 31

NAVIGATION
Function “List”
If several towns or streets with the same name are available, the function
“List” automatically displays all options with additional information.
Select the desired town and press the OK button.
u
The list of all suitable names can be displayed at any time using the
function “List”. If no letter is entered, the list will start with the first entry
alphabetically. The desired entry can be selected from the list. It is
possible to leave the list display without selecting a list entry by choosing
“Quit” from the list, or by pressing cursor button .
Special Destination
“Special Destination” can be used for the following entries:
Points of interest: Interesting or useful locations, the addresses of which
•
are already stored on the CD/DVD. These include petrol stations,
workshops, hospitals, airports, etc.
Junction: if town and street are already entered
•
All streets: Enter street name without town name. Quick Access,
•
practical for infrequently occurring street names. Please note that this
function depends on the map CD/DVD used.
Points of interest
In the “Navigation” menu select the option “Special Destination”.
u
Press the OK button.
u
Select “Points of interest”. Press the OK button.
u
Select: “Close to car” if you wish to be routed to a destination
close to the current vehicle location. “At destination”, if you wish
to be routed to an address within an already entered destination
town. “National importance”, if you wish to select a destination of
national significance.
u
Press the OK button.
u
Select the required category. If necessary, scroll with the cursor
buttons and , to display the desired categories outside the
screen area. Press the OK button.
u
Select the desired address. Press the OK button.
u
Select “Guidance”. Press the OK button.
31
Page 32

NAVIGATION
In the case of map DVD/CDs featuring additional travel information about
points of interest, the line “Quit” in the list display will show an “i”. If
additional information is available, this will be indicated by a
provider-specific letter (e.g. “v” for Varta). Press the cursor button , to
display this additional information. (see also chapter Travel info)
If the route to the actual destination is to be interrupted e.g. by a trip
t
to a petrol station, enter the interim destination via “Via points”.
Junction
For longer destination streets, it might be sensible to enter a junction:
In the “Navigation” menu select the option “Special Destination”.
u
Press the OK button.
Select ”Junction”. Press the OK button.
u
Enter the junction using the keypad (see direct address input) or
u
the list (see list input).
All streets (Quick Access)
In the “Navigation” menu select the option “Special Destination”.
u
Press the OK button.
Select “All streets”. Press the OK button.
u
u Enter the street name (see direct address input), press the OK
button.
This input only makes sense for street names that do not occur too
frequently. If a frequently occurring street name is entered, the cursor
will automatically move to “Quit”. In this case, first enter the town name.
If there are a reasonable number of towns with this street, the cursor will
move to “List”.
u
Select the desired town and press the OK button.
u
Select “Guidance”. Press the OK button.
32
Page 33

NAVIGATION
Address book (see also chapter Address book)
If the desired destination address is already in the address book, or
happens to be one of the last 20 destinations entered, the address can
easily be used as a destination address:
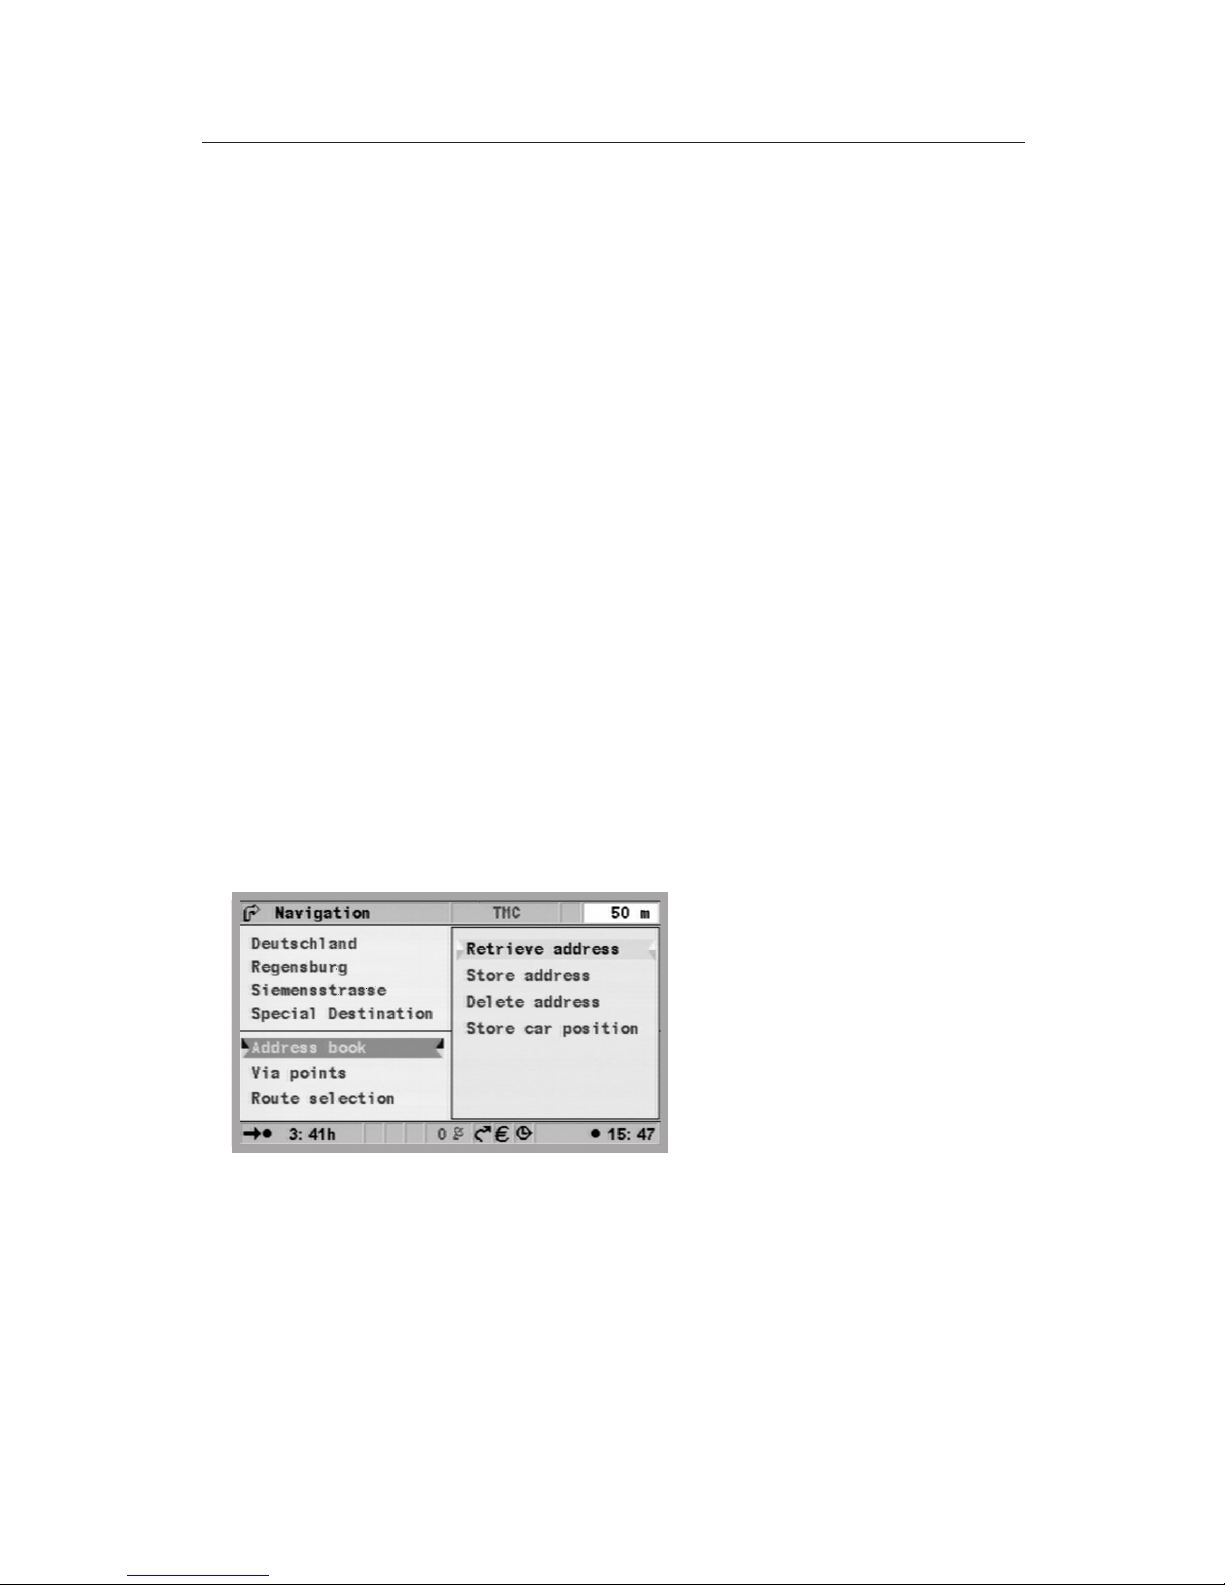
In the “Navigation” menu select the function “Address book”,
u
press the OK button.
Select “Retrieve address”, press the OK button.
u
Select the address book category, or the destination memory
u
containing the last 20 destinations by means of “Prev.
destinations”. Press the OK button.
Select the desired list entry. Press the OK button.
u
Choose “Quit” from the list or press the left cursor button to leave the list
display without selecting one of the list entries. If maps from different
providers are used it may be necessary to adapt the stored addresses.
Destination map
The destination map can be used to enter a destination by means of:
Cursor
•
Co-ordinates
•
Cursor
If the destination is not in the vicinity of the vehicle location, first
enter the destination as accurately as possible using the keypad (see
Direct address input).
u
In the “Navigation” menu select the option “Destination map”, or
u
press a cursor button if the map is already being displayed. The
destination map is displayed featuring a cursor. The cursor marks
the current vehicle location if no destination data has been
entered.
u
Use the cursor buttons to move the cursor.
u
Press the OK button, select ”Store”, and press the OK button
again, so that the system accepts the position as a destination.
t
First select a large scale for an approximate destination definition. Then
choose a smaller scale to mark the destination accurately with the
cursor. Destinations which are not in the digitised map area can also be
selected. Ensure that correct side of the road is selected when targeting
a destination on motorways.
33
Page 34
NAVIGATION
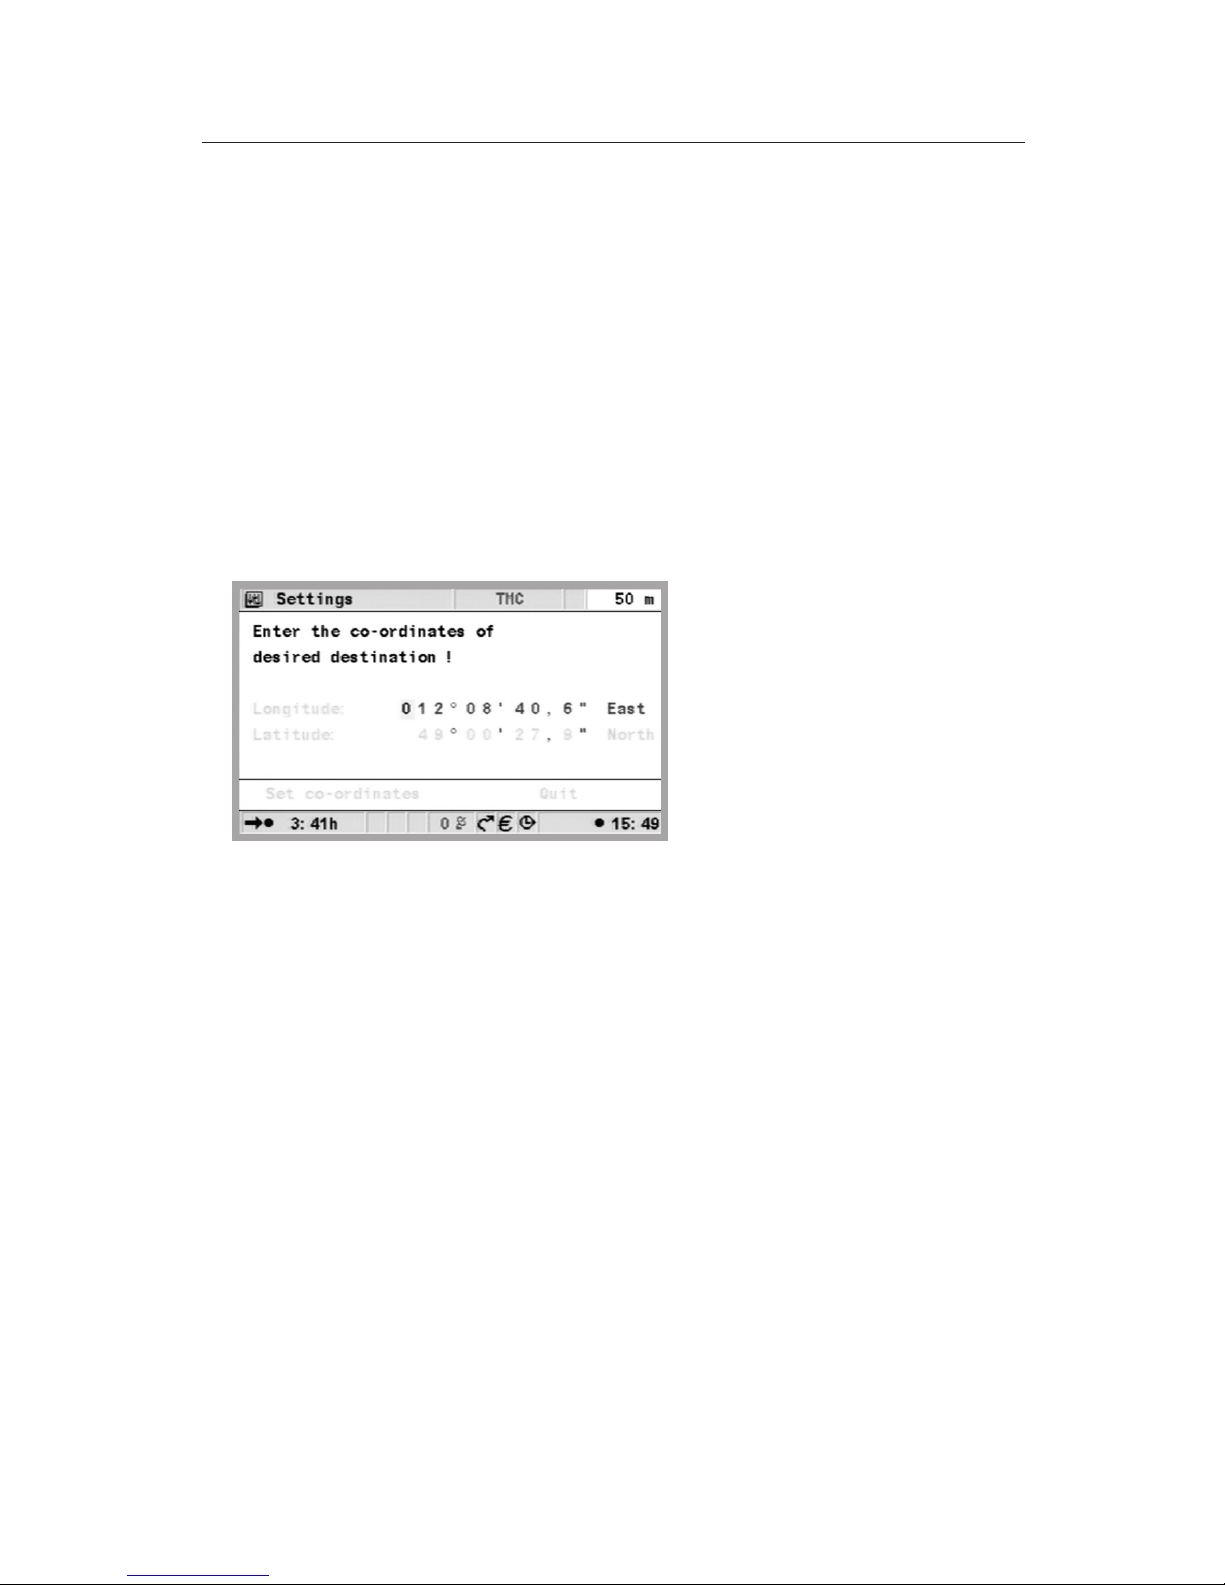
Co-ordinates
Select “Destination map” under ”Navigation”. The map with the
u
cursor will be displayed. Press the OK button.
Select “Co-ordinates”, and press the OK button.
u
Select “Longitude” or “Latitude”, press the OK button.
u
Define each digit with the cursor buttons on the remote
u
control and confirm with OK. Should you wish to skip a digit, press
the OK button.
Select “Set co-ordinates”, press the OK button.
u
To start navigation press the OK button, select “Return”, select
u
“Guidance” and press the OK button again.
Via points (intermediate destinations)
Should you wish to drive to other locations on your way to your
destination, these can be entered as via points. The navigation system
then plans the route to include the via points according to their order of
entry before the destination address is reached. Once a via point has been
passed it is automatically deleted from the list. A maximum of 25 via
points can be stored.
u
In the “Navigation” menu select the function “Via points”. Press
the OK button.
You can enter the via points in the same way as destination addresses
(see above sections). Use “Return” to return to the “Navigation” menu.
If a via point is active, all route information such as distance or travel time
relates to that via point.
34
Page 35
NAVIGATION
Storing a via point
Select “Store via point” and press the OK button.
u
Deleting via points
Select “Delete via point” and press the OK button. A list of the
u
stored via points appears.
Select the via point to be deleted and press the OK button. A
u
popup menu with the entry appears.
Select “Delete” and press the OK button, if you wish to delete the
u
displayed via point from memory.
Select “Quit” and press the OK button, if you do not wish to
u
delete it.
Should the memory already contain 25 via points, a note is displayed
stating that no further via points can be stored. Press the OK button.
Should you wish to enter a new via point, one of the previously entered
via points must be deleted.
If all via points are to be deleted, it is possible to delete the destination
t
along with all via points under ”Navigation”.
Stop guidance
If you are in one of the guidance screens, guidance can be stopped at any
time.
u
Press the OK button, select the option ”Stop guidance”, and press
the OK button.
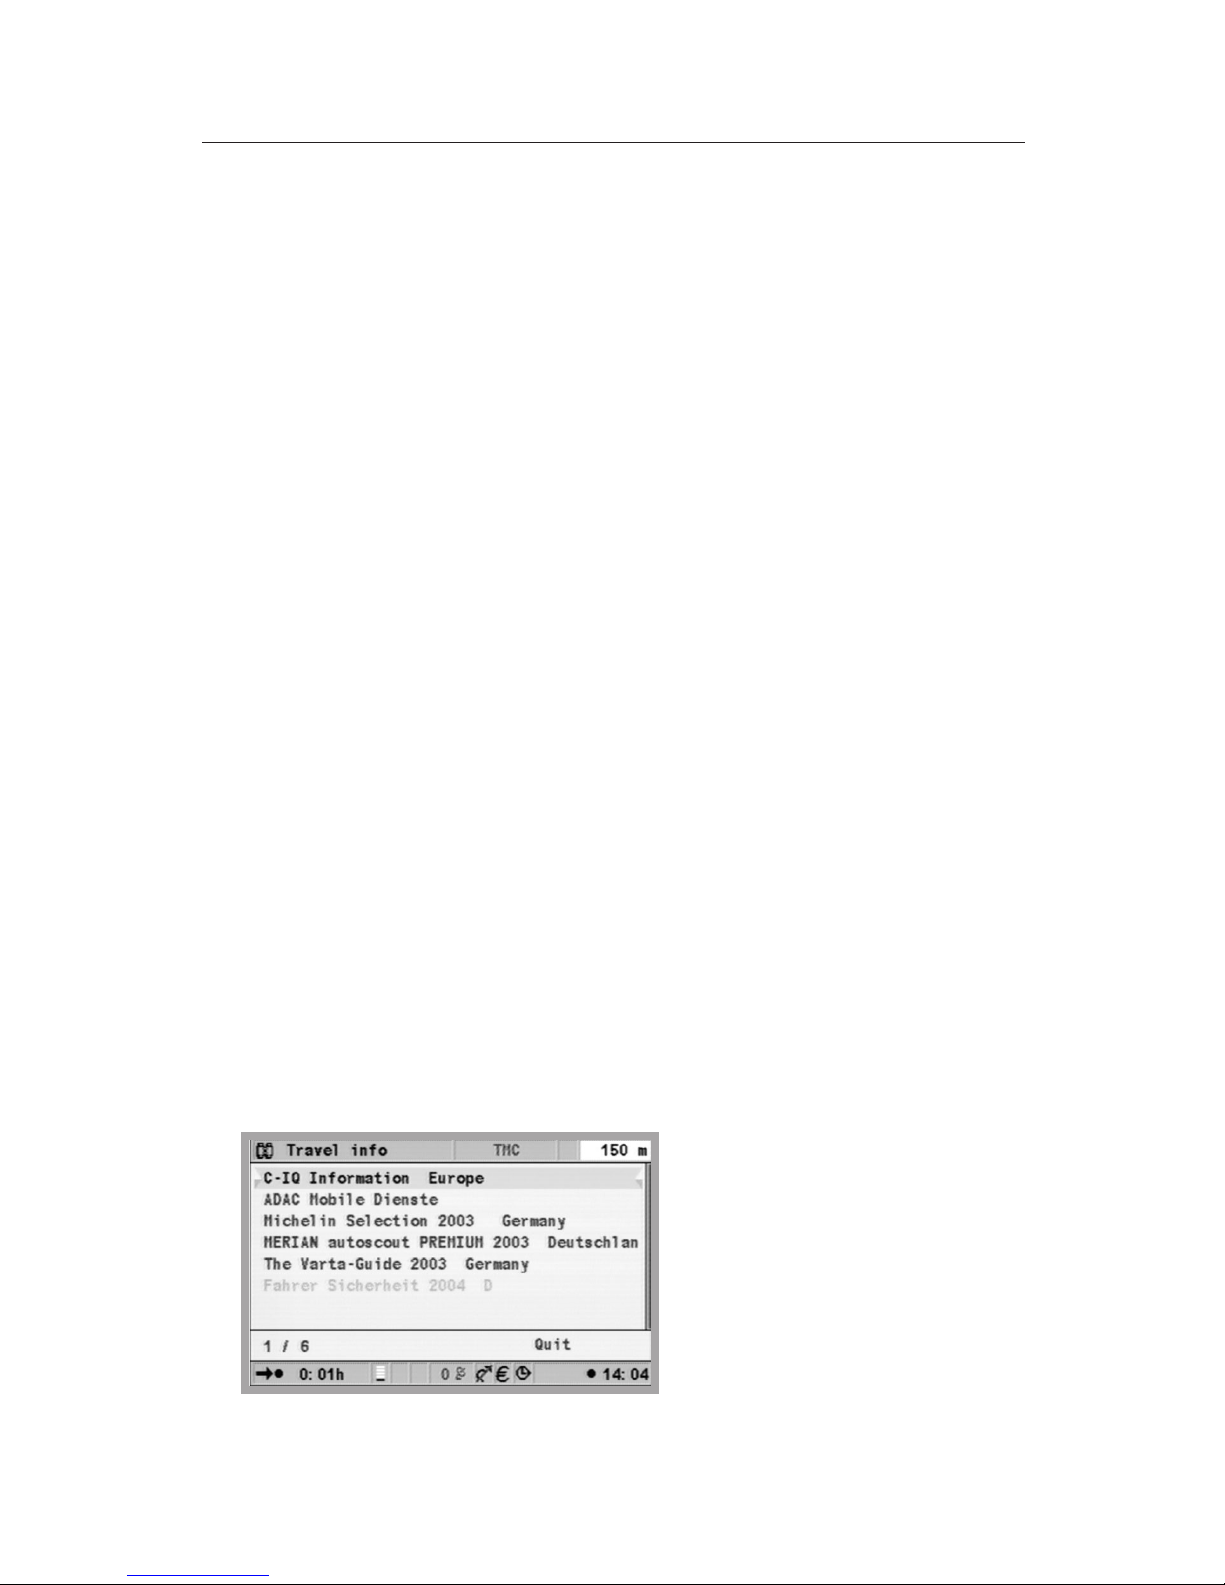
Travel info
In the start menu, the button “Travel info” can be selected, if this
information is available on the DVD/CD, and if you have activated at least
one provider of travel guide information (see also chapter C-IQ - your key
to map, traffic and travel information). This button can be used to select
35
Page 36

NAVIGATION
this or any other provider of travel guide information. Following this
define the search option. The following can be selected:
Search at destination
•
Search close to car (current location)
•
Search near a city (enter the city name via the keypad)
•
Search near via point
•
To narrow the search, this may be followed by a multistage query,
presented in the form of lists, from which the respective subcategories
can be selected. The option “Go to the homepage” (if available), can be
used to access the homepage of the respective provider directly.
The link colours used on the travel info pages may vary from one source
t
to another. To activate the selected link, simply press the OK button.
See also page 14 for the preview function, which you can use to test
travel info products.
Points of interest
For map DVD/CDs with activated travel guides to points of interest, an “i”
is displayed additionally in the “Quit” line of the list display. If additional
information about the facilities in the list display is available, this is
indicated by a provider-specific letter (e.g. “v” for Varta).
Press the button to display this additional information.
u
u
Use cursor buttons and to select the detail view. If “Links” are
available, the desired link can be marked using cursor buttons
and . Press the OK button.
A list with the following functions is displayed:
•
“Return:” Return to the list display for points of interest.
•
“Activate:” Jump to the information in accordance with the previously
marked link, or accept the marked facility as destination address.
•
“Previous:” display previous page.
•
“Next:” display next page.
•
“History:” Select page from a list of previously viewed pages.
The function list is automatically closed after several seconds, if no
function is selected. If no additional information is available, simply select
the list entry in the category.
u
Select the desired facility and press the OK button to open the
function list.
u
Select “Activate”, and press the OK button.
u
Select ”Guidance”, and press the OK button.
36
Page 37
NAVIGATION
Points of interest cannot be selected if the location has been entered
t
via its postal code.
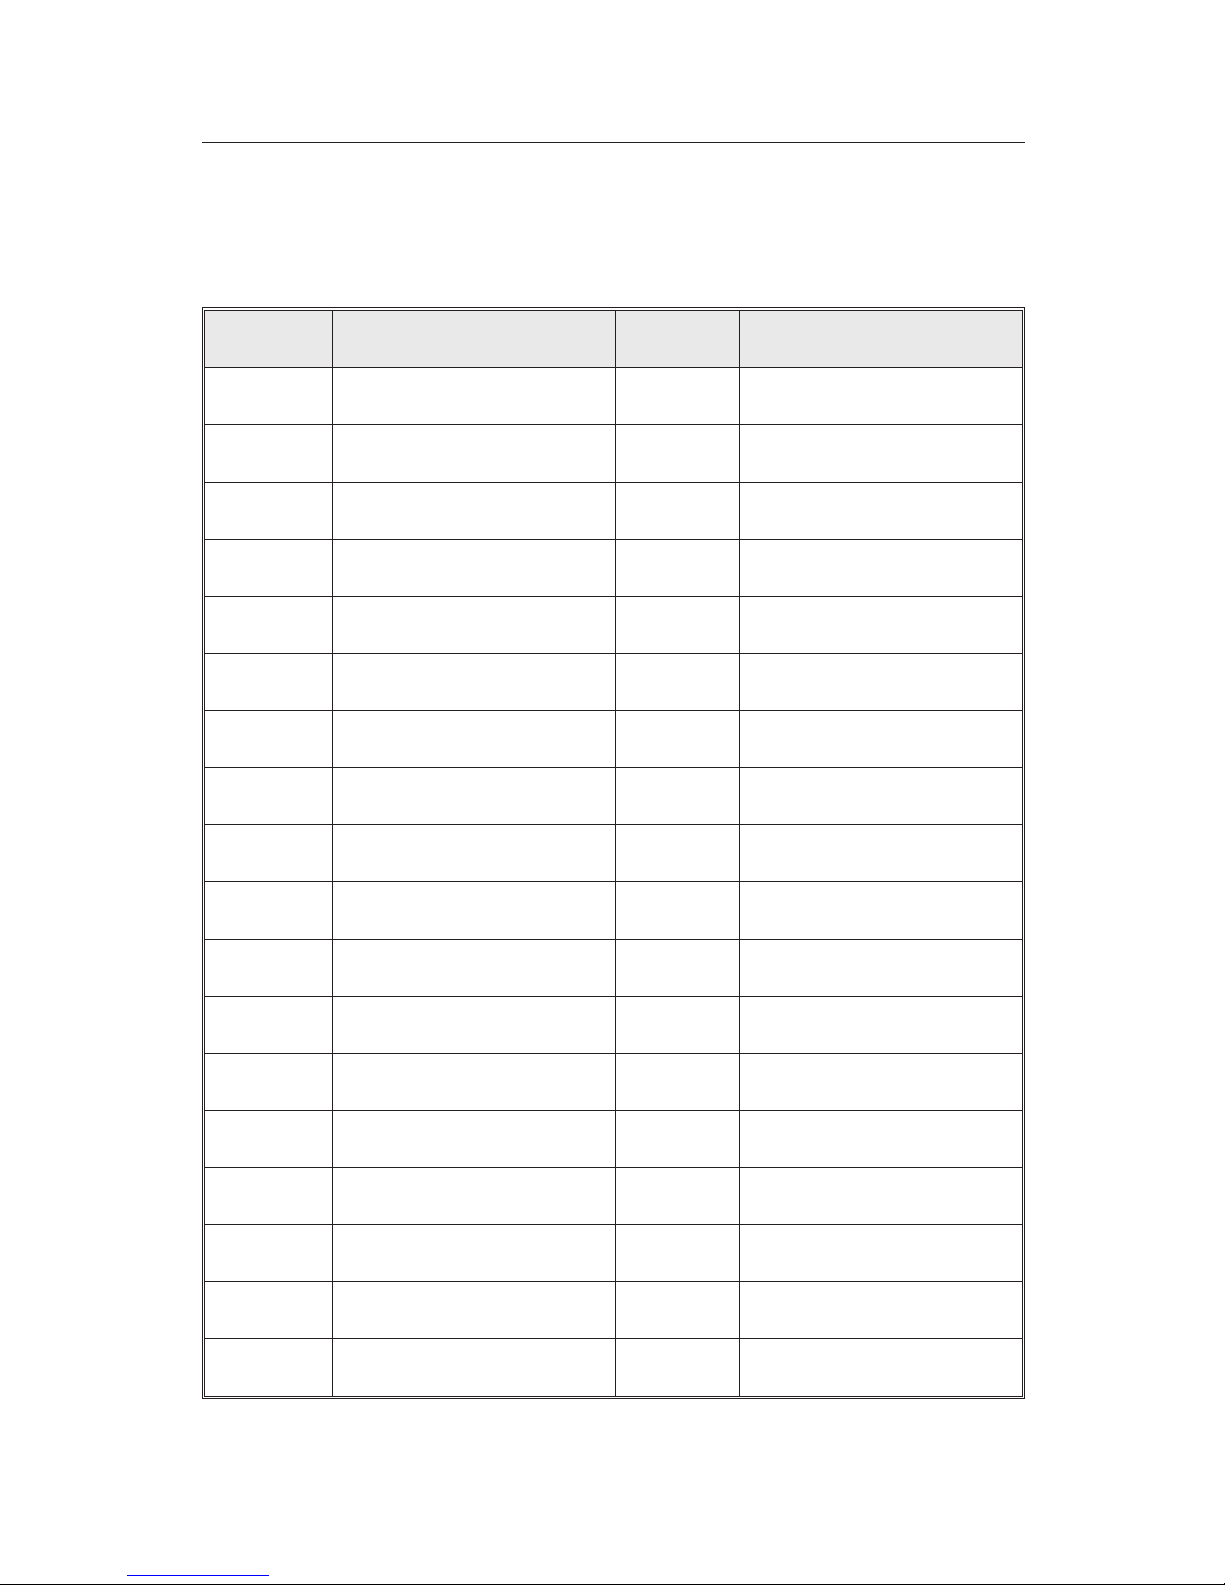
Travel symbols
Symbol Meaning Symbol Meaning
A Chemist m Marina
! Exhibition centre & Cinema
% Automobile club [ Place of worship
c Car rental company J Clinic
r Car repair H Hospital
e Railway station k Cultural centre
$ Bank n Military base
G Council office M Museum
o Library R Park + Ride
L Education p Park
O Embassy P Car park
Q Bus station B Police
D Monument b Post office
S Shopping centre q Services
F Ferry E Restaurant
f Fire station x Tourist attraction
a Airport X Sports centre
I Tourist information C City centre
37
Page 38
NAVIGATION
Symbol Meaning Symbol Meaning
u ATM T Petrol station
] Community centre U Theatre
g Court house y Entertainment
Y Golf course V Amusement park
h Hotel Z Destination
i Industrial estate
Screen displays
With guidance activated, switch between the various guidance screens by
pressing the MAP or Navigation button.
Guidance display
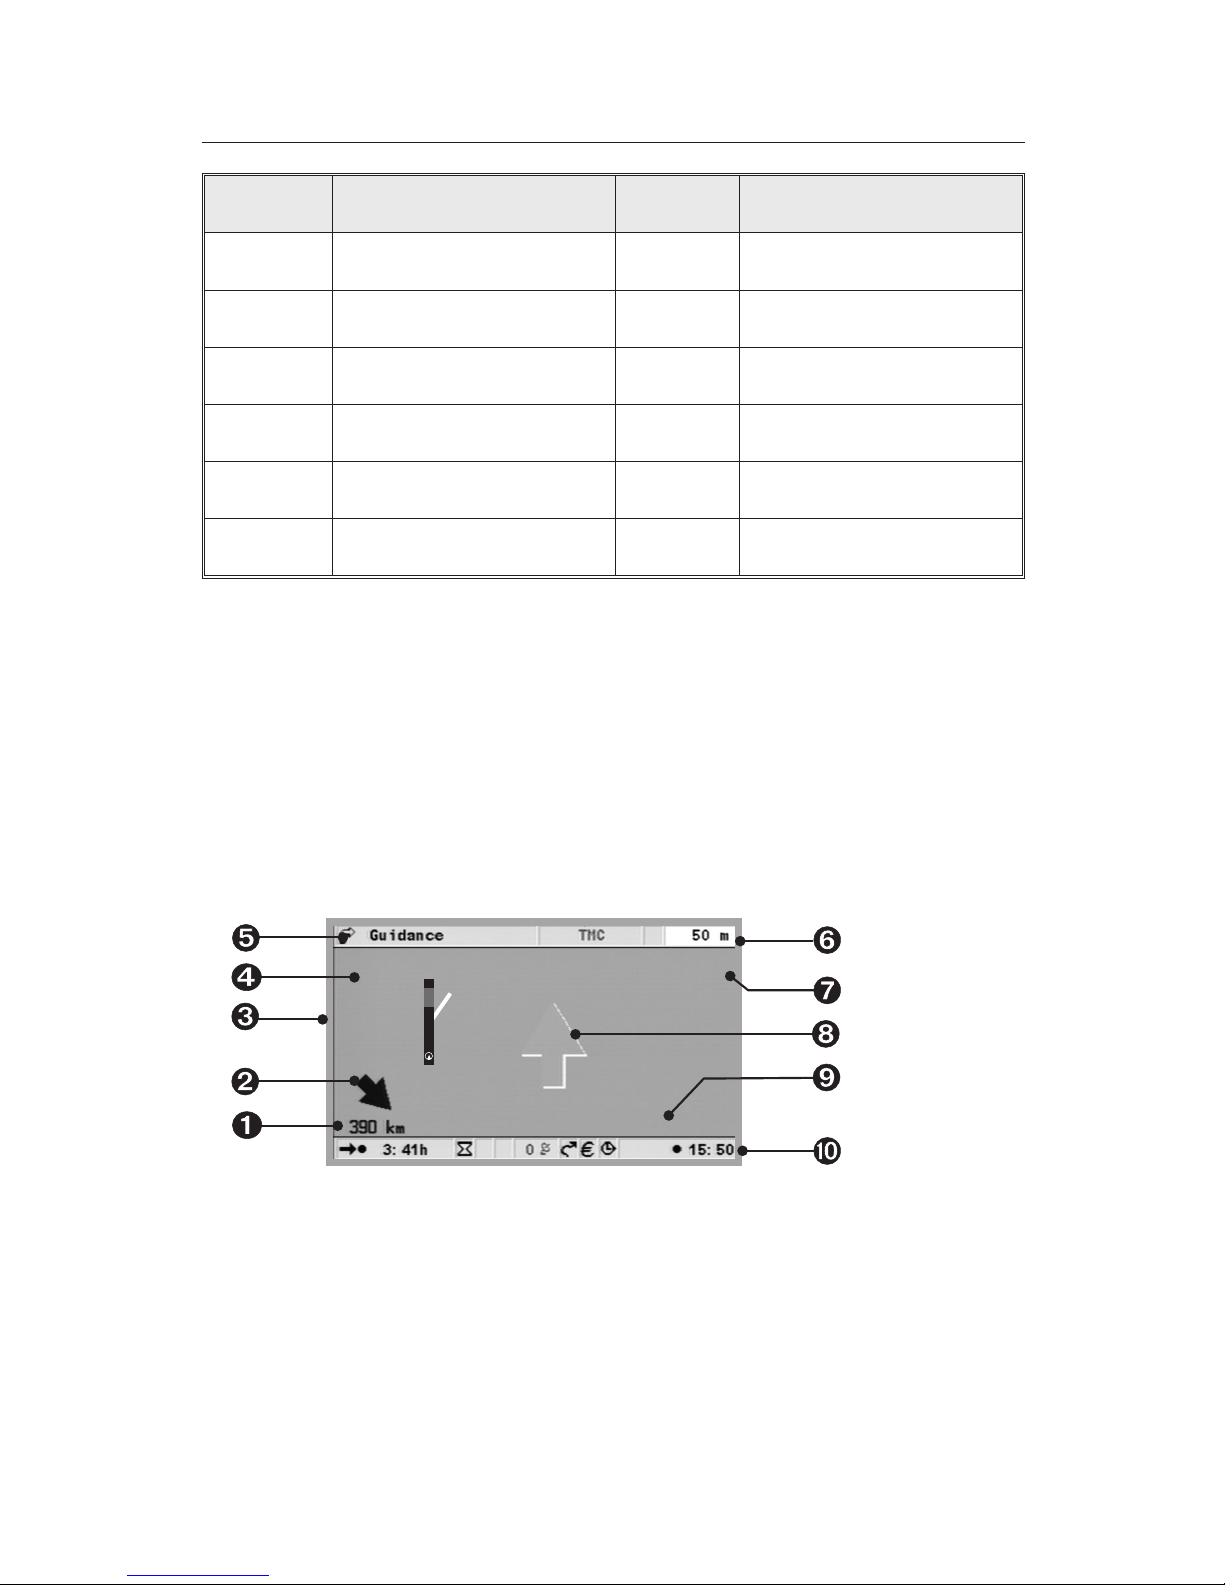
Once “Guidance” has been activated, the system will plan the route. This
may take several minutes. In the meantime, the first set of guidance
information will be displayed by means of the guidance display. This will
include the following information.
Gambacher Kreuz
J
14 km
d
34 km
A 45, Linden

Distance to destination or to next via point.
·
Directional arrow pointing to the destination as the crow flies.
¸
Distance to a road obstruction from the vehicle’s position, possibly
including the length of the obstruction.
38
Page 39
NAVIGATION
TMC symbol for the next road obstruction on the planned route (only
¹
with TMC source connected and TMC traffic information available).
Menu name
º
Distance to the next change of direction.
»
Name of the street to turn into (next change of direction).
¼
Directional arrow for next crossing or junction.
Ñ
Current location of the vehicle: Street name, town name and district, if
Ò
available on the map DVD/CD.
Status line (see also chapter Settings)
Ó
Map display
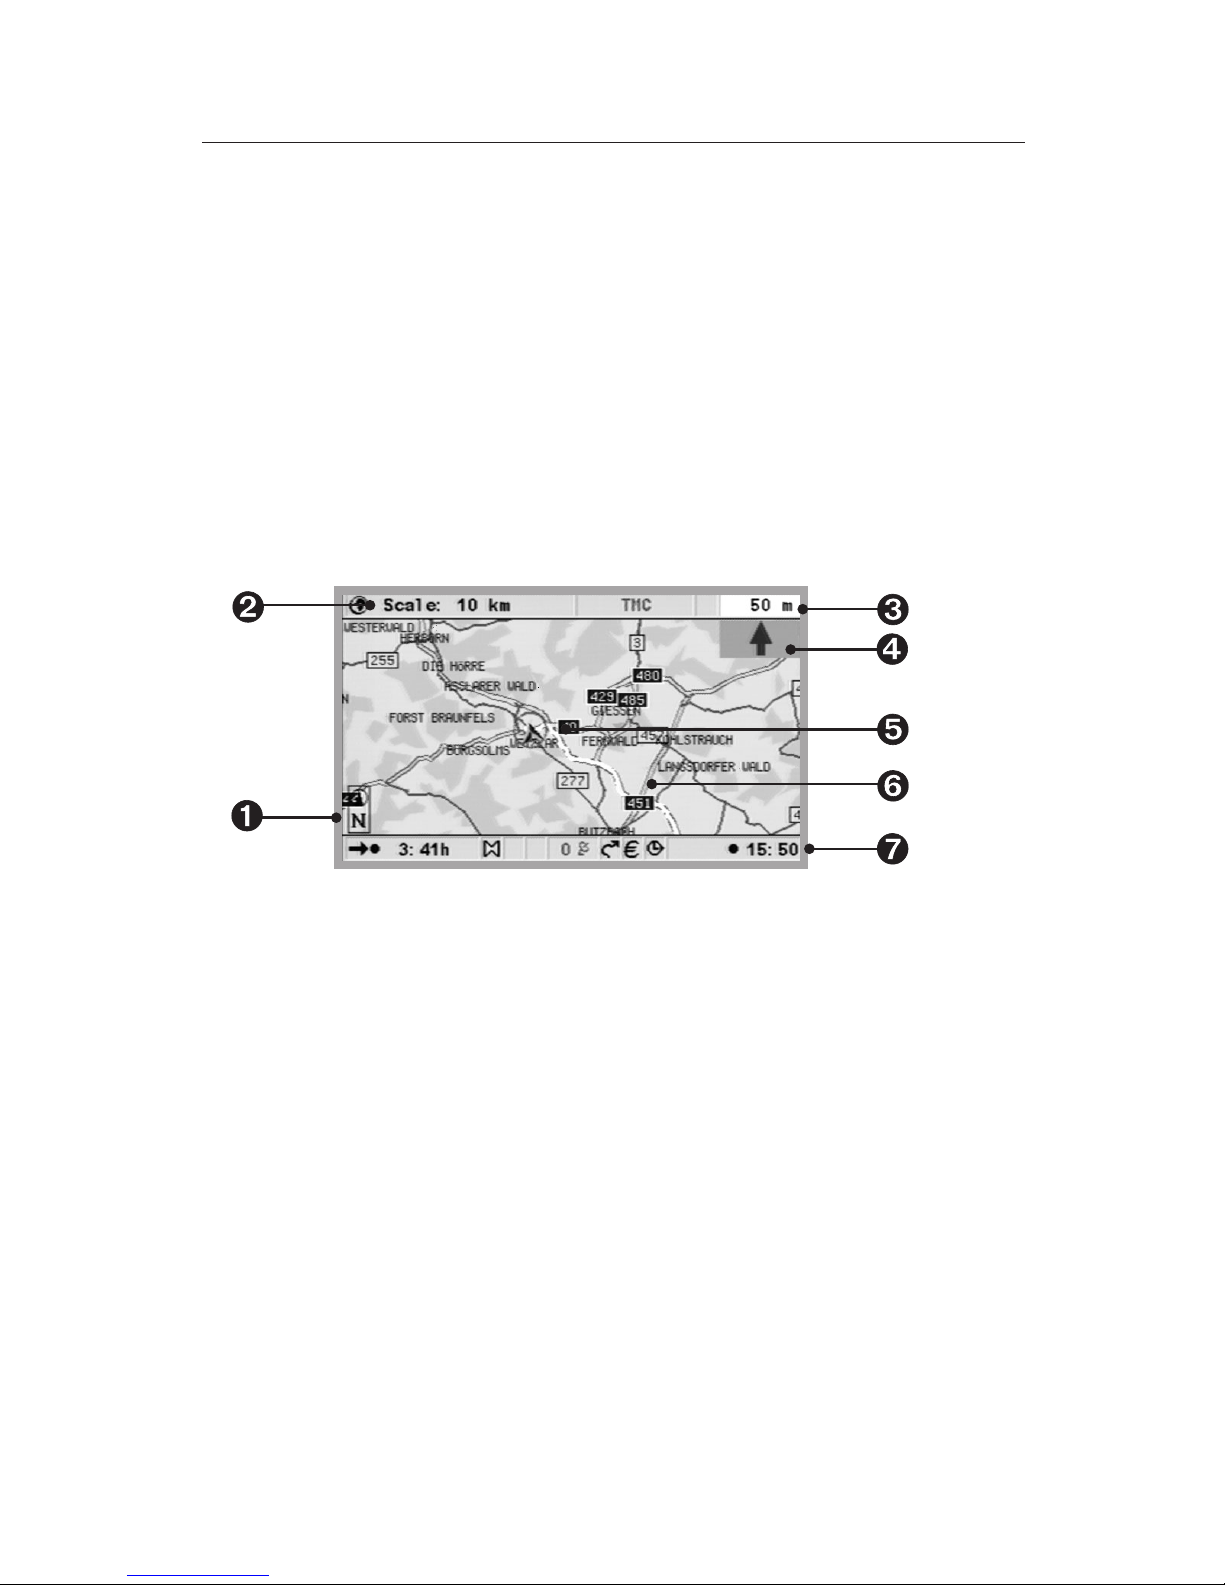
The map display can be selected when guidance is active, by pressing the
MAP or Navigation button, or by selecting ”Map” in the “Start menu”.
7
J
Ê
Compass: The arrow in the circle points north.
Ë
Selected scale
Ì
Distance to the next change of direction.
Í
Simplified graphical presentation of the direction of travel, the next
crossing or junction.
Î
Vehicle position, arrow indicates current direction of travel.
Ï
TMC symbol for the next road obstruction on the planned route (only
with TMC source connected and TMC traffic information available).
Ð
Status line (see also chapter Settings)
Split screen
This screen display combines both of the display types previously
described. Road obstructions are not shown in this display mode.
39
Page 40

NAVIGATION
Guidance in non-digitised areas
If the specified destination is not located on a digitised road, the
directions will take you to the position (linear distance) closest to the
destination. The display shows the note “The destination is outside the
digitised map area”. In all display modes, rather than being provided as
directions, guidance takes the form of an arrow which points to the
destination.
Guidance in partly digitised areas
In rural areas and in small townships not all the streets may be stored on
the map DVD/CD. Whenever you leave a digitised road, the guidance
screen changes. The system automatically switches from the guidance or
the split screen display to the map display.
Instead of the usual guidance information, an arrow which points in the
direction of the destination is now shown at the top right. The distance
(linear distance) to the destination is shown underneath. This can also
occur in areas with complete digitisation, as not all parking areas are
digitised, for example.
Audible messages
As soon as guidance is activated, acoustic routing information is provided
in addition to the symbols on the guidance screens. You didn’t hear the
information?
u Press the { or VOICE button on the remote control. The last
direction is repeated and/or updated driving directions are
provided.
If the symbol l is shown in the status line, the audible information is
switched off. It can be switched on again using the “Settings” menu or
also by pressing button + or - on the remote control.
Plan Alternative Route
During guidance it is possible for the navigation system to plan an
alternative route to cover a distance which you can select. Use this
function, e.g. if you wish to avoid stationary traffic, or if you do not agree
with the current routing. The alternative route will be calculated for the
specified distance from the vehicle’s current location.
u
Press the ALT-R button. The system now displays the ”Distance”
for which the alternative route is to be planned. This can be set
from 1 to 50 km.
u
Select the value after “Distance:”, and press the OK button.
40
Page 41

NAVIGATION
Set the value with the aid of the cursor buttons and .
u
Press the OK button.
Select the option “yes”, and press the OK button.
u
Use ”Return” to return to the start menu.
u
TMC traffic information
Your Navigation System processes TMC traffic information, provided a
TMC expansion, e.g. the MT 5010, is connected, and the TMC data is
supported in this region by the map DVD/CD. This is generally the case if
TMC traffic information is broadcast in a country (meaning that it can
therefore also be received) and you have a current map DVD/CD.
You have the option of adapting the TMC service to your own
requirements. Details can be found in the chapter Settings under dynamic
route, route criteria and traffic inform. Urgent traffic reports, however,
cannot be switched off. If an expansion is connected, and TMC can be
received, the TMC status is shown in the status line of the screen.
“TMC” = green TMC information is available. Alternatively
the name of the provider may be displayed.
“TMC” = black No TMC database on the CD/DVD for the region
or data not active for navigation (see C-IQ).
”T” = red Traffic information for the planned route is
available.
“T” = green Less than 50km to the road obstruction
on the planned route. Deviation is possible.
“T“ = orange Accepted or bypassed traffic jams on the
original route.
“TMC” = red TMC reception distorted/no TMC transmitter
selected.
41
Page 42
NAVIGATION
Pay TMC
In some countries or regions extended TMC information might be
available for an additional charge. These Pay TMC services are supported
by your navigation system and are activated via the C-IQ service
(www.C-IQ.net or 00800 99 33 33 33). You can see from the station list in
the Info menu whether a Pay TMC station is available in your current
region. Pay TMC stations are generally identified by a coin. If you have
activated a Pay TMC service and this station is temporarily unavailable, in
the case of the TMC receiver MT 5010 the system automatically switches
to an available free station until reception is restored.
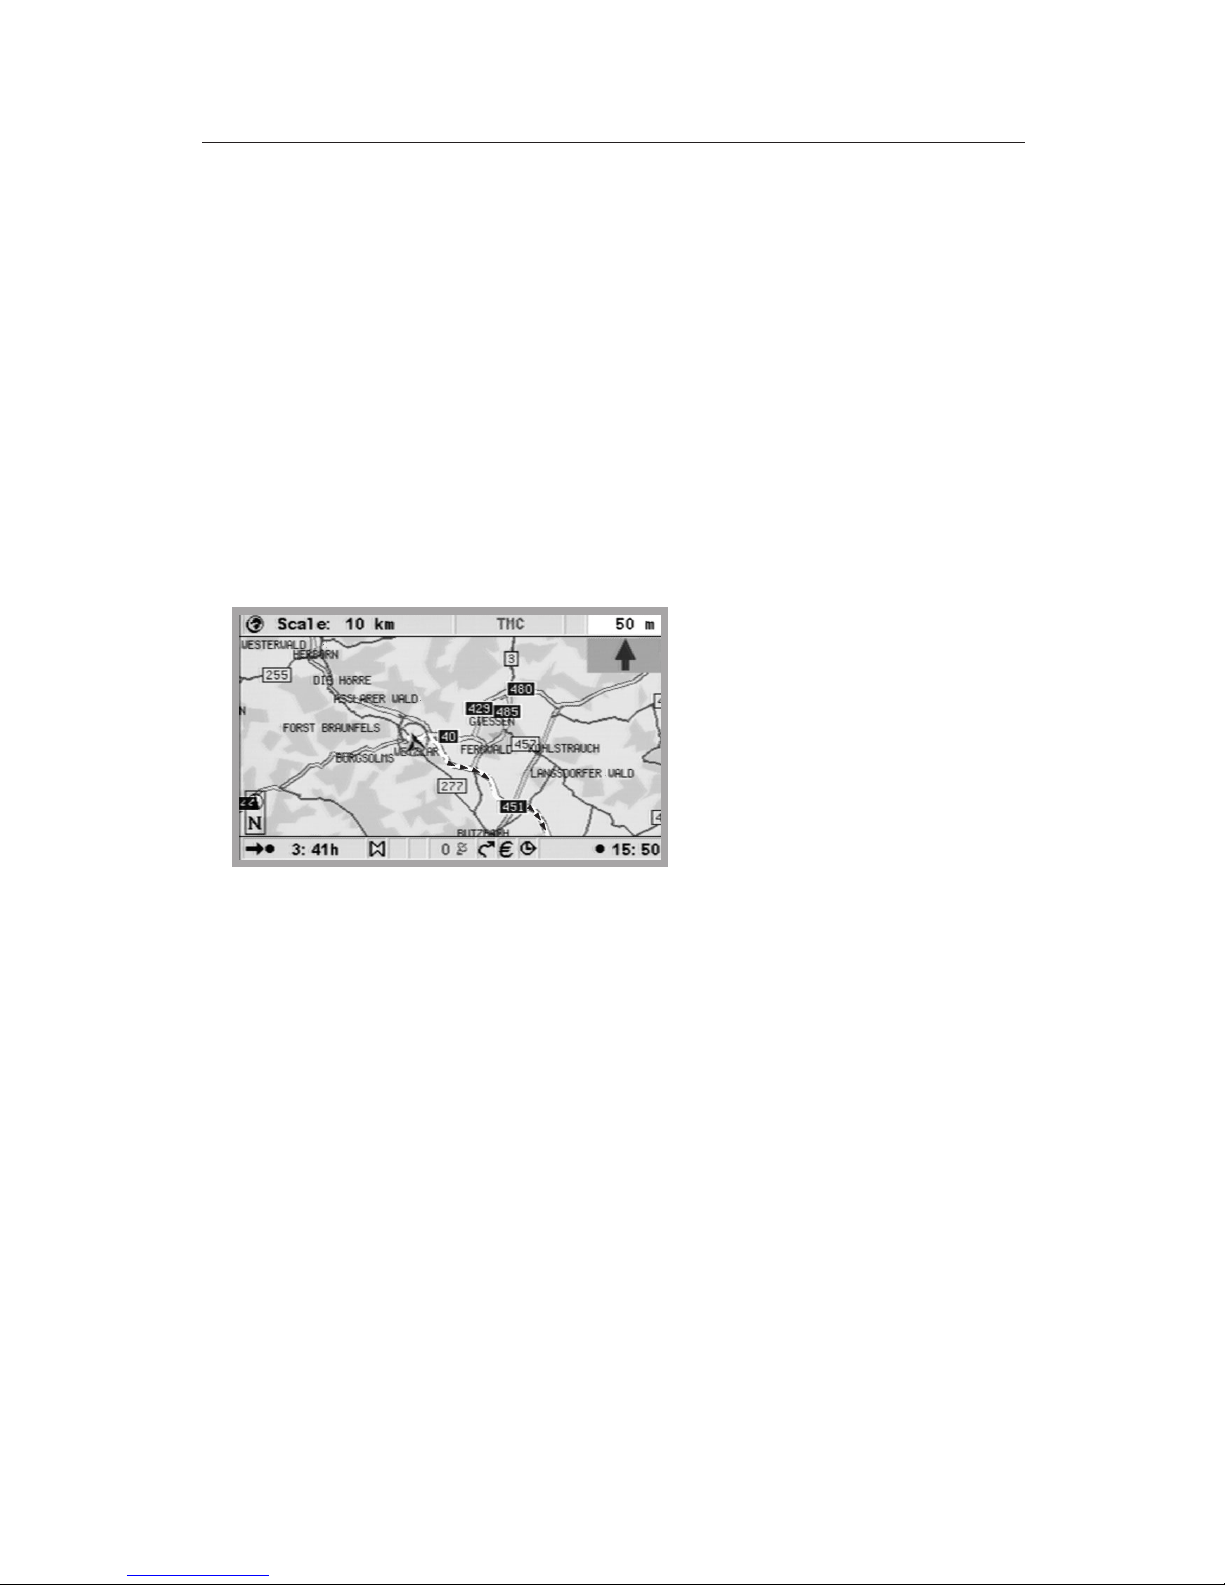
In the map display
If traffic information is available, the system will show the positions of
accidents or stationary traffic on the map. If the obstruction is relevant, it
is displayed with a red border. Otherwise it has a grey or orange border,
and may show an arrow in the direction of the obstruction.
J
For small map scales, the traffic information is displayed in summary. For
larger scales, they are displayed in detail. Road obstructions of a certain
length are displayed on smaller scales along with an indication of their
direction and length. Traffic density (slow and queuing traffic, or
stationary traffic) and the length of the obstruction are displayed by
means of arrows.
42
Page 43
NAVIGATION
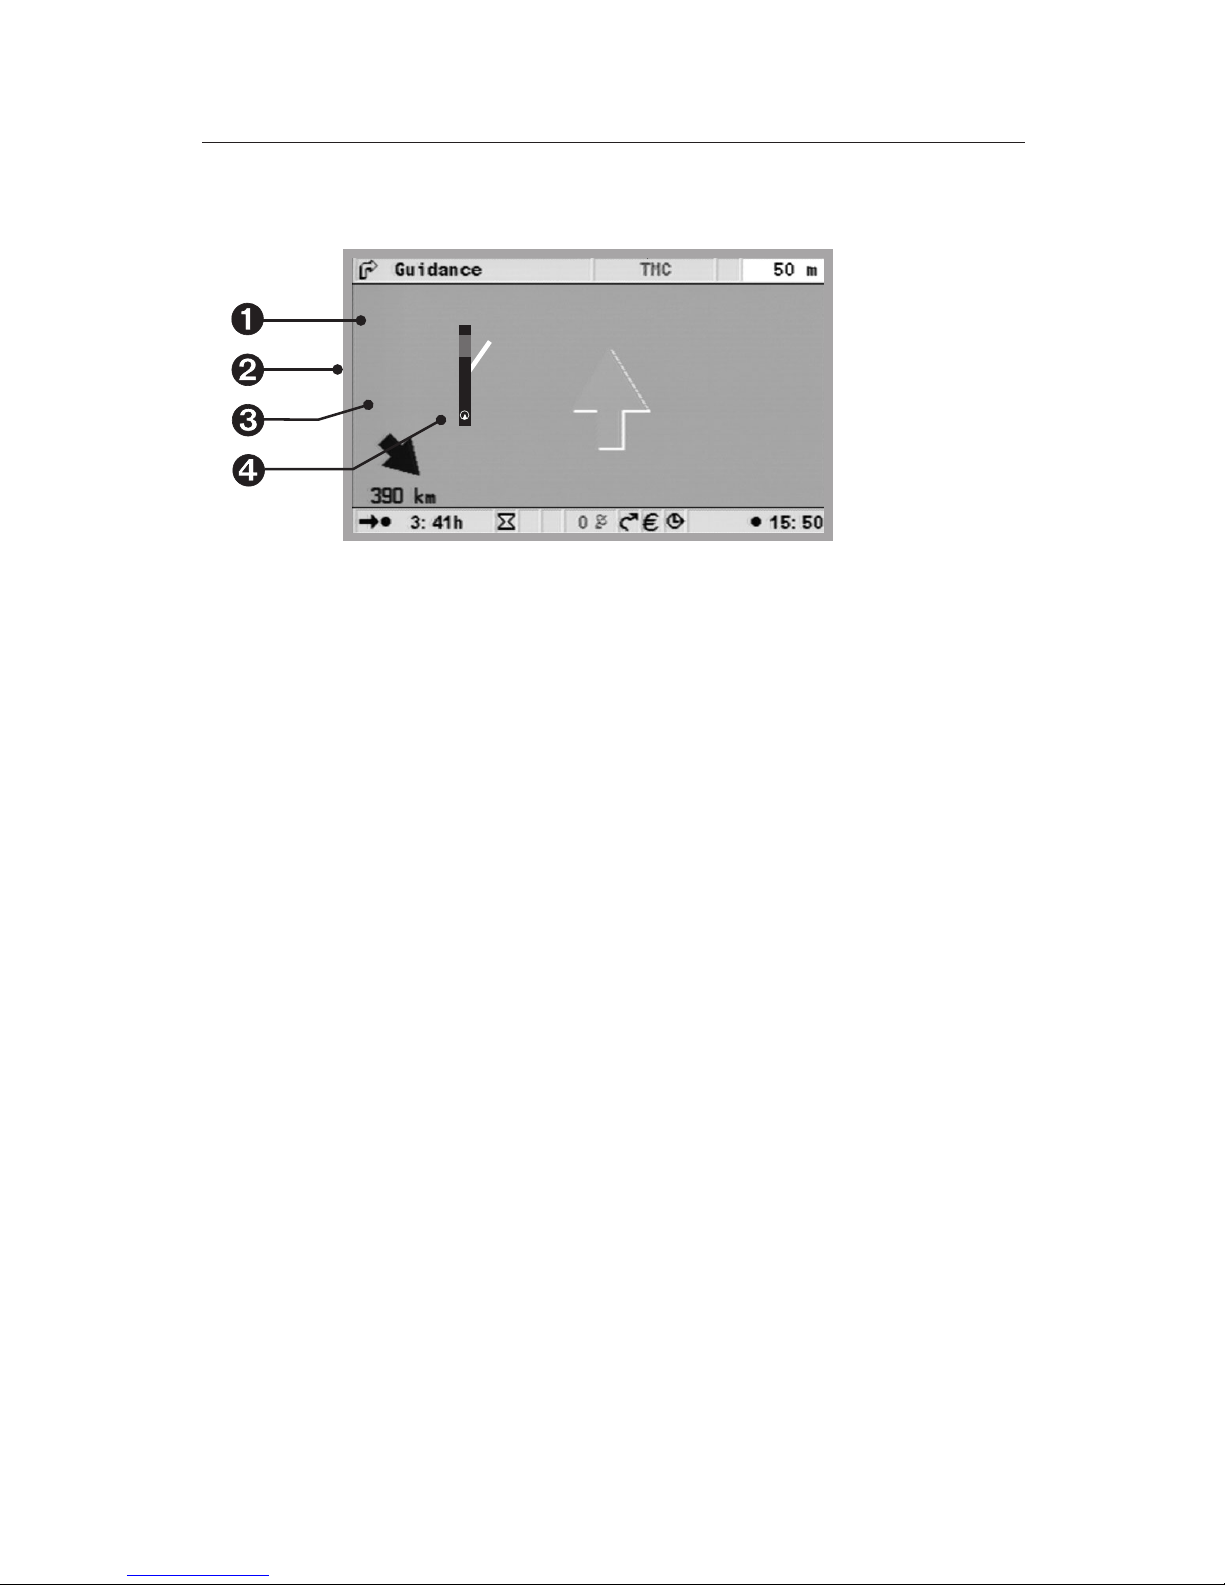
On the guidance display
Gambacher Kreuz
J
14 km
d
34 km
A 45, Linden
TMC symbol: Indicates the type of road obstruction. If a number of
Ê
obstructions exist, this is indicated by means of a second TMC symbol
which is partially obscured by the first.
d + Unit of measure (red): Length of the road obstruction, or distance
Ë
to the end of the section affected by stationary traffic.
Unit of measure: Distance to the beginning of the section affected by
Ì
stationary traffic.
Í Simplified presentation of the route (black bar) and location of the
road obstruction (red segment). Vehicle position is shown as a circle
with an arrow inside.
For urgent traffic information, a special note is displayed on the screen
(can be deleted by confirming with the OK button). In addition, this
information is provided as an audible message. Please not that
route-specific traffic information can only be displayed if guidance is
active.
TMC detail information
You can choose to have detailed information about specific road
obstructions displayed at any time.
Map display
u
Press the OK button to open the function list.
u
Select “Traffic view”, and press the OK button. The map display
shows a square cursor field.
u
Using the remote control cursor buttons move the cursor field to
the icon for the TMC that you wish to consult. Press the OK
button. The screen displays a window containing the requested
traffic report.
43
Page 44

NAVIGATION
Select “Next” and press the OK button to immediately select
u
another TMC icon.
“Quit”, followed by confirmation with the OK button, terminates the
“Traffic view” function. The map display is shown again without the
cursor field.
Guidance screen
In the guidance screen, press the OK button to open the
u
“Information” function list.
Select “Info”, and press the OK button. (See ”Info” menu)
u
Select the desired category and press the OK button.
u
A list containing a brief description of the road obstruction is
displayed. This shows the information: road and the next town, as
well as type and length of the obstruction. Do you wish to see more
detailed information about a displayed road obstruction?
Use the buttons and to mark an entry; the road obstructions
u
are displayed in order of occurrence along the route.
Press the OK button or button. A description of the selected
u
road obstruction is displayed, including detailed information
about the location, street name and duration of the congestion.
u
Pressing the OK button or the cursor button , returns to the list
with the abbreviated descriptions of the road obstruction.
Graphic display of a road obstruction
After selecting the option “Traffic on route” in the ”Information” menu,
the road obstructions are displayed as a list and in graphic form. If
necessary, you can scroll through the list using the cursor buttons
and . The road obstructions will be displayed in graphic form at the
lower edge of the screen. The attention symbol indicates the location of
the road obstruction.
Distances of up to 125 km are displayed in accordance with the scale. For
distances that exceed 125 km, the first 100 km are displayed in the first
80% of the bar according to the scale, and the remaining distance is
compressed into the remaining 20% of the bar. This area is then marked
with a black border.
Bypassing a road obstruction
Approx. 50 km prior to the last opportunity to deviate from the route
before a road obstruction occurs, the system provides an appropriate
acoustic warning. The function list is opened automatically in the
guidance display. The function list contains the new function “Detour”,
which can be used to tell the system to plan a new route around the road
obstruction. If you wish to bypass the road obstruction:
44
Page 45

NAVIGATION
Select “Detour” in the function list and press the OK button.
u
In the subsequent popup menu, select the option “Plan detour”
u
and press the OK button. The system plans a new route within
seconds.
Concurrent dynamic route guidance
If a traffic station informs the system that the stationary traffic has
dispersed while a detour is active and if automatic mode is not activated a
popup menu will appear on the screen. The user can now re-optimise the
route starting from the car’s current position.
45
Page 46
NAVIGATION
TMC symbols
This list provides an overview of all the symbols used in the guidance and
map displays. These will only be displayed if a TMC expansion is
connected.
Symbol Meaning Symbol Meaning
For small scales U Accidents
> Road obstruction in the
B Slow or queuing traffic
direction of travel
indicated
@ Road obstruction in both
J Stationary traffic
directions of travel
In the detailed display and in the
W Delays, waiting times
guidance display
R Roadworks g Exceptional vehicles
6 Danger v Narrow road sections
F Slippery road p No parking possibility
Y Poor weather conditions G Vehicle on wrong
carriageway
K Bad roadway c Closed roads
N Bad visibility S Smog alert
H Heavy wind D Overhead clearance
46
restriction
r Observe information in
the radio
Page 47
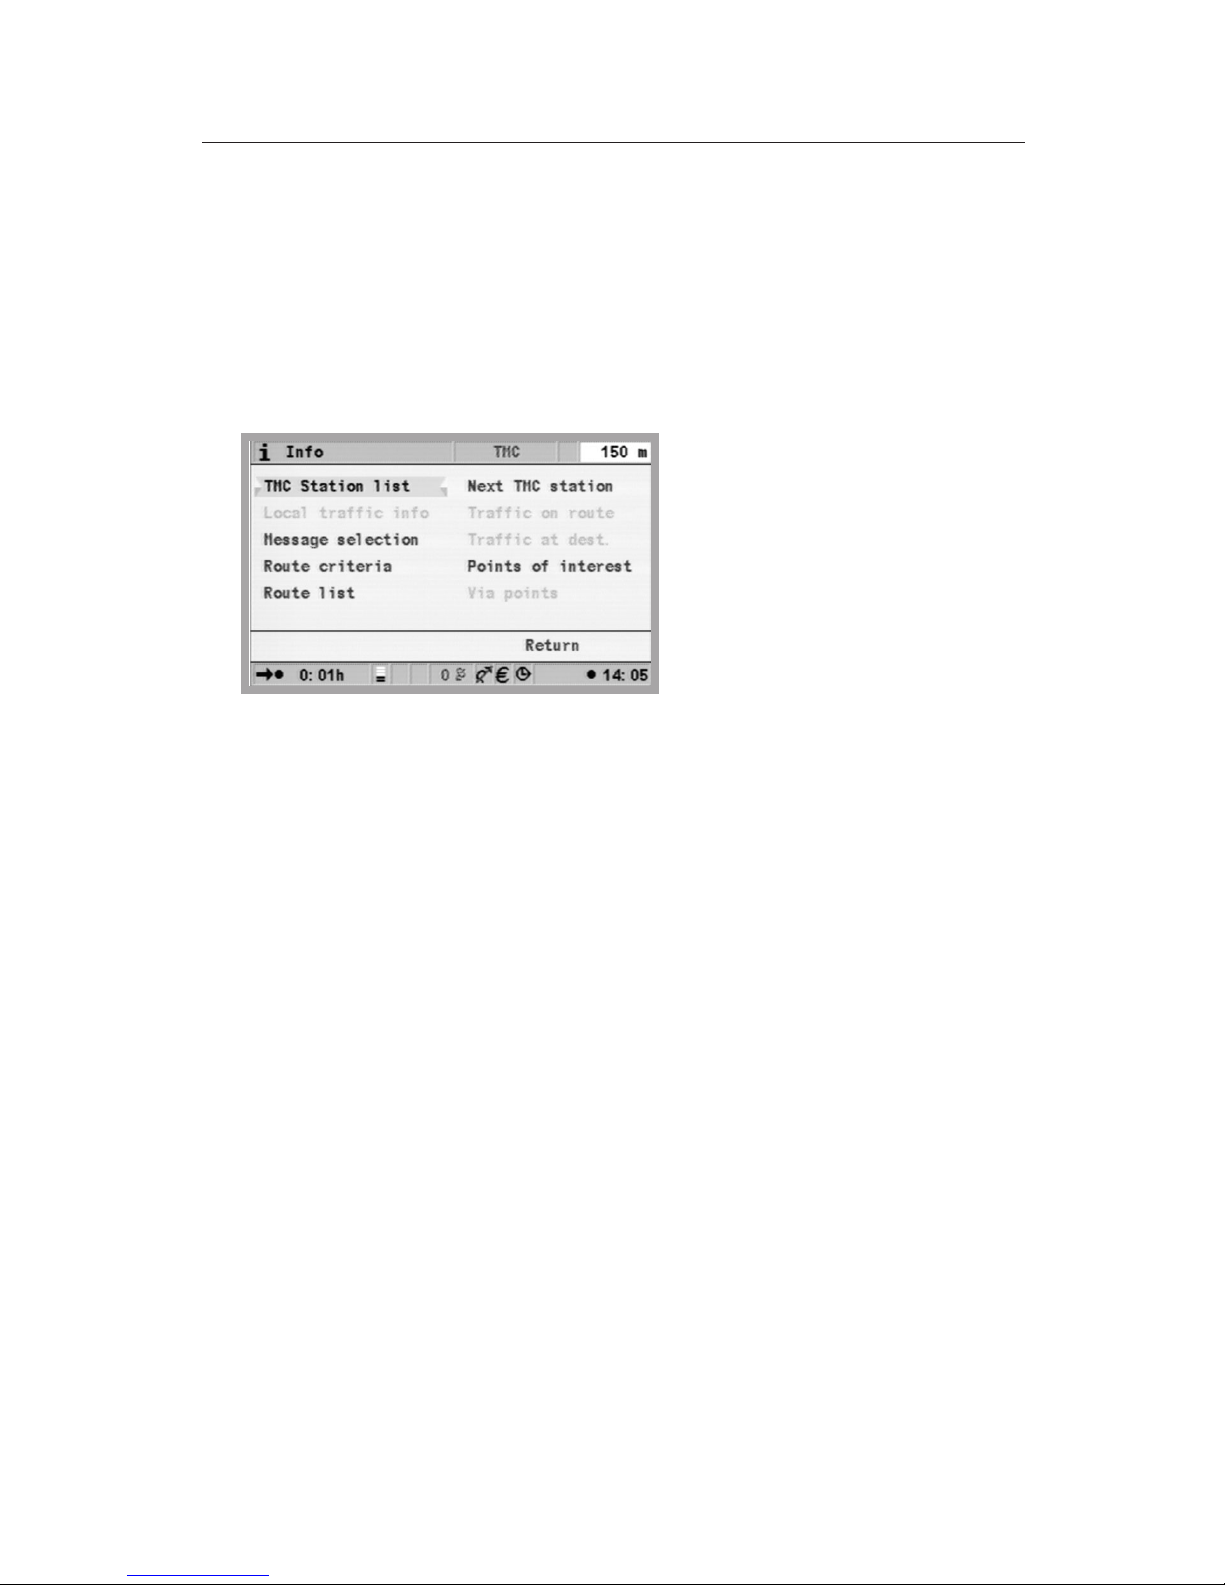
NAVIGATION
“Info” menu
The Info menu can be selected from the Start menu and from all guidance
screens. From a guidance screen:
Press the OK button from one of the navigation screens.
u
Select ”Info”, press the OK button.
u
From the Start menu, select ”Info”, and press the OK button
u
The following options are available:
Message selection: Selection list for TMC messages, to be displayed on
•
the screen and output acoustically.
•
Traffic on route*: List of road obstructions on the planned route
•
Local traffic info*: List of road obstructions in a circumference of 400km
from the current vehicle position if they are provided by the TMC
supplier.
•
Traffic at dest.*: List of road obstructions in a circumference of 400km
from the next via point/destination if they are provided by the TMC
supplier.
•
Route criteria: see chapter Settings.
•
Route list: List of the roads on the planned route.
•
Next TMC station*: Start scan for the next TMC station.
•
Points of interest: Display of a list of points of interest in the vicinity of
the vehicle’s position, see “Travel info” and “Special Destination” in the
Start menu.
•
Via points: Display of the next via point in the via point list.
*Only for system expansion starting from MT 5010.
47
Page 48

NAVIGATION
The address book
The navigation system provides the capability to store at least 200
destination addresses in a personal address book. The address book is
divided into “Home”, “Work”, “Private” and “Business”. ”Home” and
”Work” can each contain one address for quick access.
Store addresses
Select “Address book” under “Navigation”. Press the OK button.
u
Enter the address (see destination entry).
u
Select “Store address” and confirm with the OK button.
u
Select the address book category and confirm with the OK button.
u
The address displayed is then stored. If the address memory is full, before
any new addresses can be entered, one or more of the old ones must be
deleted.
Delete address
Select “Address book” under “Navigation”. Press the OK button.
u
Select “Retrieve Address”, and confirm with the OK button.
u
u Should you wish to delete an address entry, select the function
“Delete Address”.
u
Select the desired address book category. A list with the names of
the stored addresses is displayed.
u
Select the desired address and press the OK button.
The selected address is deleted, or displayed in the “Address book” menu,
and can be changed and stored again as necessary.
Delete previous destinations
u
Select “Address book” under “Navigation”. Press the OK button.
u
Select “Delete address” and press the OK button.
u
Select “Prev. destinations” and press the OK button.
u
A security prompt will appear to prevent you from deleting an
entry by mistake. Press the OK button.
48
Page 49

NAVIGATION
Store vehicle position in address book
Select “Address book” under “Navigation”. Press the OK button.
u
Select “Store car position” and press the OK button.
u
Select the address book category.Press the OK button.
u
In order to edit the address (e.g. to add a name), it must first be loaded
t
from the address book, edited and then stored in the address book
again.
Retrieve address from the destination memory
Select “Address book” under “Navigation”. Press the OK button.
u
Select “Retrieve address”. Press the OK button.
u
Select “Prev. destinations”. Press the OK button. A list of the last
u
20 destinations is displayed.
Select the desired entry and confirm with the OK button.
u
49
Page 50
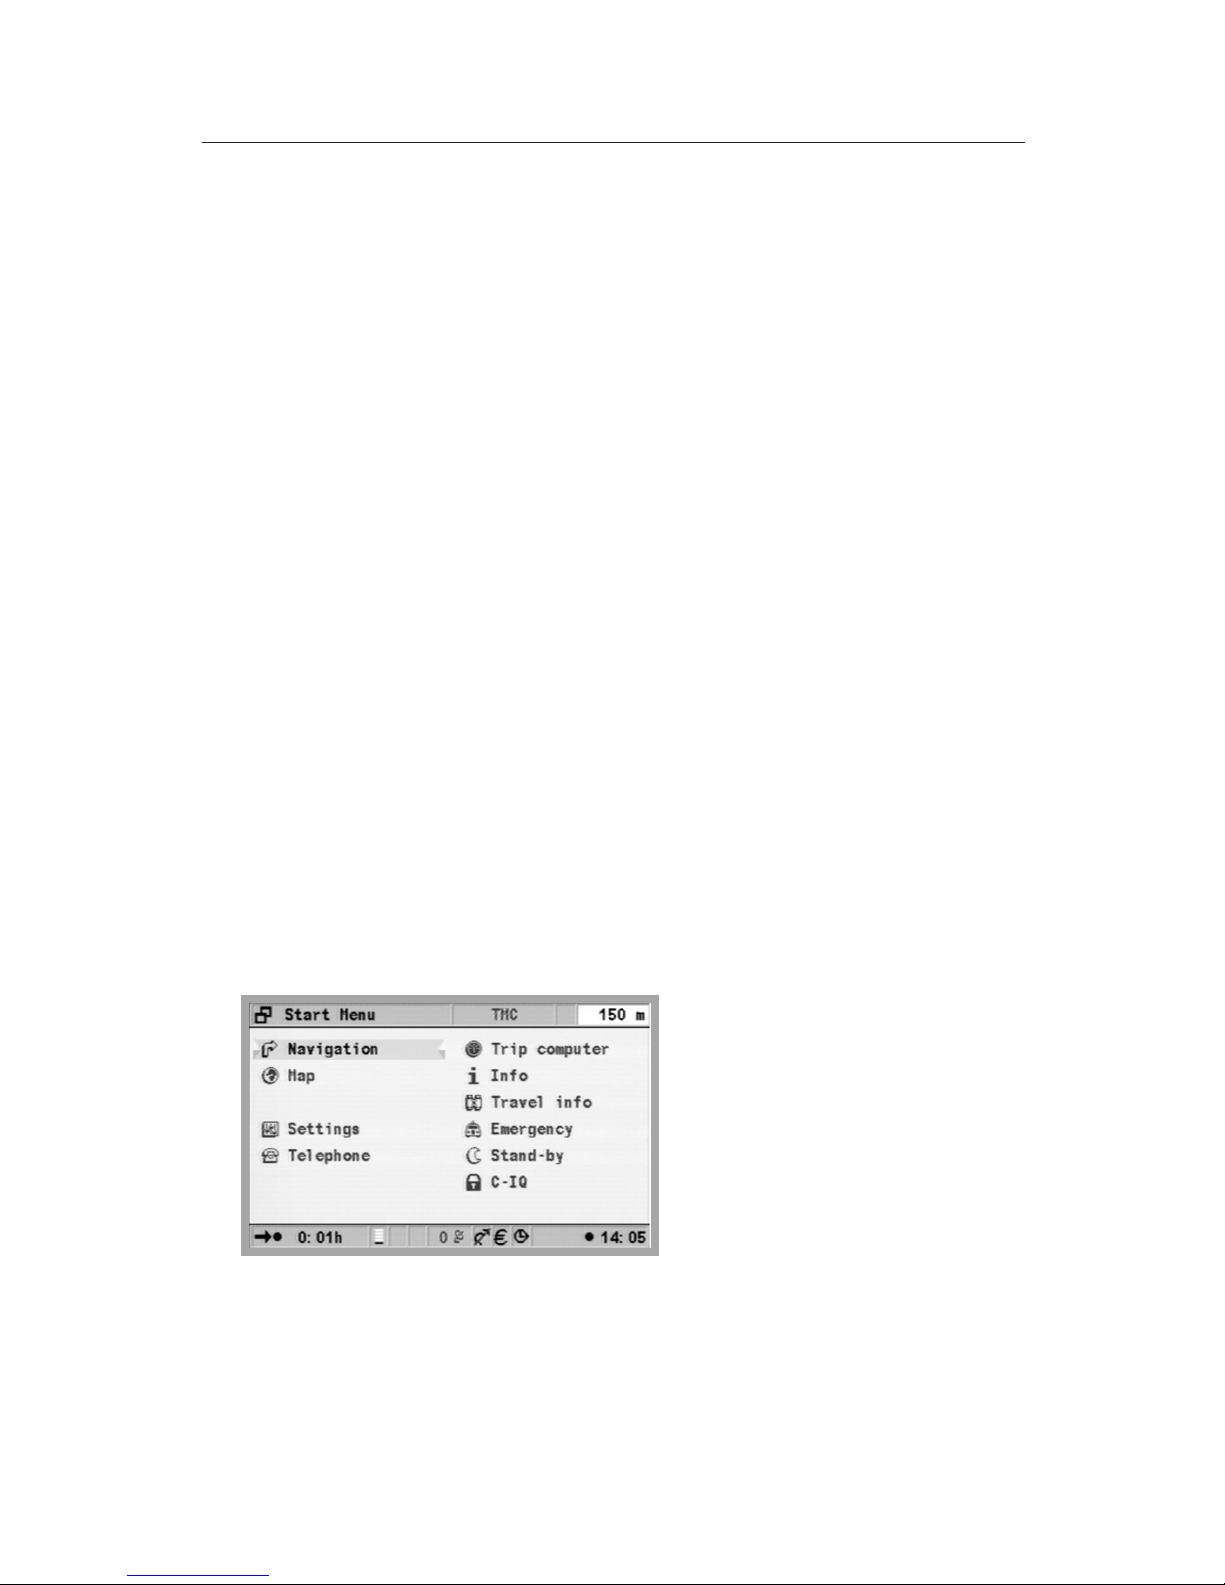
TELEPHONE
Telephone
CI 3000
If a Communication Interface Module (e.g. CI 3000) is connected to the
navigation system as an extension, you can use different standard
hands-free units and current mobile phones with the system. Selected
functions of your mobile phone are then available to you in a well
laid-out and convenient manner via the monitor of your navigation
system.
If a compatible hands-free unit is connected to the Communication
Interface Module and if the cradle contains a suitable mobile phone with
SIM card and the PIN code has been entered, the Telephone option will
appear in the Start menu. The main functions of your phone are available
in this menu.
CIX 3000 Blue
Alternatively you can add the CIX 3000 Blue extension module to the CIX
3000. The CIX 3000 Blue is a Bluetooth hands-free unit. It replaces the
commercial hands-free unit and mobile phone unit cradle and allows you
to communicate while driving without the need for cables thanks to the
Bluetooth data transmission standard. You will require a compatible
Bluetooth mobile phone for this application.
At www.vdodayton.com or www.C-IQ.net and by dialling the C-IQ Service
Centre on 00800 99 33 33 33 you will find current compatibility lists for all
supported mobile phones and hands-free units.
The Bluetooth connection requires pairing or linking of your mobile
phone with the CIX 3000 Blue. You can also carry out the “pairing
process” without the navigation system. For further information please
see the CIX 3000 Blue operating instructions.
The mobile phone can only be operated directly from the phone once the
ignition has been switched off. To operate it via the monitor and remote
control, the ignition must be switched on.
50
Page 51

TELEPHONE
Please note that the MO 5595 system software continues to support the
MG 3000 phone connection, but with limited functionality compared to
the CI 3000. For an overview of functions please read the operating
instructions for the MO 5594 software.
Linking of mobile phone with CIX 3000 Blue
In order to be able to operate the mobile phone with the CIX 3000 Blue
Hands-free terminal it must be registered with the CIX 3000 Blue. This
process need only be carried out once for each phone.
If there is no system-linked mobile phone within range, the “Bluetooth”
option will automatically appear in the Start menu of the navigation
system. Please make sure that the Bluetooth feature of your mobile
phone is activated (for more information see the operating instructions
for your mobile phone). If you want to link or pair the phone:
Select “Bluetooth” in the Start menu. Press the OK button.
u
The screen displays the “Start pairing?” prompt. Select ”Yes”, and
u
press the OK button.
The screen will display the message “Pairing started”. Now also
u
start the search for Bluetooth devices on your phone. This function
is manufacturer-specific. The navigation system will now need
some time to register the mobile phone.
u
If the process has been successful, the device name of your mobile
phone will appear on the screen. Confirm by pressing the OK
button.
u
The “Telephone” option appears in the Start menu.
t
If registration has been unsuccessful the fault could lie with the
firmware of your mobile phone. Please check the firmware. You can get
the current lists of suitable firmware at vdodayton.com, www.C-IQ.net
and by dialling the C-IQ Service Centre on 00800 99 33 33 33.
Driver software for the CI 3000
The CI 3000 is compatible with selected hands-free units and mobile
phones. For some of these, the required driver software is preinstalled
(see CI 3000 product label). It is possible to update the CI 3000, for
example in order to use a new mobile phone.
The updating of the driver software can be performed automatically or
manually. Should a new mobile phone be inserted that is unknown to the
CI 3000 the navigation system will automatically start downloading the
suitable driver software. If you would like to use several or a variety of
mobile phones, for example, with a universal hands-free unit or via the
CIX 3000 Blue, this process can also be carried out manually.
51
Page 52

TELEPHONE
Select ”Telephone” in the main menu and press the OK button.
u
Select the folder and press the OK button.
u
Select “Phone settings” and press the OK button.
u
Select “SW download” and press the OK button. You will be
u
prompted with the message “Start software download using
CIM?”.
Select ”Yes” and press the OK button. The system will
u
automatically establish a connection with the server, transmit the
software to your mobile phone and terminate the connection.
After this, the main menu will again be displayed.
To download software the CI 3000 must be registered with the C-IQ
Service Centre. Please have your CIM ID to hand. You will find the CIM ID
on your device or under Phone Info in the phone settings of your
navigation system!
Please refer to our current compatibility lists regarding supported
hands-free units and mobile phones at www.vdodayton.com.
Loading phone book
The phone book of a mobile phone is initially loaded into the navigation
system automatically. This process involves both the data stored in the
phone and on the SIM card being loaded. Subsequently the process can
be performed manually.
u
In the main menu, select “Telephone“ Press the OK button.
u
Select the folder. Press the OK button.
u
Select “Phonebook download”. Press the OK button.
u
Select “Yes”. Press the OK button.
52
Page 53
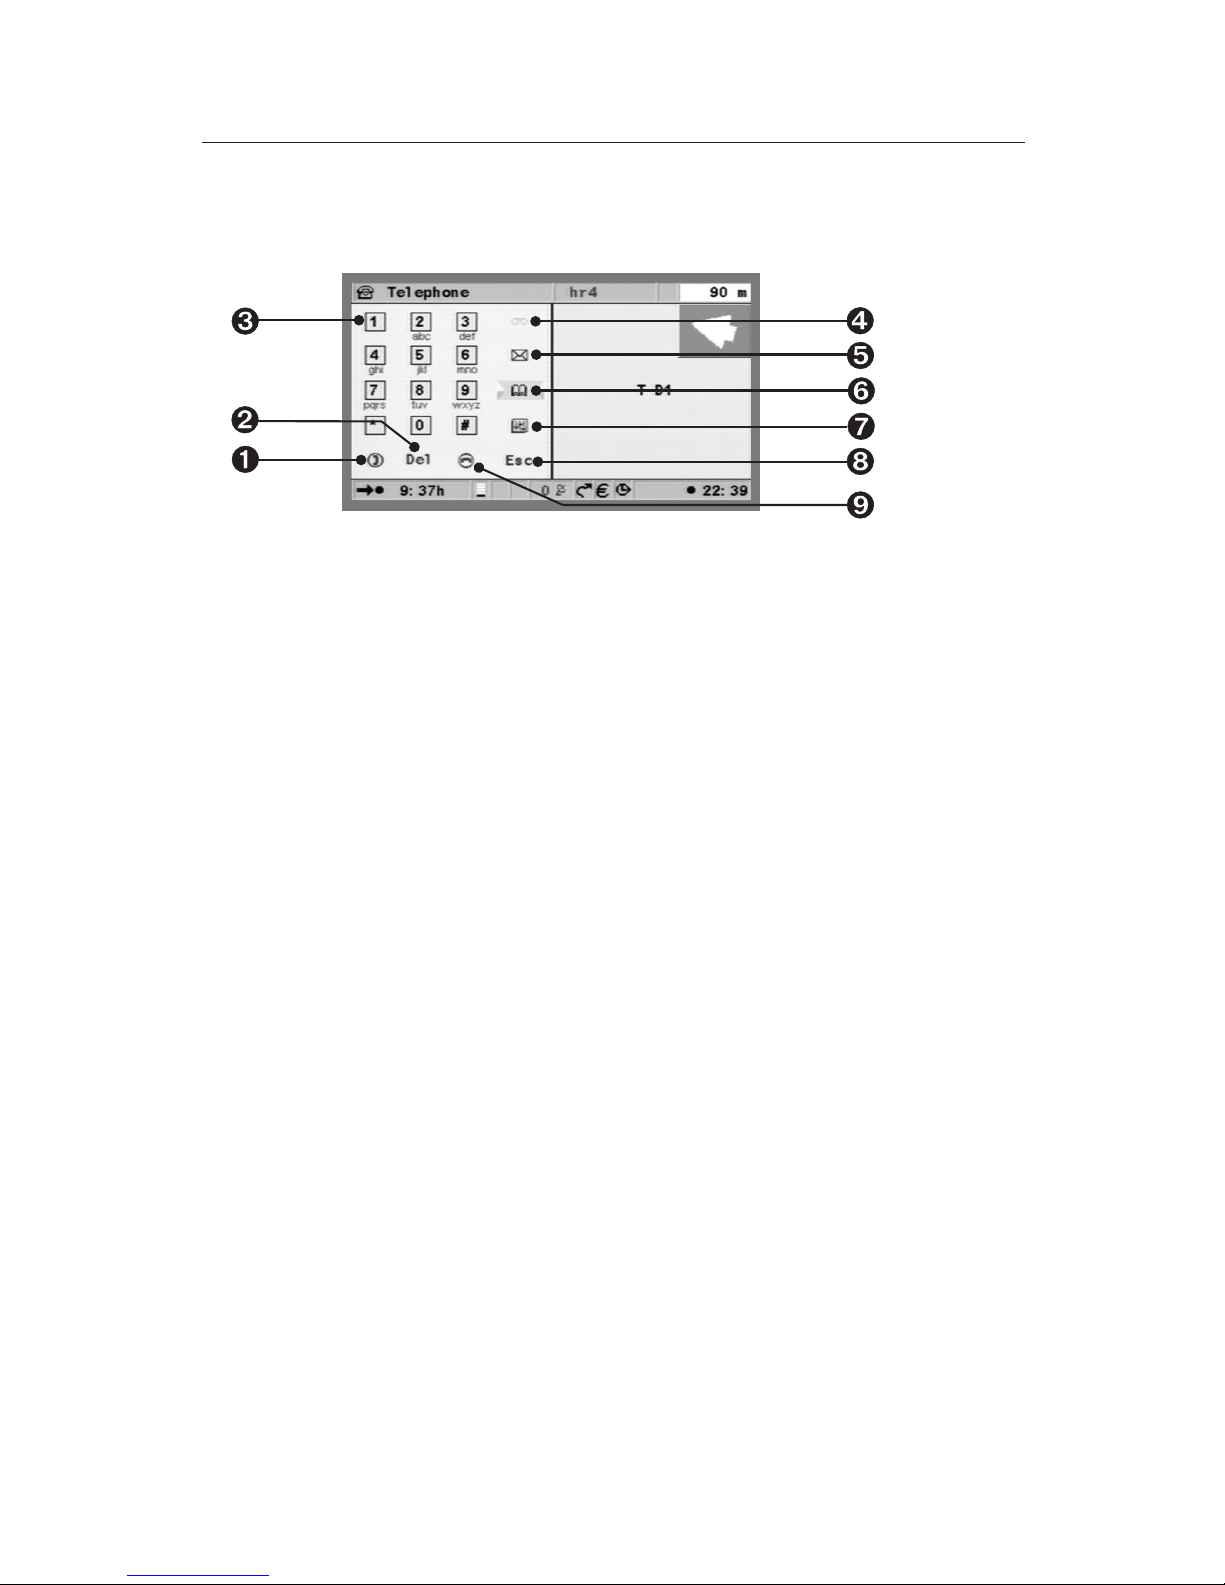
TELEPHONE
Telephone functions
Establish connection, take call and direct call-up of the “Outgoing
Ê
calls” list.
Deleting the last number.
Ë
Keypad for entering numbers.
Ì
Mailbox – listen to incoming messages.
Í
Messages/SMS – write or read a text message.
Î
Call up phone book menu to store (only on SIM card), search for or
Ï
delete phone book entries.
Ð
Folder – Voice recognition (only in conjunction with CIX 3000 Blue),
incoming, outgoing and missed calls, the option of loading the phone
book into the navigation system and general phone settings are
available here.
Ñ
ESC returns you to the previous menu.
Ò
End connection and direct call up of “Missed calls”.
The field strength is displayed in the status line. As for the phone, the
number of solid rectangles shows the strength of reception.
53
Page 54

TELEPHONE
Calling
Volume of call
During a phone call, the volume can be adjusted via the + or - buttons on
the remote control. The last setting selected is stored. Alternatively, the
volume can be adjusted on the mobile phone itself. The ring volume for
an incoming call can be lowered or increased.
Dialling
Phone numbers to be dialled can be
entered directly,
•
selected from call lists
•
selected from the “Navigation” menu (destination phone number,
•
where available)
selected from the list of points of interest (POI browser), if a phone
•
number is provided
selected from the phone book of the SIM card and the phone memory.
•
Dialling via numeric buttons
Enter the desired phone number in the “Phone” menu via the
u
virtual keypad. Once a button has been highlighted with the
cursor and the OK button pressed to confirm the selection, the
digit will be shown in the right-hand display zone.
u
Once entry of the desired phone number is complete, press the
green handset button and confirm with OK. The connection is
established. Pressing the red handset button terminates the
connection.
Call list
Call numbers can also be selected for dialling directly from the following
lists in the phone menu: “Missed calls”*, “Incoming calls” *, “Outgoing
calls”
* depending on the network operator. The function for caller
identification must be supported.
To select a phone number from the call lists:
u
Select the folder in the “Telephone” menu and press the OK
button.
u
Select “Call register” and confirm with the OK button.
u
Select the desired list and press the OK button.
u
Select the desired entry and press the OK button. The selected
phone number appears in the display field.
u
The connection can be initiated by pressing the green handset
button.
54
Page 55

TELEPHONE
Calls from the phone book
Select the phone book in the Telephone menu and confirm with
u
the OK button.
Select the desired option and confirm with the OK button.
u
Retrieving an entry from the phone book
The desired phone number can be retrieved by entering the
corresponding name via the keypad. If the first few characters entered
clearly belong to a particular entry, the complete entry will be displayed
above the keypad. To accept the call number in the phone menu, press
the OK button.
Deleting an entry
Select the phone book in the “Telephone” menu and confirm with
u
the OK button.
Select “Delete entry” and confirm with the OK button.
u
Select the desired entry and confirm with the OK button. A
u
security prompt is displayed in order to prevent the inadvertent
deletion of an entry.
Select “Delete” and confirm with the OK button to remove the
u
entry from the phone book.
This always deletes the complete phone book entry.
55
Page 56

TELEPHONE
Adding an entry (only on SIM card)
Enter the desired phone number in the “Telephone” menu or
u
select it from the call list. If a number has already been entered,
you are prompted for the name as soon as the phone book button
is pressed.
Select ”Phone book” and confirm with the OK button.
u
Select “Enter name”, and press the OK button. The keypad for
u
entering the corresponding name is displayed on the screen.
After entering the name, confirm with the “OK” button. The entry
u
will be stored in the phone book.
In the event of insufficient SIM card or phone memory, an appropriate
message will be displayed. To store a new entry, if necessary, first delete
another entry.
SMS (Short Message Service)
When connected to the mobile phone, short text messages (SMS, up to
160 characters in length) can also be received and sent via the navigation
system. The availability of this function depends upon the network
operator, enabling may be necessary. Refer to the network operator’s
details.
Images, sounds or multi-media messages as well as excessively long SMS
texts are not supported. The phone number for the SMS service centre
must be entered via the mobile phone settings.
56
Page 57

TELEPHONE
Receiving SMS messages
When new SMS messages are received, the message “New SMS! … Read
now?” will appear on the display.
Select “Yes” and confirm with the OK button if you want to look
u
at the message immediately.
Select “No” and confirm with the OK button if you want to look at
u
the message at a later stage (see below).
Incoming SMS messages are stored either on the SIM card, or in the
internal memory of the mobile phone (depending on the device). They
thus remain stored after the system has been switched off and can e.g. be
read later from the mobile phone.
Reading SMS messages
SMS messages are automatically loaded into the navigation system if the
mobile phone is being connected to the system for the first time or if the
system is restarted. The number of SMS messages is limited to 50. Please
also note that it can take some time for all SMS texts to be read.
Select the envelope symbol in the Telephone menu and confirm
u
with the OK button.
Select “Read SMS” and confirm with the OK button. The “Stored
u
SMS” menu appears.
u
It is possible to use the buttons on the remote control to scroll
line-by-line to the bottom or top of the message.
Below the display window for the text, the sender’s phone number is
displayed (only if caller identification is supported).
The purpose of the function buttons below is as follows:
•
“Edit”: the displayed text can be edited, e.g. to attach a reply
•
“SMS list”: in the case of several incoming SMS messages, you can skip
entries in the list of incoming SMS messages
•
“Options”: to send or delete the SMS message displayed as well as store
or directly dial the sender’s phone number (“SMS number”)
57
Page 58

TELEPHONE
Writing SMS messages
Select the envelope in the Telephone menu and confirm with the
u
OK button.
Select “Write SMS” and confirm with the OK button.
u
Enter the text using the keypad (max. 160 characters). Confirm by
u
pressing the OK button.
If you want to delete one or several elements select “Del” and
u
confirm with the OK button.
Select “! ->A” and confirm with the OK button to switch between
u
upper and lower case letters as well as numbers/characters.
Sending SMS messages
To send the displayed SMS message select “Send message” and
u
confirm with the OK button. The “Send message” menu is
displayed.
Enter the recipient’s phone number in its entirety (including
u
international dialling code, if required) or accept the number from
the phone book. Confirm by pressing the OK button.
When attaching a reply to a received SMS message and displaying the
sender’s phone number, the phone number is automatically transferred
to the “Send message” menu.
Direct dialling of displayed call numbers
With certain map DVDs/CDs, additional information regarding points of
interest can be called up (see chapter “Points of interest”). Where these
contain a telephone number, it can be dialled directly.
u
Select the desired point of interest featuring the additional
information and confirm by pressing the OK button.
u
Highlight the phone symbol and confirm with the OK button.
Connection can be terminated pressing the OK button while this message
is displayed. During the call, the “Phone active” menu is displayed, which
enables further numbers / control characters (for controlling the mailbox
functions etc) to be entered, for example. Once the call has ended, the
system returns to the additional points of interest information display.
58
Page 59

TELEPHONE
Telephone Settings
The following functions are available in the phone settings:
Phone Info
•
Phone Book
•
Store Mailbox No
•
SW download (see Software download chapter)
•
Bluetooth (only in conjunction with CIX 3000 Blue). The Bluetooth
•
option can be used to start the mobile phone’s voice recognition
feature. This function is dependent on the phone. Voice recognition
can only be configured via the mobile phone.
Phone Info
This information relates to the phone module and is important for
customer service. It should be to hand whenever you phone the Customer
Helpdesk.
Select the folder in the Telephone menu and confirm with the OK
u
button.
Select “Phone settings” and confirm with the OK button.
u
Select “Phone Info” and confirm with the OK button. The relevant
u
information is displayed.
Phone Book
Under telephone settings you can determine whether data from the
mobile phone or the SIM card is to be displayed.
u
In the main menu, select “Telephone“ Press the OK button.
u
Select the folder and press the OK button.
u
Select “Phone settings”. Press the OK button.
u
Select ”Phone book”. Press the OK button.
u
Select “SIM card” or “Mobile Phone”. Press the OK button.
59
Page 60

TELEPHONE
Storing a mailbox no
If you want to store your mailbox number in the system:
In the main menu, select “Telephone“ Press the OK button.
u
Enter the desired number. Use the OK button to confirm each of
u
the digits selected.
Select the folder and press the OK button.
u
Select “Phone settings”. Press the OK button.
u
Select “Store Mailbox No”. Press the OK button.
u
Select “Yes”. Press the OK button.
u
SW download
See page 51.
Bluetooth
See also page 51.
In the main menu, select “Telephone“ Press the OK button.
u
Select the folder and press the OK button.
u
Select “Phone settings”. Press the OK button.
u
u
Select “Bluetooth”. Press the OK button.
u
Select “Yes”. Press the OK button.
60
Page 61

USEFUL EXTRAS
Trip computer
The trip computer is selected by means of the function “Trip computer” in
the Start menu. The integrated trip computer displays the following
information:
Current speed: Current speed
•
Avg. speed: Average speed (since reset)
•
Elapsed distance: Route distance (since reset)
•
Elapsed time: Travel time (since reset)
•
Location with geographical longitude and latitude.
•
The speed display serves only as additional information. Only the
vehicle’s speedometer should be used to determine actual speed. The
function “Reset” is used to reset the data for distance, travel time and
average speed to “0”.
61
Page 62
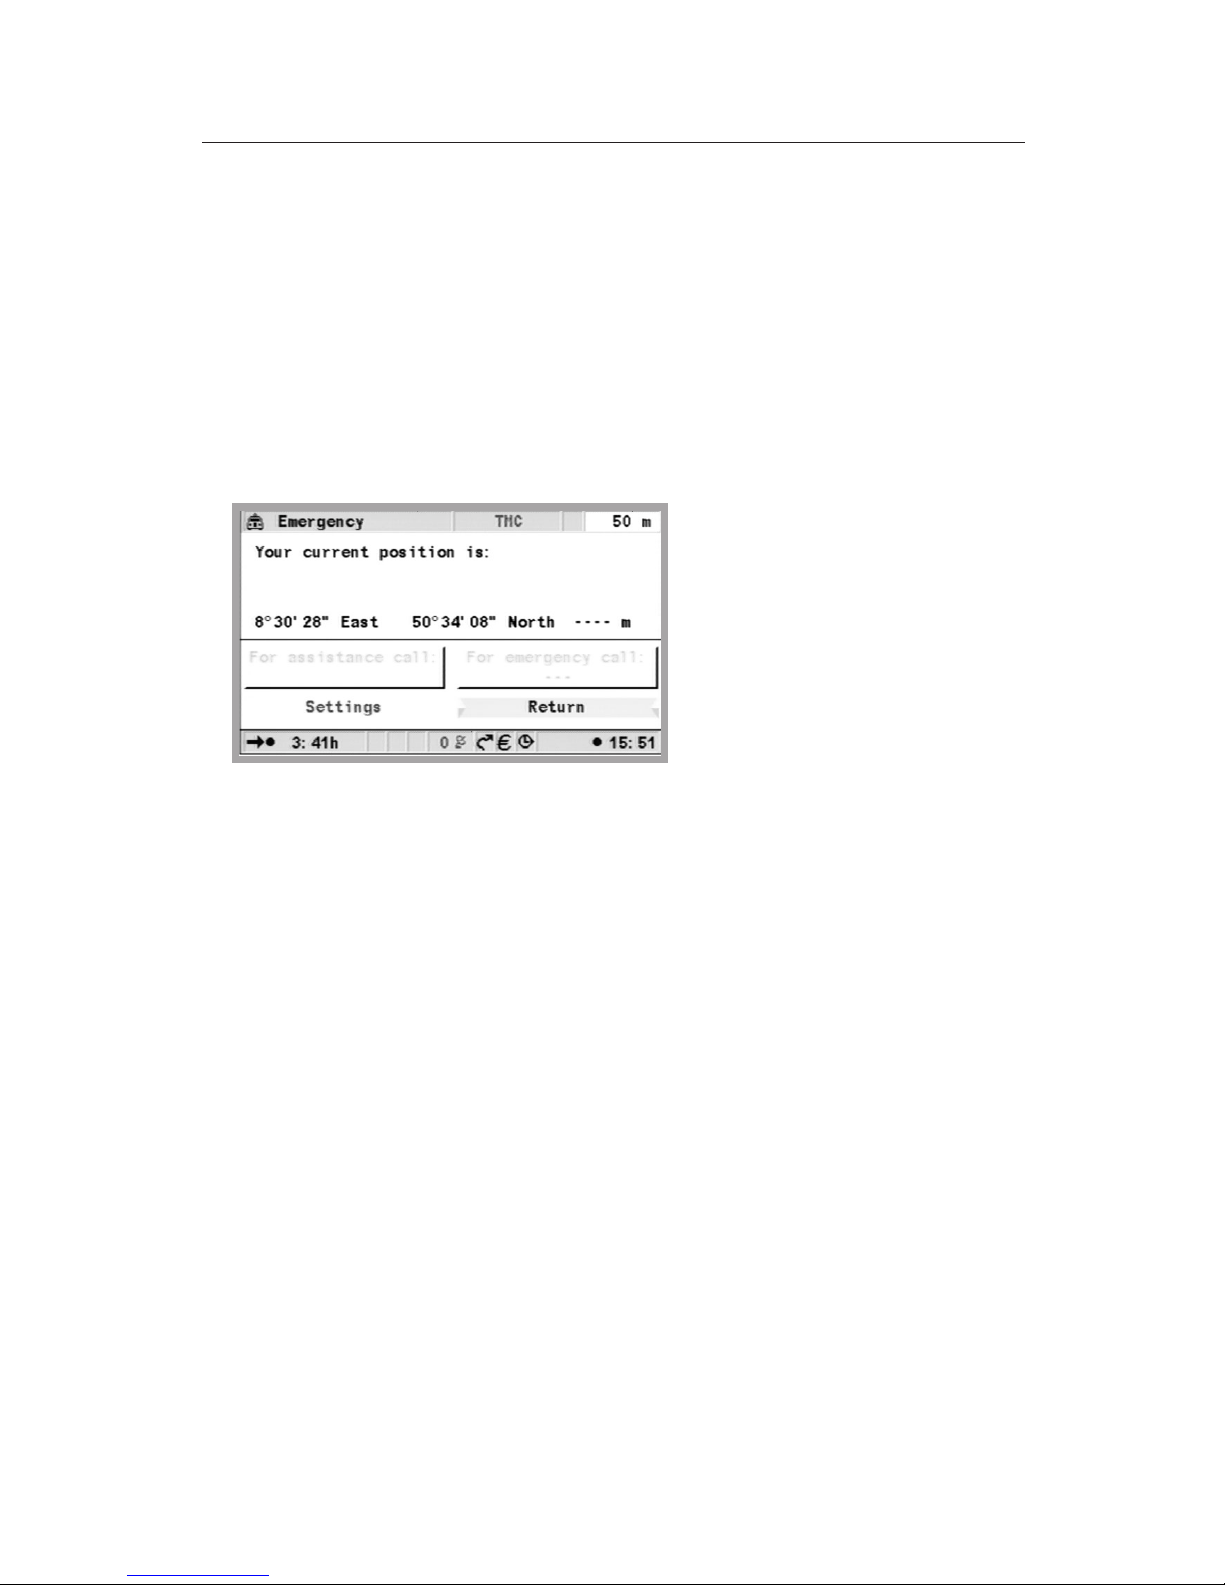
USEFUL EXTRAS
Emergency
The emergency menu displays the current vehicle position, the
country-specific emergency number (under ’Help:’) as well as a freely
programmable telephone number for an assistance centre. The vehicle’s
position is accurate to within approx. 30m.
The names of country, city and street for the vehicle’s current position are
only displayed if the vehicle is located on a digitised road. Otherwise, or if
no or an incorrect map DVD/CD is inserted into the navigation system,
only the geographical latitude and longitude position calculated by the
GPS will be displayed.
Dialling another emergency number is only possible with a SIM card
inserted and after entering the PIN. The mobile phone must be connected
to the GSM network.
u
Select “Emergency” in the main menu and press the OK button.
u
Select “For emergency call:” and press the OK button.
u
Confirm the subsequent message with “OK” within 5 seconds.
The connection is established.
62
Page 63

USEFUL EXTRAS
Entering an assistance number
You can store a telephone number of your choice for help in an
emergency, e.g. the number of an automobile club or an assistance
centre.
Select the function “Setting” in the Emergency menu, press the OK
u
button.
Enter the telephone number that you want to use for emergency
u
assistance. Confirm each digit you enter with the OK button.
The entered number will be displayed in the Emergency menu. In order to
select the phone number of an “Assistance centre” (breakdown service),
the mobile phone must be ready for operation and connected to a
network. This option is not available without a SIM card and without a
PIN being entered.
63
Page 64

TROUBLESHOOTING
In very rare cases it can happen that your multimedia system does not
function as you would expect. Before you contact customer service, please
read the user manual and review the following checklist, as an apparent
malfunction can possibly be quickly remedied.
Symptoms Possible cause / remedy
System does not
start, screen dark.
The system switches
itself off after a
period of normal
operation.
Screen switches off
under excessive
temperature.
After the ignition
has been switched
off, the last menu
remains visible on
the screen.
System does not
react to actuation of
the buttons if
remote control is not
in its holder.
Ignition switched off: please switch on
Ignition is already switched on, system is on standby:
Press one of the cursor buttons, the OK button, or
the menu button on the remote control.
At extremely high or low temperatures the system is
automatically switched off to protect against
damage. It switches on again as soon as the
temperature has returned to normal.
At temperatures exceeding 75 degrees centigrade,
the screen switches itself off temporarily to protect
against damage. It switches on again as soon as the
temperature returns to normal.
The screen remains switched on for approx.
30 seconds after the ignition has been switched off.
Batteries are empty: Replace the batteries in the
remote control, or install the remote control in its
holder.
System reacts very
slowly to inputs, or
takes a long time to
respond
“Guidance” cannot
be selected in
“Navigation” menu
64
You are located in an extremely densely digitised
area. The system requires more time to read large
data quantities.
Ensure that you have entered a destination address.
Page 65

Symptoms Possible cause / remedy
TROUBLESHOOTING
System fails to plan
route despite
destination address
being entered.
Guidance
information not
audible.
Some of the symbols
shown in the
manual are not
displayed in the
status line.
Vehicle is not on a digitised road: Drive in the
direction of a digitised road.
Check whether “Audible information” has been
activated in the ”Settings” menu.
Check whether “Volume” in the “Settings” menu is
set to minimum.
If no external speaker is connected:
Check the volume setting of the loudspeaker in the
monitor.
Activate the respective information in the “Screen
settings” menu under “Setting” for “Status line
right” and “Status line left”.
Colour of the
satellite symbol on
the GPS logo is
constantly red.
Navigation system
automatically ejects
the CD.
Current time in the
status line is
incorrect.
Addresses cannot be
stored in the address
book
Guidance is not
accurate.
No satellite signal reception.
Ensure that the GPS antenna is not obscured by any
objects.
The CD may be dirty: Clean the CD with a special
CD cleaning fluid.
Set the correct time zone in the “Settings” menu,
function “Date/time”.
Address book full: Delete one or more entries from
the address book that are no longer required.
An accuracy of 50m falls within the specified
tolerance limits: Please contact an authorised dealer
if greater inaccuracies repeatedly occur.
65
Page 66

TROUBLESHOOTING
Symptoms Possible cause / remedy
Displayed position
does not correspond
to actual vehicle
position.
Directions do not
correspond to the
actual traffic
conditions.
“TMC” logo in the
status line is
permanently red, no
traffic information is
displayed on the
map.
System reports
”Wrong or defect.
media!”
Problems with GPS reception persist. The position is
corrected automatically as soon as satisfactory GPS
reception resumes: If necessary wait a few minutes;
ask your installation workshop to check whether the
installation angle of the navigation computer has
been correctly entered in the diagnosis menu.
It is possible that the car’s position as calculated by
the navigation system is not currently correct. Traffic
routing may have been changed and no longer
corresponds to the information on the map CD.
Poor / disrupted TMC reception. With TMC radio
connected: Switch on radio, and tune to an
RDS transmitter with TMC traffic information.
DVD/CD could be damaged
DVD/CD may not be C-IQ compatible
System reports
”Incorrect code”
Map button does
not function, or only
in the 1000 km scale
System reports
”System error”
DVD/CD is not suited to your system
Code was entered incorrectly. Code input must be
repeated.
Code was transmitted by the C-IQ service incorrectly.
Contact the C-IQ service to receive the correct code
Identical code had already been entered and is either
already active or has already expired. Check your
access data under ”My C-IQ” .
The region or the country may not have been
activated. Contact the C-IQ service.
Your system requires service. Please contact your
installation workshop or your dealer.
66
Page 67

Symptoms Possible cause / remedy
TROUBLESHOOTING
After the phone has
been plugged in, the
Telephone menu
item does not
appear on the LCD
screen.
The other person
cannot hear me
during phone calls.
The radio is not
muted.
The SMS list or
phone book entries
in the mobile phone
and in the
hands-free unit are
not identical.
Problems with the mobile phone holder.
Remove the phone from the holder, check the
contacts and clean. Put the phone back into the
holder.
Microphone not connected or wrongly connected.
Check the connections.
The radio setting for phone mute switchover is not
set correctly. See user manual for the radio.
The control unit of the hands-free unit has not been
connected correctly to the radio input for the mute
function. Consult your installation dealer to check
the connections.
The SMS list or phone book have been edited directly
on the mobile phone. Perform data reconciliation by
taking the phone out of the holder and reinserting it.
This will update the data of the hands-free unit and
the phone.
If you cannot find a solution to any problem that may occur, contact an
authorised service agent or call our Customer Helpdesk.
67
 Loading...