

Page 1
www.vdocyclecomputing.com/service
ENGLISH
Installation video
Operating video
Settings video
Page 2

2
M5
Preface
Pack contents
Congratulations
In choosing a VDO computer, you have opted for high-quality
device with first rate technology.
To optimally use the computer, we recommend that you read
this manual carefully. It contains full operating instructions
and many useful tips.
We hope you enjoy cycling with your VDO computer.
Cycle Parts GmbH
First, please ensure that the contents of this pack are
complete:
1 VDO computer
1 battery for the computer
1 speed transmitter, battery installed
1 handlebar bracket
1 spoke magnet (clip magnet)
cable ties for attaching the bracket and
the transmitter
1 quick-start instruction manual
Page 3

3
M5
Table of contents
Display .................................................................. 04
Buttons
................................................................. 07
Functions
.............................................................. 08
Accessing the total values
..................................... 11
Operation while cycling
......................................... 13
Sleep mode ........................................................... 13
Attaching the handlebar bracket
........................... 14
Attaching the speed transmitter
............................ 15
Inserting the computer into the bracket
................. 16
Pairing the transmitter (initial use) ........................ 16
Function testing
.................................................... 17
Settings ................................................................ 18
Language ....................................................................... 18
Unit ............................................................................... 20
Wheel circumference ..................................................... 22
My data ......................................................................... 26
Sensor selection ..............................................................28
Clock ............................................................................. 30
Switching the beeper on or off.........................................32
Total distance ................................................................ 33
Total ride time ............................................................... 35
Total calorie burn ........................................................... 37
Setting the navigator ............................................. 39
Resetting the navigator to zero
.............................. 40
Trip section counter .............................................. 41
Resetting the trip section counter to zero
.............. 42
Resetting trip data after the trip ............................ 42
Bike selection: bike 1 or bike 2
.............................. 43
Backlight mode
...................................................... 44
Heart rate option
................................................... 45
Activating the heart rate option ..................................... 45
Display when using the heart rate option ....................... 46
Button allocation with the heart rate option ................... 46
Functions in the heart rate option .................................. 47
Selecting heart rate zones ............................................. 49
Cadence option
..................................................... 50
Activating the cadence option ........................................ 50
Display when using the cadence option ......................... 51
Button allocation and functions
with the cadence function ............................................. 52
Attaching the cadence transmitter ................................. 52
Heart rate and cadence options
simultaneously activated ...................................... 52
Display with heart rate and cadence .............................. 53
Buttons/functions with
heart rate and cadence options ..................................... 54
Battery status indicator ......................................... 55
Replacing the battery in the computer ................... 55
Replacing the battery in the speed transmitter
...... 56
Terms of guarantee ............................................... 57
Troubleshooting
.................................................... 58
Technical specifications ........................................ 59
Page 4

4
M5
Display
The VDO M5 has a large, easy-to-read display that can be
divided into four areas.
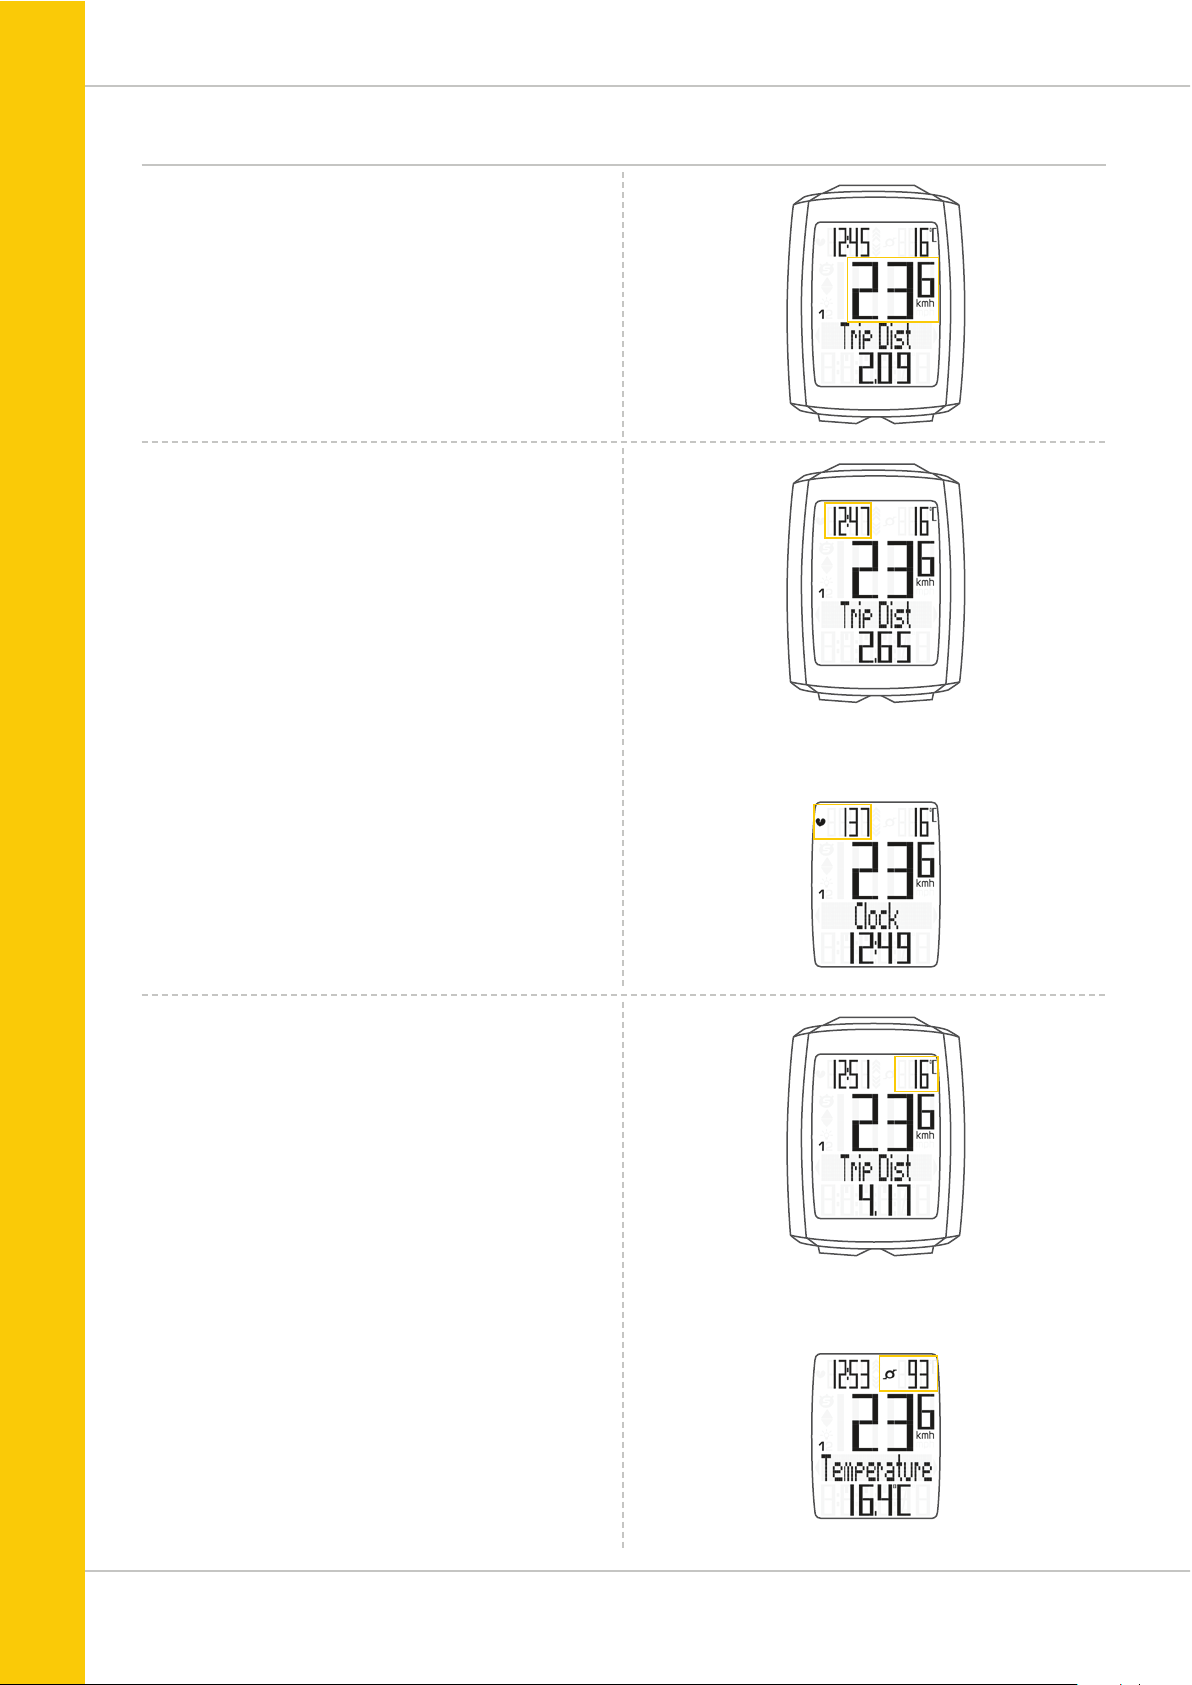
Area 1:
The top line permanently displays the time on the left and the
temperature on the right.
If the heart rate function is selected: the heart rate is
permanently displayed on the left.
If the cadence function is selected: the cadence is
permanently displayed on the right.
If the heart rate + cadence option is selected:
the heart rate is displayed on the left and the cadence on
the right.
Area 2:
The middle line of the display permanently indicates the
current speed.
Area 3:
The third line uses clear text to display a description of
the selected indicator function.
Area 4:
The bottom line of the display shows the value for
the selected function.
Display with heart rate option
Display with cadence option
Display with heart rate + cadence option
Area 1
Area 2
Area 3
Area 4
Area 1
Area 1
Area 1
Page 5

5
M5
Display
On the right of the display, under
the speed indicator, the unit kmh
or mph is displayed.
“ ”
The VDO M5 can be used on two bikes. The
indicator icons 1 and 2 show you whether
your VDO M5 is currently using the settings
for bike 1 or bike 2.
A description of how to switch between bike
1 and bike 2 can be found on page 43.
“UP/DOWN arrow”
The arrows indicate whether you are
currently travelling quicker or slower
than your current average speed.
Page 6

6
M5
Display
The following icons are shown on the left of the display next
to the speed:
“ ”: the icon is ON
if the trip section counter has been started.
A more detailed description of the trip section counter can be
found on page 41.
Light mode ON/OFF
This icon indicates whether the display backlight mode is
switched on or off.
Left/right arrows next to the description of the selected
indicator function (area 3 of the display).
In setting mode, these arrows indicate that you can scroll by
pressing the BIKE or the TOTAL/PULSE/CAD (TPC) button or
increase/reduce the value with both buttons.
Page 7
7
M5
Buttons
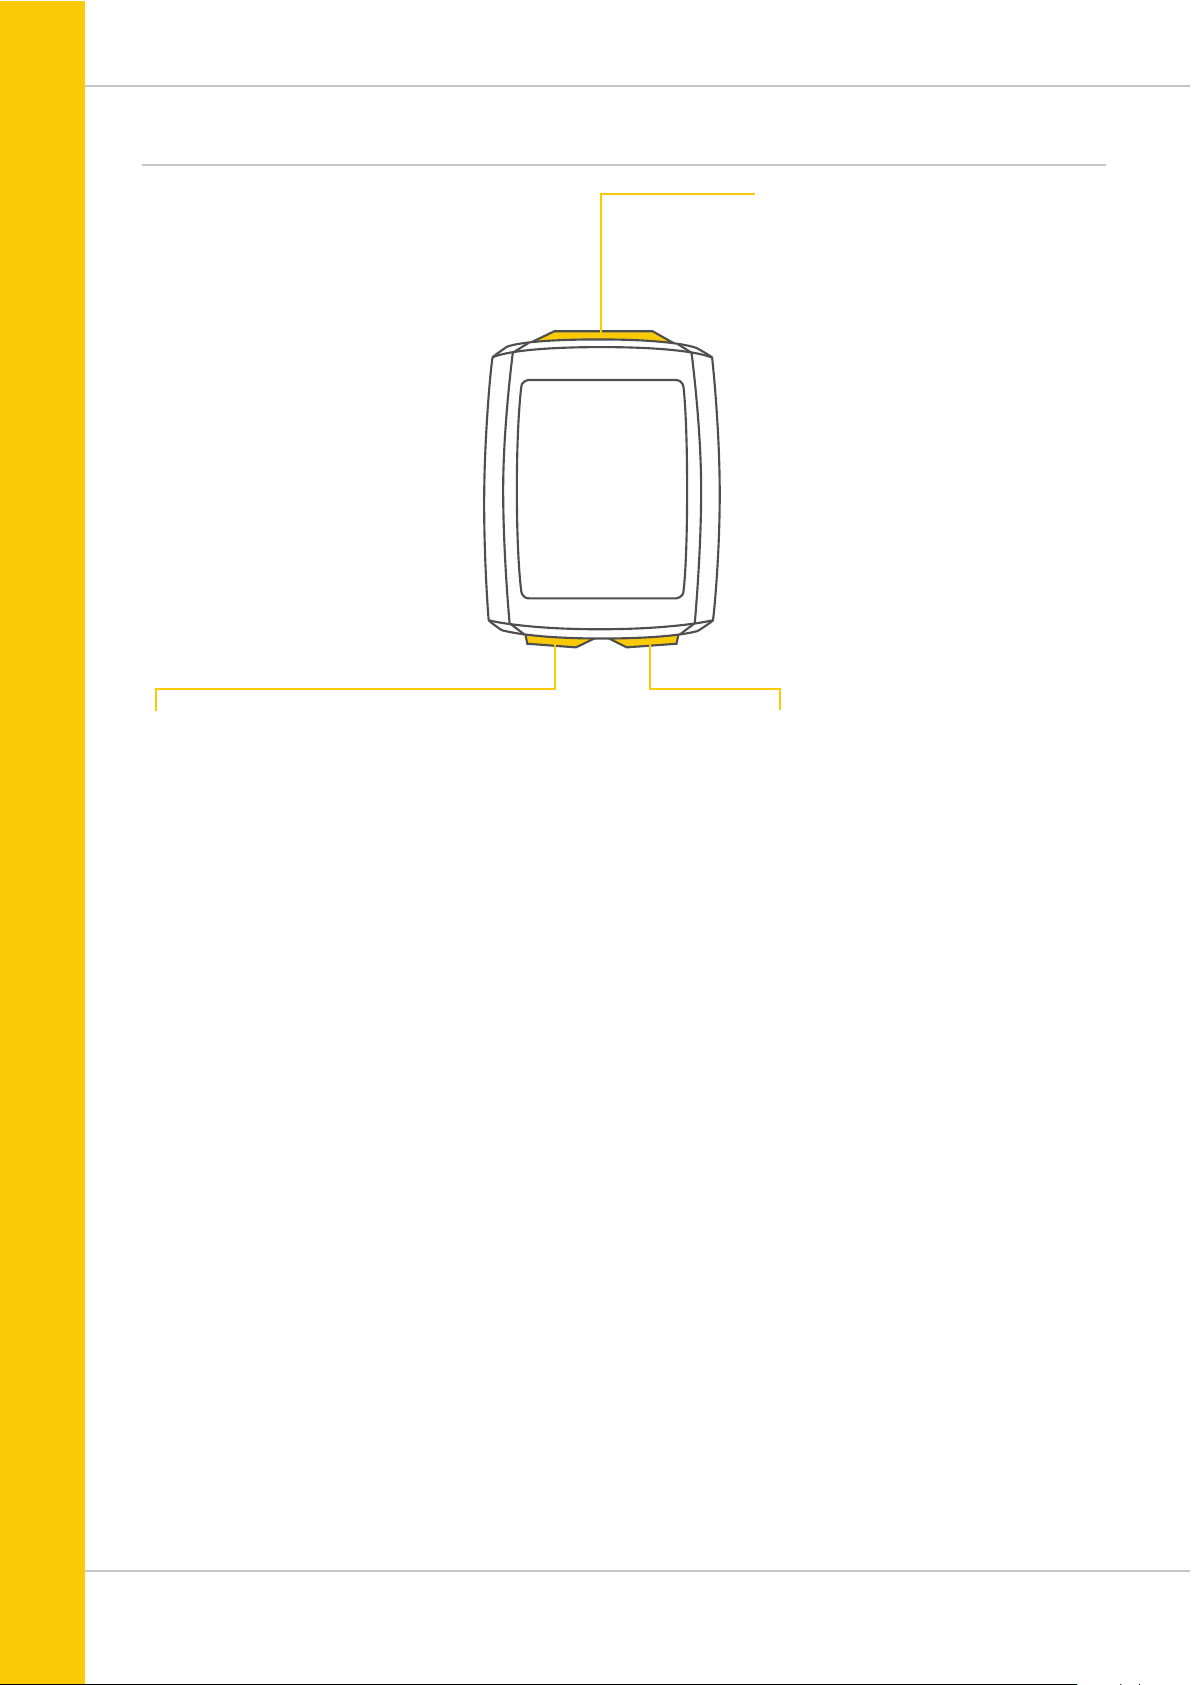
The VDO M5 has three buttons.
SET
In function mode:
– Scroll backwards through the functions
– Open the setting mode (press and hold)
– Access the total values for distance
and ride time (press and hold)
In setting mode:
– Open the setting
– Confirm the setting once ready
– Exit setting mode and return to
function mode
BIKE
In function mode:
– Access the functions
(scroll forwards through the functions)
– Reset trip data to zero
(press and hold)
In setting mode:
– Scroll in the setting menu (forwards)
– Change the data to be set (increase)
– Exit setting mode (one level back);
hold down button a second time,
back to function mode
TPC (TOTAL/PULSE/CAD)
In function mode:
– Access the totals for distance/ride time
– Access the heart rate functions if
the heart rate option is activated
– Access the cadence functions if
the cadence option is activated
In setting mode:
– Scroll in the setting menu (backwards)
– Change the data to be set (decrease)
Page 8
8
M5
Functions
The VDO M5 has the following functions:
Current speed
The current speed is permanently shown on the display.
For a wheel circumference of 2,155 mm, the maximum
possible speed is 199 kmh or 124 mph.
Time
The current time is permanently displayed at the top left.
ATTENTION: if the HEART RATE option is activated,
the current heart rate is displayed here. See page 45.
Current temperature
The current temperature is permanently displayed on
the top right.
ATTENTION: if the CADENCE option is activated,
the current cadence is displayed here. See page 50.
With
HEART RATE option
With
CADENCE option
Page 9
9
M5
Functions
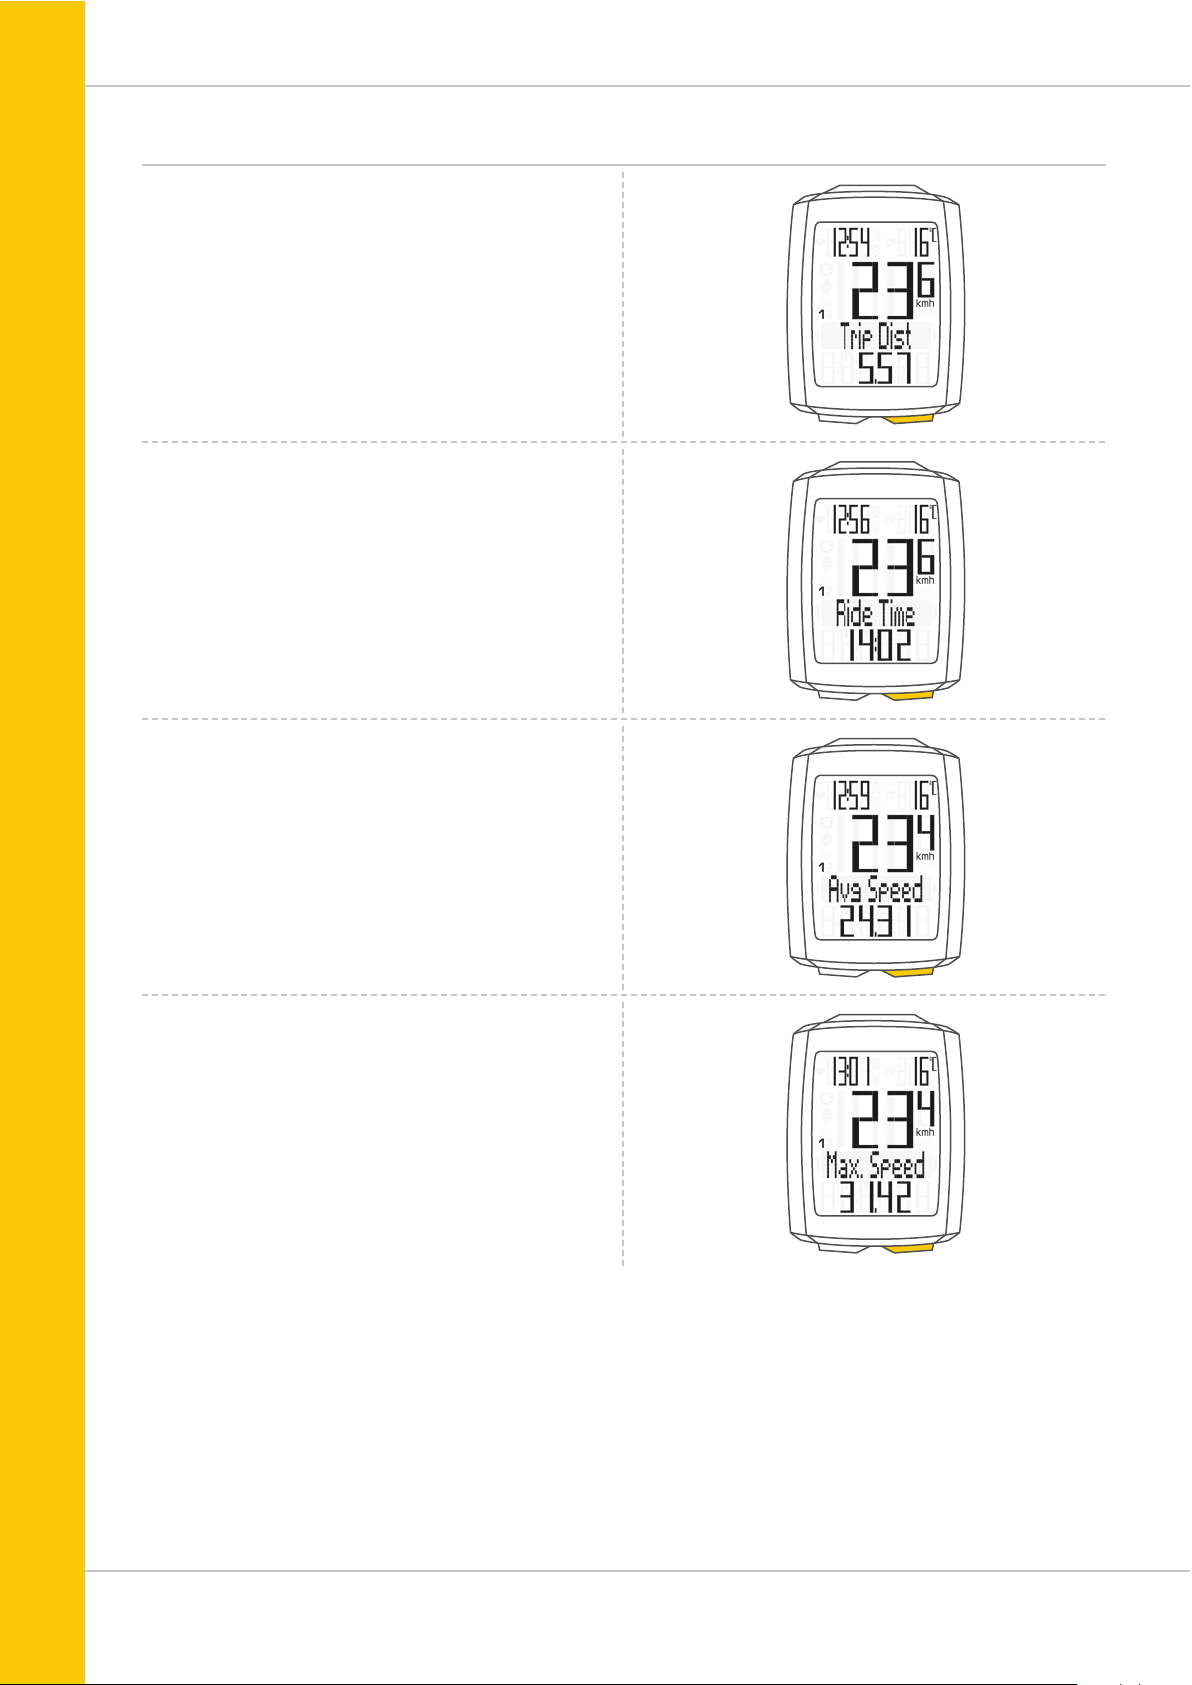
Average speed
for the current trip
The average speed is specified to two decimal places.
Press the BIKE button to access the following information:
Current distance
The current distance counts up to 9,999.99 km or miles.
If this value is exceeded, the counter restarts the current
distance count at zero.
Current ride time
The current ride time counts up to 99:59:59 HH:MM:SS.
If this value is exceeded, the ride time counter restarts at
zero.
Maximum speed
for the current trip
The maximum speed is specified to two decimal places.
Page 10

10
M5
Functions
Section distance
Shows the distance travelled while the trip section counter is
activated.
Navigator
The navigator is a second, completely independent
trip distance counter.
The navigator is used to measure trip sections.
The navigator is particularly helpful when riding a route
shown in a road book (e.g. Moser Bike Guide).
The navigator can:
– be reset to zero as often as desired and
independently of the trip distance counter
– be preset to a specific value
– count forwards or backwards from this value
Information on how to operate the navigator can be found
on page 39.
Navigator setting range: -99.99 to +999.99 km or miles.
Section time
The VDO M5 has a trip section counter.
The trip section counter is like a stopwatch.
If the trip section counter is running, the section time is
recorded, as with a stopwatch. When the trip section counter
is running, the section distance is also recorded.
The trip section counter is started and stopped by pressing
the BIKE + SET buttons (simultaneously press both buttons –
do NOT hold).
ATTENTION: the trip section counter stops automatically
when the speed is zero.
Page 11

11
M5
Total distance 1
(Cumulative value for all trips on bike 1)
The total distance counts up to 99,999 km or miles.
If this value is exceeded, the total distance counter restarts at
zero.
If the unit is switched from miles to km and the conversion
result is greater than 100,000 km, the counter is reset to
zero.
Now press theTPC (TOTAL/PULSE/CAD) button to scroll to
the total ride time
(Cumulative value for all trips)
The total ride time counts up to 9999:59 HHHH:MM. If
this value is exceeded, the total ride time count restarts at
zero.
Accessing the total values
The total values for the distance travelled, the ride time
and the altitude data are accessed separately to the data
for the CURRENT trip.
There are two options for displaying the totals.
OPTION 1:
Access the totals by pressing the TPC (TOTAL/PULSE/
CAD) button.
If you have also used bike 2, the values for
bike 2 are also displayed here.
Press the TPC (TOTAL/PULSE/CAD) button to scroll to the
other values for bike 2.
You can also access the total values (cumulative data for
bike 1 and bike 2).
Page 12

12
M5
Accessing the total values
OPTION 2:
Press and hold the SET button until the TOTAL VALUES
menu opens.
– Press theSET button to open the total values display.
– Press the BIKE or TPC button to scroll in the total values.
The total distance 1 (cumulative distance for all individual
trips on bike 1) is displayed first.
– Press the BIKE or TPC button to scroll to the other totals.
– Total distance 1
– Total ride time 1
If you have also used bike 2, the values for bike 2 are also
displayed here.
– Total distance bike 2
– Total ride time bike 2
You can also access the total values for bike 1 + bike 2
here:
– Total distance bike 1 + bike 2
– Total ride time bike 1 + bike 2
If the HEART RATE option is activated, you will also receive
cumulative data for your calorie burn:
– Calorie burn with bike 1
– Calorie burn with bike 2
– Total calorie burn with bike 1 + bike 2
Press (and hold) the SET button to return from the total
values information to the normal function mode.
Page 13

13
M5
1x
BIKETPC
SET
Operation while cycling
While cycling, the display functions can be accessed by
pressing the BIKE button (scroll forwards through the
functions).
Pressing the BIKE button shows the next function on the
display.
ATTENTION: if the HEART RATE option is activated, the
heart rate functions are displayed by pressing the TPC button.
By pressing the SET button you can also scroll backwards
through the functions. This enables you to quickly display
the desired function.
The totals can be accessed by pressing the TPC (TOTAL/
PULSE/CAD) button.
A detailed description can be found on page 47.
Sleep mode
If you take a break and the M5 is in the bracket,
the computer switches to standby mode after five minutes.
If you set off again after a break, the VDO M5 has an
auto-start function.
The auto-start function is activated by a movement sensor.
Moving the handlebars is enough to wake up the M5 from
sleep mode. The VDO M5 immediately switches to function
mode. The current speed and the distance are once again
displayed after a few seconds.
Page 14

14
M5
90°
334
4
–
–
1
2
1
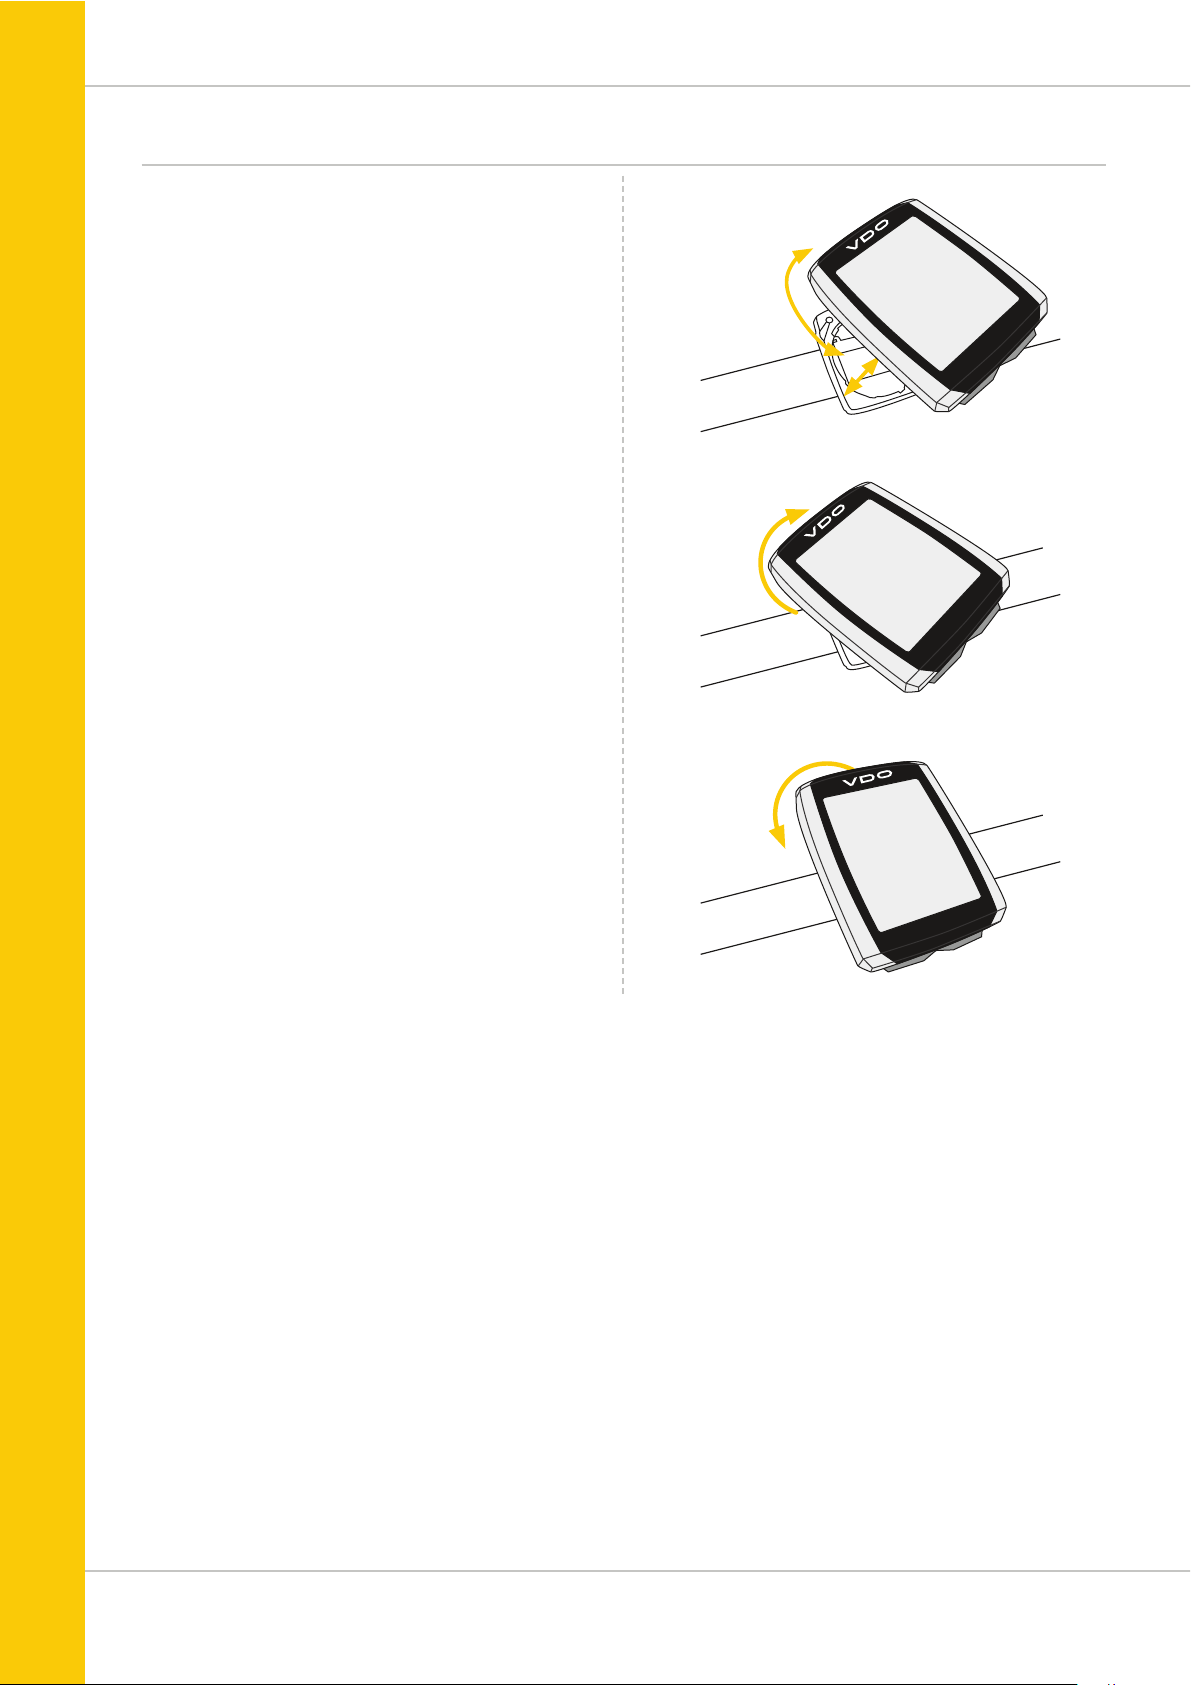
Attaching the handlebar bracket
You can attach the computer to the right or left of
the handlebars or in the centre on the stem. Attach the
handlebar bracket in the corresponding position.
STEP 1
Decide whether you want to attach the computer to the
handlebars or the stem.
STEP 2
Rotate the foot of the handlebar bracket by 90° accordingly.
To do so, undo the screws in the bracket, remove the foot and
rotate it 90° then insert and tighten the screws again.
Attention: do not overtighten the screws.
STEP 3
Guide the cable ties through the slot in the handlebar bracket,
place around the handlebars or the stem and pull (do not pull
tight just yet).
STEP 4
For handlebar attachment: align the computer angle to
achieve optimum readability.
Now pull the cable ties tight.
Use clippers to snip off protruding ends.
Page 15

15
M5
90° – 45°
MAGNET
Attaching the speed transmitter
The transmitter can be attached to the fork leg on the right
or left.
Note:
If you have attached the computer to the stem or the
left of the handlebars, the speed transmitter MUST be
attached to the LEFT fork leg.
STEP 1
Place the rubber shim under the transmitter. Fit the
transmitter on the same side of the forks where you later
want to fit the computer to the handlebars (right or left)
using the cable ties supplied (loosely at first, do not pull
tight just yet).
ATTENTION: The cross-hatched marking on the lid of
the transmitter‘s battery compartment must point
toward the spokes.
Depending on the available space, the transmitter can be
mounted along the front of the fork, on the inside of the fork,
or the back of the fork.
STEP 2
Place the spoke magnet around an outside spoke. The VDO
logo of the rod-shaped magnet core should point toward the
transmitter. Align the magnet with the cross-hatched sensor
marking on the transmitter at a distance of 1- 5 mm.
STEP 3
Align the transmitter and magnet in their final positions and
fasten them in place:
pull the cable ties tight and push the magnet in firmly.
The transmitter should be folded down at a maximum angle
of 45° to the spokes. If you cannot achieve this angle, move
the transmitter down along the fork leg towards the hub until
you have reduced the angle to less than 45°.
LEFT
RIGHT
STEM
LEFT
Page 16
16
M5
1. LOCK 2. CLICK
2. UNLOCK
UNLOCK
LOCK
Inserting the computer into the bracket
The VDO twist-click system securely connects the computer
to the handlebar bracket.
How to insert the computer:
STEP 1
Place the computer into the bracket in a 10 o’clock position.
STEP 2
Rotate the computer to the right into the 12 o’clock position
and click it into the bracket system. A noticeable resistance
must be overcome to move it into place.
STEP 3
To remove the computer, rotate it to the left (without pushing
or pulling).
Memory aid: Rigid to the Right, Loose to the Left
Page 17
17
M5
Function testing
Once the transmitter has been attached, check that it
functions correctly.
How to test the transmitter:
– Insert the computer into the bracket.
The speed indicator flashes. The computer now searches
for its speed transmitter.
– Lift and spin the front wheel.
The green LED on the transmitter flashes several times.
– A speed should now be displayed on the computer.
If the cadence option is activated, the
cadence transmitter must also be paired:
– The cadence indicator flashes. The computer now searches
for its cadence transmitter.
– Rotate the crank or set off.
The green LED on the cadence transmitter flashes
several times.
– A cadence should now be displayed on the computer.
If the heart rate option is activated, the heart rate
transmitter must also be paired:
– The heart rate indicator flashes. The computer now
searches for its heart rate transmitter.
– Put on the heart rate transmitter and wait a few seconds.
– A heart rate should now be displayed on the computer.
If no speed, cadence or heart rate is displayed, there can
be several reasons for this.
The possible reasons are described in the
“Troubleshooting” section.
Pairing the transmitter (initial use)
The VDO M5 automatically pairs the transmitter.
Once the computer has been rotated into place in the bracket,
it starts searching for the transmitter.
The transmitter search is identified by the flashing digits for:
– Speed
– Heart rate (if the heart rate option is activated)
– Cadence (if the cadence option is activated)
The VDO M5 has an automatic bike recognition function.
Depending on whether you are using bike 1 or bike 2,
the data is recorded for bike 1 or bike 2.
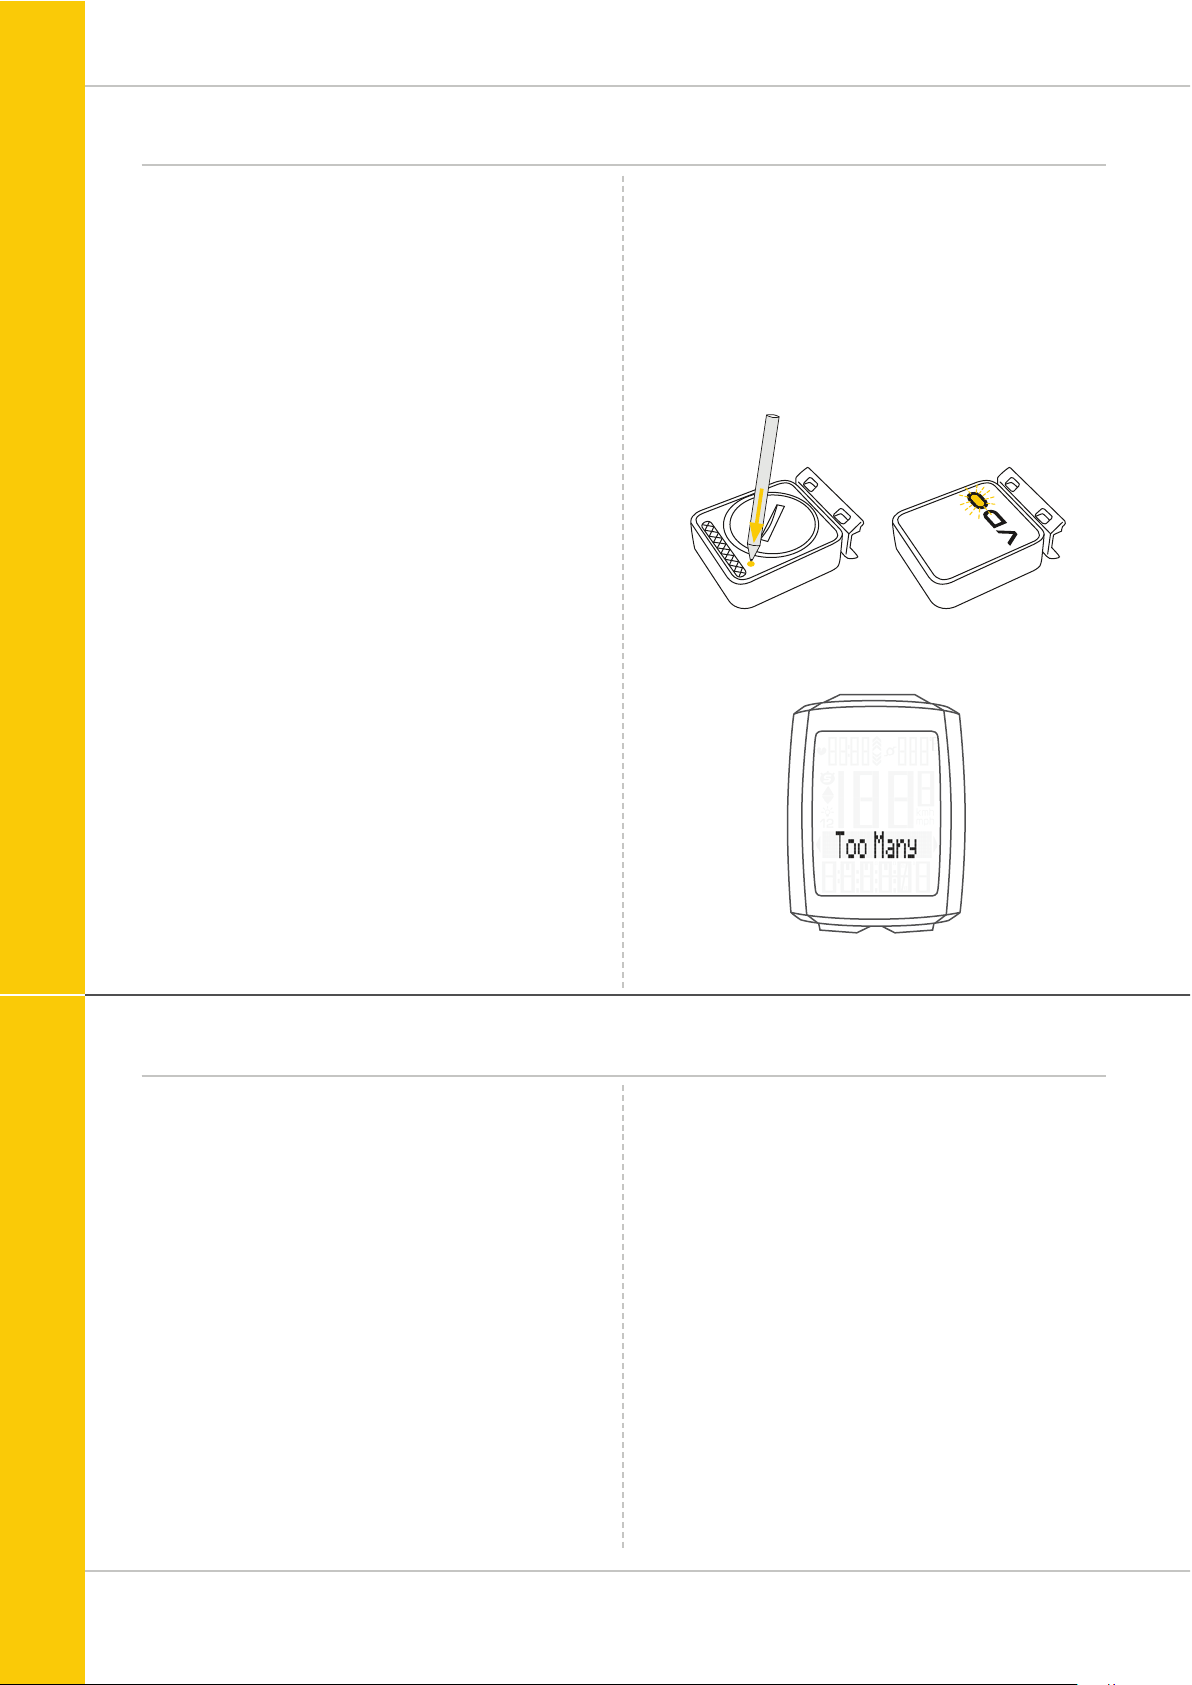
ATTENTION: When other radio signals interfere during the
pairing function, the display shows the message “Too Many
Signals”.
Confirm this message by pressing any key. You will then need
to leave this location and move to another location. Untwist
the computer from the handlbar bracket. Then reinsert the
computer into the handlebar bracket. The computer will now
attempt another pairing.
Potential source of interference:
– LED lights
– Mobile telephone
– GPS recever
– WLAN
– Anti-theft security systems inside the store
These sources can interfere with the pairing.
ATTENTION: when using the transmitter for the first time, the
bike recognition switch must be set to either BIKE 1 or BIKE 2.
Only then will the automatic bike recognition work.
Press and HOLD the button until the LED flashes.
Green flashes once = bike 1 is selected
Red flashes twice = bike 2 is selected
Page 18
18
M5
Settings – language
The following display languages can be selected for
the VDO M5:
– German
– English
– French
– Italian
– Spanish
– Dutch
How to select the language:
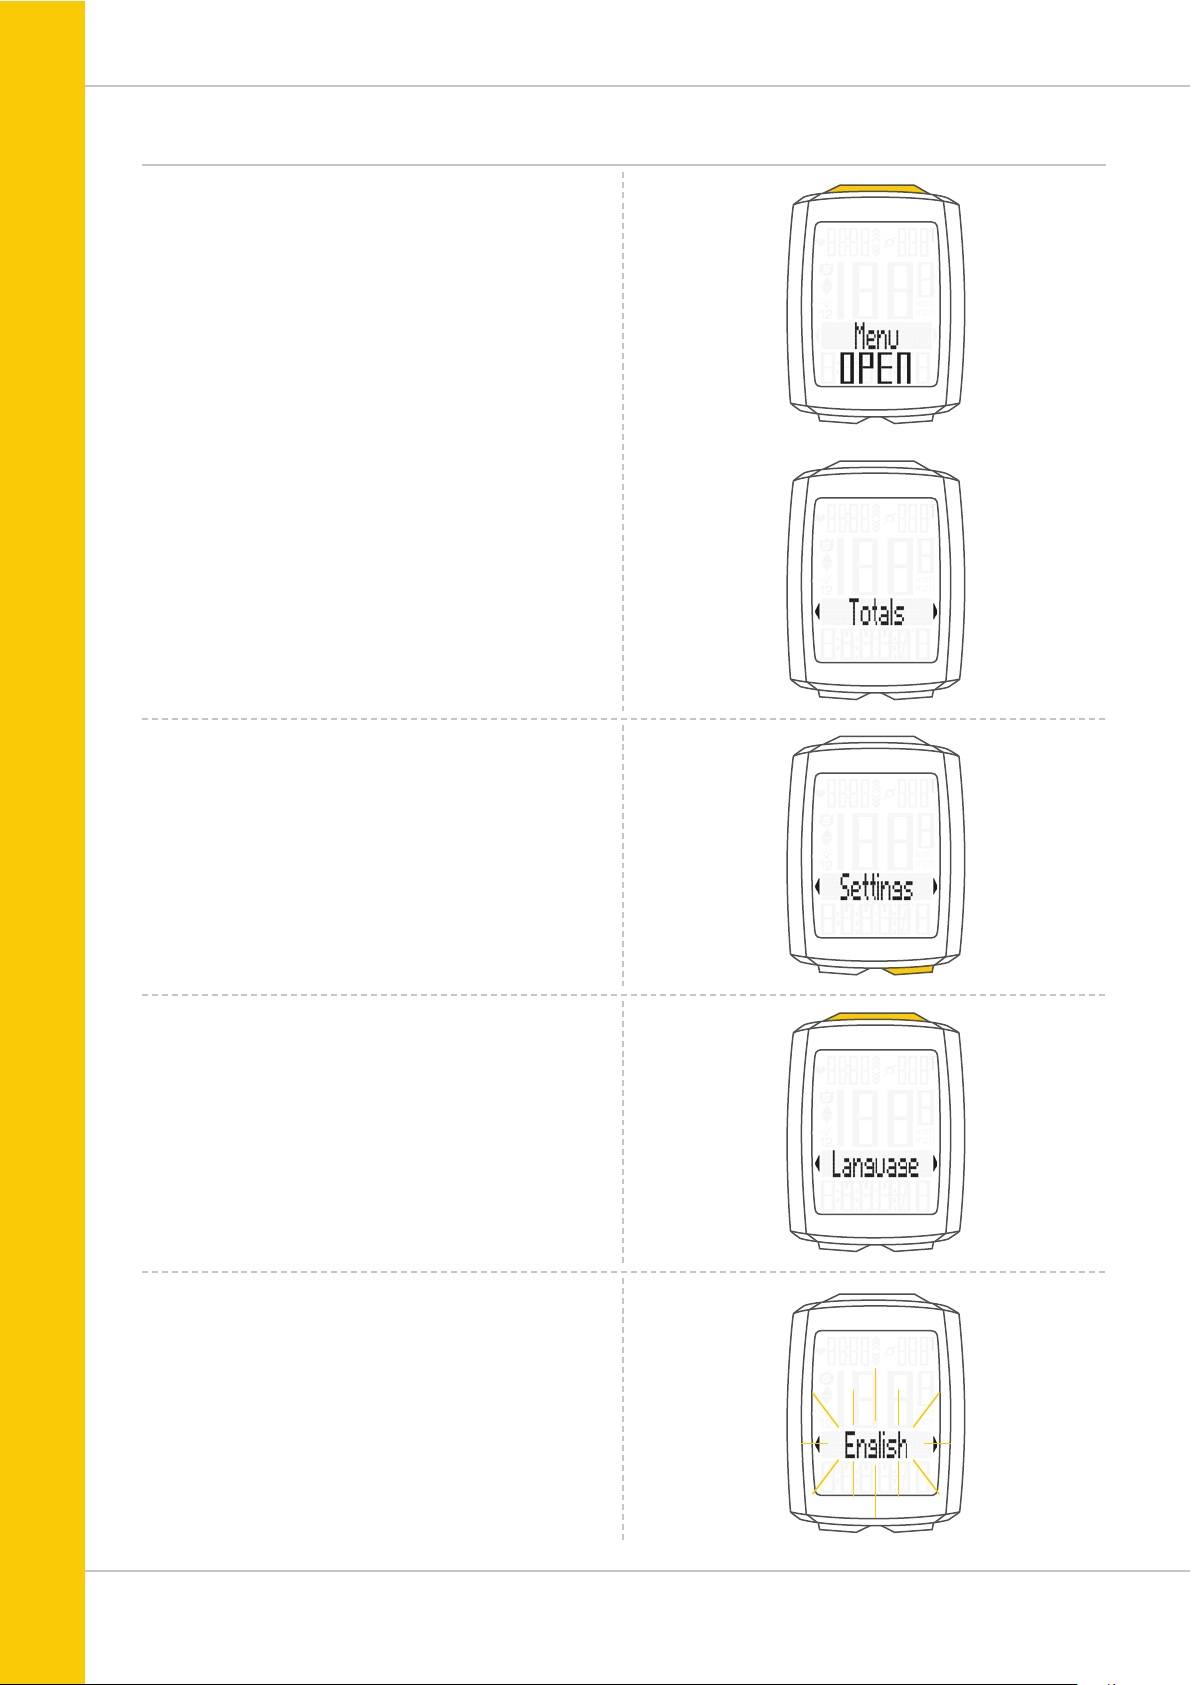
Press and hold the SET button until the settings menu
opens.
The Totals first appear on the display.
Press the BIKE button to scroll to Settings.
Press the SET button to open the settings.
“Language” appears on the display.
Press SET to open the language settings.
English flashes.
Page 19

19
M5
Settings – language
You can now press the BIKE button to select a different
language.
Press the SET button to confirm your language setting.
The response “Set OK” appears on the display.
If you want to configure further settings, press the
BIKE button to access these.
If you do not want to configure any further settings,
press and hold the SET button.
The settings menu closes.
The VDO M5 returns to function mode.
Page 20

20
M5
Settings – unit
Use the unit settings to specify the measurement formats for:
– Speed (kmh or mph)
– Temperature (C or F)
– Weight (kg or lbs)
– Time (24-hour or 12-hour with AM/PM)
How to set the units:
Press and hold the SET button until the settings menu
opens.
Press the BIKE button to scroll from Totals to Settings.
Press the SET button to open the settings.
“Language” appears on the display.
Press the BIKE button to scroll to the setting for the
Dimension.
Press the SET button to open the unit setting.
First set the unit for the speed.
“KMH” flashes in the bottom line of the display.
Press the BIKE button to change the unit to “MPH”.
Press the SET button to confirm the setting.
The setting for the temperature unit next appears on the
display. Set whether the temperature should be displayed in
Celsius or Fahrenheit.
Press the BIKE button to make your setting.
Press the SET button to confirm your setting.
The setting for the unit weight now appears on the display.
KG or LBS (POUNDS) can be selected.
Press the BIKE button to make the setting.
Press the SET button to confirm the setting.
Page 21

21
M5
Settings – unit
The setting for the time format now appears on the display.
Here, you can select a 24-hour format or a 12-hour format
with AM/PM.
Press the BIKE button to make the setting.
Press the SET button to confirm the setting.
The response “Set OK” appears on the display.
If you want to configure further settings, press the BIKE or
TPC button to access these.
If you do not want to configure any further settings,
press and hold the SET button.
The settings menu closes.
The VDO M5 returns to function mode.
Page 22

22
M5
1x
You can set the roll circumference of your wheel in
millimetres on the VDO M5 or select the applicable
tyres from a tyre table.
The more accurate this setting, the more accurate your speed
indicator and the measurement of the distance you have
travelled. You can find the values for your tyres in the tyre size
table and set these in the device.
ATTENTION: the values in the table are approximations only.
The actual values can deviate from the values in the table
depending on the manufacturer and the tyre tread.
If your tyre size is not listed in the table, you can accurately
measure the roll circumference.
How to measure the roll circumference:
STEP 1
Stand your bike up and position the wheel to which you
want to attach the sensor so that the valve is directly on
the ground. Ensure that the tyres are fully pumped up in
accordance with the usage instructions. Mark the position
of the valve on the ground with a line or adhesive strip.
STEP 2
Now push your bike forwards in a straight line until the valve
is back on the ground after one rotation.
Again mark the position of the valve on the ground with a line
or adhesive strip.
STEP 3
The distance between the two marks corresponds to your
wheel circumference or wheel size in millimetres.
Settings – wheel circumference/wheel size
Wheel circumference in mm/inches
Tyre size ETRTO
KMH
Wheel
circumference
in mm
MPH
Wheel
circumference
in inches
16 x 1.75 47-305 1,272 50.1
20 x 1.75 47-406 1,590 62.6
24 x 1.75 47-507 1,907 75.1
26 x 1.5 40-559 2,026 79.8
26 x 1.75 47-559 2,070 81.5
26 x 1.9 2,089 82.2
26 x 2.00 50-559 2,114 83.2
26 x 2.10 54-559 2,125 83.7
26 x 2.25 57-559 2,155 84.8
26 x 2.35 60 -559 2,160 85.0
26 x 2.40 62-559 2,170 85.4
28 x 1.5 40-622 2,224 87.6
28 x 1.6 42-622 2,235 88.0
28 x 1.7 5 47-622 2,268 89.3
29 x 2.10 54-622 2,295 90.4
29 x 2.25 57-622 2,288 90.1
29 x 2.40 62-622 2,300 90.6
650 B 2,100 82.7
700 x 18C 18-622 2,102 82 .8
700 x 20C 20-622 2,114 83.2
700 x 23C 23-622 2,095 82.5
700 x 25C 25-622 2,146 84.5
700 x 30C 30-622 2,149 84.6
700 x 32C 32-622 2,174 85.6
700 x 38C 38-622 2,224 87.6
Page 23

23
M5
Settings – wheel circumference/wheel size
How to set your wheel circumference:
Press and hold the SET button until the settings menu
opens.
Press the BIKE button to switch from Totals to Settings.
Press the SET button to open the settings.
“Language” appears on the display.
Press the BIKE or TPC button to scroll to the setting for the
Wheelsize.
Press the SET button to open the setting (description here is
for bike 1).
In the display, you can now choose whether you want
to manually set the wheel size in millimetres or
select the appropriate tyres from a tyre list.
Press the BIKE button to make the selection.
Confirm the setting by pressing the SET button.
Press the SET button to open the setting for the wheel size.
You can set the wheel size separately for bike 1 and bike 2.
Press the BIKE button to scroll from the setting for bike 1 to
the setting for bike 2.
Page 24

24
M5
Settings – wheel circumference/wheel size
Manual setting by entering the roll circumference
in millimetres
The first two digits (in the example “21”) flash.
Press the BIKE or TPC button to set these digits to the
desired value.
Press the SET button to confirm your setting.
The third digit now flashes and is ready to be set.
Press the BIKE or TPC button to set this digit.
Press the SET button to confirm your setting.
The final digit on the right now flashes.
Press the BIKE or TPC button to set this digit.
Press the SET button to confirm your setting.
Your wheel circumference setting is now complete.
The response ‘Set OK’ appears on the display.
If you want to configure further settings,
press the BIKE button to access these.
If you do not want to configure any further settings,
press and hold the SET button.
The settings menu closes.
The VDO M5 returns to function mode.
Page 25
25
M5
Settings – wheel circumference/wheel size
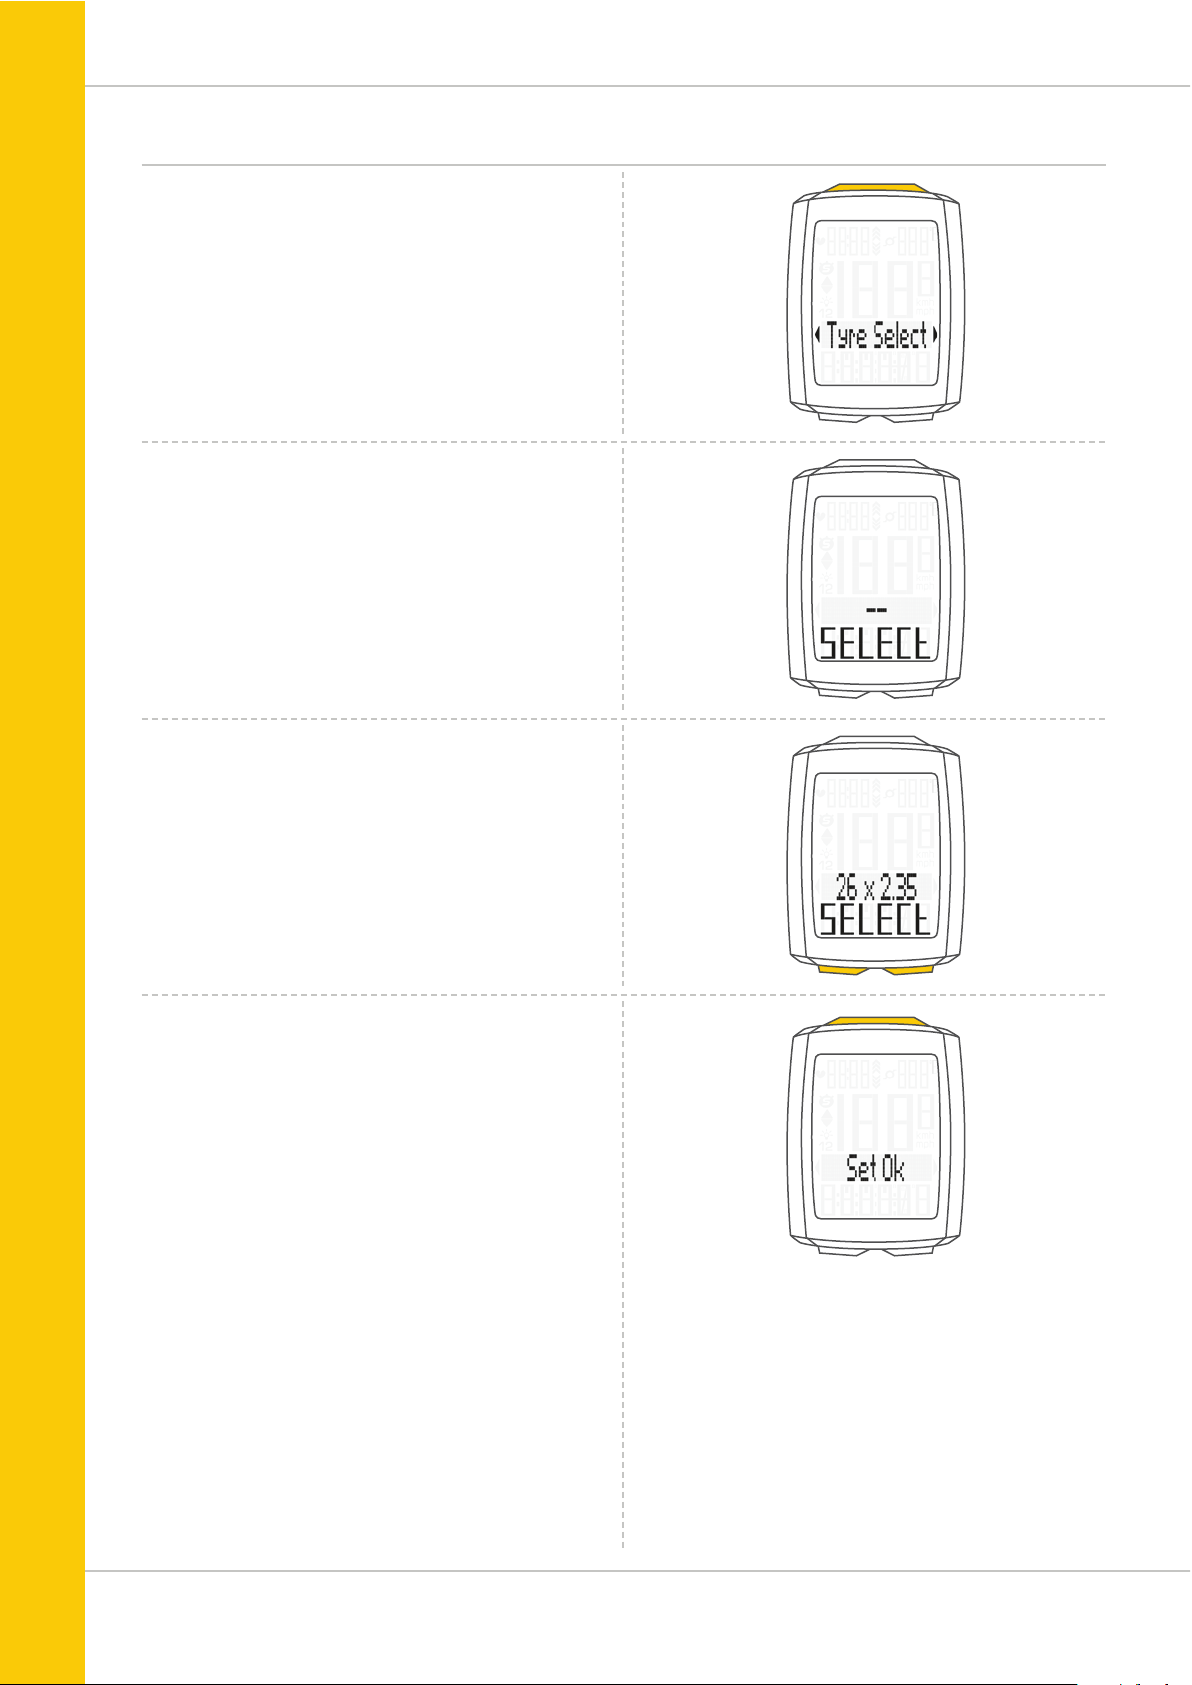
Setting the wheel size using the tyre list
Open the wheel size settings via the tyre list by pressing the
SET button (see previous page).
Press the BIKE or TPC button to scroll through the tyre list
until your tyres are displayed (in the example shown
26 x 2.35)
SELECT (or the last selected tyre size) appears on the display.
Press the SET button to confirm the setting.
The response “Set OK” appears on the display.
If you want to configure further settings,
press the BIKE button to access these.
If you do not want to configure any further settings,
press and hold the SET button.
The settings menu closes.
The VDO M5 returns to function mode.
Page 26
26
M5
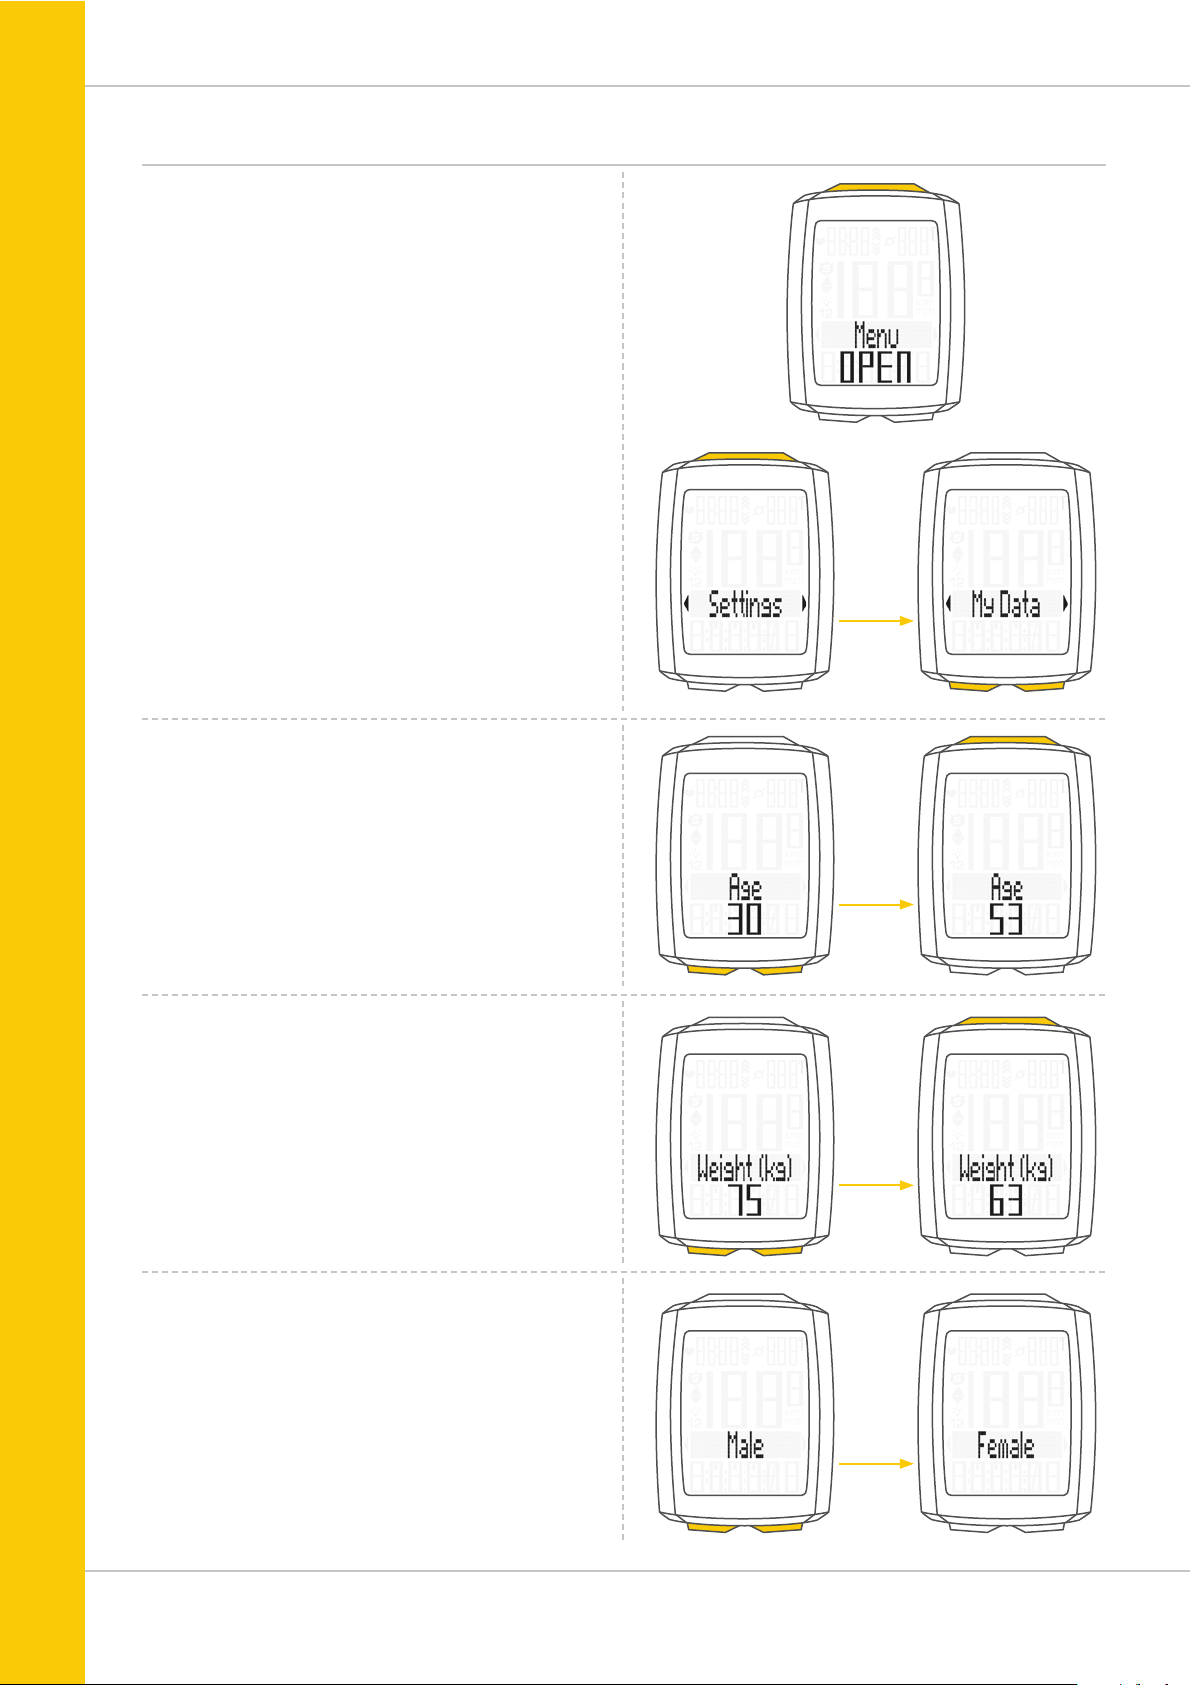
Settings – my data
Use the My data settings to set your data for your age,
weight, gender and HR max. These are required to calculate
the heart rate training zones.
The following are calculated on the basis of the data:
– Maximum personal heart rate (HR max)
– FIT zone
– FAT zone
How to set your My data information:
Press and hold the SET button until the settings menu opens.
Press the BIKE button to switch from Totals to Settings.
Press the SET button to open the settings.
“Language” appears on the display.
Press the BIKE or TPC button to scroll to the My Data
settings.
Press the SET button to open the settings.
First, set your age.
Press the BIKE button to increase the value and the
TPC button to decrease the value.
Press the SET button to confirm the value you have set.
Now set your weight.
Press the BIKE button to increase the value and the
TPC button to decrease the value.
Press the SET button to confirm the value you have set.
Now set your gender.
Press the BIKE or TPC button to select your gender.
Press the SET button to confirm the value you have set.
Page 27

27
M5
Settings – my data
The calculated upper limit for your personal maximum heart
rate (HR max) is now displayed.
The calculated value flashes and can be changed.
Press the BIKE button to increase the value and the
TPC button to decrease the value.
Press the SET button to confirm the value you have set.
The value for the calculated upper limit of the training zone
Own is then displayed.
Press the BIKE button to increase the value and the
TPC button to decrease the value.
The calculated lower limit for the training zone Own is now
displayed.
Press the BIKE button to increase the value and the
TPC button to decrease the value.
Press the SET button to confirm the value you have set.
Press the SET button to confirm the value you have set.
The response “Set OK” appears on the display.
If you want to configure further settings,
press the BIKE button to access these.
If you do not want to configure any further settings,
press and hold the SET button.
The settings menu closes.
The VDO M5 returns to function mode.
Page 28

28
M5
Settings – sensor selection
The M5 can display heart rate and (simultaneously)
cadence data.
To do this, a heart rate and/or cadence transmitter must be
available and installed. Use the sensor selection menu to
select the sensor that should be activated.
ATTENTION: once a transmitter has been selected, the
sensor values (heart rate/cadence) appear on the display.
The display changes.
The layout of the functions on the buttons also changes.
Further information on this is provided on page 51 for the
heart rate option and on page 53 for the cadence option.
How to select the sensors:
Press and hold the SET button until the settings menu opens.
Press the BIKE button to move from Totals to Settings.
Press the SET button to open the settings.
“Language” appears on the display.
Press the BIKE or TPC button to scroll to the setting for the
Sensor.
Press the SET button to open the settings.
Heart rate OFF or ON flashes.
Press the BIKE or TPC button to select ON or OFF.
Press the SET button to confirm the setting.
You can now select whether the cadence transmitter
should be activated.
Press the BIKE or TPC button to select ON or OFF.
Page 29

29
M5
Settings – sensor selection
Press the SET button to confirm the setting.
The response “Set OK” appears on the display.
If you want to configure further settings,
press the BIKE button to access these.
If you do not want to configure any further settings,
press and hold the SET button.
The settings menu closes.
The VDO M5 returns to function mode.
Page 30

30
M5
Settings – clock
On the VDO M5, you can set the time in 12-hour AM/PM
format or 24-hour format.
Specify the desired time format in the unit settings
(see page 20).
How to set the time:
Press and hold the SET button until the settings menu
opens.
Press the BIKE button to move from Totals to Settings.
Press the SET button to open the settings.
“Language” appears on the display.
Press the BIKE or TPC button to scroll to the setting for the
Clock.
Press the SET button to open the setting for the clock.
The hour digits flash.
Press the BIKE or TPC button to change the setting for the
hours.
Press the SET button to confirm your setting.
Display in 24-h format
Display in 12-h format
Page 31

31
M5
Settings – clock
The minute digits now flash on the display.
Press the BIKE or TPC button to set the minutes.
Press the SET button to confirm your setting.
The response “Set OK” appears on the display.
If you want to configure further settings,
press the BIKE button to access these.
If you do not want to configure any further settings,
press and hold the SET button.
The settings menu closes.
The VDO M5 returns to function mode.
Display in 24-h format
Display in 12-h format
Page 32

32
M5
Settings – switching the beeper on or off
On the M5, you can switch the beeper for the heart rate
warning on or off.
How to set the beeper:
Press and hold the SET button until the settings menu
opens.
Press the BIKE button to move from Totals to Settings.
Press the SET button to open the settings.
“Language” appears on the display.
Press the BIKE or TPC button to scroll to the settings for
the Beeper.
Press the SET button to open the settings.
Press the BIKE or TPC button to select whether the beeper
should be switched on or off.
Press the SET button to confirm the setting.
The response “Set OK” appears on the display.
If you want to configure further settings,
press the BIKE or TPC button to access these.
If you do not want to configure any further settings,
press and hold the SET button.
The settings menu closes.
The VDO M5 returns to function mode.
Page 33

33
M5
Settings – total distance
You can set the total distance ridden on the
VDO M5. For example, you can enter your data here at the
start of a new cycling season. You can set the total distance
separately for bike 1 and bike 2.
ATTENTION: the M5 has a data memory.
No data is lost when the battery is replaced.
How to set the total distance:
Press and hold the SET button until the settings menu
opens.
Press the BIKE button to move from Totals to Settings.
Press the SET button to open the settings.
“Language” appears on the display.
Press the BIKE or TPC button to scroll to the setting for
the Total Dist.
Press the SET button to open the settings.
Press the BIKE or TPC button to select whether
you want to set the total distance for bike 1 or bike 2.
Press the SET button to confirm the setting.
The left digit flashes.
Press the BIKE or TPC button to change this digit.
Once this digit has been set, confirm the setting by pressing
the SET button.
Page 34

34
M5
Settings – total distance
The next digit starts to flash and is ready to be set.
Press the BIKE or TPC button to change this digit.
Once this digit has also been set, confirm the setting
by pressing the SET button.
The next digit flashes.
Once you have set all the digits, confirm the setting again
by pressing the SET button.
The response “Set OK” appears on the display.
The set value is stored.
If you want to configure further settings,
press the BIKE or TPC button to access these.
If you do not want to configure any further settings,
press and hold the SET button.
The settings menu closes.
The VDO M5 returns to function mode.
Page 35

35
M5
Settings – total ride time
You can set the total ride time on the VDO M5.
For example, you can set your total ride time (cumulative ride
time for all trips) at the start of the new cycling season.
You can set the values separately for bike 1 and bike 2.
ATTENTION: the M5 has a data memory.
No data is lost when the battery is replaced.
How to set the total time:
Press and hold the SET button until the settings menu
opens.
Press the BIKE button to move from Totals to Settings.
Press the SET button to open the settings.
“Language” appears on the display.
Press the BIKE or TPC button to scroll to the settings for
the Total Time.
Press the SET button to open the setting for the total time.
Press the BIKE or TPC button to select whether you want to
set the total time for bike 1 or bike 2.
Press the SET button to confirm the setting.
The left digit of the hours setting flashes and is ready
to be set.
Press the BIKE or TPC button to set the value of this digit.
Press the SET button to confirm your setting.
Page 36

36
M5
Settings – total ride time
The next digit on the left starts to flash and is ready
to be set.
Press the BIKE or TPC button to set the value of this digit.
Press the SET button to confirm your setting.
Once you have set all four digits, confirm the setting again
by pressing the SET button.
The setting for the minutes is then opened.
Press the BIKE or TPC button to set the minutes.
Once the minutes have been set, confirm the setting by
pressing the SET button.
The response “Set OK” appears on the display.
If you want to configure further settings,
press the BIKE button to access these.
If you do not want to configure any further settings,
press and hold the SET button.
The settings menu closes.
The VDO M5 returns to function mode.
Page 37

37
M5
Settings – total calorie burn
On the M5, the total calorie burn can be set for all trips,
separately for bike 1 and bike 2, for example at the start of
the new cycling season.
ATTENTION: the M5 stores all total values even if you
replace the batteries. No data is lost.
How to set the total calorie burn:
Press and hold the SET button until the settings menu
opens.
Press the BIKE button to move from Totals to Settings.
Press the SET button to open the settings.
“Language” appears on the display.
Press the BIKE or TPC button to scroll to the settings for
the Total Kcal (total calorie burn).
Press the SET button to open the settings.
Press the BIKE or TPC button to select whether you want to
configure the setting for bike 1 or bike 2.
Press the SET button to confirm your selection and open the
setting.
The left digit flashes. Press the BIKE or TPC button
to set the value for this digit.
Press the SET button to confirm your setting.
Page 38

38
M5
Settings – total calorie burn
The next digit on the left starts to flash and is ready
to be set.
Press the BIKE or TPC button to set the value for this digit.
Press the SET button to confirm your setting.
Once all the digits have been set, confirm the setting by
pressing the SET button.
The response “Set OK” appears on the display.
If you want to configure further settings,
press the BIKE button to access these.
If you do not want to configure any further settings,
press and hold the SET button.
The settings menu closes.
The VDO M5 returns to function mode.
Page 39

39
M5
Setting the navigator
The navigator is a second, completely independent
trip distance counter.
The navigator can:
– be reset to zero any number of desired times during a trip
– be set to a distance value
– count forwards or backwards from the set distance value.
Navigator setting range: -99.99 to +999.99 km or miles.
How to set the navigator:
Press the BIKE button to display the navigator function.
Once the navigator function is on the display, press
and hold the SET button until the settings menu opens.
First select whether the navigator should count forwards or
backwards from the set value.
Press the BIKE button to make the setting.
Press the SET button to confirm your setting.
The screen for setting the navigator’s distance value is
opened. The first digit on the left flashes.
Press the BIKE or TPC button to change this digit.
Press the SET button to confirm the entry.
Page 40

40
M5
Setting the navigator
The second digit on the left flashes.
Press the BIKE or TPC button to change this digit.
Press the SET button to confirm the entry.
Once all the digits have been set, confirm the entry
by pressing the SET button.
The response“Set OK” appears on the display.
The settings menu closes.
The VDO M5 returns to function mode.
Once the navigator function appears on the display,
press and hold the BIKE button.
Navigator RESET appears on the display.
If you continue to hold down the BIKE button,
the navigator is reset to zero.
Resetting the navigator to zero
The navigator can be reset to zero any number of desired
times during a trip.
How to reset the navigator:
Press the BIKE button to display the navigator function.
Page 41

41
M5
Trip section counter
The VDO M5 has a time and distance counter that works
similarly to a stopwatch.
When the trip section counter is running, the time and
distance covered in this time are recorded.
Starting the trip section counter
Simultaneously press the BIKE and SET buttons.
The section time immediately appears on the display and
the icon for the trip section counter is visible.
Press the BIKE button to scroll to the trip section.
Stopping the trip section counter
To stop the trip section counter,
simultaneously press the BIKE and SET buttons.
ATTENTION: if you take a break (speed = zero),
the trip section counter will automatically stop.
When you set off again (the trip section counter is still active,
as shown by the icon “ ” on the display), the trip section
counter will automatically restart.
Restarting the trip section counter
If you have manually stopped the trip section counter and
now want to restart it, simultaneously press the BIKE and
SET buttons again. The trip section counter continues from
the last value.
Page 42

42
M5
Resetting the trip section counter to zero
To reset the counter either the section time or the
section distance must be shown on the display.
Press and hold the BIKE button.
The text Trip Section RESET appears on the display.
If you continue to hold down the BIKE button,
the trip section data is now reset to zero.
The following data is reset to zero:
– Section distance
– Section ride time
Resetting trip data after the trip
After each trip, you can reset the data for this trip to zero.
The VDO M5 is then ready for the next trip.
ATTENTION: your total distance (total number of kilometres
ridden), total ride time and total calorie burn (if the heart rate
function is activated) are not reset to zero.
How to reset the trip data:
Press and hold the BIKE button for a few seconds.
The text Tour Data RESET appears on the display.
If you continue to hold down the BIKE button,
the trip data is now reset to zero.
The following data is reset to zero:
– Distance
– Ride time
– Average speed
– Maximum speed
If the heart rate option is activated (see page 45):
– Average heart rate
– Maximum heart rate
– Time in, over and under the set training zone
– Calories
If the cadence option is activated (see page 50):
– Average cadence
– Maximum cadence
Page 43

43
M5
Bike selection: bike 1 or bike 2
The VDO M5 has an automatic bike recognition function.
The digital data from the speed transmitter also informs the
VDO M5 of whether bike 1 or bike 2 is currently being used.
The total data is correspondingly stored for bike 1 or bike 2.
ATTENTION: when using the transmitter for the first time, the
bike recognition switch must be set to either BIKE 1 or BIKE 2.
Only then will the automatic bike recognition work.
See Setting the transmitter on page 16.
Page 44

44
M5
Switching the backlight mode on or off
The M5 has a backlit display.
If backlight mode is activated, the display illuminates for
several seconds each time a button is pressed.
If backlight mode is activated, the light icon can be seen at
the top of the display.
ATTENTION: backlight mode is switched off if the M5 goes
into sleep mode, e.g. if you take a break during a trip.
This avoids unnecessary use of the battery.
How to switch ON the backlight mode:
Simultaneously press the SET and TPC buttons.
The text “Light on” and the light icon are displayed.
How to switch OFF the backlight mode:
Simultaneously press the SET and TPC buttons.
The text “Light off” is displayed and the light icon
disappears.
Page 45

45
M5
Activating the heart rate option
The M5 can also display heart rate values.
ATTENTION: the heart rate option can only be activated if you
have the VDO heart rate transmitter, product no. CP3013.
How to activate the heart rate option:
Press and hold the SET button until the settings menu
opens.
Press the BIKE button to move from Totals to Settings.
Press the SET button to open the settings.
“Language” appears on the display.
Press the BIKE or TPC button to scroll to the setting for
the Sensor.
Press the SET button to open the setting for the sensors.
‘HR OFF’ flashes on the display.
Now press the BIKE or TPC button to select ON.
Press the SET button to confirm the selection.
The selection is confirmed on the display with the text
“Set OK”.
The heart rate option is now activated.
Press and hold the SET button to return to function mode.
Page 46

46
M5
Display when using the heart rate option
If the heart rate option is activated, the current heart rate is
shown at the top left of the display.
If the heart rate option is activated the indicator arrows
show whether the heart rate is below or above the selected
training zone.
The time, which is also displayed if the heart rate option is
disabled, is now accessed as a function by pressing the BIKE
button.
Button allocation with the heart rate option
If the heart rate option is activated, the heart rate functions
can be accessed by pressing the TPC (TOTAL/PULSE/CAD)
button.
When the heart rate option is activated, the TPC
(TOTAL/PULSE/CAD) button has the following functions:
TPC (TOTAL/PULSE/CAD)
In function mode:
– Access the heart rate functions
(scroll forwards through the functions)
– Select the heart rate training zone
(press and hold)
In setting mode:
– Scroll in the setting menu (backwards)
– Change the data to be set (decrease)
Page 47

47
M5
Functions in the heart rate option
If the heart rate option is activated, the heart rate functions
are accessed by pressing the TPC (TOTAL/PULSE/CAD) button.
The following functions can be sequentially accessed:
Zones graph
With the current heart rate as a percentage of the personal
maximum heart rate and an indicator of the selected training
zone (FIT/FAT/OWN).
Calories
Indicates the calories burnt on the current trip.
Average heart rate
Indicates the average heart rate on the current trip.
Maximum heart rate
Indicates the maximum heart rate on the current trip.
Time below
the selected training zone.
Indicates the time during which the current heart rate
was under the lower limit for the training zone.
Page 48

48
M5
Functions in the heart rate option
Time in
the selected training zone.
Indicates the time during which the current heart rate
was within the selected training zone.
Time above
the selected training zone.
Indicates the time during which the current heart rate
was above the upper limit for the training zone.
Page 49

49
M5
Selecting the heart rate training zone
If the heart rate option is activated, you can choose between
three training zones:
Training zone FAT
Select this training zone if you want to promote optimum fat
burning while training.
Lower limit: 55 percent of the HR max
Upper limit: 70 percent of the HR max
Training zone FIT
Select this training zone if you want to enhance your general
fitness.
Lower limit: 70 percent of the HR max
Upper limit: 80 percent of the HR max
Training zone OWN
Select this training zone if you have defined your own training
target. You can set the lower and upper limits in the settings
under MY DATA.
How to set the limits:
Press and hold the TPC (TOTAL/PULSE/CAD) button until
the heart rate zone selection menu opens.
Based on the calculated or set HR max, the calculated or set
lower and upper limits for the respective training zone will
appear on the display.
Press the BIKE or TPC button to select one of the
three training zones.
Press the SET button to confirm the selection.
The VDO M5 confirms your selection by displaying the text
“Set OK”.
The M5 automatically returns to function mode.
Page 50

50
M5
Activating the cadence option
The VDO M5 can also display the cadence.
ATTENTION: to display the cadence, the VDO cadence
transmitter, product no. CP3012, must be installed.
The cadence option must be activated in the settings.
How to activate the cadence option:
Press and hold the SET button until the settings menu
opens.
Press the BIKE button to move from Totals to Settings.
Press the SET button to open the settings.
“Language” appears on the display.
Press the BIKE or TPC button to scroll to the setting for the
Sensor.
Press the SET button to open the setting for the sensors.
Press theSET button to confirm HR OFF.
You can now press the BIKE button to activate the cadence.
Press the Bike button to switch from OFF to ON.
Press the SET button to confirm your selection.
The cadence option is now activated.
Page 51

51
M5
Activating the cadence option
The VDO M5 confirms the setting by displaying the text
“Set OK”.
If you want to configure further settings,
press the BIKE button to access these.
If you do not want to configure any further settings,
press and hold the SET button.
The settings menu closes.
The VDO M5 returns to function mode.
Display when using the cadence option
If the cadence option is activated, the current cadence is
shown at the top right of the display.
The temperature indicator can now be found in the
BIKE function menu.
Page 52

52
M5
Button allocation and functions with the cadence option
If the cadence option is activated, the cadence functions are
displayed by pressing the TPC (TOTAL/PULSE/CAD) button.
Current cadence:
Permanently shown on the top right of the display.
Average cadence CAD AVG:
The average cadence for the current trip is displayed.
Maximum cadence CAD MAX:
The maximum cadence for the current trip is displayed.
Attaching the cadence transmitter
Heart rate + cadence option
A description of how to attach the cadence transmitter can be
found in the cadence transmitter instruction manual.
On the VDO M5, you can simultaneously activate the heart
rate and cadence options.
The heart rate and cadence are both shown on the display
simultaneously.
A video of how to attach the cadence transmitter can be
found at: www.vdocyclecomputing.com/service
For how to activate the heart rate option, see page 45.
For how to activate the cadence option, see page 50.
Page 53

53
M5
Display with heart rate + cadence
If both the heart rate and cadence options are activated
both values are simultaneously shown on the display.
The current heart rate is displayed at the top left instead of
the time.
The cadence is displayed on the top right instead of the
temperature.
The time and temperature can now be accessed by pressing
the BIKE button.
Page 54

54
M5
Button allocation/functions with the heart rate + cadence options
All heart rate and cadence functions are accessed by pressing
the TPC (TOTAL/PULSE/CAD) button.
A description of the heart rate functions can be found
on page 47.
A description of the cadence functions can be found
on page 54.
Page 55

55
M5
OPEN CLOSE
N
EW
OL
D
10 SEC.
1
2
3
Replacing the battery in the computer
To ensure your cycle computer is fully functional,
we recommend replacing the battery annually.
ATTENTION: your settings, total distance and total ride time
information remain stored when you replace the battery.
NO data is lost.
You need a 3 V 2450 battery.
We recommend using a branded battery from Sony,
Panasonic, Varta or Duracell.
How to replace the battery:
STEP 1
Use a coin to remove the battery compartment cover.
STEP 2
Remove the dead battery.
ATTENTION: Wait for 10 seconds before inserting the new
battery. The electronics need this time to recognise that the
battery is being changed.
STEP 3
Insert the battery into the computer housing with the +pole
up. Ensure that the battery is not tilted.
Ensure that the rubber seal lies smoothly on the lid of the
battery compartment.
STEP 4
Insert the battery compartment cover into the opening and
use a coin to turn it to right as far as it will go.
Battery status indicator
The VDO M5 has a low battery warning.
If the remaining battery capacity falls below a certain level,
a warning appears on the display.
Press any button to clear the warning.
Following a low battery warning, you still have
approximately two weeks to replace the battery.
You also receive low battery warnings for the
speed transmitter, heart rate transmitter and
cadence transmitter.
Page 56

56
M5
OPEN CLOSE
OL
D
N
EW
10 SEC.
1
2
3
Replacing the battery in the speed transmitter
The battery in the speed transmitter should be replaced
annually to guarantee seamless wireless transmission.
You need a 3 V 2032 battery.
We recommend using a branded battery from Sony,
Panasonic, Varta or Duracell.
How to replace the battery:
STEP 1
Use a coin to remove the battery compartment cover.
STEP 2
Remove the dead battery.
ATTENTION: Wait for 10 seconds before inserting the new
battery. The electronics need this time to recognise that the
battery is being changed.
STEP 3
Insert the battery into the transmitter housing with the +pole
up. Ensure that the battery is not tilted.
Ensure that the rubber seal lies smoothly on the lid of the
battery compartment.
STEP 4
Insert the battery compartment cover into the opening and
use a coin to turn it to right as far as it will go.
Page 57

57
M5
Terms of guarantee
VDO Cycle Parts offers a two-year guarantee on your
VDO computer,starting from the date of purchase.
This guarantee covers material and processing defects on
the computer itself, the sensor/transmitter and the handlebar
bracket. Cables, batteries and mounting materials are not
covered by the guarantee.
The guarantee is only valid if the affected components have
not been opened (exception: computer’s battery compartment), no force has been used and there is no sign of wilful
damage.
Please store the purchase receipt in a safe place as it must
be submitted in the event of a complaint.
If your complaint is legitimate, you will receive a comparable
replacement device. You are not entitled to a replacement of
the identical model if the model in question is no longer in
production due to a model change.
Please contact the dealer from whom you purchased the
device for all complaints and guarantee claims. Alternatively,
send your complaint directly to:
Cycle Parts GmbH
Le Quartier Hornbach 13
67433 Neustadt/Weinstrasse
If you have any technical questions, please do not hesitate to
call our hotline on:
+49 (0) 63 21- 95 82 7 - 10
+49 (0) 63 21- 95 82 7 - 18
Our telephone hotline is available to assist you
9:00-12:00, Monday to Friday
service@cycleparts.de
Additional technical information is available at:
www.vdocyclecomputing.com
We reserve the right to make technical changes in the course
of further development.
Page 58

58
M5
Troubleshooting
Error Possible cause Correction
Half segments on the display
(e.g. after a battery change)
Computer software not running
correctly after battery change
Remove and re-insert the battery
No speed displayed Distance from sensor to magnet too
great or magnet not correctly aligned
with the sensor position
Correct the sensor and magnet positions
No speed displayed Computer not properly clicked into the
handlebar bracket
Insert the computer into the handlebar
bracket and rotate it as far as possible
(“click”)
No speed displayed Wheel circumference is set incorrectly
or to zero
Set the wheel circumference
No speed displayed Battery in the transmitter is dead Replace the battery in the transmitter
Display becomes weak Battery dead Check the battery, replace if nec.
No heart rate displayed Heart rate sensor has not been selected. Select the heart rate sensor from the
sensor selection area
No heart rate displayed Heart rate sensor has not been paired Activate the heart rate sensor, correctly
position the heart rate chest belt on your
body. Insert the computer into the
handlebar bracket, heart rate symbol
flashes to indicate pairing
No heart rate displayed Battery in the heart rate chest belt is
dead
Replace the battery in the heart rate
chest belt
No cadence displayed Cadence sensor has not been paired Activate the cadence sensor, insert the
computer into the handlebar bracket,
cadence symbol flashes to indicate
pairing
No cadence displayed Battery in the cadence transmitter is
dead
Replace the battery in the cadence
transmitter
Page 59

59
M5
Technical specifications
Computer:
Approx. 49 H x 38 W x 12 D mm
Display:
H approx. 39 mm, W approx. 29 mm
Computer weight:
Approx. 30 g
Handlebar bracket weight:
Approx. 10 g
Speed transmitter weight:
Approx. 20 g
Cadence transmitter weight:
Approx. 20 g
Heart rate transmitter weight:
Approx. 50 g
Computer battery:
3V, type 2450
Computer battery service life:
Approx. 2 years (approx. 400 ride hours,
approx. 8,000 km (5,000 mi)
Speed transmitter battery:
3V, type 2032
Speed transmitter battery life:
Approx. 1.5 years (approx. 1,000 ride hours,
approx. 20,000 km (12,000 mi)
Cadence transmitter battery:
3V, type 2032
Cadence transmitter battery life:
Approx. 1.5 years (approx. 1,000 ride hours,
approx. 20,000 km (12,000 mi)
Heart rate transmitter battery:
3V, type 2032
Heart rate transmitter battery life:
Approx. 1.5 years (approx. 1,000 ride hours,
approx. 20,000 km (12,000 mi)
Wireless transmission ranges:
Speed transmitter: 75 cm
Cadence transmitter: 90 cm
Heart rate transmitter: 75 cm
Temperature indicator range on the display:
-20°C to +70°C/-4°F to +158°F
Speed range for wheel size 2,155 mm:
Min 2.0 kmh,
Max 199 kmh
Ride time measurement range:
Up to 99:59:59 HH:MM:SS.
Trip distance odometer measurement range:
Up to value 9,999.99 km or mi
NAVIGATOR measurement range:
From -99.99 to +999.99 km or mi
Total km measurement range:
Up to value 99,999 km or mi
Total ride time measurement range:
9999:59 HHHH:MM
Heart rate measurement range:
40 to 240 bpm
Cadence measurement range:
20 to 180 rpm
Wheel circumference setting range:
From 100 mm to 3,999 mm (3.9 to 157.4 inches)
Page 60

60
M5
Correct disposal of this product (electrical waste)
(To be used in EU countries and other European
countries with a separate collection system). The
labelling on the product and the relevant literature
indicates that it must not be disposed of with normal household waste at the end of its service life. Please dispose of
this device separately to other waste so as not to harm the
environment or human health through uncontrolled waste
disposal. Recycle the device to promote the sustainable reuse
of material resources. Private users should contact the retailer
from whom they purchased the product or the responsible
authorities to find out how they can recycle the device in
an environment-friendly manner. Commercial users should
contact their suppliers and consult the conditions of the sales
agreement. This product must not be disposed of with other
commercial waste.
EU declaration of conformity
We, CYCLE PARTS GmbH, Le Quartier Hornbach 13, D-67433
Neustadt/Weinstraße, declare that when used as intended,
the VDO cycle computer with wireless transmission VDO M5
and all transmitters D3-SPD, D3-CAD, D3-HR comply with
the essential requirements established in Article 3 of the
R&TTE Directive 1999/5/EC.
The declaration of conformity can be viewed at:
www.vdocyclecomputing.com.
Neustadt, October 2013
FCC-Addendum
IC-Addendum
This device complies with part 15 of the FCC Rules.
Operation is subject to the following two conditions:
(1) This device may not cause harmful interference,
and
(2) this device must accept any interference received,
including interference that may cause undesired
operation.
NOTE: This equipment has been tested and found to comply
with the limits for a Class B digital device, pursuant to part 15
of the FCC Rules. These limits are designed to provide
reasonable protection against harmful interference in a
residential installation. This equipment generates, uses and
can radiate radio frequency energy and, if not installed and
used in accordance with the instructions, may cause harmful
interference to radio communications. However, there is
no guarantee that interference will not occur in a particular
installation.
This device complies with Industry Canada licence-exempt
RSS standard(s).
Operation is subject to the following two conditions:
(1) This device may not cause interference,
and
If this equipment does cause harmful interference to radio or
television reception, which can be determined by turning the
equipment off and on, the user is encouraged to try to correct
the interference by one or more of the following measures:
– Reorient or relocate the receiving antenna.
– Increase the separation between the equipment and
receiver.
– Connect the equipment into an outlet on a circuit different
from that to which the receiver is connected.
– Consult the dealer or an experienced radio/TV technician
for help.
Changes or modifications not expressly approved by the party
responsible for compliance could void the user’s authority to
operate the equipment.
(2) this device must accept any interference,
including interference that may cause undesired
operation of the device.
This Class digital apparatus complies with Canadian
ICES-003.
Page 61

www.vdocyclecomputing.com
Cycle Parts GmbH
Le Quartier Hornbach 13
67433 Neustadt/Weinstrasse (Germany)
+49 (0) 63 21- 95 82 7 - 0
Page 62

www.vdocyclecomputing.com/service
DEUTSCH
Montage-Video
Bedien-Video
Einstell-Video
Page 63

2
M5
Vorwort
Verpackungsinhalt
Herzlichen Glückwunsch.
Mit Ihrer Wahl für einen VDO Computer haben Sie sich für ein
technisch und qualitativ sehr hochwertiges Gerät entschieden.
Um den Computer optimal nutzen zu können, empfehlen wir
Ihnen, diese Anleitung sorgfältig zu lesen. Sie erhalten alle
Hinweise zur Bedienung sowie viele weitere nützliche Tipps.
Wir wünschen Ihnen viel Freude beim Fahren mit Ihrem VDO
Computer.
Cycle Parts GmbH
Bitte prüfen Sie zunächst die Vollständigkeit dieser
Verpackung:
1 VDO Computer
1 Batterie für Computer
1 Geschwindigkeits-Sender, Batterie eingebaut
1 Lenkerhalterung
1 Speichenmagnet (Clip-Magnet)
Kabelbinder zur Montage der Halterung und
des Senders
1 Kurz-Bedienungsanleitung
Page 64

3
M5
Inhaltsverzeichnis
Das Display .................................................................... 04
Die Tasten ...................................................................... 07
Die Funktionen .............................................................. 08
Abrufen der Gesamtwerte ........................................... 11
Die Bedienung während der Fahrt ............................. 13
Schlaf-Modus ................................................................ 13
Montage der Lenkerhalterung .................................... 14
Montage des Geschwindigkeit-Senders .................... 15
Computer in die Halterung einsetzen ........................ 16
Pairing (Inbetriebnahme) der Sender ........................ 16
Funktionsprüfung ......................................................... 17
Die Einstellungen ......................................................... 18
Sprache ........................................................................ 18
Maßeinheit .................................................................... 20
Radumfang ................................................................... 22
Meine Daten .................................................................. 26
Sensor-Auswahl ............................................................ 28
Uhrzeit .......................................................................... 30
Beeper Ein- oder Ausschalten ........................................ 32
Gesamtstrecke .............................................................. 33
Gesamtfahrzeit .............................................................. 35
Gesamt-Kalorienverbrauch ............................................ 37
Navigator Einstellen ..................................................... 39
Navigator auf NULL zurückstellen .............................. 40
Trip-Section-Zähler ...................................................... 41
Trip-Section-Zähler auf NULL zurückstellen ............. 42
Tourdaten nach der Fahrt zurückstellen ................... 42
Rad-Auswahl Rad 1 oder Rad 2 .................................. 43
Beleuchtungs-Modus ................................................... 44
Die Puls-Option ............................................................. 45
Aktivieren der Puls-Option ............................................. 45
Display in der Puls-Option ............................................. 46
Tastenbelegung mit Puls-Option .................................... 46
Funktionen in der Puls-Option ....................................... 47
Puls-Zonen-Auswahl ..................................................... 49
Die Trittfrequenz-Option .............................................. 50
Aktivieren der Trittfrequenz-Funktion ............................. 50
Display in der Trittfrequenz-Option ................................ 51
Tastenbelegung und Funktionen
mit Trittfrequenz-Funktion ............................................. 52
Montage des Trittfrequenz-Senders ............................... 52
Puls und Trittfrequenz-Option
gleichzeitig aktiviert .................................................... 52
Display mit Puls-und Trittfrequenz ................................. 53
Tastenbelegung/Funktionen
mit Puls-und Trittfrequenz-Option .................................. 54
Batterie-Status-Anzeige .............................................. 55
Batteriewechsel im Computer .................................... 55
Batteriewechsel im Geschwindigkeit-Sender ........... 56
Garantiebedingungen ................................................... 57
Fehlerbehebung ............................................................ 58
Technische Daten ......................................................... 59
Page 65

4
M5
Das Display
Der VDO M5 hat ein großes, sehr gut ablesbares Display.
Das Display kann in 4 Bereiche unterteilt werden.
Bereich 1:
Im oberen Bereich des Displays wird links permanent die
Uhrzeit angezeigt. Rechts wird permanent die Temperatur
angezeigt.
Bei Puls-Option: wird links permanent die Herzfrequenz
angezeigt.
Bei Trittfrequenz-Option: wird rechts permanent
die Trittfrequenz angezeigt.
Bei Puls + Trittfrequenz-Option: Hier wird die
Herzfrequenz links und die Trittfrequenz rechts angezeigt.
Bereich 2:
Im mittleren Bereich des Displays wird permanent die aktuelle
Geschwindigkeit angezeigt.
Bereich 3:
Im dritten Bereich erscheint im Klartext die Beschreibung
der ausgewählten Anzeige-Funktion.
Bereich 4:
Im unteren Bereich des Displays wird der Wert für die
ausgewählte Funktion angezeigt.
Display mit Puls-Option
Display mit Trittfrequenz-Option
Display mit Puls + Trittfrequenz-Option
Bereich 1
Bereich 2
Bereich 3
Bereich 4
Bereich 1
Bereich 1
Bereich 1
Page 66

5
M5
Das Display
Im rechten Display-Bereich, unterhalb
der Geschwindigkeitsanzeige, wird die
Masseinheit kmh oder mph angezeigt.
„ “
Der VDO M5 kann an 2 Rädern eingesetzt
werden. Die Anzeige-Symbole 1 und 2 zeigen
Ihnen, ob Ihr VDO M5 gerade mit den
Einstellungen für Rad 1 oder mit den
Einstellungen für Rad 2 arbeitet.
Wie die Rad-Auswahl von Rad 1 auf Rad 2
funktioniert, ist auf Seite 43 beschrieben.
„Pfeil UP/Pfeil DOWN“
Die Pfeile zeigen an, ob Sie gerade schneller
oder langsamer als Ihre aktuelle Durchschnitts-Geschwindigkeit unterwegs sind.
Page 67

6
M5
Das Display
Im linken Display-Bereich neben der GeschwindigkeitsAnzeige werden folgende Symbole angezeigt:
„ “: Das Symbol ist AN,
wenn der Trip-Section-Zähler gestartet wurde.
Nähere Beschreibung des Trip-Section-Zählers
finden Sie auf Seite 41.
Licht-Modus AN/AUS
Dieses Symbol zeigt an, ob der Display-Beleuchtungs-Modus
ein- oder ausgeschaltet ist.
Pfeile rechts links neben der Beschreibung der
ausgewählten Anzeige-Funktion (Bereich 3 im Display).
Diese Pfeile zeigen im Einstell-Modus, dass Sie mit der
BIKE- oder der TOTAL/PULS/CAD (TPC)-Taste blättern können
oder den Wert mit den beiden Tasten erhöhen/reduzieren
können.
Page 68

7
M5
Die Tasten
Der VDO M5 hat 3 Tasten.
SET
Im Funktions-Modus:
– In den Funktionen rückwärts blättern
– Öffnen des Einstell-Modus
(Taste gedrückt halten)
– Aufruf der Gesamt-Werte für Strecke
und Fahrzeit (Taste gedrückt halten)
Im Einstell-Modus:
– Einstellung öffnen
– Fertige Einstellung bestätigen
– Einstell-Modus beenden, zurück zum
Funktions-Modus
BIKE
Im Funktions-Modus:
– Abruf der Funktionen
(vorwärts durch die Funktionen blättern)
– Tour Daten auf Null zurückstellen
(Taste gedrückt halten)
Im Einstell-Modus:
– Blättern im Einstell-Menü (vorwärts)
– Einzustellende Daten verändern (erhöhen)
– Einstell-Modus beenden (eine Menu-Stufe
zurück),Taste weiter gedrückt halten,
zurück zum Funktions-Modus
TPC-(TOTAL / PULS / CAD)
Im Funktions-Modus:
– Abruf der Gesamtdaten für
Strecke / Fahrzeit
– Abruf der Puls-Funktionen bei
aktivierter Puls-Option
– Abruf der Trittfrequenz-Funktionen bei
aktivierter Trittfrequenz-Option
Im Einstell-Modus:
– Blättern im Einstell-Menü (rückwärts)
– Einzustellende Daten verändern (verringern)
Page 69

8
M5
Die Funktionen
Der VDO M5 hat folgende Funktionen:
Aktuelle Geschwindigkeit
Die aktuelle Geschwindigkeit wird permanent im Display
angezeigt. Bei einem Radumfang von 2155 mm beträgt die
maximal mögliche Geschwindigkeit 199 kmh oder 124 mph.
Uhrzeit
Links oben im Display wird permanent die aktuelle Uhrzeit
angezeigt.
ACHTUNG: Bei aktivierter PULS-Option wird hier der
aktuelle Puls angezeigt. Siehe dazu Seite 45.
Aktuelle Temperatur
Rechts oben im Display wird permanent die aktuelle
Temperatur angezeigt.
ACHTUNG: Bei aktivierter TRITTFREQUENZ-Option
wird hier die aktuelle Trittfrequenz angezeigt.
Siehe dazu Seite 50.
Mit
PULS-Option
Mit
TRITTFREQUENZ-Option
Page 70

9
M5
Die Funktionen
Durchschnitts-Geschwindigkeit
auf der aktuellen Tour
Die Durchschnitts-Geschwindigkeit wird mit einer Genauigkeit
von 2 Stellen hinter dem Komma angegeben.
Mit der BIKE-Taste rufen Sie folgende Informationen ab:
Aktuelle Strecke
Die aktuelle Strecke zählt bis 9.999,99 KM oder Meilen.
Beim Überschreiten dieses Wertes beginnt die aktuelle
Streckenzählung wieder bei Null.
Aktuelle Fahrzeit
Die aktuelle Fahrzeit zählt bis 99:59:59 HH:MM:SS.
Beim Überschreiten dieses Wertes beginnt die
Fahrzeitzählung wieder bei Null.
Maximale Geschwindigkeit
auf der aktuellen Tour
Die maximale Geschwindigkeit wird mit einer Genauigkeit
von 2 Stellen hinter dem Komma angegeben.
Page 71

10
M5
Die Funktionen
Teil-Strecke
zeigt die Strecke an, die bei aktiviertem Trip-Section-Zähler
gefahren wird.
Navigator
Der Navigator ist ein ZWEITER, völlig unabhängiger
Tages-Streckenzähler.
Der Navigator dient zum Ausmessen von Teilstrecken.
Besonders wenn man eine Tour nach einem „Roadbook“
nachfährt (z.B. Moser Bike Guide) ist der Navigator sehr
hilfreich.
Der Navigator kann:
– beliebig oft und unabhängig vom Tages-Strecken-Zähler
auf NULL zurückgestellt werden
– auf einen Wert voreingestellt werden
– von diesem Wert vorwärts oder rückwärts zählen
Die Bedienung des Navigators ist auf Seite 39 beschrieben.
Einstellbereich Navigator: -99,99 bis + 999,99 KM oder
Meilen.
Teil-Zeit
Der VDO M5 hat einen Trip-Section-Zähler.
Der Trip-Section-Zähler ist vergleichbar mit einer Stoppuhr.
Wenn der Trip-Section-Zähler läuft, wird wie bei einer
Stoppuhr die Teil-Zeit erfasst. Zusätzlich wird bei laufendem
Trip-Section-Zähler auch noch die Teil-Strecke erfasst.
Der Trip-Section-Zähler wird über die Tastenkombination
BIKE + SET (beide Tasten gleichzeitig KURZ drücken)
gestartet und auch wieder gestoppt.
ACHTUNG: Der Trip-Section-Zähler stoppt automatisch,
wenn die Geschwindigkeit NULL ist.
Page 72

11
M5
Gesamtstrecke 1
(Summe aller Tagestouren mit Rad 1)
Die Gesamt-Strecke zählt bis 99.999 KM oder Meilen.
Beim Überschreiten dieses Wertes beginnt die
Gesamtstrecken-Zählung wieder bei Null.
Wenn von Meilen auf KM umgestellt wird und das
Umrechnungsergebnis über 100.000 KM ergibt,
wird der Zähler auf Null zurückgestellt.
Mit der TPC (TOTAL/PULS/CAD)-Taste blättern Sie nun zur
Gesamt-Fahrzeit
(Summe aller Tagestouren)
Die Gesamt-Fahrzeit zählt bis 9999:59 HHHH:MM. Beim
Überschreiten dieses Wertes beginnt die Gesamt-FahrzeitZählung wieder bei Null.
Abruf der Gesamtwerte
Die Gesamtwerte für die gefahrene Strecke, die Fahrzeit
und die Höhendaten werden getrennt von den Daten der
AKTUELLEN Tour abgerufen.
Sie haben zwei Möglichkeiten die Gesamtdaten
anzuzeigen.
MÖGLICHKEIT 1:
Mit der TPC (TOTAL / PULS / CAD)-Taste rufen Sie die
Gesamtdaten ab.
Wenn Sie auch mit Rad 2 unterwegs waren,
werden hier auch die Werte für Rad 2
angezeigt.
Blättern Sie mit der TPC (TOTAL / PULS / CAD)-Taste zu
den weiteren Werten für Rad 2.
Zusätzlich können Sie hier die Totalwerte (Summe der
Daten für Rad 1 plus Rad 2) abrufen.
Page 73

12
M5
Abruf der Gesamtwerte
MÖGLICHKEIT 2:
Halten Sie dazu die SET-Taste gedrückt bis sich das
Menu TOTALWERTE öffnet.
– Mit der SET-Taste öffnen Sie die Anzeige der Totalwerte.
– Mit der BIKE- oder der TPC-Taste blättern Sie in den
Gesamtwerten.
Zuerst wird die Gesamtstrecke 1 (Summe aller einzelnen
Touren mit Rad 1) angezeigt.
– Mit der BIKE- oder der TPC-Taste blättern Sie zu den
weiteren Gesamtdaten.
– Gesamtstrecke 1
– Gesamt-Fahrzeit 1
Wenn Sie auch mit Rad 2 unterwegs waren, werden hier
auch die Werte für Rad 2 angezeigt.
– Gesamt-Strecke Rad 2
– Gesamt-Fahrzeit Rad 2
Zusätzlich können Sie hier die Totalwerte für Rad 1 + Rad 2
abrufen:
– Gesamt-Strecke Rad 1 + Rad 2
– Gesamt-Fahrzeit Rad 1 + Rad 2
Wenn die PULS-Option aktiviert ist, dann erhalten Sie hier
auch Gesamt-Daten zum Kalorienverbrauch:
– Kalorienverbrauch mit Rad 1
– Kalorienverbrauch mit Rad 2
– Gesamt-Kalorienverbrauch mit Rad 1+ Rad 2
Mit der SET-Taste (gedrückt halten) kommen Sie aus
der Anzeige der Gesamtwerte zurück zum normalen
Funktions-Modus.
Page 74

13
M5
1x
BIKETPC
SET
Die Bedienung während der Fahrt
Während der Fahrt können die Anzeige-Funktionen über
die Taste BIKE abgerufen werden (blättern vorwärts
durch die Funktionen).
Durch einen kurzen Druck auf die Taste BIKE wird die
nächste Funktion ins Display gebracht.
ACHTUNG: Bei aktivierter PULS-Option werden die
Puls-Funktionen über die Taste TPC angezeigt.
Durch einen kurzen Druck auf die SET-Taste können Sie auch
rückwärts durch die Funktionen blättern. So bringen Sie
schnell die gewünschte Funktion in die Anzeige.
Die Gesamtdaten rufen Sie über die Taste TPC
(Total/Puls/CAD) ab.
Eine genaue Beschreibung finden Sie auf Seite 47.
Schlaf-Modus
Wenn Sie eine Pause machen und der M5 in der
Halterung ist, geht der Computer nach 5 Minuten in den
Stand-By-Modus.
Wenn Sie nach einer Pause weiterfahren, hat der VDO M5
eine Auto-Start-Funktion.
Die Auto-Start-Funktion wird über einen Bewegungs-Sensor
aktiviert.
Eine Lenkerbewegung reicht aus, um den M5 aus dem
Schlaf-Modus aufzuwecken. Der VDO M5 wechselt
sofort wieder in den Funktions-Modus. Die aktuelle
Geschwindigkeit und die Strecke werden nach wenigen
Sekunden wieder angezeigt.
Page 75

14
M5
90°
334
4
–
–
1
2
1
Montage der Lenkerhalterung
Sie können den Computer rechts oder links am Lenker
montieren oder mittig auf dem Vorbau. Entsprechend
montieren Sie die Lenkerhalterung.
STEP 1
Entscheiden Sie, ob Lenker- oder Vorbau-Montage
gewünscht ist.
STEP 2
Entsprechend den Fuß der Lenkerhalterung um 90° drehen.
Dazu die Schrauben in der Halterung lösen,
Fuß herausnehmen und um 90° drehen,
einsetzen und Schrauben wieder festdrehen.
Achtung: Schrauben nicht überdrehen.
STEP 3
Kabelbinder durch die Schlitze in der Lenkerhalterung führen,
um den Lenker oder den Vorbau legen und anziehen
(noch nicht festziehen).
STEP 4
Bei Lenkermontage: Neigungswinkel des Computers
ausrichten, um optimale Ablesbarkeit zu erreichen.
Kabelbinder jetzt festziehen.
Überstehende Enden mit einer Zange abknipsen.
Page 76

15
M5
90° – 45°
MAGNET
Montage des Geschwindigkeit-Senders
Der Sender kann rechts oder links am Gabelholm montiert
werden.
Hinweis:
Wenn Sie den Computer auf dem Vorbau oder
links am Lenker montiert haben, dann MUSS der
Geschwindigkeits-Sender am LINKEN Gabelholm
montiert werden.
STEP 1
Legen Sie das Unterleg-Gummi unter den Sender. Montieren
Sie den Sender auf der Gabelseite, an der Sie später den
Computer am Lenker montieren wollen (rechts oder links)
mit beiliegendem Kabelbinder (zunächst lose, noch nicht
festziehen).
ACHTUNG: Die schraffierte Markierung auf der
Batteriefachdeckel-Seite des Senders muss dabei
zu den Speichen zeigen.
Der Sender kann je nach Platzverhältniss vorne auf die Gabel,
innen an der Gabel oder hinten an der Gabel montiert werden.
STEP 2
Legen Sie den Speichenmagneten um eine Außen-Speiche.
Der stabförmige Magnetkern zeigt dabei mit dem VDO-Logo
zum Sender. Magnet an der schraffierten Sensor-Markierung
auf dem Sender mit etwa 1- 5 mm Abstand ausrichten.
STEP 3
Sender und Magnet endgültig ausrichten und fixieren:
Kabelbinder festziehen und Magnet kräftig zudrücken.
Der Sender sollte bis maximal 45° zu den Speichen hin
eingeklappt werden. Wenn Sie diesen Winkel nicht erreichen,
dann verschieben Sie den Sender am Gabelholm nach unten
Richtung Nabe, bis ein Winkel kleiner als 45° erreicht wird.
LINKS
RECHTS
VORBAU
LINKS
Page 77

16
M5
1. LOCK 2. CLICK
2. UNLOCK
UNLOCK
LOCK
Einsetzen des Computers in die Halterung
Das VDO Twist-Click-System verbindet den Computer
sicher mit der Lenkerhalterung.
Und so geht es:
STEP 1
Computer in 10 Uhr-Position in die Halterung einsetzen.
STEP 2
Computer nach rechts auf 12-Uhr-Position drehen,
und in das Haltesystem einrasten. Es muss ein spürbarer
Widerstand beim Eindrehen überwunden werden.
STEP 3
Zum Herausnehmen den Computer nach
links drehen (dabei nicht drücken oder ziehen).
Gedankenstütze: Rein nach Rechts, Los nach Links
Page 78

17
M5
Funktionsprüfung
Nach der Montage überprüfen Sie die Funktion.
Und so geht es:
– Computer in die Halterung einsetzen.
Die Geschwindigkeits-Anzeige blinkt. Der Computer sucht
nun seinen Geschwindigkeits-Sender
– Vorderrad anheben und drehen.
Am Sender blinkt einige Male die grüne LED.
– Am Computer sollte jetzt eine Geschwindigkeit angezeigt
werden.
Bei aktivierter Trittfrequenz-Option muss auch der
Trittfrequenz-Sender gepairt werden:
– Die Trittfrequenz-Anzeige blinkt. Der Computer sucht nun
seinen Trittfrequenz-Sender.
– Tretkurbel drehen oder losfahren.
Am Trittfrequenz-Sender blinkt einige Male die grüne LED.
– Am Computer sollte jetzt eine Trittfrequenz angezeigt
werden.
Bei aktivierter Puls-Option muss auch der Puls-Sender
gepairt werden:
– Die Puls-Anzeige blinkt. Der Computer sucht nun seinen
Puls-Sender
– Puls-Sender anlegen, einige Sekunden warten.
– Am Computer sollte jetzt ein Puls angezeigt werden.
Wird keine Geschwindigkeit oder Trittfrequenz oder Puls
angezeigt, kann es dafür mehrere Ursachen geben.
Die möglichen Ursachen sind im Kapitel „Fehlerbehebung“
beschrieben.
Pairing (Inbetriebnahme) der Sender
Der VDO M5 macht ein automatisches Pairing der Sender.
Nach dem der Computer in die Lenkerhalterung eingedreht
wurde, beginnt der Computer mit der Sendersuche.
Die Sendersuche erkennt man an den blinkenden Ziffern für:
– Geschwindigkeit
– Puls (bei aktivierter Puls-Option)
– Trittfrequenz (bei aktivierter Trittfrequenz-Option)
Der VDO M5 hat eine automatische Raderkennung. Je nach
dem, ob Sie Rad 1 oder Rad 2 verwenden, werden die Daten
entsprechend für Rad 1 oder Rad 2 erfasst.
ACHTUNG: Wenn während des Pairings Funkstörungen
durch andere Störquellen auftreten, dann meldet das Display
„Zu viele Signale“.
Diese Meldung bestätigen Sie mit einer beliebigen Taste.
Danach verlassen Sie bitte den Ort mit den Störungen und
gehen an einen anderen Ort.
Drehen Sie den Computer aus der Lenkerhalterung.
Setzen Sie den Computer nun erneut in die Lenkerhalterung.
Der Computer macht nun ein neues Pairing.
Mögliche Störquellen:
– LED-Beleuchtung
– Mobil-Telefon
– GPS-Empfänger
– WLAN
– Diebstahl-Sicherungsanlagen im Geschäft
Diese Störquellen können das Pairing stören.
ACHTUNG: Im Sender muss bei der ersten Inbetriebnahme
der Schalter für die Raderkennung entweder auf RAD 1 oder
RAD 2 eingestellt werden. Nur dann funktioniert auch die
automatische Raderkennung.
Taste LANG gedrückt halten, bis LED Blinkt.
1 mal blinken grün = Rad 1 ist ausgewählt
2 mal blinken rot = Rad 2 ist ausgewählt
Page 79

18
M5
Die Einstellungen – Sprache
Beim VDO M5 können Sie folgende Sprachen für die
Display-Anzeige einstellen:
– Deutsch
– Englisch
– Französisch
– Italienisch
– Spanisch
– Holländisch
Und so geht es:
Die SET-Taste gedrückt halten, bis sich das Einstell-Menü
öffnet.
Sie sehen im Display zuerst Totalwerte.
Mit der Bike-Taste blättern Sie zu Einstellung.
Die Einstellungen öffnen Sie mit der SET-Taste.
„Language“ steht im Display.
Mit SET öffnen Sie die Einstellung der Sprache.
Englisch blinkt.
Page 80

19
M5
Die Einstellungen – Sprache
Mit der BIKE-Taste können Sie nun eine andere Sprache
auswählen.
Mit der SET-Taste bestätigen Sie Ihre Spracheinstellung.
Im Display bekommen Sie die Rückmeldung Set OK.
Wenn Sie weitere Einstellungen machen wollen, kommen Sie
mit der BIKE-Taste auf die anderen Einstellungen.
Wenn Sie keine weiteren Einstellungen machen wollen,
halten Sie die SET-Taste gedrückt.
Das Einstellmenü wird geschlossen.
Der VDO M5 kehrt in den Funktions-Modus zurück.
Page 81

20
M5
Die Einstellungen – Maßeinheit
In der Masseinheiten-Einstellung legen Sie die Mess-Formate
fest für:
– Geschwindigkeit (kmh oder mph)
– Temperatur (C oder F)
– Gewicht (kg oder LBS)
– Uhrzeit (24 Std. oder 12 Std mit AM/PM)
Und so geht es:
Die SET-Taste gedrückt halten, bis sich das Einstell-Menü
öffnet.
Von Totalwerte blättern Sie mit der BIKE-Taste zu
Einstellung.
Mit der SET-Taste öffnen Sie die Einstellungen.
Im Display erscheint „Language“.
Mit der BIKE-Taste blättern Sie zur Einstellung für die
Masseinheit.
Die Einstellung der Masseinheit öffnen Sie mit der SET-Taste.
Zuerst stellen Sie die Masseinheit für die Geschwindigkeit
ein.
Im unteren Bereich des Displays blinkt „KMH“.
Mit der BIKE-Taste können Sie auf „MPH“ umstellen.
Die Einstellung bestätigen Sie mit der SET-Taste.
Danach erscheint im Display die Einstellung für die
Temperatur Einheit. Hier stellen Sie ein, ob die Temperatur
in Celsius oder Fahrenheit angezeigt werden soll.
Mit der BIKE-Taste machen Sie Ihre Auswahl.
Mit der SET-Taste bestätigen Sie Ihre Auswahl.
Im Display erscheint nun die Einstellung für die Masseinheit
für das Gewicht. KG oder LBS (POUNDS) können hier
ausgewählt werden.
Die Auswahl machen Sie mit der BIKE-Taste.
Mit der SET-Taste bestätigen Sie die Auswahl.
Page 82

21
M5
Die Einstellungen – Maßeinheit
Im Display erscheint nun die Einstellung für das
Uhrenformat. Hier können Sie ein 24 Stunden- oder ein
12 Stunden-Format mit AM/PM –Anzeige einstellen.
Die Auswahl machen Sie mit der BIKE-Taste.
Mit der SET-Taste bestätigen Sie die Auswahl.
Im Display bekommen Sie die Rückmeldung
Masseinheit Set OK.
Wenn Sie weitere Einstellungen machen wollen, kommen
Sie mit der BIKE- oder der TPC-Taste auf die anderen
Einstellungen.
Wenn Sie keine weiteren Einstellungen machen wollen,
halten Sie die SET-Taste gedrückt.
Das Einstellmenü wird geschlossen.
Der VDO M5 kehrt in den Funktions-Modus zurück.
Page 83

22
M5
1x
Sie können am VDO M5 den Abroll-Umfang ihres Rades
in Millimetern einstellen oder aus einer Reifen-Tabelle
den passenden Reifen auswählen.
Je genauer Sie diese Einstellung vornehmen, umso genauer
ist Ihre Geschwindigkeits-Anzeige und Ihre Messung der
gefahrenen Strecke. Aus der Reifengrössen-Tabelle können
Sie die Werte für Ihren Reifen ablesen und einstellen.
ACHTUNG: Die Werte in der Tabelle sind nur Näherungswerte.
Je nach Fabrikat und Reifenprofil können die echten Werte
von den Werten in der Tabelle abweichen.
Wenn Ihre Reifengrösse nicht in der Tabelle aufgelistet ist,
dann können Sie den Abroll-Umfang genau ausmessen.
Das Ausmessen geht so:
STEP 1
Stellen Sie Ihr Rad aufrecht hin und richten Sie das Rad,
an dem Sie den Sensor montieren wollen so aus, dass das
Ventil exakt am Boden ist. Achten Sie darauf, dass der Reifen
entsprechend der Einsatzbedingungen voll aufgepumpt ist.
Markieren Sie die Position des Ventils mit einem Strich oder
Klebestreifen am Boden.
STEP 2
Schieben Sie nun Ihr Rad gerade nach vorn, bis nach einer
Umdrehung das Ventil wieder direkt am Boden steht.
Markieren Sie die Position des Ventils wiederum mit einem
Strich oder Klebestreifen.
STEP 3
Der Abstand der beiden Markierungen entspricht Ihrem
Radumfang, bzw. Ihrer Radgröße in Millimetern.
Die Einstellungen – Radumfang / Radgröße
Radumfang in mm/inch
Reifengrösse ETRTO
KMH
Radumfang
in mm
MPH
Radumfang
in inch
16 x 1,75 47-305 1272 50,1
20 x 1,7 5 47-406 1590 62,6
24 x 1,75 47-507 1907 75,1
26 x 1,5 40-559 2026 79,8
26 x 1,75 47-559 2070 81,5
26 x 1,9 2089 82,2
26 x 2,00 50-559 2114 83,2
26 x 2,10 54-559 2125 83,7
26 x 2,25 57-559 2145 84,4
26 x 2,35 60-559 2160 85,0
26 x 2,40 62-559 21 70 85,4
28 x 1,5 40-622 2224 87,6
28 x 1,6 42-622 2235 88,0
28 x 1,75 47-6 22 2268 89,3
29 x 2,10 54-622 2295 90,4
29 x 2,25 57-622 2288 90,1
29 x 2,40 62-622 2300 90,6
650 B 2100 82,7
700 x 18C 18-622 2102 82,8
700 x 20C 20-622 2114 83,2
700 x 23C 23-622 2095 82,5
700 x 25C 25-622 2146 84,5
700 x 30C 30-622 2149 84,6
700 x 32C 32-622 2174 85,6
700 x 38C 38-622 2224 87,6
Page 84

23
M5
Die Einstellungen – Radumfang / Radgröße
So stellen Sie den Radumfang ein:
Die SET-Taste gedrückt halten, bis sich das Einstell-Menü
öffnet.
Mit der BIKE-Taste wechseln Sie von Totalwerte zu
Einstellung.
Die Einstellung öffnen Sie mit der SET-Taste.
Im Display erscheint „Language“.
Mit der BIKE- oder der TPC-Taste blättern Sie zur
Einstellung für die Radgröße.
Die Einstellung (hier für Rad 1 erklärt) öffnen Sie mit der
SET-Taste.
Im Display können Sie nun wählen, ob Sie die Radgröße
manuell in Millimetern einstellen wollen, oder ob Sie
aus einer Reifen-Liste den passenden Reifen
auswählen wollen.
Die Auswahl machen Sie mit der BIKE-Taste, bestätigen
der Auswahl mit der SET-Taste.
Mit der SET-Taste öffnen Sie die Einstellung für die
Radgrösse.
Sie können die Radgröße für Rad 1 und für Rad 2
getrennt einstellen.
Mit der Bike-Taste blättern Sie von der Einstellung für
Rad 1 zur Einstellung für Rad 2.
Page 85

24
M5
Die Einstellungen – Radumfang / Radgröße
Einstellung Manuell über Eingabe des Abroll-Umfangs
in Millimetern
Die Ersten beiden Ziffern (im Beispiel „21“ blinken).
Mit der BIKE- oder der TPC-Taste können Sie diese
Ziffern auf den von Ihnen gewünschten Wert einstellen.
Mit der Set-Taste bestätigen Sie Ihre Einstellung.
Jetzt blinkt die dritte Ziffer und ist zur Eingabe bereit.
Mit der BIKE-oder der TPC-Taste stellen Sie diese Ziffer ein.
Mit der SET-Taste Bestätigen Sie die Einstellung.
Danach blinkt die letzte Ziffer rechts.
Mit der BIKE- oder der TPC-Taste stellen Sie diese Ziffer
ein.
Mit der SET-Taste bestätigen Sie die Einstellung.
Ihre Radumfang-Einstellung ist fertig.
Im Display bekommen Sie die Rückmeldung Set OK.
Wenn Sie weitere Einstellungen machen wollen, kommen
Sie mit der BIKE-Taste auf die anderen Einstellungen.
Wenn Sie keine weiteren Einstellungen machen wollen,
halten Sie die SET-Taste gedrückt.
Das Einstellmenü wird geschlossen.
Der VDO M5 kehrt in den Funktions-Modus zurück.
Page 86

25
M5
Die Einstellungen – Radumfang / Radgröße
Einstellung der Radgröße über Reifen-Liste
Öffnen Sie die Einstellung der Radgröße über die Reifen
Liste mit der SET-Taste (Siehe vorherige Seite).
Mit der BIKE- oder der TPC-Taste blättern Sie durch die
Reifen-Liste, bis Ihr Reifen angezeigt wird (hier im
Beispiel 26 x 2,35).
Im Display sehen Sie SELECT (oder die zuletzt eingestellte
Reifengrösse).
Mit der SET-Taste bestätigen Sie die Auswahl.
Im Display bekommen Sie die Rückmeldung Set OK.
Wenn Sie weitere Einstellungen machen wollen, kommen
Sie mit der BIKE-Taste auf die anderen Einstellungen.
Wenn Sie keine weiteren Einstellungen machen wollen,
halten Sie die SET-Taste gedrückt.
Das Einstellmenü wird geschlossen.
Der VDO M5 kehrt in den Funktions-Modus zurück.
Page 87

26
M5
Die Einstellungen – Meine Daten
In den Einstellungen Meine Daten stellen Sie Ihre Daten ein
für Alter, Gewicht, Geschlecht und HF-Max die für die
Berechnung der Puls-Trainingszonen benötigt werden.
Auf Basis der Daten werden berechnet:
– maximaler persönlicher Puls HF-max
– FIT-Zone
– FAT-Zone
So stellen Sie Meine Daten ein:
Die SET-Taste gedrückt halten, bis sich das Einstell-Menü
öffnet.
Mit der BIKE-Taste wechseln Sie von Totalwerte zu
Einstellung.
Die Einstellung öffnen Sie mit der SET-Taste.
Im Display erscheint „Language“.
Mit der BIKE-Taste oder der TPC-Taste blättern Sie zur
Einstellung für Meine Daten.
Die Einstellung öffnen Sie mit der SET-Taste.
Zuerst stellen Sie Ihr Alter ein.
Mit der BIKE-Taste erhöhen Sie den Wert,
mit der TPC-Taste verringern Sie den Wert.
Den eingestellten Wert bestätigen Sie mit der SET-Taste.
Jetzt stellen Sie Ihr Gewicht ein.
Mit der BIKE-Taste erhöhen Sie den Wert,
mit der TPC-Taste verringern Sie den Wert.
Den eingestellten Wert bestätigen Sie mit der SET-Taste.
Nun stellen Sie Ihr Geschlecht ein.
Mit der BIKE-Taste oder mit der TPC-Taste wählen Sie
Ihr Geschlecht aus.
Den eingestellten Wert bestätigen Sie mit der SET-Taste.
Page 88

27
M5
Die Einstellungen – Meine Daten
Nun wird die berechnete persönliche maximale
Pulsobergrenze angezeigt HFmax.
Die berechnete Zahl blinkt und kann verändert werden.
Mit der BIKE-Taste erhöhen Sie den Wert,
mit der TPC-Taste verringern Sie den Wert.
Den eingestellten Wert bestätigen Sie mit der SET-Taste.
Anschließend wird der Wert für die berechnete Obergrenze
der Trainings-Zone OWN angezeigt.
Mit der BIKE-Taste erhöhen Sie den Wert,
mit der TPC-Taste verringern Sie den Wert.
Jetzt wird die berechnete Untergrenze für die Trainings-Zone
OWN angezeigt.
Mit der BIKE-Taste erhöhen Sie den Wert,
mit der TPC-Taste verringern Sie den Wert.
Den eingestellten Wert bestätigen Sie mit der SET-Taste.
Den eingestellten Wert bestätigen Sie mit der SET-Taste.
Im Display bekommen Sie die Rückmeldung Set OK.
Wenn Sie weitere Einstellungen machen wollen, kommen
Sie mit der BIKE-Taste auf die anderen Einstellungen.
Wenn Sie keine weiteren Einstellungen machen wollen,
halten Sie die SET-Taste gedrückt.
Das Einstellmenü wird geschlossen.
Der VDO M5 kehrt in den Funktions-Modus zurück.
Page 89

28
M5
Die Einstellungen – Sensor-Auswahl
Der M5 kann Puls-Daten und (gleichzeitig) TrittfrequenzDaten anzeigen.
Dazu muss ein Puls-Sender und/oder ein TrittfrequenzSender vorhanden und installiert sein. Im Sensor-AuswahlMenü wählen Sie nun aus, welcher Sensor aktiviert werden
soll.
ACHTUNG: Nach der Auswahl eines Senders werden die
Sensor-Werte (Puls/Trittfrequenz) im Display angezeigt.
Das Display verändert sich.
Zusätzlich verändert sich die Zuordnung der Funktionen
auf die Tasten.
Das wird für die Puls-Option noch mal genau auf Seite 51
erklärt und auf Seite 53 für die Trittfrequenz-Option.
So wählen Sie Sensoren aus:
Die SET-Taste gedrückt halten, bis sich das Einstell-Menü
öffnet.
Mit der BIKE-Taste wechseln Sie von Totalwerte zu
Einstellung.
Die Einstellung öffnen Sie mit der SET-Taste.
Im Display erscheint „Language“.
Mit der BIKE-Taste oder der TPC-Taste blättern Sie zur
Einstellung für die Sensoren.
Die Einstellung öffnen Sie mit der SET-Taste.
Puls OFF oder ON blinkt.
Mit der BIKE-Taste oder mit der TPC-Taste wählen Sie
ON oder OFF aus.
Mit der SET-Taste bestätigen Sie die Auswahl.
Sie können jetzt auswählen, ob der Trittfrequenz-Sender
aktiviert werden soll.
Mit der BIKE-Taste oder mit der TPC-Taste wählen Sie
ON oder OFF aus.
Page 90

29
M5
Die Einstellungen – Sensor-Auswahl
Mit der SET-Taste bestätigen Sie die Auswahl.
Im Display bekommen Sie die Rückmeldung Set OK.
Wenn Sie weitere Einstellungen machen wollen,
kommen Sie mit der BIKE-Taste auf die anderen
Einstellungen.
Wenn Sie keine weiteren Einstellungen machen wollen,
halten Sie die SET-Taste gedrückt.
Das Einstellmenü wird geschlossen.
Der VDO M5 kehrt in den Funktions-Modus zurück.
Page 91

30
M5
Die Einstellungen – Uhrzeit
Sie können im VDO M5 die Uhrzeit im 12-Stunden
AM / PM-Format oder im 24-Stunden-Format einstellen.
Das Uhren-Format legen Sie in den Einstellungen zur
Masseinheit fest (Siehe Seite 20).
So stellen Sie die Uhrzeit ein:
Die SET-Taste gedrückt halten, bis sich das Einstell-Menü
öffnet.
Mit der BIKE-Taste wechseln Sie von Totalwerte zu
Einstellung.
Die Einstellung öffnen Sie mit der SET-Taste.
Im Display erscheint „Language“.
Mit der BIKE-Taste oder der TPC-Taste blättern Sie zur
Einstellung für die Uhrzeit.
Mit der SET-Taste öffnen Sie die Einstellung für die Uhrzeit.
Die Stunden-Anzeige blinkt.
Mit der BIKE- oder der TPC-Taste ändern Sie die Einstellung
für die Stunden.
Mit der SET-Taste bestätigen Sie die Einstellung.
Anzeige im 24 h-Format
Anzeige im 12 h-Format
Page 92

31
M5
Die Einstellungen – Uhrzeit
Nun blinken die Minuten im Display.
Mit der BIKE- oder der TPC-Taste stellen Sie die Minuten
ein.
Mit der SET-Taste bestätigen Sie die Einstellung.
Im Display bekommen Sie die Rückmeldung Set OK.
Wenn Sie weitere Einstellungen machen wollen,
kommen Sie mit der BIKE-Taste auf die anderen
Einstellungen.
Wenn Sie keine weiteren Einstellungen machen wollen,
halten Sie die SET-Taste gedrückt.
Das Einstellmenü wird geschlossen.
Der VDO M5 kehrt in den Funktions-Modus zurück.
Anzeige im 24 h-Format
Anzeige im 12 h-Format
Page 93

32
M5
Die Einstellungen – Beeper Ein- oder Ausschalten
Im M5 können Sie den Beeper für die Puls-Warnung
ein- oder ausschalten.
So stellen Sie den Beeper ein:
Die SET-Taste gedrückt halten, bis sich das Einstell-Menü
öffnet.
Mit der BIKE-Taste wechseln Sie von Totalwerte zu
Einstellung.
Die Einstellung öffnen Sie mit der SET-Taste.
Im Display erscheint „Language“.
Mit der BIKE- oder der TPC-Taste blättern Sie zur
Einstellung für den Beeper.
Die Einstellung öffnen Sie mit der SET-Taste.
Mit der BIKE- oder der TPC-Taste wählen Sie aus,
ob der Beeper Ein-oder Ausgeschaltet sein soll.
Die Einstellung bestätigen Sie mit der SET-Taste.
Im Display bekommen Sie die Rückmeldung Set OK.
Wenn Sie weitere Einstellungen machen wollen,
kommen Sie mit der BIKE- oder der TPC-Taste auf die
anderen Einstellungen.
Wenn Sie keine weiteren Einstellungen machen wollen,
halten Sie die SET-Taste gedrückt.
Das Einstellmenü wird geschlossen.
Der VDO M5 kehrt in den Funktions-Modus zurück.
Page 94

33
M5
Die Einstellungen – Gesamtstrecke
Sie können am VDO M5 die gefahrene Gesamtstrecke
einstellen. Z. B. am Beginn der neuen Radsaison können Sie
hier Ihre Daten eingeben. Sie können die Gesamtstrecke
getrennt für Rad 1 oder Rad 2 einstellen.
ACHTUNG: Der M5 hat eine Datenspeicherung.
Beim Batteriewechsel gehen keine Daten verloren.
So stellen Sie die Gesamtstrecke ein:
Die SET-Taste gedrückt halten, bis sich das Einstell-Menü
öffnet.
Mit der BIKE-Taste wechseln Sie von Totalwerte zu
Einstellung.
Die Einstellung öffnen Sie mit der SET-Taste.
Im Display erscheint „Language“.
Mit der BIKE-Taste oder der TPC-Taste blättern Sie zur
Einstellung für die Gesamtstrecke.
Die Einstellung öffnen Sie mit der SET-Taste.
Mit der BIKE- oder der TPC-Taste wählen Sie aus, ob
Sie die Gesamtstrecke für Rad 1 oder Rad 2 einstellen
wollen.
Die Auswahl bestätigen Sie mit der SET-Taste.
Die linke Ziffer blinkt.
Mit der BIKE- oder der TPC-Taste können Sie die Ziffer
verändern.
Wenn diese Ziffer eingestellt, bestätigen Sie die
Einstellung mit der SET-Taste.
Page 95

34
M5
Die Einstellungen – Gesamtstrecke
Die nächste Ziffer beginnt zu blinken und ist für die
Einstellung bereit.
Mit der BIKE- oder der TPC-Taste verändern Sie diese Ziffer.
Wenn auch diese Ziffer eingestellt ist, bestätigen Sie die
Einstellung mit der SET-Taste.
Die nächste Ziffer blinkt.
Wenn Sie alle Ziffern eingestellt haben, bestätigen Sie
die Einstellung noch mal mit der SET-Taste.
Im Display bekommen Sie die Rückmeldung Set OK.
Der eingestellte Wert wird übernommen.
Wenn Sie weitere Einstellungen machen wollen,
kommen Sie mit der BIKE-oder der TPC-Taste auf die
anderen Einstellungen.
Wenn Sie keine weiteren Einstellungen machen wollen,
halten Sie die SET-Taste gedrückt.
Das Einstellmenü wird geschlossen.
Der VDO M5 kehrt in den Funktions-Modus zurück.
Page 96

35
M5
Die Einstellungen – Gesamtfahrzeit
Am VDO M5 können Sie die Gesamt-Fahrzeit einstellen.
z. B. zu Beginn der neuen Radsaison können Sie hier
Ihre Gesamt-Fahrzeit (Summe der Fahrzeit aller Touren)
einstellen. Die Einstellung können Sie getrennt für Rad 1
und Rad 2 machen.
ACHTUNG: Der M5 hat eine Datenspeicherung.
Beim Batteriewechsel gehen keine Daten verloren.
So stellen Sie die Gesamt-Zeit ein:
Die SET-Taste gedrückt halten, bis sich das Einstell-Menü
öffnet.
Mit der BIKE-Taste wechseln Sie von Totalwerte zu
Einstellung.
Die Einstellung öffnen Sie mit der SET-Taste.
Im Display erscheint „Language“.
Mit der BIKE- oder der TPC-Taste blättern Sie zur
Einstellung für die Gesamt-Zeit.
Mit der SET-Taste öffnen Sie die Einstellung für die
Gesamt-Zeit.
Mit der BIKE-Taste oder der TPC-Taste wählen Sie aus, ob
Sie die Gesamt-Zeit für Rad 1 oder Rad 2 einstellen wollen.
Mit der SET-Taste bestätigen Sie die Auswahl.
Die linke Ziffer der Stunden-Einstellung blinkt und ist zur
Einstellung bereit.
Mit der BIKE- oder der TPC-Taste stellen Sie den Wert für
diese Ziffer ein.
Mit der SET-Taste bestätigen Sie die Einstellung.
Page 97

36
M5
Die Einstellungen – Gesamtfahrzeit
Die nächste Ziffer links beginnt zu blinken und ist für die
Einstellung bereit.
Mit der BIKE- oder der TPC-Taste stellen Sie den Wert für
diese Ziffer ein.
Mit der SET-Taste bestätigen Sie die Einstellung.
Wenn Sie alle 4 Ziffern für die Stunden eingestellt haben,
bestätigen Sie die Einstellung mit der SET-Taste.
Danach wird die Einstellung für die Minuten geöffnet.
Mit der BIKE- oder der TPC-Taste stellen Sie die Minuten
ein.
Wenn die Minuten eingestellt sind, bestätigen Sie die
Einstellung mit der SET-Taste.
Im Display bekommen Sie die Rückmeldung Set OK.
Wenn Sie weitere Einstellungen machen wollen,
kommen Sie mit der BIKE-Taste auf die anderen
Einstellungen.
Wenn Sie keine weiteren Einstellungen machen wollen,
halten Sie die SET-Taste gedrückt.
Das Einstellmenü wird geschlossen.
Der VDO M5 kehrt in den Funktions-Modus zurück.
Page 98

37
M5
Die Einstellungen – Gesamt-Kalorienverbrauch
Im M5 kann der Gesamt-Kalorienverbrauch aller Touren,
getrennt für Rad 1 und Rad 2 eingestellt werden, z. B. am
Beginn der neuen Radsaison.
ACHTUNG: Der M5 speichert alle Gesamtdaten auch bei
einem Batteriewechsel. Es gehen keine Daten verloren.
So stellen Sie den Gesamt-Kalorien-Verbrauch ein:
Die SET-Taste gedrückt halten, bis sich das Einstell-Menü
öffnet.
Mit der BIKE-Taste wechseln Sie von Totalwerte zu
Einstellung.
Die Einstellung öffnen Sie mit der SET-Taste.
Im Display erscheint „Language“.
Mit der BIKE- oder der TPC-Taste blättern Sie zur
Einstellung für die Gesamt KCAL (Gesamt-KalorienVerbrauch).
Mit der SET-Taste öffnen Sie die Einstellung.
Mit der BIKE- oder der TPC-Taste wählen Sie aus, ob
Sie die Einstellung für Rad 1 oder Rad 2 machen wollen.
Mit der SET-Taste bestätigen Sie die Auswahl und öffnen die
Einstellung.
Die linke Ziffer blinkt. Mit der BIKE- oder der TPC-Taste
stellen Sie den Wert für diese Ziffer ein.
Mit der SET-Taste bestätigen Sie die Einstellung.
Page 99

38
M5
Die Einstellungen – Gesamt-Kalorienverbrauch
Die nächste Ziffer links beginnt zu blinken und ist für die
Einstellung bereit.
Mit der BIKE- oder der TPC-Taste stellen Sie den Wert
für diese Ziffer ein.
Mit der SET-Taste bestätigen Sie die Einstellung.
Wenn alle Ziffern eingestellt sind, bestätigen Sie die
Einstellung mit der SET-Taste.
Im Display bekommen Sie die Rückmeldung Set OK.
Wenn Sie weitere Einstellungen machen wollen,
kommen Sie mit der BIKE-Taste auf die anderen
Einstellungen.
Wenn Sie keine weiteren Einstellungen machen wollen,
halten Sie die SET-Taste gedrückt.
Das Einstellmenü wird geschlossen.
Der VDO M5 kehrt in den Funktions-Modus zurück.
Page 100

39
M5
Navigator Einstellen
Der Navigator ist ein zweiter, völlig unabhängiger,
Tagesstreckenzähler.
Der Navigator kann
– beliebig oft während einer Tour auf Null zurückgestellt
werden
– auf einen Strecken-Wert eingestellt werden
– von dem eingestellten Strecken-Wert vorwärts oder
rückwärts zählen.
Einstellbereich Navigator: -99,99 KM bis +999,99 KM oder
Meilen.
So geht es:
Holen Sie die Navigator-Funktion mit der BIKE-Taste in
die Anzeige.
Halten Sie, wenn die Navigator-Funktion im Display
ist, die SET-Taste gedrückt, bis das Einstell-Menü geöffnet
wird.
Wählen Sie zuerst aus, ob der Navigator vom eingestellten
Wert aus vorwärts oder rückwärts zählen soll.
Die Auswahl machen Sie mit der BIKE-Taste.
Ihre Auswahl bestätigen Sie mit der SET-Taste.
Die Einstellung für den Strecken-Wert des Navigators wird
geöffnet. Die erste Ziffer links blinkt.
Mit der BIKE-oder der TPC-Taste verändern Sie die Ziffer.
Mit der SET-Taste bestätigen Sie die Eingabe.
 Loading...