

Page 1

USER'S GUIDE
Vaisala Barometric Pressure Transfer
Standard
PTB330TS
M210983EN-A
Page 2

PUBLISHED BY
Vaisala Oyj Phone (int.): +358 9 8949 1
P.O. Box 26 Fax: +358 9 8949 2227
FI-00421 Helsinki
Finland
Visit our Internet pages at http://www.vaisala.com/
© Vaisala 2009
No part of this manual may be reproduced in any form or by any means,
electronic or mechanical (including photocopying), nor may its contents
be communicated to a third party without prior written permission of the
copyright holder.
The contents are subject to change without prior notice.
Please observe that this manual does not create any legally binding
obligations for Vaisala towards the customer or end user. All legally
binding commitments and agreements are included exclusively in the
applicable supply contract or Conditions of Sale.
Page 3

________________________________________________________________________________
Table of Contents
CHAPTER 1
GENERAL INFORMATION . . . . . . . . . . . . . . . . . . . . . . . . . . . . . . . . . . . . . .9
About This Manual . . . . . . . . . . . . . . . . . . . . . . . . . . . . . . . . .9
Contents of This Manual . . . . . . . . . . . . . . . . . . . . . . . . . . .9
Version Information . . . . . . . . . . . . . . . . . . . . . . . . . . . . . .10
Related Manuals . . . . . . . . . . . . . . . . . . . . . . . . . . . . . . . .10
General Safety Considerations . . . . . . . . . . . . . . . . . . . . .10
Feedback . . . . . . . . . . . . . . . . . . . . . . . . . . . . . . . . . . . . . .11
Product Related Safety Precautions . . . . . . . . . . . . . . . . . .11
ESD Protection . . . . . . . . . . . . . . . . . . . . . . . . . . . . . . . . . . .11
Regulatory Compliance . . . . . . . . . . . . . . . . . . . . . . . . . . . .12
Recycling . . . . . . . . . . . . . . . . . . . . . . . . . . . . . . . . . . . . . . . .12
Trademarks . . . . . . . . . . . . . . . . . . . . . . . . . . . . . . . . . . . . . .12
License Agreement . . . . . . . . . . . . . . . . . . . . . . . . . . . . . . . .12
Warranty . . . . . . . . . . . . . . . . . . . . . . . . . . . . . . . . . . . . . . . .13
CHAPTER 2
PRODUCT OVERVIEW . . . . . . . . . . . . . . . . . . . . . . . . . . . . . . . . . . . . . . .15
Introduction to PTB330TS . . . . . . . . . . . . . . . . . . . . . . . . . .15
Basic Features and Options . . . . . . . . . . . . . . . . . . . . . . .18
Pressure Measurement . . . . . . . . . . . . . . . . . . . . . . . . . . . . .19
Pressure Measurement Principle . . . . . . . . . . . . . . . . . . . .20
Humidity and Temperature Measurement (Option) . . . . . .21
Additional Temperature Probe (Option) . . . . . . . . . . . . . . .21
Chemical Purge (Option) . . . . . . . . . . . . . . . . . . . . . . . . . .22
CHAPTER 3
OPERATION . . . . . . . . . . . . . . . . . . . . . . . . . . . . . . . . . . . . . . . . . . . . . . . .23
Transport . . . . . . . . . . . . . . . . . . . . . . . . . . . . . . . . . . . . . . . .23
Basic Use of the MI70 Indicator . . . . . . . . . . . . . . . . . . . . . .24
Menus and Functions . . . . . . . . . . . . . . . . . . . . . . . . . . . . .28
Preparations for Measurement . . . . . . . . . . . . . . . . . . . . . .29
Charging . . . . . . . . . . . . . . . . . . . . . . . . . . . . . . . . . . . . . .29
Using AA Batteries. . . . . . . . . . . . . . . . . . . . . . . . . . . . 29
Pressure Input Connectors . . . . . . . . . . . . . . . . . . . . . . . .30
MI70 Indicator Settings . . . . . . . . . . . . . . . . . . . . . . . . . . .31
Measuring Barometric Pressure . . . . . . . . . . . . . . . . . . . . .32
Measuring Humidity and Temperature (Option) . . . . . . . . .33
Graphic History . . . . . . . . . . . . . . . . . . . . . . . . . . . . . . . . . . .35
VAISALA________________________________________________________________________ 1
Page 4

________________________________________________________________________________
Recording Data . . . . . . . . . . . . . . . . . . . . . . . . . . . . . . . . . . .36
Saving Individual Data Points . . . . . . . . . . . . . . . . . . . . . .38
Viewing and Deleting Recorded Files . . . . . . . . . . . . . . . .38
Alarm Function . . . . . . . . . . . . . . . . . . . . . . . . . . . . . . . . . . .39
MI70 Link Interface Software for Data Handling . . . . . . . . .40
CHAPTER 4
MAINTENANCE . . . . . . . . . . . . . . . . . . . . . . . . . . . . . . . . . . . . . . . . . . . . .41
Cleaning . . . . . . . . . . . . . . . . . . . . . . . . . . . . . . . . . . . . . . . . .41
Changing the MI70 Battery Pack . . . . . . . . . . . . . . . . . . . . .41
Changing the HMP155 Probe Filter . . . . . . . . . . . . . . . . . . .42
Changing the Sensor in the HMP155 . . . . . . . . . . . . . . . . . .44
Calibration and Adjustment . . . . . . . . . . . . . . . . . . . . . . . . .44
Calibration and Adjustment of PTB330 . . . . . . . . . . . . . . . .45
Opening and Closing the Adjustment Mode . . . . . . . . . . . .46
1-Point Adjustment (LCP1) . . . . . . . . . . . . . . . . . . . . . . . .47
Multipoint Adjustment (MPCP1) . . . . . . . . . . . . . . . . . . . . .48
Entering Adjustment Information . . . . . . . . . . . . . . . . . . . .50
Calibration and Adjustment of HMP155 . . . . . . . . . . . . . . .50
Calibrating and Adjusting Relative Humidity . . . . . . . . . . .51
Calibrating and Adjusting Temperature . . . . . . . . . . . . . . .53
CHAPTER 5
TROUBLESHOOTING . . . . . . . . . . . . . . . . . . . . . . . . . . . . . . . . . . . . . . . .55
Technical Support . . . . . . . . . . . . . . . . . . . . . . . . . . . . . . . . .58
Return Instructions . . . . . . . . . . . . . . . . . . . . . . . . . . . . . . . .58
Vaisala Service Centers . . . . . . . . . . . . . . . . . . . . . . . . . . . .59
CHAPTER 6
SERIAL LINE COMMUNICATION WITH PTB330 BAROMETER . . . . . . .61
Connecting to the Serial Line . . . . . . . . . . . . . . . . . . . . . . . .61
Service Port Connection . . . . . . . . . . . . . . . . . . . . . . . . . .62
Installing the Driver for the USB Cable . . . . . . . . . . . . 63
User Port Connection . . . . . . . . . . . . . . . . . . . . . . . . . . . . .64
List of PTB330 Serial Commands . . . . . . . . . . . . . . . . . . . .66
Measurement Commands . . . . . . . . . . . . . . . . . . . . . . . . . . .68
INTV . . . . . . . . . . . . . . . . . . . . . . . . . . . . . . . . . . . . . . . . .68
R . . . . . . . . . . . . . . . . . . . . . . . . . . . . . . . . . . . . . . . . . . . . .68
S . . . . . . . . . . . . . . . . . . . . . . . . . . . . . . . . . . . . . . . . . . . . .69
SEND . . . . . . . . . . . . . . . . . . . . . . . . . . . . . . . . . . . . . . . . .69
Measurement Settings . . . . . . . . . . . . . . . . . . . . . . . . . . . . .69
AVRG . . . . . . . . . . . . . . . . . . . . . . . . . . . . . . . . . . . . . . . . .69
DPMAX . . . . . . . . . . . . . . . . . . . . . . . . . . . . . . . . . . . . . . .70
TQFE . . . . . . . . . . . . . . . . . . . . . . . . . . . . . . . . . . . . . . . . .70
HHCP . . . . . . . . . . . . . . . . . . . . . . . . . . . . . . . . . . . . . . . . .71
HQFE . . . . . . . . . . . . . . . . . . . . . . . . . . . . . . . . . . . . . . . . .71
HQNH . . . . . . . . . . . . . . . . . . . . . . . . . . . . . . . . . . . . . . . . .71
2 _______________________________________________________________________________
Page 5

________________________________________________________________________________
Formatting Measurement Output . . . . . . . . . . . . . . . . . . . .71
FORM . . . . . . . . . . . . . . . . . . . . . . . . . . . . . . . . . . . . . . . .71
UNIT . . . . . . . . . . . . . . . . . . . . . . . . . . . . . . . . . . . . . . . . . .73
User Port Serial Settings . . . . . . . . . . . . . . . . . . . . . . . . . . .74
SERI . . . . . . . . . . . . . . . . . . . . . . . . . . . . . . . . . . . . . . . . . .74
SMODE . . . . . . . . . . . . . . . . . . . . . . . . . . . . . . . . . . . . . . .75
ECHO . . . . . . . . . . . . . . . . . . . . . . . . . . . . . . . . . . . . . . . . .76
Other Commands . . . . . . . . . . . . . . . . . . . . . . . . . . . . . . . . .77
? . . . . . . . . . . . . . . . . . . . . . . . . . . . . . . . . . . . . . . . . . . . . .77
ERRS . . . . . . . . . . . . . . . . . . . . . . . . . . . . . . . . . . . . . . . . .77
RESET . . . . . . . . . . . . . . . . . . . . . . . . . . . . . . . . . . . . . . . .78
VERS . . . . . . . . . . . . . . . . . . . . . . . . . . . . . . . . . . . . . . . . .78
CHAPTER 7
TECHNICAL DATA . . . . . . . . . . . . . . . . . . . . . . . . . . . . . . . . . . . . . . . . . . .79
General . . . . . . . . . . . . . . . . . . . . . . . . . . . . . . . . . . . . . . . . . .80
Performance . . . . . . . . . . . . . . . . . . . . . . . . . . . . . . . . . . . . .81
Inputs and outputs . . . . . . . . . . . . . . . . . . . . . . . . . . . . . . . .83
Mechanics . . . . . . . . . . . . . . . . . . . . . . . . . . . . . . . . . . . . . . .84
Options and Accessories . . . . . . . . . . . . . . . . . . . . . . . . . . .85
VAISALA________________________________________________________________________ 3
Page 6

________________________________________________________________________________
4 _______________________________________________________________________________
Page 7

________________________________________________________________________________
List of Figures
Figure 1 The PTB330TS with Case Open . . . . . . . . . . . . . . . . . . . . . . .17
Figure 2 Typical Connections and Cables . . . . . . . . . . . . . . . . . . . . . . .19
Figure 3 PTB330 Barometer in Tabletop Casing . . . . . . . . . . . . . . . . . .20
Figure 4 HMP155 Probe with Additional T-probe. . . . . . . . . . . . . . . . . .22
Figure 5 Transport Case Pressure Release Valve. . . . . . . . . . . . . . . . .23
Figure 6 Transport Case With Shoulder Strap. . . . . . . . . . . . . . . . . . . .24
Figure 7 MI70 Indicator . . . . . . . . . . . . . . . . . . . . . . . . . . . . . . . . . . . . .25
Figure 8 MI70 Keypad . . . . . . . . . . . . . . . . . . . . . . . . . . . . . . . . . . . . . .26
Figure 9 MI70 Basic View . . . . . . . . . . . . . . . . . . . . . . . . . . . . . . . . . . .27
Figure 10 Installing the Clip for AA Batteries . . . . . . . . . . . . . . . . . . . . . .30
Figure 11 Pressure Input Connectors . . . . . . . . . . . . . . . . . . . . . . . . . . .31
Figure 12 Ready for Pressure Measurement. . . . . . . . . . . . . . . . . . . . . .33
Figure 13 PTB330 and HMP155 Connected . . . . . . . . . . . . . . . . . . . . . .35
Figure 14 Graphic History . . . . . . . . . . . . . . . . . . . . . . . . . . . . . . . . . . . .36
Figure 15 Recording in Progress . . . . . . . . . . . . . . . . . . . . . . . . . . . . . . .37
Figure 16 List of Data Files . . . . . . . . . . . . . . . . . . . . . . . . . . . . . . . . . . .38
Figure 17 Alarm Menu . . . . . . . . . . . . . . . . . . . . . . . . . . . . . . . . . . . . . . .39
Figure 18 Changing the MI70 Battery Pack . . . . . . . . . . . . . . . . . . . . . . .42
Figure 19 HMP155 Sensor and Filter Structure. . . . . . . . . . . . . . . . . . . .43
Figure 20 PTB330 Adjustments . . . . . . . . . . . . . . . . . . . . . . . . . . . . . . . .45
Figure 21 Inside of Open Barometer . . . . . . . . . . . . . . . . . . . . . . . . . . . .47
Figure 22 HMP155 Adjustment Buttons. . . . . . . . . . . . . . . . . . . . . . . . . .51
Figure 23 Starting Adjustment Mode for HMP155 . . . . . . . . . . . . . . . . . .52
Figure 24 Select Quantity. . . . . . . . . . . . . . . . . . . . . . . . . . . . . . . . . . . . .52
Figure 25 Service Port on the PTB330 Motherboard. . . . . . . . . . . . . . . .63
Figure 26 Wiring of the M12 (8-Pin) Connector . . . . . . . . . . . . . . . . . . . .65
Figure 27 Female M12 Connector with Screw Terminals . . . . . . . . . . . .66
Figure 28 Accuracy Over Temperature Range . . . . . . . . . . . . . . . . . . . .83
VAISALA________________________________________________________________________ 5
Page 8

________________________________________________________________________________
6 _______________________________________________________________________________
Page 9

________________________________________________________________________________
List of Tables
Table 1 Manual Revisions. . . . . . . . . . . . . . . . . . . . . . . . . . . . . . . . . . . . .10
Table 2 Related Manuals . . . . . . . . . . . . . . . . . . . . . . . . . . . . . . . . . . . . .10
Table 3 Quantities Measured by PTB330TS. . . . . . . . . . . . . . . . . . . . . . .16
Table 4 Quantities Available With Optional HMP155 . . . . . . . . . . . . . . . .16
Table 5 Menu Structure of the MI70 Indicator. . . . . . . . . . . . . . . . . . . . . .28
Table 6 Maximum Recording Times . . . . . . . . . . . . . . . . . . . . . . . . . . . . .37
Table 7 Adjustment and Calibration Com ma nds for Module P1. . . . . . . .46
Table 8 Troubleshooting Chart . . . . . . . . . . . . . . . . . . . . . . . . . . . . . . . . .56
Table 9 Serial Communication Settings for the Service Port . . . . . . . . . .62
Table 10 Default Serial Communication Settings for the User Port . . . . . .64
Table 11 M12 Connector Pin Assignments. . . . . . . . . . . . . . . . . . . . . . . . .65
Table 12 The modifiers . . . . . . . . . . . . . . . . . . . . . . . . . . . . . . . . . . . . . . . .72
Table 13 Output Quantities and Units. . . . . . . . . . . . . . . . . . . . . . . . . . . . .73
Table 14 Selection of Output Modes. . . . . . . . . . . . . . . . . . . . . . . . . . . . . .76
Table 15 Options and Accessories . . . . . . . . . . . . . . . . . . . . . . . . . . . . . . .85
VAISALA________________________________________________________________________ 7
Page 10

________________________________________________________________________________
8 _______________________________________________________________________________
Page 11

Chapter 1 ________________________________________________________ General Information
CHAPTER 1
GENERAL INFORMATION
This chapter provides general notes for the manual and the PTB330TS.
About This Manual
This manual provides information for installing, operating, and
maintaining Vaisala BAROCAP® Digital Barometer PTB330.
Contents of This Manual
This manual consists of the following chapters:
- Chapter 1, General Information: This chapter provides general
notes for the manual and the PTB330TS.
- Chapter 2, Product Overview: This chapter introduces the features,
advantages, and the product nomenclature of PTB330TS.
- Chapter 3, Operation: This chapter contains information that is
needed to operate the PTB330TS.
- Chapter 4, Maintenance: This chapter contains information that is
needed maintenance of the PTB330TS.
- Chapter 5, Troubleshooting: This chapter contains instructions for
diagnosing problems with the PTB330TS.
VAISALA________________________________________________________________________ 9
Page 12

User's Guide ______________________________________________________________________
- Chapter 6, Serial Line Communication With PTB330 Barometer:
This chapter contains instructions for serial line use of the PTB330
barometer.
- Chapter 7, Technical Data: This chapter provides the technical data
of the PTB330TS.
Version Information
Table 1 Manual Revisions
Manual Code Description
M210983EN-A March 2009 - First version
Related Manuals
The manuals listed below contain additional information about the
PTB330 barometer and the HMP155 humidity and temperature probe,
including the calculation formulas used by the products. You can
download the manuals from www.vaisala.com.
WARNING
CAUTION
Table 2 Related Manuals
Manual Code Description
M210855EN PTB330 User’s Guide
M210912EN HMP155 User’s Guide
General Safety Considerations
Throughout the manual, important safety considerations are highlighted
as follows:
Warning alerts you to a serious hazard. If you do not read and follow
instructions very carefully at this point, there is a risk of injury or even
death.
Caution warns you of a potential hazard. If you do not read and follow
instructions carefully at this point, the product could be damaged or
important data could be lost.
NOTE
10 ___________________________________________________________________M210983EN-A
Note highlights important information on using the product.
Page 13

Chapter 1 ________________________________________________________ General Information
Feedback
Vaisala Customer Documentation Team welcomes your comments and
suggestions on the quality and usefulness of this publication. If you find
errors or have other suggestions for improvement, please indicate the
chapter, section, and page number. You can send comments to us by email: manuals@vaisala.com
Product Related Safety Precautions
The product delivered to you has been tested for safety and approved as
shipped from the factory. Note the following precautions:
CAUTION
Do not modify the unit. Improper modification can damage the
product or lead to malfunction.
ESD Protection
Electrostatic Discharge (ESD) can cause immediate or latent damage to
electronic circuits. Vaisala products are adequately protected against
ESD for their intended use. However, it is possible to damage the
product by delivering electrostatic discharges when touching,
removing, or inserting any objects inside the equipment housing.
To make sure you are not delivering high static voltages yourself:
- Handle ESD sensitive components on a properly grounded and
protected ESD workbench. When this is not possible, ground
yourself to the equipment chassis before touching the boards.
Ground yourself with a wrist strap and a resistive connection cord.
When neither of the above is possible, touch a conductive part of
the equipment chassis with your other hand before touching the
boards.
- Always hold the boards by the edges and avoid touching the
component contacts.
VAISALA_______________________________________________________________________ 11
Page 14
User's Guide ______________________________________________________________________
Recycle all applicable material.
Dispose of batteries and the unit according to statutory regulations.
Do not dispose of with regular household refuse.
Regulatory Compliance
PTB330TS is in conformity with the following EU directives:
- EMC Directive (2004/108/EC)
Complies with the EMC product family standard
EN61326-1, Electrical equipment for measurement control and
laboratory use - Basic immunity test requirements.
- Low Voltage Directive (2006/95/EC)
- ROHS Directive (2002/95/EC)
Recycling
Trademarks
HUMICAP® and BAROCAP® are registered trademarks of Vaisala.
Microsoft®, Windows®, Windows 2000®, Windows XP®, Windows
Server 2003®, and Windows Vista® are are registered trademarks of
Microsoft Corporation in the United States and/or other countries.
License Agreement
All rights to any software are held by Vaisala or third parties. The
customer is allowed to use the software only to the extent that is
provided by the applicable supply contract or Software License
Agreement.
12 ___________________________________________________________________M210983EN-A
Page 15

Chapter 1 ________________________________________________________ General Information
Warranty
Vaisala hereby represents and warrants all Products
manufactured by Vaisala and sold hereunder to be free
from defects in workmanship or material during a
period of twelve (12) months from the date of delivery
save for products for which a special warranty is given.
If any Product proves however to be defective in
workmanship or material within the period herein
provided Vaisala undertakes to the exclusion of any
other remedy to repair or at its own option replace the
defective Product or part thereof free of charge and
otherwise on the same conditions as for the original
Product or part without extension to original warranty
time. Defective parts replaced in accordance with this
clause shall be placed at the disposal of Vaisala.
Vaisala also warrants the quality of all repair and
service works performed by its employees to products
sold by it. In case the repair or service works should
appear inadequate or faulty and should this cause
malfunction or nonfunction of the product to which the
service was performed Vaisala shall at its free option
either repair or have repaired or replace the product in
question. The working hours used by employees of
Vaisala for such repair or replacement shall be free of
charge to the client. This service warranty shall be
valid for a period of six (6) months from the date the
service measures were completed.
This warranty does not however apply when the defect
has been caused through
a) normal wear and tear or accident;
b) misuse or other unsuitable or unauthorized use of
the Product or negligence or error in storing,
maintaining or in handling the Product or any
equipment thereof;
c) wrong installation or assembly or failure to se rv ice
the Product or otherwise follow Vaisala's service
instructions including any repairs or installation or
assembly or service made by unauthorized personnel
not approved by Vaisala or replacements with parts not
manufactured or supplied by Vaisala;
d) modifications or changes of the Product as well as
any adding to it without Vaisala's prior authorization;
e) other factors depending on the Customer or a third
party.
Notwithstanding the aforesaid Vaisala's liability under
this clause shall not apply to any defects arising out of
materials, designs or instructions provided by the
Customer.
This warranty is however subject to following
conditions:
a) A substantiated written claim as to any alleged
defects shall have been received by Vaisala within
thirty (30) days after the defect or fault became known
or occurred, and
b) The allegedly defective Product or part shall, should
Vaisala so require, be sent to the works of Vaisala or to
such other place as Vaisala may indicate in writing,
freight and insurance prepaid and properly packed and
labelled, unless Vaisala agrees to inspect and repair the
Product or replace it on site.
This warranty is expressly in lieu of and excludes all
other conditions, warranties and liabilities, express or
implied, whether under law, statute or otherwise,
including without limitation any implied warranties of
merchantability or fitness for a particular purpose and
all other obligations and liabilities of Vaisala or its
representatives with respect to any defect or deficiency
applicable to or resulting directly or indirectly from the
Products supplied hereunder, which obligations and
liabilities are hereby expressly cancelled and waived.
Vaisala's liability shall under no circumstances exceed
the invoice price of any Product for which a warranty
claim is made, nor shall Vaisala in any circumstances
be liable for lost profits or other consequential loss
whether direct or indirect or for special damages.
VAISALA_______________________________________________________________________ 13
Page 16

User's Guide ______________________________________________________________________
14 ___________________________________________________________________M210983EN-A
Page 17

Chapter 2 __________________________________________________________ Product Overview
CHAPTER 2
PRODUCT OVERVIEW
This chapter introduces the features, advantages, and the product
nomenclature of PTB330TS.
Introduction to PTB330TS
Barometric Pressure Transfer Standard PTB330TS combines a PTB330
digital barometer with a handheld MI70 indicator into a portable unit
that can be used as a transfer standard. Optional HMP155 probe is
available for accurate humidity and temperature measurement. The
PTB330TS is suitable for reference measurements in industrial and
meteorological areas.
The PTB330TS is housed in a durable and weatherproof transport case
that can be easily carried and shipped. The components of the
PTB330TS are placed in a foam interior, with accessories and user’s
guide placed in the lid organizer. The case includes a shoulder strap.
The quantities measured and calculated by PTB330TS are presented in
Table 3 on page 16. Quantities available using the optional HMP155
probe are presented in Table 4 on page 16.
VAISALA_______________________________________________________________________ 15
Page 18

User's Guide ______________________________________________________________________
Table 3 Quantities Measured by PTB330TS
Quantity Abbreviation
Pressure (measures average
pressure from P
, P2, and P3)
1
Pressure from barometer
P
P
, P2, and P
1
3
module 1 or 2 or 3
Temperature of barometer
TP1, TP2, and TP
3
module 1 or 2 or 3
Pressure trend and tendency P
Pressure difference (P1 -P2) deltaP
Pressure difference (P1 -P3) deltaP
Pressure difference (P2-P3) deltaP
3h
12
13
23
QNH pressure QNH
QFE pressure QFE
Height Corrected Pressure HCP
Table 4 Quantities Available With Optional HMP155
Quantity Abbreviation
Relative Humidity RH
Temperature T
Additional T- probe temperature T
Dewpoint / Frostpoint
a
T
d/f
temperature
Dewpoint temperature T
d
Mixing ratio x
Wetbulb temperature T
w
16 ___________________________________________________________________M210983EN-A
Page 19

Chapter 2 __________________________________________________________ Product Overview
0910-031
Figure 1 The PTB330TS with Case Open
where
1 = HMP155 humidity and temperature probe (option)
2 = P TB330 barometer in tabletop case, with room for CDs under
the case
3 = Shoulder strap and documentation
4 = Cables and pressure tubing
5 = Spiral cable and additional T-probe (option)
6 = MI70 indicator
7 = AC adapter and accessories (e.g. quick connector and M12
connector)
VAISALA_______________________________________________________________________ 17
Page 20

User's Guide ______________________________________________________________________
Basic Features and Options
- PTB330 digital barometer for accurate pressure measurement
- 1 ... 3 barometer modules
- barbed fitting for pressure input installed, quick connector
supplied
- calculated output quantities, QFE and QNH, available
- handheld MI70 indicator with a user friendly, multilingual display
- service port for MI70 Link Interface Software or PC
- weatherproof transport case
Available options:
- ISO/IEC 17025 Accredited calibration for PTB330
- HMP155 humidity and temperature probe
- HMP155 options: additional temperature probe, manually
controlled chemical purge feature
- MI70 Link software and USB or RS232 cable for downloading
measurement data to a PC
- USB service cable for connecting to the service port on the
PTB330 barometer
18 ___________________________________________________________________M210983EN-A
Page 21
Chapter 2 __________________________________________________________ Product Overview
0901-017
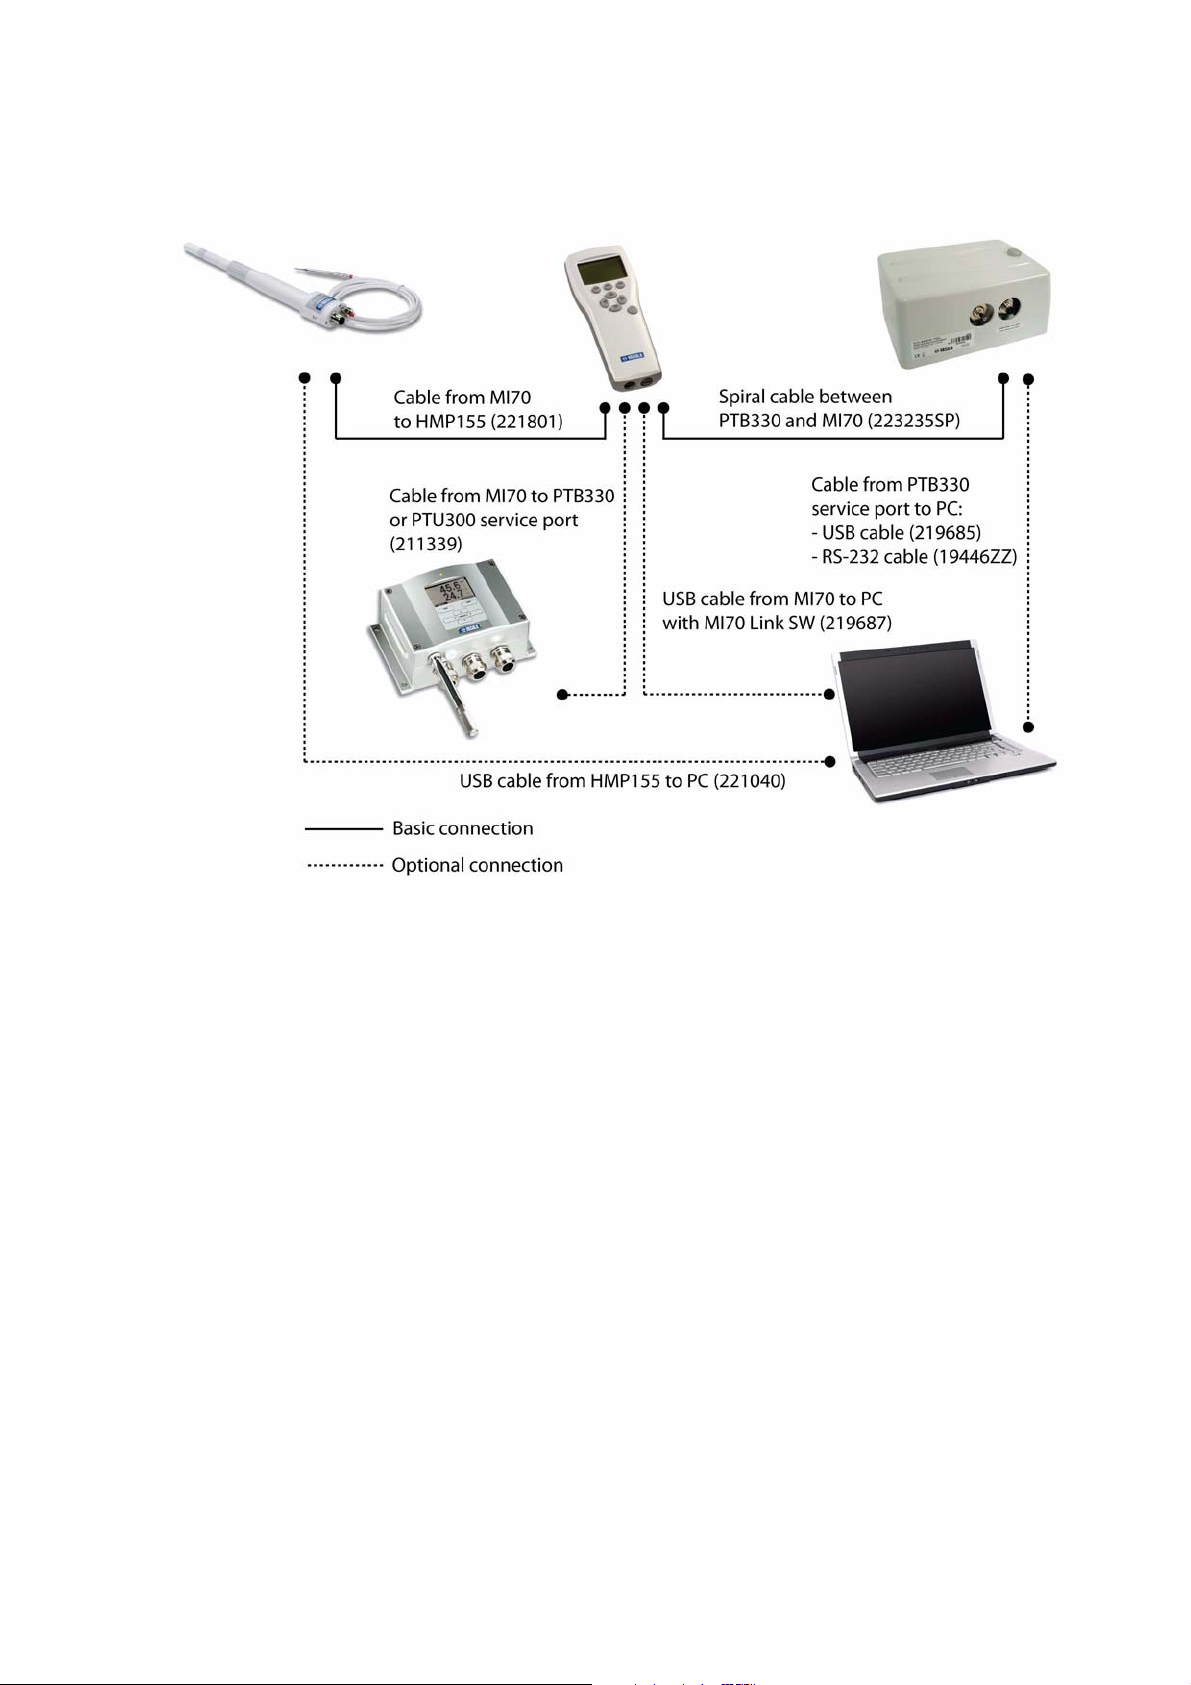
Figure 2 Typical Connections and Cables
Pressure Measurement
The PTB330TS uses a PTB330 series digital barometer that is housed
in a tabletop casing. The barometer does not come with its own display
and keypad; instead, it is designed to be operated using the handheld
MI70 indicator. The MI70 indicator also provides the operation power
for the barometer.
The pressure port, and the M12 connector for the MI70 indicator, are
placed on the side of the casing for easy access. The top of the casing
has a holder for the MI70 indicator for tabletop use. To access the
service port, the barometer can be opened without removing it from the
tabletop casing.
VAISALA_______________________________________________________________________ 19
Page 22

User's Guide ______________________________________________________________________
0810-032
Figure 3 PTB330 Barometer in Tabletop Casing
Numbers refer to Figure 3 on page 20:
1 = MI70 holder
2 = M12 connector for MI70 connection
3 = Pressure port
Pressure Measurement Principle
PTB330 uses a BAROCAP® silicon capacitive absolute pressure sensor
developed by Vaisala for barometric pressure measurement
applications. The BAROCAP® sensor has excellent hysteresis and
repeatability characteristics, low temperature dependence and a very
®
good long-term stability. The ruggedness of the BAROCAP
outstanding and the sensor is resistant to mechanical and thermal
shocks.
The measurement principle of the PTB330 is based on an advanced RC
oscillator and reference capacitors against which the capacitive pressure
sensor is continuously measured. The microprocessor of the barometer
performs compensation for pressure linearity and temperature
dependence.
sensor is
PTB330 can be ordered with 1 ... 3 barometer modules. The use of more
than one module provides increased accuracy and fault tolerance.
20 ___________________________________________________________________M210983EN-A
Page 23

Chapter 2 __________________________________________________________ Product Overview
Humidity and Temperature Measurement (Option)
An optional HMP155 humidity and temperature probe is available for
the PTB330TS. HMP155 provides reliable humidity and temperature
measurement in a wide range of applications. Humidity measurement is
based on the capacitive thin film polymer sensor HUMICAP®180R.
Temperature measurement is based on resistive platinum sensors
(Pt100). Both the humidity and temperature sensors are located at the
tip of the probe, protected by a sintered Teflon filter.
The MI70 indicator is used as the display, and the MI70 indicator also
provides the operation power for the probe. The PTB330 and HMP155
can be connected to the MI70 indicator simultaneously. The HMP155
version that is offered for the PTB330TS has RS-485 digital output.
Additional Temperature Probe (Option)
The HMP155 can be ordered with an additional temperature probe. The
T-probe is attached to the HMP155 with a two meter cable.
When the HMP155 is equipped with the additional T-probe, it
calculates the relative humidity value based on the dewpoint (Td) value
obtained from the humidity probe and the Ta value obtained from the Tprobe. This means that when you measure relative humidity (RH),
mixing ratio (x) or wetbulb temperature (Tw) using HMP155 with Tprobe, it is important to make sure that the humidity probe and the T-
probe are placed in the same conditions in order to get accurate
readings.
VAISALA_______________________________________________________________________ 21
Page 24

User's Guide ______________________________________________________________________
0910-033
Figure 4 HMP155 Probe with Additional T-probe
Chemical Purge (Option)
Chemicals in the measured gas may interfere with the humidity sensor
of the HMP155. The sensor polymer absorbs the interfering chemical,
gradually reducing its ability to absorb water molecules. Consequently
the sensor gain decreases.
The chemical purge function heats humidity sensor to a temperature of
approximately +180 °C for several minutes, which evaporates the
interfering chemical and any moisture on the sensor. The purge function
starts with heating stage, continues with settling and when the
temperature of the sensor has decreased, the probe returns to normal
mode. The entire cycle takes about eight minutes. For the duration of the
purge, the output from the HMP155 is locked to the last measured
values.
If your HMP155 is equipped with the chemical purge function, perform
it always before RH calibration (see section Calibration and Adjustment
of HMP155 on page 50) or when there is a reason to believe that a
sensor has become exposed to an interfering chemical. The purge can
be activated from the Functions menu of the MI70 indicator. Make sure
that the temperature of the sensor has come down to normal temperature
before starting a calibration.
If the chemical purge function is enabled, and the HMP155 is left
continuously powered, it will perform the chemical purge at a very long
interval of approximately 22.7 days (automatic purge). This interval can
be changed using serial line; see the HMP155 User’s Guide.
22 ___________________________________________________________________M210983EN-A
Page 25

Chapter 3 ________________________________________________________________ Operation
CHAPTER 3
OPERATION
This chapter contains information that is needed to operate the
PTB330TS.
Transport
Before transporting the PTB330TS, make sure that all instruments are
securely placed in the foam interior. The inside of the case should be
clean and dry. If water has entered the case due to operation in the field,
let it dry before closing.
The transport case has an air pressure release valve below the handle.
Close the valve for maximum protection during for transport, and open
it before attempting to open the case. The valve is closed when the
indicator in the valve is red, and open when it is green. Refer to Figure
5 on page 23. It may take some minutes for pressure to equalize after
opening the valve.
0801-001
Figure 5 Transport Case Pressure Release Valve
VAISALA_______________________________________________________________________ 23
Page 26
User's Guide ______________________________________________________________________
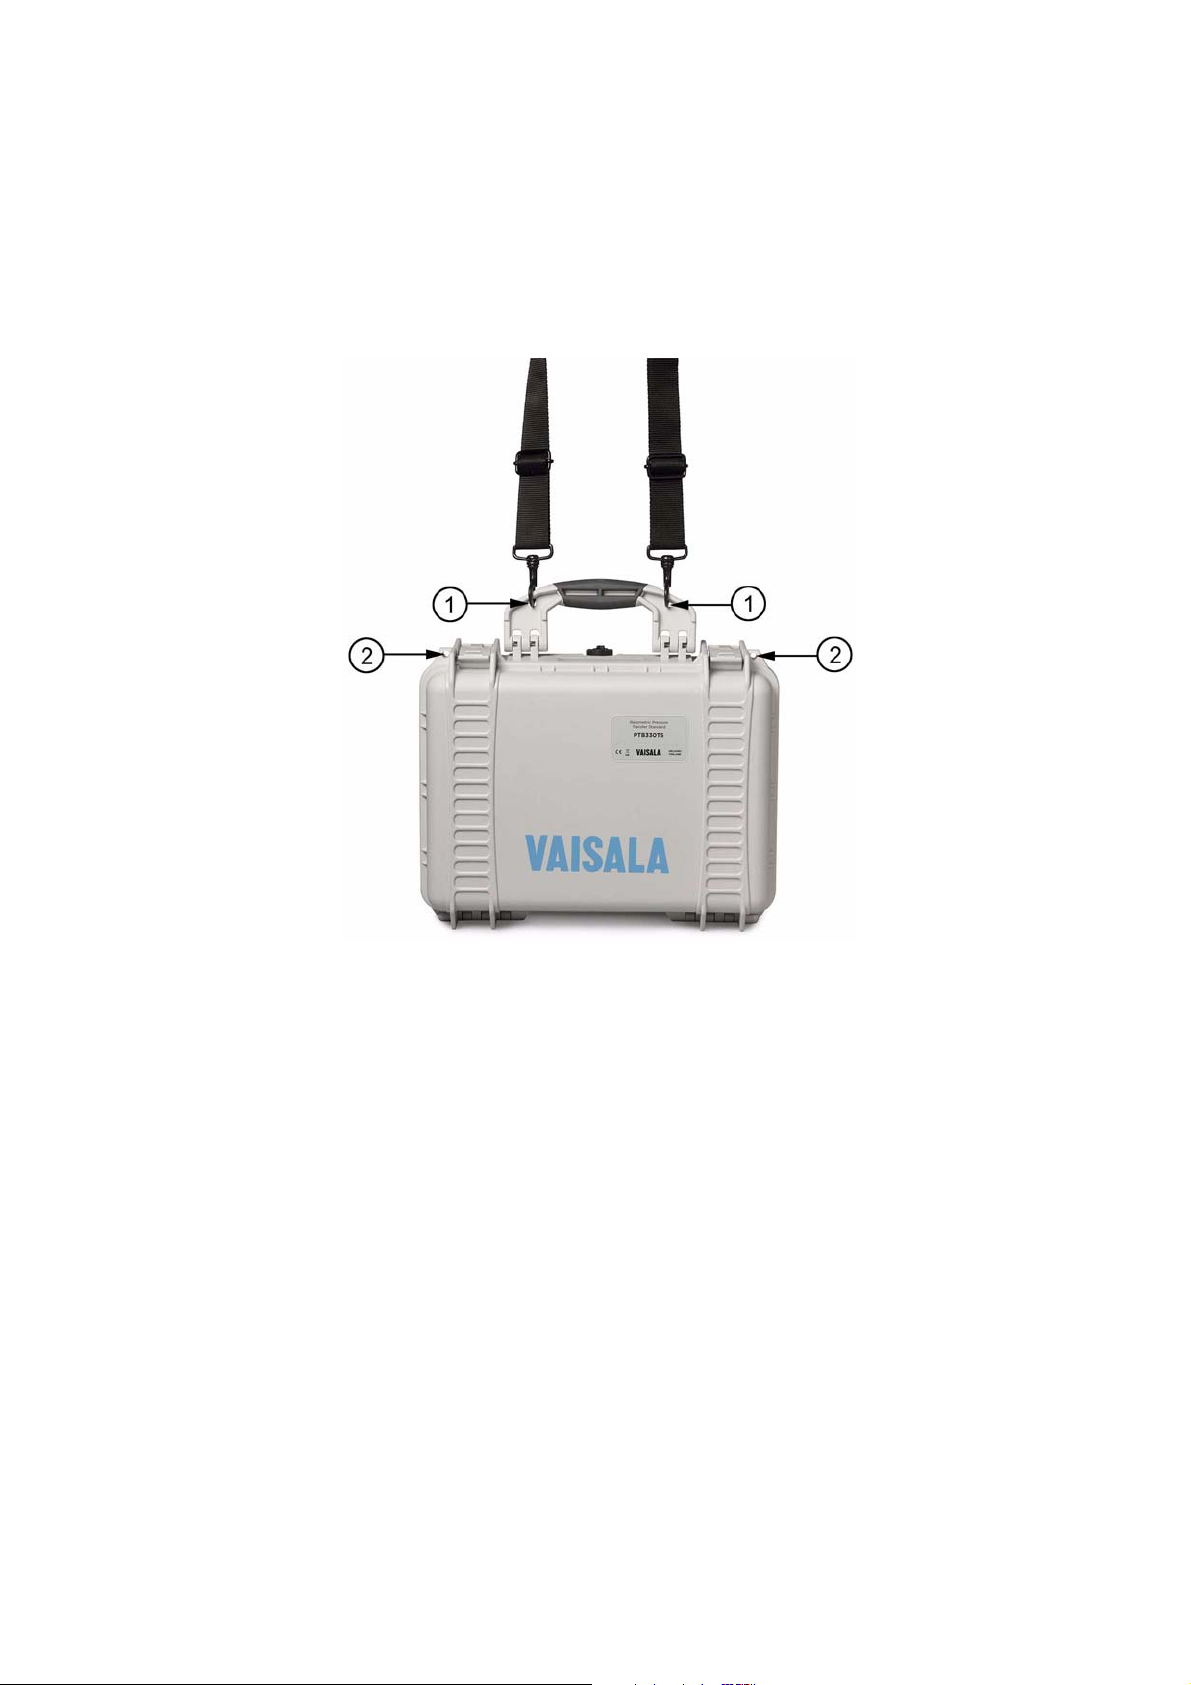
A shoulder strap is included with the transport case. The attachment
holes for the shoulder strap are located on the handle; see Figure 6 on
page 24. The other two holes on the case can be used to lock the case
with a padlock (not supplied).
0902-009
Figure 6 Transport Case With Shoulder Strap
where
1 = Holes for shoulder strap clips
2 = Padlock holes for locking the case (lock not included)
Basic Use of the MI70 Indicator
The MI70 indicator is used as the display and keypad in the PTB330TS.
Connections to the PTB330 barometer and the HMP155 probe are
through the two connection ports at the bottom of the indicator. The
MI70 indicator has a rechargeable battery, which provides the operation
power to the PTB330 and the HMP155.
24 ___________________________________________________________________M210983EN-A
Page 27
Chapter 3 ________________________________________________________________ Operation
NOTE
The MI70 indicator is also used in other Vaisala products, such as the
Vaisala HUMICAP Hand-Held Humidity and Temperature Meter
HM70. Because of this, the MI70 indicator has some software features
and accessories that are not relevant for the PTB330TS, and are not
described in this manual.
0704-035
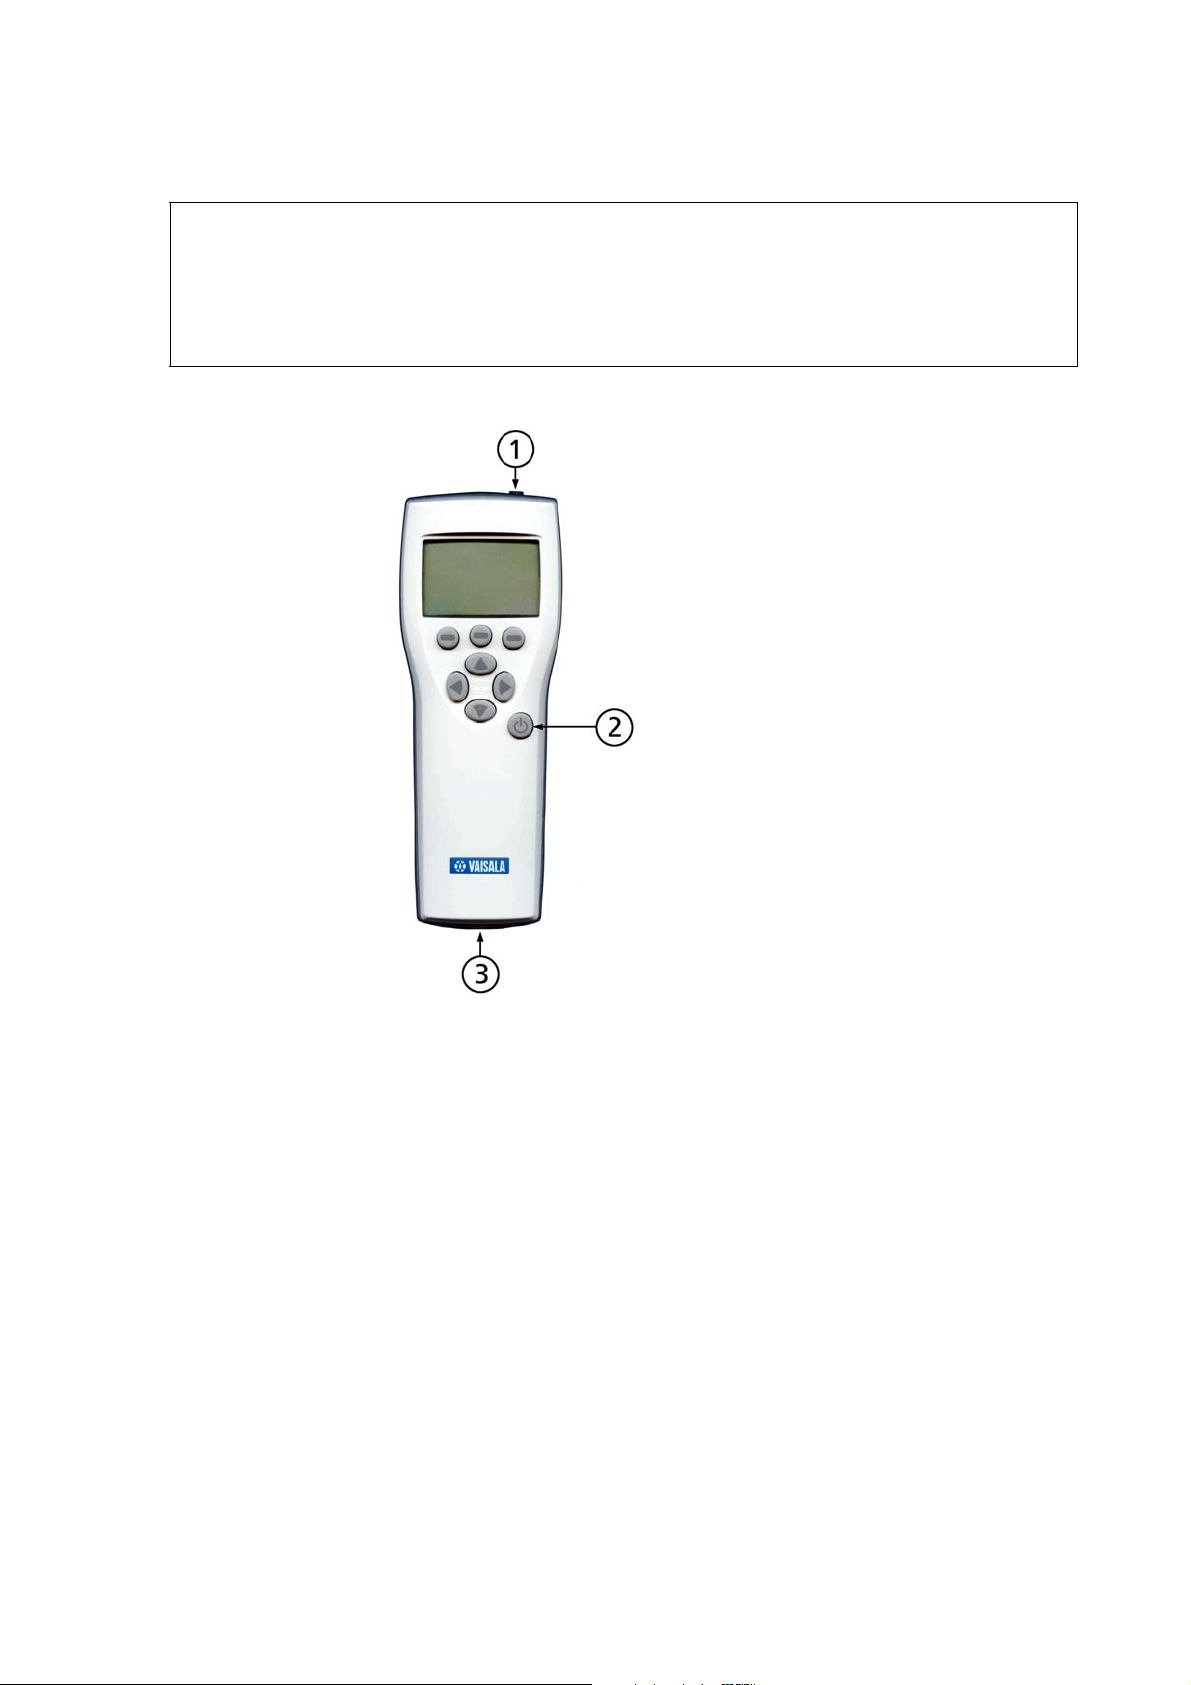
Figure 7 MI70 Indicator
Numbers refer to Figure 7 on page 25:
1 = Recharger connection
2 = Power button
3 = Connection ports (2) for cables
VAISALA_______________________________________________________________________ 25
Page 28

User's Guide ______________________________________________________________________
0704-034
Figure 8 MI70 Keypad
Numbers refer to Figure 8 on page 26:
1 = Shortcut buttons: press to activate the function shown above
the button
2 = Arrow buttons: for navigating the menus, and zooming the
view when in graph mode. To open the main menu while in
basic view, press any arrow key, followed by the middle
shortcut button.
3 = Power button: press until the indicator turns on/off. If data
recording is underway , it will continue in the background even
if the indicator is turned off.
26 ___________________________________________________________________M210983EN-A
Page 29

Chapter 3 ________________________________________________________________ Operation
0810-073
Figure 9 MI70 Basic View
Numbers refer to Figure 9 on page 27:
1 = Selected quantities (1 ... 3), measurement value and unit.
Also shows the MI70 port (I or II) that is connected to the
instrument that measures the quantity.
2 = Battery indicator (showing full battery)
3 = Alarm indicator, shown when the alarm function is enabled.
4 = Indicator for serial connection, shown when the MI70 is
connected to a PC
5 = Indicator for chemical purge, shown when purge is active
6 = Environment settings (showing pressure compensation setting
for RH measurement)
7 = Shortcut button Graphic switches the display to graph mode
8 = Shortcut button Hold/Sa freezes the display, and allows you
to save the data point to memory
9 = Shortcut button Record takes you to the Recording/Viewing
menu
You can change the default shortcuts of the shortcut buttons; see section
MI70 Indicator Settings on page 31.
VAISALA_______________________________________________________________________ 27
Page 30

User's Guide ______________________________________________________________________
Menus and Functions
The table below shows the menu structure of the MI70 Indicator. The
functions available under some entries, such as the Environment menu,
depend on the connected devices.
Table 5 Menu Structure of the MI70 Indicator
Main Menu First level submenu Functions in the submenu
Display Quantities and units Select measured quantities and units.
Rounding Turn the rounding of measured values ON/OFF
Hold/Save display Hold and save current readings
Graphic history Show history graphs
Functions Alarm Configure the alarm functio n of the M I70 indi cat or
Analog output Configure the analog output function of the MI70 indicator
Chemical purge Start the chemical purge function
Calibrate transmitters Start the calibration function for compatible transmitters
Recording/
Viewing
Environment (Available settings
Settings User interface Configure user interface settings of the MI70 indicator
Record data Start and stop data recording
View recorded data View recorded files
Memory status Show memory usage
Clear data memory Clear all recorded files
Set environment settings for measurement compensation.
depend on connected
devices)
Date and time Set date, date format, time, and clock type (12h or 24h)
Measurement settings Set measurement settings; available settings depend on
Device information View device information
Factory settings Revert the MI70 indicator to factory settings
When HMP155 is connected, pressure compensation for
RH measurement can be set.
connected devices. When PTB330 is connected, you can
set measurement settings for HCP, QFE and QNH
quantities, measurement averanging filter, and pressure
stability.
Note: the pressure stability setting (P stab) controls the
"OK" indication on the display of the PTB330 barome ter . It is
not used in the PTB330TS, so you can ignore the "P stab"
setting.
28 ___________________________________________________________________M210983EN-A
Page 31

Chapter 3 ________________________________________________________________ Operation
Preparations for Measurement
Charging
When the MI70 indicator is turned on, the battery level symbol in the
top left corner of the display indicates the current status of the battery.
It is best to prepare for measurement by having a fully charged battery.
To charge the MI70 indicator, plug in the recharger to the base of the
indicator, and connect the other end to a wall socket. The battery symbol
is animated when charging is in progress.
- It is not recommended to use MI70 during the first recharging.
After the first charge cycle is complete, you can use the MI70 while
recharging.
- The duration of recharging depends on the charge level of the
battery pack. 4 hours is a typical recharging time. The
recommended first charging time is 6 hours.
NOTE
- When the battery symbol animation stops, the battery is fully
recharged. Disconnect the recharger.
If the indicator will not turn on at all, it is likely that the battery is empty.
If the battery will not charge at all, or the operation time is very short
even after a full charge, see section Changing the MI70 Battery Pack on
page 41.
Using AA Batteries
You can use regular AA batteries (IEC LR6) instead of the rechargeable
battery pack to power the MI70 indicator. To use AA batteries, you
must remove the rechargeable battery pack, and install a small metallic
clip on the bottom end of the battery compartment. The clip is provided
in a small plastic bag, along with a black plastic plug that you can use
to cover an unused port on the MI70 indicator.
The battery clip is not designed to be installed and removed repeatedly.
Install it only if you intend to power the MI70 indicator with AA
batteries exclusively, and not use the rechargeable battery pack.
VAISALA_______________________________________________________________________ 29
Page 32

User's Guide ______________________________________________________________________
0901-001
Figure 10 Installing the Clip for AA Batteries
1. Open the back cover of the MI70 indicator and remove the
rechargeable battery pack. See section Changing the MI70 Battery
Pack on page 41 for instructions.
NOTE
2. Position the metallic clip as shown in Figure 10 on page 30, and
push down on it to snap it into place. Note that you have to push
quite hard.
3. Insert four AA batteries. The correct orientation of the batteries is
imprinted on the bottom of the battery compartment.
4. Close the back cover, and power on the MI70 indicator to check
that the clip and batteries are installed properly.
If you connect the charger when the MI70 indicator is equipped with
AA batteries, it will run on the power from the charger. The MI70 will
not charge AA batteries, only the rechargeable battery pack.
Pressure Input Connectors
The PTB330 barometer is equipped with a 1/8" barbed fitting for the
pressure input. To measure the pressure from a specific source, connect
the pressure source to this connector using a suitable tube.
You can also attach a 1/8" quick connector as an alternative connector.
The quick connector is included with every PTB330TS. To remove the
barbed fitting, use a 9mm wrench. Unless your wrench is suitably slim,
30 ___________________________________________________________________M210983EN-A
Page 33

Chapter 3 ________________________________________________________________ Operation
you may have to remove the PTB330 barometer from the tabletop case
to change the connector.
0812-016
Figure 11 Pressure Input Connectors
MI70 Indicator Settings
Before starting to use the PTB330TS, go through the user interface
settings of the MI70 indicator:
1. Turn on the MI70 indicator.
2. Open the Settings menu.
3. Select User Interface.
4. Set the interface options as desired. Use the arrow up and down
buttons to move the selection, and the shortcut buttons to change
the setting.
- Language: Changes the language of the user interface. Note
that some menu entries and messages may still be in English
only.
- Auto power off: The indicator can power off automatically
after 15 or 60 minutes of inactivity. The default is 15 minutes.
You can also disable the auto power off.
- Program shortcut keys: If you wish to change the shortcut
button functions that are shown in the basic view, select this
option and follow the instructions. You can, for example,
replace the Hold/Sa button with the Chemical purge.
VAISALA_______________________________________________________________________ 31
Page 34

User's Guide ______________________________________________________________________
- Key click: Turn on/off the click sound when indicator buttons
are pressed.
- Backlight on key press: Turn on/off the automatic display
backlight activation when buttons are pressed.
5. Return to the Settings menu using the left arrow button, and select
Date and Time.
6. Set the Date, Time, and Desired date format using the options.
You can also select a 12-hour clock.
NOTE
If you have accidentally selected an unfamiliar language and cannot
read the menu anymore, you can navigate to the language selection by
pressing the following button sequence (from the basic view):
Right, middle shortcut key, up, right, right, middle shortcut key.
Measuring Barometric Pressure
1. Check that the MI70 indicator is connected to the PTB330, and
turn it on. Set the correct time, date, and environmental settings if
prompted.
You can keep the PTB330 in the transport case if you wish; it does
not affect the pressure measurement.
2. If the quantities or units that appear on the MI70 indicator are not
the ones you want to measure, change them from the Display
menu:
a. Open the menu by pressing an arrow button, followed by
OPEN.
b. Select the Display menu and press the right arrow button.
c. Select Quantities and units and press the right arrow again.
d. To select a quantity, move on the quantity you want by using
the arrow buttons, and press SELECT. You can select up to
three quantities.
You can change the measurement unit by pressing UNIT, and
hide a selected quantity by pressing HIDE.
e. After completing your selection, press EXIT to return to the
basic display. You may be prompted to check the environment
32 ___________________________________________________________________M210983EN-A
Page 35

Chapter 3 ________________________________________________________________ Operation
settings upon exiting; select YES if you want to check the
settings, or NO to exit.
3. Attach the MI70 indicator to the top of the tabletop casing, and wait
for the reading to stabilize.
0812-017
Figure 12 Ready for Pressure Measurement
Measuring Humidity and Temperature (Option)
1. Place the HMP155 probe in the desired measurement location:
- Make sure the probe sits securely and will not fall when
operating the MI70 indicator.
- The probe should be out of direct sunlight and not near any
heat sources.
- If you are measuring relative humidity (RH), mixing ratio (x)
or wetbulb temperature (Tw) and your HMP155 has the
additional temperature probe (T-probe), it is important to
make sure that the humidity probe and the T-probe are placed
in the same conditions in order to get meaningful and accurate
humidity readings. The two probes need to be installed so that
the humidity probe does not heat the T-probe, but is close
enough for the probes to share the same environment
conditions.
VAISALA_______________________________________________________________________ 33
Page 36

User's Guide ______________________________________________________________________
2. Check that the MI70 indicator is connected to the HMP155, and
turn it on. Set the correct time, date, and environmental settings
(pressure compensation) if prompted.
3. If the measured quantities or units that appear on the MI70
indicator are not the ones you want, change them from the Display
menu:
a. Open the menu by pressing an arrow button, followed by
OPEN.
b. Select the Display menu and press the right arrow button.
c. Select Quantities and units and press the right arrow again.
d. To select a quantity, move on the quantity you want by using
the arrow buttons, and press SELECT. You can select up to
three quantities.
You can change the measurement unit by pressing UNIT, and
hide a selected quantity by pressing HIDE.
NOTE
e. After completing your selection, press EXIT to return to the
basic display. You may be prompted to check the environment
settings upon exiting; select YES if you want to check the
settings, or NO to exit.
4. If your HMP155 has the chemical purge option, you can manually
start the chemical purge which will dry out the sensor from the
Functions menu.
When the HMP155 starts the purge, it will stop updating the
measurement values to the MI70 indicator for approximately eight
minutes. The measurements will be unchanging until the purge is
done. While the purge is ongoing, an indicator is displayed next to
the battery indicator.
5. Wait for the reading to stabilize; this may take up to 20 minutes.
Make sure that the Stevenson Screen is closed if you are using one.
Beware of temperature differences when measuring humidity. It is
essential that temperature of the probe and measuring environment is
the same. Even a small difference in temperature between the
environment and the probe causes an error. Temperature differences
may also cause water to condense on the sensor surface.
34 ___________________________________________________________________M210983EN-A
Page 37

Chapter 3 ________________________________________________________________ Operation
0903-021
Figure 13 PTB330 and HMP155 Connected
Graphic History
Graphic history shows you the measurements from the last hour in a
form of curve. To see longer graphs, use the data recording function to
save the data and then view it as a graph. See section Recording Data on
page 36.
To open the graphic history, press the Graphic shortcut button when
the MI70 indicator is in the basic display. You can also open the
graphical display using the Graphic history menu item in the Display
menu.
The curve for the quantity that is uppermost in the basic display is
shown first. You can show the curve for the next quantity by pressing
the Next shortcut button, or show up to three curves at the same time by
pressing the All button. The All selection is shown after browsing
through the curves of the available quantities. To get the statistical info
on the graph area (minimum, maximum and mean values), press Info.
VAISALA_______________________________________________________________________ 35
Page 38

User's Guide ______________________________________________________________________
0812-020
Figure 14 Graphic History
Recording Data
You can record measurement data into the memory of the MI70
indicator, and view it later on the display. You can also use the MI70
Link program to transfer and view the data on a PC.
To start the data recording:
1. Open the Recording/Viewing menu. You can get to this menu
directly from the basic view by pressing the Record shortcut
button.
2. Select Memory status and press Show to check the currently
available space for recordings. Press OK to exit from the memory
status view.
3. Select Record data.
4. Check the currently selected recording Interval, and press Set to
adjust it. The MI70 indicator will record the values of the currently
selected quantities at this interval (for example, one minute).
5. Check the recording Duration, and press Set to adjust it. If you
select Memory full, the recording will continue until memory is
full. Table 6 on page 37 presents the maximum recording times for
each interval with one, two and three recorded quantities.
6. Select Start/Stop recording, and press the Start button to star t the
recording. If you chose "Memory full" as the duration, you see the
maximum recording time on the display. You can also delete files
in order to empty the memory. Press Start again to accept
maximum recording time.
The recording indicator will appear in the basic view when a
recording is ongoing.
36 ___________________________________________________________________M210983EN-A
Page 39

Chapter 3 ________________________________________________________________ Operation
0812-021
Figure 15 Recording in Progress
The recording will continue until the selected duration has elapsed, until
the MI70 indicator runs out of power, or until you manually stop the
recording using the Start/Stop recording option.
You can switch the MI70 indicator off during recording to save battery.
Display message tells you that recording continues undisturbed even
when power is off. If the indicator is switched off during recording, a
progress bar is shown on the display every 10 seconds (all the time, if a
charger is connected). This bar shows the amount of recorded data.
CAUTION
Do not disconnect any cables when the data recording is on, even if the
indicator is off. This may cause loss of recorded data.
Table 6 Maximum Recording Times
Recording
interval
1 s 45 min 22 min 15 min
5 s 3 h 1 13 min 75 min
15 s 11 h 5 h 3 h
30 s 22 h 11 h 7 h
1 min 45 h 22 h 15 h
5 min 9 days 4 days 3 days
15 min 28 days 14 days 9 days
30 min 56 days 28 days 18 days
1 h 113 days 56 days 37 days
3 h 339 days 169 days 112 days
12 h 1359 days 678 days 451 days
Maximum recording time (memory full)
1 quantity 2 quantities 3 quantities
VAISALA_______________________________________________________________________ 37
Page 40

User's Guide ______________________________________________________________________
Saving Individual Data Points
You can save the currently displayed readings in memory using the
Hold/Save function. When in the basic display, press the Hold/Sa
shortcut button to freeze the currently shown readings., and press Save
to save the data point in memory.
The data points are are saved as individual files, and identified by the
saving date and time. The files remain in memory even if the indicator
is turned off.
Viewing and Deleting Recorded Files
To view the recorded files and data points:
1. Open the Recording/Viewing menu. You can get to this menu
directly from the basic view by presssing the Record shortcut
button.
2. Select View recorded data. A list of data files will be shown,
unless the memory is empty.
0811-015
Figure 16 List of Data Files
3. Select a file using the up and down arrow buttons, and view the file
using the right arrow.
To delete a file, select it and press the Delete button. To delete all
files, open the Recording/Viewing menu and select Clear data
memory.
Press the Info button to view details of the recording, including:
- Recording start time
- Recorded quantities
38 ___________________________________________________________________M210983EN-A
Page 41

Chapter 3 ________________________________________________________________ Operation
- Number of recorded data points
- Recording interval
Alarm Function
The MI70 indicator can produce an alarm when a measured quantity is
outside the allowed range. The range is controlled by setting the lower
and upper limits. When the alarm is active, the indicator will show an
alarm message, play a beeping sound, and blink the display backlight.
The alarm can only be set for one quantity at a time. Set the alarm as
follows:
1. Open the Functions menu.
2. Select Alarm.
3. Select the measured Quantity for the alarm. Only quantities that
are currently measured can be selected.
NOTE
4. Set two limit values for the alarm using the Limit options.
5. Check the Alarm on/off checkbox to enable the alarm. After you
enable the alarm and exit the menu, the alarm symbol will appear
on the display, and flash briefly.
0812-019
Figure 17 Alarm Menu
The alarm will automatically turn off if you change the measurement
configuration (change the measured quantities, or connect/disconnect
devices). If you use the alarm function, always check the alarm
settings after changes.
VAISALA_______________________________________________________________________ 39
Page 42

User's Guide ______________________________________________________________________
MI70 Link Interface Software for Data Handling
Recorded data can be transferred from the MI70 indicator to a PC by
using MI70 Link Interface Software. You can examine the recorded
data easily in Windows environment and transfer it further to a
spreadsheet program (such as Microsoft Excel) or virtually to any
Windows program in numeric or graphical format. The MI70 Link
program also allows you to monitor the readings directly with a PC
(real-time window function).
The MI70 Link program and the connection cables are available from
Vaisala. See list of accessories in section Options and Accessories on
page 85.
Connect the PTB330TS to the MI70 Link as follows:
1. Connect the connection cable between your PC and one of the
probe ports on the MI70 indicator. If you are using the USB
connection cable, you must install the included driver software
before using the cable.
2. Connect the PTB330 barometer or the HMP155 probe to the other
probe port on the MI70 indicator.
3. Turn on the MI70 indicator.
4. Start the MI70 Link program. The program detects the connection
type automatically, so there is usually no reason to select a COM
port manually.
40 ___________________________________________________________________M210983EN-A
Page 43

Chapter 4 ______________________________________________________________ Maintenance
CHAPTER 4
MAINTENANCE
This chapter contains information that is needed in maintenance of the
PTB330TS.
Cleaning
You can clean the transport case and the barometer enclosure with a
soft, lint-free cloth moistened with mild detergent.
Changing the MI70 Battery Pack
The battery pack of your MI70 indicator can be replaced if necessary.
New battery packs can be ordered from Vaisala; see Options and
Accessories on page 85. Change the battery pack as follows:
1. Turn off the MI70 indicator.
2. Open the screw on the back plate, and lift the plate from the narrow
end to remove it.
3. Note the orientation of the black battery pack connector. Detach
connector by pulling up carefully from the wires, and remove the
old battery pack.
4. Connect the black connector of the new battery pack. Ensure that
the white wires are on the right edge of the connector as shown in
Figure 18 on page 42.
VAISALA_______________________________________________________________________ 41
Page 44

User's Guide ______________________________________________________________________
Do not push the connector with conducting material, for example
with a metallic screwdriver.
0811-094
Figure 18 Changing the MI70 Battery Pack
5. Position the battery pack in inside the case, replace the back plate,
and tighten the screw.
6. Charge the battery pack before use. Refer to section Charging on
page 29.
Changing the HMP155 Probe Filter
New filters for the HMP155 probe can be ordered from Vaisala; see
Options and Accessories on page 85. Change the filter as follows:
1. Remove the filter from the probe by turning it counter-clockwise.
When pulling out the filter, be sure not to damage the sensor. Refer
to Figure 19 on page 43.
2. After removing the filter, check the O-ring and replace it if
necessary.
3. Install a new filter on the probe.
42 ___________________________________________________________________M210983EN-A
Page 45

Chapter 4 ______________________________________________________________ Maintenance
0802-159
Figure 19 HMP155 Sensor and Filter Structure
where
1 = Filter
2=O-ring
3=
HUMICAP® sensor
4 = Pt100 temperature sensor
VAISALA_______________________________________________________________________ 43
Page 46

User's Guide ______________________________________________________________________
Changing the Sensor in the HMP155
If your HMP155 uses the HUMICAP® 180R sensor, you can change it
yourself without sending in the probe for service. After changing the
sensor, you must calibrate the new sensor using serial line.
For instructions on how to change the sensor and calibrate it, refer to the
HMP155 User’s Guide. It is available for download from
www.vaisala.com.
CAUTION
HUMICAP® 180RC sensors cannot be changed by the user.
Calibration and Adjustment
The PTB330 and HMP155 are fully calibrated and adjusted as shipped
from factory. Calibration must be done always when there is reason to
believe that the device is not within the accuracy specifications.When
defining the calibration interval the long term specifications and the
requirements of the customer must be taken into consideration. Contact
Vaisala Service Centers for details. It is recommended that calibration
and adjustment should be carried out by Vaisala. See Vaisala Service
Centers on page 59.
Users can calibrate the PTB330 barometer using serial port commands.
Using the service port is recommended; see section Connecting to the
Serial Line on page 61. The calibration and adjustment procedure, as
well as the calibration commands, are described in section Calibration
and Adjustment of PTB330 on page 45.
The HMP155 can be adjusted using the MI70 indicator, or through the
serial port. This document explains the adjustment using the MI70
indicator. For instructions on using the serial port, refer to the HMP155
User’s Guide.
44 ___________________________________________________________________M210983EN-A
Page 47

Chapter 4 ______________________________________________________________ Maintenance
Calibration and Adjustment of PTB330
In PTB330, the raw measured pressure value of each barometer module
is first corrected using the corresponding multipoint adjustment values.
The additional linear adjustment (if enabled) is applied to the corrected
values. This allows the user to fine-tune the pressure reading using the
linear adjustment without performing a complete readjustment for the
barometer module, see Figure 20 on page 45.
NOTE
0708-053
Figure 20 PTB330 Adjustments
To measure new adjustment values and perform the actual adjustment,
first disable the corresponding adjustment on each barometer module
you are going to adjust (see the procedure above). If you are going to
perform a multipoint adjustment, disable also the linear adjustments. If
you are going to do only a linear adjustment, leave the multipoint
adjustments untouched.
After disabling the previous adjustments, calibrate the PTB330 against
your pressure reference. Make a note of the pressure reading of each
PTB330 barometer module separately (quantities P
, P2, and P3). Then
1
use the display/keypad to enter and activate the new multipoint/linear
adjustment factors.
Making adjustments is possible only after adjustments have been
unlocked. To unlock the adjustment menu, press the ADJ button on the
motherboard of the transmitter.
The user can select a simple offset or a two-point offset and gain
adjustment and use the LCP command for adjustment of the barometer
module. The MPCP command is used for the more sophisticated
multipoint correction capability at up to eight pressure levels. Check
first what linear corrections the transmitter is currently using before
VAISALA_______________________________________________________________________ 45
Page 48

User's Guide ______________________________________________________________________
attempting to readjust the barometer module. As the previous linear
corrections will disappear when new linear corrections are input, the
user has to take into account the previous linear corrections when
deciding about the new ones.
NOTE
Entering new linear or multipoint corrections will always cancel the
previous corrections. It is advisable to write down the previous linear
and multipoint corrections so that they will not be lost by mistake.
Table 7 Adjustment and Calibration Commands for Module
P1
Command Function
LCP1 ON/OFF Enables/Disables the linear
corrections
LCP1 Enter linear corrections
MPCP1 ON/OFF Enables/Disables the multipoint
corrections
MPCP1 Enters multipoint corrections
CDATE Shows or sets the calibration date
CTEXT Shows or sets the calibration info
text.
Opening and Closing the Adjustment Mode
The adjustment mode has to be available before you can proceed with
the adjustment and calibration. The adjustment button with indicator
LED is located in the upper corner on the left-hand side of the
motherboard. See the position of the adjustment button in Figure 21 on
page 47.
1. Open the barometer cover.
2. Press the ADJ button. The adjustment mode is now available. The
red indicator LED is on.
3. Press the ADJ button again to end the adjustment mode. The red
indicator LED is off.
46 ___________________________________________________________________M210983EN-A
Page 49

Chapter 4 ______________________________________________________________ Maintenance
0705-091
Figure 21 Inside of Open Barometer
Numbers refer to Figure 21 on page 47:
1 = Adjustment button with indicator LED
2 = Power supply module (not included in PTB330TS)
3 = Power supply mode selections (do not change)
4 = Service port (RS-232)
5 = Module 1/Module 3 connectors
6 = User port (wired to the M12 connector)
7 = Module 2/Module 4 connectors
1-Point Adjustment (LCP1)
The LCP1 command performs linear correction for barometer
module/module P1. Use the command LCP1
- to activate or deactivate the linear adjustment function
- to enter new linear offset and offset/gain pressure corrections to the
transmitter
- to edit existing linear offset and offset/gain pressure corrections.
VAISALA_______________________________________________________________________ 47
Page 50

User's Guide ______________________________________________________________________
Key in the linear corrections for each barometer module separately.
Feeding ON or OFF as a parameter enables or disables the linear
correction. A single question mark shows the reading and reference
information stored and the state of the linear correction. Each barometer
module has its own adjustment commands. If there are three barometer
modules installed, the commands LCP1, LCP2, and LCP3 will be
available. First deactivate the previous corrections by using the LCP1
OFF command.
LCP1 [x/y] [z]
where
x=ON
y=OFF
z=?
NOTE
Example
>lcp1
1. Reading ? 980.2
1. Reference ? 980.0
2. Reading ? 1100.1
2. Reference ? 1100.0
>
The new linear corrections will always cancel the previous corrections
as well as the valid date of calibration of the transmitter.
Multipoint Adjustment (MPCP1)
Use the MPCP1 command
- to perform multipoint correction for barometer module/module P1
- to activate or deactivate the multipoint adjustment function
- to enter new linear offset and offset/gain pressure corrections to the
transmitter
- to edit existing linear offset and offset/gain pressure corrections.
48 ___________________________________________________________________M210983EN-A
Page 51

Chapter 4 ______________________________________________________________ Maintenance
The command operates like LCP1, but can take up to eight reading/
reference pairs. If there are three pressure barometer modules installed,
the commands MCP1, MCP2, and MCP3 will be available. First
deactivate the previous corrections by using the MPCP1 OFF
command. Precalibration of the transmitter then gives the required
corrections. When entering new multipoint corrections, always start at
the low-pressure end and then go up the pressure range. Key in the
multipoint corrections for each barometer module separately.
NOTE
The new multipoint corrections will always cancel the previous
corrections as well as the valid date of calibration of the transmitter.
MPCP1 [x/y] [z]
where
x=ON
y=OFF
z=?
Example:
>mpcp1
1. Reading ? 980.1
1. Reference ? 980.0
2. Reading ? 999.8
2. Reference ? 1000.0
3. Reading ? 1020.2
3. Reference ? 1020.0
.
.
.
8. Reading ? 1100.1
8. Reference ? 1100.0
>
VAISALA_______________________________________________________________________ 49
Page 52

User's Guide ______________________________________________________________________
Entering Adjustment Information
Adjustment information and date are a part of the device information
that is shown using the ? command. Use the CTEXT and CDATE
commands to enter updated adjustment information.
CTEXT
Use the CTEXT command to enter text to the adjustment information
field.
Example:
>ctext Vaisala/MSL
Calibration text : Vaisala/MSL
>
CDATE
Use the CDATE command to enter date to adjustment information field.
Set the adjustment date in format YYYY-MM-DD.
>cdate 2006-06-12
Calibration date : 2006-06-12
>
Calibration and Adjustment of HMP155
The procedures below provide a simple way to check and adjust the
HMP155 using the MI70 indicator. You can perform a 1-point or
2-point adjustment on relative humidity and temperature.
The humidity quantity to be adjusted is always RH. The temperature
quantity that you can adjust using the MI70 indicator depends on your
hardware options, since the HMP155 can have two temperature sensors:
- If you do not have the additional temperature probe, the quantity
you can calibrate and adjust is T. It is measured on the HMP155
probe, next to the HUMICAP® sensor.
- If you have the additional temperature probe, the quantity is T
.
a
It is measured by the separate temperature probe that is attached to
the HMP155.
50 ___________________________________________________________________M210983EN-A
Page 53

Chapter 4 ______________________________________________________________ Maintenance
Calibrating and Adjusting Relative Humidity
1. Check that the MI70 indicator is connected to the HMP155, and
turn it on. Set the correct time, date, and environmental settings
(pressure compensation) if prompted.
2. Start the chemical purge from the Functions menu, if available.
After the chemical purge is complete, allow sufficient time for the
probe to reach ambient temperature before continuing.
3. Uncover the adjustment buttons on the HMP155 probe by
removing the protective cover and removing the calibration seal.
Refer to Figure 22 on page 51.
0801-076
Figure 22 HMP155 Adjustment Buttons
where
1 = Protective cover
2 = Down button
3 = ADJ button
4 = Up button
5 = Protective plug
VAISALA_______________________________________________________________________ 51
Page 54

User's Guide ______________________________________________________________________
4. Activate the adjustment mode by holding down the ADJ button on
the probe until the message below appears on the MI70 display.
0811-086
Figure 23 Starting Adjustment Mode for HMP155
5. Press OK to move on to the adjustment and select RH as the
quantity you want to adjust.
0811-087
Figure 24 Select Quantity
6. Check the environment settings if prompted.
7. Insert the probe into a known reference environment. You can, for
example, use the HMK15 humidity calibrator.
If you have the additional temperature probe, it is not necessary to
place it into the reference environment. The HMP155 turns off the
additional temperature probe during RH adjustment, and uses
internal temperature measurement instead. When you exit the
adjustment mode or start calibrating temperature, the HMP155
takes the temperature probe into use again.
8. Wait for the reading to stabilize, and compare the reading with the
reference. If the reading is not within the stated accuracy of the
HMP155, continue this procedure to adjust the measurement. If the
reading is accurate, exit the adjustment mode by pressing the Back
button, then the Exit button.
9. Press the Adjust button and select 1-point or 2-point calibration. If
a Cannot adjust message is displayed, press OK and try again.
10. Follow the instructions given on the display to finish the
adjustment.
52 ___________________________________________________________________M210983EN-A
Page 55

Chapter 4 ______________________________________________________________ Maintenance
Calibrating and Adjusting Temperature
NOTE
If your HMP155 has the additional temperature probe, you cannot
calibrate the temperature sensor on the HMP155 probe using the MI70
indicator. However, you can do so using the CT command on the serial
line. Additional calibration and adjustment methods are provided in
the HMP155 User’s Guide, which is available for download from
www.vaisala.com.
1. Check that the MI70 indicator is connected to the HMP155, and
turn it on. Set the correct time, date, and environmental settings
(pressure compensation) if prompted.
2. Uncover the adjustment buttons on the HMP155 probe by
removing the protective cover and removing the calibration seal.
Refer to Figure 22 on page 51.
3. Activate the adjustment mode by holding down the ADJ button on
the probe.
4. Press OK to move on to the adjustment and select T or Ta as the
quantity you want to adjust. Only one of them is shown; if you can
select T, it means you do not have the additional temperature
probe.
5. Insert the probe into a known reference environment:
- If you are calibrating and adjusting T, insert the HMP155
probe in the environment.
- If you are calibrating and adjusting Ta, insert the additional
temperature probe in the environment, and ignore the main
HMP155 probe.
6. Wait for the reading to stabilize, and compare the reading with the
reference. If the reading is not within the stated accuracy of the
HMP155, continue this procedure to adjust the measurement. If the
reading is accurate, exit the adjustment mode by pressing the Back
button, then the Exit button.
7. Press the Adjust button and select 1-point or 2-point calibration. If
a Cannot adjust message is displayed, press OK and try again.
8. Follow the instructions given on the display to finish the
adjustment.
VAISALA_______________________________________________________________________ 53
Page 56

User's Guide ______________________________________________________________________
54 ___________________________________________________________________M210983EN-A
Page 57

Chapter 5 ___________________________________________________________ Troubleshooting
CHAPTER 5
TROUBLESHOOTING
This chapter contains information for diagnosing problems with the
PTB330TS.
If an operating condition requires user attention, usually an informative
message will appear on the screen of the MI70 indicator. If the source
of the message is PTB330 or HMP155, and both are connected at the
same time, the MI70 port number will indicate which instrument has
produced the event.
If there is a problem with the PTB330 barometer, it will also blink the
green LED on the cover of the barometer. You can check the currently
active error messages directly from the PTB330 barometer or the
HMP155 probe using the serial command ERRS. For instructions on
connecting to the serial interface, see section Connecting to the Serial
Line on page 61.
Refer to Table 8 on page 56 for advice in typical problem situations. If
you are unable to remove the cause of the error, please contact Vaisala.
See the list of Vaisala Service Centers on page 59.
VAISALA_______________________________________________________________________ 55
Page 58

User's Guide ______________________________________________________________________
Table 8 Troubleshooting Chart
Problem or message Likely causes and solutions
The MI70 indicator will not turn on. - The battery pack is empty. Connect the charger.
- The battery pack is not present. Install and charge the
battery pack.
- You are using AA batteries, and they are empty. Replace
the batteries.
The message "Switch off power and
connect probe." appears on the MI70
display when turning it on.
The MI70 powers off by itself. - The Auto Power Off feature is enabled, and shuts down
- Measurement instruments not connected. Turn off MI70
and connect PTB330 and/or HMP155.
- Loose cable connection. Turn off MI70 and tighten the
connectors.
- Incorrect cable. Check that you are using the spiral cable
223235SP between MI70 and PTB330 , and cable 221801
between MI70 and HMP155.
- Incorrect PTB330 user port settings. Restore the correct
settings via the service port; for instructions, see section
User Port Serial Settings on page 74.
the MI70 (and connected instruments) after 15 or 30
minutes of no user input. Y ou ca n turn off this feature from
the Settings - User interface menu if you want to.
The HMP155 is measuring clearly
incorrect humidity readings.
Measurement reading on the MI70
display shows dashes "----" instead
of measured values.
- The battery of the MI70 has run out. There have probably
been several "Battery almost empty." messages on the
display already. Recharge the battery or change the nonchargeable batteries (if used).
- It is possible that condensation has formed on the sensor.
Activate the chemical purge function to dry it.
- There may be a temperature difference between the
HMP155 and the measurement environment. Let the
temperature stabilize. If you have the additional
temperature probe, make sure it is placed close to the
HMP155 probe.
- The HMP155 may be in need of adjustment. Perform the
procedure in section Calibration and Adjustment of
HMP155 on page 50.
- You have selected P
one of the measured quantities. It will take three hours for
the barometer to produce a reading; until then, dashes
are shown. Wait patiently , and make sure the Auto Power
Off feature is disabled in the Settings - User interface
menu.
- The measurement instrument has been disconnected.
Turn off the MI70 and reconnect it. Do not connect cab les
while the MI70 is on.
(pressure trend and tendency) as
3h
56 ___________________________________________________________________M210983EN-A
Page 59

Chapter 5 ___________________________________________________________ Troubleshooting
Table 8 Troubleshooting Chart
Problem or message Likely causes and solutions
The message "Add-on module 1/2/3
connection failure." appears when
PTB330 is connected.
Any of the following messages
appears when the PTB330 is
connected:
- Internal EEPROM read error.
- Internal EEPROM write error.
- Internal system voltage out of
range
- Checksum error in the internal
configuration memory
- EEPROM failure on add-on
module 1/2/3
The message "Device internal
temperature out of range." appe ars
when PTB330 is connected.
The message "Difference between
pressure transducers too large."
appears when PTB330 is connected,
and more than one module is used.
Loose connection of an add-on module. Turn off the power,
and open the barometer. Check that the ribbon cables of the
modules are securely connected. Close the barometer and
turn on the power.
Internal barometer failure. Return the barometer to a Vaisala
Service Center for repair.
The barometer is either too hot or too cold. Ensure that the
operating temperature is within the valid range.
- All barometer modules may not be measuring the same
pressure. Open the barometer and check the tubing to
the pressure input connector.
- The allowed pressure difference may be set too low.
Connect to the service port of the barometer and use the
DPMAX command to check the value.
The message "Operating voltage out
of range." appears when PTB330 is
connected, and powered by an
external power source (not MI70).
The message "Pressure out of valid
range." appears when PTB330 is
connected.
When outputting measurement
messages on the PTB330 serial line,
you see asterisk characters (****)
instead of measured values.
- A barometer module may require adjustment. See section
Calibration and Adjustment of PTB330 on page 45.
The supply voltage of the barometer is outside the correct
range. Change the supply voltage to 10 ... 35 VDC.
The pressure measured by the barome ter is outside the
specified measurement range
500 ... 1100 hPa. Do not operate the barometer outside the
measurement range.
- You have selected P
one of the quantities in the measurement message. It will
take three hours for the barometer to produce a reading;
until then, asterisks are shown in the measurement
message. Wait patien tly, and make sure the Auto Power
Off feature is disabled in the Settings - User interface
menu of the MI70 indicator.
- There may be a problem with the measurement. Check
the display of the MI70 for messages. Also use the ERRS
command on the serial line.
(pressure trend and tendency) as
3h
VAISALA_______________________________________________________________________ 57
Page 60

User's Guide ______________________________________________________________________
Technical Support
For technical questions, contact the Vaisala technical support:
E-mail helpdesk@vaisala.com
Fax +358 9 8949 2790
If the product needs repair, please follow the instructions below to
speed up the process and to avoid extra costs to you.
Return Instructions
1. Read the warranty information.
2. Write a Problem Report with the name and contact information of
a technically competent person who can provide further
information on the problem.
3. On the Problem Report, please explain:
- What failed (what worked / did not work)?
- Where did it fail (location and environment)?
- When did it fail (date, immediately / after a while /
periodically / randomly)?
- How many failed (only one defect / other same or similar
defects / several failures in one unit)?
- What was connected to the product and to which connectors?
- Input power source type, voltage and list of other items
(lighting, heaters, motors etc.) that were connected to the same
power output.
- What was done when the failure was noticed?
4. Include a detailed return address with your preferred shipping
method on the Problem Report.
5. Pack the faulty product and include the Problem Report in the same
box.
58 ___________________________________________________________________M210983EN-A
Page 61

Chapter 5 ___________________________________________________________ Troubleshooting
6. Send the box to:
Vaisala Oyj Contact person
Vanha Nurmijärventie 21
FIN-01670 Vantaa
Finland
or to the Vaisala Service Center in your region (see contact
information below).
Vaisala Service Centers
Vaisala Service Centers perform calibrations and adjustments as well as
repair and spare part services, see contact information below.
Vaisala Service Centers offer also extended services, for example
accreditated calibrations, maintenance contracts and calibration
reminder program. Do not hesitate to contact them to get further
information.
VAISALA_______________________________________________________________________ 59
Page 62

User's Guide ______________________________________________________________________
60 ___________________________________________________________________M210983EN-A
Page 63

Chapter 6 ______________________________ Serial Line Communication With PTB330 Barometer
CHAPTER 6
SERIAL LINE COMMUNICATION WITH
PTB330 BAROMETER
This chapter contains instructions for serial line use of the PTB330
barometer.
NOTE
This chapter provides the necessary instructions for connecting to the
serial line of the PTB330 barometer, and using the most important
serial line commands. For a full description of the commands and
connection options for the PTB330, refer to the PTB330 User’s Guide.
Serial line operation of the HMP155 is not described in this User’s
Guide. If you need to access the serial line of the HMP155, refer to the
HMP155 User’s Guide. An USB cable for connecting the HMP155 to
a PC is available (Vaisala order code 221040).
The PTB330 and HMP155 User’s Guides are available for download
from www.vaisala.com.
Connecting to the Serial Line
The PTB330 barometer has two connections to the serial interface: the
service port and the user port.
- The service port is located on the motherboard of the barometer.
It is always available with fixed serial settings, and starts in the
STOP mode after a power-up. The barometer cover must be
opened to access the service port.
VAISALA_______________________________________________________________________ 61
Page 64

User's Guide ______________________________________________________________________
- The user port is wired to the 8-pin M12 connector in the
instrument base that houses the barometer, and is used when
communicating with the MI70 indicator. The user port settings and
startup mode are configurable.
When you need to access the serial line of the PTB330, it is
recommended that you use the service port. The user port is reserved for
communication with the MI70 indicator, and changing its serial
communication settings will break the communication with the MI70
indicator.
Service Port Connection
1. Turn the tabletop casing over and open the four screws on the
barometer cover. Open the cover.
2. Connect the serial interface cable (optional accessory, order code:
219685) between a USB port on your PC and the service port
connector on the motherboard. See Figure 25 on page 63 for the
location of the service port.
If this is the first time you use the cable, you must first install the
necessary driver on your PC; see section Installing the Driver for
the USB Cable on page 63.
3. Open a terminal application and set the communication settings as
shown in Table 9 on page 62.
If you need a terminal application, you can download the PuTTY
terminal application for Windows at www.vaisala.com.
Instructions for using the application are included in the
installation package.
4. Check that the MI70 indicator is connected to the M12 connector
of the barometer, and turn on the MI70 indicator. After power-up
the barometer outputs the software version and the command
prompt.
Table 9 Serial Communication Settings for the Service Port
Parameter Value
Bit rate 19200
Parity None
Data bits 8
Stop bit s 1
Flow control None
62 ___________________________________________________________________M210983EN-A
Page 65

Chapter 6 ______________________________ Serial Line Communication With PTB330 Barometer
0812-022
Figure 25 Service Port on the PTB330 Motherboard
Installing the Driver for the USB Cable
Before taking the USB cable into use, you must install the provided
USB driver on your PC. When installing the driver, you must
acknowledge any security prompts that may appear. The driver is
compatible with Windows 2000, Windows XP, Windows Server 2003,
and Windows Vista.
1. Check that the USB cable is not connected. Disconnect the cable if
you have already connected it.
2. Insert the media that came with the cable, or download the driver
from www.vaisala.com.
3. Execute the USB driver installation program (setup.exe), and
accept the installation defaults. The installation of the driver may
take several minutes.
4. After the driver has been installed, connect the USB cable to a USB
port on your PC. Windows will detect the new device, and use the
driver automatically.
5. The installation has reserved a COM port for the cable. Verify the
port number, and the status of the cable, using the Vaisala USB
Instrument Finder program that has been installed in the Windows
Start menu.
VAISALA_______________________________________________________________________ 63
Page 66

User's Guide ______________________________________________________________________
Windows will recognize each individual cable as a different device, and
reserve a new COM port. Remember to use the correct port in the
settings of your terminal program.
There is no reason to uninstall the driver for normal use. However, if
you wish to remove the driver files and all Vaisala USB cable devices,
you can do so by uninstalling the entry for Vaisala USB Instrument
Driver from the Add or Remove Programs (Programs and Features
in Windows Vista) in the Windows Control Panel.
User Port Connection
The user port of the PTB330 is used by the connection to the MI70
indicator. For this connection, the user port is wired to the 8-pin M12
connector on the table casing. The serial line communication settings
are also preconfigured for the MI70 indicator; see table below.
Table 10 Default Serial Communication Settings for the User
Port
Parameter Value
Bit rate 19200
Parity None
Data bits 8
Stop bit s 1
Flow control None
Startup operating mode (SMODE) TS
Transmitter address (ADDR) 0
SMODE is the startup operating mode for the serial line. In PTB330TS,
the default SMODE for the user port is TS, which is a special mode
intended only for use with the MI70 indicator. See section SMODE on
page 75.
If you change the user port communication settings, the interoperability
between the MI70 indicator and the PTB330 will be broken. Because of
this, it is recommended that you only use the service port for all serial
line communication, and reserve the user port for MI70 indicator.
However, you can use the user port if you need to, as long as you
remember to restore the default settings so that the MI70 indicator will
work again. See section User Port Serial Settings on page 74.
64 ___________________________________________________________________M210983EN-A
Page 67

Chapter 6 ______________________________ Serial Line Communication With PTB330 Barometer
To take the user port into use for a serial connection:
- Connect to the service port first, and configure the user port
communication settings using the SMODE and SERI commands.
The new user port settings will be taken into use when the
transmitter is reset or powered up. For example:
SMODE STOP
SERI 9600 E 7 1
- Connect to the M12 connector using a serial cable with the proper
wiring. The wiring of the M12 connector is described in Figure 26
on page 65. Note that you also have to provide the operation power
for the barometer (10 ... 35 VDC) via the cable.
0503-026
Figure 26 Wiring of the M12 (8-Pin) Connector
Table 11 M12 Connector Pin Assignments
Pin/Terminal Wire RS-485 (EIA-485)
1WhiteA 2BrownSerial GND
3 (optional) Green Serial GND
4 Yellow 5 Grey Supply 6 Pink Supply +
7BlueB 8 Shield/Red Cable shield
VAISALA_______________________________________________________________________ 65
Page 68

User's Guide ______________________________________________________________________
A female M12 connector with screw terminals is provided with the
PTB330TS; see Figure 27 on page 66.
0812-018
Figure 27 Female M12 Connector with Screw Terminals
List of PTB330 Serial Commands
The bold text in the brackets is the default setting. To issue a command,
type it on your terminal application and press the Enter key.
Measurement commands
INTV [0...255 s/min/h/d] Shows or sets the continuous output interval (for RUN mode).
R Changes the serial mode to RUN and starts outputting
measurement results according to the FORM string (with
interval defined by INTV).
S Changes the serial mode to STOP and stops outputting
measurement results.
SEND Shows the measurement results according to the configured
form.
Measurement setting commands
AVRG [1...600 s] Set the barometer measurement averaging time (in seconds)
DPMAX Shows or sets the maximum allowed pressure difference
between barometer modules.
TQFE [-80...+200 °C] Shows or sets the temperature for QFE corrected pressure.
HHCP [-30...+30 m] Shows or sets the altitude for height corrected pressure.
HQFE [-30...+30 m] Shows or sets the altitude for the QFE corrected pressure.
HQNH [-30...+3000 m] Shows or sets the altitude for the QNH corrected pressure.
66 ___________________________________________________________________M210983EN-A
Page 69

Chapter 6 ______________________________ Serial Line Communication With PTB330 Barometer
Formatting commands
FORM Sets the measurement message format for SEND command
and for RUN mode
UNIT Shows or sets unit for a quantity . If several quantities offer the
same unit, these will also be changed to the given unit.
User port serial settings
SERI [baud p d s] User port serial communication settings, default: 19200 N 8 1.
SMODE [STOP/RUN/POLL/
Shows or sets the serial interface mode.
TS]
ECHO [ON/OFF] Shows or sets the serial interface echoing.
Calibration and adjustment commands
LCP1
Performs a linear correction for the barometer module.
LCP2
LCP3
MPCP1
Performs a multipoint correction for the barometer module.
MPCP2
MPCP3
CDATE Shows or sets the calibration date.
CTEXT Shows or sets the calibration info text.
Other commands
? Outputs information on the device.
ERRS Shows all unacknowledged errors (and clears them).
HELP Shows a list of all available commands.
RESET Resets the barometer.
VERS Displays the product name and software version number.
NOTE
The calibration and adjustment commands LCP and MPCP are
available in adjustment mode only. Press the adjustment button before
inputting these commands. For more information, see Calibration and
Adjustment of PTB330 on page 45.
VAISALA_______________________________________________________________________ 67
Page 70

User's Guide ______________________________________________________________________
Measurement Commands
INTV
Use the command INTV to view or set the outputting interval for the
RUN mode.
INTV [xxx yyy]
where
xxx = Output inverval (0 ... 255). 0: the fastest possible output rate.
yyy = Unit (s, min, h or d)
Examples:
>intv
Output interval: 1 s
>
>intv 10 s
Output interval : 10 s
>
R
Enter the R command to start the continuous output of measurements.
This command starts a temporary RUN mode. The output format can be
adjusted with the FORM command and the output interval can be
changed with the INTV command.
68 ___________________________________________________________________M210983EN-A
Page 71

Chapter 6 ______________________________ Serial Line Communication With PTB330 Barometer
Example:
>r
986.62
986.63
986.63
986.63
...
S
Use the S command to end the RUN mode. After this command all other
commands can be used. You can also press the Esc key on your
keyboard or reset the transmitter to stop the outputting.
SEND
Use the SEND command to output the reading once in STOP mode. The
output format can be adjusted with the FORM command.
Example:
>send
986.61
>
Measurement Settings
AVRG
Use the AVRG command to set the barometer measurement averaging
time. Valid range of averaging time is 1 ... 600 seconds.
AVRG [x]
where
x = Averaging time in seconds
VAISALA_______________________________________________________________________ 69
Page 72

User's Guide ______________________________________________________________________
Example:
>avrg
Average filter : 1 s ?
>
DPMAX
Use the DPMAX command to show or set the maximum pressure
difference allowed between barometer modules. The command is only
available if more than one barometer module has been installed.
DPMAX [x]
where
x = Pressure
Example:
>dpmax 0.2
Max. diff. : 0.20 hPa
>
TQFE
Use the TQFE command to show or set the temperature for QFE
corrected pressure. The valid range of QFE temperature is -80...+200
°C.
Example:
>tqfe
QFE temp. : 20.00 'C ?
>
70 ___________________________________________________________________M210983EN-A
Page 73

Chapter 6 ______________________________ Serial Line Communication With PTB330 Barometer
HHCP
The HHCP command shows or sets the altitude for height corrected
pressure. The valid range of HCP height is -30...+30 m.
Example:
>hhcp
HCP height : 0.0 m ?
>
HQFE
The HQFE command displays or sets altitude for QFE corrected
pressure. The valid range of QFE height is -30...+30 m.
Example:
>hqfe
QFE height : 0.0 m ?
>
HQNH
The HQNH command displays or sets altitude for QNH corrected
pressure. The valid range of QNH height is -30...+3000 m.
Example:
>hqnh
QNH height : 0.0 m ?
>
Formatting Measurement Output
FORM
Use the serial line command FORM to change the output format and
quantities for serial line use. See Table 3 on page 16 for available
quantities.
VAISALA_______________________________________________________________________ 71
Page 74

User's Guide ______________________________________________________________________
FORM [x]
where
x = Formatter string
Formatter string consists of quantities and modifiers. When selecting
the quantity, use the abbreviations of the quantities presented in Table
3 on page 16. The modifiers are presented in Table 12 on page 72.
Table 12 The modifiers
Modifier Description
x.y Length modifier (number of digits and decimal places)
#t Tabulator
#r Carriage-return
#rn CR+LF
#n Line feed
“” String constant
#xxx Special character, code "xxx" (decimal), for example #027 for
ESC
U5 Unit field and length (optional)
Example:
>form "pressure = " P " " U #r #n
"pressure = " P " " U #r #n
>
Command ‘FORM /’ will return the default output format. The default
output format depends on the device configuration.
>form /
Output format : P " " P1 " " QNH #RN
>send
1004.95 1004.96 1004.95
>
72 ___________________________________________________________________M210983EN-A
Page 75

Chapter 6 ______________________________ Serial Line Communication With PTB330 Barometer
UNIT
Use the UNIT command to display or set the output quantities and their
units for serial line use.
Table 13 Output Quantities and Units
Quantity Output Quantity Available Output Units
Pressure (measures average
pressure from P
Pressure from barometer
module 1 or 2 or 3
Pressure trend P
Pressure difference (P1 -P2) deltaP
Pressure difference (P1 -P3) deltaP
Pressure difference (P2 -P3) deltaP
QNH pressure QNH
QFE pressure QFE
Height Corrected Pressure HCP
Temperature fro m bar o me ter
module 1 or 2 or 3
, P2, and P3)
1
P hPa, psi, inHg, torr, bar, mbar,
mmHg, kPa, Pa, mmH2O, inH2O
P
, P2, and P
1
3h
12
13
23
, TP2, and TP
TP
1
3
3
Celcius, Fahrenheit or Kelvin
UNIT [x] [y]
where
x = Output quantity
y = Output unit
Use the UNIT command to set the measurement unit for the quantities.
The output of all the quantities measured will be shown in the unit fed
by the user.
Example:
>unit Pa
P : Pa
P3h : Pa
P1 : Pa
P2 : Pa
DP12 : Pa
HCP : Pa
QFE : Pa
QNH : Pa
>
VAISALA_______________________________________________________________________ 73
Page 76

User's Guide ______________________________________________________________________
Use the UNIT command to change the measurement unit for a quantity.
Specify the quantity and the desired unit for it.
Example:
>unit P mmhg
P : mmHg
P3h : Pa
P1 : Pa
P2 : Pa
DP12 : Pa
HCP : Pa
QFE : Pa
QNH : Pa
>
Use the UNIT ?? command to list the available measurement units for
the quantities.
User Port Serial Settings
CAUTION
Changing the User Port serial settings may prevent the PTB330
barometer from operating with the MI70 indicator. To restore the
default settings, connect to the serial line using the service port, and
give the following commands:
SERI 19200 N 8 1
SMODE TS
ADDR 0
SERI
Use the serial line command SERI [b p d s] to set communication
settings for the user port.
74 ___________________________________________________________________M210983EN-A
Page 77

Chapter 6 ______________________________ Serial Line Communication With PTB330 Barometer
SERI [b p d s]
where
b = Bit rate (110, 150, 300, 600, 1200, 2400, 4800, 9600,19200,
38400, 57600, 115200)
p = Parity (n = none, e = even, o = odd)
d = Data bits (7 or 8)
s = Stop bits (1 or 2)
Example:
>seri
Baud P D S : 9600 N 8 1
>
You need to reset the barometer to activate the new communication
settings set with the SERI command.
The settings can be changed one parameter at a time or all parameters
at once:
>seri 0
Baud P D S : 9600 N 8 1
>seri o
Baud P D S : 9600 O 8 1
>
SMODE
Use the command SMODE to set the user port start-up operating mode.
SMODE [xxxx]
where
xxx = STOP, RUN, POLL, or TS
VAISALA_______________________________________________________________________ 75
Page 78

User's Guide ______________________________________________________________________
Table 14 Selection of Output Modes
Mode Output Available Commands
STOP Transmitter outputs the measurement
message only as a response to the SEND
command
RUN Automatic outputs measurement messages
automatically after power-up
POLL Transmitter outputs the measurement
message only as a response to the SEND
[addr] command
TS Output via MI70 indicator This mode must be used when the MI70
All commands available
Only command S
All commands available, transmitter
address must be used. Use this mode with
RS-485 buses; see the PTB330 User’s
Guide for more information.
indicator is connected to the user port
(default mode in PTB330TS)
Selected output mode will be activated after the transmitter is reset or
powered off and on.
NOTE
ECHO
Use the command ECHO to set the user port echo. The command either
enables or disables echo of characters received.
ECHO [x] [y]
where
x = ON (default) or
y=OFF
The SERI, SMODE, INTV and ECHO commands can be used to
change/view the user port settings even if you are currently connected
to the service port.
Example:
>echo off
Echo : OFF
send
pressure = 1013.00 hPa
echo on
Echo : ON
>
76 ___________________________________________________________________M210983EN-A
Page 79

Chapter 6 ______________________________ Serial Line Communication With PTB330 Barometer
Other Commands
?
Use the serial line command ? to check the current barometer
configuration. Command ?? is similar but can also be used if the
barometer is in POLL mode.
Example:
>?
PTB330 / 1.04
Serial number : D5050002
Batch number : D4120001
Output format : P #R #N
Adjust. date : 2008-12-12
Adjust. info : Vaisala/HEL
Date : 2000-01-01
Time : 00:00:24
Start mode : TS
Baud P D S : 19200 N 8 1
Output interval: 1 s
Address : 0
Echo : ON
Module 1 : EMPTY
Module 2 : BARO-1
Module 3 : EMPTY
Module 4 : EMPTY
>
ERRS
Use the command ERRS to display all unacknowledged errors (and
clear them). If an error is still active, it will be displa yed again with the
ERRS command.
Example:
>errs
PASS
No errors
>
VAISALA_______________________________________________________________________ 77
Page 80

User's Guide ______________________________________________________________________
RESET
Use the RESET command to reset the barometer. After the reset, the
user port switches to start-up output mode selected with command
SMODE.
Example:
>reset
PTB330 / 1.04
>
VERS
Use the command VERS to display software version information.
Example:
>vers
PTB330 / 1.04
>
78 ___________________________________________________________________M210983EN-A
Page 81

Chapter 7 ____________________________________________________________ Technical Data
CHAPTER 7
TECHNICAL DATA
This chapter provides the technical data of the PTB330TS.
These specifications apply when MI70, PTB330 and HMP155 are used
together in the PTB330TS product. For individual specifications, please
refer to the product documentation and brochures of the PTB330 and
HMP155.
VAISALA_______________________________________________________________________ 79
Page 82

User's Guide ______________________________________________________________________
General
Operating temperature range -10 ... +40 °C (+14 ... +104 )°F
Operating humidity range non-condensing
Maximum pressure limit 5000 hPa abs.
Power supply Rechargeable NiMh battery pack
with AC-adapter or 4xAA-size
alkalines, type IEC LR6
Operation time (using rechargeable battery pack)
Continuous use with PTB330 11 h typical at +20 °C (+68 °F)
Datalogging use up to 30 days
Menu languages English, Chinese, French, Spanish,
German, Russian, Japanese,
Swedish, Finnish
Display LCD with backlight, graphic trend
display of any parameter, character
height up to 16 mm
Data logging capacity 2700 points
Alarm audible alarm function
Regulatory compliance See section Regulatory
Compliance on page 12.
BAROCAP® and HUMICAP® are registered trademarks of Vaisala. Specifications are
subject to change without prior notice. ©Vaisala Oyj
80 ___________________________________________________________________M210983EN-A
Page 83

Chapter 7 ____________________________________________________________ Technical Data
Performance
Barometric Pressure (PTB330)
Measurement range 500 ... 1100 hPa
Linearity* ± 0.05 hPa
Hysteresis* ± 0.03 hPa
Repeatability* ± 0.03 hPa
Calibration uncertainty** ± 0.07 hPa
Accuracy at +20 °C (+68 °F)** ± 0.10 hPa
Temperature dependence**** ± 0.1 hPa
Total accuracy at -10 ... +40 °C
(+14 ... +104 °F)
Long term stability ± 0.10 hPa/year
Settling time at power-up (one sensor) 4 s
Response time (one sensor) 2 s
Acceleration sensitivity negligible
* Defined as ±2 standard deviation limits of endpoint non-linearity, hysteresis or repeatability
error.
** Defined as ±2 standard deviation limits of inaccuracy of the working standard including
traceability to NIST.
*** Defined as the root sum of the squares (RSS) of endpoint non-linearity, hysteresis error,
repeatability error and calibration uncertainty at room temperature
**** Defined as ±2 standard deviation limits of temperature dependence over the operating
temperature range.
± 0.15 hPa
VAISALA_______________________________________________________________________ 81
Page 84

User's Guide ______________________________________________________________________
Relative Humidity (HMP155)
Measurement range 0 ... 100 %
Accuracy (incl. non-linearity, hysteresis and repeatability) at
+15 ... +25 °C (+59 ... +77 °F) ±1 %RH (0 ... 90 %RH)
±1.7 %RH (90 ... 100 %RH)
-10 ... +40 °C (+14 ... 104 °F) ±(1.0 + 0.008 x reading) %RH
Factory calibration uncertainty (+20 °C /+68 °F) ±0.6 %RH (0 ... 40 %RH)*
±1.0 %RH (40 ... 97 %RH)*
Humidity sensor HUMICAP180R
HUMICAP180RC
Response time at +20 °C in still air with a sintered PTFE filter
63 % 20 s
90 % 60 s
* Defined as ±2 standard deviation limits. Small variations possible, see also calibration
certificate.
Temperature (HMP155)
Measurement range -10 ... +40 °C (+14 ... +104 °F)
Accuracy
-10 ... +20 °C ±(0.176 - 0.0028 x temperature) °C
+20 ... +40 °C ±(0.07 + 0.0025 x temperature) °C
Accuracy over temperature range: see Figure 28 on page 83.
Temperature sensor Pt100 RTD 1/3 Class B IEC 751
Response time with additional temperature probe in 3 m/s air flow
63 % < 20 s
90 % < 35 s
82 ___________________________________________________________________M210983EN-A
Page 85

Chapter 7 ____________________________________________________________ Technical Data
0901-016
Figure 28 Accuracy Over Temperature Range
Available Parameters
Pressure parameters P, P3h, HCP, QFE, QNH
Humidity and temperature parameters RH, T, Tdf, Td, x, T
w
Inputs and outputs
MI70 probe ports 2
MI70 data interface RS-232 (accessible only with MI70
Link software)
PTB330 supply voltage 10 ... 35 VDC (if not powered by
MI70)
PTB330 data interface RS-232C
PTB330 serial I/O connectors RJ45 (service port)
Male 8-pin M12 (user port)
HMP155 data interface RS-485
HMP155 serial I/O connector Male 8-pin M12
VAISALA_______________________________________________________________________ 83
Page 86

User's Guide ______________________________________________________________________
Mechanics
PTB330
Housing material G-AlSi 10 Mg (DIN 1725)
Housing classification IP65
Pressure connector M5 (10-32) internal thread
Pressure fitting barbed fitting for 1/8" I.D. tubing
or quick connector with shutoff
valve for 1/8" hose
HMP155
Housing material PC
Housing classification IP66
Additional T-probe cable length 2 m
Cable material PUR
Sensor protection Sintered PTFE
MI70 Measurement Indicator
Housing classification IP54
Housing material ABS/PC blend
Transport case
Housing classification
(when closed)
Plastic parts
Metal parts stainless steel AISI303
Interior foam material PE and polyether
Weight with all instruments and
typical accessories
Exterior dimensions (LxWxH) 405×330×165 mm
IP67
TTX01®, PP+SEBS, POM
5.9 kg
(15.94×12.99×6.50 inch)
84 ___________________________________________________________________M210983EN-A
Page 87

Chapter 7 ____________________________________________________________ Technical Data
Options and Accessories
Table 15 Options and Accessories
Description Item Code
PTB330
MI70 - PTB330 Spiral Cable 223235SP
USB-RJ45 serial connection cable 219685
Serial connection cable 19446ZZ
Barbed fitting 1/8" 19498SP
Quick connector 1/8" 220186
Transport case with interior foams and tabletop
casing for PTB330
Tabletop casing for PTB330 224064SP
MI70
USB cable for MI70, incl. MI70 Link software 219687
MI70 Link software MI70LINK
MI70 connection cable to HMT330,
MMT330, DMT340, HMT100, PTB330
MI70 battery pack 26755
AC adapter for Australia MI70AUSADAPTER
AC adapter for Europe MI70EUROADAPTER
AC adapter for UK MI70UKADAPTER
AC adapter for USA MI70AUSADAPTER
All AC adapters MI70ALLADAPTER
HMP155
HMP155 - MI70 connection cable 221801
Protection set for HMP155 calibration buttons:
protective cover, 2 O-rings and protective plug
USB cable for HMP155 221040
Sintered teflon filter + O-ring 219452SP
Humidity sensor HUMICAP180R
Humidity Calibrator HMK15
224068SP
211339
221318
VAISALA_______________________________________________________________________ 85
Page 88

User's Guide ______________________________________________________________________
86 ___________________________________________________________________M210983EN-A
Page 89

*M210983
EN
*
www.vaisala.com
 Loading...