

Page 1

USER'S GUIDE
Vaisala HUMICAP® Moisture and
Temperature Transmitter for Oil
MMT162
M210934EN-C
Page 2

PUBLISHED BY
Vaisala Oyj Phone (int.): +358 9 8949 1
P.O. Box 26 Fax: +358 9 8949 2227
FI-00421 Helsinki
Finland
Visit our Internet pages at www.vaisala.com
© Vaisala 2013
No part of this manual may be reproduced, published or publicly displayed in any form
or by any means, electronic or mechanical (including photocopying), nor may its
contents be modified, translated, adapted, sold or disclosed to a third party without prior
written permission of the copyright holder. Translated manuals and translated portions
of multilingual documents are based on the original English versions. In ambiguous
cases, the English versions are applicable, not the translations.
The contents of this manual are subject to change without prior notice.
This manual does not create any legally binding obligations for Vaisala towards
customers or end users. All legally binding obligations and agreements are included
exclusively in the applicable supply contract or the General Conditions of Sale and
General Conditions of Service of Vaisala.
Page 3

________________________________________________________________________________
Table of Contents
CHAPTER 1
GENERAL INFORMATION ............................................................................ 5
About This Manual ................................................................... 5
Contents of This Manual ....................................................... 5
Version Information ............................................................... 6
Related Manuals ................................................................... 6
Documentation Conventions ................................................. 6
Safety ......................................................................................... 7
Recycling .................................................................................. 7
Regulatory Compliances ......................................................... 7
Trademarks ............................................................................... 8
License Agreement .................................................................. 8
Warranty .................................................................................... 8
CHAPTER 2
PRODUCT OVERVIEW .................................................................................. 9
Introduction to MMT162 ........................................................... 9
Basic Features and Options .................................................. 10
Transmitter Structure ............................................................. 11
Typical Applications .............................................................. 12
Method Used for Measuring Moisture in Oil ........................ 12
Lubrication Oil ..................................................................... 12
Transformer Oil ................................................................... 13
CHAPTER 3
INSTALLATION ............................................................................................ 15
Installing the Transmitter ...................................................... 15
Wiring ...................................................................................... 17
Connection Cables .............................................................. 18
Power Supply Requirements ............................................... 19
CHAPTER 4
OPERATION ................................................................................................. 21
Getting Started ....................................................................... 21
Analog Output Operation Modes .......................................... 21
Normal Operation Mode and Malfunction Alarm ................. 21
Limit Alarm .......................................................................... 22
Serial Communication ........................................................... 22
Connecting to Serial Interface ............................................. 22
Installing the Driver for the USB Cable ............................... 23
Terminal Program Settings ................................................. 24
List of Serial Commands ....................................................... 26
Device Information and Status ............................................. 27
Show Device Information .................................................... 27
VAISALA ________________________________________________________________________ 1
Page 4

User's Guide ______________________________________________________________________
Show Firmware Version ...................................................... 27
Configuring Serial Line Operation ........................................ 28
Set Serial Line Settings ....................................................... 28
Set Serial Line Response Time ........................................... 29
Set Transmitter Address ...................................................... 29
Format Measurement Output .............................................. 30
Select Unit ........................................................................... 32
Set Serial Interface Mode .................................................... 33
Configuring Measurement Parameters ................................ 33
Select Analog Output Parameter and Scaling ..................... 33
Set Analog Output Mode (mA/V) ......................................... 34
Calibrate Analog Output ...................................................... 34
Set Malfunction Alarm Output for Analog Channels ............ 35
Set Alarm Limits and LED Indication for Analog Outputs.... 35
Set Voltage for LED Alarm .................................................. 36
Extend Analog Output Range .............................................. 36
Serial Line Output Commands .............................................. 37
Start Measurement Output .................................................. 37
Stop Measurement Output .................................................. 37
Set Output Interval............................................................... 38
Output Reading Once .......................................................... 38
Troubleshooting Commands ................................................. 39
Display the Currently Active Errors ..................................... 39
Test Analog Outputs ............................................................ 39
Other Commands ................................................................... 40
Opening the Transmitter in POLL Mode ............................. 40
Closing the Connection to a Transmitter in POLL Mode ..... 40
Display Command List ........................................................ 41
Reset Transmitter ................................................................ 42
Restore Factory Settings ..................................................... 42
ppm Conversion ..................................................................... 43
MMT162 ppm Conversion for Transformer Oils .................. 43
Conversion Model with Average Coefficients ...................... 43
Conversion Model with Oil-specific Coefficients ................. 44
Setting Oil Coefficients Using Serial Line ............................ 44
OIL .................................................................................. 44
Determination of Oil-Specific Coefficients ........................... 45
CHAPTER 5
MAINTENANCE ............................................................................................ 47
Cleaning ................................................................................... 47
Changing the Filter ................................................................. 48
Changing the Sensor ............................................................. 48
Error States ............................................................................. 48
Unknown Serial Settings ....................................................... 49
Technical Support .................................................................. 50
Product Returns...................................................................... 50
CHAPTER 6
CALIBRATION AND ADJUSTMENT ........................................................... 51
MM70 in Checking and Adjusting ......................................... 52
One-Point Relative Humidity Adjustment ............................ 52
Using Serial Line ................................................................. 52
2 ___________________________________________________________________ M210934EN-C
Page 5

________________________________________________________________________________
CRH ............................................................................... 52
Using MI70 .......................................................................... 53
One-Point Temperature Adjustment .................................... 56
Using Serial Line ................................................................. 56
Using MI70 .......................................................................... 57
Analog Output Adjustment.................................................... 58
CHAPTER 7
TECHNICAL DATA ...................................................................................... 59
Measured Parameters ............................................................ 59
Operating Environment ......................................................... 60
Inputs and Outputs ................................................................ 60
Mechanics ............................................................................... 60
Spare Parts and Accessories ................................................ 61
Dimensions in mm (inches) .................................................. 62
VAISALA ________________________________________________________________________ 3
Page 6

User's Guide ______________________________________________________________________
List of Figures
Figure 1 Moisture and Temperature Transmitter for Oil MMT162 .......... 11
Figure 2 Water Solubility of Transformer Oils versus Temperature ....... 14
Figure 3 Removing the Transportation Protection Cap .......................... 15
Figure 4 Installing the Transmitter .......................................................... 16
Figure 5 Connecting the Cable ............................................................... 16
Figure 6 Connectors I and II ................................................................... 17
Figure 7 Connector Pinout ...................................................................... 17
Figure 8 Cable with Threaded Connector ............................................... 18
Figure 9 Cable with 90° Angle Threaded Connector .............................. 18
Figure 10 LED Cable ................................................................................ 19
Figure 11 USB Serial Interface Cable ....................................................... 19
Figure 12 PuTTY Terminal Application ..................................................... 25
Figure 13 Metal Housing Transmitter Dimensions ................................... 62
Figure 14 Plastic Housing Transmitter Dimensions .................................. 63
List of Tables
Table 1 Manual Revisions ....................................................................... 6
Table 2 Related Manuals ......................................................................... 6
Table 3 Parameters Measured and Calculated by MMT162 ................... 9
Table 4 Default Serial Interface Settings ............................................... 23
Table 5 Serial Line Commands ............................................................. 26
Table 6 FORM Command Modifiers ...................................................... 31
Table 7 Symbols Used in FORM Checksum Equations ........................ 32
Table 8 Analog Output Modes ............................................................... 34
Table 9 Error Messages ........................................................................ 49
4 ___________________________________________________________________ M210934EN-C
Page 7

Chapter 1 ________________________________________________________ General Information
CHAPTER 1
GENERAL INFORMATION
This chapter provides general notes for the manual and the product.
About This Manual
This manual provides information for installing, operating, and
maintaining Vaisala HUMICAP® Moisture and Temperature Transmitter
for Oil MMT162.
Contents of This Manual
This manual consists of the following chapters:
- Chapter 1, General Information, provides general notes for the manual
and the product.
- Chapter 2, Product Overview, introduces the features, advantages, and
the product nomenclature
- Chapter 3, Installation, provides you with information that is intended
to help you install the product.
- Chapter 4, Operation, provides information that is needed in basic
maintenance of the product.
- Chapter 5, Maintenance, provides information that is needed in basic
maintenance of the product.
- Chapter 6, Calibration and Adjustment, provides information that is
needed in calibration and adjustment of the product.
- Chapter 7, Technical data, provides the technical data of the product.
VAISALA ________________________________________________________________________ 5
Page 8

User's Guide ______________________________________________________________________
Manual Code
Description
M210934EN-C
April 2013. This manual. Updated descriptions of
Updated list of spare parts and accessories.
M210934EN-B
March 2009. Previous version. Updated cable
specification.
Manual Code
Manual Name
M210935EN
MMT162 Quick Reference Guide
Warning alerts you to a serious hazard. If you do not read and follow
instructions very carefully at this point, there is
death.
Caution warns you of a potential hazard. If you do not read and follow
instructions carefully at this point, the product could be damaged or
important data could be lost.
Note highlights important
Version Information
Table 1 Manual Revisions
connection cables and serial line commands.
Related Manuals
Table 2 Related Manuals
Documentation Conventions
WARNING
CAUTION
NOTE
Throughout the manual, important safety considerations are highlighted
as follows:
a risk of injury or even
information on using the product.
6 ___________________________________________________________________ M210934EN-C
Page 9

Chapter 1 ________________________________________________________ General Information
Ground the
periodically to minimize shock hazard.
Do not modify the unit. Improper modification can damage the product
or lead to malfunction.
Recycle all applicable material.
Dispose of
not dispose of with regular household refuse.
Safety
The Vaisala HUMICAP® Moisture and Temperature Transmitter for Oil
MMT162 delivered to you has been tested for safety and approved as
shipped from the factory. Note the following precautions:
WARNING
CAUTION
Recycling
product, and verify outdoor installation grounding
batteries and the unit according to statutory regulations. Do
Regulatory Compliances
Vaisala HUMICAP® Moisture and Temperature Transmitter for Oil
MMT162 is in conformity with the following EU directive:
- EMC-Directive
Conformity is shown by compliance with the following standards:
- EN 61326-1: Electrical equipment for measurement, control and
laboratory use - EMC requirements - Industrial environment.
- EN 55022 Class B: Information technology equipment – Radio
disturbance characteristics – Limits and methods of measurement.
VAISALA ________________________________________________________________________ 7
Page 10

User's Guide ______________________________________________________________________
Trademarks
HUMICAP® is a registered trademark of Vaisala Oyj.
Windows® is a registered trademark of Microsoft Corporation in the
United States and/or other countries.
License Agreement
All rights to any software are held by Vaisala or third parties. The
customer is allowed to use the software only to the extent that is provided
by the applicable supply contract or Software License Agreement.
Warranty
Visit our Internet pages for standard warranty terms and conditions:
www.vaisala.com/warranty.
Please observe that any such warranty may not be valid in case of
damage due to normal wear and tear, exceptional operating conditions,
negligent handling or installation, or unauthorized modifications. Please
see the applicable supply contract or Conditions of Sale for details of the
warranty for each product.
8 ___________________________________________________________________ M210934EN-C
Page 11

Chapter 2 __________________________________________________________ Product Overview
Parameter
Abbreviation
Metric Unit
Non Metric Unit
Water activity
Aw
Temperature
T
°C
°F
Mass concentration of
water in oil
ppm
ppm is
CHAPTER 2
PRODUCT OVERVIEW
This chapter introduces the features, advantages, and the product
nomenclature of Moisture and Temperature Transmitter for Oil
MMT162.
Introduction to MMT162
The MMT162 transmitter is a microprocessor based instrument for the
measurement of moisture in terms of water activity, for example in the
lubrication of circulation systems or in transformer oil. The probe
incorporates a capacitive thin film sensor. The operation of the sensor is
based on changes in its capacitance as the thin polymer film absorbs
water molecules.
NOTE
The MMT162 transmitter is available with either metal or plastic
housing. The transmitter can be configured in many ways: two analog
output signals can be scaled, the measurement ranges can be changed
within certain limits and there are two mechanical connection options,
ISO and NPT 1/2. The MMT162 probe is supplied with a three or five
meter connection cable.
The MMT162 also provides for accurate temperature measurement. It is
an easy-to-install on-line probe which can be calibrated against, for
example, traceable salt solutions.
Table 3 Parameters Measured and Calculated by MMT162
only applicable to transformer oil.
Vaisala HUMICAP® Moisture and Temperature Transmitter for Oil
MMT162 provides reliable moisture measurement in wide range of
applications. Analog outputs can be chosen between current and voltage
signals. Alternatively, digital output RS-485 comes as standard.
VAISALA ________________________________________________________________________ 9
Page 12

User's Guide ______________________________________________________________________
Basic Features and Options
- Two analog outputs
- Digital output: RS-485
- USB connectivity for service connections via the optional
USB M8 cable
- Different cable lengths available
- Available with two different thread options: ISO G1/2" and NPT 1/2"
- Low maintenance requirements due to excellent long term stability
- LED cable option that enables a visual alarm function
- Field calibration possible with MM70
- Two filter types available: stainless steel grid filter and high flow
stainless steel grid filter (> 1 m/s)
10 __________________________________________________________________ M210934EN-C
Page 13
Chapter 2 __________________________________________________________ Product Overview
where
1 = 4-pin M8 connector I: analog output channels and operating
power
2 = 4-pin M8 connector II (shown with protective cap):
digital output (RS-485) and operating power
3 = 30 mm nut
4 = HUMICAP® sensor protected with stainless steel grid filter
5 = Connection thread: ISO G1/2" or NPT 1/2"
Transmitter Structure
The structure of the MMT162 is shown in Figure 1 on page 11. The
transmitter body does not have user serviceable parts inside, and is not
designed to be opened. Opening the transmitter will void the warranty.
When the transmitter is delivered, the filter is protected by a yellow
transport protection cap. Remove the transport protection cap before
installing the transmitter.
0805-007
Figure 1 Moisture and Temperature Transmitter for Oil
MMT162
VAISALA _______________________________________________________________________ 11
Page 14

User's Guide ______________________________________________________________________
To avoid self
errors, make sure there is some flow in the application
Typical Applications
Method Used for Measuring Moisture in Oil
The MMT162 transmitter measures water in oil in terms of water activity
(aw) which can be determined as follows: water activity indicates the
amount of water on the scale of 0 - 1 aw. In this scale, 0 aw is an
indication of completely water free oil and 1 aw an indication of oil fully
saturated with water. Water is present in free form.
The most important feature which distinguishes the measurement of
water activity (aw) from the traditional measurement of absolute water
content (in ppm) is that the saturation point remains stable regardless of
the oil type or the aging of oil, additives used etc. As water activity
exceeds 0.9 aw in any system, there is a risk for segregation (especially if
the temperature decreases).
NOTE
The water activity is used for alarming at the point of >0.9 aw that the
risk for free water in the system is obvious. The most important
advantages of this system are the fact that water activity is immune to the
aging of oil and to additives, and that the MMT162 transmitter can be
used for continuous on-line measurements. In addition, the MMT162 can
be calibrated against salt solutions and no reference oils are needed.
-heating of the probe and consequential measurement
process.
Lubrication Oil
In many industrial plants, like paper mills, hydro power plants and offshore wind turbines, there is a certain amount of free moisture constantly
present. This means that there is a high risk of the free moisture
becoming into contact with the machine bearings. The most common
reasons for the entrance of water are inadequate sealing of the housing or
moisture absorption from ambient air. Accidental leakages from oil
coolers and other equipment can also cause damage.
Free water in lubrication oil prevents oil from forming a uniform layer on
the metal surfaces and thus deteriorating its lubrication properties. This
can cause, for example, spot heating, cavitation, corrosion and micro
pitting. Free water also ruins additives like AW (antiwear) and EP
(extreme pressure). Note that bearings should never be exposed to oils
that have high water content; this is also important during standstill
because the risk for corrosion increases as the oil temperature decreases.
12 __________________________________________________________________ M210934EN-C
Page 15

Chapter 2 __________________________________________________________ Product Overview
It is essential to monitor the water content and to keep it on a suitable
level, meaning below saturation.
When measuring the water content of oil, it is best to measure the water
activity before an oil reservoir and from a pressure line flow. This way
the performance of dehumidifiers can be kept under control to ensure that
no free water reaches the bearings.
Transformer Oil
The determination of moisture in oil is an essential part of a
comprehensive transformer maintenance program. Aging and
deterioration increase the capacity of oil to absorb water. The primary
interest in transformers is to measure the water not in oil but in the
cellulosic insulation around the transformer windings. Heating and
cooling have a considerable effect on moisture levels in oil. While
temperature rises, the paper insulation of transformers tends to loose
moisture which is absorbed by the oil surrounding it. Saturation level is
thus a true indicator of moisture present. The MMT162 method provides
for a reliable detection of the aging of oil and possible leakages.
Oil immersed transformers rely on the oil for cooling, protection from
corrosion and as an important component of their insulation. Excessive
moisture content in oil causes accelerated ageing of the insulation
materials and reduces their dielectric strength. In extreme cases this can
result in arcing and short circuits within the windings. Accurate moisture
measurements can also warn about leaks in the oil system, as water is
absorbed from the surrounding air.
Heating and cooling of a transformer affect moisture levels in oil. This is
due to the fact that the water solubility of oil is temperature dependent. In
general, water solubility increases as temperature rises; see Figure 2 on
page 14 below. Changes in temperature also have an effect on water
desorption of the paper insulation around the transformer windings.
Desorption of water from the insulation increases as temperature rises
and the surrounded oil absorbs desorbed water. Moisture level in oil is
thus a true indicator of moisture present in the paper insulation.
In addition, it must be noted that capacity of oil to absorb water depends
both on the chemical structure of the oil and the additives.
VAISALA _______________________________________________________________________ 13
Page 16

User's Guide ______________________________________________________________________
WATER SOLUBILITY IN MINERAL TRANSFORMER OIL
10
100
1000
10000
0 10 20 30 40 50 60 70 80 90 100
Temperature (°C)
average water
solubility
range of
variation due to
oil type
range of
variation due to
oil type
0510-029
Figure 2 Water Solubility of Transformer Oils versus
Temperature
The margins show the range of variation of water solubility found in
mineral oils.
14 __________________________________________________________________ M210934EN-C
Page 17
Chapter 3 _______________________________________________________________ Installation
CHAPTER 3
INSTALLATION
This chapter provides you with information that is intended to help you
install the product.
Installing the Transmitter
After selecting a suitable measurement location, follow the procedure
below to install the transmitter:
1. Remove the yellow transport protection cap from the transmitter.
0805-005
Figure 3 Removing the Transportation Protection Cap
2. Prepare the sealing of the connection:
- If the transmitter has a parallel ISO G1/2" thread, place the
sealing ring at the base of the thread. Always use a new
sealing ring; do not re-use a previously installed one.
- If the transmitter has an NPT 1/2" thread, do not use the
sealing ring. Instead, apply PTFE tape or suitable paste
sealant to the thread. Follow the application instructions of
the sealant.
3. Make sure that the threads on the mounting point are of the correct
type, and fasten the transmitter to the measurement point. Use your
hands to turn the probe until it feels tight. Do not use force at this
point, and check that the sealing ring
(if used) remains centered.
VAISALA _______________________________________________________________________ 15
Page 18
User's Guide ______________________________________________________________________
Only tighten the probe from the 30
other points in the probe body.
CAUTION
0805-006
Figure 4 Installing the Transmitter
4. Use a 30 mm wrench to tighten the connection to 25 Nm, as shown
in Figure 4 above. If you do not have a 30 mm wrench, use a
1 3/16” wrench or an adjustable wrench instead.
mm nut. Do NOT apply force to
5. Connect the wires of the connection cable.
6. Plug in the cable to the transmitter. Be sure to use the correct
7. Cover the unused connector on the transmitter with the rubber plug
16 __________________________________________________________________ M210934EN-C
0710-130
Figure 5 Connecting the Cable
connector; refer to section Wiring on page 17.
that is attached to the transmitter.
Page 19
Chapter 3 _______________________________________________________________ Installation
Pin I II
Wire Color
1
Vcc
Vcc
Brown
2
Analog output 1
RS-485 B / D-
White
3
GND
GND
Blue
4
Analog output 2 / LED
RS-485 A / D+
Black
Wiring
0707-035
Figure 6 Connectors I and II
VAISALA _______________________________________________________________________ 17
1210-005
Figure 7 Connector Pinout
Page 20
User's Guide ______________________________________________________________________
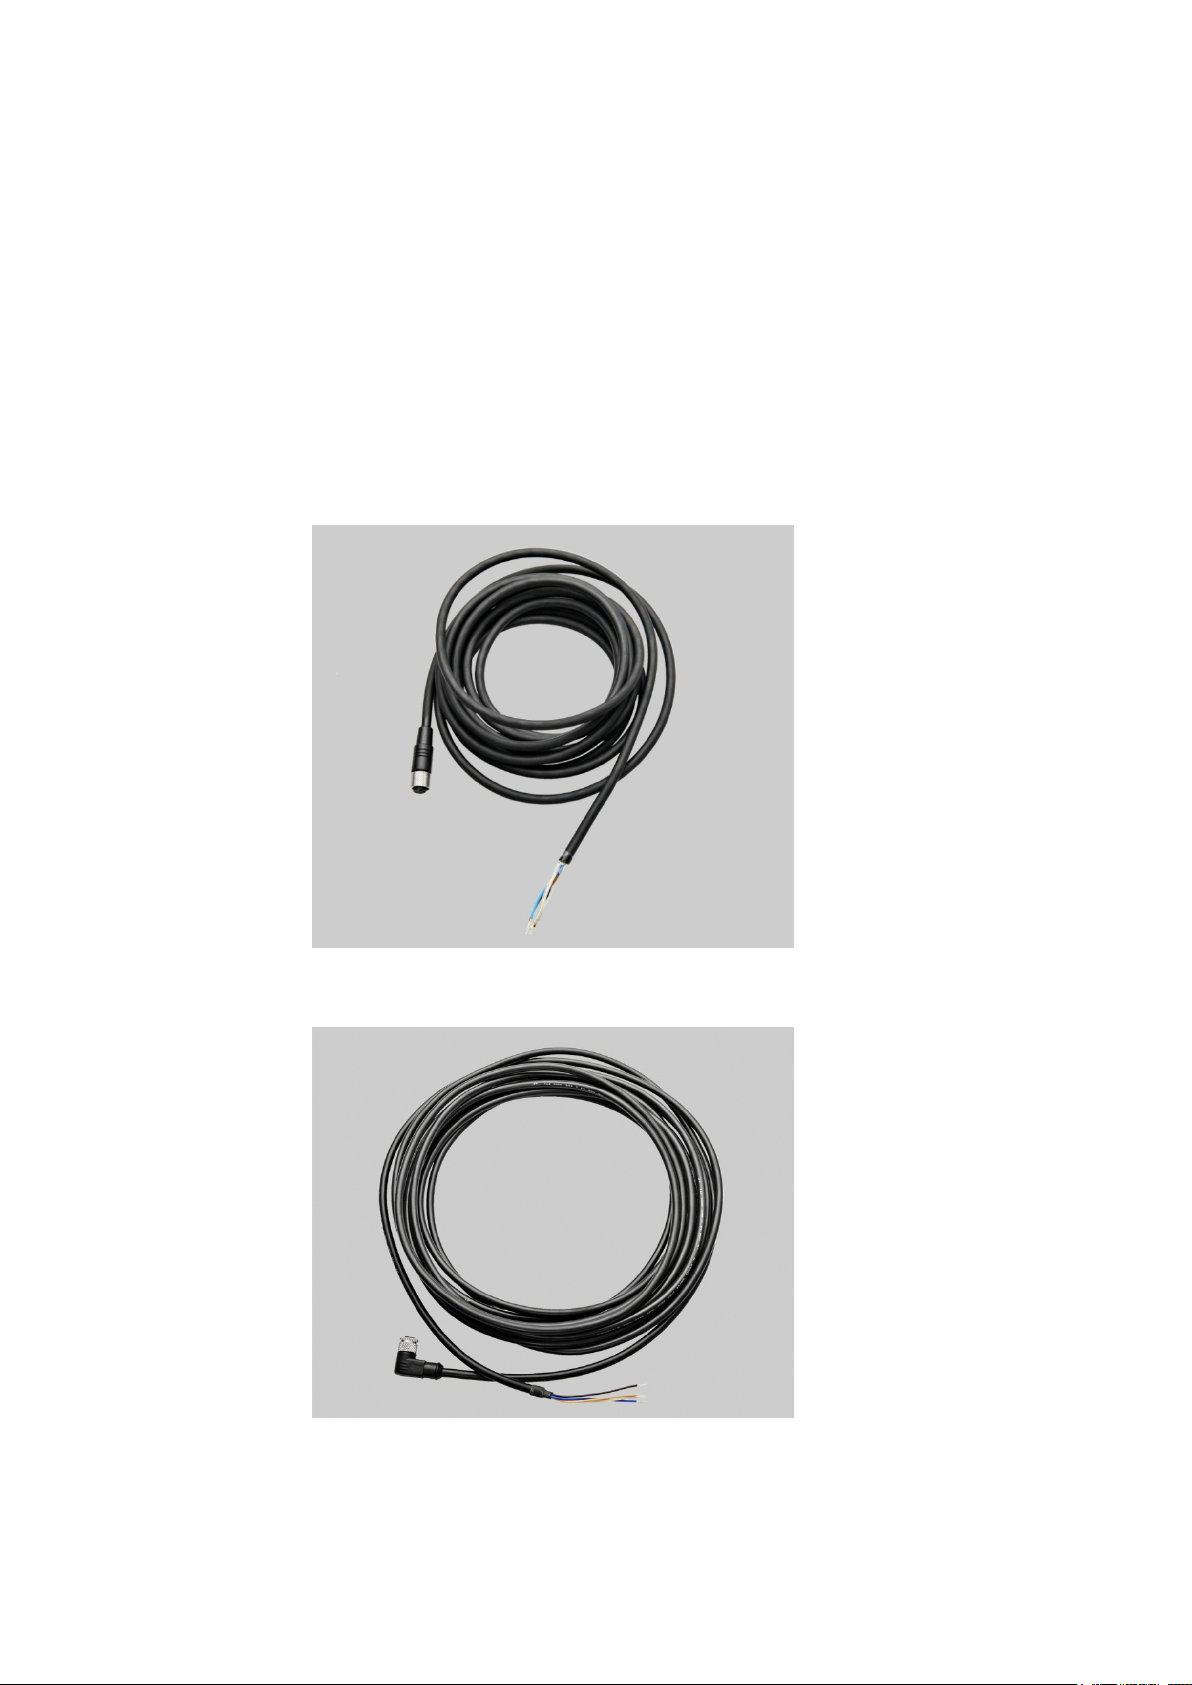
Connection Cables
The following connection cable options are available for MMT162:
- Shielded cables with M8 female straight threaded connector
- Cables with M8 female 90° angle threaded connector
- LED cable
- USB serial interface cable
The figures below show the different cable options that are available.
For order codes, see section Spare Parts and Accessories on page 61.
1210-063
Figure 8 Cable with Threaded Connector
1211-024
Figure 9 Cable with 90° Angle Threaded Connector
18 __________________________________________________________________ M210934EN-C
Page 21

Chapter 3 _______________________________________________________________ Installation
1211-025
Figure 10 LED Cable
1210-062
Figure 11 USB Serial Interface Cable
Power Supply Requirements
The MMT162 transmitters are designed to operate with a supply voltage
of 14 … 24 VDC.
The power supply should maintain the voltage for all load conditions.
Current consumption during normal measurement is 20 mA + load
current. For more specific information, see chapter Technical data on
page 59.
VAISALA _______________________________________________________________________ 19
Page 22

User's Guide ______________________________________________________________________
This page intentionally left blank.
20 __________________________________________________________________ M210934EN-C
Page 23

Chapter 4 ________________________________________________________________ Operation
The malfunction alarm
is malfunctioning, the analog outputs are set to the levels specified with
the
being controlled.
CHAPTER 4
OPERATION
This chapter contains information that is needed to operate this product.
Getting Started
MMT162 is ready to be used once it has been connected to a power
source.
Analog Output Operation Modes
The MMT162 has two analog output channels. These channels can
function in two different modes, which can be set individually for both
channels:
1. Normal operation mode
2. Limit alarm mode
When the transmitter is ordered from Vaisala, the modes are configured
as specified in the order form. You can change the operation settings
after delivery by using serial commands and the USB cable accessory.
Normal Operation Mode and Malfunction Alarm
In the normal operation mode, a channel outputs voltage or current that
corresponds to the reading of the selected parameter.
If the transmitter is malfunctioning, the channel output is set to a predefined level. This level can be changed using the AERR command; see
page 35.
NOTE
AERR command, unless the malfunction prevents the outputs from
VAISALA _______________________________________________________________________ 21
overrides the limit alarm mode. If the transmitter
Page 24

User's Guide ______________________________________________________________________
Limit Alarm
The limit alarm is activated when the measured parameter goes below the
low limit, or above the high limit. The alarm levels and limits are
configurable using the ALARM command (see page 35). By default, the
alarm levels are set as follows:
- For current output, an active alarm is indicated by the current being
at the maximum of the scale (20 mA).
- For voltage output, an active alarm is indicated by the voltage being
at the maximum of the selected scale. For example, if the voltage
output scale is 0 … 5 V, an output of 5 V indicates the alarm is active.
- For LED alarm, an active alarm is indicated by a lit LED. When the
alarm status is low, the LED is not lit. If the transmitter is
malfunctioning or it cannot measure for some reason, this causes the
LED to blink at 0.5 Hz frequency.
LED alarm indicator is integrated to a LED cable (Vaisala item
MP300LEDCBL) that can be ordered and used instead of a regular
connection cable.
Serial Communication
Connecting to Serial Interface
The MMT162 can be connected to a PC using the RS-485 line,
for example using the USB serial connection cable (Vaisala item
219690). The cable also provides operation power to the transmitter from
the USB port. It is OK to connect the USB serial connection cable even if
the transmitter is already supplied with operation power from another
cable.
To connect to serial interface:
1. If you have not used the MMT162 USB serial connection cable
before, install the driver that came with the cable. Refer to section
Installing the Driver for the USB Cable on page 23 for detailed
instructions.
2. Connect the USB serial connection cable between your PC and the
RS-485 port of the MMT162 (port II).
3. Open the terminal program (for example, PuTTY in Microsoft
Windows®).
4. Set the serial settings of the terminal program, and open the
connection. See the following table.
22 __________________________________________________________________ M210934EN-C
Page 25

Chapter 4 ________________________________________________________________ Operation
Property
Description / Value
Baud rate
19200
Parity
none
Data bits
8
Stop bits
1
Table 4 Default Serial Interface Settings
Installing the Driver for the USB Cable
Before taking the USB cable into use, you must install the provided USB
driver on your PC.
1. Check that the USB cable is not connected. Disconnect the cable if
you have already connected it.
2. Insert the media that came with the cable, or download the driver
from www.vaisala.com.
3. Execute the USB driver installation program and accept the
installation defaults. The installation of the driver may take several
minutes.
4. After the driver has been installed, connect the USB cable to a USB
port on your PC. Windows will detect the new device, and use the
driver automatically.
5. The installation has reserved a COM port for the cable. Verify the
port number, and the status of the cable, using the Vaisala USB
Instrument Finder program that has been installed in the
Windows Start menu.
Windows will recognize each individual cable as a different device, and
reserve a new COM port. Remember to use the correct port in the
settings of your terminal program.
There is no reason to uninstall the driver for normal use. However, if you
wish to remove the driver files and all Vaisala USB cable devices, you
can do so by uninstalling the entry for Vaisala USB Instrument Driver
from the Programs and Features menu in the Windows Control Panel.
In Windows XP and earlier Windows versions the menu is called Add or
Remove Programs.
VAISALA _______________________________________________________________________ 23
Page 26

User's Guide ______________________________________________________________________
Terminal Program Settings
The default settings of the MMT162 serial interface are presented in
Table 4 on page 23. If the settings of your MMT162 have been changed
and you do not know what they are, refer to section Unknown Serial
Settings on page 49.
The steps below describe how to connect to the MMT162 using the
PuTTY terminal application for Windows (available for download at
www.vaisala.com) and a USB serial interface cable:
1. Connect the USB serial interface cable between your PC and the
RS-485 port of the MMT162 (port II).
2. Start the PuTTY application.
3. Select the Serial settings category, and check that the correct COM
port is selected in the Serial line to connect to field.
Note: You can check which port the USB cable is using with the
Vaisala USB Instrument Finder program that has been installed
in the Windows Start menu.
4. Check that the other serial settings are correct for your connection,
and change if necessary. Flow control should be set to None unless
you have a reason to change it.
5. Click the Open button to open the connection window and start
using the serial line.
Note: If PuTTY is unable to open the serial port you selected, it
will show you an error message instead. If this happens, restart
PuTTY and check the settings.
6. You may need to set the Local echo setting to Force on in the
Terminal category to see what you are typing on the serial line. To
access the configuration screen while a session is running, click the
right mouse button over the session window, and select Change
Settings... from the pop-up menu.
24 __________________________________________________________________ M210934EN-C
Page 27

Chapter 4 ________________________________________________________________ Operation
Figure 12 PuTTY Terminal Application
0807-004
VAISALA _______________________________________________________________________ 25
Page 28

User's Guide ______________________________________________________________________
Command
Description
?
Output information about the device
??
Output information about the device in
POLL mode
ACAL
Analog output calibration
ADDR [0 ... 255]
Set the transmitter address (for POLL
mode)
AERR
Change the analog error output values
ALARM
Set analog output limit alarm modes
AMODE
Set analog output modes
AOVER [ON/OFF]
Allow analog outputs to exceed their range
10%
ASEL
Select the parameters for the analog
outputs
ATEST
Set and display current output values
CLOSE
Close the temporary connection (Back to
POLL mode)
CRH
Relative humidity calibration
CT
Temperature calibration
ERRS
List present transmitter errors
FORM
Set the output format of SEND and R
commands
FRESTORE
Restore factory settings
HELP
List the most common commands
INTV [0 ... 255 S/MIN/H]
Set the continuous output interval
(for RUN mode)
LED
Set voltage for LED alarm
OIL
Display oil parameters
OILI
Set new oil parameters
OPEN [0 ... 255]
Open a temporary connection to a POLL
mode device
R
Start the continuous outputting
RESET
Reset the transmitter
S
Stop the continuous outputting
SDELAY
View or set user port (RS-485) answer
minimum delay
SEND [0 ... 255]
Output the reading once
SERI [baud p d s]
User Port settings (Default: 4800 E 7 1)
baud: 300 ... 115200
SMODE
[STOP/RUN/POLL]
Set the serial interface mode
UNIT [M/N]
Select the metric or non-metric output units
VERS
Display the software version information
List of Serial Commands
All commands can be issued either in uppercase or lowercase. In the
command examples, the keyboard input by the user is in bold type.
The notation <cr> refers to pressing the carriage return (Enter) key on
your computer keyboard. Enter a <cr> to clear the command buffer
before starting to enter commands.
Table 5 Serial Line Commands
26 __________________________________________________________________ M210934EN-C
Page 29

Chapter 4 ________________________________________________________________ Operation
Device Information and Status
Show Device Information
The ? command outputs a listing of device information. If you wish to
display the listing for all devices on the current serial line, issue the
command ??.
?<cr>
??<cr>
Example:
?
MMT162 0.92
Serial number : G0000002
Batch number : D0720012
Module number : ????????
Sensor number : C6010000
Sensor model : Humicap L2
Cal. date : YYYYMMDD
Cal. info : NONE
Time : 00:21:19
Serial mode : STOP
Baud P D S : 4800 E 7 1
Output interval: 2 S
Serial delay : 0
Address : 0
Pressure : 1.0132 bar
Filter : 0.800
Ch1 output : 0 ... 20 mA
Ch2 output : 0 ... 20 mA
Ch0 error out : 0.000 mA
Ch1 error out : 0.000 mA
Ch0 aw lo : 0.00
Ch0 aw hi : 1.00
Ch1 T lo : -20.00 'C
Ch1 T hi : 80.00 'C
Show Firmware Version
Use the VERS command to display software version information.
Example:
vers
MMT162 1.02
VAISALA _______________________________________________________________________ 27
Page 30

User's Guide ______________________________________________________________________
where
b = Bit rate (110, 150, 300, 600, 1200, 2400, 4800, 9600,19200,
38400)
p = Parity (n = none, e = even, o = odd)
d = Data bits (7 or 8)
s = Stop bits (1 or 2)
Configuring Serial Line Operation
Set Serial Line Settings
Use the serial line command SERI [b p d s] to set communication
settings for the user port.
SERI [b p d s]<cr>
Example:
seri 600 n 8 1
600 N 8 1
You need to reset the transmitter to activate the new communication
settings set with the SERI command.
The settings can be changed one parameter at a time or all parameters at
once:
seri o changing parity only
4800 O 7 1
seri 600 n 8 1
600 N 8 1
changing all parameters
You can use the SERI command to change/view the user port settings
even if you are currently connected to the service port.
28 __________________________________________________________________ M210934EN-C
Page 31

Chapter 4 ________________________________________________________________ Operation
where
delay
=
Serial line delay, range 0 ... 255. Multiply the value by four
to get milliseconds (for example, delay value of
40 millisecond delay).
where
aaa
=
address (0 ... 255) (default = 0)
Set Serial Line Response Time
With the SDELAY command you can set delay (response time) of the
serial line, or view the currently set delay value.
SDELAY [delay]<cr>
10 equals
Example:
sdelay
Serial delay : 0 ? 10
sdelay
Serial delay : 10 ?
Set Transmitter Address
Addresses are required only for POLL mode (see Set Serial Interface
Mode on page 33). Use the ADDR command to input the RS-485
transmitter address.
ADDR [aaa]<cr>
Example (configure transmitter to address 99):
addr
Address : 2 ? 99
VAISALA _______________________________________________________________________ 29
Page 32

User's Guide ______________________________________________________________________
where
x = Formatter string
Format Measurement Output
Use the serial line command FORM to change the format or select
certain parameters for the output commands SEND and R.
FORM [x]<cr>
Formatter string consists of parameters and modifiers. The MMT162
measures the following parameters:
- water activity (aw)
- temperature (T) (metric unit: ºC, non metric unit:ºF)
- ppm for transformer oil only (H2O)
When selecting the parameter, use its abbreviation (for example, aw).
The modifiers are presented in Table 6 on page 31.
Example (configure transmitter to output water activity and temperature):
form "aw=" 6.4 aw #t "t=" 6.2 t #r#n
OK
send
aw= 0.2644 t= 25.50
Example (configure transmitter to output ppm only):
form "Oil ppm= " h2o " " u3 #r#n
OK
send
Oil ppm= 16.6 ppm
Example (configure transmitter to default output format):
form /
OK
send
aw= 0.087 T= 24.0 'C
30 __________________________________________________________________ M210934EN-C
Page 33

Chapter 4 ________________________________________________________________ Operation
Modifier
Description
/
Restores the default output message (depends on the
device configuration). Used alone.
x.y
Length modifier (number of digits and decimal places).
parameter
Abbreviation of a measured parameter, for example aw.
* characters if measured value is not available.
U1…U7
Unit symbol in the specified number of characters
(truncated or space filled as necessary).
“xxx”
String constant (free text).
#a
\a
Audible bell character <0x07>.
#b
\b
Backspace character <0x08>
#f
\f
Form feed character <0x0C>.
#n
\n
Line feed character <0x0A>.
#r
\r
Carriage return character <0x0D>.
#t
\t
Horizontal tabulator character <0x09>.
#v
\v
Vertical tabulator character <0x0B>.
#\
\\
Backslash character.
#0…#255
\0…\255
Data byte with the specified decimal value.
ADDR
Device address (left-filled with spaces).
CS2
Modulus-256 checksum of message sent so far,
hexadecimal format.
CS4
Modulus-65536 checksum of message sent so far,
hexadecimal format.
CSX
NMEA XOR checksum of message sent so far, hexadecimal
format
ERR
Currently active transmitter errors in a four bit field.
bit4 = Internal error (Program flash check sum error)
SN
Device serial number.
TIME
Time since transmitter startup in format hh:mm:ss.
Table 6 FORM Command Modifiers
Outputs the measured value of the parameter, or
0 = no error, 1 = error.
bit1 = Temperature measurement (T meas error)
bit2 = Not used
bit3 = Humidity measurement (F meas error)
VAISALA _______________________________________________________________________ 31
Page 34

User's Guide ______________________________________________________________________
1
=
∑
=
=
n
i
i
bcs
1
2
256mod
2
=
65536mod
1
4
∑
=
=
n
i
i
bcs
3
=
24630'
2463'
'''
i
21
===
≠≠=
⊕⊕⊕=
ii
iiii
nx
borbifb
bandbifbb
bbbcs
Symbol
Description
cs2
Value of CS2 checksum in the output message.
cs4
Value of CS4 checksum in the output message.
csx
Value of CSX checksum in the output message.
bi
Value of the byte at position i (1-based) in the output message.
n
Number of bytes in the output message before the CS2, CS4,
or CSX field (including earlier checksum fields, if any).
⊕
Bit-wise exclusive-or operator.
36
Byte value of ASCII $ character.
42
Byte value of ASCII * character.
where
x
=
M or N
where
M = Metric units
N = Non-metric units
Checksums are calculated as described in the equations below.
Table 7 Symbols Used in FORM Checksum Equations
Select Unit
Use the UNIT command to select metric or non-metric output units.
UNIT [x]<cr>
32 __________________________________________________________________ M210934EN-C
Page 35

Chapter 4 ________________________________________________________________ Operation
where
xxxx
=
STOP, RUN or POLL
In STOP mode:
measurements output only by command SEND, all
commands can be used
In RUN mode:
outputting automatically, only command S can be
used to stop.
In POLL mode:
measurements output only with command SEND
[addr].
where
xxx
=
Parameter of channel 1
yyy
=
Parameter of channel 2
Set Serial Interface Mode
Use the SMODE command to set the default serial interface mode.
SMODE [xxxx]<cr>
When several transmitters are connected to the same line, each
transmitter must be entered an own address in the initial configuration,
and POLL mode must be used.
Configuring Measurement Parameters
Select Analog Output Parameter and Scaling
Select and scale the parameters for the analog outputs with the ASEL
command. Note that the optional parameters can be selected only if they
have been selected when ordering the device.
ASEL [xxx yyy]<cr>
Always enter all the parameters for all outputs. The MMT162 measures
the following parameters:
- water activity (aw)
- temperature (T) (metric unit: ºC, non metric unit: ºF)
- ppm for transformer oil only (H2O)
Example:
asel
Ch0 aw lo : 0.00 ?
Ch0 aw hi : 1.00 ?
Ch1 T lo : -20.00 'C ?
Ch1 T hi : 80.00 'C ?
VAISALA _______________________________________________________________________ 33
Page 36

User's Guide ______________________________________________________________________
Parameter
Output mode
1
0 … 20 mA
2
4 … 20 mA
4
0 … 5 V
5
0 … 10 V
6
LED alarm
7
Current alarm
8
Voltage alarm
where
channel
=
Analog output channel to be adjusted, 1 or 2.
Set Analog Output Mode (mA/V)
The AMODE command can be used to change the analog output mode
of channels 1 and 2. When used without parameters it displays the
current settings and with parameters new settings can be set. The
available parameters are listed in Table 8 below.
Table 8 Analog Output Modes
Example:
amode 1 2
Ch1 output : 0 ... 20 mA
Ch2 output : 4 ... 20 mA
Calibrate Analog Output
Use the ACAL command to adjust analog output channels.
ACAL [channel]<cr>
After entering the ACAL command, use a calibrated current/voltage
meter to measure the output, and enter the values.
Example:
acal 1
Ch1 U1 ( V ) ? 1.001
Ch1 U2 ( V ) ? 9.011
acal 2
Ch2 U1 ( V ) ? 0.0988
Ch2 U2 ( V ) ? 0.8997
34 __________________________________________________________________ M210934EN-C
Page 37

Chapter 4 ________________________________________________________________ Operation
The error output value must be within a valid range of the output mode.
The error output value is displayed only when
faults such as a humidity sensor damage. When there is a severe device
malfunction, the error output value is not necessarily shown.
Set Malfunction Alarm Output for Analog Channels
Use the AERR command to set the analog output levels that are output in
case of a device malfunction. The default output level is 0.
AERR<cr>
Example:
aerr
Ch1 error out : 10.000V ? 0
Ch2 error out : 1.000V ? 0
NOTE
NOTE
there are minor electrical
Set Alarm Limits and LED Indication for Analog Outputs
Use the ALARM command to set the analog output alarm limits and
parameters. For an explanation of the alarm limits, see section Limit
Alarm on page 22.
ALARM<cr>
Before setting the alarm limits, verify the currently set analog output
modes using the AMODE command.
The following example shows that a high limit alarm has been enabled
for channel 2. If the measured value rises above the limit ( 0.90 aw), an
error is reported. If you are using a LED cable, the LED lights up to
indicate an error state.
Example:
alarm ?
Channel 1:
Low Limit : OFF
High Limit : OFF
Aerr : ON
Quantity : T
Limit Lo : 15.00
Limit Hi : 30.00
VAISALA _______________________________________________________________________ 35
Page 38

User's Guide ______________________________________________________________________
Hysteresis : 0.50
Level Lo : 0.20
Level Hi : 0.80
Channel 2:
Low Limit : OFF
High Limit : ON
Aerr : OFF
Quantity : aw
Limit Lo : 0.10
Limit Hi : 0.90
Hysteresis : 0.01
Level Lo : 0.20
Level Hi : 0.80
Set Voltage for LED Alarm
With the LED command, you can set a different voltage level for each
channel.
LED<cr>
Example:
led ?
Ch 1 Led Voltage : 2.80 V
Ch 2 Led Voltage : 2.80 V
Extend Analog Output Range
Use the AOVER command to allow the analog output channels to
exceed their specified range by 10 %. The scaling of the parameter
remains as before; the extra range is used for additional measurement
range in the wet end.
AOVER [ON/OFF]<cr>
Example:
aover on
: ON
36 __________________________________________________________________ M210934EN-C
Page 39

Chapter 4 ________________________________________________________________ Operation
Serial Line Output Commands
Start Measurement Output
Use the R command to start the continuous outputting of measurement
values as an ASCII text string to the serial line. The format of the
measurement message is set with the FORM command.
R<cr>
Example:
r
aw= 0.261 T= 23.8 'C H2O= 15 ppm
You can change the format of the output with the following commands:
- Outputting interval can be changed with the INTV command.
- Output message format can be changed with the FORM command.
Stop Measurement Output
Use the S command to end the RUN mode. After this command all other
commands can be used. You can also press the Esc button or reset the
transmitter to stop the outputting.
S<cr>
Since the interface is half-duplex, you must enter the command when the
transmitter is not outputting. Give the command again if the transmitter
continues to output measurement messages.
See SMODE command on page 33 to change the default (power-up)
operation mode.
VAISALA _______________________________________________________________________ 37
Page 40

User's Guide ______________________________________________________________________
where
n = time interval = 0 ... 255
xxx
=
time unit = "S", "MIN", or "H"
where
aaa = Transmitter address (0 ... 255). Must be specified if the
transmitter is in POLL mode, and a line has not been opened
using the OPEN command.
Set Output Interval
Use the INTV command to set or display the output interval.
INTV [n xxx]<cr>
Example:
intv 1 min
Output interval: 1 MIN
The shortest output interval (with n = 0) is approximately one second due
to the internal measurement cycle.
Output Reading Once
Use the SEND command to output the reading once in STOP mode.
The output format depends on which parameters the transmitter can
output.
SEND [aaa]<cr>
Example:
send
T= 25.2 'C aw= 0.299 H2O= 19 ppm RS= 29.9 %
38 __________________________________________________________________ M210934EN-C
Page 41

Chapter 4 ________________________________________________________________ Operation
where
xxx
=
Channel 1 output value (V or mA)
yyy
=
Channel 2 output value (V or mA)
Troubleshooting Commands
Display the Currently Active Errors
Use the ERRS command to display the currently active transmitter error
states. Possible errors and their causes are listed in Table 9 on page 49.
ERRS<cr>
Example:
errs
No errors
Test Analog Outputs
The operation of the analog outputs can be tested with the ATEST
command by forcing the output to a given value which can then be
measured with calibrated multimeter. The command uses the currently
selected analog output types for the channels (voltage or current) so you
do not have to specify the unit.
Before testing, you can verify the currently set analog output modes
using the AMODE command. After testing the output, give the ATEST
command again to exit the test mode.
ATEST [xxx yyy]<cr>
The output shows the test values of the analog channels, and diagnostic
information that may be useful to Vaisala Service if there is a problem
with the analog outputs.
Example:
atest 1 15
1.00 2660
15.00 19425
atest
0.00 79
0.00 20110
VAISALA _______________________________________________________________________ 39
Page 42

User's Guide ______________________________________________________________________
where
aaa = address (0 ... 255)
Other Commands
Opening the Transmitter in POLL Mode
Use the OPEN command to connect to a transmitter that is in POLL
mode.
OPEN [aaa]<cr>
Example:
open 0
MMT162 0 line opened for operator commands
Closing the Connection to a Transmitter in POLL Mode
The CLOSE command closes the connection to the transmitter.
CLOSE<cr>
Example:
close
line closed
40 __________________________________________________________________ M210934EN-C
Page 43

Chapter 4 ________________________________________________________________ Operation
Display Command List
Use the HELP command to list the available commands.
HELP<cr>
Example:
help
?
??
ACAL
ADDR
ADJD
AERR
ALARM
AMODE
AOVER
ASEL
ATEST
CDATE
CLOSE
CRH
CT
CTEXT
ERRS
FILT
FORM
FRESTORE
HELP
INTV
L
LED
OIL
OILI
OPEN
PCOMP
PRES
R
RESET
SDELAY
SEND
SERI
SMODE
UNIT
VAISALA _______________________________________________________________________ 41
Page 44

User's Guide ______________________________________________________________________
Reset Transmitter
When the RESET command is given, the transmitter will restart as if it
had just been powered on. All transmitter settings are retained. The serial
line mode of the transmitter will be set to the mode that was set using the
SMODE command.
RESET<cr>
Restore Factory Settings
Use the FRESTORE command to restore the factory settings to the
transmitter. All user settings will be lost.
FRESTORE<cr>
42 __________________________________________________________________ M210934EN-C
Page 45

Chapter 4 ________________________________________________________________ Operation
where
aw = water activity
A,B
=
coefficients (average/oil-specific)
T = temperature (ºC)
ppm Conversion
MMT162 ppm Conversion for Transformer Oils
Traditionally, moisture in transformer oil is measured by using ppm
units. The ppm output shows the average mass concentration of water in
oil.
The moisture and temperature transmitter MMT162 has an option for
ppm-output provided that this has been notified when placing the order
for the transmitter. Vaisala has this conversion readily available for
mineral transformer oils.
Conversion Model with Average Coefficients
The conversion model of the MMT162 is based on the average water
solubility behaviour of transformer oils. The ppm-output is calculated as
follows:
ppm = aw×10
Generally, measurements with MMT162 give accuracy better than 10 %
of the reading. If additional accuracy is needed, refer to section
Conversion Model with Oil-specific Coefficients below.
(A/(T+273.16)+B)
VAISALA _______________________________________________________________________ 43
Page 46

User's Guide ______________________________________________________________________
Conversion model with oil
silicone based oils.
where
Oil [0]
corresponds to parameter A
Oil [1]
corresponds to parameter B
Oil [2]
Corresponds to parameter C
Conversion Model with Oil-specific Coefficients
For additional accuracy, oil-specific conversion model can be used both
for mineral and silicon based oils. An oil sample has to be sent to Vaisala
for modelling. As a result, the specific coefficients (A and B) for the
transformer oil are determined by Vaisala. For additional information,
please contact Vaisala.
The determined coefficients of the transformer oil can be programmed to
the MMT162 by Vaisala or by a user according to the instructions
presented in this chapter.
NOTE
-specific coefficients is always needed for
Setting Oil Coefficients Using Serial Line
If the ppm conversion and oil-specific coefficients have been
programmed at Vaisala, you do not have to set the conversion coefficients.
If you have defined the coefficients or separately received from Vaisala
the oil-specific coefficients A and B, related to your own oil type, the
coefficients can be set to the software of MMT162 by using serial line.
OIL
Use the serial line command OIL to display oil-specific parameters for
ppm conversion. With OILI command you can set new oil parameters.
Example:
44 __________________________________________________________________ M210934EN-C
oil
Oil[0] : -1.66269994E+03
Oil[1] : 7.36940002E+00
Oil[2] : 0.00000000E+00
Page 47

Chapter 4 ________________________________________________________________ Operation
The sample has to be sealed very carefully
will
If the oil sample is very dry and the temperatures are close to each
other, it may cause inaccuracy to the calculation model. In order
get the best possible performance it is recommended to use oil
conditions that represent real conditions in application.
Recommended values for sample are aw approx. 0.5 at 20 °C.
Determination of Oil-Specific Coefficients
The equation of the ppm calculation is:
ppm = aw×10
With the following procedure the coefficients A and B can be defined for
the equation:
LOG(PPM
Equipment needed:
- Apparatus for determining water content ( for example, coulometric
titrator and e.g. magnetic stirrer.)
- Oil test station:
Procedure:
1. Define the water content of the oil sample with the titration. Use
the oil moisture level that is close to real conditions in the process.
(B+A/T)
)= B + A/T
sat
- a temperature test chamber.
- a suitable container (for example, a conical 1 L flask) sealed
by PTFE stopper with an inlet for a moisture probe.
- a MMT162 transmitter by Vaisala.
- a magnetic stirrer.
NOTE
NOTE
2. Measure the water activity of this sample with MMT162 at two
temperatures that differ at least 20 °C.
. Contact with ambient air
change the water content.
to
VAISALA _______________________________________________________________________ 45
Page 48

User's Guide ______________________________________________________________________
[ ] [ ]
( ) ( )
1/1-2/1
1(-2(
TT
TPPM
LOGTPPMLOG
A
satsat
))
=
[ ]
)(
A/T1 - 1TPPMLOGB
sat
=
T (°C)
aw
ppm
24.1
0.478
213/0.478 = 445.6067
57.6
0.188
213/0.188 = 1132.979
3. Define the correlation between aw, T and PPM (w/w) from the
measured values. Calculate A and B according to the following
example.
Example (measured water content 213 ppm):
saturation
A = (LOG(1132.98)-LOG(445.607))/(1/(57.6+273.16)1/(24.1+273.16)) = -1189.4581
B= LOG(445.607)-(-1189.4581)/(24.1 + 273.16) = 6.6503583
Assumptions:
The isoterm of water activity versus water concentration is linear and the
solubility curve has the form of the given equation.
46 __________________________________________________________________ M210934EN-C
Page 49

Chapter 5 ______________________________________________________________ Maintenance
Do not immerse the sensor in any polar solvents, for example ketones
or alcohols.
CHAPTER 5
MAINTENANCE
This chapter provides information that is needed in basic maintenance of
the product.
Cleaning
Clean the transmitter enclosure with a soft. lint-free cloth moistened with
mild detergent.
Clean the sensor before storing the MMT162 probe and before
calibration. For cleaning the the probe you need instrument air and
heptane (C7H16) liquid. If heptane is not available, you can also use diesel
oil or petrol. Dry with instrument air to prevent oxidation of the oil on the
sensor. The oxidation of the oil on the sensor can cause extended
response times or drifting.
NOTE
1. Blow the probe head (with filter) with instrument air to remove the
remains of oil.
2. Immerse the probe head into heptane liquid and rinse out the oil
(for one minute maximum).
3. Dry the probe head with instrument air. In case you are going to
calibrate the probe, remove the filter and dry the sensor with
instrument air. Check that the sensor looks clean.
VAISALA _______________________________________________________________________ 47
Page 50

User's Guide ______________________________________________________________________
Changing the Filter
1. Remove the filter from the probe.
2. Install a new filter on the probe. When using the stainless steel
filter (for oil and fuel cell), take care to tighten the filter properly
(recommended force 130 Ncm).
New filters can be ordered from Vaisala, see section Spare Parts and
Accessories on page 61.
Changing the Sensor
If you need to change the sensor on your MMT162, send it to Vaisala
where the sensor will be changed for you.
Error States
MMT162 has the following states that indicate a problem with the probe:
- Analog 4 - 20 mA current output at 0 mA
- Analog voltage output at 0 V
- Serial line outputs asterisk characters (*** **)
The asterisk characters on the serial line may also appear during the startup procedure.
You can also check the error message via the serial interface by using the
ERRS command. In case of constant error, please contact Vaisala; see
section Technical Support on page 50.
48 __________________________________________________________________ M210934EN-C
Page 51

Chapter 5 ______________________________________________________________ Maintenance
Error Message
Action
Voltage error
Internal error or invalid supply voltage.
T meas error
Internal error, can be caused by
damage to the temperature sensor.
F meas error
Internal error, can be caused by
damage to the HUMICAP® sensor.
Voltage too low error
Supplied operating voltage is too low
for reliable operation.
Voltage too low for mA output
Supplied operating voltage is too low
current output.
Voltage is too low for V output
Supplied operating voltage is too low
voltage output.
Program flash check sum error
Internal error
Parameter check sum error
Internal error
INFOA check sum error
Internal error
SCOEFS check sum error
Internal error
CURRENT check sum error
Internal error
Table 9 Error Messages
for reliable operation of the analog
for reliable operation of the analog
Unknown Serial Settings
If you are not sure what the current serial settings of your transmitter are,
follow the steps below to connect to the transmitter. This procedure
assumes you have the USB service cable available.
For more information on the USB service cable and the PuTTY terminal
application, see section Serial Communication on page 22.
1. Connect the USB service cable to your PC, but do not connect it to
the transmitter yet.
2. Start a terminal application and open a terminal session using the
default serial settings of 19200 8 N 1.
3. Plug the USB service cable into the transmitter, and quickly send at
least one hash character # to the serial line:
#
4. The normal startup of the transmitter is now interrupted, and the
transmitter is available for commands with the default serial
settings. You can now check the transmitter’s information by
issuing the ? command:
?
The transmitter’s currently stored serial settings are visible on the
line marked Baud P D S.
VAISALA _______________________________________________________________________ 49
Page 52

User's Guide ______________________________________________________________________
Technical Support
For technical questions, contact the Vaisala technical support by e-mail at
helpdesk@vaisala.com. Provide at least the following supporting
information:
- Name and model of the product in question
- Serial number of the product
- Name and location of the installation site
- Name and contact information of a technically competent person who
can provide further information on the problem.
Product Returns
If the product must be returned for service, see www.vaisala.com/returns.
For contact information of Vaisala Service Centers, see
www.vaisala.com/servicecenters.
50 __________________________________________________________________ M210934EN-C
Page 53

Chapter 6 ___________________________________________________ Calibration and Adjustment
NOTE
It is important to clean the sensor before calibration as the oily
condition.
CHAPTER 6
CALIBRATION AND ADJUSTMENT
This chapter provides information that is needed in calibration and
adjustment of the product.
The MMT162 is fully calibrated and adjusted as shipped from factory.
The calibration interval depends on the application. It is recommended
that calibration is done always when there is a reason to believe that the
device is not within the accuracy specifications.
You can calibrate the MMT162 yourself or send it to Vaisala for
calibration. Calibration and adjustment is usually carried out through
serial line. One-point calibrations and adjustments can also be done by
using an MI70 indicator and Vaisala humidity calibrator HMK15.
Before the calibration, the used sensor needs to be cleaned with
instrument air to blow out existing oil or gently first flush with hepthane
(C7H16) and dry with instrument air to decrease response time, see
section Cleaning on page 47.
sensor can contaminate the salt bath and change the reference
Vaisala HUMICAP® hand-held moisture and temperature in oil meter
MM70 can also be used for calibration.
VAISALA _______________________________________________________________________ 51
Page 54

User's Guide ______________________________________________________________________
Make sure that both probes are stabilized to same conditions so that
the temperature readings are the same.
MM70 in Checking and Adjusting
MMT162 can be checked and adjusted by using the MM70. In the field
you can check and adjust the probe's reading against the calibrated
reference probe of the MM70.
To check the MMT162 transmitter with MM70:
1. Connect the MMT162 to the MM70 indicator with the appropriate
connection cable (Vaisala item 219980).
2. Turn on the MM70.
3. Prepare the probe for adjustment by opening the adjustment menu
on the MM70 (Menu → Functions → Adjustments)
NOTE
4. Press the OK key to start adjustment.
One-Point Relative Humidity Adjustment
Note that the humidity reference must be at least 50% RH. The MMT162
must be unpowered during stabilization which can take 30 minutes or
more.
Using Serial Line
To adjust the relative humidity:
1. Remove the filter from the probe and insert the probe into a
measurement hole of the dry end reference chamber (for example,
NaCl: 75 % RH in the humidity calibrator HMK15). Use the
adapter fitting.
2. Wait at least 30 minutes for the sensor to stabilize.
3. Connect the MMT162 to a PC, see section Serial Communication
on page 22. Then open a terminal program.
4. Enter the CRH command and press ENTER.
CRH
5. Type C and press ENTER a few times to check if the reading has
stabilized.
52 __________________________________________________________________ M210934EN-C
Page 55

Chapter 6 ___________________________________________________ Calibration and Adjustment
6. When the reading is stable, give the reference humidity after the
question mark and press ENTER.
crh
RH : 25.21 Ref1 ?
RH : 25.22 Ref1 ?
RH : 25.22 Ref1 ? 30.1
Press any key when ready ...
RH : 25.19 Ref2 ?
OK
7. OK indicates that the adjustment has succeeded and the new
calibration coefficients are calculated and stored.
8. Take the probe out of the reference conditions and replace the
filter.
Using MI70
To adjust the relative humidity:
1. Connect MI70 to MMT162.
2. Turn MI70 on.
3. On the MI70, go to Menu → Functions → Adjustments.
VAISALA _______________________________________________________________________ 53
Page 56

User's Guide ______________________________________________________________________
4. Follow the instructions given on the display.
5. Select RH from the list and press Select.
6. When adjusting relative humidity, you need to check the
environment settings before making the adjustment.
54 __________________________________________________________________ M210934EN-C
Page 57

Chapter 6 ___________________________________________________ Calibration and Adjustment
7. In adjustment mode, enter the correct reference value and then exit
by pressing Back.
VAISALA _______________________________________________________________________ 55
Page 58

User's Guide ______________________________________________________________________
One-Point Temperature Adjustment
The MMT162 must be unpowered during stabilization which can take 30
minutes or more.
Using Serial Line
1. Remove the probe filter and insert the probe into the reference
temperature.
2. Enter the command CT and press ENTER:
CT<cr>
3. Type C and press ENTER a few times to check if the reading is
stabilized. Let the reading stabilize, give the reference temperature
after the question mark and press ENTER three times.
Example:
ct
T : 22.03 Ref1 ?
T : 22.03 Ref1 ?
T : 22.03 Ref1 ? 25.0
Press any key when ready ...
T : 22.02 Ref2 ?
OK
4. OK indicates that the calibration has succeeded.
5. Take the probe out of the reference conditions and replace the
filter.
56 __________________________________________________________________ M210934EN-C
Page 59

Chapter 6 ___________________________________________________ Calibration and Adjustment
Using MI70
To adjust temperature:
1. Connect MI70 to MMT162 via connector II.
2. Turn on MI70.
3. On the MI70 display, go to Menu → Functions → Adjustments.
4. Follow the instructions given on the MI70 display.
5. Select T from the list and press Select.
VAISALA _______________________________________________________________________ 57
Page 60

User's Guide ______________________________________________________________________
6. Select 1-point adjustment and press Select.
7. In adjustment mode, enter the correct reference value and then exit
by pressing Back.
8. After you have exited the adjustment mode, MI70 confirms it by
displaying the message below.
Analog Output Adjustment
In the analog output calibration the analog output is forced to the
following values:
- current output: 2 mA and 18 mA
- voltage output: 10 % and 90 % of the range
Connect MMT162 to a calibrated current/voltage meter in order to
measure either current or voltage depending on the selected output type.
To calibrate analog output, see section Calibrate Analog Output on page
34.
58 __________________________________________________________________ M210934EN-C
Page 61

Chapter 7 ____________________________________________________________ Technical data
CHAPTER 7
TECHNICAL DATA
This chapter provides the technical data of the product.
Measured Parameters
Water activity
Measurement range 0 ... 1 (@-40 ... +180 °C/ -40 ... +356 °F
Accuracy (including non-linearity, hysteresis and repeatability)
When calibrated against salt solutions (ASTM E104-85):
0 ... 0.9 ± 0.02
0.9 ... 1.0 ± 0.03
Response time in oil flow (typical)
with stainless steel filter < 1 min. (dry-wet)
Sensor HUMICAP®
Temperature
Measurement range -40 ... +80 °C (-40 ... +176 °F)
Accuracy at +20 °C (+68 °F) ± 0.2 °C (± 32.36 °F)
Typical temperature dependence of
electronics ± 0.005 °C/°C (± 0.003 °F/°F)
Sensor Pt100 RTD Class F0.1 IEC 60751
)
VAISALA _______________________________________________________________________ 59
Page 62

User's Guide ______________________________________________________________________
Operating Environment
Operating temperature -40 ... +60 °C (40 ... +140°F)
Pressure range
metal version up to 200 bar
plastic version up to 40 bar
Complies with EMC standard EN61326-1: Industrial environment
Oil flow some flow recommended
Inputs and Outputs
Minimum operating voltage
with current output 22…28 VDC
with voltage output 16…28 VDC
with RS-485 14…28 VDC
Supply current
normal measurement 20 mA + load current
External load for
current output max. 500 Ω
voltage output min. 10 kΩ
Analog outputs (2 standard)
current output 0 ... 20 mA, 4 ... 20 mA
voltage output 0 ... 5 V, 0 ... 10 V
Accuracy of analog outputs at 20 °C ± 0.05 % full scale
Temperature dependence of the analog outputs
current ± 0.005 %/°C full scale
voltage
Digital output RS-485
Mechanics
Interface cable connector M8 series 4-pin (male) with plug
Probe cable diameter 5.5 mm
Probe cable lengths
shielded cables 0.32 m, 3 m, 5 m and 10 m
90° angle cable 2 m and 5 m
LED cable 3 m
Housing material
metal AISI 316L
plastic PPS + 40% GF
Housing classification IP 65 (NEMA 4)
Mechanical connections
Option 1 ISO G1/2"
Option 2 NPT 1/2"
Weight
Metal with ISO thread 200 g
Metal with NPT thread 200 g
Plastic with ISO thread 65 g
(female) with straight or 90° angle
connector
60 __________________________________________________________________ M210934EN-C
Page 63

Chapter 7 ____________________________________________________________ Technical data
Description
Order code
Connection cable for MM70
219980
USB serial interface cable
219690
CH1 signal + Ch2 LED cable, M8 threaded
connector
MP300LEDCBL
Sealing ring set (copper) ISO G1/2, 3 pieces
221524SP
Sealing ring set (U-seal) ISO G1/2, 3 pieces
221525SP
Protection plug for connector
218675
ISO 1/2" plug
218773
NPT 1/2" plug
222507
110 … 240 VAC external power supply
POWER-1
Calibration adapter for HMK15
211302SP
Filters
Stainless steel grid filter (with 3 mm holes)
225356SP
Stainless steel grid filter for high flow
(with 2 mm holes, for > 1 m/s flow)
221494SP
Analog/RS-485 output cables
0.32 m (1 ft) shielded cable, M8 threaded
connector
HMP50Z032
3 m (9.8 ft) shielded cable, M8 threaded
connector
HMP50Z300
5 m (16.4 ft) shielded cable, M8 threaded
connector
HMP50Z500
10 m (32.8 ft) shielded cable, M8 threaded
connector
HMP50Z1000
2 m (9.8 ft) cable, 90° angle connector
221739
5 m (16.4 ft) cable, 90° angle connector
221740
Sampling cells (available only for ISO
G1/2")
Sampling cell
DMT242SC
Sampling cell with 1/4" male Swagelok
connectors
DMT242SC2
Spare Parts and Accessories
VAISALA _______________________________________________________________________ 61
Page 64

User's Guide ______________________________________________________________________
Dimensions in mm (inches)
0804-084
Figure 13 Metal Housing Transmitter Dimensions
62 __________________________________________________________________ M210934EN-C
Page 65

Chapter 7 ____________________________________________________________ Technical data
0804-085
Figure 14 Plastic Housing Transmitter Dimensions
VAISALA _______________________________________________________________________ 63
Page 66

*M210934EN*
www.vaisala.com
 Loading...