

M211501EN-E
User Guide
Carbon dioxide probe for CO2 incubators
GMP231

PUBLISHED BY
Vaisala Oyj
Vanha Nurmijärventie 21, FI-01670 Vantaa, Finland
P.O. Box 26, FI-00421 Helsinki, Finland
+358 9 8949 1
Visit our Internet pages at www.vaisala.com.
© Vaisala 2020
No part of this document may be
reproduced, published or publicly
displayed in any form or by any means,
electronic or mechanical (including
photocopying), nor may its contents be
modified, translated, adapted, sold or
disclosed to a third party without prior
written permission of the copyright holder.
Translated documents and translated
portions of multilingual documents are
based on the original English versions. In
ambiguous cases, the English versions are
applicable, not the translations.
The contents of this document are subject
to change without prior notice.
Local rules and regulations may vary and
they shall take precedence over the
information contained in this document.
Vaisala makes no representations on this
document’s compliance with the local
rules and regulations applicable at any
given time, and hereby disclaims any and
all responsibilities related thereto.
This document does not create any legally
binding obligations for Vaisala towards
customers or end users. All legally binding
obligations and agreements are included
exclusively in the applicable supply
contract or the General Conditions of Sale
and General Conditions of Service of
Vaisala.
This product contains software developed
by Vaisala or third parties. Use of the
software is governed by license terms and
conditions included in the applicable
supply contract or, in the absence of
separate license terms and conditions, by
the General License Conditions of Vaisala
Group.

Table of contents
Table of contents
1. Commands......................................................................................................... 7
1.1 Version information.......................................................................................... 7
1.2 Related manuals................................................................................................7
1.3 Documentation conventions............................................................................7
1.4 Trademarks........................................................................................................8
1.5 Patent notice..................................................................................................... 8
2. Product overview............................................................................................ 9
2.1 Introduction to GMP231....................................................................................9
2.2 Basic features and options.............................................................................10
2.3 GMP231 parts.....................................................................................................11
2.4 Operating principle of CO2 measurement....................................................12
2.5 Environmental compensation........................................................................13
2.5.1 Pressure compensation...........................................................................14
2.5.2 Temperature compensation ...................................................................14
2.5.3 Background gas compensations............................................................14
2.6 Probe startup...................................................................................................14
2.7 Analog output overrange behavior...............................................................15
2.8 Safety................................................................................................................15
2.8.1 ESD protection......................................................................................... 16
2.9 Regulatory compliances................................................................................. 16
3. Installation........................................................................................................ 17
3.1 Thermal management.....................................................................................17
3.2 Avoiding condensation................................................................................... 17
3.3 Probe installation depth................................................................................. 17
3.4 Dimensions.......................................................................................................18
3.5 Recommended installation...........................................................................20
3.6 Wiring...............................................................................................................22
3.7 Power supply...................................................................................................23
4. Vaisala Industrial Protocol........................................................................ 24
4.1 Overview of Vaisala Industrial Protocol.......................................................24
4.2 Serial interface settings................................................................................. 24
4.3 Physical interface............................................................................................24
4.4 Connecting with a computer........................................................................ 24
4.4.1 Installing driver for the USB service cable........................................... 25
4.4.2 Connecting to probe...............................................................................26
4.5 Serial commands............................................................................................ 27
4.6 Device information and status......................................................................29
4.7 Serial line output commands......................................................................... 31
4.8 Changing measurement settings..................................................................35
4.9 Configuring serial line operation.................................................................. 38
4.10 Calibration commands.................................................................................. 40
4.11 Configuring analog output........................................................................... 44
4.12 Other commands............................................................................................47
1

GMP231 User Guide M211501EN-E
5. I2C interface....................................................................................................50
5.1 Overview of I2C interface.............................................................................. 50
5.1.1 Physical interface....................................................................................50
5.1.2 Communication parameters..................................................................50
5.1.3 Addressing...............................................................................................50
5.1.4 Timing........................................................................................................ 51
5.1.5 Status byte................................................................................................ 51
5.1.6 Checksum.................................................................................................52
5.1.7 Status word..............................................................................................52
5.2 Commands...................................................................................................... 54
5.2.1 Get_Interface_Version .......................................................................... 54
5.2.2 Get_Parameter........................................................................................ 55
5.2.3 Set_Parameter.........................................................................................57
5.2.4 Get_Parameter_Info............................................................................... 59
5.2.5 Adjust.........................................................................................................61
5.3 Adjusting measurement................................................................................ 63
5.3.1 1-point adjustment ................................................................................. 63
5.3.2 2-point adjustment................................................................................. 63
5.4 Data registers..................................................................................................64
5.4.1 Data formats............................................................................................ 64
5.4.2 Register table.......................................................................................... 64
6. Maintenance....................................................................................................69
6.1 Cleaning...........................................................................................................69
6.1.1 Chemical tolerance................................................................................. 69
6.2 Changing the filter......................................................................................... 69
6.3 Changing the silicone plug............................................................................70
6.4 Calibration and adjustment............................................................................ 71
6.4.1 Calibration setup...................................................................................... 71
6.4.2 Eect of environmental compensations.............................................. 73
6.4.3 Limits of adjustment............................................................................... 73
6.4.4 Adjustment types ...................................................................................73
7. Operating with MI70 indicator................................................................75
7.1 Overview of MI70 support.............................................................................75
7.2 Connecting GMP231 to MI70 Indicator.........................................................75
7.3 Changing environmental compensation settings with MI70 indicator....75
7.4 Calibration and adjustment with MI70 indicator........................................ 77
7.4.1 1-point adjustment with an MI70-compatible reference probe.........77
7.4.2 1-point adjustment with a reference gas..............................................79
8. Troubleshooting............................................................................................. 81
8.1 Problem situations...........................................................................................81
8.2 Analog output error state...............................................................................81
9. Technical data................................................................................................83
9.1 GMP231 specifications....................................................................................83
9.2 Spare parts and accessories..........................................................................85
2

Table of contents
Online store.......................................................................................................87
Warranty............................................................................................................ 87
Technical support............................................................................................ 87
Recycling........................................................................................................... 87
3

GMP231 User Guide M211501EN-E
List of figures
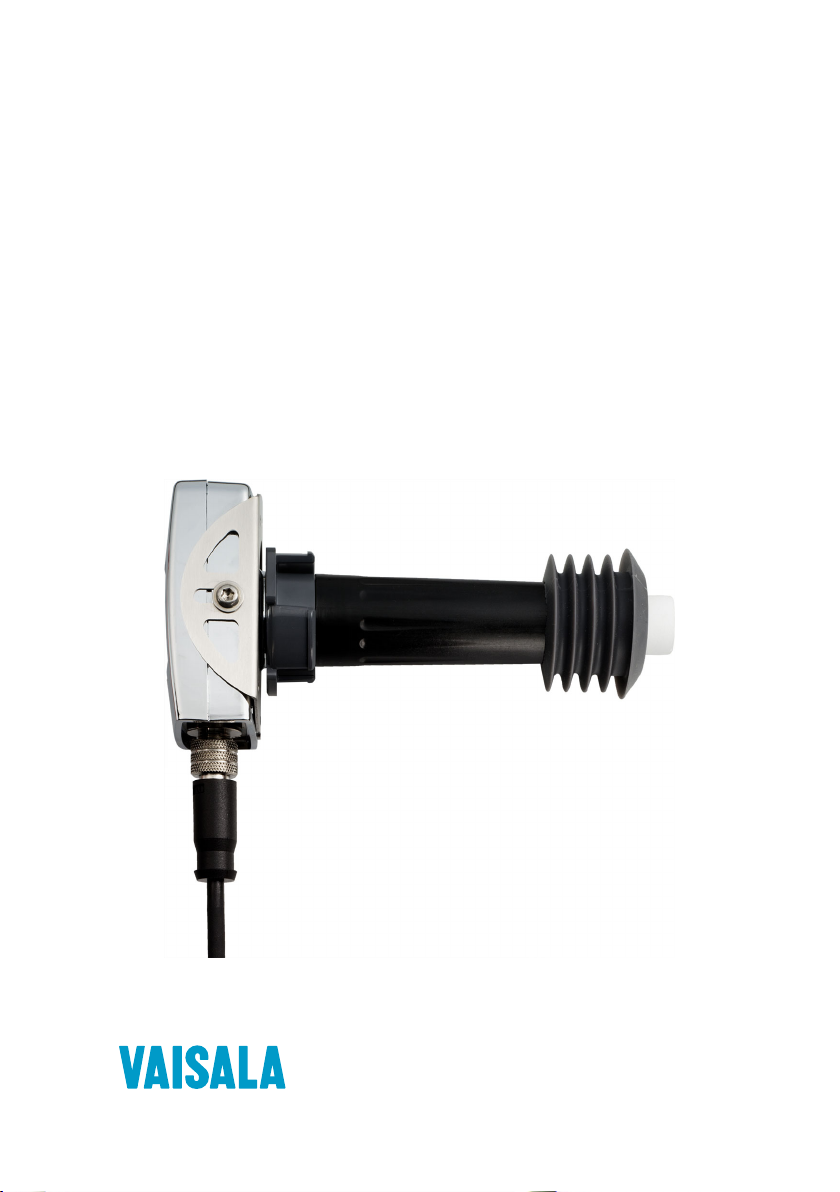
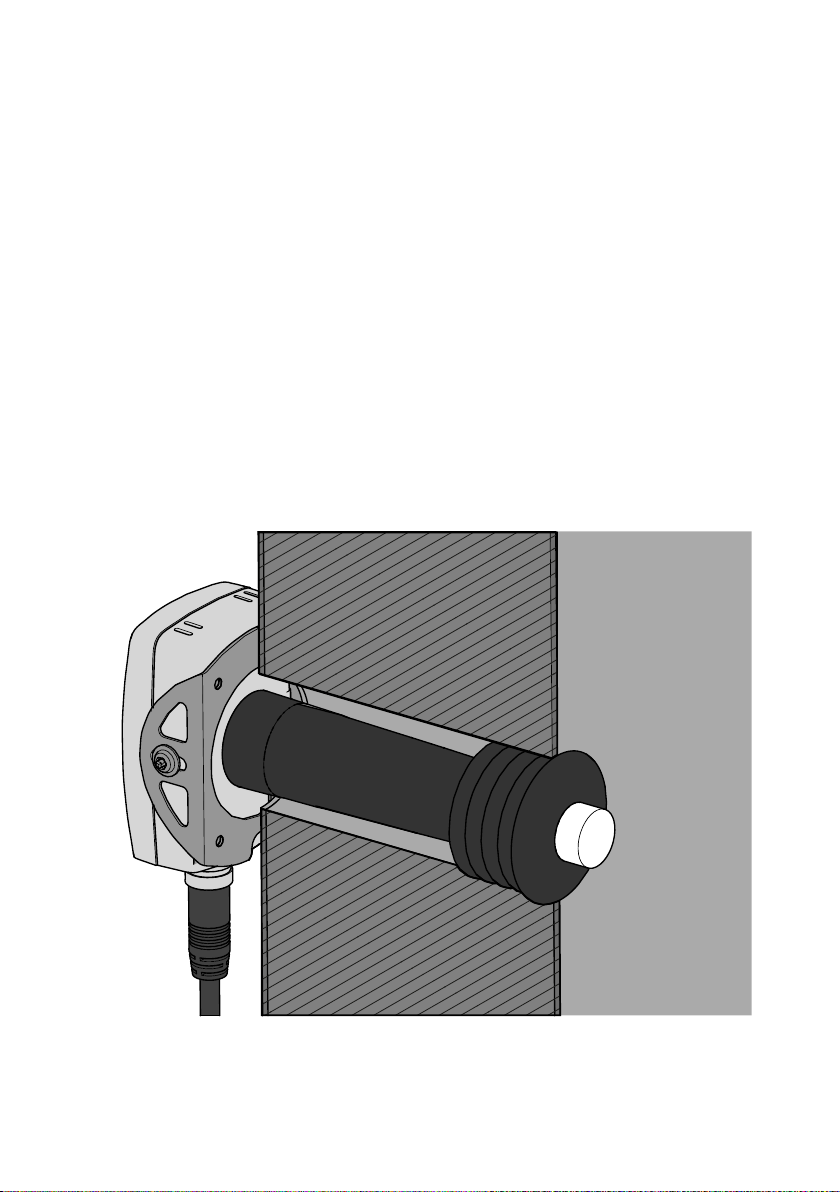
Figure 1 GMP231 installed through a chamber wall.................................................. 9
Figure 2 GMP231 parts.......................................................................................................11
Figure 3 CARBOCAPâ sensor of the GMP231........................................................... 12
Figure 4 CO2 measurement inside the incubator......................................................13
Figure 5 Probe installation depth..................................................................................18
Figure 6 Probe dimensions without silicone plug.................................................... 18
Figure 7 Probe dimensions with silicone plug...........................................................19
Figure 8 Electronics housing dimensions................................................................... 19
Figure 9 Attachment bracket dimensions.................................................................20
Figure 10 Recommended installation............................................................................ 21
Figure 11 PuTTY terminal application...........................................................................27
Figure 12 Hardware schematic.......................................................................................50
Figure 13 Changing the filter...........................................................................................70
Figure 14 Changing the silicone plug.............................................................................71
Figure 15 Inserting the calibration adapter over the filter.......................................72
Figure 16 CO2 reading on MI70 screen......................................................................... 75
Figure 17 CO2 reading with Tcomp and Pcomp on MI70 screen...........................76
Figure 18 GMP231 compensation settings on MI70 screen.....................................76
4

List of tables
Table 1 Document versions (English)...........................................................................7
Table 2 Related manuals.................................................................................................. 7
Table 3 Applicable patents..............................................................................................8
Table 4 GMP231 connector pinout...............................................................................22
Table 5 Cable ....................................................................................................................23
Table 6 Default serial interface settings....................................................................24
Table 7 Basic serial commands.................................................................................... 27
Table 8 Advanced serial commands...........................................................................28
Table 9 ? Command........................................................................................................ 29
Table 10 SNUM command............................................................................................... 29
Table 11 VERS command................................................................................................ 30
Table 12 SYSTEM command...........................................................................................30
Table 13 TIME command................................................................................................. 30
Table 14 HELP command.................................................................................................30
Table 15 R command......................................................................................................... 31
Table 16 S command.........................................................................................................32
Table 17 INTV command..................................................................................................32
Table 18 SEND command................................................................................................ 32
Table 19 FORM command................................................................................................33
Table 20 Output commands for FORM command....................................................34
Table 21 Modifiers for FORM command...................................................................... 35
Table 22 Compensation mode commands................................................................. 35
Table 23 ENV command...................................................................................................36
Table 24 STANDBY command........................................................................................ 38
Table 25 SMODE command.............................................................................................38
Table 26 SERI command.................................................................................................. 39
Table 27 ADDR command............................................................................................... 39
Table 28 SDELAY command...........................................................................................40
Table 29 ECHO command............................................................................................... 40
Table 30 CCO2 command................................................................................................40
Table 31 CDATE command...............................................................................................41
Table 32 CTEXT command.............................................................................................. 42
Table 33 CT command......................................................................................................42
Table 34 CP command......................................................................................................43
Table 35 ASEL command.................................................................................................44
Table 36 AMODE command............................................................................................44
Table 37 AOVER command.............................................................................................45
Table 38 ATEST command..............................................................................................46
Table 39 PASS command................................................................................................. 47
Table 40 OPEN command................................................................................................47
Table 41 CLOSE command..............................................................................................47
Table 42 ERRS command................................................................................................ 48
Table 43 RESET command.............................................................................................. 48
Table 44 FRESTORE command......................................................................................49
Table 45
GMP231 I2C Address..........................................................................................51
List of tables
5

GMP231 User Guide M211501EN-E
Table 46 GMP231 Device Address...................................................................................51
Table 47 Timing................................................................................................................... 51
Table 48 Status Byte..........................................................................................................52
Table 49 Status word content.........................................................................................53
Table 50 Get_Interface_Version invoke message.....................................................54
Table 51 Get_Interface_Version response message................................................55
Table 52 Get_Parameter invoke message...................................................................55
Table 53 Get_Parameter response message..............................................................56
Table 54 Read CO2 measurement sequence example.............................................56
Table 55 Set_Parameter invoke message....................................................................57
Table 56 Set_Parameter response message.............................................................. 58
Table 57 Set_Parameter return codes..........................................................................58
Table 58 Set compensation temperature sequence example............................... 59
Table 59 Get_Parameter_Info invoke message........................................................ 60
Table 60 Get_Parameter_Info response message................................................... 60
Table 61 Parameter data types......................................................................................60
Table 62 Parameter persistence......................................................................................61
Table 63 Adjust invoke message.....................................................................................61
Table 64 Adjust response message................................................................................61
Table 65 Adjustment subcommands............................................................................62
Table 66 Adjustment parameters..................................................................................62
Table 67 Adjustment return codes................................................................................62
Table 68 Data formats...................................................................................................... 64
Table 69 GMP231 register table......................................................................................64
Table 70 Possible problem situations and their remedies.......................................81
Table 71 Measurement performance............................................................................83
Table 72 Operating environment...................................................................................84
Table 73 Inputs and outputs...........................................................................................84
Table 74 Mechanical specifications...............................................................................85
Table 75 Spare parts and accessories for GMP231....................................................85
6

Chapter 1 – Commands
1. Commands
1.1 Version information
This document provides information for installing, operating, and maintaining the Vaisala
CARBOCAPâ Carbon Dioxide Probe GMP231.
Table 1 Document versions (English)
Document code Date Description
M211501EN-E April 2020 • Corrected initial CRC calculation value in section
M211501EN-D December 2014 Applicable from software version 1.1.0 onward.
M211501EN-C May 2014 Updated description for ENV command in section
1.2 Related manuals
Checksum (page 52)
• Updated examples in sections Get_Parameter
(page 55) and Set_Parameter (page 57)
• Updated section GMP231 specifications (page 83)
• Updated document to new visual appearance
Updated section Status word (page 52).
Changing measurement settings (page 35).
Table 2 Related manuals
Document code Name
M211603EN GMP231 Quick Guide
1.3 Documentation conventions
WARNING!
follow instructions carefully at this point, there is a risk of injury or even death.
CAUTION!
follow instructions carefully at this point, the product could be damaged or
important data could be lost.
Warning alerts you to a serious hazard. If you do not read and
Caution warns you of a potential hazard. If you do not read and
7

GMP231 User Guide M211501EN-E
Note highlights important information on using the product.
Tip gives information for using the product more eciently.
Lists tools needed to perform the task.
Indicates that you need to take some notes during the task.
1.4 Trademarks
CARBOCAPâ is a registered trademark of Vaisala Oyj.
All other product or company names that may be mentioned in this publication are trade
names, trademarks, or registered trademarks of their respective owners.
1.5
Patent notice
This product is protected by the following patents and their corresponding national rights:
Table 3 Applicable patents
Patent issued by Patent number
United States Patent and Trademark Oce US 5,827,438
US 6,177,673
European Patent Oce EP0776023
EP0922972
German Patent and Trade Mark Oce 69615635
Japan Patent Oce 4263285
Finnish Patent Oce 112005
105598
8
Chapter 2 – Product overview
2. Product overview
2.1 Introduction to GMP231
Vaisala CARBOCAPâ Carbon Dioxide Probe GMP231 is designed for incubator manufacturers
requiring accurate and reliable carbon dioxide measurements and sterilization durability at
high temperatures.
GMP231 probe is based on patented Vaisala CARBOCAPâ technology and a new type of infrared light source. The probe can remain in place during high-temperature sterilization cycles
that heat the chamber interior to +180 °C. Special design of the probe enables easy installation
through the incubator wall and ensures that the sensor optics and electronics are separated
and thermally insulated.
Sensor performance is optimized at 5 %CO2 measurement. GMP231 also has an internal
pressure sensor, which allows compensation of the measurement according to ambient
pressure. Since dust and most chemicals do not aect the measurement, and the eect of
water vapor can be compensated for, GMP231 is accurate and stable at CO2 incubator
conditions.
Figure 1 GMP231 installed through a chamber wall
9

GMP231 User Guide M211501EN-E
2.2 Basic features and options
• CO2 measurement range 0 … 20 %CO2.
• Temperature durability in standby mode up to +195 °C (+383 °F).
• Vaisala CARBOCAPâ CO2 sensor with excellent long-term stability.
• Measurement compensated for eects of pressure, temperature, and background gas.
Pressure compensation based on integrated pressure sensor.
• Heating to avoid condensation on optical elements.
• Analog output: one current output channel (0 … 20 mA or 4 … 20 mA).
• Digital output:
• I2C.
• RS-485 (non-isolated) with Vaisala Industrial Protocol.
More information
‣
Operating principle of CO2 measurement (page 12)
‣
Environmental compensation (page 13)
‣
Thermal management (page 17)
10

3
2
4
1
5
6
7
8
Chapter 2 – Product overview
2.3 GMP231 parts
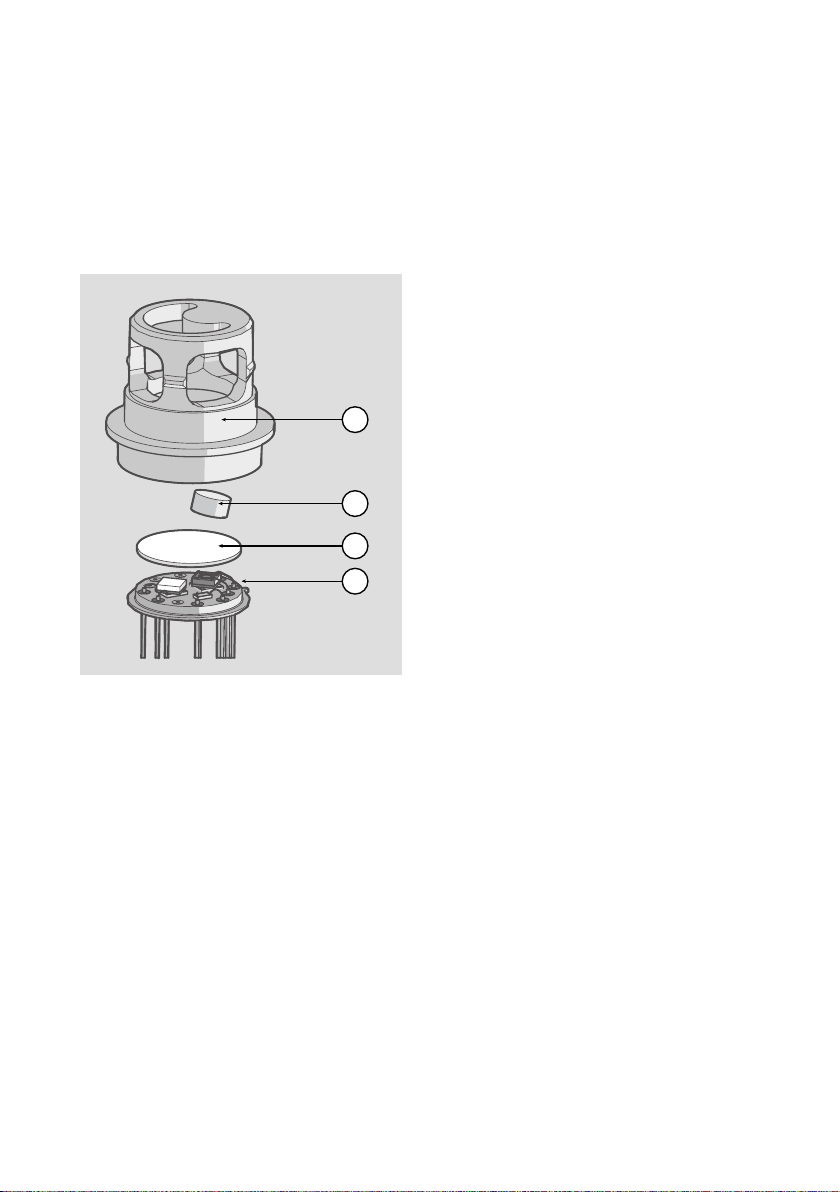
Figure 2 GMP231 parts
1 Electronics housing. Contains the main component board, including the digital pressure
sensor.
2 Holes for M4 screws on both sides of the housing. Maximum screw depth 8 mm. Two
screws included, type BN 10649 M4.
3 Type label on housing cover (not shown).
4 8-pin M12 connector.
5 Probe body.
6 Measurement cuvette with optics and CARBOCAPâ CO2 sensor.
7 PTFE filter.
8 Silicone plug for sealing the lead-through. Recommended accessory, suitable for
∅ 44 mm lead-throughs.
CAUTION!
parts inside. All wiring is done through the M12 connector (4).
More information
‣
Wiring (page 22)
Do not open the electronics housing; there are no user serviceable
11
2
3
4
1
GMP231 User Guide M211501EN-E
2.4 Operating principle of CO2 measurement
Vaisala CARBOCAPâ sensor used in the GMP231 is a silicon-based, non-dispersive infrared
(NDIR) sensor for the measurement of gaseous carbon dioxide. It is especially designed to
tolerate high temperatures in standby mode, up to +195 °C (+383 °F). This allows it to be used
in applications that utilize high temperature for heat sterilization. The operating temperature
range of the sensor is 0 … +70 °C (+32 ... +158 °F).
Figure 3 CARBOCAPâ sensor of the
GMP231
1 Cuvette
2 Mirror
3 Window
4 Sensor chips
The sensitivity to carbon dioxide is based on absorption of infrared light at a characteristic
wavelength. The light is emitted by a novel, silicon-based microchip emitter into the cuvette
which contains the gas to be measured. After reflection from the mirror, the light intensity is
measured with a thermopile chip at a wavelength chosen by a micromechanical Fabry–Pérot
interferometer (FPI) and a band pass filter. A hermetically sealed sapphire window is used to
protect the sensor chips from moisture and contamination. A heater chip is utilized to prevent
condensation in normal operation.
The carbon dioxide measurement consists of two steps: First, the FPI is electrically tuned so
that its pass band coincides with the characteristic absorption wavelength of carbon dioxide
and the signal is recorded. Second, the pass band is shifted to a wavelength where no
absorption occurs in order to get a reference signal. The ratio of these two signals, one at the
absorption wavelength and the other at the reference wavelength, gives the fraction of light
absorption from which the carbon dioxide concentration is calculated. The reference signal
compensates the possible eects of sensor aging and signal attenuation due to dirt on optical
surfaces, making the sensor very stable over time.
12
1
2
3 4
5
6
7
8
9 10
Chapter 2 – Product overview
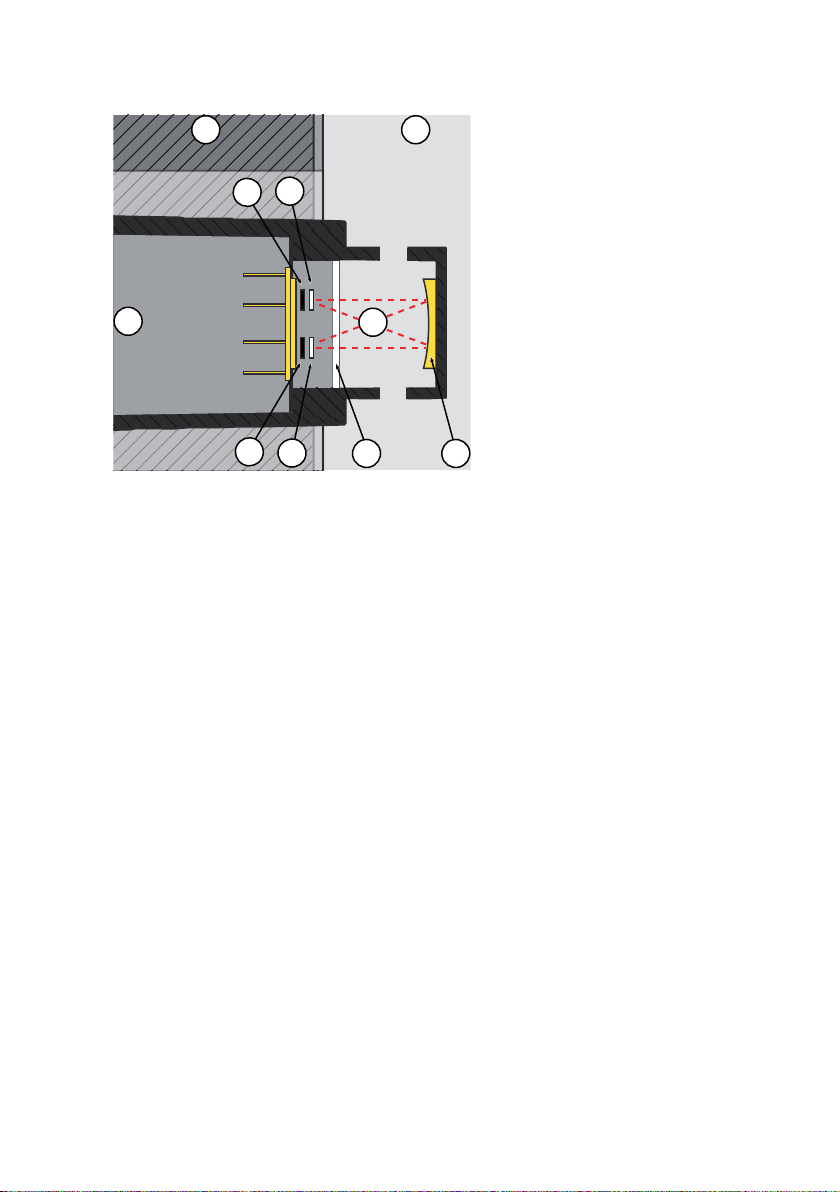
Figure 4 CO2 measurement inside the incubator
1 Chamber wall
2 Chamber interior
3 Light source
4 Band pass filter
5 Ambient air (400 … 1000 ppm CO2)
6 Light absorbed by CO2 in the incubator gas
7 Thermopile detector
8 Fabry-Perot interferometer
9 Sapphire window. Separates the sensor’s active components from the
measured environment.
10 Gold-plated mirror
2.5 Environmental compensation
GMP231 improves the CO2 measurement accuracy by applying various environmental
compensations. GMP231 compensates for the eects of:
• Pressure
• Temperature
• Background gas oxygen (O2) content
• Background gas relative humidity (%RH)
Compensation parameters are configured on the order form when ordering the probe, and can
later be updated using serial commands, MI70 Indicator, or I2C protocol. If the probe is
integrated in a system that measures one or more of the compensation parameters, they can
be updated to the probe continuously.
13

GMP231 User Guide M211501EN-E
You can also turn o any of the compensations. In that case, GMP231 uses the default
compensation value that is mathematically neutral for the probe’s internal compensation
model.
For more information on the eect of the compensations on measurement accuracy, see
GMP231 specifications (page 83).
2.5.1 Pressure compensation
There is a pressure sensor on the component board of the GMP231 that provides a live
measurement of ambient pressure. GMP231 can compensate the CO2 measurement based on
this pressure reading, or it can use a fixed setpoint. Using the GMP231’s own sensor is
recommended for most applications.
If pressure compensation is turned o, GMP231 uses the default compensation value of 1013.2
hPa.
2.5.2 Temperature compensation
GMP231 can measure the approximate temperature of the CARBOCAPâ sensor for
compensation, or use a fixed setpoint. The temperature measurement is accurate enough to be
useful for compensation, and is recommended for use unless a dedicated temperature
measurement is available and can be regularly updated to the GMP231.
If temperature compensation is turned o, GMP231 uses the default value of +37 °C (+98.6 °F).
2.5.3 Background gas compensations
Compensation for background gas parameters are based on setpoint values only, as GMP231
has no internal measurement for oxygen concentration or humidity. The default setpoint
values are as follows:
• Oxygen concentration: 19.7 %O
• Relative humidity: 93 %RH
If background gas compensations are turned o, GMP231 uses the value 0% for both.
2
2.6
Probe startup
When powered on, GMP231 starts up within 10 seconds. Measurements from the outputs
(digital and analog) become available during this time but note that they only reach specified
accuracy after a one minute warm-up period. For this reason, you should design the
incubator’s control system so that it does not rely on measurements from GMP231 during this
time.
Specifically note that the CO2 reading rises to the correct reading as the sensor's
infrared emitter achieves operation temperature.
14
Chapter 2 – Product overview
2.7 Analog output overrange behavior
Analog output of the GMP231 has a defined behavior when the values measured by the probe
are outside the scaled analog output range:
• Output is allowed to go 10% over the scaled range.
• Output is set to error state when measured value is more than 10% outside the scaled
range.
• Output resumes normal function when measured value returns to within 10% of the
selected range.
For example, consider a GMP231 with 0 ... 20 mA analog output, scaled to 0 ... 10 %CO2.
• When measured CO2 rises above 10 %CO2, the output rises above 20 mA.
• The output keeps rising until the measurement is 11 %CO2, at which point the probe
outputs 22 mA.
• If the CO2 level rises above 11 %CO2, the output enters the error state, which is 23 mA for
the 0 ... 20 mA output.
This overrange and error state behavior is specific to the analog output, and does
not aect the readings provided by the digital outputs.
You can change the analog output overrange behavior using the
More information
‣
Analog output error state (page 81)
2.8
Safety
The probe delivered to you has been tested for safety and approved as shipped from the
factory. Note the following precautions:
WARNING!
has not been exposed to dangerous contamination, and is safe to handle
without special precautions.
CAUTION!
documentation. Improper modification or use may lead to safety hazards,
equipment damage, failure to perform according to specification, or decreased
equipment lifetime.
When returning a product for calibration or repair, make sure it
Do not modify the unit or use it in ways not described in the
AOVER command.
15

GMP231 User Guide M211501EN-E
CAUTION!
serviceable parts inside the probe body.
Do not attempt to open the probe body. There are no user
2.8.1 ESD protection
Electrostatic Discharge (ESD) can damage electronic circuits. Vaisala products are adequately
protected against ESD for their intended use. However, it is possible to damage the product by
delivering electrostatic discharges when touching, removing, or inserting any objects in the
equipment housing.
To avoid delivering high static voltages to the product:
• Handle ESD‑sensitive components on a properly grounded and protected ESD workbench
or by grounding yourself to the equipment chassis with a wrist strap and a resistive
connection cord.
• If you are unable to take either precaution, touch a conductive part of the equipment
chassis with your other hand before touching ESD‑sensitive components.
• Hold component boards by the edges and avoid touching component contacts.
2.9
Regulatory compliances
The probe is in conformity with the provisions of the following EU directives:
• EMC-Directive
• RoHS-Directive
The conformity is declared with using the following standards:
• EN 50581: Technical documentation for the assessment of electrical and electronic
products with respect to the restriction of hazardous substances.
• EN 61326-1: Electrical equipment for measurement, control, and laboratory use – Immunity
requirements for equipment to be used in a basic EMC environment.
• EN 55032: Class B. Electromagnetic compatibility of multimedia and information
technology equipment – Emission requirements.
16

Chapter 3 – Installation
3. Installation
3.1 Thermal management
GMP231 is designed to remain installed during typical heat sterilization cycles that raise the
chamber temperature to 180 °C (356 °F). Since 180 °C is the target temperature for
sterilization, it is likely that there are hotspots inside the chamber that are above this
temperature. Avoid installing the GMP231 near such hotspots, for example near heating
elements. Do not expose the GMP231 to temperatures higher than 195 °C / 383 °F.
The following considerations are most important for achieving the specified heat durability
and measurement stability:
• Only the sensor and its filter should be exposed to heat. The filter must be completely in
the heated chamber. The probe body must remain inside the unheated chamber wall so
that only the end of the probe body extends exactly 2.5 mm into the chamber.
• During the sterilization cycle, you must set the GMP231 to standby mode (turns o the
CO2 measurement), or power o the probe completely. The GMP231 automatically stops
its measurement cycle if it detects a high temperature, but it is best if the incubator’s
control system sets the GMP231 to standby mode when the sterilization cycle is started.
• The installation tube must be sealed from the chamber side to limit heat conduction, and
to prevent CO2 in the chamber from entering the probe. Vaisala recommends a 44 mm
diameter installation tube together with Vaisala’s silicone plug.
• If the chamber wall contains heating elements, or has a construction where hot air is
circulated inside the wall, design the installation tube so that excessive heat is not
conducted to the GMP231.
3.2
Avoiding condensation
The sensor head of the GMP231 is heated during normal operation, which prevents
condensation from forming inside the filter and on the optical surfaces. The heating is not on
when GMP231 is in standby mode or unpowered. For this reason, keep the probe powered and
operating when the incubator is in use and humidity inside the chamber is high.
Correct installation depth of the probe is also important for preventing condensation from
running to the sensor along the chamber wall.
3.3
Probe installation depth
GMP231 must be installed so that only the sensor element and the filter are inside the chamber.
If the probe is longer than the installation tube, the extra length should extend to the outside
of the chamber.
The installation depth must be 2.5 mm. This installation depth provides the specified heat
durability of the probe, and allows the silicone plug to seal the Ø 44 mm installation tube
properly.
17

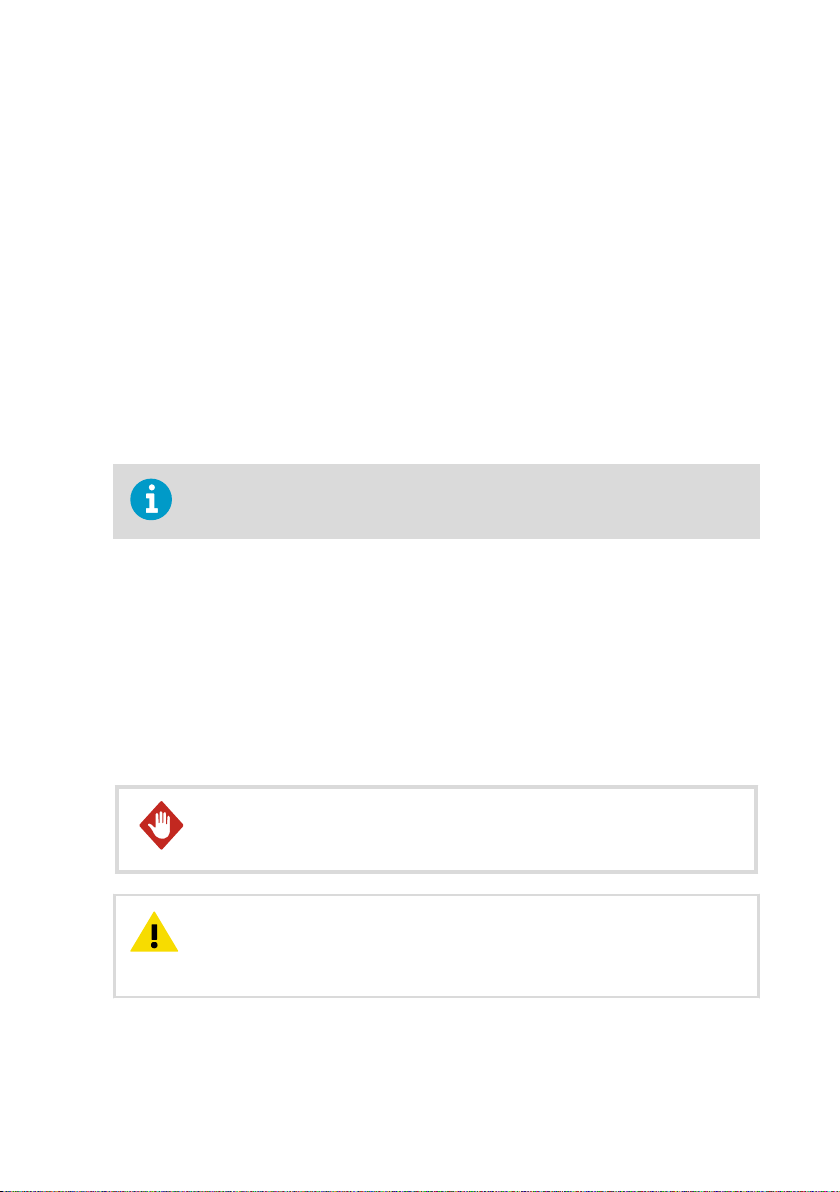
2.5 mm
163
118.5
Screw BN 10649 M4 x 8 mm
(for 1 mm thick sheet metal
attachment)
1121
Ø 30.2
1.3°
Ø 19
Ø 24.8
Position only the filter
inside the heated chamber
GMP231 User Guide M211501EN-E
Figure 5 Probe installation depth
3.4
Dimensions
Figure 6 Probe dimensions without silicone plug
18
163
118.5
Screw BN 10649 M4 x 8 mm
(for 1 mm thick sheet metal
attachment)
1121
Ø 30.2
Ø 19
2.5
Incubator’s inner wall
1.3°
Position only the filter
inside the heated chamber
Recommended
diameter for
installation tube
44 mm
Figure 7 Probe dimensions with silicone plug
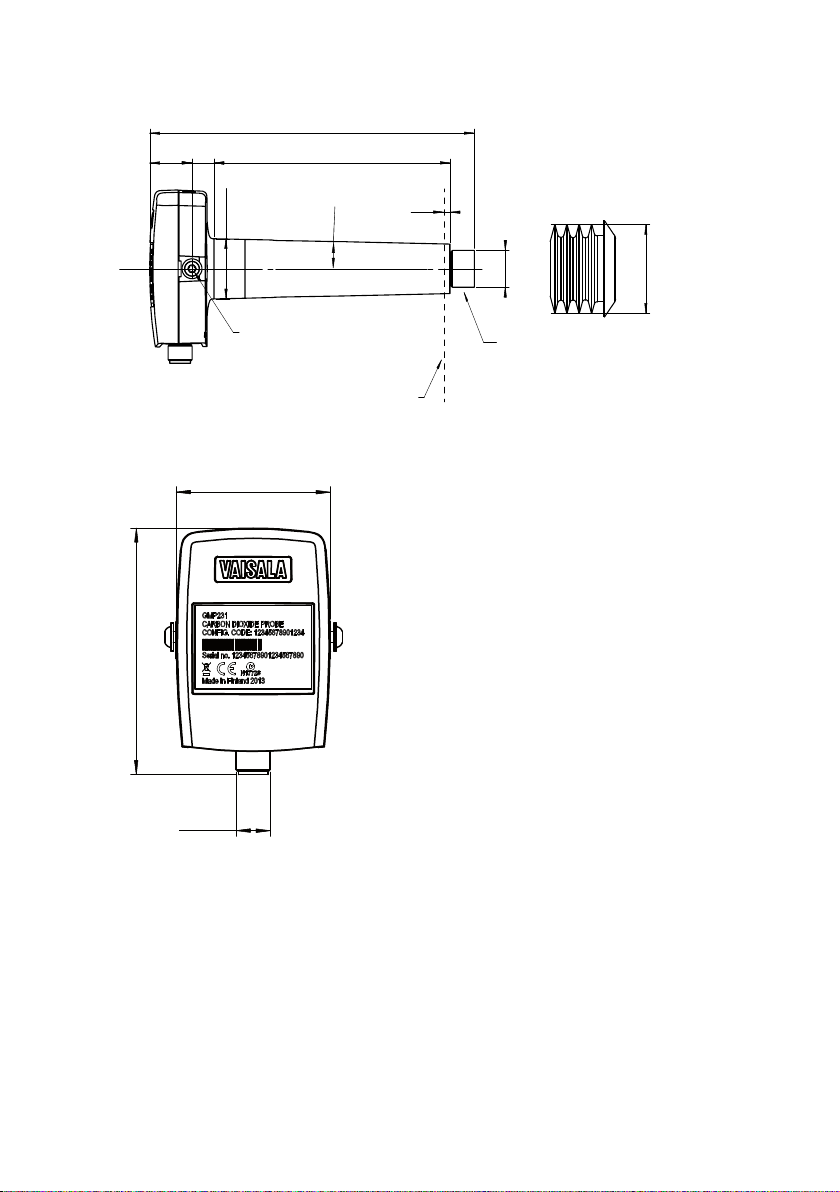
M12
54.4
87
Reserve space for M12 cable
Chapter 3 – Installation
Figure 8 Electronics housing dimensions
19
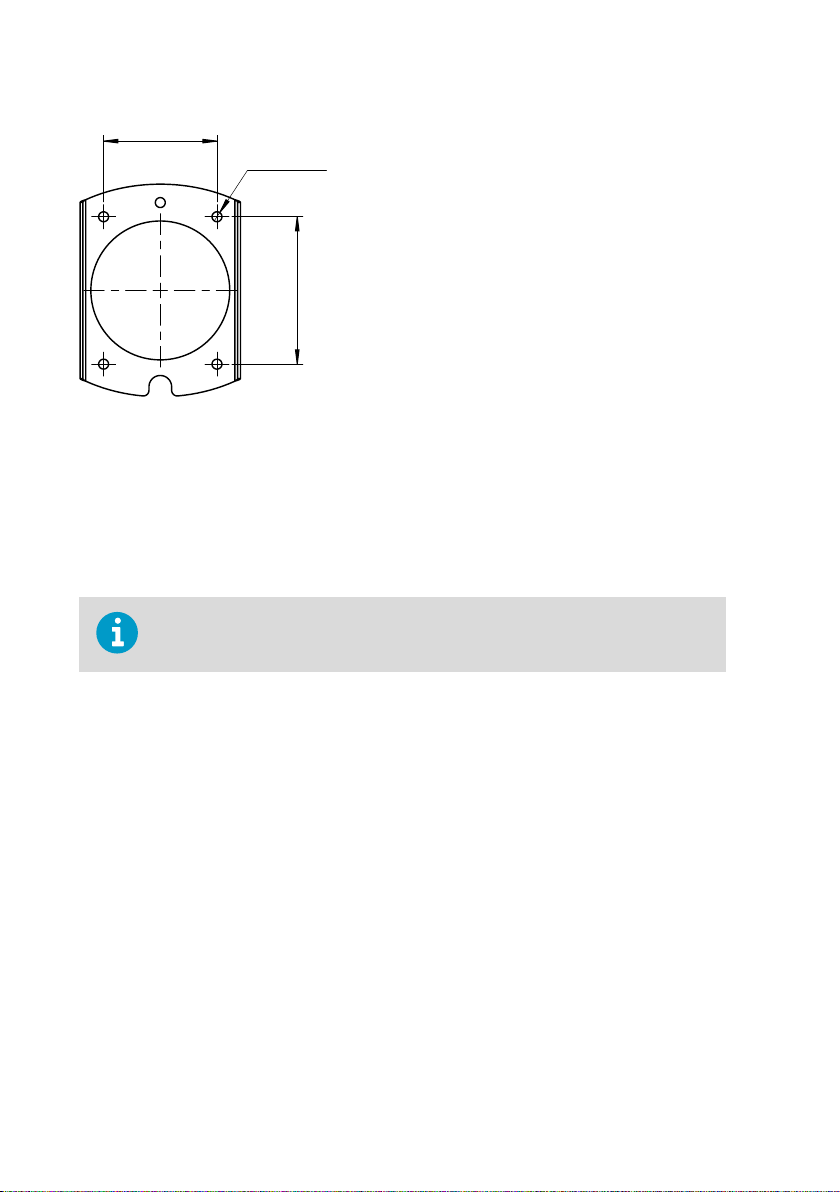
40
4 × Ø3.5
52
GMP231 User Guide M211501EN-E
Figure 9 Attachment bracket dimensions
3.5
Recommended installation
GMP231 is designed to be installed through a chamber wall, and attached to the chamber
chassis using an attachment bracket and the two screw holes on the side of the probe. As the
installation depth of the probe inside the chamber is critical, the mounting method must allow
the probe to be positioned exactly.
The probe and electronics housing must remain outside the heated chamber. The
electronics housing should be in a ventilated space that is open to ambient air.
20

4
1 2 3
5
6
7
9
8
10
Figure 10 Recommended installation
Chapter 3 – Installation
1 Ambient air
2 Chamber wall
3 Chamber interior
4 GMP231 electronics housing
5 M4 screw holes on both sides of the probe housing
6 8-pin M12 connector
7 Cable
8 CARBOCAPâ sensor under PTFE filter. The filter must be inside the chamber completely.
9 Silicone plug. Insert the plug over the probe from inside the chamber.
10 Ø 44 mm installation tube through the chamber wall. The diameter is important for
proper sealing by the silicone plug.
More information
‣
Wiring (page 22)
21
1
5
6
7
3
4
8
2
GMP231 User Guide M211501EN-E
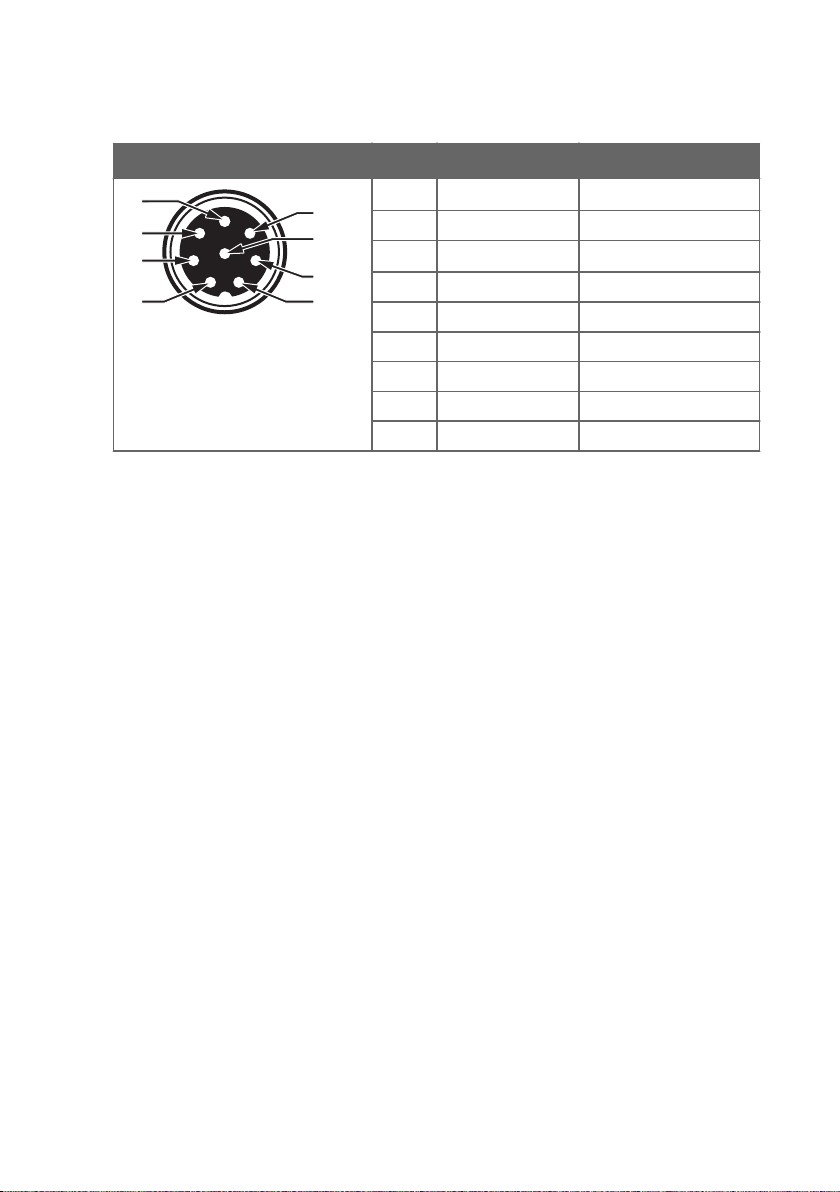
3.6 Wiring
GMP231 provides several outputs you can use. Connect the output pins you need, and the
power supply and ground pins. Use a shielded cable, and connect the shield to the chassis of
the GMP231’s M12 connector, and to ground on the other side.
Ground pin 5 to put the probe in standby mode (stops CO2 measurement). The probe resumes
normal measurement operation when pin 5 is no longer grounded, unless its internal
measurement shows the temperature is too high.
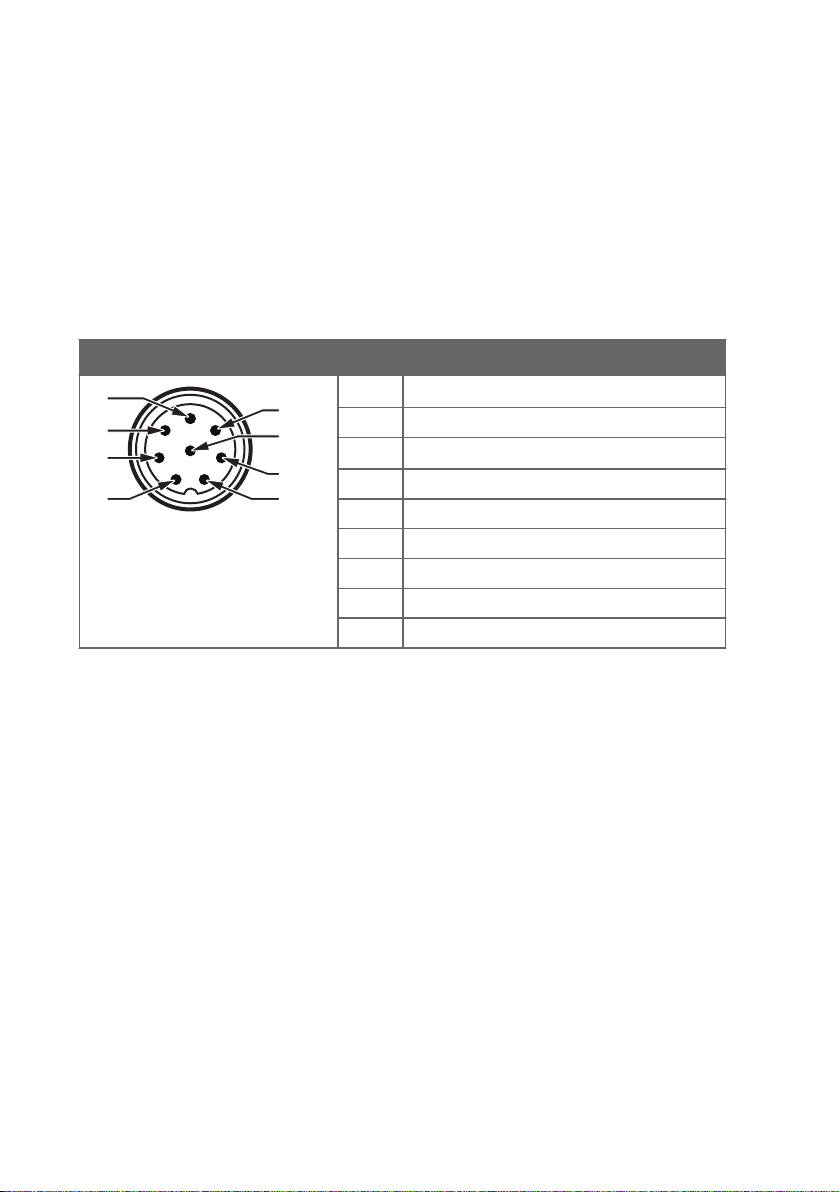
Table 4 GMP231 connector pinout
Male 8-pin M12 Pin # Function
1
2 RS-485 D-
3
4 Analog output +
5 Standby
6 RS-485 D+
7 Power supply +
8 Ground
- Shield
I2C SDA
I2C SCL
Vaisala’s standard connection cable for the GMP231 (item code DRW240977) is a 90 cm long
cable with female 8-pin M12 connector on one end, and open ended wires on the other. It
supports all outputs from the GMP231, and connects the cable shield to the connector chassis.
22
1
6
8
7
3
4
5
2
Chapter 3 – Installation
Table 5 Cable
Female 8-pin M12 Pin # Function Wire color
1
2 RS-485 D- Brown
3
4 Analog output + Yellow
5 Standby Gray
6 RS-485 D+ Pink
7 Power supply + Blue
8 Ground Red
- Shield Black
I2C SDA
I2C SCL
White
Green
3.7 Power supply
The supply voltage range of GMP231 is 11 … 30 VDC. If the analog output is used, the supply
voltage range is 20 … 30 VDC.
The maximum power consumption is 1 W.
23

GMP231 User Guide M211501EN-E
4. Vaisala Industrial Protocol
4.1 Overview of Vaisala Industrial Protocol
RS-485 line of the GMP231 provides an implementation of the Vaisala Industrial Protocol that
can be used for service and configuration use, or for interfacing with the incubator’s control
system. The protocol is a plaintext protocol suitable for use both by human operators and
automated systems.
4.2 Serial interface settings
Table 6 Default serial interface settings
Property Value
Bit rate 19200
Parity None
Data bits 8
Stop bit 1
Flow control None
4.3 Physical interface
The physical interface is a non-isolated 3-wire interface. The data lines are RS-485 D- and
RS-485 D+. Ground is shared with power supply.
The connector is an 8-pin male M12.
More information
‣
Wiring (page 22)
4.4
Connecting with a computer
Connecting with a computer allows you to configure and troubleshoot your probe using serial
line commands.
When connecting using a computer, use a compatible Vaisala USB service cable (item code
221040) and a suitable terminal application.
24
Chapter 4 – Vaisala Industrial Protocol
More information
‣
Installing driver for the USB service cable (page 25)
‣
Connecting to probe (page 26)
‣
Serial commands (page 27)
4.4.1 Installing driver for the USB service cable
Only Windowsâ operating systems are supported by the driver of the USB
service cable.
1. Connect the USB service cable to a USB port on your computer. Windowsâ detects the
new device and installs the appropriate driver.
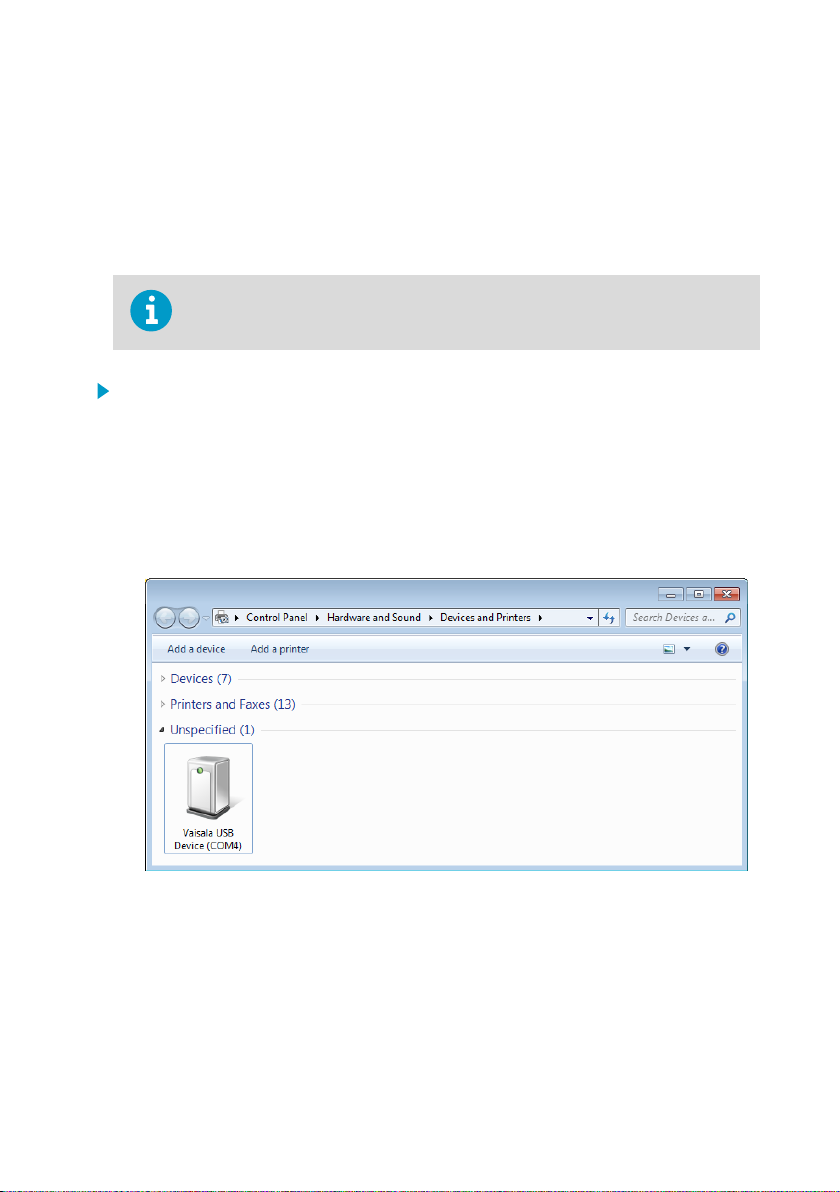
2. Open Devices and Printers from the Windowsâ Start menu. Use search to find it if
necessary (search for "devices").
3. Locate the cable in the list of devices:
• If the device is listed as Vaisala USB Device with a COM port number in brackets, the
cable is ready for use. Note the COM port number, you will need it later.
• If the device is listed as Vaisala USB Instrument Cable without a COM port number
listed, you must install the driver manually.
4. To install the driver manually:
a. Disconnect the USB service cable from the computer.
b. Download the Vaisala USB driver at http://www.vaisala.com/software (select the
appropriate USB Instrument Driver Setup for your cable).
c. Run the USB driver installation program Vaisala USB Device Driver
Setup.exe. Accept the installation defaults.
d. Go back to step 1 and verify that the driver installation works as expected.
25

GMP231 User Guide M211501EN-E
4.4.2 Connecting to probe
The following steps describe how to connect to the probe using the PuTTY terminal
application for Windows (available for download at www.vaisala.com) and a USB service cable:
1. Connect the USB service cable between your computer and the M12 connector of the
probe.
2. Start the PuTTY application.
3. Select Connection > Serial & USB and check that the correct COM port is selected in the
Serial or USB line to connect to field. If you are using the PuTTY terminal application
supplied by Vaisala, you can press the USB Finder button to open the Vaisala USB
Instrument Finder program.
4. Check that the other serial settings are correct for your connection, and change if
necessary. Flow control should be set to None unless you have a reason to change it.
5. Select Open to open the connection window and start using the serial line.
If PuTTY is unable to open the serial port you selected, it shows you an error
message instead. If this happens, restart PuTTY and check the settings.
26

Chapter 4 – Vaisala Industrial Protocol
6. You may need to adjust the Local echo setting in the Terminal category to see what you
are typing on the serial line. To access the configuration screen while a session is running,
click the right mouse button over the session window, and select Change Settings from
the pop-up menu.
Figure 11 PuTTY terminal application
4.5
Serial commands
All commands can be issued either in uppercase or lowercase. In the command examples, the
keyboard input by the user is in bold.
The notation <cr> refers to pressing the carriage return (ENTER) key on your computer
keyboard. Enter a <cr> to clear the command buer before starting to enter commands.
Table 7 Basic serial commands
Command Description
?
CLOSE
ECHO
ENV
Show probe information.
Close connection to probe (POLL mode)
Show or set remote echo mode.
Show or set environmental parameters.
27

GMP231 User Guide M211501EN-E
Command Description
ERRS
Show currently active errors.
FORM [modifier string] Show or set output format.
HELP
Show list of currently available serial commands.
INTV [0 ... 9999 s/min/h] Set continuous output interval for R command.
OPEN [address] Open connection to probe in POLL mode
PASS [1300] Access advanced serial commands.
R
RESET
S
Start the continuous outputting.
Reset the probe.
Stop the continuous outputting.
SDELAY [0 ... 255] Show or set serial line transmission delay in milliseconds.
SEND
Output measurement message once.
SERI [baud data stop parity] Show or set the serial interface settings
SMODE [mode] Show or set startup serial mode: RUN, STOP, or POLL .
SNUM
Show probe serial number.
STANDBY [on/off] Standby mode on/o (turn o measurement)
SYSTEM
TIME
VERS
Show probe firmware information
Show probe operation hours and uptime
Show probe firmware version.
Table 8 Advanced serial commands
Command Description
ADDR [0 … 254] Show or set probe address.
AMODE
AOVER
Show or set analog output mode.
Show or set analog output overrange and clipping
behavior.
ASEL
ATEST
CCO2
CDATE
CP
CT
Show or set analog output parameter.
Test analog output.
Adjust CO2 measurement gain and oset.
Show or set calibration date.
Adjust pressure measurement oset.
Adjust temperature measurement oset.
28

Chapter 4 – Vaisala Industrial Protocol
Command Description
CTEXT
FRESTORE
O2CMODE
PCMODE
RHCMODE
TCMODE
Show or set calibration information.
Restore probe to factory settings.
Show or set oxygen compensation mode.
Show or set pressure compensation mode.
Show or set humidity compensation mode.
Show or set temperature compensation mode.
4.6 Device information and status
Table 9 ? Command
Syntax Description
?<cr> Show listing of device information.
??<cr> Show listing of device information even if the
Example:
device is in POLL mode but its address is
unknown.
Do not use the ?? command if you have more
than one device on an RS-485 line.
?
Device : GMP231
Copyright : Copyright (c) Vaisala Oyj 2013. All rights reserved.
SW Name : GMP231
SW version : 1.0.1.1537
Snum : J1320082
Calibrated : 2014-03-11
Address : 1
Smode : STOP
Table 10 SNUM command
Syntax Description
SNUM<cr> Show serial number of the probe.
Example:
snum
Serial number : J1320082
29

GMP231 User Guide M211501EN-E
Table 11 VERS command
Syntax Description
VERS
Show firmware version of the probe.
Example:
vers
GMP231 / 1.1.0.1537
Table 12 SYSTEM command
Syntax Description
SYSTEM<cr> Show probe firmware information.
Example:
system
Device Name : GMP231
SW Name : GMP231
SW version : 1.1.0.1537
Table 13 TIME command
Syntax Description
TIME
Show how long the probe has been in operation
since the last startup or reset.
The operation counter is in format hh:mm:ss.
Full days and hours are retained in the counter,
minutes and seconds are cleared at reset.
Example:
time
00000:23:56:49 Up time: 3409 s
Cumulative uptime is 23 hours, 56 minutes, and 49 seconds, uptime since last reset is 3409
seconds.
Table 14 HELP command
Syntax Description
HELP<cr> Show list of the currently available serial
commands.
30

Chapter 4 – Vaisala Industrial Protocol
Syntax Description
Example (shows basic commands, advanced commands are not enabled):
CLOSE
ECHO
ENV
ERRS
FORM
HELP
INTV
PASS
R
RESET
S
SDELAY
SEND
SERI
SMODE
SNUM
STANDBY
SYSTEM
TIME
VERS
4.7
Serial line output commands
Table 15 R command
Syntax Description
R<cr> Start the continuous outputting of measurement
values as an ASCII text string to the serial line.
The probe keeps outputting measurement
messages at the interval that has been set with
the INTV command until stopped with the S
command or with the Esc key.
Example (measurement message in default format):
r
CO2= 490 ppm
CO2= 490 ppm
CO2= 491 ppm
CO2= 491 ppm
CO2= 491 ppm
...
31

GMP231 User Guide M211501EN-E
Table 16 S command
Syntax Description
S<cr> Stop the continuous outputting that was started
with the R command.
Example:
...
CO2= 5.1 %CO2
CO2= 5.0 %CO2
CO2= 5.0 %CO2
s
Table 17 INTV command
Syntax Description
INTV [n xxx]<cr> Change the output interval of the automatically
repeating measurement messages. The
measurement messages are repeated in the
RUN mode, or after the R command has been
given.
Set the output interval.
• n = interval, range 0 ... 255
• xxx = unit for interval setting.
• s = seconds
• min = minutes
• h = hours
If you set the interval to 0, the output messages
are output as quickly as they are generated,
without additional delay.
Example:
intv 5 s
Output interval : 5 S
Table 18 SEND command
Syntax Description
SEND<cr> Output a single measurement message.
Example:
send
CO2= 1702 ppm
32

Chapter 4 – Vaisala Industrial Protocol
Table 19 FORM command
Syntax Description
FORM<cr> Change the measurement message sent by the
probe.
FORM /<cr> Reset measurement format to default.
FORM [modifier string]<cr> modifier string = String of parameters and
modifiers that defines the output format, length
1 ... 150 characters. Maximum length may be
shorter when text strings are used.
For more information, see Table 20 (page 34)
and Table 21 (page 35).
33

GMP231 User Guide M211501EN-E
Syntax Description
Examples:
Example of default output (continuous output from RUN mode):
CO2= 860 ppm
CO2= 861 ppm
CO2= 861 ppm
...
Command to set output format as %CO2:
form 3.1 "CO2=" CO2% " " U4 #r #n
Output example:
CO2= 5.1 %CO2
CO2= 5.1 %CO2
CO2= 5.0 %CO2
...
Command to set output format as CO2 ppm with Modulus-65536 checksum:
form 6.0 "CO2=" CO2 " " U3 " " CS4 #r #n
Output example:
CO2= 3563 ppm 9F
CO2= 3562 ppm 9E
CO2= 3559 ppm A4
...
Command to set output format as CO2 ppm, with start of text (ASCII character 002) and
end of text (003) ASCII codes, and without line feed and carriage return at the end:
form #002 6.0 "CO2=" CO2 " " U3 #003
Output example (ASCII codes not visible here):
CO2= 866 ppm CO2= 866 ppm CO2= 867 ppm CO2= 867 ppm
CO2= 867 ppm CO2= 868 ppm CO2= 868 ppm CO2= 869 ppm
...
Table 20 Output commands for FORM command
Measured parameter Abbreviation in FORM command
Carbon dioxide in ppm
CO2
34

Chapter 4 – Vaisala Industrial Protocol
Measured parameter Abbreviation in FORM command
Carbon dioxide in percent
Currently used temperature compensation value
Currently used pressure compensation value
Currently used oxygen concentration
compensation value
Currently used relative humidity compensation
value
Table 21 Modifiers for FORM command
Modifier Description
x.y
#t
#r
#n
""
#xxx
ADDR
SN
TIME
Ux
CS4
CSX
Length modifier (number of digits and decimal places)
Tabulator
Carriage-return
Line feed
String constant, length 1 ... 15 characters
ASCII code value (decimal) of a special character; for example, #027 for ESC
Probe address (0 ... 254)
Probe serial number
Cumulative operating hours of the probe.
Shows the name of the measurement unit using “x” number of characters. For
example, U3 shows the name of the measurement unit with three characters
Modulus-65536 checksum of message sent so far, ASCII encoded hexadecimal
notation
NMEA xor-checksum of message sent so far, ASCII encoded hexadecimal
notation
CO2%
TCOMP
PCOMP
O2COMP
RHCOMP
4.8 Changing measurement settings
Table 22 Compensation mode commands
Syntax Description
PCMODE [on | off | measured]<cr> Show current compensation value for pressure
compensation mode.
35

GMP231 User Guide M211501EN-E
Syntax Description
TCMODE [on | off | measured]<cr> Show current compensation value for
temperature compensation mode.
O2CMODE [on | off]<cr> Show current compensation value for oxygen
compensation mode.
RHCMODE [on | off]<cr> Show current compensation value for relative
humidity compensation mode.
• on = Compensation enabled using setpoint
value.
• off = Compensation disabled, neutral value
used.
• measured = Compensation enabled using
internal measurement. Available only for
pressure and temperature compensations.
Example (check temperature compensation mode):
pass 1300
tcmode
T COMP MODE : ON
Example (change temperature compensation mode to use internal measurement):
pass 1300
tcmode measured
T COMP MODE : MEASURED
Table 23 ENV command
Syntax Description
ENV [temp|pres|oxy|hum] [value]<cr> Set new permanent compensation values and
store them in EEPROM.
• temp = Compensation temperature. Range
-40 ... 100 °C.
• pres = Compensation pressure. Range 500 ...
1150 hPa.
• oxy = Oxygen content of background gas.
Range 0 ... 100%.
• hum = Relative humidity of background gas.
Range 0 ... 100%.
36

Chapter 4 – Vaisala Industrial Protocol
Syntax Description
ENV [xtemp|xpres|xoxy|xhum]
[value]<cr>
Set new compensation values and store them in
RAM.
• xtemp = Compensation temperature. Range
-40 ... 100 °C.
• xpres = Compensation pressure. Range
500 ... 1150 hPa.
• xoxy = Oxygen content of background gas.
Range 0 ... 100%.
• xhum = Relative humidity of background gas.
Range 0 ... 100%.
Values of the parameters are stored in two places: EEPROM (non-volatile memory, values retained
during power o) and RAM (volatile memory that loses the values when probe is reset, and where
values are loaded from non-volatile memory at startup). As the number of writes to EEPROM is
limited to 30000 cycles by memory implementation, you must write all continuously updated
values to RAM to avoid wearing out the EEPROM.
Example (Show current compensation values; all compensations are enabled. Note that
temperature and pressure compensations use internal measurement, so the value in use is
constantly changing):
env
Temperature (C) : 37.00
Pressure (hPa) : 1013.20
Oxygen (%O2) : 19.70
Humidity (%RH) : 93.00
In use:
Temperature (C) : 23.10
Pressure (hPa) : 1011.28
Oxygen (%O2) : 19.70
Humidity (%RH) : 93.00
The following example sets temperature compensation to setpoint mode, and changes
temperature setpoint value to 37.2 in RAM.
pass 1300
tcmode on
T COMP MODE : ON
env xtemp 37.2
In eeprom:
Temperature (C) : 37.00
Pressure (hPa) : 1013.20
Oxygen (%O2) : 19.70
Humidity (%RH) : 93.00
In use:
Temperature (C) : 37.2
Pressure (hPa) : 1013.20
Oxygen (%O2) : 19.70
Humidity (%RH) : 93.00
37

GMP231 User Guide M211501EN-E
If temperature and pressure compensations are configured to use internally
measured values, they continuously update the values in RAM, overriding any
temperature and pressure values that are written to RAM with the ENV command.
Table 24 STANDBY command
Syntax Description
STANDBY [on | off]<cr> Set the probe to standby mode.
In standby mode, the CO2 measurement is
disabled. Probe returns to the normal
measurement when you give the STANDBY off
command or reset the probe.
Example (enable standby mode):
standby on
Standby mode : ON
4.9 Configuring serial line operation
Table 25 SMODE command
Syntax Description
SMODE [mode]<cr> Set serial line start-up operating mode.
Available modes:
• STOP = No automatic output. All commands
available. Default mode.
• RUN = Automatic output of measurement
messages. You can stop the output with the S
command, and continue again with the R
command.
• POLL = No automatic output. Will respond to
addressed SEND command and ?? command.
You can use other commands after opening a
connection using an addressed OPEN
command. Use with RS- 485 buses where
multiple probes can share the same line.
Example:
smode poll
Serial mode : POLL
38

Chapter 4 – Vaisala Industrial Protocol
Table 26 SERI command
Syntax Description
SERI<cr> Show current serial line settings.
SERI [b p d s]<cr> Set new serial line settings. The new settings are
taken into use when the probe is reset or
powered up.
• b = baud rate (9600, 19200, or 19200)
• p = parity
• n = none
• e = even
• o = odd
• d = data bits (7 or 8)
• s = stop bits (1 or 2)
Example (shows default settings):
seri
Com1 Baud rate : 19200
Com1 Parity : N
Com1 Data bits : 8
Com1 Stop bits : 1
Example (set serial line to 9600 baud, even, 7 data bits, and 1 stop bit):
seri 9600 e 7 1
OK
seri
Com1 Baud rate : 9600
Com1 Parity : E
Com1 Data bits : 7
Com1 Stop bits : 1
Table 27 ADDR command
Syntax Description
ADDR<cr> Show current device address. Addresses are
required for POLL mode.
ADDR [aaa]<cr> Set new device address.
• aaa = Device address of the probe, range
0 ... 254 (default = 0).
Example (change probe address to 52):
pass 1300
addr 52
Address : 52
39

GMP231 User Guide M211501EN-E
Table 28 SDELAY command
Syntax Description
SDELAY<cr> Show serial line transmission delay.
SDELAY [delay]<cr> Set a new serial line transmission delay, range 0
Example (set delay to 50 milliseconds):
sdelay 50
Serial delay : 50
Table 29 ECHO command
Syntax Description
ECHO [on/off]<cr> Enable or disable echoing of characters received
Example:
echo
Echo : OFF
… 255 (milliseconds)
by the probe.
4.10 Calibration commands
Before calibrating GMP231 using serial line commands, see Calibration and
adjustment (page 71).
Make sure that the environmental compensation settings of the GMP231 are
properly set for your calibration environment.
Table 30 CCO2 command
Syntax Description
cco2<cr> Show current user adjustment status.
cco2 -lo [co2]<cr>
cco2 -hi [co2]<cr>
40
Perform a 1-point (only either low or high
concentration) or 2-point (both low and high
concentrations) calibration and adjustment.
-lo = Adjustment at low concentration (under 2
%CO2)
-hi = Adjustment at high concentration (over 2
%CO2)
co2 = CO2 concentration reference in ppm

Chapter 4 – Vaisala Industrial Protocol
Syntax Description
cco2 -save<cr> Save the currently entered adjustments.
Successfully saving the adjustment clears the
calibration date (cdate command) and
calibration text (ctext command) that have
been stored in the probe. Use those commands
to enter a new calibration date and text.
cco2 -cancel<cr> Cancel currently entered adjustments.
cco2 -reset<cr> Clear user adjustments.
Example (show current user adjustment status – no adjustment done):
pass 1300
cco2
1.Ref. point low 0
1.Meas. point low 0
2.Ref. point low 200000
2.Meas. point low 200000
Gain : 1.0000
Offset : 0.0000
Example (one-point adjustment in 5 % concentration (50000 ppm)):
pass 1300
cco2 –lo 50000
OK
cco2 –save
OK
Table 31 CDATE command
Syntax Description
CDATE<cr> Show calibration date.
CDATE [yyyy mm dd]<cr> Set a new calibration date.
• yyyy = Year of calibration in four digits.
• mm = Month of calibration in two digits.
• dd = Day of calibration in two digits.
41

GMP231 User Guide M211501EN-E
Syntax Description
Example (show currently stored calibration date):
>pass 1300
>cdate
Calibration date : 2013-10-03
Example (set calibration date to 2014-03-10):
>pass 1300
>cdate 2014 03 10
Calibration date : 2014-03-10
Table 32 CTEXT command
Syntax Description
CTEXT<cr> Show calibration information text.
CTEXT [text]<cr> Calibration information text string, max 19
characters. If you want to use spaces in the
string, enclose the text in quotes.
Example (shows the text “Calibrated at” followed by the currently stored calibration text):
pass 1300
ctext
Calibrated at Vaisala
Example (set calibration text to “Lab_1”):
pass 1300
ctext Lab_1
Calibrated at Lab_1
Table 33 CT command
Syntax Description
CT [temp]<cr> Perform an oset correction to the internal
temperature measurement.
temp = correct temperature in degrees Celsius
(°C).
CT [-reset]<cr> Clear the oset adjustment from internal
temperature measurement.
42

Chapter 4 – Vaisala Industrial Protocol
Syntax Description
Example (adjust the internal temperature measurement to 23 °C at the current conditions):
pass 1300
ct 23
OK
Example (clear the oset adjustment from internal temperature measurement):
pass 1300
ct -reset
OK
Table 34 CP command
Syntax Description
CP [pressure]<cr> Perform an oset correction to the internal
pressure measurement.
pressure = Correct pressure in hectopascals
(hPa).
CP [-reset]<cr> Clear the oset adjustment from internal
pressure measurement.
Example (adjust the internal pressure measurement to 990 hPa at the current conditions):
pass 1300
cp 990
OK
Example (clear the oset adjustment from internal pressure measurement):
pass 1300
cp -reset
OK
More information
‣
Changing measurement settings (page 35)
43

GMP231 User Guide M211501EN-E
4.11 Configuring analog output
Table 35 ASEL command
Syntax Description
ASEL [channel]<cr> Show the parameter and scaling of the analog
ASEL [channel] [parameter lowlimit
highlimit]<cr>
Example (change channel scaling to 0 … 5 %):
pass 1300
asel 1 co2 0 50000
Aout 1 quantity : CO2(0 ... 50000)
output in ppm.
channel = Analog output channel, only 1 can
be selected.
Set the parameter and scaling of the analog
output.
• parameter = Parameter that is output on
analog channel. Only parameter available is
CO2.
• lowlimit = Lower limit of channel scaling in
ppm.
• highlimit = High limit of channel scaling in
ppm.
Table 36 AMODE command
Syntax Description
AMODE [channel]<cr> Show currently set analog output limits and
AMODE [channel lo_value hi_value
error_value]<cr>
44
error level.
channel = Analog output channel, only 1 can
be selected.
Set new analog output limits and error output
value.
• lo_value = Low limit of the channel.
• hi_value = High limit of the channel.
• error_value = Error value of the channel.

Chapter 4 – Vaisala Industrial Protocol
Syntax Description
Example (show current configuration):
pass 1300
amode 1
Aout 1 range (mA) :4.00 ... 20.00 (error :21.00)
Example (set channel to 4 … 20 mA, and error level to 3.6 mA):
pass 1300
amode 1 4 20 3.6
Aout 1 range (mA) :4.00 ... 20.00 (error :3.60)
Table 37 AOVER command
Syntax Description
AOVER [channel]<cr> Show the behavior of the analog output when
the measured value is outside the scaled output
range.
channel = Analog output channel, only 1 can
be selected.
AOVER [channel clip% valid%]<cr> Set the behavior of the analog output when the
measured value is outside the scaled output
range.
• clip% = Output margin (%) at which the
output is clipped.
• valid% = Output margin (%) at which the
output of the channel goes into the error
state. The error state is defined using the
AMODE command.
45

GMP231 User Guide M211501EN-E
Syntax Description
For example, first check the analog output settings using ASEL, AMODE, and AOVER commands:
pass 1300
asel 1
Aout 1 quantity : CO2(0 ... 50000)
amode 1
Aout 1 range (mA) :0.00 ... 20.00 (error : 23)
aover 1
Aout 1 clipping :10.00 %
Aout 1 error limit :10.00 %
Now give the following AOVER command:
aover 1 5 10
Aout 1 clipping : 5.00 %
Aout 1 error limit :10.00 %
The analog output now behaves like this:
• Clipping is now set to 5 %, meaning the output is allowed to vary between 0 ... 21 mA. The analog
channel will output the measurement for 0 ... 52500 ppm, but range 0 ... 20 mA remains scaled
to 0 ... 50000 ppm.
• Error limit is 10 %, which means the output will show the error state (23 mA) when the measured
value is 10 % outside the scaled output range. With the settings above, this will happen if the
measured CO2 concentration is outside range 0 ... 55000 ppm.
• The output will never actually be between 21 mA and 23 mA because of clipping.
Table 38 ATEST command
Syntax Description
ATEST [channel] [level]<cr> Test the operation of the analog output by
forcing the output to a given value.
• channel = Analog output channel, only 1 can
be selected.
• level = Level for analog output channel in
mA.
You can then measure the output with a
calibrated multimeter. After testing the output,
use the ATEST command again to exit the test
mode.
46

Chapter 4 – Vaisala Industrial Protocol
Syntax Description
Example (enable analog output test mode, set level to 20 mA):
pass 1300
atest 1 20
Aout 1 (mA) :20.000
Example (disabling analog output test mode, resuming normal output):
atest 1
Aout 1 test mode disabled.
4.12 Other commands
Table 39 PASS command
Syntax Description
PASS [code]<cr> Access advanced serial commands. You can use
Example:
advanced commands until the next reset.
[code] = Code for enabling advanced
commands (1300).
pass 1300
Table 40 OPEN command
Syntax Description
OPEN [address]<cr> Connect to a probe that is in POLL mode.
address = Probe address, range 0 ... 254.
Example (target probe in POLL mode, with address 52):
open 52
GMP231: 52 Opened for operator commands
Table 41 CLOSE command
Syntax Description
CLOSE<cr> Close the connection to a probe.
47

GMP231 User Guide M211501EN-E
Syntax Description
Example (target probe in POLL mode, with address 52):
Example:
close
line closed
Table 42 ERRS command
Syntax Description
ERRS<cr> Show active errors.
The possible errors and their identifying
numbers correspond to content of the status
word of the I2C interface.
Example (showing normal status, no active errors):
errs
NO CRITICAL ERRORS
NO ERRORS
NO WARNINGS
STATUS NORMAL
Example (showing probe in standby mode, no active errors):
errs
NO CRITICAL ERRORS
NO ERRORS
NO WARNINGS
STATUS 25 : Device in standby mode (set by user)
Table 43 RESET command
Syntax Description
RESET<cr> Reset the probe. The probe restarts as if it had
just been powered on.
Example:
reset
GMP231 1.0.0
48

Chapter 4 – Vaisala Industrial Protocol
Table 44 FRESTORE command
Syntax Description
FRESTORE<cr> Restore the probe to its factory configuration.
All user settings are lost.
After using the FRESTORE
command, reset the probe using
the RESET command.
Example:
pass 1300
frestore
Parameters restored to factory defaults
reset
GMP231 - Version 1.1.0
Vaisala Oyj 2012 - 2014
49

3.3 V 5.0 V
SDA
SCL
GND
2 x 10 kΩ 2 x 10 kΩ
uP
Buer and
level shift
GMP231 User Guide M211501EN-E
5. I2C interface
5.1 Overview of I2C interface
GMP231 has an inter-integrated circuit (I2C) interface for interfacing with the incubator’s
control computer. GMP231 implements I2C slave functionality, with the incubator’s computer
acting as the master. The interface can be used to read measurement values and status
information, set operation parameters, and make adjustments.
5.1.1 Physical interface
The physical interface is a non-isolated 3-wire interface. Wires are SDA, SCL and ground. SDA
and SCL lines are buered. Ground is shared with power supply. There are small pull-up
resistors for SCL and SDA. Connector is 8 pin male M12. Maximum cable length should not
exceed 5 m and maximum capacitance between communication lines and ground should not
exceed 500 pF.
Figure 12 Hardware schematic
More information
‣
Wiring (page 22)
5.1.2 Communication parameters
GMP231 supports maximum 50 kHz clock speed. Protocol bits are sent most significant bit
(MSB) first. Parameter bytes are sent using little endian order.
5.1.3 Addressing
GMP231 uses 7-bit addressing. The address consists of:
• 4-bit device type identifier part (default “0001” for GMP231)
• 3-bit sub address (default “001”)
50

Chapter 5 – I2C interface
The full 7-bit default address is “0001001” (09
). In I2C communication, the address should
hex
be provided by the master in the standard way after the I2C start condition, with the read/
write bit as the least significant bit (LSB).
Table 45 GMP231 I2C Address
0 0 0 1 0 0 1 R/W
Device type Sub-address Read/write bit
(LSB)
The I2C implementation of the GMP231 also includes the address inside the message frame.
The purpose of this is to make the I2C implementation easier, since the I2C address can be lost
by the I2C hardware. This address is provided without the read/write bit, with zero as the MSB.
Table 46 GMP231 Device Address
0 0 0 0 1 0 0 1
MSB Device type Sub-address
Make sure that there are no addressing conflicts if other I2C devices are put on the
same bus. The GMP231 address can be changed.
More information
‣
Register table (page 64)
5.1.4 Timing
The minimum time delay that the master must wait between the invoke and response
messages depends on the operation. If the operation includes a write to the non-volatile
memory, it takes more time than other operations.
Table 47 Timing
Operation Minimum Delay
Normal delay between invoke and response 10 ms
Delay when write to non-volatile memory 300 ms
5.1.5 Status byte
The status byte gives the master device information about the slave device’s state, and
information about the communication status with the ACK/NACK bit.
51

GMP231 User Guide M211501EN-E
The status byte has bits for signaling Status, Warning, Error and Critical error statuses. These
bits are cleared when the status word is read. Bits are set when the corresponding status or
error state changes in the slave device.
Table 48 Status Byte
Bit# Description
0 ACK/NACK
1 Critical error
2 Error
3 Warning
4 Status
5
6
7
5.1.6 Checksum
GMP231 uses a CRC16-CCITT checksum in its protocol frame. CCITT (x.25) polynomial is
X16+X12+X5+1 = 11021
checksum uses a bit reversed algorithm.
When the invoke message is received, the checksum is calculated using bytes from the
command byte to the last byte of the data field. The checksum needs to be valid before data
can be accepted. If the checksum is not valid, the message is rejected and the internal state of
the GMP231 is set to Idle.
When the response message is transmitted, the checksum is calculated using bytes from the
status byte to the last byte of the data field.
. Initial value is FFFF
hex
and the final value is XORed with FFFF
hex
hex
. The
5.1.7 Status word
The status word is used to monitor the status of the GMP231 device. It can be read in the same
way as any other slave parameter. The status word is used as a 32-bit long bit field, where each
bit represents a state of some error or other essential status. The status word is sent least
significant bit (LSB) first.
The status word content is updated every two seconds. Changes in the status word bits can be
monitored by reading the status byte.
Table 49 (page 53) lists the content of the status word. The status bits are categorized
according to the severity of the status:
• Critical errors are fatal to the operation of the unit. It may not be able to respond to
communication at all, and does not measure correctly.
52

Chapter 5 – I2C interface
• Errors prevent CO2 measurement and cause the analog outputs to be set to the error
state. Depending on the problem, errors may resolve themselves. For example, sensor
heating eventually dries out condensation on the optical surfaces.
• Warnings do not prevent normal operation but may indicate possible problems.
• Status indicates a known state of the unit, such as the CO2 measurement standby mode.
There are several possible internal error statuses that you cannot do much about.
After using the instructions in the following table and in Problem situations
(page 81), try to power cycle the probe and see if the error stays on.
If your unit has persistent errors that you cannot resolve yourself, contact Vaisala.
Table 49 Status word content
Bit# Type Meaning Recommended action
0 Critical Error Program memory corrupted (CRC error). Fatal error, contact Vaisala.
1 Critical Error Parameter memory corrupted
(CRC error).
2 Reserved
3 Reserved
4 Error Low supply voltage error. Check supply voltage.
5 Error Low internal 30 V voltage.
6 Error Low input signal. Can be caused by dirt
or condensation on the optical surfaces.
7 Error Low internal 8 V voltage.
8 Error Signal dynamic range too high.
9 Error Pressure sensor communication.
10 Error Pressure sensor out of range.
11 Error Sensor temperature too high for
operation.
12 Error CO2 concentration too high to measure. Wait for CO2 concentration to
13 Error Sensor heater resistance out of range.
14 Error IR source temperature error too high.
15 Reserved
16 Error Internal 2.5 V voltage out of range.
17 Error Internal 1.7 V voltage out of range.
Fatal error, contact Vaisala.
Wait to see if condensation is
removed by heat.
For cleaning instructions, see
Cleaning (page 69).
Wait for sensor to cool down.
fall into the measurable range.
53

GMP231 User Guide M211501EN-E
Bit# Type Meaning Recommended action
18 Error Low IR current.
19 Reserved
20 Warning Low input signal. Can be caused by dirt
or condensation on the optical surfaces.
21 Reserved
22 Warning Noisy signal. Continue normally.
23 Warning Transmitter reset by watchdog process. Continue normally.
24 Status CO2 measurement in standby mode: set
automatically due to high temperature.
25 Status CO2 measurement in standby mode:
set by user command.
26 Status CO2 adjustment state on. Complete the CO2 adjustment.
27 Reserved
28 Reserved
29 Reserved
30 Reserved
31 Reserved
Continue normally.
Wait for sensor to cool down.
Set to normal mode when
desired.
More information
‣
Status byte (page 51)
5.2
Commands
5.2.1 Get_Interface_Version
Get_Interface_Version command (ID 80
command is recommended for verifying version compatibility before reading or writing
parameters.
Table 50 Get_Interface_Version invoke message
Message segment Length Content
I2C address
Command ID 1 byte Always 80
Device address 1 byte See Table 46 (page 51).
54
1 byte
) reads the interface version information. This
hex
I2C address (write)
hex

Chapter 5 – I2C interface
Message segment Length Content
Frame length 1 byte Always 05
hex
Checksum 2 bytes See Checksum (page 52).
Table 51 Get_Interface_Version response message
Message segment Length Content
I2C address
1 byte
I2C address (read)
Status 1 byte See Status byte (page 51).
Command ID 1 byte Always 80
hex
Device address 1 byte See Table 46 (page 51).
Frame length 1 byte Always 0A
hex
Data 1 byte Device version
1 byte Protocol frame version
1 byte Command set version
1 byte Parameter set version
Checksum 2 bytes See Checksum (page 52).
5.2.2 Get_Parameter
Get_Parameter command (ID 81
measurement results and operational parameters. If the master tries to read more bytes than
message size, the slave sends FF
) reads parameter values. You can use it to read both
hex
bytes.
hex
Table 52 Get_Parameter invoke message
Message segment Length Content
I2C address
Command ID 1 byte Always 81
1 byte
I2C address (write)
hex
Device address 1 byte See Table 46 (page 51).
Frame length 1 byte Always 06
hex
Data 1 byte ID of parameter to be read
Checksum 2 bytes See Checksum (page 52).
55

GMP231 User Guide M211501EN-E
Table 53 Get_Parameter response message
Message segment Length Content
I2C address
1 byte
I2C address (read)
Status 1 byte See Status byte (page 51). If requested parameter
ID was unknown, NACK bit is set in the status
byte.
Command ID 1 byte Always 81
hex
Device address 1 byte See Table 46 (page 51).
Frame length 1 byte Varies according to data length, 07
hex
... 39
hex
.
Data 1 byte ID of parameter
1 ... 50 bytes Value of parameter. If requested parameter ID is
unknown, these data bytes are left out of the
response.
Checksum 2 bytes See Checksum (page 52).
5.2.2.1 Example: Read CO2 measurement
Table 54 Read CO2 measurement sequence example
Message bytes (hex) Sent by Content
Master
12
I2C start condition
I2C address (write)
81 Get_parameter command
09 Device address
06 Frame length
0A CO2 parameter ID
AA CRC high
9F CRC lo
13
I2C repeated start condition
I2C address (read)
56

Chapter 5 – I2C interface
Message bytes (hex) Sent by Content
00 GMP231 Status byte (no errors, ACK)
81 Get_parameter command
09 Device address
0B Frame length
0A CO2 Parameter ID
69 CO2 value 653.6314 ppm
68
23
44
75 CRC high
7D CRC lo
Master
I2C end condition
5.2.3 Set_Parameter
Set_Parameter command (ID 82
use it to set the operational parameters of the GMP231. Depending on the change, the
functionality of the GMP231 may not change immediately.
The length of the invoke message varies depending on the data length. The master must write
as many bytes as indicated in the frame length of the invoke message. If the master tries to
write a longer or shorter message, GMP231 rejects the message.
) writes parameter values to non-volatile memory. You can
hex
Table 55 Set_Parameter invoke message
Message segment Length Content
I2C address
Command ID 1 byte Always 82
1 byte
I2C address (write)
hex
Device address 1 byte See Table 46 (page 51).
Frame length 1 byte Varies according to data length, 07
Data 1 byte Parameter ID
1 ... 50 bytes Parameter value
Checksum 2 bytes See Checksum (page 52).
hex
... 38
hex
.
57

GMP231 User Guide M211501EN-E
Table 56 Set_Parameter response message
Message segment Length Content
I2C address
1 byte
I2C address (read)
Status 1 byte See Status byte (page 51).
Command ID 1 byte Always 82
hex
Device address 1 byte See Table 46 (page 51).
Frame length 1 byte Always 08
hex
.
Data 1 byte Parameter ID
1 byte Return code. See the following table.
Checksum 2 bytes See Checksum (page 52)
Table 57 Set_Parameter return codes
Code Meaning
0 Ok
1 Unknown parameter ID
2 Not writeable parameter
3 Value field too long
4 Value field too short
5 Data value not accepted
6 Incorrect message length
58

Chapter 5 – I2C interface
5.2.3.1 Example: Set compensation temperature
Table 58 Set compensation temperature sequence example
Message Bytes (hex) Sent by Content
Master
12
82 Set_parameter command
09 Device address
0A Frame length
10 Parameter ID of compensation temperature
00 Temperature 37 °C
00
14
42
0C CRC high
6E CRC lo
13
04 GMP231 Status byte (error active, ACK)
82 Set_parameter command
09 Device address
08 Frame length
10 Parameter ID of compensation temperature
00 Return code: Ok
D1 CRC high
CE CRC lo
Master
I2C start condition
I2C address (write)
I2C repeated start condition
I2C address (read)
I2C end condition
5.2.4 Get_Parameter_Info
Get_Parameter_Info command (ID 83
GMP231. The command is useful for adapting to parameters that have been added in a new
software version. If the requested parameter ID is not valid, data type Unknown Parameter ID
is returned.
) reads the properties of a single parameter from the
hex
59

GMP231 User Guide M211501EN-E
Table 59 Get_Parameter_Info invoke message
Message segment Length Content
I2C address
Command ID 1 byte Always 83
1 byte
I2C address (write)
hex
Device address 1 byte See Table 46 (page 51).
Frame length 1 byte Always 06
hex
.
Data 1 byte Parameter ID
Checksum 2 bytes See Checksum (page 52).
Table 60 Get_Parameter_Info response message
Message segment Length Content
I2C address
1 byte
I2C address (read)
Status 1 byte See Status byte (page 51).
Command ID 1 byte Always 83
hex
Device address 1 byte See Table 46 (page 51).
Frame length 1 byte
Data 1 byte Parameter ID
1 byte Parameter datatype. See the following table.
1 byte Parameter length in bytes.
1 byte Parameter persistence. Describes if the parameter
value is volatile (lost at reset) or non-volatile
(survives reset). See Table 62 (page 61).
≥8 bytes Parameter name. If name is shorter than 8 bytes,
extra bytes are filled with 00
hex
.
Checksum 2 bytes See Checksum (page 52).
Table 61 Parameter data types
Code Meaning
0 Unknown parameter ID
1 Byte
2 Integer (16-bit)
3 Unsigned integer (16–bit)
60

Chapter 5 – I2C interface
Code Meaning
4 Float (32-bit)
5 String
Table 62 Parameter persistence
Code Meaning
0 Void
1 Volatile
2 Non volatile
5.2.5 Adjust
Adjust command (ID 84
Table 63 Adjust invoke message
Message segment Length Content
I2C address
Command ID 1 byte Always 84
Device address 1 byte See Table 46 (page 51).
Frame length 1 byte Varies according to data length, 07
Data 1 byte Adjustment subcommand. See Table 65
Checksum 2 bytes See Checksum (page 52).
) controls the user adjustment sequence of CO2 measurement.
hex
1 byte
I2C address (write)
hex
hex
(page 62).
1 byte Parameter to be adjusted. See Table 66
(page 62).
4 bytes Value of parameter. Used only with
subcommands 2 and 3.
... 0B
hex
.
Table 64 Adjust response message
Message Segment Length Content
I2C address
1 byte
I2C address (read)
Status 1 byte See Status byte (page 51).
Command ID 1 byte Always 84
hex
Device address 1 byte See Table 46 (page 51).
61

GMP231 User Guide M211501EN-E
Message Segment Length Content
Frame length 1 byte Always 07
hex
.
Data 1 byte Return code. See Table 67 (page 62).
Checksum 2 bytes See Checksum (page 52).
Table 65 Adjustment subcommands
Code Adjustment operation
0 Start 1 point adjustment
1 Start 2 point adjustment
2 Record measured point 1, reference value is given in parameter
3 Record measured point 2, reference value is given in parameter
4 Cancel adjustment (previous adjustment is reverted)
5 End (adjustment is saved and new values are taken in use)
6 Revert to factory calibration (clear user adjustment)
Table 66 Adjustment parameters
Code Purpose
0 All parameters (valid with revert to factory calibration)
1 CO
2
Table 67 Adjustment return codes
Code Meaning
0 OK
1 Function not supported
2 Sequence error
3 Recorded-Reference dierence too large
4 2-point adjustment: Points too close
5 Given reference value is invalid
62

Chapter 5 – I2C interface
5.3 Adjusting measurement
Before implementing an adjustment sequence using the Adjust command, read
the general instructions for calibration and adjustment.
Create the reference environment inside the chamber, and use the Adjust command to
perform the adjustment sequence.
Adjustment can fail for a number of reasons. For a list of return codes for the Adjust
command, see Table 67 (page 62).
More information
‣
Calibration and adjustment (page 71)
5.3.1 1-point adjustment
To perform a 1-point adjustment of carbon dioxide (CO2), measurement using I2C protocol, you
must perform the following sequence:
1. Using the Adjust command, start 1-point adjustment for the chosen parameter.
2. Place the sensor in the reference environment and wait until the measurement has
stabilized.
3. Using the Adjust command, record the measured point and give the reference value.
4. Use the Adjust command to end the adjustment.
5.3.2 2-point adjustment
To perform a 2-point adjustment of CO2 measurement using I2C protocol, you must perform
the following sequence:
1. Using the Adjust command, start 2-point adjustment for CO2.
2. Supply the low concentration CO2 reference gas to the sensor and wait for three minutes
until the measurement has stabilized.
3. Using the Adjust command, record the first measured point and give the first reference
value.
4. Supply the high concentration CO2 reference gas to the sensor and wait for three minutes
until the measurement has stabilized.
5. Using the Adjust command, record the second measured point and give the second
reference value.
6. Use the Adjust command to end the adjustment.
63

GMP231 User Guide M211501EN-E
5.4 Data registers
The register table describes all available parameters and their properties. The properties are:
parameter meaning, ID, name, data type, length and persistence. Persistence defines if the
parameter is saved in EEPROM (non-volatile memory) or in RAM. Make sure not to write
excessively to the EEPROM, as it has a maximum lifetime of approximately 30000 cycles.
5.4.1 Data formats
Table 68 Data formats
Data type name Size in bytes Other
Byte 1 Value range 0 ... 255
Integer 2 Value range -32768 ... 32767.
Unsigned integer 2 Value range 0 … 65535
Long integer 4 Value range −2,147,483,648 … 2,147,483,647
Unsigned long integer 4 Value range 0 … 4,294,967,295
Float 4 According to IEEE-754. Nan (7FC00000
is returned if no value is available.
String Max. 50 All characters accepted (00
hex
… FF
hex
hex
)
)
Maximum string size refers to maximum communication buer size. For the
actual reserved storage space for each parameter, see Register table (page 64).
Integers and floating point numbers are sent LSB first.
5.4.2 Register table
Table 69 GMP231 register table
Meaning Name ID Size in
Factory information
Device address ADDR 0 1 Byte R Yes Default is 09
Device serial
number
64
SNUM 1 12 Str R Yes Example:
bytes
Type Read/
write
Persistent Other
A1234567
hex
.

Chapter 5 – I2C interface
Meaning Name ID Size in
bytes
Type Read/
write
Persistent Other
Sensor number SSNUM 2 12 Str R Yes Example:
B1234567
Component
board number
Software version
number
Factory
CBNUM 3 12 Str R Yes Example:
C1234567
VERS 4 12 Str R Yes Example:
1.2.3.4567
ADATEY 5 2 Uint R Yes Example: 2014
adjustment date
Year
Factory
ADATEM 6 1 Byte R Yes Example: 3
adjustment date
Month
Factory
ADATED 7 1 Byte R Yes Example: 29
adjustment date
Day
General parameters and variables
Device status
word
CO
2
measurement
mode
STATUS 8 4 Str R No See Status word
(page 52).
CO2_MODE 9 1 Byte R/W Yes 0 = Standby
mode.
Measurement
and probe
heating is o
1 = Measurement
on
Internal logic
can override this
setting.
Final CO2 result CO2 10 4 Float R No ppm CO
Raw CO
2
CO2_RAW 11 4 Float R No ppm CO
(uncompensate
d, unfiltered)
Compensated
CO2_COMP 12 4 Float R No ppm CO
CO2 (unfiltered)
CO
2
measurement
filtering
CO2_FILT 13 1 Byte R/W Yes Range 0 … 1
0 = no filtering
1 = filtering
(default)
2
2
2
65

GMP231 User Guide M211501EN-E
Meaning Name ID Size in
bytes
Type Read/
write
Persistent Other
Sensor heating HEAT 14 1 Byte R/W Yes Range 0…1
0 = no heating
1 = heating
(default)
Compensation settings
Temperature
compensation
mode
TC_MODE 15 1 Byte R/W Yes 0 =
Compensation
o
1 = Use
temperature
setpoint value
(default)
2 = Use Internal
sensor
temperature
Compensation
T_COMP 16 4 Float R/W No Celsius
temperature
Measured
T 17 4 Float R No Celsius
temperature
(internal sensor)
Pressure
compensation
mode
PC_MODE 18 1 Byte R/W Yes 0 =
Compensation
o
1 = Use pressure
setpoint value
2 = Use internal
pressure sensor
(default)
Compensation
P_COMP 19 4 Float R/W No hPa
pressure
Measured
P 20 4 Float R No hPa
pressure
(internal sensor)
Humidity
compensation
mode
RHC_MODE 21 1 Byte R/W Yes 0 =
Compensation
o
1 = Use RH
setpoint value
(default)
Compensation
RH_COMP 22 4 Float R/W No %RH
humidity
66

Chapter 5 – I2C interface
Meaning Name ID Size in
Oxygen
O2C_MODE 23 1 Byte R/W Yes 0 =
bytes
compensation
mode
Compensation
O2_COMP 24 4 Float R/W No %O
oxygen
Adjustment settings
Reference CO
CO2_RP1 25 4 Float R/W Yes ppm CO
2
point 1
Measured CO
CO2_MP1 26 4 Float R Yes ppm CO
2
point 1
Reference CO
CO2_RP2 27 4 Float R/W Yes ppm CO
2
point 2
Measured CO
CO2_MP2 28 4 Float R Yes ppm CO
2
point 2
Reference
T_RP1 29 4 Float R/W Yes Celsius 0 °C
temperature
point 1
Measured
T_MP1 30 4 Float R Yes Celsius 0 °C
temperature
point 1
Reference
PRE_RP1 31 4 Float R/W Yes 1013.25 hPa
pressure point 1
Measured
PRE_MP1 32 4 Float R Yes 1013.25 hPa
pressure point 1
Analog output settings
Analog output
A_MODE 33 1 Byte R/W No 0 = O (0 mA)
mode
Analog output
A_TC 34 4 Float R/W No 0 … 25 mA
test current
Type Read/
write
Persistent Other
Compensation
o
1 = Use oxygen
concentration
setpoint value
(default)
2
2
2
2
2
1 = Test mode
2 = Normal
(default)
3 = Locked to
latest value
67

GMP231 User Guide M211501EN-E
Meaning Name ID Size in
Analog output
A_EC 35 4 Float R/W Yes 0 … 25 mA
bytes
Type Read/
write
error state
current
Analog output
A_LC 36 1 Byte R/W Yes 0 = 0 mA
low end current
Analog output
A_LOW 37 4 Float R/W Yes ppm CO
scale low (0/4
mA)
Analog output
A_HI 38 4 Float R/W Yes ppm CO
scale high (20
mA)
Other
Persistent compensation values (used if volatile values are not given)
Compensation
T_COMP2 39 4 Float R/W Yes 37 °C (default)
temperature
Compensation
P_COMP2 40 4 Float R/W Yes 1013.25 hPa
pressure
Compensation
RH_COMP2 41 4 Float R/W Yes 90 %RH
humidity
Compensation
O2_COMP2 42 4 Float R/W Yes 19.7 %O
oxygen
Persistent Other
1 = 4 mA
2
2
(default)
(default)
2
(default)
68

Chapter 6 – Maintenance
6. Maintenance
6.1 Cleaning
When correctly installed, the GMP231 is minimally exposed to contaminants in the chamber.
There is little reason to perform cleaning other than normal chamber sterilization, and
changing the filter and/or silicone plug if they appear contaminated.
The CARBOCAPâ sensor of the GMP231 is well protected by the PTFE filter, and it can tolerate
some dirt on the optics as the measurement is compensated for the reduction of signal.
CAUTION!
blow any loose dirt and filter material away from the sensor. Do not attempt to
clean the optical surfaces of the sensor in any other manner.
More information
‣
Changing the filter (page 69)
‣
Changing the silicone plug (page 70)
When changing the filter, you can use clean instrument air to gently
6.1.1 Chemical tolerance
GMP231 tolerates the following sterilization chemicals:
• DMSO
• IPA (70 % Isopropyl Alcohol, 30 % water)
• H2O2 (2000 ppm), non-condensing
• Ethanol
• Acetic acid
CAUTION!
expose it to these chemicals. If necessary, you can clean the housing by wiping
with a moist cloth.
The electronics housing of the GMP231 is not sealed, so do not
6.2 Changing the filter
Change the filter to a new one if it shows visible signs of contamination.
1. Pull the white PTFE filter away from the sensor. Rotating the filter slightly makes it easier
to detach.
2. Use clean instrument air to gently blow any loose dirt and filter material away from the
sensor.
69

GMP231 User Guide M211501EN-E
3. Take a new clean filter and push it onto the sensor. If you are using the Vaisala silicone
plug for sealing, push and rotate the filter slightly to make sure the filter reaches below
the edge of the plug.
Figure 13 Changing the filter
6.3
Changing the silicone plug
Change the silicone plug if it shows visible signs of contamination. It is best to replace the filter
also.
1. Pull the white PTFE filter away from the sensor. Rotating the filter slightly makes it easier
to detach
2. Lift one edge of the plug and pull it away from the installation tube.
3. Use clean instrument air to gently blow any loose dirt and filter material away from the
sensor.
4. Clean the installation tube and the wall around the plug.
5. Place the new silicone plug over the sensor and push it into the installation tube.
70

Chapter 6 – Maintenance
6. Take a new clean filter and push it onto the sensor. Push and rotate the filter slightly to
make sure it is fully in place.
Figure 14 Changing the silicone plug
6.4
Calibration and adjustment
Calibrate and adjust the CO2 measurement of GMP231 as needed. Before starting, read through
this section completely so that you are aware of your options, and the main factors that aect
the result.
Performing an accurate calibration and adjustment takes some time and
preparation. Instead of doing it yourself, contact Vaisala.
Calibration means comparing GMP231 to a known reference, such as calibration
gas or a reference instrument. Correcting the reading of the GMP231 so that is
measures accurately is referred to as adjustment.
6.4.1 Calibration setup
GMP231 is designed to be calibrated while it remains installed through an incubator wall. If you
calibrate the GMP231 without it being installed, note the following:
71

GMP231 User Guide M211501EN-E
• If you are using a calibration gas, prevent it from entering the electronics housing of the
GMP231. Otherwise it diuses through the probe to the sensor and alter the CO2 reading.
• Make sure that the PTFE filter is in place when performing calibration.
• If you are using the calibration adapter accessory to feed the calibration gas to the sensor,
note that you must have the silicone plug and the PTFE filter installed on the probe.
Without both of them in place, the calibration adapter does not function properly. Vaisala
recommends replacing the silicone plug and the PTFE filter before calibration.
Figure 15 Inserting the calibration adapter over the filter
Using ambient air as reference
6.4.1.1
You can use ambient air to do a 1-point calibration with the background CO2 level as your
reference. You need a calibrated reference instrument to compare against, for example a GM70
hand-held meter with a calibrated GMP222 probe.
With the GMP231 and the reference instrument in the same space (for example, inside the
incubator with the door open), allow the measurement to stabilize before comparing the
readings. Try to provide as stable environment as you can during this time. Avoid working
around the incubator during this time.
Using a calibration gas as reference
6.4.1.2
There are 2 easy ways to use a calibration gas as a reference:
• You can supply the gas to the GMP231 using the calibration adapter accessory. Gas flow
should be in the range 0.5 … 1.1 l/min, recommendation is 1 l/min. Allow the measurement
to stabilize for three minutes before starting the calibration.
• You can fill the entire incubator with the calibration gas.
72

Chapter 6 – Maintenance
To perform a 2-point adjustment, you need 2 calibration gases: one that is below 2 %CO2 (lowend reference) and one that is above 2 %CO2 (high-end reference).
When supplying the gas from a gas bottle, make sure the gas bottle has stabilized to room
temperature before starting.
6.4.2 Eect of environmental compensations
GMP231 has various environmental compensations that improve its CO2 measurement
accuracy. As the calibration and adjustment environment may dier from the actual
measurement environment, you must make sure that the compensation settings are properly
set. Here are some key points to remember:
• Pressure and temperature compensations have a significant eect on accuracy. If you are
using setpoint values instead of the values from built-in pressure and temperature
sensors, make sure to correct the setpoints so that they corresponds to your calibration
situation. Consider switching the compensations to use the internal sensors when
calibrating, and then switching back when calibration and adjustment is done.
• The eect of background gas compensations for humidity and oxygen may be significant
when using calibration gases, since they are often dry and oxygen-free. For example, pure
nitrogen gas is typically used as a convenient 0 ppm CO2 reference.
• Remember to restore the normal compensation settings after completing calibration and
adjustment. If you are integrating the calibration functionality of the GMP231 as part of
the incubator’s control software, also implement proper handling of the environmental
compensations.
More information
‣
Environmental compensation (page 13)
6.4.3 Limits of adjustment
GMP231 limits the amount of adjustment that is allowed to the CO2 measurement. The
maximum correction that you can apply is 1000 ppm + 25 % of the probe’s uncorrected
reading. Previous user adjustments do not aect this limit (correction is not cumulative). This
feature limits the possible error introduced by incorrect adjustment.
For example, if you are adjusting using a 5 %CO2 calibration gas (50000 ppm), the maximum
correction you can apply is approximately 13500 ppm. Attempting to apply a greater
adjustment fails. Notification of failure from the GMP231 depends on the interface you are
using for adjustment.
6.4.4 Adjustment types
You can adjust the CO2 measurement of GMP231 in 1 or 2 points.
• 1-point adjustment is recommended if you are interested in maintaining a fixed CO2 level
inside the chamber. For best result, use a calibration gas with a CO2 concentration that is
close to the intended level.
73

GMP231 User Guide M211501EN-E
• 2-point adjustment is recommended if you typically measure a variable CO2 level.
Available adjustment functions depend on the interface you use to operate the GMP231. If you
want to integrate the functionality into the incubator’s control system, the I2C interface and the
Vaisala Industrial Protocol are recommended. If you want to compare the reading of the
GMP231 to a reference instrument as adjust it accordingly, use an MI70 handheld indicator and
a reference probe.
6.4.4.1 I2C Interface
I2C interface supports 1 and 2-point adjustment sequences as well as configuration of the
environmental compensation settings using the Get_Parameter and Set_Parameter
commands.
More information
‣
Get_Parameter (page 55)
‣
Set_Parameter (page 57)
‣
Adjust (page 61)
6.4.4.2 Vaisala Industrial Protocol
Vaisala industrial protocol supports one and two-point adjustment with the CCO2 command.
You can also adjust the internal pressure and temperature measurements with a simple oset
correction. Configuration of the environmental compensation settings can be done using serial
line commands.
More information
‣
Changing measurement settings (page 35)
‣
Calibration commands (page 40)
MI70 handheld indicator
6.4.4.3
MI70 handheld indicator supports 1-point adjustment, either using a calibration gas or using a
reference instrument that is connected to the MI70.
More information
‣
Calibration and adjustment with MI70 indicator (page 77)
74

Chapter 7 – Operating with MI70 indicator
7. Operating with MI70 indicator
7.1 Overview of MI70 support
GMP231 is compatible with instruments that utilize the MI70 indicator, for example the GM70
Handheld Carbon Dioxide Meter. The MI70 indicator is a convenient service tool for viewing the
measurement readings, adjusting the environmental compensation settings, and performing
calibration and one-point adjustment.
Figure 16 CO2 reading on MI70 screen
7.2
Connecting GMP231 to MI70 Indicator
1. If GMP231 is installed in an incubator, disconnect the incubator’s cable from the 8-pin M12
connector. Note that GMP231 can remain physically connected to the incubator.
2. If the MI70 indicator is on, turn it o.
3. Connect GMP231 to the MI70 indicator using the GMP231 service cable for MI70.
4. Turn on the MI70 indicator. MI70 detects the probe and proceeds to show the
measurement screen. The parameters measured by GMP231 start to show valid
measurement results after a few seconds.
More information
‣
Spare parts and accessories (page 85)
7.3
Changing environmental compensation
settings with MI70 indicator
You can see the compensation values that are currently used by GMP231 by selecting them as
display quantities from Main menu > Display > Quantities and Units. The quantities are as
follows:
• Tcomp: currently active temperature compensation value.
75

GMP231 User Guide M211501EN-E
• Pcomp: currently active pressure compensation value.
• Ocomp: currently active oxygen concentration compensation value.
• Hcomp: currently active relative humidity compensation value.
Figure 17 CO2 reading with Tcomp and Pcomp on MI70 screen
You can change the compensation settings from Main menu > Settings > Measurement
settings.
Figure 18 GMP231 compensation settings on MI70 screen
When you turn a compensation o, GMP231 still shows a value for the
corresponding display quantity (for example, Pcomp shows 1013.2 hPa). This is
the default compensation value that is mathematically neutral for the probe’s
internal compensation model.
More information
‣
Environmental compensation (page 13)
76

Chapter 7 – Operating with MI70 indicator
7.4 Calibration and adjustment with MI70 indicator
Before using the MI70 indicator for calibration and adjustment, see Calibration
and adjustment (page 71).
Make sure that the environmental compensation settings of the GMP231 are
properly set for your calibration environment.
When 2 probes are connected to the MI70 indicator, it uses Roman numerals “I”
and “II” to indicate which port the parameter or function in question is connected
to.
More information
‣
Changing environmental compensation settings with MI70 indicator (page 75)
7.4.1 1-point adjustment with an MI70-compatible reference
probe
1. Connect the GMP231 to Port I of the MI70 indicator.
2. Connect the calibrated reference probe to Port II. Make sure the reference probe is in the
same environment as the GMP231’s sensor.
3. If you are using the calibration adapter to feed a calibration gas to the GMP231, you must
feed the same gas to the reference probe also. Refer to the documentation of your
reference probe on how to do this, and what accessories you need.
4. Turn on the MI70 indicator.
5. Start the adjustment sequence from Main menu > Functions > Adjustments.
6. MI70 notifies you that automatic power o is disabled during adjustment mode, press OK
to acknowledge.
77

GMP231 User Guide M211501EN-E
7. To proceed with the adjustment, select the CO2(I) parameter in the Select Quantity
screen. In the Select Quantity screen you can also view the currently used compensation
values, and the Last adjustment date information. You can update the date and text using
the CDATE and CTEXT commands on the serial line.
8. You may be prompted to check the environmental settings of the reference probe before
proceeding. Press Yes to check the settings and Exit when you have checked and
corrected the settings.
9. The adjustment mode is now active, and you can see the measured CO2 readings and their
dierence on the screen. Allow the measurement to stabilize. To proceed with the
adjustment, press Adjust.
10.
Select To same as CO2(II).
11. You are prompted if you really want to adjust. Select Yes.
12. If the adjustment is successful MI70 shows the text Adjustment Done, after which you
return to the adjustment mode. At this point you can press Back and Exit to leave the
adjustment mode. The adjustment is now completed. If the adjustment cannot be applied
MI70 shows the text Cannot adjust, possibly followed by a text stating the reason. A
possible reason for an adjustment failure is attempting to apply a very large correction to
the reading.
More information
‣
Limits of adjustment (page 73)
78

Chapter 7 – Operating with MI70 indicator
7.4.2 1-point adjustment with a reference gas
1. Connect GMP231 to Port I of the MI70 indicator.
2. Feed a calibration gas to GMP231 using the calibration adapter accessory. If you are using
ambient air as the calibration gas, you must have a reference meter in the same
environment to verify the CO2 concentration.
3. Turn on the MI70 indicator.
4. Start the adjustment sequence from Main menu > Functions > Adjustments.
5. MI70 notifies you that automatic power o is disabled during adjustment mode, press OK
to acknowledge.
6. Select the CO2 parameter when prompted.
7. You may be prompted to check the environmental settings of the reference probe before
proceeding. Press Yes to check the settings and Exit when you have checked and
corrected the settings.
8. The adjustment mode is now active, and you can see the measured CO2 reading on the
screen. To proceed with the adjustment, press Adjust.
79

GMP231 User Guide M211501EN-E
9. Select 1-point adjustment.
10. You are prompted if you really want to adjust. Select Yes.
11. You are now in the 1-point adjustment screen. Allow the measurement to stabilize and
press Ready.
12. Enter the CO2 concentration of the reference gas and press OK.
13. You are prompted if you really want to adjust. Select Yes.
14. If the adjustment is successful MI70 shows the text Adjustment Done, after which you
return to the adjustment mode. At this point you can press Back and Exit to leave the
adjustment mode. The adjustment is now completed. If the adjustment cannot be applied
MI70 shows the text Cannot adjust, possibly followed by a text stating the reason. A
possible reason for an adjustment failure is attempting to apply a very large correction to
the reading.
More information
‣
Limits of adjustment (page 73)
80

8. Troubleshooting
8.1 Problem situations
Table 70 Possible problem situations and their remedies
Problem Possible cause Remedy
Analog output reading is
unchanging and appears
incorrect.
Probe outputs stars "****" on
serial line instead of
measurement data.
Unable to access probe on
RS-485 line.
Probe in POLL mode with
CO2 measurement not
working.
Analog output is in error
state.
Incorrect supply voltage. Check the power supply. Check the
Unsuitable operating
environment.
Incorrect wiring. Check that the RS-485 connection is
Power cycle or reset the probe and
unknown address.
Condensation on the sensor. Remove the PTFE filter and check if
Remove the cause of the error state
and the analog output recovers its
normal function.
active errors using the ERRS
command on the serial line.
Verify that the operating
environment is within specified
operating limits.
wired correctly.
try again.
Issue the ?? command to make the
probe output its information. Then
use the OPEN command to open a
line to the probe’s address.
condensation has formed on the
sensor. If yes, dry out the
condensation with instrument air
and insert a new dry filter. Keep the
probe powered and operating to
prevent re-occurrence.
Chapter 8 – Troubleshooting
More information
‣
Wiring (page 22)
‣
Analog output error state (page 81)
8.2
Analog output error state
GMP231 sets the analog output channel into a defined error level instead of the measured
result in 2 situations:
81

GMP231 User Guide M211501EN-E
• Probe detects a measurement malfunction. This means an actual measurement problem,
such as sensor damage or unsuitable environmental conditions.
• Measured value(s) are well outside the scaled output range.
The default error level depends on the output type:
• For 4 ... 20 mA output, the default error level is 3.6 mA.
• For 0 ... 20 mA output, the default error level is 23 mA.
The probe resumes normal operation of the analog output when the cause of the error state is
removed.
More information
‣
Analog output overrange behavior (page 15)
82

Chapter 9 – Technical data
9. Technical data
9.1 GMP231 specifications
Table 71 Measurement performance
Property Description/Value
Measurement range 0 … 20 %CO
Calibration uncertainty at 5 %CO
2
±0.1 %CO
Start-up time < 20 s
Warm-up time for full spec. < 3 min
Response time
T63 < 30 s
T90 < 50 s
Accuracy at 37 °C, 1013 hPa
Repeatability at:
0 … 8 %CO
8 … 12 %CO
12 … 20 %CO
2
2
2
Non-linearity at 0 … 20 %CO
2
±0.1 %CO
±0.2 %CO
±0.4 %CO
±0.1 %CO
Temperature dependence
With compensation at 3 … 12 %CO2, 20 … 60 °C ±0.1 %CO
Without compensation (typical) -0.4 % of reading/°C
Pressure dependence
With compensation at 3 … 12 %CO2, 700 … 1100 hPa ±0.015 % of reading/hPa
Without compensation (typical) +0.15 % of reading/hPa
Humidity dependence
With compensation at 0 … 20 %CO2, 0 … 100 %RH ±0.9 % of reading (at 37 °C)
Without compensation (typical) +0.05 % of reading/%RH
O2 dependence
With compensation at 0 … 20 %CO2, 0 … 90 %O
2
±0.6 % of reading
2
2
2
2
2
2
2
83

GMP231 User Guide M211501EN-E
Property Description/Value
Without compensation (typical) -0.08 % of reading/%O
2
Long-term stability
0 … 8 %CO
2
8 % … 12 %CO
12 % … 20 %CO
2
2
< ±0.2 %CO2/year
< ±0.5 %CO2/year
< ±1.0 %CO2/year
Table 72 Operating environment
Property Description/Value
Operating temperature for CO2 measurement 0 … +70 °C (+32 … +158 °F)
Max. temperature durability in standby mode
Max. +195 °C (+383 °F)
(sensor head only)
Heat sterilization 180 °C durability At least 120 cycles
Storage temperature -40 … +75 °C (-40 … +167 °F)
Pressure (compensated) 500 … 1100 hPa
Pressure (operating) < 1500 hPa
Humidity 0 … 100 %, non-condensing
Condensation prevention Sensor head heating when power on
Chemical tolerance DMSO, IPA (70 %), H2O2 (2000 ppm, non-
condensing), ethanol, acetic acid
Electromagnetic compatibility EN61326-1, Generic Environment
Table 73 Inputs and outputs
Property Description/Value
Digital outputs
I2C 5 V, RS-485 (2-wire with Vaisala Industrial
Protocol)
Analog output 0 … 20 mA (scalable)
max. load 600 Ω
Power consumption < 1 W (pulsed)
Operating voltage 11 … 30 VDC
20 ... 30 VDC (with analog output)
84

Chapter 9 – Technical data
Table 74 Mechanical specifications
Property Description/Value
Connector M12/8 pin
Weight 150 g (5.29 oz) without cable
200 g (7.05 oz) with cable
IP rating IP54 (sensor head)
IP20 (electronics housing)
Materials
Housing Metal coated plastic ABS+PC
Inner tube Aluminum
Probe tube PPSU
Filter PTFE
Dimensions
Probe tube max. diameter 30.2 mm (1.19 in)
Probe tube min. diameter 24.8 mm (0.98 in)
Probe tube length 118.5 mm (4.67 in)
Sensor filter diameter 19 mm (0.75 in)
Sensor filter length 12 mm (0.47 in)
9.2 Spare parts and accessories
Table 75 Spare parts and accessories for GMP231
Description Item code
M12 connection cable 0.9 m with open ends DRW240977SP
M12 connection cable 0.9 m with open ends ASM210903SP
Service cable for MI70 221801
USB PC connection cable 221040
PTFE filter DRW240494SP
Silicone plug DRW240015SP
Attachment bracket DRW240247SP
Calibration adapter for GMP231 239523
85


Online store
Accessories, spare parts, and calibration and repair products are available online at
store.vaisala.com.
Warranty
For standard warranty terms and conditions, see www.vaisala.com/warranty.
Please observe that any such warranty may not be valid in case of damage due to normal wear
and tear, exceptional operating conditions, negligent handling or installation, or unauthorized
modifications. Please see the applicable supply contract or Conditions of Sale for details of the
warranty for each product.
Technical support
Contact Vaisala technical support at helpdesk@vaisala.com. Provide at least the
following supporting information as applicable:
• Product name, model, and serial number
• Software/Firmware version
• Name and location of the installation site
• Name and contact information of a technical person who can provide further
information on the problem
For more information, see www.vaisala.com/support.
Recycling
Recycle all applicable material.
Follow the statutory regulations for disposing of the product and packaging.
87


www.vaisala.com
 Loading...