

Page 1

Quick Guide
ASM245628SP
Vaisala H UMICAP® Moisture and Temperature Transmitter for Oil MMT162
MMT162 Weather Shield Installation
1
MMT162 must be installed to the process before
attaching the weather shield. Tighten only from the
30 mm nut, never from the transmitter body. See
MMT162 User’s Guide for installation instructions.
3 4
2
Place the 30 mm nut on MMT162 body on the
weather shield’s locking base. Lower the locking bar
through the locking base and weather shield base.
Tighten the nuts on the locking bar to fasten
MMT162 to the weather shield base.
5
If wiring from above, note that moisture can move
down along the cable to the connectors. Make sure
moisture has no direct downward path to MMT162.
Ref.M211892EN-B
© Vaisala 2017. All Rights Reserved.
*M211892EN*
r
When wiring, use the cable clamp on the bottom of
the shield base to secure the cable.
6
After wiring, insert the grooves of the weather
shield cover in the washer nuts and tighten.
Vaisala Oyj
Vanha Nurmijärventie 21
c
FI-01670 Vantaa, Finland
A
Page 2
Quick Guide
ASM245628SP
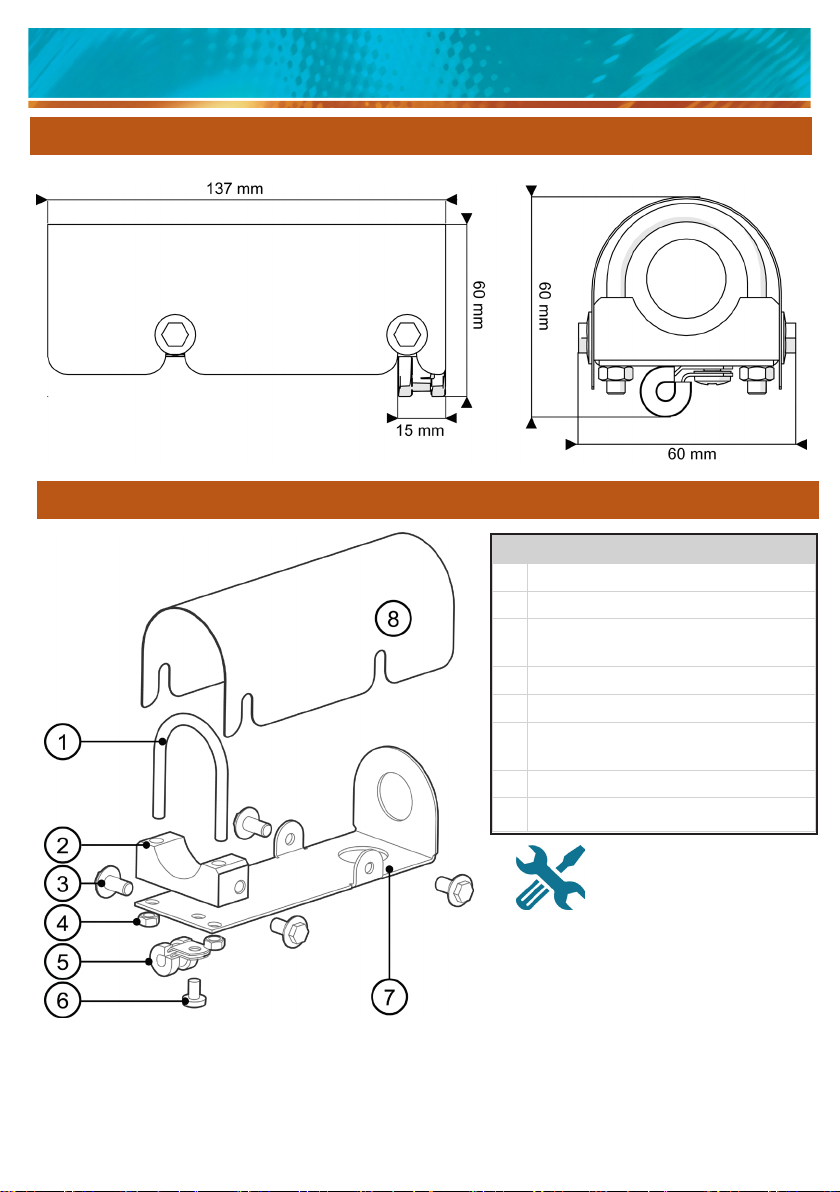
Weather Shield Dimensions
Weather Shield Parts
Vaisala H UMICAP® Moisture and Temperature Transmitter for Oil MMT162
MMT162 Weather Shield Installation
Part List
1 Locking bar for MMT162
2 Locking base for MMT162
3 Screw nut and washer
(4 pcs, M6x12 ECO-FIX A2 230887)
4 Nut (2 pcs, M5 DIN 934 A4)
5 Cable clamp
6 Phillips screw
(1 pcs, M5x8 DIN 7985 A4)
7 Weather shield base plate
8 Weather shield cover
Ref.M211892EN-B
© Vaisala 2017. All Rights Reserved.
*M211892EN*
r
c
Required tools:
Adjustable or socket wrench
Phillips screwdriver
Vaisala Oyj
Vanha Nurmijärventie 21
FI-01670 Vantaa, Finland
A
 Loading...