

Page 1
M210865EN-J
User Guide
Vaisala DRYCAPâ Dew Point Transmitter
DMT152
Page 2

PUBLISHED BY
Vaisala Oyj
Vanha Nurmijärventie 21, FI-01670 Vantaa, Finland
P.O. Box 26, FI-00421 Helsinki, Finland
+358 9 8949 1
Visit our Internet pages at www.vaisala.com.
© Vaisala Oyj 2019
No part of this document may be
reproduced, published or publicly
displayed in any form or by any means,
electronic or mechanical (including
photocopying), nor may its contents be
modified, translated, adapted, sold or
disclosed to a third party without prior
written permission of the copyright holder.
Translated documents and translated
portions of multilingual documents are
based on the original English versions. In
ambiguous cases, the English versions are
applicable, not the translations.
The contents of this document are subject
to change without prior notice.
Local rules and regulations may vary and
they shall take precedence over the
information contained in this document.
Vaisala makes no representations on this
document’s compliance with the local
rules and regulations applicable at any
given time, and hereby disclaims any and
all responsibilities related thereto.
This document does not create any legally
binding obligations for Vaisala towards
customers or end users. All legally binding
obligations and agreements are included
exclusively in the applicable supply
contract or the General Conditions of Sale
and General Conditions of Service of
Vaisala.
Page 3

Table of Contents
Table of Contents
1. About This Document................................................................................... 7
1.1 Version Information..........................................................................................7
1.2 Related Manuals................................................................................................ 7
1.3 Documentation Conventions...........................................................................7
1.4 Trademarks........................................................................................................ 8
2. Product Overview...........................................................................................9
2.1 Introduction to DMT152....................................................................................9
2.1.1 Basic Features and Options......................................................................9
2.1.2 Transmitter Structure.............................................................................. 10
2.1.3 Safety..........................................................................................................11
2.1.4 ESD Protection...........................................................................................11
2.1.5 Regulatory Compliances.......................................................................... 11
3. Functional Description................................................................................ 12
3.1 Advanced DRYCAP Technology.................................................................... 12
3.1.1 Auto-Calibration.......................................................................................12
3.1.2 Sensor Purge.............................................................................................12
4. Installation........................................................................................................ 13
4.1 Selecting the Location....................................................................................13
4.2 Installing the Transmitter................................................................................13
4.3 Wiring................................................................................................................15
4.3.1 Output Noise Minimization Option........................................................ 17
4.3.2 Connection Cables................................................................................... 18
4.3.3 Power Supply Requirements.................................................................. 19
4.4 Loop-Powered Display................................................................................... 19
4.5 Sampling from Process..................................................................................20
4.6 Sampling Accessories..................................................................................... 21
4.6.1 DMT242SC Sampling Cell........................................................................21
4.6.2 DMT242SC2 Sampling Cell with Swagelok Connectors...................... 21
4.6.3 DSC74 Sampling Cell with Quick Connector and Leak Screw........... 22
4.6.4 DSC74B Two-Pressure Sampling Cell................................................... 23
4.6.5 DSC74C Two-Pressure Sampling Cell with Coil...................................25
4.6.6 NW40 Mounting Flange......................................................................... 28
5. Serial Line Operation.................................................................................. 29
5.1 Connecting to Serial Interface......................................................................29
5.1.1 Installing Driver for USB Service Cable................................................ 29
5.1.2 Terminal Application Settings............................................................... 29
5.1.3 List of Serial Commands..........................................................................31
5.2 Device Information.........................................................................................33
5.2.1 Show Device Information.......................................................................33
5.2.2 Show Transmitter Status........................................................................ 33
5.2.3 Show Firmware Version..........................................................................34
1
Page 4

DMT152 User Guide M210865EN-J
5.3 Configuring Analog Outputs.........................................................................35
5.3.1 Limit Alarm.............................................................................................. 36
5.3.2 Purge Status Alarm................................................................................. 37
5.3.3 Malfunction Alarm...................................................................................38
5.3.4 Select Analog Output Parameter and Scaling.....................................39
5.4 Configuring Serial Line Operation................................................................39
5.4.1 Set Serial Line Settings...........................................................................39
5.4.2 Set Serial Line Response Time.............................................................. 40
5.4.3 Set Transmitter Address........................................................................ 40
5.4.4 Set Measurement Output Format.........................................................40
5.4.5 Select Unit................................................................................................42
5.4.6 Set Serial Line Operating Mode.............................................................43
5.5 Configuring Measurement Parameters........................................................43
5.5.1 Enable or Disable Sensor Purge............................................................ 43
5.5.2 Set Pressure Value for ppm Calculation...............................................44
5.5.3 Set Molar Mass for ppmw Calculation...................................................45
5.6 Serial Line Output Commands..................................................................... 46
5.6.1 Start Measurement Output....................................................................46
5.6.2 Stop Measurement Output.....................................................................47
5.6.3 Set Output Interval..................................................................................47
5.6.4 Output a Reading Once..........................................................................47
5.7 Troubleshooting and Maintenance Commands..........................................48
5.7.1 Display Currently Active Errors.............................................................48
5.7.2 Test Analog Outputs...............................................................................48
5.7.3 Calibrate Analog Output........................................................................49
5.7.4 Extend Analog Output Range...............................................................49
5.8 Other Commands...........................................................................................50
5.8.1 Opening the Transmitter in POLL Mode...............................................50
5.8.2 Closing the Connection to a Transmitter in POLL Mode....................50
5.8.3 Display Command List.............................................................................51
5.8.4 Set Time.....................................................................................................51
5.8.5 Reset Transmitter..................................................................................... 51
5.8.6 Set LED Voltage........................................................................................51
5.8.7 Restore Factory Settings........................................................................52
6. Maintenance....................................................................................................53
6.1 Cleaning the Transmitter............................................................................... 53
6.2 Changing the Filter.........................................................................................53
6.3 Calibration and Adjustment..........................................................................54
6.3.1 Field Check Using DM70........................................................................ 54
7. Troubleshooting............................................................................................ 57
7.1 Typical Problems.............................................................................................57
7.2 Unknown Serial Settings................................................................................57
7.3 Error State........................................................................................................57
7.4 Error Codes..................................................................................................... 58
2
Page 5

Table of Contents
8. Technical Data............................................................................................... 60
8.1 Specifications................................................................................................. 60
8.2 Spare Parts and Accessories.........................................................................63
8.3 Dimensions......................................................................................................65
Warranty............................................................................................................ 67
Technical Support............................................................................................67
Recycling...........................................................................................................67
3
Page 6

DMT152 User Guide M210865EN-J
List of Figures
Figure 1 DMT152 Probe Parts.........................................................................................10
Figure 2 DMT152 Installed Directly to Pipeline (Max. 50 bar)............................... 13
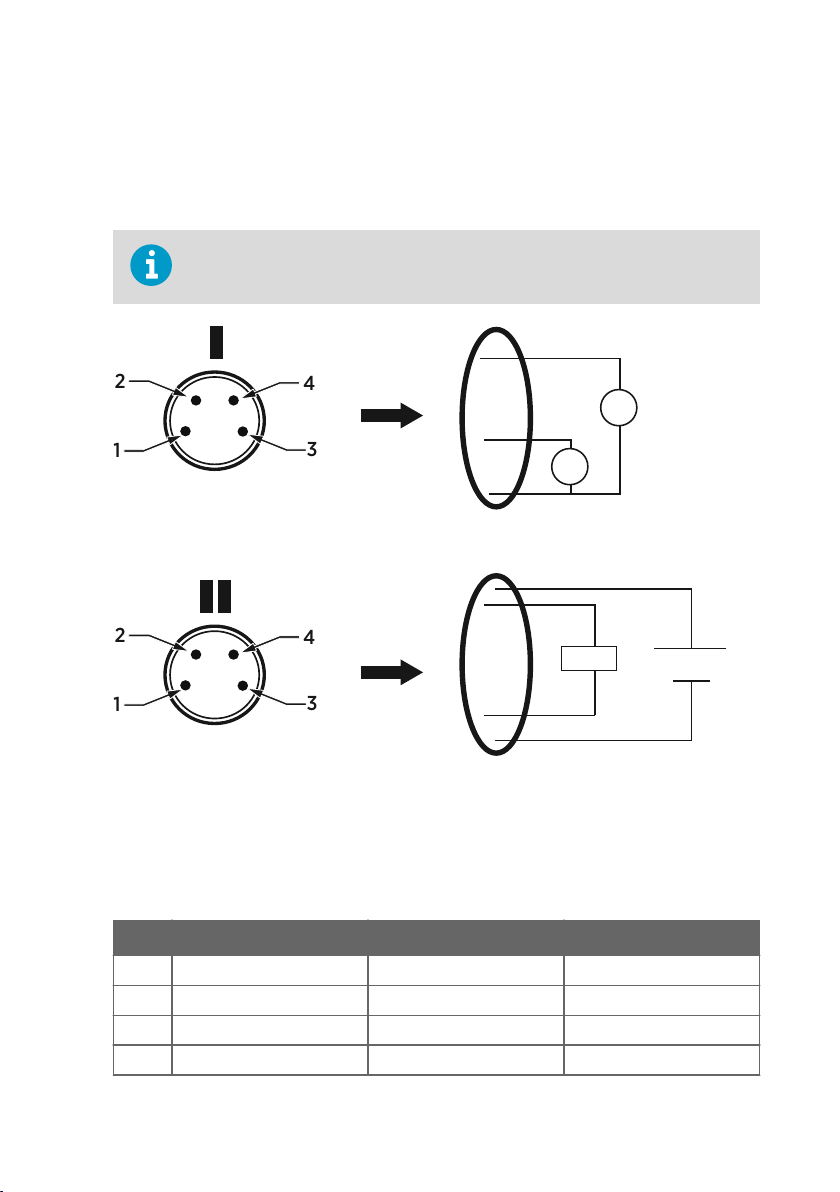
Figure 3 Connectors I and II............................................................................................16
Figure 4 Connector Pinout..............................................................................................16
Figure 5 Output Noise Minimization Wiring Option................................................ 17
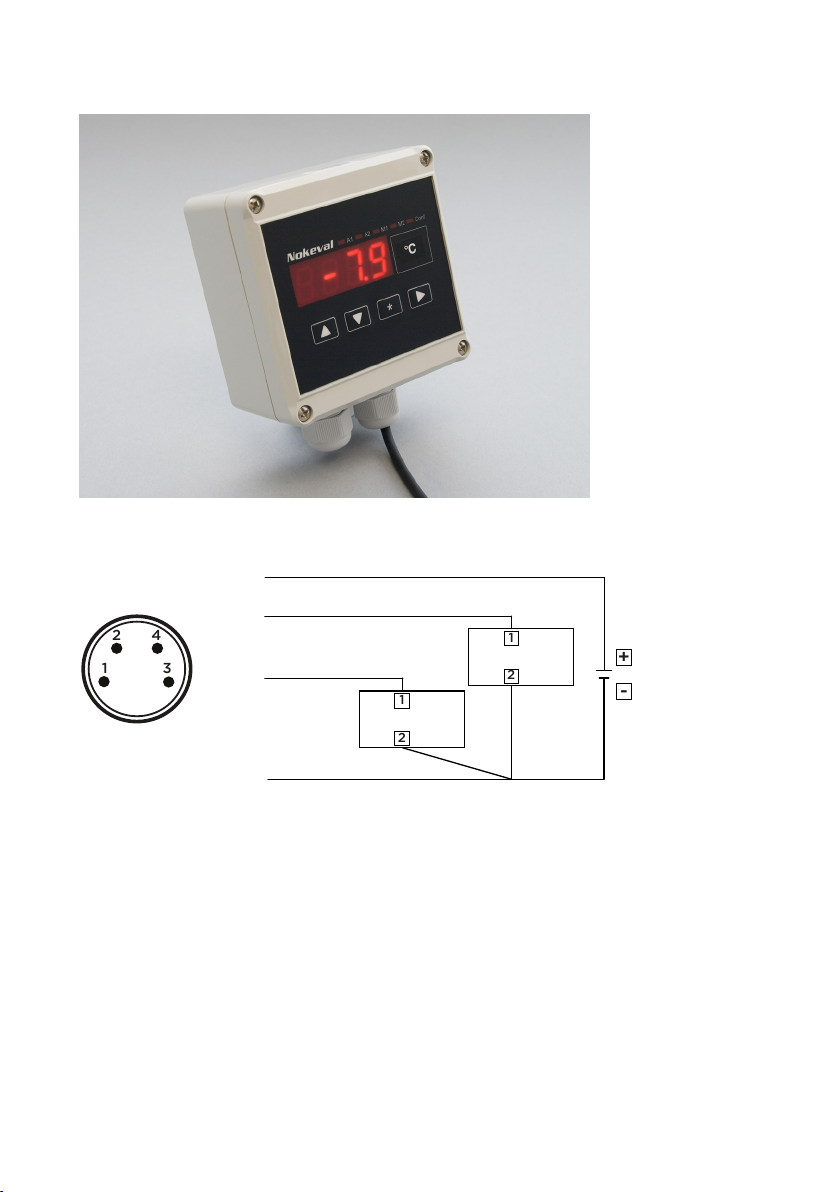
Figure 6 Nokeval 301 Loop-Powered Display...........................................................20
Figure 7 DMT152 Nokeval 301/302 Wiring Diagram...............................................20
Figure 8 Sampling Cells DMT242SC2 (Left) and DMT242SC (Right).................22
Figure 9 DSC74 Sampling Cell with Accessories......................................................23
Figure 10 DSC74B............................................................................................................... 24
Figure 11 Removing the Leak Screw............................................................................. 25
Figure 12 Default Assembly of DSC74C....................................................................... 26
Figure 13 Alternative Assembly of DSC74C (for Tight Spaces).............................27
Figure 14 NW40 Mounting Flange.................................................................................28
Figure 15 NW40 Mounting Flange Dimensions......................................................... 28
Figure 16 Filter Structure..................................................................................................53
Figure 17 Accuracy Over Temperature Range.............................................................61
Figure 18 DMT152 Dimensions........................................................................................ 65
4
Page 7

List of Tables
Table 1 Document Versions (English).......................................................................... 7
Table 2 Related Manuals...................................................................................................7
Table 3 DMT152 Measurement Parameters.................................................................9
Table 4 Standard Wiring Pinouts and Wire Colors..................................................15
Table 5 Output Noise Minimization Wiring Option Pinouts and
Wire Colors..........................................................................................................17
Table 6 Connection Cable Options.............................................................................. 18
Table 7 Default Serial Interface Settings...................................................................29
Table 8 List of Serial Commands.................................................................................. 31
Table 9 ? command......................................................................................................... 33
Table 10 STAT command................................................................................................. 34
Table 11 VERS command................................................................................................ 34
Table 12 AMODE command............................................................................................ 35
Table 13 ALARM command.............................................................................................36
Table 14 STATUS command............................................................................................ 38
Table 15 AERR command................................................................................................ 38
Table 16 ASEL command.................................................................................................39
Table 17 SERI command.................................................................................................. 39
Table 18 FORM Command Parameters.........................................................................41
Table 19 FORM Command Modifiers.............................................................................41
Table 20 UNIT command..................................................................................................42
Table 21 SMODE Command............................................................................................43
Table 22 Selection of Output Modes............................................................................ 43
Table 23 XPUR command................................................................................................44
Table 24 PRES and XPRES command..........................................................................44
Table 25 Pressure Conversion Coecients.................................................................45
Table 26 MOL command.................................................................................................. 46
Table 27 R Command........................................................................................................46
Table 28 INTV Command................................................................................................. 47
Table 29 ERRS command................................................................................................ 48
Table 30 ATEST command.............................................................................................. 48
Table 31 ACAL command................................................................................................49
Table 32 AOVER command.............................................................................................49
Table 33 OPEN command................................................................................................50
Table 34 CLOSE command..............................................................................................50
Table 35 TIME command...................................................................................................51
Table 36 LED command....................................................................................................52
Table 37 Error Codes.........................................................................................................58
Table 38 Measurement Performance........................................................................... 60
Table 39 Operating Environment................................................................................... 61
Table 40 Inputs and Outputs........................................................................................... 61
Table 41 Mechanical Specifications.............................................................................. 62
Table 42 Output Cable Specifications.......................................................................... 62
Table 43 Accessories.........................................................................................................63
List of Tables
5
Page 8

DMT152 User Guide M210865EN-J
6
Page 9
Chapter 1 – About This Document
1. About This Document
1.1 Version Information
Table 1 Document Versions (English)
Document Code Date Description
M210865EN-J October 2019 This manual.
• Added information on Nokeval display support.
• Corrected the dew point measurement range upper limit
specification from −10 °C to −20 °C.
• Added information on the minimum valid pressure
setting in the PRES/XPRES
• Updated the document template.
M210865EN-H October 2017 Previous version. IP class specification of the probe
M210865EN-G October 2015 Updated the dew point temperature measurement
updated to IP66 (applies to probes manufactured from
March 2017 onwards). Added information about the
output noise minimization wiring option.
accuracy
specification.
1.2 Related Manuals
commands.
Table 2 Related Manuals
Document Code Description
M210866EN DMT152 Quick Reference Guide
1.3
Documentation Conventions
WARNING!
follow instructions carefully at this point, there is a risk of injury or even death.
CAUTION!
follow instructions carefully at this point, the product could be damaged or
important data could be lost.
Warning alerts y
Caution w
ou to a serious hazard. If you do not read and
arns you of a potential hazard. If you do not read and
7
Page 10

DMT152 User Guide M210865EN-J
Note highlights important information on using the product.
1.4 Trademarks
DRYCAPâ is a registered trademark of Vaisala Oyj.
All other product or company names that may be mentioned in this publication are trade
names, trademarks, or registered trademarks of their respective owners.
8
Page 11

Chapter 2 – Product Overview
2. Product Overview
2.1 Introduction to DMT152
The Vaisala DRYCAPâ dew point transmitter DMT152 measures dew point temperature
accurately in a measurement range from −80 °C to −20 °C (−112 … −4 °F). The maximum
output range of the transmitter is −100 … 20 °C (−148 … +68 °F).
DMT152 is designed for a wide range of OEM applications. The transmitter is easy to install, and
the mechanics have been designed for harsh environments requiring protection against dust,
dirt, and splashed water.
The excellent stability and reliability of the transmitter’s performance is based on advanced
DRYCAP polymer sensor technology. The DRYCAP technology has low maintenance needs due
to its excellent long-term stability and durability against condensation. For more information
on DRYCAP technology, see Advanced DRYCAP Technology (page 12).
DMT152 Measurement Parameters
Table 3 DMT152 Measurement Parameters
Parameter Abbreviation Metric Unit Non-Metric Unit
Dew point / frost point
temperature
Parts per million H2O ppmv/ppm
TDF °C °F
w
ppmv/ppm
w
2.1.1 Basic Features and Options
• Calibrated dew point measurement range −80 … −20 °C Td, output range
−100 … +20 °C T
• Output in Td 1) and ppm
• DRYCAP polymer sensor with auto-calibration and sensor purge ensures long-term
stability
• Small size to fit in tight installations
• Two analog output channels, selectable from 0 … 20 mA / 4 … 20 mA and 0 … 5 V /
0 … 10 V
• Configurable alarm modes for analog outputs
• Digital output: RS-485
• Serial line connection also via USB serial interface cable
• Simultaneous use of analog and digital output possible
• Field check suitability with DM70 handheld meter
• Sampling cells with dierent installation options available as optional accessories
1) When the dew point is below 0 °C, the transmitter outputs frost point for T
d
d
9
Page 12
1
2
3
4
5
DMT152 User Guide M210865EN-J
• LED cable option that enables a visual indication of transmitter status: LED lit when
measurement is frozen (for example, purge active), blinking for malfunction alarm
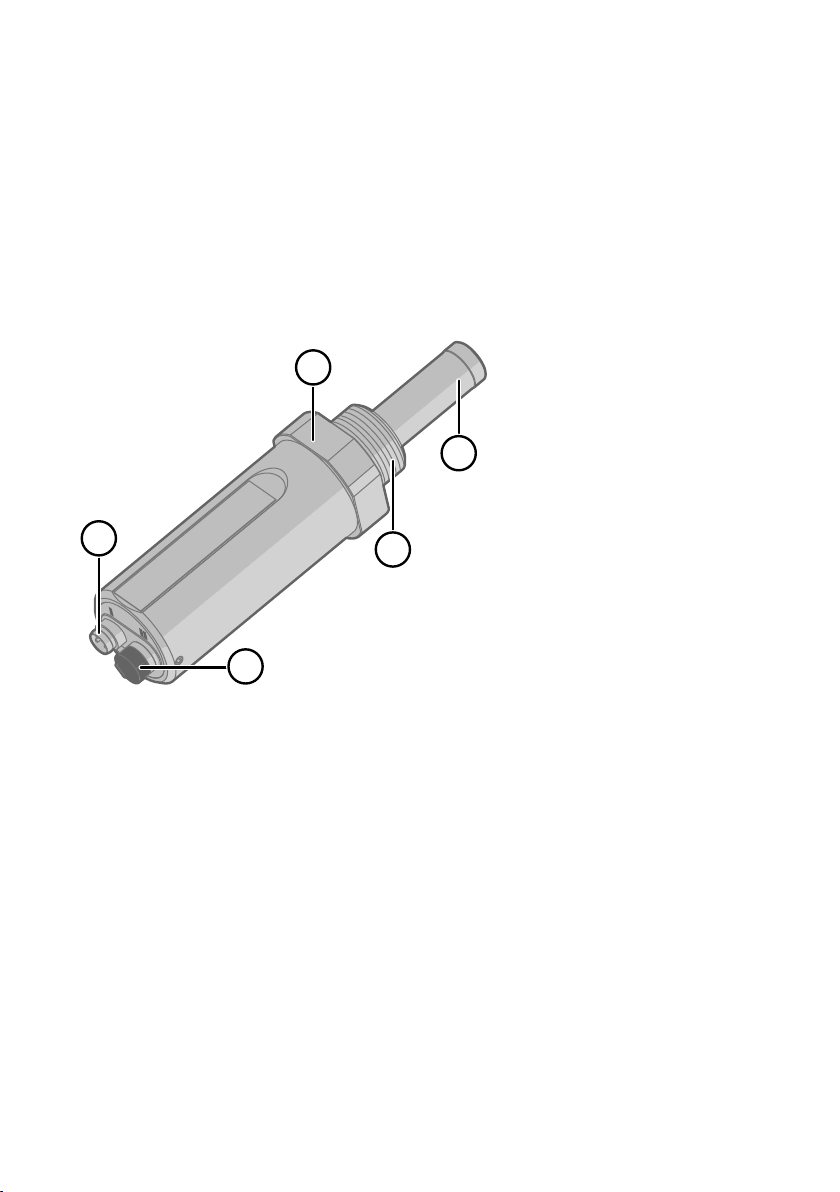
2.1.2 Transmitter Structure
When the transmitter is delivered, the filter is protected by a yellow transport protection cap
that keeps the sensor dry. The transport protection cap should be left on the transmitter
during storage. Remove the transport protection cap before installing the transmitter.
The transmitter body does not have user serviceable parts inside, and is not designed to be
opened. Opening the transmitter will void the warranty.
Figure 1 DMT152 Probe Parts
4-pin M8 connector I: analog output channels and operating power
1
2 4-pin M8 connector II (shown with protective cap): digital output (RS-485) and operating
power
3 Tightening nut (30 mm)
4 Connection thread, alternatives:
• ISO G1/2"
• NPT 1/2"
• UNF 3/4"-16 2A
5 DRYCAP sensor protected with stainless steel mesh filter (see Changing the Filter
When installing a DMT152 transmitter with ISO or UNF thread, use a sealing ring to achieve a
tight installation. Three copper sealing rings are provided with the transmitter, and more can
be ordered from Vaisala. Note that the sealing rings for ISO and UNF threads are dierent. See
Spare Parts and Accessories (page 63).
10
• UNF 5/8"-18
(page 53))
Page 13
Chapter 2 – Product Overview
Do not use a sealing ring with the NPT thread. Instead, seal the thread using PTFE
tape or PTFE sealant paste.
2.1.3 Safety
This product has been tested for safety. Note the following precautions:
CAUTION!
product or lead to malfunction.
CAUTION!
and is not designed to be opened. Opening the transmitter will void the
warranty.
Do not modify the unit. Improper modification can damage the
The transmitter body does not have user serviceable parts inside,
2.1.4 ESD Protection
Electrostatic Discharge (ESD) can cause immediate or latent damage to electronic circuits.
Vaisala products are adequately protected against ESD for their intended use. However, it is
possible to damage the product by delivering an electrostatic discharge when touching,
removing or inserting any objects inside the equipment housing.
Avoid touching component contacts or connectors when working with the device.
2.1.5 Regulatory Compliances
This product is in conformity with the provisions of the following EU directives:
• EMC-Directive
• RoHS-Directive
Conformity is shown by compliance with the following standards:
• EN 61326-1: Electrical equipment for measurement, control, and laboratory use – EMC
requirements – for use in industrial locations.
• EN 550022: Information technology equipment – Radio disturbance characteristics –
Limits and methods of measurement
11
Page 14

DMT152 User Guide M210865EN-J
3. Functional Description
3.1 Advanced DRYCAP Technology
Dew point transmitter DMT152 utilizes an advanced, patented measurement technology to
ensure accurate measurement with excellent long-term stability. This results in very low
maintenance requirements for the transmitter. The lasting performance is achieved with
microprocessor technology and software that automatically performs self-diagnostic functions
in addition to the normal dew point measurement. The self-diagnostic procedures that are
conducted are called auto-calibration, sensor purge, and sensor warming.
3.1.1 Auto-Calibration
The auto-calibration feature of the DMT152 transmitter is an automatic procedure that greatly
reduces the possible drift in the dry end of the dew point measurement.
Auto-calibration is performed:
• at 45-minute intervals
• at shorter intervals if Td is near the dry end of the measurement range
• when the transmitter is powered up
• when the measured environment changes rapidly.
During auto-calibration the sensor is warmed for a short period (< 1 min) and the sensor
capacitance values are evaluated at the elevated temperature. The possible dry end drift is
then corrected to correspond to the calibrated values. Measurement and output remain active
during auto-calibration.
Auto-calibration is carried out only if several criteria for the measurement environment are
fulfilled. This ensures the reliability of the adjustments, and maintains the excellent long-term
stability.
3.1.2 Sensor Purge
Sensor purge is also an automatic procedure that minimizes the drift at the wet end readings
of the dew point measurement. Sensor purge is performed once a week or when the power is
switched on. The sensor is heated for several minutes, which will then evaporate all excess
molecules out of the sensor polymer. This, together with the auto-calibration, results in a very
small drift. The measurement output of the transmitter is frozen to the last measured value for
the duration of the sensor purge.
12
Page 15
Chapter 4 – Installation
4. Installation
4.1 Selecting the Location
It is important that the conditions at the point of installation represent well the gas to be
measured. Temperature changes do not aect the dew point measurement, but pressure
changes will have an eect on the measurement. All leaks in the system must be eliminated to
avoid ambient humidity aecting the measurement.
Direct installation to the measured gas is the recommended installation method if the
temperature of the gas is suitable for DMT152 and no additional filtering is needed due to very
dusty or oily gas. Oil as such is not harmful for the DRYCAP sensor, but response time may be
slower if there are oil particles in the system, or if oil is collected to the filter over a longer
period of time. The maximum measurement pressure is 50 bara / 725 psia (absolute pressure)
for direct measurement.
If the gas temperature is higher than the specified maximum operating temperature of the
transmitter, gas sampling and cooling it to ambient temperature (for example, 10 °C / 18 °F) is
recommended. Note that the dew point temperature must be clearly lower than the ambient
temperature to avoid condensation in the sampling line. Sampling from the process is easy by
using Vaisala sampling cell options; see Sampling Accessories (page 21).
DMT152 is light in weight, which means that it can be installed in a sample pipeline in the
sampling cells without the need for any additional mechanical support.
4.2
Installing the Transmitter
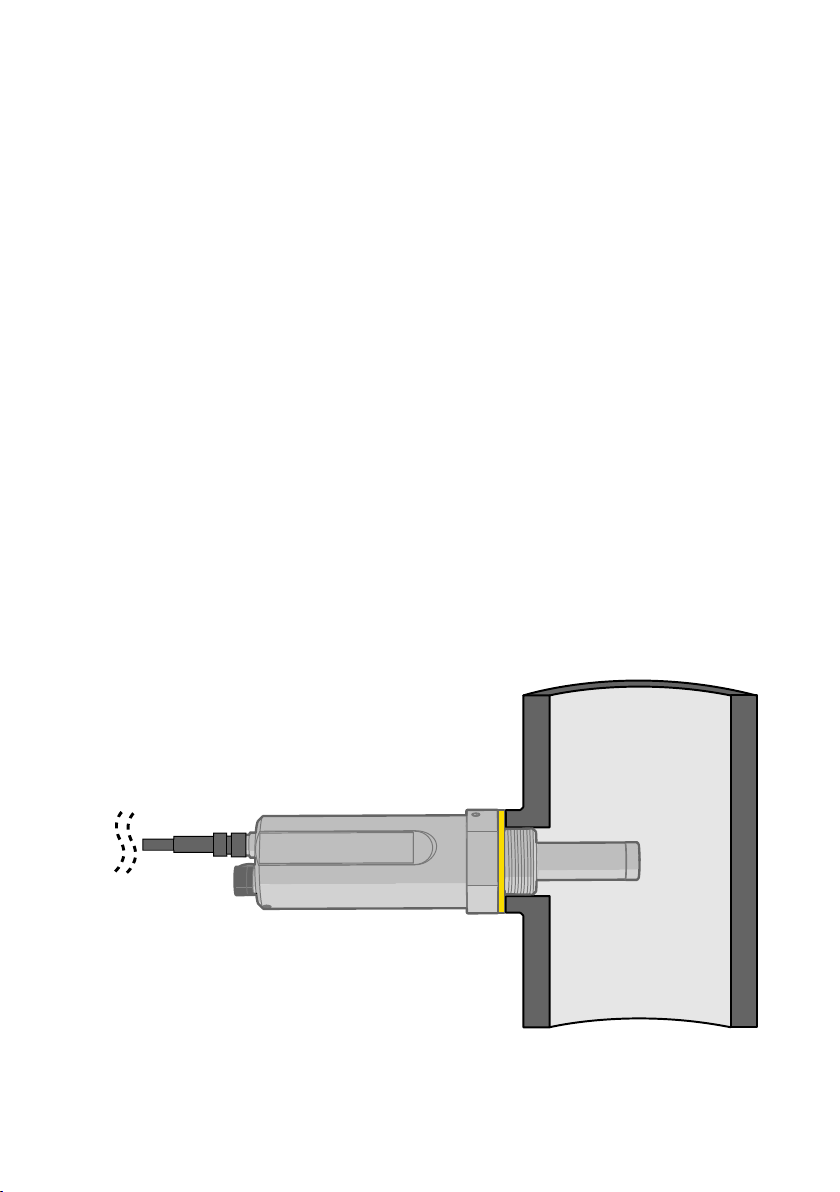
Figure 2 DMT152 Installed Directly to Pipeline (Max. 50 bar)
13
Page 16
30 mm
DMT152 User Guide M210865EN-J
After selecting a suitable measurement location, install the transmitter as instructed here.
1. Remove the yellow transport protection cap from the transmitter. Do not touch the filter
with your hands.
2. Prepare the sealing of the connection:
a. If the transmitter has a parallel ISO G1/2" thread or UNF 3/4"-16 thread, place the
sealing ring at the base of the thread. Always use a new sealing ring; do not reuse a
previously installed one.
b. If the transmitter has an NPT 1/2" thread, do not use the sealing ring. Instead, apply
PTFE tape or suitable sealant paste to the thread. Follow the application instructions
of the paste.
3. Make sure that the threads on the mounting point are of the correct type, and fasten the
transmitter to the measurement point. Use your hands to turn the probe until it feels tight.
Do not use force at this point, and check that the sealing ring (if used) remains centered.
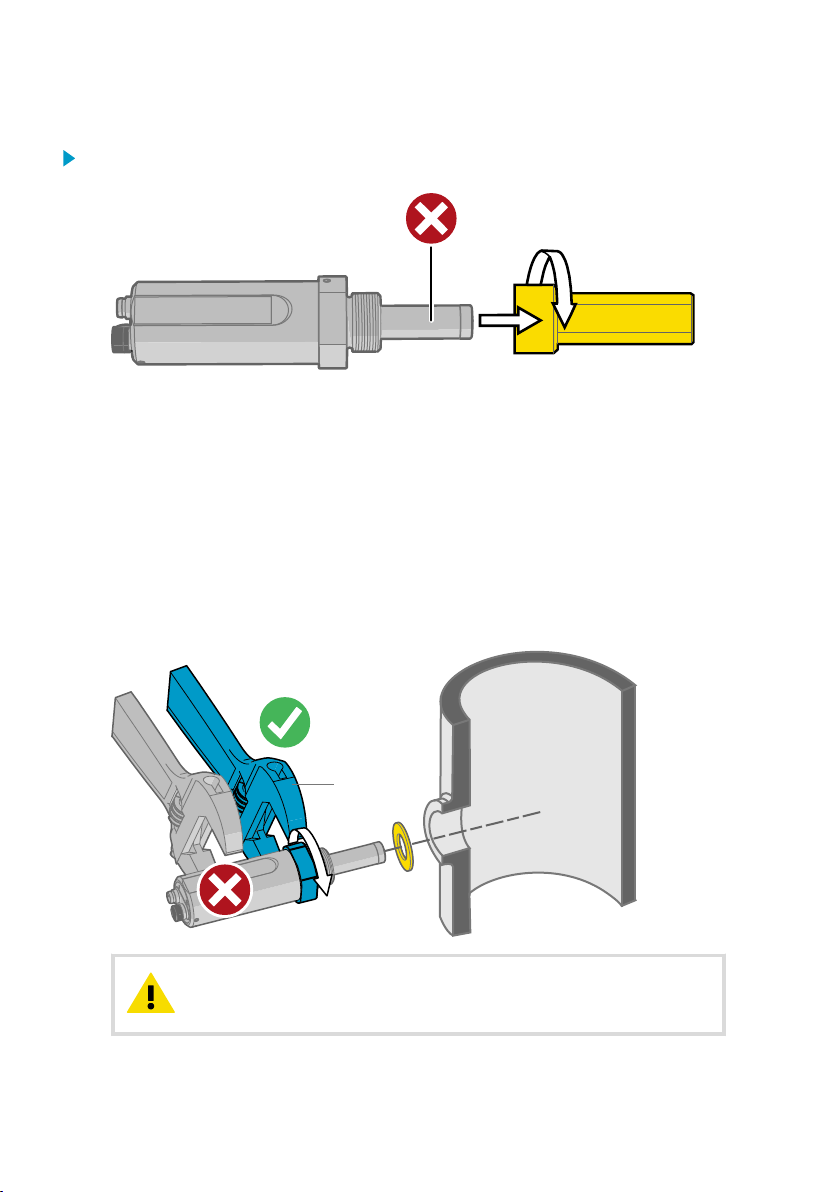
4. Use a 30 mm wrench to tighten the connection to 25 Nm. If you do not have a 30 mm
wrench, use a 1 3/16" wrench or an adjustable wrench.
CAUTION!
NOT apply force to other points in the probe body.
Only tighten the probe from the 30 mm tightening nut. Do
14
Page 17
Chapter 4 – Installation
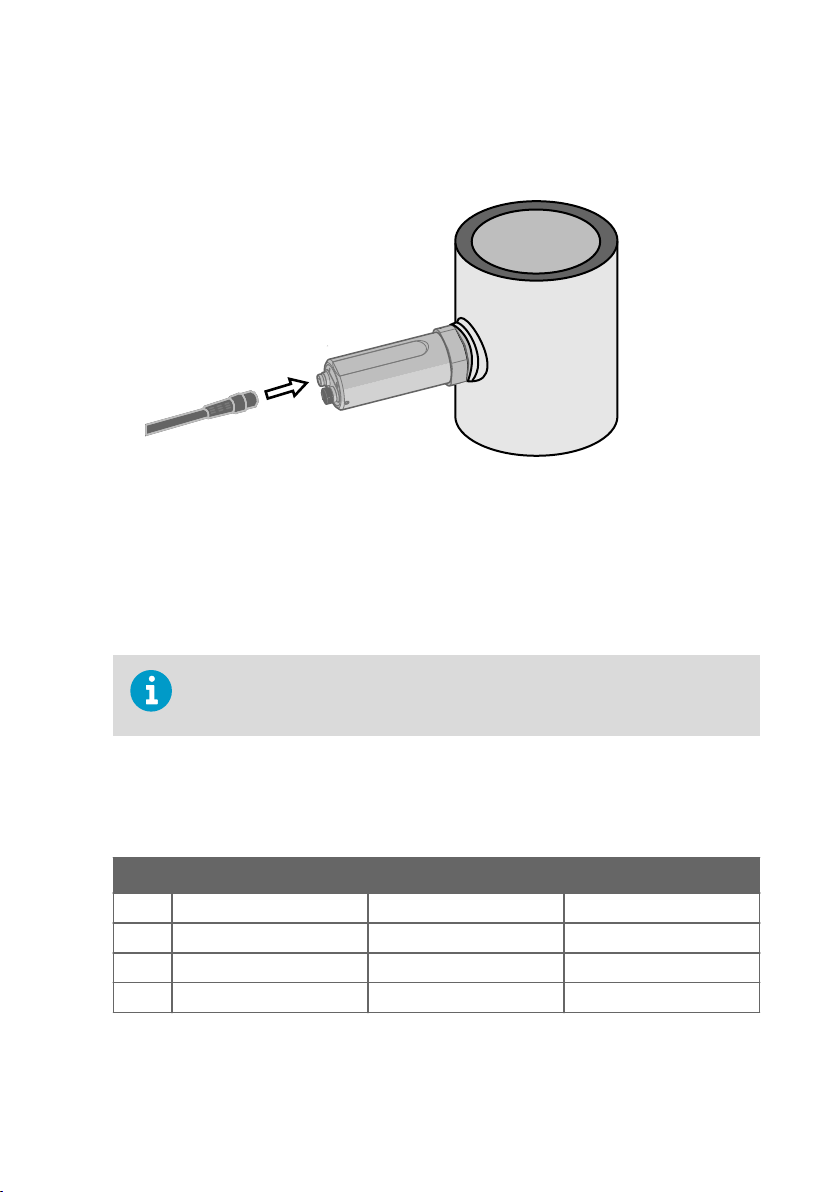
5. Connect the wires of the connection cable. When using cables provided with DMT152, see
Wiring (page 15) and Power Supply Requirements (page 19).
6. Plug in the cable to the transmitter. Be sure to use the correct connector; see Wiring
(page 15).
7. Cover the unused connector on the transmitter with the rubber plug that is attached to
the transmitter.
8. Turn on the power supply. DMT152 performs self-diagnostics at startup, and the output is
frozen for several minutes. The transmitter will output an approximated reading after one
minute, but accurate measurement will only be available after the startup procedure is
complete.
Normal operation is typically achieved in 10 … 15 minutes. If the measurement environment
changes during the startup, the startup may take up to 15 minutes.
The transmitter always performs the self-diagnostic procedure and sensor purge
when starting up. Keep the transmitter continuously powered to optimize its
measurement performance and availability.
4.3 Wiring
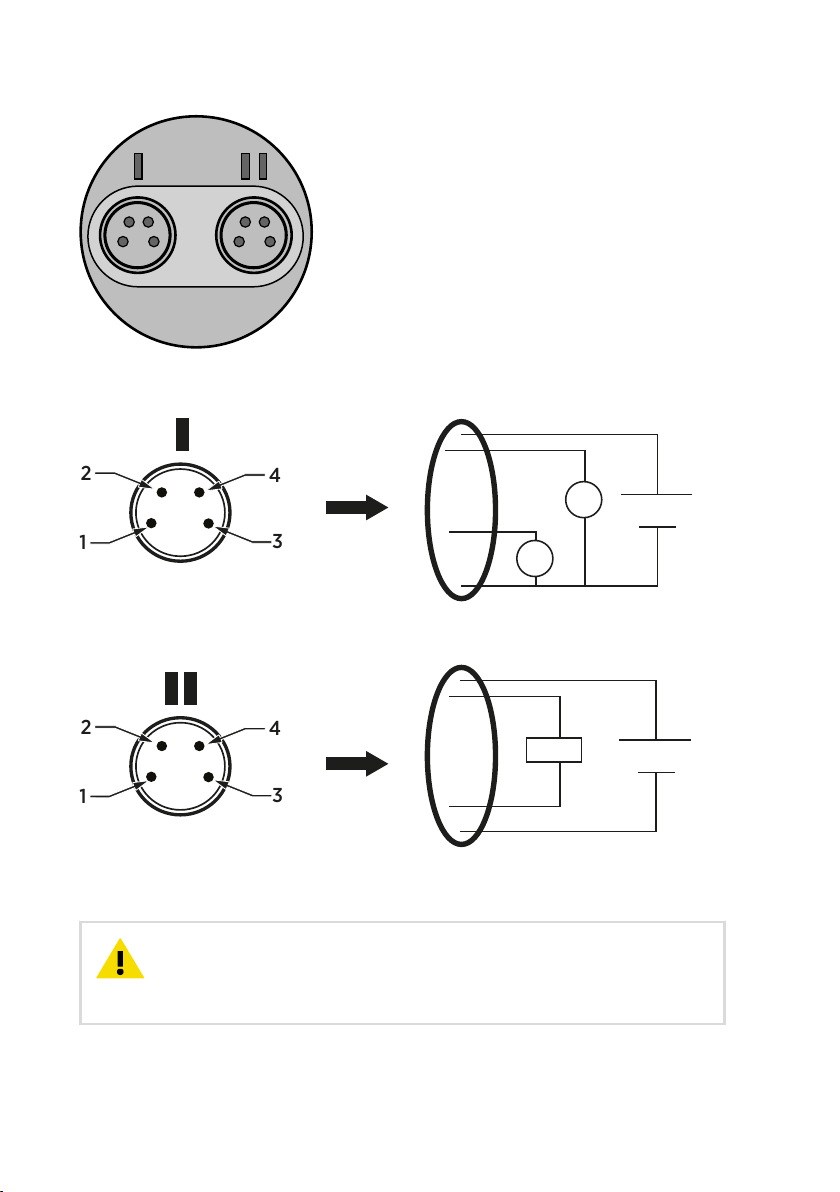
Table 4 Standard Wiring Pinouts and Wire Colors
Pin Connector I Connector II Wire Color
1 VDC supply+ VDC supply+ Brown
2 Signal Ch 1+ RS-485 - / B White
3 GND GND Blue
4 Signal Ch 2+ / LED RS-485 + / A Black
15
Page 18
1
3
4
2
1
342
+
-
Vs
1
3
+
-
V/m A
4
+
-
V/m A
2
+
-
Vs
1
3
+ / A
4
2
RS485
- / B
DMT152 User Guide M210865EN-J
Figure 3 Connectors I and II
Figure 4 Connector Pinout
CAUTION!
one of them, but do not connect more than one supply voltage in permanent
installations. Temporary simultaneous use with the USB serial interface cable or
DM70 handheld dew point meter (which also provide operation power) is OK.
16
The power supply lines are internally connected. You can use either
Page 19
4.3.1 Output Noise Minimization Option
1
3
4
2
1
342
3
+
-
V/m A
4
+
-
V/m A
2
+
-
Vs
1
3
+ / A
4
2
RS485
- / B
To minimize the output noise:
• Wire only the analog outputs (V/mA) to Port I
• Connect the power supply only to Port II
Avoid connecting the Port I and Port II grounds (pin #3) together
Chapter 4 – Installation
Figure 5 Output Noise Minimization Wiring Option
The wiring of pinouts 1 … 4 in ports I and II in the output minimization option is described in
the following table.
Table 5 Output Noise Minimization Wiring Option Pinouts and Wire Colors
Pin Connector I Connector II Wire Color
1 Not wired VDC supply+ Brown
2 Signal Ch 1+ RS-485 - / B White
3 GND GND Blue
4 Signal Ch 2+ / LED RS-485 + / A Black
17
Page 20
DMT152 User Guide M210865EN-J
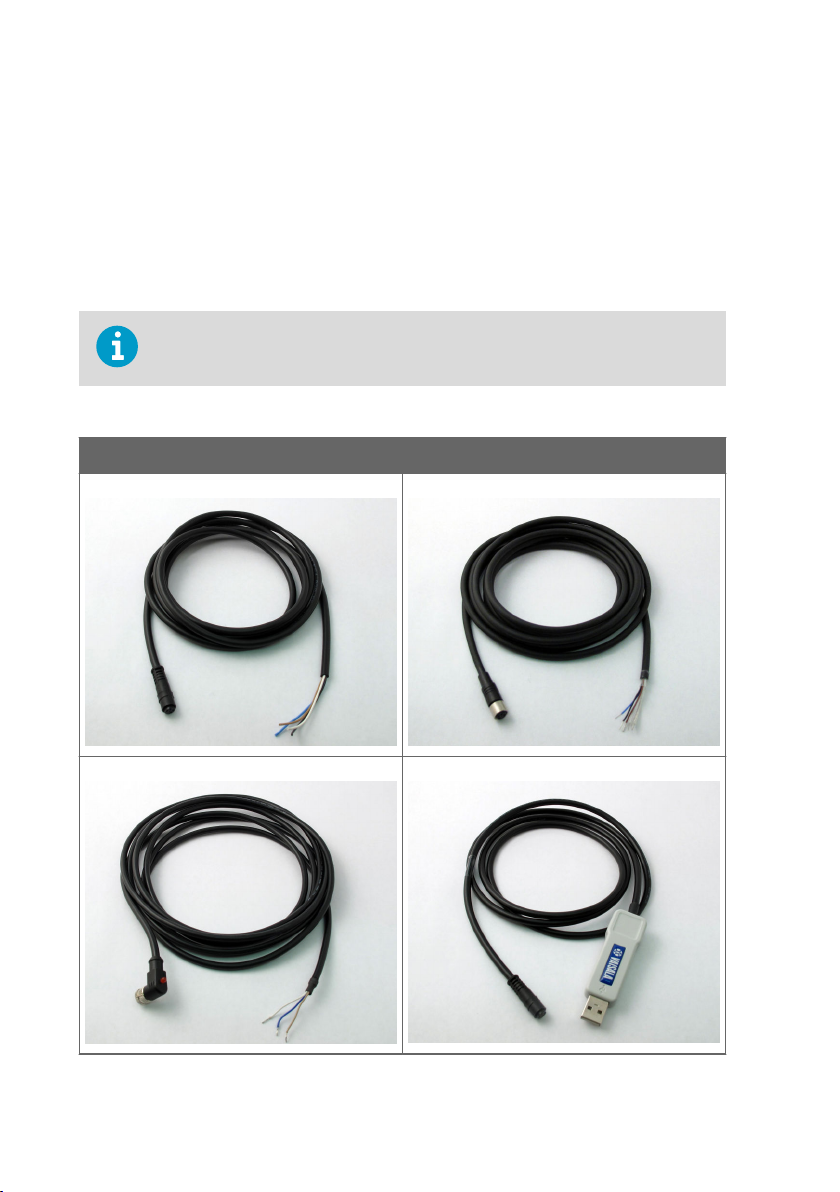
4.3.2 Connection Cables
The following connection cable options are available for DMT152:
• Unshielded cable with M8 female straight snap-on connector
• Shielded cable with M8 female straight threaded connector
• Unshielded cable with LED indicator for analog channel 2, 90° angled M8 female threaded
connector
• USB serial interface cable
For cable order codes, see Spare Parts and Accessories (page 63).
Avoid using long cables (over 2 m) with voltage output.
Table 6 Connection Cable Options
DMT152 Connection Cable Options
Cable with Snap-On Connector Cable with Threaded Connector
LED Cable USB Serial Interface Cable
18
Page 21

Chapter 4 – Installation
4.3.3 Power Supply Requirements
The DMT152 transmitters are designed to operate with a supply voltage of 15 … 28 VDC
(voltage output version) or 21 … 28 VDC (current output version). When only the RS-485
output is used, 11 … 28 VDC is enough in typical measurement conditions.
When measuring in pressures 20 … 50 bara (290 … 725 psia) or in temperatures −40 … 0 °C
(−40 … 32 °F), a supply voltage of 21 … 28 VDC is required.
The power supply should maintain the voltage for all load conditions. Voltage fluctuations
must be smaller than 0.3 V, as continuous supply voltage fluctuation may interfere with the
auto-calibration function.
• If auto-calibration has failed due to voltage fluctuation, you can verify it using the STAT
command on the serial line. See Show Transmitter Status (page 33).
• If auto-calibration fails repeatedly, the Autocal error code will be activated. See Error
Codes (page 58).
Current consumption during normal operation is 20 mA. Consumption increases during autocalibration and sensor purge. The maximum current consumption is 220 mA pulsed current.
DMT152 can be powered by the MI70 indicator or the Vaisala USB cable. However,
the power supplied by these devices may not be enough for all functions of the
transmitter (for example, the current output).
If you are using a separate power supply in connector I, connect the power supply
first before connecting the USB cable or the MI70 indicator. The order is
important, since the transmitter will use the power supply that is connected first.
4.4 Loop-Powered Display
DMT152 can be connected to a loop-powered external LED display. The display provides a
reading of the output parameter. The display is powered by the 4 ... 20 mA current signal, so
there is no need for an external power supply.
Two models are available:
• Nokeval 301 (Vaisala order code 226476)
• Nokeval 302 (with alarm relays, Vaisala order code 234759)
The display is delivered at its default settings. Configure the display functions and scaling
according to the documentation delivered with the display. For a wiring example, see Figure 7
(page 20) .
The loop resistance of the display must be included in the loop resistance
calculation for the complete current loop. For the loop resistance of the display,
refer to the manufacturer’s documentation.
19
Page 22
134
2
DMT152
Analog connector
4 ... 20 mA output
4 Ch2+ (black)
2 Ch1+ (white)
3 GND (blue)
1 VDC+ (brown)
Power supply
21 ... 28 VDC
301/302Nokeval
-
+
1
2
mA+
mA-
301/302Nokeval
1
2
mA+
mA-
DMT152 User Guide M210865EN-J
Figure 6 Nokeval 301 Loop-Powered Display
Figure 7 DMT152 Nokeval 301/302 Wiring Diagram
4.5
Sampling is needed when direct measurement of the air or gas is not possible or desirable.
This may be related to, for example, a high process temperature, protecting the sensor from
water spikes, the need to easily detach the instrument from a pressurized process without
running the whole process down, or wanting to make the measurement at a more convenient
location. To get a representative sample of the process gas and avoid error sources caused by
the sampling system, the following aspects should be considered:
20
Sampling from Process
Page 23

Chapter 4 – Installation
Pressure
It is important to keep in mind that changing the pressure of a gas changes the dew point
temperature of the gas. If the sensor is at a dierent pressure than the process itself, there may
be an error of several tens of degrees in the dew point measurement. You can use the Vaisala
Humidity Calculator to simulate the eect of pressure change to dew point. The Humidity
Calculator can be found at www.vaisala.com/humiditycalculator.
Leak Tightness and Materials
Due to the typically very low level of humidity, dew point measurements are sensitive to
ambient moisture leaks. It is therefore important to have a leak tight sampling system
construction.
The system is likewise sensitive to diusion of water molecules through the materials, as well
as the absorption of moisture into the materials. The piping should preferably be made of
metal, for example, stainless steel with a good surface finish. Hygroscopic materials such as
plastics are undesirable and should be avoided.
Sample tubing should be as short in length as possible. "Dead ends" should be avoided. Also
minimizing the number of connections helps in avoiding leaks. If possible, prepare for
measurements by flushing the sampling lines with dry gas.
Flow
Vaisala DRYCAP sensor is not flow-dependent as such. For this reason, the flow of the system
is not critical to the measurement, although a higher flow improves the response time.
Typically, a flow of 1 ... 2 l/min (0.035 ... 0.7 ft3/min) is enough.
4.6
Sampling Accessories
4.6.1 DMT242SC Sampling Cell
The DMT242SC is a basic sampling cell with only the main sampling cell body. The inlet and
outlet are female threaded sample connectors (inlet G3/8", outlet G1/4" ISO).
The DMT242SC is suitable for users requiring only a sampling cell to fit the transmitter into and
doing further assembly (piping into inlet and outlet, valves, possible flow meter) by
themselves.
4.6.2 DMT242SC2 Sampling Cell with Swagelok Connectors
The DMT242SC2 is similar to DMT242SC, but connections are made easy. The sampling cell
includes welded Swagelok connectors at both the inlet and outlet that fit directly to 1/4"
tubing.
To fit 6 mm tubing to the connectors, an adapter such as Swagelokâ Reducer SS-6M0-R-4
(not supplied by Vaisala) can be used.
21
Page 24

3
2
1
1
2
4
DMT152 User Guide M210865EN-J
DMT242SC2 is the suitable choice in, for example, plastics drying systems, where the
measurement is made by tapping o the dryer system and bringing a small air stream to the
sensor.
The Swagelok connectors of DMT242SC2 connect easily to a cooling coil or tubing, providing
the essential function of cooling the dry air to ambient temperature before it reaches the
sensor.
Figure 8 Sampling Cells DMT242SC2 (Left) and DMT242SC (Right)
Male pipe welded connector Swagelok 1/4"
1
2 G1/2"
3 G1/4"
4 G3/8"
4.6.3 DSC74 Sampling Cell with Quick Connector and Leak Screw
The DSC74 has been designed especially for compressed air lines. The sampling cell contains
an adjustable leak screw that allows keeping up the pipeline pressure at the sensor. The leak
screw is opened and closed with a screwdriver. The leak screw should be 1/2 turn open. This
can be verified by first closing the leak screw, then turning 1/2 turn to open it. Then the air
coming out will make a barely audible little hiss and it can be lightly felt when putting a hand
in front of the air stream.
22
Page 25

4
3
1
2
5
Chapter 4 – Installation
Do not open the leak screw more than 1/2 turn to avoid reducing the pressure in
the sampling cell.
The DSC74 comes with a quick connector that fits to industry standard compressed air line
connectors (suitable for type D, Quick08, NIP08). This allows for easy installation and
detachment of the dew point transmitter without having to shut down the process. Alternative
ways to connect are through the two dierent thread adapters (G3/8" to G1/2" and G3/8" to
G1/4" ISO) that are supplied with each DSC74 unit.
When using the DSC74, seal the threads of the quick connector or thread adapter carefully
with PTFE thread seal tape. Tighten with an open-end wrench.
Figure 9 DSC74 Sampling Cell with Accessories
Thread adapter type G3/8" - G1/2"
1
2 Thread adapter type G3/8" - G1/4"
3 Quick connector
4 Leak screw
5 Sampling cell body (DMT242SC)
4.6.4 DSC74B Two-Pressure Sampling Cell
The DSC74B and DSC74C sampling cells are enhanced versions of the DSC74. The body is
designed in a way that it is possible to measure at both system pressure and atmospheric
pressure.
23
Page 26

1
2
DMT152 User Guide M210865EN-J
The DSC74B limits the flow rate with a fixed leak screw. The flow is optimized for pressures 3 ...
10 barg. The fixed leak screw eliminates the risk of opening the leak screw fully by accident
and this way emptying a gas vessel. The maximum flow can be increased, if needed, by
removing the leak screw and adjusting the flow manually with the valve. Harmful gases can be
recovered by connecting a collection system at the outlet (not available from Vaisala).
In the basic operation of the DSC74B, the gas flows to the sensor from the front and the outlet
is on the side. To have the measurement done at atmospheric pressure, the inlet and outlet are
reversed. Then the reducing parts supplied (G3/8" - G1/2" or G3/8" - G1/4") on the outlet side
help to protect the sensor from ambient humidity coming in.
DSC74B parts are:
• Sampling cell, thread G3/8"
• Connection part with a needle valve and an integrated leak screw
• Reducing Nipple (thread adapter), G3/8" - G1/2"
• Reducing Adapter (thread adapter), G3/8" - G1/4"
Figure 10 DSC74B
1
2 Gas comes out
24
Gas goes in
Page 27

Chapter 4 – Installation
Figure 11 Removing the Leak Screw
4.6.5 DSC74C Two-Pressure Sampling Cell with Coil
The DSC74C with an outlet coil is designed for the most critical measurements at atmospheric
pressure. In the DSC74C, the coil is connected to the sampling cell outlet to protect the sensor
from ambient humidity disturbing the measurement. The coil can also be used as a cooling coil
for sampling from high temperature processes.
DSC74C parts are:
• Sampling cell, thread G3/8"
• Connection part with a needle valve and an integrated leak screw
• Reducing nipple (thread adapter), G3/8" - G1/2"
• Reducing adapter (thread adapter), G3/8" - G1/4"
• Diusion coil (for measurements in atmospheric pressure)
25
Page 28

3
4
1
2
DMT152 User Guide M210865EN-J
Figure 12 Default Assembly of DSC74C
Gas goes in. The coil can also be used here.
1
2 Gas comes out
3 Coil
4 Valve
26
Page 29

1
2
3
4
5
Chapter 4 – Installation
Figure 13 Alternative Assembly of DSC74C (for Tight Spaces)
Gas comes out
1
2 Coil
3 Thread, max. size 7 mm
4 Gas goes in
5 Valve
The thread size cannot exceed 7 mm. Use the provided adapter to avoid damage to the
transmitter.
27
Page 30

30 [1.18]
17.8 [0.70]
41.2 [1.62]
53 [2.09]
55 [2.17]
1 [0.04]
3.5 [0.14]
13 [0.51]
G1/2 ISO228
14 [0.55]
33 [1.30]
21 [0.83]
mm
[in]
DMT152 User Guide M210865EN-J
4.6.6 NW40 Mounting Flange
An NW40 mounting flange (Vaisala order code 225220SP) is available for installations through
thin chamber walls or into vacuum processes. The flange is compatible with ISO G1/2"
threaded transmitters.
Vaisala does not provide the flange counterpart, only the attachment for DMT152.
Figure 14 NW40 Mounting Flange
Figure 15 NW40 Mounting Flange Dimensions
28
Page 31

Chapter 5 – Serial Line Operation
5. Serial Line Operation
5.1 Connecting to Serial Interface
DMT152 can be connected to a PC using the RS-485 line on Port II. You can use, for example,
the USB serial interface cable (Vaisala order code 219690). The cable also provides enough
operating power for transmitter configuration purposes from the USB port. For continuous
measurement, it is recommended to supply the transmitter with operating power from another
cable: see Power Supply Requirements (page 19).
If you have not used the DMT152 USB serial interface cable before, install the driver that came
with the cable. See Installing Driver for USB Service Cable (page 29) for detailed instructions.
5.1.1 Installing Driver for USB Service Cable
Before taking the USB service cable into use, you must install the provided USB driver on your
PC. When installing the driver, you must acknowledge any security prompts that may appear.
The driver is compatible with Windows 7, Windows 8, and Windows 10.
1. Check that the USB service cable is not connected. Disconnect the cable if you have
already connected it.
2. Insert the media that came with the cable, or download the driver from www.vaisala.com/
software.
3. Execute the USB driver installation program (setup.exe), and accept the installation
defaults. The installation of the driver may take several minutes.
4. After the driver has been installed, connect the USB service cable to a USB port on your
PC. Windows will detect the new device, and use the driver automatically.
5. The installation has reserved a COM port for the cable. Verify the port number, and the
status of the cable, using the Vaisala USB Instrument Finder program that has been
installed in the Windows Start menu.
Windows will recognize each individual cable as a dierent device, and reserve a new COM
port. Remember to use the correct port in the settings of your terminal program.
There is no reason to uninstall the driver for normal use. However, if you wish to remove the
driver files and all Vaisala USB cable devices, you can do so by uninstalling the entry for
Vaisala USB Instrument Driver in Windows Control Panel.
5.1.2 Terminal Application Settings
Table 7 Default Serial Interface Settings
Property Description / Value
Baud rate 19200
Parity None
29
Page 32

DMT152 User Guide M210865EN-J
Property Description / Value
Data bits 8
Stop bits 1
Flow control None
The following steps describe how to connect to DMT152 using the PuTTY terminal application
for Windows (available for download at www.vaisala.com/software) and a USB serial interface
cable:
1. Connect the USB serial interface cable between your PC and the RS-485 port of DMT152
(connector II).
2. Start the PuTTY application.
3. Select the Serial settings category, and check that the correct COM port is selected in the
Serial line to connect to field.
You can check which port the USB cable is using with the Vaisala USB
Instrument Finder program that has been installed in the Windows Start
menu.
4. Check that the other serial settings are correct for your connection, and change if
necessary. Flow control should be set to None unless you have a reason to change it.
5. Click the Open button to open the connection window and start using the serial line. If
PuTTY is unable to open the serial port you selected, it will show you an error message
instead. If this happens, restart PuTTY and check the settings.
30
Page 33

Chapter 5 – Serial Line Operation
6. You may need to adjust the Local echo setting in the Terminal category to see what you
are typing on the serial line. To access the configuration screen while a session is running,
click the right mouse button over the session window, and select Change Settings... from
the pop-up menu.
5.1.3 List of Serial Commands
All commands can be issued either in uppercase or lowercase. In the command examples, the
keyboard input by the user is in bold type.
The notation <cr> refers to pressing the carriage return key (the Enter key) on your computer
keyboard. Enter a <cr> to clear the command buer before starting to enter commands.
Note that the term quantity in the serial interface corresponds to measurement parameter.
Table 8 List of Serial Commands
Command Description
?
??
ACAL [1/2]
ADDR [0 ... 99] Set the transmitter address for POLL mode
AERR
ALARM
Show device information
Show device information (overrides POLL mode)
Calibrate analog channel
Set analog output device malfunction error mode
Set analog output limit alarm modes
31
Page 34

DMT152 User Guide M210865EN-J
Command Description
AMODE
AOVER [ON/OFF]
ASEL
ATEST
CLOSE
Set analog output mode
Allow analog outputs to exceed their range 10 %
Configure analog output parameter and scaling
Test analog outputs
Close the temporary connection and return the device to POLL
mode
ERRS
FORM
FRESTORE
HELP
INTV [0 ... 255
S/MIN/H]
LED
MOL
OPEN [0 ... 99]
PRES
R
RESET
S
Display the currently active errors
Change the format of the measurement output
Restore factory settings
Display the command list
Set the continuous output interval (for RUN mode and R
command)
Set voltage for LED alarm (not needed with Vaisala LED cable)
Set the molar mass of the process gas (used in ppmw calculation)
Open temporary connection to a device that is in POLL mode
Set value for pressure compensation
Start the continuous outputting
Reset the transmitter
Stop the continuous outputting
SDELAY [0 ... 255] Set response sending delay in milliseconds
SEND [0 ... 99] Output readings once (specify address for transmitters in POLL
mode)
SERI
SMODE [RUN/POLL/STOP]
STAT
STATUS
TIME
UNIT
VERS
XPRES
Set the serial interface settings
Set the serial interface mode
Display transmitter status
Set analog output purge status alarm
Set time for transmitter clock
Select metric or non-metric units
Display transmitter software version
Set value for pressure compensation (temporarily, is cleared at
reset)
XPUR [ON/OFF]
Enable or disable sensor purge (temporarily, is enabled at reset)
32
Page 35

Chapter 5 – Serial Line Operation
5.2 Device Information
5.2.1 Show Device Information
The ? command outputs a listing of device information.
Table 9 ? command
Syntax Description
?<cr> Display device information.
??<cr> Display device information in POLL mode.
Example:
?
?
DMT152/1.10
Serial number : D1930026
Batch number : D1330070
Module number : ????????
Sensor number : C1420000
Cal. date : 20080512
Cal. info : Vaisala/HEL
Serial mode : STOP
Baud P D S : 19200 N 8 1
Output interval: 1S
Address : 0
Pressure : 1.0132 bar
Filter : 1.000
Ch1 output : 0 ... 5 V
Ch2 output : U ALARM
Ch1 Tdf lo : -80.00 'C
Ch1 Tdf hi : 20.00 'C
Ch2 Tdf lo : 0.00 'C
Ch2 Tdf hi : 0.00 'C
If the transmitter is in POLL mode, but a connection has not been opened using the OPEN
command, issue the ?? command. For a description of the serial interface modes, see Set
Serial Line Operating Mode (page 43).
5.2.2 Show Transmitter Status
The STAT command displays the status of the transmitter in 4 characters.
The characters in the output have the following meaning:
[sensor purge] - [output frozen] - [settling] - [status]
During normal measurement all characters are zeroes. When purge is activated, output frozen,
or the transmitter is in the settling period after sensor purge, the corresponding status
character is 1.
33
Page 36

DMT152 User Guide M210865EN-J
The final status character can have several values:
0 Normal status
1 Transmitter error
7 Retrying auto-calibration due to fluctuations in the supply voltage
9 Transmitter startup
Some example status codes:
0109 Transmitter performing startup procedure
1100 Sensor purge in progress, output frozen
1110 Settling period after purge, output frozen
0000 Normal measurement
Table 10 STAT command
Syntax Description
STAT<cr> Display the status of the transmitter in 4
Example:
STAT
0000
characters.
It is normal for measurement output to freeze temporarily if the measurement
environment is changing rapidly.
5.2.3 Show Firmware Version
Table 11 VERS command
Syntax Description
VERS<cr> Display the transmitter firmware version
Example:
vers
DMT152 / 1.10
34
number.
Page 37

Chapter 5 – Serial Line Operation
5.3 Configuring Analog Outputs
DMT152 has two analog output channels. These channels can function either as normal
measurement channels, or produce an ON/OFF output if the measurement exceeds a given
alarm level (limit alarm) or if the measurement reading is frozen (for example, during sensor
purge).
• In the normal operation mode, a channel outputs voltage or current that corresponds to
the reading of the selected measurement parameter.
• In the ON/OFF output mode, a channel outputs a specified voltage or current level. This
mode is used by the limit alarm and the purge status alarm.
• In the LED alarm output mode, the channel outputs operation voltage for the LED cable.
The LED will light up to indicate a frozen measurement output which is typically caused
by transmitter start-up or sensor purge. The LED will blink at approximately 0.5 Hz if the
malfunction alarm is active. The LED will not light up for the limit alarm.
Additionally, DMT152 has a malfunction alarm that is always enabled in normal operation
mode. The malfunction alarm can also be enabled for a channel in ON/OFF output mode. See
Malfunction Alarm (page 38).
When the transmitter is ordered from Vaisala, the modes are configured as specified in the
order form. You can change the operation settings after delivery using the AMODE command:
Table 12 AMODE command
Syntax Description
AMODE [c1 c2]<cr> c1 = Channel 1 analog output mode. Available
options are:
1 0 … 20 mA
2 4 … 20 mA
4 0 … 5 V
5 0 … 10 V
7 I alarm (ON/OFF output using current)
8 U alarm (ON/OFF output using voltage)
Modes 1 … 5 are normal measurement modes,
where malfunction alarm is always enabled, and
limit alarm and purge status alarm are disabled.
c2 = Channel 2 analog output mode. Available
options are:
1 0 … 20 mA
2 4 … 20 mA
4 0 … 5 V
5 0 … 10 V
6 LED alarm
7 I alarm (ON/OFF output using current)
8 U alarm (ON/OFF output using voltage)
Enable mode 6 for channel 2 if you are using the
Vaisala LED cable.
35
Page 38

DMT152 User Guide M210865EN-J
Syntax Description
Example:
amode 2 1
Ch1 output : 4 ... 20 mA
Ch2 output : 0 ... 20 mA
5.3.1 Limit Alarm
The limit alarm is activated when the measured parameter goes below the low limit or above
the high limit. The alarm can be specified during ordering for a specified parameter, or
configured on the serial line using the ALARM command.
When ordering a limit alarm, the alarm levels are set as follows:
• For current output, an active alarm is indicated by the current being at the maximum of
the scale (20 mA).
• For voltage output, an active alarm is indicated by the voltage being at the maximum of
the selected scale. For example, if the voltage output scale is 0 … 5 V, an output of 5 V
indicates the alarm is active.
Using the ALARM command, you can also set a hysteresis value to prevent the repeated
triggering of the alarm when the measurement fluctuates around a limit value.
Table 13 ALARM command
Syntax Description
ALARM ?<cr> View the current alarm settings.
ALARM<cr> Select at the prompt (?) whether the alarm is
enabled or disabled and define the alarm limits.
36
Page 39

Chapter 5 – Serial Line Operation
Syntax Description
The following example shows that a high limit alarm has been enabled for channel 1. If the
measured value rises above the -40.00 °C Td limit, analog channel 1 is set to 5 V (Limit Hi = -40.00,
Level Hi = 5.00). The malfunction alarm (aerr) is disabled for both channels.
Note that the term quantity in the serial interface corresponds to measurement parameter.
alarm ?
Channel 1:
Low Limit : OFF
High Limit : ON
Aerr : OFF
Quantity : Tdf
Limit Lo : 0.00
Limit Hi : -40.00
Hysteresis : 0.00
Level Lo : 0.00
Level Hi : 5.00
Channel 2:
Low Limit : OFF
High Limit : OFF
Aerr : OFF
Quantity : ppm
Limit Lo : 0.00
Limit Hi : 0.00
Hysteresis : 0.00
Level Lo : 0.00
Level Hi : 0.00
Avoid enabling more than one alarm type for a channel.
5.3.2 Purge Status Alarm
The transmitter can temporarily freeze the output when measurement is not possible (for
example, during sensor purge). The purge status alarm indicates this state by setting the
analog output at a defined level, in the same way as the limit alarm (see Limit Alarm
(page 36)).
Use the STATUS command to enable/disable the alarm and to define the voltage/current levels
(see example below). The channel is set to the value of Level Hi when sensor purge is active
and to Level Lo during normal operation. During auto-calibration, the output is not frozen, that
is, the output of the purge status alarm is on Level Lo.
37
Page 40

DMT152 User Guide M210865EN-J
Table 14 STATUS command
Syntax Description
STATUS<cr> Select at the prompt (?) whether the alarm is
enabled or disabled and define the voltage/
current levels.
The following example shows the purge status alarm enabled for channel 1:
status
Channel 1:
Status : ON ?
Level Lo : 0.00 ?
Level Hi : 5.00 ?
Channel 2:
Status : OFF ?
Level Lo : 0.00 ?
Level Hi : 0.00 ?
Level Lo and Level Hi are shared between the STATUS and ALARM commands. For example, if
you change the levels using the ALARM command, they will also change when viewing the
STATUS command.
5.3.3 Malfunction Alarm
If the transmitter is malfunctioning, the channel output is set to a pre-defined level. This
overrides the normal measurement output of the channel. You can specify the level using the
AERR command:
Table 15 AERR command
Syntax Description
AERR<cr> Enter the error output level at the prompt (?)
for each channel.
Example:
aerr
Ch1 error out : 20.000 mA ?
Ch2 error out : 0.000 V ?
The current value is shown after the colon ":". To set a new value, enter it after the question
mark. The error output value must be within the valid range for the selected output mode.
The error output value is displayed only when there are minor electrical faults
such as a humidity sensor damage. When there is a severe device malfunction,
the error output value is not necessarily shown.
38
Page 41

Chapter 5 – Serial Line Operation
The malfunction alarm is always enabled for channels that are in the normal measurement
modes (see Configuring Analog Outputs (page 35)), but you can enable or disable it using the
ALARM command for channels that are in the ON/OFF output mode.
5.3.4 Select Analog Output Parameter and Scaling
Use the ASEL command to select which measurement parameters the analog channels output.
See Table 18 (page 41) for the selectable parameters. After entering the command, you will
be prompted to enter the scaling of the parameters for both channels. Press the Enter key to
accept the suggested scaling values.
Table 16 ASEL command
Syntax Description
ASEL [xxx yyy]<cr> xxx Analog channel 1 output parameter
Example:
asel tdf ppm
Ch1 Tdf lo : -80.00 'C ?
Ch1 Tdf hi : 20.00 'C ?
Ch2 ppm lo : 0.00 ppm ?
Ch2 ppm hi : 1000000.00 ppm ?
yyy Analog channel 2 output parameter
5.4 Configuring Serial Line Operation
5.4.1 Set Serial Line Settings
Use the SERI command to set the serial line settings. The new settings will be taken into use
when the transmitter is reset or powered up. Note that the transmitter will use its default serial
line settings if it is in error state; see Error State (page 57).
Also note that changing the serial line settings will slightly alter how the transmitter works
with the MI70 indicator. If you are not using the default settings of 19200 N 8 1, you will
have to power o MI70 before it can find the transmitter (you cannot connect it on-the-fly).
Table 17 SERI command
Syntax Description
SERI [b p d s]<cr> B Baud rate (300, 600, 1200, 2400, 4800,
9600, or 19200)
P Parity (n = none, e = even, o = odd)
D Data bits (7 or 8)
S Stop bits (1 or 2)
39
Page 42

DMT152 User Guide M210865EN-J
Syntax Description
Example:
seri 9600 e 7 1
Baud P D S : 9600 E 7 1
5.4.2 Set Serial Line Response Time
With the SDELAY command you can set the delay (response time) of the serial line, or view
the currently set delay value.
SDELAY [delay]<cr>
Syntax Description
SDELAY [delay]<cr> [delay] = serial line delay, range 0 … 255. One unit of delay
corresponds to 4 milliseconds.
Example (set delay to 120 milliseconds):
sdelay 30
Serial delay : 30
5.4.3 Set Transmitter Address
To operate in the POLL mode, the transmitter must have an address. If multiple transmitters
share the same serial line, each transmitter must have a dierent address.
Syntax
ADDR [address]<cr> [address] = address, range 0 ... 99.
Example:
addr
Address : 0 ?
Description
5.4.4 Set Measurement Output Format
Use the serial line command FORM to change the format or to select the measurement
parameters for the output commands SEND and R. You can return to the default format using
the FORM / command.
40
Page 43

Chapter 5 – Serial Line Operation
Syntax Description
FORM [x]<cr> [x] = formatter string
The formatter string consists of parameters and modifiers. The
maximum length of the form string is 74 characters. When
entering the command, use the abbreviations of the parameters.
The parameters are presented in Table 18 (page 41), and
modifiers in Table 19 (page 41).
FORM /<cr> Return to default format.
Example:
form 4.2 TDF #r #n
OK
form 3.1 “H2O= “ ppm “ “ U3 #r #n
OK
Table 18 FORM Command Parameters
Parameter Description
TDF Dew point / frost point temperature
PPM Water content in parts per million
PPB Water content in parts per billion
PPMW Water content in parts per million by weight
For accurate ppm, ppb, or ppmw reading, you must compensate for the pressure
and molar mass of the process gas.
Table 19 FORM Command Modifiers
Modifier Description
x.y
#t
#r
#n
""
#xxx
Length modifier (number of digits and decimal places)
Tabulator
Carriage return
Line feed
String constant
ASCII code value (decimal) of a special character; for example,
#027 for Esc
41
Page 44

DMT152 User Guide M210865EN-J
Modifier Description
ADDR
ERR
SN
STAT
TIME
Ux
Transmitter address with 2 characters (00 … 99)
Currently active transmitter errors in a 9-bit field:
bit0 … bit8
• bit0 T MEAS error
• bit1 F MEAS error
• bit2 Voltage too low error
• bit3 Voltage too low for mA output error
• bit4 Ambient temperature error
• bit5 Flash checksum error
• bit6 Parameter checksum error
• bit7 Autocalibration error
• bit8 Internal error
Transmitter serial number
Transmitter status in a 1-character field. Transmitter status in 4
characters. The status codes are the same as for the STAT
command; see Show Transmitter Status (page 33).
Current time; see the description of the TIME command: Set
Time (page 51).
Shows the name of the measurement unit using “x” number of
characters. For example, U3 shows the name of the measurement
unit with 3 characters
5.4.5 Select Unit
DMT152 outputs dew point temperature Td in either Celsius or Fahrenheit degrees depending
on the unit selection. The unit selection also aects the unit (bara or psia) for the pressure
compensation.
Table 20 UNIT command
Syntax Description
UNIT [x]<cr> [x] selects the unit type to output:
• m = metric units (for example, Celsius)
• n = nonmetric units (for example, Fahrenheit)
Example:
unit m
Units : Metric
42
Page 45

Chapter 5 – Serial Line Operation
5.4.6 Set Serial Line Operating Mode
Table 21 SMODE Command
Syntax Description
SMODE [xxx]<cr> [xxx] = select the serial line interface mode:
• STOP
• RUN
• POLL
See Table 22 (page 43) for a description of the serial modes.
Table 22 Selection of Output Modes
Mode Measurement Output Available Commands
STOP Only with the SEND command. All (default mode).
RUN Automatic output. Only command S.
POLL Only with the SEND [addr]
command.
The polling mode can be used when more than one transmitter is connected to one serial bus.
When set to POLL state, the transmitters communicate one at a time when the specific
transmitter address is called on the serial line. See the descriptions of ADDR command (Set
Transmitter Address (page 40)) and OPEN command (Opening the Transmitter in POLL Mode
(page 50)).
Selected output mode will be activated at next reset or power up.
Example:
SEND [addr] and OPEN [addr].
Other commands available after opening
a line to the transmitter using the OPEN
command.
smode poll
Serial mode : POLL
5.5
Configuring Measurement Parameters
5.5.1 Enable or Disable Sensor Purge
You can temporarily disable the sensor purge function using the XPUR command. Note that
disabling the sensor purge will aect the measurement performance of the transmitter.
43
Page 46

DMT152 User Guide M210865EN-J
Table 23 XPUR command
Syntax Description
XPUR [ON/OFF]<cr> ON = Enable sensor purge
OFF = Disable sensor purge
Example:
xpur off
Purge : OFF
After giving the XPUR OFF command, the transmitter will not perform a sensor purge until
one of the following events takes place:
• Transmitter is reset or powered up
• Sensor purge is enabled using the XPUR ON command
5.5.2 Set Pressure Value for ppm Calculation
The DRYCAP 180U sensor in DMT152 is not pressure-dependent. When measuring dew point,
pressure compensation is not needed. However, in the calculation of ppm volume
concentration, the pressure of the system must be known. If you did not specify pressure
compensation when ordering the product, use the commands below to enable the pressure
compensation and set the pressure value.
Table 24 PRES and XPRES command
Syntax Description
PRES [pp.pppp]<cr> [pp.pppp] = Absolute pressure in the
XPRES [pp.pppp]<cr> [pp.pppp] = Absolute pressure in the
Use the XPRES command if the value is changed frequently. The value set using the XPRES
command overrides the PRES value, but it is not retained at reset. When the XPRES value is set to
0, the last value set with PRES is used instead.
The minimum valid pressure value for both the PRES and XPRES commands is 0.1 bara.
Example:
pres 1.01325
Pressure : 1.01325 bar
44
measuring point. The unit is bara if metric units
have been selected, and psia if non-metric units
are used.
measuring point. The unit is bara if metric units
have been selected, and psia if non-metric units
are used.
Page 47

Chapter 5 – Serial Line Operation
The pressure conversion coecients from other pressure units to bars are given in Table 25
(page 45).
Table 25 Pressure Conversion Coecients
From To bar
²
PaN/m
mmHg torr 0.001333224
inHg 0.03386388
mmH2O 0.00009806650
inH2O 0.002490889
atm 1.01325
at 0.980665
psi
a
a
0.00001
0.06894757
Example:
29.9213 inHg = 29.9213 × 0.03386388 = 1.01325 bar
a
Conversions from mmHg and inHg are defined at 0 °C and from mmH2O and
inH2O at 4 °C.
You can also set the pressure compensation value when you connect DMT152 to
the MI70 indicator. When using MI70, the pressure unit is bara.
5.5.3 Set Molar Mass for ppmw Calculation
Use the MOL command to view and set the molar mass of the gas in the measurement
environment. The molar mass parameter is used in calculating H2O ppmw. Some typical molar
masses are:
28.96 g/mol
Air
N228.0134 g/mol
O232.00 g/mol
SF6146.06 g/mol
45
Page 48

DMT152 User Guide M210865EN-J
Table 26 MOL command
Syntax Description
MOL [n]<cr> [n] = Molar mass (in g/mol) of the gas in the
Examples:
mol 146.06
Mol : 146.0600
mol
Mol : 146.0600 ?
measurement environment.
You can also set the molar mass when you connect DMT152 to the MI70 indicator.
5.6 Serial Line Output Commands
5.6.1 Start Measurement Output
Use the R command to start the continuous outputting of measurement values as an ASCII text
string to the serial line. The format of the measurement message is set with the FORM
command.
Table 27 R Command
Syntax Description
r<cr> Starts continuous measurement output.
Example:
r
Tdf= -2.5 'C H2O= 4919 ppm
Tdf= -2.5 'C H2O= 4918 ppm
Tdf= -2.5 'C H2O= 4917 ppm
...
Outputting the results continues in intervals issued with the command INTV. You can stop the
output by pressing the Esc key, or with the command S. Since the interface is half-duplex, you
must enter the commands when the transmitter is not outputting.
46
Page 49

Chapter 5 – Serial Line Operation
5.6.2 Stop Measurement Output
You can stop the measurement output by pressing the Esc key, or with the S command:
S <cr>
5.6.3 Set Output Interval
Use the INTV command to change the output interval of the automatically repeating
measurement messages. The measurement messages are repeated in the RUN mode, or after
the R command has been given.
Table 28 INTV Command
Syntax Description
INTV [n xxx]<cr> Set the output interval:
Example:
intv 1 min
Output interval: 1 MIN
The shortest output interval (with n = 0) outputs the measurement messages as quickly as the
transmitter’s internal measurement cycle produces them, without additional delay.
n time interval = 0 … 255
xxx time unit = S, MIN, or H
5.6.4 Output a Reading Once
Use the SEND command to output a single measurement message. The output message is sent
in the format that has been set using the FORM command.
Syntax
SEND [address]<cr> [address] = address of the transmitter, range 0 … 99.
Example:
send
Tdf= -2.0 'C H2O= 5152 ppm
Description
Must be specified if the transmitter is in POLL mode, and a line
has not been opened using the OPEN command.
47
Page 50

DMT152 User Guide M210865EN-J
5.7 Troubleshooting and Maintenance Commands
5.7.1 Display Currently Active Errors
Use the ERRS command to display the currently active transmitter error codes. Possible errors
and their causes are listed in Table 37 (page 58).
Table 29 ERRS command
Syntax Description
ERRS<cr> Displays the list of currently active error codes.
Example:
errs
Voltage too low error
5.7.2 Test Analog Outputs
The operation of the analog outputs can be tested with the ATEST command by forcing the
output to a given value which can then be measured with calibrated multimeter. The command
uses the currently selected analog output types for the channels (voltage or current) so you
do not have to specify the unit.
Before testing, you can verify the currently set analog output modes using the AMODE
command. After testing the output, give the ATEST command again to exit the test mode.
Table 30 ATEST command
Syntax Description
ATEST [xxx yyy]<cr> Enter the test output values for channel 1 and
channel 2.
xxx Channel 1 output value (V or mA)
yyy Channel 2 output value (V or mA)
The output shows the test values of the analog channels as well as diagnostic
information that may be useful to Vaisala Service Center if there is a problem
with the analog outputs.
48
Page 51

Chapter 5 – Serial Line Operation
Syntax Description
Examples:
atest 1 15
1.00 2660
15.00 19425
atest
0.00 79
0.00 20110
5.7.3 Calibrate Analog Output
Use the ACAL command to force the analog outputs to the following values:
• Current output: 2 mA and 18 mA
• Voltage output: 10 % and 90 % of the range
After entering the ACAL command, use a calibrated current/voltage meter to measure the
output, and enter the values. Note that the calibration is only valid for the currently selected
analog output modes.
Table 31 ACAL command
Syntax Description
ACAL [channel]<cr> [channel] = Analog output channel: 1 or 2
Example:
acal 1
Ch1: I1 ( mA ) ? 0.166
I2 ( mA ) ? 18.1
3.61058569E+02 1.40927863E+03
5.7.4 Extend Analog Output Range
Use the AOVER command to allow the analog output channels to exceed their specified range
by 10 %. The scaling of the measurement parameter remains as before; the extra range is used
for additional measurement range in the wet end.
Table 32 AOVER command
Syntax Description
AOVER [ON/OFF]<cr> [channel] = Analog output channel: 1 or 2
49
Page 52

DMT152 User Guide M210865EN-J
Syntax Description
Example:
aover on
: ON
The following example illustrates how the analog output is aected.
Channel 1 outputs Td with voltage output 0 … 5 V (-80 °C … -30 °C). After giving the AOVER ON
command, the range is 0 … 5.5 V (-80 °C … -25 °C).
Note that the -30 °C Td point is still at 5 V.
5.8 Other Commands
5.8.1 Opening the Transmitter in POLL Mode
Use the OPEN command to connect to a transmitter that is in POLL mode.
Table 33 OPEN command
Syntax Description
OPEN [aa]<cr> [aa] = address of the transmitter to connect to,
Example:
range: 0 … 99.
open 1
DMT152 1 line opened for operator commands
5.8.2 Closing the Connection to a Transmitter in POLL Mode
Use the CLOSE command to close a connection to a transmitter that is in POLL mode.
Table 34 CLOSE command
Syntax Description
CLOSE<cr> Closes the transmitter connection.
Example:
close
line closed
50
Page 53

Chapter 5 – Serial Line Operation
5.8.3 Display Command List
Use the HELP command to display the available commands.
help<cr>
5.8.4 Set Time
Use the TIME command to view and set the transmitter clock. The clock does not have a
battery backup – it is reset to 00:00:00 when the transmitter is powered up or reset.
Table 35 TIME command
Syntax Description
TIME
TIME [hh mm ss]<cr> hh Hours (24-hour clock)
Examples:
time 12 30 00
12:30:00
time
12:30:00
Display the current time.
mm Minutes
ss Seconds
5.8.5 Reset Transmitter
When the RESET command is given, the transmitter will restart as if it had just been powered
on. All transmitter settings are retained. The serial line mode of the transmitter will be set to
the mode that was set using the SMODE command.
As the transmitter starts up, it performs the startup sensor purge and auto-calibration before
resuming measurement.
RESET<cr>
5.8.6 Set LED Voltage
With the LED command, you can set the supply voltage that is provided to the LED when the
LED alarm mode is used. If you are using the Vaisala LED cable, leave this setting at the default
voltage (2.80 V).
51
Page 54

DMT152 User Guide M210865EN-J
Table 36 LED command
Syntax Description
LED<cr> Enter the LED voltage at the prompt.
Example:
led
Ch 1 Led Voltage : 2.80 V
Ch 2 Led Voltage : 2.80 V
5.8.7 Restore Factory Settings
Use the FRESTORE command to restore the factory settings to the transmitter.
FRESTORE<cr>
CAUTION!
command.
All user settings will be lost when you enter the FRESTORE
52
Page 55

1 2
3 4
Chapter 6 – Maintenance
6. Maintenance
6.1 Cleaning the Transmitter
The body of the transmitter can be cleaned by wiping with a moistened lint-free cloth. Do not
immerse the transmitter in liquid and do not use cleaning agents or solvents. Do not attempt
to clean the filter or the sensor element. If the filter is contaminated, replace it with a new one.
6.2 Changing the Filter
If the filter is contaminated, it should be replaced. New filters can be ordered from Vaisala
(order code 220957). Be careful when changing the filter, since it is easy to break the sensor
when the filter is removed.
CAUTION!
sure that the pressure of the chamber is equalized with the ambient pressure
prior to removing the transmitter. When the transmitter is removed for
maintenance, cap the hole with a capped nut. This way, the process can be
running although the transmitter is not in place.
Plugs are available from Vaisala for ISO threaded connections (Vaisala order
code 218773) and NPT threaded connections (Vaisala order code 222507).
Figure 16 Filter Structure
Vaisala DRYCAP sensor
1
2 Spring washer
3 Stainless steel mesh filter (do not touch)
4 Top of the filter
When replacing the filter, note the following:
• The pores of the steel mesh may become blocked if touched. Do not touch the filtering
surface with your hands or any tools. Always handle the filter from the top of the filter
body.
• Touching the filter with your fingers will also deposit oil and dirt on the filter, which may
aect the measurement. Always handle the filter with gloved hands.
If the transmitter is installed in a pressurized chamber, always make
53
Page 56

DMT152 User Guide M210865EN-J
• When installing the transmitter after a filter change, always use a new sealing ring (ISO
and UNF threads only).
Replace the filter as follows:
1. Grip the old filter from the top of the filter body using an 11 mm socket wrench. Turn the
filter counterclockwise until it is loose.
2. Pull the filter straight out carefully; do not damage the sensor, and do not lose the spring
washer.
3. Take the new filter, and insert it to the filter threads. The spring washer should be under
the filter.
4. Tighten the new filter by turning it clockwise with the 11 mm socket wrench. Tighten to
5 Nm.
6.3 Calibration and Adjustment
DMT152 is fully calibrated as shipped from the factory. The recommended calibration interval is
2 years. If the transmitter is used in the wet end of the measurement range, calibration should
be done every year. Calibration should also be done if there is a reason to believe that the
device is not within its accuracy specifications.
You can perform a simple field checking operation by comparing the readings of DMT152 and
DM70 handheld dewpoint meter with a calibrated reference probe. For more information, see
Field Check Using DM70 (page 54).
If there is need for calibration or adjustment, contact a Vaisala Service Center or your local
Vaisala representative.
6.3.1 Field Check Using DM70
To check the accuracy of DMT152 in the field, you need the following equipment:
• A fully charged MI70 indicator (the measurement display that is included in the
DM70 package).
• A calibrated reference probe that is suitable for the intended measurement
environment and dew point range. You can use a DMP74 probe from the DM70
for dew point down to −60 °C (−76 °F), or a second DMT152 for full
measurement range.
• A connection cable between the DMT152 and the MI70 indicator (Vaisala order
code 219980).
• A reference environment with a stable dew point and temperature in a suitable
range for both probes. The normal measurement environment of the
transmitter can also be used, if it meets these criteria.
54
Page 57

Chapter 6 – Maintenance
In the procedure described here, the readings of the probes are checked
individually. You can also perform the field check so that you connect the
reference probe simultaneously with the DMT152 you are checking. In this case,
you need two connection cables if you are using a DMT152 also as the reference
probe. Also, you must power one of the transmitters by other means than the
MI70 indicator.
1. Place DMT152 in the reference environment (unless it is there already). You can perform
the check even if DMT152 is currently being powered and used, as long as there is no cable
connected to connector II.
2. Connect the MI70 connection cable between the MI70 indicator and connector II of
DMT152.
3. Turn on the MI70 indicator. If the analog channels of your DMT152 are configured to use
the current output, and if DMT152 is powered by MI70, you will see an error message that
indicates the supply voltage is too low for running the actual analog output. This is
expected behavior; press OK to acknowledge the error and continue the field check.
4. Check and adjust the environment settings if prompted. You can change the pressure
compensation value (only needed for ppm calculation) and the molar mass of the
measurement gas. The pressure must be entered in bara; to enter the value in psia, use the
serial line. For more information on these settings, see the following sections:
• Set Pressure Value for ppm Calculation (page 44)
• Set Molar Mass for ppm w Calculation (page 45)
5. After a brief delay, DMT152 should provide an approximate measurement reading of the
selected parameters. Remember that it takes up to 15 minutes for the transmitter to start
the active measurement. If the desired parameters are not shown on the display, select
them from the Display – Quantities and units menu.
6. The Auto power o function should be disabled on the MI70 indicator to prevent the
indicator from powering o in the middle of the check. While waiting for the active
measurement to start, check the setting in the Settings - User Interface menu, and
change if necessary.
7. Write down the Td reading after the measurement has stabilized.
8. Turn o the MI70 indicator and disconnect DMT152.
9. Insert the reference probe to the measurement environment, and connect it to the MI70
indicator.
10. Turn on the MI70 indicator. Check and adjust the environment settings if prompted.
55
Page 58

DMT152 User Guide M210865EN-J
11. Wait for the reference probe to provide a stable reading, and compare it with the reading
from DMT152.
The dierence between the readings will give you an indication of the approximate drift of
DMT152 and its need for calibration. As a general rule, the reading from DMT152 should be
within ±4 °C Td of the reading from the reference probe.
Some notes on using the MI70 indicator with the DMT152:
• If you disconnect DMT152 while the MI70 indicator is on, the parameters
measured will remain on the screen, but no measurement will be shown.
• The messages from the transmitter (such as the supply voltage error) will
appear in English even if MI70 has been set to another language.
56
Page 59

Chapter 7 – Troubleshooting
7. Troubleshooting
7.1 Typical Problems
If you have a problem with DMT152, first read the following sections concerning the behavior
and error indications of the transmitter:
• Configuring Analog Outputs (page 35)
• Error State (page 57)
• Error Codes (page 58)
Possible causes of errors include insucient supply voltage, excessive supply voltage
fluctuation, physical damage to the transmitter, and incorrect connections. Connection
problems can be caused by misconfiguration of the analog outputs or the serial line. Also
remember that the startup of the transmitter may take up to 15 minutes.
Some problems can be solved by simply resetting the transmitter. You can reset the
transmitter by disconnecting the power or issuing the RESET command on the serial line.
If you cannot locate the source of the error and return the transmitter to the normal state,
contact Vaisala technical support. See www.vaisala.com/support for more information.
7.2
Unknown Serial Settings
If you are not sure what the serial settings of your transmitter are, follow these steps to view
and change the settings.
1. Make sure there are no other transmitters on the serial line.
2. Provide the transmitter with a 9 V supply voltage. This voltage is enough to start it in the
error state.
3. Connect to the serial line using the error state serial line settings 19200 N 8 1.
4. Give the ? command to view the transmitter settings, including the serial settings and
address. For an output example, see Show Device Information (page 33).
You may have to give the command several times if there are characters in the buer.
5. If necessary, set new serial line settings using the SERI command. For instructions on
using the command, see Set Serial Line Settings (page 39).
7.3
Error State
If the voltage supplied to DMT152 is too low for reliable operation, or fluctuates heavily, or
there is some serious problem that prevents measurement, DMT152 will enter an error state.
The error state is indicated by the following:
• Analog current output at 0 mA or 4 mA (according to selected range)
• Analog voltage output at 0 V
57
Page 60

DMT152 User Guide M210865EN-J
• Serial line outputs asterisk characters "*" instead of measurement data. For example:
Tdf=****** 'C H2O=****** ppm
The analog output levels for the error state are configurable using the AERR command; see
Malfunction Alarm (page 38). Note that the asterisk characters on the serial line may also
appear during the startup procedure. When the transmitter is in the error state, it will use the
default serial interface settings, regardless of the currently set serial interface mode. If you
have set a dierent mode with the SERI command, you will have to set your terminal program
to the default settings of 19200 N 8 1 (see Terminal Application Settings (page 29))
before you can connect to the transmitter in error state.
7.4 Error Codes
The transmitter has error codes that can be displayed on the serial line using the ERRS
command. See section Display Currently Active Errors (page 48).
Table 37 Error Codes
Error Code Cause
Ambient temperature error Ambient temperature out of operating range
Autocal error Transmitter unable to complete auto-calibration
Voltage error Supplied operating voltage is too low or high for
Voltage too low error Supplied operating voltage is too low for reliable
(probably too hot).
after several attempts. Can be caused by
continuously changing measurement
environment, problem with supply voltage, or
transmitter malfunction.
reliable operation, or there is a problem with
voltage measurement.
operation.
58
Page 61

Chapter 7 – Troubleshooting
Error Code Cause
Voltage too low for mA output error Supplied operating voltage is too low for reliable
operation of the analog current output.
It is normal to receive this error
when using the MI70 indicator or
the USB serial interface cable, as
they do not provide a sucient
operating voltage to operate the
current output. To avoid this
error, connect a power supply
for the transmitter to connector I
before connecting the MI70
indicator or USB cable. See
Power Supply Requirements
(page 19).
T meas error Internal error, can be caused by damage to the
F meas error Internal error, can be caused by damage to the
Internal error Transmitter unable to function. Can be caused
Parameter flash check sum error Internal error
Program flash check sum error Internal error
INFOA check sum error Internal error
SCOEFS check sum error Internal error
CURRENT check sum error Internal error
Unknown error Internal error
sensor.
sensor.
by transmitter malfunction or unsuitable
measurement environment.
59
Page 62

DMT152 User Guide M210865EN-J
8. Technical Data
8.1 Specifications
Table 38 Measurement Performance
Property Description/Value
Sensor Vaisala DRYCAPâ 180U
Thin-film capacitive polymer sensor
Recommended calibration interval 2 years
Dew Point Temperature
Measurement range −80 … −20 °C (−112 … −4 °F) T
Accuracy
−80 … −40 °C (−112 … −40 °F) ±2 °C (3.6 °F) T
−40 … −20 °C (−40 … −4 °F) ±3 °C (5.4 °F) T
Non-calibrated range −100 … +20 °C (−148 … +68 °F) T
Typical response time 63 % [90 %] at a gas temperature of +20 °C (+68 °F) and pressure of 1 bar:
−20 … −80 °C T
−80 … −20 °C T
d
d
Typical long-term stability Better than 2 °C (3.6 °F) / year
Analog Output Scalings
Option 1 −80 … +20 °C (−112 … +68 °F) T
Option 2 −100 … 0 °C (−148 … +32 °F) T
Option 3 Free scaling
Concentration by Volume (ppm)
Measurement range (typical) 0 … 500 ppm
Accuracy at +20 °C (+68 °F), 1013 mbar ±(0.2 ppm + 20 % of reading)
1)
d
d
d
d
0.5 min [7.5 min]
2 s [5 s]
d
d
1) When the dew point is below 0 °C, the transmitter outputs frost point for Td.
60
Page 63

Dew point temperature (°C)
-40
-20 0
20
20
-60
-80
0
10
30
-10
-20
-30
-50
-40
-70
-10-30 10
30
40 50 60
70
-90
-100
Temperature of measured gas (°C)
Area not recommended
for continuous measurement
Accuracy not specified
Accuracy
±3 °C Td
Accuracy
±2 °C Td
Accuracy not specified
Chapter 8 – Technical Data
Figure 17 Accuracy Over Temperature Range
Table 39 Operating Environment
Property Description/Value
Temperature −40 … +70 °C (−40 … +158 °F)
Relative humidity 0 … 100 %RH (up to +20 °C / +68 °F)
Pressure 0 … 50 bar (725 psia)
Measured gases Non-corrosive gases
Sample flow rate No eect on measurement accuracy
EMC compliance EN61326-1, Industrial environment
Table 40 Inputs and Outputs
Property Description/Value
Two analog outputs (scalable) 4 … 20 mA, 0 … 20 mA (3-wire) 0 … 5 V, 0 … 10 V
Digital output RS-485 (2-wire)
Alarm-level indication by analog signal User selectable
Purge information 5 V, 10 V, 20 mA, or LED
Accuracy of analog outputs ±0.01 V / ±0.01 mA
ON/OFF Output Available Instead of 2nd Analog Output
Purge inactive 0 V or 4 mA
Purge active 5 V, 10 V, or 20 mA
OR exceeded Td or ppm limit User selectable
61
Page 64

DMT152 User Guide M210865EN-J
Property Description/Value
Typical Temperature Dependence
Voltage output ±0.001 % of span / °C
Current output ±0.005 % of span / °C
Operating Voltage
RS-485 output
Voltage output
11 … 28 VDC
15 … 28 VDC
1)
1)
Current output 21 … 28 VDC
Supply Current
Normal measurement 20 mA + load current
During self-diagnostics Max. 220 mA pulsed
Supply voltage fluctuation Max. 0.3 V
External Load
Voltage output Min. 10 kΩ
Current output Max. 500 Ω
1) For extended temp. down to −40 °C (−40 °F) or pressure up to 50 bar (725 psia), the supply
voltage is 21 … 28 VDC.
Table 41 Mechanical Specifications
Property Description/Value
Housing material (wetted parts) AISI316L
Stainless steel mesh filter Filter body AISI303, mesh AISI316L, grade 18 μm
Mechanical connections ISO G1/2", NPT 1/2", UNF 3/4"- 16", UNF 5/8"-18"
IP rating IP66
Storage temperature range −40 … +80 °C (−40 … +176 °F)
Weight with dierent thread options ISO thread: 190 g (6.70 oz)
NPT thread: 210 g (7.41 oz)
UNF thread: 186 g (6.56 oz)
Table 42 Output Cable Specifications
Property Specification
Connector Straight, moulded M8 female (IEC 60947-5-2)
62
Page 65

Property Specification
Color Black
Number of contacts 4
Conductors
Insulation PVC
Cable diameter 5.0 mm / 0.2 in
Protection class IP67 / NEMA 4
Wire color code EN50044
0.25 mm2 (× 4) / 0.00039 inch2 (× 4)
8.2 Spare Parts and Accessories
Table 43 Accessories
Item Order Code
Connection cable for MI70 handheld indicator 219980
USB cable for PC connection 219690
Sealing ring set ISO (copper, 3 pcs) 221524SP
Sealing ring set UNF (copper, 3 pcs) 221563SP
Stainless steel mesh filter (18 µm) 220957SP
110 … 240 VAC external power supply POWER-1
Plug kit (ISO 1/2") 218773
Plug kit (NPT 1/2") 222507
Loop-powered external display (Nokeval 301) 226476
Loop-powered external display with relays
(Nokeval 302)
NW40 flange 225220SP
Analog/RS-485 Output Cables
2 m (6,5 ft) cable, M8 snap-on connector 211598
3 m (9.8 ft) cable, Ch1 signal + Ch2 LED, M8
threaded connector
0.32 m (1 ft) shielded cable, M8 threaded
connector
3 m (9.8 ft) shielded cable, M8 threaded
connector
234759
MP300LEDCBL
HMP50Z032
HMP50Z30ASP
Chapter 8 – Technical Data
63
Page 66

DMT152 User Guide M210865EN-J
Item Order Code
5 m (16.4 ft) shielded cable, M8 threaded
HMP50Z500SP
connector
10 m (32.8 ft) shielded cable, M8 threaded
HMP50Z1000SP
connector
Sampling Cells (Available for ISO G1/2")
Basic sampling cell DMT242SC
With Swagelok 1/4" male connectors DMT242SC2
With a quick connector and leak screw DSC74
Two-pressure sampling cell DSC74B
Separate cooling/venting coil for sampling cells DMCOIL
64
Page 67

8.3 Dimensions
76 [2.99]
Ø
29.5
[1.16]
Ø
12
[0.47]
32.5 [1.28]
120.5 [4.74]
G 1/2" ISO 228-1
Ø
33
[1.3]
AW30[1.18]
Ø
29.5
[1.16]
128.5 [5.06]
76 [2.99]
32.5 [1.28]
Ø
12
[0.47]
1/2" NPT
29.5
[1.16]
120.5 [4.74]
32.5 [1.28]76 [2.99]
Ø
12
[0.47]
3/4"-16 UNF
5/8"-18 UNF
Ø
12
[0.47]
120.5 [4.74]
32.5 [1.28]76 [2.99]
Ø
29.5
[1.16]
Ø
mm
[in]
Chapter 8 – Technical Data
Figure 18 DMT152 Dimensions
65
Page 68

DMT152 User Guide M210865EN-J
66
Page 69

Warranty
For standard warranty terms and conditions, see www.vaisala.com/warranty.
Please observe that any such warranty may not be valid in case of damage due to normal wear
and tear, exceptional operating conditions, negligent handling or installation, or unauthorized
modifications. Please see the applicable supply contract or Conditions of Sale for details of the
warranty for each product.
Technical Support
Contact Vaisala technical support at helpdesk@vaisala.com. Provide at least the
following supporting information as applicable:
• Product name, model, and serial number
• Software/Firmware version
• Name and location of the installation site
• Name and contact information of a technical person who can provide further
information on the problem
For more information, see www.vaisala.com/support.
Recycling
Recycle all applicable material.
Follow the statutory regulations for disposing of the product and packaging.
67
Page 70

DMT152 User Guide M210865EN-J
68
Page 71

Page 72

www.vaisala.com
 Loading...