

Page 1

(
Installation and User Guide
IN-WALL™ RECESSED CAMERA MOUNTING SYSTEMS
Recessed Camera Mounting Systems for Vaddio™, Sony®, Polycom®, LifeSize®, Cisco®
PTZ Cameras and Vaddio™ EZCamera™ Cable System Packages
Images: IN-Wall Systems - Top Row (left to right) Vaddio RoboSHOT™ and HD-Series (HD-18 /19/20/22/30/USB), LifeSize 10X and 4 X, Cisco Precision
60 and PrecisionHD. Bottom Row
OVERVIEW:
The Vaddio IN-Wall camera mounting systems are an attractive way to mount PTZ camera s on a wall where room aesthetics
are critical. These mounting systems use the depth of the wall cavity to minimize the camera’s extension into the room while
providing a finished look to the installation. Each system consists of an in-wall mounting bo x, camera pl atform and fac e frame,
which are powder coated white, but can be painted to match any décor.
IN-Wall Enclosure Supported Cameras and Part Numbers
Part Number Compatible Camera Systems
999-2225-018 Vaddio ClearVIEW™, PowerVIEW™, WallVIEW™ HD Series or RoboSHOT Series Systems
999-2225-012 Vaddio ZoomSHOT and WideSHOT Sony EVI-D70 , Vaddio WallVIEW 70 System
999-2225-014 Sony EVI-HD1, Vaddio WallVIEW CCU or PRO HD1 PTZ System, WallVIEW EagleEye 1080 HD and Polycom EagleEye 1080 HD
999-2225-015 Polycom EagleEye and EagleEye IV, Vaddio WallVIEW PRO EagleEye, Cisco PrecisionHD, Cisco PrecisionHD 1080p and LifeSize 4X
999-2225-016
999-2225-011 Sony EVI-D100, Vaddio Model & WallVIEW 100 System
999-2225-019 Sony BRC-Z330, Vaddio WallVIEW CCU or PRO Z330 PTZ System, EVI-D80 EVI-D90, EVI-H100, Vaddio WallVIEW 80 & 90
999-2225-020 Cisco Precision 60
999-2225-220 LifeSize 10X PTZ
Intended Use: Please read the entire manual thoroughly. The IN-Wall Enclosure was designed, built and tested for use indoors
and for a particular camera listed above. Mounting the wrong camera in the IN-Wall may create a potentially unsafe o perating
condition.
Save These Instructions: The information contained in this manual will help you install and operate your product. If these
instructions are misplaced, Vaddio keeps copies of Specifications, Install ation and User Guides and most pertinent product
drawings for the Vaddio product line on the Vaddio website. These documents can be download ed from www.vaddio.com free
of charge.
UNPACKING:
Carefully remove the product and all of the parts from the packaging and identify the following parts:
One (1) Back Box Enclosure
One (1) Camera Platform
One (1) Face Frame
One (1) Set Mounting Hardware and Screws
Four (4) 8-32 X ¼” White Pan Head Screws (for Face Frame attachment)
Four (4) 10-32 x ¼” Flat Head Screws (for Camera Platform attachment)
Four (4) Self-Drilling Drywall Anchors
Four #8 x 1.25” Screws for Wall Anchors
One (1) ¼” x 20 Camera Mounting Screw (for those cameras that use ¼” x 20 screws)
-OR-
Four (4) M3x6mm Camera Mounting Screws for Polycom EagleEye Cameras (non-Sony)
Sony BRC-H700, Vaddio WallVIEW CCU or PRO H700 PTZ System
Sony BRC-Z700, BRC-H900 Vaddio WallVIEW CCU or PRO Z700 PTZ System
left to right): Polycom EagleEye, Sony EVI-D100, EVI-D70, EVI-HD1, BRC-Z330, Sony BRC-Z700 and BRC-H700.
Note: Cameras are
not included with the
IN-Wall mounts.
©2014 Vaddio - All Rights Reserved. IN-Wall Enclosures - Document Number 341-744 Rev F
Page 2
IN-Wall Enclosures
Deep Back Box Enclosure
The 3-15/16” deep metal wall box uses the maximum depth of a standard 2” x 4” framed wall cavity and minimizes the camera’s
protrusion into the room. Each Enclosure is outfitted with three (3) conduit knockouts (2-sides, 1-top) and a cable pass-through
in the back box and camera platform.
Before Installing
When locating the IN-Wall enclosure, consider viewing angles , lighting conditions, possible line of site o bstructions and check
for in-wall obstructions where the camera is to be mounted (like studs). Pick a mounting location to optimize the
performance of the camera. Please read the step-by-step instructions fully before starting the installati on.
INSTALLATION INSTRUCTIONS:
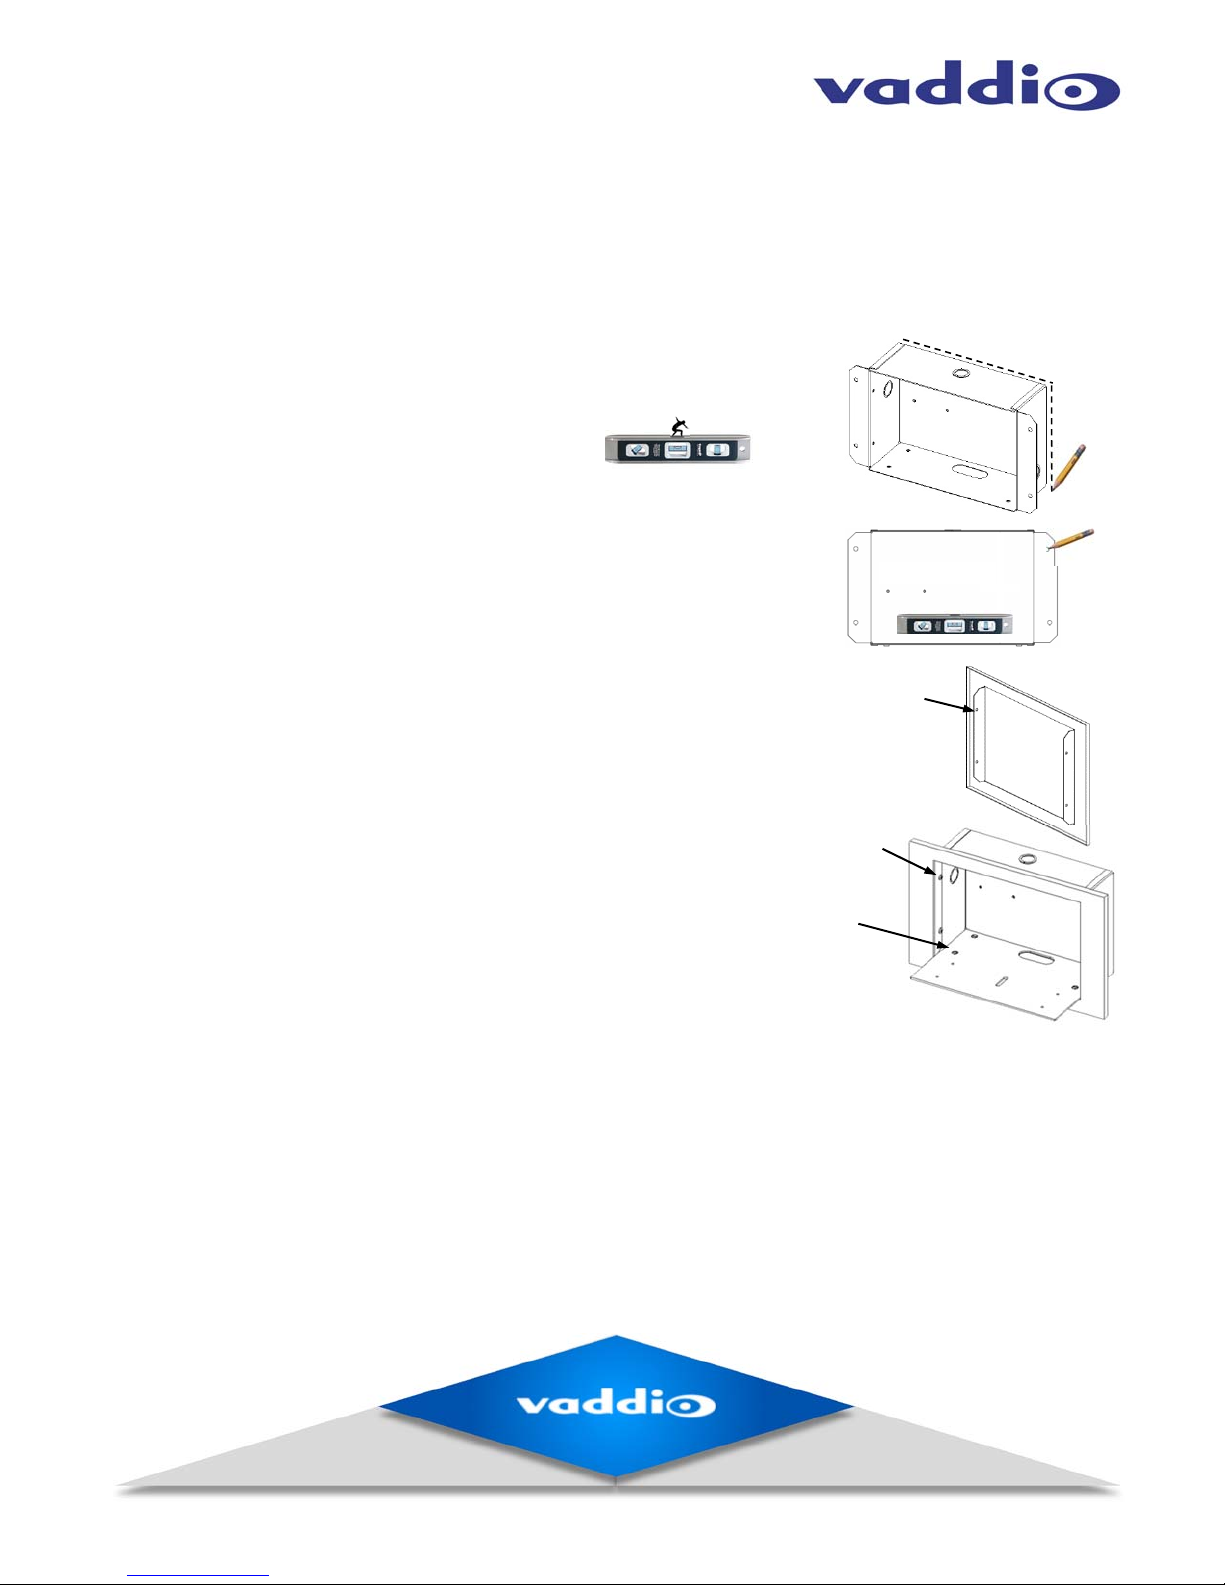
1)
Position the back box enclosure against the wall, level the box and trace the outline
of the box on the wall with a pencil.
Use a level to position the enclosure and trace a line
around the back of the enclosure once the box is level.
2)
After checking for in-wall obstructions, cut out the area marked on the wall with a
drywall saw.
3)
Place the enclosure into the wall opening for a dry fit and mark the four holes for
the spiral wall anchors through the mounting flanges. The integrator can use any
wall anchor of their choice or use the supplied wall anchors. Level the b ack box.
Remove the back box and install the wall anchors. Pull the cabling through the
wall and back box and push it into the opening. Fasten the enclosure to the wall
with wall anchors.
4)
On the sides of the face frame, there are four holes (see drawing below) for
attaching the Face Frame to the Back Box with the supplied white pa n head
machine screws.
Four Screw holes
for mounting the
Face Frame to the
Back Box
Face Frame
(rear view)
5)
Place the Camera Platform onto the bottom of the Back Box, and screw the
platform down with the four flat head machine screws. If using the cable
pass-through, thread the cables through the platform.
6)
Connect the camera system and push the slack in the cabling back into the
wall.
7)
Place the camera on the Camera Platform and secure the camera to the
platform with the supplied screws
Face Frame
attached to
back box with
four screws
Camera
Platform
attached to
Back Box with
four Screws
EZIM
Mounting
Nuts X 2
HARDWARE WARRANTY:
Please see the Vaddio website at support.vaddio.com for the Vaddio Statement of Warranty for all Vaddio Products. The
Statement of Warranty covers the policies and procedures of the Hardware Warranty, Exclusions, Customer Service, Technical
Support, Return Material Authorizations (RMA), Voided Warranty, Shipping, Handling and Products Not Under Warranty. The
Vaddio Warranty Statement supercedes all other published warranty statements heretofore in content and cover ages. Vaddio
Technical Support can be contacted through the Vaddio website or through e-mail sup port at support@vaddio.com.
©2014 Vaddio - All Rights Reserved. Reproduction in whole or in part without written permission is prohibited. Specifications and pricing are subject to change without notice or
obligation. Vaddio, IN-Wall, RoboSHOT, ClearVIEW, PowerVIEW and WallVIEW are trademarks of Vaddio. All other trademarks are property of their respective owners. Planet
HD-189733b in front page header courtesy of Hubble Space Telescope, Document Number 341-744 Rev F, SD: 68314.1
Toll Free: 1-800-572-2011, Main: 763-917-4400, FAX: 763- 971-4464, vaddio.com
 Loading...