

Page 1
ADSL Ethernet/USB Router
Quick Installation Guide for Windows 95 B, 98, NT
4.0, 2000, Me, XP (or later), Linux, and Macintosh
Operating Systems*
English
Français
Italiano
Deutsch
Português
Español
Model 9003
*Windows 95 and NT 4.0 don’t support USB.
Part Number R24.0300.00
Page 2

U.S. Robotics Corporation
935 National Parkway
Schaumburg, Illinois
60173-5157
USA
No part of this documentation may be reproduced in any form or by any means or used to make any
derivative work (such as a translation, transformation, or adaptation) without written permission from
U.S. Robotics Corporation. U.S. Robotics Corporation reserves the right to revise this documentation
and to make changes in the products and/or content of this document from time to time without obligation to provide notification of such revision or change. U.S. Robotics Corporation provides this documentation without warranty of any kind, either implied or expressed, including, but not limited to,
implied warranties of merchantability and fitness for a particular purpose. If there is any software on
removable media described in this documentation, it is furnished under a license agreement included
with the product as a separate document, in the hard copy documentation, or on the removable media
in a directory file named LICENSE.TXT or !LICENSE.TXT. If you are unable to locate a copy, please contact U.S. Robotics and a copy will be provided to you.
UNITED STATES GOVERNMENT LEGEND If you are a United States government agency, then this documentation and the software described herein are provided to you subject to the following:
All technical data and computer software are commercial in nature and developed solely at private
expense. Software is delivered as “Commercial Computer Software” as defined in DFARS 252.2277014 (June 1995) or as a “commercial item” as defined in FAR 2.101(a) and as such is provided with only
such rights as are provided in U.S. Robotics standard commercial license for the Software. Technical
data is provided with limited rights only as provided in DFAR 252.227-7015 (Nov 1995) or FAR 52.22714 (June 1987) whichever is applicable. You agree not to remove or deface any portion of any legend
provided on any licensed program or documentation contained in, or delivered to you in conjunction
with, this Quick Installation Guide.
Copyright © 2002 U.S. Robotics Corporation. All rights reserved. U.S. Robotics and the U.S. Robotics
logo are registered trademarks of U.S. Robotics Corporation. Other product names are for identification purposes only and may be trademarks of their respective companies. Product specifications sub-
ject to change without notice.
Page 3

Installation Overview & System Requirements ........................................................ 1
Configuration requise et informations générales sur l'installation .......................... 29
Überblick über Installation und Systemanforderungen ........................................... 59
Introduzione all'installazione e requisiti di sistema................................................. 89
Perspectiva geral da instalação e Requisitos do sistema......................................... 119
Generalidades relativas a la instalación y requisitos del sistema ............................ 147
Page 4

Page 5
For current product support and contact information, go to this Web site:
http://www.usr.com/broadbandsupport
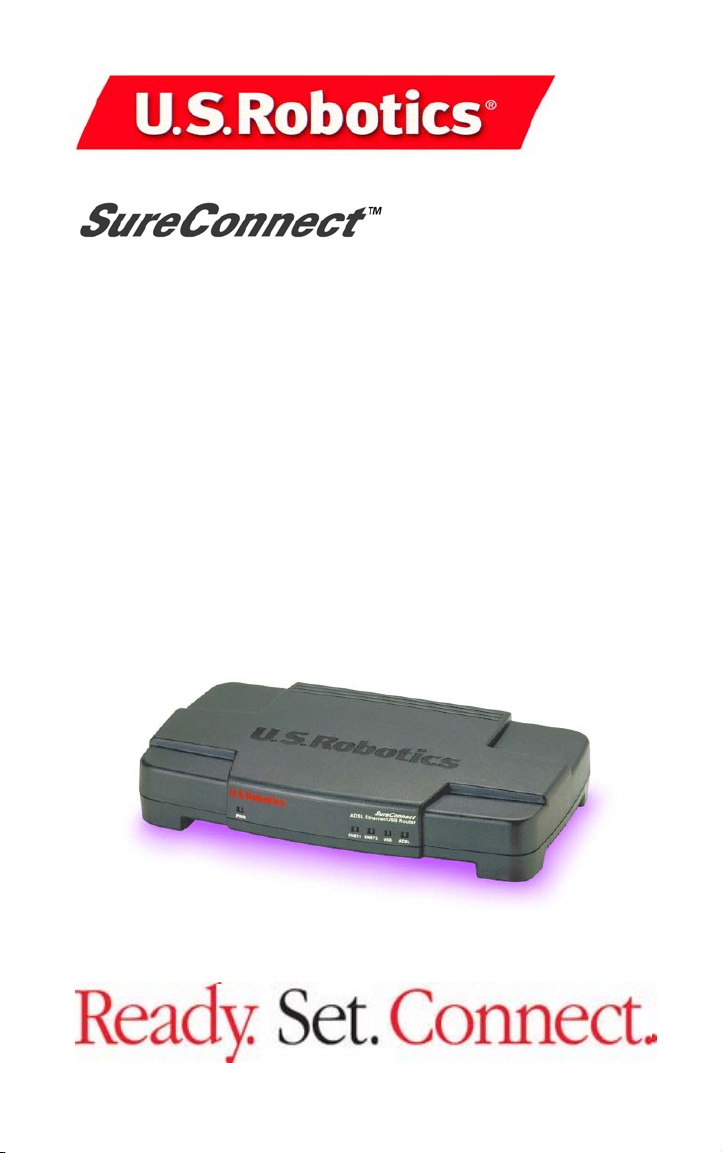
Thank you for purchasing the U.S. Robotics SureConnect ADSL Ethernet/USB
Router, Model 9003. The following instructions walk you through installation of
the U.S. Robotics SureConnect ADSL Ethernet/USB Router.
Please write down your serial number for future reference. If you
need to call our Technical Support department, you must have this
number to receive assistance. You’ll find your serial number on a bar
code sticker on the bottom of the router and also on the box. This
number has 12 characters. You will also need your model number. It
appears below.
Write your serial number in the space provided below.
9003
Model Number
Serial Number
Installation Overview & System Requirements
What You Need Before You Begin
• Active ADSL and Internet service from your local telephone company
or Internet Service Provider (ISP).
• A microfilter may be required for each telephone device (telephones,
answering machines, and fax machines) that shares the same phone
line as the ADSL signal. Make sure that no filter connects between the
ADSL router and telephone wall jack. (Some installations require a
special type splitter between the router and wall jack. In these installations, the splitter must include both telephone and router jacks. If
the splitter doesn’t, don’t install it between the phone jack and
router.)
Your ISP should be able to provide the following:
• Your user name and password, if they were assigned
• ADSL Standard (Modulation)
- G.dmt - Multi-Mode
- G.lite - T1.413, Issue 2
• VPI/VCI Settings
Page 6
• Encapsulation Mode
- RFC1483 Bridged - PPPoA
- RFC1483 Routed - MER
-PPPoE -
Computer Requirements
Minimum System Requirements – Ethernet Port
• Computer with a 10/100 Ethernet adapter (NIC)
• 32 MB RAM
• 10 MB hard disk space
• Any operating system that supports an Ethernet connection with an IP
stack
• Internet Explorer or Netscape Navigator 4.0 or later Web browser
• SureConnect Installation CD-ROM requires Windows 95, Windows 98,
Windows Me, Windows NT4.0, Windows 2000, or Windows XP
Minimum System Requirements – USB Port
• Pentium 200 MHz or faster compatible CPU
• Host PC with Universal Serial Bus (USB) support
• 32 MB RAM
• 10 MB hard disk space
• Internet Explorer or Netscape Navigator 4.0 or later Web browser
• SureConnect Installation CD-ROM requires Windows 98, Windows Me,
Windows 2000, or Windows XP
Make sure that your computer is on. You should have
your operating system CD-ROM readily available.
The installation program requires use of the Windows
Setup CD.
ADSL Network Requirements
ADSL and Internet service from your local telephone company or Internet Service
Provider (ISP).
Power Requirements
The U.S. Robotics SureConnect ADSL Ethernet/USB Router obtains power from
the included power supply. Be sure to only use the included power supply when
operating this device.
2
Page 7

This U.S. Robotics SureConnect ADSL Ethernet/USB Router package includes
the following items:
U.S. Robotics SureConnect ADSL
Ethernet/USB Router
Model 9003
Optional Components
Some models may include a microfilter in the box, or your
ISP may supply a microfilter. Check with your ISP to see if
you need a microfilter. The next section discusses microfilter installation.
Standard 7 ft RJ-11 telephone cable
(4 wire)
Power Adapter
USB Cable
(3 ft/1 m)
Ethernet Straight-Through Cable
(6 ft/1.8 m)
Quick Installation Guide
U.S. Robotics SureConnect Installation CD-ROM
with User Guide
If you discover incorrect, missing, or damaged parts, inform your dealer.
Should You Connect via Ethernet or USB?
The U.S. Robotics SureConnect ADSL Ethernet/USB Router gives you the option
to connect through a USB or an Ethernet port. Selecting how to connect your
router is a matter of preference. Connection also depends on your available
computer ports and the operating system that you use. For example, you must
use an Ethernet connection with these operating systems: Windows 95,
Windows NT 4.0, Macintosh and Linux.
3
Page 8
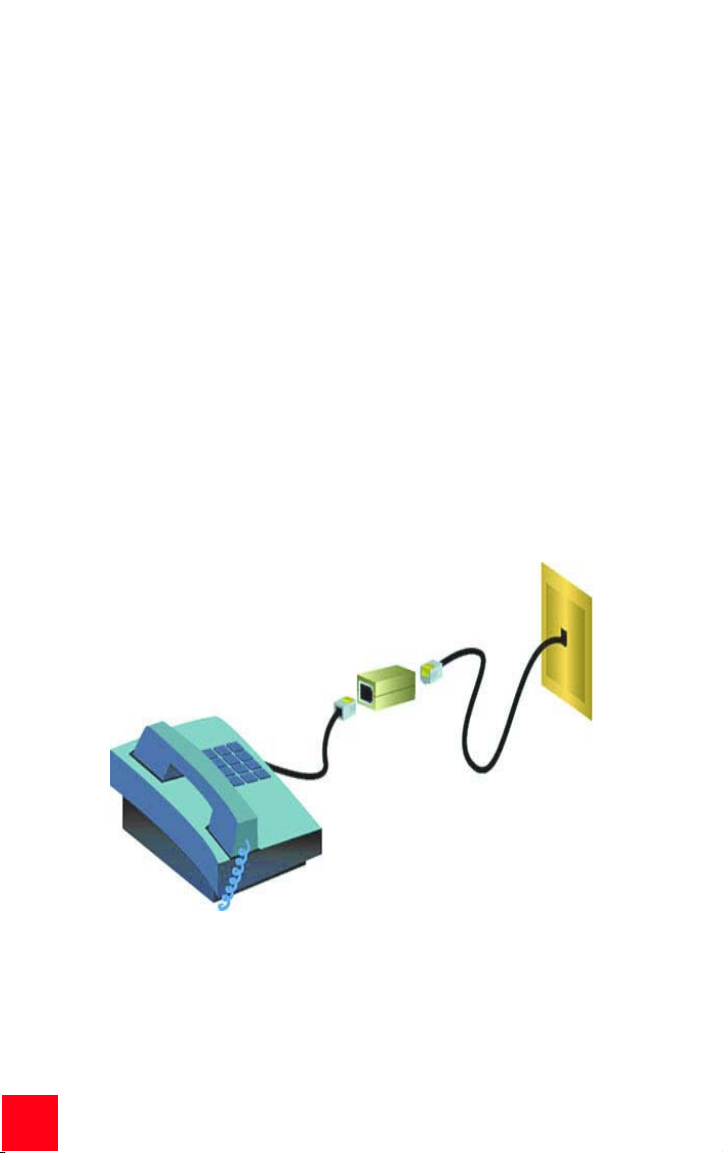
Step 1. Connect Microfilters (If Necessary)
• If your package didn’t include microfilters, and your ISP didn’t provide
any: Skip to Step 2 of these instructions.
• If your installation requires microfilters: Install one on each telephone
device that shares the same phone line as the ADSL signal. (Telephone devices include telephones, answering machines, and fax
machines.)
A microfilter is a small device that reduces interference between ADSL signals
and telephone signals. You only need a microfilter if the ADSL router and
telephone device share the same phone line. If you don’t use a microfilter, you
may experience background noise on your telephone during data transmission.
Also, telephone calls may interrupt data transmissions.
Connect Microfilters to Telephone Devices
To install the microfilter, plug the phone into the microfilter, and then plug the
microfilter into the telephone wall jack. Do not install a microfilter on the cable
that connects your router to the telephone jack unless your microfilter has a
connection for both the telephone and the DSL device.
4
Page 9
Step 2. Install the ADSL Ethernet/USB Router
Windows 95 & NT 4.0, Macintosh and Linux Users
If you’re installing the U.S. Robotics SureConnect ADSL Ethernet/USB
Router on a system running Windows 95, NT 4.0, Macintosh or Linux,
you must install the router using the Ethernet option.
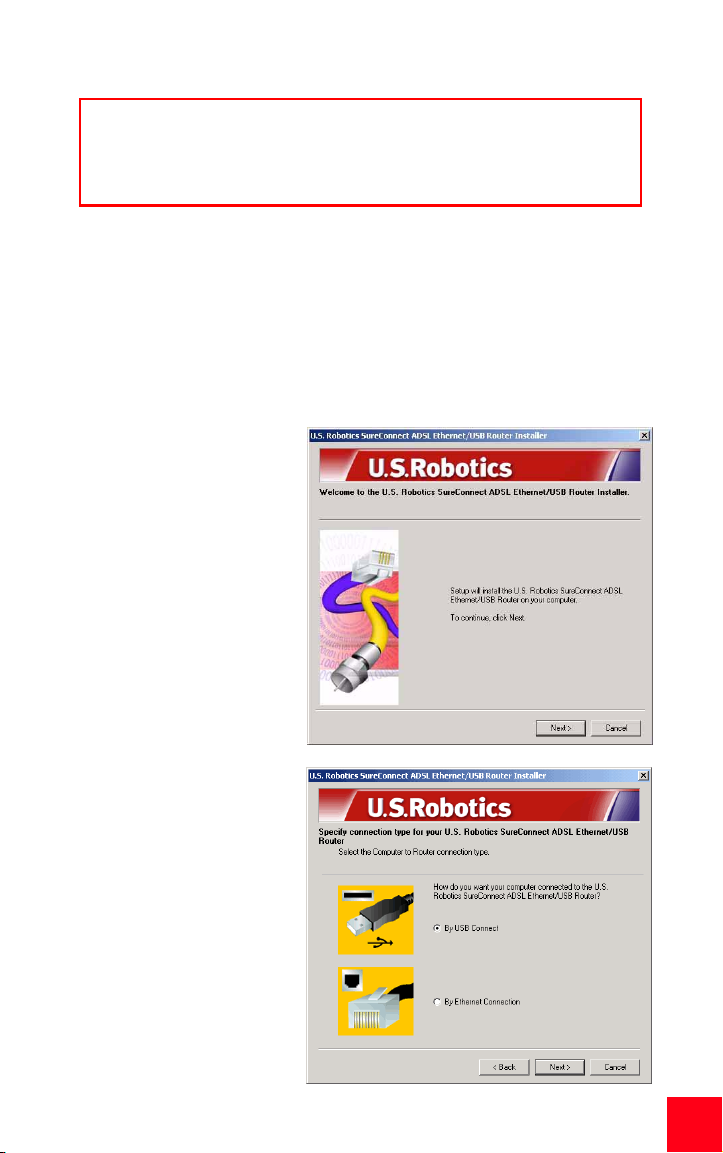
Installation Instructions for Windows 98, 2000, Me & XP
To install the U.S. Robotics SureConnect ADSL Ethernet/USB Router, insert the
U.S. Robotics SureConnect Installation CD-ROM into the CD-ROM drive of your
computer. If the installation does not start automatically, go to your desktop and
double-click My Computer, double-click the drive letter associated with your CDROM drive, and then double-click Setup.
The U.S. Robotics
SureConnect ADSL Ethernet/
USB Router Installer Welcome
window will display. Click Next
to continue installing the U.S.
Robotics SureConnect ADSL
Ethernet/USB Router.
• Select the connection type that you
will use to connect
the router to your
computer. Click
Next.
5
Page 10

• A qualification test
will run to verify that
your system meets
the minimum installation requirements. The Results
screen will display
those items in your
configuration that
passed with a green
flag and the ones
that failed with a red
flag. If your system
passed the qualification, click Next.
If the software notifies you that your system failed the test, click the View Report
button. The report identifies which component failed.
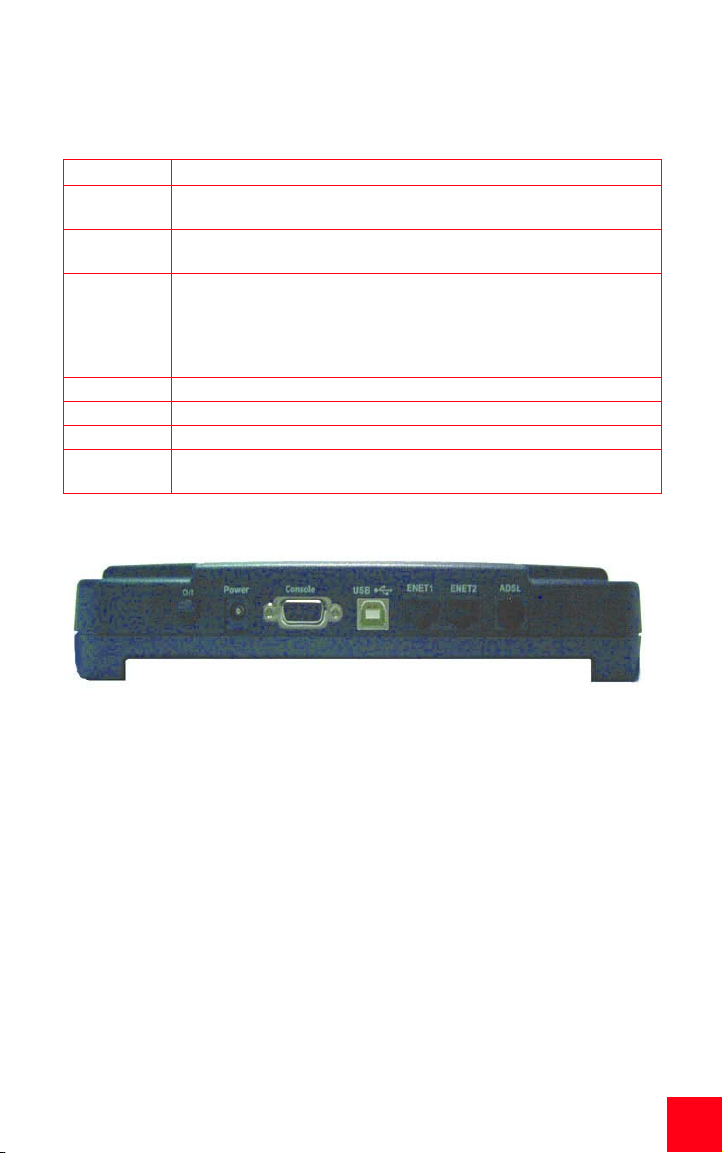
Step 3. Connect the Cables
The table below summarizes data for connections and ports on the back of the
router.
Item Description
O / I
Power Input jack that accepts cable from wall power supply.
Console
USB Universal serial bus port on the back of the router.
ENET1 Ethernet Port 1 on the back of the router.
ENET2 Ethernet Port 2 on the back of the router.
ADSL Digital subscriber line RJ-11 service jack on the back of the router.
Pushbutton switch that turns the U.S. Robotics SureConnect ADSL USB/
Ethernet Router on and off.
Connects an RS-232 cable (not included) to the router. You can use the
cable to communicate to the router through the Terminal User Interface.
The Terminal User Interface (TUI) is another way to configure the router
or get diagnostic info. The TUI substitutes for the Web User Interface.
6
Page 11

Connect the Power Adapter
Be sure to only use the included power supply. Connect the power adapter cord
to the “Power” jack at the rear of the router. Connect the power adapter to a
standard wall outlet.
Turn on the router by pressing the power button labeled “O/ I.” The “PWR” LED
on the front panel of the U.S. Robotics SureConnect ADSL Ethernet/USB Router
will be illuminated if power is being supplied to the router. The router will
initialize after the power is plugged in. This process takes about a minute. Click
Next to initialize the router.
Connect the Telephone Cable
Connect one end of the included telephone cable to the “ADSL” telephone port
on the back of your router. Connect the other end of the cable into the telephone
wall jack. Click Next.
Connect the Ethernet or USB Cable
Ethernet
If you are connecting up to two devices, you can plug them directly into the back
of the router. Doing so eliminates the need for a separate hub. Insert one end of
the Ethernet cable into either the “ENET1” or “ENET2” port on the back of the
U.S. Robotics SureConnect ADSL Ethernet/USB Router. Connect the other end of
the Ethernet cable to the Ethernet port on your computer’s 10/100 network
interface card (NIC).
• Click Finish.
USB
• If you have chosen to connect via the USB port, insert the rectangular
end of the included USB cable into the USB port of the computer.
Insert the square end of the cable into the port labeled “USB” on the
U.S. Robotics SureConnect ADSL Ethernet/USB Router.
• After you plug in the USB cable, the router detects your PC. Then the
router automatically installs its software on your PC. (Your system
may require a system reboot.)
• The Found New Hardware Wizard notifies you that the PC detects the
router. Click Finish.
7
Page 12
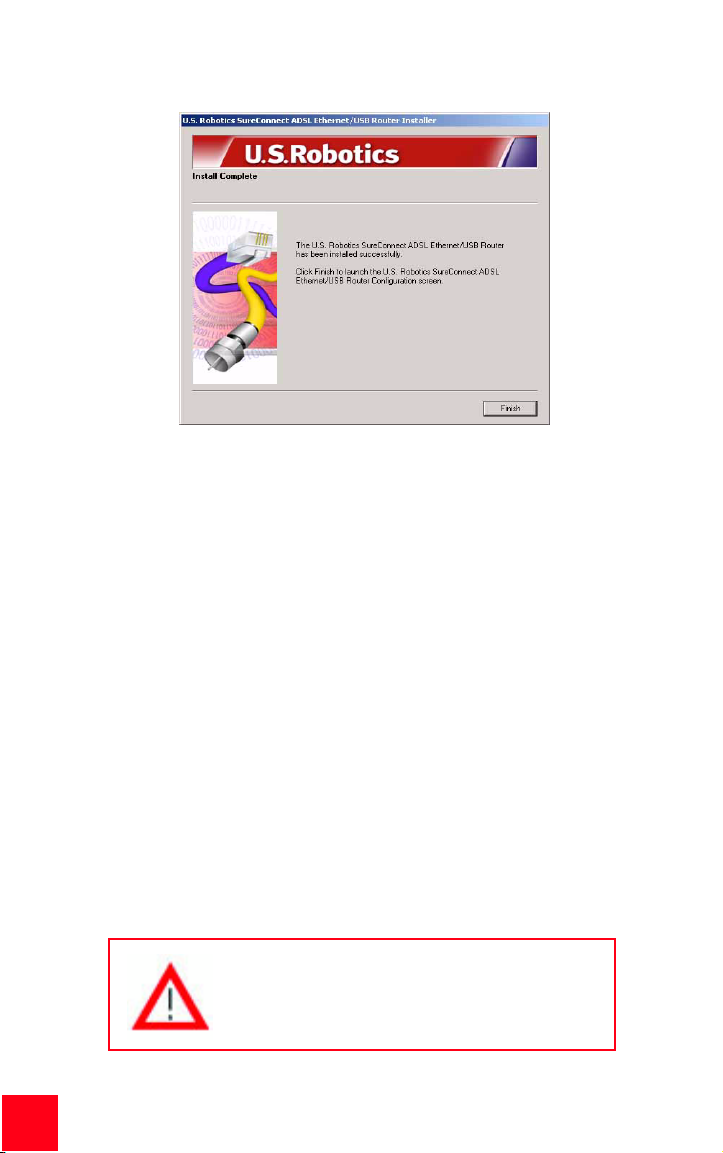
Congratulations! Installation Complete!
You’ve completed installation of the U.S. Robotics SureConnect ADSL Ethernet/
USB Router. Click Finish. The installer will automatically launch the Internet
browser. The Internet browser will point to IP address 192.168.1.1.
At this point, the software prompts you for a username and password. The
default username is “root.” The default password is “12345.” Enter these values
(without periods or quotation marks).
If your browser doesn’t auto-launch...
Begin the Quick Setup by launching your Internet browser and entering http://
192.168.1.1. The SureConnect ADSL Utility Quick Setup screen will display.
Step 4. Use the Quick Setup Menu
The U.S. Robotics SureConnect ADSL Ethernet/USB Router comes equipped
with the SureConnect ADSL Web Utility. This utility helps you get the router set
up in three easy steps...
• Select ADSL Standard.
• Configure service provider settings.
• Save and restart.
Do not turn the power off or disturb the router
before the save operation completes. Interrupting
this process will cause the router to lose setup data.
8
Page 13
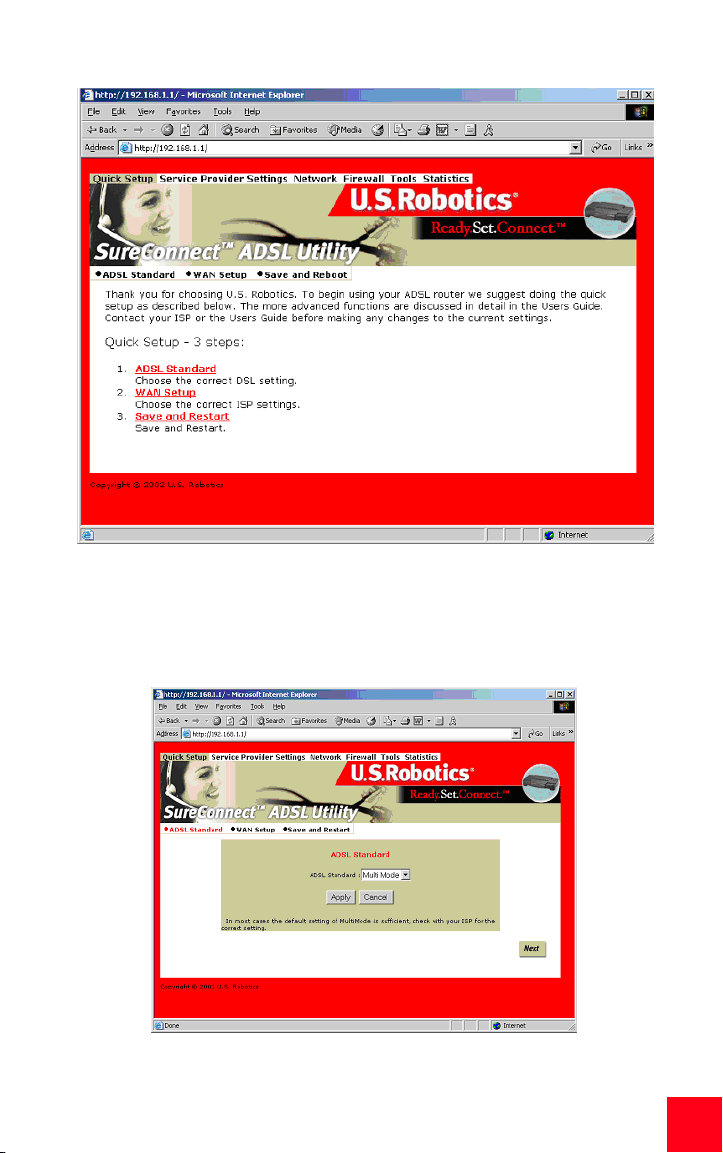
Select ADSL Mode
1. Click the ADSL Standard radio button. The ADSL Standard window opens.
This window allows you to select the ADSL standard that you’ll use.
9
Page 14

2. From the ADSL Standard drop-down list, select G.dmt, G.lite, T1.413, or
Multi-Mode. In most cases, the default setting of Multi-Mode is sufficient.
You may want to check with your ISP to confirm the correct settings. Once
you have made your selection, click Apply.
3. Click the Next button in the lower right corner of the screen to move to the
WAN Setup page.
Configure Service Provider Settings
In the Service Provider Settings/WAN Setup screen, enter the values obtained
from your ISP. See the User Guide’s ISP Settings Table for popular ISP settings.
(Settings may vary from the table listing. Check with your ISP.) If you don’t find
your ISP on the table, call your ISP to obtain settings.
1. See the Current ATM PVC List at the bottom of the screen. On this list,
delete any connection type that you don’t need.
2. Select the connection type recommended by your ISP. Choose mode
RFC1483 bridged, RFC 1483 routed, PPPoE, PPPoA or MER. Some connection types may require additional information, such as IP address or username and password.
3. At the top of the WAN Setup Screen, fill in the VPI and VCI values.
4. Select the Encapsulation mode. Click either the LLC/SNAP or VC Multi-
plexing radio button.
5. If appropriate, check the Network Settings box entitled “Enable NAPT.”
6. If appropriate, check the Network Settings box entitled “Enable DHCP.”
7. Click the Add button.
8. To continue, click the Next button in the lower right corner of the screen.
10
Page 15
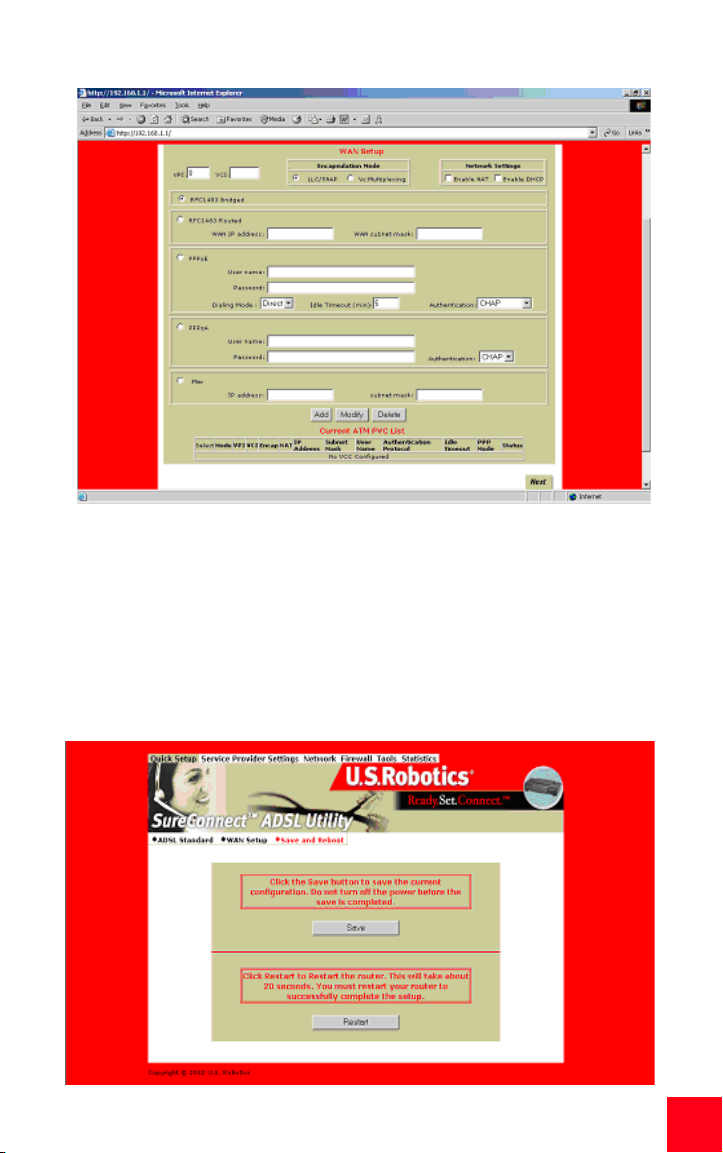
Save and Restart
Once you’ve filled out the ADSL Standard and WAN Setup screens, save your
settings and restart your router.
1. On the Save & Restart screen, click Save.
2. Once the save is complete, click Restart.
11
Page 16
If your ISP gave you software to install, install the
software now. Be sure to read and follow the
installation instructions.
3. You can test your connection by registering your router at:
www.usr.com/productreg
Troubleshooting
Troubleshooting Checklist
To help diagnose the problem, use the checklist below.
✔ Confirm that you have secured the power adapter to the router and to
an active wall outlet. The “PWR” LED should illuminate.
✔ Confirm that you have secured the telephone cable to the telephone
wall jack and to the router. The “ADSL” LED should illuminate.
✔ Confirm that you have secured the Ethernet cable to the “ENET1” and/
or “ENET2” port on the router and to the computer’s network interface
card. The “ENET1” or “ENET2” LED, or both, should illuminate.
✔ If you’re using the USB cable: Confirm that you’ve secured the USB
cable to the “USB” port on the router and computer. The “USB” LED
should illuminate.
Status LEDs
The front of the U.S. Robotics SureConnect ADSL Ethernet/USB Router has five
LEDs. The first from the left is the “PWR” LED. The second and third are the data
transfer “ENET1” and “ENET2” LEDs. The fourth is the “USB” LED. The fifth is the
“ADSL” LED. LED conditions below indicate the router’s operational status.
12
Page 17

PWR
On Green Receiving power from the wall jack power supply.
Off Detected no power.
Established and detected a physical connection
through the Ethernet cable between router and
computer.
Flowing data traffic.
Did not establish a physical connection between
router and computer.
Established and detected a physical connection
through the USB cable between router and computer.
Did not establish a physical connection between
router and computer.
ENET1
ENET2
USB
ADSL
On Green/10 Mbps
On Orange/100 Mbps
Flashing Green or
Orange
Off
On Green
Flashing Green Flowing data traffic.
Off
On Green Established a DSL link.
Flashing Green Negotiating a DSL link.
Off The DSL link failed.
Troubleshooting Tips
None of the LEDs illuminates when I turn on the router.
• Check the connection between the power adapter, router, and wall
outlet.
• Confirm that you’re using the power adapter that came with your U.S.
Robotics SureConnect ADSL Ethernet/USB Router package.
The ADSL light is flashing or is not illuminated.
• Make sure that the telephone cable connects properly at the “ADSL”
port on the rear of the router and at the phone wall jack.
I can’t connect to the router’s configuration utility.
Possible Solution 1:
• Make sure that Ethernet or USB cables connect properly and securely.
• Make sure that you’ve plugged in the power cord.
Possible Solution 2:
• Make sure that your PC is using an IP address within the range of
192.168.1.2 to 192.168.1.254.
• Make sure that the address of the subnet mask is 255.255.255.0.
13
Page 18

• If necessary, the Default Gateway data should be at 192.168.1.1.
• To verify these settings, perform the following steps:
Windows 95, 98, or Me Users:
1. Click Windows Start.
2. Click Run.
3. Type winipcfg.
4. Click OK.
5. Check the IP Address, Subnet Mask, Default Gateway data. Is this
data correct?
6. If the data isn’t correct, click Release All. Then click Renew All.
Windows NT, 2000, or XP Users:
1. Click Windows Start.
2. Click Run.
3. Type cmd.
4. Click OK.
5. At the DOS prompt, type ipconfig /all.
6. Check the IP Address, Subnet Mask, Default Gateway data. Is this
data correct?
7. If the data isn’t correct…
• Type ipconfig /release.
• Press Enter.
• Type ipconfig /renew.
• Press Enter.
Possible Solution 3:
• Check the connection setting of your Web browser.
• Check that the HTTP Proxy feature of your Web browser is disabled.
Make these checks so that your Web browser can read configuration
pages inside your router.
• Launch your Web browser.
Internet Explorer users:
1. Click Tools and then click Internet Options. Then click the
Connections tab.
2. Select Never dial a connection. Click Apply. Then click OK.
3. Click Tools again. Then click Internet Options.
4. Click the Connections tab. Then click the LAN Settings button.
5. Clear all the check boxes. Click OK.
6. Click OK.
14
Netscape Navigator users:
1. Click Edit, Preferences, and then double-click Advanced in the
Category window.
2. Click Proxies, select Direct connection to the Internet, and then
Page 19

click OK.
3. Click Edit again, and then click Preferences.
4. Under Category, double-click Advanced, and then click Proxies.
5. Select Direct connection to the Internet and click OK.
• If you still can’t connect to the router, see the Troubleshooting Ping
procedure below in these Troubleshooting Tips.
I can't access the Internet.
Possible Solution:
• Make sure that you’ve connected the power cord.
• Make sure that you’ve correctly connected Ethernet or USB cables
between the router and PCs.
• Make sure that you have a DSL link.
• Make sure that you have an active ISP account.
• See the router’s Service Provider Setting Page under WAN Setup.
Check your settings for VCI and VPI.
• See the router’s Service Provider Setting Page under WAN Setup.
Check your settings for username and password.
• For more suggestions, refer to the router’s user guide.
I don’t know if my assigned IP Address is Static or Dynamic.
Possible Solution:
• If you have active DSL service, you probably have a Dynamic IP
address.
• Check with your service provider to verify this information. Some
providers assign Static IP addresses.
• If your service provider uses dynamic host configuration protocol,
verify that you’ve enabled DHCP.
While trying to check my network configuration settings in Windows Me or XP, I
can’t find the Network icon.
Possible Solution:
• The default setting in Windows Me and XP is to not show all of the icons
within the Control Panel. Click Windows Start, Settings, and then
Control Panel.
• Within Control Panel, click View all Control Panel options on the left
side of the screen. All Control Panel icons should now be visible.
I don’t know how to configure the TCP/IP protocol to work with the router.
Possible Solution:
• The router must access a network interface card inside your PC. Your
PC may not recognize this internal network interface card. You may be
15
Page 20

able to resolve this problem by installing or adding the correct
hardware.
• Open the help menu system in your operating system.
• Check the help messages for TCP/IP.
Troubleshooting Ping Procedure
1. Click Windows Start and then click Run. In the Run dialog box,
Windows 95, 98, and Me users: Type “command” and click OK.
Windows NT, 2000, and XP users: Type “cmd” and click OK. The
command line screen opens.
2. Type Ping 127.0.0.1. This is your local host address. The address
assures that TCP/IP installs and functions properly. If you can’t
complete this ping, disconnect the router and then repeat the
installation procedure.
3. Type Ping followed by your PC’s IP address. This assures that
your PC responds to requests. If you can’t complete this ping,
make sure all the cables connect properly and that all the correct
drivers are installed.
4. Type Ping followed by your gateway address to check the
communication with your gateway. (The default gateway
address is 192.168.1.1.) This assures that you can connect to
other machines and the router. If you can establish
communication with the router, you can access the
Administration page and configure settings. If you can’t
complete this ping, make sure the router power cord is plugged
in and properly connected to your PC.
5. Type Ping followed by the outside Internet address of your
router. This is the address that is provided either by your ISP or
by the outside LAN. This procedure will assure that your router
functions properly and allows traffic to pass through.
6. Type Ping followed by your known DNS server address. This will
allow you to resolve valid Internet host names to IP addresses
and to verify that you can access the Internet.
What if I don’t receive a return message from a successful ping?
1. No return message indicates that the PC can’t communicate to the
router through IP address assignment. Check the address in the
configuration utility.
2. If necessary, correct the address in the Console Mode.
3. After making corrections, continue with the ping procedure.
How do I uninstall the router?
Windows 95
1. Click Windows Start, select Settings, and click Control Panel.
2. Double-click Add/Remove Programs icon.
16
Page 21

3. On the Install/Uninstall tab, select U.S. Robotics SureConnect ADSL
Ethernet/USB Router. You may have to scroll down to locate this
program.
4. Click the Remove button.
5. The Reinstall or Uninstall screen will display. Click Uninstall and select
Yes if the display prompts you to confirm the uninstallation. All
components will uninstall from the computer.
Windows 98 and 2000
1. Click Windows Start, select Settings, and click Control Panel.
2. Double-click the Add/Remove Programs icon.
3. The Add/Remove Programs screen will display all programs that you
currently have installed. Locate and select the U.S. Robotics
SureConnect ADSL Ethernet/USB Router. You may have to scroll
down to locate this program.
4. Click Add/Remove in Windows 98 or Change/Remove in Windows
2000.
5. The Reinstall or Uninstall screen will display. Click the Uninstall option
and then click Next. All components will uninstall from the computer.
Windows XP
1. Click Windows Start and then click Control Panel.
2. Double-click Add/Remove Programs.
3. The Install/Uninstall tab will display all programs that you currently
have installed. Locate and select the U.S. Robotics SureConnect ADSL
Ethernet/USB Router. You may have to scroll down to locate this
program.
4. Click the Add/Remove button.
5. The Reinstall or Uninstall screen will display. Click the Uninstall option
and then click Next. All components will uninstall from the computer.
Windows NT
1. Click Windows Start and select Settings, then click Control Panel.
2. Double-click the Add/Remove Program icon.
3. The Add/Remove Programs screen will display all programs that you
currently have installed. Locate and select the U.S. Robotics
SureConnect ADSL Ethernet/USB Router. You may have to scroll
down to locate this program.
4. Click the Add/Remove button.
5. The Reinstall or Uninstall screen will display. Click the Uninstall option
and then click Next. All components will uninstall from the computer.
Macintosh and Linux
Unplug all cables from the computer and the router.
17
Page 22

Technical Support
Go to the Support section of the U.S. Robotics Web site:
http://www.usr.com/support
• See the FAQ and Troubleshooting Web pages for your specific product.
These pages address the most common difficulties that users
experience.
• If you can’t connect to the Internet, contact your ISP for assistance.
• For current support contact information, go to the following Web site:
http://www.usr.com/broadbandsupport
18
Page 23

Regulatory Information
Manufacturer’s Declarations of Conformity
FCC Declaration of Conformity
We declare under our sole responsibility that the U.S. Robotics SureConnect ADSL Ethernet/USB Router
to which this declaration relates, is in conformity with the following standards or other normative
documents:
FCC Class B Statement
This device complies with Part 15 of the FCC Rules. Operation is subject to the following two conditions:
Radio and Television Interference
Note: This equipment has been tested and found to comply with the limits for a Class B digital device,
pursuant to Part 15 of the FCC Rules. These limits are designed to provide reasonable protection against
harmful interference in a residential installation. This equipment generates and uses radio frequency
energy and, if not installed and used in accordance with the instructions, may cause interference to
radio communications. However, there is no guarantee that interference will not occur in a particular
installation. If this equipment does cause interference to radio or television reception, which can be
determined by turning the equipment off and on, the user is encouraged to try to correct the
interference by one or more of the following measures:
The user may find the following information prepared by the Federal Communications Commission
helpful:
Consult the dealer or an experienced radio/TV technician for help.
Telephone Interference Bulletin
This document is available on the Internet through the FCC Consumer Information Bureau Home Page
at http://www.fcc.gov/cib. Under Consumer Information Directory>Telephone>Miscellaneous
Telephone Information, select Interference to Telephones.
Caution: Changes or modifications not expressly approved by the party responsible for compliance
could void the user’s authority to operate this equipment.
In order to maintain compliance with the limits of a Class B digital device, U.S. Robotics requires that
you use a quality interface cable when connecting to this device. Suggested cable type is 90-ohm USB
cable for the USB port, and standard telephone cable for the RJ-11 port. The telco cable needs to be
connected with a minimum 26AWG telephone cable.
UL Listing/C-UL Listing
This information technology equipment is UL Listed and C-UL Listed for both the US and Canadian
markets respectively, for uses described in the User Guide.
FCC Part 68 Registration
Customer Information
This equipment complies with Part 68 of the FCC rules and the requirements adopted by the ACTA. On
the bottom of this equipment is a label that contains, among other information, a product identifier in
the format US: AAAEQ##TXXXX. If requested, this number must be provided to the telephone company.
This equipment uses the following Universal Service Order Code (USOC) jacks: RJ-11.
ANSI C63.4-1992 Methods of measurement
Federal Communications Commission 47 CFR Part 15, subpart B
1) 15.107 (e) Class B Conducted Limits
2) 15.109 (g) Class B Radiated Emissions Limits
1) this device may not cause harmful electromagnetic interference, and
2) this device must accept any interference received including interference that may cause
undesired operations.
• Reorient or relocate the receiving antenna or cable input device.
• Increase the separation between the equipment and receiver.
• Connect the equipment into an outlet on a circuit different from that to which the receiver
is connected.
• Consult the dealer or an experienced radio/TV technician for help.
19
Page 24

A plug and jack used to connect this equipment to the premises wiring and telephone network must
comply with the applicable FCC Part 68 rules and requirements adopted by the ACTA. A compliant
telephone cord modular plug is provided with this product. It is designed to be connected to a
compatible modular jack that is also compliant. See this document for details.
The REN is used to determine the number of devices that may be connected to a telephone line.
Excessive RENs on a telephone line may result in the devices not ringing in response to an incoming call.
In most but not all areas, the sum of RENs should not exceed five (5.0). To be certain of the number of
devices that may be connected to a line, as determined by the total RENs, contact the local telephone
company. For products approved after July 23, 2001, the REN for this product is part of the product
identifier that has the format US: AAAEQ##TXXXX. The digits represented by ## are the REN without a
decimal point (e.g., 03 is a REN of 0.3).
If thi s e qui pm ent , U. S. Rob ot ics Su reC onn ec t AD SL Ethernet/USB Router, causes harm to the telephone
network, the telephone company will notify you in advance that temporary discontinuance of service
may be required. But if advance notice is not practical, the telephone company will notify the customer
as soon as possible. Also, you will be advised of your right to file a complaint with the FCC if you believe
it is necessary.
The telephone company may make changes in its facilities, equipment, operations or procedures that
could affect the operation of the equipment. If this happens the telephone company will provide
advance notice in order for you to make necessary modifications to maintain uninterrupted service.
If trouble is experienced with this equipment, for repair or warranty information, please contact:
USR - Walnut
528 Spanish Lane
Walnut, CA 91789
If the equipment is causing harm to the telephone network, the telephone company may request that
you disconnect the equipment until the problem is resolved.
There are no serviceable parts in this equipment.
If your home has specially wired alarm equipment connected to the telephone line, ensure the
installation of this equipment does not disable your alarm equipment. If you have questions about what
will disable alarm equipment, consult your telephone company or a qualified installer.
For Canadian router Users
Utilisateurs de routers au Canada
Industry Canada (IC)
This digital apparatus does not exceed the Class B limits for radio noise emissions from digital
apparatus set out in the interference-causing equipment standard entitled Digital Apparatus, ICES-003
of Industry Canada.
Le présent appareil numérique n’émet pas de bruits radio-électriques dépassant les limites applicables
aux appareils numériques de la classe B prescrites dens le Règlement sur le brouillage radioélectrique
édicté par l’Industrie. NMB-003
Customer Information
Notice: This equipment meets the applicable Industry Canada Terminal Equipment Technical
Specifications. This is confirmed by the registration number. The abbreviation, IC, before the
registration number signifies that registration was performed based on a Declaration of Conformity
indicating that Industry Canada technical specifications were met. It does not imply that Industry
Canada approved the equipment.
Notice: The Ringer Equivalence Number (REN) for this terminal equipment is 0.1B. The REN assigned to
each terminal equipment provides an indication of the maximum number of terminals allowed to be
connected to a telephone interface. The termination on a interface may consist of any combination of
devices subject only to the requirement that the sum of the Ringer Equivalence Numbers of all the
devices does not exceed five.
AVIS: Le nombre équivalent de sonneries (REN) affecté à chaque terminal indique le nombre maximal
20
Page 25

de terminaux qui peuvent être branchés à une interface téléphonique. L’équipement terminal d’une
interface peut comporter toute combinaison d’appareils, à la condition unique que le nombre
équivalent total des sonneries de tous les appareils ne dépasse pas 5. Le nombre équivalent des
sonneries se trouve sur la base du router.
AVIS: L’étiquette d’Industrie Canada (IC) permet d’identifier le matériel homologué. Cette
homologation signifie que le matériel est conforme à certaines normes de protection, d’exploitation et
de sécurité des réseaux de télécommunications, comme le prescrivent les documents qui portent sur
les exigences techniques relatives à l’équipement terminal. Cependant, le Ministère ne garantit pas que
l’appareil fonctionnera à la satisfaction de l’utilisateur.
Avant d’installer ce matériel, l’utilisateur doit s’assurer qu’il est permis de le raccorder aux installations
de l’entreprise locale de télécommunication. Le matériel doit également être installé selon une
méthode de raccordement autorisée. Dans certains cas, le câblage intérieur de la compagnie étant
associé à une ligne individuelle, le service individuel peut être étendu au moyen d’un connecteur
certifié (rallonge téléphonique). L’abonné ne doit pas oublier que la conformité aux conditions
susmentionnées n’empêchera peut-être pas la dégradation du service dans certains cas. À l’heure
actuelle, les compagnies de téléphone n’autorisent pas les utilisateurs à raccorder leur appareil au jack
sauf dans des circonstances précises énoncées dans les contrats et tarifs de ces compagnies.
Les réparations de matériel homologué doivent être coordonnées par un représentant désigné par le
fournisseur. L’entreprise de télécommunications peut demander à l’utilisateur de débrancher un
appareil à la suite de réparations ou de modifications effectuées par l’utilisateur ou à cause d’un
mauvais fonctionnement de l’appareil.
AVIS: L’étiquette d’Industrie Canada identifie le matériel homologué. Cette étiquette certifie que le
matériel est conforme aux normes de protection, d’exploitation et de sécurité des réseaux de
télécommunications, comme le prescrivent les documents concernant les exigences techniques
relatives au matériel terminal. Le Ministère n’assure toutefois pas que le matériel fonctionnera à la
satisfaction de l’utilisateur.Avant d’installer ce matériel, l’utilisateur doit s’assurer qu’il est permis de
le raccorder aux installations de l’entreprise locale de télécommunication. Le matériel doit également
être installé en suivant une méthode acceptée de raccordement. L’abonné ne doit pas oublier qu’il est
possible que la conformité aux conditions énoncées ci-dessus n’empêche pas la dégradation du service
dans certaines situations.Les réparations de matériel homologué doivent être coordonnées par un
représentant désigné par le fournisseur. L’entreprise de télécommunications peut demander à
l’utilisateur de débrancher un appareil à la suite de réparations ou de modifications effectuées par
l’utilisateur ou à cause de mauvais fonctionnement.Canadian router Users, your warranty and repair
centre is:
CE Compliance
CE Declaration of Conformity
We, U.S. Robotics Corporation of 935 National Parkway, Schaumburg, Illinois, 60173-5157,USA, declare
under our sole responsibility that the U.S. Robotics SureConnect ADSL Ethernet/USB Router to which
this declaration relates is in conformity with the following standards and/or other normative
documents:
EN60950 EN55022 EN55024 EN61000-3-2 EN61000-3-3
We hereby declare that this product is in compliance with all the essential requirements of Directive
1999/5/EC. The conformity assessment procedure referred to in Article 10(3) and detailed in Annex II of
Directive 1999/5/EC has been followed.
Product Specifications for ADSL Ethernet Router
Standard Conformance
Basic ADSL
Standards and Specifications
• Analog Devices 6480/6482 Eagle ADSL Chipset and 6489 Network Processor
• Supports full-rate G.DMT (ITU-T G.992.1)and T1.413Issue 2 ADSL: up to 8 Mbps
downstream and up to 1 Mbps upstream
U.S. Robotics
Unit - 100
13751 Mayfield Place
Richmond, B.C. Canada V6V 2G9
21
Page 26

• Supports G.lite (ITU-T G.992.2)ADSL:up to 1.5 Mbps downstream and up to 512 Kbps
upstream
• Supports DSL handshaking (ITU-T G.994.1)
• Multi-DSLAM interoperability including Alcatel, Globespan, Te xas Instruments, and Analog
Devices-based DSLAMs (results available upon request)
Transport Protocols:
• RFC 2516 PPP over Ethernet (Client and Relay)
• RFC 2364 PPP over ATM
• RFC 2225 (formerly 1577)Classical IP and ARP over ATM
• RFC 2684 (formerly 1483)Multi-protocol over ATM (Bridged and Routed)
ATM Attributes:
• AAL Type: AAL 5
• ATM Service Class: UBR, CBR, nrt-VBR, rt-VBR
• Virtual Circuit Support:16 PVCs
• TR37 Auto-provisioning with ILMI v4.0
• End-to-end loopback: OAM
• ATM pacing, policing (QOS)
• Traffic Management 4.1
Data Rate:
G.dmt: 8Mbps (downstream), 1Mbps (upstream)
G.lite: 1.5Mbps (downstream), 512Kbps (upstream)
Media Type: Simultaneous data/voice (can coexist with HPNA)
Service Provider: Digital Subscriber Line Access Multiplexer (DSLAM)
Media Connection:
(2)RJ-45 10/100 Ethernet ports
(1)USB 1.1 compliant port
ADSL port (RJ-11)
Console port (RS-232)
AC into power supply
Ethernet cable connection to computer, RJ-11 connection to ADSL provider
System Requirements
• A host computer running Windows 95, Windows 98, 2000, Me, NT 4.0, XP, Linux, or
•A host computer running Internet Explorer 4.0 or later.
• 32 MB of RAM and 10 MB of hard disk space (memory intensive applications may require
• 200 MHz Pentium or faster compatible CPU.
• For Ethernet port, any computer with an Ethernet 10/100 RJ-45 interface.
• For USB port, host PC with Universal Serial Bus (USB) support.
Physical Characteristics:
LEDs/Indicators:
•Power
•DSL
•USB
• Ethernet 1
• Ethernet 2
Dimensions:
Length 5.5 in.(13.97 cm)
Width 9.2 in.(23.36 cm)
Height 1.6 in.(23.36 cm)
Weight:14.4 oz. (0.448 kg)
22
Macintosh.
more RAM).
Page 27

Power: Consumption: 10V DC at 680mA
Environmental
Operating temperature conditions: 32 -122 °F (0 -50 °C)
Operating humidity: 5%to 95% RH non-condensing
U.S. Robotics Corporation Limited Warranty
HARDWARE: U.S. Robotics warrants to the end user (“Customer”) that this hardware product will be
free from defects in workmanship and materials, under normal use and service, for the following length
of time from the date of purchase from U.S. Robotics or its authorized reseller:
Two (2) Years
U.S. Robotics’s sole obligation under this express warranty shall be, at U.S. Robotics option and
expense, to repair the defective product or part, deliver to Customer an equivalent product or part to
replace the defective item, or if neither of the two foregoing options is reasonably available, U.S.
Robotics may, in its sole discretion, refund to Customer the purchase price paid for the defective
product. All products that are replaced will become the property of U.S. Robotics. Replacement
products may be new or reconditioned.
U.S. Robotics warrants any replaced or repaired product or part for ninety (90) days from shipment, or
the remainder of the initial warranty period, whichever is longer.
SOFTWARE: U.S. Robotics warrants to Customer that each software program licensed from it will
perform in substantial conformance to its program specifications, for a period of ninety (90) days from
the date of purchase from U.S. Robotics or its authorized reseller. U.S. Robotics warrants the media
containing software against failure during the warranty period. No updates are provided. U.S. Robotics
sole obligation under this express warranty shall be, at U.S. Robotics’s option and expense, to refund
the purchase price paid by Customer for any defective software product, or to replace any defective
media with software which substantially conforms to applicable U.S. Robotics published specifications.
Customer assumes responsibility for the selection of the appropriate applications program and
associated reference materials. U.S. Robotics makes no warranty or representation that its software
products will meet Customer’s requirements or work in combination with any hardware or applications
software products provided by third parties, that the operation of the software products will be
uninterrupted or error free, or that all defects in the software products will be corrected. For any thirdparty products listed in the U.S. Robotics software product documentation or specifications as being
compatible, U.S. Robotics will make reasonable efforts to provide compatibility, except where the non
compatibility is caused by a “bug” or defect in the third party’s product or from use of the software
product not in accordance with U.S. Robotics published specifications or User Guide.
THIS U.S. ROBOTICS PRODUCT MAY INCLUDE OR BE BUNDLED WITH THIRD-PARTY SOFTWARE, THE USE
OF WHICH IS GOVERNED BY A SEPARATE END-USER LICENSE AGREEMENT. THIS U.S. ROBOTICS
WARRANTY DOES NOT APPLY TO SUCH THIRD-PARTY SOFTWARE. FOR THE APPLICABLE WARRANTY,
PLEASE REFER TO THE END-USER LICENSE AGREEMENT GOVERNING THE USE OF SUCH SOFTWARE.
U.S. Robotics shall not be responsible for any software, firmware, information, or memory data of
Customer contained in, stored on, or integrated with any products returned to U.S. Robotics for repair,
whether under warranty or not.
OBTAINING WARRANTY SERVICE: Customer must contact a U.S. Robotics Corporate Service Center or
an Authorized U.S. Robotics Service Center within the applicable warranty period to obtain warranty
service authorization. Dated proof of purchase from U.S. Robotics or its authorized reseller may be
required. Products returned to U.S. Robotics Corporate Service Center must be pre-authorized by U.S.
Robotics with a Service Repair Order (SRO) number marked on the outside of the package, and sent
prepaid and packaged appropriately for safe shipment, and it is recommended that they be insured or
sent by a method that provides for tracking of the package. The repaired or replaced item will be
23
Page 28

shipped to Customer, at U.S. Robotics’s expense, not later than thirty (30) days after U.S. Robotics
receives the defective product. Return the product to:
In The United States:
USR-Walnut
528 Spanish Lane
Walnut, CA 91789
In Canada:
U.S. Robotics
Unit - 100
13751 Mayfield Place
Richmond, B.C. Canada V6V 2G9
WARRANTIES EXCLUSIVE: IF A U.S. ROBOTICS’S PRODUCT DOES NOT OPERATE AS WARRANTED ABOVE,
CUSTOMER’S SOLE REMEDY FOR BREACH OF THAT WARRANTY SHALL BE REPAIR, REPLACEMENT, OR
REFUND OF THE PURCHASE PRICE PAID, AT U.S. ROBOTICS’S OPTION. TO THE FULL EXTENT ALLOWED
BY LAW, THE FOREGOING WARRANTIES AND REMEDIES ARE EXCLUSIVE AND ARE IN LIEU OF ALL OTHER
WARRANTIES, TERMS, OR CONDITIONS, EXPRESS OR IMPLIED, EITHER IN FACT OR BY OPERATION OF
LAW, STATUTORY OR OTHERWISE, INCLUDING WARRANTIES, TERMS, OR CONDITIONS OF
MERCHANTABILITY, FITNESS FOR A PARTICULAR PURPOSE, SATISFACTORY QUALITY,
CORRESPONDENCE WITH DESCRIPTION, AND NON-INFRINGEMENT, ALL OF WHICH ARE EXPRESSLY
DISCLAIMED. U.S. ROBOTICS NEITHER ASSUMES NOR AUTHORIZES ANY OTHER PERSON TO ASSUME
FOR IT ANY OTHER LIABILITY IN CONNECTION WITH THE SALE, INSTALLATION, MAINTENANCE OR USE
OF ITS PRODUCTS. U.S. ROBOTICS SHALL NOT BE LIABLE UNDER THIS WARRANTY IF ITS TESTING AND
EXAMINATION DISCLOSE THAT THE ALLEGED DEFECT OR MALFUNCTION IN THE PRODUCT DOES NOT
EXIST OR WAS CAUSED BY CUSTOMER’S OR ANY THIRD PERSON’S MISUSE, NEGLECT, IMPROPER
INSTALLATION OR TESTING, UNAUTHORIZED ATTEMPTS TO OPEN, REPAIR OR MODIFY THE PRODUCT,
OR ANY OTHER CAUSE BEYOND THE RA NGE OF THE INTENDED USE, OR BY ACCIDENT, FIRE, LIGHTNING,
OTHER HAZARDS, OR ACTS OF GOD.
LIMITATION OF LIABILITY: TO THE FULL EXTENT ALLOWED BY LAW, U.S. ROBOTICS AL SO EXCLUDES FOR
ITSELF AND ITS SUPPLIERS ANY LIABILITY, WHETHER BASED IN CONTRACT OR TORT (INCLUDING
NEGLIGENCE), FOR INCIDENTAL, CO NSEQUENTIAL, INDIRECT, SPECIAL, OR PUNITIVE DAMAGES OF ANY
KIND, OR FOR LOSS OF REVENUE OR PROFITS, LOSS OF BUSINESS, LOSS OF INFORMATION OR DATA,
OR OTHER FINANCIAL LOSS ARISING OUT OF OR IN CONNECTION WITH THE SALE, INSTALLATION,
MAINTENANCE, USE, PERFORMANCE, FAILURE, OR INTERRUPTION OF ITS PRODUCTS, EVEN IF U.S.
ROBOTICS OR ITS AUTHORIZED RESELLER HAS BEEN ADVISED OF THE POSSIBILITY OF SUCH DAMAGES,
AND LIMITS ITS LIABILITY TO REPAIR, REPLACEMENT, OR REFUND OF THE PURCHASE PRICE PAID, AT
U.S. ROBOTICS’S OPTION. THIS DISCLAIMER OF LIABILITY FOR DAMAGES WILL NOT BE AFFECTED IF ANY
REMEDY PROVIDED HEREIN SHALL FAIL OF ITS ESSENTIAL PURPOSE.
DISCLAIMER: Some countries, states, or provinces do not allow the exclusion or limitation of implied
warranties or the limitation of incidental or consequential damages for certain products supplied to
consumers, or the limitation of liability for personal injury, so the above limitations and exclusions may
be limited in their application to you. When the implied warranties are not allowed to be excluded in
their entirety, they will be limited to the duration of the applicable written warranty. This warranty gives
you specific legal rights which may vary depending on local law.
GOVERNING LAW: This Limited Warranty shall be governed by the laws of the State of Illinois, U.S.A.
excluding its conflicts of laws principles and excluding the United Nations Convention on Contracts for
the International Sale of Goods.
Manufacturer’s Disclaimer Statement
The information in this document is subject to change without notice and does not represent a
commitment on the part of the vendor. No warranty or representation, either expressed or implied, is
made with respect to the quality, accuracy or fitness for any particular purpose of this document. The
manufacturer reserves the right to make changes to the content of this document and/or the products
associated with it at any time without obligation to notify any person or organization of such changes.
In no event will the manufacturer be liable for direct, indirect, special, incidental or consequential
damages arising out of the use or inability to use this product or documentation, even if advised of the
possibility of such damages. This document contains materials protected by copyright. All rights are
res erve d. No par t of th is ma nua l may be re prod uced or transmitted in any form, by any means or for any
24
Page 29

purpose without expressed written consent of its authors. Product names appearing in this document
are mentioned for identification purchases only. All trademarks, product names or brand names
appearing in this document are property of their respective owners.
25
Page 30

26
Page 31

Page 32

Page 33

Pour obtenir les coordonnées les plus récentes de l'assistance technique, visitez
le site Web suivant :
http://www.usr.com/broadbandsupport
Nous vous remercions d'avoir choisi le routeur U.S. Robotics SureConnect ADSL
Ethernet/USB Router, modèle 9003. Les instructions suivantes vous indiqueront
comment l'installer.
Veuillez noter le numéro de série de votre routeur afin de pouvoir
vous y référer par la suite. Si vous devez appeler notre service
d'assistance technique, vous aurez besoin de ce numéro. Vous
trouverez le numéro de série de 12 caractères sur la boîte et sur
l'étiquette de code-barre figurant sous le modem. Vous aurez
également besoin de votre numéro de modèle, indiqué ci-dessous.
Inscrivez votre numéro de série dans l'espace ci-dessous.
9003
Numéro de modèle
Numéro de série
Configuration requise et informations générales sur
l'installation
Ce dont vous avez besoin avant de commencer
• Services ADSL et Internet actifs, proposés par votre opérateur téléphonique local ou votre fournisseur d'accès Internet (FAI).
• Vous aurez peut-être besoin de microfiltres pour chaque appareil téléphonique (téléphones, répondeurs et télécopieurs) partageant la même
ligne téléphonique que le signal ADSL. Aucun filtre ne doit être installé
entre le routeur ADSL et la prise téléphonique murale. (Dans certaines
installations, un répartiteur de type spécial doit se trouver entre le routeur et la prise murale. Le répartiteur doit alors comporter une prise pour
le routeur et une autre pour le téléphone. Si ce n'est pas le cas, ne
l'installez pas entre le routeur et la prise téléphonique murale.)
Votre FAI devrait pouvoir fournir les éléments suivants :
• Votre nom d'utilisateur et votre mot de passe, si votre FAI vous en a
attribués.
• La norme ADSL (Modulation)
- G.dmt - Multi-Mode
- G.lite - T1.413, Edition 2
Page 34

• Valeurs VPI/VCI
• Type d'encapsulation
- RFC 1483 ponté - PPPoA
- RFC 1483 routé - MER
-PPPoE -
Configuration requise pour l'ordinateur
Configuration système minimum – Port Ethernet
• Un ordinateur doté d'une carte réseau Ethernet 10/100
• 32 Mo de mémoire vive
• 10 Mo d'espace disque
• Tout système d'exploitation prenant en charge une connexion
Ethernet avec pile IP
• Navigateur Web Internet Explorer ou Netscape Navigator 4.0 (ou version supérieure)
• Windows 95, Windows 98, Windows Me, Windows NT4.0, Windows 2000
ou Windows XP pour le CD-ROM d'installation SureConnect
Configuration système minimum – Port USB
• Processeur Pentium 200 MHz ou plus rapide
• PC hôte avec prise en charge USB (Universal Serial Bus)
• 32 Mo de mémoire vive
• 10 Mo d'espace disque
• Navigateur Web Internet Explorer ou Netscape Navigator 4.0 (ou version supérieure)
Assurez-vous que votre ordinateur est allumé. Lors de
l'installation, faites en sorte d'avoir le CD-ROM
d'installation de votre système d'exploitation
Windows à portée de main.
• Le CD-ROM d'installation SureConnect U.S. Robotics nécessite un
système d'exploitation Windows 98, Windows Me, Windows 2000 ou
Windows XP
Configuration réseau requise pour l'ADSL
Services ADSL et Internet proposés par votre opérateur téléphonique local ou
votre fournisseur d'accès Internet (FAI).
30
Page 35

Alimentation
Le routeur U.S. Robotics SureConnect ADSL Ethernet/USB Router fonctionne
grâce à l'adaptateur secteur fourni. Attention, n'utilisez pas d'autres
adaptateurs pour faire fonctionner ce dispositif.
La boîte de ce routeur U.S. Robotics SureConnect ADSL Ethernet/USB Router
contient les éléments suivants :
U.S. Robotics SureConnect ADSL
Ethernet/USB Router
modèle 9003
Composants optionnels
Pour certains modèles, il arrive qu'un microfiltre soit inclus
dans la boîte ou soit fourni par votre FAI. Renseignez-vous
auprès de votre FAI pour savoir si un microfiltre est nécessaire. Lisez la section suivante pour en savoir plus sur
l'installation des microfiltres.
Cordon téléphonique RJ-11 standard de 2 m
(4 fils)
Adaptateur secteur
Câble USB
(1 m)
Câble Ethernet droit
(1,8 m)
Guide d'installation rapide
CD-ROM d'installation U.S. Robotics SureConnect,
avec guide de l'utilisateur
Veuillez signaler à votre revendeur tout élément incorrect, manquant ou
endommagé.
31
Page 36

Est-il préférable d'opter pour une connexion USB ou
Ethernet ?
Le routeur U.S. Robotics SureConnect ADSL Ethernet/USB Router vous donne la
possibilité de vous connecter via un port USB ou Ethernet. Aucune des deux
solutions n'est préférable à l'autre. Votre choix peut dépendre des ports
disponibles sur votre ordinateur et du système d'exploitation que vous utilisez.
Par exemple, vous devez utiliser une connexion Ethernet avec les systèmes
d'exploitation Windows 95, Windows NT 4.0, Macintosh et Linux.
Etape 1. Connexion de microfiltres (si nécessaire)
• Si aucun microfiltre n'était inclus dans votre boîte et que votre FAI ne
vous en a pas fourni, passez à l'étape 2 de ces instructions d'installation.
• Si des microfiltres sont nécessaires, installez-en un sur chacun des
appareils téléphoniques (téléphones, répondeurs et télécopieurs)
partageant la même ligne téléphonique que le signal ADSL.
Le microfiltre est un petit appareil permettant de réduire les interférences entre
les signaux ADSL et les signaux téléphoniques. Il n'est nécessaire que si le
routeur ADSL partage la même ligne qu'un appareil téléphonique. Si vous
n'utilisez pas de microfiltre, vous risquez d'entendre un bruit de fond sur votre
téléphone pendant le transfert de données. Par ailleurs, les appels téléphoniques
risquent d'interrompre les transmissions de données.
Connexion de microfiltres aux appareils téléphoniques
Pour installer le microfiltre, branchez le téléphone au microfiltre, puis branchez
le microfiltre à la prise téléphonique murale. N'installez pas de microfiltre sur le
câble reliant le routeur à la prise téléphonique, à moins que le microfiltre ne
dispose d'une prise pour le téléphone et pour le dispositif ADSL.
32
Page 37

Etape 2. Installation du routeur ADSL Ethernet/USB
Router
Utilisateurs de Windows 95 & NT 4.0, Macintosh et Linux
Si vous installez le routeur U.S. Robotics SureConnect ADSL Ethernet/
USB Router sur un système fonctionnant sous Windows 95, NT 4.0,
Macintosh ou Linux, vous devez utiliser l'option de connexion Ethernet.
Instructions d'installation pour Windows 98, 2000, Me et XP
Pour installer le routeur U.S. Robotics SureConnect ADSL Ethernet/USB Router
et l'utilitaire, insérez le CD-ROM d'installation U.S. Robotics SureConnect dans
le lecteur de CD-ROM de votre ordinateur. Si l'installation ne démarre pas
automatiquement, accédez à votre bureau et double-cliquez sur Poste de
travail, puis sur la lettre du lecteur correspondant à votre lecteur de CD-ROM.
Double-cliquez ensuite sur
Setup (Installation).
L'écran d'accueil du
programme d'installation du
routeur U.S. Robotics
SureConnect ADSL Ethernet/
USB Router s'affiche. Cliquez
sur Next (Suivant) pour
commencer à installer le
routeur U.S. Robotics
SureConnect ADSL Ethernet/
USB Router.
• Choisissez le type
de connexion que
vous allez utiliser
pour relier le routeur à votre ordinateur. Cliquez sur
Next (Suivant).
33
Page 38

•Un test de
qualification sera
exécuté pour vérifier
que votre système
répond à la
configuration
minimale requise
pour l'installation.
L'écran des
résultats affichera
un drapeau vert à
côté des éléments
de votre
configuration qui
remplissent les
conditions et un
drapeau rouge à côté de ceux qui ne les remplissent pas. Si votre
système a réussi le test de qualification, cliquez sur Next (Suivant).
Si le logiciel vous informe que votre système ne satisfait pas aux conditions
requises, cliquez sur View Report (Afficher le rapport). Vous pourrez ainsi
identifier l'élément en cause.
34
Page 39
Etape 3. Branchement des câbles
Le tableau ci-dessous récapitule à quoi correspondent les différents éléments
situés à l'arrière du routeur.
Elément Description
O/I
Power
Console
USB Port USB (Universal Serial Bus) situé au dos du routeur.
ENET1 Port Ethernet 1 situé au dos du routeur.
ENET2 Port Ethernet 2 situé au dos du routeur.
ADSL
Commutateur sur lequel il faut appuyer pour allumer et éteindre le routeur U.S. Robotics SureConnect ADSL Ethernet/USB Router.
Prise permettant de relier le routeur à une prise d'alimentation murale
via un câble.
Pour connecter un câble RS-232 (non fourni) au dos du routeur. Vous
pouvez utiliser ce câble pour communiquer avec le routeur via l'interface utilisateur du terminal. Celle-ci vous permet également de configurer le routeur et d'effectuer des diagnostics. Vous pouvez donc
l'utiliser à la place de l'interface utilisateur Web.
Prise RJ-11 pour service DSL (Digital Subscriber Line), située au dos du
routeur.
Branchement de l'adaptateur secteur
Attention, n'utilisez que l'adaptateur secteur fourni. Branchez une extrémité du
cordon de l'adaptateur secteur dans la prise « Power » à l'arrière du routeur, et
branchez l'autre extrémité dans une prise murale standard.
Allumez le routeur en appuyant sur le bouton « O/I ». Le voyant « PWR » à
l'avant du routeur U.S. Robotics SureConnect ADSL Ethernet/USB Router devrait
s'allumer. Le routeur s'initialise après la mise sous tension. Cela prend environ
une minute. Cliquez sur Next (Suivant) pour terminer l'installation.
Branchement du cordon téléphonique
Branchez une extrémité du cordon téléphonique fourni dans le port « ADSL » à
l'arrière du routeur, et branchez l'autre extrémité dans une prise téléphonique
murale standard. Cliquez sur Next (Suivant).
35
Page 40

Branchement du câble Ethernet ou USB
Ethernet
Si vous connectez moins de deux dispositifs, vous pouvez les brancher
directement à l'arrière du routeur. Cela vous évite d'utiliser un concentrateur
séparé. Branchez l'une des extrémités du câble Ethernet dans le port « ENET1 »
ou « ENET2 » situé à l'arrière du routeur U.S. Robotics SureConnect ADSL
Ethernet/USB Router. Branchez l'autre extrémité du câble Ethernet dans le port
Ethernet de la carte d'interface réseau 10/100 de votre ordinateur.
• Cliquez sur Finish (Terminer).
USB
• Si vous avez choisi de vous connecter via le port USB, branchez
l'extrémité rectangulaire du câble USB fourni dans le port USB de
l'ordinateur. Insérez l'extrémité carrée du câble dans le port « USB »
du routeur U.S. Robotics SureConnect ADSL Ethernet/USB Router.
• Une fois le câble USB branché, le routeur détecte votre PC, puis il
installe automatiquement les logiciels nécessaires dessus. (Vous
devrez peut-être redémarrer votre système).
• L'Assistant Nouveau matériel vous informe que le PC a détecté le routeur. Cliquez sur Finish (Terminer).
Félicitations ! La procédure d'installation est terminée !
Vous avez fini d'installer le routeur U.S. Robotics SureConnect ADSL Ethernet/
USB Router. Cliquez sur Finish (Terminer). Le programme d'installation lance
automatiquement le navigateur Internet, qui cherche à atteindre l'adresse IP
192.168.1.1.
36
Page 41

Le logiciel vous demande alors votre nom d'utilisateur et votre mot de passe.
Tapez le nom d'utilisateur par défaut « root » et le mot de passe par défaut
« 12345 », sans guillemets ou de points.
Si votre navigateur ne se lance pas automatiquement...
Lancez la procédure de configuration rapide en ouvrant votre navigateur
Internet et en entrant l'adresse http://192.168.1.1. L'écran Quick Setup
(Configuration rapide) de l'utilitaire SureConnect ADSL s'affiche.
Etape 4. Utilisation du menu Quick Setup (Configuration
rapide)
Le routeur U.S. Robotics SureConnect ADSL Ethernet/USB Router est fourni avec
l'utilitaire Web SureConnect ADSL. Cet utilitaire facilite la configuration du
routeur en la réduisant à trois étapes simples.
• Cliquez sur ADSL Standard (Norme ADSL).
• Configurez les paramètres du FAI.
• Sauvegardez, puis redémarrez le système.
Ne coupez pas le courant ou ne perturbez pas le
fonctionnement du routeur avant que la sauvegarde
soit terminée. Si vous interrompez le processus de
sauvegarde, les données de configuration seront
37
Page 42

Choisissez le mode ADSL.
1. Cliquez sur le bouton radio ADSL Standard (Norme ADSL) pour ouvrir la
fenêtre du même nom. Vous pouvez alors choisir la norme ADSL que vous
allez utiliser.
38
Page 43

2. Dans le menu déroulant, sélectionnez G.dmt, G.lite, T1.413 ou Multi-Mode.
Le réglage par défaut (Multi-Mode) convient à la plupart des utilisateurs.
Demandez confirmation auprès de votre FAI. Lorsque vous avez fait votre
choix, cliquez sur Apply (Appliquer).
3. Cliquez sur Next (Suivant) en bas à droite pour passer à l'écran WAN Setup
(Configuration WAN).
Configuration des paramètres du FAI
A l'écran Service Provider Settings>WAN Setup (Configuration WAN), entrez les
valeurs que votre FAI vous a communiquées. Voir le tableau du guide de
l'utilisateur pour connaître les réglages des FAI les plus courants (ces réglages
pouvant varier, vérifiez-les auprès de votre FAI). Si votre FAI ne figure pas dans
le tableau, appelez-le pour obtenir les bons paramètres.
1. Sous Current ATM PVC List, au bas de l'écran, supprimez tous les types de
connexions dont vous n'avez pas besoin.
2. Sélectionnez le type de connexion recommandé par votre FAI. Choisissez
un mode : RFC1483 Bridged, RFC Routed, PPPoE, PPPoA ou MER. Pour certains types de connexions, vous devrez fournir des informations supplémentaires, telles qu'une adresse IP, un nom d'utilisateur et un mot de
passe.
3. En haut de l'écran WAN Setup, tapez les valeurs VPI et VCI.
4. Sélectionnez le mode d'encapsulation souhaité. Cliquez sur le bouton
radio LLC/SNAP ou VC Multiplexing.
5. Si nécessaire, cochez la case Enable NAPT (Activer NAPT) dans la section
Network Settings (Paramètres réseau).
6. Si nécessaire, cochez la case Enable DHCP (Activer DHCP) dans la section
Network Settings (Paramètres réseau).
7. Cliquez sur le bouton Add (Ajouter).
8. Pour continuer, cliquez sur Next (Suivant), en bas à droite de l'écran.
39
Page 44

Sauvegarde et redémarrage du système.
Une fois la norme ADSL choisie et l'écran de configuration WAN rempli,
sauvegardez vos modifications et redémarrez le routeur.
1. A l'écran Save & Restart, cliquez sur Save (Sauvegarder).
2. Une fois la sauvegarder terminée, cliquez sur Restart (Redémarrer).
40
Page 45

Si votre FAI vous a donné un logiciel à installer,
faites-le maintenant. N'oubliez pas de lire et de
suivre toutes les instructions d'installation fournies.
3. Vous pouvez tester votre connexion en enregistrant votre modem sur le
site :
www.usr.com/productreg
Dépannage
Liste de dépannage
Pour diagnostiquer et résoudre le problème plus facilement, consultez les
points de la liste ci-dessous.
✔ Assurez-vous que vous avez bien branché l'adaptateur secteur au
routeur et à une prise murale active. La DEL « PWR » devrait s'allumer.
✔ Assurez-vous que vous avez bien branché le cordon téléphonique à la
prise téléphonique murale et au routeur. La DEL « ADSL » devrait
s'allumer.
✔ Assurez-vous que vous avez bien branché le câble Ethernet au port
« ENET1 » et/ou « ENET2 » du routeur et à la carte d'interface réseau
de l'ordinateur. La DEL « ENET1 » ou « ENET2 » devrait s'allumer.
✔ Si vous utilisez le câble USB : assurez-vous que vous avez bien
branché le câble USB au port « USB » du routeur et de l'ordinateur.
La DEL « USB » devrait s'allumer.
41
Page 46

Voyants DEL de statut
A l'avant du routeur U.S. Robotics SureConnect ADSL Ethernet/USB Router se
trouvent cinq voyants DEL. Le premier en partant de la gauche est le voyant
« PWR ». Le second et le troisième sont les voyants de transfert des données
« ENET1 » et « ENET2 ». Le quatrième est le voyant « USB » et le cinquièreme le
voyant « ADSL ». Le statut des DEL indique l'état de fonctionnement du routeur.
PWR
ENET1
ENET2
USB
ADSL
Allumé, vert
Eteint Pas d'alimentation.
Allumé, vert:
10 Mbits/s
Allumé, orange
100 Mbits/s
Clignotant, vert ou
orange
Eteint
Allumé, vert
Clignotant, vert Le trafic de données circule.
Eteint
Allumé, vert Liaison DSL établie.
Clignotant, vert Liaison DSL en cours de négociation.
Eteint Echec de la liaison DSL.
Alimentation depuis la prise d'alimentation
murale.
Connexion physique détectée et établie par le
biais du câble Ethernet entre l'ordinateur et le
routeur.
Le trafic de données circule.
Echec de l'établissement de la connexion physique entre le routeur et l'ordinateur.
Connexion physique détectée et établie par le
biais du câble USB entre l'ordinateur et le routeur.
Echec de l'établissement de la connexion physique entre le routeur et l'ordinateur.
Conseils de dépannage
Aucune DEL ne s'allume lorsque le routeur est sous tension.
• Vérifiez les branchements au niveau de l'adaptateur secteur, du
routeur et de la prise murale.
• Assurez-vous que vous utilisez l'adaptateur secteur fourni dans la boîte
de votre routeur U.S. Robotics SureConnect ADSL Ethernet/USB Router .
La DEL ADSL clignote ou n'est pas allumée.
• Vérifiez que le cordon téléphonique est correctement branché dans le
port « ADSL » situé à l'arrière du routeur et dans la prise téléphonique
murale.
42
Page 47

Je ne peux pas me connecter à l'utilitaire de configuration du routeur.
Première solution possible
• Assurez-vous que les câbles Ethernet ou USB sont bien installés et
correctement connectés.
• Assurez-vous que le cordon d'alimentation est branché.
Deuxième solution possible
• Assurez-vous que l'adresse IP utilisée par le PC est comprise entre
192.168.1.2 et 192.168.1.254.
• Assurez-vous que l'adresse du masque de sous-réseau est
255.255.255.0.
• Si nécessaire, vous devriez trouver les données de passerelle par
défaut à 192.168.1.1.
• Pour vérifier ces paramètres, suivez les étapes suivantes :
Utilisateurs de Windows 95, 98 ou Me :
1. Cliquez sur Démarrer.
2. Cliquez sur Exécuter.
3. Tapez winipcfg.
4. Cliquez sur OK.
5. Vérifiez l'adresse IP, le masque de sous-réseau et la passerelle
par défaut.
6. Si ces paramètres sont incorrects, cliquez sur Tout libérer.
Cliquez ensuite sur Tout renouveler.
Utilisateurs de Windows NT, 2000 ou XP :
1. Cliquez sur Démarrer.
2. Cliquez sur Exécuter.
3. Tapez cmd.
4. Cliquez sur OK.
5. A l'invite DOS, tapez ipconfig /all.
6. Vérifiez l'adresse IP, le masque de sous-réseau et la passerelle
par défaut.
7. Si les paramètres sont incorrects...
• Tapez ipconfig/release.
• Appuyez sur Entrée.
• Tapez ipconfig/renew.
• Appuyez sur Entrée.
Troisième solution possible
• Vérifiez les paramètres de connexion de votre navigateur Web.
• Assurez-vous que la fonction HTTP Proxy du navigateur est désactivée.
Votre navigateur Web pourra ainsi lire les pages de configuration au
sein du routeur.
• Lancez votre navigateur Web.
43
Page 48

Utilisateurs d'Internet Explorer :
1. Cliquez sur Outils, puis sur Options Internet. Cliquez ensuite sur
l'onglet Connexions.
2. Choisissez Ne jamais établir de connexion. Cliquez sur
Appliquer, puis sur OK.
3. Cliquez une nouvelle fois sur Outils, puis sur Options Internet.
4. Cliquez ensuite sur l'onglet Connexions. Cliquez ensuite sur le
bouton Paramètres LAN.
5. Décochez toutes les cases. Cliquez sur OK.
6. Cliquez sur OK.
Utilisateurs de Netscape Navigator :
1. Cliquez sur Edition, Préférences et double-cliquez sur Avancées
dans la fenêtre Catégorie.
2. Cliquez sur Proxy, choisissez Connexion directe à Internet et
cliquez sur OK.
3. Cliquez encore sur Edition et sur Préférences.
4. Sous Catégorie, double-cliquez sur Avancées, puis cliquez sur
Proxy.
5. Choisissez Connexion directe à Internet et cliquez sur OK.
• Si vous ne parvenez toujours pas à accéder au routeur, reportez-vous
à la procédure d'utilisation de la commande Ping ci-dessous, dans les
conseils de dépannage.
Je ne peux pas accéder à l'Internet.
Solution possible :
• Assurez-vous que le cordon d'alimentation est branché.
• Assurez-vous que les câbles Ethernet ou USB sont bien connectés
entre le routeur et les PC.
• Assurez-vous que vous disposez d'une liaison DSL.
• Assurez-vous que votre compte auprès de votre FAI est actif.
• Consultez la page Service Provider Setting (Paramètres du FAI) à la
section WAN Setup (Configuration WAN). Vérifiez les valeurs VCI
et VPI.
• Consultez la page Service Provider Setting (Paramètres du FAI) à la
section WAN Setup (Configuration WAN). Vérifiez les noms
d'utilisateurs et les mots de passe.
• Pour des suggestions supplémentaires, consultez le guide de
l'utilisateur du routeur.
44
Page 49

Je ne sais pas si l'adresse IP qui m'a été attribuée est statique ou dynamique.
Solution possible :
• Si vous disposez d'un accès DSL actif, votre adresse IP est sûrement
dynamique.
• Contactez votre fournisseur d'accès pour vous en assurer, car certains
FAI attribuent des adresses IP statiques.
• Si votre FAI utilise DHCP, vérifiez que vous avez activé cette fonction.
Lorsque j'essaie de vérifier mes paramètres de configuration réseau dans
Windows Me ou XP, je ne trouve pas l'icône Réseau.
Solution possible :
• La configuration par défaut dans Windows Me et XP est de ne pas
afficher toutes les icônes dans le panneau de configuration. Cliquez
sur Démarrer, Paramètres et enfin sur Panneau de configuration.
• Dans le panneau de configuration, cliquez sur Afficher toutes les
options du panneau de configuration sur la gauche de l'écran.
Toutes les icônes devraient alors s'afficher.
Je ne sais pas comment configurer le protocole TCP/IP de sorte à le faire
fonctionner avec le routeur.
Solution possible :
• Le routeur doit pouvoir accéder à une carte d'interface réseau, située
dans votre PC. Votre PC ne la reconnaît peut-être pas. Pour résoudre le
problème, il vous suffit d'installer ou d'ajouter une carte qui convient.
• Ouvrez le système d'aide de votre système d'exploitation.
• Consultez les rubriques se rapportant à TCP/IP.
Dépannage – Procédure d'utilisation de la commande Ping
1. Cliquez sur Démarrer, puis sur Exécuter. Sous Windows 95, 98
ou Me, tapez command dans la boîte de dialogue Exécuter, puis
cliquez sur OK. Sous Windows NT, 2000 et XP, tapez cmd, puis
cliquez sur OK. L'écran de ligne de commande s'affiche.
2. Tapez Ping 127.0.0.1. Il s'agit de votre adresse d'hôte local.
Cette adresse permet de s'assurer que TCP/IP est installé et
fonctionne. Si cette intervention échoue, déconnectez le
routeur, puis recommencez la procédure d'installation.
3. Tapez Ping suivi de l'adresse IP de votre PC. Vous pourrez ainsi
vérifier que le PC répond aux requêtes. Si cette intervention
échoue, assurez-vous que les câbles sont bien connectés et que
tous les pilotes appropriés sont installés.
45
Page 50

4. Tapez Ping suivi de l'adresse de votre passerelle pour vérifier la
communication avec la passerelle. (L'adresse de passerelle par
défaut est 192.168.123.254.) Cette intervention permet de
vérifier si vous pouvez accéder à d'autres ordinateurs et joindre
le routeur. Si vous parvenez à établir une communication avec le
routeur, vous pouvez accéder à la page Administration et
configurer les paramètres. Si cette intervention échoue, assurezvous que le cordon d'alimentation du routeur est branché et que
le routeur est correctement connecté au PC.
5. Tapez Ping suivi de l'adresse Internet extérieure de votre
routeur. Cette adresse est fournie par le fournisseur d'accès
Internet ou par le réseau local extérieur. Cette intervention
permet de vérifier que le routeur fonctionne correctement et s'il
permet le passage des données.
6. Tapez Ping suivi de l'adresse connue de votre serveur DNS. Ceci
vous permettra de traduire des noms d'hôtes Internet valides en
adresses IP et de vérifier que vous pouvez accéder à l'Internet.
Et si je ne reçois pas de message de retour lorsqu'une commande ping a réussi ?
1. Si vous ne recevez pas de message de retour, cela signifie que le PC ne
peut pas communiquer avec le routeur par le biais d'une attribution
d'adresse IP. Vérifiez l'adresse dans l'utilitaire de configuration.
2. Si nécessaire, corrigez l'adresse en mode Console,
3. puis reprenez la procédure de commande ping.
Comment désinstaller le routeur ?
Windows 95
1. Cliquez sur Démarrer, choisissez Paramètres, puis cliquez sur
Panneau de configuration.
2. Double-cliquez sur l'icône Ajout/Suppression de programmes.
3. A l'onglet Installation/Désinstallation, sélectionnez U.S. Robotics
SureConnect ADSL Ethernet/USB Router. Il se peut qu'il soit
nécessaire de faire défiler la liste vers le bas pour localiser ce
programme.
4. Cliquez sur le bouton Supprimer.
5. L'écran de réinstallation ou de désinstallation. Cliquez sur
Désinstaller puis sur Oui si l'on vous demande de confirmer. Tous les
composants se désinstalleront de votre ordinateur.
46
Page 51

Windows 98/2000/Me
1. Cliquez sur Démarrer, choisissez Paramètres, puis cliquez sur
Panneau de configuration .
2. Double-cliquez sur l'icône Ajout/Suppression de programmes.
3. L'écran Ajout/Suppression de programme affiche tous les
programmes actuellement installés. A l'onglet Installation/
Désinstallation, sélectionnez U.S. Robotics ADSL Ethernet/USB
Ethernet/USB Router. Il se peut qu'il soit nécessaire de faire défiler la
liste vers le bas pour localiser ce programme.
4. Cliquez sur Ajouter/Supprimer dans Windows 98/Me ou Modifier/
Supprimer dans Windows 2000.
5. L'écran de réinstallation ou de désinstallation. Cliquez sur
Désinstaller, puis sur Suivant. Tous les composants se désinstalleront
de votre ordinateur.
Windows XP
1. Cliquez sur le bouton Démarrer puis sur Panneau de configuration.
2. Double-cliquez sur Ajout/Suppression de programmes.
3. L'onglet Installation/Désinstallation affiche tous les programmes
actuellement installés. Sélectionnez U.S. Robotics ADSL Ethernet/
USB Ethernet/USB Router. Il se peut qu'il soit nécessaire de faire
défiler la liste vers le bas pour localiser ce programme.
4. Cliquez sur le bouton Ajouter/Supprimer.
5. L'écran de réinstallation ou de désinstallation. Cliquez sur
Désinstaller, puis sur Suivant. Tous les composants se désinstalleront
de votre ordinateur.
Windows NT
1. Cliquez sur Démarrer, Paramètres et enfin sur Panneau de
configuration.
2. Double-cliquez sur l'icône Ajout/Suppression de programmes.
3. L'écran Ajout/Suppression de programme affiche tous les
programmes actuellement installés. A l'onglet the Installation/
Désinstallation, sélectionnez U.S. Robotics ADSL Ethernet/USB
Ethernet/USB Router. Il se peut qu'il soit nécessaire de faire défiler la
liste vers le bas pour localiser ce programme.
4. Cliquez sur le bouton Ajouter/Supprimer.
5. L'écran de réinstallation ou de désinstallation. Cliquez sur
Désinstaller, puis sur Suivant. Tous les composants se désinstalleront
de votre ordinateur.
Macintosh et Linux
Débranchez tous les câbles du routeur et de l'ordinateur.
47
Page 52

Assistance technique
Allez à la section Support du site Web de U.S. Robotics à l'adresse
http://www.usr.com/support
• Consultez les pages Web FAQ et Dépannage consacrées à votre
produit. Vous y trouverez la réponse à la plupart des problèmes
rencontrés par les utilisateurs.
• Si vous ne parvenez pas à vous connecter à Internet, contactez votre
FAI pour obtenir de l'aide.
• Pour obtenir les coordonnées les plus récentes de l'assistance technique, visitez le site Web suivant :
http://www.usr.com/broadbandsupport
48
Page 53

Informations légales
Déclarations de conformité du fabricant
Déclaration de conformité FCC
Nous déclarons (et assumons l'entière responsabilité de cette déclaration) que le routeur U.S. Robotics
SureConnect ADSL Ethernet/USB Router, auquel se rapporte la présente déclaration, est conforme aux
normes ou autres documents normatifs suivants :
Déclaration FCC, Classe B
Ce dispositif est conforme à la Section 15 des règles de la FC C. S on f onc tio nne men t est sou mis aux deu x
conditions suivantes :
1) ce produit ne risque pas de causer d'interférences électromagnétiques nuisibles ;
2) ce produit doit accepter toutes les interférences reçues, y compris celles qui risquent d’entraîner un
Interférences radiophoniques et télévisuelles
Remarque : ce produit a été testé et déclaré conforme aux limitations relatives à un appareil
numérique de classe B, en vertu de la Section 15 des règles de la FCC. Ces limitations visent à assurer
une protection raisonnable contre les interférences dans le cadre d'une installation résidentielle. Cet
équipement génère et utilise de l'énergie de fréquence radio et risque, s'il n'est pas installé et utilisé
correctement, de provoquer des interférences de communications radiophoniques. Il n'y a toutefois
aucune garantie qu'il ne se produira pas d'interférences dans une installation particulière. Si cet
appareil brouille la réception radiophonique ou télévisuelle, ce qu'on peut déterminer en éteignant
puis en rallumant l'appareil, nous encourageons l'utilisateur à essayer de corriger le problème en
prenant une ou plusieurs des mesures suivantes :
Vous trouverez également des renseignements utiles dans la documentation préparée par la Federal
Communications Commission :
Mesures ANSI C63.4-1992
Federal Communications Commission 47 CFR Section 15, Sous-section B
1) 15.107 (e) Limitations sur les émissions par conduction de classe B
2) 15.109 (g) Limitations sur les émissions par radiation de classe B
fonctionnement indésirable.
• Réorienter ou déplacer l'antenne de réception ou l'appareil à l'entrée du câble.
• Augmenter la distance entre l'équipement et le récepteur.
• Brancher l'équipement à une prise de courant faisant partie d'un autre circuit que celui sur
lequel est branché le récepteur.
• Consulter le fournisseur ou un technicien d'expérience en radio/télévision afin d'obtenir
de l'assistance.
Telephone Interference Bulletin.
Ce document est disponible sur Internet, en passant par la page d'accueil du Consumer Information
Bureau de la FCC, à l'adresse http://www.fcc.gov/cib. Sous Consumer Information
Directory>Telephone>Miscellaneous Telephone Information, sélectionnez Interference to
Telephones.
Attention : tout changement ou toute modification non expressément approuvé(e) par la partie
responsable de la conformité pourrait annuler l'autorisation accordée à l'utilisateur d'utiliser cet
appareil.
Afin de maintenir la conformité aux limitations d'un périphérique numérique de classe B, U.S. Robotics
requiert que vous utilisiez un câble d'interface de qualité pour le branchement de ce périphérique. Les
types de câbles suggérés sont un câble USB 90 ohms pour le port USB et un cordon téléphonique
standard pour le port RJ-11. Le câble de l'opérateur téléphonique doit être connecté avec un câble
téléphonique 26AWG minimum.
Homologation UL/C-UL
Cet équipement informatique est homologué UL et C-UL pour les marchés des Etats-Unis et du Canada,
respectivement, pour les utilisations décrites dans ce guide de l'utilisateur.
49
Page 54

Enregistrement FCC, Section 68
Informations clients
Ce produit est conforme à la Section 68 des règles de la FCC et aux conditions requises adoptées par
l'ACTA. Au bas de cet équipement se trouve une étiquette contenant, entre autres, un identifiant de
produit au format : US: AAAEQ##TXXXX. Si nécessaire, ce numéro doit être fourni à l'opérateur
téléphonique.
Cet équipement fonctionne avec les prises USOC (Universal Service Order Code) suivantes : RJ11.
Les prises utilisées pour brancher cet équipement (au câblage local et au réseau de l'opérateur
téléphonique) doivent être conformes à la Section 68 des règles de la FCC et aux conditions requises
par l'ACTA. Une prise modulaire avec cordon téléphonique conforme est fournie avec ce produit. Elle
est conçue pour être connectée à une prise modulaire compatible, également conforme aux règles et
conditions requises. Pour en savoir plus, consultez ce document.
Le REN (Ringer Equivalence Number - nombre équivalent de sonneries) permet de déterminer le nombre
de dispositifs pouvant être connectés à une ligne téléphonique. Si le REN sur une ligne téléphonique
est trop élevé, les périphériques risquent de ne pas sonner lors d'un appel. Dans la plupart des régions,
la somme des REN ne doit pas dépasser cinq (5). Pour connaître avec certitude le nombre de
périphériques pouvant être connectés à une ligne (total des REN), contactez l'opérateur téléphonique
local. Pour les produits approuvés après le 23 juillet 2001, le REN fait partie de l'identifiant du produit
(format US: AAAEQ##TXXXX). Les chiffres représentés par ## correspondent au REN sans virgule
décimale (ex : 03 correspond à un REN de 0,3).
Si le routeur U.S. Robotics SureConnect ADSL Ethernet/USB Router endommage le réseau
téléphonique, l'opérateur téléphonique vous préviendra à l'avance qu'une interruption temporaire du
service pourrait être nécessaire. Si l'opérateur téléphonique ne peut pas vous prévenir à l'avance pour
des raisons pratiques, il vous avertira le plus tôt possible. On vous fera également connaître votre droit
à déposer une plainte auprès de la FCC si vous le jugez nécessaire.
L'opérateur téléphonique peut parfois modifier ses installations, ses équipements, ses opérations ou
ses procédures ; il est possible que ces changements affectent le fonctionnement de cet appareil. Si
cela se produit, il vous préviendra à l'avance afin que vous puissiez procéder aux modifications
nécessaires et que le service ne soit pas interrompu.
Si vous rencontrez des problèmes avec cet équipement et que vous souhaitez obtenir des informations
sur les réparations et la garantie, veuillez contacter :
FRS Europe BV.
Draaibrugweg 2
1332 AC Almere, Pays-Bas
Si l'équipement endommage le réseau téléphonique, l'opérateur téléphonique vous demandera peutêtre de le déconnecter jusqu'à ce que le problème soit résolu.
Cet équipement ne comporte pas de pièces réparables.
Si, chez vous, vous disposez d'un système d'alarme spécial connecté à votre ligne téléphonique,
assurez-vous que l'installation du modem ne désactivera pas votre alarme. Si vous avez des questions
à ce sujet, veuillez contacter votre opérateur téléphonique ou un installateur qualifié.
50
Page 55

Conformité CE
Déclaration de conformité CE
Nous, U.S. Robotics Corporation, sis au 935 National Parkway, Schaumburg, Illinois, 60173-5157, EtatsUnis, déclarons (et assumons l'entière responsabilité de cette déclaration) que le routeur U.S. Robotics
SureConnect ADSL Ethernet/USB Router, auquel se rapporte la présente déclaration, est conforme aux
normes et/ou autres documents normatifs suivants :
EN60950 EN55022 EN55024 EN61000-3-2 EN61000-3-3
Nous déclarons que ce produit est conforme aux spécifications essentielles et autres dispositions de la
Directive 1999/5/EC. Nous avons respecté la procédure d'établissement de conformité visée à l'article
10(3) et détaillée en annexe II de la Directive 1999/5/EC.
Spécifications de produit pour le routeur ADSL Ethernet
Conformité aux normes
ADSL
Normes et spécifications
• Chipset Analog Devices 6480/6482 Eagle ADSL et processeur réseau 6489
• Prise en charge ADSL G.DMT à plein débit (UIT-T G.992.1) et T1.413 Edition 2 : jusqu'à
8 Mbits/s pour la réception et 1 Mbits/s pour l'émission
• Prise en charge ADSL G.lite (UIT-T G.992.2) : jusqu'à 1,5 Mbits/s pour la réception et
512 Kbits/s pour l'émission
• Prise en charge de l'établissement de liaison DSL (UIT-T G.994.1)
• Interopérabilité multi-DSLAM (multiplexeurs d'accès DSL) incluant Alcatel, Globespan,
Texas Instruments ainsi que les DSLAM basés sur Analog Devices (résultats disponibles sur
demande)
Protocoles de transport :
• PPP over Ethernet RFC 2516 (client et relais)
• PPP over ATM RFC 2364
• IP classique et ARP over ATM RFC 2225 (anciennement 1577)
• Multiprotocol over ATM (ponté et routé) RFC 2684 (anciennement 1483)
Attributs ATM :
• Type AAL : AAL5
• Classe de service ATM : débit binaire non spécifié (UBR), débit binaire constant (CBR)
et débit binaire variable en temps réel (rt-VBR) ou non réel (nrt-VBR)
• Prise en charge de circuit virtuel : 16 PVC
• Auto-approvisionnement TR37 avec ILMI v4.0
• Bouclage complet : OAM
• Gestion de police et régulation ATM (Qualité de service)
• Gestion du trafic 4.1
Débit de données :
G.dmt : 8 Mbits/s (réception), 1 Mbits/s (émission)
G.lite : 1,5 Mbits/s (réception), 512 Kbits/s (émission)
Type de support : données/voix simultané (peut coexister avec HPNA)
Fournisseur d'accès : DSLAM (Digital Subscriber Line Access Multiplexer - Multiplexeur
d'accès DSL)
Connexion :
(2) ports Ethernet 10/100 Mbits/s RJ-45
(1) port conforme à la norme USB 1.1
Port ADSL (RJ-11)
Port de console (RS-232)
Adaptateur secteur CA
Branchement par câble Ethernet à l'ordinateur, connexion RJ-11 au fournisseur ADSL
51
Page 56

Configuration requise
• Un ordinateur hôte sous Windows 95, 98, 2000, Me, NT 4.0, XP, Linux ou un ordinateur
Macintosh.
• Un ordinateur hôte exécutant Internet Explorer 4.0 ou une version ultérieure.
• 32 Mo de mémoire vive et 10 Mo d'espace disque (voire plus de mémoire vive pour les
applications requérant beaucoup de mémoire).
• Processeur Pentium 200 MHz ou plus rapide.
• Pour le port Ethernet, tout ordinateur doté d'une interface Ethernet 10/100 RJ-45.
• Pour le port USB, un PC hôte avec prise en charge USB (Universal Serial Bus).
Caractéristiques physiques :
Voyant/DEL :
•Power
•DSL
•USB
• Ethernet 1
• Ethernet 2
Dimensions :
Longueur : 13,97 cm
Largeur : 23,36 cm
Hauteur : 23,36 cm
Poids : 448 g
Alimentation : consommation : 10 V CC à 680 mA
Environnement
Température de fonctionnement : de 0 à 50 degrés Celsius
Humidité en fonctionnement : entre 5 et 95 % d'humidité relative sans condensation
52
Page 57

Garantie limitée de U.S. Robotics Corporation
MATERIEL : U.S. Robotics garantit à l'utilisateur final (« le client ») que ce produit est dénué de
défauts et vices de fabrication, dans des conditions normales d'utilisation et d'exploitation, pour la
durée suivante à compter de la date d'achat auprès de U.S. Robotics ou d'un revendeur agréé :
Deux (2) ans
La seule obligation de U.S. Robotics aux termes de la présente garantie explicite est, à la discrétion et
aux frais de U.S. Robotics, de réparer le produit ou la pièce défectueuse, de livrer au client une pièce ou
un produit équivalent pour remplacer l'élément défectueux ou, si aucune des deux options précédentes
n'est applicable, U.S. Robotics peut, à sa seule discrétion, rembourser au client le prix acquitté pour le
produit défectueux. Tous les produits remplacés deviendront la propriété de U.S. Robotics. Les
produits de substitution peuvent être neufs ou à l'état neuf.
U.S. Robotics garantit toute pièce et tout produit réparé ou remplacé pendant quatre-vingt-dix (90)
jours à compter de la date d'envoi ou pendant le reste de la période de garantie initiale, selon la période
la plus longue.
LOGICIEL : U.S. Robotics garantit au client que les logiciels sous licence fonctionneront
conformément aux spécifications du programme correspondant, pour une période de quatre-vingt-dix
(90) jours à compter de la date d'achat auprès de U.S. Robotics ou d'un revendeur agréé. U.S. Robotics
garantit que les supports contenant le logiciel sont exempts de tout défaut durant la période de
garantie. Aucune mise à jour ne sera fournie. La seule obligation de U.S. Robotics aux termes de la
présente garantie explicite est, à la discrétion et aux frais de U.S. Robotics, de rembourser le prix
acquitté par le client pour le produit défectueux, ou de le remplacer par un logiciel conforme aux
spécifications publiées par U.S. Robotics. Le client est responsable du choix du programme approprié
et de la documentation associée. U.S. Robotics ne garantit ni ne déclare que ses logiciels
correspondront aux beso ins des clients ou fonctionneront avec du matériel ou des logiciels fournis par
des tiers, que le fonctionnement des logiciels sera ininterrompu et sans erreur et que tous les défauts
présents dans les logiciels seront corrigés. Pour les produits de tiers répertoriés dans la documentation
ou dans les spécifications du logiciel U.S. Robotics comme étant compatibles, U.S. Robotics fera le
maximum pour que cette compatibilité soit effective, sauf si l'incompatibilité est due à un « bug », à un
défaut du produit tiers ou à une utilisation du logiciel non conforme aux spécifications publiées par U.S.
Robotics ou dans le guide de l'utilisateur.
IL EST POSSIBLE QUE CE PRODUIT U.S. ROBOTICS COMPRENNE UN LOGICIEL DE TIERS OU SOIT LIVRE
AVEC UN TEL LOGICIEL, DONT L'UTILISATION EST REGIE PAR UN CONTRAT DE LICENCE UTILISATEUR
SEPARE. LA PRESENTE GARANTIE DONNEE PAR U.S. ROBOTICS NE COUVRE PAS LES LOGICIELS DE
TIERS MENTIONNES PLUS HAUT. POUR LA GARANTIE APPLICABLE, VEUILLEZ VOUS REPORTER AU
CONTRAT DE LICENCE UTILISATEUR CORRESPONDANT A CES LOGICIELS.
U.S. Robotics ne saurait être responsable des données logicielles ou micrologicielles, des informations
ou des données du client contenues, stockées ou intégrées dans le produit renvoyé à U.S. Robotics
pour réparation, que le produit soit sous garantie ou non.
POUR OBTENIR UN SERVICE DE GARANTIE : le client d oit contacter un centre d'assistance U.S. Robotics
ou un centre d'assistance agréé par U.S. Robotics pendant la période de garantie applicable afin
d'obtenir une autorisation de service de garantie. Une preuve d'achat datée de U.S. Robotics ou d'un
revendeur agréé peut vous être demandée. Les produits renvoyés au centre U.S. Robotics doivent être
accompagnés d'une autorisation préalable de U.S. Roboti cs et d’u n numéro SRO (Ser vice Rep air Orde r
- commande de réparation de service) clairement indiqué sur le colis ; ce dernier doit être envoyé port
payé et dûment emballé. Nous vous recommandons de l’assurer ou d’employer une méthode vous
permettant d'effectuer un suivi du colis. Le produit réparé ou remplacé sera envoyé au client, aux frais
de U.S. Robotics, dans un délai de trente (30) jours suivant la réception du produit défectueux à U.S.
Robotics. Renvoyez le produit à :
En Europe :
FRS Europe BV.
Draaibrugweg 2
1332 AC Almere, Pays-Bas
53
Page 58

GARANTIES EXCLUSIVES : SI UN PRODUIT U.S. ROBOTICS NE FONCTIONNE PAS COMME L'INDIQUE LA
GARANTIE, LE SEUL RECOURS PROPOSE AU CLIENT EN CAS DE RUPTURE DE GARANTIE EST LA
REPARATION, LE REMPLACEMENT DU PRODUIT OU LE REMBOURSEMENT DU PRIX ACQUITTE, A LA
DISCRETION DE U.S. ROBOTICS. DANS LA MESURE OU LA LOI LE PERMET, LES GARANTIES ET LES
RECOURS PRECEDEMMENT CITES SONT EXCLUSIFS ET REMPLACENT LES AUTRES GARANTIES, TERMES
OU CONDITIONS, EXPLICITES OU IMPLICITES, DE FACTO OU DE JURE, STATUTAIRES OU AUTRES,
NOTAMMENT LES GARANTIES, TERMES OU CONDITIONS DE COMMERCIALISATION, D'ADAPTATION A
UN USAGE PARTICULIER, DE QUALITE SATISFAISANTE, DE CORRESPONDANCE A LA DESCRIPTION
FOURNIE ET DE NON-INFRACTION, QUI SONT TOUS EXPRESSEMENT REJETES. U.S. ROBOTICS
N'ASSUME NI N'AUTORISE AUCUNE PERSONNE A ASSUMER EN SON NOM TOUTE AUTRE
RESPONSABILITE EN RAPPORT AVEC LA VENTE, L'INSTALLATION, L'ENTRETIEN OU L'UTILISATION DE
SES PRODUITS. U.S. ROBOTICS NE SAURAIT ETRE TENU POUR RESPONSABLE AUX TERMES DE LA
PRESENTE GARANTIE SI LE TEST OU L'EXAMEN DU PRODUIT REVELE QUE LE DEFAUT OU LE
DYSFONCTIONNEMENT EN QUESTION N'EXISTE PAS OU A ETE PROVOQUE PAR UNE MAUVAISE
UTILISATION, UNE NEGLIGENCE, UNE MAUVAISE INSTALLATION, UN TEST INAPPROPRIE, DES
TENTATIVES NON AUTORISEES D'OUVRIR, REPARER OU MODIFIER LE PRODUIT DE LA PART DU CLIENT
OU DE T OUT E AUT RE P ERS ONN E. I L EN VA D E MEM E PO UR T OUT DOM MAG E PR OVO QUE PAR UN US AGE
NE REPONDANT PAS AUX UTILISATIONS PREVUES, OU RESULTANT D'UN ACCIDENT, D'UN INCENDIE, DE
LA FOUDRE ET AUTRES CATASTROPHES NATURELLES.
LIMITATION DE RESPONSABILITE : DANS LA MESURE OU LA LOI LE PERMET, U.S. ROBOTICS REJETTE, AU
NOM DE LA SOCIETE ET DE SES FOURNISSEURS, TOUTE RESPONSABILITE, CONTRACTUELLE OU DE
DROIT CIVIL (Y COMPRIS LA NEGLIGENCE), POUR LES DOMMAGES ACCESSOIRES, INDIRECTS,
PARTICULIERS OU PUNITIFS DE QUELQUE NATURE QUE CE SOIT, AINSI QUE TOUTE RESPONSABILITE
DECOULANT DE TOUT MANQUE A GAGNER, PERTE D'ACTIVITE, PERTE D'INFORMATIONS OU DE
DONNEES OU AUTRE PERTE FINANCIERE RESULTANT DE OU LIEE A LA VENTE, L'INSTALLATION,
L'ENTRETIEN, L'UTILISATION, LES PERFORMANCES, LA PANNE OU L'INTERRUPTION DE
FONCTIONNEMENT DE SES PRODUITS, MEME SI U.S. ROBOTICS OU SES REVENDEURS AGREES ONT ETE
INFORMES DE L'EVENTUALITE DE TELS DOMMAGES. U.S. ROBOTICS LIMITE SA RESPONSABILITE A LA
REPARATION, AU REMPLACEMENT OU AU REMBOURSEMENT DU PRIX ACQUITTE, A SA DISCRETION.
CETTE LIMITATION DE RESPONSABILITE LIEE AUX DOMMAGES RESTERA INCHANGEE MEME SI LES
SOLUTIONS PROPOSEES DANS LA PRESENTE S'AVERENT INEFFICACES.
REJET DE RESPONSABILITE : certains pays, états ou provinces n'autorisent pas l'exclusion ou la
limitation des garanties implicites ou la limitation de responsabilité quant aux dommages accessoires
ou indirects pour certains produits fournis aux clients, ou encore la limitation de responsabilité en cas
de blessure, de sorte que les limitations et exclusions énoncées ci-dessus peuvent ne pas s'appliquer
à vous. Lorsque les garanties implicites ne peuvent pas être exclues dans leur intégralité, elles seront
limitées à la durée de la garantie écrite applicable. Cette garantie vous confère des droits légaux
spécifiques qui peuvent varier en fonction de la loi locale.
LOI APPLICABLE : la présente garantie limitée est régie par la législation de l'état de l'Illinois, Etats-Unis,
à l'exception de ses conflits de principes de droit et à l'exception de la convention de l'ONU sur les
contrats pour la vente internationale de biens.
Déclaration de rejet de responsabilité du fabricant
Les informations contenues dans ce document sont susceptibles d'être modifiées sans préavis et
n'engagent en rien le fournisseur. Aucune garantie ou déclaration d'aucune sorte, que ce soit explicite
ou implicite, n'est formulée concernant la qualité, l'exactitude ou l'adéquation à un usage particulier
de ce document. Le fabricant se réserve le droit d'apporter des modifications au contenu du présent
document et/ou aux produits qui y sont associés, à tout moment et sans préavis d'aucune sorte. Le
fabricant ne saurait en aucun cas être tenu pour responsable de dommages directs, indirects,
particuliers ou accessoires résultants de l'utilisation ou de l'impossibilité d'utiliser ce produit ou cette
documentation, même s'il a été averti de l'éventualité de tels dommages. Ce document contient des
informations protégées par des copyrights. Tous les droits sont réservés. La reproduction ou la
transmission totale ou partielle de ce manuel sous quelque forme et par quelque moyen que se soient
est interdite, à moins que ses auteurs n'y consentent par écrit. Les noms de produits figurant dans ce
document sont utilisés à des fins d'identification seulement. Les marques, noms de produit et noms de
marques figurant dans ce document appartiennent à leurs propriétaires respectifs.
54
Page 59

5556575859
Page 60

Page 61

Page 62

Page 63
pensi Aktuelle Produkt-Support- und Kontaktinformationen finden Sie auf dieser
Website:
http://www.usr.com/broadbandsupport
Vielen Dank, dass Sie sich für den U.S. Robotics SureConnect™ ADSL Ethernet/
USB Router, Modell 9003, entschieden haben. Mit Hilfe der folgenden
Anweisungen werden Sie durch die Installation des U.S. Robotics SureConnect
ADSL-Ethernet/USB Routers geführt.
Notieren Sie sich bitte die Seriennummer. Diese Nummer benötigen
Sie, wenn Sie sich an unsere Support-Abteilung wenden. Die 12stellige Seriennummer finden Sie auf einem Strichcode-Aufkleber
auf der Router-Unterseite und der Routerverpackung. Bitte geben
Sie auch die unten aufgeführte Modellnummer an.
Tragen Sie die Seriennummer in das unten stehende Feld ein.
9003
Modellnummer
Seriennummer
Überblick über Installation und Systemanforderungen
Was Sie zunächst brauchen:
• Aktiver ADSL- und Internetdienst Ihrer lokalen Telefongesellschaft
oder Ihres Internet Service Providers (ISP).
• Möglicherweise benötigen Sie einen Mikrofilter für jedes Telekommunikationsgerät (Telefone, Anrufbeantworter, Faxgeräte), das dieselbe
Telefonleitung nutzt wie das ADSL-Signal. Stellen Sie sicher, dass kein
Filter zwischen den ADSL-Router und die Telefonbuchse geschaltet ist.
(Manchmal muss zwischen Router und Telefonbuchse ein spezieller
Splitter geschaltet sein. Falls dies zutrifft, muss der Splitter sowohl für
die Telefonbuchse als auch den Router-Anschluss geeignet sein. Ist
dies nicht der Fall, darf er nicht zwischen Telefonbuchse und Router
installiert werden.)
Ihr ISP sollte Folgendes zur Verfügung stellen:
• Benutzername und Kennwort, falls bereits zugewiesen.
• ADSL-Standard (Modulation)
- G.dmt - Multi-Mode
- G.Lite - T1.413, Ausgabe 2
Page 64

• VPI/VCI-Angaben
• Kapselungsmodus
- RFC1483 Bridged. - PPPoA
- RFC1483 Routed - MER
-PPPoE -
Anforderungen an den Computer
Mindestsystemanforderungen – Ethernet-Anschluss
• Computer mit einem Ethernet 10/100 Ethernet-Adapter
(Netzwerkkarte)
• 32 MB RAM
• 10 MB Festplattenspeicher
• Jedes Betriebssystem, das eine Ethernet-Verbindung mit IP-Stack
unterstützt
• Internet Explorer oder Netscape Navigator 4.0 oder höherer Webbrowser
• SureConnect Installations-CD-ROM erfordert Windows 95, Windows
98, Windows Me, Windows NT 4.0, Windows 2000 oder Windows XP.
Mindestsystemanforderungen – USB-Anschluss
• Pentium- oder kompatible CPU, 200 MHz oder schneller
• Host-PC mit USB (Universal Serial Bus)-Unterstützung
• 32 MB RAM
• 10 MB Festplattenspeicher
Ihr Computer muss eingeschaltet sein. Halten Sie
außerdem die CD-ROM Ihres Betriebssystems bereit.
Für die Ausführung des Installationsprogramms ist
die Windows Setup-CD erforderlich.
• Internet Explorer oder Netscape Navigator 4.0 oder höherer Webbrowser
• SureConnect Installations-CD-ROM erfordert Windows 98, Windows
Me, Windows 2000 oder Windows XP.
Anforderungen an das ADSL-Netzwerk
ADSL- und Internetdienst von Ihrer lokalen Telefongesellschaft oder Ihrem
Internet Service Provider (ISP)
60
Page 65
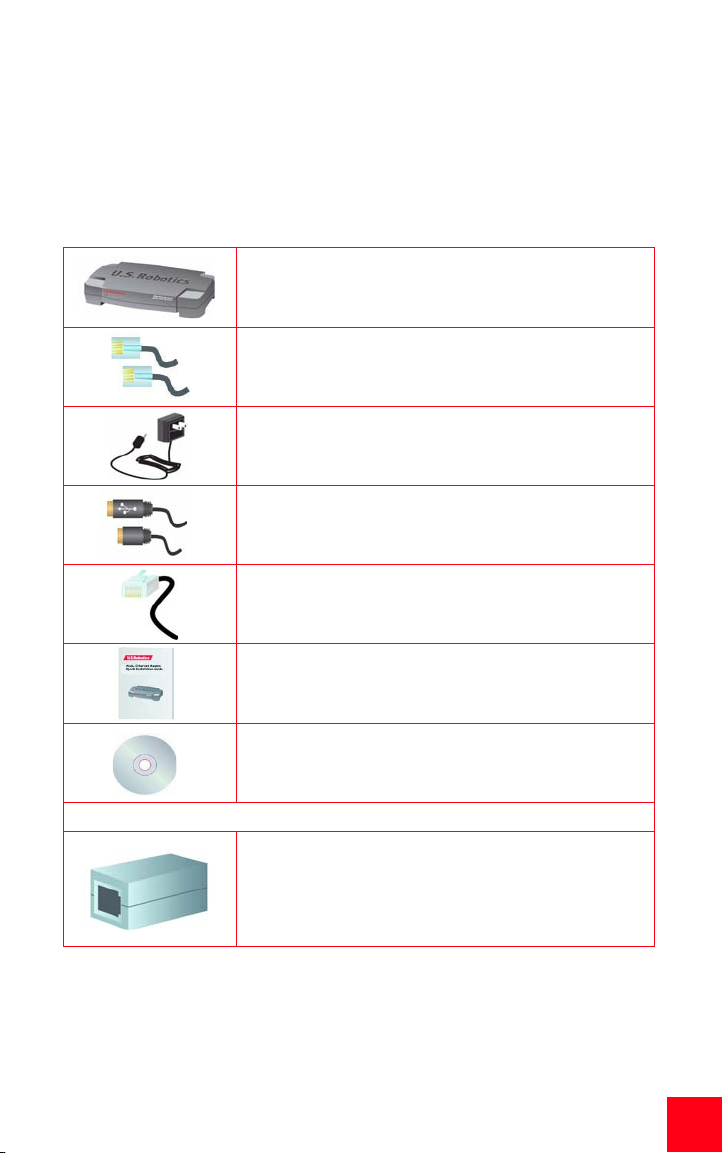
Anforderungen an die Stromversorgung
Die Stromversorgung des U.S. Robotics SureConnect ADSL Ethernet/USB
Routers erfolgt über das beigefügte Netzteil. Verwenden Sie das Gerät
ausschließlich zusammen mit dem beigefügten Netzteil.
Im Lieferumfang dieses U.S. Robotics SureConnect ADSL Ethernet/USB RouterPakets sind folgende Elemente enthalten:
U.S. Robotics SureConnect ADSL
Ethernet/USB Router
Modell 9003
Optionale Komponenten
Bei einigen Modellen ist ein Mikrofilter im Lieferumfang
enthalten. Möglicherweise stellt auch Ihr ISP einen Mikrofilter zur Verfügung. Fragen Sie bei Ihrem ISP nach, ob Sie
einen Mikrofilter benötigen. Weitere Erläuterungen zu Mikrofiltern finden Sie im folgenden Abschnitt.
Standard-RJ-11-Telefonkabel, 2,1 m
(4 Adern)
Netzteil
USB-Kabel
(1 m)
Ethernet Straight Through-Kabel
(1,8 m)
Installationsanleitung
U.S. Robotics SureConnect Installations-CD-ROM
mit Bedienungsanleitung
Setzen Sie sich mit Ihrem Händler in Verbindung, wenn Teile fehlerhaft oder
beschädigt sind bzw. nicht geliefert wurden.
61
Page 66

Welche Verbindungsart: Ethernet oder USB?
Den U.S. Robotics SureConnect ADSL Ethernet/USB Router können Sie über
einen USB- oder Ethernet-Anschluss anschließen. Die Entscheidung liegt bei
Ihnen. Welche Verbindungsart Sie wählen, hängt auch von der Verfügbarkeit der
Computeranschlüsse sowie dem verwendeten Betriebssystem ab. Bei folgenden
Betriebssystemen muss eine Ethernet-Verbindung gewählt werden: Windows
95, Windows NT 4.0, Macintosh und Linux.
1. Schritt: Anschließen von Mikrofiltern (bei Bedarf)
• Falls im Lieferumfang keine Mikrofilter enthalten waren und Ihr ISP
kein entsprechendes Gerät zur Verfügung stellt, sollten Sie direkt zu
Schritt 2 übergehen.
• Falls für die Installation Mikrofilter erforderlich sind: Installieren Sie
an jedem Telefongerät, das dieselbe Telefonleitung wie das ADSL-Signal verwendet, einen Mikrofilter. (Als Telefongerät gelten Telefone,
Anrufbeantworter und Faxgeräte.)
Ein Mikrofilter ist ein kleines Gerät, das die gegenseitigen Störungen zwischen
ADSL- und Telefonsignalen verringert. Er ist nur dann erforderlich, wenn der
ADSL-Router und ein Telefon die gleiche Leitung verwenden. Wenn Sie keinen
Mikrofilter verwenden, können während einer Datenübertragung auf Ihrem
Telefon Hintergrundgeräusche auftreten. Umgekehrt können bei Telefonanrufen
Datenübertragungen gestört werden.
Anschließen von Mikrofiltern an Telekommunikationsgeräte
Zur Installation des Mikrofilters stecken Sie das Telefon in den Mikrofilter und
diesen danach in die Telefonwandbuchse. Installieren Sie keinen Mikrofilter an
dem Kabel, das Ihren Router mit der Telefonbuchse verbindet, sofern der Filter
nicht mit einer entsprechenden Buchse für das Telefon und das DSL-Gerät
ausgestattet ist.
62
Page 67

2. Schritt: Installieren des ADSL Ethernet/USB Routers
Hinweis für Benutzer von Windows 95 und NT 4.0, Macintosh und Linux
Wenn Sie den U.S. Robotics SureConnect ADSL Ethernet/USB Router in
einem System installieren, das unter Windows 95, NT 4.0, Macintosh
oder Linux ausgeführt wird, müssen Sie die Ethernet-Option wählen.
Installationsanleitung für Windows 98, 2000, Me und XP
Zur Installation des U.S. Robotics SureConnect ADSL Ethernet/USB Routers
legen Sie die U.S. Robotics SureConnect Installations-CD-ROM in das CD-ROMLaufwerk Ihres Computers. Sollte die Installation nicht automatisch beginnen,
öffnen Sie auf dem Windows-Desktop mit einem Doppelklick Arbeitsplatz,
doppelklicken Sie auf den Laufwerksbuchstaben Ihres CD-ROM-Laufwerks und
danach auf Setup.
Es erscheint das Startfenster
des U.S. Robotics
SureConnect ADSL Ethernet/
USB RouterInstallationsprogramms.
Klicken Sie auf Next (Weiter),
um mit der Installation des
U.S. Robotics SureConnect
ADSL Ethernet/USB Routers
fortzufahren.
• Wählen Sie die
Verbindungsart,
über die Sie den
Router und Ihren
Computer verbinden. Klicken Sie auf
Next (Weiter).
63
Page 68

•In einem Test wird
nun überprüft, ob
Ihr System die
Mindestvoraussetzungen für die
Installation erfüllt.
Auf dem Bildschirm
"Results"
(Ergebn isse) werden
diejenigen
Elemente, die die
Prüfung bestanden
haben, mit einer
grünen Flagge
markiert. Eine rote
Flagge kennzeichnet
unzureichende Elemente. Wenn Ihr System die Überprüfung
bestanden hat, klicken Sie auf Next (Weiter).
Wenn Sie eine Meldung erhalten, dass Ihr System die Überprüfung nicht
bestanden hat, klicken Sie auf View Report (Bericht anzeigen). Der Bericht gibt
Auskunft darüber, bei welcher Komponente ein Fehler aufgetreten ist.
64
Page 69

3. Schritt: Anschließen der Kabel
In der unten stehenden Tabelle sind Daten über Verbindungstypen und
Anschlüsse (an der Rückseite des Routers) zusammengefasst.
Text Beschreibung
Drucktaste zum Ein- und Ausschalten des U.S. Robotics SureConnect ADSL
O / I
USB/Ethernet Routers.
Power Eingangsbuchse für das Stromkabel (von der Wandsteckdose).
Anschlussbuchse für das RS-232-Kabel (nicht im Lieferumfang enthalten). Sie
können das Kabel verwenden, um über die Terminal-Benutzeroberfläche mit
Console
dem Router zu kommunizieren. Der Router kann auch für die TerminalBenutzeroberfläche (TUI) konfiguriert werden. Außerdem kann über diese
Schnittstelle auf Diagnosedaten zugegriffen werden. Die Terminal-Benutzer-
USB USB (Universal Serial Bus)-Anschluss an der Rückseite des Routers.
ENET1 Ethernet-Anschluss 1 an der Rückseite des Routers.
ENET2 Ethernet-Anschluss 2 an der Rückseite des Routers.
ADSL Digitaler Teilnehmeranschluss für RJ-11-Stecker an der Rückseite des Routers.
65
Page 70

Anschließen des Netzteils
Verwenden Sie ausschließlich das beigefügte Netzteil. Schließen Sie das
Netzadapter-Kabel an die mit "Power" gekennzeichnete Buchse an der
Rückseite des Routers an. Stecken Sie das Netzteil in eine Steckdose.
Drücken Sie zum Einschalten des Routers die Drucktaste "O/I". Sobald der U.S.
Robotics SureConnect ADSL Ethernet/USB Router mit Strom versorgt wird,
leuchtet die "PWR"-LED an der Vorderseite des U.S. Robotics ADSL Ethernet/
USB Routers auf. Der Router wird initialisiert, sobald die Stromversorgung
hergestellt ist. Dies dauert ungefähr eine Minute. Klicken Sie auf Next (Weiter),
um die Initialisierung des Routers abzuschließen.
Anschließen des Telefonkabels
Stecken Sie ein Ende des beigefügten Telefonkabels in den mit "ADSL"
gekennzeichneten Telefonanschluss an der Rückseite des Routers. Stecken Sie
das andere Ende in die Telefonbuchse an der Wand. Klicken Sie auf Next
(Weiter).
Anschließen des Ethernet- oder USB-Kabels
Ethernet
Wenn Sie nicht mehr als zwei Geräte anschließen, können Sie diese direkt an der
Rückseite des Routers anschließen. Sie brauchen dann kein Hub. Stecken Sie
ein Ende des Ethernet-Kabels in einen der beiden Anschlüsse "ENET1" oder
"ENET2" an der Rückseite des U.S. Robotics SureConnect ADSL Ethernet/USB
Routers. Stecken Sie das andere Ende des Ethernet-Kabels in den EthernetAnschluss der 10/100-Netzwerkkarte Ihres Computers.
• Klicken Sie auf Finish (Fertig stellen).
USB
• Wenn Sie den Router über den USB-Anschluss anschließen, stecken
Sie das rechteckige Ende des beigefügten USB-Kabels in den USBAnschluss des Computers. Stecken Sie das quadratische Ende des
Kabels in den mit "USB" gekennzeichneten Anschluss an der Rückseite des U.S. Robotics SureConnect ADSL Ethernet/USB Routers.
• Nach dem Einstecken des Kabels erfasst der Router Ihren PC und
installiert die Software automatisch auf Ihrem Computer. (Sie müssen
unter Umständen einen Systemneustart durchführen.)
• Sie werden vom Assistenten für das Suchen neuer Hardware über die
Erfassung des Routers informiert. Klicken Sie auf Finish (Fertig
stellen).
66
Page 71

Herzlichen Glückwunsch! Die Installation ist abgeschlossen!
Sie haben die Installation des U.S. Robotics SureConnect ADSL Ethernet/USB
Routers abgeschlossen. Klicken Sie auf Finish (Fertig stellen). Das
Installationsprogramm startet automatisch den Webbrowser. Dieser stellt eine
Verbindung mit der IP-Adresse 192.168.1.1 her.
Sie müssen nun einen Benutzernamen und ein Kennwort eingeben. Der
Standard-Benutzername ist "root". Das Standard-Kennwort ist "12345". Geben
Sie diese Daten ein (ohne Anführungszeichen).
Wenn der Browser nicht automatisch startet ...
Beginnen Sie mit der Schnellinstallation (Quick Setup), indem Sie den
Webbrowser starten und folgende Adresse eingeben: http://192.168.1.1.
Daraufhin wird der Bildschirm "SureConnect ADSL Utility" (SureConnect ADSLDienstprogramm) aufgerufen.
67
Page 72

4. Schritt: Verwendung des Menüs "Quick Setup"
(Schnellinstallation)
Der U.S. Robotics SureConnect ADSL Ethernet/USB Router ist mit dem
SureConnect ADSL-Dienstprogramm ausgestattet. Mit diesem Dienstprogramm
können Sie den Router in drei einfachen Schritten schnell einrichten.
• Wählen Sie "ADSL Standard".
• Konfigurieren Sie die Einstellungen für den Internet Service Provider.
• Speichern Sie die Einstellungen und starten Sie den Router neu.
Schalten Sie den Router während des
Speichervorgangs nicht aus und vermeiden Sie
jegliche anderen Störungen. Wird der
Speichervorgang unterbrochen, gehen
Installationsdaten verloren.
68
Page 73

Auswahl des ADSL-Modus
1. Markieren Sie das Optionsfeld ADSL Standard. Das Fenster "ADSL Standard" wird geöffnet. Auf diesem Bildschirm können Sie den ADSL-Standard
festlegen.
69
Page 74

2. Das Dropdown-Listenfeld enthält folgende Standards: G.dmt, G.Lite,
T1.413 oder Multi-Mode. In den meisten Fällen reicht die Standardeinstellung "Multi-Mode". Informieren Sie sich ggf. bei Ihrem ISP über die passende Einstellung. Klicken Sie auf Apply (Übernehmen), wenn Sie einen
Standard gewählt haben.
3. Klicken Sie rechts unten auf Next (Weiter). Sie gelangen dann zur WANSetup-Seite.
Konfigurieren der Einstellungen für den Internet Service
Provider
Auf dem oben abgebildeten Bildschirm müssen Sie die vom ISP bereitgestellten
Daten eingeben. Gängige ISP-Einstellungen finden Sie in der Tabelle "ISPEinstellungen" in der Bedienungsanleitung. (Die Einstellungen können von
denen in der Tabelle abweichen. Fragen Sie bei Ihrem ISP nach.) Falls Ihr ISP in
der Liste fehlt, müssen Sie die Einstellungen telefonisch erfragen.
1. Überprüfen Sie die Tabelle mit den aktuell verwendeten ATM-PVCs (am
unteren Bildschirmrand). Entfernen Sie die nicht benötigten Verbindungsarten.
2. Wählen Sie die von Ihrem ISP empfohlene Verbindungsart. Wählen Sie
einen Modus: RFC1483 Bridged, RFC Routed, PPPoE, PPPoA oder MER. Bei
einigen Verbindungsarten müssen unter Umständen Zusatzinformationen
zur Verfügung gestellt werden (z. B. IP-Adresse, Benutzername und Kennwort).
3. Oben auf dem WAN-Setup-Bildschirm können Sie die VPI- und VCI-Werte
eingeben.
4. Wählen Sie einen Kapselungsmodus. Markieren Sie das Optionsfeld für
LLC/SNAP oder VC Multiplexing.
5. Markieren Sie, falls zutreffend, unter "Network Settings" (Netzwerkeinstellungen) "Enable NAPT" (NAPT aktivieren).
6. Markieren Sie, falls zutreffend, unter "Network Settings" (Netzwerkeinstellungen) "Enable DHCP" (DHCP aktivieren).
7. Klicken Sie auf Add (Hinzufügen).
8. Klicken Sie zum Fortfahren rechts unten auf Next (Weiter).
70
Page 75
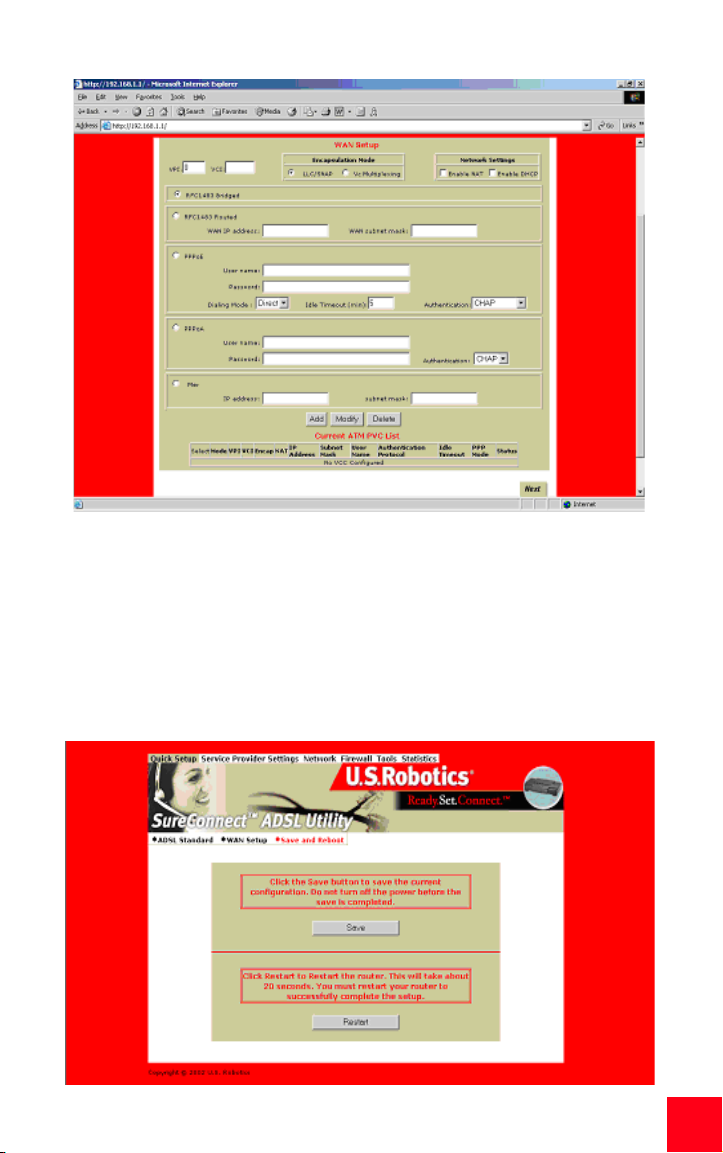
Save & Restart (Speichern und neu starten)
Speichern Sie nach Abschluss des ADSL-Standard- und WAN-Setup-Bildschirms
Ihre Einstellungen und starten Sie den Router neu.
1. Klicken Sie auf dem oben abgebildeten Bildschirm auf Save (Speichern).
2. Klicken Sie nach dem Neustart auf Restart (Neu starten).
71
Page 76

Falls Sie von Ihrem ISP Installationssoftware
erhalten haben, sollten Sie diese jetzt installieren.
Lesen und befolgen Sie die zugehörigen
Installationsanweisungen.
3. Sie können die Verbindung Ihres Routers testen, indem Sie ihn auf folgender Website registrieren lassen:
http://www.usr.com/productreg
Fehlerbehebung
Checkliste zur Fehlerbehebung
Verwenden Sie die folgende Checkliste, um die Ursache des Problems
festzustellen.
✔ Vergewissern Sie sich, dass das Netzteil sicher an den Router sowie
an eine funktionierende Steckdose angeschlossen ist. Die PWR-LED
sollte leuchten.
✔ Vergewissern Sie sich, dass das Telefonkabel sicher in der Telefon-
wandbuchse und im Router steckt. Die ADSL-LED sollte aufleuchten.
✔ Vergewissern Sie sich, dass das Ethernet-Kabel sicher im Anschluss
ENET1 und/oder ENET2 des Routers und in der Netzwerkschnittstellenkarte des Computers steckt. Die ENET1-LED und/oder die ENET2LED sollte leuchten.
✔ Vergewissern Sie sich, dass das USB-Kabel sicher im USB-Anschluss
des Routers und des Computers steckt, wenn Sie das USB-Kabel verwenden. Die USB-LED sollte leuchten.
72
Page 77

Status-LEDs
Auf der Vorderseite des U.S. Robotics SureConnect ADSL Ethernet/USB Routers
befinden sich fünf LEDs. Ganz links befindet sich die PWR-LED. Die zweite und
dritte LED von links weisen auf die Datenübertragung von ENET1 bzw. ENET2 hin.
Die vierte LED ist die USB-LED. Die fünfte LED ist die ADSL-LED. Die folgenden
LED-Zustände zeigen den Betriebsstatus des Routers an.
Das Gerät wird von der Steckdose mit Strom versorgt.
Über das Ethernet-Kabel zwischen Router und
Computer besteht eine physische Verbindung.
Es werden Daten übertragen.
Zwischen Router und Computer besteht keine
physische Verbindung.
Über das USB-Kabel zwischen Router und Computer besteht eine physische Verbindung.
Zwischen Router und Computer besteht keine
physische Verbindung.
PWR
ENET1
ENET2
USB
ADSL
Leuchtet grün
Aus Das Gerät wird nicht mit Strom versorgt.
Leuchtet grün/
10 Mbps
Leuchtet orange/
100 Mbps
Blinkt grün oder
orange
Aus
Leuchtet grün
Blinkt grün Es werden Daten übertragen.
Aus
Leuchtet grün Es wurde eine DSL-Verbindung hergestellt.
Blinkt grün Eine DSL-Verbindung wird abgestimmt.
Aus Es besteht keine DSL-Verbindung.
Tipps zur Fehlerbehebung
Beim Einschalten des Routers blinkt keine LED.
• Überprüfen Sie die Verbindung zwischen Netzteil, Router und
Steckdose.
• Vergewissern Sie sich, dass das im Lieferumfang des U.S. Robotics
SureConnect ADSL Ethernet/USB Routers enthaltene Netzteil
verwendet wird.
Die ADSL-LED blinkt oder leuchtet gar nicht.
• Vergewissern Sie sich, dass das Telefonkabel ordnungsgemäß im
ADSL-Anschluss auf der Rückseite des Routers und in der
Telefonwandbuchse sitzt.
73
Page 78

Ich kann keine Verbindung zum Konfigurationsdienstprogramm des Routers
herstellen.
Lösungsvorschlag 1:
• Vergewissern Sie sich, dass die Ethernet- oder USB-Kabel
ordnungsgemäß und sicher angeschlossen sind.
• Vergewissern Sie sich, dass das Netzkabel eingesteckt ist.
Lösungsvorschlag 2:
• Vergewissern Sie sich, dass der PC eine IP-Adresse im Bereich
192.168.1.2 bis 192.168.1.254 verwendet.
• Für die Subnetzmaske muss 255.255.255.0 verwendet werden.
• Die Adresse des Standard-Gateways muss ggf. 192.168.1.1 sein.
• Führen Sie zur Überprüfung der Einstellungen folgende Schritte aus:
Benutzer von Windows 95, 98 und Me:
1. Klicken Sie auf Start.
2. Klicken Sie auf Ausführen.
3. Geben Sie winipcfg ein.
4. Klicken Sie auf OK.
5. Überprüfen Sie die Daten für IP-Adresse, Subnetzmaske und
Standard-Gateway. Stimmen die Daten?
6. Klicken Sie auf Alles freigeben, wenn die Daten nicht stimmen.
Klicken Sie anschließend auf Alles aktualisieren.
Benutzer von Windows NT, 2000 oder XP:
1. Klicken Sie auf Start.
2. Klicken Sie auf Ausführen.
3. Geben Sie cmd ein.
4. Klicken Sie auf OK.
5. An der DOS-Eingabeaufforderung geben Sie Folgendes ein:
ipconfig /all.
6. Überprüfen Sie die Daten für IP-Adresse, Subnetzmaske und
Standard-Gateway. Stimmen die Daten?
7. Führen Sie die folgenden Schritte durch, wenn die Daten nicht
stimmen:
• Geben Sie ipconfig /release ein.
• Drücken Sie die Eingabetaste.
• Geben Sie ipconfig /renew ein.
• Drücken Sie die Eingabetaste.
Lösungsvorschlag 3:
• Überprüfen Sie die Verbindungseinstellung des Webbrowsers.
• Vergewissern Sie sich, dass die HTTP-Proxyfunktion des Webbrowsers
deaktiviert ist. Führen Sie die folgenden Schritte durch, um zu
überprüfen, ob der Webbrowser die Konfigurationsseiten im Router
lesen kann.
• Starten Sie Ihren Webbrowser.
74
Page 79

Benutzer von Internet Explorer:
1. Klicken Sie auf Extras und dann auf Internetoptionen. Klicken Sie
dann auf die Registerkarte Verbindungen.
2. Markieren Sie Keine Verbindung wählen. Klicken Sie auf
Übernehmen. Klicken Sie anschließend auf OK.
3. Klicken Sie danach erneut auf Extras. Klicken Sie dann auf
Internetoptionen.
4. Klicken Sie auf die Registerkarte Verbindungen. Klicken Sie auf
LAN-Einstellungen.
5. Entfernen Sie aus sämtlichen Kontrollkästchen die
Markierungen. Klicken Sie auf OK.
6. Klicken Sie auf OK.
Benutzer von Netscape Navigator:
1. Klicken Sie zunächst auf Bearbeiten, Einstellungen und
doppelklicken Sie dann im Kategoriefenster auf Erweitert.
2. Klicken Sie auf Proxies, wählen Sie Direkte Verbindung zum
Internet und klicken Sie auf OK.
3. Klicken Sie erneut auf Bearbeiten und dann auf Einstellungen.
4. Doppelklicken Sie unter Kategorie auf Erweitert und klicken Sie
dann auf Proxies.
5. Wählen Sie Direkte Verbindung zum Internet und klicken Sie auf
OK.
• Siehe "Fehlerbehebung mit dem Befehl 'ping'" weiter unten, wenn
keine Verbindung zum Router hergestellt werden kann.
Ich kann keine Verbindung zum Internet herstellen.
Lösungsvorschlag:
• Vergewissern Sie sich, dass das Netzkabel eingesteckt ist.
• Vergewissern Sie sich, dass die Ethernet- oder USB-Kabel zwischen
Router und PCs ordnungsgemäß angeschlossen sind.
• Vergewissern Sie sich, dass ein DSL-Anschluss vorhanden ist.
• Vergewissern Sie sich, dass Sie ein aktives ISP-Konto besitzen.
• Sehen Sie auf der Seite Service Provider Setting (Service ProviderEinstellung) des Routers unter WAN Setup (WAN-Einrichtung) nach.
Überprüfen Sie die Einstellungen für VCI und VPI.
• Sehen Sie auf der Seite Service Provider Setting (Service ProviderEinstellung) des Routers unter WAN Setup (WAN-Einrichtung) nach.
Überprüfen Sie die Einstellungen für Benutzernamen und Kennwort.
• Weitere Lösungsvorschläge finden Sie in der RouterBedienungsanleitung.
75
Page 80

Ich weiß nicht, ob ich eine statische oder dynamische IP-Adresse habe.
Lösungsvorschlag:
• Wenn der DSL-Dienst freigeschaltet ist, verfügen Sie wahrscheinlich
über eine dynamische IP-Adresse.
• Wenden Sie sich an den Service Provider, um diese Information zu
überprüfen. Einige Provider weisen statische IP-Adressen zu.
• Vergewissern Sie sich, dass DHCP (Dynamic Host Configuration
Protocol) aktiviert ist, wenn der Service Provider DHCP verwendet.
Beim Überprüfen meiner Netzwerkkonfiguration unter Windows Me oder XP
finde ich das Netzwerksymbol nicht.
Lösungsvorschlag:
• Standardmäßig sind Windows Me und XP so eingestellt, dass nicht alle
Symbole in der Systemsteuerung angezeigt werden. Klicken Sie unter
Windows auf Start, Einstellungen und dann auf Systemsteuerung.
• Klicken Sie in der Systemsteuerung links auf dem Bildschirm auf die
Option zum Anzeigen aller Systemsteuerungsoptionen. Es sollten
nun alle Systemsteuerungsoptionen zu sehen sein.
Ich weiß nicht, wie ich das TCP/IP-Protokoll für die Verwendung mit dem Router
konfigurieren muss.
Lösungsvorschlag:
• Der Router muss mit einer Netzwerkschnittstellenkarte im PC
verbunden sein. Diese interne Netzwerkschnittstellenkarte wird vom
PC u. U. nicht erkannt. Sie können dieses Problem beheben, indem Sie
die richtige Hardware installieren oder hinzufügen.
• Öffnen Sie das Hilfesystem des Betriebssystems.
• Weitere Informationen finden Sie in der Hilfe zu TCP/IP.
Fehlerbehebung mit dem Befehl "ping"
1. Klicken Sie unter Windows auf Start und dann auf Ausführen.
Benutzer von Windows 95, 98 und Me: Geben Sie im Dialogfeld
Ausführen den Befehl command ein und klicken Sie dann auf OK.
Benutzer von Windows NT, 2000 und XP: Geben Sie cmd ein und
klicken Sie auf OK. Das Fenster Eingabeaufforderung wird
geöffnet.
2. Geben Sie ping 127.0.00.1 ein. Hierbei handelt es sich um die
lokale Hostadresse. Diese Adresse bestätigt, dass TCP/IP
installiert ist und ordnungsgemäß funktioniert. Kann der PingVorgang nicht vollständig ausgeführt werden, trennen Sie die
Verbindung zum Router und wiederholen Sie die Installation.
76
Page 81

3. Geben Sie ping und die IP-Adresse Ihres PCs ein. Dadurch wird
bestätigt, dass der PC Anforderungen beantwortet. Kann der
Ping-Vorgang nicht vollständig ausgeführt werden, überprüfen
Sie, ob alle Kabel korrekt angeschlossen und alle Treiber
installiert sind.
4. Geben Sie ping und die Gateway-Adresse ein, um die
Kommunikation mit dem Gateway zu überprüfen. (Die Adresse
des Standard-Gateways ist 192.168.1.1.) Dadurch wird bestätigt,
dass Sie Verbindungen zu anderen Computern und zum Router
herstellen können. Wenn es möglich ist, eine Verbindung zum
Router herzustellen, können Sie auch auf die Administrationsseite
zugreifen und die Einstellungen konfigurieren. Kann der PingVorgang nicht vollständig ausgeführt werden, überprüfen Sie, ob
das Netzkabel des Routers angeschlossen ist, und
ordnungsgemäß mit dem PC verbunden ist.
5. Geben Sie ping und die externe Internetadresse des Routers ein.
Diese Adresse erhalten Sie entweder vom ISP oder vom
Administrator des externen LAN. Dadurch wird bestätigt, dass
der Router einwandfrei funktioniert und die Übertragung von
Daten ermöglicht.
6. Geben Sie ping und die Adresse des DNS-Servers ein. Hiermit
wird die Auflösung gültiger Internet-Hostnamen zu IP-Adressen
ermöglicht und überprüft, ob Sie eine Internetverbindung
herstellen können.
Welche Schritte muss ich durchführen, wenn ich von ping keine Antwort erhalte?
1. Wenn Sie keine Antwort erhalten, bedeutet dies, dass der PC nicht mit
der IP-Adresse des Routers kommunizieren kann. Überprüfen Sie die
Adresse im Konfigurationsdienstprogramm.
2. Korrigieren Sie die Adresse ggf. im Konsolenmodus.
3. Führen Sie den Ping-Vorgang nach dem Durchführen der Änderung
erneut durch.
Was muss ich tun, um den Router zu deinstallieren?
Windows 95
1. Klicken Sie unter Windows auf Start, wählen Sie Einstellungen und
klicken Sie auf Systemsteuerung.
2. Doppelklicken Sie auf das Symbol Software.
3. Wählen Sie auf der Registerkarte Installieren/Deinstallieren den
Eintrag U.S. Robotics SureConnect ADSL Ethernet/USB Router. Dazu
müssen Sie eventuell in der Liste nach unten scrollen.
4. Klicken Sie auf Entfernen.
5. Der Bildschirm zum Neuinstallieren oder Deinstallieren wird
angezeigt. Klicken Sie auf Deinstallieren. Klicken Sie auf Ja, wenn Sie
aufgefordert werden, die Deinstallation zu bestätigen. Alle
Komponenten werden vom Computer deinstalliert.
77
Page 82

Windows 98/2000/Me
1. Klicken Sie unter Windows auf Start, wählen Sie Einstellungen und
klicken Sie auf Systemsteuerung.
2. Doppelklicken Sie auf das Symbol Software.
3. Auf dem Bildschirm Software werden alle derzeit installierten
Programme angezeigt. Suchen Sie den U.S. Robotics SureConnect
ADSL Ethernet/USB Router und markieren Sie ihn. Dazu müssen Sie
eventuell in der Liste nach unten scrollen.
4. Klicken Sie in Windows 98/Me auf Hinzufügen/Entfernen oder in
Windows 2000 auf Ändern/Entfernen.
5. Der Bildschirm zum Neuinstallieren oder Deinstallieren wird angezeigt.
Klicken Sie auf Deinstallieren und dann auf Weiter. Alle Komponenten
werden vom Computer deinstalliert.
Windows XP
1. Klicken Sie unter Windows auf Start, dann auf Systemsteuerung.
2. Doppelklicken Sie auf Software.
3. Auf der Registerkarte Installieren/Deinstallieren werden alle derzeit
installierten Programme angezeigt. Suchen und markieren Sie U.S.
Robotics SureConnect ADSL Ethernet/USB Router. Dazu müssen Sie
eventuell in der Liste nach unten scrollen.
4. Klicken Sie auf Hinzufügen/Entfernen.
5. Der Bildschirm zum Neuinstallieren oder Deinstallieren wird angezeigt.
Klicken Sie auf Deinstallieren und dann auf Weiter. Alle Komponenten
werden vom Computer deinstalliert.
Windows NT
1. Klicken Sie unter Windows auf Start, wählen Sie Einstellungen und
klicken Sie auf Systemsteuerung.
2. Doppelklicken Sie auf das Symbol Software.
3. Auf dem Bildschirm Software werden alle derzeit installierten
Programme angezeigt. Suchen und markieren Sie U.S. Robotics
SureConnect ADSL Ethernet/USB Router. Dazu müssen Sie eventuell
in der Liste nach unten scrollen.
4. Klicken Sie auf die Schaltfläche Hinzufügen/Entfernen.
5. Der Bildschirm zum Neuinstallieren oder Deinstallieren wird
angezeigt. Klicken Sie auf die Option Deinstallieren und dann auf
Weiter. Alle Komponenten werden vom Computer deinstalliert.
Macintosh und Linux
Ziehen Sie alle an Computer und Router angeschlossenen Kabel heraus.
78
Page 83

Technischer Support
Rufen Sie den Abschnitt Support der U.S. Robotics-Website auf:
http://www.usr.com/support
• Suchen Sie auf den Webseiten FAQ und Troubleshooting nach dem
jeweiligen Produkt. Auf diesen Seiten finden Sie Lösungen für die
meisten auftretenden Probleme.
• Wenn Sie keine Verbindung zum Internet herstellen können, wenden
Sie sich an Ihren ISP.
• Aktuelle Supportkontakt-Informationen finden Sie auf der folgenden
Website:
http://www.usr.com/broadbandsupport
79
Page 84

Hinweise zu Vorschriften
Erklärung des Herstellers zur Konformität
FCC-Erklärung zur Konformität
Wir erklären in unserer eigenen Verantwortung, dass der U.S. Robotics SureConnect ADSL Ethernet/
USB Router, auf den sich diese Erklärung bezieht, folgende Standards bzw. anderen Vorschriften erfüllt:
1) 15.107 (e), Klasse B, Grenzwerte für leitungsgebundene Emissionen
2) 15.109 (g), Klasse B, Grenzwerte für abgestrahlte Emissionen
Erklärung zur Klasse B nach FCC
Dieses Gerät ist mit Teil 15 der FCC-Vorschriften konform. Der Betrieb unterliegt den folgenden beiden
Bedingungen:
Störungen von Radio und Fernsehen
Hinweis: Dieses Gerät wurde geprüft, und es wurde festgestellt, dass es die Grenzwerte für ein
Digitalgerät der Klasse B gemäß Teil 15 der FCC-Vorschriften einhält. Diese Grenzwerte sind für die
Gewährleistung eines angemessenen Schutzes gegen schädliche Störungen bei Installation im
Wohnbereich gedacht. Diese Ausrüstung erzeugt und benutzt hochfrequente Energien. Wenn sie nicht
in Übereinstimmung mit den Anleitungen installiert und verwendet wird, kann sie Störungen des
Rundfunkempfangs verursachen. Bei keiner Installation können Störungen jedoch völlig
ausgeschlossen werden Wenn diese Ausrüstung Störungen des Rundfunk- und Fernsehempfangs
verursacht, was durch Ein- und Ausschalten des Gerätes festgestellt werden kann, sollte der Benutzer
versuchen, die Störung durch eine oder mehrere der folgenden Maßnahmen zu beheben:
Die folgenden durch die Federal Communications Commission erstellten Informationen könnten für den
Benutzer hilfreich sein:
Telephone Interference Bulletin
Dieses Dokument ist im Internet über die Homepage des FCC Consumer Information Bureau http://
www.fcc.gov/cib verfügbar. In "Consumer Information Directory > Telephone > Miscellaneous
Telephone Information" wählen Sie "Interference to Telephones".
Vorsicht: Veränderungen oder Modifikationen, die nicht ausdrücklich durch die für die Konformität
zuständige Stelle genehmigt sind, könnten die Berechtigung des Benutzers zum Betreiben des Gerätes
ungültig machen.
Zur Erfüllung der Grenzwerte für ein Digitalgerät der Klasse B fordert U.S. Robotics für den Anschluss
des Gerätes den Einsatz eines hochwertigen Schnittstellenkabels. Der empfohlene Kabeltyp ist ein 90Ohm-USB-Kabel für den USB-Anschluss sowie ein normales Telefonkabel für den RJ-11-Anschluss. Das
Telekommunikationskabel muss mit einem Telefonkabel verbunden werden, das mindestens der USamerikanischen Norm 26AWG entspricht.
UL-Registrierung/C-UL-Registrierung
Diese IT-Ausrüstung ist für die im Benutzerhandbuch beschriebenen Anwendungsweisen sowohl für
den US- als auch den kanadischen Markt UL- bzw. C-UL-registriert.
Registrierung nach FCC Teil 68:
Kundeninformationen
Dieses Gerät ist mit Teil 68 der FCC-Vorschriften sowie den ACTA-Anforderungen konform. Auf der
Unterseite dieses Gerätes befindet sich ein Etikett, das neben anderen Informationen eine
Produktkennzeichnung im folgenden Format trägt: US: AAAEQ##TXXXX. Diese Nummer muss der
Telefongesellschaft auf Anfrage mitgeteilt werden.
ANSI C63.4-1992 Messmethoden
Federal Communications Commission 47 CFR, Teil 15, Unterabschnitt B:
1) Dieses Gerät darf keine schädlichen elektromagnetischen Störungen verursachen.
2) Dieses Gerät muss alle Störungen vertragen, einschließlich Störungen, die
unerwünschte Funktionen verursachen können.
• Bringen Sie die Empfangsantenne oder das Kabeleingangsgerät an eine andere Stelle bzw.
richten Sie sie neu aus.
• Vergrößern Sie den Abstand zwischen dem Gerät und dem Empfänger.
• Schließen Sie das Gerät an einen Stromkreis an, den der Empfänger nicht benutzt.
• Wenden Sie sich an den Händler oder einen erfahrenen Rundfunk-/TV-Techniker.
80
Page 85

Dieses Gerät verwendet die folgenden Universal Service Order Code (USOC)-Anschlüsse: RJ-11.
Mit diesem Gerät verwendete Stecker und Buchsen zum Anschluss an das Telefonnetz oder das
Standortnetz müssen die anwendbaren Anforderungen des Teils 68 der FCC-Vorschriften sowie die
ACTA-Anforderungen erfüllen. Dieses Gerät wird mit einem entsprechenden Telefonkabel und einem
modularen Stecker ausgeliefert. Sie dienen zum Anschluss an eine ebenfalls konforme modulare
Steckverbindung. Weitere Einzelheiten finden Sie in dieser Installationsanleitung.
Die REN (Ringer Equivalence Number) wird zur Bestimmung der Anzahl der Geräte verwendet, die Sie
an Ihre Telefonleitung anschließen können. Eine besonders hohe REN-Summe bei einer einzigen
Telefonleitung könnte dazu führen, dass die angeschlossenen Geräte eingehende Anrufe nicht mehr
signalisieren. In den meisten Fällen darf die Summe der RENs aller an eine Leitung angeschlossenen
Geräte fünf (5) nicht überschreiten. Wenden Sie sich an die für Ihre Region zuständige
Telefongesellschaft, wenn Sie sich nicht sicher sind, wie viele Geräte Sie aufgrund der sich ergebenden
REN-Gesamtsumme an eine Leitung anschließen dürfen. Für nach dem 23. Juli 2001 anerkannte Geräte
ist die REN dieses Produkts Teil der Produktbezeichnung im folgenden Format: US: AAAEQ##TXXXX. Die
Zeichen ## stehen für die REN-Summe (z. B. 03 für REN-Summe 3).
Wenn dieser U.S. Robotics SureConnect ADSL Ethernet/USB Router Schaden für das Telefonnetz
verursacht, wird Sie die Telefongesellschaft im Voraus darüber informieren, dass eine zeitweilige
Unterbrechung des Betriebes gefordert werden kann. Wenn aber eine Mitteilung im Voraus nicht
möglich ist, informiert die Telefongesellschaft den Kunden so bald wie möglich. Ebenso werden Sie
über Ihr Recht informiert, eine Beschwerde bei der FCC einzureichen, wenn Sie dies für nötig erachten.
Die Telefongesellschaft kann Veränderungen an ihren Einrichtungen, Ausrüstungen, Betriebsabläufen
und Verfahren vornehmen, die den Betrieb des Gerätes beeinflussen könnten. Wenn dies geschieht,
informiert Sie die Telefongesellschaft im Voraus, damit Sie die nötigen Veränderungen für die
Aufrechterhaltung eines ununterbrochenen Betriebes veranlassen können.
Bei Problemen mit diesem Gerät sowie für Informationen zu Reparatur und Garantie wenden Sie sich
bitte an:
FRS Europe BV.
Draaibrugweg 2
1332 AC Almere, Niederlande
Wenn das Gerät Schaden im Telefonnetz verursacht, kann die Telefongesellschaft verlangen, dass Sie
das Gerät vom Netz trennen, bis das Problem gelöst ist.
Dieses Gerät enthält keine wartungspflichtigen Teile.
Wenn Sie eine speziell verdrahtete Alarmanlage an Ihre Telefonleitung angeschlossen haben, stellen
Sie sicher, dass Ihre Anlage durch die Installation dieses Gerätes nicht außer Betrieb gesetzt wird.
Wenn Sie sich nicht sicher sind, welche Faktoren Ihre Alarmanlage außer Betrieb setzen könnten,
wenden Sie sich an Ihre Telefongesellschaft oder einen anderen qualifizierten Anbieter.
Für Router-Benutzer in Kanada:
Utilisateurs de routers au Canada:
Industry Canada (IC)
Dieses digitale Gerät überschreitet nicht die Grenzwerte der Klasse B für Funkstöremissionen aus
digitalen Geräten, die im Standard für störungsverursachende Ausrüstung mit dem Titel "Digital
Apparatus, ICES-003 of Industry Canada" festgelegt sind.
Le présent appareil numérique n’émet pas de bruits radio-électriques dépassant les limites applicables
aux appareils numériques de la classe B prescrites dens le Règlement sur le brouillage radioélectrique
édicté par l’Industrie. NMB-003
Kundeninformationen
Hinweis: Dieses Gerät erfüllt die geltenden technischen Spezifikationen von Industry Canada
hinsichtlich Endeinrichtungen. Dies wird durch die Registrierungsnummer bestätigt. Die Abkürzung
"IC" vor der Registrierungsnummer besagt, dass die Registrierung auf der Grundlage einer Erklärung
zur Konformität erfolgt ist, welche bestätigt, dass die technischen Spezifikationen von Industry Canada
erfüllt wurden. Dies bedeutet nicht, dass Industry Canada das Gerät anerkannt hat.
81
Page 86

Hinweis: Die REN (Ringer Equivalence Number) für dieses Endgerät ist 0.1B. Die jedem Endgerät
zugewiesene REN gibt einen Hinweis darauf, wie viele Endgeräte höchstens an eine TelefonSchnittstelle angeschlossen werden dürfen. Die Art der Endgeräte an einer Schnittstelle spielt keine
Rolle, solange die Summe der RENs aller Geräte den Wert 5 nicht übersteigt.
AVIS : Le nombre équivalent de sonneries (REN) affectéà chaque terminal indique le nombre maximal
de terminaux qui peuvent être branchés à une interface téléphonique. L’équipement terminal d’une
interface peut comporter toute combinaison d’appareils, à la condition unique que le nombre
équivalent total des sonneries de tous les appareils ne dépasse pas 5. Le nombre équivalent des
sonneries se trouve sur la base du router.
AVIS: L’étiquette d’Industrie Canada (IC) permet d’identifier le matériel homologué. Cette
homologation signifie que le matériel est conforme à certaines normes de protection, d’exploitation et
de sécurité des réseaux de télécommunications, comme le prescrivent les documents qui portent sur
les exigences techniques relatives à l’équipement terminal. Cependant, le Ministère ne garantit pas que
l’appareil fonctionnera à la satisfaction de l’utilisateur.
Avant d’installer ce matériel, l’utilisateur doit s’assurer qu’il est permis de le raccorder aux installations
de l’entreprise locale de télécommunication. Le matériel doit également être installé selon une
méthode de raccordement autorisée. Dans certains cas, le câblage intérieur de la compagnie étant
associé à une ligne individuelle, le service individuel peut être étendu au moyen d’un connecteur
certifié (rallonge téléphonique). L’abonné ne doit pas oublier que la conformité aux conditions
susmentionnées n’empêchera peut-être pas la dégradation du service dans certains cas. À l’heure
actuelle, les compagnies de téléphone n’autorisent pas les utilisateurs à raccorder leur appareil au jack
sauf dans des circonstances précises énoncées dans les contrats et tarifs de ces compagnies.
Les réparations de matériel homologué doivent être coordonnées par un représentant désigné par le
fournisseur. L’entreprise de télécommunications peut demander à l’utilisateur de débrancher un
appareil à la suite de réparations ou de modifications effectuées par l’utilisateur ou à cause d’un
mauvais fonctionnement.
AVIS: L’étiquette d’Industrie Canada identifie le matériel homologué. Cette étiquette certifie que le
matériel est conforme aux normes de protection, d’exploitation et de sécurité des réseaux de
télécommunications, comme le prescrivent les documents concernant les exigences techniques
relatives au matériel terminal. Le Ministère n’assure toutefois pas que le matériel fonctionnera à la
satisfaction de l’utilisateur. Avant d’installer ce matériel, l’utilisateur doit s’assurer qu’il est permis de
le raccorder aux installations de l’entreprise locale de télécommunication. Le matériel doit également
être installé en suivant une méthode acceptée de raccordement. L’abonné ne doit pas oublier qu’il est
possible que la conformité aux conditions énoncées ci-dessus n’empêche pas la dégradation du service
dans certaines situations. Les réparations de matériel homologué doivent être coordonnées par un
représentant désigné par le fournisseur. L’entreprise de télécommunications peut demander à
l’utilisateur de débrancher un appareil à la suite de réparations ou de modifications effectuées par
l’utilisateur ou à cause de mauvais fonctionnement. Für kanadische Routerbenutzer gilt bei
Garantieanfragen und Reparaturen folgende Adresse:
U.S. Robotics
Unit - 100
13751 Mayfield Place
Richmond, B.C. Kanada V6V 2G9
CE-Konformität
CE-Erklärung zur Einhaltung von Richtlinien:
Wir, die U.S. Robotics Corporation, 935 National Parkway, Schaumburg, Illinois, 60173-5157, USA,
bes tätig en auf eigen e Vera ntwort ung, d ass de r U.S. Robot ics Su reCon nect A DSL Et herne t/USB Route r,
auf den sich diese Erklärung bezieht, folgende Standards und/oder andere Vorschriften erfüllt:
EN60950 EN55022 EN55024 EN61000-3-2 EN61000-3-3
Wir erklären hiermit, dass dieses Produkt alle wesentlichen Anforderungen der Richtlinie 1999/5/EC
erfüllt. Das in Artikel 10(3) genannte und in Anhang II der Richtlinie 1999/5/EC beschriebene Verfahren
zur Bewertung der Konformität ist befolgt worden.
82
Page 87

Produktspezifikationen für den ADSL Ethernet Router:
Standardkonformität
Basis-ADSL
Standards und Spezifikationen
• Analog Devices 6480/6482 Eagle ADSL-Chipset und 6489-Netzwerkprozessor
• Unterstützt G.DMT (ITU-T G.992.1) mit maximaler Datenübertragung und ADSL-Standard
T1.413, Ausgabe 2: bis zu 8 Mbps Downstream, bis zu 1 Mbps Upstream
• Unterstützt G.Lite (ITU-T G.992.2) ADSL bis zu 1,5 Mbps Downstream und bis zu 512 Kbps
Upstream
• Unterstützt DSL-Handshake (ITU-T G.994.1)
• Multi-DSLAM-Interoperabilität, darunter Alcatel, Globespan, Texas Instruments und
Analog Devices-basierte DSLAMs (Ergebnisse auf Anfrage erhältlich)
Transportprotokolle:
• RFC 2516 PPP über Ethernet (Client und Relay)
• RFC 2364 PPP über ATM
• RFC 2225 (früher 1577) Klassisches IP und ARP über ATM
• RFC 2684 (früher 1483) verschiedene Protokolle über ATM (Bridge- und RouterKonfigurationen)
ATM-Attribute:
• AAL-Typ: AAL 5
• ATM Service Class: UBR, CBR, nrt-VBR, rt-VBR
• Unterstützung virtueller Schaltkreise: 16 PVCs
• TR37 Auto-Provisioning mit ILMI v4.0
• End-to-End-Schleifentest: OAM
• ATM-Steuerung, -Überwachung (QOS)
• Traffic Management (Verkehrsverwaltung) 4.1
Datendurchsatz:
G.dmt: 8 Mbps (Downstream), 1 Mbps (Upstream)
G.Lite: 1,5 Mbps (Downstream), 512 Kbps (Upstream)
Medientyp: Daten/Sprache simultan (Koexistenz mit HPNA möglich)
Service Provider: Digital Subscriber Line Access Multiplexer (DSLAM)
Medienverbindung:
(2) RJ-45 10/100 Ethernet-Anschlüsse
(1) USB 1.1-kompatibler Anschluss
ADSL-Anschluss (RJ-11)
Konsolenanschluss (RS-232)
WS-Netzteil
Verbindung zum Computer über Ethernet-Kabel, RJ-11-Telefonkabel als Verbindung zum
ADSL-Provider
Systemanforderungen
• Ein Hostcomputer mit den Betriebssystemen Windows 95, Windows 98, 2000, Me, NT 4.0,
XP, Linux oder Macintosh.
• Ein Hostcomputer mit Internet Explorer 4.0 oder höher.
• 32 MB RAM und 10 MB freier Festplattenspeicherplatz (speicherintensive Anwendungen
benötigen eventuell mehr RAM).
• Pentium-kompatible CPU, 200 MHz oder schneller
• Für den Ethernet-Anschluss: Computer mit einer Ethernet 10/100 RJ-45-Schnittstelle.
• Für den USB-Anschluss: Host-PC mit USB- (Universal Serial Bus) Unterstützung.
83
Page 88

Physische Merkmale:
LEDs/Anzeigen:
•Power
•DSL
•USB
• Ethernet 1
• Ethernet 2
Abmessungen:
Länge 13,97 cm
Breite 23,36 cm
Höhe 23,36 cm
Gewicht: 0,448 kg
Stromverbrauch: 10 V= bei 680 mA
Umgebung
Betriebstemperaturbedingungen: 0 - 50° C
Betriebsfeuchtigkeit: 5 % bis 95 % rel. Luftfeuchtigkeit, nicht kondensierend
Beschränkte Garantie der U.S. Robotics Corporation
HARDWARE: U.S. Robotics garantiert dem Endbenutzer ("Kunde"), dass dieses Hardware-Produkt
bei normaler Anwendung für folgenden Zeitraum ab Kaufdatum bei U.S. Robotics oder seinem
Vertragshändler frei von Verarbeitungs- und Materialmängeln ist:
Zwei (2) Jahre
Der gesamte Haftungsumfang seitens U.S. Robotics unter dieser ausdrücklichen Garantie besteht im
Ermessen und zu Lasten von U.S. Robotics in der Reparatur des defekten Produktes oder Teils, dem
Ersatz fehlerhafter Artikel durch ein gleichwertiges Produkt oder Teil für den Kunden oder, falls keine
dieser beiden Möglichkeiten besteht, in der Erstattung des Kaufpreises für das defekte Produkt. Alle
ersetzten Produkte gehen in den Besitz von U.S. Robotics über. Ersatzprodukte können neue oder
überholte Produkte sein.
U.S. Robotics gewährt auf jedes ersetzte oder reparierte Produkt oder Teil den längeren Zeitraum einer
Garantie von neunzig (90) Tagen ab Versand oder der Restlaufzeit der ursprünglichen Garantiezeit.
SOFTWARE: U .S . Ro bo tic s g ara nt ier t de m K un den fü r ne un zig (90 ) T ag e ab Ka ufd at um b ei U.S . R obo ti cs
oder seinem Vertragshändler, dass jedes durch ihn lizenzierte Software-Programm im Wesentlichen in
Übereinstimmung mit seinen Programmspezifikationen funktioniert. U.S. Robotics gewährt während
dieses Garantiezeitraums eine Garantie auf die Fehlerfreiheit des Aufnahmemediums der Software. Es
werden keine Updates bereitgestellt. Die Verpflichtung von U.S. Robotics unter dieser ausdrücklichen
Gar anti e bes chr änkt sich nach Erme ssen von U .S. R obotics darauf, den durch den Kunden für ein defektes
Software-Produkt gezahlten Kaufpreis zu erstatten oder defekte Medien durch Software zu ersetzen, die
im Wesentlichen mit den von U.S. Robotics veröffentlichten Spezifikationen übereinstimmt. Der Kunde
trägt die Verantwortung für die Auswahl des geeigneten Anwendungsprogramms und der damit
verbundenen Referenzmaterialien. U.S. Robotics garantiert bzw. behauptet nicht, dass seine
Softwareprodukte die Anforderungen des Kunden erfüllen oder in Kombination mit Hardware oder
Anwendungssoftware Dritter funktionieren oder dass die Softwareprodukte ununterbrochen bzw.
fehlerfrei funktionieren und dass alle Mängel an den Softwareprodukten behoben werden. U.S. Robotics
unternimmt angemessene Anstrengungen, die Kompatibilität aller in der SoftwareProduktdokumentation oder den Spezifikationen von U.S. Robotics als kompatibel aufgelisteten
Produkte Dritter sicherzustellen, außer wenn die Nichtkompatibilität durch einen Fehler oder Mangel im
Produkt des Drittanbieters verursacht wurde oder wenn das Softwareprodukt nicht entsprechend den von
U.S. Robotics veröffentlichten Spezifikationen oder dem Handbuch verwendet wurde.
84
Page 89

DIESES U.S. ROBOTICS-PRODUKT KANN SOFTWARE VON DRITTANBIETERN, DEREN VERWENDUNG
DURCH EINEN SEPARATEN LIZENZVERTRAG GEREGELT WIRD, BEINHALTEN BZW. MIT SOLCHER
GEBÜNDELT SEIN. DIESE U.S. ROBOTICS-GARANTIE GILT NICHT FÜR DERARTIGE SOFTWARE VON
DRITTANBIETERN. HINSICHTLICH DER ANWENDBAREN GARANTIE INFORMIEREN SIE SICH BITTE IM
ENDBENUTZER-LIZENZVERTRAG, DER DIE BENUTZUNG DERARTIGER SOFTWARE REGELT.
U.S. Robotics ist nicht für Software, Firmware, Informationen oder gespeicherte Daten des Kunden
verantwortlich, die auf an U.S. Robotics zur Reparatur zurückgesandten Produkten gespeichert bzw. in
diese integriert sind, unabhängig davon, ob die Einsendung während der Garantiezeit erfolgte oder
nicht.
WAS IM GARANTIEFALL ZU TUN IST: Der Kunde muss sich zur Wahrnehmung seines Garantieanspruchs
innerhalb der gültigen Garantiezeit mit einem Firmen-Servicecenter von U.S. Robotics oder einem
Vertrags-Servicecenter von U.S. Robotics in Verbindung setzen. Dazu ist evtl. die Vorlage eines
datierten Kaufbelegs von U.S. Robotics oder einem autorisierten Vertragshändler erforderlich.
Produkte, die an das U.S. Robotics Corporate Service Center geschickt werden, müssen auf der
Außenseite des Paketes mit einer zuvor von U.S. Robotics angeforderten Auftragsnummer für
Reparaturen (SRO) gekennzeichnet sein. Senden Sie die Produkte nur ausreichend frankiert und
sorgfältig verpackt an U.S. Robotics. Es wird empfohlen, die Sendung zu versichern oder eine
Versandart zu wählen, bei der verloren gegangene Sendungen nachverfolgt werden können.
Spätestens dreißig (30) Tage, nachdem U.S. Robotics das defekte Produkt erhalten hat, wird das
reparierte Produkt oder ein Ersatzgerät auf Kosten von U.S. Robotics an den Kunden zurückgesandt.
Schicken Sie das Produkt an:
In Europa:
FRS Europe BV.
Draaibrugweg 2
1332 AC Almere, Niederlande
In Kanada:
U.S. Robotics
Unit - 100
13751 Mayfield Place
Richmond, B.C. Kanada V6V 2G9
GARANTIEAUSSCHLUSS: SOLLTE EIN U.S. ROBOTICS-PRODUKT NICHT ORDNUNGSGEMÄSS, WIE OBEN
GARANTIERT, FUNKTIONIEREN, SO SIND REPARATUR, ERSATZ ODER ERSTATTUNG DES BEZAHLTEN
KAUFPREISES DIE ENTSCHÄDIGUNGSMÖGLICHKEITEN FÜR DEN KUNDEN. ES LIEGT DABEI, SOWEIT ES
DAS GESETZ ZULÄSST, IM ERMESSEN VON U.S. ROBOTICS, WELCHE DER DREI MÖGLICHKEITEN IN
FRAGE KOMMT. DIE VORERWÄHNTEN GARANTIEN UND ABHILFEN GELTEN AUSSCHLIESSLICH: SIE
TRETEN IM VOLLEN GESETZLICH ZULÄSSIGEN UMFANG AN DIE STELLE ALLER SONSTIGEN GARANTIEN,
LAUFZEITEN ODER BEDINGUNGEN, AUSDRÜCKLICH VEREINBART ODER STILLSCHWEIGEND
EINGESCHLOSSEN, ENTWEDER FAKTISCH ODER KRAFT GESETZES, GESETZLICH VORGESCHRIEBEN
ODER SONSTWELCHER ART, EINSCHLIESSLICH GARANTIEN, LAUFZEITEN ODER
HANDELSBEDINGUNGEN, EIGNUNG FÜR EINEN BESTIMMTEN ZWECK, ZUFRIEDENSTELLENDER
QUALITÄT, ÜBEREINSTIMMUNG MIT DER PRODUKTBESCHREIBUNG UND UNVERLETZTER PATENTE, DIE
ALLE AUSDRÜCKLICH NICHT ANERKANNT WERDEN. WEDER U.S. ROBOTICS SELBST NOCH EIN VON U.S.
ROBOTICS BERECHTIGTER DRITTER ÜBERNIMMT IM ZUSAMMENHANG MIT VERKAUF, INSTALLATION,
WARTUNG UND VERWENDUNG DIESER PRODUKTE EINE ANDERE HAFTUNG. U.S. ROBOTICS KANN
NICHT DURCH DIESE GARANTIE HAFTBAR GEMACHT WERDEN, WENN SICH BEI DER ÜBERPRÜFUNG UND
UNTERSUCHUNG EINES PRODUKTES HERAUSSTELLT, DASS DER ANGEGEBENE FEHLER ODER DIE
FUNKTIONSSTÖRUNG NICHT VORLIEGT BZW. DASS DER FEHLER DURCH DEN KUNDEN ODER EINEN
DRITTEN DURCH UNSACHGEMÄSSE VERWENDUNG, FAHRLÄSSIGKEIT, FEHLERHAFTE INSTALLATION
ODER ÜBERPRÜFUNG, UNBEFUGTES ÖFFNEN, REPARATUREINGRIFFE ODER
MODIFIZIERUNGSVERSUCHE BZW. DURCH EINE ANDERE, NICHT DEM EINSATZZWECK ENTSPRECHENDE
URSACHE SOWIE DURCH UNFALL, BRAND, BLITZSCHLAG ODER EINE ANDERE FORM VON HÖHERER
GEWALT VERURSACHT WURDE.
85
Page 90

HAFTUNGSAUSSCHLUSS: IM GESAMTEN GESETZLICH ZULÄSSIGEN UMFANG SCHLIESST U.S. ROBOTICS
JEGLICHE HAFTUNG SEINERSEITS ODER SEINER ZULIEFERER FÜR BEGLEIT-, FOLGE-, INDIREKTE ODER
ANDERWEITIGE SCHÄDEN SOWIE BUSSGELDER, EINKOMMENS- ODER GEWINNAUSFALL,
GESCHÄFTSAUSFALL, VERLUST VON INFORMATIONEN ODER DATEN ODER ANDERWEITIGE FINANZIELLE
SCHÄDEN AUS, DIE IN VERBINDUNG MIT VERKAUF, INSTALLATION, WARTUNG, ANWENDUNG, LEISTUNG
ODER DIENSTUNTERBRECHUNG SEINER PRODUKTE ENTSTANDEN SIND, OB VERTRAGS- ODER
ANDERWEITIG ZIVILRECHTLICH (EINSCHLIESSLICH FAHRLÄSSIGKEIT) UND SELBST WENN U.S.
ROBOTICS ODER SEINE VERTRAGSHÄNDLER AUF DIE MÖGLICHKEIT DERARTIGER SCHÄDEN
HINGEWIESEN WURDEN. U.S. ROBOTICS BEGRENZT SEINE HAFTUNG AUF REPARATUR, ERSATZ ODER
ERSTATTUNG DES KAUFPREISES IM ERMESSEN VON U.S. ROBOTICS. DER HAFTUNGSAUSSCHLUSS
BLEIBT AUCH DANN BESTEHEN, WENN EINE IM RAHMEN DER GARANTIE GELEISTETE ABHILFE IHREN
ZWECK NICHT ERFÜLLT.
HAFTUNGSAUSSCHLUSS: Einige Länder, Staaten oder Provinzen gestatten keine Beschränkung oder
Begrenzung stillschweigend mit eingeschlossener Garantien oder die Beschränkung von Begleit- oder
Folgeschäden für bestimmte, an Verbraucher gelieferte Produkte oder die Haftungsbegrenzung für
Personenschäden, wodurch die vorgenannten Beschränkungen und Ausschlüsse möglicherweise nur
begrenzt auf Sie zutreffen. Falls der vollständige Ausschluss der stillschweigenden Garantien nicht
zulässig ist, gilt auch für sie die Frist der entsprechenden schriftlichen Garantie. Diese Garantie gewährt
Ihnen spezielle gesetzliche Rechte, die von Land zu Land unterschiedlich sein können.
ANWENDBARES RECHT: Diese beschränkte Garantie unterliegt den Gesetzen des Staates Illinois, USA,
mit Ausnahme des internationalen Privatrechts und der Konvention der Vereinten Nationen zu
Verträgen für den Handel zwischen verschiedenen Ländern.
Haftungsausschlusserklärung des Herstellers
Der Hersteller behält sich Änderungen an diesem Dokument vor. Es stellt keine Verpflichtung seitens
des Händlers dar. Es wird keine stillschweigende oder ausdrückliche Garantie oder Behauptung über
die Qualität, Genauigkeit oder Eignung für einen bestimmten Zweck dieses Dokuments abgegeben. Der
Hersteller behält sich das Recht vor, jederzeit Änderungen am Inhalt dieses Dokuments und/oder an
den dazugehörigen Geräten vorzunehmen, ohne eine Person oder eine Organisation von derartigen
Änderungen unterrichten zu müssen. In keinem Fall übernimmt der Hersteller die Haftung für direkte,
indirekte, Begleit- oder Folgeschäden, die aus der Benutzung oder der nicht möglichen Nutzung dieses
Produkts oder der Dokumentation entstehen, selbst wenn er auf die Möglichkeit solcher Schäden
hingewiesen wurde. Dieses Dokument enthält urheberrechtlich geschütztes Material. Alle Rechte
bleiben vorbehalten. Kein Teil dieser Dokumentation darf ohne ausdrückliche schriftliche
Genehmigung der Autoren in irgendeiner Form, mit irgendwelchen Mitteln oder zu irgendeinem Zweck
vervielfältigt oder übertragen werden. Alle Produktbezeichnungen in diesem Dokument dienen nur zur
Identifizierung. Alle Marken, Produkt- oder Markennamen in diesem Dokument sind das Eigentum der
jeweiligen Unternehmen.
86
Page 91

87
Page 92

88
Page 93

Per informazioni aggiornate sul prodotto e su come contattare l'assistenza
tecnica, visitare il sito Web:
http://www.usr.com/broadbandsupport
Grazie per aver acquistato U.S. Robotics SureConnect ADSL Ethernet/USB
Router, modello 9003. Le istruzioni riportate di seguito illustrano l'installazione
di U.S. Robotics SureConnect ADSL Ethernet/USB Router.
Annotare il numero di serie per riferimenti futuri. Il numero di serie è
necessario per ottenere l'assistenza del supporto tecnico. Il numero
di serie, costituito da 12 caratteri, è indicato sull'etichetta adesiva
con il codice a barre situata sulla parte inferiore del modem e sulla
confezione. È inoltre necessario disporre del numero di modello, che
è indicato qui sotto.
Annotare il numero di serie nello spazio sottostante.
9003
Numero modello
Numero di serie
Introduzione all'installazione e requisiti di sistema
Elementi necessari per iniziare
• Servizi ADSL e Internet forniti dalla compagnia telefonica o dal provider di servizi Internet locale (ISP).
• Potrebbe essere necessario installare un microfiltro per ogni dispositivo telefonico (telefoni, segreterie telefoniche e fax) che utilizza la
stessa linea telefonica del segnale ADSL. Accertarsi che non vi siano
filtri installati tra il router ADSL e la presa a muro del telefono. (Alcune
installazioni richiedono uno speciale splitter tra il router e la presa a
muro. In questi casi, lo splitter deve includere prese sia per il telefono
che per il router. Se non ne è dotato, non installarlo tra la presa telefonica e il router.)
L'ISP deve fornire i seguenti servizi e informazioni:
• Nome utente e password, nel caso siano stati assegnati
• Standard ADSL (modulazione)
- G.dmt - Multi-Mode
- G.lite - T1.413, Issue 2
• Impostazioni VPI/VCI
Page 94

• Modalità di incapsulamento
- RFC1483 Bridged - PPPoA
- RFC1483 Routed - MER
-PPPoE -
Requisiti del computer
Requisiti minimi di sistema - Porta Ethernet
• Computer con scheda NIC Ethernet 10/100
• 32 MB di RAM
• 10 MB di spazio su disco rigido
• Sistema operativo che supporti una connessione Ethernet con uno
stack IP
• Browser Web Internet Explorer o Netscape Navigator 4.0 o superiore
• Il CD-ROM di installazione SureConnect richiede Windows 95,
Windows 98, Windows Me, Windows NT4.0, Windows 2000 o
Windows XP
Requisiti minimi di sistema - Porta USB
• CPU con processore Pentium da 200 MHz o superiore
• PC host con supporto USB (Universal Serial Bus)
• 32 MB di RAM
• 10 MB di spazio su disco rigido
• Browser Web Internet Explorer o Netscape Navigator 4.0 o superiore
• Il CD-ROM di installazione SureConnect richiede Windows 98,
Windows Me, Windows 2000 o Windows XP
Accertarsi che il computer sia acceso. È necessario
disporre del CD-ROM del sistema operativo in uso.
Il programma di installazione richiede il CD di
installazione di Windows.
Requisiti della rete ADSL
Servizi ADSL e Internet forniti dalla compagnia telefonica o dal provider di servizi
Internet locale (ISP).
Requisiti di alimentazione
U.S. Robotics SureConnect ADSL Ethernet/USB Router utilizza l'alimentatore
incluso nella confezione. Assicurarsi di utilizzare solamente questo alimentatore
quando si usa il router.
90
Page 95
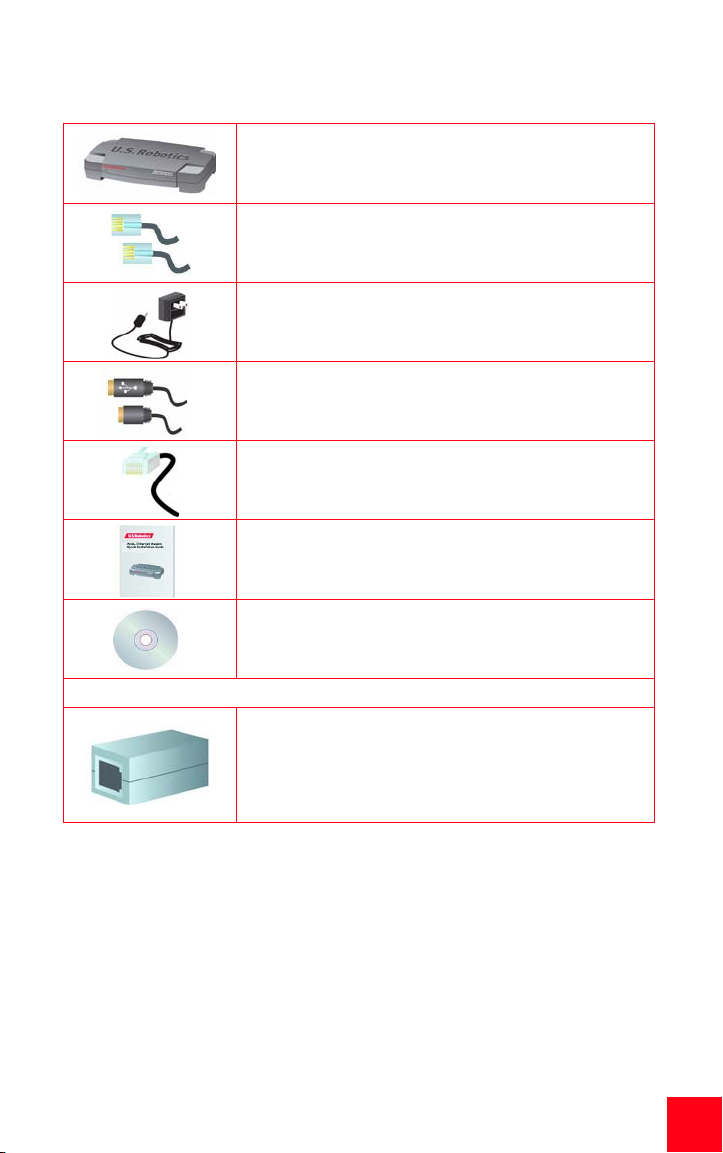
La confezione di U.S. Robotics SureConnect ADSL Ethernet/USB Router
comprende i seguenti componenti:
U.S. Robotics SureConnect ADSL
Ethernet/USB Router
Modello 9003
Cavo telefonico RJ-11 standard (2 m circa)
(4 fili)
Adattatore di alimentazione
Cavo USB
(1 m)
Cavo Ethernet straight-through
Guida all'installazione rapida
CD-ROM di installazione U.S. Robotics SureConnect
(1,8 m)
con guida utente
Componenti opzionali
Per alcuni modelli, nella confezione può essere incluso un
microfiltro. In alternativa, il microfiltro può anche essere
fornito dall'ISP. Rivolgersi all'ISP per stabilire se è necessario l'uso di un microfiltro. La sezione successiva illustra
l'installazione dei microfiltri.
Se si riscontrano componenti errati, mancanti o danneggiati, informare il
rivenditore.
Connessione Ethernet o USB?
U.S. Robotics SureConnect ADSL Ethernet/USB Router offre la scelta tra
connessione mediante porta USB e connessione mediante porta Ethernet. La
scelta della connessione dipende dalle preferenze dell'utente, ma anche dalle
porte disponibili sul computer e dal sistema operativo utilizzato. È necessario
usare una connessione Ethernet, ad esempio, se si utilizzano i seguenti sistemi
operativi: Windows 95, Windows NT 4.0, Macintosh e Linux.
91
Page 96

Fase 1. Collegamento dei microfiltri (se necessario)
• Se la confezione non include microfiltri e l'ISP non ne ha fornito
alcuno, passare alla fase 2 di queste istruzioni.
• Se è necessaria l'installazione di microfiltri, installarne uno su tutti gli
apparecchi telefonici (telefoni, segreterie telefoniche e dispositivi fax)
che utilizzano la stessa linea telefonica del segnale ADSL.
I microfiltri sono piccoli dispositivi utilizzati per diminuire le interferenze tra i
segnali ADSL e i segnali telefonici. L'uso dei microfiltri è necessario solamente
se il router ADSL utilizza la stessa linea telefonica di uno o più dispositivi
telefonici. In questo caso, se non si installano i microfiltri è possibile che usando
il telefono si riscontrino dei rumori di fondo durante la trasmissione di dati e che
la trasmissione dei dati sia interrotta dalle chiamate telefoniche.
Collegamento dei microfiltri ai dispositivi telefonici
Per installare un microfiltro, collegare il telefono al microfiltro, quindi collegare
il microfiltro alla presa a muro del telefono. Non installare microfiltri sul cavo che
collega il router alla presa del telefono, a meno che il microfiltro non sia dotato
di una connessione sia per il telefono che per il dispositivo DSL.
92
Page 97

Fase 2. Installazione di ADSL Ethernet/USB Router
Utenti Windows 95 e NT 4.0, Macintosh e Linux
Se si installa U.S. Robotics SureConnect ADSL Ethernet/USB Router su
un sistema che utilizza Windows 95, NT 4.0, Macintosh o Linux, è
necessario installare il router utilizzando l'opzione Ethernet.
Istruzioni per l'installazione su Windows 98, 2000, Me e XP
Per installare U.S. Robotics SureConnect ADSL Ethernet/USB Router, inserire il
CD-ROM di installazione U.S. Robotics SureConnect nell'unità CD-ROM del
computer. Se l'installazione non si avvia automaticamente, fare doppio clic
sull'icona Risorse del computer sul desktop, fare doppio clic sulla lettera
associata all'unità CD-ROM, quindi fare doppio clic su Setup (Installazione).
Verrà visualizzata la finestra
iniziale del programma di
installazione di U.S. Robotics
SureConnect ADSL Ethernet/
USB Router. Fare clic su Next
(Avanti) per continuare
l'installazione di U.S. Robotics
SureConnect ADSL Ethernet/
USB Router.
• Selezionare il tipo
di connessione che
si desidera utilizzare per connettere
il router al computer. Fare clic su
Next (Avanti).
93
Page 98

• Verrà eseguito un
test di qualifica per
verificare che il
sistema soddisfi i
requisiti minimi di
installazione. La
schermata Results
(Risultati) visualizza
gli elementi della
configurazione che
hanno superato il
test con una bandierina verde e quelli
che non lo hanno
superato con una
bandierina rossa.
Se il sistema supera il test di qualifica, fare clic su Next (Avanti).
Se il software comunica che il sistema non ha superato il test, fare clic sul
pulsante View Report (Visualizza report). Il report identifica i componenti che
non hanno superato il test.
94
Page 99

Fase 3. Collegamento dei cavi
La tabella qui sotto illustra le connessioni e le porte che si trovano sul retro del
router.
Voce Descrizione
O / I
Power (Ali-
mentazione)
Console
USB Porta USB (Universal Serial Bus) situata sul retro del router.
ENET1 Porta Ethernet 1 situata sul retro del router.
ENET2 Porta Ethernet 2 situata sul retro del router.
ADSL Presa RJ-11 per la linea DSL situata sul retro del router.
Pulsante di accensione di U.S. Robotics SureConnect ADSL Ethernet/
USB Router.
Presa per il cavo dell'alimentazione di corrente.
Connette il router a un cavo RS-232 (non incluso). Il cavo può essere utilizzato per comunicare con il router mediante l'interfaccia utente terminale. L'interfaccia utente terminale (TUI) rappresenta un metodo
alternativo per configurare il router od ottenere informazioni di diagnostica. L'interfaccia TUI sostituisce l'interfaccia utente Web.
95
Page 100

Collegamento dell'adattatore di alimentazione
Assicurarsi di utilizzare solamente l'alimentatore incluso nella confezione.
Collegare l'adattatore alla presa “Power” sul retro del router e ad una presa di
corrente standard.
Accendere il router premendo il pulsante di accensione “O/I”. Il LED “PWR” sul
pannello frontale di U.S. Robotics SureConnect ADSL Ethernet/USB Router si
illumina se il router riceve alimentazione. La procedura di inizializzazione del
router viene avviata all'accensione. Questo processo richiede circa un minuto.
Fare clic su Next (Avanti) per inizializzare il router.
Collegamento del cavo telefonico
Collegare un'estremità del cavo telefonico in dotazione alla porta telefonica sul
retro del router identificata dalla dicitura “ADSL” e collegare l'altra estremità
alla presa a muro del telefono. Fare clic su Next (Avanti).
Collegamento del cavo Ethernet o USB
Ethernet
Se non si collegano più di due dispositivi, è possibile collegarli direttamente al
retro del router. In questo modo si elimina la necessità di un hub separato.
Inserire un'estremità del cavo Ethernet nella porta “ENET1” o “ENET2” sul retro
di U.S. Robotics SureConnect ADSL Ethernet/USB Router. Collegare l'altra
estremità alla porta Ethernet della scheda NIC 10/100 del computer.
96
• Fare clic su Finish (Fine).
USB
• Se si è scelta la connessione tramite porta USB, inserire l'estremità
rettangolare del cavo USB incluso nella porta USB del computer.
Inserire l'estremità quadrata nella porta contrassegnata con “USB” di
U.S. Robotics SureConnect ADSL Ethernet/USB Router.
• Una volta collegato il cavo USB, il router rileva il PC e installa automaticamente il proprio software sul PC. (Potrebbe essere necessario
riavviare il sistema.)
• L'Installazione guidata nuovo hardware notifica all'utente che il router
è stato rilevato dal PC. Fare clic su Finish (Fine).
 Loading...