

United Office ULG 350 A1 User Manual [pl, en, cs]

4
Laminator ULG 350 A1
KOMPERNASS GMBH
BURGSTRASSE 21 · D-44867 BOCHUM
www.kompernass.com
ID-Nr.: ULG 350 A1-03/11-V1
IAN: 67173
Laminator
Operating instructions
Urządzenie do
laminowania
Instrukcja obsługi
Laminálógép
Használati utasítás
Plastifi kator
Navodila za uporabo
Laminovací přístroj
Návod k obsluze
Prístroj na laminovanie
Návod na obsluhu

ULG 350 A1
w
q
1 23
4
56
0
789

Content Page
1. Intended use 2
2. Items supplied 2
3. Appliance description 2
4. Technical Data 2
5. Safety instructions 3
6. Suitable laminating pouches 4
7. Operating levels 4
8. Preparing for hot lamination 5
9. Preparing for cold lamination 6
10. Lamination process 6
11. Anti-Blocking Switch (ABS) 7
12. Trimming function 7
13. Cleaning and care 8
14. Storage 8
15. Disposal 8
16. Warranty and Service 9
17. Importer 9
Read the operating instructions carefully before using the device for the first time and preserve this booklet
for later reference. Pass this manual on to whoever might acquire the device at a future date.
- 1 -
Laminator
1. Intended use
This laminator is intended exclusively for use in private households and for the hot and cold lamination
of documents printed on paper or cardboard.
Additionally, the documents can be trimmed.
It is NOT intended for use with any other materials.
It is also NOT intended for commercial or industrial
applications.
The warranty does not provide compensation for
damage caused by improper use of the appliance!
3. Appliance description
Pouch guide (rear)
q
Cutting rail
w
Cutting head
e
Pouch format lock
r
Slot for manual pouch input
t
ON / OFF Indicator lamp
y
Indicator lamp "Ready"
u
Selector switch for hot and cold lamination
i
(HOT and COLD)
Anti-Blocking switch and pouch thickness switch
o
Pouch ejector slot (front)
a
Document support
s
Trimming attachment
d
2. Items supplied
1x Laminator
10x Laminating pouches DIN A4 for hot laminating
(80 micron)
10x Laminating pouches DIN A5 for hot laminating
(80 micron)
10x Laminating pouches for hot lamination of
business cards (80 micron)
1 x Operating Instructions
4. Technical Data
Nominal voltage: 220 - 240 V~50 Hz
Current demand : 1,6 A
Power consumption: 350 W
Laminating speed:
Pouch thickness
Foil size
A4 approx. 40 s approx. 51 s
A5 approx. 29 s approx. 36 s
Pouch width: Max. 230 mm
Pouch thickness for hot lamination:
max. 125 micron
Pouch thickness for cold lamination:
max. 200 micron
Protection class: II /
position switch: 80
microns
Pouch thickness
position switch:
125 microns
- 2 -

Cutting capacity of the cutter attachment d:
max. 3 sheets 80g/m
(80 microns).
Overheating protection
This appliance is equipped with overheating protection. If the motor becomes too hot due to overload,
the appliance switches itself off automatically. In this
case, disconnect the plug and wait until the appliance has cooled itself to room temperature. You can
then reconnect the power cable to the mains power
socket and continue using the appliance.
We recommend that after 2 hours of use you allow
the appliance to cool down for about 30 minutes.
2
or one laminated document
5. Safety instructions
• This appliance is not intended for use by individuals
(including children) with restricted physical, physiological or intellectual abilities or deficiences in
experience and/or knowledge unless they are
supervised by a person responsible for their safety
or receive from this person instruction in how the
appliance is to be used.
• Children should be supervised to ensure that they
do not play with the appliance.
• Unplug the power cable after every use and before cleaning, so as to prevent the appliance from
inadvertently switching itself on.
• Check the appliance and all parts for visible
damages. The safety concept can work only if
the appliance is in a faultless condition.
• Never perform hot lamination on flammable,
heat-sensitive and/or meltable materials and do
not laminate drawings on temperature-sensitive
paper or material that will undergo changes in
colour or quality when subjected to heat.
• Never laminate valuable or unique documents.
Although the laminator satisfies all predominant
safety norms and standards, errors can never be
completely discounted - as with all electrical appliances. Errors with the laminator can result in
damage to the document being laminated.
• Do NOT laminate any document which, together
with the laminating pouch, would have a thickness
of more than 1,0 mm. Should you do so, the laminating pouch could cant itself inside the laminating
appliance. This would damage the laminating pouch,
the document being laminated as well as the laminator.
• Do not use an extension cable. Place the appliance
where the mains power socket is easily accessible,
so that in the event of an emergency the plug can
be quickly withdrawn.
• Do not use an external timing switch or a separate
remote control system to operate the appliance.
• Place the appliance where the power wall socket
is easily accessible, so that in the event of an
emergency the plug can be quickly withdrawn.
Risk of electrical shock!
• Connect the appliance to a mains power socket
with a mains voltage of 220-240 V ~50 Hz.
• Do not take the appliance into use if the power
cable or the plug is damaged.
• Arrange for defective power plugs and/or cables
to be replaced at once by qualified technicians
or our Customer Service Department.
• NEVER immerse the appliance in water.
Wipe it only with a damp cloth.
• Do not expose the appliance to rain and never
use it in a humid or wet environment.
• Ensure that the power cable never becomes wet
during operation.
• Unplug the appliance immediately after use.
The appliance is free of electricity only when you
remove the plug from the mains power socket.
• Do not open the housing or attempt to repair the
appliance yourself. Should you do so, device safety
can no longer be assured and the warranty will
become void.
- 3 -

Risk of fire!
• Do not use the appliance in the vicinity of hot
surfaces.
• Do not place the appliance at locations exposed
to direct sunlight.
This could lead to overheating and cause irreparable damage.
• Do not leave the appliance unattended when in
use.
• NEVER cover the ventilation slits on the top of the
appliance while it is switched on.
RISK OF INJURY!
•
Keep children away from the connecting cable and
the appliance. Children frequently underestimate the
dangers of electrical devices.
• Ensure that the appliance stands with a safe and
secure positioning.
• Do not operate the appliance if it has sustained
a fall or is damaged. Arrange for the appliance
to be checked and, if necessary, repaired by a
qualified expert.
• Some parts of the appliance become very hot
during operation. To avoid burns, do not touch
these parts.
6. Suitable laminating pouches
• For hot lamination you can use pouches with a
width of up to 230 mm and a maximum thickness
of 125 micron.
• Please note that each laminating pouch may only
be used once.
For hot lamination, use only laminating
pouches that are expressly designated
for hot lamination.
For cold lamination, use only laminating
pouches that are expressly designated
for cold lamination.
Take note that the laminating pouches in-
cluded with the laminator are intended
exclusively for hot lamination.
7. Operating levels
Position of
selector switch
i
HOT 80 > 60 - 80
Position of
pouch thickness
switch
o
Laminating foil
thickness
HOT 125 85 - 125
Cold 125 to 200
Tip: For high-gloss photos, you should select the switch
position “125” as well as the appropriate
pouch thickness.
- 4 -
8. Preparing for hot lamination
Insert the pouch guide
on the rear of the laminator.
If not already done, fold the trimming attach-
ment
down.
d
Pull the document support
document can be pulled in straight into the slot
for manual pouch input
Insert the laminator plug into a mains power
socket.
Ensure the appliance has a stable positioning.
Switch the appliance on by placing the selector
switch for hot and cold lamination
The red ON / OFF indicator lamp
glows.
into the holes provided
q
out, so that the
s
.
t
at "HOT".
i
y
now
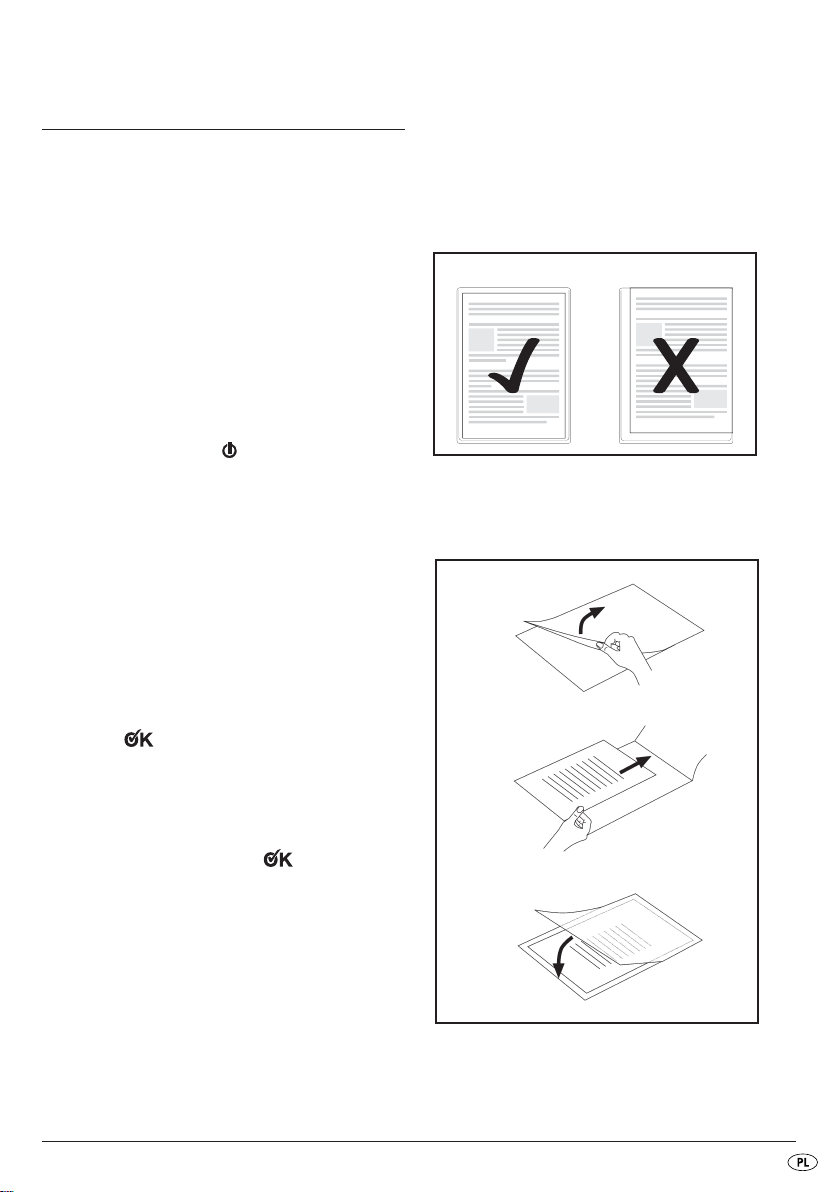
Lay the document to be laminated into a lami-
nating pouch of the appropriate size.
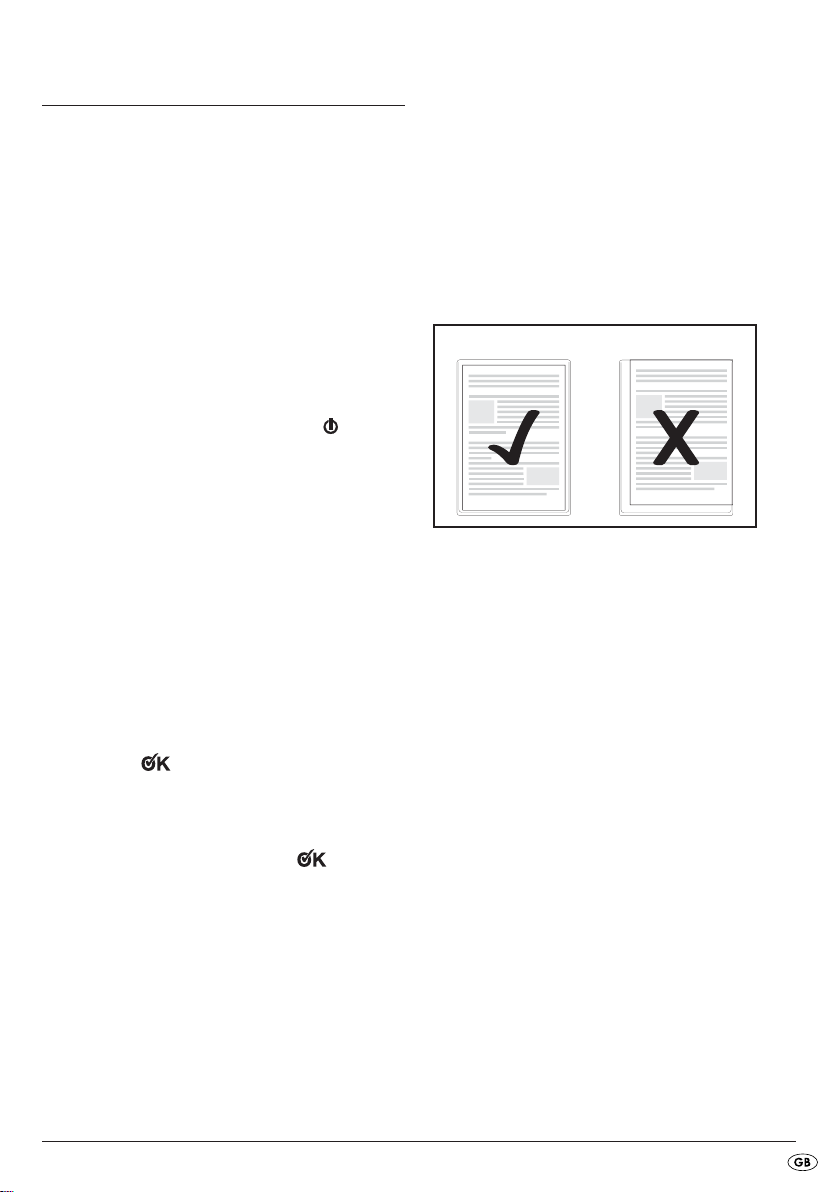
Make certain that all corners of the docu-
ment have at least two millimetres of space
to the edge of the laminating pouch, as
shown in Fig. 1. Make certain that you use
only one pouch for laminating. First open
it up, as shown in Fig. 2.
Fig. 1
Activate the pouch thickness switch
when the appliance is switched on. Otherwise, the appliance could be irreparably
damaged.
Place the pouch thickness switch
pouch thickness (80 or 125 micron).
The laminator now heats itself up to the operating
temperature.
• The laminator has reached its operating temperature as soon as the green LED indicator light
"Ready"
u
glows.
o
only
o
at the desired
Attainment of the operating temperature
is indicated by the lighting up of the green
LED indicator lamp "Ready"
more uniform laminating result we recommend, especially for thinner foils (below
125 Micron) and after adjustment to a different foil thickness, to first wait an additional 2-3 minutes before beginning with
lamination.
u
. For a
For information about the lamination
process, please read section 10.
- 5 -
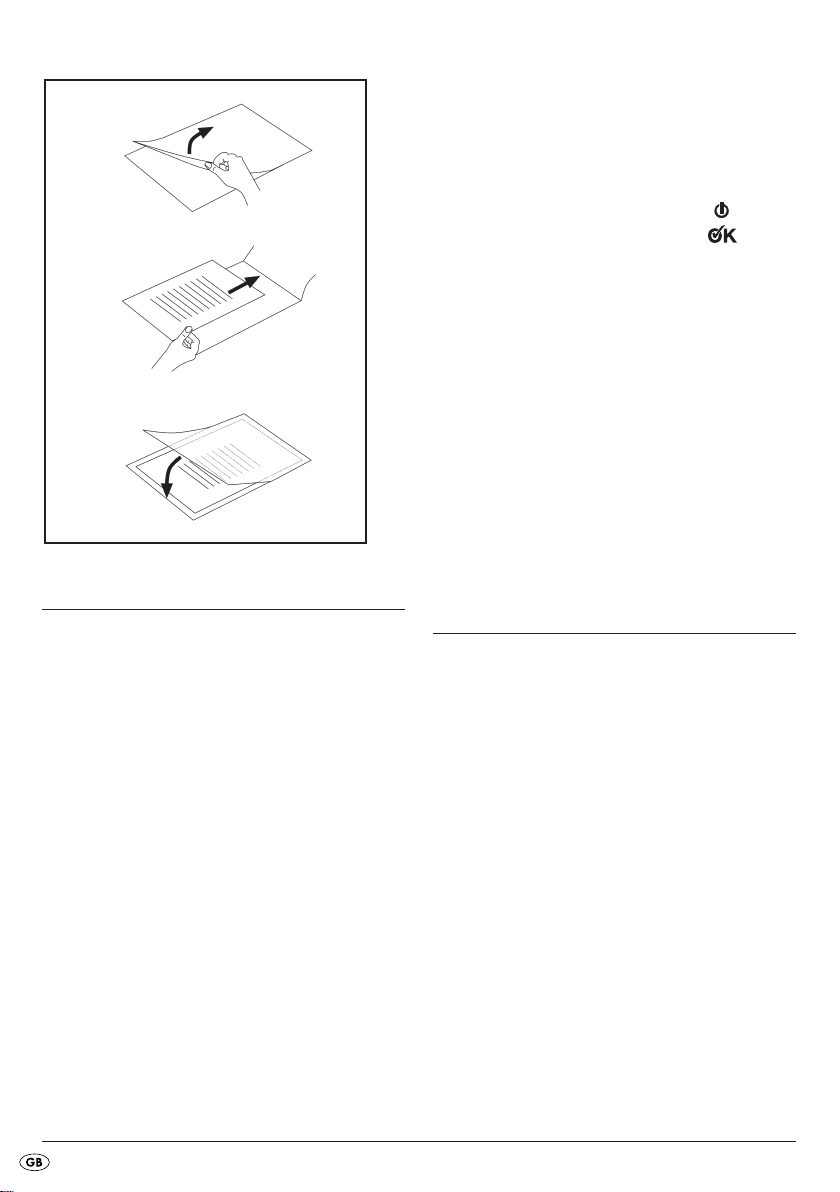
Fig. 2
9. Preparing for cold lamination
If you have previously performed hot lami-
nation:
After hot laminating, allow the laminator
to cool down completely before beginning
with cold lamination. Remember, the rollers
inside the laminator will still be hot. These
can damage the laminating pouch and the
document to be laminated!
Insert the pouch guide
on the rear of the laminator.
If not already done, fold the trimming attach-
ment
down.
d
Pull the document support
document can be pulled in straight into the slot
for manual pouch input
Insert the laminator plug into a mains power
socket.
Ensure the appliance has a stable positioning.
into the holes provided
q
out, so that the
s
.
t
For cold lamination, ALWAYS place the pouch
thickness switch
at 125 microns.
o
Switch the appliance on by placing the selector
switch for hot and cold lamination
The red ON / OFF indicator lamp
the green indicator lamp "Ready"
now glow.
at "COLD".
i
y
and
u
Lay the document to be laminated into a lami-
nating pouch of the appropriate size.
Make certain that all corners of the docu-
ment have at least two millimetres of space
to the edge of the laminating pouch, as
shown in Fig. 1.
Make certain that you use only one pouch
for laminating. First open it up, as shown
in Fig. 2.
For information about the lamination pro-
cess, please read section 10.
10. Lamination process
Lay the laminating pouch onto the pouch guide
Lay the right or left edge of the laminating pouch
against the pouch format lock
leading). Slide the pouch format lock
until the selected format size is reached. This prevents the laminating pouch from being pulled in
at an angle.
(closed side
r
r
Should the laminating pouch be pulled in
at an angle, use the "Anti-Blocking Funktion" as described in chapter 11.
Now slide the laminating pouch slowly into the
slot for manual pouch input
t
.
q
together
.
- 6 -

When you have slid the laminating pouch several
centimetres into the slot
in automatically. Release the laminating pouch
as soon as you notice it being pulled in automatically.
, it will start to be pulled
t
Remove the laminate pouch.
Turn the anti-blocking switch (ABS)
the desired foil thickness.
Re-start the lamination process.
o
back to
Ensure there is at least 30 cm of open space
in front of the laminator. If you do not, the
laminating pouch will not be completely
ejected from the laminator after lamination. This could damage the laminated
pouch.
The completed laminated pouch is ejected from
the pouch ejector slot
of the laminator.
a
Only after hot lamination:
When the finished laminated pouch is discharged from the pouch ejector slot
the appliance, it is hot and can easily
change its shape. For this reason, allow
the laminated pouch to cool down for at
least one minute before touching it.
To improve the lamination result, you can
weigh a still hot laminated pouch down with
a book, a file folder or any other heavy,
flat object. This helps achieves a flat and
flawless surface.
a
of
11. Anti-Blocking Switch (ABS)
At the start of the lamination process, the pouch
may be pulled in at an angle or jam itself inside the
appliance.
12. Trimming function
Should you wish to use the trimming function on the
pouch guide
When necessary, fold in the document
supports
If not already done, place the trimming attach-
ment
pouch guide
Slide the cutting head
cutting head
cutting rail
Flap the cutting rail
grip and position the document on the pouch
guide
pouch format locks
both sides of the document.
Use the markings on the measurement table to
align the document precisely.
Flap the cutting rail
engages.
Hold the paper in a secure position with your
left hand.
To trim, press the cutting head
the right hand and then slide it with one pull or
push over the document.
, dismantle the pouch guide q.
q
.
s
so that it forms a level surface with the
d
.
q
to the end stop (the
e
can be slid to both ends of the
e
).
w
upwards with the rounded
w
. Restrain the document by sliding the
q
together until they touch
r
downwards so that it
w
down with
e
Turn the anti-blocking switch (ABS)
position ABS.
• The laminate pouch is not pulled any further in.
o
to the
- 7 -

13.Cleaning and care
Potentially fatal electrical shock:
• Never open the appliance housing. There
are no user-serviceable elements inside.
• Never submerse the appliance into water
or other liquids!
Cleaning the housing:
Clean the surface of the housing with a
slightly moistened cleaning cloth.
First remove the plug.
Allow the appliance to cool down completely.
Ensure that no moisture can permeate into the
appliance.
Cleaning the interior of the appliance:
With every lamination, contaminants are deposited
on the rollers inside the laminator. Over time, this reduces the performance of the laminator. You should
therefore clean the rollers inside the laminator after
use.
Release the sheet as soon as you notice it
being pulled in automatically.
• The contaminants on the rollers inside the laminator are now transferred to this sheet of paper.
The paper will be discharged from the pouch
ejector slot
of the laminator.
a
Repeat this cleaning process several times.
Use a fresh clean sheet of paper each time.
When you no longer see any contaminants on
the paper, the rollers inside the laminator are
clean.
14. Storage
Allow the appliance to cool down completely
before putting it into storage.
Do not store the laminator in damp loca-
tions where moisture could enter inside
the appliance. (E.g. cellars)!
15. Disposal
Prepare the appliance as described in Chapter
8 "Preparing for hot lamination", up to the point
where the green indicator lamp "Ready"
glows.
u
Then run a sheet of DIN A4 paper, folded in
the middle (maximum thickness 1.0 mm) …
• without a laminating pouch and
• with the fold first
… slowly into the slot for manual pouch input t.
Do not dispose of the appliance with
your normal domestic waste. This
product is subject to the provisions of
European Directive 2002/96/EC.
Dispose of the appliance through an approved waste
disposal centre or at your community waste facility.
Observe the currently applicable regulations.
In case of doubt, please contact your waste disposal
centre.
Dispose of all packaging materials in an
environmentally friendly manner.
- 8 -

16. Warranty and Service
17. Importer
The warranty for this appliance is for 3 years from
the date of purchase. The appliance has been manufactured with care and meticulously examined before delivery. Please retain your receipt as proof of
purchase. In the event of a warranty claim, please
make contact by telephone with our Service Department. Only in this way can a post-free despatch for
your goods be assured.
The warranty covers only claims for material and
maufacturing defects, but not for transport damage,
for wearing parts or for damage to fragile components, e.g. buttons or batteries. This product is for
private use only and is not intended for commercial
use. The warranty is void in the case of abusive and
improper handling, use of force and internal tampering not carried out by our authorized service
branch. Your statutory rights are not restricted in
any way by this warranty.
The warranty period will not be extended by repairs
made under warranty. This applies also to replaced
and repaired parts. Any damage and defects extant
on purchase must be reported immediately after unpacking the appliance, at the latest, two days after
the purchase date. Repairs made after the expiration of the warranty period are subject to payment.
KOMPERNASS GMBH
BURGSTRASSE 21
D-44867 BOCHUM, GERMANY
www.kompernass.com
Service Great Britain
Tel.: 0871 5000 720 (£ 0.10/Min.)
E-Mail: kompernass@lidl.gb
IAN 67173
Service Ireland
Tel.: 1890 930 034
(0,08 EUR/Min., (peak))
(0,06 EUR/Min., (off peak))
E-Mail: kompernass@lidl.ie
IAN 67173
- 9 -

- 10 -

Spis treści Strona
1. Przeznaczenie 12
2. Zakres dostawy 12
3. Opis urządzenia 12
4. Dane techniczne 12
5. Wskazówki bezpieczeństwa 13
6. Odpowiednie koszulki foliowe 14
7. Zakresy włączania 14
8. Przygotowania laminowania na gorąco 15
9. Przygotowanie laminowania na zimno 16
10. Laminowanie 16
11. Funkcja przeciwdziałająca blokowaniu (ABS) 17
12. Funkcja przycinania 17
13. Czyszczenie i konserwacja 18
14. Przechowywanie 18
15. Utylizacja 18
16. Gwarancja i serwis 19
17. Importer 19
Przed pierwszym użyciem urządzenia należy dokładnie przeczytać niniejszą instrukcję obsługi i zachować ją na
przyszłość. W przypadku przekazania urządzenia osobom trzecim należy przekazać im także instrukcję.
- 11 -
Urządzenie do
laminowania
1. Przeznaczenie
Urządzenie jest przeznaczone wyłącznie do laminowania na gorąco i na zimno dokumentów z papieru
i tektury w domowych warunkach. Można nim również
przycinać dokumenty.
Nie można używać innych materiałów. Urządzenia
nie należy stosować do celów komercyjnych i przemysłowych.
Za szkody, powstałe w wyniku zastosowania niezgodnego z przeznaczeniem, producent nie ponosi
żadnej odpowiedzialności!
2. Zakres dostawy
1x urządzenie do laminowania
10x folii do laminowania DIN A4 na gorąco
(80 mikronów)
10x folii do laminowania DIN A5 na gorąco
(80 mikronów)
10x folii do laminowania wizytówek na gorąco
(80 mikronów)
1x Instrukcja obsługi
3. Opis urządzenia
Prowadnica folii (z tyłu)
q
Szyna tnąca
w
Głowica tnąca
e
Blokada formatu
r
Szczelina ręcznego doprowadzenia folii
t
Lampka WŁ./WYŁ.
y
Lampka kontrolna „gotowości do pracy”
u
Przełącznik wybierania laminowania na gorąco
i
i na zimno (HOT i COLD)
Włącznik funkcji przeciwdziałającej blokowaniu
o
i przełącznik grubości folii
Szczelina wyjścia folii (przód)
a
Podparcie dokumentu
s
Przystawka przycinająca
d
4. Dane techniczne
Napięcie nominalne: 220 - 240 V~50 Hz
Pobór prądu: 1,6 A
Pobór mocy: 350 W
Prędkość laminowania:
Położenie nastawni-
Rozmiar folii
A4 około 40 s około 51 s
ka grubości folii: 80
mikronów
Położenie
nastawnika gru-
bości folii: 125
Mikron
A5 około 29 s około 36 s
Szerokość folii: maks. 230 mm
Grubość folii w laminowaniu
na gorąco: maks. 125 mikronów
Grubość folii w laminowaniu
na zimno: maks. 200 mikronów
Klasa ochrony: II/
- 12 -

Wydajność nasadki tnącej d:
maks. 3 kartki 80g/m
ment (80 mikronów).
Zabezpieczenie przed przegrzaniem
Urządzenie jest wyposażone w zabezpieczenie
przed przegrzaniem. Urządzenie wyłączy się automatycznie, gdy z powodu przeciążenia silnik nagrzeje się zbyt mocno. W takim wypadku wyjmij
wtyczkę z gniazdka i zaczekaj, aż urządzenie ostygnie do temperatury pokojowej. Po ostygnięciu silnika ponownie podłącz wtyczkę do gniazdka i uruchom urządzenie.
Zalecamy po 2 godzinach pracy urządzenia zrobienie 30 minutowej przerwy na ostygnięcie silnika.
2
lub jeden laminowany doku-
5. Wskazówki bezpieczeństwa
• Urządzenie nie jest przeznaczone do użytkowania
przez osoby (w tym dzieci) z ograniczoną sprawnością fizyczną, sensoryczną bądź umysłową lub
nieposiadające doświadczenia i / lub wiedzy,
chyba że będą one przebywały pod opieką osoby
odpowiedzialnej za ich bezpieczeństwo lub
uzyskają od niej wskazówki dotyczące właściwego
używania urządzenia.
• Nie można pozwolić dzieciom na zabawę
urządzeniem.
• Aby uniknąć przypadkowego włączenia urzą-
dzenia, po każdym jego użyciu i przed każdym
czyszczeniem wyciągać wtyczkę z gniazdka
elektrycznego.
• Sprawdzać urządzenie pod kątem widocznych
uszkodzeń. Bezpieczeństwo urządzenia gwarantowane jest wyłącznie wtedy, jeżeli jest ono
w prawidłowym stanie.
• Nie należy laminować na gorąco żadnych łatwopal-
nych, wrażliwych na wysokie temperatury i / lub topliwych materiałów oraz żadnych rysunków na papierze wrażliwym wysokie temperatury, którego kolor
lub jakość zmienia się pod wpływem nagrzewania.
• Nie laminować żadnych wartościowych, występujących tylko w jednym egzemplarzu dokumentów.
Chociaż laminarka odpowiada wszystkim obowiązującym normom / standardom bezpieczeństwa,
tak jak we wszystkich urządzeniach elektrycznych, nie można wykluczyć wadliwego działania. Może ono prowadzić do uszkodzenia laminowanego dokumentu.
• Nie laminuj dokumentów, których grubość wraz
z grubością folii przekroczyłaby 1,0 mm. Mogłoby to powodować zaginanie się folii we wnętrzu
laminarki. Grozi to uszkodzeniem dokumentów
oraz laminarki.
• Nie stosować przedłużaczy. Postaw urządzenie
w takim miejscu, by mieć łatwy dostęp do gniazda zasilania i w razie awarii wyciągnąć wtyczkę.
• Do sterowania pracą urządzenia nie próbuj używać
żadnych zewnętrznych zegarów sterujących ani
żadnego innego systemu zdalnego sterowania.
• Urządzenie ustaw w taki sposób, by zapewnić
łatwy dostęp do wtyczki sieciowej i w razie sytuacji
awaryjnej móc szybko odłączyć go od zasilania
sieciowego.
Zagrożenie porażenia prądem elektrycznym!
• Podłączaj urządzenie do gniazdka zasilania
o napięciu nominalnym 220-240 V ~50 Hz.
• Nie używać urządzenia w wypadku uszkodzenia
przewodu zasilającego lub gniazdka elektrycznego.
• Naprawę uszkodzonej wtyczki lub kabla sieciowego niezwłocznie zleć wykwalifikowanemu
personelowi lub serwisowi klienta.
• Nie zanurzaj urządzenia pod wodą.
Czyść wyłącznie wilgotnym ręcznikiem lub ścierką.
• Nie wystawiaj urządzenia na działanie deszczu
oraz nie używaj go w wilgotnym lub mokrym
otoczeniu.
• Zwróć uwagę, aby przewód zasilania nigdy nie
był wilgotny lub zamoknięty.
• Urządzenie odłączać z prądu bezpośrednio po
użyciu. Urządzenie pozostaje całkowicie odcięte
od zasilania tylko w wypadku wyjęcia wtyczki
z gniazdka elektrycznego.
- 13 -

• Obudowa nie jest przeznaczona do otwierania
lub naprawy. Stanowi to poważne zagrożenie
i powoduje wygaśnięcie gwarancji.
Niebezpieczeństwo pożaru!
• Nie używaj urządzenia w pobliżu gorących
powierzchni.
• Nie stawiaj urządzenia w miejscach wystawionych
na bezpośrednie działanie promieniowania słonecznego.
W przeciwnym wypadku działanie wysokiej temperatury może spowodować nieodwracalne uszkodzenia.
• W trakcie używania nigdy nie zostawiać urządzenia bez nadzoru.
• Nigdy nie zakrywać szczeliny wentylacyjnej
u góry urządzenia, jeśli jest ono włączone.
Zagrożenie odniesieniem obrażeń!
•
Urządzenie wraz z przewodem zasilającym trzymaj
z dala od dzieci. Dzieci potrafią lekceważyć
niebezpieczeństwo, jakie niesie z sobą kontakt
z urządzeniami elektrycznymi.
• Należy dbać o prawidłowy stan techniczny
urządzenia.
• Nie włączaj urządzenia, jeśli spadło z wysokości
lub zostało uszkodzone, Oddaj urządzenie do
kontroli specjaliście i w razie konieczności zleć
naprawę.
• Części urządzenia w trakcie używania nagrzewają
się. Nie wolno ich dotykać aby uniknąć poparzenia.
6. Odpowiednie koszulki foliowe
• Do laminowania na gorąco można stosować koszuli
foliowe o szerokości maks. 230 mm i grubości
maks. 125 mikronów.
• Należy mieć na uwadze fakt, że folia nadaje się
do laminowania tylko raz.
Do laminowania na gorąco stosować
wyłącznie folie specjalnie do tego przewidziane.
Do laminowania na zimno stosować
wyłącznie folie specjalnie do tego przewidziane.
Upewnić się, że dołączony zestaw folii
nadaje się wyłącznie do laminowania
na gorąco.
7. Zakresy włączania
Położenie
przełącznika
wyboru
i
HOT 80 > 60 - 80
HOT 125 85 - 125
Cold 125 do 200
Wskazówka: W przypadku zdjęć błyszczących
Położenie
przełącznika gr. folii
wybierz położenie „125”, a także
odpowiednią grubość folii.
Gr. laminowanej
o
folii
- 14 -
8. Przygotowania laminowania
na gorąco
Umieść prowadnicę folii
do tego otworach z tyłu urządzenia.
Opuść przystawkę przycinającą
jeszcze nie zostało to zrobione.
Wyciągnij podparcie dokumentu
któremu dokumenty będą wciągane prosto
w szczelinę ręcznego doprowadzenia folii
Włóż wtyczkę laminarki do gniazdka zasilania.
Zapewnij prawidłowe ustawienie urządzenia.
Włącz urządzenie, ustawiając przełącznik
wybierania laminowania na gorąco i na zimno
w położenie „HOT”. Zapala się czerwona dioda
kontrolna WŁ./WYŁ.
w przewidzianych
q
, o ile
d
s
.
y
, dzięki
t
Uważać, aby wszystkie krawędzie doku-
mentu były oddalone przynajmniej dwa
mm od krawędzi folii, patrz opis na rys. 1.
Zwróć uwagę, aby do laminowania była
używana tylko jedna folia. Rozłożyć ją
najpierw tak, jak przedstawiono na rys. 2.
Rys. 1
.
i
Z przełącznika grubości folii
tylko wtedy, gdy urządzenie jest włączone.
W przeciwnym wypadku urządzenie może
ulec nieodwracalnemu uszkodzeniu.
Przełącznik grubości folii
grubość folii (80 lub 125 mikronów).
Laminarka nagrzewa się do temperatury
roboczej.
• Zapalenie się zielonej lampki „Gotowość do
pracy”
się do odpowiedniej temperatury roboczej.
u
o
oznacza, że laminarka rozgrzała
korzystaj
o
ustaw na żądaną
Uzyskanie temperatury roboczej wskazy-
wane jest przez zapalenie się zielonej diody
„Gotowość do pracy”
uzyskiwania równego efektu laminowania
zaleca się, w szczególności przy cieńszych
foliach (poniżej 125 mikronów) oraz przy
ustawianiu innego grubości folii, rozpocząć
laminowanie dopiero po odczekaniu
dodatkowego czasu około 2-3 minut.
. W celu
u
Umieść laminowany dokument w folii o odpo-
wiednim rozmiarze.
Aby uzyskać informacje odnośnie
laminowania, przejdź do rozdziału 10.
Rys. 2
- 15 -

9. Przygotowanie laminowania
na zimno
W wypadku ostatniego laminowania na
gorąco:
Przed rozpoczęciem laminowania na zimno
odczekać do całkowitego ostygnięcia
urządzenia. W przeciwnym wypadku rolki
we wnętrzu laminarki będą jeszcze gorące.
Grozi to uszkodzeniem folii i laminowanych
dokumentów!
Umieść prowadnicę folii
do tego otworach z tyłu urządzenia.
Opuść przystawkę przycinającą
jeszcze nie zostało to zrobione.
Wyciągnij podparcie dokumentu
któremu dokumenty będą wciągane prosto
w szczelinę ręcznego doprowadzenia folii
Włożyć wtyczkę laminarki do gniazdka zasilania.
Zapewnić prawidłowe ustawienie urządzenia.
w przewidzianych
q
, o ile
d
, dzięki
s
t
.
Wskazówka: Przy laminowaniu na zimno
przełącznik grubości folii
na 125 mikronów.
ustawiaj zawsze
o
Włącz urządzenie, ustawiając przełącznik
wybierania laminowania na gorąco i na zimno
w położenie „COLD”. Zapalają się czerwona
lampka kontrolna WŁ./WYŁ.
lampka kontrolna „Gotowość do pracy”
y
i zielona
Umieść laminowany dokument w folii o odpo-
wiednim rozmiarze.
Uważać, aby wszystkie krawędzie doku-
mentu były oddalone przynajmniej dwa
mm od krawędzi folii, patrz opis na rys. 1.
Zwróć uwagę, aby do laminowania była
używana tylko jedna folia. Rozłoż ją najpierw tak, jak przedstawiono na rys. 2.
Aby uzyskać informacje odnośnie lamino-
wania, przejdź do rozdziału 10.
10. Laminowanie
i
u
.
Połóż folię na prowadnicy
lewą krawędź folii do blokady formatu
zamkniętą do przodu). Zsuń blokadę formatu
aż do dopasowania do formatu folii.
Dzięki temu folia nie będzie miała możliwości
ukośnego przesuwania się.
. Przyłóż prawą bądź
q
Jeśli mimo to folia będzie nadal wciągana
ukośnie, możesz skorzystać z „funkcji
przeciwdziałania blokowaniu“, patrz
rozdział 11.
Wsuń folię powoli do szczeliny ręcznego dopro-
wadzania folii
- 16 -
t
.
r
(stroną
r

Po wsunięciu folii kilka centymetrów do szczeliny
dalej zostanie ona wciągnięta automatycznie.
Puść folię po rozpoczęciu automatycznego
wsuwania.
Laminarka powinna stać w miejscu za-
pewniającym przynajmniej 30 cm swobodnej
przestrzeni. W przeciwnym wypadku wychodzące dokumenty po laminowaniu nie
będą mogły swobodnie się wysuwać z urządzenia. Laminowana folia może ulec uszkodzeniu.
Gotowa folia po laminowania jest wysuwana
ze szczeliny
laminarki.
a
Zawsze po zakończenia laminowania na
gorąco:
Folia zalaminiowanego dokumentu wychodzącego ze szczeliny
i bardzo plastyczna. Z tego względu po
zakończeniu laminowania odczekaj jeszcze
jedną minutę do ostygnięcia folii i dopiero
wtedy ją dotknij.
Aby poprawić rezultat laminowania, jeszcze gorącą folię można docisnąć książką,
segregatorem lub innym ciężki przedmiotem
o płaskiej powierzchni. W ten sposób folia
uzyskuje gładką i równą powierzchnię.
jest gorąca
a
11. Funkcja przeciwdziałająca
blokowaniu (ABS)
,
Zdejmij folię.
t
Obróć włącznik funkcji przeciwdziałającej
blokowaniu (ABS)
wybranej grubości folii.
ponownie w położenie
o
Rozpocząć ponownie laminowanie.
12. Funkcja przycinania
W celu użycia funkcji przycinania w prowadnicy q,
zdejmij prowadnicę
W razie potrzeby rozłóż podpórkę na doku-
menty
s
.
Jeżeli jeszcze nie zostało to zrobione, ustaw
przystawkę przycinającą
tworzyła ona równą powierzchnię z prowadnicą
Dosuń głowicę tnącą
tnąca
e
szyny tnącej
Szynę tnącą
i połóż dokumenty na prowadnicy
dokument, zsuwając blokadę
dotknie ona z obu stron krawędzie dokumentu.
Użyj znaczników na tabliczce ze skalą do
precyzyjnego ustawienia dokumentu.
Opuść szynę tnącą
Przytrzymaj papier lewą ręką w bezpiecznym
miejscu.
W celu przycięcia papieru wciśnij głowicę
tnącą
e
ruchem po dokumencie.
.
q
d
.
q
do oporu (głowicę
e
można dosunąć do obu końców
).
w
podnieś za zaokrąglony uchwyt
w
dotąd, aż się zatrzaśnie.
w
prawą ręką i przesuń ją jednym
w taki sposób, by
. Zablokuj
q
dotąd, aż
r
W początkowej fazie laminowania folia może wejść
ukośnie lub zahaczyć się we wnętrzu urządzenia.
Obróć włącznik funkcji przeciwdziałającej
blokowaniu (ABS)
• Urządzenie przestanie wciągać folię.
w położenie ABS.
o
- 17 -
 Loading...