

KOMPERNASS GMBH
BURGSTRASSE 21 · D-44867 BOCHUM
www.kompernass.com
ID-Nr.: ULG300A1-04/10-V2
IAN: 61862
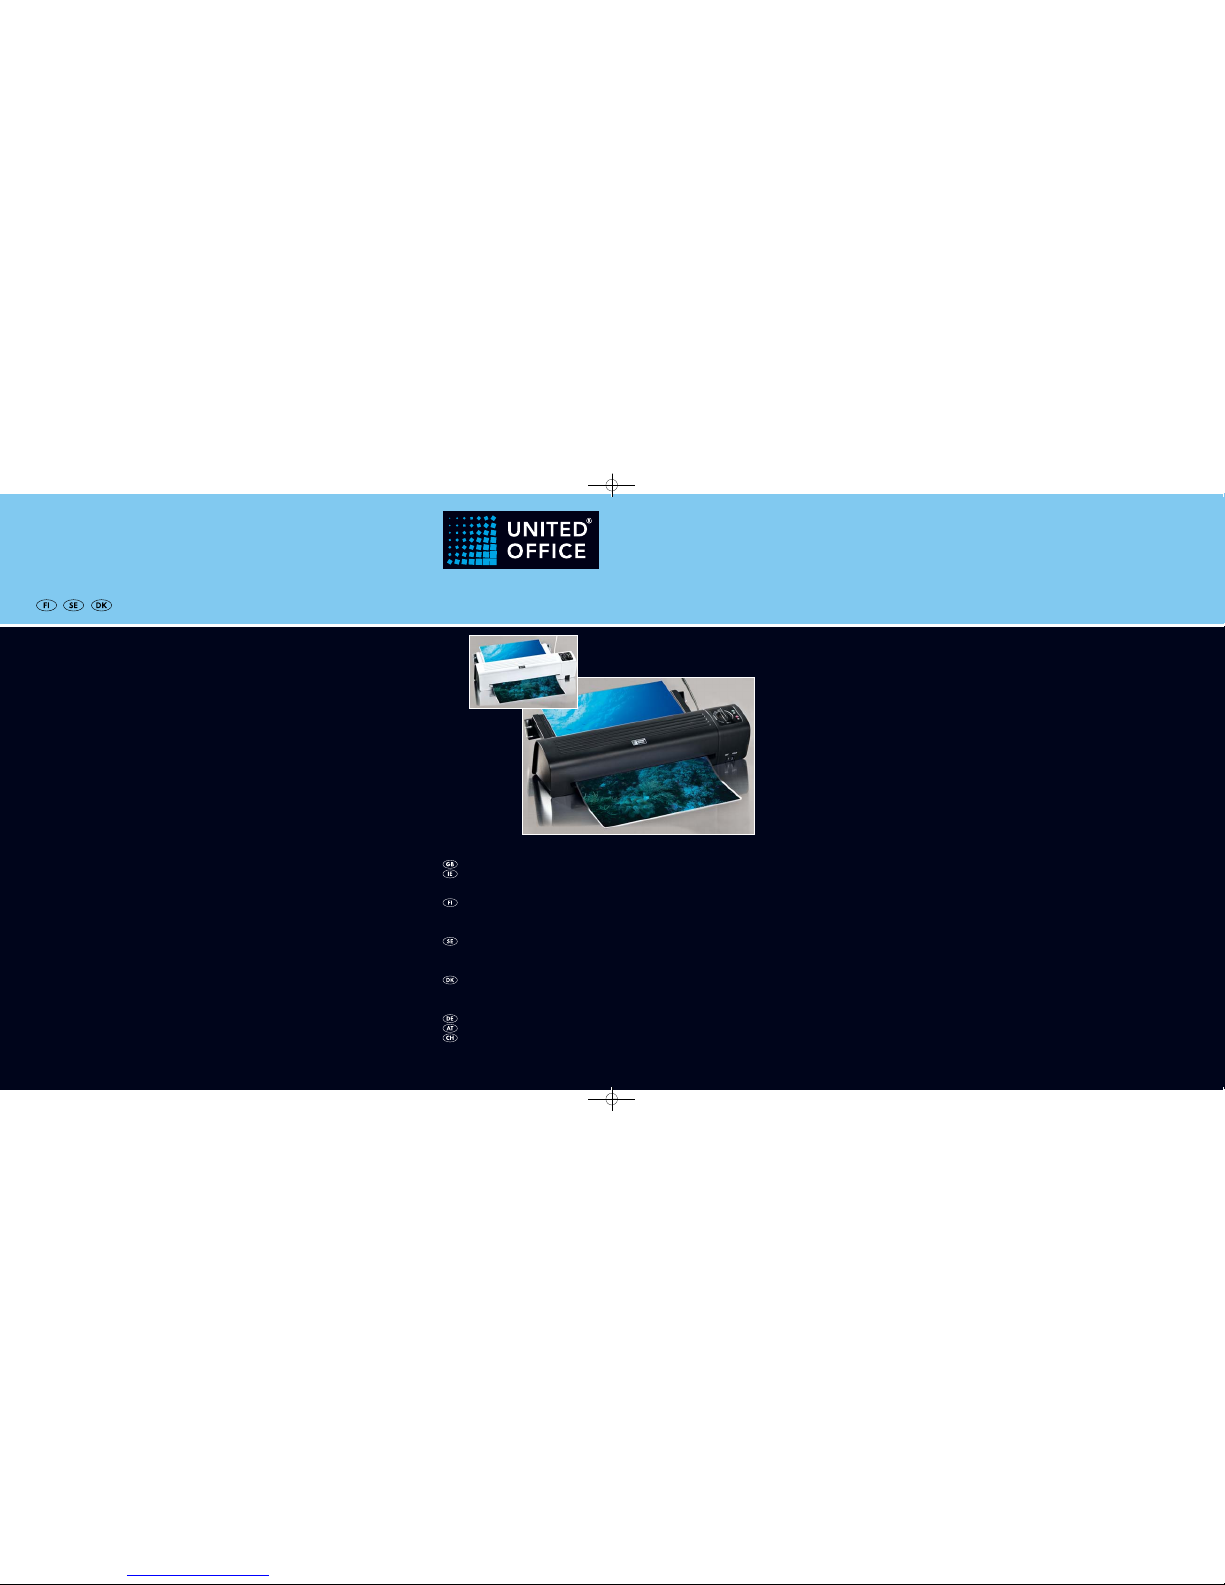
A3 Laminator ULG 300 A1
A3 Laminator
Operating instructions
Laminointilaite A3
Käyttöohje
Lamineringsapparat A3
Betjeningsvejledning
Laminiergerät A3
Bedienungsanleitung
Lamineringsapparat A3
Bruksanvisning
CV_61862_ULG300A1_LB3.qxd 05.01.2011 8:53 Uhr Seite 1
ULG 300 A1
1
2
4
5
6
7
89
0
q
w
3
CV_61862_ULG300A1_LB3.qxd 05.01.2011 8:53 Uhr Seite 4

- 1 -
Content Page
1. Intended use 2
2. Items supplied 2
3. Appliance description 2
4. Technical Data 2
5. Safety instructions 3
6. Suitable laminating pouches 4
7. Operating levels 4
8. Preparing for hot lamination 5
9. Preparing for cold lamination 6
10. Lamination process 6
11. Anti-Blocking Switch (ABS) 7
12. Trimming function 7
13. Cleaning and care 7
14. Storage 8
15. Disposal 8
16. Warranty and Service 8
17. Importer 9
Read the operating instructions carefully before using the device for the first time and preserve this booklet
for later reference. Pass this manual on to whoever might acquire the device at a future date.

- 2 -
A3 Laminator
1. Intended use
This laminator is intended exclusively for use in private households and for the hot and cold lamination
of documents printed on paper or cardboard.
Additionally, the documents can be trimmed.
It is NOT intended for use with any other materials.
It is also NOT intended for commercial or industrial
applications.
The warranty does not provide compensation for
damage caused by improper use of the appliance!
2. Items supplied
1x Laminator with pluggable cutter attachment
8x DIN A3 size Laminating pouches for hot lamina-
tion (80 microns)
1x Operating instructions
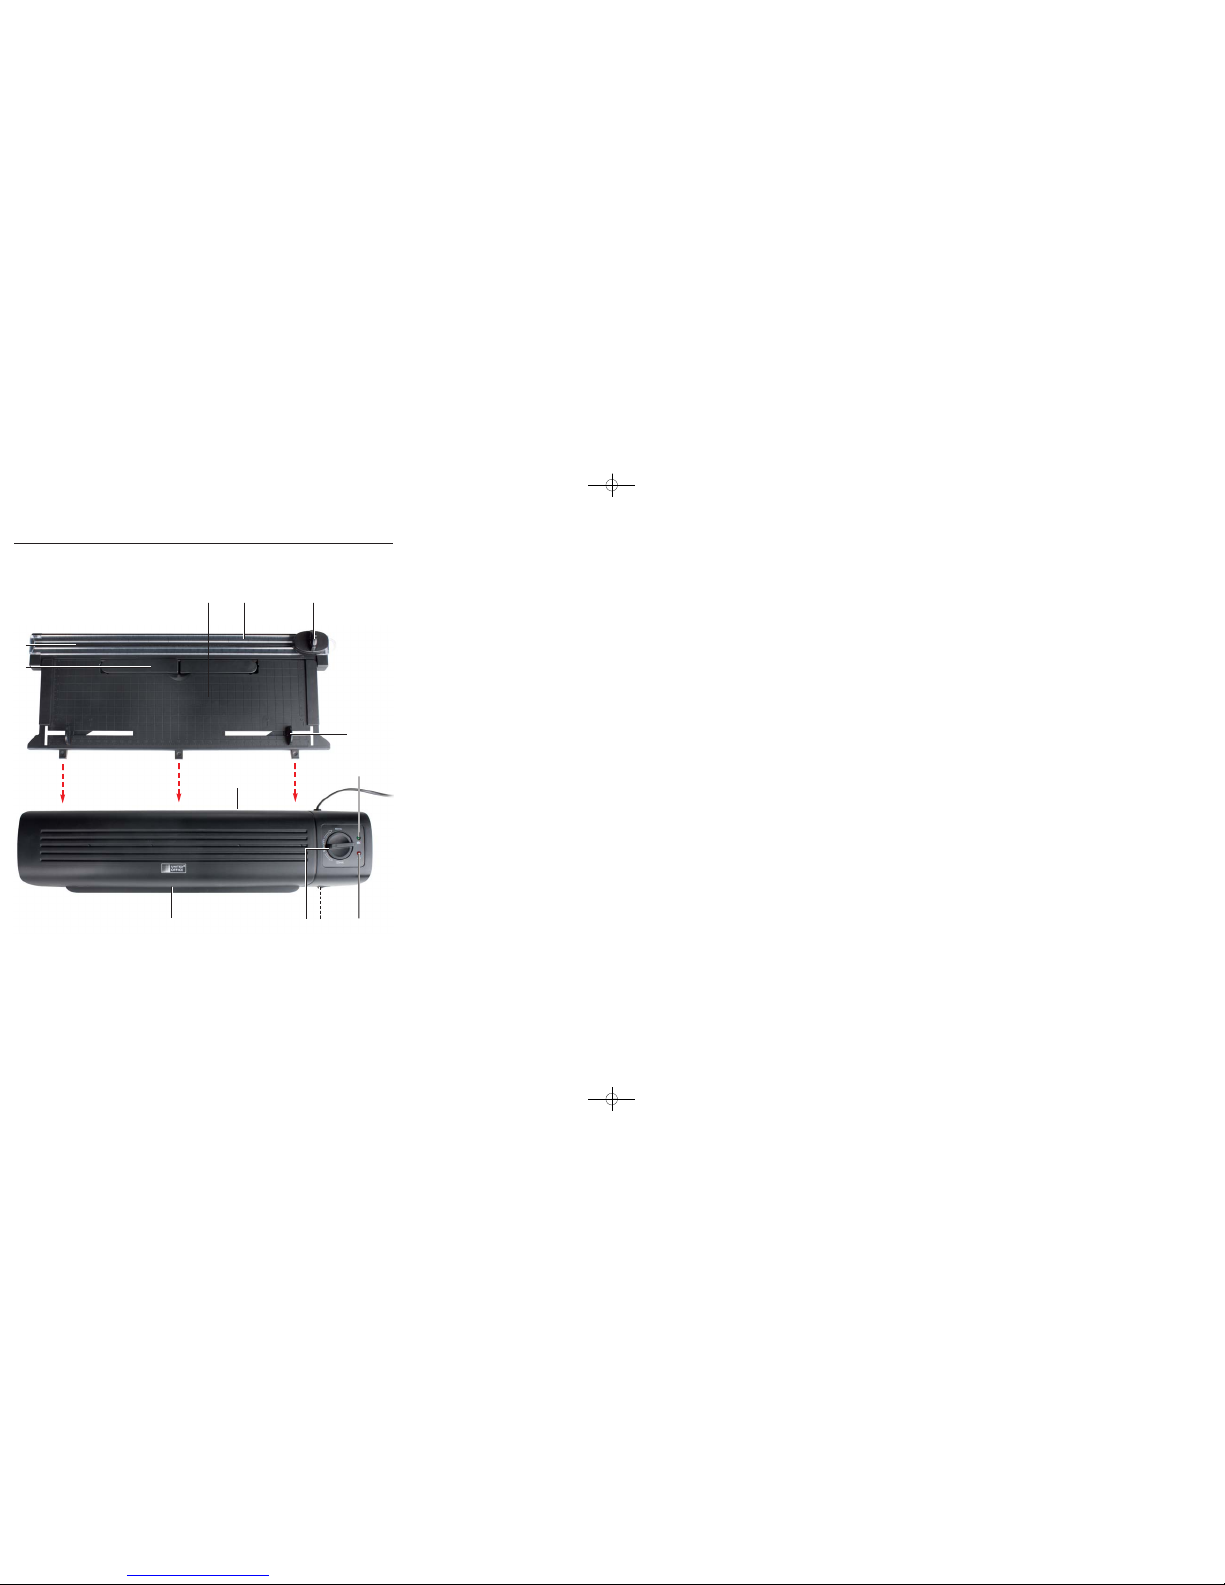
3. Appliance description
q
Foil guide rails (rear)
w
Cutting rail
e
Cutting head
r
Foil format restraint
t
Slot for manual foil feed
y
Indicator lamp "Ready"
u
ON/OFF Indicator lamp
i
Selector switch for hot and cold lamination
(HOT and COLD)
o
Anti-blockage switch and foil thickness switch
a
Foil slot (front)
s
Document support
d
Cutter attachment
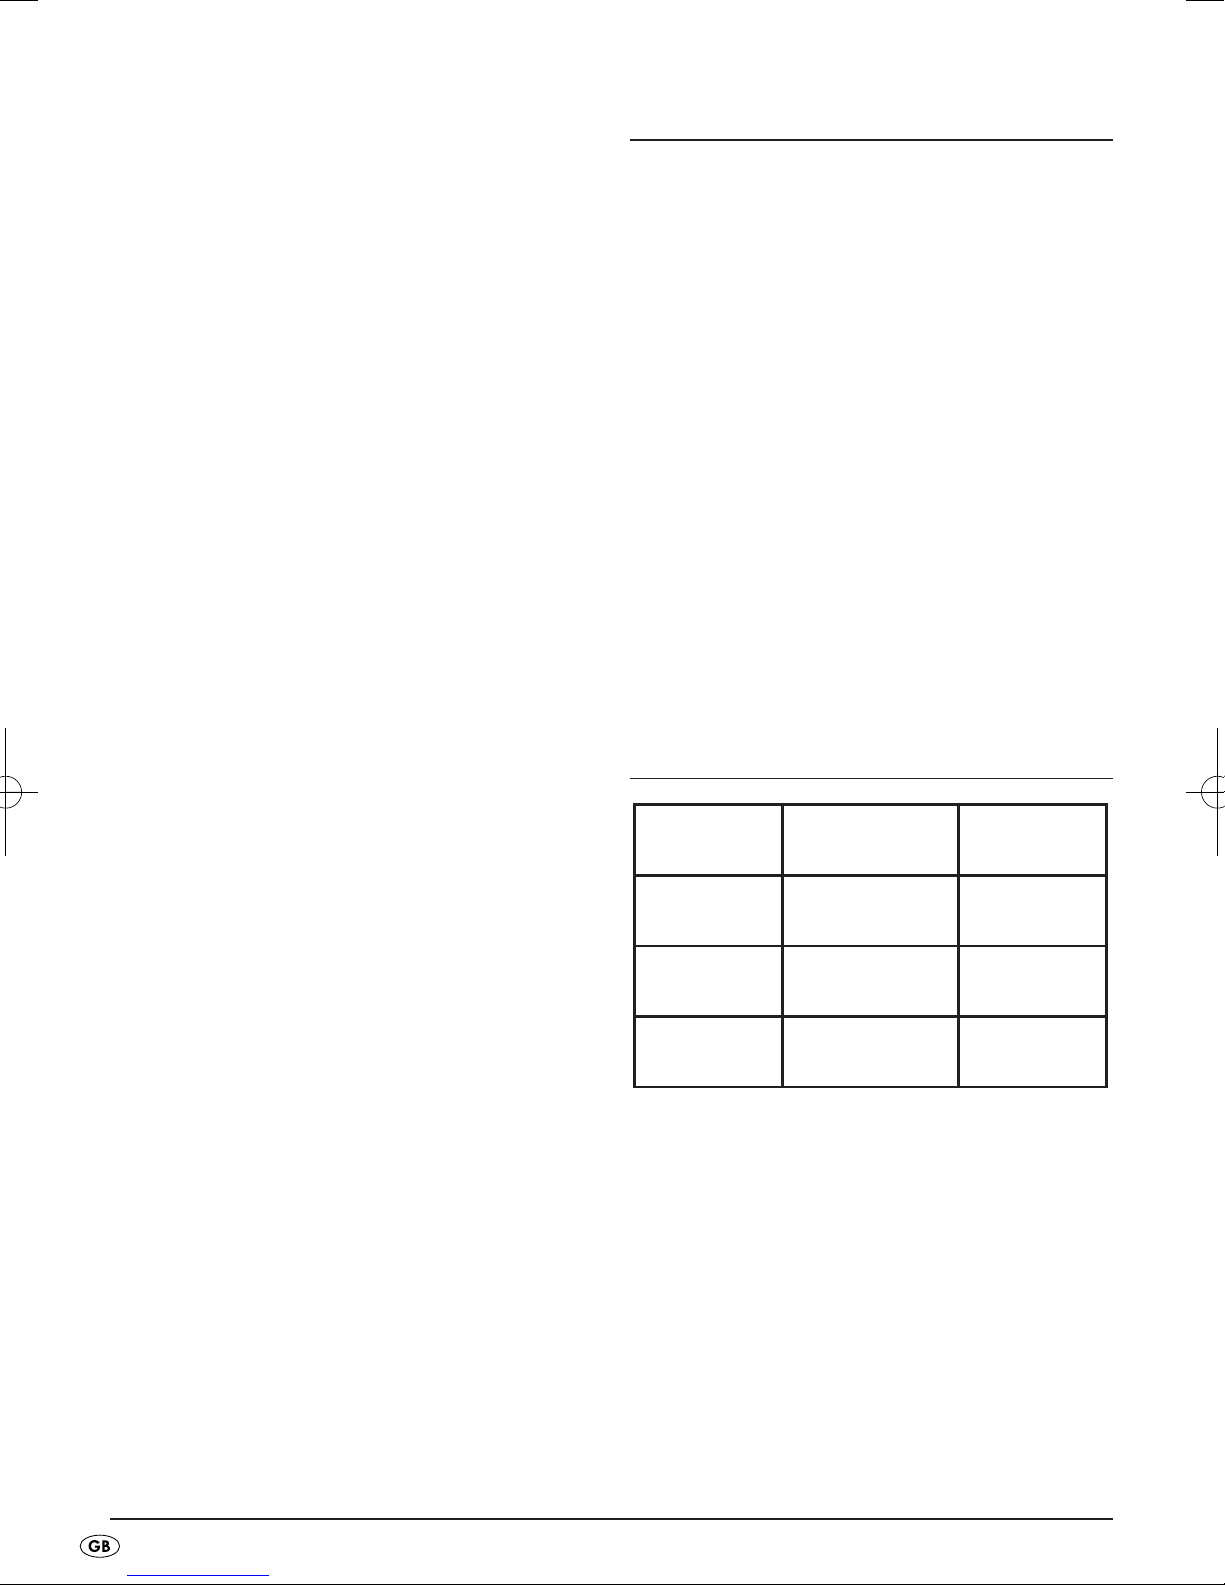
4. Technical Data
Rated voltage: 220 - 240 V~50 Hz
Current consumption: 1.4 A
Power consumption: 300 W
Lamination speed:
Foil width: max. 320 mm
Foil thickness hot lamination: max. 125 Mikron
Foil thickness cold lamination: max. 200 Mikron
Protection class: II/
Cutting capacity of the cutter attachment
d
:
max. 3 Sheets of 80g/m
2
or a laminated document
(80 micron).
Sheet size 80 Micron 125 Micron
A4 approx. 52 s approx. 70 s
A3 approx. 75 s approx. 105 s

- 3 -
Overheating Protection
This appliance is fitted with overheating protection.
Should the motor become too hot due to excessive
loading, the appliance switches itself off automatically. In this case, disconnect the plug from the
mains power socket and wait until the appliance
has cooled down to room temperature. You can
then reconnect the plug to the mains power socket
and continue using the appliance. We recommend
that, after 2 hours continuous use, you allow the appliance to cool down for about 30 minutes.
5. Safety instructions
• This appliance is not intended for use by individuals
(including children) with restricted physical, physiological or intellectual abilities or deficiences in
experience and/or knowledge unless they are
supervised by a person responsible for their safety
or receive from this person instruction in how the
appliance is to be used.
• Children should be supervised to ensure that they
do not play with the appliance.
• Unplug the power cable after every use and before cleaning, so as to prevent the appliance from
inadvertently switching itself on.
• Check the appliance and all parts for visible
damages. The safety concept can work only if
the appliance is in a faultless condition.
• Never perform hot lamination on flammable,
heat-sensitive and/or meltable materials and do
not laminate drawings on temperature-sensitive
paper or material that will undergo changes in
colour or quality when subjected to heat.
• Never laminate valuable or unique documents.
Although the laminator satisfies all predominant
safety norms and standards, errors can never be
completely discounted - as with all electrical appliances. Errors with the laminator can result in
damage to the document being laminated.
• Do NOT laminate any document which, together
with the laminating pouch, would have a thickness
of more than 1,0 mm. Should you do so, the laminating pouch could cant itself inside the laminating
appliance. This would damage the laminating pouch,
the document being laminated as well as the
laminator.
• Do not use an extension cable. Place the appliance
where the mains power socket is easily accessible,
so that in the event of an emergency the plug can
be quickly withdrawn.
• Do not use an external timing switch or a separate
remote control system to operate the appliance.
• Place the appliance where the power wall socket
is easily accessible, so that in the event of an
emergency the plug can be quickly withdrawn.
Risk of electrical shock!
• Connect the appliance to a mains power socket
with a mains voltage of 220-240 V ~50 Hz.
• Do not take the appliance into use if the power
cable or the plug is damaged.
• Arrange for defective power plugs and/or cables
to be replaced at once by qualified technicians
or our Customer Service Department.
• NEVER immerse the appliance in water.
Wipe it only with a damp cloth.
• Do not expose the appliance to rain and never
use it in a humid or wet environment.
• Ensure that the power cable never becomes wet
during operation.
• Unplug the appliance immediately after use.
The appliance is free of electricity only when you
remove the plug from the mains power socket.
• Do not open the housing or attempt to repair the
appliance yourself. Should you do so, device safety
can no longer be assured and the warranty will
become void.
- 4 -
Risk of fire!
• Do not use the appliance in the vicinity of hot
surfaces.
• Do not place the appliance at locations exposed
to direct sunlight.
This could lead to overheating and cause irreparable damage.
• Do not leave the appliance unattended when in
use.
• NEVER cover the ventilation slits on the top of the
appliance while it is switched on.
Risk of injury!
•
Keep children away from the connecting cable and
the appliance. Children frequently underestimate the
dangers of electrical devices.
• Ensure that the appliance stands with a safe and
secure positioning.
• Do not operate the appliance if it has sustained
a fall or is damaged. Arrange for the appliance
to be checked and, if necessary, repaired by a
qualified expert.
• Some parts of the appliance become very hot
during operation. To avoid burns, do not touch
these parts.
6. Suitable laminating pouches
• For hot lamination you can use pouches with a
width of up to 230 mm and a maximum thickness
of 125 micron.
• Please note that each laminating pouch may only
be used once.
For hot lamination, use only laminating
pouches that are expressly designated
for hot lamination.
For cold lamination, use only laminating
pouches that are expressly designated
for cold lamination.
Take note that the laminating pouches in-
cluded with the laminator are intended
exclusively for hot lamination.
7. Operating levels
Tip: For high-gloss photos, you should select the switch
position “125” as well as the appropriate
pouch thickness.
Position of
selector switch
i
Position of
pouch thickness
switch
o
Laminating foil
thickness
HOT 80 > 60 - 80
HOT 125 85 - 125
Cold 125 to 200
- 5 -
8. Preparing for hot lamination
➩ Insert the foil guide rails
q
in the designated
holes on the rear of the laminator.
➩ Fold out the document supports
s
, so that the
documents can be pulled in straight into the slot
for manual foil feed
t
.
➩ Insert the plug of the laminator into a mains
power socket.
➩ Provide a firm location for the appliance.
➩ Set the selector switch for hot and cold lamina-
tion
i
to "HOT ".
➩ Set the foil thickness switch
o
to the desired foil
thickness (80 or 125 microns). The red ON/OFF
indicator lamp
u
will now glow. The lami-
nator heats itself up to its operating temperature.
• As soon as the green indicator lamp "Ready"
y
glows, the laminator has reached its
operating temperature.
Attainment of the operating temperature
is indicated by the lighting up of the green
LED indicator lamp "Ready"
y
. For a
more uniform laminating result we recommend, especially for thinner foils (below
125 Micron) and after adjustment to a different foil thickness, to first wait an additional 2-3 minutes before beginning with
lamination.
➩ Lay the document to be laminated into a lami-
nating pouch of the appropriate size.
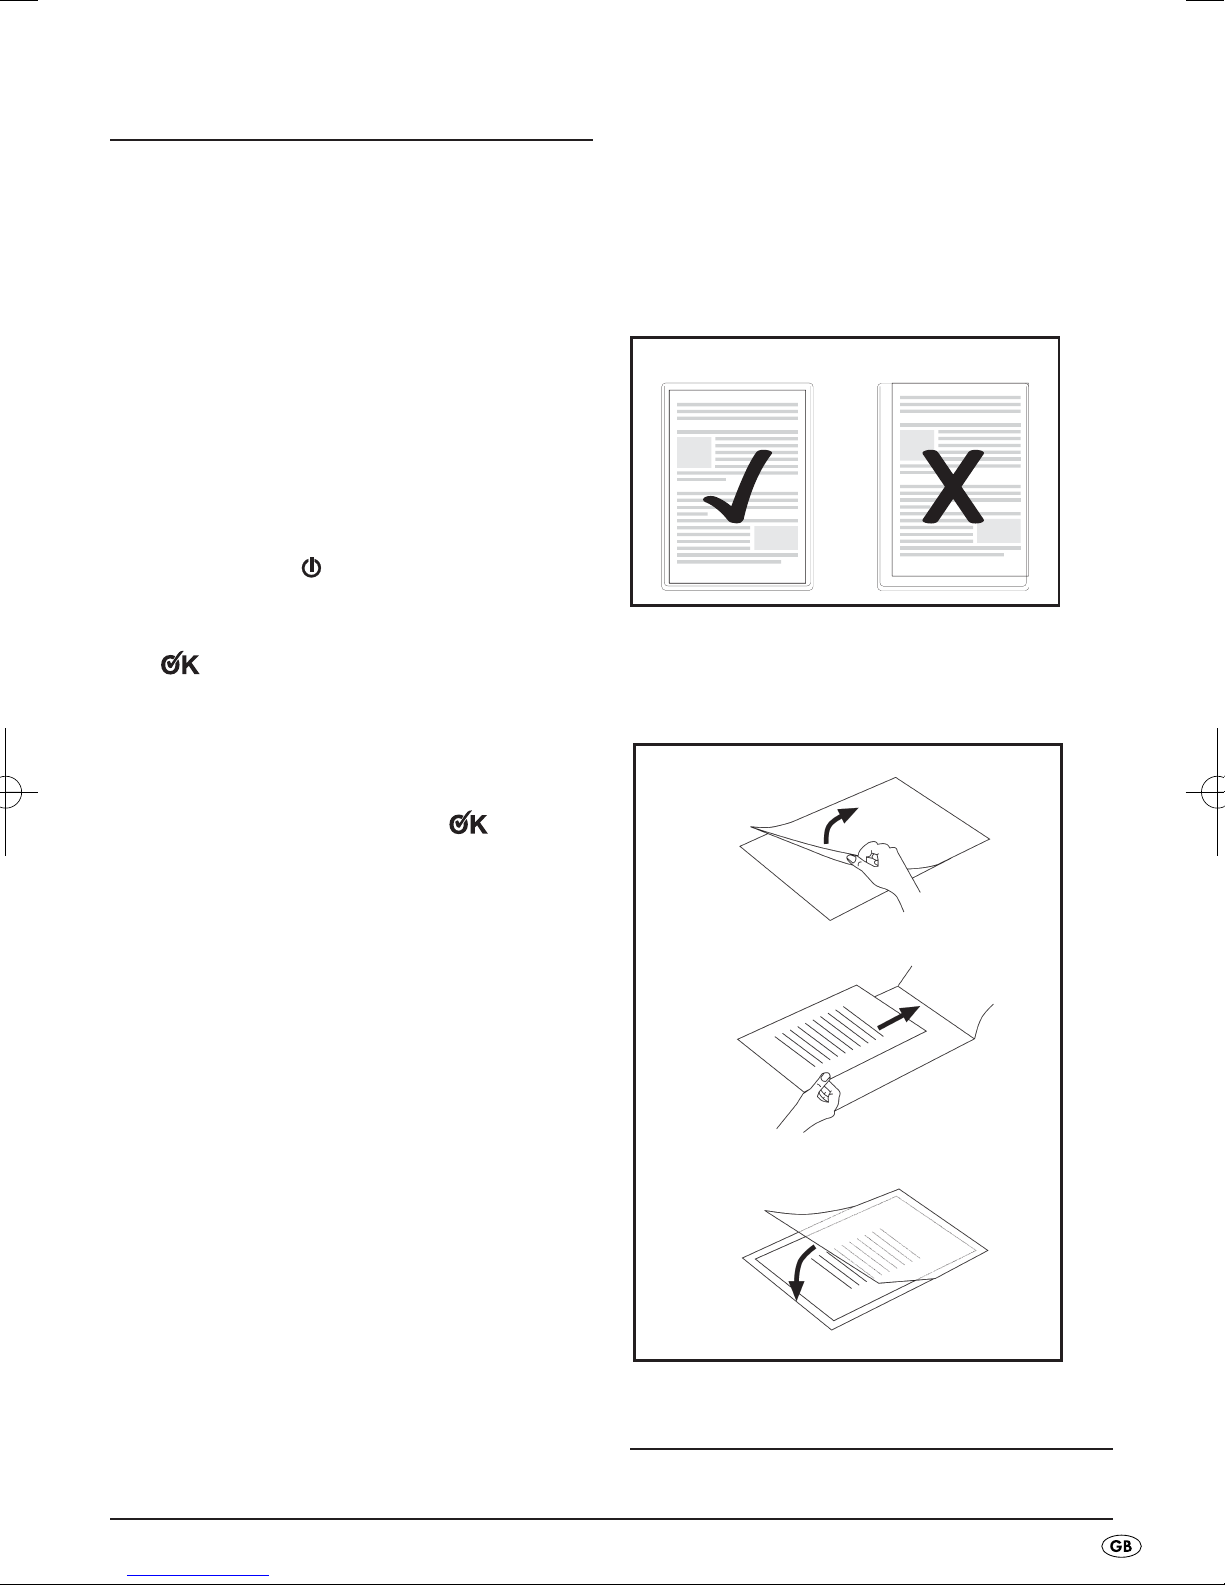
Make certain that all corners of the docu-
ment have at least two millimetres of space
to the edge of the laminating pouch, as
shown in Fig. 1. Make certain that you use
only one pouch for laminating. First open
it up, as shown in Fig. 2.
For information about the lamination
process, please read section 10.
Fig. 2
Fig. 1
- 6 -
9. Preparing for cold lamination
If you have previously performed hot lami-
nation:
After hot laminating, allow the laminator
to cool down completely before beginning
with cold lamination. Remember, the rollers
inside the laminator will still be hot. These
can damage the laminating pouch and the
document to be laminated!
➩ Insert the foil guide rails
q
in the designated
holes on the rear of the laminator.
➩ Pull out the document supports
s
so that the
documents can be pulled in straight into the slot
for manual foil feed
t
.
➩ Insert the plug of the laminator into a mains
power socket.
➩ Provide a firm location for the appliance.
➩ Set the selector switch for hot and cold lamina-
tion
i
to "COLD".
Take note: For cold lamination, ALWAYS place
the foil thickness switch
o
at 125 microns.
The red ON/OFF indicator lamp
u
and
the green indicator lamp "Ready"
y
now glow.
➩ Place the document to be laminated into a
laminating pouch of the matching size.
Make certain that all corners of the docu-
ment have at least two millimetres of space
to the edge of the laminating pouch, as
shown in Fig. 1.
Make certain that you use only one pouch
for laminating. First open it up, as shown
in Fig. 2.
For information about the lamination pro-
cess, please read section 10.
10. Lamination process
➩ Lay the laminating pouch onto the pouch guide
q
.
Lay the right or left edge of the laminating pouch
against the pouch format lock
r
(closed side
leading). Slide the pouch format lock
r
together
until the selected format size is reached. This prevents the laminating pouch from being pulled in
at an angle.
Should the laminating pouch be pulled in
at an angle, use the "Anti-Blocking Funktion" as described in chapter 11.
➩ Now slide the laminating pouch slowly into the
slot for manual pouch input
t
.
➩ When you have slid the laminating pouch several
centimetres into the slot
t
, it will start to be pulled
in automatically. Release the laminating pouch
as soon as you notice it being pulled in automatically.
Ensure there is at least 45 cm of open space
in front of the laminator. If you do not, the
laminating pouch will not be completely
ejected from the laminator after lamination. This could damage the laminated
pouch.
➩ The finished laminated pocket is now ejected
from the foil slot
a
of the laminator.
Only after hot lamination:
➩ Remove them immediately from the appliance,
as hot foil pockets can still be easily deformed.
Place them on a flat surface to cool down.
To improve the lamination result, you can
weigh down the still hot foil bag with a
book, a file folder or other heavy, smooth
object. This will give it a smooth and flawless surface.

- 7 -
➩ If you do not want to start another lamination
process, turn the foil thickness switch
o
to ABS
(OFF) and withdraw the plug from the mains
power socket.
11. Anti-Blocking Switch (ABS)
At the start of the lamination process, the pouch
may be pulled in at an angle or jam itself inside the
appliance.
➩ Turn the anti-blocking switch (ABS)
o
to the
position ABS.
• The laminate pouch is not pulled any further in.
➩ Remove the laminate pouch.
➩ Turn the anti-blocking switch (ABS)
o
back to
the desired foil thickness.
➩ Re-start the lamination process.
12. Trimming function
Should you wish to use the trimming function on the
pouch guide
q
, dismantle the pouch guide q.
➩ If necessary, fold the documents supports
s
down.
➩ Adjust the cutter attachment
d
so that it forms
a straight face with the foil guide rails
q
.
➩ Slide the cutting head
e
to the end stop (the
cutting head
e
can be slid to both ends of the
cutting rail
w
).
➩ Flap the cutting rail
w
upwards with the rounded
grip and position the document on the pouch
guide
q
. Restrain the document by sliding the
pouch format locks
r
together until they touch
both sides of the document.
➩ Use the markings on the measurement table to
align the document precisely.
➩ Flap the cutting rail
w
downwards so that it
engages.
➩ Hold the paper in a secure position with your
left hand.
➩ To trim, press the cutting head
e
down with
the right hand and then slide it with one pull or
push over the document.
13.Cleaning and care
Potentially fatal electrical shock:
• Never open the appliance housing. There
are no user-serviceable elements inside.
• Never submerse the appliance into water
or other liquids!
Cleaning the housing:
Clean the surface of the housing with a
slightly moistened cleaning cloth.
➩ First remove the plug.
➩ Allow the appliance to cool down completely.
➩ Ensure that no moisture can permeate into the
appliance.
Cleaning the interior of the appliance:
With every lamination, contaminants are deposited
on the rollers inside the laminator. Over time, this reduces the performance of the laminator. You should
therefore clean the rollers inside the laminator after
use.
➩ Prepare the appliance as described in Chapter
8 "Preparing for hot lamination", up to the point
where the green indicator lamp "Ready"
y
glows.
- 8 -
➩ Then run a sheet of DIN A3 paper, folded in
the middle (maximum thickness 1.0 mm) …
• without a laminating pouch and
• with the fold first
… slowly into the slot for manual pouch input t.
➩ Release the sheet as soon as you notice it
being pulled in automatically.
• The contaminants on the rollers inside the laminator now firmly attach themselves to the sheet
of paper. The paper is discharged from the foil
slot
a
of the laminator.
➩ Repeat this cleaning process several times.
Use a fresh clean sheet of paper each time.
When you no longer see any contaminants on
the paper, the rollers inside the laminator are
clean.
14. Storage
Allow the appliance to cool down completely
before putting it into storage.
Do not store the laminator in damp loca-
tions where moisture could enter inside
the appliance (e.g. cellars)!
15. Disposal
Do not dispose of the appliance with
your normal domestic waste. This
product is subject to the provisions of
European Directive 2002/96/EC.
Dispose of the appliance through an approved waste
disposal centre or at your community waste facility.
Observe the currently applicable regulations.
In case of doubt, please contact your waste disposal
centre.
Dispose of all packaging materials in an
environmentally friendly manner.
16. Warranty and Service
The warranty for this appliance is for 3 years from
the date of purchase. The appliance has been manufactured with care and meticulously examined before delivery. Please retain your receipt as proof of
purchase. In the event of a warranty claim, please
make contact by telephone with our Service Department. Only in this way can a post-free despatch for
your goods be assured.
The warranty covers only claims for material and
maufacturing defects, but not for transport damage,
for wearing parts or for damage to fragile components, e.g. buttons or batteries. This product is for
private use only and is not intended for commercial
use. The warranty is void in the case of abusive and
improper handling, use of force and internal tampering not carried out by our authorized service
branch. Your statutory rights are not restricted in
any way by this warranty.
The warranty period will not be extended by repairs
made under warranty. This applies also to replaced
and repaired parts. Any damage and defects extant
on purchase must be reported immediately after unpacking the appliance, at the latest, two days after
the purchase date. Repairs made after the expiration of the warranty period are subject to payment.

- 9 -
DES UK LTD
Tel.: 0871 5000 700
(£ 0.10 / minute)
E-Mail: support.uk@kompernass.com
Kompernass Service Ireland
Tel.: 1850 930 412 (0,082 EUR/Min.)
Standard call rates apply. Mobile operators may vary.
E-Mail: support.ie@kompernass.com
Kompernass Service Cyprus
Tel.: 800 9 44 01
E-Mail: support.cy@kompernass.com
17. Importer
KOMPERNASS GMBH
BURGSTRASSE 21
D-44867 BOCHUM, GERMANY
www.kompernass.com
CY

- 10 -

- 11 -
Sisällysluettelo Sivu
1. Käyttötarkoitus 12
2. Toimituslaajuus 12
3. Laitekuvaus 12
4. Tekniset tiedot 12
5. Turvaohjeet 13
6. Sopivat kalvotaskut 14
7. Käyttötasot 14
8. Kuumalaminoinnin esivalmistelu 15
9. Kylmälaminoinnin valmistelu 16
10. Laminoinnin kulku 16
11. Tukkeutumisen estotoiminto (ABS) 17
12. Leikkuutoiminto 17
13. Puhdistus ja hoito 17
14. Säilytys 18
15. Hävittäminen 18
16. Takuu ja huolto 18
17. Maahantuoja 18
Lue käyttöohje ennen ensimmäistä käyttökertaa huolellisesti läpi ja pidä sitä lähettyvillä myös myöhemmissä
käytöissä. Jos myyt laitteen, anna ohje myös seuraavalle omistajalle.
- 12 -
Laminointilaite A3
1. Käyttötarkoitus
Laminointilaite on tarkoitettu ainoastaan paperisten
tai pahvisten asiakirjojen kuuma- ja kylmälaminointiin
kotitalouksissa. Lisäksi asiakirjat voidaan leikata.
Sitä ei saa käyttää muiden materiaalien kanssa.
Laitetta ei ole myöskään tarkoitettu kaupalliseen tai
teolliseen käyttöön.
Takuu ei kata vahinkoja, jotka ovat syntyneet epäasianmukaisesta käytöstä!
2. Toimituslaajuus
1x laminointilaite ja liitettävä leikkuuosa
8x muovitaskua DIN A3 kuumalaminointiin
(80 mikronia)
1x käyttöohje
3. Laitekuvaus
q
Kalvon ohjauskisko (takana)
w
Leikkuukisko
e
Leikkuupää
r
Kalvomuodon lukitus
t
Manuaalisen kalvonohjauksen aukko
y
Merkkivalo "Käyttövalmis"
u
PÄÄLLE/POIS-merkkivalo
i
Valintakytkin kuuma- ja kylmälaminointia varten
(HOT ja COLD)
o
Juuttumisenestokytkin ja kalvonpaksuuden kytkin
a
Kalvoaukko (edessä)
s
Asiakirjatuet
d
Leikkuuosa
4. Tekniset tiedot
Nimellisjännite: 220 - 240 V~50 Hz
Tehonotto: 1,4 A
Tehontarve: 300 W
Laminointinopeus:
Kalvonleveys: kork. 320 mm
Kalvonpaksuus kuumalaminointi:kork. 125 mikronia
Kalvonpaksuus kylmälaminointi: kork. 200 mikronia
Suojausluokka: II/
Leikkuuosan
d
leikkuukapasiteetti:
kork. 3 arkkia 80g/m
2
tai yksi laminoitu asiakirja
(80 mikronia).
Kalvokoko 80 mikronia 125 mikronia
A4 n. 52 s n. 70 s
A3 n. 75 s n. 105 s

- 13 -
Ylikuumenemissuoja
Tämä laite on varustettu ylikuumenemissuojalla. Jos
moottori kuumenee liikaa ylikuormituksen vuoksi, laite sammuu automaattisesti. Irrota tässä tapauksessa
verkkopistoke ja odota, kunnes laite on jäähtynyt huoneenlämpöiseksi. Sitten voit jälleen liittää verkkopistokkeen sähköverkkoon ja ottaa laitteen käyttöön.
Suosittelemme, että laitteen annetaan jäähtyä 2 tuntia käytön jälkeen n. 30 minuutin ajan.
5. Turvaohjeet
• Tätä laitetta ei ole tarkoitettu sellaisten henkilöiden
(mukaan lukien lapset) käyttöön, joiden rajoitetut,
fyysiset, aistilliset tai henkiset kyvyt tai kokemuksen
ja/tai tiedon puute estävät käytön, lukuun ottamatta tilanteita, joissa heitä valvoo turvallisuudesta vastaava henkilö tai joissa he ovat saaneet tältä
ohjeita laitteen käytöstä.
• Lapsia on valvottava ja on varmistettava, että he
eivät leiki laitteella.
• Vedä jokaisen käytön jälkeen ja aina ennen puhdistusta verkkopistoke pistorasiasta, jotta vältät
virran kytkeytymisen laitteeseen.
• Tarkista laite ja kaikki osat näkyvien vaurioiden
varalta. Laitteen turvallisuus on taattu vain, kun
laite on virheettömässä kunnossa.
• Älä käytä kuumalaminointia syttyvien, kuumuudelle
arkojen ja/tai sulavien materiaalien laminointiin.
Älä myöskään käytä asiakirjoja, jotka ovat lämpöherkkiä tai joiden värit tai laatu voivat huonontua kuumuuden seurauksena.
• Älä yleisesti laminoi ainutlaatuisia tai arvokkaita
asiakirjoja. Vaikka laminointilaite vastaa kaikkia
turvallisuusasetuksia ja -standardeja, niin toimintahäiriöt ovat aina mahdollisia sähkölaitteita käytettäessä. Laminointilaitteen toimintahäiriöt voivat
vahingoittaa laminoitavaa asiakirjaa.
• Älä laminoi mitään asiakirjoja, joiden paksuus
yhdessä laminointikalvon kanssa ylittää 1,0 mm.
Muuten foliotasku voi tarttua kiinni laminointilaitteen sisälle. Tämä voi vahingoittaa kalvotaskua,
laminoitavaa asiakirjaa sekä laminointilaitetta.
• Älä käytä jatkojohtoa. Sijoita laite niin, että pistorasia on helppopääsyisessä paikassa, jotta laite
voitaisiin hätätilanteessa irrottaa sähköverkosta
nopeasti.
• Älä käytä laitetta ulkoisen ajastimen tai erillisen
kaukovaikutusjärjestelmän avulla.
• Aseta laite niin, että verkkopistokkeeseen on helppo
päästä käsiksi ja laite voidaan irrottaa hätätapauksessa nopeasti sähköverkosta.
Sähköiskun vaara!
• Liitä laite verkkopistorasiaan, jonka verkkojännite
on 220-240 V ~50 Hz.
• Laitetta ei saa käyttää, jos johto tai verkkopistoke
ovat vahingoittuneita.
• Anna vaurioitunut verkkopistoke tai virtajohto heti
valtuutetun ammattihenkilöstön tai huoltopalvelun
vaihdettavaksi vaarojen välttämiseksi.
• Älä koskaan kasta laitetta veteen. Pyyhi sitä vain
kostutetulla liinalla.
• Älä jätä laitetta sateeseen tai käytä sitä koskaan
kosteassa tai märässä ympäristössä.
• Varmista, ettei virtajohto koskaan kastu tai kostu
käytön aikana.
• Irrota laite käytön jälkeen sähköverkosta. Laite on
täysin virraton vasta, kun verkkopistoke on irrotettu
pistorasiasta.
• Laitteen koteloa ei saa avata tai korjata itse. Jos
laitteen kotelo avataan itse, turvallisuus ei ole
taattu ja takuu raukeaa.

- 14 -
Tulipalon vaara!
• Älä aseta laitetta lämmönlähteiden lähelle.
• Älä sijoita laitetta paikkaan, jossa se altistuu suoralle
auringonvalolle.
Laite saattaa tällöin ylikuumentua ja vahingoittua
niin, että sitä ei enää voi korjata.
• Älä jätä laitetta käytön aikana ilman valvontaa.
• Älä milloinkaan peitä laitteen yläosassa olevaa
tuuletusaukkoa laitteen ollessa kytkettynä päälle.
Loukkaantumisvaara!
•
Pidä liitäntäjohto ja laite poissa lasten ulottuvilta.
Lapset aliarvioivat usein sähkölaitteiden vaaran.
• Huolehti siitä, että laite on turvallisessa kunnossa.
• Jos laite putoaa tai vahingoittuu, sitä ei saa ottaa
käyttöön. Anna pätevien ammattilaisten tutkia ja
mahdollisesti korjata laite.
• Laitteen osat kuumenevat käytön aikana. Älä
koske niihin välttääksesi palovamman.
6. Sopivat kalvotaskut
• Voit käyttää kuumalaminointiin kalvotaskuja, jotka
ovat korkeintaan 230 mm leveitä ja korkeintaan
125 mikronin paksuisia.
• Huomaa, että yksittäistä kalvotaskua voi käyttää
laminointiin ainoastaan kerran.
Käytä kuumalaminointiin vain sellaisia
kalvotaskuja, jotka on selvästi tarkoitettu
kuumalaminointiin.
Käytä kylmälaminointiin vain sellaisia
kalvotaskuja, jotka on selvästi tarkoitettu
kylmälaminointiin.
Käytä mukana toimitettuja kalvotaskuja
vain kuumalaminointiin.
7. Käyttötasot
Vihje: Kiiltäväpintaisille valokuville tulisi valita kytki-
men asento "125" sekä vastaava laminointikalvon paksuus.
Asento
valintakytkin
i
Asento
kalvonpaksuuskytkin
o
Laminointikalvon
paksuus
HOT 80 > 60 - 80
HOT 125 85 - 125
Cold 125 < 200

- 15 -
8. Kuumalaminoinnin
esivalmistelu
➩ Aseta kalvon ohjauskisko
q
sille tarkoitettuihin
reikiin laminointilaitteen taustapuolella.
➩ Käännä asiakirjatuet
s
ulos, jotta asiakirjat vedetään suoraan manuaalisen kalvonohjauksen
aukkoon
t
.
➩ Liitä laminointilaitteen verkkopistoke verkkopis-
torasiaan.
➩ Huolehdi laitteen tukevasta asennosta.
➩ Aseta kuuma- ja kylmälaminoinnin valintakytkin
i
asentoon "HOT".
➩ Aseta kalvonpaksuuden kytkin
o
haluttuun kalvonpaksuuteen (80 tai 125 mikronia). Nyt punainen PÄÄLLE/POIS-merkkivalo
u
palaa.
Laminointilaite lämpenee käyttölämpötilaan.
• Heti kun vihreä merkkivalo "Käyttövalmis"
y
palaa, laminointilaite on saavuttanut käyttölämpötilansa.
Käyttölämpötilan saavuttaminen osoitetaan
vihreän käyttövalmiuden merkkivalon
y
syttymisellä. Tasaisen laminointituloksen saavuttamiseksi suosittelemme erityisesti ohuilla kalvoilla (alle 125 mikronia) ja
toista kalvonpaksuutta säädettäessä odottamaan laminointitapahtuman aloittamista
vielä noin 2-3 ylimääräistä minuuttia.
➩ Aseta laminoitava asiakirja sopivankokoiseen
kalvotaskuun.
Varmista, että kaikki asiakirjan reunat ovat
vähintään 2 mm:n päässä kalvotaskun
reunoista kuvassa 1 esitetyllä tavalla.
Tarkista, että käytät laminointiin vain yhtä
kalvoa. Käännä se ennen laminointia auki
kuvan 2 mukaisesti.
Saat lisätietoja laminoinnin kulusta
luvusta 10.
Kuva 2
Kuva 1

- 16 -
9. Kylmälaminoinnin valmistelu
Jos olet juuri käyttänyt kuumalaminointia:
Anna laminointilaitteen viilentyä kuumalaminoinnin jälkeen kokonaan ennen kylmälaminoinnin aloittamista. Muutoin laitteen
sisällä olevat rullat ovat yhä kuumia. Se
voi vahingoittaa kalvotaskua sekä laminoitavaa asiakirjaa!
➩ Aseta kalvon ohjauskisko
q
sille tarkoitettuihin
reikiin laminointilaitteen taustapuolella.
➩ Vedä asiakirjatuet
s
ulos, jotta asiakirjat vedetään suoraan manuaalisen kalvonohjauksen
aukkoon
t
.
➩ Liitä laminointilaitteen verkkopistoke verkkopis-
torasiaan.
➩ Huolehdi laitteen tukevasta asennosta.
➩ Aseta kuuma- ja kylmälaminoinnin valintakytkin
i
asentoon "COLD".
Ohje: Aseta kalvonpaksuuden kytkin
o
kylmälaminointia varten aina arvoon 125 mic. Punainen PÄÄLLE/POIS-merkkivalo
u
ja vihreä
merkkivalo "Käyttövalmis"
y
palavat nyt.
➩ Aseta laminoitava asiakirja sopivan kokoiseen
kalvotaskuun.
Varmista, että kaikki asiakirjan reunat ovat
vähintään 2 mm:n päässä kalvotaskun
reunoista kuvassa 1 esitetyllä tavalla.
Tarkista, että käytät laminointiin vain yhtä
kalvoa. Käännä se ennen laminointia auki
kuvan 2 mukaisesti.
Saat lisätietoja laminoinnin kulusta luvusta
10.
10. Laminoinnin kulku
➩ Aseta kalvotasku kalvon ohjauskiskoon
q
. Aseta
kalvotaskun vasen tai oikea puoli kalvomuodon
lukitukseen
r
(suljettu reuna ensin). Työnnä
kalvomuodon lukitusta
r
yhteen niin pitkälle,
kunnes valittu muoto on saavutettu. Näin estetään
kalvotaskun sisäänveto vinossa.
Mikäli kalvo kuitenkin vedetään vinoon,
voit käyttää luvussa 11 kuvattua tukkeutumisen estotoimintoa.
➩ Työnnä kalvotaskua nyt hitaasti manuaalisen
kalvonohjauksen aukkoon
t
.
➩ Kun olet työntänyt kalvotaskua muutaman sentin
verran rakoon
t
, se vedetään automaattisesti
eteenpäin. Päästä kalvotaskusta irti heti, kun huomaat että se alkaa työntyä laiteeseen automaattisesti.
Varmista, että laminointilaitteen etupuolella
on ainakin 45 cm tilaa. Muutoin kalvotasku
ei mahdu poistumaan laminointilaitteesta
laminoinnin jälkeen. Laminoitu kalvotasku
saattaa vahingoittua.
➩ Valmiiksi laminoitu kalvotasku tulee ulos lami-
nointilaitteen kalvoaukosta
a
.
Vain kuumalaminoinnin jälkeen:
➩ Ota kalvotasku välittömästi laitteesta, koska
kuumana sen muoto voi vielä helposti muuttua.
Aseta se jäähtymään tasaiselle pinnalle.
Voit parantaa laminointitulosta asettamalla
vielä kuuman kalvotaskun päälle painoksi
kirjan, kansion tai muun painavan, sileän
esineen. Näin se saa tasaisen, moitteettoman
pinnan.
➩ Jos et halua käynnistää uutta laminointitapahtumaa,
käännä kalvonpaksuuden kytkin
o
asentoon ABS
(OFF) ja vedä verkkopistoke irti pistorasiasta.

- 17 -
11. Tukkeutumisen estotoiminto
(ABS)
Kalvo saattaa laminoinnin alussa mennä vinoon tai
juuttua laitteen sisälle.
➩ Kierrä tukkeutumisen estotoiminnon kytkin
(ABS)
o
asentoon ABS.
• Kalvoa ei vedetä sisään pidemmälle.
➩ Poista kalvo.
➩ Kierrä tukkeutumisen estotoiminnon kytkin
o
jälleen haluttuun kalvonpaksuuteen.
➩ Aloita laminointi uudelleen.
12. Leikkuutoiminto
Jos haluat käyttää kalvon ohjauskiskossa qolevaa
leikkuutoimintoa, irrota kalvon ohjauskisko
q
.
➩ Käännä tarvittaessa asiakirjatuet
s
sisään.
➩ Säädä leikkuuosa
d
niin, että se muodostaa
tasaisen pinnan kalvonohjauskiskon
q
kanssa.
➩ Työnnä leikkuupää
e
paikoilleen vasteeseen
saakka (Leikkuupää
e
voidaan työntää kum-
paankin leikkuukiskon
w
päähän asti).
➩ Käännä leikkuukisko
w
pyöristetystä kahvasta
ylöspäin ja aseta asiakirjat kalvon ohjauskiskoon
q
. Lukitse asiakirja työntämällä kalvo-
muodon lukitusta
r
yhteen, kunnes se koskee
asiakirjan molempiin reunoihin.
➩ Käytä mitta-asteikkolevyn merkintöjä suunna-
taksesi dokumenttisi tarkkaan.
➩ Käännä leikkuukisko
w
alaspäin niin, että se
lukittuu paikoilleen.
➩ Pidä paperia vasemmalla kädellä tukevasti pai-
koillaan.
➩ Leikkaa painamalla leikkuupäätä
e
oikealla
kädellä alaspäin ja työnnä sitä yhdellä vedolla
asiakirjan yli.
13. Puhdistus ja hoito
Hengenvaarallisen sähköiskun vaara:
• Älä koskaan avaa laitteen koteloa. Sisällä
ei ole minkäänlaisia hallintalaitteita.
• Älä koskaan upota laitteen osia veteen tai
muihin nesteisiin!
Kotelon puhdistaminen:
Puhdista kotelon pinta kevyesti kostutetul-
la liinalla.
➩ Vedä aluksi verkkopistoke irti.
➩ Anna laitteen viilentyä kunnolla.
➩ Varmista, että laitteen sisäosiin ei pääse
kosteutta.
Laitteen sisäosan puhdistaminen:
Laitteen sisäpuolella oleviin rulliin kertyy epäpuhtauksia jokaisen laminointikerran seurauksena. Tästä
syystä laitteen teho heikkenee ajan kuluessa. Laminointilaitteen sisällä olevat rullat tulisi puhdistaa
jokaisen käyttökerran jälkeen.
➩ Esivalmistele laite luvussa 8 "Kuumalaminoinnin
valmistelu" kuvatulla tavalla, kunnes vihreä
käyttövalmiuden merkkivalo
y
syttyy.
➩ Vie keskeltä taitettu (enintään 1,0 mm vahvuinen)
A3-paperiarkki …
• ilman kalvotaskua
• taite edellä
… hitaasti manuaalisen kalvonohjauksen auk-
koon
t
.

- 18 -
➩ Päästä arkista heti irti, kun huomaat, että se al-
kaa työntyä automaattisesti.
• Epäpuhtaudet rullissa laminointilaitteen sisällä
tarttuvat nyt paperiarkkiin. Paperi tulee ulos
laminointilaitteen kalvoaukosta
a
.
➩ Toista puhdistus useamman kerran.
Käytä joka kerralla uutta, puhdasta paperiarkkia.
Kun paperissa ei enää näy epäpuhtauksia, laitteen sisällä olevat rullat ovat puhdistuneet.
14. Säilytys
Ennen kuin siirrät laitteen syrjään, anna sen ensin
jäähtyä kokonaan.
Älä säilytä laminointilaitetta kosteissa
tiloissa. Silloin laitteen sisälle voi päästä
kosteutta. (esim. kellaritilat)!
15. Hävittäminen
Älä missään tapauksessa heitä laitetta
tavallisen talousjätteen sekaan. Tämä
tuote on eurooppalaisen direktiivin
2002/96/EC mukainen.
Hävitä laite hyväksytyn jätteenhuoltoyrityksen tai
kunnallisen jätehuollon kautta.
Noudata voimassa olevia määräyksiä.
Ota epävarmoissa tapauksissa yhteyttä jätelaitokseesi.
Hävitä kaikki pakkausmateriaalit ympäristöystävällisellä tavalla.
16. Takuu ja huolto
Laitteen takuu on 3 vuotta ostopäivästä. Laite on
valmistettu huolellisesti ja tarkistettu tarkasti ennen
toimitusta. Säilytä ostokuitti todisteeksi takuun voimassaolosta.
Ota takuutapauksessa puhelimitse yhteyttä huoltopisteeseesi. Vain näin voidaan taata tuotteesi maksuton lähettäminen huoltoon.
Takuu koskee ainoastaan materiaali- ja valmistusvirheitä, ei kuitenkaan kuljetusvaurioita, kuluvia osia tai
herkästi vaurioituvien osien, esim. kytkinten tai akkujen vaurioita.
Tuote on tarkoitettu ainoastaan yksityiseen, ei kaupalliseen käyttöön.
Väärä tai asiaton käyttö, väkivallan käyttö ja muiden kuin valtuutetun huoltopisteen suorittamat korjaukset aiheuttavat takuun raukeamisen. Tämä takuu
ei rajoita kuluttajan lakisääteisiä oikeuksia.
Takuukorjaus ei pidennä takuuaikaa. Tämä koskee
myös vaihdettuja ja korjattuja osia. Mahdollisista jo
ostettaessa olemassa olevista vahingoista ja puutteista on ilmoitettava välittömästi pakkauksesta purkamisen jälkeen, kuitenkin viimeistään kaksi päivää
ostopäiväyksen jälkeen. Takuuajan jälkeen suoritetut
korjaukset ovat maksullisia.
Kompernass Service Suomi
Tel.: 010 30 935 80
(Soittamisen hinta lankaliittymästä: 8,21 snt/puh + 5,9 snt/min /
Matkapuhelimesta: 8,21 snt/puh + 16,90 snt/min)
E-Mail: support.fi@kompernass.com
17. Maahantuoja
KOMPERNASS GMBH
BURGSTRASSE 21
D-44867 BOCHUM, SAKSA
www.kompernass.com

- 19 -
Innehållsförteckning Sidan
1. Föreskriven användning 20
2. Leveransens innehåll 20
3. Beskrivning 20
4. Tekniska data 20
5. Säkerhetsanvisningar 21
6. Lämpliga plastfickor 22
7. Inställningslägen 22
8. Förberedelser för varmlaminering 23
9. Förberedelser för kallaminering 24
10. Lamineringsprocess 24
11. Antiblockeringssystem (ABS) 25
12. Skärfunktion 25
13. Rengöring och skötsel 25
14. Förvaring 26
15. Kassering 26
16. Garanti och service 26
17. Importör 26
Läs igenom bruksanvisningen noga innan du börjar använda apparaten och spara den för senare bruk.
Lämna över bruksanvisningen tillsammans med apparaten om du överlåter den till någon annan person.

- 20 -
Lamineringsapparat A3
1. Föreskriven användning
Den här lamineringsapparat är endast avsedd att
användas för varm- och kallaminering av pappersdokument eller papp i privata hushåll. Den kan dessutom användas för att beskära dokument.
Den är inte avsedd att användas för laminering av
andra material. Den är inte heller avsedd för yrkesmässigt eller industriellt bruk.
Tillverkaren ansvarar inte för någon form av skada
som är ett resultat av att apparaten använts på fel
sätt!
2. Leveransens innehåll
1 lamineringsmaskin med avtagbar skärtillsats
8 foliefickor DIN A3 för varmlaminering (80 mikron)
1 bruksanvisning
3. Beskrivning
q
Styrskena (bak)
w
Skärskena
e
Skärhuvud
r
Arretering för folieformat
t
Öppning för manuell foliematning
y
Indikatorlampa "Klar för drift"
u
PÅ/AV-indikator
i
Brytare för varm- eller kallaminering (HOT och
COLD)
o
Antiblockerings- och folietjockleksbrytare
a
Folieöppning (fram)
s
Dokumentstöd
d
Skärtillsats
4. Tekniska data
Nominell spänning: 220 - 240 V~50 Hz
Strömupptagning: 1,4 A
Effektförbrukning: 300 W
Lamineringshastighet:
Foliebredd: max 320 mm
Folietjocklek för varmlaminering max 125 mikron
Folietjocklek för kallaminering max 200 mkron
Skyddsklass: II/
Skärtillsatsens
d
kapacitet:
max 3 ark 80g/m
2
eller ett laminerat dokument
(80 mikron).
Foliestorlek 80 mikron 125 mikron
A4 ca 52 s ca 70 s
A3 ca 75 s ca 105 s

- 21 -
Överhettningsskydd
Den här apparaten är utrustad med ett överhettningsskydd. Om motorn blir för het på grund av
överbelastning stängs apparaten av automatiskt.
Dra i så fall ut kontakten och vänta tills apparaten
svalnat till rumstemperatur. Sedan kan du sätta kontakten i uttaget igen och fortsätta använda apparaten. Vi rekommenderar att apparaten stängs av efter
2 timmar drift och sedan får svalna i ca 30 minuter.
5. Säkerhetsanvisningar
• Den här apparaten ska inte användas av personer
(inklusive barn) med begränsad fysisk, sensorisk
eller mental förmåga eller bristande erfarenhet
och kunskap om de inte först övervakats eller
instruerats av någon ansvarig person.
• Håll uppsikt över barnen och se till så att de inte
leker med apparaten.
• Dra alltid ut kontakten när du använt laminatorn
färdigt och innan du rengör den, så undviker du
att den sätts på av misstag.
• Kontrollera om apparaten har några synliga skador.
Säkerheten kan bara garanteras om alla delar är
i felfritt skick.
• I princip bör man inte varmlaminera något lättan-
tändligt papper resp. material eller material som
inte tål värme och/eller kan smälta och inte heller
värmekänsligt papper/material där bilden eller
skriften förändrar färg och/eller kvalitet när den
utsätts för värme.
• Laminera aldrig några värdefulla, unika dokument.
Fast den här laminatorn motsvarar alla gällande
säkerhetskrav och standarder kan man, precis som
för alla elektriska apparater, aldrig helt utesluta
att det uppstår fel i funktionen. Om laminatorn
inte fungerar som den ska kan de dokument som
lamineras skadas.
• Laminera inte dokument som är tjockare än 1 mm
inklusive lamineringsfolien. Annars kan plastfikkan hamna på tvären inuti laminatorn. Då kan
både plastficka, dokument och laminator skadas.
• Använd inga förlängningskablar. Placera apparaten
så att uttaget med kontakten är lättåtkomligt så att
det går snabbt att dru ut kontakten vid nödsituationer.
• Använd ingen extern timer eller separat fjärrkontroll
för att styra apparaten.
• Ställ apparaten så att kontakten är lättåtkomlig
och går snabbt att dra ut vid nödsituationer.
Risk för elchocker!
• Anslut apparaten till ett eluttag med en nätspänning
på 220-240 V ~50 Hz.
• Använd inte laminatorn om anslutningsledning
eller kontakt är skadade.
• Låt omedelbart en auktoriserad yrkesman eller
vår kundtjänst byta ut skadade kontakter och
strömkablar för att inte utsätta dig för onödiga
risker.
• Doppa aldrig ner apparaten i vatten.
Torka bara av den med en fuktig trasa.
• Utsätt aldrig apparaten för regn och använd den
aldrig i fuktiga eller våta utrymmen.
• Akta så att anslutningsledningen inte blir våt eller
fuktig när apparaten används.
• Bryt strömtillförseln så snart du använt apparaten
färdigt. Den är bara helt strömfri när du dragit ut
kontakten ur uttaget.
• Du får aldrig försöka öppna eller reparera höljet.
Gör du det kan vi inte garantera säkerheten och
garantin förlorar sin giltighet.

- 22 -
Brandrisk!
• Använd inte apparaten i närheten av heta ytor.
• Ställ inte apparaten i direkt solljus.
Då kan den bli överhettad och skadas så att den
inte går att reparera.
• Lämna aldrig apparaten helt utan uppsikt när den
används.
• Täck aldrig över ventilationsöppningarna på
apparatens ovansida när den är påkopplad.
Risk för personskador!
•
Håll barnen på avstånd från apparat och anslutningsledning. Barn underskattar ofta riskerna med
elektriska apparater.
• Se till så att apparaten står stadigt.
• Om apparaten faller i golvet eller skadas på
annat sätt får du inte använda den längre. Låt
en yrkesman kontrollera och reparera den om
det behövs.
• Vissa delar blir mycket varma när apparaten används. Rör inte vid dessa för att undvika brännskador.
6. Lämpliga plastfickor
• För varmlaminering kan du använda plastfickor
som är upp till 230 mm breda och max 125 mikron
i tjocklek.
• Observera att plastfickorna bara kan användas
till en laminering.
Vid varmlaminering får endast plastfickor
som uttryckligen är avsedda för detta
ändamål användas.
Vid kallaminering får endast plastfickor
som uttryckligen är avsedda för detta
ändamål användas.
Observera att de plastfickor som ingår i
leveransen endast är avsedda för varmlaminering.
7. Inställningslägen
Tips: För högglansiga foton bör du sätta väljaren
på 125 och välja en motsvarande folietjocklek.
Ställning
väljare
i
Ställning
väljare folietjocklek
o
Folietjocklek för
lamineringsplast
HOT 80 > 60 - 80
HOT 125 85 - 125
Cold 125 upp till 200

- 23 -
8. Förberedelser för
varmlaminering
➩ Stick in styrskenan
q
i de hål som är avsedda
för detta på lamineringsmaskinens baksida.
➩ Fäll ut dokumentstöden
s
så att dokumenten dras
in rakt i öppningen för manuell foliematning
t
.
➩ Sätt lamineringsmaskinens kontakt i ett eluttag.
➩ Se till så att apparaten står stadigt.
➩ Sätt brytaren för varm- och kallaminering
i
på läge HOT.
➩ Sätt folietjockleksbrytaren
o
på önskad folietjocklek (80 eller 125 mikron). Den röda PÅ/
AV-indikatorn
u
tänds. Lamineringsmaski-
nen värms nu upp till drifttemperatur.
• Så snart den gröna indikatorlampan "Klar - för
drift"
y
börjar lysa har lamineringsma-
skinen kommit upp i rätt drifttemperatur.
Den gröna indikatorn "Klar för drift"
y
visar att apparaten kommit upp i drifttemperatur. För att få ett jämnare resultat,
särskilt för tunn folie (under 125 mikron)
och när man har ändrat folietjocklek, rekommenderar vi att man väntar i ytterligare
2 - 3 minuter innan man börjar laminera.
➩ Lägg det dokument som ska lamineras i en
plastficka av passande storlek.
Se till att det finns ett avstånd på minst två
millimeter mellan plastfickans kant och dokumentet, så som framgår av bild 1. Var
noga med att bara använda en plastficka
åt gången när du laminerar. Vik upp den
först, så som framgår av bild 2.
För att få veta mer om hur lamineringen
går till ska du läsa kapitel 10.
Bild 2
Bild 1

- 24 -
9. Förberedelser för
kallaminering
Om du först har varmlaminerat:
Låt laminatorn bli helt kall efter varmlamineringen innan du börjar kallaminera.
Annars kommer rullarna inuti laminatorn
fortfarande att vara mycket varma. Då
kan plastfickan och det dokument som
ska lamineras skadas!
➩ Stick in styrskenan
q
i de hål som är avsedda
för detta på lamineringsmaskinens baksida.
➩ Dra ut dokumentstödet
s
så att dokumenten dras
in rakt i öppningen för manuell foliematning
t
.
➩ Sätt lamineringsmaskinens kontakt i ett eluttag.
➩ Se till så att apparaten står stadigt.
➩ Sätt brytaren för varm- och kallaminering
i
på läge COLD.
Observera: Ställ alltid in folietjockleken på
125 mikron med brytaren
o
när du ska
kallaminera. Den röda PÅ/AV-indikatorn
u
och den gröna indikatorlampan "Klar för drift"
y
tänds.
➩ Stoppa in det dokument som ska lamineras i
en lagom stor folieficka.
Se till att det finns ett avstånd på minst två
millimeter mellan plastfickans kant och
dokumentet, så som framgår av bild 1.
Var noga med att bara använda en plast-
ficka åt gången när du laminerar. Vik upp
den först, så som framgår av bild 2.
För att få veta mer om hur lamineringen
går till ska du läsa kapitel 10.
10. Lamineringsprocess
➩ Lägg plastfickan på styrskenan
q
. Lägg plastfickans högra eller vänstra kant mot formatarreteringen
r
(den stängda sidan framåt). Tryck
ihop formatarreteringen
r
till passande format.
Då hindras plastfickan från att dras in snett.
Om plastfolien ändå dras in snett använder
du antiblockeringsfunktionen så som beskrivs i kapitel 11.
➩ För sedan långsamt in plastfickan i öppningen
för manuell foliematning
t
.
➩ När plastfickan förts in några centimeter i öpp-
ningen
t
fortsätter den att dras in automatiskt.
Släpp plastfickan så snart du märker att den
dras in av sig själv.
Se till att det finns en fri yta på minst 45 cm
framför laminatorn. Annars kan plastfickan
inte komma ut helt och hållet. Då kan det
laminerade dokumentet skadas.
➩ Det färdiglaminerade dokumentet kommer ut ur
öppningen
a
på lamineringsmaskinen.
Endast efter varmlaminering:
➩ Ta genast ut de varma foliefickorna ur maskinen,
annars kan de deformeras. Lägg dem att svalna
på en plan yta.
För att få ett ännu bättre resultat kan du
lägga en bok, en mapp eller något annat
tungt, platt föremål med slät yta på de
varma foliefickorna. Då blir fickorna släta
och fina.
➩ Om du inte ska laminera mer skruvar du foliet-
jockleksbrytaren
o
till läge ABS (OFF) och drar
ut kontakten ur uttaget.

- 25 -
11. Antiblockeringssystem (ABS)
När man börjar laminera kan det hända att plastfickan dras in snett eller fastnar inuti laminatorn.
➩ Skruva antibockeringsknappen (ABS)
o
till
läge ABS.
• Nu slutar laminatorn att mata in folie.
➩ Ta ut plastfolien.
➩ Vrid tillbaka antiblockeringsknappen (ABS)
o
till önskad folietjocklek.
➩ Gör ett nytt lamineringsförsök.
12. Skärfunktion
Om du vill använda skärfunktionen på styrskenan
q
tar du av styrskenan q.
➩ Fäll ev. in dokumentstödet
s
.
➩ Sätt skärtillsatsen
d
så att den ligger helt i våg
med styrskenan
q
.
➩ Skjut fram skärhuvudet
e
till anslaget (skärhu-
vudet
e
kan flyttas ända ut i bägge ändarna
av skärskenan
w
).
➩ Fäll upp skärskenan
w
med det runda handta-
get och placera dokumenten på styrskenan
q
.
Arretera dokument genom att föra ihop formatarreteringen
r
tills den ligger emot båda sidor-
na av dokumentet.
➩ Använd markeringarna på måttavlan för att
rikta dokumentet exakt.
➩ Fäll ner skärskenan
w
tills den låser fast.
➩ Håll i papperet på ett säkert sätt med vänster
hand.
➩ För att skära trycker du ner skärhuvudet
e
med höger hand och för det i en enda rörelse
över dokumentet.
13. Rengöring och skötsel
Livsfarlig elektrisk ström:
• Öppna aldrig apparatens hölje. Det finns
inga som helst kontrollelement inuti den.
• Doppa aldrig ner några delar av apparaten
i vatten eller andra vätskor!
Rengöra apparaten utvändigt:
Rengör laminatorn utvändigt med en lätt
fuktad trasa.
➩ Dra först ut kontakten.
➩ Låt apparaten bli helt kall.
➩ Akta så att det inte kommer in vätska i appara-
ten.
Rengöring invändigt:
Varje gång man laminerar fastnar smuts på rullarna
inuti laminatorn. Det försämrar laminatorns funktion
och effektivitet efter en tid. Därför bör rullarna rengöras efter varje användningstillfälle.
➩ Förbered apparaten så som beskrivs i kapitel 8
"Förberedelser för varmlaminering" fram tills
att den gröna indikatorlampan "Klar för drift"
y
börjar lysa.
➩För sedan långsamt in ett dubbelvikt DIN
A3-papper (max 1 mm tjockt) …
• utan plastficka
• med den vikta sidan framåt
… i öppningen för manuell foliematning t.

- 26 -
➩ Släpp pappret så snart du märker att det dras
in av sig själv.
• Smutsen på rullarna inuti lamineringsmaskinen
fastnar nu på pappersarket. Papperet kommer
ut ur skåran
a
på lamineringsmaskinen.
➩Upprepa proceduren flera gånger.
Ta ett nytt, rent papper varje gång.
När du inte längre kan se någon smuts på pappret
är rullarna inuti laminatorn rena.
14. Förvaring
Låt apparaten bli helt kall innan du ställer undan den.
Förvara inte laminatorn i fuktiga utrymmen,
då kan fukten tränga in i den. (t ex i källare)!
15. Kassering
Apparaten får absolut inte kastas bland
hushållssoporna. Produkten faller under
EU-direktiv 2002/96/EC.
Lämna in den till ett företag som har tillstånd att ta
hand om den här typen av uttjänta apparater eller
till din kommunala avfallsanläggning.
Följ gällande föreskrifter.
Kontakta din avfallsanläggning om du har några
frågor.
Lämna in allt förpackningsmaterial till
miljövänlig återvinning.
16. Garanti och service
För den här apparaten lämnar vi tre års garanti från
och med inköpsdatum. Den här apparaten har tillverkats med omsorg och genomgått en noggrann
kontroll innan leveransen. Var god bevara kassakvittot som köpbevis. Vi ber dig att kontakta ditt serviceställe per telefon vid garantifall. Endast då kan produkten skickas in fraktfritt.
Garantin gäller bara för bara för material- eller fabrikationsfel, den täcker inte transportskador, förslitningsdelar eller skador på ömtåliga delar som t ex
brytare och batterier. Produkten är endast avsedd
för privat bruk och får inte användas yrkesmässigt.
Vid missbruk och felaktig behandling, användande
av våld och vid ingrepp som inte gjorts av vår auktoriserade servicefilial upphör garantin att gälla.
Den lagstadgade garantin begränsas inte av denna
garanti.
Garantitiden förlängs inte för att man utnyttjar garantiförmånerna. Det gäller även för utbytta eller reparerade delar. Eventuella skador och brister som
upptäcks redan vid köpet måste anmälas omedelbart efter uppackningen, dock senast två dagar efter inköpsdatum. När garantitiden är slut måste man
betala för eventuella reparationer.
Kompernass Service Sverige
Tel.: 0770 93 00 35
E-Mail: support.sv@kompernass.com
Kompernass Service Suomi
Tel.: 010 30 935 80
(Soittamisen hinta lankaliittymästä: 8,21 snt/puh + 5,9 snt/min /
Matkapuhelimesta: 8,21 snt/puh + 16,90 snt/min)
E-Mail: support.fi@kompernass.com
17. Importör
KOMPERNASS GMBH
BURGSTRASSE 21
D-44867 BOCHUM, GERMANY
www.kompernass.com

- 27 -
Indholdsfortegnelse Side
1. Anvendelsesformål 28
2. Medfølger ved køb 28
3. Beskrivelse af maskinen 28
4. Tekniske data 28
5. Sikkerhedsanvisninger 29
6. Egnede folielommer 30
7. Omskiftertrin 30
8. Forberedelse af varmlamineringen 31
9. Forberedelse af kold-laminering 32
10. Arbejdsforløb 32
11. Antiblokeringsfunktion (ABS) 33
12. Skærefunktion 33
13. Rengøring og vedligeholdelse 33
14. Opbevaring 34
15. Bortskaffelse 34
16. Garanti og service 34
17. Importør 34
Læs betjeningsvejledningen igennem før første brug, og opbevar den til senere brug. Lad vejledningen følge
med, hvis apparatet gives videre til andre.

- 28 -
Lamineringsapparat A3
1. Anvendelsesformål
Lamineringsmaskinen er udelukkende beregnet til
varm- og koldlaminering af dokumenter af papir
eller pap i private husholdninger. Endvidere kan
man skære dokumenter med den.
Den er ikke beregnet til anvendelse med andre materialer. Den er heller ikke beregnet til anvendelse til
erhvervs- eller industrielle formål.
For skader, der opstår som resultat af, at lamineringsmaskinen bruges uden for anvendelsesområdet, giver
vi ingen garanti!
2. Medfølger ved køb
1x lamineringsmaskine med monterbar skæreenhed
8x folielommer DIN A3 til varmlaminering
(80 mikron)
1x betjeningsvejledning
3. Beskrivelse af maskinen
q
Styreskinne til folien (bag)
w
Skæreskinne
e
Skærehoved
r
Folieformatlås
t
Åbning til manuel folieforsyning
y
Indikatorlampe "driftsklar"
u
TÆND-/SLUK-indikatorlampe
i
Kontakt til valg af kold- og varmlaminering
(HOT og COLD)
o
Antiblokeringskontakt og folietykkelseskontakt
a
Folieåbning (foran)
s
Dokumentstøtte
d
Skæreenhed
4. Tekniske data
Mærkespænding: 220 - 240 V~50 Hz
Strømforbrug: 1,4 A
Effektforbrug: 300 W
Lamineringshastighed:
Foliebredde: maks. 320 mm
Folietykkelse varmlaminering: maks. 125 mikron
Folietykkelse koldlaminering: maks. 200 mikron
Beskyttelsesklasse: II/
Skæreenhedens skærekapacitet
d
:
maks. 3 ark 80g/m
2
eller et lamineret dokument
(80 mikron).
Foliestørrelse 80 mikron 125 mikron
A4 ca. 52 s ca. 70 s
A3 ca. 75 s ca. 105 s

- 29 -
Overophedningsbeskyttelse
Dette apparat er udstyret med en overophedningsbeskyttelse. Hvis motoren bliver for varm på grund
af overbelastning, kobles den automatisk fra. Tag så
strømstikket ud, og vent, til apparatet er kølet ned til
rumtemperatur. Derefter kan du tilslutte strømstikket
til strømforsyningen og starte apparatet igen. Vi anbefaler at lade apparatet køle af i ca. 30 minutter
efter 2 timer drift.
5. Sikkerhedsanvisninger
• Denne lamineringsmaskine må ikke benyttes af
personer (inklusive børn) med begrænsede fysiske,
sensoriske eller psykiske evner eller med manglende
erfaringer og/eller manglende viden, medmindre
en ansvarlig person holder opsyn med dem og
giver dem anvisninger til, hvordan lamineringsmaskinen skal benyttes.
• Hold øje med børn, så de ikke leger med lamine-
ringsmaskinen.
• Træk stikket ud efter brug og inden rengøring,
så maskinen ikke aktiveres ved en fejltagelse.
• Kontrollér maskinen og alle dele for synlige skader.
Maskinens sikkerhedskoncept fungerer kun, hvis
maskinen er i fejlfri stand.
• Antændelige, varmefølsomme og/ eller smeltelige
materialer eller tegninger på varmefølsomt papir,
eller materialer, hvis farve eller kvalitet forandrer
sig ved varmepåvirkning, må principielt ikke varmelamineres.
• Undlad at laminere værdifulde, enestående doku-
menter. Selv om lamineringsmaskinen overholder
alle almindelige sikkerhedsnormer/-standarder,
kan fejlfunktioner – som ved alle elapparater –
aldrig udelukkes helt. Fejlfunktioner på lamineringsmaskinen kan medføre, at dokumentet, der
skal lamineres, ødelægges.
• Laminér ikke dokumenter, som sammen med lamineringsfolien har en tykkelse på mere end 1,0 mm.
Ellers kan folielommen sætte sig fast inden i lamineringsmaskinen. Derved kan folielommen og dokumentet til laminering samt lamineringsmaskinen
blive beskadiget.
• Brug ikke forlængerledning. Stil maskinen, så det
er nemt at komme til stikkontakten, så stikket i nødstilfælde kan trækkes ud, så maskinen afbrydes fra
strømforsyningen.
• Brug aldrig et eksternt tænd-sluk-ur eller et separat
fjernkontrolsystem til at styre lamineringsmaskinen
med.
• Stil maskinen, så det er nemt at komme til stikket,
så den i nødstilfælde hurtigt kan afbrydes fra
strømnettet.
Fare for elektrisk stød!
• Slut lamineringsmaskinen til en stikkontakt med
en netspænding på 220-240 V ~50 Hz.
• Maskinen må ikke bruges med beskadiget ledning
eller stik.
• Lad omgående defekte stik eller kabler udskifte
af en autoriseret reparatør, så farlige situationer
undgås.
• Læg aldrig maskinen ned i vand.
Tør den kun af med en fugtig klud.
• Udsæt ikke lamineringsmaskinen for regn, og
brug den aldrig i fugtige eller våde omgivelser.
• Sørg for, at tilslutningsledningen aldrig bliver våd
eller fugtig, når maskinen er i gang.
• Afbryd strømmen til maskinen efter brug. Maskinen
er kun fuldstændigt strømfri, hvis du trækker stikket ud af stikkontakten.
• Du må ikke åbne eller reparere lamineringsmaskinens kabinet. Gør du det, er maskinen ikke sikker,
og garantien bortfalder.

- 30 -
Brandfare!
• Brug ikke maskinen i nærheden af varme overflader.
• Stil ikke maskinen på steder, hvor den er udsat for
direkte sol.
Ellers kan den overophedes og gå i stykker, så
den ikke længere kan repareres.
• Hold altid øje med maskinen under brug.
• Dæk aldrig luftåbningerne på maskinens overside
til, når den er tændt.
Fare for personskade!
•
Hold børn væk fra tilslutningsledningen og lamineringsmaskinen. Børn undervurderer ofte farerne ved
elapparater.
• Sørg for at holde lamineringsmaskinen i god
stand.
• Hvis lamineringsmaskinen falder ned eller er
beskadiget, må den ikke længere tages i brug.
Lad en kvalificeret tekniker efterse og ved behov
reparere maskinen.
• Dele af lamineringsmaskinen bliver varme
under brug. Rør ikke ved dem, så du undgår
forbrændinger.
6. Egnede folielommer
• Du kan bruge folielommer med en bredde på op
til 230 mm og en tykkelse på maksimalt 125 mikron
til varmlaminering.
• Vær opmærksom på, at folielommerne kun kan
bruges én gang til laminering.
Til varmlaminering må du udelukkende
bruge folielommer, som udtrykkeligt er
beregnet til varmlaminering.
Til koldlaminering må du udelukkende
bruge folielommer, som udtrykkeligt er
beregnet til koldlaminering.
Vær opmærksom på, at folielommerne, som
leveres med, udelukkende er beregnet til
varmlaminering.
7. Omskiftertrin
Tip: Ved højglansfotos skal du vælges kontaktstilling
“125” og den korrekte lamineringsfolietykkelse.
Stilling
Funktionsvælger
i
Stilling
Folietykkelses-
kontakt
o
Lamineringsfolie-
tykkelse
HOT 80 > 60 - 80
HOT 125 85 - 125
Cold 125 til 200

- 31 -
8. Forberedelse af varmlamineringen
➩ Sæt styreskinnen til folien
q
ind i de dertil beregnede huller på bagsiden af lamineringsmaskinen.
➩ Klap dokumentstøtterne
s
ud, så dokumentrene
trækkes lige ind i åbningen til manuel folieforsyning
t
.
➩ Sæt lamineringsmaskinens strømstik i en stik-
kontakt.
➩ Sørg for, at maskinen står fast og stabilt.
➩ Stil kontakten til valg mellem varm- og kold-
laminering
i
på "HOT".
➩ Stil folietykkelseskontakten
o
på den ønskede
folietykkelse (80 eller 125 mikron). Nu lyser den
røde TÆND- / SLUK-indikatorlampe
u
.
Lamineringsmaskinen varmes op til driftstemperatur.
• Så snart den grønne indikatorlampe "driftsklar"
y
lyser, har lamineringsmaskinen nået
sin driftstemperatur.
Når driftstemperaturen er nået, lyser den
grønne LED-indikationslampe "driftsklar"
y
. For at opnå et ensartet lamineringsresultat anbefaler vi især i forbindelse med
tyndere folier (under 125 mikron) og ved
indstilling af en anden folietykkelse, at
lamineringen først startes efter en ekstra
ventetid på ca. 2-3 minutter.
➩ Læg dokumentet i en folielomme med en pas-
sende størrelse.
Pas på, at alle dokumentets kanter har
mindst to millimeters afstand til folielommens kant som beskrevet i fig. 1. Sørg for
kun at anvende folie, der er beregnet til
laminering. Luk folien op som beskrevet i
fig. 2.
For informationer om laminerings-
forløbet bedes du læse videre under
kapitel 10.
Fig. 2
Fig. 1

- 32 -
9. Forberedelse af koldlaminering
Hvis du tidligere har varmlamineret:
Lad først lamineringsmaskinen afkøle helt
efter varmlamineringen, før du begynder
med koldlamineringen. Ellers er valserne
inden i lamineringsmaskinen stadig varme.
Derved kan folielommen og dokumentet
til laminering blive beskadiget!
➩ Sæt styreskinnen til folien
q
ind i de dertil
beregnede huller på bagsiden af lamineringsmaskinen.
➩ Træk dokumentstøtten
s
ud, så dokumenterne
trækkes lige ind i åbningen til manuel folieforsyning
t
.
➩ Sæt lamineringsmaskinens strømstik i en stik-
kontakt.
➩ Sørg for, at maskinen står fast og stabilt.
➩ Stil kontakten til valg mellem varm- og kold-
laminering
i
på "COLD".
Bemærk: Stil altid folietykkelseskontakten
o
på 125 mic ved koldlaminering. Den røde
TÆND- / SLUK-indikatorlampe
u
og den
grønne indikatorlampe "driftsklar"
y
lyser nu.
➩ Læg dokumentet, der skal lamineres, ind i en
folielomme af passende størrelse.
Sørg for, at alle dokumentets kanter har
mindst to millimeters afstand til folielommens
kant som beskrevet i fig. 1.
Vær opmærksom på, at du udelukkende må
anvende folie, der er beregnet til laminering.
Luk den op som beskrevet i fig. 2.
For informationer om lamineringsforløbet
bedes du læse videre under kapitel 10.
10. Arbejdsforløb
➩ Læg folielommen på folieskinnen q. Læg folie-
lommens højre eller venstre kant op ad folieformatlåsen
r (lukket side fremad). Skub folieformat-
låsen
r
sammen, så du får det valgte format.
Sådan forhindrer du, at folielommen trækkes
skævt ind.
Hvis folien alligevel trækkes skævt ind,
skal du bruge "antiblokeringsfunktionen"
som beskrevet i kapitel 11.
➩ Skub nu langsomt folielommen ind i åbningen til
manuel folieindføring
t.
➩ Når du har sat folielommen nogle centimeter
længere ind i åbningen
t
, trækkes den automatisk videre ind. Slip folielommen, så snart
du mærker, at den trækkes automatisk ind.
Sørg for, at der er mindst 45 cm fri plads
foran lamineringsmaskinen. Ellers kan
folielommen ikke komme rigtigt ud efter
lamineringen. Den laminerede folielomme
kan ødelægges.
➩ Den færdiglaminerede folielomme kommer ud af
lamineringsmaskinens folieåbning
a
.
Kun efter varmlaminering:
➩ Tag straks folielommen ud af maskinen, da varme
folielommer let kan deformeres. Læg den på en
jævn overflade, så den kan køles af.
For at forbedre lamineringsresultatet kan
du lægge en bog, en mappe eller en anden
tung genstand oven på den varme folielomme. Så får den en helt glat overflade.
➩ Hvis du ikke vil starte flere lamineringer, skal du
dreje folietykkelseskontakten
o
hen på OFF
og tage stikket ud af stikkontakten.

- 33 -
11. Antiblokeringsfunktion
(ABS)
I begyndelsen af lamineringsforløbet kan folien
trækkes skævt ind eller sætte sig fast inden i maskinen.
➩ Drej antiblokeringskontakten (ABS)
o
hen
på position ABS.
• Folien trækkes ikke længere ind.
➩ Tag folien ud.
➩ Drej igen antiblokeringskontakten (ABS)
o
hen på den ønskede folietykkelse.
➩ Start lamineringen igen.
12. Skærefunktion
Hvis du vil bruge skærefunktionen på folieskinnen q,
skal du tage folieskinnen
q
af.
➩ Klap dokumentstøtten
s
ind.
➩ Indstil skæreenheden
d
, så den danner en
lige linje med styreskinnen til folien
q
.
➩ Flyt skærehovedet
e
indtil stop (skærehovedet
e
kan flyttes til begge ender af skæreskinnen w).
➩ Klap skæreskinnen
w
op med det afrundede
greb, og læg dokumenterne på folieskinnen
q
.
Lås dokumentet fast ved at skubbe folieformatlåsen
r
sammen, indtil den rører ved begge
dokumentets sider.
➩ Brug markeringerne på målestokken, så doku-
mentet ligger helt perfekt.
➩ Klap skæreskinnen
w
ned, så den går i hak.
➩ Hold papiret i en sikker position med venstre
hånd.
➩ Tryk skærehovedet
e
ned med højre hånd,
og flyt den med et træk hen over dokumentet.
13. Rengøring og
vedligeholdelse
Livsfare på grund af elektrisk stød:
• Åbn aldrig lamineringsmaskinens kabinet.
Der er ikke betjeningsdele i kabinettet.
• Læg aldrig maskinens dele ned i vand eller
andre væsker!
Rengøring af kabinettet:
Rengør kabinetoverfladen med en let fugtet
klud.
➩ Træk først strømstikket ud.
➩ Lad maskinen afkøle fuldstændigt.
➩ Sørg for, at der ikke kommer fugt ind i det
indvendige af maskinen.
Rengøring af det indvendige af kabinettet:
Ved hver laminering aflejres der urenheder på valserne
i det indvendige af lamineringsmaskinen. Dermed
falder lamineringsmaskinens ydeevne i tidens løb.
Derfor bør du rengøre valserne inden i lamineringsmaskinen efter brug.
➩ Forbered maskinen som beskrevet i kapitel 8
"Varmlaminering", indtil den grønne indikationslampe "driftsklar"
y
lyser.
➩ Sæt et ark DIN A3 papir (tykkelse maksimalt
1,0 mm), som er foldet på midten...
• uden folielomme og
• med falsen fremad
… langsomt ind i spalten for manuel folieind-
føring
t
.
➩ Slip arket, så snart du mærker, at det trækkes
automatisk ind.

- 34 -
• Nu sætter urenhederne på rullerne inden i lamineringsmaskinen sig fast på papirarket. Papiret
kommer ud af lamineringsmaskinens folieåbning
a
.
➩Gentag rengøringen flere gange.
Tag hver gang et nyt, rent stykke papir.
Når du ikke kan se nogen urenheder på papiret
mere, er valserne inden i lamineringsmasinen
rene.
14. Opbevaring
Lad lamineringsmaskinen køle helt af, før du stiller
den væk.
Opbevar ikke lamineringsmaskinen på
fugtige steder, da der kan trænge fugt ind
i den. (f. eks. kælderrum)!
15. Bortskaffelse
Smid aldrig lamineringsmaskinen ud
sammen med det normale husholdningsaffald. Dette produkt er underkastet det
europæiske direktiv 2002/96/EC.
Bortskaf lamineringsmaskinen via en godkendt
bortskaffelsesvirksomhed eller den kommunale
genbrugsstation.
Følg de aktuelt gældende regler.
Henvend dig i tvivlstilfælde til det lokale bortskaffelsessted.
Aflever alle emballagematerialer på et
affaldsdepot, så miljøet skånes.
16. Garanti og service
På denne donkraft får du 3 års garanti fra købsdatoen. Apparatet er produceret omhyggeligt og inden levering afprøvet samvittighedsfuldt. Opbevar
kassebonen som bevis for købet.
I garantitilfælde bedes du kontakte service-afdelingen telefonisk. På denne måde kan gratis indsendelse af varen garanteres.
Garantiydelsen gælder kun for materiale- eller fabrikationsfejl, men ikke for transportskader, sliddele eller skader på skrøbelige dele som f.eks. kontakter
eller batterier. Produktet er kun beregnet til privat og
ikke til erhvervsmæssigt brug.
Ved misbrug og uhensigtsmæssig behandling, anvendelse af vold og ved indgreb, som ikke er foretaget af vores autoriserede service-afdeling, ophører
garantien. Dine juridiske rettigheder indskrænkes
ikke ved denne garanti.
Garantiperioden forlænges ikke på grund af produktansvaret. Det gælder også for udskiftede og reparerede dele. Eventuelle skader og mangler, som
allerede findes ved køb, skal straks anmeldes efter
udpakning og senest to dage efter købsdatoen.
Når garantiperioden er udløbet, skal udgifterne til
reparationer betales normalt.
Kompernass Service Danmark
Tel.: 80-889 980
(
Der kan kun ringes til servicenummeret fra fastnet)
E-Mail: support.dk@kompernass.com
17. Importør
KOMPERNASS GMBH
BURGSTRASSE 21
D-44867 BOCHUM, GERMANY
www.kompernass.com

- 35 -
Inhaltsverzeichnis Seite
1. Verwendungszweck 36
2. Lieferumfang 36
3. Gerätebeschreibung 36
4. Technische Daten 36
5. Sicherheitshinweise 37
6. Geeignete Folientaschen 38
7. Schaltstufen 38
8. Heißlaminieren vorbereiten 39
9. Kaltlaminieren vorbereiten 40
10. Laminiervorgang 40
11. Anti Blockier-Funktion (ABS) 41
12. Schneidfunktion 41
13. Reinigen und Pflegen 42
14. Aufbewahren 42
15. Entsorgen 42
16. Garantie und Service 43
17. Importeur 43
Lesen Sie die Bedienungsanleitung vor der ersten Verwendung aufmerksam durch und heben Sie diese für
den späteren Gebrauch auf. Händigen Sie bei Weitergabe des Gerätes an Dritte auch die Anleitung aus.

- 36 -
Laminiergerät A3
1. Verwendungszweck
Das Laminiergerät ist ausschließlich zum Heiß- und
Kaltlaminieren von Dokumenten aus Papier oder
Pappe in privaten Haushalten bestimmt. Desweiteren kann man die Dokumente schneiden.
Es ist nicht zur Verwendung mit anderen Materialien
bestimmt. Es ist ebenfalls nicht zur Verwendung in
gewerblichen oder industriellen Bereichen vorgesehen.
Für Schäden, die aus nicht bestimmungsgemäßem
Gebrauch des Gerätes resultieren, wird keine
Gewährleistung übernommen!
2. Lieferumfang
1x Laminiergerät mit ansteckbarem
Schneideaufsatz
8x Folientaschen DIN A3 zum Heißlaminieren
(80 Mikron)
1x Bedienungsanleitung
3. Gerätebeschreibung
q
Folienführungsschiene (hinten)
w
Schneideschiene
e
Schneidekopf
r
Folienformat-Arretierung
t
Schlitz für manuelle Folienzufuhr
y
Indikationsleuchte „Betriebsbereit“
u
EIN-/AUS-Indikationsleuchte
i
Wahlschalter für Heiß- und Kaltlaminieren
(HOT und COLD)
o
Anti Blockier-Schalter und Folienstärke-Schalter
a
Folien-Schlitz (vorne)
s
Dokumentstütze
d
Schneideaufsatz
4. Technische Daten
Nennspannung: 220 - 240 V~50 Hz
Stromaufnahme: 1,4 A
Leistungsaufnahme: 300 W
Laminiergeschwindigkeit:
Folienbreite: max. 320 mm
Folienstärke Heißlaminieren: max. 125 Mikron
Folienstärke Kaltlaminieren: max. 200 Mikron
Schutzklasse: II/
Schneidekapazität des Schneideaufsatzes
d
:
max. 3 Blatt 80g/m
2
oder ein laminiertes Doku-
ment (80 Mikron).
Foliengröße 80 Mikron 125 Mikron
A4 ca. 52 s ca. 70 s
A3 ca. 75 s ca. 105 s

- 37 -
ÜÜbbeerrhhiittzzuunnggsssscchhuuttzz
Dieses Gerät ist mit einem Überhitzungsschutz ausgestattet. Wenn der Motor aufgrund von Überlastung zu heiß wird, schaltet sich das Gerät automatisch aus. Ziehen Sie in diesem Fall den Netzstecker
und warten Sie, bis sich das Gerät auf die Raumtemperatur abgekühlt hat. Sie können dann den Netzstecker wieder mit dem Stromnetz verbinden und
das Gerät wieder in Betrieb nehmen.
Wir empfehlen, nach 2 Stunden Betrieb das Gerät
für ca. 30 Minuten abkühlen zu lassen.
5. Sicherheitshinweise
• Dieses Gerät ist nicht dafür bestimmt, durch
Personen (einschließlich Kinder) mit eingeschränkten physischen, sensorischen oder
geistigen Fähigkeiten oder mangels Erfahrung
und/oder mangels Wissen benutzt zu werden, es
sei denn, sie werden durch eine für ihre
Sicherheit zuständige Person beaufsichtigt oder
erhielten von ihr Anweisungen, wie das Gerät zu
benutzen ist.
• Kinder sollten beaufsichtigt werden, um sicherzu-
stellen, dass sie nicht mit dem Gerät spielen.
• Ziehen Sie nach jedem Gebrauch und vor jeder
Reinigung den Netzstecker, um ein unbeabsichtigtes Einschalten zu vermeiden.
• Prüfen Sie das Gerät und alle Teile auf sichtbare
Schäden. Nur in einwandfreiem Zustand kann
das Sicherheitskonzept des Gerätes
funktionieren.
• Heißlaminieren Sie grundsätzlich keine
entzündlichen, hitzeempfindlichen und/ oder
schmelzbaren Materialien und keine Zeichnungen auf wärmeempfindlichem Papier bzw.
Material, dessen Farbe bzw. Qualität sich durch
Hitzeeinwirkung verändert.
• Laminieren Sie grundsätzlich keine wertvollen,
einzigartigen Dokumente. Obwohl das Laminiergerät allen gängigen Sicherheitsnormen/
-standards entspricht, können Fehlfunktionen –
wie bei allen Elektrogeräten – niemals völlig ausgeschlossen werden. Fehlfunktionen des Laminiergerätes können zu Beschädigungen am zu laminierenden Dokument führen.
• Laminieren Sie keine Dokumente, die zusammen
mit der Laminierfolie eine Dicke von mehr als
1,0 mm haben. Anderenfalls kann sich die Folientasche im Inneren des Laminiergerätes verkanten.
Dadurch können die Folientasche, das zu laminierende Dokument sowie das Laminiergerät beschädigt werden.
• Benutzen Sie keine Verlängerungskabel. Platzieren Sie das Gerät so, dass die Netzsteckdose gut
zu erreichen ist, um das Gerät im Notfall schnell
vom Stromnetz trennen zu können.
• Benutzen Sie keine externe Zeitschaltuhr oder ein
separates Fernwirksystem um das Gerät zu betreiben.
• Stellen Sie das Gerät so auf, dass der Netzstecker gut zu erreichen ist, und das Gerät im
Notfall schnell vom Stromnetz getrennt werden
kann.
Gefahr durch elektrischen Schlag!
• Schließen Sie das Gerät an eine Netzsteckdose
mit einer Netzspannung von 220 -240 V
~
50 Hz an.
• Betreiben Sie das Gerät nicht mit beschädigter
Anschlussleitung oder Netzstecker.
• Lassen Sie beschädigte Netzstecker oder Netzkabel sofort von autorisiertem Fachpersonal oder
dem Kundenservice austauschen, um Gefährdungen zu vermeiden.
• Tauchen Sie das Gerät niemals in Wasser ein.
Wischen Sie es nur mit einem feuchten Tuch ab.
• Setzen Sie das Gerät nicht dem Regen aus und
benutzen Sie es auch niemals in feuchter oder
nasser Umgebung.

- 38 -
• Achten Sie darauf, dass die Anschlussleitung
während des Betriebs niemals nass oder feucht
wird.
• Trennen Sie das Gerät sofort nach Gebrauch
vom Stromnetz. Nur wenn Sie den Netzstecker
aus der Netzsteckdose ziehen, ist das Gerät
völlig stromfrei.
• Sie dürfen das Gerätegehäuse nicht öffnen oder
reparieren. In diesem Falle ist die Sicherheit nicht
gegeben und die Gewährleistung erlischt.
Brandgefahr!
• Benutzen Sie das Gerät nicht in der Nähe von
heißen Oberflächen.
• Stellen Sie das Gerät nicht an Orten auf, die
direkter Sonnenstrahlung ausgesetzt sind.
Anderenfalls kann es überhitzen und irreparabel
beschädigt werden.
• Lassen Sie das Gerät während des Betriebs niemals unbeaufsichtigt.
• Decken Sie niemals die Lüftungsschlitze auf der
Oberseite des Gerätes ab, wenn es eingeschaltet
ist.
Verletzungsgefahr!
•
Halten Sie Kinder von Anschlussleitung und Gerät
fern. Kinder unterschätzen häufig die Gefahren von
Elektrogeräten.
• Sorgen Sie für einen sicheren Stand des Gerätes.
• Falls das Gerät heruntergefallen oder beschädigt
ist, dürfen Sie es nicht mehr in Betrieb nehmen.
Lassen Sie das Gerät von qualifiziertem Fachpersonal überprüfen und gegebenfalls
reparieren.
• Teile des Gerätes werden während des
Gebrauchs heiß. Berühren Sie diese nicht um
Verbrennungen zu vermeiden.
6. Geeignete Folientaschen
• Sie können zum Heißlaminieren Folientaschen mit
einer Breite von bis zu 320 mm und einer Stärke
von maximal 125 Mikron benutzen.
• Beachten Sie, dass jede Folientasche nur einmal
zum Laminieren verwendet werden kann.
Verwenden Sie zum Heißlaminieren aus-
schließlich Folientaschen, die ausdrücklich
zum Heißlaminieren vorgesehen sind.
Verwenden Sie zum Kaltlaminieren ausschließlich Folientaschen, die ausdrücklich
zum Kaltlaminieren vorgesehen sind.
Beachten Sie, dass die im Lieferumfang
enthaltenen Folientaschen ausschließlich
zum Heißlaminieren geeignet sind.
7. Schaltstufen
Tipp: Bei Hochglanz Fotos sollten Sie Schalter-
stellung “125”, sowie die entsprechende
Laminierfolienstärke wählen.
Stellung
Wahlschalter
i
Stellung
Folienstärke-Schalter
o
Laminierfolien-
stärke
HOT 80 > 60 - 80
HOT 125 85 - 125
COLD 125 bis 200

- 39 -
8. Heißlaminieren vorbereiten
➩ Stecken Sie die Folienführungsschiene
q
in die
dafür vorgesehenen Löcher auf der Rückseite
des Laminiergerätes.
➩ Klappen Sie die Dokumentstützen
s
heraus, damit die Dokumente grade in den Schlitz für manuelle Folienzufuhr
t
eingezogen werden.
➩ Stecken Sie den Netzstecker des Laminiergerä-
tes in eine Netzsteckdose ein.
➩ Sorgen Sie für einen festen Stand des Gerätes.
➩ Stellen Sie den Wahlschalter für Heiß- und
Kaltlaminieren
i
auf „HOT“.
➩ Stellen Sie den Folienstärke-Schalter
o
auf die
gewünschte Folienstärke ein (80 oder 125
Mikron). Die rote EIN- / AUS-Indikationsleuchte
u
leuchtet nun.
Das Laminiergerät erwärmt sich auf
Betriebstemperatur.
• Sobald die grüne Indikationsleuchte
„Betriebsbereit“
y
leuchtet, hat das La-
miniergerät seine Betriebstemperatur erreicht.
Das Erreichen der Betriebstemperatur wird
durch Aufleuchten der grünen
Indikationsleuchte „Betriebsbereit“
y
angezeigt. Für ein gleichmäßigeres Laminierergebnis empfehlen wir, insbesondere bei dünneren Folien (unter 125
Mikron) und beim Einstellen einer
anderen Folienstärke, erst nach einer zusätzlichen Wartezeit von ca. 2-3 Minuten
mit dem Laminiervorgang zu beginnen.
➩ Legen Sie das zu laminierende Dokument in
eine Folientasche passender Größe ein.
Achten Sie darauf, dass alle Ränder des
Dokuments mindestens zwei Millimeter
Abstand zum Rand der Folientasche haben müssen, wie in Abb. 1 beschrieben.
Beachten Sie, dass Sie lediglich eine Folie
zum Laminieren verwenden. Klappen Sie
diese vorher auf, wie in Abb. 2 beschrieben.
Für Informationen zum Laminiervor-
gang lesen Sie bitte weiter unter
Kapitel 10.
Abb. 2
Abb. 1

- 40 -
9. Kaltlaminieren vorbereiten
Wenn Sie zuvor heißlaminiert haben:
Lassen Sie das Laminiergerät nach dem
Heißlaminieren erst komplett abkühlen,
bevor Sie mit dem Kaltlaminieren
beginnen. Anderenfalls sind die Rollen im
Inneren des Laminiergerätes noch heiß.
Dadurch können die Folientasche und das
zu laminierende Dokument beschädigt
werden!
➩ Stecken Sie die Folienführungsschiene
q
in die
dafür vorgesehenen Löcher auf der Rückseite
des Laminiergerätes.
➩ Ziehen Sie die Dokumentstütze
s
heraus, damit
die Dokumente grade in den Schlitz für manuelle Folienzufuhr
t
eingezogen werden.
➩ Stecken Sie den Netzstecker des Laminiergerä-
tes in eine Netzsteckdose ein.
➩ Sorgen Sie für einen festen Stand des Gerätes.
➩ Stellen Sie den Wahlschalter für Heiß- und
Kaltlaminieren
i
auf „COLD“.
Hinweis: Stellen Sie zum Kaltlaminieren den
Folienstärke-Schalter
o
immer auf 125 mic.
Die rote EIN- / AUS-Indikationsleuchte
u
und die grüne Indikationsleuchte „Betriebsbereit“
y
leuchten nun.
➩ Legen Sie das zu laminierende Dokument in
eine Folientasche passender Größe ein.
Achten Sie darauf, dass alle Ränder des
Dokuments mindestens zwei Millimeter
Abstand zum Rand der Folientasche
haben müssen, wie in Abb. 1 beschrieben.
Beachten Sie, dass Sie lediglich eine Folie
zum Laminieren verwenden. Klappen Sie
diese vorher auf, wie in Abb. 2 beschrieben.
Für Informationen zum Laminiervorgang
lesen Sie bitte weiter unter Kapitel 10.
10. Laminiervorgang
➩ Legen Sie die Folientasche auf die Folien-
führungsschiene
q
. Legen Sie die rechte oder
linke Kante der Folientasche an die Folienformat-Arretierung
r
an (geschlossene Seite
voran). Schieben Sie die Folienformat-Arretierung
r
so weit zusammen, bis das gewählte
Format erreicht ist. So verhindern Sie, dass die
Folientasche schräg eingezogen wird.
Wird die Folie dennoch schräg einge-
zogen, benutzen Sie die „Anti BlockierFunktion“, wie in Kapitel 11 beschrieben.
➩ Schieben Sie die Folientasche nun langsam in
den Schlitz für manuelle Folienzufuhr
t
.
➩ Wenn Sie die Folientasche einige Zentimeter
weit in den Schlitz
t
eingeschoben haben, wird
sie automatisch weiter eingezogen. Lassen Sie
die Folientasche los, sobald Sie merken, dass sie
automatisch eingezogen wird.
Sorgen Sie dafür, dass vor dem Laminier-
gerät mindestens 45 cm Platz frei bleiben.
Anderenfalls kann die Folientasche nach
dem Laminieren nicht vollständig aus dem
Laminiergerät ausgegeben werden. Die
laminierte Folientasche kann beschädigt
werden.

- 41 -
➩ Die fertig laminierte Folientasche wird aus dem
Folien-Schlitz
a
des Laminiergerätes ausgege-
ben.
Nur nach dem Heißlaminieren:
➩ Nehmen Sie diese sofort aus dem Gerät, da sich
heiße Folientaschen noch leicht verformen können. Legen Sie sie zum auskühlen auf eine ebene Fläche.
Um das Laminierergebnis zu verbessern,
können Sie die noch heiße Folientasche
mit einem Buch, einem Aktenordner oder
einem anderen schweren, glatten Gegenstand beschweren. So erhält sie eine
glatte, makellose Oberfläche.
➩ Wenn Sie keinen weiteren Laminiervorgang star-
ten wollen, drehen Sie den Folienstärke-Schalter
o
auf ABS (OFF) und ziehen Sie den Netz-
stecker aus der Netzsteckdose.
11. Anti Blockier-Funktion (ABS)
Zu beginn des Laminierens kann die Folie schräg
eingezogen werden oder sich im Geräteinneren
verhaken.
➩ Drehen Sie den Anti Blockier-Schalter (ABS)
o
auf die Position ABS.
• Die Folie wird nicht weiter eingezogen.
➩ Entnehmen Sie die Folie.
➩ Drehen Sie den Anti Blockier-Schalter (ABS)
o
wieder auf die gewünschte Folienstärke.
➩ Beginnen Sie erneut mit dem Laminiervorgang.
12. Schneidfunktion
Wenn Sie die Schneidfunktion an der Folienführungsschiene
q
benutzen wollen, nehmen Sie die
Folienführungsschiene
q
ab.
➩ Klappen Sie, wenn nötig die Dokumentenstütze
s
ein.
➩ Stellen Sie den Schneideaufsatz
d
so ein,
dass er eine grade Fläche mit der Folienführungsschiene
q
bildet.
➩ Schieben Sie den Schneideknopf
e
bis zum
Anschlag (Der Schneidekopf
e
kann bis zu
beiden Enden der Schneideschiene
w
gescho-
ben werden).
➩ Klappen Sie die Schneideschiene
w
am gerundeten Griff nach oben und positionieren Sie
die Dokumente auf der Folienführungsschiene
q
. Arretieren Sie das Dokument, indem Sie
die Folienformat-Arretierung
r
zusammenschieben, bis sie beide Seiten des Dokumentes
berührt.
➩ Benutzen Sie die Markierungen auf der Maß-
stabtafel, um Ihr Dokument exakt auszurichten.
➩ Klappen Sie die Schneideschiene
w
nach
unten, so dass sie einrastet.
➩ Halten Sie das Papier mit der linken Hand in
sicherer Position.
➩ Zum Schneiden drücken Sie den Schneidekopf
e
mit der rechten Hand nach unten und schie-
ben Sie ihn in einem Zug über das Dokument.

- 42 -
13. Reinigen und Pflegen
Lebensgefahr durch elektrischen Schlag:
• Öffnen Sie niemals das Gehäuse des
Geräts. Es befinden sich keinerlei Bedienelemente darin.
• Tauchen Sie die Geräteteile niemals in
Wasser oder andere Flüssigkeiten!
Reinigen des Gehäuses:
Reinigen Sie die Gehäuseoberfläche mit
einem leicht angefeuchteten Spültuch.
➩ Ziehen Sie zunächst den Netzstecker.
➩ Lassen Sie das Gerät vollständig abkühlen.
➩ Achten Sie darauf, dass keine Feuchtigkeit ins
Geräteinnere gelangt.
Reinigen des Geräteinneren:
Bei jedem Laminieren lagern sich Verunreinigungen
auf den Rollen im Inneren des Laminiergerätes ab.
Dadurch sinkt die Leistungsfähigkeit des Laminiergerätes im Laufe der Zeit. Sie sollten die Rollen im
Inneren des Laminiergerätes daher nach dem
Gebrauch reinigen.
➩ Bereiten Sie das Gerät so weit vor, wie in
Kapitel 8 „Heißlaminieren vorbereiten“ beschrieben, bis die grüne Indikationsleuchte
„Betriebsbereit“
y
leuchtet.
➩ Führen Sie dann ein in der Mitte gefaltetes
Blatt DIN A3-Papier (Stärke maximal 1,0 mm)
…
• ohne Folientasche und
• mit dem Falz voran
… langsam in den Schlitz für manuelle Folienzu-
fuhr
t
ein.
➩ Lassen Sie das Blatt los, sobald Sie merken, dass
es automatisch eingezogen wird.
• Die Verunreinigungen auf den Rollen im Inneren
des Laminiergerätes setzen sich nun auf dem
Blatt Papier fest. Das Papier wird aus dem
Folien-Schlitz
a
des Laminiergerätes ausgege-
ben.
➩ Wiederholen Sie die Reinigung mehrmals.
Nehmen Sie bei jedem Mal ein neues, sauberes
Blatt Papier.
Wenn Sie auf dem Papier keine Verunreinigungen mehr sehen, so sind die Rollen im Inneren
des Laminiergerätes sauber.
14. Aufbewahren
Lassen Sie das Gerät erst vollständig auskühlen,
bevor Sie es wegstellen.
Lagern Sie das Laminiergerät nicht an
feuchten Orten, da sonst Feuchtigkeit in
das Geräteinnere eindringen kann
(z. B. Kellerräume)!
15. Entsorgen
Werfen Sie das Gerät keinesfalls in den
normalen Hausmüll. Dieses Produkt
unterliegt der europäischen Richtlinie
2002/96/EC.
Entsorgen Sie das Gerät über einen zugelassenen
Entsorgungsbetrieb oder über Ihre kommunale
Entsorgungseinrichtung.
Beachten Sie die aktuell geltenden Vorschriften.
Setzen Sie sich im Zweifelsfall mit Ihrer Entsorgungseinrichtung in Verbindung.
Führen Sie alle Verpackungsmaterialien
einer umweltgerechten Entsorgung zu.

- 43 -
16. Garantie und Service
Sie erhalten auf dieses Gerät 3 Jahre Garantie ab
Kaufdatum. Das Gerät wurde sorgfältig produziert
und vor Anlieferung gewissenhaft geprüft.
Bitte bewahren Sie den Kassenbon als Nachweis
für den Kauf auf. Bitte setzen Sie sich im Garantiefall mit Ihrer Servicestelle telefonisch in Verbindung.
Nur so kann eine kostenlose Einsendung Ihrer Ware
gewährleistet werden.
Die Garantieleistung gilt nur für Material- oder
Fabrikationsfehler, nicht aber für Transportschäden,
Verschleißteile oder für Beschädigungen an zerbrechlichen Teilen, z. B. Schalter oder Akkus. Das
Produkt ist lediglich für den privaten und nicht für
den gewerblichen Gebrauch bestimmt.
Bei missbräuchlicher und unsachgemäßer Behandlung, Gewaltanwendung und bei Eingriffen, die
nicht von unserer autorisierten Service-Niederlassung vorgenommen wurden, erlischt die Garantie.
Ihre gesetzlichen Rechte werden durch diese
Garantie nicht eingeschränkt.
Die Garantiezeit wird durch die Gewährleistung
nicht verlängert. Dies gilt auch für ersetzte und reparierte Teile. Eventuell schon beim Kauf vorhandene
Schäden und Mängel müssen sofort nach dem
Auspacken gemeldet werden, spätestens aber zwei
Tage nach Kaufdatum. Nach Ablauf der Garantiezeit anfallende Reparaturen sind kostenpflichtig.
Schraven
Service- und Dienstleistungs GmbH
Tel.: +49 (0) 180 5 008107
(0,14 EUR/Min. aus dem dt. Festnetz,
Mobilfunk max. 0,42 EUR/Min.)
Fax: +49 (0) 2832 3532
E-Mail: support.de@kompernass.com
Kompernaß Service Österreich
Tel.: 0820 899 913 (
0,20 EUR/Min.)
E-Mail: support.at@kompernass.com
Kompernaß Service Switzerland
Tel.: 0848 000 525 (
max. 0,0807 CHF/Min.)
E-Mail: support.ch@kompernass.com
17. Importeur
KOMPERNASS GMBH
BURGSTRASSE 21
D-44867 BOCHUM, GERMANY
www.kompernass.com
 Loading...