

United Office Paper Trimmer User Manual [de, cs, pl, en]

2-in-1 Paper Trimmer
G 2-in-1 Paper Trimmer
Operating and safety information
H Papírvágó, 2 az 1ben
Kezelési és biztonsági útmutató
s Rezačka na papier 2 v 1
Návod a bezpečnostné pokyny
DAc 2 in 1 Papierschneidegerät
Bedienungs- und Sicherheitshinweise
p
Gilotyna do papieru 2 w 1
Wskazówki dotyczące obsługi i bezpieczeństwa
t
Rezalnik papirja 2 v 1
Napotki za upravljanje in varnost
C
Řezačka papíru 2 v 1
Pokyny k obsluze a bezpečnostní upozornění
IAN 73837
LB4.pdf 1LB4.pdf 1 15.02.2012 12:08:5415.02.2012 12:08:54
pH
tCs

G
Before starting to read the manual, fold out the page containing the illustrations and familiarise yourself with all
the functions provided.
________________________________________________________________________________________________________________________________________________________________________________________________________________________________________________
p
Przed rozpoczęciem czytania należy odchylić stronę z ilustracjami, a następnie zapoznać się ze wszystkimi funk
cjami przyrządu.
________________________________________________________________________________________________________________________________________________________________________________________________________________________________________________
H
Olvasás előtt hajtsa szét az ábrákat tartalmazó oldalt, majd ismerkedjen meg a gép működésével.
________________________________________________________________________________________________________________________________________________________________________________________________________________________________________________
t
Pred začetkom branja odprite stran s slikami in se nato seznanite z vsemi funkcijami naprave.
________________________________________________________________________________________________________________________________________________________________________________________________________________________________________________
C
Než začnete číst, rozevřete stranu s vyobrazeními a pak se seznamte se všemi funkcemi přístroje.
________________________________________________________________________________________________________________________________________________________________________________________________________________________________________________
s
Pred prečítaním návodu vyklopte stranu s obrázkami a následne sa oboznámte so všetkými funkciami zariadenia.
________________________________________________________________________________________________________________________________________________________________________________________________________________________________________________
DAc
Klappen Sie vor dem Lesen die Seite mit den Abbildungen aus und machen Sie sich
anschließend mit allen Funktionen des Geräts vertraut.
________________________________________________________________________________________________________________________________________________________________________________________________________________________________________________
G Operating and safety information Page 5
p Wskazówki dotyczące obsługi i bezpieczeństwa Strona 10
H Kezelési és biztonsági útmutató Oldal 15
t Napotki za upravljanje in varnost Stran 19
C Pokyny k obsluze a bezpečnostní upozornění Strana 24
s Návod a bezpečnostné pokyny Strana 29
DAc Bedienungs- und Sicherheitshinweise Seite 34
LB4.pdf 2LB4.pdf 2 15.02.2012 12:08:5515.02.2012 12:08:55
1
2
3
4
__
~
---
5
__
~
---
6
7
__
---
~
LB4.pdf 3LB4.pdf 3 15.02.2012 12:08:5615.02.2012 12:08:56

G
Scope of delivery:
1x 2-in-1 Paper Trimmer,1x operating manual
________________________________________________________________________________________________________________________________________________________________________________________________________________________________________________
p
Zakres dostawy:
1x Gilotyna do papieru 2 w 1, 1x instrukcja obsługi
________________________________________________________________________________________________________________________________________________________________________________________________________________________________________________
H
Alapkészlet:
1x Papírvágó, 2 az 1ben, 1x kezelési útmutató
________________________________________________________________________________________________________________________________________________________________________________________________________________________________________________
t
Obseg dobave:
1x Rezalnik papirja 2 v 1, 1x navodila za uporabo
________________________________________________________________________________________________________________________________________________________________________________________________________________________________________________
C
Obsah balení:
1x Řezačka papíru 2 v 1, 1x Návod k obsluze
________________________________________________________________________________________________________________________________________________________________________________________________________________________________________________
s
Obsah balenia:
1x Rezačka na papier 2 v 1, 1x návod na obsluhu
________________________________________________________________________________________________________________________________________________________________________________________________________________________________________________
DAc
Lieferumfang:
1x 2 in 1 Papierschneidegerät, 1x Bedienungsanleitung
________________________________________________________________________________________________________________________________________________________________________________________________________________________________________________
LB4.pdf 4LB4.pdf 4 15.02.2012 12:08:5615.02.2012 12:08:56

Congratulations!
We are please that you have chosen this high-quality
device. The operating manual is a component part of
the device. It contains important information regarding
safety, use and disposal. Familiarise yourself with all
the operating and safety information before starting to
use the device. Only use the device in the way de
scribed and for its intended purpose. Hand over all
the documents when passing the device on to third
parties.
Contents
Congratulations! 5......................
Contents 5............................
Important Safety Information 5.............
Exemption From Liability 6................
Intended Use 6........................
Overview 6...........................
Features 6............................
Guillotine 6...........................
Trimmer 7............................
Selecting the Type of Cut 7................
Replacing the Blade 7...................
Changing a Cutting Head 7...............
Cleaning the Device 8...................
Troubleshooting 8......................
Disposal 8............................
Warranty 8...........................
Terms of Warranty 8....................
Period of Warranty and Legal Claims
for Defects 8.......................
Scope of Warranty 9....................
Processing Claims Under the Terms
of Warranty 9......................
Consumables 9........................
Service 9.............................
Manufacturer 9........................
Important Safety
Information
Please observe the following safety inform
ation to ensure the paper trimmer is used
reliably and safely:
1. Read this manual thoroughly and observe the in
structions and information in it when operating the
device.
2. Keep this operating manual in a safe place for
future reference.
3. Before starting to use the device, set it down on a
level, stable working base.
4. Never take hold of the blade when carrying the
device or putting it away.
5. Use both hands to operate the device.
6. Keep loose clothing, ties, jewellery, long hair and
other loose objects away from the cutting unit.
7. The device has been exclusively designed to cut
paper.
8. Before cutting, remove any staples or paper clips
from the document.
9. The blades must be neither greased nor ground.
10. The device must not be used if a blade or the
housing of a blade is damaged.
11. The device must not be used if the blade protec
tion is not installed properly.
12. Take care not to injure yourself when replacing a
blade. Avoid contact with the blades at all times.
13. Keep the device out of the reach of children.
14. Children and minors may only use the device un
der the supervision of an adult.
15. The device is not intended to cut fingernails or
toenails.
LB4.pdf 5LB4.pdf 5 15.02.2012 12:08:5715.02.2012 12:08:57
GB 5

Attention: improper use of the
device can result in severe injury!
The device must not be operated
by children! Keep children away
from the device.
Note: Failure to observe the safety labels can result
in severe personal injury!
Exemption From Liability
We cannot guarantee that the information which
relates to the technical properties of the product or to
the product itself contained in this document is correct.
The product and, where applicable, its accessories,
described in this document are subject to constant
improvement and further development. For this reason,
we reserve the right to modify components, accessor
ies, technical specifications and related documentation
of the product described herein at any time without
notice.
Intended Use
This paper trimmer may only be used to cut paper,
card, photo paper and laminating foil.
Remove all paper clips and staples from paper before
using the device to cut the paper!
Using the device for any purpose other than the inten
ded use described is considered unintended use.
It is forbidden to complete any modifications to the
device. Contravention results in the annulment of all
rights to legal, guarantee and warranty claims.
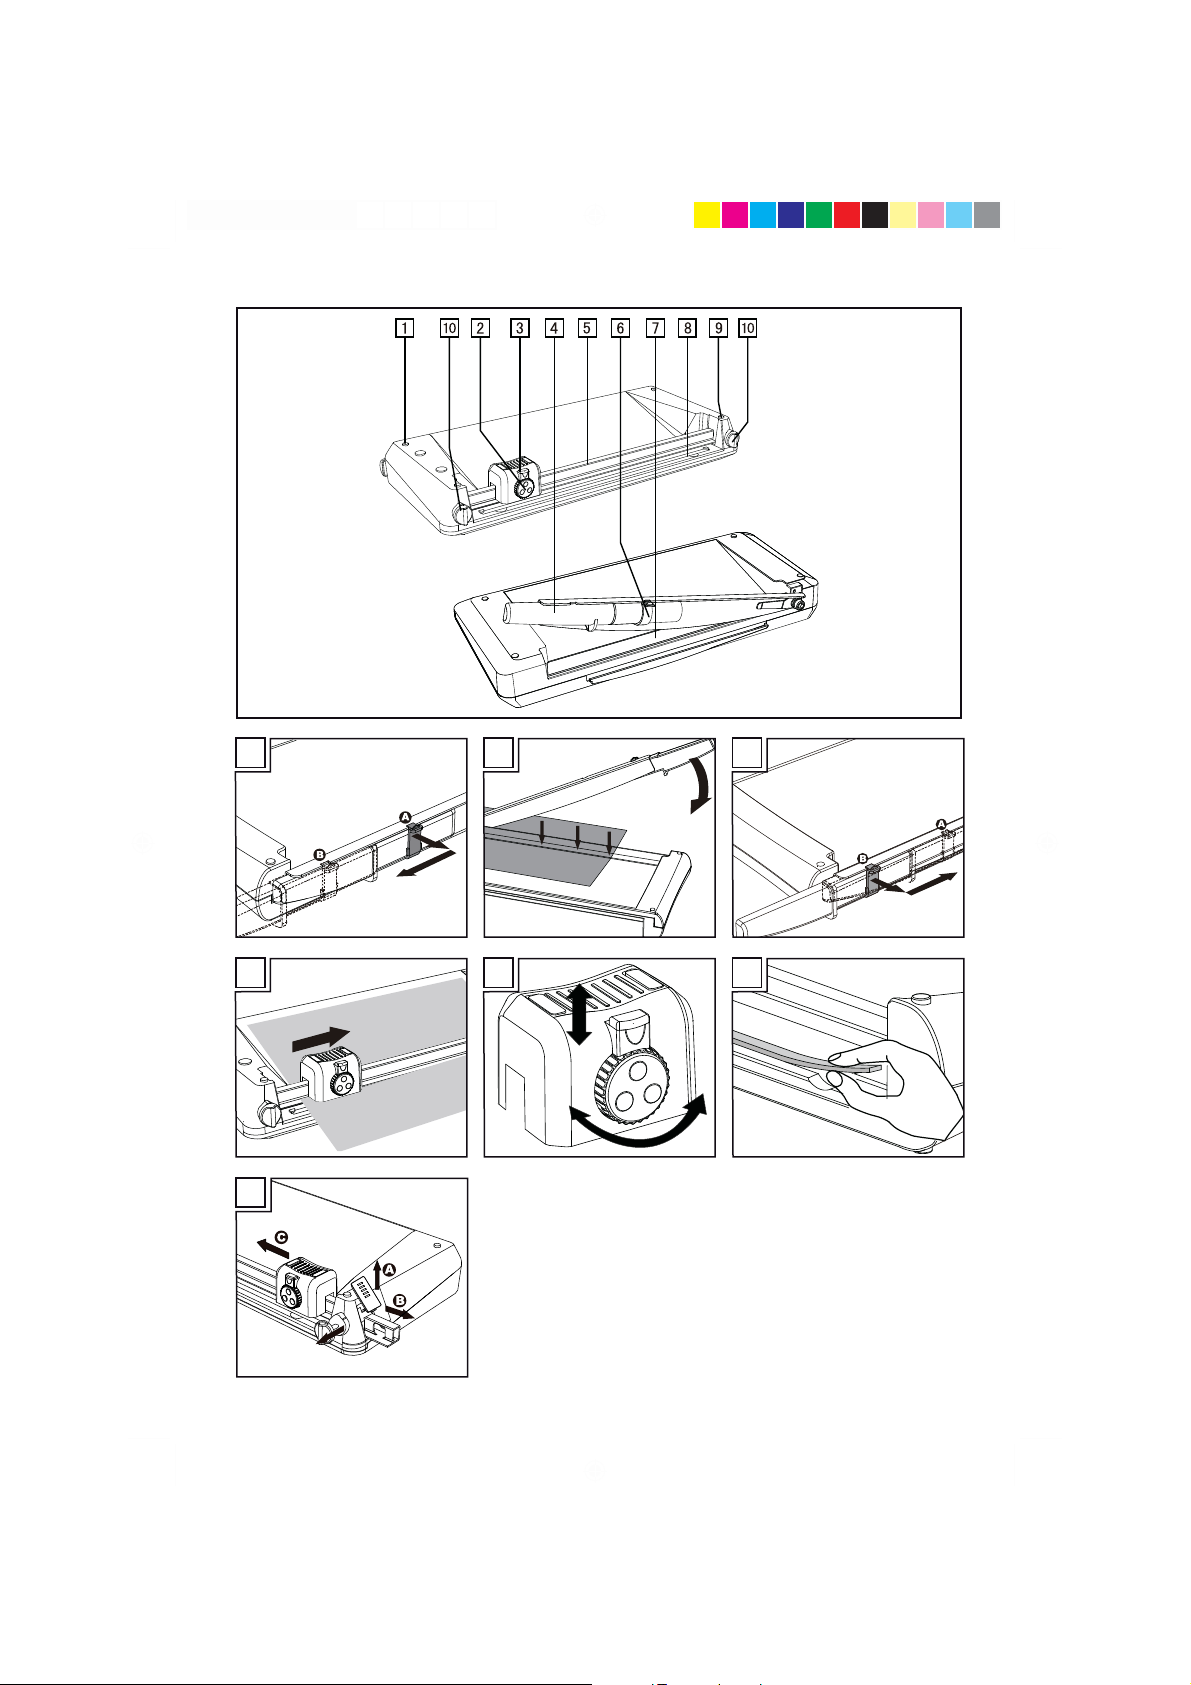
Overview
1. Rubber footpads
2. Selector knob
3. Setting lock
4. Guillotine arm
5. Guide rail
6. Lock
7. Pressing rail with finger protection
8. Blade
9. End cap
10. Rotating knobs
Features
For cutting photos, card, printouts or laminated paper
perfectly to size.
- Guillotine including pressing rail with finger pro
tection.
- Trimmer with 3 types of cut (straight cut, perfora
tion and wave cut)
- Visual positioning aids in cm (lines, angles, scale)
- Rubber footpads for secure, non-slip base
- Dimensions: 453 x 215 x 64 mm (L x W x H)
- Weight: 1.36 kg
- Cutting length, guillotine: 320 mm
- Cutting length, reel trimmer: 320 mm
Guillotine
Guillotine with integrated pressing rail and
finger protection, blade made of stainless
steel and a cutting capacity of max. 10
sheets (80 g / m²).
1. Remove the device carefully from the packaging.
2. Place the cutting unit on a stable, level working
base with the guillotine side facing up.
6 GB
LB4.pdf 6LB4.pdf 6 15.02.2012 12:08:5715.02.2012 12:08:57

3. The guillotine arm is locked on the underside of
the cutting unit. To unlock the guillotine arm, pull
the locking latch out to the right to Position A and
then slide the locking latch towards the front to
Position B (Fig. 1).
4. Move the guillotine arm upwards.
5. Place the material to be cut in the required posi
tion under the pressing rail and press the pressing
rail down (Fig. 2).
6. Then use your other hand to move the guillotine
arm down and cut the document (Fig. 2).
7. In order to lock the guillotine arm again after fin
ishing your work, move the guillotine arm down
as far as possible, pull the locking latch at Posi
tion B out to the right and then slide the locking
latch to the rear to Position A (Fig. 3).
Trimmer
Trimmer with integrated cut selector knob
and setting lock.
Cutting function:
- Straight cut
Cutting capacity: max. 10 sheets (80 g / m²)
- Perforation
Cutting capacity: max. 3 sheets (80 g / m²)
- Wave cut
Cutting capacity: max. 3 sheets (80 g / m²)
The blades are accommodated in a protected hous
ing.
1. Place the cutting unit on a stable, level working
base with the trimmer side facing up.
2. Slide the cutting head to one side of the guide rail
3. Turn the left and right-hand rotating knobs to
OPEN. Place the material to be cut under the
guide rail. Then the rotating knobs to LOCK. The
material is fixed and you can cut it.
Note: Hold the material to be cut securely, otherwise
it could shift and be cut inaccurately. The raster and
measuring system on the trimmer's working surface
serve as positioning aids.
4. To complete the cut, press the cutting head down
and slide it along the guide rail to the other side
(Fig. 4).
Note: To prevent a faulty cutting edge, do not run the
cutting head back again but remove the cut material
directly after completing the cut.
Selecting the Type of Cut
The trimmer has three different types of cut available
for selection: straight cut, perforation cut and wave
cut.
1. Slide the lock on the cutting head upwards (Fig.
5).
2. Turn the selector knob until the symbol represent
ing the required type of cut is under the lock (Fig.
5).
3. Press the lock on the cutting head downwards
(Fig. 5).
Replacing the Blade
The blade has four cutting edges (two on each side).
When the quality of the cut is no longer clean, turn the
blade so that one of the unused cutting edges will be
used.
1. Slide the cutting head to one end of the guide
rail.
2. Remove the blade out of the slot from the other
side of the guide rail. Recesses are provided for
this at both sides of the guide rail (Fig. 6).
3. Turn the blade so that one of the cutting edges
not yet used is moved to the cutting position. Lay
the blade back in the slot. When all four cutting
edges of the blade are worn, replace the blade.
Changing a Cutting Head
When the blade of the cutting head is damaged or
worn, the cutting head must be replaced.
1. Remove the end cap of the guide rail from the
base plate (Fig. 7, A) by simultaneously pressing
it in a little at the bottom end and sliding it up.
LB4.pdf 7LB4.pdf 7 15.02.2012 12:08:5715.02.2012 12:08:57
GB 7

2. Turn the rotating knobs so that the LOCK inscrip
tion is at the top. Pull the rotating knobs about 1 2 mm out of the device. Turn the rotating knobs
about 30 degrees and pull them out completely.
Pull the guide rail out of the base plate (Fig. 7, B).
3. Remove the cutting head from the guide rail
(Fig. 7, C).
4. Replace the old cutting head with a new one
5. Slide the guide rail back in the base plate and
install the new cutting head in the process.
6. Slide the rotating knobs in the device, turning
them a little while doing so (LOCK label at the
top, the tips pointing inwards).
7. Insert the end cap from above on the opening at
the end of the guide rail.
Note: Only the entire cutting head can be replaced.
To obtain a new cutting head, please telephone our
hotline.
Cleaning the Device
Safety note: Avoid cleaning the blade of the guillo
tine/trimmer. Risk of injury!
Clean the outside of the device with a slightly damp
cloth.
Note: Do not use any aggressive cleaning agents.
Never use any chemicals (e.g. cleaning solvent, alco
hol) to clean the housing
Troubleshooting
If problems occur when using the trimmer, check you
are using it properly as described in the correspond
ing sections.
If this procedure does not solve the current problem,
please telephone our hotline:
IAN 73837
Hotline international
00800 100 22 100
Disposal
This symbol (crossed out waste bin) indic
ates that the product must be returned to
an authorised recycling centre or collec
tion point when it has reached the end of
its service life. The symbol only applies to
states within the EEA (*)
*EEA = European Economic Area, which is comprised
of the member states of the EU plus Norway, Island
and Liechtenstein.
Warranty
Dear Customer,
This device has a 3 year period of warranty beginning
on the purchase date. In the case of defects concern
ing this product, you have rights to assert legal claims
against the product seller. These rights to legal claims
are not affected by the warranty explained below.
Terms of Warranty
The period of warranty begins on the date of pur
chase. Please keep the original purchase receipt in a
safe place. It is required as evidence of purchase.
If a material or manufacturing fault occurs to the
product within three years of purchasing the product,
the product will be repaired or replaced, according to
our choice, free of charge. This warranty assumes that
the defect device and the purchase receipt (sales re
ceipt) are submitted within the three-year period to
gether with a short description of the defect and when
it occurred.
When the defect is covered by our terms of warranty,
you will receive the repaired product or a new one.
Receipt of a new or repaired product does not repres
ent the start of a new period of warranty.
Period of Warranty and Legal
Claims for Defects
The period of warranty is not extended by the guaran
tee. This applies to replaced and repaired parts. Any
damage or defects present at the time of purchase
must be reported immediately the device is unpacked.
When the period of warranty has expired, any repairs
are subject to a charge.
8 GB
LB4.pdf 8LB4.pdf 8 15.02.2012 12:08:5715.02.2012 12:08:57

Scope of Warranty
Consumables
The device was produced according to strict quality
guidelines and carefully controlled prior to supply.
The warranty applies for all material or manufacturing
defects. The warranty does not apply to product parts
subject to normal wear and tear and can be con
sidered wearing parts or to damaged to fragile parts,
e.g. switches, batteries or glass parts.
There is no entitlement to the terms of warranty when
the product damaged was not used or serviced prop
erly. Proper use of the product includes strictly ob
serving all the instructions and information provided in
the operating manual. It is essential to avoid using or
handling the product in any way which deviates from
that described in the operating manual or of which
you have been warned.
The product is only intended for private use and not
for commercial use. The terms of warranty are an
nulled in the case of misuse, unintended use, the use of
force and tampering not performed by our authorised
service centres.
Processing Claims Under the
Terms of Warranty
In order to be able to process your claims quickly,
please follow the information below:
- Please keep the purchase receipt and the Art. No.
(e.g. IAN 12345) as evidence of the purchase.
- The Art. No. is engraved on the rating plate, on
the cover page of the operating manual (bottom
left) or on the label on the rear or underside of the
device.
- If functional faults or other damage becomes ap
parent, please contact the Service department
specified below by telephone or E-mail.
- When the product has been registered as defect
ive, you can send it together with the purchase
receipt, description of the problem and when it
occurred, free of charge to the service centre we
specify.
- This and many other manuals, product videos and
software are available as downloads from our
web site at www.lidl-service.com.
If the cutting head or blade becomes worn, please
contact the hotline. You will then receive a new cutting
head with a detailed, illustrated manual.
Service
IAN 73837
Hotline international
00800 100 22 100
service.uk@jet-servicenet.com
GSL Gesellschaft für Service + Logistik in Mit
teldeutschland mbH
Am Weimarer Berg 6
D-99510Apolda / Thüringen
GERMANY
Manufacturer
Olympia Business Systems Vertriebs GmbH
Zum Kraftwerk 1
D-45527 Hattingen
GERMANY
LB4.pdf 9LB4.pdf 9 15.02.2012 12:08:5715.02.2012 12:08:57
GB 9

Gratulujemy!
Dokonując zakupu zdecydowali się Państwo na
przyrząd wysokiej jakości. Instrukcja obsługi jest
częścią składową przyrządu. Zawiera ona ważne
wskazówki dotyczące bezpieczeństwa, użytkowania i
utylizacji. Przed użyciem przyrządu należy zapoznać
się ze wszystkimi wskazówkami dotyczącymi obsługi
i bezpieczeństwa. Przyrządu należy używać
wyłącznie w opisany sposób i w wymienionych
obszarach zastosowań. W razie dalszej odsprzedaży
przyrządu osobom trzecim należy wraz z nim wydać
również całą dokumentację.
Spis treści
Gratulujemy! 10.........................
Spis treści 10...........................
Ważne wskazówki dotyczące bezpieczeństwa 10
Wyłączenie odpowiedzialności 11...........
Zastosowanie zgodne z przeznaczeniem 11....
Przegląd 11...........................
Właściwości techniczne 11................
Obcinarka gilotynowa 11.................
Obcinarka rolkowa 12....................
Wybór rodzaju cięcia 12..................
Wymiana listwy tnącej 12.................
Wymiana głowicy tnącej 12................
Czyszczenie przyrządu 13.................
Rozwiązywanie problemów 13.............
Wskazówka dotycząca utylizacji 13..........
Gwarancja 13..........................
Warunki gwarancji 13....................
Okres gwarancji i ustawowe roszczenia
reklamacyjne 14.....................
Zakres gwarancji 14.....................
Procedura w przypadku objętym gwarancją 14.
Materiały eksploatacyjne 14...............
Serwis 14.............................
Producent 14...........................
Ważne wskazówki do
tyczące bezpieczeństwa
Aby zagwarantować niezawodną pracę
z obcinarką do papieru, należy przestrze
gać następujących wskazówek doty
czących bezpieczeństwa:
1. Proszę dokładnie przeczytać niniejsze instrukcje
i przestrzegać ich podczas obsługi przyrządu.
2. Zachować instrukcję obsługi do późniejszego
użycia.
3. Przed zastosowaniem należy ustawić przyrząd
na płaskim i stabilnym stanowisku roboczym.
4. Podczas przemieszczania lub odstawiania przy
rządu nie należy w żadnym wypadku chwytać
za nóż.
5. Przyrząd należy obsługiwać dwiema rękami.
6. Luźne elementy ubrania, krawaty, biżuterię, dłu
gie włosy i inne luźne przedmioty należy trzymać
z dala od deski do cięcia.
7. Przyrząd przeznaczony jest wyłącznie do cięcia
papieru.
8. Przed cięciem należy usunąć z dokumentu wy
stępujące w nim ewentualnie zszywki i spinacze.
9. Ostrzy tnących nie wolno ani smarować, ani
szlifować.
10. Przyrządu nie wolno używać, jeżeli ostrze tnące
lub jego obudowa są uszkodzone.
11. Przyrządu nie wolno używać, jeżeli osłona noża
nie jest prawidłowo osadzona.
12. Należy zwrócić uwagę na to, aby nie zranić się
podczas wymiany ostrza tnącego. Z zasady na
leży unikać zetknięcia z nożami.
13. Chronić przyrząd przed dziećmi.
14. Dzieci i osoby małoletnie mogą używać przy
rządu tylko pod nadzorem osoby dorosłej.
15. Przyrząd nie jest przewidziany do obcinania pa
znokci u rąk lub nóg.
10 PL
LB4.pdf 10LB4.pdf 10 15.02.2012 12:08:5715.02.2012 12:08:57

Uwaga, błędne zastosowanie
przyrządu może spowodować
poważne obrażenia.
Dzieciom nie wolno obsługiwać
przyrządu. Chronić przyrząd
przed dziećmi.
Wskazówka: Nieprzestrzeganie tego znaku bez
pieczeństwa może spowodować poważne obrażenia
ciała.
Wyłączenie
odpowiedzialności
Nie udzielamy gwarancji poprawności informacji,
które odnoszą się do właściwości technicznych oraz
do niniej-szej dokumentacji. Produkt opisany w ninie
jszej dokumentacji i ewentualnie jego akcesoria są
stale udoskonalane i rozwijane. Z tego powodu za
strzegamy sobie prawo do zmiany w każdej chwili
komponentów, akcesoriów, specyfikacji technicznych
oraz niniejszej dokumentacji produktu bez uprze
dniego zawiadomienia.
Zastosowanie zgodne z prze
znaczeniem
Tej obcinarki do papieru wolno używać tylko do przy
cinania papieru, kartek, papieru fotograficznego i folii
do laminowania.
Przed użyciem przyrządu do cięcia papieru należy
usunąć wszystkie zszywki i spinacze biurowe.
Każde zastosowanie inne od opisanego jako zgodne
z przeznaczeniem traktowane jest jako niezgodne
z przeznaczeniem.
Modyfikacje przyrządu są zabronione. Nieprzestrze
ganie powyższego powoduje utratę prawa do
gwarancji, rękojmi i roszczeń prawnych.
Przegląd
1. Gumowe podstawki
2. Przycisk wyboru
3. Zabezpieczenie przed przestawieniem
4. Gilotyna
5. Szyna prowadząca
6. Blokada
7. Listwa dociskowa z ochroną palców
8. Listwa tnąca
9. Kołpak końcowy
10. Pokrętła
Właściwości techniczne
Perfekcyjne przycinanie zdjęć, kart, wydruków lub
papieru laminowanego.
- Obcinarka gilotynowa z listwą dociskową
z ochroną palców
- Obcinarka rolkowa z 3 funkcjami cięcia (cięcie
proste, perforowanie papieru i cięcie linią falistą)
- Wzrokowa pomoc w pozycjonowaniu w cm
(linie, kąty, skala)
- Gumowe podstawki zapewniające stabilność
- Wielkość: 453 x 215 x 64 mm (D x S x W)
- Masa: 1,36 kg
- Długość cięcia obcinarki gilotynowej: 320 mm
- Długość cięcia obcinarki rolkowej: 320 mm
Obcinarka gilotynowa
Obcinarka gilotynowa ze zintegrowaną
listwą dociskową z ochroną palców, ostrze
ze stali nierdzewnej o wydajności cięcia
maks. 10 kartek (80 g/m²).
1. Ostrożnie wyjąć przyrząd z opakowania.
2. Umieścić deskę do cięcia na płaskim i stabilnym
stanowisku roboczym stroną obcinarki gilotyno
wej do góry.
LB4.pdf 11LB4.pdf 11 15.02.2012 12:08:5715.02.2012 12:08:57
PL 11

3. Gilotyna zablokowana jest na spodzie deski do
cięcia. W celu odryglowania gilotyny należy od
ciągnąć blokadę w położenie A w prawo, a na
stępnie przesunąć blokadę do przodu w po
łożenie B (rys. 1).
4. Przemieścić gilotynę deski do cięcia do góry.
5. Ułożyć materiał do cięcia na żądanej pozycji
pod listwą dociskową i docisnąć listwę do
ciskową w dół (rys. 2).
6. W celu cięcia inną ręką nacisnąć gilotynę w dół
(rys. 2).
7. Aby po wykonaniu pracy ponownie unieruchomić
gilotynę, należy wcisnąć dźwignię całkowicie
w dół, odciągnąć blokadę w prawo, w położenie
B (rys. 3) i przesunąć ją do tyłu w położenie A
(rys. 3).
Obcinarka rolkowa
Obcinarka rolkowa ze zintegrowanym
przełącznikiem wybierakowym i zabezpie
czeniem przed przestawieniem.
Funkcja cięcia:
- cięcie proste
wydajność cięcia: maks. 10 kartek (80 g/m²)
- perforowanie papieru
wydajność cięcia: maks. 3 kartki (80 g/m²)
- cięcie linią falistą
wydajność cięcia: maks. 3 kartki (80 g/m²)
Noże znajdują się w obudowie ochronnej.
1. Umieścić deskę do cięcia na płaskim i stabilnym
stanowisku roboczym stroną obcinarki rolkowej
do góry.
2. Przesunąć głowicę tnącą na jedną stronę szyny
prowadzącej.
3. Obrócić lewe i prawe pokrętło w kierunku
OTWÓRZ. Podłożyć materiał do cięcia pod
szynę prowadzącą. Teraz obrócić pokrętła w
kierunku ZAMKNIJ. Materiał jest unieruchomiony
i można rozpocząć cięcie.
Wskazówka: Umiejscowiony materiał należy pe
wnie przytrzymać, ponieważ w przeciwnym razie
może dojść do niedokładności. Rastrowanie i przy
rządy pomiarowe na desce do cięcia mogą służyć
jako pomoc podczas pozycjonowania.
4. W celu wykonania cięcia docisnąć głowicę tnącą
w dół i przeciągnąć ją wzdłuż szyny prowa
dzącej na drugą stronę (rys. 4).
Wskazówka: Aby uniknąć błędnej krawędzi cię
cia, nie należy prowadzić głowicy tnącej z powrotem,
lecz po przecięciu usunąć włożony materiał.
Wybór rodzaju cięcia
Obcinarka rolkowa wyposażona jest w trzy różne
funkcje cięcia: cięcie proste, perforowanie papieru i
cięcie linią falistą.
1. Pociągnąć blokadę na głowicy tnącej do góry
(rys. 5).
2. Obrócić przycisk wyboru, aż symbol żądanego
rodzaju cięcia znajdzie się pod blokadą (rys. 5).
3. Nacisnąć blokadę na głowicy tnącej do dołu
(rys. 5).
Wymiana listwy tnącej
Listwa tnąca ma cztery krawędzie tnące (dwie po
każdej stronie). Jeżeli obraz cięcia nie jest czysty,
należy obrócić listwę tnącą tak, aby użyta została
jedna z nieużywanych jeszcze krawędzi tnących:
1. Przesunąć obcinarkę rolkową do końca szyny
prowadzącej.
2. Na drugim końcu szyny prowadzącej wyjąć te
raz listwę tnącą z jej rowka. W tym celu po obu
stronach szyny prowadzącej występują zagłębie
nia (rys. 6).
3. Obrócić listwę tnącą tak, aby użyta została jedna
z nieużywanych jeszcze krawędzi tnących. Po
nownie ułożyć listwę tnącą w rowku. Jeżeli wszy
stkie cztery krawędzie tnące są zużyte, należy
wymienić listwę tnącą.
Wymiana głowicy tnącej
Jeżeli ostrze obcinarki rolkowej jest uszkodzone, na
leży wymienić głowicę tnącą.
1. Usunąć kołpak końcowy szyny prowadzącej
z płyty bazowej (rys. 7, A), lekko wciskając jego
dolny koniec do środka i przesuwając do góry.
12 PL
LB4.pdf 12LB4.pdf 12 15.02.2012 12:08:5715.02.2012 12:08:57

2. Obrócić pokrętła tak, aby napis ZAMKNIĘTE
ustawiony był na górze. Wyciągnąć pokrętła
z przyrządu na około 1 - 2 mm. Obrócić pokrętła
o około 30 stopni i wyciągnąć je całkowicie. Wy
ciągnąć szynę prowadzącą z płyty bazowej
(rys. 7, B).
3. Zdjąć przy tym głowicę tnącą z szyny prowa
dzącej (rys. 7, C).
4. Wymienić starą głowicę tnącą na nową.
5. Ponownie wsunąć szynę prowadzącą w płytę
bazową i nałożyć przy tym nową głowicę tnącą.
6. Ponownie wsunąć pokrętła w przyrząd lekko je
obracając (opis ZAMKNIĘTE na górze, noski skie
rowane do wewnątrz).
7. Wetknąć kołpak końcowy od góry na otwór na
koń-cu szyny prowadzącej.
Wskazówka: Możliwa jest wymiana wyłącznie
kom-pletnej głowicy tnącej. W celu nabycia nowej
głowicy tnącej należy skontaktować się z infolinią
telefoniczną.
Czyszczenie przyrządu
Wskazówka dotycząca bezpieczeństwa:
Unikać czyszczenia noży obcinarki gilotynowej /
rolkowej. Niebezpieczeństwo zranienia!
Czyścić przyrząd z zewnątrz używając lekko zwil
żonej ściereczki.
Wskazówka: Nie używać ostrych środków czysz
czących. Do czyszczenia obudowy nie używać żad
nych chemikaliów (np. benzyny, alkoholu).
Rozwiązywanie problemów
Gdyby podczas pracy obcinarki do papieru wy
stąpiły problemy, należy skontrolować prawidłowość
zastosowania zgodnie z opisem w odpowiednich
podrozdziałach.
Gdyby procedura ta nie rozwiązała istniejącego pro
blemu, należy skontaktować się z naszą infolinią:
IAN 73837
Infolinia międzynarodowa
00800 100 22 100
Wskazówka dotycząca
utylizacji
Ten symbol (przekreślony kosz na
śmieci) oznacza, że po upływie okresu
użytkowania produkt ten należy dostar
czyć do systemu przyjmowania zwrotów
lub oddzielnej zbiórki surowców. Symbol ten obowiązuje tylko w państwach
EOG*.
*EOG = Europejski Obszar Gospodarczy, obejmu
jący państwa członkowskie UE oraz Islandię, Liechten
stein i Norwegię.
Gwarancja
Szanowni Klienci,
na przyrząd ten udzielamy gwarancji na okres 3 lat
od daty zakupu. W przypadku usterek niniejszego
produktu przysługują Państwu ustawowe prawa w
stosunku do sprzedawcy produktu. Te ustawowe
prawa nie są ograniczane przez naszą gwarancję
przedstawioną poniżej.
Warunki gwarancji
Okres gwarancji biegnie od daty zakupu. Proszę do
brze zachować oryginalny paragon. Dokument ten
potrzebny jest jako potwierdzenie zakupu.
Jeżeli w ciągu trzech lat od daty zakupu tego produ
ktu wystąpią wady materiałowe lub wykonawcze,
produkt zostanie - według naszego wyboru - nieod
płatnie naprawiony lub wymieniony. Warunkiem tego
świadczenia gwarancyjnego jest przedłożenie w
okresie trzech lat uszkodzonego przyrządu i do
kumentu zakupu (paragonu) oraz krótkiego opisu na
piśmie, na czym polega wada i kiedy wystąpiła.
Jeżeli wada objęta jest naszą gwarancją, otrzymają
Państwo z powrotem naprawiony lub nowy produkt.
Naprawa lub wymiana produktu nie rozpoczyna
biegu nowego okresu gwarancji.
LB4.pdf 13LB4.pdf 13 15.02.2012 12:08:5815.02.2012 12:08:58
PL 13
 Loading...