

United Office Paper Trimmer User Manual [en, pl, cs, de]

IAN 71864
Gyártja/Výrobce/Výrobca:
Olympia Business Systems
Vertriebs GmbH
Zum Kraftwerk 1
D-45527 Hattingen
Dovozce: LIDL Česká Republika v.o.s.,
Nárožní 1359/11, 158 00 Praha 5
Származási hely/Vyrobeno v/
Vyrobené v: Kína/Čína/Číne
Last Information Update · Stan informacji · Információk állása
Stanje informacij · Stav informací · Stav informácií
Stand der Informationen: 09/2011 · Ident.-No.: 092011-4
71864_uof_2in1_papierschneidegeraet_cover_lb4.indd 1 17.10.2011 10:54:43
4

2-in-1 Paper Trimmer
GB
2-IN-1 PAPER TRIMMER
Operation and Safety Notes
HU
PAPÍRVÁGÓ, 2 AZ 1BEN
Kezelési és biztonsági utalások
CZ
ŘEZAČKA PAPÍRU 2 V 1
Pokyny pro obsluhu a bezpečnostní pokyny
DE AT
CH
PL
GILOTYNA DO PAPIERU 2 W 1
Wskazówki dotyczące obsługi i bezpieczeństwa
SI
2 V 1 REZALNIK PAPIRJA
Navodila za upravljanje in varnostna opozorila
SK
REZAČKA NA PAPIER 2 V 1
Pokyny pre obsluhu a bezpečnostné pokyny
2 IN 1 PAPIERSCHNEIDEGERÄT
Bedienungs- und Sicherheitshinweise
71864_uof_2in1_papierschneidegeraet_cover_lb4.indd 2 17.10.2011 10:54:44
4

GB
Before reading, unfold the page containing the illustrations and familiarise yourself with all functions
of the device.
PL
Przed przeczytaniem proszę rozłożyć stronę z ilustracjami, a następnie proszę zapoznać się z
wszystkimi funkcjami urządzenia.
HU
Olvasás előtt kattintson az ábrát tartalmazó oldalra és végezetül ismerje meg a készülék
mindegyik funkcióját.
SI
Pred branjem stran s slikami odprite navzven in se nato seznanite z vsemi funkcijami
naprave.
CZ
Před čtením si otevřete stranu s obrázky a potom se seznamte se všemi funkcemi přístroje.
SK
Pred čítaním si odklopte stranu s obrázkami a potom sa oboznámte so všetkými funkciami
prístroja.
DE AT CH
Klappen Sie vor dem Lesen die Seite mit den Abbildungen aus und machen Sie sich
anschließend mit allen Funktionen des Gerätes vertraut.
GB Operation and Safety Notes Page 5
PL Wskazówki dotyczące obsługi i bezpieczeństwa Strona 9
HU Kezelési és biztonsági utalások Oldal 13
SI Navodila za upravljanje in varnostna opozorila Stran 17
CZ Pokyny pro obsluhu a bezpečnostní pokyny Strana 21
SK Pokyny pre obsluhu a bezpečnostné pokyny Strana 25
DE / AT / CH Bedienungs- und Sicherheitshinweise Seite 29
71864_uof_2in1_papierschneidegeraet_cover_lb4.indd 3 17.10.2011 10:54:44
1
2
3
4
7
5
---
__
~
__
~
---
__
---
~
6
71864_uof_2in1_papierschneidegeraet_cover_lb4.indd 4 17.10.2011 10:54:46

Contents of package:
1x Two-in-one Paper Cutter, 1x User‘s Guide
Zakres dostawy:
1x urządzenie do przycinania papieru 2 in 1, 1 x instrukcja obsługi
Szállítási terjedelem:
1 db 2 az 1-ben papírvágógép, 1 db használati útmutató
Obseg pošiljke:
1x 2 v 1 Rezalnik papirja, 1x navodila za uporabo
Obsah dodávky:
1x řezačka papíru 2 v 1, 1x návod k obsluze
!
Rozsah dodávky:
1x 2 v 1 rezačka na papier, 1x návod na obsluhu
Lieferumfang:
1x 2 in 1 Papierschneidegerät, 1x Bedienungsanleitung
71864_uof_2in1_papierschneidegeraet_cover_lb4.indd 5 17.10.2011 10:54:46

Maintenance and Care
Safety notice: Avoid cleaning the blades of the rotary/guillotine trimmer.
Risk of injury!
Cleaning: Wipe the surface of the unit with a soft, slightly damp cloth.
Note: To clean the unit, do neither use household nor aggressive nor
chemical cleaners (such as benzene or alcohol).
Konserwacja i pielęgnacja
Wskazówka w zakresie
bezpieczeństwa: Unikać czyszczenia noży dźwigni przycinarki.
Niebezpieczeństwo doznania skaleczeń!
Limpeza: Limpe a superfície do aparelho com um pano macio e ligeiramente
humedecido.
Nota: Para limpar o aparelho não deve utilizar detergentes domésticos
agressivos nem substâncias químicas (p. ex. gasolina, álcool).
Karbantartás és ápolás
Biztonsági tudnivalók: Kerülje a karos/görgős vágógép késeinek tisztítását. Sérülésveszély!
Tisztítás: A gép felületét puha, enyhén megnedvesített ruhával tisztítsa.
Megjegyzés: A gép tisztításához ne használjon háztartásban szokásos vagy
éles tisztítóeszközt, sem pedig vegyszert (pl. benzin, alkohol).
Vzdrževanje in nega
Varnostni napotek: Izogibajte se čiščenja rezil vzvoda-/ kotalnega rezila. Nevarnost
poškodb!
Čiščenje: Očistite površino naprave z mehko rahlo navlaženo krpo.
Napotek: Ne uporabljajte pri čiščenju naprave niti gospodinjska niti
agresivna čistila in tudi brez kemikalij. (na primer bencin, alkohol).
Údržba a péče
Bezpečnostní upozornění: Vyhněte se čištění nožů pákové/kotoučové řezačky.
Nebezpečí zranění!
Čištění: Povrch zařízení čistěte jemným lehce navlhčeným hadrem.
Upozornění: K čištění zařízení nepoužívejte ani běžné domácí ani ostré čisticí
prostředky a ani žádné chemikálie (např. benzín, alkohol).
!
Údržba a starostlivosť
Bezpečnostné upozornenie: Vyhnite sa čisteniu nožov pákovej rezačky/rezačky kotúčov.
Nebezpečenstvo poranenia!
Čistenie: Povrch prístroja čistite mäkkou mierne navlhčenou handrou.
Upozornenie: Na čistenie prístroja nepoužívajte ani bežné čistiace prostriedky,
ani agresívne čistiace prostriedky a ani žiadne chemikálie
(napr. benzín, alkohol).
Wartung und Pflege
Sicherheitshinweis: Vermeiden Sie die Reinigung der Messer des Hebel-/Rollenschnei ders. Verletzungsgefahr!
Reinigung: Reinigen Sie die Oberfläche des Gerätes mit einem weichen leicht
angefeuchteten Tuch.
Hinweis: Verwenden Sie zur Reinigung des Gerätes weder haushaltsübliche
noch scharfe Reinigungsmittel und auch keine Chemikalien
(z.B. Benzin, Alkohol).
71864_uof_2in1_papierschneidegeraet_cover_lb4.indd 6 17.10.2011 10:54:46
33

Table of contents
Important safety information ...................................................... Page 6
Exemption from liability.............................................................. Page 6
Intended use .............................................................................. Page 6
Overview.................................................................................... Page 6
Features ..................................................................................... Page 6
Guillotine.................................................................................... Page 6
Trimmer ..................................................................................... Page 7
Selecting the type of cut ............................................................ Page 7
Replacing the blade ................................................................... Page 7
Replacing the cutting head ........................................................ Page 8
Guarantee.................................................................................. Page 8
Maintenance and Care .............................................................. Page 33
5
GB
71864_uof_2in1_papierschneidegeraet_content_lb4.indd 5 27.09.2011 08:40:21

Important safety
information
Please observe the following
information to ensure reliable
operation of the cutting unit:
Read this manual thoroughly, observing 1.
the instructions and information in it
when operating the machine.
Keep this operating manual in a safe 2.
place for future reference.
Before starting to use the device, set it 3.
down on a level, stable working base.
Never take hold of the knife blades when 4.
carrying the device or putting it away.
Use both hands to operate the device.5.
Keep loose clothing, ties, jewellery, long 6.
hair and other loose objects away from
the cutting unit.
Risk of injury!
The device has been exclusively 7.
designed to cut paper.
Before cutting, remove any staples or 8.
paper clips from the document.
The blades must be neither greased nor 9.
ground.
The device must not be used if a blade or 10.
the housing of a blade is damaged.
The device must not be used if the knife 11.
protection is not installed properly.
Be careful not to cut your fingers when 12.
replacing blades. Avoid contact with the
cutting blades at all times.
Keep the device out of the reach of 13.
children.
Children and minors may only use the 14.
device under the supervision of an adult.
The device is not intended to cut 15.
fingernails.
Exemption From Liability
We cannot guarantee that the information
which relates to the technical properties of
the product or to the product itself contained
in this document is correct. The product
and, where applicable, its accessories,
described in this document are subject to
constant improvement and further
development. For this reason, we reserve
the right to modify components,
accessories, technical specifications and
related documentation of the product
described herein at any time without notice.
Intended use
This cutting unit may only be used to cut
paper, card, photo paper and laminating foil.
Any other use is considered unintended use.
Unauthorised modifications or
reconstructions are not permitted.
Overview
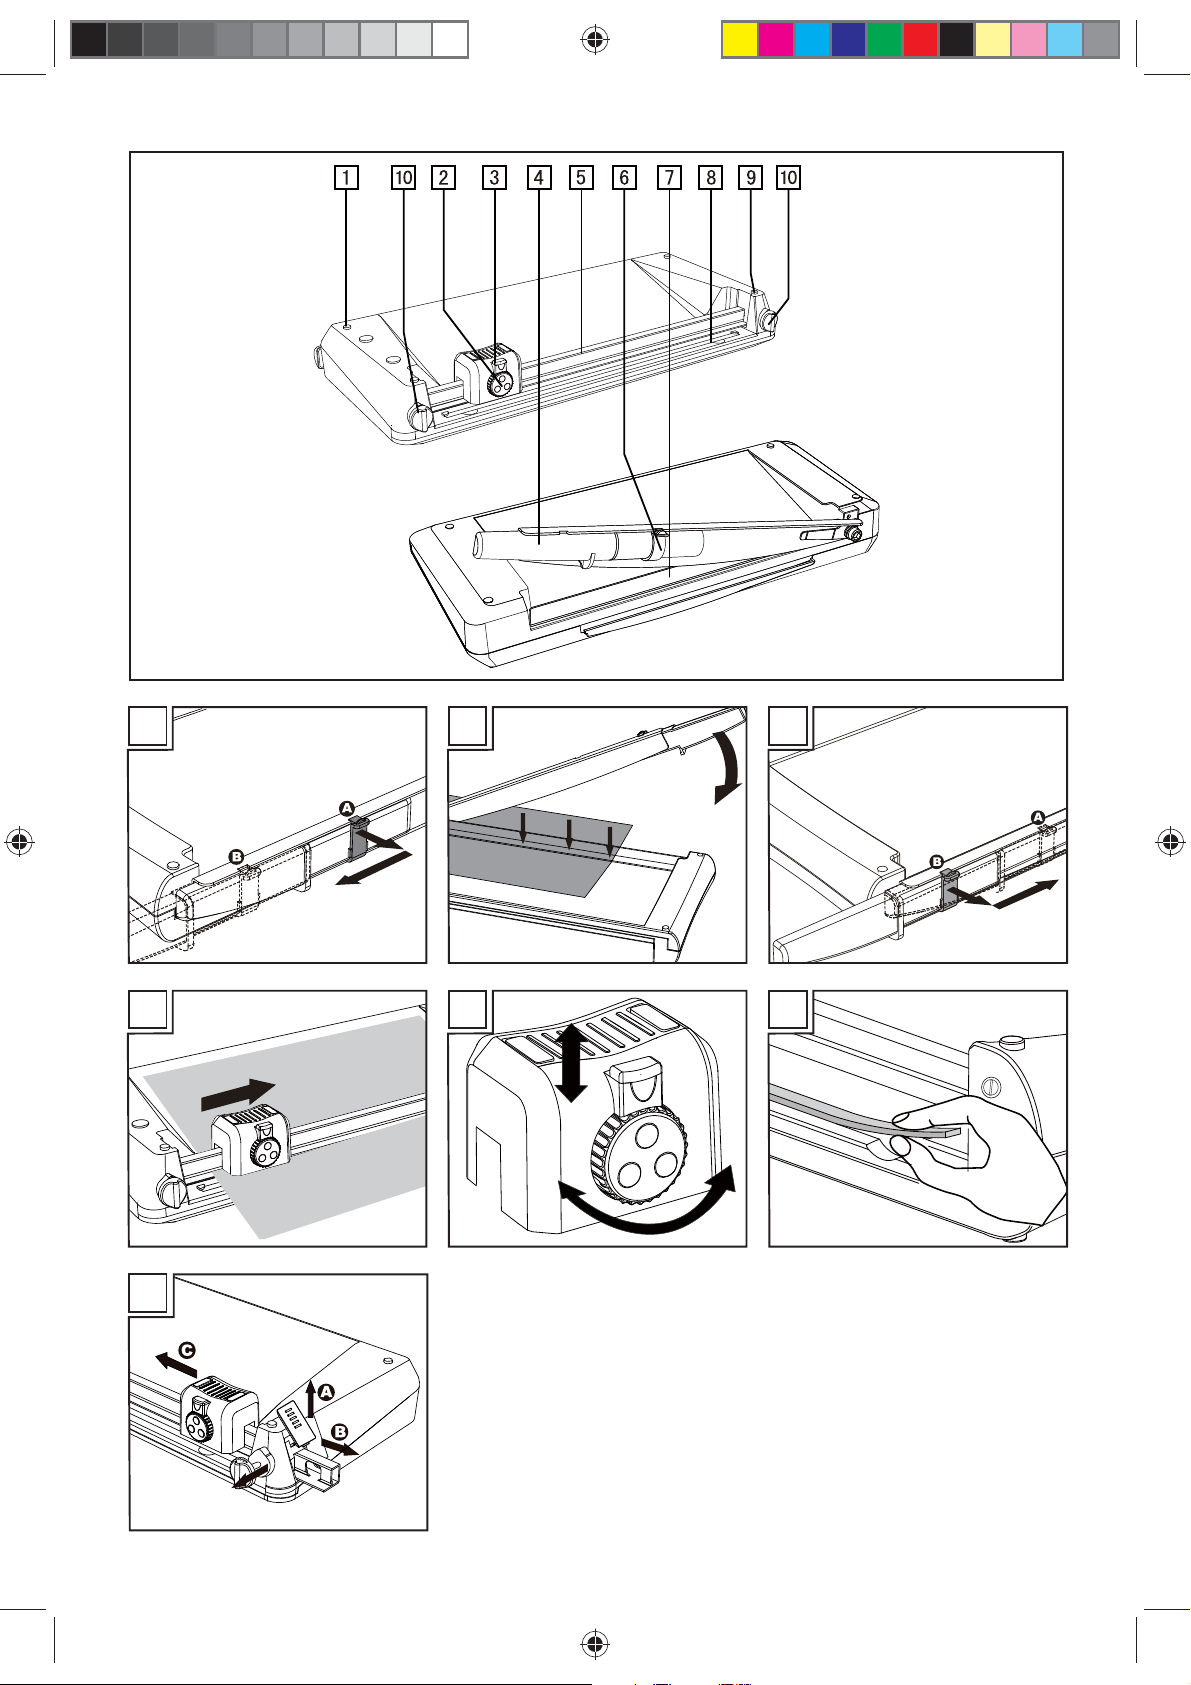
1
Rubber footpads
2
Selector knob
3
Setting lock
4
Guillotine arm
5
Guide rail
6
Locking latch
7
Pressing rail with finger protection
8
Blade
9
End cap
10
Pressure paper knob
Features
For cutting photos, card, printouts or
laminated paper perfectly to size
Guillotine + pressing rail with finger
protection
Trimmer with 3 types of cut
(straight cut, perforation and wave cut)
Visual positioning aids in cm (lines,
angles, scale)
Rubber footpads for secure, non-slip
base
Dimensions: 453 x 215 x 64 mm mm
(L x W x H)
Weight: 1.37 kg
Cutting length guillotine: 318 mm
Cutting length trimmer: 320 mm
Guillotine
Cutting capacity: max. 10 sheets
(80 g / m²)
Pressing rail with finger protection
Cutting blade made of stainless steel
6
GB
71864_uof_2in1_papierschneidegeraet_content_lb4.indd 6 27.09.2011 08:40:21

Place the cutting unit on a stable, level 1.
base with the guillotine side facing up.
The guillotine arm is locked at the 2.
bottom edge of the cutting unit. To unlock
the guillotine arm, pull the locking latch
out a little (Fig. 1, A) and slide it towards
the front to Position B (Fig. 1).
Move the guillotine arm upwards.3.
Place the material to be cut in the 4.
required position under the pressing rail
and press the pressing rail down (Fig. 2).
Then use your other hand to move the 5.
guillotine arm down and cut the
document (Fig. 2).
In order to lock the guillotine arm again 6.
after finishing your work, move the
guillotine arm down as far as possible,
pull the locking latch at Position B out a
little and slide it back to Position A (Fig. 3).
securely, otherwise it could shift and
be cut inaccurately. The raster and
measuring system on the trimmer’s
working surface serve as positioning
aids.
To complete the cut, press the cutting 4.
head down and slide it along the guide
rail to the other side (Fig. 4).
Note: To prevent a faulty cutting edge,
do not run the cutting head back again
but remove the cut material directly after
completing the cut.
Selecting the type of cut
The trimmer has various types of cut
available for selection: straight cut,
perforation cut and wave cut. Select the
type of cut you require.
Trimmer
Trimmer with integrated cut selector
switch and setting lock
Cutting functions:
Straight cut 1.
Cutting capacity: max. 10 sheets
(80 g / m²)
Perforation 2.
Cutting capacity: max. 3 sheets
(80 g / m²)
Wave cut 3.
Cutting capacity: max. 3 sheets
(80 g / m²)
The blades are accommodated in a
protected housing.
Place the cutting unit on a stable, level 1.
base with the trimmer side facing up.
Slide the cutting head to one side of the 2.
guide rail.
If you turn the left and right rotary knobs 3.
in the OPEN direction, the guide rail will
lift upwards. Place the material to be
cut under the guide rail. Now turn the
rotary knobs in the LOCK direction. The
material is fastened and you can now
cut.
Note: Hold the material to be cut
Slide the lock for the trimmer’s rotary cut 1.
selector upwards (Fig. 5).
Turn the selector knob until the symbol 2.
representing the required type of cut is
under the lock (Fig. 5).
Press the lock for the trimmer’s rotary 3.
cut selector downwards (Fig. 5).
Replacing the blade
The blade has four cutting edges (two on
each side).When the quality of the cut is no
longer clean, turn the blade so that one of
the unused cutting edges will be used:
Slide the trimmer to one end of the guide 1.
rail.
Remove the blade out of the slot from 2.
the other side of the guide rail. Recesses
are provided for this at both sides of the
guide rail (Fig. 6).
Turn the blade so that a cutting edge 3.
which has still not been used is set to the
working position and replace the blade
back in the slot. When all four cutting
edges of the blade are worn, replace the
blade.
7
GB
71864_uof_2in1_papierschneidegeraet_content_lb4.indd 7 27.09.2011 08:40:21

Replacing the cutting head
is to contact our hotline.
If the blade of the slitter rewinder has
been damaged, the cutting head must be
replaced.
Remove the end cap of the guide 1.
rail from the base plate (Fig. 7, A) by
pushing it upwards at the lower end at
the same time as pushing it inwards
gently.
Turn the rotary knobs in such a way 2.
that the LOCK lettering is at the top.
Pull out the rotary knobs approx. 1 – 2
mm from the device. Turn the knobs by
about 30 degrees and now pull them out
completely. Pull out the guide rail from
the base plate (Fig. 7, B).
Remove the cutting head from the guide 3.
rail (Fig. 7, C).
Replace the old cutting head with a new 4.
one.
Slide the guide rail back in the base 5.
plate and install the new cutting head in
the process.
Turning them slightly, push the rotary 6.
knobs into the device again (LOCK
lettering at the top, the noses pointing
inwards). Place the end cap from above
on to the opening at the end of the guide
rail.
Note: Only the entire cutting head can
be replaced. To obtain a new cutting
head, please telephone our hotline.
Hotline international
00800 100 22 100
We are sorry for any inconvenience.
Yours faithfully
Olympia Business Systems
Vertriebs GmbH
Consumables
If the cutting head or blade becomes worn,
please contact the hotline. You will receive
a new cutting head from us together with
detailed illustrated instructions.
Guarantee
It is essential to retain this guarantee!
Dear Customers,
we are pleased that you have chosen the
reversible guillotine / trimmer. Should a
technical problem arise with regard to the
equipment, please observe the following
points:
- The period of guarantee for the equipment
is 36 months.
- It is essential to keep the purchase receipt
and original packing.
- The first line of action if a problem occurs
8
GB
71864_uof_2in1_papierschneidegeraet_content_lb4.indd 8 27.09.2011 08:40:21

Spis zawartości
Ważne wskazówki dotyczące bezpieczeństwa .......................... Strona 10
Wykluczenie odpowiedzialności ................................................. Strona 10
Zastosowanie zgodne z przeznaczeniem................................... Strona 10
Widok.......................................................................................... Strona 10
Cechy urządzenia ....................................................................... Strona 10
Dźwignia tnąca ........................................................................... Strona 11
Nóż krążkowy ............................................................................. Strona 11
Wybór rodzaju cięcia .................................................................. Strona 11
Wymiana listwy tnącej ................................................................ Strona 12
Wymiana głowicy tnącej ............................................................. Strona 12
Gwarancja .................................................................................. Strona 12
Konserwacja i pielęgnacja .......................................................... Strona 33
9
PL
71864_uof_2in1_papierschneidegeraet_content_lb4.indd 9 27.09.2011 08:40:21
 Loading...