

Page 1
W ash Select II Operations Manual
With W ashPay Integration
Unitec
www.StartwithUnitec.com
Page 2

WASH SELECT II
WASH SELECT II WITH WASHPAY INTEGRATION
OPERATIONS MANUAL
SOFTWARE VERSION 6.10
This manual provides comprehensive operational procedures for the Wash Select II. In this
manual, we will discuss the setup, operation and maintenance of the Wash Select II.
If further assistance is needed, please contact the distributor from which the product was
purchased.
When calling for assistance, you must have the following information available:
Wash Select II Serial Number:
Distributor Name:
COPYRIGHT
© 2012 Unitec, Incorporated. All rights reserved. No part of this book, including text, screen
examples, diagrams, or icons, may be reproduced or transmitted in any form, by any means
(electronic, photocopying, recording, or otherwise) without prior written permission of Unitec,
Incorporated.
TRADEMARKS
Wash Select II, WashPay, VIP Wash Pass, Customized VIP Wash Pass, VIP Wash
Coupons, Unitec, and the Unitec Logo are trademarks, service marks, or registered
trademarks of Unitec, Incorporated.
GiveX is the registered trademark of GiveX Incorporated.
CoinCo is the registered trademark of Coin Acceptors, Inc.
All other products, services, and company names are trademarks or registered trademarks of
their respective owners.
Document Number: WS21058
Document Title: WSII Operations Manual ver 6.10
Page 3

WASH SELECT II
Document Revision History
Software
Version
6.10 12/2012 Added support to charge tax on credit sakes through WashPay system, bug
6.02 3/2012 Added Canadian support, added support for fundraisers, monetary-based
6.01 9/2011 Added Specials as payment method, Added RFID diagnosti cs, bug fixes
6.00 2/2011 Original release.
Release
Date
Changes Made
fixes
fleet accounts in WashPay, added support for upgrades for product-based
accounts in Washpay, bug fixes
Document Number: WS21058
Document Title: WSII Operations Manual ver 6.10
Page 4

WASH SELECT II
[THIS PAGE INTENTIONALLY LEFT BLANK]
Document Number: WS21058
Document Title: WSII Operations Manual ver 6.10
Page 5

WASH SELECT II
Table of Contents
1 System Overview............................................................................................................................1
1.1 Introduction to the Wash Select II with WashPay Integration................................................1
1.2 Wash Select II Function Changes with WashPay Integration...............................................1
1.3 Setup and Operate Modes.....................................................................................................2
1.4 Customer Interface................................................................................................................2
1.5 Wash Select II Features ........................................................................................................3
1.5.1 Standard Features .......................................................................................................................3
1.5.2 Optional Features.........................................................................................................................3
2 Initial Setup .....................................................................................................................................7
2.1 Credit System........................................................................................................................8
2.1.1 Obtaining a Merchant Account.....................................................................................................8
2.1.2 Credit Mode..................................................................................................................................8
2.1.3 Print Transaction Status...............................................................................................................8
2.1.4 Print Credit Transaction History...................................................................................................8
2.1.5 Clearing the Transaction History................................................................................................10
2.1.6 Credit + Coupon.........................................................................................................................10
2.1.7 Batch Functions.........................................................................................................................10
2.1.8 Merchant ID................................................................................................................................11
2.1.9 POS Auth Timeout.....................................................................................................................11
2.1.10 Split Tender..............................................................................................................................11
2.1.11 Credit Sales Tax.......................................................................................................................11
2.2 Wash and Option Names and Prices ..................................................................................12
2.3 Speech Menu.......................................................................................................................12
2.3.1 Playback Messages...................................................................................................................12
2.3.2 Record Messages......................................................................................................................12
2.3.3 Set Greeting Start Delay............................................................................................................13
2.3.4 Set Greeting Repeat Delay........................................................................................................13
2.3.5 Printing Message List.................................................................................................................13
2.3.6 Viewing Current Message List....................................................................................................13
2.4 Text Messages Menu ..........................................................................................................14
2.5 Wash Interface Menu...........................................................................................................14
2.5.1 Enable Relay Stacking...............................................................................................................14
2.5.2 Enable Relay Latching...............................................................................................................14
2.5.3 Configure the Wash Relay Pattern.............................................................................................15
2.5.4 Enable Automatic Out-Of-Service Detection.............................................................................. 16
Document Number: WS21058 i
Document Title: WSII Operations Manual ver 6.10
Page 6

2.5.5 Wash Handshaking....................................................................................................................16
2.5.6 Wash Fault.................................................................................................................................17
2.5.7 OOS Timer.................................................................................................................................17
2.5.8 Tunnel Wash Settings................................................................................................................ 18
2.5.9 Combo Mode..............................................................................................................................18
2.5.10 Edit Combo Names..................................................................................................................19
2.5.11 Optioning..................................................................................................................................19
2.5.12 Remote Code POS4000 Support.............................................................................................20
WASH SELECT II
2.6 Customer Interface Menu....................................................................................................21
2.6.1 Customer Stacking.....................................................................................................................22
2.6.2 Forced Selection........................................................................................................................22
2.6.3 Allow Upgrades..........................................................................................................................23
2.6.4 Enabling and Setting Automatic Selection Timer .......................................................................23
2.7 Paging Functions.................................................................................................................23
2.8 Cash and Tokens Menu.......................................................................................................24
2.8.1 Country Code.............................................................................................................................24
2.8.2 Configure Coin Dispensing Mode...............................................................................................24
2.8.3 Configure Dispensed Coin Value...............................................................................................25
2.8.4 Disabling Cash Acceptance.......................................................................................................25
2.8.5 Tokens.......................................................................................................................................25
2.9 Miscellaneous Setup Menu..................................................................................................25
2.9.1 Alarm Duration...........................................................................................................................25
2.9.2 Set System Date and Time........................................................................................................25
2.9.3 Assigning a Service Phone Number...........................................................................................26
2.9.4 Assigning a Site ID Number.......................................................................................................26
2.9.5 Enable Receipt Printer...............................................................................................................26
2.9.6 Cash Receipt..............................................................................................................................26
2.10 Remote Reporting Menu...................................................................................................27
2.11 Pass Codes and Pass Cards............................................................................................27
2.11.1 Using PassCodes/Cards..........................................................................................................28
2.11.2 Add Code/Card........................................................................................................................28
2.11.3 View Codes/Cards ...................................................................................................................29
2.11.4 Print Codes/Cards....................................................................................................................29
2.11.5 Delete Code/Card ....................................................................................................................29
2.12 VIP Wash Coupons...........................................................................................................30
2.12.1 CoinCo Bill Validator................................................................................................................30
2.12.2 Mars (MEI) Bill Validator ..........................................................................................................30
2.13 POS4000 Link...................................................................................................................33
2.13.1 Interface Mode.........................................................................................................................34
2.13.2 Notifications..............................................................................................................................34
Document Number: WS21058 ii
Document Title: WSII Operations Manual ver 6.10
Page 7

2.13.3 Set Bay Address......................................................................................................................34
2.13.4 Convey Accounting..................................................................................................................35
WASH SELECT II
3 Daily Operations...........................................................................................................................37
3.1 Reporting Menu...................................................................................................................37
3.1.1 Configuration Report..................................................................................................................37
3.1.2 Accounting Report......................................................................................................................37
3.2 Fleet Accounts and Coupons Menu ....................................................................................38
3.3 Cash Reconciliation.............................................................................................................38
3.3.1 Removing Cash..........................................................................................................................38
3.3.2 Adding Cash...............................................................................................................................38
3.4 Diagnostics Menu................................................................................................................39
3.4.1 Testing Output Relays................................................................................................................39
3.4.2 Cycling Output Relays................................................................................................................ 39
3.4.3 Testing Inputs.............................................................................................................................40
3.4.4 Testing Coin and Bill Pulse Relays ............................................................................................40
3.4.5 Test Coin Dispenser...................................................................................................................41
3.4.6 Testing the Magnetic Card Reader ............................................................................................41
3.4.7 Testing the Thermal Printer........................................................................................................42
3.4.8 Testing the Standard Keypad.....................................................................................................43
3.4.9 Testing the Buttons....................................................................................................................44
3.4.10 Test Exp. Memory....................................................................................................................44
3.4.11 Test RFID (AWID)....................................................................................................................44
3.4.12 Inapplicable Diagnostics with WashPay Integration.................................................................44
4 Component Operation & Maintenance.......................................................................................45
4.1 Component Locations..........................................................................................................45
4.2 Software Updates................................................................................................................46
4.3 Bill Validator.........................................................................................................................47
4.3.1 Mars Bill Validator......................................................................................................................47
4.4 Single Coin Acceptor...........................................................................................................54
4.4.1 Replacing the Reference Coin ...................................................................................................54
4.4.2 Adjusting the Selectivity to the Coins.........................................................................................54
4.4.3 Removing the Coin Acceptor......................................................................................................55
4.5 Multi-Coin Acceptor Programming and Operation...............................................................56
4.5.1 Programming the IDX Acceptor..................................................................................................56
4.5.2 Programming the IDX to Accept Site-Specific Tokens...............................................................58
4.5.3 Programming Token Value ........................................................................................................59
4.5.4 Programming Dispense Value (for $1 coin dispensing only)......................................................60
4.5.5 Modifying the Hopper.................................................................................................................61
4.5.6 Program the IDX to Accept Quarters..........................................................................................65
4.5.7 Programming the IDX to Accept $1 Coins..................................................................................65
Document Number: WS21058 iii
Document Title: WSII Operations Manual ver 6.10
Page 8

4.5.8 Erasing IDX Programming .........................................................................................................65
4.5.9 The Token Bucket......................................................................................................................65
4.5.10 Cleaning and General Maintenance.........................................................................................66
4.5.11 System Settings Affecting IDX Coin Acceptor Operations .......................................................66
WASH SELECT II
4.6 Speech Module....................................................................................................................66
4.6.1 Recording Messages .................................................................................................................67
4.6.2 System Settings Affecting Speech Module Operations..............................................................69
4.7 Proximity Sensor..................................................................................................................69
4.7.1 Normal Adjusting of Proximity Sensitivity...................................................................................69
4.7.2 Adjusting Sensitivity with the 100% Range Setting....................................................................70
4.7.3 System Settings Affecting Proximity Sensor Operations............................................................70
4.8 Coin Hopper and Assembly.................................................................................................71
4.8.1 Filling the Hopper.......................................................................................................................71
4.8.2 Removing the Hopper from the Wash Select II..........................................................................71
4.8.3 Cleaning and General Maintenance ...........................................................................................72
4.8.4 System Settings Affecting Coin Hopper Operations...................................................................72
4.9 Card Reader........................................................................................................................72
4.9.1 Card Reader Related System Settings ......................................................................................73
4.9.2 System Settings Affecting Card Reader Operations ..................................................................73
4.10 Thermal Printer Assembly ................................................................................................73
4.10.1 Replacing the Printer Paper.....................................................................................................74
4.10.2 Clearing a Paper Jam ..............................................................................................................74
4.10.3 Reset and Feed Buttons ..........................................................................................................74
4.10.4 Manually Printing a Self Test....................................................................................................75
4.10.5 Thermal Printer Control Board.................................................................................................75
4.10.6 System Settings Affecting Thermal Printer...............................................................................75
4.11 Fuse..................................................................................................................................76
Appendix A. Wash Select II – WashPay Notifications .................................................................77
Appendix B. Circuit Board Connections.......................................................................................79
Appendix C. Tunnel Mode...............................................................................................................95
Appendix D. Wash Select II/POS4000 Canadian Addendum.......................................................97
Appendix E. Security Alarm Option.............................................................................................107
Appendix F. Citizen CD-S500 Printer Configuration Procedures.............................................113
Document Number: WS21058 iv
Document Title: WSII Operations Manual ver 6.10
Page 9

WASH SELECT II
Index of Figures
Figure 1. Setup/Operate Toggle Switch Location............................................................................ 2
Figure 2. Alternate Keypad Functions............................................................................................19
Figure 3. Blue Service Button Location..........................................................................................32
Figure 4. Wash Select II Internal Component Locations ...............................................................45
Figure 5. Locating the EPROM and Reset System Memory Button..............................................46
Figure 6. Mars Bill Validator/Stacker..............................................................................................48
Figure 7. Mars Bill Validator—Top View........................................................................................48
Figure 8. Mars Bill Stacker Replacement.......................................................................................49
Figure 9. Mars Flash Code LED ....................................................................................................50
Figure 10. Mars with Lower Housing .............................................................................................52
Figure 11. Mars with Lower Housing Removed.............................................................................52
Figure 12. Mars DIP Switches .......................................................................................................53
Figure 13. Outside/ Inside of the IDX.............................................................................................57
Figure 14. IDX Wire Harness (Green Phoenix Connector) Configurations ................................... 58
Figure 15. Hopper View - Side Screw and Internal Hopper - Cube...............................................61
Figure 16. Hopper View - Removing the Hopper - Cube Top........................................................62
Figure 17. Hopper View - Top Removed ....................................................................................... 62
Figure 18. Hopper View - Wheel Removed................................................................................... 63
Figure 19. Hopper View - Guide Arm Cover Removed..................................................................63
Figure 20. Hopper View - Removal of the Coin Guide Arm...........................................................64
Figure 21. Hopper View - Coin Exit Opening and Chute...............................................................64
Figure 22. Proximity Sensor Power Block......................................................................................70
Figure 23. Outside/Inside the IDX Coin Acceptor........................................................................100
Figure 24. Shock Sensor..............................................................................................................109
Figure 25. Mounted Siren.............................................................................................................109
Figure 26. Door Switch.................................................................................................................110
Figure 27. WS2 Alarm Wiring Diagram........................................................................................111
Document Number: WS21058 v
Document Title: WSII Operations Manual ver 6.10
Page 10

WASH SELECT II
Index of Tables
Table 1. Country Codes.................................................................................................................24
Table 2. Programming Pass Codes/Cards....................................................................................29
Table 3. Mars Coupon ID Codes ...................................................................................................31
Table 4. Wash Select II-POS40000 Wiring....................................................................................33
Table 5. POS4000 Bay Numbering................................................................................................34
Table 6. Conveying Accounting.....................................................................................................35
Table 7. Bill/Coin Inputs.................................................................................................................41
Table 8. Printer Error Codes.......................................................................................................... 43
Table 9. Mars Bill Validator Flash Codes.......................................................................................50
Table 10. Mars Bill Validator DIP Switches....................................................................................53
Table 11. IDX Program Configuration............................................................................................ 57
Table 12. Wash Select II Token Values......................................................................................... 59
Table 13. System Settings Affecting IDX Coin Acceptor Operations ............................................66
Table 14. System Settings Affecting Speech Module Operations.................................................69
Table 15. System Settings Affecting Proximity Sensor Operations...............................................71
Table 16. System Settings Affecting Coin Hopper Operations......................................................72
Table 17. Card Reader Related System Settings..........................................................................73
Table 18. System Settings Affecting Thermal Printer Operations ................................................. 75
Table 19. Wash Select II Token Values.......................................................................................100
Table 20. Canadian IDX Program Configuration.........................................................................101
Table 21. CashCode Bill Validator Diagnostic Flash Codes........................................................103
Table 22. CashCode DIP Switch Settings ...................................................................................105
Table 23. Programming Pass Codes/Cards................................................................................108
Table 24. Wiring Guide ................................................................................................................110
Document Number: WS21058 vi
Document Title: WSII Operations Manual ver 6.10
Page 11

WASH SELECT II
Wash Select II Menu Tree
Version 6.01
Reporting Menu Diagnostics Menu Cust Interface Menu
Print Configuration Test Outputs Customer Stacking
View Configuration Cycle Outputs Forced Selection
Print Accounting Test Inputs Allow Upgrades
- Detailed Test Bills/Coins Auto Select Timer
- Summary Dispense Coins
View Accounting Test Card Reader Edit Pager #
Clear Accounting - Check Card Type View Pager #s
Fleet Menu (N/A)
- Check Tracks Print Pager #s
Add Account Test Receipt Printer Test a Pager
Edit Account Test Keypad Site ID Voice #
Add to Account Test Buttons Print Pager Log
Delete Account Test Modem
View Accounts Get Network Info Country Code
Print 1 Account Modem Loopback Token Value (N/A)
Print Accounts 485/POS Loopback Max Tokens/Customer (N/A)
View Transaction History Test Expansion Memory Dispense Mode
Print Transaction History Test RFID Reader Dispense Value
Delete All Empty RFID loopback Cash Mode*
Edit Profile Debit loopback
Add Per Profile Test RFID (AWID) System Time (N/A)
View Profiles Aux P4 Loopback Service Phone #
Print Profiles Aux J1 Loopback Site ID
External Fleet
Wash Setup (N/A)
Erase All Wash Prices Cash Receipt
Credit System
Credit Mode
Wash Names Receipt Bar Code*
Speech Menu (24 Messages)
Remote Setup Play Message
Remote Dial Up Record Message Enable/Disable
Print Transaction Status Greeting Delay Set Password
Print Transaction History Repeat Delay Rings to Answer
Clear Transaction History Print Message List Set Deaf Time
Pay Fleet Acct (N/A) View Message List Modem/Local
Return Credit (N/A)
Text Messages (N/A) Passcodes/cards
Credit & Coupon Receipt Header Add Code/Card
Open a Batch (N/A) 2nd Line of Wash View Codes/Cards
Close a Batch (N/A) Greeting Screen* Print Codes/Cards
Clear A Batch (N/A)
Wash Interface Menu
Processor Type Relay Stacking
Auto Batching Relay Latching Setup Co upon
Accept Proprietary (N/A) Relay Pattern Set Manufacturer
POS Auth Timeout Auto OOS Detect Coupon Limit
Network Params Wash Handshaking
Merchant ID (N/A) Fault Input Interface Mode
Split Tender (N/A) OOS Timer Set Bay Address
Credit Sales Tax (N/A) Tunnel Mode Convey Accounting
Barrier Gate* Use POS Names/Prices
Combo Mode Notifications
Edit Combo Names
Optioning
Remote Codes
Paging Functions (N/A)
Cash & Tokens
Misc. Setup
Receipt Printer
Alarm Duration (N/A)
Remote Reporting (N/A)
Delete Code/Card
VIP Coupons
POS4000 Link
Document Number: WS21058 i
Document Title: WSII Operations Manual ver 6.10
Page 12

WASH SELECT II
[THIS PAGE INTENTIONALLY LEFT BLANK]
Document Number: WS21058 ii
Document Title: WSII Operations Manual ver 6.10
Page 13

WASH SELECT II
1 System Overview
1.1 Introduction to the Wash Select II with WashP ay Integration
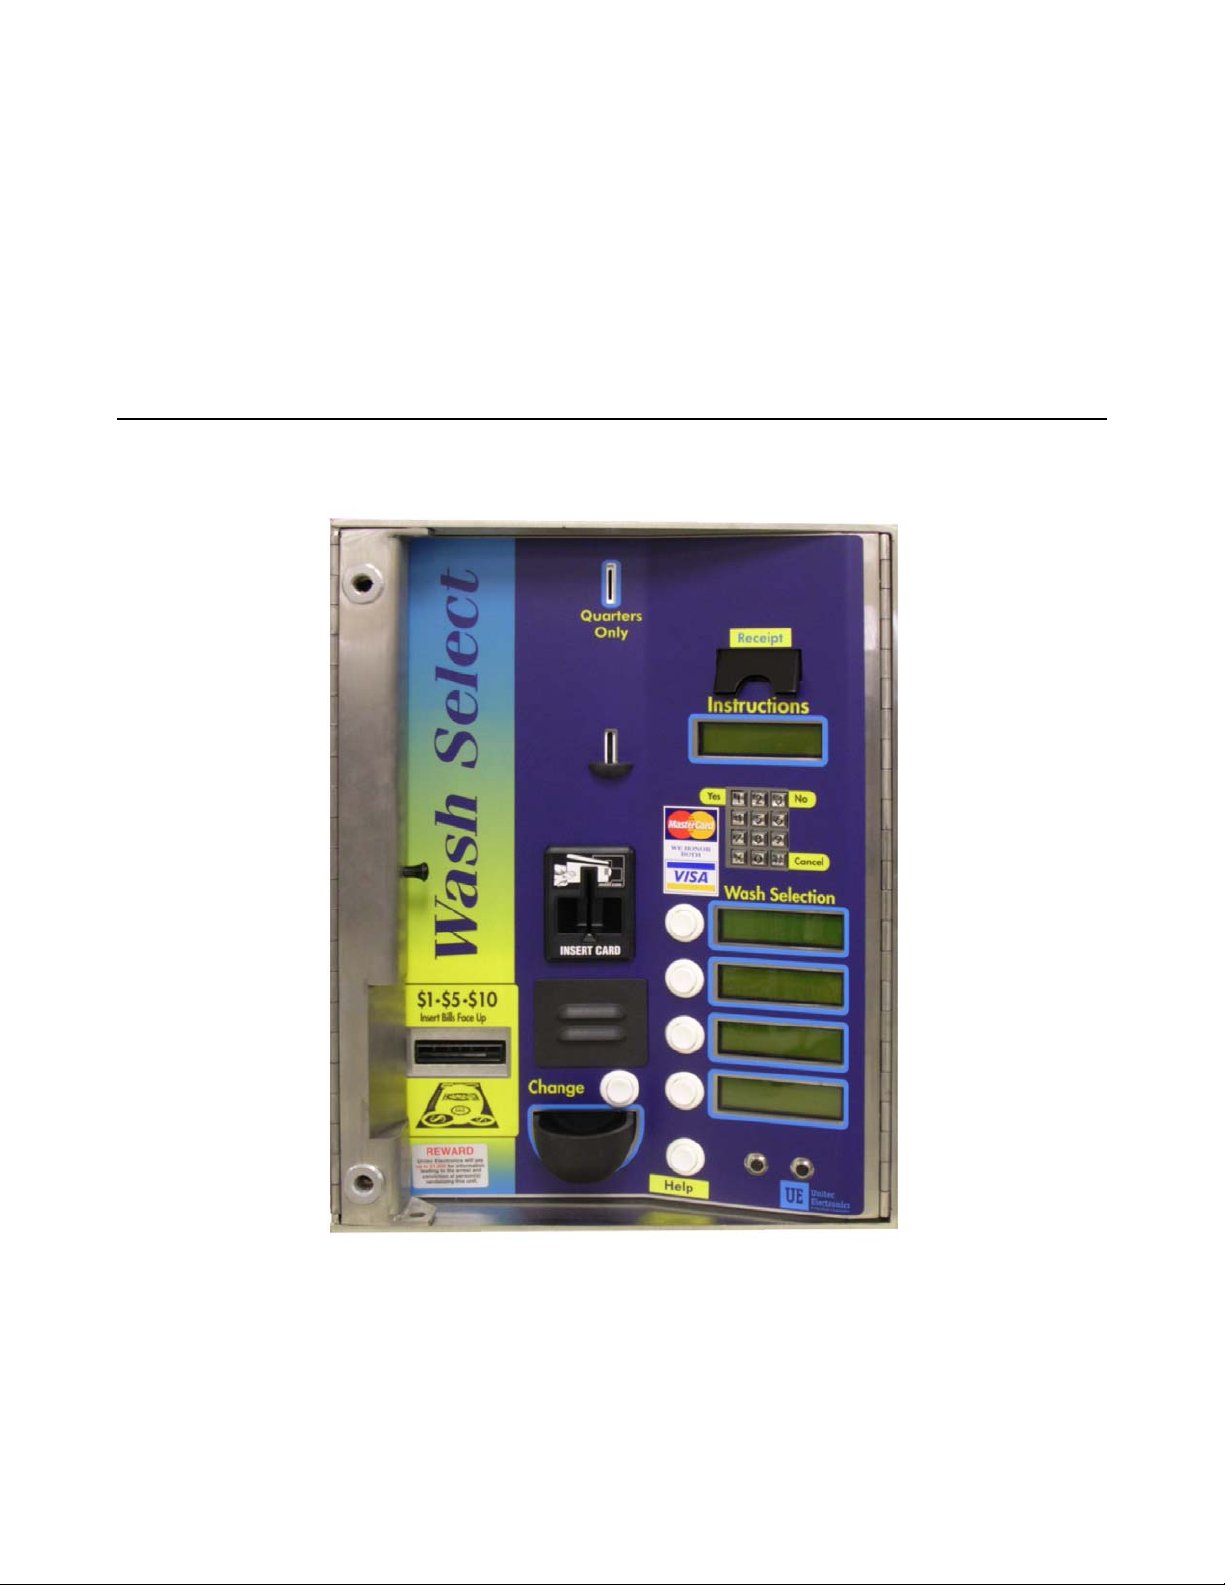
The Wash Select II is a self-serve unattended automatic car wash entry system designed
specifically for the self-serve car wash market. The Wash Select II accepts various forms of
payment, interacts with customers at the car wash entrance, an d arms the car wash.
With WashPay integration, the Wash Select II functionality expands to easily access remote
reporting via the Internet, unlimited fleet accounts, and increased marketing and promotions
functionality.
1.2 Wash Select II Function Changes with WashPay Integration
When the Wash Select II interfaces with the WashPay server, a few functions are moved
from setup and operation in the Wash Select II to the WashPay server. The Wash Select II
will display the message “Settings are in the WashPay Server.” For further information on
how to program these functions, please see the Sierra Software Management Application
Programming Manual at
www.StartwithUnitec.com. Those functions are:
• Price and names of washes and options (added services)
• Fleet account management
• Text message setup (greeting, receipt header, second line messages, and option
prompt)
• Token value setup
• System time and date
• Alarm duration
• VIP wash coupon setup
• Specials scheduling
• Fundraiser setup
• Free wash scheduling
A few functions will be disabled and will display the message “this function/setting is not
available when connecting to WashPay server”. Those functions are:
• Pay fleet accounts with credit cards
• Credit refunds
• Multi-unit link to other Wash Select IIs
• Use POS4000 wash prices and names
Document Number: WS21058 1
Document Title: WSII Operations Manual ver 6.10
Page 14
WASH SELECT II
Code entry for fleet accounts will require pressing the (*) key, unless the code is 5 digits or
longer. In this case, the code will automatically be accepted after 4 seconds. In cases where
the Wash Select II is connected to a POS4000, codes will be verified by the POS4000 first,
then the WashPay server.
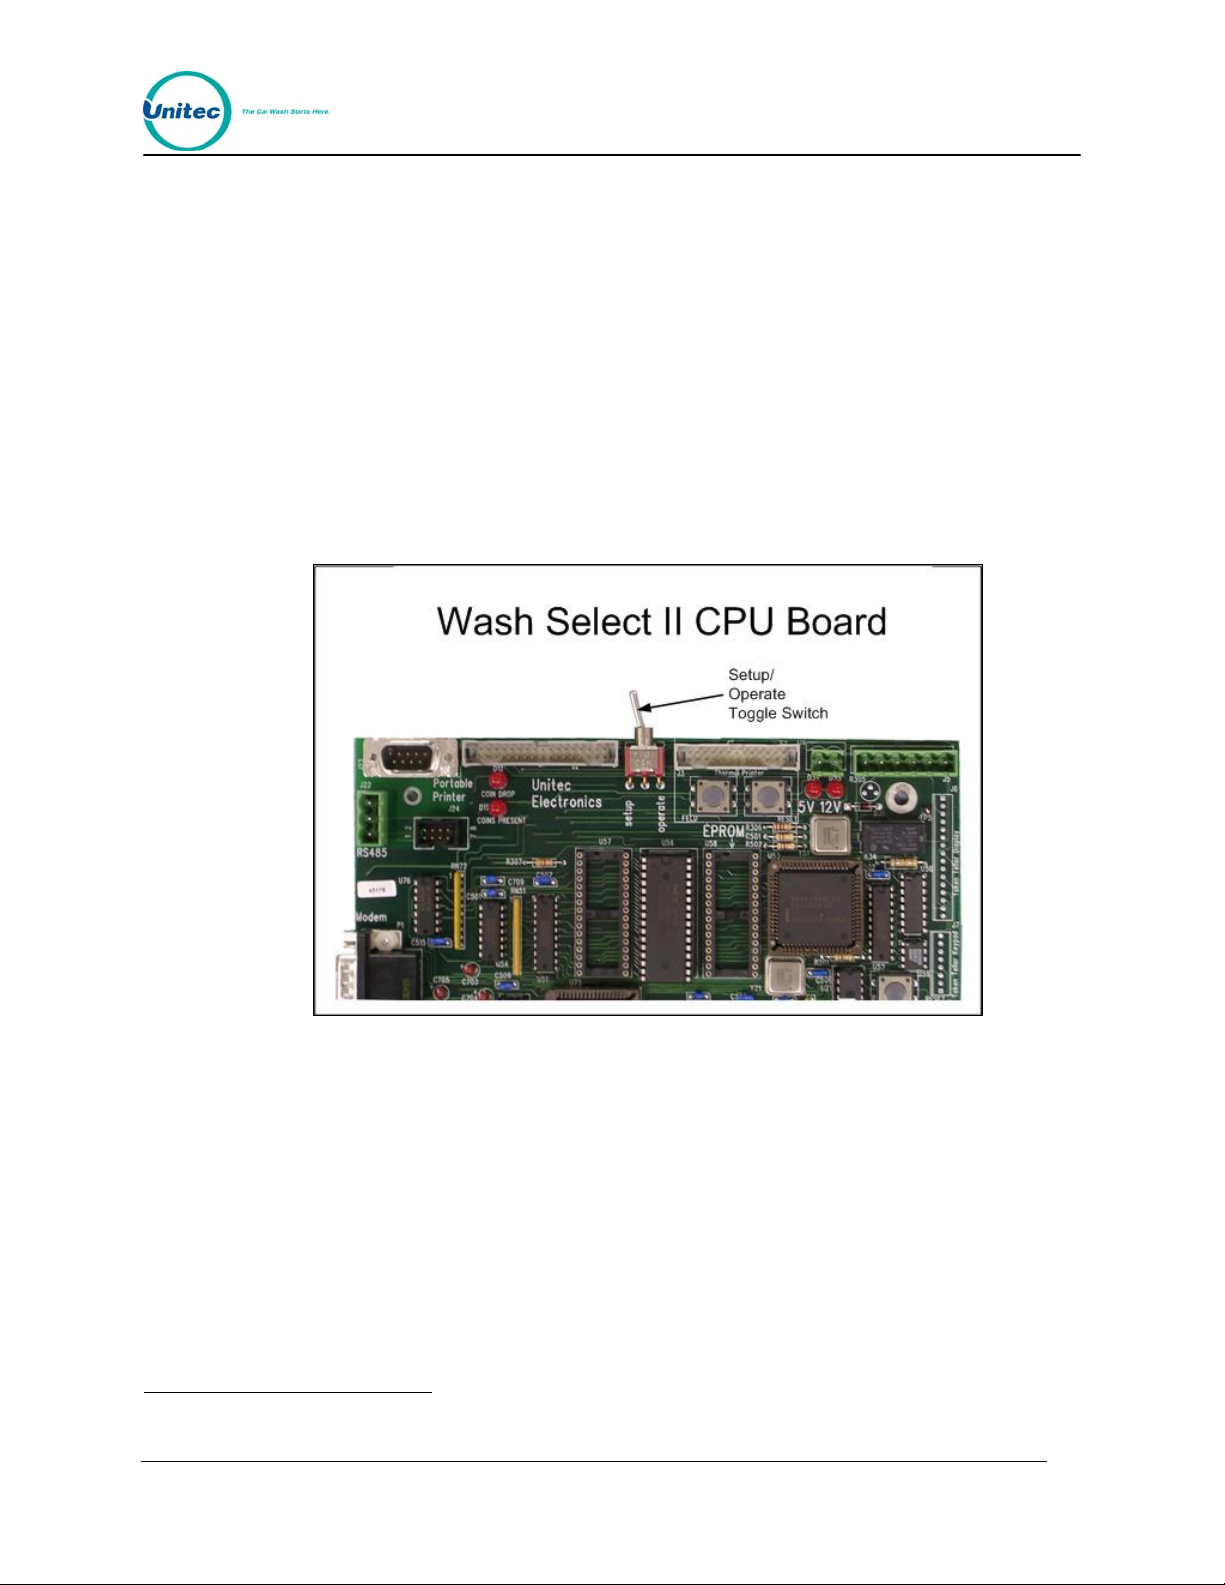
1.3 Setup and Operate Modes
The Wash Select II functions in two different modes: Setup and Operate. It can be placed in
either mode by using the toggle switch at the top of the CPU board which is located on the
inside right wall of the Wash Select II case. While in “Setup” mod e, the Wash Select II can be
programmed and reports can be viewed using the main display screen or printed using the
optional thermal receipt printer. When in “Operate” mode, the Wash Select II allows the
customer to purchase four different wash packages using several different methods of
payment.
Figure 1. Setup/Operate Toggle Switch Location
1.4 Customer Interface
The Wash Select II offers many features that allow effective customer interaction, such as
large-character daylight readable displays and oversized butto ns. As customers approach the
entry system unit, they can be greeted with a customized, pre-recorded message
same time, instructions on the main display guide the customer through the ir choices.
The customer can either select their wash package first, and then insert payment, or insert
payment and then select their wash package. Whichever way they choose, the unit will
prompt them for either payment or wash package selection. When the customer has paid and
*
Pre-recorded voice messages are included with the purchase of the Speech option package.
Document Number: WS21058 2
Document Title: WSII Operations Manual ver 6.10
*
. At the
Page 15

WASH SELECT II
selected their wash package, they are prompted to begin the wash by either driving forward,
or by pressing the start button and following the wash bay instruction s.
Within these basic parameters, there are many options available for you to program to
customize your individual customer’s wash experience.
1.5 Wash Select II Features
The Wash Select II car wash entry system provides the features you need in order to most
fully profit from your car wash.
1.5.1 Standard Features
The Wash Select II standard features provide the full range of services required by an
advanced wash entry system:
• MARS Bill Validator, which allows acceptance of $1, $2, $5, $10 bi lls.
• 2500 coin capacity change hopper for dispensing U.S. quar ters
• Acceptance of U.S. quarters via the Slug-buster II® single-coin acceptor
• One large-character daylight readable main instructional display
• Four large-character daylight readable wash selection displays
• Provides up to four wash packages
• Eight programmable wash arming relays
• Fault and warning output relays
• Pass-codes for easy entry to menus without unlocking the unit
• Padlock holes for added security in top and bottom of Wash Select II Case
1.5.2 Optional Features
In addition to standard features, the functionality of the Wash Select II can be expanded with
the purchase of additional optional features:
• Credit – This option allows your unit to accept all major credit cards. It includes
credit option software, a card reader with interface cable, and a credit transaction
modem with power supply and interface cable. In addition, your site will require a
dedicated phone line on site, and a Merchant account. With the purchase of this
option package, you also receive the Remote Reporting and Paging options as
well.
• Multi-Coin Acceptance – Featuring an IDX coin acceptor, the Multiple Coin
Acceptance option gives your WS II the ability to accept U.S. quarters, $1 US
coins, $1 and $2 Canadian coins (loonies and toonies), and as many as four
different bimetal tokens through a single coin slot. Detailed information for
programming, operation and maintenance of this option can be found in Section
4.5 of this manual.
Document Number: WS21058 3
Document Title: WSII Operations Manual ver 6.10
Page 16

WASH SELECT II
• Multi-use Codes - The multi-use codes feature, also known as "bundled wash"
and similar to a fleet account, is used to sell a number of uses of a particular
wash at a preset price. The customer gets a single code for these uses. The
price, the number of uses, the type of wash in the package, and the feature
number representing this package are preset in a "template". Once a feature
(wash) number is assigned to the package, the sale of a multi-use code is similar
to that of a regular code, just ringing up the feature number for the package
defined in the template. (POS4000 console is required - no programming or setup
is needed at the WSII.)
• Speech Option – This option allows the Wash Select II to give voice prompts to
the customer. This option includes a speech circuit board and a speaker. The
Speech option may be shipped with your unit, or purchased as an upgrade for an
existing unit. This option features several different voice prompts including a
greeting message (which requires the proximity option), a message asking the
customer to make a wash selection, and a message asking the cu stomer to in sert
money or codes. Detailed information for programming, operation and
maintenance of this option can be found in Section
4.6 of this manual.
• Proximity Sensor – This option works with the Speech option to sense when
customer vehicles approach the unit. When it senses a vehicle, the unit plays the
customer greeting.
• VIP Wash Pass Cards – With this option you can use magnetically encoded
cards for fleet sales. To use this option, your unit must also be equipped a
magnetic card reader. VIP Wash Pass Cards are intended for prepaid fleet sales,
and allow you to program a specific amount of washes or a set dollar amount for
each account. If the account uses or dollar value becomes low, more washes can
easily be added.
• VIP Wash Coupons –VIP Wash Coupons can be used as a great advertising
tool. There are six different VIP Wash Coupons available, and you can have up to
three concurrently valid at any one time. VIP Wash Coupons are printed in
magnetic ink to inhibit fraud. Each coupon can be customized with your site name
and location on the back in red ink. These coupons can be used to offe r discounts
or even free washes to your customers. Programming information can be found in
Section
2.12 of this manual.
• Card Reader – This option is required to enable the acceptance of VIP Wash
Pass cards and Pass cards with the Enhanced Fleet option, and also to accept
credit cards with the Credit option.
• Thermal Receipt Printer – This option provides the ability to print reports, cash
and credit receipts, and customer over payment vouchers. The Thermal Receipt
Printer” option is a 27 character high-speed thermal printer. The Wash Select II
can detect printer problems and alert the operator via the warning relay output, a
page, alarm status on the configuration report, or upon login for remote reporting.
• Remote Reporting – With WashPay integration, remote reporting is available via
the Internet.
• GiveX – This option allows the Wash Select II to accept the proprietary GiveX gift
card across multiple car wash sites using a dialup network. The Credit option is
also required to accept GiveX cards.
Document Number: WS21058 4
Document Title: WSII Operations Manual ver 6.10
Page 17

WASH SELECT II
• Multi-Unit Fleet – The Wash Select II multi-unit fleet upgrade feature enables the
sharing of fleet accounts generated at a Master unit for use at any bay in your
system, including the Master. This option does not require, and is not compatible
with the POS4000 option.
• POS4000 – This separate unit produced by Unitec provides the ability to sell and
share codes from a C-Store.
• External Fleet – This option allows the use of third-party cashless card systems,
such as eWash, ExpressKey, and WashCard.
• Security Alarm – This option adds an alarm to the WSII that monitors the door
for unauthorized entry, and a shock sensor for detecting attempted vandalizism.
When triggered, a siren will sound from 1-60 minutes (to configure, see Section
2.9.1), a message will display and print on the POS4000 controller in the store (if
equipped),and a page will be sent (if configured for p aging).
• Barrier Gate – With the purchase of this option, the Wash Select II can be
integrated with a gated system to control the flow of cars into either attended or
unattended tunnel washes. Sites with multiple lanes will require the installation of
the gate controller as well. For more information, see the Unitec Gate Controller
for Multi-Lane Applications Install Guide.
Document Number: WS21058 5
Document Title: WSII Operations Manual ver 6.10
Page 18

WASH SELECT II
[THIS PAGE INTENTIONALLY LEFT BLANK]
Document Number: WS21058 6
Document Title: WSII Operations Manual ver 6.10
Page 19

WASH SELECT II
2 Initial Setup
The Wash Select II configuration menus provide the ability to customize your unit to interface
with your site-specific options, wash equipment, and marketing plans. The following sections
provide configuration procedures for each of the available menu functions.
If you are integrating the Wash Select II with the WashPay Site Management System, ensure
the expansion board is installed in the upper right corner above the CPU board on the inside
right wall of the WSII unit and is connected to the CPU board with a short ribbon cable. A
CAT5E Ethernet cable will be connected from the expansion board to the router in the
office/C-store. Then complete the following steps:
1. Place the WSII in Setup mode. Scroll to: Credit System (*) Credit Mode (*) 6 (*)
2. The Version of the installed expansion board will be displayed. If the board is not
connected correctly, the error “NIC not found!” will be displayed on the LCD
windows on the door. The credit mode will not save and the system will not
connect to the WashPay server until this is corrected.
3. Scroll to Network Params (*)
4. You should see “Rev#: WP2.XX. Press any key.” Press any key to continue. If
this message is not displayed, make sure the LED light is lit on the expansion
board by the Ethernet cable and make sure the ribbon cable and Ethernet cable
connections are secure, then reboot the Wash Select II un it.
5. The network status will be displayed:
host connected: communication to the server is established (or)
network online: server connected, but no communication (or)
network down [x]: where x equals one of the following error co des:
1 - No DHCP returned
2 - Cannot create TCP server
3 - Cannot set up UDP socket
4 - Cannot find controller
5 - Did not connect to TCP server
6 - Did not get a device ID
no response: No response from the interface (If "no response", set up will
exit.)
6. The parameters will be sent to the network interface. If successful, it shows "IP
addresses set", otherwise "Cannot Set IP".
Document Number: WS21002 7
Document Title: WSII Operations Manual ver 5.50
Page 20

WASH SELECT II
2.1 Credit System
The Credit system manages credit transactions. These include all major credit cards and the
Mercury Gift Card. Credit system options are configured using the Credit Syst em menu.
The Wash Select II is Cardholder Information Security Program (CISP) compliant:
Being CISP compliant, Wash Select II does NOT:
• Store or print magnetic stripe data or card verification data subsequent to initial
Note:
2.1.1 Obtaining a Merchant Account
You must have a Merchant Account in order to use the Credit option.
If you have not acquired a merchant account, contact Unitec at 1-800-486-4832 ext. 108 for
compatible merchant account specifications to ensure that your merchant account provider
will operate with Unitec equipment.
authorization of a transaction;
• Store complete credit card number or expiration date after the transaction is
settled.
• Print complete credit card number or expiration date on any printout s, including
output through Remote Report.
2.1.2 Credit Mode
The Wash Select II operates in several different credit modes. The mode used with Wash Pay
integration is Mode 6. This was already programmed during setup.
2.1.3 Print Transaction Status
Place the WSII in Setup mode. Scroll to: Credit System (*) Print Trans Stat (*)
2.1.4 Print Credit Transaction History
The WSII holds information on the 500 most recent credit transactions. The oldest transaction
gets purged from the system when a new transaction is completed.
1. Place the WSII in Setup mode. Scroll to: Credit System (*) Print Trans Hist (*)
2. You will be given two options. (1 = Detailed, 2 = Condensed) Choose the option
you want and then press the (*) key to enter.
3. You will be given two options. (1 = Date Range, 2 = All Records). If you want a
specific date range, choose 1 and press the (*) key to enter then enter the date
range. If not, press 2.
Below you will find sample of each type of report.
Detailed: Prints all available information from processed network (e. g. credit) tran sactions.
**CREDIT TRANS HISTORY**
Document Number: WS21058 8
Document Title: WSII Operations Manual ver 6.10
Page 21

WASH SELECT II
Current Date: 02/14/2010
Current Time: 10:05AM
Transactions in history: 1
-------------------------- INDEX NUMBER: 0
STATUS:REG. SALE CAPTURED
ACNT#:XXXXXXXXXXXX0736
CARD: Visa
TIME:15:21 DATE:02/11/10
WASH: 4 AMOUNT:$ 8.00
REFERENCE:011109
RESP CODE: 200 (APPROVED)
---------------------------
CAPTURED CREDIT SALES:
AX-AMEX 0 $0.00
VI-VISA 1 $8.00
MC-MASTERCARD 0 $0.00
DS-DISCOVER 0 $0.00
VC-SHEETZ Z 0 $0.00
DC-DINERS/CART 0 $0.00
JC-JCB 0 $0.00
DB-DEBIT 0 $0.00
VF-VISA FLEET 0 $0.00
MF-MC FLEET 0 $0.00
WF-WRIGHT EXP 0 $0.00
PL-SHEETZ ADV 0 $0.00
YF-VOYAGER 0 $0.00
FF-FLEET ONE 0 $0.00
FC-FLEETCOR 0 $0.00
OTHER 0 $0.00
Condensed: Prints a summary of information from processed network (e.g. credit)
transactions.
**CREDIT TRANS HISTORY**
Current Date: 10/20/2010
Current Time: 10:05AM
Transactions in history:2
-------------------------- TYPE & ACCOUNT# AMOUNT DATE
AMEX 9012 $5.00 1020
VISA 0736 $6.00 1019
CAPTURED CREDIT SALES:
AX-AMEX 1 $5.00
VI-VISA 1 $6.00
MC-MASTERCARD 0 $0.00
DS-DISCOVER 0 $0.00
VC-SHEETZ Z 0 $0.00
DC-DINERS/CART 0 $0.00
JC-JCB 0 $0.00
Document Number: WS21058 9
Document Title: WSII Operations Manual ver 6.10
Page 22
DB-DEBIT 0 $0.00
VF-VISA FLEET 0 $0.00
MF-MC FLEET 0 $0.00
WF-WRIGHT EXP 0 $0.00
PL-SHEETZ ADV 0 $0.00
YF-VOYAGER 0 $0.00
FF-FLEET ONE 0 $0.00
FC-FLEETCOR 0 $0.00
OTHER 0 $0.00
Note:
WASH SELECT II
The credit cards types in the Captured Credit Sale sectio n shown in th e samples a re for
Credit Mode 5. In other Credit Modes, only Amex, Visa, MC, Discover and Other are
shown.
2.1.5 Clearing the Transaction History
This function will clear all information in the “Credit Transaction History”. If you periodically
print a “Credit Transaction” report for record keeping, you may want to clear the information
after you receive a successful print out.
Follow the steps below to clear your “Credit Transaction History”:
1. Place the WSII in Setup mode. Scroll to: Credit System (*) Clear Trans Hist (*)
2. You will be asked “Clear Credit History?” Press the (1) key for YES or the (3) key
for NO, at this point the display will read “History Cleared”.
2.1.6 Credit + Coupon
The Credit + Coupon feature allows a coupon fleet account customer to use a credit card to
upgrade their wash package using a credit card prior to selecting a wash package. This
setting is enabled by default. Note that this setting does not affect the use of VIP coupons in
any way.
Follow the steps below to enable the “Credit + Cou pon” feature.
1. Place the WSII in Setup mode. Scroll to: Credit System (*) Credit & Coupon (*)
2. You will be asked “Coupon & Credit?” Press the (1) key for YES or the (3) key for
NO.
2.1.7 Batch Functions
All batching functions are not applicable when the Wash Select II is integrated with the
WashPay server.
Document Number: WS21058 10
Document Title: WSII Operations Manual ver 6.10
Page 23

WASH SELECT II
2.1.8 Merchant ID
The Merchant ID will be entered during setup of the WashPay site server. For further
instructions, please see the Sierra Management Application Programming Manual at
www.StartwithUnitec.com.
2.1.9 POS Auth Timeout
This setting allows you to decide how much time to allow the POS authorization device to
give the final authorization needed to arm the wash in a POS auth transaction. Under normal
operating conditions, the default setting should be used. Only change it if absolutely
necessary.
Follow the steps below to configure the POS auth timeout.
1. Place the WSII in Setup mode. Scroll to: Credit System (*)
2. Scroll through this sub-menu, until the “POS Auth Timeout” option is displayed.
Press the (*) key to enter.
3. Enter any number that falls within the displayed range, and then press the (*) key.
2.1.10 Split Tender
If enabled, Split Tender allows an option to be purchased using a credit card or GiveX card,
even if the wash is paid using another payment method, as lon g as t he amount to be charged
is $1.00 or more. For a split tender to be allowed, the customer has to make the selection of
the wash (or enter the wash code) and select an option before swiping card. Split tender also
allows code transactions to be upgraded with an option by using a credit card, if the option
sells for $1.00 or more.
The customer may use a GiveX card, even if the account balance does not cover the
purchase amount. Once the GiveX account is depleted, the Wash Select I I will prompt for the
amount owed. The customer may then use cash or another credit card to pay the balance. If
the customer decides not to pay the balance and cancels the transaction, the amount
charged to the GiveX card will be reversed and credited back to t he GiveX account.
1. Place the WSII in Setup mode. Scroll to: Credit System (*) Split Tender (*)
2. Select 1 to Enable or 2 to Disable and press the (*) key to enter.
2.1.11 Credit Sales Tax
Some regions of the country require that sales tax be added to credit transactions. If your
state requires this tax, you may configure the WSII to add tax to the wash transaction. Any
portion of the sale purchased with a credit card will automatically have tax added when this
feature is enabled.
1. Place the WSII in Setup mode. Scroll to: Credit System (*) Credit Sales Tax (*)
2. The unit will ask if you want to enable credit sales tax. Select 1 for Yes or 2 to
Disable and press the (*) key to enter.
Document Number: WS21058 11
Document Title: WSII Operations Manual ver 6.10
Page 24

3. Enter the amount of tax in percent form (0.00%) and press the (*) key to enter.
WASH SELECT II
2.2 Wash and Option Names and Prices
The wash names and prices and added services (options) are programmed in the WashPay
server. For further instructions, see the Sierra Management Application Programming Manual
at
www.StartwithUnitec.com
2.3 Speech Menu
The functions in this menu will allow you to configure and test the optional speech module
card. This card attaches to the middle of the CPU board of the Wash Select II.
2.3.1 Playback Messages
This function will allow you to playback each of the 24 speech messages. When you enter
the play message function, choose the message you wish to hear. The following steps will
walk you through the “Playback Messages” function.
4. Place the WSII in Setup mode. Scroll to: Speech (*) Play Message (*)
5. Enter the number of the message you wish to hear or press (0) to hear all
messages.
Once you have entered the message number, the display will show you the message name,
message number and the length of the message played.
EXAMPLE:
GREETING MESSAGE
PLAYING: 1 10.25S
The first line shows the message name. The second line shows that message number 1 is
playing and that it is 10.25 seconds long. For more information regarding messages, refer to
the “Speech Message Script” in Section 3.6.
2.3.2 Record Messages
Using this function will allow you to record a speech message. This function requires a
microphone. Instructions and tips for recording speech messages are found in Section 3.6 of
this manual.
1. Plug the microphone into the top of the CPU board.
2. Place the WSII in Setup mode. Scroll to: Speech (*) Record Message (*)
3. Enter the number of the message you wish to record (1-24). Press (*).
4. Record the message.
Document Number: WS21058 12
Document Title: WSII Operations Manual ver 6.10
Page 25

WASH SELECT II
2.3.3 Set Greeting Start Delay
This function is used to set the amount of time that the Wash Select II will wait to activate the
greeting message after the Proximity sensor detects the presence of a vehicle. This delay is
usually set to give the customer enough time to roll down the window once they have
stopped in front of the Wash Select II. This time may be set between 0 and 10 seconds. The
system default setting is three seconds. Follow the steps below to set the greeting start delay
time.
1. Place the WSII in Setup mode. Scroll to: Speech (*) Greeting D elay (*)
2. Enter the length of time you wish the Wash Select II to wait before activating the
greeting message (0-10 seconds), and then press the (*) key.
2.3.4 Set Greeting Repeat Delay
Using this feature, you will set the greeting message repeat delay. This is the amount of time
that the Wash Select II will wait before repeating the message if the customer has not
responded by selecting a wash, entering cash or swiping a credit card. The greeting repeat
delay may be set between 0 and 60 seconds. This default setting is 20 seconds. Follow the
steps below to set the greeting repeat delay time.
3. Place the WSII in Setup mode. Scroll to: Speech (*) Repeat Delay (*)
4. Enter the amount of time you wish the Wash Select II to wait before repeating the
message, and then press the (*) key.
2.3.5 Printing Message List
Using this command, you can print a list of speech message s. T he list will show the message
number, message name and the length of the message. To print the message list, follow the
steps below.
1. Place the WSII in Setup mode. Scroll to: Speech (*) Print Msg List (*)
2. The message list will begin to print.
2.3.6 Viewing Current Message List
If you do not have the optional thermal printer, you may view the message list using this
function. The list will show the message number, name and the length of the message.
Follow the steps below to view the current message list.
1. Place the WSII in Setup mode. Scroll to: Speech (*) Play Message (*) View Msg
List (*)
2. You will need to use the (3) button to scroll forward to view the next message and
the (1) key to return to the previous one.
Document Number: WS21058 13
Document Title: WSII Operations Manual ver 6.10
Page 26

WASH SELECT II
2.4 Text Messages Menu
Text messages are different messages that appear within the Wash Select II system such as
receipt messages and the second line of the wash display. Text messages need to be
programmed into the WashPay server. For further instructions, please see the Sierra
Management Application Programming Manual at
2.5 Wash Interface Menu
Most car wash manufacturers support the Wash Select II default settings. However, if
anything must be changed in order to interface with your car wash, it may be done within the
Wash Interface menu.
2.5.1 Enable Relay Stacking
Relay stacking is the ability for the Wash Select II to hold all arming signals while the wash is
in use. Most car wash systems will work with (or prefer to work with) Relay Stacking enabled.
Some systems that have bay entry signs require the Relay Stacking to be disabled.
ENABLED – No arming signals will be sent to the was h if the wash is “In Use” (See Wash
Handshaking). If a purchase is “In Use” and another wash is purchased, the Wash Select II
will hold the new wash until the previous wash ha s completed its cycle.
www.startwithunitec.com.
DISABLED – The Wash Select II will send any wash arming signal immediately, even if there
is a wash in progress.
To configure “Relay Stacking”, follow the steps below.
1. Using the toggle switch at the top of the CPU board, place the Wash Select II in
setup mode by moving the switch toward the back of the Wash Select II case.
(The CPU board is located on the inside right wall of the Wash Select II case.)
2. Using the (3) key to scroll forward and the (1) key to scroll back, scroll through the
main menu until the “Wash Interface” option is displayed. Press the (*) key to
enter. (This should be the first option displayed.)
3. Scroll through this menu until the “Relay Stacking” option is displayed, and then
press the (*) key to enter.
4. Press the (1) key for “YES” (enabled) or the (3) key for “NO” (disabled).
Default setting = Yes/Enabled
2.5.2 Enable Relay Latching
“Relay Latching” describes the type of relay output for the wash arming signals. Most car
washes prefer the signals to be set as “Pulsed/No”.
Document Number: WS21058 14
Document Title: WSII Operations Manual ver 6.10
Page 27

WASH SELECT II
Yes/Latched – Relays are turned on when the arming signal is sent to the car wash. These
relays stay on until the customer purchases an upgrade (provided upgrades are enabled) or
the wash becomes “In Use”.
No/Pulsed – Relays are turned on for a two second pulse when the arming signal is sent to
the car wash. These relays will not be re-activated unless an upgrade is purchased (provided
upgrades are enabled).
Use the steps below to assist you when enabling this feature.
1. Place the WSII in Setup mode. Scroll to: Wash Interface (*) Relay Latch ing (*)
2. Press the (1) key for “YES” (Latched) or the (3) key for “NO” (Pulsed).
Default Setting = No/Pulsed
2.5.3 Configure the Wash Relay Pattern
The “Wash Relay” pattern allows you to decide which relays will be turned on for each wash
package. The industry standard is that one relay should be turned on for each wash package.
The Wash Select II provides eight wash relays, which allows the relay pattern to be reconfigured if you wish to change a wash to another output relay. This is helpful if a relay were
to fail. Switching the wash to another output relay avoids having to replace parts. The wash
relays may be used in any combination for each wash.
The following steps will help you set the wash relay pattern.
1. Place the WSII in Setup mode. Scroll to: Wash Interface (*) Relay Pattern (*)
2. Enter the wash number of the relay pattern you would like to program, and then
3. Turn on the relay you wish to use for this wash. This is done by using the Wash
EXAMPLE:
If you wish to turn on relays 1, 3, and 7 the pattern should be shown as f ollows.
12345678 relays
1 3 7
This denotes that relays 1, 3, and 7 are turned on and the remaining relays a re turned off.
DEFAULT:
Note:
press the (*) key to enter.
Select II keypad to select number of the relay you would like to have on while this
wash is in service.
Remember when setting your wash relay pattern that wash 1 is the wash in the bottom
display screen and that wash 4 is in the top display screen.
Wash 1: Relay 1 only
Wash 2: Relay 2 only
Document Number: WS21058 15
Document Title: WSII Operations Manual ver 6.10
Page 28

WASH SELECT II
Wash 3: Relay 3 only
Wash 4: Relay 4 only
Default relay patterns will be shown on the configuration report a s follows.
Wash Relays (1-8)
Wash 4 name 4
Wash 3 name 3
Wash 2 name 2
Wash 1 name 1
2.5.4 Enable Automatic Out-Of-Service Detection
If the car wash goes down, the Wash Select II can be informed to let customers know that the
wash is down. The Wash Select II supports the detection of an Out-of-Service condition on
the Wash-in-Use input. This method is supported by many, but not a ll, car wash systems.
If the Automatic Out-Of-Service detection is enabled, and the car wash goes down, the
wash’s Wash-in-Use signal should do the following:
• Turn off for at least one second.
• Turn on for one second. (+/- 1/8 second tolerance)
• Turn off for one second. (+/- 1/8 second tolerance)
• Turn on for the duration of the out-of-service condition.
• Turn off when the car wash is back in service.
If the Wash Select II goes Out of Service while it contains credit in escrow, a voucher will
be printed for the customer.
To enable the “Automatic Out-Of-Service detection, follow the steps below.
1. Place the WSII in Setup mode. Scroll to: Wash Interface (*) Aut o OOS Detect (*)
2. Press the (1) key for “YES” or the (3) key for “NO”.
Default: Enabled
2.5.5 Wash Handshaking
The Wash Select II supports two types of “Wash-In-Use” hand shaking.
• Wash-In-Use: The car wash activates the wash-in-use signal for the entire time
the car wash is in use. (Voltage present)
• Cycle complete: The “Wash-In-Use” is normally on (voltage present). When it is
given a “wash is completed” signal (no voltage present), the car wash will
deactivate the “Wash-In-Use” signal for about two seconds and it will be
Document Number: WS21058 16
Document Title: WSII Operations Manual ver 6.10
Page 29

WASH SELECT II
reactivated. When using the “Cycle Complete” mode, “Upgrades” will be disabled
and “Forced Selection” will be enabled. If your car wash supports the “Wash-InUse” method, you should not use the “Cycle Complete”.
The Wash Select II supports a 24V – 120V AC or DC “Wash-In-Use signal. No internal
changes need be made for eithe r voltage.
(*)
Note:
The following steps will assist you in configuring “Wash Han dshaking”
1. Place the WSII in Setup mode. Scroll to: Wash Interface (*) Wash Handshaking
2. Press the (1) key for “Wash-In-Use” or the (3) key for “Cycle Complete”.
Default: Wash-In-Use
2.5.6 Wash Fault
If your car wash manufacturer does not support the Wash-in-Use signal, you can use the
wash fault input to let the Wash Select II know when a downtime occurs. When enabled, you
may set this feature to detect either an on or off fault signal. Enabling the “Fault Input” signal
allows the wash to send a signal to the coin box if it is malfunctioning or not in service,
causing the coin box to go out-of-service. Once the coin box has gone out of service, it will
display the standard Out of Service message.
If the Wash Select II goes Out of Service while it contains credit in escrow, a voucher will be
printed for the customer.
To enable this feature, follow the steps below.
1. Place the WSII in Setup mode. Scroll to: Wash Interface (*) W ash Fault (*)
2. Press the (1) button for “YES” or the (3) button for “ NO”.
3. The following prompt comes up. You must select whether the Wash Select II should
fault when a high (on) signal is detected or a low (off) signal. "On " is the default.
i. 1=FAULT WHEN ON
ii. 3=FAULT WHEN OFF
4. Next you are prompted to enter how long (in seconds) the Wash Select II should
delay after it sees the signal before it goes out of service. It can be anywhere from 1
to 300 seconds, inclusive.
Default: 10 seconds
2.5.7 OOS Timer
If your car wash is using “Cycle Complete” handshaking, a feature of the Wash Select II is
that it can go out of service if the wash-in-use signal remains off for too long. “Too long” is
defined by the OOS timer, which has a default of 60 seconds. Your wash may require a
different amount of time. If so, follow the steps below to co nfigure.
Document Number: WS21058 17
Document Title: WSII Operations Manual ver 6.10
Page 30

WASH SELECT II
This feature may require hardware changes. If after it has been enabled, you find it
does not work, refer to the Wash Select II Installations Manual for wiring instructions.
between 1 – 300 seconds (5 minutes).
Note:
1. Place the WSII in Setup mode. Scroll to: Wash Interface (*) O OS Timer (*)
2. You will be prompted to enter the Delay before OOS. This may be set anywhere
Default: 60 seconds
2.5.8 Tunnel Wash Settings
The WSII can be installed at tunnel washes with or without barrier gates and with or without
live attendants. Each detail of your wash can be set using the Tunnel Mode, Barrier Gate,
and Receipt Bar Code configurations in the Wash Interface menu.
2.5.8.1 Tunnel Mode
When the Tunnel Mode is set to “Attended,” each customer will receive a receipt to give to
the attendant, who will then arm the appropriate wash. When the Tunnel Mode is set to
“Unattended,” customers will not automatically receive a receipt.
1. Place the WSII in Setup mode. Scroll to: Wash Interface (*) Tu nnel Mode (*)
2. Press the (1) button for “Unattended Tunnel Mode” or the (2) button for “Attended
Tunnel Mode” or (0) button to disable tunnel mode (rollover washes only), and
then press the (*) key.
2.5.8.2 Barrier Gate
You must have a Barrier Gate Interface Box in order to use the Barrier Gat e feature.
1. Place the WSII in Setup mode. Scroll to: Wash Interface (*) Ba rrier Gate (*)
2. Press the (3) button to disable the Barrier Gate option, or the (1) button to enable
the option.
2.5.9 Combo Mode
Combo mode is used when your car wash is equipped to wash vehicles using both the
“friction” and “touchfree” methods (the names are configurable; see the next section), and
you want to give your customers the ability to select between the two depending on the wash
bought. For instance, the purchase of your most expensive wash type treats customers to
both wash methods (i.e. a combo), while the lesser wash types give a choice between f riction
and touch free. A selectable wash works by sending a different relay pattern to the wash
depending on the wash method selected. Follow the steps below to set the combo mode
option for each wash type. After setting the combo mode, you will want to also check and
perhaps reconfigure the relay patterns for each wash. See the Combo Mode Addendum
(Unitec Document WS21020) for further information.
1. Place the WSII in Setup mode. Scroll to: Wash Interface (*) Co mbo Mode (*)
Document Number: WS21058 18
Document Title: WSII Operations Manual ver 6.10
Page 31

2. Press the (1) button for “YES” or the (3) button for “NO”, and then press the (*)
WASH SELECT II
key.
3. If you selected to enable combo mode, you will be prompted to enter which wash
types (1-4) will be selectable by the customer. Enter (1) “YES” or (3) “NO” for
each prompt that pops up.
4. You are next prompted to enter the default wash if no selection. Press the wash
button corresponding to which wash method you want to give customers as the
default should they fail to make a timely selection after having purchased the
wash. (This “automatic selection” will only work if you have the Auto Select option
(in Customer menu) enabled).
2.5.10 Edit Combo Names
The default names for the two wash methods of combo mode are “Softtouch” and
“Touchfree”.
Refer to
Figure 2 for the different characters available for each key. Press each key until the
desired character displayed. Press the (#) key to accept the character and continue to the
next character. When you have finished entering Wash Name, press the enter (*) key.
Figure 2. Alternate Keypad Functions
To change the Combo names:
1. Place the WSII in Setup mode. Scroll to: Wash Interface(*) Edit Combo Names (*)
2. Use the diagram of alternate keypad functions in Figure 2 to assist you in
programming the name of your friction wash method.
3. Again using Figure 2, program the name of your touchfree wash method.
2.5.11 Optioning
The Optioning feature allows you to add options to a wash package. It appears after a wash
selection is made during the normal purchase process. If enabled, any time a wash package
is selected, an option screen will display. Wash upgrades ar e not permitted when Option ing is
enabled. No wash is armed on code entry until after an option selection is made or declined
and payment is added.
Document Number: WS21058 19
Document Title: WSII Operations Manual ver 6.10
Page 32

WASH SELECT II
The Optioning feature is highly configurable and a separate menu is provided with all the
associated commands. This menu is located under the existing Wash Interface menu. In
addition, a new command under the Credit Menu called “Split Tender” (See Section 2.3.19)
controls whether a credit card can be used to purchase an option.
To enable Optioning:
1. Place the WSII in Setup mode. Scroll to: Wash Interface (*) Op tioning (*)
2. Press the (1) button for “YES” to enable or the (3) button for “NO” to disable, and
then press the (*) key.
If you chose to enable Optioning, you will then need to set the Features, Option prices
and names. This task is accomplished on the WashPay server. For further instruction,
please see the Sierra Management Application Programming Manual at
www.StartwithUnitec.com
2.5.12 Remote Code POS4000 Support
The Wash Select II may be configured to interface to a POS4000 in order to be activated by
codes sold at one or multiple POS4000 units. In cases where it is not feasible to wire the
POS4000 and WSII to each other, the Remote Code option may be used. This option allows
an encrypted wash code to be sold from the POS4000, then, once this code is entered into
the WSII, it is decrypted and the wash is fired.
For Remote Code functions, make sure washes and options programmed in the WashPay
server are same as ones programmed in the POS4000 or the code will be declined. For
example, a code sold with an option will not be accepted in a WSII with optioning disabled.
Also verify the date settings on the WSII and the POS4000 involved to make sure they are
accurate because the Remote Code function depends on them.
2.5.12.1 Enable and Setup Remote Code
Before starting using remote code, make sure these requirements are met: on the WSII:
• Expansion memory installed
• POS LINK is not set to POS4000 Link
To enable the Remote Code function in the WSII:
1. Place the WSII in Setup mode. Scroll to: Wash Interface (*) Re mote Code (*)
2. “Use Remote Code?” will be displayed. Press (1) for yes and (3) for no. Press (*)
to enter.
Once enabled, go to Parameter Setup and enter the following information:
• IDs of POS Where Codes Sold: enter the ID of the POS4000(s) where the code is sold.
Up to 4 POS4000 IDs are supported. Default = 1
Document Number: WS21058 20
Document Title: WSII Operations Manual ver 6.10
Page 33

WASH SELECT II
• Code Expiration: number of days a code is good after purchase from1 to 60 days.
Default=14
• Daily Code limit: maximum number of codes can be issued per day from 10 to190.
Default = 100
• Security Code: used to decrypt the wash code and is up to 7 digits. Using default value
or simple numbers like “1234567” or “3333333” is discouraged.
Note: After completing the items, the settings are printed out. Keep printout as the same
settings are entered into the POS4000(s).
Remote codes are accepted in multi-WSII with POS link. When a code is entered at a
secondary unit, it will be checked with the POS4000 first then the remote code, while at the
Primary it will be checked for remote code first.
2.5.12.2 Remote Code Utilities
To access the Remote Code utilities, go to the Wash In terface menu.
• Print Used Codes: Get a printout of the redemption of the codes sold on a
particular day. Enter the date when the code issue date in the MMDD format
(leading 0 required), then press ‘*’. Codes redeemed in any secondary units
connected are included too.
• Clear Used Codes: To clear the code redemption history.
2.5.12.3 Changes to Code Entry on Wash Select II
When Remote Code is enabled, these features apply to all codes entered in the WSII
keypad:
• DO NOT use 6 or 7 digit codes for fleet accounts when using Remote Code. The
Code Length may conflict with codes sold at the Remote Code POS4000.
• Zeros in code no longer serve as the Enter key, it can appear in any position for
any code.
• Fleet Account codes which have 5 digits or less will require the code to end in 0 in
order for the code to be accepted.
• For codes longer than 5 digits, a 3 second pause will cause the code to be
entered automatically.
2.6 Customer Interface Menu
The “Customer Interface Menu” contains functions that affect the operation of the coin box
with the customer.
Document Number: WS21058 21
Document Title: WSII Operations Manual ver 6.10
Page 34

WASH SELECT II
2.6.1 Customer Stacking
This feature allows you to enable or disable the ability for the Wash Select II to interact with a
customer in front of it while the wash is in use.
ENABLED – When this feature is enabled, it allows the Wash Select II to interact with a
customer at the coin box while another customer is using the wash. The Wash Select II will
greet the customer, allow the purchase of a wash and if the previous customer has not
completed their wash, they will be instructed to please wait unt il the wash is no longer in u se.
DISABLED – The Wash Select II will not allow any interaction at the coin box while the wash
is in use.
The steps below will help you to enable this feature.
1. Place the WSII in Setup mode. Scroll to: Cust. Interface (*) Cust. Stacking (*)
2. Press the (1) button for “YES” (Enabled) or the (3) button for “NO” (Disabled) .
Default: Enabled
2.6.2 Forced Selection
The “Forced Selection” feature will force a wash selection by the customer for all cash and
token purchases. This setting will not affect Cr edit or Flee t transaction.
Note:
ENABLED – With this feature enabled, the customer must make a wash selection before a
wash is activated. If a customer adds cash or tokens wit hout se lecting, the W ash Select II will
instruct them to make a selection. At this point, all wash displays for which the customer has
deposited enough money/tokens to purchase will begin to flash and the current credited
amount will be displayed.
DISABLED – If this feature is disabled, once a customer deposits enough cash/token s to pay
for the least expensive wash that wash will be armed. For example: A customer adds $1 bills
one at a time until there is a credit of $4, the $4 wash would automatically be armed.
However, if the customer adds enough cash/tokens to pay for a more expensive wash, that
wash will be armed. The customer cannot make another selection or receive change.
Follow the steps below to enable “Forced Selection”.
1. Place the WSII in Setup mode. Scroll to: Cust. Interface (*) Forc ed Selection (*)
2. Press the (1) button for “YES” (Enabled) or the (3) button for “NO” (Disabled) .
If “Allow Upgrades” is disabled while “Forced Selection” is also disabled, the Wash
Select II will automatically enable Forced Selection.
Default: Enabled
Document Number: WS21058 22
Document Title: WSII Operations Manual ver 6.10
Page 35

WASH SELECT II
2.6.3 Allow Upgrades
The Allow Upgrades feature is disabled when integrated with WashPay.
2.6.4 Enabling and Setting Automatic Selection Timer
This setting is disabled by default, but if enabled it will allow the Wash Select II to make a
wash selection if the customer has not done so within a specified time. This helps
compensate for a customer that deposits cash, but drives into the wash without making a
wash selection. For example: The auto select timer has been set to 30 seconds. Your wash
prices are set at $4, $5, $6 and $7. The customer deposits a $5 bill, and then drives into the
wash without making a wash selection. After 30 seconds, the Wash Select II will
automatically arm the $5 wash.
Here are the steps to enable this feature.
Note:
1. Place the WSII in Setup mode. Scroll to: Cust. Interface (*) Auto Select T imer (*)
2. Enter the amount of time you wish the Wash Select II to wait before automatically
You may disable this feature by setting the timer to “0”.
arming a wash (1-120 seconds), and then press the (*) key to enter.
2.7 Paging Functions
When integrated with the WashPay server, paging functions are handled through the
notifications function of the Sierra server via email or text message. Please see the S ierra
Management Application Programming Manual under Users.
Document Number: WS21058 23
Document Title: WSII Operations Manual ver 6.10
Page 36

WASH SELECT II
2.8 Cash and Tok ens Menu
This menu contains functions that affect the acceptance and/or dispensing of cash and
tokens.
2.8.1 Country Code
The country code affects the assignment of coin and bill values for each coin and bill input, as
well as which coin input is used for tokens. The Wash Select II software will support these
countries; however, hardware changes are required for the cash components to work for
different countries.
Table 1. Country Codes
Country Code Country
0 USA
1 Canada M ode 1 (Disp ense $.25)
2 Canada M ode 2 (Disp ense $1)
3 Australia
4 Europe (Not yet avail able.)
Default : USA
2.8.2 Configure Coin Dispensing Mode
The “Coin Dispensing Mode” will allow you to configure the manner in which coins are
dispensed. You may use the Wash Select II as a changer (put money in and press refu nd), or
decide if a purchase is necessary to receive change. No matter how this feature is
configured, however, no money may ever be refunded if the amount has already been
applied to the purchase of a wash.
DISPENSE MODE 0:
Pressing the refund button will not give change under any circu mstance.
DISPENSE MODE 1: (AFTER PURCHASE)
Pressing the refund button before a wash is purchased will not result in a refund. If you have
purchased the $4 wash and choose to upgrade the $5 wash, but change your mind before
the upgrade is complete, the Wash Select II will refund any money over the price of the $4
wash as long as the additional money has not been applied to th e purchase of a wash.
DISPENSE MODE 2:
The Wash Select II will refund any money that has not yet been applied to the purchase of a
wash.
(NONE)
(ANYTIME)
Follow these steps to configure the dispense mode:
Document Number: WS21058 24
Document Title: WSII Operations Manual ver 6.10
Page 37

1. Place the WSII in Setup mode. Scroll to: Cash & Tokens (*) Dispense Mode (*)
2. Enter the dispense mode of your choice (0-2), and then press the (*) key.
WASH SELECT II
Default: Dispense Mode 1
2.8.3 Configure Dispensed Coin Value
This function allows you to configure the value of the coin that is dispensed (given as
change). If you wish to dispense the $1 coin, you must first modify the hopper to allow for the
larger coin. The steps below will assist you with setting the “Dispensed Coin Value”.
1. Place the WSII in Setup mode. Scroll to: Cash & Tokens (*) Dispen se Value (*)
2. Enter the desired value in cents format, and then press the (*) key. (Example: A
value of $.25 must be entered as 25.)
2.8.4 Disabling Cash Acceptance
You may disable the acceptance of cash at the Wash Select II unit. If you set the system to
“No Cash Mode”, you will not see or print the cash-related sections of the accounting and
configuration reports. To enter “No Cash Mode”:
1. Place the WSII in Setup mode. Scroll to: Cash & Tokens (*) Cash Mode (*)
2. Press (1) to enable Cash Acceptance, or (3) to disable Ca sh Acceptance.
2.8.5 Tokens
Token setup functions (Token Value, Max Tokens per Customer, and Dispense Value) are
setup on the WashPay server. For further instructions, plea se refer to the Sierra Manage ment
Application Programming Manual at
www.startwithunitec.com.
2.9 Miscellaneous Setup Menu
This menu contains features that do not fall under another specific category.
2.9.1 Alarm Duration
With the purchase of the Security Alarm option, you can set the length of time that the a larm’s
siren will sound using this command. In order to do this, the date and time must be
programmed into the WashPay server. For further instructions, please refer to the Sierra
Management Application Programming Manual at
www.StartwithUnitec.com.
2.9.2 Set System Date and Time
The Wash Select II will accurately keep a running date and time stamp for use in processing
data and keeping accounting records. Be sure the date and time are programmed accurately.
In order to do this, the date and time must be programmed into the WashPay server. For
Document Number: WS21058 25
Document Title: WSII Operations Manual ver 6.10
Page 38

further instructions, please refer to the Sierra Management Application Programming Manual
at
www.StartwithUnitec.com
WASH SELECT II
2.9.3 Assigning a Service Phone Number
A service phone number is printed on a customer overpayment ticket (issued when change
has failed to dispense). This allows the customer to call the site operator for a credit. This
phone number may be entered in 7, 10, or 11-digit numeric format. Follow the steps below to
program a service phone number.
1. Place the WSII in Setup mode. Scroll to: Misc Setup (*) Service Phone # (*)
2. Enter the number you wish to have printed, and then press the (*) key to ent er.
2.9.4 Assigning a Site ID Number
The Site I.D. is used by the Wash Select II to identify the unit on configuration, accounting
and remote reports. It is also used by the pager system to identify the site. To set a site I.D.
follow the steps below.
If your distributor is monitoring your site, you may wish to have them assign your site
I.D.
Note:
1. Place the WSII in Setup mode. Scroll to: Misc Setup (*) Site ID (* )
2. Enter the site number, and then press the (*) key to enter.
2.9.5 Enable Receipt Printer
If you have purchased the optional “Thermal Receipt Printer“, it must be enabled for it to
work. The steps below will walk you through this process.
1. Place the WSII in Setup mode. Scroll to: Misc Setup (*) Receipt Printer (*)
2. Press the (1) button for “YES” or the (2) button for “NO” or the (3) button for
“AUTODETECT”.
Default: Auto
2.9.6 Cash Receipt
If your unit is equipped with the optional “Thermal Receipt Printer”, this feature will print a
receipt for customers using cash, tokens, VIP wash pass coupons and the “External Fleet”
option. It will also print receipts for customers purchasing upgrades with cash or forms of
cash. Follow the steps below to enable cash receipts.
1. Place the WSII in Setup mode. Scroll to: Misc Setup (*) Cash Receipt (*)
2. Press the (1) key for “YES” (enabled) or (3) for “NO” (disabled).
Default: Disabled
Document Number: WS21058 26
Document Title: WSII Operations Manual ver 6.10
Page 39

2.9.6.1 Receipt Bar Codes
WASH SELECT II
You can program a specific bar code for each wash package to be printed on each receipt.
This allows the attendant to scan the bar code to activate the appropriate wash. Bar codes
can be 1-99999999. To print Bar Codes:
1. Place the WSII in Setup mode. Scroll to: Misc Setup (*) Receipt Bar Code s (*)
2. Press the (1) button to enable bar codes.
3. When you enable bar codes, you will be prompted to “Enter Wash 1 Bar Code.”
Key in a number (up to 8 digits in length) for this wash and press the (*) key to
enter.
4. Repeat step 3 each of the remaining washes.
2.10 Remote Repor ting Menu
Reporting functions are handled through the WashPay Server via the Internet. For more
information, please see the Sierra Management Application Programming Manual at
www.StartwithUnitec.com .
2.11 Pass Codes and Pass Cards
The Pass Codes and Pass Cards discussed in this Section provide access to programming
fleet accounts. They are not to be confused with the VIP Pass Cards™ or the Fleet Account
Codes themselves.
This feature allows the owner/operator to gain access to the setup menu and its functions
without opening the unit. Using this feature allows quick and easy management of fleet
accounts, and when used along with the “Fleet Account Profiles” feature you can program a
fleet account in approximately ten seconds. You may configure up to 20 codes/cards and
several of them may perform the same function if you wish. This allows you to give others the
ability to access specific functions without allowing them access to the insid e of the unit.
Pass codes and Pass cards may be programmed to complete the following f unctions:
• Alarm Activation (Opens the Arm//Disarm menu for the Security Alarm Option.)
• REPORTING MENU (Allows access to the entire Reporting Menu.)
o Print Accounting (Allows printing of an Accounting report without the
option of clearing it.)
o Print & Clear Acct (Prints an accounting report with the option t o clear it.)
o View Accounting (Allows you to view an Accounting Report without the
option to clear it.)
o View & Clear (Allows you to view an Accounting Report with the option to
clear it.)
• DIANOSTICS MENU (Allows access to the Diagnostics Menu.)
Document Number: WS21058 27
Document Title: WSII Operations Manual ver 6.10
Page 40

WASH SELECT II
• Optioning Setup (Allows you to enable/disable optioning and change optioning
settings.)
2.11.1 Using PassCodes/Cards
Using PassCode/cards to help manage fleet accounts is a powerful and time saving feature . If
you want to quickly manage fleet accounts or you wish to offer promotional fleet accounts,
you can program a PassCode or PassCard to help you manage it. But using PassCard and
PassCodes for Fleet accounts are not their only use. Here ar e some ideas:
PROMOTIONAL VIP WASH PASS™ ACCOUNTS PROGRAMMED ON THE
SPOT.
Set up a Fleet profile for the promotion that you wish to make, such as six of your best
washes for the price of five (good stocking stuffer for Xmas). Then set up a PassCard for the
“Add per Profile” function. Then keep a stack of un-programmed VIP Wash Pass ™ cards with
the “Add per profile” PassCard on the top. When you are ready to sell the promotion, swipe
the PassCard at the Wash Select II and, then, swipe the un-programmed card. The VIP card
is now activated. If you have a receipt printer, the account information will be printed for the
customer.
QUICK PROGRAMMING OF VIP WASH PASS™ FLEET ACCOUNTS
Set up a PassCard for the “Add Account” function. Then keep a stack of un-programmed VI P
Wash Pass™ cards with the “Add Account” PassCard on the top. When you are ready to sell
the account swipe the PassCard at the Wash Select II and then configure the new account
swiping the un-programmed card during the process. If you have a receipt printer, the
account information will be printed for the customer.
QUICK ACCOUNTING PRINT OUT OR VIEWING
You can use one of the four accounting report functions to allow yourself or an
attendant/trustee to print/view an accounting report every time the money is removed from
the Wash Select II. This way you do not have to teach the attendant/trustee how to operate
the unit. This is useful also if you want to have a trustee remove cash from the unit and print a
report while you are on vacation.
REFUND CREDIT
You can give your attendant/trustee a PassCard that allows them to refund a credit
transaction. Remember, for financial security, you cannot refund a transaction unless the
customer has actually purchased a wash on their credit card. The actual sale of the card and
the return credit will be logged in the credit transact ion history for futur e reference.
2.11.2 Add Code/Card
This function allows you to add a new code or card. All code numbers must end with a zero. If
the number or card you enter already exists, the Wash Select II will prompt you to enter
another number. Follow the steps below to program a Pass Code or Pass Card.
1. Place the WSII in Setup mode. Scroll to: Pass Code/Card (*) Add Code/Card (*)
2. The table below will show you how to program a code and a card. The first three
steps above are the same for programming each.
Document Number: WS21058 28
Document Title: WSII Operations Manual ver 6.10
Page 41

WASH SELECT II
Table 2. Programming Pass Codes/Cards
PASS CODE PASS CARD
1. Press the (1) key for code.
2. Enter the code number, and then press
the (*) key to enter. (The code must be at
least four digits long and end with a zero.)
3. Using the (3) key to scroll, scroll forward
until you find the menu option you are
programming the code to access.
4. If you are programming a fleet account
that is paid with a credit card, choose
“Fleet Acct” under “Select Type” an d then
scroll thru and select “Pay Fleet Act.” The
credit card associated with the account
will be charged.
2.11.3 View Codes/Cards
Use this function to view all Pass Codes and Pass Cards and their configuration. The
code/card numbers and all their information will be shown in the wash displays. Use the
instructions below to view codes and cards.
1. Press the (3) key for card.
2. Insert the card into the card reader or key
in the number that appears on the front of
the card, and then press the (*) key to
enter. (If you insert the card there is no
need to press the (*) key.
3. Using the (3) key to scroll, scroll forward
until you find the menu option you are
programming the code to access.
4. If you are programming a fleet account
that is paid with a credit card, choose
“Fleet Acct” under “Select Type” an d then
scroll thru and select “Pay Fleet Act.” The
credit card associated with the account
will be charged.
1. Place the WSII in Setup mode. Scroll to: Pass Code/Card (*) View Codes/Cards
(*)
2. Use the (3) key to scroll forward or the (1) key to scroll back to view all Pass
Codes and Pass Cards.
2.11.4 Print Codes/Cards
Using this function, you can print a list of all Pass Codes and Pass Cards and the
configuration information. This feature requires the optional “Thermal Receipt Printer”. Follow
the steps below to print a list of Pass Codes and Pass Cards.
3. Place the WSII in Setup mode. Scroll to: Pass Code/Card (*) Print Codes/Cards
(*) The list will begin to print upon pressing enter.
2.11.5 Delete Code/Card
This function allows you to delete a Pass Code/Card. Follow the steps below to delete a
code/card.
1. Place the WSII in Setup mode. Scroll to: Pass Code/Card (*) Delete Code/Card
(*)
2. Enter the code number, and then press the (*) key or swipe the card. The “Main
Display” should show that the code/card has been deleted.
Document Number: WS21058 29
Document Title: WSII Operations Manual ver 6.10
Page 42

WASH SELECT II
2.12 VIP Wash Coupons
VIP Wash Coupons are a form of paper token for use in marketing your wash. You may
distribute them just like tokens. Like cash, they are used by inserting them into the bill
validator. VIP Wash Coupons must be purchased according to the manufacturer of your bill
validator. You cannot use one manufacturer’s coupons on another manufacturer’s bill
validator.
2.12.1 CoinCo Bill Validator
Six different types of VIP Wash Coupons (A-F) are available for into the Wash Select II with
the CoinCo bill validator, but only three can be programmed at one time. Change will not be
given when a coupon is used. A customer using a VIP Wash Coupon may cancel the
transaction only if no other form of tender has been entered, but even then, the entered
coupon will be lost.
Each bill validator is programmed to accept VIP Wash Coupons styles A, B, and C by default
before it leaves Unitec. Coupon styles D, E, and F can be custom programmed for new units
by Unitec prior to shipping, or they can be programmed after installation by purchasing a
coupon programmer. If the bill validator will not accept VIP Wash Coupons, it must be
reprogrammed to recognize the coupons.
The value of each coupon must be programmed in the WashPay server. If a coupon has not
been programmed into the WashPay server, the bill validator will reject the coupon.
You can program the coupon value to be either a discount (e.g. the coupon gives the
programmed discount to selected washes) or to be worth an entire wash (e.g. the coupon
automatically credits the programmed wash).
For information on how to program coupons into the WashPay server. For further
instructions, please see the Sierra Management Application Programming Manual at
www.startwithunitec.com .
2.12.2 Mars (MEI) Bill Validator
Up to 10 different types of VIP Wash Coupons may be programmed into the Wash Select II
with the Mars (MEI) bill validator. Unitec sells 6 different styles of coupons, for your
convenience. Change will not be given when a coupon is used. A customer using a VIP
Wash Coupon may cancel the transaction only if no other form of tender has been entered,
but even then, the entered coupon will be lost.
The value of each coupon must be programmed in the WashPay server. If a coupon has not
been enabled in the WashPay server, the bill validator will not accept the coupon.
You can program the coupon value to be either a discount (e.g. the coupon gives the
programmed discount to selected washes) or to be worth an entire wash (e.g. the coupon
automatically credits the programmed wash).
Document Number: WS21058 30
Document Title: WSII Operations Manual ver 6.10
Page 43

2.12.2.1 Enabling/Disabling Mars (MEI) Coupons
WASH SELECT II
This feature allows you to configure the Wash Select II to accept and credit predetermined
washes or dollar amounts, or to reject specific coupons entered into the bill validator. Each
coupon will be labeled M1-M6 and has a specific ID Code that must be programmed into the
Wash Select. The Serial Number is printed on each of the coupons, but you must refer to the
following table for the respective ID Codes.
Table 3. Mars Coupon ID Codes
Coupon
Serial Number ID Code
Label
M1 A000079 8808
M2 A000081 8840
M3 A000083 8872
M4 A000085 8920
M5 A000087 8968
M6 A000089 9000
To configure the Wash Select II to accept the coupo ns, perform the following procedures:
Document Number: WS21058 31
Document Title: WSII Operations Manual ver 6.10
Page 44

WASH SELECT II
Enable Coupon
1. Press the blue service button directly on the back of the bill feed opening, below
the bill stacker.
Top of Bill Stacker
n
o
t
t
u
B
e
c
i
v
r
e
S
e
u
l
B
Figure 3. Blue Service Button Location
2.
The Bezel Lights on the bill acceptor opening will start blinking.
3. Feed the coupon you want to be enabled.
4. The coupon will be drawn into the bill validator, and then will be eject ed.
5. The flash code LED (see Section 4.3.1.3) will flash 10 times to indicate the
coupon is enabled.
Disable Coupons
1. Press the blue service button directly on the back of the bill feed opening, below
the bill stacker.
2. The Bezel Lights on the bill acceptor opening will start blinking.
3. Feed the coupon you want to be disabled.
4. Coupon will be drawn into the bill validator, and then will be ejected.
5. The flash code LED (see Section 4.3.1.3) will flash 3 times to indicate the coupon
is disabled.
Document Number: WS21058 32
Document Title: WSII Operations Manual ver 6.10
Page 45

WASH SELECT II
2.13 POS4000 Link
The POS4000 Link menu allows the Wash Select II to be configured to interface with a
POS4000. In addition, it provides the activation of the Multi-Unit Fleet opt ion.
Once the Wash Select II is properly configured, codes can be sold at one or more POS4000
units to be used at the Wash Select II. Configuring of these settings is also necessary for
units that are equipped for authorization through the POS network. In this case, set the
interface mode to ‘1’. If you have multiple Wash Select II units, you will also need to set the
bay address for each Wash Select II.
The following instructions show how to set up the Wash Select II unit to interface to the
POS4000.
1. If not already installed, with the power disconnected, install the Wash Select II
communications module onto the top left hand corner of the CPU board. The
board is installed with LED’s on the b ottom.
2. Restore power to the Wash Select II and place the unit in setup mode. If you have
more than one bay, set the units up one at a time, with all un-configured units
turned off.
3. Wire the POS4000 cable connections as per the following connections:
Table 4. Wash Select II-POS40000 Wiring
POS4000 Wash Select II
connector J22
Pin 1 – White Pin 1 – White
Pin 2 – Red Pin 2 – Red
Pin 3 – Black Pin 3 – Black
Shield – Not
connected
4. If the POS4000 is connected and both units are powered, the RX light on the 485
communications module should be blinking every couple of seconds. If neither of
the lights is blinking, you may have a failed connection or a failed POS4000. A
failed communications module may also be possible.
5. Enter the POS4000 link sub-menu and enable the interface. (See Section 2.13.1.)
6. If you have more than one unit, set the bay address per the in structions in Section
2.13.2. (Car wash bay 1 should be set up as unit 2.)
7. Place the unit in operate mode. At this point, you should see both the RX and the
TX lights on the Wash Select II 485 communications module begin to blink in an
alternating fashion at intervals of a second or less. (If you have more than one
bay, the RX light should stay on longer than the TX light.)
8. Place the unit back into setup mode.
9. Configure the Convey Accounting settings. (See Section 2.13.4.)
Shield, strap to base
mounting bolt in case.
Document Number: WS21058 33
Document Title: WSII Operations Manual ver 6.10
Page 46

WASH SELECT II
2.13.1 Interface Mode
The interface mode configures the Wash Select II to listen and respond to POS4000
messages or to enable the Multi-Unit link. Once this mode is enabled, the Wash Select II will
respond to messages sent by the POS4000 or a master Wash Select II Unit. It will also allow
codes purchased at the master POS4000 or a master Wash Select II unit to be used at a
secondary Wash Select II at your site. If at any time this feature is disabled or the unit loses
communication, you will get a message on the POS4000 that indicates “Time Out From Unit
“X”. (The “X” denotes the number of the unit, bay or other POS4000 (if t here is more than one
POS4000) unit that has lost communication.) To configure the interface mode, follow the
steps below.
1. Place the WSII in Setup mode. Scroll to: POS4000 Link (*) Interface Mode (*)
2. Press the (0) key for “ALONE” (just one Wash Select II), the (1) key for
“WS2/POS” (Wash Select II and POS4000 units) or the (2) key for “Multi-Unit
Link” (multiple Wash Select II units).
Default: 0
2.13.2 Notifications
You can have any notifications that are normally sent to the pager printed at the POS4000 as
well.
1. Place the WSII in Setup mode. Scroll to: POS4000 Link (*) Notifications (*)
2. Enable or disable print errors by selecting Yes or No, respect ively.
2.13.3 Set Bay Address
2.13.3.1 Set POS4000 Bay Address
The POS4000 network allows for up to four entry systems to be connected to the same
“Master” POS4000. Units are denoted by the network address. Entry systems units are
assigned bay addresses 2-5. Bay number one should be configured as bay address two
(default).
Note:
If you have a multi-bay system, you need to change the settings as follow s:
The Master POS4000 will always be network address one.
Table 5. POS4000 Bay Numbering
Bay Number Bay Address
1 2 (Default)
2 3
Document Number: WS21058 34
Document Title: WSII Operations Manual ver 6.10
Page 47

WASH SELECT II
3 4
4 5
To set the bay address, follow the steps below.
1. Place the WSII in Setup mode. Scroll to: POS4000 Link (*) Set Bay Address (*)
2. Enter the “Bay Address” of the unit you are configuring, and then press the (*)
key.
2.13.3.2 Set Multi-Unit Fleet Bay Address
The Wash Select II multi-unit function is not applicable when interfacing with the
WashPay server. The WashPay server tracks activity on all units.
2.13.4 Convey Accounting
This feature allows the POS4000 to receive information when cash or other forms o f payment
are used at the Wash Select II coin box. If you choose to not have accounting information
conveyed (you may do this in the case of revenue sharing if codes are being sold by a
partnering merchant), all coin-box accounting information is withheld from the POS4000.
Follow the steps below to enable/disable the “Convey Account ing” feature.
Table 6. Conveying Accounting
Use Setting
Carwash and store where POS4000 is
located are owned by the same person(s)
Carwash and store where POS4000 is
located are owned by 2 separate persons
(revenue share)
1. Place the WSII in Setup mode. Scroll to: POS4000 Link (*) Convey Accounting
(*)
2. Press the (1) key for “YES” (enabled) or the (3) key for “NO” (disabled).
Yes: Enabled (default)
No: Disabled
Document Number: WS21058 35
Document Title: WSII Operations Manual ver 6.10
Page 48

WASH SELECT II
[THIS PAGE INTENTIONALY LEFT BLANK]
Document Number: WS21002 36
Document Title: WSII Operations Manual ver 5.50
Page 49

WASH SELECT II
3 Daily Operations
Once the WSII is setup, the only functions needed on a day-to-day basis are reporting, fleet
account management and reporting, cash reconciliation, and diagnostics.
3.1 Reporting Menu
The Reporting menu allows you to access, view, and print (if the thermal printer option has
been purchased) system reports from the Wash Select II.
3.1.1 Configuration Report
The configuration report shows the most up to date configuration of the system. These are
the settings that can be configured while in setup mode. They are categorized on the report
based on their typical use. As explained above, the report can either be viewed at the unit or
printed. For the most complete reporting, the printed report is recommended.
To print a configuration report:
• Place the WSII is in Setup mode. Scroll to: Reporting (*) Print Config (*)
To view a configuration report:
• Place the WSII is in Setup mode. Scroll to: Reporting (*) View Config (*)
3.1.2 Accounting Report
The reports found in the WashPay server should be used for all accounting information. The
Wash Select II still maintains an accounting report that provides a list of transactions made on
the Wash Select II.
To print an accounting report:
3. Place the WSII in Setup Mode. Scroll to: Reporting (*) Print Accounting (*)
4. Next, you will be given two options, 1 = Detailed, and 2 = Summary. Press the
proper key, and then press the (*) key to enter.
To view an accounting report:
1. Place the WSII in Setup Mode. Scroll to: Reporting (*) View Accounting (*)
2. Using the (3) key, scroll through the accounting report.
To clear an accounting report:
This menu option will clear all accounting information. Be sure you have an accurate
Document Number: WS21058 37
Document Title: WSII Operations Manual ver 6.10
Note:
record of your accounting information, as th e information will be irr etrievable once this
procedure is performed.
Page 50

WASH SELECT II
1. Place the WSII in Setup Mode. Scroll to: Reporting (*) Clear Account ing (*)
2. Press the (1) key for YES or the (3) key for NO.
3.2 Fleet Accounts and Coupons Menu
Fleet Accounts are setup in the WashPay server. For further instructions, please see the
Sierra Management Application Programming Manual at
3.3 Cash Reconciliation
The cash reconciliation function allows you to track the cash inserted to or withdrawn from the
Wash Select II unit to keep accurate accounting of cash. When this function is used, it will
reset the cash totals. You must setup a pass card or pass code to access the cash
reconciliation functions.
Note: the Cash function should be used whenever change is restocked or cash is removed
from the WSII. Failure to do so will cause the cash report to be inaccurate and could cause
false alert notifications to be sent).
www.StartwithUnitec.com.
3.3.1 Removing Cash
When removing cash, you must remove ALL cash from the bill acceptor or coin acceptor in
order for the WSII to report accurate amounts. Upon completion of the withdrawal, the WSII
printer will issue a receipt listing the amounts removed and updated cash balances. The
transaction is also recorded in the WashPay server.
To remove cash from the WSII unit:
1. Swipe the pass card or enter the pass code.
2. The display will prompt “Remove or Add?” Press 1 to select Remove.
3. The display will prompt “Bills or Coins?” Press 1 for bills, or 3 for coins.
4. Remove all cash. Remember to take the printer receipt.
3.3.2 Adding Cash
To add cash to the WSII unit:
1. Swipe the pass card or enter the pass code.
2. The display will prompt “Remove or Add?” Press 3 to select Add.
3. The display will prompt “Number of Coins?” Enter the number of coins that will be
added to the hopper.
Document Number: WS21058 38
Document Title: WSII Operations Manual ver 6.10
Page 51

WASH SELECT II
Upon completion of the withdrawal, the WSII printer will issue a receipt listing the amounts
added and updated cash balances. The transaction is also re corded in the WashPay se rver.
3.4 Diagnostics Menu
The Diagnostics menu contains diagnostics functions that are used for troubleshooting and
testing the Wash Select II system components.
3.4.1 Testing Output Relays
In this sub-menu, you may turn each of the Wash Select II outputs on or off. To test the
output relays:
1. Place the WSII in Setup mode. Scroll to: Diagnostics (*) Test Outputs (*)
2. Once you are in the “Test Outputs” menu you may turn the following outputs on
or off, by pressing (1) for YES or (3) for NO. (You may scroll to the next option
using the (3) key.)
• Wash Relay 1 – output to car wash controller
• Wash Relay 2 – output to car wash controller
• Wash Relay 3 – output to car wash controller
• Wash Relay 4 – output to car wash controller
• Wash Relay 5 – output to car wash controller
• Wash Relay 6 – output to car wash controller
• Wash Relay 7 – output to car wash controller
• Wash Relay 8 – output to car wash controller
• Bill Enable – Signal to bill validator (not bil l validator power)
• Coins Enable – power to coin acceptor
• Fault Relay – output to external device such as car wash controller
• Warning Relay – output to external device such as car wash controller
• Auxiliary 1 – spare output on display I/O board for external fleet card
• Auxiliary 2 – spare output on display I/O board for external fleet card
• Auxiliary 3 – spare output on display I/O board for external fleet card
• Auxiliary 4 – spare output on display I/O board for external fleet card
• RFID Light – Toggle Speedpass light on and off
• AWID Power – Toggle power to ReachFree ID reader on and off
3.4.2 Cycling Output Relays
This function will cycle through all Wash Select II outputs. For a list of the outputs, see Section Error!
Reference source not found. above. Follow the steps below to cycle output relays:
Document Number: WS21058 39
Document Title: WSII Operations Manual ver 6.10
Page 52

Note:
Place the WSII in Setup mode. Scroll to: Diagnostics (*) Cycle Outputs (*)and cycling
will begin
Each output will turn on for one second, and then proceed to the next output. All outputs will
be turned off at the beginning of the test and again upon test completion. You may stop or
pause the test at anytime by pressing the (3) key to pause and the (#) key to cancel.
WASH SELECT II
Disconnect the Wash Select II unit from the car wash equipment prior to running this
function. Running this function while connected to a car wash will produce inaccurate
results.
3.4.3 Testing Inputs
With this function, you can test the discrete inputs of the Wash Select II. Follow the steps
below to test the inputs.
Place the WSII in Setup mode. Scroll to: Diagnostics (*) Test Inputs (*)
Once you are in the “Test Inputs” sub-menu, the following inputs may be test ed.
• Coins Present – on when coins are present in the Change Dispenser Ho pper
• Proximity – on when there is a car in front of the coin box
• Wash-in-Use – on when the wash is in use
• Wash Warning – on when there is a warning from the car wash, this is an optional
input
• Wash Fault – on when there is a fault with the car wash (wash is down), this is an
optional input
• Auxiliary 1 – spare output on Display I/O board for EXT Fleet card
• Auxiliary 2 – spare output on Display I/O board for EXT Fleet Card
3.4.4 Testing Coin and Bill Pulse Relays
Using this feature, you can test the coin dispenser and the bill validator without affecting the
account report. This test also allows you to enter cash without having the cash acceptance
disabled as it would automatically do in normal operational mode once you have paid for the
most expensive wash.
To enter the “Test Bills/Coins” menu, follow the steps be low.
1. Place the WSII in Setup mode. Scroll to: Diagnostics (*) Test Bills/Coins (*)
2. Begin to insert coin, bills, or tokens.
The main display screen will show the total cash and tokens. The wash display screens will
show the pulse count for each input. You may clear the totals at any time by pressing the (*)
key.
Inputs for the USA version (Country Code = USA) are defined as follows:
Document Number: WS21058 40
Document Title: WSII Operations Manual ver 6.10
Page 53

WASH SELECT II
Table 7. Bill/Coin Inputs
Input Pulse Input
$1 bill credit pulse Bill Input 0
Note: VIP wash coupons will pulse as
follows:
12 pulses: coupon 1
13 pulses: coupon 2
14 pulses: coupon 3.
The Wash Select II recognizes these
pulses as VIP coupons.
$5 bill credit pulse Bill Input 1 (not implemented)
Quarter credit pulse Coin Input 1
$1 coin credit pulse Coin Input 2
Token credit pulse
Token value configured in
Cash/Token Settings
Spare (not used) Coin Input 4
Note:
The pulse inputs for the bill validator are as follows: a $5 bill will show five pulses on bil l
input zero and a $10 bill will show 10 pulses on bill input zero.
Coin Input 3
3.4.5 Test Coin Dispenser
This function will allow you to test the coin dispenser. It will allow you to dispense up to 100
coins. Use of this function will not affect the accounting report. To use this function follow the
steps below.
1. Place the WSII in Setup mode. Scroll to: Diagnostics (*) Dispense Coins (*)
2. The main display will prompt “Enter # to Dump?”. Enter the number of coins you
would like to have dispensed and then press the (*) key to enter.
3. Once the coin dispenser has dispensed the coins, count them to be sure it has
dispensed the amount you requested.
3.4.6 Testing the Magnetic Card Reader
Using this function, you can test your card reader’s ability to read a magnetically striped card.
The test will recognize standard credit/debit cards, Pass Cards, GiveX cards, and VIP Wash
Pass cards. There are three types of diagnostics you can perform: Check Tracks, Card Data,
and Card Type.
Using the Check Tracks command, you can read the exact track data read by the card
reader. This enables you to verify that the card reader is able to correctly read both tracks on
the magnetic card stripe.
Document Number: WS21058 41
Document Title: WSII Operations Manual ver 6.10
Page 54

WASH SELECT II
Follow the steps below to test the magnetic stripe tracks:
1. Place the WSII in Setup mode. Scroll to: Diagnostics (*) Test Card Reader (*)
Check Tracks (*)
2. Insert any type of card; you should be prompted to “Remove Card”. If you do not
see the “Remove Card” prompt, your card reader may be dirty (use a card
cleaner) or defective.
3. Remove the card. The main display should show you the status of each of the
tracks. The track data will appear in the displays below. Use the (1) or (3) keys to
scroll left or right respectively through the displayed data.
4. Press the (#) key to exit this command.
Use this function to test your card reader’s basic ability to re ad a magnetically striped card.
Follow the steps below to test the Card Reader:
1. Place the WSII in Setup mode. Scroll to: Diagnostics (*) Test Card Reader (*)
Check Data (*)
2. Insert any type of card; you should be prompted to “Remove Card”. If you do not
see the “Remove Card” prompt, your card reader may be dirty (use a card
cleaner) or defective.
3. Remove the card. The main display should show you the account number on the
card, as well as the name if found. If you are using a Pass Card or a VIP Wash
Pass card, the main display will show “VIP Wash Pass” and the number th at is on
the card you used for the test.
4. Press the (#) key to exit this command.
This command will display the type and status of the card you are swiping.
Follow the steps below:
1. Place the WSII in Setup mode. Scroll to: Diagnostics (*) Test Card Reader (*)
Card Type (*)
2. Insert any type of card; you should be prompted to “Remove Card”. If you do not
see the “Remove Card” prompt, your card reader may be dirty (use a card
cleaner) or defective.
3. Remove the card. The main display should show you the type of card inserted
and its status.
4. Press the (#) key to exit this command.
3.4.7 Testing the Thermal Printer
This feature will test your thermal printer. Any existing error condition messages will be
displayed in the main display window.
1. Place the WSII in Setup mode. Scroll to: Diagnostics (*) Test Thermal Prt (*)
2. At this time, the printer will begin to print and/or show any necessary error
condition.
Document Number: WS21058 42
Document Title: WSII Operations Manual ver 6.10
Page 55

WASH SELECT II
Below you will see a sample of the printer test printout. T he text will be pr inted four times.
Abcdefghijklmnopqrst
uvwxyzABCDEFGHIJKLMN
OPQRSTUVWXYZ12345678
90!@#$%^&*()+|,./><
For an explanation of printer error codes refer to the following ta ble.
Table 8. Printer Error Codes
Error Message Possible Reasons
Receipt Printer not enabled Printer feature is not enabled. Enable printe r in Misc Setup Me nu.
Printer not conn[ected]
or Hardware Err[or]
Head lever is in
Head up position
Printer voltage
Error
Auto Cutter
Error
Thermal Head
Temperature Err[or]
Return Waiting Status One of the connectors from the mechan ism to the printer control board is
Printer is out of Paper Printer is out of paper or a paper sensor is faulty. Also check that all wires
Printer is still Printing Printer control board believes the printer is still printing. Reset the printer by
Printer control board is not connected to CPU board vi a ribbon cable.
Printer control board is faulty.
Printer mechanism head lever (on right side of printer) is in up position. Move
the lever to the down position.
Check for 24V power to Printer control board at J4 (pins 1 &2) a nd at J5 (Red
& Black wires).
Auto cutter connector to Printer control board is not connected (CN3)
Auto cutter is jammed. This can be UN-jammed in the field
Auto cutter is faulty.
Printer mechanism head is overheated or one of the cables from the
mechanism to the control board is broken or disconnected.
disconnected or the Auto cutter is not working.
from printer mechanism to printer control board are connected.
pressing the reset button. This is located near the top of the CPU board next
to the feed button.
the CPU board.
DO NOT Press the reset button on the middle right si de of
3.4.8 Testing the Standard Keypad
Using this function will allow you to test the Wash Select II keypad. To test the keypad, follow
the steps below.
1. Place the WSII in Setup mode. Scroll to: Diagnostics (*) Test Keypad (*)
2. Press each key on the keypad. As you press each key, the main display should
show the number or symbol of that key. To abort testing at any time, press the
wash button labeled “Cancel” to exit.
Document Number: WS21058 43
Document Title: WSII Operations Manual ver 6.10
Page 56

WASH SELECT II
3.4.9 Testing the Buttons
This function will allow you to test the four wash buttons and the change butto n. The follow ing
steps will assist in testing the buttons.
1. Place the WSII in Setup mode. Scroll to: Diagnostics (*) Test Buttons (*)
2. Press each button one at a time. As you press each button, the main display
should show the wash number that each button corresponds to (1-4) and a “C”
when the change button is pressed.
3.4.10 Test Exp. Memory
An expansion memory chip will be located at connector U57 on the CPU board. To ensure
that the expansion memory is working properly, follow the steps below.
1. Place the WSII in Setup mode. Scroll to: Diagnostics (*) Test EXP. Memory" (*)
2. “PASSED” or “FAILED” will appear in the main display window depending on the
outcome of the test.
3.4.11 Test RFID (AWID)
To ensure the ReachFree ID system is reading the tags properly. Once the reader
antenna is installed and vehicle tag is detected by the reader, the 8-digit code will be
displayed in the third window on the Wash Select II door. As long as the RF tag remains
in range of the reader, the WSII will beep once per second. You can determine the area
the RF Reader can read tags by moving the tag around and listening for the beeps. As
long as the unit is beeping once per second, the RF tag is in-range.
The Diagnostics>Test RFID (AWID) function also has a power adjustment. All RFID boards
are shipped with the power adjustment set to 5. If you need to adjust the power for the
reader, enter a number from 1-9 on the keypad. The power levels range from 1 to 9, with 9
being the highest.
3.4.12 Inapplicable Diagnostics with WashPay Integration
When the Wash Select II is integrated with the WashPay site server, The following
diagnostics ar no longer applicable:
• Testing the Modem
• Get Network Info
• Modem Loop back
• POS/485 Loop back
Document Number: WS21058 44
Document Title: WSII Operations Manual ver 6.10
Page 57

WASH SELECT II
4 Component Operation & Maintenance
This Section contains instructions for component operations and maintenance. Routine
maintenance tasks must be performed regularly to ensure that your Wash Select II continues
to operate at maximum efficiency.
4.1 Component Locations
The following line drawing provides a general overview of where the Wash Select II primary
components are located. The printer, token bucket, printer controller board, intercom board,
card reader, and proximity sensor are components that can be added by purchasing the
corresponding option package.
Figure 4. Wash Select II Internal Component Loc ations
Document Number: WS21058 45
Document Title: WSII Operations Manual ver 6.10
Page 58

WASH SELECT II
4.2 Software Updates
To upgrade the WSII software, perform the following procedures:
1. Remove the existing EPROM located at connection U58 on the CPU board (see
Figure 5) by inserting a small flat-blade screwdriver between the EPROM and the
socket and prying it off. Be careful not to damage the socke t or the circuit board.
Figure 5. Locating the EPROM and Reset Sy stem Memory Button
Caution:
Take care not to damage any pins when removing or installing chips.
2. Insert the new EPROM into the socket on the board. Chip pins may need to be
adjusted to fit into the socket. Use the follow ing steps to adjust the pin s:
• Lay the chip on its side with the pins facing away fr om you.
• Gently rock the chip away from you to bend the pins.
• Lay chip on its other side and rock it away from you.
• Repeat the above steps, alternating sides of the chip, until pins are at approx imately a
90-degree angle and line up in the socket.
Document Number: WS21058 46
Document Title: WSII Operations Manual ver 6.10
Page 59

WASH SELECT II
3. The notched end of the chip goes up. There is a silk-screened image on the CPU
board you can use to line up the notch correctly. T his image is labeled EPROM.
4. Push the EPROM chip in gently. Do not force it, as you may cause damage to the
chip or the CPU board.
5. Press the Reset System Memory button. Once the button is pressed, the system
will ask if you’d like to clear all memory or keep accounts. Press 1 to reset all
memory, or press 2 to reset all but the fleet accounts.
6. Replace the protective plastic cover over the CPU board.
4.3 Bill Validator
The standard Wash Select II comes equipped with the MARS bill validation unit to stack bills
up to $20 in value (NOTE: $20 bill acceptance is disabled at the time of shipment). To ensure
maximum performance by the unit, it will be necessary to read this Section in its entirety.
4.3.1 Mars Bill Validator
The Mars bill validator is provided as an optional choice of bill validator. This bill validator
does not support the VIP Wash Coupon feature.
4.3.1.1 Emptying the Bill Stacker
The bill stacker will hold up to 1,000 bills and is designed to allow quick and easy removal of
stored money. To empty the bill stacker, hold the validator with one hand pushing the blue
lock at the top of the validator with one of your fingers. With your other hand, lift the stacker
upward to remove it.
Document Number: WS21058 47
Document Title: WSII Operations Manual ver 6.10
Page 60
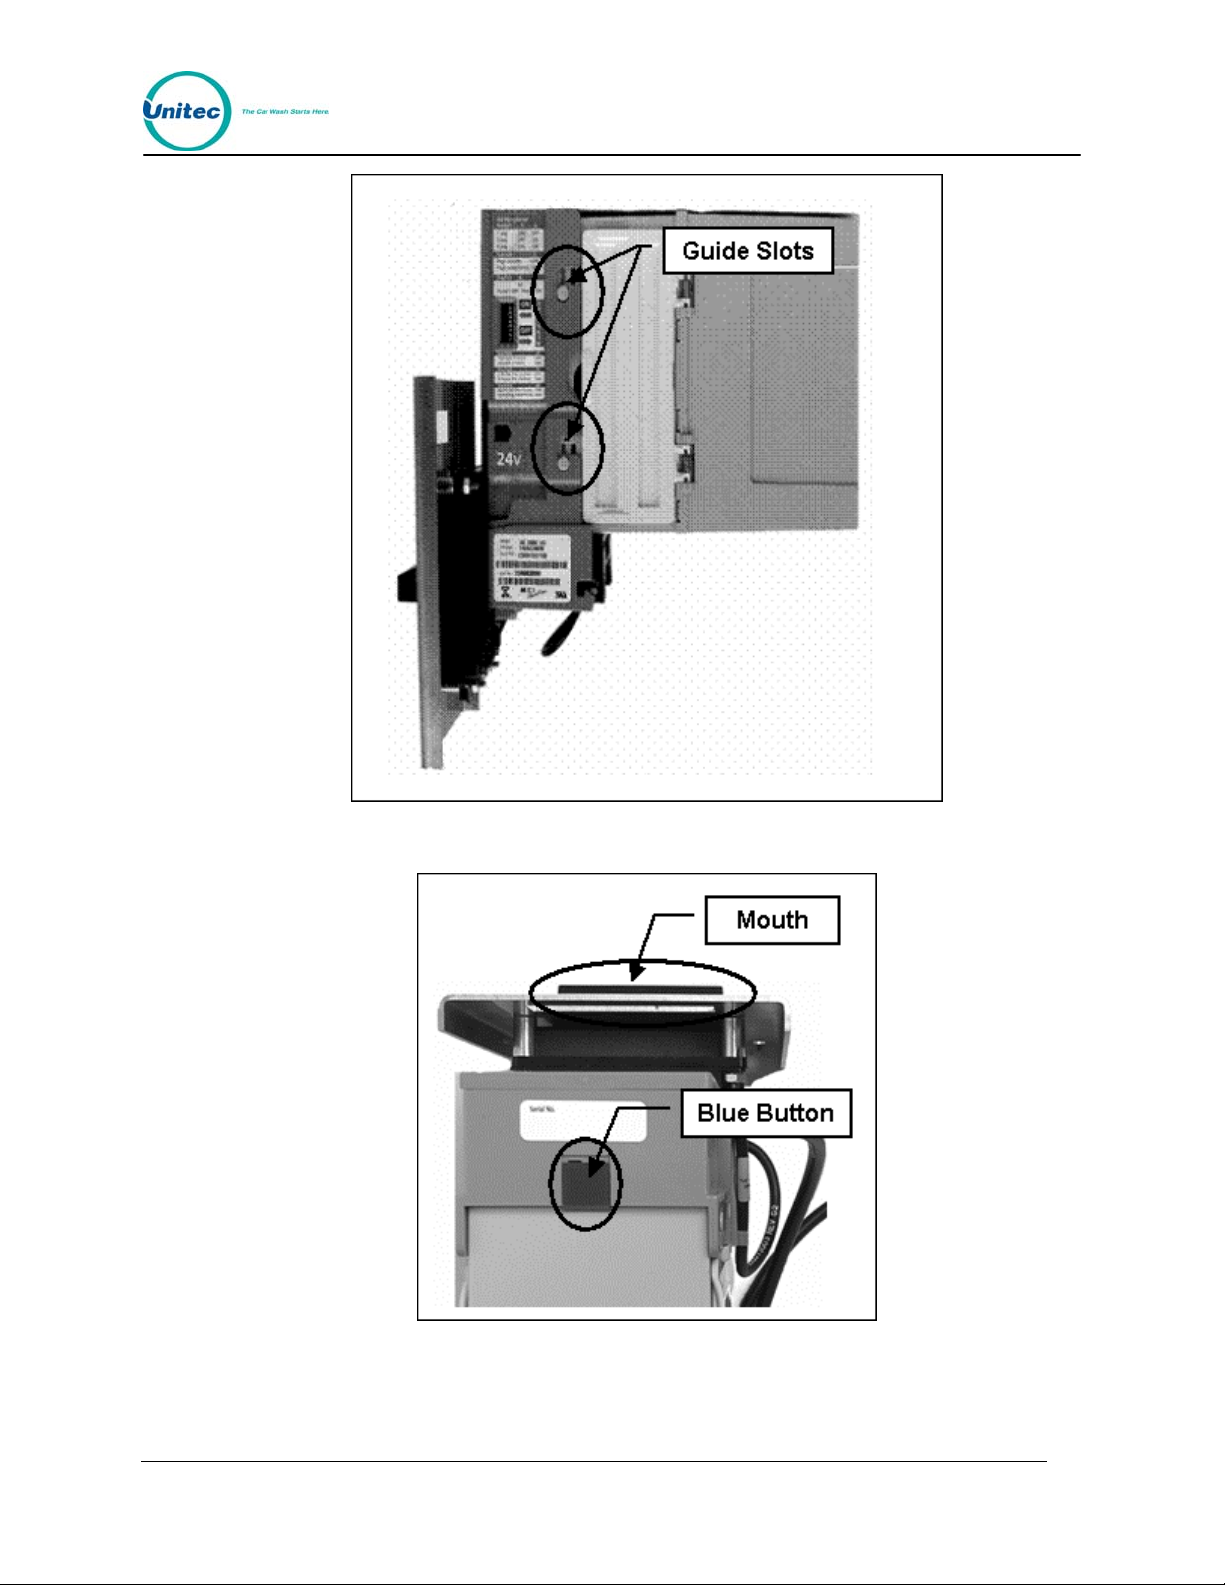
WASH SELECT II
Figure 6. Mars Bill Validator/Stacker
Figure 7. Mars Bill Validator—Top View
Document Number: WS21058 48
Document Title: WSII Operations Manual ver 6.10
Page 61

WASH SELECT II
4.3.1.2 Replacing the Stacker
To replace the stacker, perform the following steps:
1. Position the stacker behind the Mars Bill Validator with the hinged doors on the
side, and the back of the stacker facing away from you.
1. Place the stacker against the bill validator.
2. Align the tabs on the bill stacker just above the guide slots on t he bill validator.
3. Slide the stacker tabs into the guide slots, and then down until it is fully seated, as
shown in
Figure 8.
Figure 8. Mars Bill Stacker Replacement
4.3.1.3 Mars Bill Validator Flash Codes
The Mars Bill Validator is equipped with an internal diagnostic LED flash code system. This
LED flash code system is used to alert the operator of a failure or to indicate a need for
servicing.
The flash code LED is located in the lower section of the validator, below the stacker. See
Figure 9 for the LED location.
Document Number: WS21058 49
Document Title: WSII Operations Manual ver 6.10
Page 62

WASH SELECT II
Figure 9. Mars Flash Code LED
The LED will repeat a specific number of flashes. Each number of flashes corresponds to a
specific problem.
Table 9 lists the meaning of each set of flashes. Many of these problems
may be easily corrected without the need for technical assistance.
Table 9. Mars Bill Validator Flash Codes
# Flashes Diagnostic Code Description
1 Bill path jamm ed
2 Disabled from system
3 Needs cleaning
4 Cross channel blockade
5 Magazine (stacker) removed
Continuous slow Unit failure, replace unit
Continuous fast Stacker full
LED on Ok
Document Number: WS21058 50
Document Title: WSII Operations Manual ver 6.10
Page 63

WASH SELECT II
# Flashes Diagnostic Code Description
LED off Power off
4.3.1.4 Removing the Mars Bill Validator From the WASH SELECT II
Perform the following steps to remove the Mars Bill Validator.
1. Unlock and open the door of the WASH SELECT II.
2. Power off the WASH SELECT II.
3. Hold the Bill Validator at the top.
4. Remove the two Phillips head screws on the left side of the Bill Validator
faceplate.
5. Remove the two Phillips head screws from the bottom of the Bill Validator
faceplate. (Be careful not to yank, tear, or rip out the wires connected to the Bill
Validator).
6. Once the wires on the right side of the Bill Validator are in view, grasp them at the
connector and disconnect them by gently rocking them back and forth.
4.3.1.5 Removing the Mars Bill Validator Lower Housing
If necessary, the bill validator lower housing can be removed using the following procedures.
The lower housing is the portion of the Bill Validator that sits just below the stacker and
behind the bill mouth. The bill mouth is the part of the bill validator that is used to pull in and
analyze the bills that have been inserted. Bills are pulled in by a system that draws them up
into the main body. Once they have been pulled in, four photo-optic sensor s are used to scan
them and send the information to the electronics.
Perform the following steps to remove the Mars Bill Validator low er housing.
1. Remove the Bill stacker. (See Section 4.3.1.1)
2. Reach under the bottom of the validator and locate a silver rod in the area below
where the status LED is located. (See
3. Using your thumb, push the silver rod up toward status flash code LED.
4. Firmly grasp the top of the housing with your fingers and pull the lower housing
Figure 10)
toward the palm of you hand. (Be sure to keep steady pressure on the housing at
all times during removal.)
5. Slide the inner housing out of the back of the validator, revealing the belts, pulleys
and sensors.
Document Number: WS21058 51
Document Title: WSII Operations Manual ver 6.10
Page 64
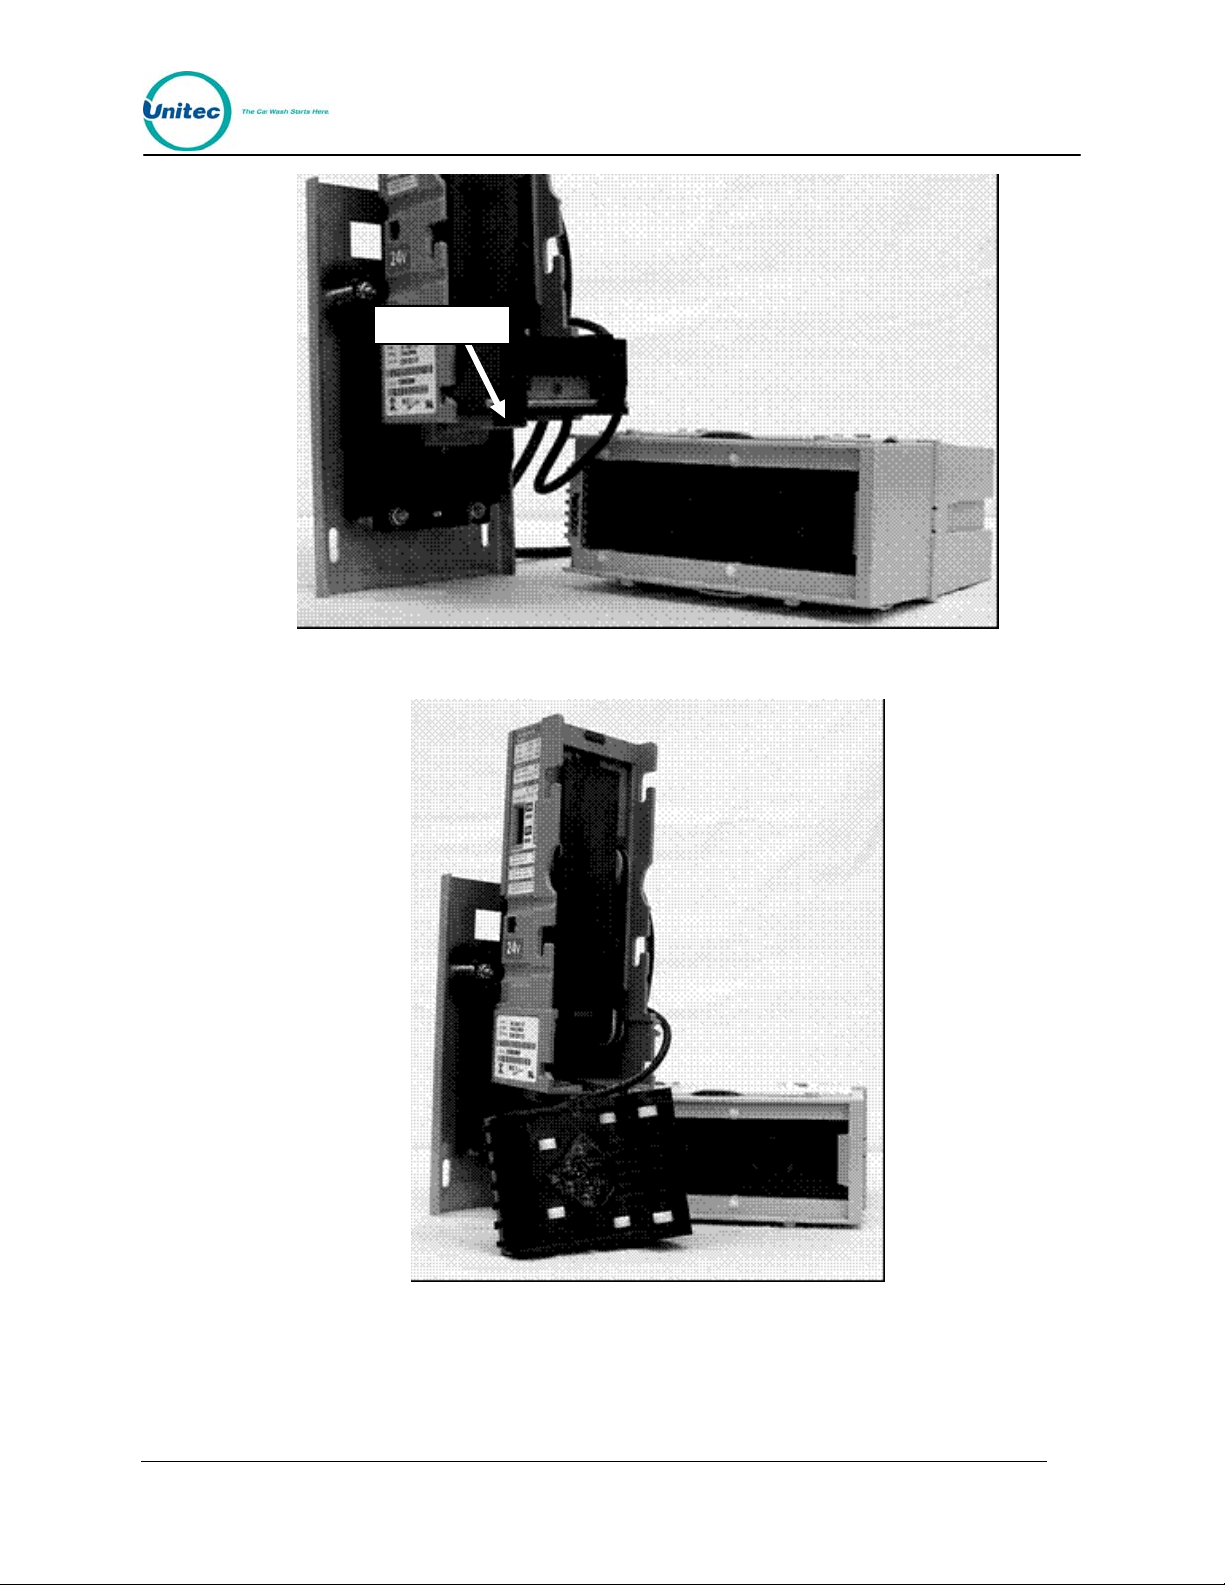
WASH SELECT II
Silver Rod
Figure 10. Mars with Lower Housing
Figure 11. Mars with Lower Housing Removed
Document Number: WS21058 52
Document Title: WSII Operations Manual ver 6.10
Page 65

WASH SELECT II
4.3.1.6 Cleaning and General Maintenance
The AE2600 series will not need cleaning as often as magnetic sensing bill validators. If
cleaning is required, use a soft cloth moistened with mild, n on-abrasive detergent.
4.3.1.7 Programming the Mars Bill Validator
The Mars Bill Validator allows programming for a maximum-security setting, as well as a
setting for a specified direction that a bill can be inserted. These options are set by a DIP
switch package located on one side of the validator.
To change any of the options, perform the following steps.
1. Remove the Mars Bill Validator from the unit. (See Section 4.3.1.2 for
instructions.)
2. Referring to Table 10, use a small flat-head screwdriver to set the DIP switches
for the options you prefer. (See
Figure 12 for DIP switch location.)
DIP switches
Figure 12. Mars DIP Switches
Table 10. Mars Bill Validator DIP Switches
Switch ON OFF Default
Document Number: WS21058 53
Document Title: WSII Operations Manual ver 6.10
Page 66

WASH SELECT II
Switch ON OFF Default
1 & 2
(switches work
in combination)
3 High Acceptance High Security
4 Reject $2
5 Reject $20* Accept $20
6 Always Enable Harness Enable
7 4 Pulse per Dollar 1 Pulse per Dollar
8 Vending Interfaces Gaming Interfaces
1 & 2 both ON =
4-way bill acceptance
(Should ALWAYS be
ON)
4.4 Single Coin Acceptor
The Wash Select II comes standard with the model PEM-35 single coin acceptor. In this
section, you will find instruction for proper maintena nce of the P EM-35.
1 ON, 2 OFF =
1-way bill acceptance
1 OFF, 2 ON =
2-way bill acceptance
Accept $2
(Should NEVER be
OFF)
1 OFF, 2 ON =
2-way bill acceptance
OFF
OFF
ON
ON
OFF
OFF
4.4.1 Replacing the Reference Coin
For proper operation of the coin acceptor, you must have a sample of the coin to be accepted
(U.S. quarter) in the sample holder. The Slug-Buster II (model PEM-35) comes from the
factory with a U.S quarter already in the sample holder.
You may use the following steps to assist you when replacing the reference coin.
Warning:
1. Loosen the retainer screw or nut just enough to allow the retainer slot to slide
Never loosen a nut on the Slug-buster II th at is covered with B LUE or RED pa int.
freely.
2. Remove the sample coin currently in the sample holder from the side of the
retainer slot.
3. Slide the retainer toward the sensing coil until it is firmly seated. (The sample
must be centered in the sensing coil and seated in the “V” groove to function
properly.)
4. Once the retainer is back in place, tighten the screw or nut .
4.4.2 Adjusting the Selectivity to the Coins
There should be no reason to change the selectivity of your new unit since it was shipped
from the factory with a tested, pre-set coin already installed. However, if you find it necessary
Document Number: WS21058 54
Document Title: WSII Operations Manual ver 6.10
Page 67

WASH SELECT II
to replace the coin samples with a different type of coin, the selectivity of the unit must be
readjusted. Before this can be done, a standard acceptance test should be performed. The
test is performed by dropping several valid coins into the Slug-Buster II, including common
slugs, and verifying that the proper coins are credited and that the slugs are rejected. If the
acceptor does not recognize all of the coins, or does not reject the invalid coins, the following
procedure should be implemented.
The coin acceptor must be powered to make a valid adjustment to the sensitivity. You
Note:
1. Locate the coin holder housing a quarter in the sample holder. Check the coin to
2. Loosen the cover nut to the electronics box on the opposite side of the coin
3. Locate the trim pot in the round hole that has been exposed by spinning the
4. Begin dropping the quarters or lower value coins into the unit, slowly turning the
5. Turn the trim pot an additional 2–5 degrees counter-clockwise (ACCEPT), and
must also avoid testing the Slug-buster II with the door open in direct sunlight. If the
Slug-Buster II main mechanism is exposed to direct sunlight, it may fail to credit the
coin.
ensure it is properly centered in the sensing coils and it is se ated securely.
acceptor. Spin the 1” x 2-1/2” cover, exposing the selectivity trim pot.
cover. The trim pot is marked “QUARTERS” and controls the quarter selectivity.
trim pot marked “QUARTERS” counter-clockwise (ACCEPT), until the SlugBuster II begins to accept the coins.
stop. This completes the smaller value coin adjust ment.
4.4.3 Removing the Coin Acceptor
If you find it necessary to remove the Slug-Buster from the Wash Select II door, a small head
Phillip’s screwdriver will be needed.
Follow the steps below to remove the assembly from the door.
1. Locate the rejected coin cup, which is mounted on the front of the Wash Select II
door underneath the coin acceptor slot.
2. Using a small Phillip’s head screwdriver, remove the screws from the inside of the
Wash Select II door that are securing the rejected coin cup. The cup should slide
off from the front of the door after removing the screws.
When replacing the coin acceptor, make sure that the exit ch ute is alig ned with the coin
Note:
3. Use a ¼” nut driver to remove the four nuts that are located at the corners of the
4. Grasp the unit in one hand and loosen the nuts with the other hand. Once the
diverter/guide assembly properly. Failure to align the two may result in coin jams or
loose coins falling to the bottom of the Wash Select II case.
faceplate. (The screws can be found inside of the Wash Select II door. The lower
screws are located next to the rejected coin cup and the upper screw s are located
just above the coin acceptance slot.)
nuts have been removed, the complete assembly can be removed by pulling it
out and away from the Wash Select II door.
Document Number: WS21058 55
Document Title: WSII Operations Manual ver 6.10
Page 68

WASH SELECT II
4.5 Multi-Coin Acceptor Programming and Operation
This optional item allows the Wash Select II to accept U.S. quarters, dollar coins and up to
four different bi-metal tokens. The Wash Select II accepts tokens ranging in size from .984” –
1.125” in diameter.
The current configuration of the Wash Select II only allows one coin to be dispensed at a
time. Therefore, if you would like to dispense the dollar coin, it will be necessary to make
changes to the coin hopper.
4.5.1 Programming the IDX Acceptor
Note:
The unit comes equipped to accept both U.S. quarters and dollar coins, and will dispense
quarters by default. The unit will also accept site-specific tokens. This section will guide you
through the programming of each of the site-specific coins that will be accepted and give
details on erasing this program, if a programming error ever oc curs.
In order to complete the programming you must have six of each of the tokens and coins you
wish to accept. It is very important that you follow these directions exactly. The IDX acceptor
will average the variances in these different sample coins during programming, and calculate
a more accurate reference model. Using less than six different coins will invalidate the
average variance generated by this process.
Please refer to the block diagrams shown in
acceptor.
When inserting coins into the IDX, you must be sure to close the cover completely.
Figure 13 while programming the IDX coin
Document Number: WS21058 56
Document Title: WSII Operations Manual ver 6.10
Page 69

WASH SELECT II
Figure 13. Outside/ Inside of the IDX
You must answer the following questions before proceeding with the programming of the IDX
coin acceptor.
• Do you want to accept tokens?
• How many different tokens will your site have?
• How much will each token be worth?
• Can the Wash Select II programmed token-value be divided evenly into each of
these values? (This helps to determine the number of pulses the IDX will need to
output for each token.)
• Will the Wash Select II dispense quarters or dollar coins?
• How many tokens will be allowed per customer per purchase?
In order to program the IDX to dispense the dollar coin, several physical changes must be
made to the IDX acceptor and wire harness. These changes can be made using the table
below to help you determine which rotary-switch position corresponds to a particular coin
output. The dispensed/diverted coin must always be assigned to output number six, requiring
pins four and five to be switched at the green Phoenix-connector at the end of the IDX wireharness to dispense the dollar coin.
Table 11. IDX Program Configuration
Coins—Quarter Coins—Dollars IDX Rotary Switch Number of Output
Document Number: WS21058 57
Document Title: WSII Operations Manual ver 6.10
Page 70

WASH SELECT II
Diverted Diverted Position Pulses
Token 1 Token 1 1 1-12, 14-255
Token 2 Token 2 2 1-255
Token 3 Token 3 3 1-255
Token 4 Token 4 4 1-255
$1-Coin Quarters 5 1
Quarters $1-Coin 6 1
Figure 14. IDX Wire Harness (Green Phoenix Connector) Configu rations
Once the configuration has been decided, the number for the switch positions, pulses, and
wire-harness pin-outs will need to be substituted for the given numbers in the instructions in
Section
4.5.2 below. The number of pulses is programmed by depressing the push-button
the desired number of times prior to insertion o f the sample /programming co ins (see
above).
4.5.2 Programming the IDX to Accept Site-Specific Tokens
When programming site-specific tokens, it is important that you take into consideration the
following items:
• Tokens with a diameter of .984” are commonly used at nationwide arcade/pizza
stores. The IDX coin acceptor will accept these tokens if your site-specif ic token is
the same size.
• Compare your token size with any local arcade tokens prior to programming the
IDX coin acceptor to accept your site token.
Before you begin programming, be sure that you have six of each token you plan to program.
You are responsible for supplying your own bi-metal tokens. Tokens are not availab le through
Unitec.
The IDX acceptor can be programmed to accept four different tokens. Each token will need to
be sampled and assigned a number of pulses. This means that each token will need to be
worth some multiple of the Wash Select II programmed token value (from the cash & tokens
menu); the programmed token value is internally multiplied by the number of pulses sent by
the IDX.
Table 11
Document Number: WS21058 58
Document Title: WSII Operations Manual ver 6.10
Page 71

WASH SELECT II
(Example: If you have assigned a token value of $.50 under the “Cash & Tokens” menu, and
you have four different tokens, each token must be worth a multiple of $.50. or as follows
token 1 = $.50, token 2 = $1.00 token 3 = $1.50 and token 4 = $2.00. As you can see each
token in this example represents numbers that can be divided by $.50.) The Wash Select II
does not keep a separate accounting of each different token your site may have; it just keeps
a running total equal to the total dollar value entered. This total will be reflected on the Wash
Select II accounting report.
To program the IDX to accept a single token, follow the instructions below. If more tokens are
required, refer to
Table 11 to get the switch locations for that particular token, and then
depress the push-button the number of times that is equal to the number of pulses to be
output for that token.
1. Locate the rotary-switch and set it to position 1, 2 , 3, or 4.
2. Press the button immediately to the left of the rotary-switch one or more times
depending on the number of pulses you want that token to send.
3. Drop six sample tokens through the coin slot one at a time, and verify that the red
light (LED) blinks several times after the last token has been entered.
4. Reset the rotary-switch to “0”, and then replace the front cover.
Now assume your token value is set for $1.00. To program the IDX acceptor to accept two
different tokens, token number 1 for $1.00 and token number 2 for $2.00, follow the steps
below.
1. Set the rotary-switch to position “1”.
2. Press the button directly to the left one time.
3. Drop six sample tokens into the coin slot one at a time, and verify that the light
(LED) blinks several times after the last token is entered.
4. Now set the rotary-switch to position “2”.
5. Press the button directly to the left of the rota ry-switch twice (for two pu lses or $2).
6. Drop six sample tokens of the second type into the coin slot one at a time, and
verify that the light (LED) blinks several times after the last t oken is enter ed.
7. Return the rotary-switch to the “0” position.
8. Replace the cover.
4.5.3 Programming Token Value
If you choose to keep the token value set to the default value, this Section can be skipped.
The default token values of the Wash Select II are shown in the table below.
Table 12. Wash Select II Token Values
Value Name Default Setting Maximum Allowed
Token Value $1.00 $99.00
Maximum Token per
Transaction
Document Number: WS21058 59
Document Title: WSII Operations Manual ver 6.10
80 80
Page 72

WASH SELECT II
The following steps will assist you wh en setting To ken Values.
1. Using the toggle switch at the top of the CPU board, place the Wash Select II in
setup mode by moving the switch toward the back of the Wash Select II case.
(The CPU board is located on the inside right wall of the Wash Select II case.)
2. Using the (3) key to scroll forward and the (1) key to scroll back, scroll through the
main menu until the “Cash & Tokens” option is displayed. Press the (*) key to
enter.
3. Scroll through this menu until the “Token Value” option is displayed, and then
press the (*) key to enter.
4. Enter the token value in cents format, and then press the (*) key to enter. (If you
would like to set the token value to $.75 for example, you would enter 75, and
then press the (*) key.)
The token value set will be multiplied by the number of pulses sent by the IDX coin
acceptor.
Note:
The steps below will assist you when setting the Max Tokens per customer value.
1. Using the toggle switch at the top of the CPU board, place the Wash Select II in
setup mode by moving the switch toward the back of the Wash Select II case.
(The CPU board is located on the inside right wall of the Wash Select II case.)
2. Using the (3) key to scroll forward and the (1) key to scroll back, scroll through the
main menu until the “Cash & Tokens” option is displayed. Press the (*) key to
enter.
3. Scroll through this menu until the “Max Tokens/cust” option is displayed, and then
press the (*) key to enter.
4. Enter the number of tokens you wish each customer to be allowed to use for a
single purchase, and then press the (*) key to enter.
4.5.4 Programming Dispense Value (for $1 coin dispensing only)
If you want your unit to dispense the dollar coin, the coin-hopper must be modified to
accommodate the larger coin. This is described in Section
of the Wash Select II must also be changed to reflect the value of the dollar coin. The default
value for this function is $.25. To change the dispense value, follow the step s below.
4.5.5, below. The dispense value
1. Using the toggle switch at the top of the CPU board, place the Wash Select II in
setup mode by moving the switch toward the back of the Wash Select II case.
(The CPU board is located on the inside right wall of the Wash Select II case.)
2. Using the (3) key to scroll forward and the (1) key to scroll back, scroll through the
main menu until the “Cash & Tokens” option is displayed. Press the (*) key to
enter.
3. Scroll through this menu until the “Dispense Value” option is displayed, and then
press the (*) key to enter.
4. Enter the dispense value in cents form, and then press the (*) key to enter. (If the
dispense value of the coin is $1.00 this must be entered as 100.)
Document Number: WS21058 60
Document Title: WSII Operations Manual ver 6.10
Page 73

WASH SELECT II
4.5.5 Modifying the Hopper
If you want your Wash Select II to dispense quarters, this procedure is NOT necessary.
However, if you wish to dispense the dollar coin, the hopper must be modified and the IDX
acceptor will need to be programmed. This Section will cover the setup of the coin- hopper. To
program the IDX acceptor and the Wash Select II, please refer to Section
manual.
4.5.5.1 Disassembling the Hopper
To disassemble the coin hopper, follow the steps below.
1. Locate the coin hopper on the floor of the Wash Select II case.
2. Remove the coin hopper by grasping it by the handle at the top and lifting up and
toward the front of the Wash Select II case. Be careful not to damage the cable
connector at the back of the hopper.
3. Once the hopper has been removed from the hopper mount, reach behind it and
grasp the cable connector. Gently remove the cable from the back of the hopper
and lift the hopper out of the Wash Select II case.
4. Once you have removed the hopper from the Wash Select II case, you can
remove the two screws that are holding the black, plastic hopper cube. (See
Figure 15, below.)
4.5.1 of this
Hopper
Cube
Figure 15. Hopper View - Side Screw and Internal Hopper - Cub e
5.
Separate the black hopper-cube from the center of the metal body of the
assembly, and then slide the red locking clasp, on the side of the black plastic
hopper downward.
Remove the 2
screws from
each side, then
pull hopper
cube out
Document Number: WS21058 61
Document Title: WSII Operations Manual ver 6.10
Page 74

WASH SELECT II
Locking Clasp
Figure 16. Hopper View - Removing the Hopper - Cub e Top
6. Slide the top piece of the black plastic hopper up and off to expose the wheel.
Figure 17. Hopper View - Top Removed
7.
Remove the dispensing wheel by grasping the coin openings and lifting up.
Document Number: WS21058 62
Document Title: WSII Operations Manual ver 6.10
Page 75

WASH SELECT II
Figure 18. Hopper View - Wheel Removed
8.
Using your hand, remove the guide arm cover from over-top of the coin exit
opening.
Figure 19. Hopper View - Guide Arm Cover Removed
9.
Using a screwdriver, gently pry off the old hopper arm. Be very careful not to
break the pins that hold the arm in place.
Document Number: WS21058 63
Document Title: WSII Operations Manual ver 6.10
Page 76

A
r
WASH SELECT II
rm Cove
Figure 20. Hopper View - Removal of the Coin Guide Arm
10.
Place the new hopper arm into the slot exactly as the old one was.
11. Place the new hopper wheel into the plastic hopper exactly as the old one was.
4.5.5.2 Re-assemble the Hopper
1.
Once the new guide arm and dispensing-wheel have been replaced, reinstall the
coin guide arm cover. (See Figure 18.)
2. Slide the black plastic top back onto the hopper-cube assembly. Securely latch it
in place by locking the clasp.
3. Place the hopper-cube back into the metal housing and replace the two screws
you removed previously. Be sure that the coin exit opening of the hopper-cube is
properly aligned with the exit chute of the metal housing. (See
Coin Exit
Opening
Figure 21.)
Coin – Hopper
Chute
Figure 21. Hopper View - Coin Exit Opening and Chute
Document Number: WS21058 64
Document Title: WSII Operations Manual ver 6.10
Page 77

WASH SELECT II
4.5.6 Program the IDX to Accept Quarters
Follow the steps below to program the IDX to accept quar ters.
1. Remove the front cover by pushing it in and up from the bo ttom right corner of the
main body. (This is located near the phone number.)
2. Locate the rotary-switch and set it to the position labeled number 6. (If you
choose to dispense $1 coins instead of quarters, this will be position 5.)
3. Press the button located immediately to the left of the switch once.
4. Drop six different quarters through the acceptor and verify that the light (LED)
blinks after the last quarter has been entered.
5. Move the rotary switch back to the position labeled ‘0’.
4.5.7 Programming the IDX to Accept $1 Coins
1. Set the rotary-switch to the position labeled number 5. (This will be position 6 if
you wish to dispense $1 coins.)
2. Press the button located immediately to the left of the switch once.
3. Drop six different dollar coins through the acceptor and verify that the light (LED)
blinks after the last coin has been entered.
4. Move the rotary switch back to the position labeled ‘0’.
Note:
The dispensed coin will always be programmed on position 6.
4.5.8 Erasing IDX Programming
If, for some reason, you need to erase programming or if anything should go wrong during
the programming process it can easily be corrected by following these steps.
1. Remove the front cover from the IDX acceptor.
2. Set the rotary switch to the position that corresponds to the coin you wish to re-
program or erase.
3. Depress the button located immediately to the right of the rotary switch only once.
4. Return the rotary switch to zero without passing any coins through the acceptor.
This will erase the program that has been stored for that number.
5. Return the front cover to the IDX.
4.5.9 The Token Bucket
If you have purchased the "Multi-Coin" option, your unit will have a coin diverting mechanism
to guide the coins to their appropriate location. If you are accepting quarters, dollar coins and
tokens, the diverting mechanism will send the coin you have chosen to dispense (quarters or
$1 coins) to the hopper to be recycled. All other coins will be sent to the token bucket. It is
very important that you check you bucket often to ensure it does not overflow .
Document Number: WS21058 65
Document Title: WSII Operations Manual ver 6.10
Page 78

WASH SELECT II
You can empty the bucket by grasping it firmly at the top and lifting it up and out of the Wash
Select II case. When returned to the case, the bucket locks into an upright position using a
bracket on the floor of the Wash Select II.
4.5.10 Cleaning and General Maintenance
You are strongly advised to check the coin-accepting system for proper operation. It is a good
habit to perform a check each time you remove cash from the box and any other time you
may open the box. Customers have been known to insert invalid coins, debris and bills into
the coin box. This will clog these systems and render them te mporarily out-of-service.
Two other components vital to the proper operation of the unit are the optical sensors of the
coin acceptors. These sensors are used to analyze the coins that are entered. Due to their
importance, the optical sensors should be cleaned period ically.
A cotton swab daubed in isopropyl alcohol is excellent for cleaning. To clean the sensor,
simply use a wet swab to wipe the inner wall area inside the first two inche s of the coin slot.
If the unit malfunctions and a good cleaning does not solve the problem, reprogram the
acceptor as described in Section
4.5.6 and 4.5.7.
The large inclined plane that protrudes from the top-front part of the bucket is used to guide
the coins smoothly into the container. If there is debris or any other substance on it, coins
may become trapped or lodged in mid-travel. This should be cleaned using a clean cloth and
a mild soap and water solution periodically to ensure proper operation .
4.5.11 System Settings Affecting IDX Coin Acceptor Operations
The following Wash Select II system settings will have an effect on how the IDX Coin
Acceptor operates.
Table 13. System Settings Affecting IDX Coin Acceptor Op erations
Setting Effect
Normal Operation When sufficient payment has been received to
cover the cost of the most expensive wash pack,
the cash acceptance will be disabled, and the coin
acceptor will reject all subsequent coins entered.
Allow Upgrades When programmed for no upgrades, the unit’s
ability to accept more cash (or other forms of
payment) for the purchase of a better, more
expensive wash is disabled.
Country Code This configures the coin value for each coin input.
4.6 Speech Module
The Speech option consists of the following components:
Document Number: WS21058 66
Document Title: WSII Operations Manual ver 6.10
Page 79

1. A speech module circuit board, which plugs into the CPU board.
2. A speaker, which is attached to the door.
3. A speaker grille, which is attached to the outside of the d oor.
4. A speaker cable, which runs from the CPU board to the speake r.
5. A microphone, which plugs into the top of the speech board and is used to re cord
WASH SELECT II
voice messages.
4.6.1 Recording Messages
Before you begin recording your personal speech messages, it is suggested that you study
the “Speech Message Script” below. It shows the time allotted for each message and gives
the pre-recorded messages already programmed on your unit.
SPEECH MESSAGE SCRIPT
1) GREETING MESSAGE (10.25 seconds)
Hello, welcome to _______________ car wash. Please Select your wash or enter
your code now.
2) SELECT PACKAGE (4.25 seconds)
Please select your wash package now.
3) PACKAGE 1-PURCHASED (8.5 seconds)
You have purchased the _______________. You may enter the wash if it is ready.
4) PACKAGE 2 PURCHASED (8.5 seconds)
You have purchased the _______________. You may enter the wash if it is ready.
5) PACKAGE 3 PURCHASED (8.5 seconds)
You have purchased the _______________. You may enter the wash if it is ready.
6) PACKAGE 4 PURCHASED (8.5 seconds)
You have purchased the ________________. You may enter the wash if it is ready.
7) CODE INVALID (4.25 seconds)
Your code is invalid. Please try again.
8) RECEIPT PROMPT (4.25 seconds)
Would you like to have a receipt?
9) AUTHORIZING (5.75 seconds)
Please wait while your card is being authorized.
10) CARD FAILURE (5.75 seconds)
Your transaction was not authorized. Please try again or use another payment
method.
11) HOPPER FAILURE (8.00 seconds)
Your change was not completely dispensed.
12) WASH IS READY (8.00 seconds)
Document Number: WS21058 67
Document Title: WSII Operations Manual ver 6.10
Page 80

WASH SELECT II
The wash is now ready. Please drive in slowly following the entrance sign on the car
wash.
13) EXACT CHANGE ONLY (5 seconds)
Please use exact change only.
14) ADD MONEY NOW (6.75 seconds)
Please add payment for your selection
15) SELECT WASH TYPE (6.75 seconds)
Please Select Soft-cloth or Touch-free now.
16) BAD CARD READ (5.75 seconds)
Your card could not be read. Swipe your card again, or try another car d.
17) ENTER PIN (3.25 seconds)
Please enter your PIN number.
18) ENTER DATA (3.25 seconds)
Please enter the requested information.
19) NETWORK ERROR (4.25 seconds)
Sorry, we were unable to process your transaction at th is time.
20) SELECT CREDIT/DEBIT (3.25 seconds)
Please select Credit or Debit.
21) ONE MOMENT PLEASE (2.50 seconds)
One moment please.
22) BAD CARD ORIENTATION (5.75 seconds)
Please check your card orientation, stripe to the right.
23) CREDIT TERM CUSTOM (5.00 seconds)
(Customized Credit Terminal Decline Message)
24) SELECT AN OPTION (3.25 seconds)
Please select an option.
When you are ready to record you messages, follow the steps below.
1. Using the toggle switch at the top of the CPU board, place the Wash Select II in
setup mode by moving the switch toward the back of the Wash Select II case.
(The CPU board is located on the inside right wall of the Wash Select II case.)
2. Using the (3) key to scroll forward and the (1) key to scroll back, scroll through the
main menu until the “Speech” option is displayed. Press the (*) key to enter .
3. Scroll through the "Speech" menu until "Record Message" is displayed, then
press (*) to enter. Enter the number of the message you want to record and p ress
the (*) key to enter.
4. Plug the provided microphone into the top of the sp eech board.
Document Number: WS21058 68
Document Title: WSII Operations Manual ver 6.10
Page 81

5. Locate the volume knob and adjust the volume by turning the knob clockwise
WASH SELECT II
about half way. (The knob should have been set fully to the counter clockwise at
the factory.)
6. Speak clearly and loudly into the microphone to record each message. (Hold the
microphone straight up and down, even with the middle of your chin for best
results.)
7. Scroll to the "Play Message" option and press (*) to enter. Listen to the message
to be sure you are happy with the sound quality and to check the accuracy of the
message.
8. Once you have recorded all messages, remove the microphone from the speech
board.
4.6.2 System Settings Affecting Speech Module Operations
The following Wash Select II system settings will have an effect on how the Speech Module
operates.
Table 14. System Settings Affecting Speech Module Operations
Setting Effect
Greeting Delay This defines how long the Wash Select II should
wait to play the greeting message for the first time
after a customer has driven up.
Repeat Delay This defines how long the Wash Select II should
wait to play the greeting message again if
customer activity has yet to begin. The greeting
message will stop repeating once the customer
initiates an action with the unit, such as adding
money, selecting a wash or swiping a credit card.
4.7 Proximity Sensor
With the proximity sensor, the Wash Select II will detect vehicles when they drive up. The
proximity sensor consists of the following components:
1. Transmitter/Receiver pair - attached to the door.
2. Power block - attached to the top of the power supply unit.
4.7.1 Normal Adjusting of Proximity Sensitivity
You may adjust the sensitivity of the proximity sensor by turning the control knob on the front
of the power block. (See
Figure 22.)
Document Number: WS21058 69
Document Title: WSII Operations Manual ver 6.10
Page 82

WASH SELECT II
Sensitivity Control
Knob, this is
numbered from 1-10.
Figure 22. Proximity Sensor Power Block
You should test this adjustment with and without a vehicle in front of the unit. The normal
sensitivity setting range is between 6 and 10 on the dial.
4.7.2 Adjusting Sensitivity with the 100% Range Setting
The proximity sensor block is shipped pre-set on the 25% range setting. If you find that this
does not work for you, you may adjust the range setting on the power block. It is suggested
that this adjustment be performed in bright sunlight. Follow the steps below to adjust the
range setting.
1. Remove the power block from the Wash Select II.
2. Set the dial on the power block to the zero setting.
3. Using a small flat-head screwdriver, remove the small plastic cover below the dial
on the power block.
4. Flip dipswitch 1 to the up position.
5. Replace the power block.
6. With no vehicle in front of the unit, turn the dial until the relay light (LED) comes
on. You must always keep the dial below this setting.
7. Next, you must turn the dial toward the lower numbers until the relay light turns off
and then turn the dial one more notch to the left.
It may be necessary to adjust the dial again at a later date if the proximity block "Relay" light
comes on when there is no vehicle present. Too high of a gain setting will give a continuous
false vehicle detection signal.
4.7.3 System Settings Affecting Proximity Sensor Operations
The following Wash Select II system settings will have an effect on how the Proximity Sensor
operates.
Document Number: WS21058 70
Document Title: WSII Operations Manual ver 6.10
Page 83

WASH SELECT II
Table 15. System Settings Affecting Proximity Sensor Operations
Setting Effect
Greeting Delay This defines how long the Wash Select II should
wait to play the greeting message for the first time
after a customer has driven up.
Repeat Delay This defines how long the Wash Select II should
wait to play the greeting message again if
customer activity has yet to begin. The greeting
message will stop repeating once the customer
initiates an action with the unit, such as adding
money, selecting a wash or swiping a credit card.
4.8 Coin Hopper and Assembly
The Wash Select II is equipped with a Suzo Mark II coin dispenser, which is embedded in a
proprietary Unitec design. The dispenser is able to hold/dispense up to 2,400 quarter-sized
coins. It is located inside the Wash Select II case directly behind the wash selection disp lays.
4.8.1 Filling the Hopper
The large opening at the top of the coin hopper has been added to increase the holding
capacity of the dispenser. The inclined plane that spans across the top half of the hopper
assembly is used to distribute the weight of the coins. When pouring coins into the dispenser,
you must direct the coins at this inclined plane to protect the moving parts at the bottom of the
hopper. Follow the instructions below to fill the coin hopper.
1. Open the door to the Wash Select II.
2. Pour the replacement coins into the large opening at the top of the hopper
assembly. Remember to direct the coins toward the inclined plane.
3. When the coin level is close to 600 - 1200 coins, begin to add coins by hand.
Using this method, coins will tend to slide into the dispensing wheel more easily,
which will reduce to possibility of clogs and jams.
Time and experience should be your guide as to when to refill your hopper. Unitec
recommends starting with approximately 900 coins to maintain a good accept/ dispense rati o.
4.8.2 Removing the Hopper from the Wash Select II
To remove your hopper, follow the steps below.
1. Grasp the handle, located across the top of the hopper and pull the hopper up
and out. Be careful not to accidentally jerk the wires out of the back o f the hopper.
2. Once the wires at the back of the hopper are visible, grasp them at the brown
plug housing and pull them straight back.
3. Gently rock the connector back and forth while pulling them outward until they
have been disconnected from the hopper.
Document Number: WS21058 71
Document Title: WSII Operations Manual ver 6.10
Page 84

WASH SELECT II
4.8.3 Cleaning and General Maintenance
The following maintenance should be performed on the Wash Select II every three months:
1. Remove the coin hopper from the unit.
2. Remove all coins from the hopper.
3. Use a damp rag to clean any metal dust that may have accumulated on the exit
ramp.
4. Remove the two side screws that hold the bottom support bracket and pull the
main hopper cube from the hopper assembly.
5. Use a Q-Tip or Iso-swab to clean the coin exit slot.
6. Remove the top part of the hopper by sliding the red lever on the side of the
hopper downward. Slide the top part of the hopper upward to re move it.
7. Remove the hopper wheel and clean it with a damp rag.
8. Clean the inside of the hopper with a damp rag.
9. Reverse these steps to replace the hopper. Be sure you do not pinch the cable
when returning the hopper into the Wash Select II case.
4.8.4 System Settings Affecting Coin Hopper Operations
The following Wash Select II system settings will have an effect on how the Coin Hopper and
Assembly operate.
Table 16. System Settings Affecting Coin Hopper Operations
Setting Effect
Dispense Mode This will affect when a customer may receive
Dispense Value This setting will configure the unit to know the
Dump Coins In the diagnostic mode , this setting ca n be used to
Coins Present Diagnostic function that detects the presence of
Exact Change Only The Wash Select II will immediately go into an
4.9 Card Reader
change from the Wash Select II.
monetary value of each coin dispensed.
dispense a specific number of coins for test.
coins in the hopper.
exact change only mode if it ever attempts to
dispense change unsuccessfully. To clear this
mode, turn the unit power off then on again. It will
clear the next time it successfully dispenses
change.
The card reader may be used with the Credit option or just for fleet cards and pass cards.
Document Number: WS21058 72
Document Title: WSII Operations Manual ver 6.10
Page 85

WASH SELECT II
4.9.1 Card Reader Related System Settings
After repeated use, the credit card reader acceptance rate will begin to decline. This is due
primarily to the internal sensing devices becoming soiled. It is best to clean your card reader
using card reader cleaning cards. These cleaner cards may be purchased directly from your
distributor or from the manufacturer of the cleaner cards. The cleaner cards are Unitec stock
#MS2031 and can also be purchased from Clean Team by calling 1-800-888-8830.
4.9.2 System Settings Affecting Card Reader Operations
The following Wash Select II system settings will have an effect on how the Card Reader
operates.
Table 17. Card Reader Related System Settings
Setting Effect
Credit Mode 0 – no credit The card reader will not recognize or try to process
a transaction being made by any credit/debit cards,
but it will process fleet and pass card accounts.
Credit Mode 1 – Demo mode The card reader will log, process, and track all
cards. All credit/debit cards are immediately
“accepted” by the reader.
Credit Mode 2 – EDC mode Normally, the card reader will only accept valid
major credit cards, fleet cards, and pass cards. If
the “Accept Propriety” setting is enabled, the
reader will also accept proprietary credit/debit
cards.
Credit Mode 3 – Generic
Terminal mode
Credit Mode 4 – POS Auth
mode
Credit Mode 5 – EDC Sheetz
Mode
Credit & Coupon If this is disabled, the card reader will not accept
Allow Upgrades If this is enabled and the credit mode is 4, the card
Same effect on the reader as Credit Mode 2.
The card reader will accept any credit/debit card
swiped, as well as fleet cards and pas s cards.
The card reader will accept any credit/debit card
swiped, as well as fleet cards and pas s cards.
card swipes that occur after a coupon code/card
entry but before the purchase of a wash.
reader will accept credit/debit card swipes that
follow wash purchases, as lon g as an upgrade is
available.
4.10 Thermal Printer Assembly
The printing operation involves the use of three different components. These component s are
the main CPU, the printer control board, and the print head mechanism. These components
Document Number: WS21058 73
Document Title: WSII Operations Manual ver 6.10
Page 86

WASH SELECT II
are located in different positions throughout the Wash Select II. The following Sections
contain information and procedures important for peak operat ing performance.
If you look towards the CPU, the section in the upper right hand corner just to the right of the
setup/operate switch deals primarily with the printer. There you will find two push button
switches mounted on the board labeled "Feed" and "Reset". You will find the printer control
board mounted on the inside right wall of the Wash Select II case, just above the CPU board.
The following sections contain information and procedures important for peak operating
performance.
1. Replacing the Printer Paper
2. Clearing a Paper Jam
3. Reset and Feed Buttons
4. Manually Printing a Self-Test
4.10.1 Replacing the Printer Paper
Replace printer paper when you see a red mark running down the side of the receipt or the
unit is reporting Paper low.
1. Insert the new paper roll on the paper carriage at the bottom of the printer. The paper roll
should be oriented such that the end of the paper is at the top of the roll. The paper will
automatically feed into the printer when the power is on.
2. Close the rear door of the printer enclosure.
4.10.2 Clearing a Paper Jam
Follow the steps below to clear a paper jam.
1. Open the printer assembly.
2. Locate the blue locking arms on the sides of the printer assembly, pull them out and
remove the main printer assembly by lifting it up and out.
3. Locate and remove the paper jam.
4. Once the jam has been dislodged, replace the main printer assembly and relock the
blue locking arms.
5. Feed the paper into the slot marked “Paper Insert.”
6. Test the printer.
4.10.3 Reset and Feed Buttons
If the printer ever malfunctions and does not respond to a request to print, you may need to
either reset the control board, or print a self-test. Before these functions can be used, you will
need to know where to find them. The reset and feed buttons are located at the top right hand
side of the CPU board, to the right of the "Setup/operate" switch. The names are written
Document Number: WS21058 74
Document Title: WSII Operations Manual ver 6.10
Page 87

WASH SELECT II
below each button. When the reset button is pressed, the printer control board and print
mechanism will go through a forced system reset. This will clear up any failures due to
electronic error. If you press the feed button and hold it, the paper feed motor will feed paper
through the side of the Wash Select II door. The paper will stop feeding once you let go of the
button.
4.10.4 Manually Printing a Self Test
If you ever question whether the system is functioning properly, you may have the system
print a self-test page. This report is internally generated and will cycle through each available
character. If the test prints completely and the printing is legible, this is considered a passed
result.
To begin printing a self-test, press both the reset and feed buttons simultaneously for at least
one second. After at least one second, let go of the reset button only, while continuing to hold
down the feed button. The printer will begin to print a complete self -test.
4.10.5 Thermal Printer Control Board
The printer control board is the small circuit board located on the inside right wall of the Wash
Select II case, just above the CPU. It controls data input and output, and communications
traffic between the CPU and the printer head. If this component fails, the system will not
operate. It is important, as with all internal components, that this component be protected
from moisture and shock. If the printer is not working, make sure there is plenty of paper,
make sure the feature is enabled in the software configuration and then run a unit self test. If
the printer still does not operate properly, contact your distr ibutor.
4.10.6 System Settings Affecting Thermal Printer
The following Wash Select II system settings will have an effect on how the Thermal Printer
operates.
Table 18. System Settings Affecting Thermal Printer Operations
Setting Effect
AUTO Printer will detect presence of printer and use as
needed; won’t detect printer errors and page site
operator.
Enable Receipt Printer This function is found in the Misc. setup function
menu. If the printer is disabled it will not be
available for printing receipts for customer. This
setting has no effect on report and accounting
printing.
Document Number: WS21058 75
Document Title: WSII Operations Manual ver 6.10
Page 88

4.11 Fuse
WASH SELECT II
Caution:
For continued protection against risk of fire, replace only with same type and rating of
fuse.
If you need to replace the fuse, be sure to replace it with only t he same type and ra ting as the
blown fuse.
Document Number: WS21058 76
Document Title: WSII Operations Manual ver 6.10
Page 89

WASH SELECT II
Appendix A. W ash Select II – W ashPay Notifications
WSII Pager ID WSII Description WashPay Alert ID WashPay Alert
1 Hopper low 16 Peripheral low (10%)
2 Hopper empty 17 Peripheral empty
4 Wash out of
4 Auto – Out Of Service
service
8 Printer paper 17 Peripheral empty
9 Printer power
12 Peripheral error
error
10 Printer error 12 Peripheral error
11 Bill jam 13 Peripheral jammed
12 Bill stacker full 14 Peripheral full
13 Bill validator error 12 Peripheral error
14 Card reader error 12 Peripheral error
16 Wash fault 2 Fault -- Out Of Service
18 Wash in service 5 Auto – returned to service
20 Security alarm 25 Alarm activated
Document Number: WS21058 77
Document Title: WSII Operations Manual ver 6.10
Page 90

WASH SELECT II
Document Number: WS21058 78
Document Title: WSII Operations Manual ver 6.10
Page 91

WASH SELECT II
Appendix B. Circuit Board Connections
The following are pin out descriptions of the various connectors on the Wash Select II
components:
CPU BOARD
J1 Main Power
Pin Description
1 +5VDC main power input
2 GND for +5VDC main power input
3 +12VDC main power input
4 GND for +12VDC main power input
J21 Hopper
Pin Description
1 Hopper Run – 12VDC when hopper is running
2 Hopper Run Ground
3 Coins present Feed
4 Coins present Return (short this to pin 3 when coins are present)
5 Coin Drop (short this to pin 2 when coin dr ops)
6 Not connected
J20 Proximity Input
Pin Description
1 Proximity Feed +
2 Proximity Return (A short from this pin to pin 1 will activate proximity input)
3 N/C
Document Number: WS21058 79
Document Title: WSII Operations Manual ver 6.10
Page 92

WASH SELECT II
J19 Fault/Warning Outputs
Pin Description
1 Fault output Common (dry contact) 500ma max
2 Fault output Normally Open (dry contact) 500 ma max
3 Warning output Common (dry contact) 500 ma max
4 Warning out put Normally Open (dry conta ct) 500ma max
J18 Wash Inputs
Pin Description
1 Wash In Use Hot (20-120VAC/DC)
2 Wash In Use Neutral
3 Wash Fault Hot (20-120VAC/DC)
4 Wash Fault Neutral
5 Wash Warning Hot (20-120VAC/DC)
6 Wash Warning Neutral
J17 Wash Relays
Pin Description
1 Program relay 1 output (500mA max)
2 Program relay 2 output (500mA max)
3 Program relay 3 output (500mA max)
4 Program relay 4 output (500mA max)
5 Program relay 5 output (500mA max)
6 Program relay 6 output (500mA max)
7 Program relay 7 output (500mA max)
8 Program relay 8 output (500mA max)
9 Program relay Common
10 N/C
Document Number: WS21058 80
Document Title: WSII Operations Manual ver 6.10
Page 93

WASH SELECT II
J14 Misc Power Input
Pin Description
1 5VDC Pass through power
2 GND for 5VDC Pass through power
3 24VAC Hot
4 24VAC Neutral
5 12VDC for I/O board
6 GND for 12VDC for I/O board
Note: J14 connects directly to J13 for power to bill validator and disp lay I/O board.
J13 Misc Power to Display I/O board
Pin Description
1 5VDC Pass through power for backlights
2 GND for 5VDC Pass through power backlights
3 24VAC Hot
4 24VAC Neutral
5 12VDC for I/O board
6 GND for 12VDC for I/O board
J9 Bill Validator (MDB Mode)
Note to Unitec Technicians: The following pin outs are reversed from the schematic to match
the pin numbering embossed in the MDB housing. Pin 1 on the housing equates to Pin 8 on
Unitec internal schematics.
Pin Description
1 Not Connected
2 Not Connected
3 Signal Ground
4 MDB Tx
5 MDB Rx
6 Not Connected
7 24VDC Power
8 24VDC Power
Document Number: WS21058 81
Document Title: WSII Operations Manual ver 6.10
Page 94

WASH SELECT II
J12 Bill Validator (Pulse Mode)
Pin Description
1 Bill Enable Common (N/C) (voltage applied to J11 pin 2) Normally 24AC neutral
(Note: 12VDC for Canadian units)
2 Bill Enable switched (switched voltage applied to J11 pin 1) Normally 24AC hot
(Note: 12VDC for Canadian units)
3 Not connected
4 Bill pulse 1 (not used)
5 Bill pulse 0 ($1 credit pulse) Short to pin 6 to issue bill pulse – floats at 12VDC
normally.
6 Bill pulse common (GND of 12VDC)
7 Bill power Neutral (Voltage applied to J11 pin 2) Normally 24AC neutral (Note:
12VDC for Canadian units)
8 Bill power Hot (Voltage applied to J11 pin 1) Normally 24AC Hot (Note: 12VDC
for Canadian units)
J11 Bill Validator Power Input
Pin Description
1 Bill validator Power Hot – Normally 24AC Hot
2 Bill validator Power Neutral – Normally 24AC Neutral
3 N/C
J10 Speaker
Pin Description
1 Speaker Output +
2 Speaker Output 3 Intercom input + (when no speech is playing this is tied to pin 1)
4 Intercom input – (when no speech is playing this is tied to pin 2)
J5 Printer Control Board Power (Printer Option Only )
Pin Description
1 24VDC + output (from J4 pin 1)
2 24VDC + output (from J4 pin 1)
3 24VDC ground output (from J4 pin 2)
4 24VDC ground output (from J4 pin 2)
5 5VDC ground output (from J1 pin 2)
Document Number: WS21058 82
Document Title: WSII Operations Manual ver 6.10
Page 95

WASH SELECT II
6 5VDC + output (from J1 pin 1)
J4 24VDC Printer Power (Printer Opti on Only )
Pin Description
1 24VDC + input from power supply
2 24VDC ground input from power supply
P1 Modem Connection (Standard PC-AT Pin Outs)
Pin Description
1 CD – carrier detect input
2 Receive Data input
3 Transmit Data output
4 DTR – Data terminal ready output
5 Ground
6 DSR – input
7 RTS – request to send output
8 CTS – clear to send output
9 N/C
J22 Expansion RS-485 Half Dupl ex (POS400 0 Interfac e)
Pin Description
1 RS485 – (To POS4000 Pin 1)
2 RS485 + (To POS4000 Pin 2)
3 Ground reference (optically isolated) (To POS4000 Pin 3)
J23 Future Expansion RS-232
Pin Description
1 Not defined at this time
2 Not defined at this time
3 Not defined at this time
4 Not defined at this time
5 Not defined at this time
6 Not defined at this time
7 Not defined at this time
8 Not defined at this time
9 Not defined at this time
Document Number: WS21058 83
Document Title: WSII Operations Manual ver 6.10
Page 96

WASH SELECT II
J26 Data to Display I/O Board
Pin Description
1 Encoded Button 0
2 GND
3 Encoded Button 1
4 Display DB0
5 Encoded Button 2
6 Display DB1
7 TTL Cash Enable
8 Display DB2
9 5VDC
10 Display DB3
11 TTL Coin pulse 1
12 Display DB4
13 TTL Coin pulse 2
14 Display DB5
15 TTL Coin pulse 3
16 Display DB6
17 TTL Coin pulse 4
18 Display DB7
19 N/C
20 GND
21 5VDC
22 Display RS
23 Keypad Feed 0
24 Display R/W
25 Keypad Feed 1
26 Display Enable 0
27 Keypad Feed 2
28 Display Enable 1
29 Keypad Return 0
30 Display Enable 2
31 Keypad Return 1
32 GND
33 Keypad Return 2
34 Keypad Return 3
Document Number: WS21058 84
Document Title: WSII Operations Manual ver 6.10
Page 97

WASH SELECT II
J25 Display I/O Board Data
Pin Description
1 N/C
2 Rear Sensor
3 Card Present
4 Data Track 1
5 Wash Fault TTL for LED
6 Strobe Track 1
7 Aux output 4
8 Data Track 2
9 Aux output 3
10 Strobe Track 2
11 Aux output 2
12 Wash Relay 1 TTL
13 Aux output 1
14 Wash Relay 2 TTL
15 Aux input 2
16 Wash Relay 3 TTL
17 Aux input 1
18 Wash Relay 4 TTL
19 Bill Pulse 0 TTL ($1 credit pulse)
20 Wash Relay 5 TTL
21 Wash Warning output TTL for LED
22 Wash Relay 6 TTL
23 Wash Warning input TTL for LED
24 Wash Relay 7 TTL
25 Wash in use input TTL for LED
26 Wash Relay 8 TTL
Document Number: WS21058 85
Document Title: WSII Operations Manual ver 6.10
Page 98

WASH SELECT II
DISPLAY I/O BOARD
J3 Main Coin Acceptor
Pin Description
1 24 AC Hot Switched (500 mA average max)
2 24 AC neutral
3 24 AC neutral
4 Coin 1 pulse (short to pin 3 or pin 2 for coin pulse)
5 Coin 2 pulse (short to pin 3 or pin 2 for coin pulse)
6 Coin 3 pulse (short to pin 3 or pin 2 for coin pulse)
J2 Auxiliary Coin Acceptor
Pin Description
1 24 AC Hot Switched (500 mA average max)
2 24 AC neutral
3 24 AC neutral
4 Coin 4 pulse (short to pin 3 or pin 2 for coin pulse)
J1 Main Power Input
Pin Description
1 5VDC power for backlights
2 GND for 5VDC power backlights
3 24VAC Hot
4 24VAC Neutral
5 12VDC for diverter sol enoid
6 GND for 12VDC for diverter solenoid
Document Number: WS21058 86
Document Title: WSII Operations Manual ver 6.10
Page 99

WASH SELECT II
JP1 Ribbon Cable Coin Acceptor Interface
Pin Description
1 12VDC switched (500 mA average max)
2 GND for 12VDC
3 Coin 4 (sink to pin 2 for coin input)
4 Coin 3 (sink to pin 2 for coin input)
5 N/C
6 N/C
7 Coin 2 (sink to pin 2 for coin input)
8 N/C
9 Coin 1 (sink to pin 2 for coin input)
10 N/C
11 N/C
12 N/C
13 N/C
14 N/C
15 N/C
16 GND for 12VDC
J25 Diverter Solenoid Output
Pin Description
1 12VDC + solenoid fire output
2 Ground 12VDC for solenoid output
3 N/C
Document Number: WS21058 87
Document Title: WSII Operations Manual ver 6.10
Page 100

WASH SELECT II
J9 Credit Card Reader
Pin Description
1 Rear Sensor
2 Data Track 2
3 Card Present
4 Strobe Track 2
5 N/C
6 5VDC power to card reader
7 GND power to card reader
8 Strobe Track 1
9 Data Track 1
J20 Wash 1 Button
Pin Description
1 12VDC button feed (current limited)
2 Button return (short this to Pin 1 for button press)
J21 Wash 2 Button
Pin Description
1 12VDC button feed (current limited)
2 Button return (short this to Pin 1 for button press)
J22 Wash 3 Button
Pin Description
1 12VDC button feed (current limited)
2 Button return (short this to Pin 1 for button press)
J23 Wash 4 Button
Pin Description
1 12VDC button feed (current limited)
2 Button return (short this to Pin 1 for button press)
Document Number: WS21058 88
Document Title: WSII Operations Manual ver 6.10
 Loading...