

Page 1
W ashPay Owner’s Manual
Unitec
www.StartwithUnitec.com
Page 2

WASHPAY
WASHPAY OWNERS MANUAL
SOFTWARE VERSION 1.52
In this manual, we discuss in detail the components and operations of the WashPay system .
If further assistance is needed, please contact the distributor from which the WashPay system was
purchased.
When calling for assistance, you must have the following information available:
WashPay Serial Number:
Distributor Name:
DECLARATION OF COMPLIANCE
This equipment has been tested and found to comply with the limits for a Class A digital device,
pursuant to Part 15 of the FCC Rules. These limits are designed to provide reasonable protection
against harmful interference when the equipment is operated in a commercial environment. This
equipment generates, uses, and can radiate radio frequency energy and, if not installed and used in
accordance with the instruction manual, may cause harmful interference to radio communications.
Operation of this equipment in a residential area is likely to cause harmful interference in which case
the user will be required to correct the interference at his own expense.
COPYRIGHT
© 2012 Unitec, Incorporated. All rights reserved. No part of this book, inclu ding text, scr een examples,
diagrams, or icons, may be reproduced or transmitted in any form, by any means (electronic,
photocopying, recording, or otherwise) without prior written perm ission of Unitec, I ncorporated.
TRADEMARKS
WashPay, Unitec, and the Unitec Logo are trademarks, service marks, or registered trademarks of
Unitec, Incorporated.
All other products, services, and company names are trademarks or registered trademarks of their
respective owners.
Document Number: WP1010
Document Title: WashPay Owners Manual
Page 3
WASHPAY
Document Revision History
Software
Version
Release Date Changes Made
Added Dresser Wayne interface, Account Listing Report, added ability
1.52 12/2012
to add taxes to credit sales, added subscription account support to
WashPay self serve, and revised the Site Revenue report.
Added Remote POS4000 support, Account Reloading, Canadian
1.42 1/2012
Currency support, Fleet reports , Console/Sales Screen Enhanc ements,
Daylight Savings Time support, and Credit Modem diag nostics.
1.34 2/2011 WashPay programming consolidated onto Sierra site controller.
Document Number: WP1010
Document Title: WashPay Owners Manual
Page 4

WASHPAY
{THIS PAGE INTENTIONALLY LEFT BLANK]
Document Number: WP1010
Document Title: WashPay Owners Manual
Page 5

WASHPAY
Table Of Contents
1 Introduction....................................................................................................................................1
1.1 System Management............................................................................................................2
2 Sierra Site Controller Setup..........................................................................................................4
2.1 General Site Information.......................................................................................................4
2.2 Product Programming...........................................................................................................4
2.3 Card Terminal Programming.................................................................................................4
2.3.1 General Information.....................................................................................................................4
2.3.2 Product Dispensing......................................................................................................................4
2.3.3 Equipment Interface.....................................................................................................................5
2.3.4 User Interface Set-up...................................................................................................................5
2.4 Receipt Printer Setup............................................................................................................5
2.5 Download Devices ................................................................................................................5
2.6 User Management.................................................................................................................5
3 Daily Operations.............................................................................................................................6
3.1 House Accounts....................................................................................................................6
3.1.1 Prepaid Accounts.........................................................................................................................6
3.1.2 Subscription Accounts .................................................................................................................6
3.1.3 Fleet Accounts.............................................................................................................................7
3.1.4 Account Programs .......................................................................................................................7
Pre-Paid Account Program Setup ..........................................................................................................8
Subscription Account Program Setup.....................................................................................................9
3.1.5 Accounts....................................................................................................................................10
3.1.5.1 Prepaid and Subscription Accounts.......................................................................................10
3.1.5.2 Fleet Accounts .......................................................................................................................10
3.1.6 Account Reports........................................................................................................................12
3.2 Reports................................................................................................................................17
3.2.1 Site Revenue Report..................................................................................................................18
3.2.2 Sales Report..............................................................................................................................19
3.2.3 Cash Report...............................................................................................................................21
3.2.4 Transaction Report ....................................................................................................................23
3.2.5 Code Listing Report...................................................................................................................25
3.3 Sales ................................................................................................................................... 27
Document Number: WP1010
Document Title: WashPay Owners Manual
Page 6

WASHPAY
4 Component Operation and Maintenance................................................................................... 33
4.1 Pay Node.............................................................................................................................33
4.1.1 Running a Self Test ...................................................................................................................33
4.1.2 Display Status............................................................................................................................34
4.1.3 Reset Capture Memory..............................................................................................................34
4.2 Card Reader........................................................................................................................ 34
4.2.1 Cleaning the Card Reader.........................................................................................................34
4.2.2 Troubleshooting the Card Reader..............................................................................................34
4.3 Networking Components.....................................................................................................35
4.3.1 Router........................................................................................................................................35
4.4 Thermal Printer....................................................................................................................36
4.4.1 Replacing the Printer Paper.......................................................................................................36
4.4.2 Clearing a Paper Jam................................................................................................................37
4.4.3 Manually Printing a Self-Test.....................................................................................................37
Appendix A – Notifications................................................................................................................ 38
Document Number: WP1010
Document Title: WashPay Owners Manual
Page 7

WASHPAY
Index of Figures
Figure 1. Login Screen.....................................................................................................................2
Figure 2. Site Summary Screen .......................................................................................................3
Figure 3. Account Program Screen..................................................................................................7
Figure 79. Pre-paid Account Program Edit Screen..........................................................................8
Figure 80. Subscription Account Program Edit Screen....................................................................9
Figure 5. Prepaid Account Edit Screen..........................................................................................10
Figure 6. Edit Fleet Account...........................................................................................................11
Figure 7. Edit Account User............................................................................................................12
Figure 8. Sample House Account Status Report............................................................................13
Figure 9. Sample House Account Fleet Report..............................................................................14
Figure 10. Account Sales Report....................................................................................................16
Figure 12. Sample Site Revenue Report........................................................................................18
Figure 13. Sample Sales Report ....................................................................................................20
Figure 14. Sample Cash Report.....................................................................................................22
Figure 15. Sample Transaction Report ..........................................................................................24
Figure 16. Sample Transaction Details..........................................................................................25
Figure 17. Sample Code Listing Report.........................................................................................25
Figure 18. Sales Screen.................................................................................................................27
Figure 19. Purchase Wash Package Screen .................................................................................28
Figure 20. Wash Purchased Screen ..............................................................................................28
Figure 21. Account Purchase.........................................................................................................29
Figure 22. Reload Account Screen ................................................................................................30
Figure 23. Reloaded Account Screen ............................................................................................30
Figure 24. Rewash Selection Screen.............................................................................................31
Figure 25. Rewash Code Issued Screen........................................................................................31
Figure 26. Report Date Selection Screen.......................................................................................32
Figure 27. Thermal Printer..............................................................................................................36
Document Number: WP1010
Document Title: WashPay Owners Manual
Page 8

WASHPAY
1 Introduction
The WashPay Site Management System is a highly configurable management system for multi-bay
self-serve and automatic wash-bay (with Wash Select II interface) carwashes. The WashPay system
consists of the following components:
• Sierra Site Controller (for both self server and Wash Select II): The Sierra site controller
works as a network server and collects data and generates reports from the card terminals,
coin machines and wash bays. The Sierra site controller is remotely accessible by PC for
configuration and reporting. The reporting function gives the site owner specific information
about the day-to-day income and activities of the carwash. System events are also monitored
and recorded using the system software.
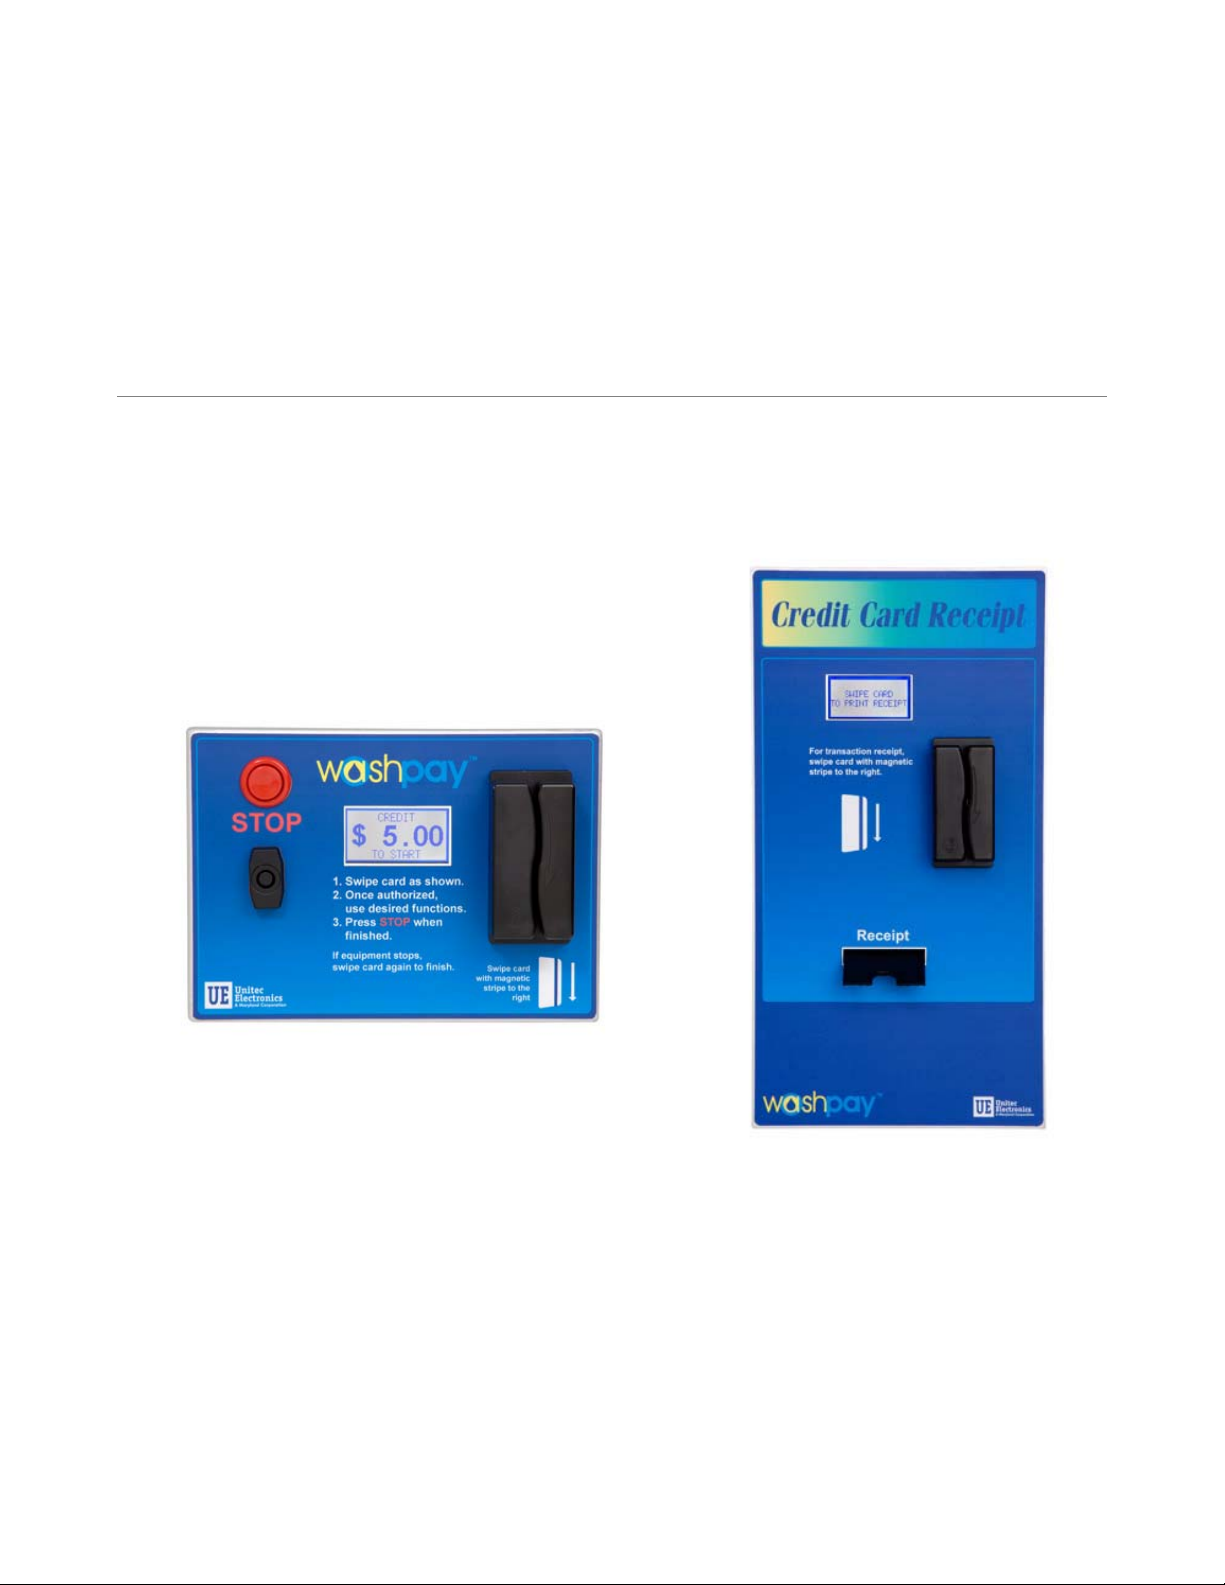
• WashPay Card Terminal: The card terminal allows the wash to accept major credit cards in
the self-serve bays. Multiple purchases by a customer may be combined in to one transaction,
minimizing credit card transaction fees to the site owner. Customers may also purchase
house accounts using VIP Wash Pass™ cards. The Card Terminal stores transaction data
locally and sends all transaction data to the Site Server.
• Receipt Printer (optional): The receipt printer provides the customer with a credit card receipt
for services rendered.
If you have a Wash Select II with WashPay integration, you will only have the Sierra Site Controller
installed.
1Document Number: WP1010 1
Document Title: WashPay Owners Manual
Page 9
WASHPAY
1.1 System Management
The Sierra Management Application is used for programming the system operating parameters,
viewing and printing reports, and managing house accounts and car wash promotions. The Sierra
Site Controller Installation Manual provides guidelines for connecting a PC t o the local site networ k.
To access the management application, type the following into t he address bar:
http://XXX.XXX.XXX.XXX:9810/web (where XXX equals your site IP address).
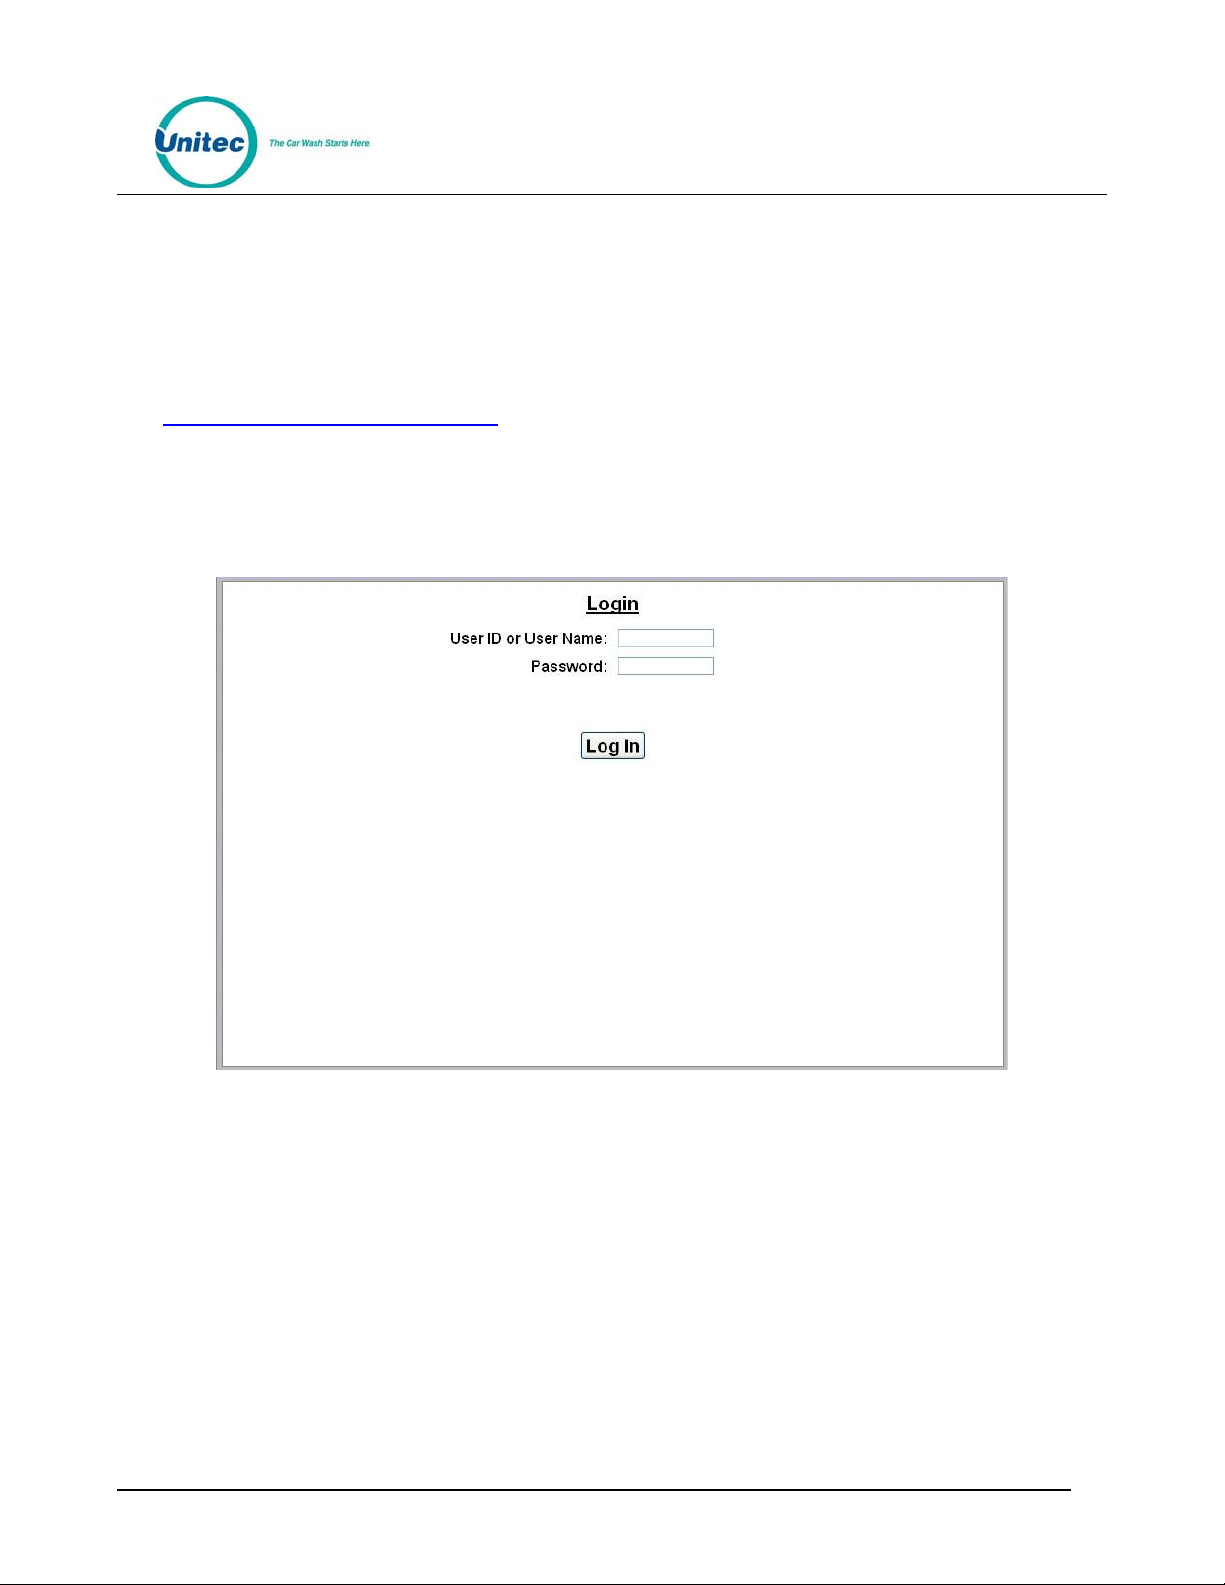
When a connection to the Sierra server is established, the log-in page should appear (as shown
below). At initial startup, you will use the administrative (ADMIN) user account (user ID 00, password
00). (Note: The factory default passwords for all User Accounts should be changed to secure access
to sensitive functions. Instructions for changing passwords is provided in the Sierra Management
Application Programming Manual).
Figure 1. Login Screen
Document Number: WP1010
Document Title: WashPay Owners Manual
Page 10
WASHPAY
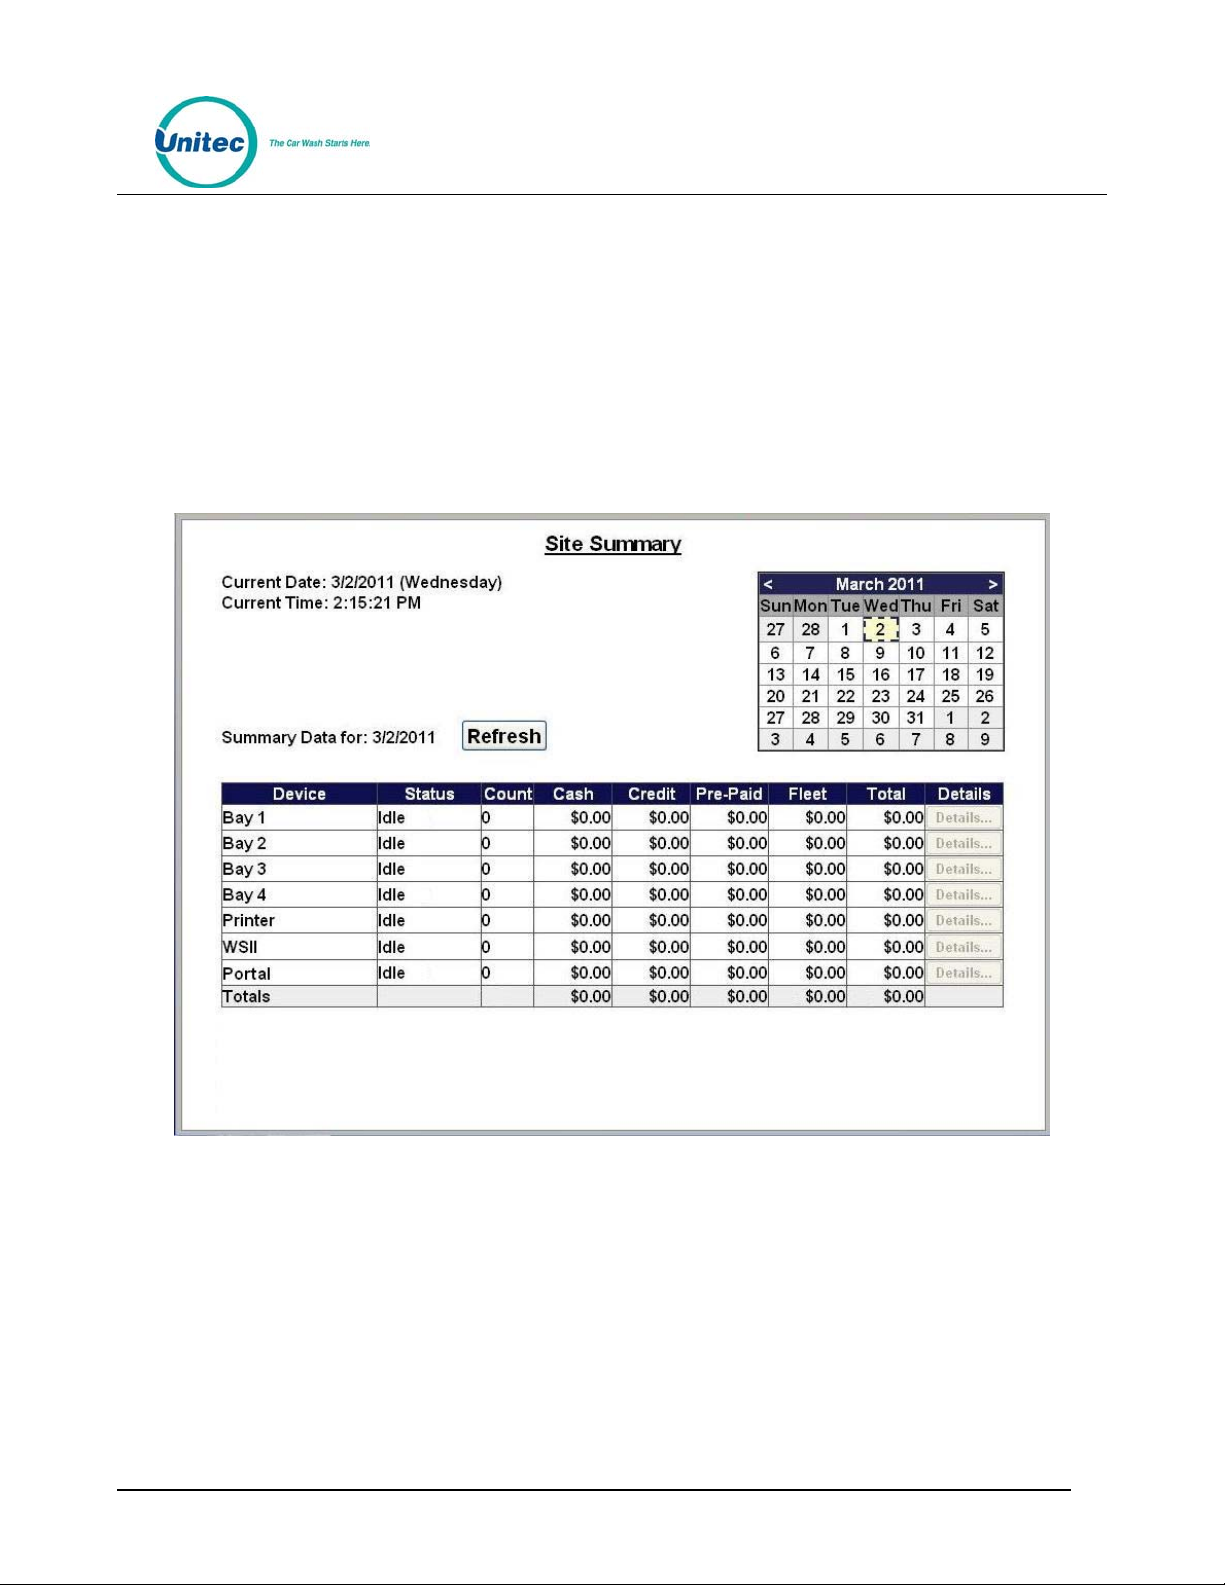
Upon successful log-in, the Summary page of the management application will appear. This page
displays a list of devices present on the local network with a count of washes provided and
associated revenue for the current day. Car counts and revenu e resu lts from previous day s can be
viewed by selecting the desired date in the calendar. The current day data can be updated by
selecting the Refresh button. The management functions are shown acr oss the top of the page. A s
each function is selected, a secondary menu of related options will appear on the left hand side of
the page.
Figure 2. Site Summary Screen
Document Number: WP1010
Document Title: WashPay Owners Manual
Page 11

WASHPAY
2 Sierra Site Controller Setup
The Set-up functions are used to program the Sierra site controller’s operational settings and for
managing system users. Sierra programming should be performed during installation by your Unitec
distributor, but there are some settings that an equipment owner may wish to change, periodically.
This section of the manual describes the programmable features that are available. For specific
details on using these features, see the Sierra Management Application Programming Manual on the
manufacturer’s website:
2.1 General Site Information
Site information should be set during installation and would not typically need to be changed. The
programmable features under site information include the site name and ID (as shown on reports and
notifications), credit card account set-up, and pre-authorization or hot file configuration.
2.2 Product Programming
A self-serve wash would only need one product to be setup. The product settings will need to be set
up by the installing distributor, but the equipment owner may need to access these settings to change
prices.
www.StartwithUnitec.com.
2.3 Card Terminal Programming
The card terminal’s configuration is programmed by creating a ‘device profile’ and then downloading
the profile to the card terminals. Whenever a change is made to the device profile, the associated
card terminals will need to be downloaded with the revised profile to implement the changes. The
device profile configuration file includes a series of set-up pages, which are described in the following
sections.
2.3.1 General Information
The Edit Profile Information page is used to program some general operational settings of the
WashPay system including:
• Initial Price
• Initial Swipe Amount
• Additional Swipe Amount
• Credit Drive Off Limit
2.3.2 Product Dispensing
The product dispensing page is used to assign the timer operational mode, and set the turn on
delay and grace times. The self-serve product must be set-up through the Products page before it
can be assigned to a device profile. This feature will typically not be changed after installation.
4Document Number: WP1010 4
Document Title: WashPay Owners Manual
Page 12

WASHPAY
2.3.3 Equipment Interface
The Equipment Interface Set-up page is used to configure the interface between the card terminal
and existing coin box and the pulses per coin or bill. These settings should only be changed by your
distributor.
2.3.4 User Interface Set-up
The User Interface set-up page is used to change messages displayed to customers and adju st ‘timewarning times for certain timer modes. This page is also used to customize the text on the screens,
that an operator may wish to adjust including the welcome message, thank you message, and stop
button message.
2.4 Receipt Printer Setup
The receipt printer setup only requires a paynode name and header and footer text. The site operator
may change the receipt message text at any time.
2.5 Download Devices
Once the self-serve and receipt printer profiles have been configured, the device profile must be
downloaded. You may choose to download each device individually or download all devices at once.
The devices will reboot and come up in operational mode.
2.6 User Management
Unique User IDs and passwords should be set up for employees, service personnel or others that
may need access to the WashPay system. The User Set-up pages are used to create new user
accounts and to edit or delete an existing account. User privileges that can be assigned are arranged
in groups as follows:
• User Management – Allows the user to set-up and manage other user a ccounts.
• Device Set Up – Allows access to the device (profile) programming f unctions.
• Accounts and Promotions – Allows the user to set up and manage promotional programs
and house accounts.
• Reports – Allows the user to access the WashPay’s accounting reports
• Utilities – Allows the user to access system utilities including data logging and database
back-up functions.
Document Number: WP1010
Document Title: WashPay Owners Manual
Page 13

WASHPAY
3 Daily Operations
3.1 House Accounts
The accounts module is a product option that allows house a ccounts to be set up and managed in the
Sierra server application. Four account types are available: prepaid, subscription, and fleet accounts.
Accounts can be configured for redemption by a magnetic stripe card, numeric code or RFID tag. The
Accounts module also includes reports for tracking account status and usage. Management functions
will appear on the left side of the Accounts management page.
3.1.1 Prepaid Accounts
Prepaid accounts function as a gift card and can be configured with either a monetary value or a
number of prepaid washes (e.g. 5 wash pass). Revenue received from the sales and recharges of
prepaid accounts is shown in the Other Revenue section of the Site Revenue Report. Account uses
(or redemptions) are reported under the Prepaid column in the Net Sales section of the Revenue
Report.
The recommended method for issuing a prepaid account is to first create an Account Program
through the Programs option in the Accounts menu. Example programs would be a $50 gift card or 5
Express Wash pass. Once a program is established, individual accounts can be issued through the
Accounts option in the Accounts menu. Configuration options for prepa id accounts include:
• Schedule – restricts the account for u sage on certain days or during certa in hours
• Expiration – set an expiration date for the account
• Frequency limit – set a frequency limit for account usage (e.g., once per day, 3 times per
week, etc…)
You may reload the account without reentering all information, and the customer may also reload his
account at the C-Start. If the balance of the account is insufficient for the purchase, the customer will
be asked if they’d like to recharge the account. If they choose to do so, they’ll be prompted to add
payment and the account will be recharged for the amount that’s defined in the account p rogram. For
instance, if the account program is configured to provide (5) $10 washes for $40, the customer will be
charged $40 for the reload and 5 washes will be added to their account. One of those will be applied
to the current sale so the remai ning balance wil l be 4 washes. Please note that this feature will also
apply to ‘multi-wash’ codes.
3.1.2 Subscription Accounts
Subscription accounts are designed to support an ‘unlimited’ wash application. These accounts are
product-based accounts and are valid for a specific wash package. It should be noted, however, that
customers using a subscription account are able to add money to upgrade to a better wash if
Upgrades are enabled. As Sierra does not include a recurring billing application for subscription
account payment, the sale of a subscription account is not reported as revenue. Likewise,
redemptions against these accounts are not reported as revenue. Redemptions are included in the
Transaction Count in the summary section of the revenue report but are excluded from the Paid
Transactions count.
Document Number: WP1010
Document Title: WashPay Owners Manual
Page 14
WASHPAY
As with prepaid accounts, subscription accounts should be set up by first creating a subscription
account program (e.g. Gold, Silver, Bronze pass) than issuing individual accounts from the desired
program. Subscription accounts can also be configured to operate on a schedule and have expiration
dates and frequency limits.
3.1.3 Fleet Accounts
Fleet accounts are intended as a ‘house credit’ application where a business will be billed for usage.
Typical customers for fleet accounts include local law enforcement agencies and private businesses
with a number of vehicles in their fleet. Fleet accounts are set up directly from the Accounts menu
option and not from the Programs menu. Once a fleet account is set up for a business, cards, codes
or RFID tags may be activated and assigned to individual users (or vehicles).
Fleet accounts can be set up to restrict a user to a single product or to allow them to select any
available product. The feature also allows the car wash Operator to assign a discount (as a dollar
value or percentage) to the account. This discount will be applied in the Account Transaction report,
which serves as the fleet customer’s statement (for billing).
The fleet account set-up page also has a check box, which is used to identify the account as a
‘maintenance’ account. Maintenance accounts are intended to be used for car wash site employees,
service providers and others that may need to use the wash but are not paying customers. The use of
maintenance accounts is not accounted for in revenue calculations but these uses are counted in the
accounting and house account reports for tracking.
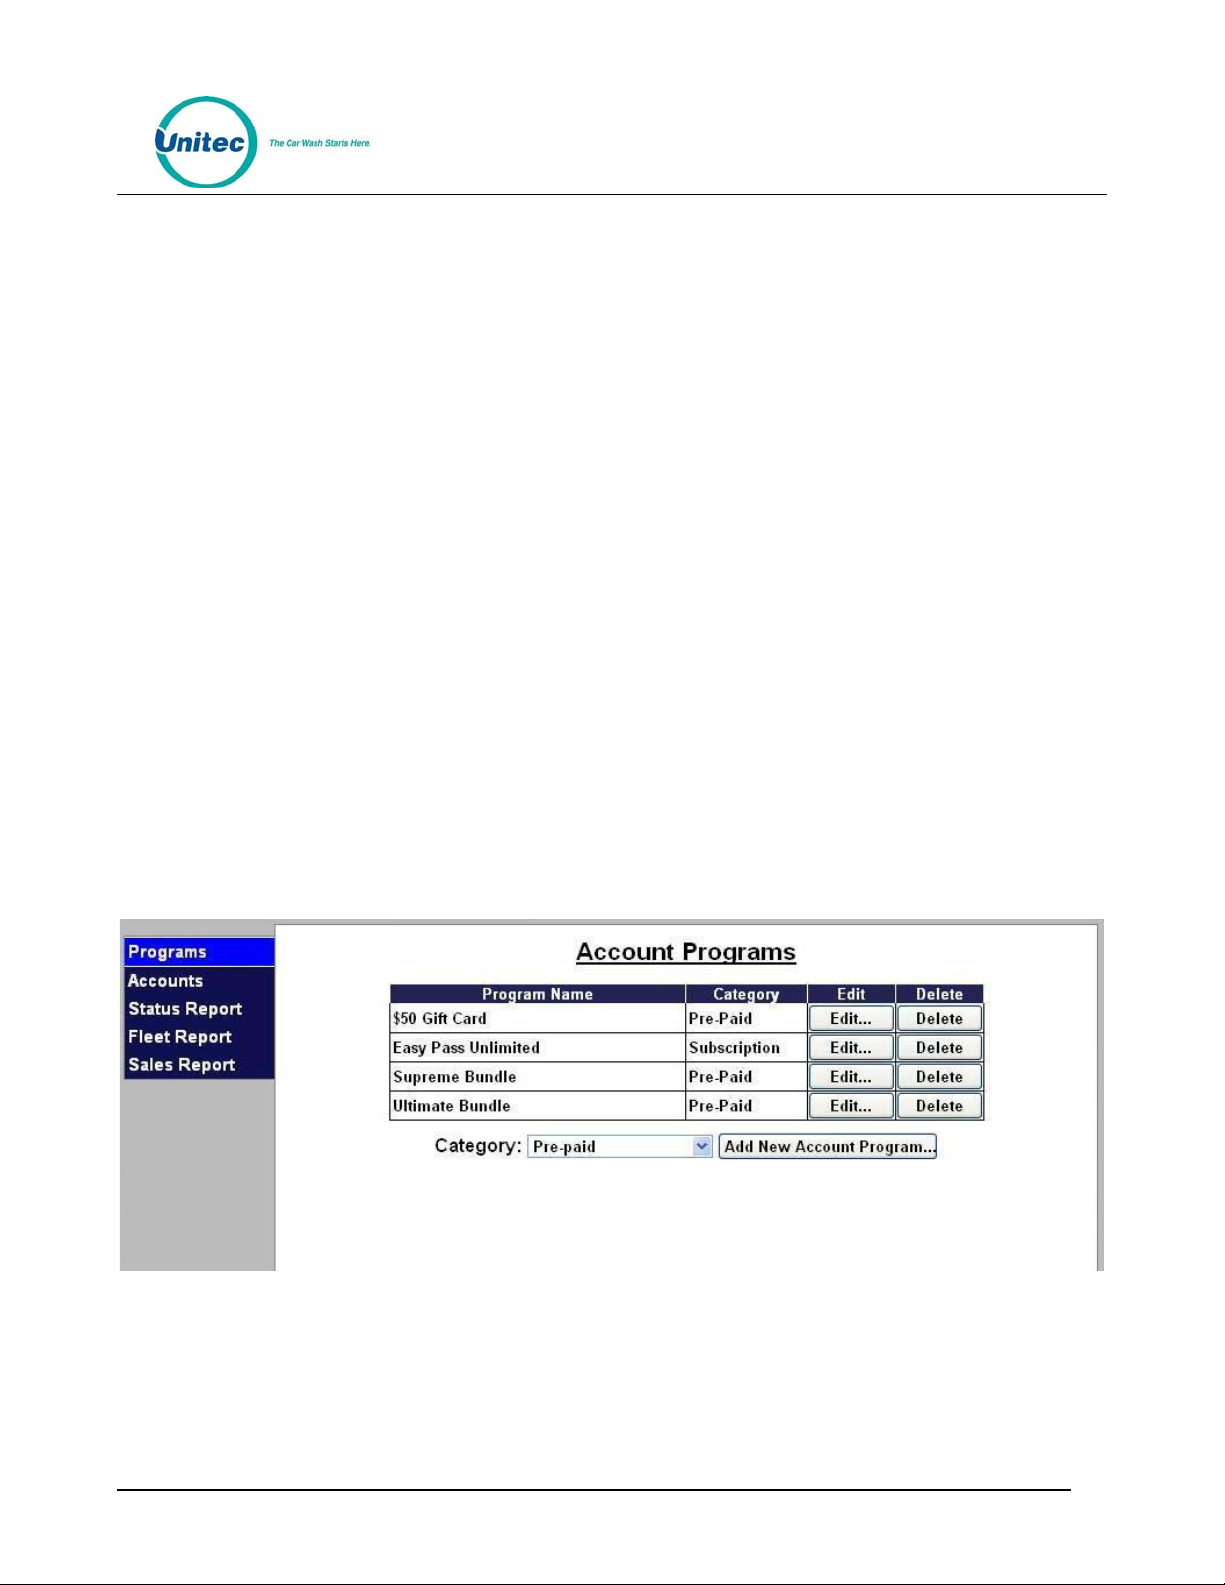
3.1.4 Account Programs
The account programs option is used to set-up standard products for pre-paid, Site Lynx pre-paid,
and subscription accounts (e.g. $50 gift card, 5 wash pass etc). Once the program is set-up the
‘Accounts’ option can be used to issue or edit an individual a ccount.
Figure 3. Account Program Screen
Document Number: WP1010
Document Title: WashPay Owners Manual
Page 15

WASHPAY
To setup a new account program, select from either Pre-paid, Subscription or Loyalty from the dropdown menu below the table and click Add New Account Program. The Edit Account screen will be
displayed. To edit an existing account program, click Edit next to that program.
Pre-Paid Account Program Setup
Figure 4. Pre-paid Account Program Edit Screen
1. Enter the name of the account program.
2. Select the type of account from the drop-down menu. A product-based account is useable
for only (1) wash product (which is selected from a drop down list). Monetary accounts can
be used for any wash. NOTE: Prepaid accounts can be monetary or product based;
subscription accounts are product based.
3. Enter the Issue Price (or selling price) that will be reported when a new account is issued
(or sold) and then enter the Value for which the account can be redeemed. This field is not
present on Subscription accounts.
4. You may limit the use and only allow a certain amount of washes per day, week, month or
year. To do this, click Limit Use and enter the amount of washes and the time increment
from the drop-down menu.
5. If you wish for the account to have an expiration date, click Enable, then enter the duration
of the account program. NOTE: This schedule runs in calendar months. The account will
expire on the last day of the month, not 30 days from the issue date.
6. If you wish to limit usage of the account to certain days and hours, click Enable under the
schedule block and enter the valid times and days of the week.
7. Click Save.
Document Number: WP1010
Document Title: WashPay Owners Manual
Page 16

WASHPAY
Subscription Account Program Setup
Figure 5. Subscription Account Program Edit Screen
1. Enter the name of the account program. Chose whether or not to force a receipt with each
transaction.
2. Select the product from the drop-down menu.
3. Enter the Issue Price (or selling price) that will be reported when a new account is issued
(or sold) and then enter the Value for which the account can be redeemed. This field is not
present on Subscription accounts.
4. If desired, enable and enter the recurring bill amount. This amount will show up on reports
ONLY. The entry unit WILL NOT automatically bill the customer, your credit processor wil.
5. You may limit the use and only allow a certain amount of washes per day, week, month or
year. To do this, click Limit Use and enter the amount of washes and the time increment
from the drop-down menu.
6. If you wish for the account to have an expiration date, click Enable, then enter the duration
of the account program. NOTE: This schedule runs in calendar months. The account will
expire on the last day of the month, not 30 days from the issue date.
7. If you wish to limit usage of the account to certain days and hours, click Enable under the
schedule block and enter the valid times and days of the week.
8. Click Save.
Document Number: WP1010
Document Title: WashPay Owners Manual
Page 17

WASHPAY
3.1.5 Accounts
When the accounts option is selected, a list of current accountholders will be displayed along with
search functions to find a specific account. To view details of an account, click Edit next to the
account. To setup a new account, select the account type from Fleet, Pre-paid or Subscription from
the drop-down menu below the table. For new Pre-paid or Subscription accounts, you may select a
Program from the additional drop-down menu.
3.1.5.1 Prepaid and Subscription Accounts
For prepaid and subscription accounts, it’s recommended that you first set up an account program,
then select the program from the drop down list. Select add new account.
Figure 6. Prepaid Account Edit Screen
The account set-up page will show values that were set-up for the account program but additional
data will need to be entered for the account holder as follow s:
• Last and First name of the Account holder. A mailing address can be entered if desired
by selecting the ‘details’ tab.
• Redemption method – select code, card or RFID (Subscription accounts only) from the
drop down menu.
• Number – Enter code, card number or RFID tag number.
3.1.5.2 Fleet Accounts
Fleet Accounts are set-up and managed directly through the ‘Accounts’ option (not the ‘Programs’
option). Account set-up is a 2-step process. The first step will be to set up and save the fleet business
Document Number: WP1010
Document Title: WashPay Owners Manual
Page 18

WASHPAY
account. The 2nd step will be to add users (drivers) under the account. From the main Accounts page
select Fleet as the account type and click the Add New Accou nt button.
Figure 7. Edit Fleet Account
To set-up the fleet account:
1. Enter the business name for the account in the Name field.
2. Select the account type as monetary or product based. For product accounts, the
associated wash product will need to be selected from the drop down list of available
products.
3. Enter the value of discount that should be applied to the fleet customer’s billing
statement. Discounts can be set for a dollar value or a percentag e.
4. Select ‘maintenance’ account if usage is not to be reported as revenue. NOTE: This
account feature would typically be used for service providers and employee s.
5. Select and enter usage limits, if desired.
6. If the account is only to be used during certain days or hours, enable and configure the
account schedule.
7. Select the Details button and enter the billing address for the account, if desired.
8. Click save to save the account and return to the account listing.
To add or edit Users under a fleet account, find the account name in the account list and select edit.
At the Account Edit page select the Users button. A list of current users will be displayed. Select the
Add User function to get to the Edit Account User screen.
Document Number: WP1010
Document Title: WashPay Owners Manual
Page 19

WASHPAY
Figure 8. Edit Account User
To add a new user,
1. Enter the first and last name of the account user
2. Select the redemption method (code, card or RFID Tag)
3. Enter the code, card number or RFID tag number for the user
4. Click Save.
3.1.6 Account Reports
Status Report
A sample status report is shown below. This report will list all accounts that are set up in the account
database with the following information:
• Account name and number
• Status – Shown as Active, Inactive (the account has been disabled by the car wash
operator), Expired, or Exhausted (prepaid account with no remaining balan ce).
• Date the account was originally opened
• Expiration date (if account is configured to expire)
• Remaining Balance – shown as $ value or number of uses, depending on the account
type)
Document Number: WP1010
Document Title: WashPay Owners Manual
Page 20

WASHPAY
• Total uses since account was opened (as $ value or number of uses, depending on the
account type)
Figure 9. Sample House Account Status Report
Listing Report
This report allows you to export a list of account holders in .csv format. The exported file includes the
account holder name and contact information, acco unt number, and enrollme nt date.
Fleet Report
The fleet report provides a list of all uses from one or more accounts over a user defined date range.
This report is used to generate a statement for fleet account billing. A sample fleet report is below.
The report shows a fleet application where the Police Department with multiple users is provided with
a $2 discount off of the ($11) Deluxe wash.
Document Number: WP1010
Document Title: WashPay Owners Manual
Page 21

WASHPAY
Figure 10. Sample House Account Fleet Report
The Fleet Report contains the following information for the spe cified time period:
• Name of the fleet account
• Dates of billing, when the payment is due, and the amount due
• The payment address
Document Number: WP1010
Document Title: WashPay Owners Manual
Page 22

Sales Report
WASHPAY
• User Name and Account Number (either card, code or RFID tag)
• Day the car wash was used
• The wash package that was purchased. Usually, a wash package is assigned to the
account in setup.
• Price of the wash package used. The price is totaled at the bottom of the column.
• Amount of discount that is applied to the account (if any). The discount if totaled at the
bottom of the column.
• Net amount due for each wash package used. The net amount is totaled at the bottom of
the column to show the total amount due for that billing period. This is the same amount
listed at the top of the report.
Document Number: WP1010
Document Title: WashPay Owners Manual
Page 23

WASHPAY
Figure 11. Account Sales Report
The account sales report provides a list of prepaid account sales and account reloads during a user
defined date range. A sample report is shown below.
• Account Name and Number
• Program – indicates whether an account program was used for this account.
• Date – day account was purchased.
• Sales type -- indicates whether the entry is for a new acco unt that was so ld (issued) or a r eload.
• Value – indicates the dollar amount or number of uses that were added to the account an d the
• Price -- indicates the amount due from the account holder.
• Employee ID – indicates the system user who issued or reloaded the accou nt.
Document Number: WP1010
Document Title: WashPay Owners Manual
Page 24

WASHPAY
3.2 Reports
The Reports function allows you to view accounting information and product usage, filtered by ranges
and dates you specify. When a report is generated, the associated dat a will appear on the screen wit h
Print and Save functions. By selecting the Print button, you can print a copy of the report at your local
printer. The Save function allows the report data to be saved in .CSV format so it can be viewed
and/or sorted in standard 3
• Revenue Report – Reports revenue at a summary level for a user-defined time period.
• Sales Report –Lists items that were sold (e.g. Washes, Added Services, Wash Codes
etc.) for a user-defined time period.
• Cash Report – Daily report of cash received and dispensed by the Wash Select II (if
applicable).
• Transaction History – Listing of transactions recorded at the unit for a user-defined
time period.
• Code Listing – Listing of wash codes (sold at a C-store POS or Pump) currently
stored in memory.
rd
party software applications (such as Microsoft Excel).
Document Number: WP1010
Document Title: WashPay Owners Manual
Page 25

WASHPAY
3.2.1 Site Revenue Report
Revenue reports can be generated for the current business day, previous day or for a user specified
date range. From the report view, the user can print a report copy or save an electronic version in
.CSV format. An example report is shown below with descriptions of the included data.
Sales Summary Sales
Washes Qty
Works 35 32 $105.00 $270.00 $375.00 $11.72
Supreme 44 41 $96.00 $290.00 $386.00 $9.41
Deluxe 28 27 $55.00 $150.00 $205.00 $7.59
Express 76 74 $118.00 $319.00 $437.00 $5.91
Total 183 174 $374.00 $1,029.00 $1,403.00 $8.06
Added Services
Tire Shine 4 4 $20.00 $0.00 $20.00
Rain-X 7 7 $21.00 $0.00 $21.00
Rain & Shine 12 12 $36.00 $0.00 $36.00
Total 23 23 $77.00 $0.00 $77.00 $0.44
Automatic Totals $451.00 $1,029.00 $1,480.00 $8.51
Self Serve
Hand Bay 29 25 $137.80 $0.00 $137.80 $5.51
Vaccum 18 18 $37.50 $0.00 $37.50 $2.08
Self Serve Totals 47 43 $175.30 0.00 175.30 $4.08
Car Wash Totals 206 197 $626.30 $1,029.00 $1,655.30
Code Sales Qty
Works 16 16 $190.00 $11.88
Supreme 22 22 $205.00 $9.32
Deluxe 37 37 $290.00 $7.84
Express 42 42 $252.00 $6.00
Code Totals 117 117 $937.00 $8.01
Account Sales Qty
$25 Gift 7 $175.00
5 Deluxe Card 3 $120.00
5 Express Card 4 $120.00
Total 14 $415.00
Accounts Reloads
5 Deluxe Card 8 $320.00
5 Express Card 5 $150.00
Total 13 $470.00
Site Totals Revenue
$2,448.30 $1,029.00 0.00
Tax Collected 38.55
Total payments $2,486.85 $1,029.00 0.00
Fundraisers Due ($7.00)
Net Revenue $2,479.85 $1,029.00 0.00
Paid Revenue Prepaid Total Net Avg
Paid Sales Average
Revenue
Prepaids Subscription
Figure 12. Sample Site Revenue Report
Document Number: WP1010
Document Title: WashPay Owners Manual
Page 26

WASHPAY
Sales Summary - Provides a wash count, breakdown of purchased and pre-paid transactions, and
average sales value. The prepaid column includes prepaid house accounts and 3
rd
party gift cards
(through Mercury Payment Systems).Added services and serf serve (if applicable) totals are also
displayed.
Average sales metrics are provided with and without discounts applied and the value of all discounts
is identified. This value includes promotions and any discounts provided to fleet customers.
Code Sales - Provides a breakdown of washes purchased from the pumps and registers.
Account Sales - Provides a breakdown of accounts offered on the sales screens
Account Reloads – Provides a breakdown of accounts that were re-purchased at the sales screen.
Site Totals – Displays the total of all revenue, pre-paid accounts, and subscription accounts ( if any).
Tax Collected – Displays the total taxes charged for credit purchases ( if required in your state).
Fundraisers Due - Identifies any amounts due from the use of fundraiser promotion type s.
Net Revenue - Identifies the net revenue, with taxes and fundraisers subtracted from the previous
sales totals.
3.2.2 Sales Report
The Sales report shows the products that were purchased in the reporting period. This report can be
generated for a specific payment device or for all devices on site. The available report periods are
current day, previous day or a user-specified date range. Sales reports can be printed or saved in
.CSV format. An example report is shown below with descriptions of the included data.
Document Number: WP1010
Document Title: WashPay Owners Manual
Page 27

WASHPAY
Figure 13. Sample Sales Report
Wash Activations - Provides a count of washes dispensed, broken down by wash type, and includes
washes dispensed using codes or maintenance accounts. The usage metric shows the percentage of
activations for each wash type. Self-serve wash packages are displayed by purchase type - cash,
credit, house account, or maintenance account.
Added Services - Provides a count of added services that were purchased, broken down by service
type. The usage metric shows the percentage of customers that selected the service.
Prepaid Upgrades – Provides a count of and dollar amount earned for upgrades purchased with a
wash package. The usage metric shows the percentage of activations for each wash type.
Document Number: WP1010
Document Title: WashPay Owners Manual
Page 28

WASHPAY
Code Sales – Provides a count of code sales and is displayed by POS device – pump, c-store
register, or remote console. The usage metric shows the percentage of activations for each wash
type.
Payments - Provides a list of payment methods used with the percentage of use (base d on $ value).
3.2.3 Cash Report
The cash report provides details on cash, coupons and tokens that were received and dispensed
during the business day. The report can be generated for the current day (as a real time snapshot) or
for any previous day. An example report is shown below with descriptions of the included data.
Document Number: WP1010
Document Title: WashPay Owners Manual
Page 29

WASHPAY
Figure 14. Sample Cash Report
The top section displays the cash adjustments record that is generated when an employee uses the
cash removal or deposit functions (from the Maintenance functions) to restock change devices or
remove cash from a cash acceptor or dispensing device. The adjustment record shows the date and
time of the event, the user ID of the employee that performed the adjustment, and lists the amount of
Document Number: WP1010
Document Title: WashPay Owners Manual
Page 30

WASHPAY
cash that was added or removed. The total amount of cash that was added and removed through
these adjustments should match the associated entries in the Cash Summary section.
The bottom of the report displays the cash information for each device.
Cash Summary - Shows starting and ending balance of all cash in the unit (in both bill and coin
acceptors and change dispensing devices). The amount of cash that was collected from customers is
shown in the Cash Received entry. The Cash Added entry is the amount of cash that was added to
restock change dispensers. The Cash Removed entry is the amount of cash that was removed from
any of the cash devices (cash acceptors or change dispensers). If the Cash Added or Removed
amounts are not zero, there should be a cash adjustment entry at the end of t he report tha t provides a
record of related events.
Cash Received - Provides a count and value of all cash received from customers, broken down by
type and denomination.
Other Receipts - Provides a count of non-cash media (coupons, tokens) received from customers.
Change Dispensed - Provides a count and value of all change dispensed to customers, broken
down by type and denomination.
Other Dispensed – Provides a count of tokens dispensed (if applicable).
3.2.4 Transaction Report
The transaction report provides a list of all transactions that were recorded over the reporting period.
Reports can be generated for the current business day, previous day or for a user-specified date
range. Additional filters are provided to refine reports include:
• Devices – show transactions for a single payment device on the site.
• Products – show transactions where a specific product (wash or added service) was
purchased.
• Payment Type – show transactions where a specific payment type (cash, credit, house
account etc.) was used. Additional filters are provided for some payment types to further
refine the report to a specific account or account type.
An example report is shown below. The date, time, amount, device, product and any discounts
applied are listed for each purchase. The payment column displays the specific payment types used.
This column will show ‘Multiple’ for a transaction that included multiple payment types (i.e., split
tender). The Account Name column (if applicable) will list the account holder’s name for transactions
that were paid with a house account. The Account column will display either the last four numbers of
the credit card used or the house account used. The Transaction status will be shown as processed
(transaction was completed), cancelled (customer cancelled the transaction before it could be
completed), or pending (transaction was started was not completed, still in process).
Document Number: WP1010
Document Title: WashPay Owners Manual
Page 31

WASHPAY
Figure 15. Sample Transaction Report
When the transaction report is viewed, a “details” link will be displayed for each record. By clicking on
this link, the user can view and print a more detailed record of the transaction. An example of this
detailed view is shown below.
Document Number: WP1010
Document Title: WashPay Owners Manual
Page 32

WASHPAY
Figure 16. Sample Transaction Details
3.2.5 Code Listing Report
The code listing report is applicable to sites that use the optional POS interface or console for wash
code sales. It can be used to check the status of a specific code by entering all or part of the code
number. To generate a complete list of wash codes in memory, leave the code field blank and select
the Run report button.
Figure 17. Sample Code Listing Report
Document Number: WP1010
Document Title: WashPay Owners Manual
Page 33

WASHPAY
The wash codes currently stored in memory are listed in chronological order. The code status will be
shown as Active, Used or Expired. The Expires column displays the date the code expires. The Issue
Date column displays the date the code was issued. The Redemption Date displays the date the code
was used if any. The Product column displays the wash package sold. The Source column will
indicate whether the code was sold from a console, C-store POS register or purchased at the pump.
For codes sold at the console, the ‘Issued by’ column will show the user ID of the attendant that
issued the code ticket. If more than 15 records are returned for the report query, use the page
navigation at the lower right corner of the table.
Document Number: WP1010
Document Title: WashPay Owners Manual
Page 34

WASHPAY
3.3 Sales
The Sales tab displays and functions as a Point of Sale console interface. This would be used with
Wash Select II integration You must first set up the Sales screen in the POS Interface in order for this
screen to be populated..
Figure 18. Sales Screen
The Sales screen function keys are color-coded. Washes are blue and reports are red. Account,
reloads, rewashes and the check and void code functions are teal.
Document Number: WP1010
Document Title: WashPay Owners Manual
Page 35

WASHPAY
To purchase a wash package, select one of the washes then click Pur chase.
Figure 19. Purchase Wash Package Screen
A code will be generated and displayed on the screen. You may then print the code from the POS
printer or from the print function of your PC.
Figure 20. Wash Purchased Screen
Document Number: WP1010
Document Title: WashPay Owners Manual
Page 36

WASHPAY
To purchase a new account, click on the account:
Figure 21. Account Purchase
1.
Select code or card.
2. Enter the account number.
3. Enter the account holder’s name.
4. Click Purchase to finalize the account purchase.
Document Number: WP1010
Document Title: WashPay Owners Manual
Page 37

WASHPAY
To reload an account, click Reload and enter the account number.
Figure 22. Reload Account Screen
Ensure the account holder’s information is correct, then click Re load.
Figure 23. Reloaded Account Screen
Document Number: WP1010
Document Title: WashPay Owners Manual
Page 38

WASHPAY
To issue a rewash code, click Rewash then select the wash to issue the code:
Figure 24. Rewash Selection Screen
Figure 25. Rewash Code Issued Screen
Document Number: WP1010
Document Title: WashPay Owners Manual
Page 39

WASHPAY
To print a report, select the report type. If you would like to select a date other than the current day,
select Change Dates. You may select the current day, select the previou s day, or se lect a date range,
then click Done, then Print Report. NOTE: The Report functions on the Sales page are for console
users ONLY.
Figure 26. Report Date Selection Screen
Document Number: WP1010
Document Title: WashPay Owners Manual
Page 40

WASHPAY
4 Component Operation and Maintenance
This section of the manual describes the normal operating procedures and basic troubleshooting and
repair techniques for each of the system components. The following procedures are designed to
provide you with the hardware troubleshooting and service information you need in order to provide
your customers with the highest quality service possible.
When troubleshooting any issue, verify that the power supply is providing power to the affected
component.
Note:
Only trained technicians should perform maintenance or repair procedures.
4.1 Pay Node
A pay node is located in each Card Terminal and Receipt Printer. It consists of an LCD screen, a
circuit board, wiring, and a metal enclosure.
4.1.1 Running a Self Test
Use the Self Test card (that was supplied with the WashPay System) to run a test on the Card
Terminal Pay Node. Swipe the card once to enter the Self Test mode and swipe the car d again t o exit
Self Test. The Card Terminal will exit Self Test and restar t. The following da ta will be listed:
• STOP key – This test checks three outputs on the pay node:
o Bay Power – The second press will energize the Power Relay for 5 seconds.
o Coin Power – the third press will energize the Coin Acceptor Power Relay.
o The next press will repeat the cycle.
Note: When running this test, the Coin Acceptor Power Relay will be de-energized when the Bay
Power test is active. The Coin and Bill Acceptors will be disabled, if they are powered through this
relay. To re-enable the Coin and Bill Acceptors, either exit and re-enter the Self Test, or press the
STOP button until the Coin Power test is active.
• Input 1 – The number of pulses generated by the device connected to the Coin 1 input will be
displayed along with the pulse width of the last pulse. The pulse width displayed will be the
pulse width that the pay node sees. It will be different from the actual pulse width generated
by the acceptor because of the time delay associated with the input circuitry of the pay node.
Note: The pulse count is a two-digit cumulative counter. After reaching 99, the next pulse will
reset the counter back to 00.
• Input 2 – The number of pulses generated by the device connected to the Coin 2 input will be
displayed along with the pulse width of the last pulse. The pulse width displayed will be the
pulse width that the pay node sees. It will be different from the actual pulse width generated
by the acceptor because of the time delay associated with the input circuitry of the pay node.
Document Number: WP1010
Document Title: WashPay Owners Manual
Page 41

WASHPAY
Note: The pulse count is a two-digit cumulative counter. After reaching 99, the next pulse will
reset the counter back to 00.
• Track 1 – When a card other than the Self Test card is swiped, this test will display GOOD if
the Track 1 data was read correctly and BAD if it was not.
• Track 2 - When a card other than the Self Test card is swiped, this test will display GOOD if
the Track 2 data was read correctly and BAD if it was not.
4.1.2 Display Status
Use the Display Status card to display valuable debug information on the paynode’s LCD screen. Th e
information will be shown for 30 seconds before the paynode re turns to normal operatio n.
4.1.3 Reset Capture Memory
A Reset Capture Memory swipe card was supplied with the WashPay system. Swiping this card in the
Card Terminal will erase all transaction data that has been stored locally in t he Card Terminal.
4.2 Card Reader
The card reader is installed on the front of the Card Terminal and requires the following maintenance.
4.2.1 Cleaning the Card Reader
The internal card reader sensing devices accumulate dirt over time. As this happens, the credit card
reader acceptance rate will begin to decline.
It is best to clean your card reader using card reader cleaning cards. These cleaner cards may be
purchased directly from your distributor or from the manufacturer of the cleaner cards. The cleaner
cards are Unitec stock #MS2031 and can also be purchased from Clean Team by calling 1-800-888-
8830.
4.2.2 Troubleshooting the Card Reader
The magnetic card reader typically reads both tracks 1 and 2. In nearly all card formats, the important
data is on track 2. Major credit cards encode the customer’s name on track 1. In the eve nt that track 1
is not read for a credit card, the transaction should still go through but the WashPay will not capture
the customer’s name. Use the Paynode Self Test card to see if tracks 1 and 2 on a credit card are
reading properly.
Document Number: WP1010
Document Title: WashPay Owners Manual
Page 42

WASHPAY
4.3 Networking Components
The Router provides connectivity from the C-store and office system components to the WashPay.
The C-Store Interface Router/Hub connects the WashPay to the following components:
1. Print Server – This component allows the connection of a stand-alone printer that can
be accessed by the other components connected to the Router.
2. Sierra Site controller – An additional port provides the ability to connect an Ethernet-
capable PC to the system, allowing direct access to the WashPay system data.
3. WAN Modem – By connecting the Router to a WAN modem, you can access the
WashPay through the Internet.
4.3.1 Router
The Router provides network connections for each of the devices in the Local Area Network (LAN).
Unitec provides and supports a four-port router. If you require additional ports, you can purchase our
networking kit and use it to expand the network. When troubleshooting the router, refer to the
documentation received with the router.
Document Number: WP1010
Document Title: WashPay Owners Manual
Page 43

WASHPAY
4.4 Thermal Printer
Figure 27. Thermal Printer
The following sections contain information and p rocedures important for peak operat ing performance.
1. Replacing the Printer Paper
2. Clearing a Paper Jam
3. Manually Printing a Self-Test
4.4.1 Replacing the Printer Paper
Replace printer paper when you see a red mark running down the side of the receipt or the unit is
reporting Paper low.
1. Open the rear door of the printer enclosure.
Document Number: WP1010
Document Title: WashPay Owners Manual
Page 44

WASHPAY
2. Insert the new paper roll on the paper carriage at the bottom of the printer. The paper roll
should be oriented such that the end of the paper is at the top of the roll. The paper will
automatically feed into the printer when the power is on.
3. Close the rear door of the printer enclosure.
4.4.2 Clearing a Paper Jam
Follow the steps below to clear a paper jam.
1. Open the printer assembly.
2. Locate the blue locking arms on the sides of the printer assembly, pull them out and
remove the main printer assembly by lifting it up and out.
3. Locate and remove the paper jam.
4. Once the jam has been dislodged, replace the main printer assembly and relock the blue
locking arms.
5. Feed the paper into the slot marked “Paper Insert.”
6. Test the printer.
4.4.3 Manually Printing a Self-Test
The printer can print a test page by swiping the special Print Test Page card that was supplied
with the WashPay system.
Document Number: WP1010
Document Title: WashPay Owners Manual
Page 45

WASHPAY
Appendix A – Notifications
Notification Options
Notifications can be provided to Users by email only. The table below outlines characteristics of each
media and how the Notification will differ between them.
User Notification Description
Notification Type Use Notification Details
E-mail (Requires
Broadband Internet
Connection)
Mail Accounts
Cell Phones with e-mail
capabilities
Uses SMTP to send text email to supported ISPs
and private e-mail access points. Sends a plain text
message indicating severity, equipment ID, site
and problem.
Wash Select II to WashPay Notifications
The following table lists the notifications the Wash Select II sends to the Sierra site controller, which
then contacts the site owner via email.
WSII Pager ID WSII Description WashPay Alert ID WashPay Alert
1 Hopper low 16 Peripheral low (10%)
2 Hopper empty 17 Peripheral empty
4 Wash out of
service
8 Printer paper 17 Peripheral empty
9 Printer power
error
10 Printer error 12 Peripheral error
4 Auto – Out Of Service
12 Peripheral error
11 Bill jam 13 Peripheral jammed
12 Bill stacker full 14 Peripheral full
13 Bill validator error 12 Peripheral error
14 Card reader error 12 Peripheral error
16 Wash fault 2 Fault -- Out Of Service
18 Wash in service 5 Auto – returned to service
20 Security alarm 25 Alarm activated
Document Number: WP1010
Document Title: WashPay Owners Manual
Page 46

WASHPAY
Document Number: WP1010
Document Title: WashPay Owners Manual
 Loading...