

Page 1
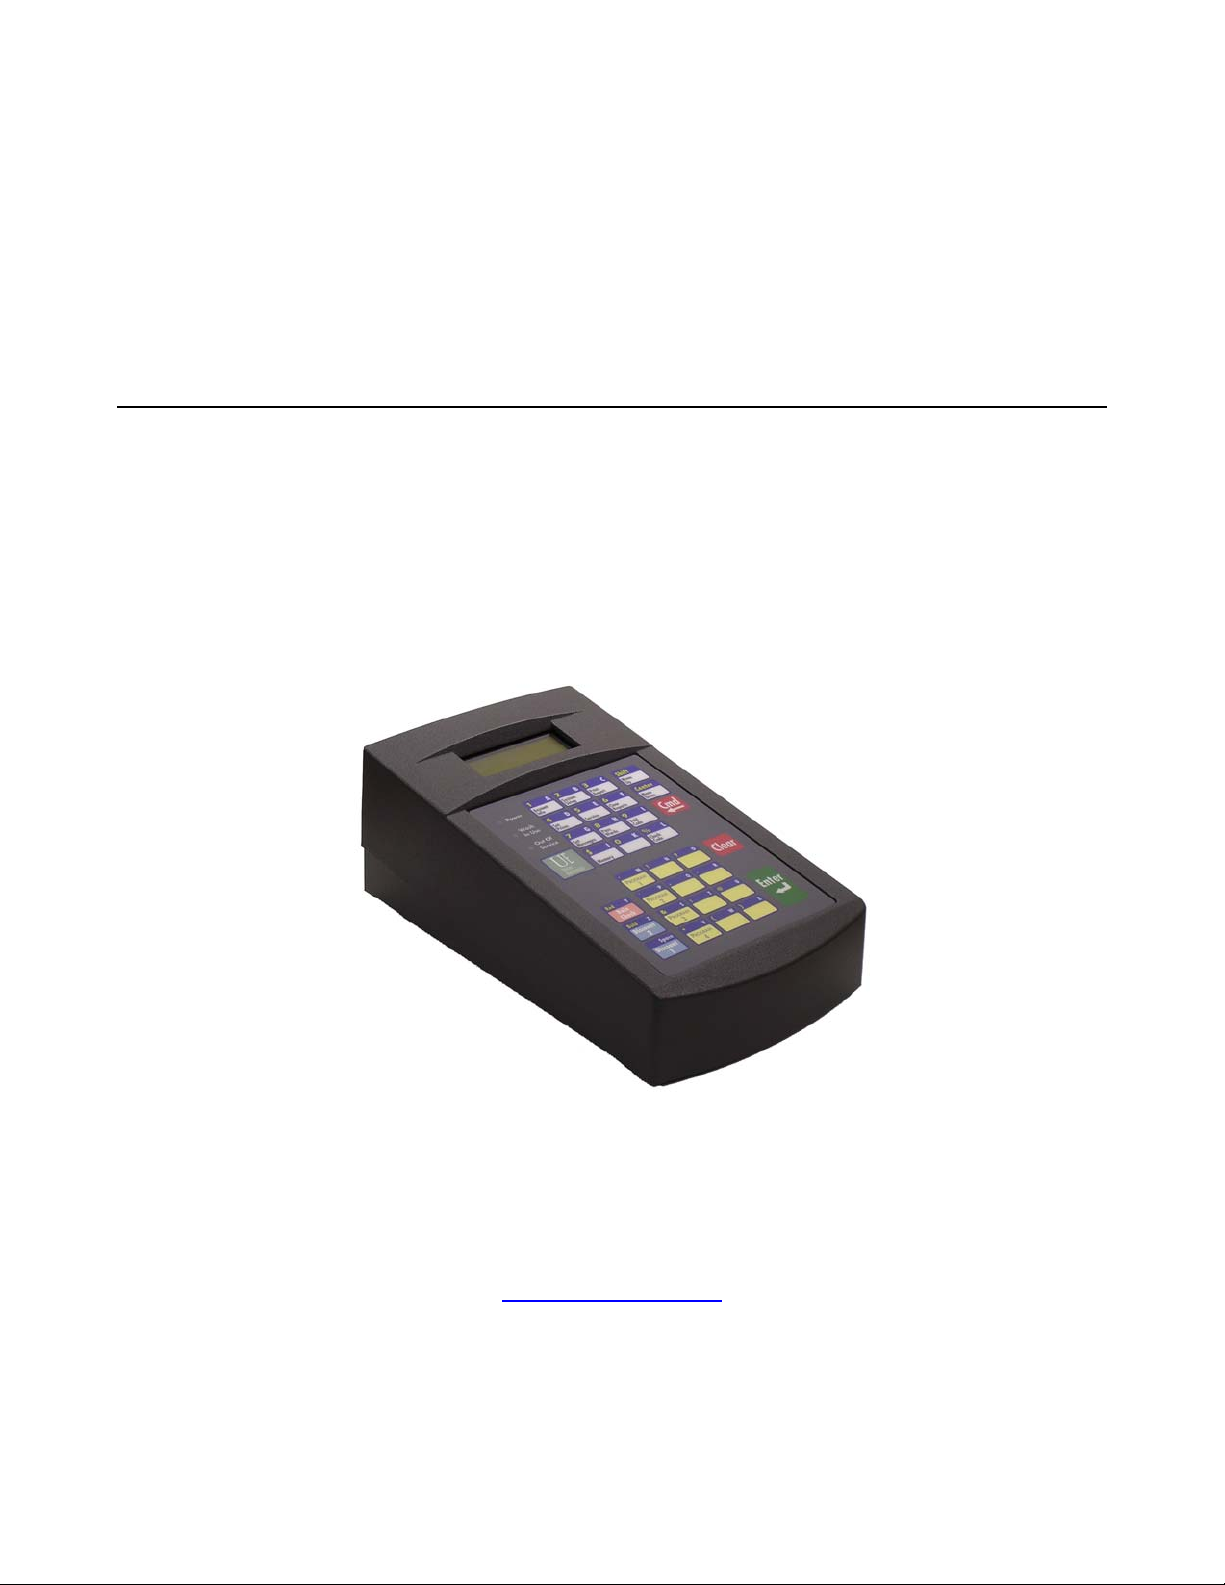
POS4000/V2-W ash Select II
Operations Manual
SOFTWARE VERSION
POS4000 8.25
Unitec
www.StartwithUnitec.com
443-561-1200
Page 2

POS4000
POS4000/V2-WASH SELECT II
OPERATIONS MANUAL
SOFTWARE VERSION 8.25
This document provides comprehensive operational procedures for the POS4000 Carwash
Marketing System. In this manual, we will discuss the installation and operations of the
POS4000, along with cashier and management operations.
If further assistance is needed, please contact the distributor from which the product was
purchased.
When calling for assistance, you must have the following information available:
POS4000 Serial Number:
Distributor Name:
COPYRIGHT
© 2010 Unitec, Incorporated. All rights reserved. No part of this book, including text, screen
examples, diagrams, or icons, may be reproduced or transmitted in any form, by any means
(electronic, photocopying, recording, or otherwise) without prior written permission of Unitec,
Incorporated.
TRADEMARKS
Wash Select II, POS4000, Unitec, and the Unitec Logo are trademarks, service marks, or
registered trademarks of Unitec, Incorporated.
All other products, services, and company names are trademarks or registered trademarks of
their respective owners.
Document Number: POS4007
Document Title: POS4000/V2 WSII Operations Manual
Page 3

POS4000
Table of Contents
Quick Start Guide.............................................................................................1
Quick Reference Guide.........................................................................1
1 Overview..........................................................................................................................................1
1.1 Keypad Layout.......................................................................................................................2
1.2 Wash Select II POS System..................................................................................................3
2 Installation.......................................................................................................................................7
2.1 Pre-Installation Requirements ...............................................................................................7
2.2 Wiring.....................................................................................................................................8
2.2.1 Wiring Information for POS4000 Interface Board.........................................................................9
2.3 POS4000 Function Lines/Car Wash Features....................................................................11
2.4 Installing/Upgrading the EPROM Chip................................................................................12
3 Testing...........................................................................................................................................15
3.1 Console Testing...................................................................................................................15
3.2 Interface Board Testing .......................................................................................................15
3.2.1 Relay Test..................................................................................................................................17
3.2.2 Input Test...................................................................................................................................17
3.2.3 Keypad Test...............................................................................................................................18
4 Management Control (Command Reference)............................................................................21
4.1 System Configuration ..........................................................................................................22
4.1.1 Set System Time and Date........................................................................................................24
4.1.2 Configuring a Group...................................................................................................................24
4.1.3 Set Code Age Warning ..............................................................................................................25
4.1.4 Set Code Length........................................................................................................................26
4.1.5 Disable Cashier Keys.................................................................................................................26
4.1.6 Set Serial Baud Rate..................................................................................................................27
4.1.7 Set Languages...........................................................................................................................28
4.1.8 Set Program Relays...................................................................................................................28
4.1.9 Cash Upgrades (Options) Menu.................................................................................................29
4.1.10 External POS MENU->.............................................................................................................31
4.1.11 Multiple Unit MENU->...............................................................................................................36
4.1.12 Modem rings............................................................................................................................38
4.1.13 E-System setup MENU->.........................................................................................................38
4.1.14 Relay Latching .........................................................................................................................39
4.1.15 Relay Stacking.........................................................................................................................39
Document Number: POS4007 i
Document Title: POS4000/V2 WSII Operations Manual
Page 4

POS4000
4.2 Multi-Use Codes..................................................................................................................40
4.2.1 Requirements and Limitations....................................................................................................40
4.2.2 Template Programming On the POS4000 .................................................................................40
4.2.3 Selling a Multi-use Code on the External POS...........................................................................41
4.3 Fleet Account Management.................................................................................................41
4.3.1 Print Current Information of All Accounts...................................................................................42
4.3.2 Add an Account..........................................................................................................................42
4.3.3 Delete an Account......................................................................................................................44
4.3.4 Print Information on a Specific Account .....................................................................................44
4.3.5 Reset Number of Washes for an Existing Account.....................................................................44
4.3.6 Delete Empty Accounts..............................................................................................................45
4.4 Accounting Report...............................................................................................................45
4.4.1 POS4000 Accounting Report.....................................................................................................45
4.4.2 POS4000-WSII Accounting Report............................................................................................49
4.4.3 Print Accounting Report.............................................................................................................54
4.5 Set Prices.............................................................................................................................54
4.5.1 Set Regular or Discount Prices..................................................................................................55
4.5.2 Print Pricing Report....................................................................................................................56
4.5.3 Set Tax Rate..............................................................................................................................56
4.5.4 Enable TAX Round Off...............................................................................................................56
4.6 Service Routines..................................................................................................................57
4.6.1 System Configuration Report.....................................................................................................57
4.6.2 Link Test ....................................................................................................................................57
4.6.3 LED Test....................................................................................................................................58
4.6.4 Set Print To display (Non printer Mode).....................................................................................59
4.6.5 Display POS Diags.....................................................................................................................59
4.7 Clear Audit Counts...............................................................................................................59
4.8 Set Messages......................................................................................................................60
4.8.1 Change Header Message..........................................................................................................60
4.8.2 Change Postscript 1-5................................................................................................................61
4.8.3 Change Footer Message............................................................................................................62
4.8.4 Change Coinbox Messages (E-System 4000 Only)................................................................... 62
4.8.5 Print Current Message Configuration.........................................................................................63
4.9 Set Passwords.....................................................................................................................63
4.9.1 Change a Specific Password.....................................................................................................63
4.10 Void a Code......................................................................................................................64
4.11 Memory Information..........................................................................................................64
4.11.1 Print Valid Codes .....................................................................................................................65
4.11.2 Print Used Codes.....................................................................................................................65
Document Number: POS4007 ii
Document Title: POS4000/V2 WSII Operations Manual
Page 5

4.11.3 Clear ALL Valid Codes.............................................................................................................65
4.11.4 Clear ALL Used Codes ............................................................................................................66
4.11.5 Clear Old Codes.......................................................................................................................66
POS4000
4.12 Code Sales Lockout..........................................................................................................66
4.12.1 Lock Console Sales .................................................................................................................67
4.12.2 Change Lockout Password......................................................................................................67
4.13 Check Code Status...........................................................................................................67
4.14 Setup a Feature................................................................................................................68
4.14.1 Change Feature Name............................................................................................................. 68
4.14.2 Assign a Postscript Message to a Feature...............................................................................69
5 Cashier Operations ......................................................................................................................70
5.1 Issuing A Customer Ticket...................................................................................................70
5.2 Issuing Multiple Customer Tickets.......................................................................................71
5.3 Issuing A Rain check Receipt..............................................................................................71
5.4 Checking a Customer Code.................................................................................................71
5.5 Voiding a Customer Code....................................................................................................72
6 Customer Access .........................................................................................................................74
6.1 Cash Upgrades (Buy ups) at the Carwash Entrance ..........................................................74
6.1.1 BUYUP: Automatic By Price.......................................................................................................75
6.1.2 BUYUP: Audit-Selected-Options................................................................................................76
6.1.3 Buy up: Forced Selection (Available for E-systems 4000 only)..................................................76
6.2 Customer Stacking..............................................................................................................77
7 Printer Instructions ......................................................................................................................78
7.1 Instructions for Citizen Model CD-3535..............................................................................78
7.1.1 General Cautions.......................................................................................................................78
7.1.2 Setting and Removing the Printer Cover ....................................................................................79
7.1.3 Ribbon and Cassette Installation................................................................................................79
7.1.4 Loading and Changing the Paper...............................................................................................80
7.1.5 Actuating the Print Functions.....................................................................................................81
7.1.6 Alarm and Paper Near-End Detection........................................................................................81
7.1.7 DIP Switch Settings....................................................................................................................82
7.2 Instructions for Citizen Model CD-S500 ..............................................................................82
8 Backup Operations.......................................................................................................................84
8.1 Programming the Change-Codes Password.......................................................................85
8.2 Programming Backup Customer Codes..............................................................................85
8.3 Programming the Output Relays.........................................................................................86
9 Troubleshooting ...........................................................................................................................87
9.1 Printer Doesn't Print.............................................................................................................87
9.2 System Locked Up...............................................................................................................87
Document Number: POS4007 iii
Document Title: POS4000/V2 WSII Operations Manual
Page 6

POS4000
9.3 Customer Buzzer Failure.....................................................................................................87
9.4 Code Stacking Does Not Work............................................................................................88
9.5 "Enter Wash" Signal Does Not Work...................................................................................88
9.6 "Reenter Code" Signal Does Not Work ...............................................................................89
9.7 Bill, Coin or Audit Inputs Do Not Work.................................................................................89
9.8 Main Console Keys Do Not Work........................................................................................89
9.9 System Resets Each Time Power Is Turned On.................................................................89
9.10 Main Console Is "DEAD"...................................................................................................89
Appendix A. Interfacing to an External Point-of-Sale..................................................................92
Appendix B. Multiple Unit Configuration......................................................................................98
Appendix C. Reconciliation of Sales When Connected to an EXTPOS Device.......................101
Appendix D. Changing the Wash Description Insert Pocket on Version 2 Style Cases........103
Appendix E. Application Notes for Using Default Discounts Function ...................................104
Appendix F. Application Notes fo r Using the Reverse Order Function...................................106
Document Number: POS4007 iv
Document Title: POS4000/V2 WSII Operations Manual
Page 7

POS4000
Index of Figures
Figure 1. POS4000 Keypad.............................................................................................................2
Figure 2. POS4000 Connections.....................................................................................................8
Figure 3. POS EPROM Location ...................................................................................................13
Figure 4. EPROM and Socket........................................................................................................14
Figure 5. Setting and Removing the Printer Cover........................................................................79
Figure 6. Installing the Printer Ribbon and Cassette.....................................................................80
Figure 7. Loading the Printer Paper...............................................................................................81
Index of Tables
Table 1. POS4000-WSII Connections ............................................................................................. 4
Table 2. Connector-Pin Communications Link to POS4000 Console.............................................9
Table 3. Connections to Carwash Controller................................................................................... 9
Table 4. Connections to Customer Entry system...........................................................................10
Table 5. Power and Audit Connections..........................................................................................10
Table 6. Function Lines.................................................................................................................. 11
Table 7. Interface Board DIP Switch Setting for Test Mode..........................................................15
Table 8. Interface Board DIP Switch Setting for Normal Operations.............................................15
Table 9. Interface Board Tests.......................................................................................................15
Table 10. Relay Continuity Check for Common and Output Connectors......................................17
Table 11. Interface Board Connector Pins.....................................................................................18
Table 12. Key Continuity Check.....................................................................................................19
Table 13. E-System Dispense Mode ............................................................................................. 31
Table 14. Setting Up Multi-Use Code Feature...............................................................................40
Table 15. POS4000/WSII Accounting Report Cross Reference....................................................52
Table 16. Printer DIP Switch Settings............................................................................................82
Table 17. Citizen CDS500 Printer Settings....................................................................................82
Table 18. Password Types.............................................................................................................84
Table 19. Output Relays ................................................................................................................86
Document Number: POS4007 v
Document Title: POS4000/V2 WSII Operations Manual
Page 8

POS4000
[THIS PAGE INTENTIONALLY LEFT BLANK]
Document Number: POS4007 vi
Document Title: POS4000/V2 WSII Operations Manual
Page 9

POS4000
Quick Start Guide
(Pull Out Reference)
Document Number: POS4007 QSG-1
Document Title: POS4000/V2 WSII Operations Manual
Page 10

POS4000
[THIS PAGE INTENTIONALLY LEFT BLANK]
Document Number: POS4007 QSG-2
Document Title: POS4000/V2 WSII Operations Manual
Page 11
POS4000
The following commands are lists of steps that would typically be performed on a new
POS4000 prior to use. For further information, see Section 4, Management Operations.
SET DATE AND TIME
Example to set time to Monday 04:30PM on 05/06/93:
[CMD]
[SYSTEM SETUP]
[3] (password 3)
[ENTER]
[MENU UP/DOWN] until "Set System Time" is displayed
[ENTER]
[0][5][0][6][9][3][1][6][3][0]
[ENTER]
[2] (Monday)
[ENTER]
NAME WASH FEATURES
Example to change the name of feature 1 to "ECONO-WASH":
[CMD]
[FEATURE 1] (cashier key)
[1] (password 1)
[MENU UP/DOWN] until "Change Wash Name" appears
[ENTER]
[E][C][O][N][O][-][W][A][S][H]
[ENTER]
To type [-] you must press [SHIFT] to switch to upper characters then [-] (on the [R]
key) then [SHIFT] again to return to the lower characters).
Note:
CONFIGURE GROUPS (Not used in all configurations)
Example to set Group 3 to Program 1 and options 1, 2 & 4:
[CMD]
[SYSTEM SETUP]
[3] (password 3)
[ENTER]
[MENU UP/DOWN] until "Configure a Group" is displayed
[ENTER]
[3] (select group #3 to configure)
[ENTER]
[Prog 1] (select wash functions in group)
[Opt 1]
[Opt 2]
[Opt 4]
[ENTER]
Document Number: POS4007 QSG-3
Document Title: POS4000/V2 WSII Operations Manual
Page 12

POS4000
SET PRICING
Example to set regular (full) price structure:
[CMD]
[SET PRICES]
[2] (password 2)
[ENTER]
[MENU UP/DOWN] until "Set Regular Prices" appears
[ENTER]
[3][5][0] (set feature 1 full price to $3.50)
[ENTER]
[4][7][5] (set feature 2 full price to $4.75)
[ENTER]
∗ (continue through all features)
∗
[ENTER]
DISABLE UNUSED CASHIER KEYS
Example to disable PROGRAM 5:
[CMD]
[SYSTEM SETUP]
[3] (password 3)
[ENTER]
[MENU UP/DOWN] until "Disable Cashier Key" is displayed
[ENTER]
[Prog 5] (disable program 5)
[ENTER]
DEFINE HEADER MESSAGE
Example to change header message text:
[CMD]
[SET MESSAGES]
[1] (password 1)
[ENTER]
[MENU UP/DOWN] until "Change Header Msg." appears
[ENTER]
[9][9] (to change all lines of message)
[ENTER]
[T][H][I][S][ ][I][S][ ][A][ ][T][E][S][T]
[ENTER]
∗ (repeat for each line)
∗
∗
[ENTER]
Document Number: POS4007 QSG-4
Document Title: POS4000/V2 WSII Operations Manual
Page 13

POS4000
DEFINE POSTSCRIPT MESSAGES
Example to change Postscript message 1:
[CMD]
[Set Messages]
[1] (password 1)
[ENTER]
[MENU UP/DOWN] until "Change Postscript 1" appears
[ENTER]
[9][9] (to change all lines of message)
[ENTER]
[T][H][I][S][ ][I][S][ ][A][ ][T][E][S][T]
[ENTER]
∗ (repeat for each line)
∗
[ENTER]
ASSIGN POSTSCRIPT MESSAGES
Example to assign postscript message 3 to Opt 2 at all price levels:
[CMD]
[Opt 2] (cashier key)
[1] (password 1)
[ENTER]
[MENU UP/DOWN] until "Set Postscript All $" appears
[ENTER]
[3] (select postscript message 3)
[ENTER]
SET UP A FLEET ACCOUNT
Example to create a fleet account with code 1234560 valid for Program 1 +
Option 1 + Option 3:
[CMD]
[ACCOUNT INFO]
[2] (password 2)
[ENTER]
[MENU UP/DOWN] until "Add an Account" is displayed
[ENTER]
[A][B][C][ ][T][A][X][I][S] (ABC TAXIS)
[ENTER]
[1][2][3][4][5][6] (account code)
[ENTER]
[4][5] (the code is valid 45 times)
[ENTER]
Document Number: POS4007 QSG-5
Document Title: POS4000/V2 WSII Operations Manual
Page 14

POS4000
[3][5][0] ($3.50 value for each use of code)
[ENTER]
[Prog 1] (account feature selections)
[Opt 1]
[Opt 3]
[ENTER]
ISSUE AND CHECK WASH TYPES (see Section 5.1)
Examples for cashier-issued wash tickets:
Example: Full price P1 & O1
[Prog 1]
[Opt 1]
[ENTER]
Example: Full price-P2 & discount 1-O1
[Prog 2]
[DISC 1][Opt 1]
[ENTER]
Example: Discount 2-P2 & discount 2-O1 & discount 2-O2
[DISC 2][Prog 2]
[DISC 2][Opt 1]
[DISC 2][opt 2]
[ENTER]
CLEAR COUNTS
Example to clear AUDITOR level of counts:
[CMD]
[CLEAR REPORTS]
[MENU UP/DOWN] until "Clear Auditor Counts" appears
[ENTER]
[5] (password 5)
[ENTER]
Document Number: POS4007 QSG-6
Document Title: POS4000/V2 WSII Operations Manual
Page 15

POS4000
Quick R ef erence Guide
(Pull Out Reference)
Document Number: POS4007 1
Document Title: POS4000/V2 WSII Operations Manual
Page 16

POS4000
[THIS PAGE INTETNTIONALLY LEFT BLANK]
Document Number: POS4007 2
Document Title: POS4000/V2 WSII Operations Manual
Page 17

POS4000
The following examples demonstrate how to perform some of the most common
functions of the POS4000. For a complete list of commands, see Section 4.
CASHIER OPERATIONS
ISSUE A TICKET: (Code valid for Program 1 and Option 1)
[Prog 1]
[Opt 1]
[ENTER]
ISSUE MULTIPLE TICKETS: (print 5 tickets in this example)
[5] (key located on management keypad)
[Prog 1]
[Opt 1]
[ENTER]
ISSUE A RAINCHECK:
[RAIN CHECK]
CHECK A CODE: (check code 123450 in this example)
[CMD]
[CHECK CODE]
[1][2][3][4][5] (code to check, 0 is optional)
[ENTER]
VOID A CODE: (void code 123450 in this example)
[CMD]
[VOID CODE]
[1] (password 1)
[ENTER]
[1][2][3][4][5] (code to void, 0 is optional)
[ENTER]
PRINT ACCOUNTING REPORT: (but do not clear counts)
[CMD]
[PRINT REPORT]
[MENU UP/DOWN] (Scroll to Report Desired)
[ENTER] (report prints)
PRINT ACCOUNTING REPORT AND CLEAR COUNTERS:
[CMD]
[CLEAR REPORTS] (clear counters)
[MENU UP/DOWN] (Scroll to Report Desired)
[ENTER]
[1],[2] or [5] (passwords 1, 2 or 5 respectively)
[ENTER]
Document Number: POS4007 3
Document Title: POS4000/V2 WSII Operations Manual
Page 18

POS4000
MANAGEMENT OPERATIONS
SET TIME
Example to set time to 07:15AM on 05/22/93
[CMD]
[SYSTEM SETUP]
[3] (password 3)
[ENTER]
[MENU UP/DOWN] until "Set System Time" appears
[ENTER]
[0][5][2][2][9][3][0][7][1][5] (MMDDYYHHMM)
[ENTER]
[2] (for Monday)
[ENTER]
SET PRICING
Example to set full price pricing
[CMD]
[SET PRICES]
[2] (password 2)
[ENTER]
[MENU UP/DOWN] until "Set Regular Prices" appears
[ENTER]
[3][5][0] (set 1st function full price to $3.50)
[ENTER]
[4][7][5] (set 2nd function full price to $4.75)
[ENTER]
*
*
*
[ENTER]
CHANGE HEADER MESSAGE TEXT
[CMD]
[SET MESSAGES]
[1] (password 1)
[ENTER]
[MENU UP/DOWN] until "Set Header Message" appears
[ENTER]
[9][9] (to change all lines of message)
[ENTER]
[T][H][I][S][ ][I][S][ ][A][ ][T][E][S][T]
[ENTER]
* (Repeat for each line)
*
*
[ENTER]
Document Number: POS4007 4
Document Title: POS4000/V2 WSII Operations Manual
Page 19

POS4000
CHANGE FOOTER MESSAGE TEXT
[CMD]
[SET MESSAGES]
[1] (password 1)
[ENTER]
[MENU UP/DOWN] until "Set Footer Message" appears
[ENTER]
[9][9] (to change all lines of message)
[ENTER]
[T][H][I][S][ ][I][S][ ][A][ ][T][E][S][T]
[ENTER]
∗ (Repeat for each line)
∗
∗
[ENTER]
DEFINE POSTSCRIPT MESSAGE TEXT
[CMD]
[SET MESSAGES]
[1] (password 1)
[ENTER]
[MENU UP/DOWN] until "Set Postscript Message 1" appears
[ENTER]
[9][9] (to change all lines of message)
[ENTER]
[T][H][I][S][ ][I][S][ ][A][ ][T][E][S][T]
[ENTER]
∗ (Repeat for each line)
∗
∗
[ENTER]
ASSIGN POSTSCRIPT MESSAGES TO WASH FUNCTIONS
Example to assign postscript message 3 to print on tickets that contain Opt 2 at any
price level
[CMD]
[Opt 2]
[1] (password 1)
[ENTER]
[MENU UP/DOWN] until "Set Postscript # All $" appears
[ENTER]
[3] (select postscript message 3)
[ENTER]
Document Number: POS4007 5
Document Title: POS4000/V2 WSII Operations Manual
Page 20

POS4000
SYSTEM CONFIGURATION COMMANDS
CHANGE A PASSWORD
CHANGE CASHIER KEY NAME
Example to change Option 1 to Wax
CONFIGURING A GROUP WASH
Example to Configure Group 3 to be Program 1 and Options 1 & 4
Example to change password 1 to "123"
[CMD]
[PASSWORDS]
[3] (password 3)
[ENTER]
[MENU UP/DOWN] until "Change Password 1" appears
[ENTER]
[1][2][3] (new password)
[ENTER]
[CMD]
[OPT 1] (this is the cashier key to re-label)
[1] (password 1)
[ENTER]
[MENU UP/DOWN] until "Change Wash Name" appears
[ENTER]
[W][A][X]
[ENTER]
[CMD]
[SYSTEM SETUP]
[3] (password 3)
[ENTER]
[MENU UP/DOWN] until "Configure a Group" appears
[ENTER]
[3] (management keypad, select group #3 to configure)
[ENTER]
[Prog 1] (select wash functions in group)
[Opt 1]
[Opt 4]
[ENTER]
Document Number: POS4007 6
Document Title: POS4000/V2 WSII Operations Manual
Page 21

POS4000
FLEET ACCOUNT COMMANDS
ADD A FLEET ACCOUNT
LIST A FLEET ACCOUNT
DELETE A FLEET ACCOUNT
Example to delete account 1234560
Example to add account with code 1234560
[CMD]
[ACCOUNT INFO]
[2] (password 2)
[ENTER]
[MENU UP/DOWN] until "Add an Account" appears
[ENTER]
[A][B][C][ ][T][A][X][I][S] (account name)
[ENTER]
[1][2][3][4][5][6] (account code 123456)
[ENTER]
[4][5] (code is valid 45 times)
[ENTER]
[3][5][0] ($3.50 value for each use of code)
[ENTER]
[1] (Print receipt when account is used)
[ENTER]
[Prog 1] (account wash selection)
[Opt 1]
[Opt 3]
[ENTER]
[CMD]
[ACCOUNT INFO]
[2] (password 2)
[ENTER]
[MENU UP/DOWN] until "List an Account" appears
[ENTER]
[1][2][3][4][5] (enter account number)
[ENTER]
[CMD]
[ACCOUNT INFO]
[2] (password 2)
[ENTER]
[MENU UP/DOWN] until "Delete an Account" appears
[ENTER]
[1][2][3][4][5][6] (account to delete)
[ENTER]
Document Number: POS4007 7
Document Title: POS4000/V2 WSII Operations Manual
Page 22

POS4000
MODIFY A FLEET ACCOUNT
Example to reset # washes to 30 for account 123456
[CMD]
[ACCOUNT INFO]
[2] (password 2)
[ENTER]
[MENU UP/DOWN] until "Reset # of Washes" appears
[ENTER]
[1][2][3][4][5][6] (account code 123456)
[ENTER]
[3][0] (make account good for 30 washes)
[ENTER]
LIST OF COMMANDS
The primary commands and the required passwords are shown below along with
their secondary commands:
Primary/Secondary Command Key Label Password
Fleet Accounts Account Info 2
The following Fleet Account menu lists the menu commands
available with the stand alone POS4000/V2:
Print All Accounts
Add an Account
Delete an Account
Print 1 Account
Reset # of Washes
Delete Empty Accounts
When using the WSII and POS4000/V2 together (POS4000/V2 Software
Version 7.90 and higher and WSII Software Version 4.20 and higher), you
will see the following Fleet Account menu:
Add Account
Edit Account
Add to an Account
Delete Account
Print Account
Print All Accounts
Print Trans History
Delete All Empty
Erase All Accounts
Document Number: POS4007 8
Document Title: POS4000/V2 WSII Operations Manual
Page 23

POS4000
The procedures for using these commands are identical to the procedures
used at the WSII. Refer to the WSII POS Operations Manual “Fleet
Accounts and Coupons” section for more information on these commands.
System Configuration System Setup 3
Set System Time
Relay Latching
Relay Stacking
Configure a Group
Set Code Age Warning
Set Code Length
Disable Cashier Key
Set Serial Baud Rate
Set Languages
Set Program Relays
Cash Upgrades MENU->
Set BUYUP Mode
Set Coin/Bill Values
Set Dispense Value
Set Dispense Mode (E-4000 only)
External POS MENU->
Set POS Offset
Define EXT. POS Type
Set POS MAX WASHES
Multiple Unit MENU->
Set Unit Number
Controller/Remote
Set # Bays/Consoles
Prog Remote Consoles
Set modem rings
E-Systems Menu->
Enab/Disab Change (E-4000 only)
Enab/Disab Displays (E-4000 only)
Each sub-menu also contains an option to "Return to SETUP MENU"
Print Audit Counts Print Report None
Print Shift/Manager
Print Auditor/Non R.
Set Pricing Set Prices 2
Set Regular Prices
Set Discount 1 Price
Set Discount 2 Price
Print Pricing Report
Set Tax Rate
Document Number: POS4007 9
Document Title: POS4000/V2 WSII Operations Manual
Page 24

POS4000
Enable TAX Round Off
Service Routines Service 4
Print Configuration
Link Test
LED Test
Print (codes) to display
Display POS Diags
Clear Audit Counts Clear Reports
Clear Shift Counts 1
Clear Manger Counts 2
Clear Auditor Counts 5
Set Messages Set Messages 1
Change Header Msg.
Change Postscript 1
Change Postscript 2
Change Postscript 3
Change Postscript 4
Change Postscript 5
Change Footer Msg.
Change Coinbox Msg. (E-4000 only)
Print Message Config
Set Passwords Passwords 3
Change Password 1
Change Password 2
Change Password 3
Change Password 5
Change Serial Pass
Void a Code Void Code 1
Memory Information Memory 2
Print Valid Codes
Print Used Codes
Clear ALL Valid
Clear ALL Used
Clear Old Codes
Check Code Status Check Code None
Setup Feature CASHIER KEYS 1
Change Wash Name
Set Reg. Postscript
Set Dis 1 Postscript
Document Number: POS4007 10
Document Title: POS4000/V2 WSII Operations Manual
Page 25

POS4000
Set Dis 2 Postscript
Set Postscript All $
Summary of access provided by each password:
Password User Commands
Clear SHIFT level counters,
1 Cashier
2 Manager
Void codes, Define Messages,
Setup Features
Clear MANAGER level
counters, Fleet Accounts, Set
Pricing, Memory Information
3 Supervisor
4 Service Service Routines
5 Auditor Clear AUDITOR level counters
System Configuration, Change
Passwords
Document Number: POS4007 11
Document Title: POS4000/V2 WSII Operations Manual
Page 26

POS4000
[THIS OAGE INTENTIONALLY LEFT BLANK]
Document Number: POS4007 12
Document Title: POS4000/V2 WSII Operations Manual
Page 27

1 Overview
The POS4000 is a car wash access controller that provides both a merchandising tool and cash
security. The system consists of a main console, which is typically located near the cashier, and
the Wash Select II (WSII) entry system that is typically located at the entrance of the car wash.
The entry system can be part of a simple “Code Only” entrance stand or feature cash
acceptance as a “Coin Box”.
The main console allows cashiers and managers to generate customer access codes, g enerate
management reports and configure access control. These various functions are selected by
using the keys on the main console.
The customer interface electronics include:
• Relays used to control customer guidance lights and activate the car wash
• A keypad used by customers to enter access codes
• Optional coin and bill acceptor inputs (to allow customers to upgrade at the car wash
entrance)
• Optional change making capabilities
• An optional alphanumeric display used to prompt the customer
The configurations for the Customer Interface electronics vary by wash manufacturer. The
POS4000 provides functionality and commands to support a wide variety of the Carwash
professional’s needs. You may find that many of the functions and commands in the POS4000
will not apply to your particular installation.
Fleet accounts are used to provide a pre-defined number of washes to a customer. This feature
is useful in selling carwashes to organizations (i.e. police or fire departments), providing
carwashes to employees and giving discounts for purchasing multiple washes. Once a fleet
account has been established, the number of washes that it is valid for can be modified without
changing the other account information. All fleet account accounting is maintained by individual
account.
A unique carwash grouping feature allows the operator to merchandise individual carwash
functions as well as merchandising carwash packages with special pricing. A carwash group is
user definable and sold using a single key on the cashier keypad. For example, a WORKS
carwash could be merchandised to include a deluxe wash with all options. This package would
have a separate 3 tier pricing structure and separate accountability. Group functionality is not
supported by all entry system configurations, and is typically most usable in systems that don’t
allow cash acceptance at the customer entrance stand.
A very flexible carwash message structure is provided that enables one to provide the customer
with a variety of information. Custom header and footer messages can each be up to 10 lines
long and are printed on the top and bottom of every ticket.
In addition to the header and footer messages, five different postscript messages, each 5 lines
long, can be defined and assigned to specific carwash features at specific price levels. This
allows different messages to be printed on full priced and discounted tickets. This flexibility
allows you to advertise discounts to customers paying full price, allows full priced tickets to be
saved as coupons toward future purchases, allows you to thank customers who earned a
discount for purchasing the goods and services that enabled them to earn the discount, etc.
The operation of the system is somewhat dependent on the options present and configuration of
the unit. This information can be obtained by using the system configuration report command
(see Section
Document Number: POS4007 1
Document Title: POS4000/V2 WSII Installation and Operations Manual
4.1). However, general operations are very similar for all systems.
Page 28
POS4000
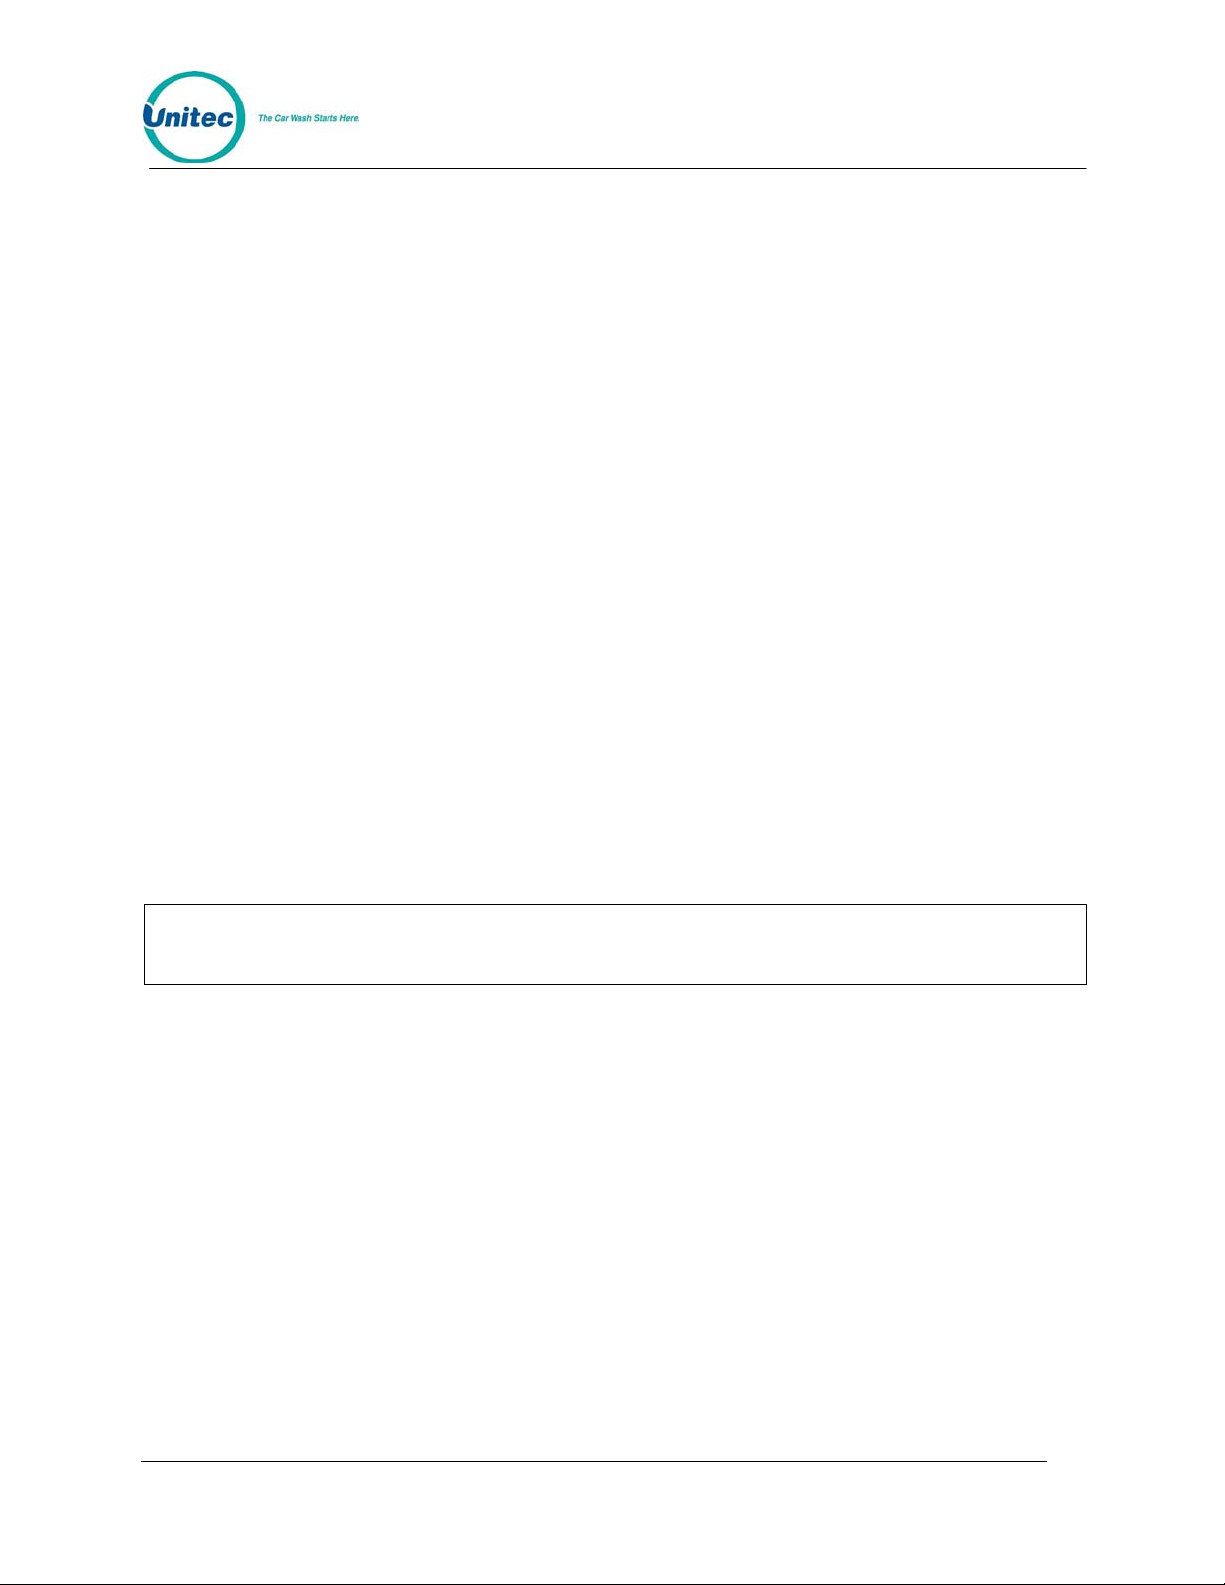
1.1 Keypad Layout
Figure 1. POS4000 Keypad
During various commands, you will be prompted to enter alphanumeric responses. To do this,
you must use the alternate characters printed on the right hand side of the keys. These alterna te
key values automatically become active when the console requires alphanumeric data entry.
Note that each alternate key has two characters printed on the t op and b otto m right han d side of
the key. When the console requests alphanumeric data, the bottom characters will initially be
active. You can switch back and forth between the top and bottom values by using the [SHIFT]
key.
Several special keys simplify alphanumeric data entry:
• [SHIFT] is used to toggle between the top and bottom selection on the alternated
keypad during alphanumeric data entry.
• [BACKSPACE] is used to erase the previous character.
• [CLEAR] has several uses depending upon what information the POS4000 is expecting.
During alphanumeric text entry (i.e. header message), it is used to erase the entire line
of data entered and to start the line over. During feature selection, it clears all current
features. During numeric entry (e.g. passwords), it clears the number and allows you to
re-enter it.
Document Number: POS4007 2
Document Title: POS4000/V2 WSII Operations Manual
Page 29

• [SPACE] is used to add a blank space in the text.
• [ENTER] is used to end the current line of text.
• [CENTER] will center the text entered. Press once during the text entry of the line to
center.
• [RED] is used to print the text in red. Press once during the text entry of the line to print
the entire line in red.
[RED] is an upper function, therefore it may be necessary to press [SHIFT] prior to
pressing this key.
• [BOLD] is used to print the text in Bold (double high and double wide). Press it once
during the text entry of the line to print in bold. When a line of text is printed in bold, only
half the number of characters of text can be used in that line.
[BOLD] is an upper function, therefore it may be necessary to press [SHIFT] prior to
pressing this key
POS4000
Note:
Pressing both [RED] and [BOLD] during text entry will print that line in bold red.
1.2 Wash Select II POS System
The Wash Select II may be configured to interface to a POS4000 in order to be activated by
Codes sold at one or multiple POS4000 units. This is how a Wash Select II/POS is configured to
operate. Any Wash Select II may also be upgraded in the field to interface to a POS4000 either
by direct wires or via RF (Radio Frequency) interface.
Upgrading a Wash Select II to interface to a POS4000 require s the following:
• Version 1.20 or greater software installed into the Wash Select II
• POS4000 with Version 7.20 or greater installed.
• Wash Select II 485 communications module. This plugs into the top left corner of
the Wash Select II CPU board.
• Cable to connect POS4000 to the Wash Select II 485 communications module
• RF transceivers (Optional if your cable connection between the POS4000 and
Wash Select II is not feasible)
The Wash Select II may be configured to convey accounting information to the POS4000 or to
withhold that financial information. If you are in a revenue share agreement, you may want to
withhold the information. If not, you should convey the accounting information to allow the
POS4000 to see the money that is being entered into the Wash Select II entr y system.
The Wash Select II is mostly configured at the Wash Select II entry system. Most of the entry
system settings in the POS4000 are not used by the Wash Select II. You may, however,
configure the Wash Select II to accept the Wash names and Prices of the POS4000. If enabled,
the Names and Prices at the WSII are automatically updated to the price at the POS after a
power cycle at the WSII or after loss of communications for over 20 seconds (Software versions
7.4 for POS and 3.01 for WSII).
Document Number: POS4007 3
Document Title: POS4000/V2 WSII Operations Manual
Page 30
POS4000
Here is a list of functions and features that must always be programmed at the Wash Select II
entry system:
• Fleet profiles
• Credit system
• Speech recordings and settings
• Receipt Header
• Wash Interface (Relay Stacking, Relay Latching, Out of Service etc… POS4000
settings are ignored)
• Customer Interface (Upgrades, forced selection, Customer stacking etc…)
• Paging functions
• Cash and Token settings.
• System time, Printer config, Site ID, and Service Phone #
• VIP Wash Coupons™
• Passcodes & Passcards
If the wash names and prices in the Wash Select II do not match the POS4000 then turn on
“Use POS Names/$” function in the POS Link menu of the Wash Select II and reprogram the
Regular prices in the POS4000. You may also program the names and prices directly into the
Wash Select II.
Here is a step-by-step guide to setting up the Wash Select II™ unit to interface to a POS4000.
1. If not already installed, with the power off, install the Wash Select II™ 485
communications module onto the top left corner of the Wash select II™ CPU board. The
board is installed with the LED’s on the bottom
2. Turn on the Wash Select II™ and put it into setup mode. If you have more than one bay,
set the units up one at a time, with un-configured units turn ed off.
3. Wire the POS4000 cable connections per the following connections:
Table 1. POS4000-WSII Connections
POS4000
Pin 1 – White Pin 1 – White
Pin 2 – Red Pin 2 – Red
Document Number: POS4007 4
Document Title: POS4000/V2 WSII Operations Manual
Wash Select II
Connector J22
Page 31

POS4000
Pin 3 – Black Pin 3 – Black
Shield – Not
connected
Shield, strap to base
mounting bolt in case.
4. If the POS4000 is connected and both units are powered, the receive light on the 485
communications module should be blinking every couple of seconds. If the light is not
blinking, you may have a failed connection or a failed POS4000. A failed
communications module is also possible.
5. Enter the POS4000 Link sub menu (refer to the WSII Operating Manual) and enable the
interface.
6. Set the bay address per the instructions in the WSII Operating Manual.
7. Set the unit to Operate mode. You should see both the receive light and the transmit
light on the Wash Select II™ 485 communications module begin to blink within 10
seconds. They should blink one after the other with a pause of less than a second
between blinking. If you have more than one bay then the receive light should be on
longer than the transmit light.
8. Set the unit back into setup mode and continue configuring the other settings.
Document Number: POS4007 5
Document Title: POS4000/V2 WSII Operations Manual
Page 32

POS4000
[THIS PAGE INTENTIONALLY LEFT BLANK.]
Document Number: POS4007 6
Document Title: POS4000/V2 WSII Operations Manual
Page 33

2 Installation
These instructions should be used as a guideline. If the wash manufacturer you purchased the
system from provides more detailed wire and installation instructions then please ignore the
following information.
2.1 Pre-Installation Requirements
If your system comes with separate entry system installation instructions then follow
Note:
them for the entry system and use the following references to POS4000 Console
installation only.
Warning:
• Conduit (3/4") from cashier (location of main console) to car wash entrance
• Conduit (3/4" minimum, 1" preferable) from car wash entrance console to car
• Dedicated duplex (120 Volts/60 Hz, 3 amps, grounded) receptacle at location of
• POS4000 main console, printer and wall transformer
• POS4000 interface board with keypad
• POS4000 main console/interface cable (3 conductor, 22 gauge with shield)
• Control wires from car wash controller to POS4000 interface board
Note:
Never run the communications li nes in the same conduit as wires used in powering the
entry system or the carwash.
console (location of customer keypad)
wash controller
main console. One is required for the console and one for the printer. The socket
outlet shall be installed near the equipment and shall be readily acceptable.
Ground hole of receptacle must be properly connected to Earth Ground.
When installing multi-Console or Multi-Bay configurations refer to included drawings for
instructions on daisy chaining the communications cable. Never wire the
communications in a STAR configuration where spli ces occur at any point oth er than at
the Consoles or Entrance stands.
Document Number: POS4007 7
Document Title: POS4000/V2 WSII Installation and Operations Manual
Page 34

POS4000
2.2 Wiring
Figure 2. POS4000 Connections
The wall transformer plugs into a 3-prong earth grounded wall outlet, the connector at the end of
the cord attaches to the mating connector on the back of the main console. This cord connects
the power and Earth Ground connection to the Console.
The main console and interface board are connected by a communication cable. The correct
communication wiring is pin 1 to 1, pin 2 to 2. The shield should be connected to earth ground at
the interface board (connector C pin 4). See the wiring diagram in the t able on the following pag e
for more detail.
Document Number: POS4007 8
Document Title: POS4000/V2 WSII Operations Manual
Page 35

POS4000
2.2.1 Wiring Information for POS4000 Interface Board
The following tables list the wiring information for the POS4000 I nterface Board.
Note:
Note:
> is a signal input to interface board
< is a signal output from interface board
Table 2. Connector-Pin Communications Link to POS4000 Console
Interface
Connector
C-1 <> Pin 1 (RS485 -)
C-2 <> Pin 2 (RS485 +)
C-3 <> Pin 3 (Signal GND)
C-4 <> Earth Ground (connected to
On POS4000 Interface boards with Vers ion 6.6 Hardware the Pin C-4 is connected
internally to Signal Ground.
Table 3. Connections to Carwash Controller
Direction Pin
(not connected)
Earth manually or via Hard
wired Earth ground cable
Connector Direction Controller Connection
D-1 > Car Wash “IN USE” Signal
D-1 > Car Wash “IN-USE” Neutral
A1-8 > Car Wash Voltage to activate wash functions
B-1 < Function 1*
B-2 < Function 2*
B-3 < Function 3*
B-4 < Function 4*
B-5 < Function 5*
B-6 < Function 6*
B-7 < Function 7*
B-8 < Function 8*
*See Section 2.3 for "Function" descriptions
Document Number: POS4007 9
Document Title: POS4000/V2 WSII Operations Manual
Page 36

POS4000
Table 4. Connections to Customer Entry system
Connector
Direction
Entry system Connection
A-7 > Power for customer lights
A-6 < "Out-of-Service" light
A-5 < "Enter Wash" light (Code valid)
A-4 < "Code Accepted / Wait" light
A-3 < "Reenter Code" light (code invalid)
D-3 > Quarter mechanism voltage pulse (credit)
D-4 > Quarter mechanism voltage neutral
D-5 > Bill mechanism voltage pulse (credit)
D-6 > Bill mechanism voltage neutral
Table 5. Power and Audit Connection s
Interface
Connector
Direction
Power/Audit Connection
A-1 > 24VAC HOT power to interface board (or 24VDC+)
A-2 > 24VAC neutral (or 24VDC-)
D-7 > Audit 1 Voltage Input
D-b > Neutral for ALL audit voltage inputs
D-9 > Audit 2 Voltage Input
D-10 > Audit 3 Voltage Input
D-11 > Audit 4 Voltage Input
D-12 > Audit 5 Voltage Input
Document Number: POS4007 10
Document Title: POS4000/V2 WSII Operations Manual
Page 37

POS4000
2.3 POS4000 Function Lines/Car Wash Fea tures
The function control lines used to start the specific car wash features pu rchased by the customer
are identified as "function lines 1 - 8". The use of these lines is dependent on the specific
software program in the POS4000 console. The uses of the function lines are given in the table
on the following page by the type and number of program. To determine your POS4000
configuration, check the system configuration report
Table 6. Function Lines
# of
Programs
Multi-pulse
1 Program Prog 1 Opt 1 Opt 2 Opt 3 Opt 4
2 Programs Prog 1 Prog 2 Opt 1 Opt 2 Opt 3
3 Programs Prog 1 Prog 2 Prog 3 Opt 1 Opt 2
4 Programs Prog 1 Prog 2 Prog 3
5 Programs Prog 1 Prog 2 Prog 3
6 Programs
7 Programs
8 Programs
*
* In multi-pulse operation, Function line 1 is pulsed 1, 2, 3 etc. times to issue different carwash programs.
Note:
1 2 3 4 5 6 7 8
Pulsed Opt 1 Opt 2 Opt 3 Opt 4
Prog 1 Prog 2 Prog 3 Prog
Prog 1 Prog 2 Prog 3 Prog
Prog 1 Prog 2 Prog 3 Prog
If your configuration has fewer than the maximum options (as indicated in the table
above), then the upper function lines are not used. For example, if you have 3
programs and 3 options then lines 7 and 8 are not used.
Interface Function Line
Prog
4
Prog
4
4
4
4
Opt
5
Opt
5
Opt
4
Opt
3
Opt 1
Prog 5 Opt
Prog
5
Prog
5
Prog
5
Opt
2
1
Prog
6
Prog
6
Prog
6
Opt 6 Opt 7
Opt 6 Opt 7
Opt 5 Opt 6
Opt 4 Opt 5
Opt 3 Opt 4
Opt 2 Opt 3
Opt 1 Opt 2
Prog
7
Prog
7
Opt 1
Prog
8
Document Number: POS4007 11
Document Title: POS4000/V2 WSII Operations Manual
Page 38

POS4000
2.4 Installing/Upgrading the EPROM Chip
Depending upon the version of software that is currently in the console, this procedure
may delete ALL configuration information, including all codes, fleet accounts, and
accounting information. All setup configurations will be reset to factory defaults. To
properly facilitate reprogramming this information, you should print the following reports
BEFORE proceeding:
Warning:
Perform the following steps to change the POS4000 console soft ware (EPROM):
1. Disconnect all cables to the console
2. Remove the plastic housing. To do this you must remove 2 screws from the rear
and 2 screws from the bottom of the unit.
3. The upper chassis must be partially removed. Remove the middle and front
screws along the side of the metal chassis. Loosen the rear two screws on each
side of the chassis. This will allow the top piece to open up revealing the main
circuit board.
4. Find the EPROM chip, as indicated below:
• System configuration
• Pricing report
• Fleet accounts
• Accounting reports (those that are used)
• Message configuration
Document Number: POS4007 12
Document Title: POS4000/V2 WSII Operations Manual
Page 39

POS4000
Figure 3. POS EPROM Location
The EPROM chip has a small window on the top surface that may or may not be covered with
an adhesive label.
5. Carefully remove the EPROM chip from the socket. Use a small flat head screw
driver or an IC remover. Be careful to pry the chip from the socket and not the
socket from the board.
Document Number: POS4007 13
Document Title: POS4000/V2 WSII Operations Manual
Page 40

POS4000
Figure 4. EPROM and Socket
6.
Carefully install the new EPROM into the socket. Make sure that the Dimple on
the chip is facing the same direction as it was before (refer to previous drawing).
Also, make sure that pins can be properly inserted into the sockets without
bending. Component legs can be bent to fit sockets as follows:
• Lay the chip on its side with the pins facing away from you.
• Gently rock the chip away from you to bend the pins.
• Lay chip on its other side and rock it away from you.
• Repeat the above steps, alternating sides of the chip until the pins line up in
the socket without forcing the legs to fit.
7. Reconnect the power and printer connections and turn on the unit. As the system
powers up the message “!!SOFTWARE UPGRADE!!” will appear momentarily.
8. After the unit is powered up, you MUST then press the RESET BUTTON to reset
the system.
9. After pressing the reset button, the display will prompt you to press 99 or 55.
Press 55.
10. Reset the system two more times. If your system previously contained standard
version TG648 and above or Unicam version 656 and above, then the codes and
messages should be retained.
11. Replace all screws and plastic cover. Connect all other cables previously
attached.
Document Number: POS4007 14
Document Title: POS4000/V2 WSII Operations Manual
Page 41

3 Testing
The following information is for technical service personnel; Unitec does not recommend end
users repair their own equipment. However the following information may be useful in helping
the end user to get his or her system up and running without requiring a service call from the
local equipment distributor.
3.1 Console Testing
During the installation and normal operations of the POS4000, there may be times when the
system doesn't operate as expected. For example, power to the system interface card may be
off. In order to expedite the checkout of the system, several service routines are provided. To
access a service routine, press the [CMD] key followed by the [SERVICE] key. The console will
request password level 4. Password 4 is always 62747. It cannot be chan ged and is inten ded for
service personnel to use for installation and testing purposes. This is the only command that
password 4 provides access to. For a specific discussion of this command, see Section
3.2 Interface Board Testing
The POS4000 interface board has a test mode of operation. To activat e this t est mode you must
change the dip switches on the interface board as follows:
4.6.
Table 7. Interface Board DIP Switch Setting fo r Test Mode
DIP Switch Setting
4 OFF
5 ON
Make sure you return the DIP switches to normal operation mode when testing is complete. For
the normal operations, set the switches as follows:
Table 8. Interface Board DIP Switch Setting fo r Normal Operations
DIP Switch Setting
4 OFF
5 OFF
While the interface board is in the test mode, the customer b uzzer will beep approximately every
5 seconds. Once in the test mode, you select the specific test desired by typing the following
codes at the customer keypad:
Table 9. Interface Board Tests
Code Test
10 Output relay line 1 on
20 Output relay line 2 on
30 Output relay line 3 on
Document Number: POS4007 15
Document Title: POS4000/V2 WSII Installation and Operations Manual
Page 42

POS4000
40 Output relay line 4 on
50 Output relay line 5 on
60 Output relay line 6 on
70 Output relay line 7 on
80 Output relay line 8 on
90 Re-enter code relay output on
110 Code Accepted/wait relay output on
120 Enter Wash relay output on
130 Out-of-Service relay out put on
140 All relay outputs on
150 Wash In-Use input status
160 Coin credit input status
170 Bill credit input status
180 Audit 1 input status
190 Audit 2 input status
210 Audit 3 input status
220 Audit 4 input status
230 Audit 5 input status
Document Number: POS4007 16
Document Title: POS4000/V2 WSII Operations Manual
Page 43

POS4000
3.2.1 Relay Test
To check a specific relay on the interface board, you should close that relay by entering the
appropriate code at the customer keypad (while the board is in t est mode). T hat relay will remain
on until another selection is made or until the board is put back into the normal mode of
operation. While the relay is on check continuity between the common and output connector
pins of the specific relay as follows:
Table 10. Relay Continuity Check fo r Common and Outpu t Connector s
Relay Common Output
Wash Function Line 1 A8 B1
Wash Function Line 2 A8 B2
Wash Function Line 3 A8 B3
Wash Function Line 4 A8 B4
Wash Function Line 5 A8 B5
Wash Function Line 6 A8 B6
Wash Function Line 7 A8 B7
Wash Function Line 8 A8 B8
Re-enter Code Relay A7 A3
Code Accepted/Wait A7 A4
Enter Wash Relay A7 A5
Out-of-Service A7 A6
3.2.2 Input Test
To check any of the inputs on the interface board, enter the appropriate code at the customer
keypad. Then apply the appropriate voltage (120VAC or 24AC/DC) to the input being tested.
While the appropriate voltage is on the specific inpu t bein g teste d, the cu stom er buzzer will b eep
rapidly, while the voltage is off the customer buzzer beeps very slowly. If the optional customer
display is connected, the status of the input is displayed.
An LED on the interface board should light while voltage is present. The location of the
Note:
specific LEDs is shown in the "POS4000 Interface Board Wiring Diagram" in the back
of this manual.
Document Number: POS4007 17
Document Title: POS4000/V2 WSII Operations Manual
Page 44
POS4000
The connector pins for the specific inputs on the interface board are given be low:
Table 11. Interface Board Connector Pi ns
Input Hot Neutral
Wash In-Use D1 D2
Coin Credit Pulse D3 D4
Bill Credit Pulse D5 D6
Audit 1 D7 D8
Audit 2 D9 D8
Audit 3 D10 D8
Audit 4 D11 D8
Audit 5 D12 D8
3.2.3 Keypad Test
To test the customer keypad, leave the interface board in the normal operations mode. As a first
test, press each key one at a time and make sure the customer buzzer beeps when each key is
pressed. Clear those entries by pressing the * key (some older units have a P key), then enter
the two test sequences at the customer keypad: 123450 and 67890. After each entry, go to the
POS4000 main console and read the customer code displayed on the bottom right of the
console display. The displayed value should match the number that was entered at the interface
board.
If one or two keys do not beep when pressed at the car wash entrance, it is likely a keypad
failure. The keypad can be checked by making the following continuity checks: First, disconnect
the KEYPAD PLUG from the interface board and check for continuity between the connector
pins specified when a particular key is depressed.
Document Number: POS4007 18
Document Title: POS4000/V2 WSII Operations Manual
Page 45

POS4000
Table 12. Key Continuity Check
Keys Connector Pins
Key 1 Pins 1 & 7
Key 2 Pins 1 & 8
Key 3 Pins 1 & 9
Key 4 Pins 2 & 7
Key 5 Pins 2 & 8
Key 6 Pins 2 & 9
Key 7 Pins 3 & 7
Key 8 Pins 3 & 8
Key 9 Pins 3 & 9
Key * or P Pins 4 & 7
Key 0 Pins 4 & 8
Key # or A Pins 4 & 9
If any of these continuity checks fail, the keypad should be replaced.
If one row or column of customer keys fails, make keypad continuity check as described above
first. If this passes, reconnect the keypad and check the wire connections between interface
board and keypad. Make sure there are no broken wires and make sure all connectors are
correctly mated. If the keypad test is OK and the wire connections are good, replace the
interface board.
Document Number: POS4007 19
Document Title: POS4000/V2 WSII Operations Manual
Page 46

[THIS PAGE INTENTIONALLY LEFT BLANK]
POS4000
Document Number: POS4007 20
Document Title: POS4000/V2 WSII Operations Manual
Page 47

POS4000
4 Management Control (Command Reference)
The management keys are used to access the various commands available. The management
keys are typically white and are located on the top half of the console keypad. They are used for
alpha-numeric entries as indicated by the large numeric characters located on the upper right
half of the keys and letters located on the lower right half of the keys. They are also used to
select commands as indicated by the text on the center of the ke ys.
Two methods are available to select a primary command. The first method allows you to scroll
through the primary menu list (by pressing the [MENU UP] or [MENU DOWN] key) and then
select the command of interest by pressing the [ENTER] key. The second method allows you to
directly access a particular primary menu command by simply pressing the [CMD] key followed
by the desired command function key (as identified by the text on the management keys). For
example, to print the wash counts report you either press the [MENU UP] and/or [MENU
DOWN] keys until the "Print Audit Counts" menu item appears on the disp lay and then pr ess the
[ENTER] key to select that command or you can simply press the [CMD] key followed by the
[PRINT REPORT] key. Both methods will activate that primary command.
Many of the console primary commands require a password. Those that do will prompt for a
specific password (password 1, password 2, ...) immediately after you select that command. To
continue with the command, type the appropriate password (using the numbers printed on the
management keys) followed by the [ENTER] key.
Many of the primary commands have a secondary command menu list. Once the primary
command has been selected and the appropriate password entered, you scroll through the
secondary menu list (using the [MENU UP] and/or [MENU DOWN] keys) and select the
secondary command of interest by pressing the [ENTER] key.
After a secondary command is executed, the primary command remains selected. This allows
several commands to be executed without having to re-enter the password. For example, all of
the passwords can be changed once the "Set Passwords" command has been activated. To exit
from a secondary menu and return the console to normal operation, scroll until "Press ENTER to
QUIT" appears and then press the [ENTER] key.
The password structure is intended to provide various levels of acce ss to th e conf iguration of the
POS4000 and the information that it maintains.
As you make numeric or character entries, the number/character is displayed. If a
mistake is made during numeric entry, it can be corrected prior to depressing the
Note:
[ENTER] key by pressing the [CLEAR] key and reentering the number. While entering
alpha-numeric data (i.e. entering header message), the [CMD] key can be used as a
backspace key.
Document Number: POS4007 21
Document Title: POS4000/V2 WSII Operations Manual
Page 48

4.1 System Configuration
The System Configuration command allows you to configure many aspects of the
console operation to your specification. To select this command press the [CMD]
key followed by the [SYS SETUP] key. You will be prompted to enter password 3.
After entering the correct password, you can scroll through the secondary menu
list that follows:
• Set System Time
• Configure a Group
• Set Code Age Warning
• Set Code Length
• Disable Cashier Key
• Set Serial Baud Rate
• Set Languages
• Set Program Relays
• Cash Upgrades MENU->
o Set BUYUP Mode
o Set Coin/Bill Values
o Set Dispense Value
• External POS MENU ->
o Set POS Offset
o Set EXT. POS Type
o Set POS Max Washes
o Set Send Code Age
o Reverse order
• Multiple Unit MENU ->
o Set Unit Number
o Controller/Remote
o Set # Bays/Consoles
o Prog Remote Consoles
To execute one of the secondary commands, scroll through the secondary menu until the
command of interest is displayed, and then press the [ENTER] key. The final three entries in the
secondary menu each allow access to a sub-menu. In addition to the choices shown for each
sub-menu, there is also an item that allows you to "Return to SETUP MENU".
The following information is provided in the System Configuration Report:
• Software Version and date of release
• Car Wash manufacturer compatibility
Document Number: POS4008-A 22
Document Title: POS4000/V2 WSII Installation and Operations Manual
Page 49

• Console language - used for text displayed on main console
• Customer language - used for tickets and customer display
• Number of Programs/options/groups
• Type of program: Multi-pulse or single line per program
• Relay Stacking status: Enabled/Disabled (see Note 1)
• Interface Relay Type: Momentary/Latched
• Type of Customer Buy up: None/Automatic/Selected/Forced
• E-system configuration (Change and Wash displays)
• Tax Rate
• Tax Round Off: Enabled/Disabled (only if tax rate is non-zero)
• Serial Baud Rate for EXT POS Device: 19200/9600/4800/2400/1200
• Code length (including zero: 5/6/7
• Code Age Warning: 0-31
• Set Send Code age
POS4000
• Reverse order of EXTPOS washes
• Maximum number of fleet accounts
• Maximum number of valid codes stored in memory
• Maximum number of used codes stored in memory
• Default passwords (see Note 2)
• Cashier Key Status: All Enabled/Specific Disabled
• Group Configurations
• Customer interface type and version
The exact format of this information is subject to change a s new features are added.
If relay stacking is disabled, the function rel ays are cl ose d as so on as a code is e ntere d
(regardless of the wash in-use signal). If relay stacking is enabled, the function relays
will not be closed until the wash in-use signal is off. In either case, a second customer
can enter their code and/or deposit ca sh while a first cust omer is in the carwa sh.
The passwords listed are the default passwords (NOT necessarily the current
passwords). Once a password has been changed, the default passwords will no longer
work. The changed passwords are not listed for security reasons. It is the responsibility
of the user to know the current passwords if they are changed fro m the default values
Note 1:
Note 2:
Document Number: POS4007 23
Document Title: POS4000/V2 WSII Operations Manual
Page 50

POS4000
4.1.1 Set System Time and Date
To set the system date and time scroll through the System Configuration main menu until "Set
System Time" appears. Once selected, the console will prompt for the date and time in the format
MMDDYYHHMM (month, day, year, hour, minute). Two digits must be used for each entry (i.e.. 3
= 03) and all entries must be completed. Time is entered in military format (i.e.. 4:30PM is entered
in the HHMM slot as 1630). After you enter the date and time, the console will prompt for the day
of the week where Sunday = 1, Monday = 2 ... Saturday = 7.
As of Version 7.00, the POS4000 is Year 2000 compliant. All printed dates are in 4-digit format.
However, whenever entering a date into the POS4000, 2-digit format is used. The 2-digit year
conversion is as follows: 00-89 = 2000-2089, 90-99 = 1990-1999. The POS4000 will calculate the
correct Date, Day of Week and Leap years until 2089.
As an example, Thursday May 6, 1999 4:37PM is entered as 0506991637 for MMDDYYHHMM
and 5 for the day of the week. If an invalid date/time is entered, the console will display "Time
Entry Error" and you will have to start over.
Example to set time to Thursday 04:37PM on 05/06/99:
[CMD]
[SYSTEM SETUP]
[3] (password 3)
[ENTER]
[MENU UP/DOWN] until "Set System Time" is displayed
[ENTER]
[0][5][0][6][9][9][1][6][3][7]
[ENTER]
[5] (Monday)
[ENTER]
4.1.2 Configuring a Group
If "Groups" are available on the cashier keys, this command can be used to configure the groups.
A group is a car wash package that includes exactly one of the car wash programs and any
combination of options. For example, a "Works" group might include the deluxe wash program
and all options available on the car wash. This "group" or package would then be available using
a single key on the cashier keypad and would have its own pricing structure and accounting
information. As with all car wash functions, the group washes can be renamed to match your
nomenclature (see Section
To configure a group scroll through the configuration secondary menu until "Configur e a Group" is
displayed and then press the [ENTER] key. You will then be prompted for the group number (i.e..
1 through 5 if five groups are available). Enter the n umber of the group to be configured using the
numbers printed on the management keypad followed by the [ENTER] key (do not use th e actu al
group key from the cashier keypad).
You will then be prompted to issue the wash type of this group. Issue the desired wash using the
cashier keys as in a normal car wash transaction. For example, press the [Program 1] key,
[Option 1] key, [Option 2] key and then the [ENTER] key. Once the car wash type is entered, a
group ticket will be printed to confirm your selection. If an invalid set of features is entered, the
console will display "INVALID SELECTION" and wait for a valid set of features to be issued.
4.14.1).
Document Number: POS4007 24
Document Title: POS4000/V2 WSII Operations Manual
Page 51

POS4000
[Prog 1] (select wash functions in group)
Note:
Example to set Group 3 to Program 1 and options 1, 2 & 4:
A carwash "group" cannot be used as a feature to configure another group, use only
specific wash programs and options.
[CMD]
[SYSTEM SETUP]
[3] (password 3)
[ENTER]
[MENU UP/DOWN] until "Configure a Group" is displayed
[ENTER]
[3] (select group #3 to configure)
[ENTER]
[Opt 1]
[Opt 2]
[Opt 4]
[ENTER]
4.1.3 Set Code Age Warning
This command allows you to change the code age warning message printed on customer tickets.
Unitec recommends that this be left at the factory default setting of ‘0’ which will cause no code
age warning to be printed on the ticket. The code age value may also be used by the
Convenience Store POS System and Pump for printing code age warnings on customer receipts.
Because the code age warning printed at the store POS and pump is controlled by the store
POS system, Customers should contact their POS supplier or distributor for guidance in
configuring the POS system for this message.
Should the Operator choose to provide a code age warning message on receipts, the procedure
is as follows:
Scroll through the configuration secondary menu until "Set Code Age Warning" is displayed and
press the [ENTER] key.
Once selected, you will be prompted to Enter # of Days Good. The default value should be 0 (no
message will be printed on customer tickets). Enter the value for number of days to use in the
code age warning message. If 1 is entered, the message will be "Code is Good One Time Today
Only". If a number between 1 and 30 is entered, the message will be "Good Once During Next #
Days".
Note that with a multiple-console configuration, when code age is changed on the master
console, it is immediately downloaded to the remote consoles.
Carwash codes are NOT automatically removed from memory when this time expires
Important:
Document Number: POS4007 25
Document Title: POS4000/V2 WSII Operations Manual
and they will still be usable. If you wish to enforce the code age warning, you must use
the Memory Information/Clear Old Codes command
Page 52

POS4000
4.1.4 Set Code Length
This command allows you to change the maximum number of digits used in codes. Larger
customer codes reduce the probability of a jackpotting of the system by guessing random
numbers. For example, if the valid codes database is filled with 5,000 carwash codes and the
code length is set to 6 (maximum code is 999990) a 10% probability of jackpotting exists, or 10
random codes would have to be tried on average to jackpot the system. With the same 5,000
valid codes but a maximum code length of 7 (maximum code is 9999990) a 1% probability of
jackpotting exists, or 100 random codes would have to be trie d on averag e to jackpot the system.
Note that with a multiple-console configuration, when code length is changed on the master
console, it is immediately downloaded to the remote consoles.
To select this command scroll through the System Configuration secondary menu until "Set Code
Length" is displayed and press the [ENTER] key. Once selected, the console prompts you to
enter the maximum code length as 5, 6, or 7. Press 5, 6 or 7 as desired followed by the [ENTER]
key.
Example to set code length to 6 digits:
[CMD]
[SYSTEM SETUP]
[3] (password 3)
[ENTER]
[MENU UP/DOWN] until "Set Code Length" is displayed
[ENTER]
[6]
[ENTER]
Note:
Important:
The code length includes the digit 0, which i s always the last digit in a code.
Setting the code length to 5 digits will result in reducing the number of valid codes
stored in memory from 5000 to 3000. This is necessary since there is a limited number
of 5 digit codes. If there are already more than 3000 co des i n mem o ry, you mu st delete
enough old codes to reduce the number in memory to fewer than 3000 or delete all
valid codes.
4.1.5 Disable Cashier Keys
This command allows you to disable specific cashier keys. If a key is disabled, it cannot be sold
as part of a customer transaction. All cashier keys for features that are not available on the
particular carwash installation should be disabled. This prevents a cashier from selling features
that are not available and is critical if you have the automatic buy up feature that allows
customers to upgrade or pay cash for a wash at the carwash entrance.
To select this command, scroll through the system configuration secondary menu until "Disable
Cashier Key" is display and press the [ENTER] key. Once selected you will be prompted Press
Cashier Keys to Disable, Then ENTER. Press all cashier keys that should be disabled and then
press the [ENTER] key. To enable all cashier keys, press only the [ENTER] key.
Document Number: POS4007 26
Document Title: POS4000/V2 WSII Operations Manual
Page 53

POS4000
For example, if you have a console with 4 programs, 4 options and 4 groups and you don't use
group 4 and the carwash doesn't have program 4 or options 3 and 4, you disable the unused
keys as follows:
[CMD]
[SYSTEM SETUP]
[3] (password 3)
[ENTER]
[MENU UP/DOWN] until "Disable Cashier Key" is displayed
[ENTER]
[Prog 4] (disable program 4)
[Opt 3] (disable option 3)
[Opt 4] (disable option 4)
[Group 4] (disable group 4)
[ENTER]
Example to re-enable all cashier keys:
[CMD]
[SYSTEM SETUP]
[3] (password 3)
[ENTER]
[MENU UP/DOWN] until "Disable Cashier Key" is displayed
[ENTER]
[ENTER] (no cashier keys pressed)
Note:
Note:
Cashier keys that have been disabled MUST be re-e nabled using t he above steps.
All programs and options not available on your particular carwash and all group
packages not programmed and used by you must be disabled if the buy up option is
enabled.
4.1.6 Set Serial Baud Rate
This command allows you to change the serial baud rate of the cash register port on the console.
This rate only needs to be changed if you are connecting to an External Point of sale de vice.
To select this command scroll through the configuration secondary menu until "Set Serial Baud"
is displayed and then press the [ENTER] key. You will then be prompted to enter the new baud
rate. Only standard baud rates are allowed: 1200, and 2400, 4800,9600, and 19200. If you enter
one of these rates, it will be saved. If you enter any other rate, an error message is displayed and
the baud rate is not changed.
Example for setting the baud rate to 9600:
[CMD]
[SYSTEM SETUP]
[MENU UP/DOWN] until "Set Baud Rate" appears
[ENTER]
[9][6][0][0]
[ENTER]
Document Number: POS4007 27
Document Title: POS4000/V2 WSII Operations Manual
Page 54

Note:
Note:
POS4000
The new Baud Rate will not take effect until a power reset of the console occurs. To do
this, simply turn the ON/OFF switch in t he OFF positi on f or a mom ent and th en ret urn it
to the ON position.
The factory default baud rate is dependent on what type of EXT POS interface is
configured on default. Serial Baud default for POS1 & POS2 is 19200, serial baud for
POS 0 (No EXT POS interface) and POS3 is 2400.
4.1.7 Set Languages
This command allows you to change the language used on the main console display and/or the
customer language (used on tickets and optional customer display at entrance of wash). To
select this command scroll through the system configuration main menu until "Set Language"
appears and then press [ENTER].
Once selected you are prompted to enter the desired console language. Press [0][ENTER] for
English or [1][ENTER] for French. Next, you are prompted to select the customer language in a
similar manner.
Example to set console language as English and the custo mer language a s German:
[CMD]
[SYSTEM SETUP]
[3] (password 3)
[MENU UP/DOWN] until "Set Languages" appears
[ENTER]
[0] for English
[ENTER]
[2] for German
[ENTER]
4.1.8 Set Program Relays
This command is only available on systems configured for a specific manufacturer. If a section
titled "OUTPUT Logic Block" does not appear on your SYSTEM CONFIGURATION report then
this option is not available on your system.
This command allows the output relays on the customer interface board to be configured for
Logic and Block values that correspond to each carwash program. To select this command, scr oll
through the system configuration secondary menu until "Set Program Relays" is display and
press the [ENTER] key.
Once this item is selected, you will be prompted to Enter Program Number. Use the numbers
printed on the management keys to select the number of the program you wish to configure (do
not use the cashier keys) and then press [ENTER]. Next you will be prompted to Enter Logic &
Block. Again, use the management keys to enter the appropriate value. If you enter and invalid
logic or block value, the console will display the message "Invalid Logic/Block" and the command
will be terminated.
Example to configure Program 1 to have a logic & block value of 32:
[CMD]
[SYSTEM SETUP]
[3] (password 3)
[MENU UP/DOWN] until "Set Program Relays" appears
[ENTER]
Document Number: POS4007 28
Document Title: POS4000/V2 WSII Operations Manual
Page 55

[1]
[ENTER]
[3][2]
[ENTER]
POS4000
4.1.9 Cash Upgrades (Options) Menu
This sub-menu is used to configure the cash upgrade or buy up capabilities of your system. It
contains three sub-menu items:
• Set BUYUP Mode
• Set Coin/Bill Values
• Set Dispense Value
• Set Dispense Mode (E-systems 4000 only)
To execute one of the sub-menu commands, first select "Cash Upgrades MENU->" from the
SYSTEM SETUP menu. Next, scroll through the sub-menu until the command of interest is
displayed and then press the [ENTER] key.
4.1.9.1 Set BUYUP Mode
This command is used to enable or disable buy up capability at the entrance of the carwash. To
select this command, scroll through the Cash Upgrades sub-menu until "Set BUYUP Mode"
appears and then press [ENTER].
There are two buy up modes that are generally available:
0: No upgrade/upgrade capability
1: Automatic by price
In addition for E-systems 4000 units :
2: Forced selection
If your carwash supports other modes, those options will appear as choices when the command
is executed.
Example to disable buy ups:
[CMD]
[SYSTEM SETUP]
[3] (password 3)
[MENU UP/DOWN] until "Cash Upgrades MENU ->" appears
[ENTER]
[MENU UP/DOWN] until "Set BUYUP Mode" appears
[ENTER]
[0]
[ENTER]
The default buy up mode depends upon the carwash your POS4000 is configured to
operate with.
Note:
Document Number: POS4007 29
Document Title: POS4000/V2 WSII Operations Manual
Page 56

4.1.9.2 Set Coin/Bill Values
This command is used to set the value of the coin and bill pulses that are connected to the
interface board at the entrance of the carwash. To select this command scroll through the Cash
Upgrades sub-menu until "Set Coin/Bill Values" appears and then press [ENTER].
Example to set coins as $0.50 and bills as $5.00:
[CMD]
[SYSTEM SETUP]
[3] (password 3)
[MENU UP/DOWN] until "Cash Upgrades MENU ->" appears
[ENTER]
[MENU UP/DOWN] until "Set Coin/Bill Values" appears
[ENTER]
[5][0]
[ENTER]
[5][0][0]
[ENTER]
POS4000
4.1.9.3 Set Dispense Value
This command is used to set the value of coins that are dispensed as change by the AUTOTEC
or the E-Systems 4000 at the entrance of the carwash. Unless your POS4000 main console is
used with the Hamilton AutoTec or the Unitec E-4000, this command will have NO effect upon
the operation of your system. To select this command scroll through the Cash Upgrades submenu until "Set Dispense Value" appears and then press [ENTER].
Note:
Caution:
Example to set the value of dispensed coins as $1.00:
The default buy up mode depends upon the carwash your POS4000 is configured to
operate with
This command is NOT available on systems configured to work with the Hamilton
Autotec.
[CMD]
[SYSTEM SETUP]
[3] (password 3)
[MENU UP/DOWN] until "Cash Upgrades MENU ->" appears
[ENTER]
[MENU UP/DOWN] until "Set Dispense Value" appears
[ENTER]
[1][0][0]
[ENTER]
Document Number: POS4007 30
Document Title: POS4000/V2 WSII Operations Manual
Note:
The default value is $0.25. Valid values are 25, 50, 100, and 200.
Page 57

4.1.9.4 Set Dispense Mode (E-System 4000 only)
POS4000
This command is used to set criteria for when the E-System 4000 coin box will dispense change.
This function will not affect the change making ability for a Hamilton Autotec. The dispense
modes are defined as follows:
Table 13. E-System Dispense Mode
Dispense Mode Description Comments
0 No change available None
1 Change available after
wash activated
2 Change available before
wash activated.
4.1.10 External POS MENU->
Change is available at the
escrowed amount only. If the
amount entered is equal to the
value of a wash (the wash armed)
then the amount will not be
refunded. Only the amount between
the wash prices is refunded.
Example: If wash prices are $3.00,
$4.00, and $5.00, and the customer
enters $3.50 ($3.00 wash is armed)
then selects the refund button, then
only the $.50 is refunded.
Refunding is disabled until the
customer has armed a wash.
This is the same as with mode 1
except that the refund is available
before a wash is activated also.
Note: if the system is prompting the
customer to make a wash selection,
refunding will not be available.
This command is used to configure an OPTIONAL FEATURE of the POS4000. If this
feature is not present in your system, you will not be able to execute these commands.
Note:
This sub-menu is used to configure the external Point-of-Sale (POS) capabilities of your system.
It contains the following sub-menu items:
• Set POS Offset (direction and amount)
• Set EXT. POS Type
• Set POS MAX WASHES (for special circumstances only)
• Set Send Code age (for certain EXTPOS units only)
• Set Reverse order (to allow pumps to have wash 1 most expensive)
• Set Default Discounts
Document Number: POS4007 31
Document Title: POS4000/V2 WSII Operations Manual
Page 58

To execute one of the sub-menu commands, first select "External POS MENU->" from the
SYSTEM SETUP menu, and then scroll through the sub-menu until the command of interest is
displayed and then press the [ENTER] key.
Note that with the Optional Remote Extpos Connection Software, th e master and each secondary
console can be set to interface to a different External POS system using different configuration
settings.
4.1.10.1 Set POS Offset
POS4000
This command is used to convert an external POS system's wash "type" or "level" to a POS4000
program or group key.
To select this command, scroll through the External POS sub-menu until "Set POS Offset"
appears and then press [ENTER].
Note:
Example to set the POS Offset as 5 UP:
Note:
This feature is for use with POS 1, 2 and 3.
[CMD]
[SYSTEM SETUP]
[3] (password 3)
[MENU UP/DOWN] until "External POS MENU->" appears
[ENTER]
[MENU UP/DOWN] until "Set POS Offset" appears
[ENTER]
[1][ENTER] to select direction UP
[5][ENTER] to select amount of offset as 5
The default is for there to be no offset (i.e. 0 down).
4.1.10.2 Define External POS Type
This command is used to define what type of external Point-of-Sale equipment is present and
connected to the POS4000. To select this command, scroll through the External POS sub-menu
until "Define EXT. POS Type" appears and then press [ENTER].
Document Number: POS4007 32
Document Title: POS4000/V2 WSII Operations Manual
Note:
Example to set the external POS type as 3:
The current EXT POS settings will print out with a mapping of the carwash type given
vs. the carwash type requested.
[CMD]
[SYSTEM SETUP]
[3] (password 3)
[MENU UP/DOWN] until "External POS MENU->" appears
[ENTER]
[MENU UP/DOWN] until "Define EXT. POS Type" appears
[ENTER]
Page 59

[3][ENTER]
POS4000
4.1.10.3 Set POS MAX WASHES
Note:
Note:
If the external POS type is set to 1 or 2, the current EXT POS settings will print out with
a mapping of the Carwash type given vs. the carwash type re quested.
This feature is for use with POS 1 and 2 only.
This function is used to modify the commands received by an external point of
sale device such as pump equipment. These commands are configured to ask for
more wash types than are available. You should only change this value when
instructed to do so from an application note or a Unitec service technician. The
default value is 0 (disabled). This value only limits the number of wash types that
can be requested by an External POS device, not the number of wash types that
can be sold via the console or entry system (cash or buy ups).
Example to set the POS MAX WASHES to 3 (max of 3 washes allowed):
[CMD]
[SYSTEM SETUP]
[3] (password 3)
[MENU UP/DOWN] until "External POS MENU->" appears
[ENTER]
[MENU UP/DOWN] until "Set POS MAX WASHES" appears
[ENTER]
[3][ENTER] to select maximum of 3 wash types to be given
4.1.10.4 Set Send Code Age
This command is used to enable the POS1 or POS2 protocol to include the response code for
code age and wash status. In some cases when this feature is not enabled (default) the receipt
printed out at the gas pump will show that the code is val id for 1 day only. Enabli ng this value may
cause the system to not work properly with some point of sale manufacturers. To select this
command, scroll through the External POS sub-menu until “Set Send Code Age” appears and
then press the indicated function key.
Document Number: POS4007 33
Document Title: POS4000/V2 WSII Operations Manual
Note:
Example to set send code age enabled:
[CMD] to select command mode
[2-System Setup] to select "System Setup" menu
The current EXT POS settings will print out with a mapping of the carwash type given
vs. the carwash type requested.
[3] Enter your password 3
[ENTER]
[Menu up] Until you see: "Ext. POS MENU->"
[Menu up] Until you see “Set Send Code Age”
[Enter] Select function
[ 1 ] To enable set send code age
Page 60

POS4000
[ENTER]
4.1.10.5 Reverse Order
Note:
Note:
The default setting is 0, which is normal protocol.
This feature is for use with POS 1 and 2 only.
Enabling the Reverse Order function will allow the order of carwashes configured
in the External POS device to be reversed. This function is often used when the
External POS has the prices configured in descending order (wash 1 on EXTPOS
is most expensive). Since the wash prices for an entry system that uses cash
must be in ascending order at the POS4000, this function allows the re-mapping
of the washes requested at the registers and pumps. This function must be
configured w/ POS MAX WASHES to determine how to reverse the order.
Example:
Carwash is configured w/ 3 washes:
Wash 1 (program 1): Basic $4.00
Wash 2 (program 2): Deluxe $5.00
Wash 3 (program 3): Supreme $6.00
Register is configured to the opposite:
Wash 1 : Supreme $6.00
Wash 2 : Deluxe $5.00
Wash 3 : Basic $4.00
To make the system function properly you must configure POS MAX washes (See Section
4.1.10) to a value of 3 (3 washes). Set Reverse order to 1 (enabled).
After changing these values the current EXT POS settings will print out with a mapping of the
Carwash type given vs. the carwash type requested. This will show the relationship of the
mapping.
If you use groups, you must also set the POS OFFSET (Se Section 6.2.10.1).
This function only works with POS 1 & POS 2.
Example to set Reverse order to Enabled:
[CMD] to select command mode
[2-System Setup] to select "System Setup" menu
[3] Enter your password 3
[ENTER]
[Menu up] Until you see: "Ext. POS MENU->"
[Menu up] Until you see “Reverse order”
[Enter] Select function
Document Number: POS4007 34
Document Title: POS4000/V2 WSII Operations Manual
Page 61

[ 1 ][Enter] To enable select 1
4.1.10.6 Set Default Discount Levels
POS4000
Note:
This feature is for use with POS 1, 2 and 3.
Setting the default discount levels of the EXTPOS washes will make it so that when the EXTPOS
wash is requesting a code, the accounting will assign a specific discount level to the purchase.
This will happen even though the EXT POS device does not tell the POS4000 the discount level
at which the wash was sold. This feature can only be accomplished C-store register systems that
can do the following:
Allow washes to be sold at pump or register only
Allow the configuration of 6 or more discrete wash types (depending on the discount levels you
need to implement the register may have to accommodate up to 12 wash ty pes)
Whenever this function is accessed, a report will print out to show the mapping of the washes.
Example:
EXT POS will be set up for 12 washes. Carwash has 4 real washes. EXT POS washes are
defined as:
Wash 1-4: Discounted washes 1-4 sold at pumps and in C-store
Wash 5-8: Full price washes 1-4 sold in C-store only
Wash 9-12: Free (rewash) washes 1-4 sold in C-store only
Example configuration process:
Set prices in POS4000 for washes 1-4 (don’t forget Discount levels)
Enable reverse ordering if required
Set POS MAX Washes value to 4
[CMD] to select command mode
[2-System Setup] to select "System Setup" menu
[3] Enter your password 3
[ENTER]
[Menu up] Until you see: "Ext. POS MENU->"
[Menu up] Until you see “Set Default Discnts”
[Enter] Select function
[ 1 ][Enter] To set EXT POS wash 1 to discount 1
[ 1 ][Enter] To set EXT POS wash 2 to discount 1
[ 1 ][Enter] To set EXT POS wash 3 to discount 1
[ 1 ][Enter] To set EXT POS wash 4 to discount 1
[ 0 ][Enter] To set EXT POS wash 5 to discount 0
[ 0 ][Enter] To set EXT POS wash 6 to discount 0
[ 0 ][Enter] To set EXT POS wash 7 to discount 0
[ 0 ][Enter] To set EXT POS wash 8 to discount 0
[ 2 ][Enter] To set EXT POS wash 9 to discount 2
[ 2 ][Enter] To set EXT POS wash 10 to discount 2
[ 2 ][Enter] To set EXT POS wash 11 to discount 2
[ 2 ][Enter] To set EXT POS wash 11 to discount 2
Document Number: POS4007 35
Document Title: POS4000/V2 WSII Operations Manual
Page 62

POS4000
4.1.11 Multiple Unit MENU->
This sub-menu is used to configure the multiple customer interf aces (carwash) and multiple Pointof-Sale (POS) capabilities of your system. It contains 4 sub-menu items:
To execute one of the sub-menu commands, first select "Multiple Unit MENU->" from the
SYSTEM SETUP menu, and then scroll through the sub-menu until the command of interest is
displayed and then press the [ENTER] key.
4.1.11.1 Set Unit Number
This command is used to set the unit number of the POS4000.
To select this command, scroll through the Multiple Unit sub-menu until "Set Unit Number"
appears and then press [ENTER].
Note:
• Set Unit Number
• Controller/Remote
• Set # Bays/Consoles
• Prog Remote Consoles
Example to set the unit number of a POS4000 as 3:
This command is used to configure an OPTIONAL FEATURE of the POS4000. If this
feature is not present in your system, you will not be able to execute these commands.
[CMD]
[SYSTEM SETUP]
[3] (password 3)
[MENU UP/DOWN] until "Multiple Unit MENU->" appears
[ENTER]
[MENU UP/DOWN] until "Set Unit Number" appears
[ENTER]
[3]
[ENTER]
4.1.11.2 Controller/Remote
This command is used to designate a POS4000 main console as either a controller console or a
remote console.
To select this command, scroll through the Multiple Unit sub-menu until "Controller/Remote"
appears and then press [ENTER].
Document Number: POS4007 36
Document Title: POS4000/V2 WSII Operations Manual
Note:
Example to designate a main console as a REMOTE Console:
The default unit number is 1.
[CMD]
[SYSTEM SETUP]
Page 63
[3] (password 3)
[MENU UP/DOWN] until "Multiple Unit MENU->" appears
[ENTER]
[MENU UP/DOWN] until "Controller/Remote" appears
[ENTER]
[2] to select Remote
[ENTER]
POS4000
4.1.11.3 Set Number of Bays and Consoles
This command is used to define the number of customer interfaces (carwash bays) and remote
POS4000s that are present at a site.
To select this command, scroll through the Multiple Unit sub-menu until "Set # Bays/Consoles"
appears and then press [ENTER].
Note:
Note:
Example to setup a controller console to communicate with 2 customer interfaces and 1 remote
POS4000:
The default is for the console unit to be a controll er.
Do not include the controller POS4000 when counting the number of Remote
POS4000s.
[CMD]
[SYSTEM SETUP]
[3] (password 3)
[MENU UP/DOWN] until "Multiple Unit MENU->" appears
[ENTER]
[MENU UP/DOWN] until "Set # Bays/Consoles" appears
[ENTER]
[2][ENTER] 2 bays
[1][ENTER] 1 remote console
4.1.11.4 Program Remote Consoles
This command is used to program or download information from the controller POS4000 to
remote POS4000s.
To select this command, scroll through the Multiple Unit sub-menu until "Prog Remote Consoles"
appears and then press [ENTER].
Document Number: POS4007 37
Document Title: POS4000/V2 WSII Operations Manual
Note:
Note:
The default is 1 bay and 0 remote consoles.
When setting up a remote console, # of remote consoles is always set to 0.
Page 64

Example to program remote consoles:
[CMD]
[SYSTEM SETUP]
[3] (password 3)
[MENU UP/DOWN] until "Multiple Unit MENU->" appears
[ENTER]
[MENU UP/DOWN] until "Prog Remote Consoles" appears
[ENTER]
This command will take a few moments to execute (depending upon the number of remote
consoles to program). As the information is being passed to the remote console, verification
messages will be displayed on the POS4000 screen. The last message to be downloaded is
“ACK DWLD Tax Rate”; if you see this message displayed for more than 15 seconds, the
downloading is complete. Press the Clear button.
POS4000
Do not attempt to perform any activity at any of the consoles while downloading is in
progress.
Note:
4.1.12 Modem rings
This command is used to configure the number of rings that the modem will answer an outside
call. This is for a POS4000 feature that is no longer supported.
4.1.13 E-System setup MENU->
This command is used to configure an E-systems coin box feature setting. If the E-systems coin
box is equipped with change making or has multiple LCD displays (for each wash type) then here
is where you will enable or disable the feature. This sub-menu is not usable on a Hamilton
Autotec system.
4.1.13.1 Enable/Disable Change
This command is used to Enable or Disable the change-making feature of an E-System coin box.
If your E-System coin box is equipped with change making capability, then you want to have
Change Enabled.
Example to Enable change in an E-syste m coin box remote con soles:
[CMD]
[SYSTEM SETUP]
[3] (password 3)
[MENU UP/DOWN] until E-System setup MENU->" appears
[ENTER]
[MENU UP/DOWN] until "Enab/Disab Change" appears
[ENTER]
[1] [ENTER] Enable change
If your system was incorre ctly configu red fo r change an d you are disab ling chan ge, you
Note:
must first power down and then power up the entry system before it will function
properly.
Document Number: POS4007 38
Document Title: POS4000/V2 WSII Operations Manual
Page 65

4.1.13.2 Enable/Disable Displays
POS4000
This command is used to Enable or Disable the wash displays feature of an E-system coin box. If
your E-System coin box is equipped with multiple LCD displays (E-4000 coin box), then you want
to have Displays enabled.
Example to Enable Displays in an E-syst em coin box remot e consoles:
[CMD]
[SYSTEM SETUP]
[3] (password 3)
[MENU UP/DOWN] until ΑE-System setup MENU->" appears
[ENTER]
[MENU UP/DOWN] until "Enab/Disab Displays" appears
[ENTER]
[1] [ENTER] Enable Displays
If your system was incorrectly configured for multiple displays and you are disabling
Note:
them, you must first power down then power up the coin box before it will function
properly.
4.1.14 Relay Latching
This command is used to set the relay latching to Momentary Outputs (default), or Latched
outputs. When relay latching is disabled (momentary outputs), the relays will pulse on for 1
second then all turn off once the customer enters a code or the appropriate amount of cash. The
relays will then pulse on again if the customer upgrades the wa sh.
When the relay latching is enabled, the program relays will come on when the customer activates
the wash by entering a code or cash. The relays will then stay on until a wash-in-use signal is
inputted to the system, at which time the outputs will all turn off.
4.1.15 Relay Stacking
This command is used to enable relay stacking (default), disable relay stacking, or set to no
customer stacking.
When relay stacking is enabled, the program relays will not activate while the wash-in-use signal
is activated. The relays will wait until the wash-in-use signal is of f to activate t he relays.
This effectively allows the customers to enter their code or cash while the wash is in use. Once
the wash is no longer in use, the appropriate wash is activated and the customer will be prompted
to enter the wash.
If relay stacking is disabled, the only difference is that the program relays will be activated
immediately upon a valid code entry or when the appropriate amount of ca sh is entered.
If No Cust Stacking is set, the customer will not be allowed to enter a code or cash into the entry
system while the wash is in use. If a voice module is available in the entry system, Message 1
should be changed to “Please wait for the wash to complete before entering your code or adding
cash.”
Document Number: POS4007 39
Document Title: POS4000/V2 WSII Operations Manual
Page 66

POS4000
4.2 Multi-Use Codes
The multi-use codes feature, also known as "bundled wash" and similar to a fleet account, is use d
to sell a number of uses of a particular wash at a preset price. The customer gets a single code
for these uses. The price, the number of uses, the type of wash in the package, and the feature
number representing this package are preset in a "template". Once a feature (wash) number is
assigned to the package, the sale of a multi-use code is similar to that of a regular code, just
ringing up the feature number for the package defined in the template.
No programming or setup is needed at the WSII, assuming its connection to the POS4000 is
working, for it to accept the multi-use code. When a multi use code is entered, the display will
show the number of uses left for the code briefly. If the print receipt option is enabled in the
template, a receipt will be printed.
4.2.1 Requirements and Limitations
• The minimum version for the POS4000 is v8.20, and v5.02 for the WSII.
• The POS4000 must have high fleet feature and the WSII must NOT have enhanced fleet
feature. These features are built into the EPROMs and are not programmable, so make
sure to install the right firmware.
• The multi-use code is only supported at the master POS4000 if there are remote
POS4000s.
• The number of codes can be sold is limited by the free fleet account spaces. The multiuse code share the account space with other fleet accounts in the POS4000, where the
fleet account capacity is 1000 with high fleet feature.
4.2.2 Template Programming On the POS4000
Perform the command to access the Multi-Use Code Setup:
[CMD]
[SYSTEM SETUP]
[3] (password 3)
[ENTER]
[MENU UP/DOWN] until "External POS" is displayed
[ENTER]
[MENU UP/DOWN] until "Set Multi-Use Code" is displayed
[ENTER]
If it shows "Menu option not available", check the EPROMs in the POS4000 and the WSII to
make sure they have the correct features (see above), then check the communication between
the POS4000 and the WSII. Fix the problem and try again.
Then follow these steps:
Table 14. Setting Up Multi-Use Code Feature
Display Action
Multi-use codes Allowed? Press 1, then Enter
Enter Account Name Give a name t o the multi-use code, the n press Enter
Document Number: POS4007 40
Document Title: POS4000/V2 WSII Operations Manual
Page 67

POS4000
The Feature Requested by EXT
POS
Wash # sold in the package Enter the number of the wash to be sold in the package,
Max # of uses per package Enter the number of uses in the package, then press
Total package price (in cents)? Enter the price of the package in cents, then pres s Enter
Print code status? Enter 1 if a receipt is printed at the WSII on each use, or
Enter the feature (wash) number representing this
package, then press Enter
then press Enter
Enter
enter 3 for no receipt, then press Enter
After these steps, the template is saved and printed.
4.2.3 Selling a Multi-use Code on the External POS
Ring up a wash with the feature number programmed in the template to start the sale. The code
issued can be used as many times as the number of uses progr ammed in the template.
4.3 Fleet Account Management
This command allows you to establish and maintain fleet accounts. A fleet account allows you to
establish a customer code that can be used multiple times by a fleet account customer. Each
time a fleet account is used, accounting information is stored and an account usage receipt is
optionally printed at the main console printer.
To select the fleet account command press the [CMD] key followed by the [ACCNT INFO] key.
The console will prompt you to enter password 2. Once the correct password is entered, you will
see the secondary menu.
The standard secondary menu consists of the following commands:
• Print All Accounts
• Add an Account
• Delete an Account
• Print 1 Account
• Reset # of Washes
With POS4000 Software Version 7.9 or above and WSII Software Version 4.20 or above (for
combined WSII/POS4000 systems with the Enhanced Fleet Option only), Fleet Account
information is stored in the WSII. With this software, you have the ability to manage all Fleet
Accounts at the POS4000 the same way you would at the WSII, including managing VIP Wash
Cards.
When you open the Account Info at the POS4000, you will see t he following seco ndary menu:
• Add Account
• Edit Account
• Add to an Account
• Delete Account
Document Number: POS4007 41
Document Title: POS4000/V2 WSII Operations Manual
Page 68

POS4000
• Print Account
• Print All Accounts
• Print Trans History
• Delete All Empty
• Erase All Accounts
To execute one of the secondary commands, scroll through the secondary menu until the
command of interest is displayed, and then press the [ENTER] key.
The procedures for using these commands are identical to the procedures used at the WSII.
Refer to the WSII POS Operations Manual “Fleet Accounts and Coupons” section for more
information on these commands.
4.3.1 Print Current Information of All Accounts
To print information on all existing accounts, scroll through the fleet acco unt secondary menu un til
"Print All Accounts" is displayed then press the [ENTER] key. The following information will be
printed for all current fleet accounts:
• Account code
• Account name
• Date and time account was opened
• Maximum number of washes
• Number of uses to date
• Receipt printed or NOT printed
• Wash type
• Unit price of wash
Example:
[CMD]
[ACCOUNT INFO]
[2] (password 2)
[MENU UP/DOWN] until "Print All Accounts" appears
[ENTER]
4.3.2 Add an Account
To add an account, scroll through the fleet account secondary menu until "Add an Account" is
displayed and then press the [ENTER] key.
You will be prompted first for the Account Name. The account name can be up to 20 characters
long and is entered using the alphanumeric charac ters on the keys followed by the [ENT ER] key.
You are then prompted for the Account Code. This code will be given to the customer and used
to activate the car wash. Account codes cannot be longer than 9 digits, must end in a 0 and must
NOT contain a 0 anywhere else in the code. If a car wash code or fleet account with this number
Document Number: POS4007 42
Document Title: POS4000/V2 WSII Operations Manual
Page 69

POS4000
already exists, you will be prompted to "Try Again". If this happens, simply type in a different code
and press [ENTER] again.
Next you will be prompted for the Maximum number Washes. This is the total number of times
this code can be used. For example, if you type 100 followed by the [ENTER] key, the code will
be good for 100 washes.
Next you will be prompted to input the Price Per Wash. This price is the amount that the
customer will owe for each use of the code. If the customer is paying for the washes at the time
the account is established, the price would be set at 0. The price is entered in cents. For e xample,
a $2.50 wash would be entered as '250' followed by the [ENTER] key.
Next, the console will display Print when Used? This item controls whether or not a receipt will
be printed each time the account code is used. If you want a receipt to be printed when the
account code is used press [1] then [ENTER], if you do not want a receipt printed when the
account code is used press [0] then [ENTER].
Finally, you will be prompted to Issue Wash Type. This defines the features for which the fleet
account code will be valid. At this point, issue a car wash as you would during a normal car wash
purchase using the cashier keys. Note that you cannot use a car wash "group" in an account.
Once all the carwash features are selected, press the [ENTER] key. If an invalid set of features
has been selected, the console will display the message "INVALID SELECTION". At this point,
you should re-enter a valid set of features. Once a valid selection is made, the account
information will be printed concluding the transaction. This receipt is for the account customer's
use.
The car wash pricing information entered when establishing an account is only recorded with the
account information. This pricing will be printed each time account information is printed but it is
not used in any of the shift report cash totals. Cash accounting for the accounts must be
performed by reviewing account receipts or printing information for 1 or all accou nts.
It is recommended that account codes be at least 6 digits to minimize the possibility of
someone "jackpotting" an account.
[CMD]
[ACCOUNT INFO]
[2] (password 2)
[ENTER]
[MENU UP/DOWN] until "Add an Account" is displayed
[ENTER]
[A][B][C][ ][T][A][X][I][S]
[ENTER]
[1][2][3][4][5][6] (account code, 0 is optional)
[ENTER]
[4][5] (the code is valid 45 times)
[ENTER]
[3][5][0] ($3.50 value for each use of code)
[ENTER]
[Prog 1] (account wash selection)
[Opt 1]
[Opt 3]
[ENTER]
Note:
Example to create a fleet account with code 1234560 valid for Program 1 + Option 1 + Option 3:
Document Number: POS4007 43
Document Title: POS4000/V2 WSII Operations Manual
Page 70

POS4000
4.3.3 Delete an Account
To delete a specific fleet account, scroll through the fleet account secondary menu until "Delete
an Account" is displayed and then press the [ENTER] key. You will then be prompted for a fleet
account code. If a valid fleet account code is entered, the current account information will be
printed and then the account will be deleted.
Example to delete account 1234560:
[CMD]
[ACCOUNT INFO]
[2] (password 2)
[ENTER]
[MENU UP/DOWN] until "Delete an Account" is displayed
[ENTER]
[1][2][3][4][5][6] (account to delete, 0 is optional)
[ENTER]
4.3.4 Print Information on a Specific Account
To print account information on a single account scroll through the fleet accounts secondary
menu until "Print 1 Account" is displayed then press the [ENTER] key. Once this is selected, you
will be prompted for a fleet account code. If a valid fleet account code is entered, the information
for that account will be printed.
Example to print information for account code 1234560:
[CMD]
[ACCOUNT INFO]
[2] (password 2)
[ENTER]
[MENU UP/DOWN] until "Print 1 Account" is displayed
[ENTER]
[1][2][3][4][5][6] (account code 123456)
[ENTER]
4.3.5 Reset Number of Washes for an Existing Account
The maximum number of washes available for an account can be reset by scrolling through the
fleet account secondary menu until "Reset # Washes" is displayed and then pressing the
[ENTER] key. Once selected, the console will prompt for the fleet account code. If a valid fleet
account code is entered, the console will first print the status of that fleet account. The console
will then prompt for the New # of Washes. When entered, the previous maximum number of
uses will be reset to the new # of washes, the number of uses to date will be cleared and the
updated account information will be printed.
This function clears the previous number of remaining uses of an account. As such,
Note:
Example to change number of washes to 30 for account 1234560:
you must account for the unused value of this account when you reset the number of
uses.
[CMD]
[ACCOUNT INFO]
[2] (password 2)
[ENTER]
[MENU UP/DOWN] until "Reset # of Washes" is displayed
Document Number: POS4007 44
Document Title: POS4000/V2 WSII Operations Manual
Page 71

[ENTER]
[1][2][3][4][5][6] (account code 123456)
[ENTER]
[3][0] (make account good for 30 washes)
[ENTER]
POS4000
4.3.6 Delete Empty Accounts
This new feature added in Version 6.64 is used to delete the fleet accounts in memory that have
used up their available washes. This can be used to clear out some of the fleet account memory
when filled up. The fleet accounts deleted will print up as if you selectively deleted each account
as with the Delete and Account command.
Example to delete empty accounts:
[CMD]
[ACCNOUNT INFO]
[2] (password 2)
[ENTER]
[MENU UP/DOWN] until "Delete Empty accounts" is displayed
[ENTER]
[1] (Yes to delete empty accounts)
[ENTER]
4.4 Accounting Report
Note:
4.4.1 POS4000 Accounting Report
Depending on your particular setup, an accounting report may include the following infor mation:
• DATE AND TIME OF REPORT
• REPORT HEADING - Defines counter levels of the report (either Manager/Shift or Non-
resettable/Auditor)
• DETAILED SALES AND USAGE COUNTS FOR EACH FEATURE
o Feature Label Code sales at each price level (Regular, Discnt1 and Discnt 2)
o Codes used
o Backup codes used - For these codes to be used, the interface board must have
o Fleet account codes used
o If buy up capability is enabled, a dashed line is printed and then wash activation
All accounting reports are mutually exclusive, meaning y ou can clea r any level
(excluding the non-resettables) witho ut affecting the other levels.
been placed in the backup mode (see Section
information is provided:
8).
o # of washes activated with code only
o # of washes activated with cash only
o # of washes activated with a code (valid for a lower priced program) and cash
Document Number: POS4007 45
Document Title: POS4000/V2 WSII Operations Manual
Page 72
o Sub-total of how many times each feature was activated
Note:
• VEHICLES WASHED SUMMARY- Summarizes the sub-totals from the detailed usage
counts
• WASH TIME INFO M:SS - This section indicates the number of times the car wash was
"in-use" for specific time amounts. For example, a count of 50 in the 1:00-2:30 duration
indicates that 50 washes were used that lasted between 1 minute and 2 minutes 30
seconds. This information is derived from the wash in-use signal; therefore numbers may
not be equal to the Vehicles Washed Summary if washes are activated by bypassing the
interface board.
• AUDIT INFORMATION - (typically not used) This section contains information about the
auxiliary counters that are located on the customer interface board. These counters can be
used to count a variety of external events such as coins or tokens inserted at the entry
system. The specific use of the counters is dependent on the particular insta llation.
• POWER OFF INFO. H:MM - This count indicates the number of times the main console
has been powered off for several specific time amounts. For example, a count of 10 in the
1:00-6:00 duration indicates that the main console has been turned off 10 times for 1 to 6
hours each time. This count can be used to determine if someone is trying to defeat the
security of the system by turning the power off.
POS4000
The counts for a particular item are, in general, printed only if the count for at least one
of the levels is non-zero. This "auto-condensing" feature makes the reports easier to
read since extraneous data is not printed.
• COMMAND USAGE COUNTS - This section indicates the number of times each type of
command has been used.
• PASSWORD FAILURES - This section documents the number of times each password
has been entered incorrectly. This can be used to flag possible tampering with the main
console.
• CODE ENTRY ERRORS - This count indicates the number of times an invalid code was
entered at the car wash entrance. This information can help raise suspicions that
somebody has been attempting to "jackpot" the system.
• RAINCHECKS -This count indicates the number of times a rain check has been issued.
• CODES VOID -This count indicates the number of customer codes that have been voided
at the main console.
• REGISTER SUMMARY - details the following items:
o Register Sales: total value of all codes generated
Note:
o Tax on Sales: total value of tax collected
o Sales Refunds: total value of codes that have been voided
The register sales counts do not in clude any entry system sale s or fleet account sales.
o Tax Refunds: total value of taxes from voided codes
o Net Register = 1 + 2 - 3 - 4
Document Number: POS4007 46
Document Title: POS4000/V2 WSII Operations Manual
Page 73

• ENTRY SYSTEM SUMMARY (if BUYUP option present) details the following items:
o Cash Deposited: total value of cash deposited
o Cash Dispensed: total value of cash dispensed
o Net Cash: cash deposited minus cash dispensed
Note:
o Overpayments: Overpayments occur when a customer enters the wash after
depositing some cash, but not enough to purchase the next feature. If overpayments
have been refunded by the cashier, the amount refunded must be used to adjust the
net register amount. This figure is already included in the Cash D eposited figure.
POS4000
The cash totals are a running sum of each cash tran saction. Therefore, if the pri cing
structure is changed during the accounti ng cycle, a computatio n of the total cash v alue
of transactions indicated on the account report made usi ng the counters and cu rrent
prices will not necessarily agree wit h the total cash sales value.
For example: assume the account report is cleared, o ne program 1 wash i s issued at
$1 and then the price is changed to $2 and anot her program 1 i s issued at $2. T he
accounting report would indicate that two program 1 washe s were issued and th at the
current price of program 1 is $2 while the cash total would be $3 (the correct amo unt).
Overpayment refunds are not processed by the mai n console an d therefore NO
Note:
o Quarters: number of quarters that customers have entered
o Bills: number of bills that customers have entered
o Token Coins: number of token coins that customers have entered
o VIP Coupons: number of VIP coupon notes that customers have entered
o Credit Wash: number of washes purchased that involved Credit, Debit, or RFID
• COUNTS CLEARED - Number of times counts have been cleared
o Last Cleared: Time/date that counts were last cleared
adjustment is made for entry syst em overpayments refunded. When an overpayment
ticket is generated and a refund is given, the ticket should be signed by the cu stomer
and cashier and used to reconcile the register.
Note: This command DOES NOT clear the account.
Document Number: POS4007 47
Document Title: POS4000/V2 WSII Operations Manual
Page 74

POS4000
SAMPLE REPORT
POS4000 REPORT
Print or Clear counts
Print Audit Accounts
Date & Time of report
1/12/2010 02:48PM
Levels of this report
The following information is repeated for each wash type:
MANAGER SHIFT
# of codes sold at each price level
PROGRAM 1
Regular $2.50 45 23
Discnt 1 $1.50 4 0
# of PROGRAM 1 codes used
Discnt 2 $0.00 8 3
# of PROGRAM 1 Fleet account codes used
Codes Used 40 21
Accounts Used 2 2
Entries below are actual washes activated:
-----------------
# activated with code only (i.e. no cash)
# activated with cash only (i.e. no code)
Code Only 32 18
Total # of PROGRAM 1 washes activated.
Cash Only 14 9
Sub-total 46 27
No discount sales were made and no fleet account codes were used for PROG 2
PROGRAM 2
Regular $2.50 5 3
Codes Used 5 3
------------------
Lower value code and cash were used
Code Only 3 3
Total # of PROGRAM 2 washes activated
Cash Only 5 1
Code + Cash 7 5
Sub-total 15 9
VEHICLES WASHED SUMMARY
Sum of all Code Only washes
Code Only 73 42
Sum of all Cash Only washes
Cash Only 42 19
Sum of all Code + Cash washes
Code + Cash 58 33
Total of all washes
Total Washes 173 94
NOTES:
Print or Clear counts
Date & Time of report
Levels of this report
The following information is repeated for each wash type:
# of codes sold at each price level
# of PROGRAM 1 codes used
# of PROGRAM 1 Fleet account codes used
Entries below are actual washes activated:
# activated with code only (i.e. no cash)
# activated with cash only (i.e. no code)
Total # of PROGRAM 1 washes activated.
No discount sales were made and no fleet account codes were
used for PROG 2
Lower value code and cash were used
Total # of PROGRAM 2 washes activated
Sum of all Code Only washes
Sum of all Cash Only washes
Sum of all Code + Cash washes
Total of all washes
Entries above the dashed line represent code sales and usage. In systems that allow the
customer to purchase a wash with cash or buy up from a code, the code usage count s cannot be
used to determine how many of each type of wash were activated. This level of detail is given by
the entries below the dashed line.
The lowest priced wash (PROGRAM 1) cannot be activated as a Code + Cash wash.
Any entry that has a count of 0 for both shift levels will not appear in the report (i.e. PROGRAM 2
discount code sales above).
In this example, the VEHICLES WASHED SUMMARY is not intended to balance with the partial
report of the wash programs above.
Document Number: POS4007 48
Document Title: POS4000/V2 WSII Operations Manual
Page 75

POS4000
4.4.2 POS4000-WSII Accounting Report
This section details the references in the POS4000 report to Sales at the Wash Se lect II software.
This report will be available at a connecting POS4000 console when the POS4000 has Wash
Select II software installed. To get more detailed information about the transactions at the Wash
Select II, print an accounting report at the Wash Select II unit or acquire the report over the
Remote Reporting option of the Wash Select II. The POS4000 report does not contain the exact
same information that the Wash Select II report does.
Sample POS4000 Manager/Shift Report when connected to a Wash Select II:
Print Audit Counts
05/30/1991 10:10PM
MANAGER SHIFT
CODE SALES/USAGE and
WASH ACTIVATION SUMMARY
EXPRESS WASH
Regular $ 4.00 13 8
Discnt 1 $ 0.00 0 0
Discnt 2 $ 0.00 0 0
Codes Used 7 3 POS4000 codes used at WSII
Accounts Used 0 0 POS4000 fleet account codes
uses at WSII
-------------- POSCode Only 6 2 Transactions at the WII
that involved only a POS4000
code.
Coinbox Only 5 5 Transactions at the WSII
that involved any form of
payment not including a
POS4000 code (Credit, cash,
token, VIP coupon etc.)
POSCode & Upgrd 0 0 Transactions that involved
both a POS4000 code and some
other type of payment as an
an upgrade.
Sub-total 11 7
DELUX WASH
Regular $ 5.00 10 6
Discnt 1 $ 0.00 0 0
Discnt 2 $ 0.00 0 0
Codes Used 3 1
Accounts Used 0 0
-------------- POSCode Only 3 1
Coinbox Only 6 6
POSCode & Upgrd 0 0
Sub-total 9 7
Document Number: POS4007 49
Document Title: POS4000/V2 WSII Operations Manual
Page 76

POS4000
SUPER WASH
Regular $ 6.00 11 5
Discnt 1 $ 0.00 0 0
Discnt 2 $ 0.00 0 0
Codes Used 5 2
Accounts Used 0 0
-------------- POSCode Only 4 1
Coinbox Only 5 5
POSCode & Upgrd 0
Sub-total 9 6
WORKS WASH
Regular $ 7.00 8 5
Discnt 1 $ 0.00 0 0
Discnt 2 $ 0.00 0 0
Codes Used 1 0
Accounts Used 0 0
-------------- POSCode Only 1 0
Coinbox Only 8 8
POSCode & Upgrd 2 2
Sub-total 11 10
VEHICLES WASHED SUMMARY
POSCode Only 14 4 Totals for all washes
Coinbox Only 24 24 Totals for all washes
POSCode & Upgrd 2 2 Totals for all washes
Offline Wash 1 2 2 Coinbox only washes that
Offline Wash 2 2 2 occurred while the POS4000
Offline Wash 3 3 3 was not communicating to the
Offline Wash 4 2 2 WSII coin box or was turned
off.
Total Washes 49 39 Total of all washes above.
WSII FLEET INFO
WSII Fleet 1 2 2 Counts for washes at WSII
WSII Fleet 2 2 2 that were paid for by using
WSII Fleet 3 5 5 a standard fleet code. These
WSII Fleet 4 4 4 are also counted in Coinbox
only counts.
Coupon Codes 1 1 Coupon Account Codes/Cards
used.
COMMAND USAGE COUNTS
Fleet Accounts 0 0
Print Audit Co 17 5
Set Pricing 6 5
Service Routing 0 0
Clear Audit Co 3 0
Set Messages 0 0
Document Number: POS4007 50
Document Title: POS4000/V2 WSII Operations Manual
Page 77

POS4000
Set Passwords 0 0
Void a Code 0 0
Memory Info. 0 0
Check Code sta 0 0
Code Sales Loc 0 0
PASSWORD FAILURES
Password 1 1 0
Password 2 0 0
Password 3 0 0
Password 4 0 0
Password 5 0 0
CODE ENTRY ERRS 1 0
RAINCHECKS 0 0
CODES VOID 0 0
REGISTER SUMMARY
Console Sales $165.80 $124.80
EXT POS Sales $0.00 $0.00
Tax on Sales $3.23 $3.23
Sales Refunds- $0.00 $0.00
Tax Refunds - $0.00 $0.00
Net Register $169.03 $128.03
COIN BOX SUMMARY
Cash Deposited $53.00 $53.00
Cash Dispensed $11.00 $11.00
Net Cash $42.00 $42.00
Overpayments $0.00 $0.00
Quarters: 28 28
$1 6 6 Includes $1 coins
$2 Bills: 0 0
$5 Bills: 4 4
$10 Bills: 2 2
$20 Bills: 0 0
Token Coins: 1 1 Token counts. This is the #
of token input pulses. If you
have multiple tokens
programmed, this
number will be based on the
programmed token value in the
Wash Select II.
VIP Coupons: 4 4 Number of VIP Wash Coupons
Credit Wash 1: 2 2 Number of transactions
Credit Wash 2: 3 3 involving Credit/Debit cards
Credit Wash 3: 2 2 or RFID (even if other payment
Credit Wash 4: 5 5 types were also used)
Document Number: POS4007 51
Document Title: POS4000/V2 WSII Operations Manual
Page 78
POS4000
COUNTS CLEARED 0 3
Last Cleared: 05/26/1991 05/27/1991
04:06PM 03:06PM
COIN BOX PRICING
Wash Select II - Bay 1 This price should match the
EXPRESS WASH $ 3.80 Wash Select II pricing. If
DELUX WASH $ 4.75 not then program the pricing
SUPER WASH $ 5.70 at the Wash Select II.
WORKS WASH $ 6.65
The following table will help you to cross reference the information on the POS4000 accounting
report to the Wash Select II report.
Table 15. POS4000/WSII Accounting Report Cross Reference
POS4000 Report Item Equivalent Item on Wash Select II POS
Codes used POS4000 code usage.
Note that the Wash Select II cannot tell if the
POS4000 code was generated for one customer
(random code) or if it was for a POS4 000 f leet code.
POS4000 code usage will be the sum of the two
POS4000 accounting report items “Codes used”
and “Accounts used” found in the POS4000
accounting report.
Accounts used POS4000 code usage.
Note that the Wash Select II cannot tell if the
POS4000 code was generated for one customer
(random code) or if it was for a POS4 000 f leet code.
POS4000 code usage will be the sum of the two
POS4000 accounting report items “Codes used”
and “Accounts used” found in the POS4000
accounting report.
POS Code Only POS Code Only
Document Number: POS4007 52
Document Title: POS4000/V2 WSII Operations Manual
Page 79
POS4000
POS4000 Report Item Equivalent Item on Wash Select II POS
Coinbox Only
Note:
If the Wash Select II activated washes
while not communicating to the
POS4000, some Coinbox Only
transactions will appear in the Offline
Wash category. Thus total Coinbox
washes will be Offline Wash + Coinbox
Only.
Sum of the all Activation transactions except for:
POS Code Only and
POS Code + Other
This includes:
Cash Only
Credit Only
Token Only
Cash + Token
Fleet Only
Fleet + Cash
Fleet + Token
Fleet + Other
Coupon + Cash
Coupon + Credit
Coupon + Token
Coupon + Other
VIP Coupon Only
VIP Coupon + Other
POS Code & Upgrade POS Code + Other
Offline Wash (1-4)
Note:
If the Wash Select II activated washes
while not communicating to the
POS4000 the Coinbox only transactions
will appear in the Offline Wash category.
Thus total Coinbox washes will be Offline
Sum of all Wash Select II non-POS4000 code
related transactions that occurred while offline with
POS4000.
Example:
Coinbox Only + Offline Wash = sum of all non
POS4000 code transactions as listed above in
Coinbox Only (Credit, Cash, Token etc.)
Wash + Coinbox Only.
WSII Fleet (1-4) Sum of:
Fleet Only
Fleet + Cash
Fleet + Token
Fleet + Other
Coupon Codes Sum of:
Coupon + Cash
Coupon + Credit
Coupon + Token
Coupon + Other
$1 Sum of $1 coins and $1 bills
Document Number: POS4007 53
Document Title: POS4000/V2 WSII Operations Manual
Page 80
POS4000
POS4000 Report Item Equivalent Item on Wash Select II POS
Token Coins
VIP Coupons Sum of Coupon 1 + Coupon 2 + Coupon 3 under
Credit Wash (1-4) Number of transactions involving Credit/Debit cards
Tokens:
Note: If you have the Multi coin option and you hav e
multiple coins programmed. This value will be
based on the number of pulses rece ived.
Example:
WSII programmed as $1 token.
Coin acceptor programmed for $1 token (1 pulse),
$5 token (5 pulses), and $6 token (6 pulses).
If you have received 10 $5 tokens, 5 $6 tokens and
4 $1 tokens then the report will show 84 Token
Coins This is from
(10x5 + 5x6 + 4x1 = 84)
the VIP Wash Coupons section
or RFID (even if other payment types were also
used)
4.4.3 Print Accounting Report
This command is used to print an accounting report. Accounting information is maintained in 4
levels. Three of the levels can be cleared independently of the other levels; the fourth cannot be
reset. An accounting report consists of two levels printed in adjacent columns.
To select this command, press the [CMD] key followed by the [PRINT REPORT] key. At this
point, you should press [MENU UP/DOWN] until the desired report levels appear (you can print
either the Shift and Manager levels or the Auditor and Non-resettable levels) and then press
[ENTER].
Example to print the Accounting report for the Auditor and Non-resettable levels:
Note:
This command does NOT clear the co unts.
[CMD]
[PRINT REPORT]
[MENU DOWN]
[ENTER]
4.5 Set Prices
This command lets you set the prices for each feature (programs, options and
groups). To select this command, press the [CMD] key followed by the [SET
PRICE] key. Then scroll to the secondary menu item of interest and press the
[ENTER] key. The secondary menu items are as follows:
• Set Regular Prices
Document Number: POS4007 54
Document Title: POS4000/V2 WSII Operations Manual
Page 81

POS4000
• Set Discount 1 Price
• Set Discount 2 Price
• Print Pricing Report
To execute one of the secondary commands, scroll through the secondary menu until the
command of interest is displayed, and then press the [ENTER] key.
4.5.1 Set Regular or Discount Prices
Once a price level has been selected (regular, discount 1 or discount 2), the pricing of all features
at that price level can be set. The label and current price of feature 1 will be displayed. At this
point, you should type in the new price and press [E NTER], the price will be updated and the next
feature label and current price will be displayed. Continue this for each feature. To keep the
current price of a feature, simply press [ENTER] when the curre nt price is displayed.
When entering discount prices, enter the final price to a customer. Do NOT enter the amount of
the discount. If the discount prices are set to zero, they are considered free .
Each price must be entered as cents followed by the [ENTER] key. For example, a $2.35 price
would be entered as 235 followed by the [ENTER] key. To zero the price of an item, press the [0]
key followed by the [ENTER] key.
Any time the prices are updated, a Current Pricing Report will automatically be printed. This
report shows the current price of every feature at all 3 price levels. This report can also be
generated by selecting the command "Print Pricing Report" from the secondary menu.
For POS4000 software versions 7.4 and later, the POS4000 will automatically update pricing at
the WSII every time power is cycled to the WSII or communication is lost between the POS and
the WSII for more than 20 seconds. This requires WSII version 3.10 or later.
Note:
Example to set regular (full) price structure:
Prices should only be set immediately after the counters are cleared and before any
tickets are issued. This will avoid any confusi on in the cash t otal.
[CMD]
[SET PRICES]
[2] (password 2)
[ENTER]
[MENU UP/DOWN] until "Set Regular Prices" appears
[ENTER]
[3][5][0] (set feature 1 full price to $3.50)
[ENTER]
[4][7][5] (set feature 2 full price to $4.75)
[ENTER]
! (continue through all features)
!
[ENTER]
After the final feature price is programmed, a current pricing report will be g enerated.
Document Number: POS4007 55
Document Title: POS4000/V2 WSII Operations Manual
Page 82

Note:
POS4000
When using Cash acceptance at the entry system, regular prices for Wash programs
and Groups must be in ascending orde r. Thus Program 1 must be le ss than program 2,
Program 2 must be less than program 3. If wash prices are not in ascending order then
washes may be ignored, or falsely armed during a cash transaction at the entry
system.
4.5.2 Print Pricing Report
This command is used to generate a report of the current prices of all features at all 3 price levels.
Note that this report is automatically printed after any price level is se t (see Section
Example to print pricing report:
[CMD]
[SET PRICES]
[2] (password 2)
[ENTER]
[MENU UP/DOWN] until "Print Pricing Report" appears
[ENTER]
4.5).
4.5.3 Set Tax Rate
This command allows you to set the tax rate used when tickets are generated. To select this
command, scroll through the system configuration secondary menu until "Set Tax Rate" is
displayed and press the [ENTER] key. Once selected you will be prompted Enter Tax Rate as
00.0%. Type in the tax rate followed by the [ENTER] key.
Example to set Tax Rate to 5.0%:
[CMD]
[SET PRICES]
[2] (password 2)
[MENU UP/DOWN] until "Set Tax Rate" appears
[ENTER]
[5][0]
[ENTER]
4.5.4 Enable TAX Round Off
This command allows you to enable or disable tax round off. The tax round off feature is useful
when the price of a wash including taxes does not result in an even dollar amount. If tax round off
is enabled then the amount of tax will be increased or decreased by $0.01 to result in an even
price. To select this command scroll through the system configuration secondary menu until
"Enable TAX Round Off" appears, and then press [ENTER].
Once selected, you will be prompted to press [0] then [ENTER] to disable tax round off or [1] then
[ENTER] to enable tax round off.
Example to enable tax round off:
[CMD]
[SET PRICES]
[2] (password 2)
[MENU UP/DOWN] until "Enable TAX Round Off" appears
[ENTER]
[1]
[ENTER]
Document Number: POS4007 56
Document Title: POS4000/V2 WSII Operations Manual
Page 83

POS4000
The default setup is tax round off disable. This feature is typically only useful when
relatively large tax rates and/or prices are in use.
Note:
4.6 Service Routines
This command allows you to see the current system configuration and run various diagnostic
tests. To select this command, press the [CMD] key followed by the [SERVICE] key. After
entering the correct password, you can scroll through the secondary menu that follows:
• Print Configuration
• Link Test
• LED Test
• Print Last 10 customer transactions
• Set print to Display (non-printer mode)
To execute one of the secondary commands, scroll through the secondary menu until the
command of interest is displayed, and then press the [ENTER] key.
Password 4 cannot be changed. It is always 62747. This is the only command that
Note:
password 4 is used for. It is intended for use by service personnel during installation
and while trouble-shooting problems.
4.6.1 System Configuration Report
The "Print Configuration" command is used to print detailed information about the setup and
configuration of your POS4000 main console and customer interface. This report can be used to
verify several user programmable parameters, (e.g. tax rate, languages, etc.) as well as fixed
parameters (e.g. software version and system compatibility).
Example to print system configuration report:
[CMD]
[SERVICE]
[6][2][7][4][7] (password 4)
[MENU UP/DOWN] until "Print Configuration" is displayed
4.6.2 Link Test
The "Link Test" command is used to test the communication link between the main console and
the customer interface. To execute this command, press [CMD][SERVICE], provide password 4,
and then select "Link Test" from the secondary menu.
The console will prompt you to Enter Unit Number or "0" to send to all. The unit number refers
to the specific component on the communication network to test. In a typical installation, the main
[ENTER]
Note:
If you need to contact technical support fo r a ssi stance wi th your p rodu ct, ple ase hav e a
current system configuration report availa ble.
Document Number: POS4007 57
Document Title: POS4000/V2 WSII Operations Manual
Page 84

POS4000
console is assigned unit #1 and the customer interface is assigned unit #2. You should type the
unit number you wish to test followed by the [ENTER] key. The console will briefly display "Wait
Response From" followed by "UNIT n RESPONSE OK" if the test was successful or "UNIT DID
NOT RESPOND" if the test failed.
Example to test link with Unit 2:
[CMD]
[SERVICE]
[6][2][7][4][7] (password 4)
[MENU UP/DOWN] until "Link Test" is displayed
[ENTER]
[2]
[ENTER]
4.6.3 LED Test
The "LED Test" command is used to test the Light Emitting Diodes (LED) located on the main
console below the POWER LED. To execute this command, press [CMD][SERVICE], provide
password 4, and then select "LED Test" from the secondary menu. At this point, you select from
the following menu:
• Turn All LEDs Off
• Turn Wash-In-Use On
• Turn Out-Of-Serv. On
• Turn LED 3 On
• Turn LED 4 On
• Quit
The following procedure tests each LED:
[CMD]
[SERVICE]
[6][2][7][4][7] Password 4
[ENTER]
[MENU UP/DOWN] until "LED Test" appears
[ENTER]
[MENU UP]
[ENTER] Wash-In-Use LED should turn on
[MENU UP]
[ENTER] Wash-In-Use LED should turn Off, Out-Of-Service LED should turn on
[MENU UP]
[ENTER] Out-Of-Service LED should turn off, LED 3 should turn on
[MENU UP]
[ENTER] LED 3 should turn off, LED 4 should turn on
[MENU UP]
[ENTER] LED 4 should turn off and the commanded is terminated
Document Number: POS4007 58
Document Title: POS4000/V2 WSII Operations Manual
Page 85

POS4000
4.6.4 Set Print To display (Non printer Mode)
This command implemented in Version 6.67 allows the manual control of printing
the customer’s code to the display during a code printing. It is intended for when
the ticket printer connected to the POS4000 is not functioning properly. When Set
print to display is enabled, the customer code will be displayed on the POS4000
main screen for 10 seconds then cleared. The cashier must write this code down
before it clears. While the code is displayed, no other code can be generated. The
cashier must wait for the first customer code to clear before proceeding.
Example to set non-printer mode:
[CMD]
[SERVICE]
[6][2][7][4][7] (password 4)
(Example to set non-printer mode cont.)
[MENU UP/DOWN] until "Set print to Display" is displayed
[ENTER]
[1] [ENTER] to enable printing customer codes to display
4.6.5 Display POS Diags
This command is used in troubleshooting the connection to the external POS
device. Enabling it will cause the POS4000 display to show diagnostic messages
that may be useful to technicians or the Engineering division of Unitec. Do not use
this command unless directed to do so by a qualified person.
Example to configure the displaying of POS diagnostic messages:
[CMD]
[SERVICE]
[6][2][7][4][7] (password 4)
(Example to enable the setting)
[MENU UP/DOWN] until "Display POS Diags" is displayed
[ENTER]
[1] [ENTER] to enable the displaying of POS diagnostics
4.7 Clear Audit Counts
This command prints an accounting report like the list counts command, but it also clears the
selected counter level after the report is print ed.
Three sets of the counters (shift, manager, and auditor) can be cleared. Each level requires a
different password to clear. The shift, manager and auditor counts are cleared using passwords
1, 2, and 5 respectively.
Example to clear the Manager level:
[CMD]
[CLEAR REPORTS]
[MENU UP/DOWN] until "Clear Manager Counts" appears
[ENTER]
[2] (password 2, depends on level requested)
Document Number: POS4007 59
Document Title: POS4000/V2 WSII Operations Manual
Page 86

[ENTER]
POS4000
4.8 Set Messages
This command allows you to define the Header Message that is printed at the top of each ticket,
the footer message that is printed at the bottom of each ticket and the Postscript messages that
are optionally printed at the bottom of tickets.
To select the Set Messages command, press the [CMD] key followed by the [SET MSGS] key.
The console will prompt you to enter password 1. Once the correct password in entered, you can
scroll through the secondary menu that follows:
• Change Header Msg.
• Change Postscript 1
• Change Postscript 2
• Change Postscript 3
• Change Postscript 4
• Change Postscript 5
• Change Footer Msg.
• Change Coinbox Msg. (Esystem 4000 only)
• Print Message Config
To execute one of the secondary commands, scroll through the secondary menu until the
command of interest is displayed, and then press the [ENTER] key.
4.8.1 Change Header Message
The Header Message is printed at the top of every ticket. It can be up to 10 lines long with each
line containing up to 40 regular sized black or red characters (20 if bold characters are used). To
change the Header message, scroll through the Set Messages secondary menu until "Change
Header Msg" appears, then press the [ENTER] key.
Once the secondary menu item is selected, the console will prompt you to Enter Line #, 99 All.
Individual message lines can be changed (enter the line number to change) or the entire
message can be changed (enter 99). Type the line number to change (i.e.. 1, 2, 3...) or 99 to
change the entire message, followed by the [ENTER] key.
Next, you will be prompted to enter the message for each line using the alternate key functions
shown on the right side of the keys.
When the "change entire message" option is selected, the console will prompt for the text for the
first line first. You should type in the text you want for line 1 followed by the [ENTER] key. Next,
the console will prompt for the next line and so on until all lines are completed. All lines must be
entered even if they are to be blank.
When you want a line to be blank, press only the [ENTER] key when the console prompts for the
text for that line. Blank lines will be printed only if non-blank lines follow them. For example, if the
last two lines of a message are blank they will not g enerate blank line s when printed.
Document Number: POS4007 60
Document Title: POS4000/V2 WSII Operations Manual
Page 87
(Example to change header message text cont.)
* (repeat for each line)
Note:
Example to change header message text:
[CMD]
[SET MESSAGES]
[1] (password 1)
[ENTER]
[MENU UP/DOWN] until "Change Header Msg." appears
[ENTER]
[9][9] (to change all lines of message)
[ENTER]
[T][H][I][S][ ][I][S][ ][A][ ][T][E][S][T]
[ENTER]
*
[ENTER]
POS4000
To simplify the message setup, it is recommended that the "change entire message"
function be selected when several lines of a message are being changed. This will
minimize the number of times the command has to be ex ecuted.
4.8.2 Change Postscript 1-5
Up to 5 postscript messages can be defined. Each postscript message can be up to 5 lines long
with each line containing up to 40 regular sized black or red characters (20 if bold characters are
used). To change a Postscript message, scroll through the Set Messages secondary menu until
the desired "Change Postscript #" message appears, th en press the [ENTER] key.
Postscript messages are only printed when a ticket is issued with a wash function that has a
postscript message number assigned to it. For example, if a ticket is issued with full price option 1
and postscript message 2 has been assigned to the full price option 1 feature, postscript
message 2 will be printed at the end of the ticke t.
The current assignment of postscript messages is included on the Message Configuration
Report. If a ticket contains more than 1 feature with the same postscript message assigned to it,
the postscript message will only be printed once. If a ticket contains more than 1 feature with
different postscript messages assigned to them, they will be printed in ascending order (1 - 5)
regardless of the order of the wash functions they are associated with. If a ticket contains
postscript messages and a footer message, the postscript messages will be printed first .
The process for changing a Postscript message is identical to that used to change the Header
message.
Example to change Postscript message 1:
[CMD]
[SET MESSAGES]
[1] (password 1)
[ENTER]
[MENU UP/DOWN] until "Change Postscript 1" appears
[ENTER]
[9][9] (to change all lines of message)
[ENTER]
[T][H][I][S][ ][I][S][ ][A][ ][T][E][S][T]
[ENTER]
* (repeat for each line)
Document Number: POS4007 61
Document Title: POS4000/V2 WSII Operations Manual
Page 88

*
[ENTER]
POS4000
4.8.3 Change Footer Message
The Footer Message is printed at the bottom of every ticket. It can be up to 10 lines long with
each line containing up to 40 regular sized black or red characters (20 if bold characters are
used). To change the Footer message, scroll through the Set Messages secondary menu until
"Change Footer Msg" appears, then press the [ENTER] key.
The process for changing the Footer message is identical to that used to change the Header
message.
Example to change footer message:
[CMD]
[SET MESSAGES]
[1] (password 1)
[ENTER]
[MENU UP/DOWN] until "Change Footer Msg." appears
[ENTER]
(Example to change footer message cont.)
[9][9] (to change all lines of message)
[ENTER]
[T][H][I][S][ ][I][S][ ][A][ ][T][E][S][T]
[ENTER]
* (repeat for each line)
*
[ENTER]
4.8.4 Change Coinbox Messages (E-System 4000 Only)
The entry system messages define the text contained on the LCD displays on the E-System 4000
entry system. The first line will contain the wash name and price. The second line may be edited
to your choosing. If you edit the first line, it will be re-written to the wash name and price if you
change either.
The process for changing the entry system message is different from the other messages. You
will be prompted for the display number (Note displays are numbered from bottom to top,
corresponding to Program 1 - 4 or Groups 1 -4). You will also be prompted for the line number (1
is the top and 2 is the bottom).
Example to change Display 1 Line 2 (top display bottom line) message:
[CMD]
[SET MESSAGES]
[1] (password 1)
[ENTER]
[MENU UP/DOWN] until "Change Coinbox Msg" appears
[ENTER]
[1] (to change display number 1)
[ENTER]
[2] (to change line 2)
[ENTER]
[W][A][S][H][ ,[ ][D ][R][Y][ ][&][W][A][X]
[ENTER]
Document Number: POS4007 62
Document Title: POS4000/V2 WSII Operations Manual
Page 89

After updating the messages, the current message structure will be updated onto the entry
system message screens.
POS4000
4.8.5 Print Current Message Configuration
This command is used to generate a printout of the current header message, postscript
messages and their assignments and footer message. To execute this command, scroll through
the Set Messages secondary menu until "Print Message Config" appears and then press
[ENTER].
Example to print current message configuration report:
[CMD]
[SET MESSAGES]
[1] (password 1)
[ENTER]
[MENU UP/DOWN] until "Print Message Config" appears
[ENTER]
4.9 Set Pass words
This command allows you to change the passwords that control access to specific commands.
To select this command press the [CMD] key followed by the [PASSWORDS] key. You will be
prompted to enter password 3. Once the correct password is entered, you can scroll through the
secondary menu that follows:
• Change Password 1
• Change Password 2
• Change Password 3
• Change Password 5
• Change Serial Pass (password used for access via serial port)
To execute one of the secondary commands, scroll through the secondary menu until the
command of interest is displayed, and then press the [ENTER] key.
Password 4 cannot be changed. It is intended to be used by service personnel.
Password 4 only allows access to the Service Routines comma nd.
Note:
4.9.1 Change a Specific Password
To change a password, scroll through the secondary menu until the password of interest is
displayed, and press the [ENTER] key. At that point, you will be prompted to enter a new
password. Enter a numeric password between 0 and 4,294,967,295 and then press the [ENTER]
key. The new password will be printed as a confirmation. Save and protect access to this
password.
Example to change password 1 to 12345:
[CMD]
[PASS WORDS]
[3] (Password 3)
[ENTER]
[MENU UP/DOWN] until "Change Password 1" appears
Document Number: POS4007 63
Document Title: POS4000/V2 WSII Operations Manual
Page 90
[ENTER]
[1][2][3][4][5] (new password 1)
[ENTER] At this point the new password will be printed.
Caution:
POS4000
SAVE THIS LISTING. THERE IS NO METHOD TO DETERMINE THE CURRENT
PASSWORDS ONCE THEY HAVE BEEN CHANGED.
If password 3 is forgotten, a service call will be required to reset the system. This reset will return
EVERYTHING to factory default values and will delete all codes from memory.
The System Configuration report (see Section
4.1) contains a section that contains the DEFAULT
passwords for the system (not the current passwords if th ey have been changed).
The use of larger passwords maximizes the security of the system. However, if you are not
concerned about system security a shorter password can be used. For example, if you changed
password 1 to be 1, you would only be required to enter 1 when password 1 was request ed.
4.10 Void a Code
This command is used to delete a single valid code from memory. Carwash codes can only be
voided prior to use. Once a code has been voided, it will not activate the carwash. To select the
void code command, press the [CMD] key followed by the [VOID CODE] key. The console will
prompt for password 1, followed by the code number to be voided.
If the code is valid, several things will occur:
• The code is removed from the valid code memory.
• A void code ticket is printed. The cashier should sign this ticket and save it with the original
ticket for use in the shift close-out audit.
• The cash value of the ticket is added to the void ticket account (this account is included in
the audit report).
If the code is not valid, a message will be printed indicating this.
Example to void code 123450:
[CMD]
[VOID CODE]
[1] (password 1)
[ENTER]
[1][2][3][4][5]
[ENTER]
4.11 Memory Information
The memory management command provides you with a means to review and control the
customer code memory of the POS4000. To select this command, press the [CMD] key followed
by the [MEMORY] key. The console will prompt for password 2. Once the correct password is
entered, you can scroll through the secondary menu that follows:
• Print Valid Codes
• Print Used Codes
• Clear ALL Valid
Document Number: POS4007 64
Document Title: POS4000/V2 WSII Operations Manual
Page 91

POS4000
• Clear ALL Used
• Clear Old Codes
To execute one of the secondary commands, scroll through the secondary menu until the
command of interest is displayed, and then press the [ENTER] key.
Note:
This command does not give access to the fleet account information.
4.11.1 Print Valid Codes
This command can be used to print all valid codes. To execute this command, scroll through the
MEMORY secondary menu until "Print Valid Codes" appears. Then press [ENTER].
When this command is executed, the console will display the total number of valid codes in
memory and then prompt for the number of codes that you want printed. Type the number of
codes you want followed by the [ENTER] key. The console will print that many of the most
recently issued valid codes.
Example to print 50 most recent valid codes:
[CMD]
[MEMORY]
[1] (password 1)
[ENTER]
[MENU UP/DOWN] until "Print Valid Codes" appears
[ENTER]
[5][0] (number of codes you want printed)
[ENTER]
4.11.2 Print Used Codes
This command is the same as the "Print Valid Codes" command except that it prints the most
recently used codes.
4.11.3 Clear ALL Valid Codes
This command cancels all valid customer codes currently in memory. To execute this command,
scroll through the MEMORY secondary menu until "Clear ALL Valid" appears. Then press
[ENTER].
In addition to the password security, this function requires you to confirm the operation by
entering 99. This provides extra security to avoid accidental deletion of the codes. This command
does not delete fleet account codes.
Example to delete all valid codes from memory:
[CMD]
[MEMORY]
[1] (password 1)
[ENTER]
[MENU UP/DOWN] until "Clear All Valid" is displayed
[ENTER]
[9][9] (enter 99 to proceed)
Document Number: POS4007 65
Document Title: POS4000/V2 WSII Operations Manual
Page 92

[ENTER]
POS4000
4.11.4 Clear ALL Used Codes
This command is the same as the Clear ALL Valid command except that the used customer
codes are canceled.
4.11.5 Clear Old Codes
This command allows you to cancel valid customer codes that were issued prior to a specific
date. This command is required to enforce the code age warning (see Section
the bottom of a ticket. To select this command, scroll through the secondary menu until "Clear
Old Codes" is displayed. Then press [ENTER].
Once you have selected this option, you will be prompted for the date to delete codes prior to in
the format MMDDYY (month, day and year each as 2 digits). All codes issued prior to this date
will be deleted. For example: if you enter 050692, all valid codes issued prior to May 6, 1992 will
be marked for deletion. Note 00-89 = 2000-2089 and 90-99 = 1990-199 9.
The console will then prompt you to either cancel only the "0=Free" codes (total price was
"$0.00") or the "1=All" codes. Press [0] then [ENTER] to delete only free codes or [1] then
[ENTER] to delete all codes. Once you have made this selection, the console will print a report
indicating the number of valid codes currently in memory and the number of codes that will be
deleted by your current request. At this point, you must press [9][9][ENTER] to confirm that you
wish to cancel the codes selected. If you enter any other number or just press [ENTER], the
command will be aborted and no codes will be deleted.
4.1.3) printed at
Depending upon the number of codes being deleted, this command may require several minutes
to complete. This is normal. During this time, other functions cannot be performed. Codes delet ed
will NOT be found using the check code command.
If the console time has been changed recently by one or more days, unanticipated
Warning:
code cancellations could occur. This command uses the current date (as set in the
POS4000) and the date codes were issu ed (also as set in the PO S4000) to deter mine
which codes will be canceled.
4.12 Code Sales Lockout
This menu of commands allows the POS4000 to lock out code sales at the console. This is
available if you want to disable the ability to sell codes from the console only. This can be used for
instance when the POS4000 is connected to an External POS device (Site controller or Register)
and it is desired to keep from issuing sales from the console. Two functions are available:
• Lock Console Sales – Enables or Disables console sales
• Change Password – Changes the Code lockout password
Document Number: POS4007 66
Document Title: POS4000/V2 WSII Operations Manual
Page 93
POS4000
This menu is password protected by the “Code Lockout Password”. This password is
defaulted to 272001.
Note:
4.12.1 Lock Console Sales
This function is used to enable or disable the Console code sales. When enabled, no codes can
be printed from the console. No external POS functions will be affected by this feature. Check a
code and Void a code functions are also not affected by this feat ure.
Example to enable console code sales lockout feature:
[Menu Down] until you see “Code Sales Lockout”
[Enter]
[272001] (Lockout password )
[ENTER]
Screen should show “Lock Console Sales”
[ENTER]
[1] 1 to Enable (0 to disable)
[ENTER]
4.12.2 Change Lockout Password
This function is used to change the Console Code Lockout password.
Example to Change Lockout Password:
[Menu Down] until you see “Code Sales Lockout”
[Enter]
[272001] (Default Lockout password)
[ENTER]
Screen should show “Lock Console Sales”
[Menu Up]
Screen should show “Change Password”
[ENTER]
[XXXXX] Enter new password (up to 8 digits)
[ENTER]
4.13 Check Code Status
This command allows you to check the status of a code. To access this command, press the
[CMD] key followed by the [CHECK CODE] key. The console will prompt you to enter the code to
check. Type the code to check followed by the [ENTER] key. The console will print the status of
the code as either valid, used, previously canceled or not in memory.
If the code is valid, the date/time it was issued and the features associated with are printed. If the
code has been used, the date/time it was redeemed is printed. If the code was previously
canceled (using the void code command), the date/time that it was canceled is printed. If the code
is not found in memory, the date and time of the oldest valid and used codes currently held in
memory will be printed.
Document Number: POS4007 67
Document Title: POS4000/V2 WSII Operations Manual
Note:
Fleet account codes will not be validated by this function for the security of those
accounts.
Page 94

POS4000
Possible conditions if code not found:
• Issue date on ticket older than the oldest valid code: Ticket may or may not have been
used (Can not determine). If ticket is older than code age warning on ticket, note this to
the customer.
• Issue date on ticket younger than oldest valid code but older than oldest used code:
• Ticket was used, but has since rolled out of the used codes database.
Example to check code 123450:
[CMD]
[CHECK CODE]
[1][2][3][4][5] (0 is optional)
[ENTER]
4.14 Setup a Feature
This command allows you to change the label (or name) of the features associated with each of
the cashier keys. These names are printed on tickets when codes are generated, accounting
reports, pricing reports and the system configuration report.
This command is also used to assign a postscript message to a feature at a specific price level.
For example, option 1 could be programmed to print a different postscript message when issued
at full price than when issued at discount 1 or discount 2. This allows you to have special
messages with certain discount levels.
To select the setup command, press the [CMD] key followed by the cashier key you want to
setup. Once the correct password is entered, you can scroll through the secondary menu that
follows:
• Change Wash Name
• Set Reg. Postscript
• Set Dis 1 Postscript
• Set Dis 1 Postscript
• Set Postscript All $
To execute one of the secondary commands, scroll through the secondary menu until the
command of interest is displayed, and then press the [ENTER] key.
4.14.1 Change Feature Name
To change the name (or label) of a feature, scroll through the Setup secondary menu until
"Change Wash Name" is displayed. Then press the [ENTER] key.
At this point, the top line of the display will prompt you to Enter Label Name and the second line
will display the current name of the feature. By using the alphanumeric characters on the keys,
you should type in the new name of the feature.
Warning:
Document Number: POS4007 68
Document Title: POS4000/V2 WSII Operations Manual
If you press [ENTER] when the current name is displayed, you will change the label to
be BLANK.
Page 95

Example to change the name of feature 1 (typically "PROGRAM 1") to "ECONO-WASH":
[CMD]
[FEATURE 1] (cashier key)
[1] (password 1)
[MENU UP/DOWN] until "Change Wash Name" appears
[ENTER]
[E][C][O][N][O][-][W][A][S][H] (to type [-] you must press [SHIFT] then [R] then
[ENTER]
POS4000
[SHIFT] again to return to the lower characters)
Note:
The [BOLD], [CENTER] and [RED] keys have no effect on wash names.
4.14.2 Assign a Postscript Message to a Feature
The following secondary menu commands allow you to assign a postscript message to a specific
price level or to all price levels of a feature:
• Set Reg. Postscript (Assign to Regular price only)
• Set Dis 1 Postscript (Assign to Discount 1 only)
• Set Dis 2 Postscript (Assign to Discount 2 only)
• Set Postscript All $ (Assign to all price levels)
Here are some examples of why you might want to assign different postscript messages to
different price levels. If you give a free wash with a gas fill up, you could print a special message
indicating that this wash is free only with a fill up. Full priced washes could have a postscript
message that indicates that the receipt can be used as a coupon for a discount on other
merchandise or on a higher priced wash. Full priced washes could have a postscript message
that indicates that a discount is available if gas, merchandise or other services are purchased.
If a ticket contains more than 1 feature with the same postscript message assigned to it, the
postscript message will only be printed once. If a ticket contains more than 1 feature with differ ent
postscript messages assigned to them, they will be printed in ascending order (1-5) regardless of
the order the wash functions were selected.
Before assigning postscript message numbers to particular wash functions, it is recommended
that you define the postscript message text first (see Sections
Configuration report (see Section
4.1). Having a listing of the postscript message text when you
4.8.2). Then print a System
assign postscript message numbers to the wash functions can reduce se lection errors.
Example to assign postscript message 3 to Opt 2 at all price levels:
[CMD]
[Opt 2] (cashier key)
[1] (password 1)
[ENTER]
[MENU UP/DOWN] until "Set Postscript All $" is displayed
[ENTER]
[3] (select postscript message 3)
Document Number: POS4007 69
Document Title: POS4000/V2 WSII Operations Manual
[ENTER]
Page 96

POS4000
5 Cashier Operations
The "cashier" keys are the 12 keys (usually yellow) on the bo ttom half of th e keyboard. The main
console has been designed so that the majority of cashier operation s will be performed using the
cashier keys. Each cashier key corresponds to a single feature. A feature may be a wash
program, option or group. The number of each type of feature present and their location on the
keypad depends upon the software installed in the POS4000 and cannot be changed by the
user.
Note:
During cashier operations, the text on the right han d side of the key s is not used.
5.1 Issuing A Customer Tick et
The cashier keys allow you to select various types of wash programs, options or groups. Any of
these wash programs, options or groups can be provided a t full, discount 1, or discount 2 prices.
The number of programs and options available is dependent on the specific carwash equipment.
To issue one full price customer code, simply press the wash program key and desired option
keys followed by the [ENTER] key.
As cashier keys are pressed, the cumulative price of the features will appear on the top right of
the display, an abbreviation of the features will appear on the top left of the display. The wash
programs are identified on the display as P1, P2 ..., the options are identified on the display as
O1, O2..., and groups are identified as G1, G2 ...
An item is discounted by pressing the Discount 1 or Discount 2 key before
the feature to be discounted. The selection is finalized by pressing the [ENTER] key. At this
point, the customer's receipt will be printed with:
Header message
Customer selections and cost of each item
Discount amounts (in red)
pressing the key of
Current day and time
Customer instructions
Unique customer access code
Code age warning
Specific postscript customer messag es
Footer Message
Discounted features will be printed as a full price item first followed by the amount of discount in
red to emphasize to the customer that a discount has been given.
In the event of an erroneous selection, the current features can be canceled by pressing the
[CLEAR] key. If an attempt is made to print a ticket for which no wash program and no group
selection were made (options only), an invalid wash selection message will be displayed. If a
particular feature has been selected with different di scounts, the last selection will be honored.
Document Number: POS4008-A 70
Document Title: POS4000/V2 WSII Installation and Operations Manual
Page 97

Example: Full price P1 & O1
[Prog 1]
[Opt 1]
[ENTER]
Example: Full price-P2 & discount 1-O1
[Prog 2]
[DISC 1][Opt 1]
[ENTER]
Example: Discount 2-P2 & discount 2-O1 & discount 2-O2
[DISC 2][Prog 2]
[DISC 2][Opt 1]
[DISC 2][opt 2]
[ENTER]
POS4000
5.2 Issuing Multiple Customer Tick ets
Multiple identical carwash tickets (each with a unique access code) can be generated using a
limited number of keypad entries. To generate these tickets, simply enter the number of tickets
(10 or less) to be printed using the numbers on the management keys (upper keys on keypad),
and then continue to issue the carwash ticket desired. When the carwash ticket is issued,
multiple tickets will be printed. For example, to get 5 customer tickets with identical feature
selections, first depress the 5 key on the management keypad (do not press the enter key at this
time). Then proceed through the normal carwash ticket gener ation procedure.
Example: Print 5 full price P1 & O1 tickets
[5] (Number of tickets to print)
[Prog 1] (Features of each ticket)
[Opt 1]
[ENTER]
5.3 Issuing A Rain check R eceipt
Rain checks can be printed by simply pressing the rain check key. The rain check ticket will
include the header message, date and time of issue. These tickets must be traded for a carwash
code at a later time.
Example:
[Rain Check]
Rain checks should be given to a customer when it is anticipated that the carwash will not be
operating for an extended period. If codes are used as rain checks for a n extended period, these
codes may eventually be deleted from the valid codes memory to make room for new codes.
5.4 Checking a Customer Code
The status of a customer code can be verified with the [CHECK CODE] command. To access
this command, press the [CMD] key followed by the [CHECK CODE] key. The console will
prompt you to enter the code to be checked. Type the code to check followed by the [ENTER]
key. The console will print the status of the code as either valid, used, previo usly cancele d or not
in memory.
Document Number: POS4007 71
Document Title: POS4000/V2 WSII Operations Manual
Page 98

If the code is valid, the date/time it was issued and the features associated with it are printed. If
the code has been used, the date/time it was redeemed is printed. If the code was previously
canceled (using the void code command), the date/time that it was canceled is printed. If the
code is not found in memory, the date and time of the oldest valid and used codes currently held
in memory will be printed.
Note that fleet account codes will not be validated by this function for the security of those
accounts.
Note that with a multiple-console configuration that codes can be checked at either the master
console or the console the code was generated from (console connected to the Extpo s).
Possible conditions if code not found:
• Issue date on ticket older than oldest valid code: Ticket may or may not have been used
(can not determine). If ticket is older than code age warning on ticket, note that to the
customer.
• Issue date on ticket younger than oldest valid code but older than oldest used code:
• Ticket was used but has since rolled out of the used code database
Example to check code 123450:
[CMD]
[CHECK CODE]
[1][2][3][4][5] (0 is optional)
[ENTER]
POS4000
5.5 V oiding a Customer Code
Carwash codes can be voided prior to use. Once a code has been voided, it will not activate the
carwash. To void a code, press the [CMD] key followed by the [VOID CODE] key. The console
will prompt for password 1, followed by the code number to be voided. If the code is valid,
several things will occur:
• The code is removed from the valid code memory.
• A void code ticket will be printed. The cashier should sign this ticket and save it with the
original ticket for use in the shift closeout aud it.
• The number of codes voided is listed on the Accounting Report in the Codes Void
section.
• The dollar value of the ticket will be added to the void ticket account (this account is
printed in the audit report as Sales Refunds in the Register Summary section).
If the code is not valid, a message will be printed indicating this.
In a multiple-console configuration, codes can be voided at eithe r the m aster console or
at the console the code was generated from (console connected to the Extpos).
[CMD]
[VOID CODE] (Unit prompts for password 1)
Note:
Example to void code 123450:
Document Number: POS4007 72
Document Title: POS4000/V2 WSII Operations Manual
Page 99

POS4000
[1] (password 1)
[ENTER]
[1][2][3][4][5]
[ENTER]
Document Number: POS4007 73
Document Title: POS4000/V2 WSII Operations Manual
Page 100

POS4000
6 Customer Access
A customer receives a car wash by entering his unique access code at the customer interface
located at the entrance of the car wash. The customer interface includes a metal numeric
keypad, coin and bill acceptor interfaces (coin/bill activation and change making is optional) and
customer display.
To receive a wash, the customer enters his unique car wash code on the numeric keypad. The
"0" that is the last character of every code is used as an enter key. When the code is completely
entered and it is determined that the code is not an account number, that code is shown on the
main console display in the lower right corner. If the code is valid, the wash type is
simultaneously issued and shown on the lower line of the main console display. The issued
wash types are identified on the display as P1, P2..., G1, G2... and O1, O2... for program 1,
program 2 ..., group 1, group 2 ..., option 1, option 2 ... r espectively.
If the code is invalid, a buzzer will sound at the main console and at the customer interface. The
number of invalid codes (since the last valid code) will be shown on the lower line of the main
console display. The number of sequential invalid codes can be used to alert the cashier of
tampering at the entrance console. Additionally, the "re-enter cod e" relay will b e turne d on brief ly
to control a customer guidance light.
If the car wash is in-use when a valid code is entered, a "Code Accepted/Please Wait" relay is
activated at the interface. This relay remains on until the wash is available.
6.1 Cash Upgrades (Buy ups) at the Carwash Entrance
Important:
As an optional feature, the POS4000 can be configured to allow customers to purchase a wash
or upgrade from a valid code by depositing cash at the entrance of the wash. This capability
requires a quarter acceptor and/or a bill acceptor be installed at the customer interface and
requires the buy up mode to be enabled. The current buy up mode is included in the System
Configuration Report.
If a customer deposits more money than is required, the extra money is escrowed for additional
purchases by that customer until they enter the wash. If escrowed money remains when the
customer enters the wash, an overpayment statement is printed at the main console. This
statement includes:
Note:
• Customer code or cash only notice
POS4000 features that are not available on your particular carwash equipment should
be disabled in order for the entry system upg rades to be sold correctly.
Buy up mode is not configurable for Hamilton Autotec systems.
• Current date and time
• Features selected and cost
Document Number: POS4007-B 74
Document Title: POS4000/V2 WSII Installation and Operations Manual
 Loading...