

Funkwetterstation
Wireless weather station
Station météorologique,
sans fi l
Stazione meteo wireless
Bedienungsanleitung
Owner’s Manual
Manuel de l’utilisateur
Manuale d’istruzioni
313508_W193_Manual_130215.indd 1 27.02.13 12:48

313508_W193_Manual_130215.indd 2 27.02.13 12:48
3 Deutsch
Funkwetterstation W193-7
Bezeichnungen und Funktionen von Tasten:
Funktion drücken 3 Sekunden halten
SNOOZE / CHANNEL /
LIGHT
Wählen zwischen Innen, Kanal 1, Autoscroll
Einschalten von Schlummerfunktion und Hinter-
grundbeleuchtung
Suche nach Fernsensor
CLOCK Uhrzeit, Datum und Wochentag ablesen Uhrzeit, Datum und
Wetter einstellen
ALARM Weckzeit ablesen;
Wecksignal aktivieren/deaktivieren
Weckzeiteinstellung
MEMORY Messung der Max./Min.-Temperaturen
und der Luftfeuchtigkeit
Speicheraufzeichnung
löschen
ZONE / DOWN (-) Umschalten zwischen Funkzeit und Zonenzeit
1 Einstellungsschritt zurück
Zonenzeiteinstellung
Schnell zurück
/ UP (+)
Suche nach Funkzeit
1 Einstellungsschritt weiter Schnell vorwärts
C / F Umschalten zwischen Temperatureinheit °C und °F
LIGHT ON / OFF Ein-/Ausschalten der Hintergrundbeleuchtung bei
angeschlossenem Adapter
Bezeichnungen und Funktionen von Tasten am Fernsensor:
Tx Übertragung der Außentemperatur zum Hauptgerät
C / F Anzeigenschaltung Grad Celsius oder Grad Fahrenheit
1 / 2 / 3 Kanalwahlschalter
Vielen Dank für den Kauf dieser elektronischen Wetterstation mit Farbdarstellung. Das Gerät wurde mit
aktueller Technologie und modernsten Bauteilen hergestellt; es liefert Ihnen eine genaue und zuverlässige
Messung der Innen- und Außenluftfeuchtigkeit und -temperatur sowie eine Wettervorhersage. Darüber
hinaus verfügt es über eine Funkuhr. Lesen Sie dieses Handbuch sorgfältig durch, um die Eigenschaften und
Funktionen dieses Produktes vollständig kennenzulernen.
W193-7 (313508.00)
Station: 3 x AAA /
DC 6.0V, 433 MHz
Sender 1: 2 x AAA (W186-F)
Tegro AG
CH-8603 Schwerzenbach
W193-7 (313508.00)
Station: 3 x AAA / DC 6.0V,
433 MHz
Sender: 2 x AAA, (W186-F)
Tegro AG
CH-8603 Schwerzenbach
W193-7 (313508.00)
Station: 3 x AAA / DC 6.0V,
433 MHz
Sender: 2 x AAA, (W186-F)
Tegro AG
CH-8603 Schwerzenbach
313508_W193_Manual_130215.indd 3 27.02.13 12:49
Deutsch 4
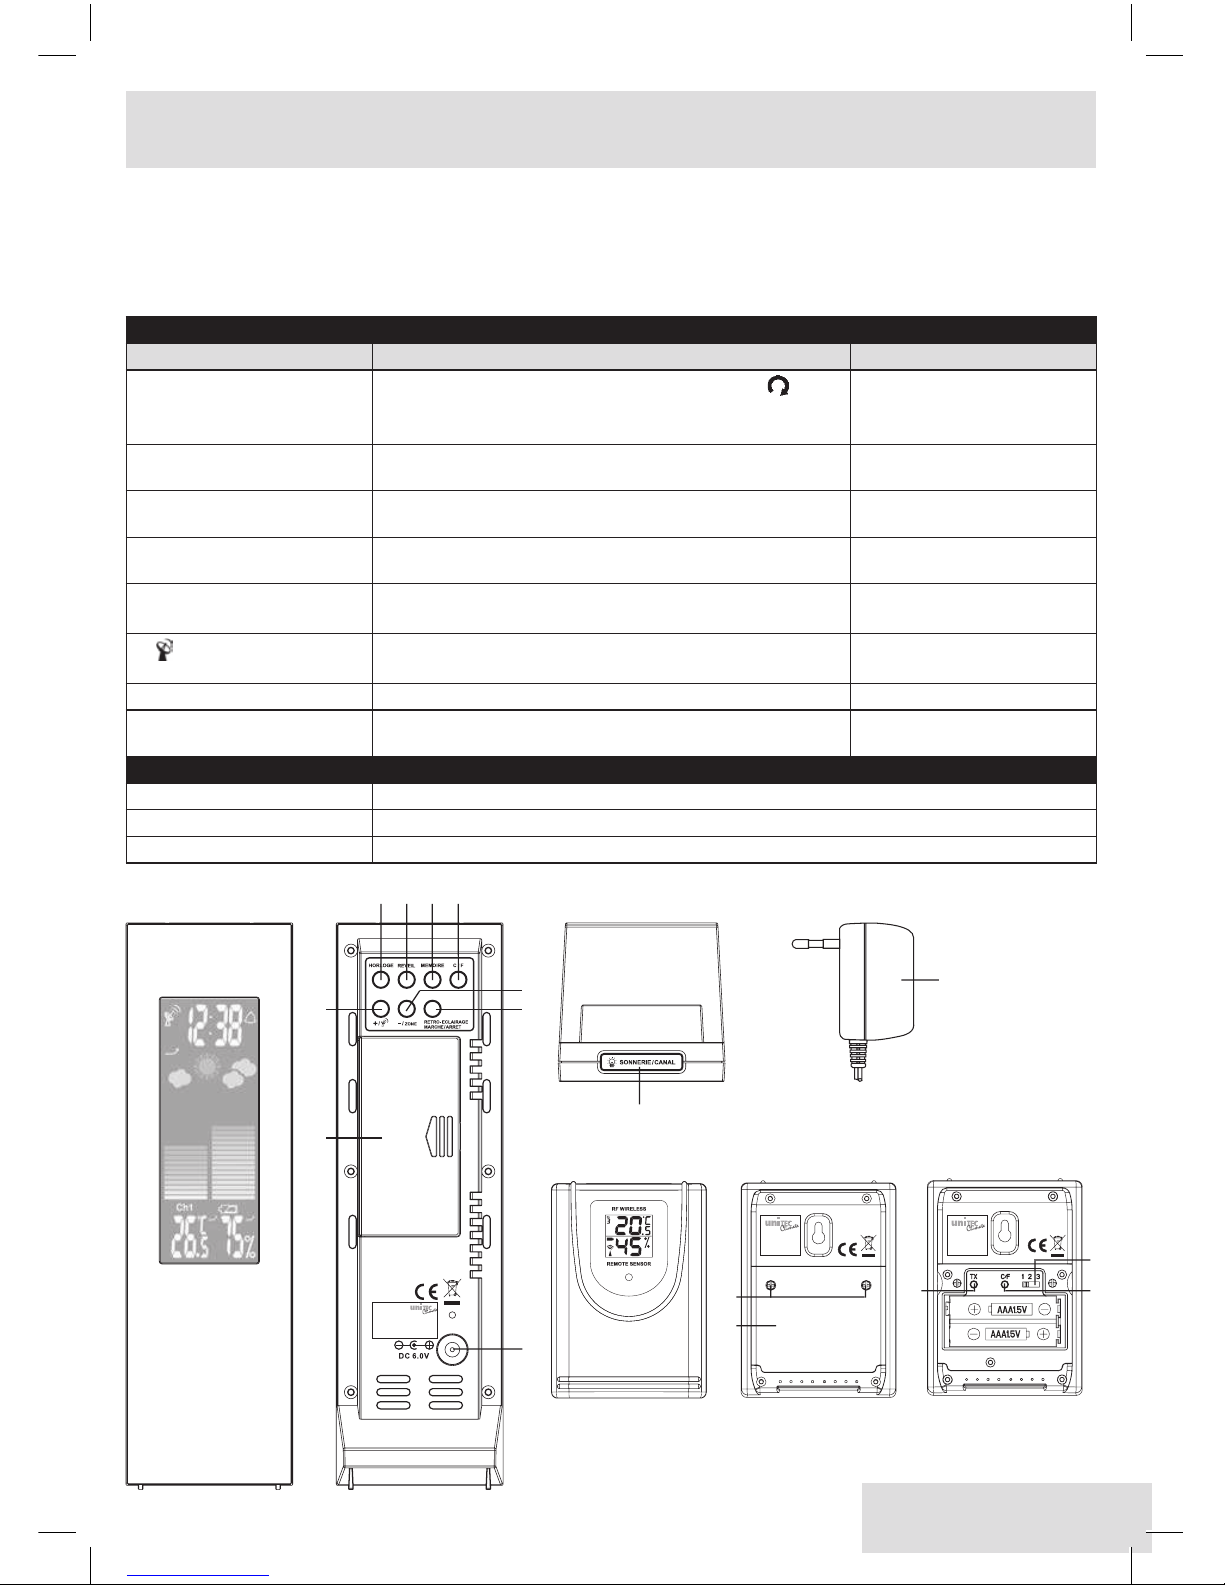
EINSETZEN DER BATTERIEN/ANSCHLUSS
DES ADAPTERS
Hauptgerät:
Hauptstromquelle: Für Basisbetrieb und für den
Betrieb der kontinuierlichen Hintergrundbeleuchtung
kann ein 6,0 V-Adapter in die Buchse an der
Geräterückseite eingesteckt werden.
Zusätzliche Stromversorgung: Öffnen Sie das Batteriefach und legen Sie 3 AAA-Batterien mit der
angegebenen Polarität ein; schließen Sie anschließend das Batteriefach wieder.
Fernsensor:
Lösen Sie die 2 Schrauben der Batterieabdeckung
mit einem kleinen Schraubendreher und legen Sie
2 AAA-Batterien ein; achten Sie dabei auf die richtige
Polarität. Setzen Sie den Deckel wieder auf und
ziehen Sie die Schrauben an.
ERSTEINSTELLUNG
Nach dem Einsetzen der Batterien in das Hauptgerät blinken die Wettersymbole (H). Drücken Sie
„UP“ oder „DOWN“ , um die lokalen Wetterbedingungen als Ersteinstellung festzulegen.
Drücken Sie auf [CLOCK] , um zu bestätigen und
zu beenden.
(Weitere Informationen finden Sie im Abschnitt
„WETTERVORHERSAGE“.)
EINRICHTUNG DES FUNK-THERMOHYGROMETERS
Schalten Sie bei der Erstinbetriebnahme immer
erst das Hauptgerät und dann den Fernsensor ein.
Wählen Sie
für den Fernsensor Kanal 1. Wählen
Sie für den zweiten und dritten Sensor (313505.00 /
W186-F) Kanal 2 bzw. 3.
• Drücken und halten Sie die Taste [SNOOZE/
CHANNEL/LIGHT] auf dem Hauptgerät, bis
ein Piepton ertönt, der anzeigt, dass nach dem
Fernsensor gesucht wird. Die Temperatur- (D) und
Luftfeuchtigkeitsanzeigen (E) zeigen durch Blinken
an, dass sich das Gerät im Suchmodus befindet.
• Drücken Sie die Taste [Tx] an der Rückseite des
Fernsensors, um das Funksignal zu übertragen.
• Wenn die Funkverbindung eingerichtet ist,
werden Temperatur und Luftfeuchtigkeit für den
gewählten Kanal am Hauptgerät angezeigt.
Hinweis:
• Bei der Aussenanwendung des Fernsensors sollte
dieser nicht direkt den Wettereinflüssen, wie z.B.
Regen, ausgesetzt werden.
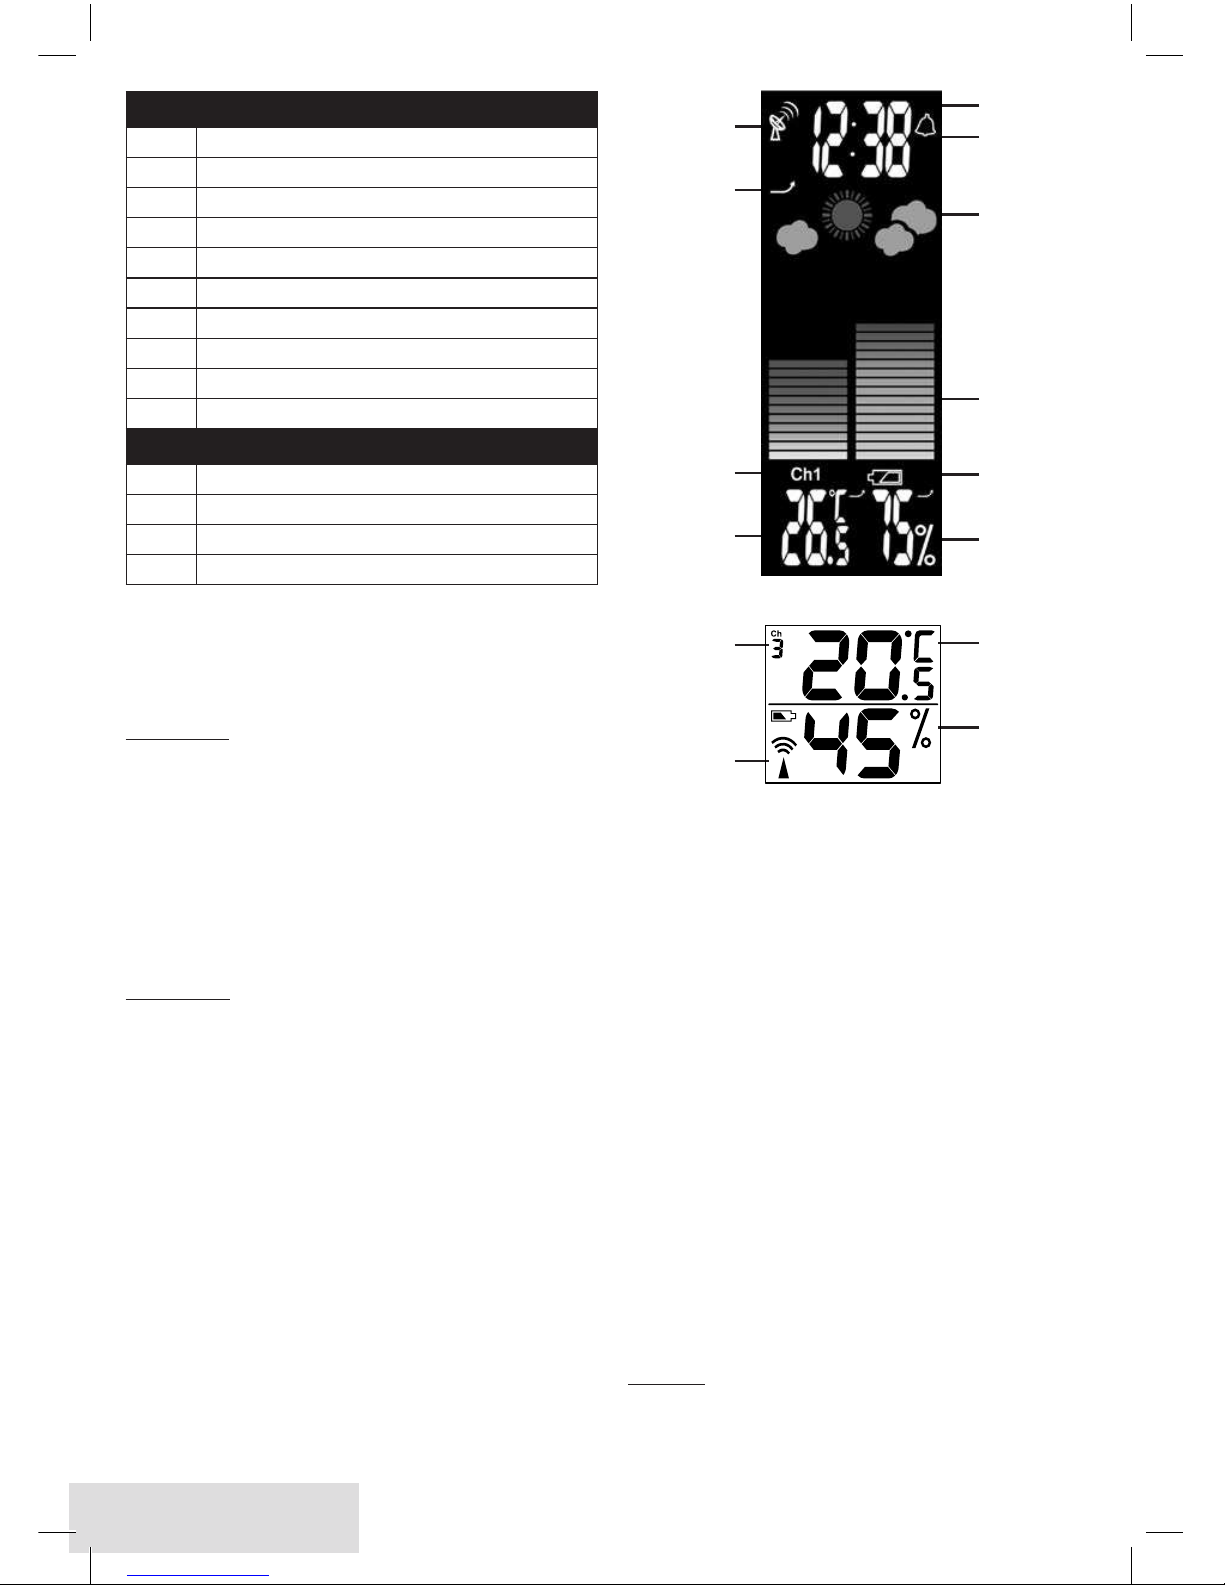
Bezeichnung der Display-Funktionen im Hauptgerät
A
Funkuhr
B Trend- / Tendenzanzeige
C Kanalnummer
D
Innen- / Aussentemperatur
E
Innen- / Aussenluftfeuchtigkeit
F Batterie-Anzeige
G Animierte Farbgrafik
H Symbole Wettervorhersage
I Alarmsymbol
J Uhr- / Datumsanzeige
Bezeichnung der Display-Funktionen im Sensor
K Kanalanzeige
L
Sende-Symbol
M Luftfeuchtigkeit
N
Temperatur
K
A
C
B
D
L
N
J
I
H
G
F
E
M
Hauptgerät
Fernsensor
313508_W193_Manual_130215.indd 4 27.02.13 12:49

5 Deutsch
WETTERVORHERSAGE
Das Gerät sagt anhand der Änderungen des atmosphärischen Drucks das Wetter der nächsten 12 – 24
Stunden voraus. Das Abdeckungsgebiet hierfür hat
einen Durchmesser von etwa 30 – 50 km. Die Wettervorhersage basiert auf Änderungen des atmosphärischen Drucks und ist zu etwa 70 – 75% korrekt. Da
Wetterbedingungen nie zu 100% genau vorhergesagt
werden können, übernehmen wir keinerlei Haftung
für durch falsche Vorhersagen eingetretene Verluste.
Um eine genaue Wettervorhersage zu erreichen,
müssen Sie ihre gegenwärtigen Wetterbedingungen als Ersteinstellung eingeben. Drücken Sie nach
Rücksetzen des Gerätes [UP] oder [DOWN] ,
um die lokalen Wetterbedingungen als Ersteinstellung festzulegen. Drücken Sie auf [CLOCK] , um
zu bestätigen und zu beenden.
Sie können die Wettervorhersage auch einstellen,
indem Sie die Taste [CLOCK] drücken und halten,
um so zum Einstellmodus zu wechseln. Drücken Sie
die Taste [CLOCK] wiederholt, um die Einstellung
für Datum und Uhrzeit zu überspringen, bis das Wettersymbol blinkt. Drücken Sie [UP] oder [DOWN]
, um die lokalen Wetterbedingungen zu wählen.
Drücken Sie auf [CLOCK] , um zu bestätigen und
zu beenden.
12/24-Stunden-Format > Stunde > Minute > Jahr
> Format T/M- oder M/T > Monat > Datum
> Wettervorhersage > ENDE
HINWEIS
Orte mit unterschiedlicher Geografie, wie z. B.
inländische Bereiche oder Küstengebiete, haben
unterschiedliche Wettervorhersagen. Wenn Ihre
Wettervorhersage über längere Zeit immer regnerisches oder stürmisches Wetter anzeigt und nicht
das tatsächliche Wetter wiedergibt, muss die oben
angegebene Feinabstimmung der Wettervorhersagegenauigkeit durchgeführt werden:
FUNKUHR
Das Gerät beginnt die Synchronisierung der Uhr
nach Einsetzen der Batterien/Anschließen des
Adapters . Um die Suche nach dem Funkzeit-Signal zu erzwingen, drücken Sie im Normalmodus die
Taste [
/UP] bis das Symbol (A) angezeigt wird.
Wenn das Symbol (A) anschließend nicht mehr angezeigt wird, ist das Funkzeitsignal in dem Moment
nicht verfügbar. Versuchen Sie zu einem späteren
Zeitpunkt andere Aufstellungsorte. Platzieren Sie
das Gerät entfernt von Störquellen, wie z. B. Mobiltelefonen, Fernseh- und anderen Elektrogeräten.
Wenn die funkgesteuerte Zeit empfangen werden
kann, wird das Antennensymbol (A) mit dem Symbol
für volle Signalstärke
angezeigt. Die Funkuhr wird
jeden Tag um etwa 02:03 und 03:03 synchronisiert.
Mindestens alle 2,5 und höchstens alle 10 Minuten
findet ein Empfangszyklus statt.
INNEN-/AUSSENTEMPERATUR UND
LUFTFEUCHTIGKEIT
Die Temperaturablesung (D) befindet sich unten
links im Display; die Luftfeuchtigkeitsablesung (E)
unten rechts. Drücken Sie die Taste [C/F] , um
zwischen den Temperatureinheiten °C/°F zu wählen.
Drücken Sie die Taste [SNOOZE/CHANNEL/LIGHT]
, um zwischen den Anzeigearten Innen, Kanal 1, 2,
3 und Automatische Kanalsuche
zu wählen.
FARBIGE BALKENGRAFIKEN
Die Farbbalken (G) sind als intuitives Mittel zur Bewertung des Wetters auf einen Blick gedacht.
Die linke Farbbalkengrafik zeigt die Innen-/Außentemperatur des gegenwärtigen Anzeigemodus. Die rechte
Grafik zeigt die entsprechende Innen-/Außen-Luftfeuchtigkeit. Mit Änderung der Messungen ändert
sich automatisch die Anzahl der farbigen Balken.
MAXIMAL- UND MINIMAL-SPEICHER
Drücken Sie die Taste [MEM] mehrfach, um sich
Maximal- und Minimalwerte für die Temperatur und
die Luftfeuchtigkeit anzeigen zu lassen. Drücken und
halten Sie die Taste [MEM] , um die Speicheraufzeichnungen zu löschen, während die entsprechenden Werte angezeigt werden.
SONNIG TEILWEISE BEWÖLKT BEWÖLKT REGNERISCH STÜRMISCH
313508_W193_Manual_130215.indd 5 27.02.13 12:49

Deutsch 6
ANZEIGEN FÜR TEMPERATUR- UND
LUFTFEUCHTIGKEITSTRENDS
Die Symbole zeigen Steigend, Gleichbleibend und
Fallend an, wenn die Temperatur oder die Luftfeuchtigkeit sich um mehr als 1 °C pro Stunde ändert.
DATUM UND UHRZEIT
Drücken Sie die Taste [CLOCK] ,
um das Display
zwischen Zeit, Datum und Wochentag umzuschalten.
Drücken und halten Sie die Taste [CLOCK] , um
zum Uhreinstellmodus zu wechseln. Drücken Sie die
Tasten [UP] bzw. [DOWN] zur Einstellung und
[CLOCK] zur Bestätigung; die folgenden Werte
können nacheinander eingestellt werden:
12/24-Stunden-Format > Stunde > Minute > Jahr
> Format T/M- oder M/T > Monat > Datum
> Wettervorhersage > ENDE
LOKALZEIT, WELTZEIT (ZONENZEIT)
Drücken und halten Sie die Taste [ZONE] , um zum
Modus für die Einstellung der Weltzeit (Zonenzeit) zu
wechseln. Drücken Sie [UP] bzw. [DOWN] , um
den gewünschten Zeitversatzwert von –12 bis +12
Stunden einzustellen (Schweiz +1). Drücken Sie auf
[CLOCK] , um zu bestätigen und zu beenden.
Drücken Sie die Taste [ZONE] , um zwischen
Lokalzeit (funkgesteuert) und Weltzeit (Zonenzeit)
zu wechseln. Das Symbol „ZONE“ wird nicht mehr
angezeigt, wenn Weltzeit (Zonenzeit) gewählt ist.
Wenn keine Zonenzeit verwendet werden soll,
stellen Sie den Wert für die Zonenzeit auf „0“.
EINSTELLUNG DES WECKERS
Drücken Sie die Taste [ALARM] , um sich die Weckzeit
anzeigen zu lassen; das Symbol „AL.“ wird angezeigt.
Drücken Sie die Taste erneut, um die Weckfunktion zu
aktivieren oder zu deaktivieren. Bei aktivierter Weckfunktion wird das Klingelsymbol
„ “ (I) angezeigt.
Drücken und halten Sie die Taste [ALARM] , um
zum Einstellmodus für die Weckzeit zu wechseln. Drücken Sie [UP] bzw. [DOWN] , um die gewünschte
Weckzeit in Stunden und Minuten einzustellen, und
drücken Sie die Taste [ALARM] zur Bestätigung.
SCHLUMMERFUNKTION/
HINTERGRUNDBELEUCHTUNG
Wenn das Wecksignal ertönt, drücken Sie die Taste
[SNOOZE/CHANNEL/LIGHT] , um die Schlummerfunktion zu aktivieren; das Symbol „Zz“ wird
angezeigt. Drücken Sie die Taste [ALARM] , um
die Weckfunktion für einen Tag zu unterbrechen.
Drücken Sie, wenn kein Adapter angeschlossen ist,
[SNOOZE/CHANNEL/LIGHT] die Hintergrundbeleuchtung wird eingeschaltet.
Drücken Sie [LIGHT ON/OFF] , um die Hintergrundbeleuchtung ein- oder auszuschalten, wenn ein
Adapter angeschlossen ist.
BATTERIEANZEIGE
Für das Hauptgerät und für alle 3 Fernkanäle gibt es
eine Anzeige (F) für niedrigen Batteriestand. Ersetzen Sie die Batterien und befolgen Sie die Inbetriebnahmeanweisungen in diesem Handbuch.
BATTERIEENTSORGUNG
Nur vom Hersteller empfohlene Batterien gleichen
oder gleichwertigen Typs verwenden.
Verbrauchte
oder defekte Batterien in umweltfreundlicher Weise
gemäß geltender Vorschriften entsorgen.
TECHNISCHE DATEN
Spannungsversorgung Hauptgerät: 3 x 1.5V oder mit 6.0 V Netzteil
Batterietyp Hauptgerät: 3 x AAA / LR03 / AM4
Temperaturbereich Hauptgerät: 0 ºC bis +50 ºC
Luftfeuchtigkeitsbereich Hauptgerät: 20% bis 99% RH
Betriebstemperatur: 0 ºC – 50 ºC
Auflösung Temperaturanzeige: 0.1 ºC
Auflösung Luftfeuchtigkeit: 1%
Spannungsversorgung Fernsensor: 2 x 1.5V
Batterietyp Fernsensor: 2 x AAA / LR03 / AM4
Temperaturbereich Fernsensor (W186-F): –20 ºC bis +60 ºC
Sendefrequenz: 433 MHz
Max. Reichweite (unter opt. Bedingungen): 30m
Anzahl Fernsensoren: 3
313508_W193_Manual_130215.indd 6 27.02.13 12:49

7 English
Wireless Weather Station W193-7
Name and Function of Buttons:
Press Functions Hold 3 seconds
SNOOZE / CHANNEL /
LIGHT
Select indoor, Channel 1, auto scroll
Trigger snooze alarm & extend backlight
Search for remote sensor
CLOCK Read time, calendar and day-of-week Set Clock, Calendar & Wea-
ther
ALARM Read alarm time; enable/disable alarm Alarm time setting
MEMORY Read max/min temperatures & humidity Clear memory record
ZONE / DOWN (-) Toggle RC time & Zone time
1 step backward in setting
Zone time setting
Fast backward
/ UP (+)
Search for Radio-Controlled time
1 step forward in setting Fast advance
C / F Toggle degree C & F unit
LIGHT ON / OFF Turn on/off continuous backlight when adap-
ter is connected
Name and Functions of Buttons on Remote Sensor:
Tx Transmit outdoor temperature data to main unit
C / F Display degree Celcius or degree Fahrenheit
1 / 2 / 3 Channel switch
Thank you for purchasing the new generation color weather station. Designed and engineered with the
state-of-art technology and components, this instrument will provide accurate and reliable measurement of
weather forecast, indoor/outdoor temperature & humidity as well as radio-controlled clock. Read this manual
carefully to fully explore the features and functions of the new product.
W193-7 (313508.00)
Station: 3 x AAA /
DC 6.0V, 433 MHz
Sender 1: 2 x AAA (W186-F)
Tegro AG
CH-8603 Schwerzenbach
W193-7 (313508.00)
Station: 3 x AAA / DC 6.0V,
433 MHz
Sender: 2 x AAA, (W186-F)
Tegro AG
CH-8603 Schwerzenbach
W193-7 (313508.00)
Station: 3 x AAA / DC 6.0V,
433 MHz
Sender: 2 x AAA, (W186-F)
Tegro AG
CH-8603 Schwerzenbach
313508_W193_Manual_130215.indd 7 27.02.13 12:49

English 8
BATTERY & ADAPTER INSTALLATION
Home Receiver Unit:
Main Power Source: Plug in the 6.0V adapter into
the adapter socket at the back for basic operation
and continuous backlight.
Backup Power: Open the battery door , install
3 pieces of AAA backup batteries according to the
polarity indicated, close the battery cover .
Remote Sensor:
Loosen the screws on the battery door with a
small screwdriver, insert 2 pieces of AAA batteries
according to the polarity indicated. Replace the cover
and tighten the screws .
INITIAL SETTING
After battery installation of the main unit, the weather icons (H) will flash. Press “UP” or “DOWN”
to select local weather condition as initial setting.
Press [CLOCK] to confirm and exit.
(Refer “WEATHER FORECAST” section for details)
SETTING UP THE WIRELESS
THERMO-HYGROMETER
For the first installation, always turn on the home
unit and then the remote sensor. Set Channel 1
for remote sensor. Set channel 2 and channel 3 for
the 2nd and 3rd sensor
(313505.00 / W186-F)
.
• Press and hold [SNOOZE/CHANNEL/LIGHT]
button on main unit until a beep is sound to search
for remote sensor. Temperature (D) & humidity
readings (E) will flash indicating it is in the
searching mode
• Press the [Tx] button on the back of remote
sensor to transmit RF signal.
• When RF connection is established, the
respective temperature & humidity of the
selected channel will appear on the main unit.
Note:
• If using the remote sensor outdoors, it should not be
directly exposed to weather influences such as rain,
for example.
Designation of display functions in the main unit
A
Radio-controlled clock
B Trend / tendency display
C Channel number
D
Indoor / outdoor temperature
E
Indoor / outdoor humidity
F Battery display
G Animated color graphs
H Weather forecast with icons
I Alarm icon
J Time / date display
Designation of display functions in the sensor
K Channel display
L
Transmission icon
M Humidity
N
Temperature
K
A
C
B
D
L
N
J
I
H
G
F
E
M
Main unit
Remote sensor
313508_W193_Manual_130215.indd 8 27.02.13 12:49

9 English
WEATHER FORECAST
The unit predicts weather condition of the next
12 – 24 hours based on the change of atmospheric
pressure. The coverage area is around 30 – 50
km. The weather forecast is based on atmospheric
pressure change and is about 70 – 75% correct.
As weather conditions cannot be 100% correctly
forecasted, we cannot be responsible for any loss
caused by an incorrect forecast.
To obtain an accurate weather forecast, you need
to input your current weather condition as initial
setting. After the reset of the unit, Press [UP] or
[DOWN] to select the local weather condition as
initial weather forecast setting. Press [CLOCK] to
confirm and exit.
You may also set the weather forecast by holding
[CLOCK] button to enter the setting mode. Press
[CLOCK] repeatedly to skip the clock & calendar
setting until the weather icon flashes. Press [UP]
or [DOWN] to select local weather condition.
Press [CLOCK] to confirm and exit.
12/24hr format > Hr > Min > Yr > D/M or M/D
format > Month > Date > Weather Forecast > EXIT
NOTE
Different geographical location such as inland area
or coastal region has different weather forecasting
response. In case your weather forecast always
show rainy or stormy over a long period of time and
does not reflect the actual weather condition, it is
necessary to follow above setting procedure for fine
tuning the weather forecast’s accuracy
RADIO-CONTROLLED CLOCK
The unit will start synchronizing the clock after battery/adapter installation or reset. In normal mode,
press [
/UP] until icon (A) appears to enforce
searching of radio-controlled clock signal. If the icon
(A) disappears afterwards, radio time signal is not
available at the moment. Try other locations later.
Place the unit away from source of interference such
as mobile phones, appliances, TV etc.
Antenna icon (A) with full signal strength
will
appear on screen if the reception of radio-controlled
time is successful. The radio-controlled clock will
have a daily synchronization at around 02:03 and
03:03 everyday. Each reception cycle is minimum
2.5 minutes and maximum 10 minutes.
IN/OUT TEMPERATURE & HUMIDITY
Temperature reading (D) is located on the lower left
of the display and humidity (E) is on the lower right.
Press [C/F] button to select temperature unit C/F.
Press [SNOOZE/CHANNEL/LIGHT] button to
select indoor, Ch1, Ch2, Ch3 and auto-channel scrolling
display modes.
COLOR BAR GRAPHS
The color graphs (G) are designed as an intuitive
way to gauge the weather at a glance.
The left color bar graph represents the respective
In/Out temperature of the current display mode.
The right graph represents the respective In/Out
humidity. As the measurements change, the number
of illuminated bars changes automatically.
MAXIMUM / MINIMUM MEMORY
Press [MEM] button repeatedly to view the maximum & minimum values of temperature & humidity
readings. To clear the memory record, hold [MEM]
button while the respective values are displaying
on screen.
TEMPERATURE & HUMIDITY TREND
INDICATOR
The icons will indicate Rising, Steady, Falling if the
temperature or humidity change is more than 1
degree C (or 2 degree F) within an hour.
SUNNY PARTLY CLOUDY CLOUDY RAINY STORMY
313508_W193_Manual_130215.indd 9 27.02.13 12:49

English 10
CLOCK & CALENDAR
Press [CLOCK] to toggle display between time,
calendar and day of the week.
Hold [CLOCK] button to enter clock setting mode.
Using [UP] or [DOWN] to adjust and [CLOCK]
to confirm, the following values can be set in
sequence:
12/24hr format > Hr > Min > Yr > D/M or M/D
format > Month > Date > Weather Forecast > EXIT
HOME TIME, WORLD (ZONE) TIME
Hold [ZONE] to enter world (zone) time setting
mode. Press [UP] or [DOWN] to enter the desired hour offset value from –12 to +12 hours
(Switzer-
land +1)
. Press [CLOCK] to confirm and exit.
Press [ZONE] button to toggle between home (radio-controlled) time and world (zone) time. “ZONE”
icon appears when world (zone) time is selected.
When zone time is not used, set zone time to “0”.
ALARM SETTING
Press [ALARM] to show alarm time and “AL.”
icon will appear. Press again to enable or disable
the alarm. Bell icon “
” (I) appears when alarm is
enabled.
Hold [ALARM] to enter alarm time setting mode.
Press [UP] or [DOWN] to enter the desired Hr/
Min values and press [ALARM] to confirm setting.
SNOOZE & BACKLIGHT
When alarm is going off, press [SNOOZE/CHANNEL/
LIGHT] to trigger snooze alarm and “Zz” icon will
appear. To stop alarm for one day, press [ALARM]
key.
Press [SNOOZE/CHANNEL/LIGHT] for an extended backlight if adapter is not connected.
Press [LIGHT ON/OFF] to turn on or off the backlight when adapter is connected.
LOW BATTERY INDICATION
Low battery indication (F) is available for the home
unit itself and all of the 3 remote channels. Replace
the batteries and follow the setup procedure in this
instruction manual.
BATTERY DISPOSAL
Replace only with the same or equivalent type
recommended by the manufacturer.
Please disposal of old, defective batteries in an
environmentally friendly manner in accordance with
the relevant legislation.
SPECIFICATIONS
Power supply of main unit: 3 x 1.5V or with 6.0 V power supply
Battery type of main unit: 3 x AAA / LR03 / AM4
Temperature range of main unit: 0 ºC to +50ºC
Humidity range of main unit: 20% to 99% RH
Operating temperature: 0 ºC – 50 ºC
Temperature display resolution: 0.1 ºC
Humidity resolution: 1%
Power supply of remote sensor: 2 x 1.5V
Battery type of remote sensor: 2 x AAA / LR03 / AM4
Temp. Range of remote sensor (W186-F): –20 ºC to +60ºC
Transmission frequency: 433 MHz
Max. range (under opt. conditions): 30m
Number of remote sensors: 3
313508_W193_Manual_130215.indd 10 27.02.13 12:49

11 Français
Station météorologique, sans fi l W193-7
Nom et fonctions des boutons:
Fonctions appui simple Maintien 3 secondes
SNOOZE / CHANNEL /
LIGHT
Intérieur, canal 1, défi lement autom.
Déclenche rappel d‘alarme et accroît
rétroéclairage
Recherche de capteur distant
CLOCK Heure, calendrier et jour de la semaine Réglage horloge, calendrier et
météo
ALARM Heure de l‘alarme; alarme activée/désactivée Réglage de l‘heure de l‘alarme
MEMORY Températures et humidité maxi/mini Efface la mémoire
ZONE / DOWN (-) Commute heure radio pilotée / fuseau horaire
Réglage lent vers l‘arrière
Réglage fuseau horaire
Réglage rapide vers l‘arrière
/ UP (+)
Recherche heure radio pilotée
Réglage lent vers l‘avant Réglage rapide vers l‘avant
C / F Commute unité degré Celsius/Fahrenheit
LIGHT ON / OFF Allume/éteint le rétroéclairage continu lorsque
l‘adaptateur est connecté
Nom et fonctions des boutons sur le capteur distant:
Tx Transmission de la température extérieure à l’unité principale
C / F Indicateur degré Celsius / Fahrenheit
1 / 2 / 3 Commuter pour sélectioner le canal
Merci d’avoir acheté la nouvelle génération de station météorologique en couleur. Conçu et développé avec
une technologie et des composants de pointe, cet instrument vous fournira des informations précises et
fi ables sur les prévisions du temps, la température et l‘humidité intérieures/extérieures, ainsi qu‘une horloge
radio pilotée. Lisez attentivement ce manuel afi n d’explorer toutes les caractéristiques et fonctions de ce
nouveau produit.
W193-7 (313508.00)
Station: 3 x AAA /
DC 6.0V, 433 MHz
Sender 1: 2 x AAA (W186-F)
Tegro AG
CH-8603 Schwerzenbach
W193-7 (313508.00)
Station: 3 x AAA / DC 6.0V,
433 MHz
Sender: 2 x AAA, (W186-F)
Tegro AG
CH-8603 Schwerzenbach
W193-7 (313508.00)
Station: 3 x AAA / DC 6.0V,
433 MHz
Sender: 2 x AAA, (W186-F)
Tegro AG
CH-8603 Schwerzenbach
313508_W193_Manual_130215.indd 11 27.02.13 12:49

Français 12
INSTALLATION DES PILES ET DE
L‘ADAPTATEUR
Unité réceptrice domestique:
Source d‘alimentation principale: branchez l‘adapta-
teur de 6,0 V dans la prise d‘adaptateur au dos
pour un fonctionnement basique et un rétroéclairage
continu.
Source de secours: ouvrez la trappe à piles , insérez 3 piles de secours AAA en respectant la polarité
indiquée puis refermez la trappe .
Capteur distant:
Dévissez les vis de la trappe à piles à l‘aide d‘un
petit tournevis, insérez 2 piles AAA en respectant la
polarité indiquée. Remettez la trappe en place et
serrez les vis .
PARAMÉTRAGE INITIAL
Après avoir installé les piles de l‘unité principale, les
icônes météo (H) se mettent à clignoter. Appuyez
sur [UP] ou [DOWN] pour sélectionner les
conditions météorologiques locales comme paramétrage initial. Appuyez sur [CLOCK] pour confirmer
et quitter.
(Consultez la section «PRÉVISIONS MÉTÉOROLOGIQUES» pour plus de détails)
PARAMÉTRAGE DU THERMOHYGROMÈTRE
SANS FIL
Pour la première installation, mettez toujours l‘unité
domestique en service en premier puis le capteur
distant. Paramétrez le canal 1 (channel 1) pour le
capteur distant.
Paramétrez le canal 2 et le canal 3 pour
les 2ème et 3ème capteurs (313505.00 / W186-F).
• Pour rechercher le capteur distant, maintenez
appuyé le bouton [SNOOZE/CHANNEL/LIGHT]
de l‘unité principale jusqu‘à l‘émission d‘un bip sonore. Les valeurs de température (D) et d‘humidité
(E) se mettent à clignoter signifiant que le système
est en mode Recherche.
•
Appuyez sur le bouton [Tx] au dos du capteur distant pour transmettre le signal de radiofréquence (RF).
• Lorsque la connexion RF est établie, la tempéra-
ture et l‘humidité correspondant au canal sélectionné apparaissent sur l‘unité principale.
Remarque:
• Si le capteur à distance est utilisé à l’extérieur, il ne
doit pas être directement exposé aux intempéries,
p.ex. à la pluie.
Désignation des fonctions d’affichage sur la station
de base
A
Horloge radio-pilotée
B Affichage tendance
C Numéro de canal
D Température intérieure / extérieure
E Hygrométrie intérieure / extérieure
F Indicateur de chargement des piles
G Grafique animé, en couleur
H Prévisions météo avec symboles
I Symbole d’alarme
J Affichage jour / mois / horloge
Désignation des fonctions d’affichage sur le capteur
K Affichage du canal
L
Symbole envoi
M Hygrométrie
N
Température
K
A
C
B
D
L
N
J
I
H
G
F
E
M
Station de base
Capteur à distance
313508_W193_Manual_130215.indd 12 27.02.13 12:49

13 Français
PRÉVISIONS MÉTÉOROLOGIQUES
L‘unité prévoit les conditions météorologiques pour
les 12 à 24 prochaines heures sur la base d‘un
changement de pression atmosphérique. La zone
couverte s‘étend à approximativement 30 ou 50
km. Les prévisions météorologiques sont basées
sur le changement de pression atmosphérique et
sont fiables à 70 – 75%. La prévision des conditions
météorologiques ne peut pas être fiable à 100%,
nous déclinons toute responsabilité en cas de perte
occasionnée par une prévision incorrecte.
Pour obtenir des prévisions météorologiques précises, vous devez saisir vos conditions météorologiques actuelles à titre de paramétrage initial. Après
la réinitialisation de l‘unité, appuyez sur [UP]
ou
[DOWN] pour sélectionner les conditions météorologiques locales à titre de paramétrage initial pour
les prévisions météo. Appuyez sur [CLOCK] pour
confirmer et quitter.
Vous pouvez également déterminer les prévisions
météorologiques en maintenant le bouton [CLOCK]
pour accéder au mode Paramétrage. Appuyez plusieurs fois sur [CLOCK] pour quitter le réglage de
l‘horloge et du calendrier jusqu‘à ce que l‘icône météo
clignote. Appuyez sur [UP] ou [DOWN] pour
sélectionner les conditions météorologiques locales.
Appuyez sur [CLOCK] pour confirmer et quitter.
Format 12/24 heures > heures > minutes > année
> format D/M (jour/mois) ou M/D (mois/jour) > mois
> date > prévisions météo > QUITTER
REMARQUE
Certaines zones géographiques telles que l‘intérieur
des terres ou une région côtière présentent des
prévisions météorologiques distinctes. Dans le cas
où vos prévisions météorologiques affichent toujours
«pluvieux» ou «orageux» sur une période prolongée
et ne reflètent pas les conditions météo réelles, il
sera nécessaire de suivre la procédure de paramétrage présentée plus haut pour un réglage fin de la
précision des prévisions météorologiques.
HORLOGE RADIO PILOTÉE
L‘unité se met à synchroniser l‘horloge une fois les
piles/l‘adaptateur installé(es) ou réinitialisé. En
mode normal, appuyez sur [
/UP] jusqu‘à ce que
l‘icône (A) apparaisse pour exécuter la recherche
du signal de l‘horloge radio pilotée. Si l‘icône (A) disparaît, le signal radio de l‘heure n‘est pas disponible
pour l‘instant. Essayez à d‘autres endroits ultérieurement. Placez l‘unité à l‘écart de toutes source
d‘interférence telle que des téléphones portables,
des serveurs, un téléviseur, etc.
Si la réception de l‘heure radio pilotée est réussie,
l‘icône de l‘antenne (A) apparaît à l‘écran avec le
symbole «signal émis» . L‘horloge radio pilotée se
synchronise tous les jours vers 2h03 et 3h03. Chaque
cycle de réception dure entre 2 mn 30 s et 10 minutes.
TEMPÉRATURE ET HUMIDITÉ INTÉRIEURES/
EXTÉRIEURES
La valeur de température (D) se situe en bas à gauche de l‘écran et celle de l‘humidité (E) en bas à droite. Appuyez sur le bouton [C/F] pour sélectionner
l‘unité de température C (Celsius) ou F (Fahrenheit).
Appuyez sur [SNOOZE/CHANNEL/LIGHT] pour
sélectionner les modes d‘affichage intérieur, canal-1,
canal-2, canal-3 ou défilement automatique des
canaux
.
GRAPHIQUES À BARRES EN COULEUR
Les graphiques en couleur (G) sont conçus de façon
intuitive pour évaluer le temps d‘un coup d‘œil.
Le graphique à barres en couleur situé à gauche représente la température intérieure/extérieure du mode
d‘affichage actuel. Le graphique situé à droite représente l‘humidité intérieure/extérieure correspondante.
Le nombre de barres illuminées change automatiquement au fur et à mesure de l‘évolution des valeurs.
MÉMOIRE MAXI / MINI
Appuyez plusieurs fois sur le bouton [MEM]
pour afficher les valeurs maximales et minimales
correspondant à la température et à l‘humidité. Pour
effacer une valeur mémorisée, maintenez le bouton
[MEM] lorsque la valeur à effacer est à l‘écran.
ENSOLEILLÉ PEU NUAGEUX NUAGEUX PLUVIEUX ORAGEUX
313508_W193_Manual_130215.indd 13 27.02.13 12:49

Français 14
INDICATEUR DE TENDANCE DE
TEMPÉRATURE ET D‘HUMIDITÉ
Les icônes indiquent Rising (en hausse), Steady
(stable), Falling (en baisse) si l‘évolution de la
température ou de l‘humidité est supérieure à 1°C
(ou 2°F) en une heure.
HORLOGE ET CALENDRIER
Appuyez sur [CLOCK] pour commuter l‘affichage
entre heure, calendrier et jour de la semaine.
Maintenez le bouton [CLOCK] pour accéder au
mode réglage de l‘horloge. Appuyez sur [UP] ou
[DOWN] pour procéder au réglage puis sur [CLOCK]
pour confirmer; les valeurs peuvent être paramétrées dans cet ordre :
Format 12/24 heures > heures > minutes > année
> format D/M (jour/mois) ou M/D (mois/jour) > mois
> date > prévisions météo > QUITTER
HEURE LOCALE, FUSEAU HORAIRE
Maintenez [ZONE] pour accéder au mode réglage
du fuseau horaire. Appuyez sur [UP] ou [DOWN]
pour saisir la valeur du décalage horaire souhaité de –12 à +12 heures
(Suisse +1)
. Appuyez sur
[CLOCK] pour confirmer et quitter.
Appuyez sur le bouton [ZONE] pour commuter
entre l‘heure (radio pilotée) locale et le fuseau horaire. L‘icône «ZONE» apparaît lorsque le fuseau horaire est sélectionné. Si vous n‘utilisez pas le fuseau
horaire, paramétrez le fuseau horaire sur «0».
RÉGLAGE DE L‘ALARME
A
ppuyez sur [ALARM] pour voir l‘heure de l‘alarme
et l‘icône «AL» apparaît. Appuyez à nouveau sur ce
bouton pour activer ou désactiver l‘alarme. L‘icône
cloche « » (I) apparaît si l‘alarme est activée.
Maintenez [ALARM] pour accéder au mode
réglage de l‘heure de l‘alarme. Appuyez sur [UP]
ou [DOWN] pour saisir les valeurs heure/minute
souhaitées et appuyez sur [ALARM] pour confirmer le réglage.
RAPPEL D‘ALARME ET RÉTROÉCLAIRAGE
Lorsque l‘alarme retentit, appuyez sur [SNOOZE/
CHANNEL/LIGHT] (rappel d‘alarme/canal/luminosité) pour déclencher la fonction de rappel d‘alarme;
l‘icône «Zz» apparaît. Pour arrêter l‘alarme jusqu‘au
lendemain, appuyez sur la touche [ALARM] .
Appuyez sur [SNOOZE/CHANNEL/LIGHT] pour
accroître le rétroéclairage si l‘adaptateur n‘est pas
connecté.
Appuyez sur [LIGHT ON/OFF] pour allumer ou
éteindre le rétroéclairage lorsque l‘adaptateur n‘est
pas connecté.
INDICATION DE PILE FAIBLE
L‘indication de pile faible (F) est disponible pour
l‘unité domestique elle-même et pour les 3 canaux
distants. Remplacez les piles et suivez la procédure
de paramétrage expliquée dans ce manuel.
MISE AU REBUT DES PILES
Remplacez les piles uniquement par des piles identiques ou de type équivalent selon les instructions
du fabricant. Jetez les piles usagées ou défectueuses dans un collecteur prévu à cet effet afin de respecter l‘environnement et la législation en vigueur.
CARACTÉRISTIQUES TECHNIQUES
Alimentation électrique de la station de base : 3 piles de 1,5 V ou bloc d’alimentation 6.0 V
Type de pile de la station de base : 3 piles AAA / LR03 / AM4
Plage de température de la station de base : 0 ºC à +50 ºC
Plage d’hygrométrie de la station de base : 20% à 99% RH
Température de fonctionnement : 0 ºC à 50 ºC
Résolution de l’affichage de température : 0,1 ºC
Résolution de l’hygrométrie : 1%
Alimentation électrique du capteur à distance 2 x 1,5 V
Type de pile du capteur à distance : 2 piles AAA / LR03 / AM4
Plage de temp. du capteur à dist. (W186-F) : –20 ºC à +60 ºC
Fréquence d’émission : 433 MHz
Portée maxi. (conditions optimales) : 30 m
Nombre de capteurs à distance : 3
313508_W193_Manual_130215.indd 14 27.02.13 12:49

15 Italiano
Stazione meteo wireless W193-7
Nome e funzioni dei pulsanti:
Funzioni Pressione per 3 secondi
SNOOZE / CHANNEL /
LIGHT
Selezione di indoor, Canale 1, scorrimento automatico
Attivazione dell’allarme snooze e
retroilluminazione prolungata
Ricerca del sensore remoto
CLOCK Visualizzazione dell’ora, del calendario
e del giorno della settimana
Impostazione di orologio,
calendario e meteo
ALARM Visualizzazione dell’ora dell’allarme;
abilitazione/disabilitazione dell’allarme
Impostazione dell’ora
dell’allarme
MEMORY Visualizzazione delle temperature e dell’umidità
max./min.
Cancellazione dei dati in
memoria
ZONE / DOWN (-) Alternanza tra l’orario RC e fuso orario
1 scatto indietro nell’impostazione
Impostazione del fuso orario
Retrocessione rapida
/ UP (+)
Ricerca dell’ora radiocontrollata
1 scatto avanti nell’impostazione Avanzamento rapido
C / F Selezione dei gradi °C e °F unità
LIGHT ON / OFF Attivazione/disattivazione della retroilluminazione
continua quando l’adattatore è collegato
Nome e funzioni dei pulsanti del sensore remoto:
Tx Trasmissione dei dati relativi alla temperatura esterna all’unità principale
C / F Cambiare visualizzazione in gradi Celsius o Fahrenheit
1 / 2 / 3 Selezione del canale remoto
Grazie per aver acquistato la stazione meteo a colori di nuova generazione. Progettata e realizzata con tecnologie e componenti allo stato dell’arte, questo strumento garantisce una misurazione precisa e affi dabile di
previsioni meteo, temperatura e umidità interne/esterne nonché l’orologio radiocontrollato. Leggere attentamente il presente manuale che consentirà di acquisire una totale dimestichezza con le caratteristiche e le
funzioni di questo nuovo prodotto.
W193-7 (313508.00)
Station: 3 x AAA /
DC 6.0V, 433 MHz
Sender 1: 2 x AAA (W186-F)
Tegro AG
CH-8603 Schwerzenbach
W193-7 (313508.00)
Station: 3 x AAA / DC 6.0V,
433 MHz
Sender: 2 x AAA, (W186-F)
Tegro AG
CH-8603 Schwerzenbach
W193-7 (313508.00)
Station: 3 x AAA / DC 6.0V,
433 MHz
Sender: 2 x AAA, (W186-F)
Tegro AG
CH-8603 Schwerzenbach
313508_W193_Manual_130215.indd 15 27.02.13 12:49

Italiano 16
INSTALLAZIONE DELLA BATTERIA E
DELL’ADATTATORE
Unità ricevente domestica:
Fonte di alimentazione principale: Per un funzio-
namento base e una retroilluminazione continua,
inserire l’adattatore da 6,0 V nella presa
dell’adattatore situata sul retro del dispositivo
Alimentazione di backup: aprire lo sportellino del
vano batterie, installare 3 batterie AA rispettando la
polarità indicata quindi chiudere lo sportellino .
Sensore remoto:
Allentare le viti dello sportellino del vano batte-
rie utilizzando un piccolo cacciavite, inserire 2 batterie AAA rispettando la polarità indicata. Rimontare lo
sportellino e serrare le viti .
IMPOSTAZIONE INIZIALE
Dopo l’installazione delle batterie dell’unità principale, l’icona relativa al meteo lampeggia (H). Premere
«UP» o «DOWN» per selezionare il meteo
locale come impostazione iniziale. Premere [CLOCK]
per confermare e uscire. (Per maggiori dettagli
ved. la sezione «PREVISIONI METEO»)
CONFIGURAZIONE DEL TERMOIGROMETRO
WIRELESS
In caso di prima installazione, accendere sempre
l’unità e dopo il sensore remoto. Impostare il Canale 1 per sensore remoto. Impostare il canale 2 e il
canale 3 per il 2° e 3° sensore
(313505.00 / W186-F)
.
• Premere e tenere premuto il pulsante [SNOOZE/
CHANNEL/LIGHT] sull’unità principale fin
quando l’unità non emette un segnale acustico
che indica la ricerca del sensore remoto. I valori
di temperatura (D) e umidità (E) lampeggiano ad
indicare che l’unità si trova in modalità ricerca
• Premere il pulsante [Tx] sul retro del sensore
remoto per trasmettere il segnale RF.
• Una volta stabilita la connessione RF, sull’unità
principale compaiono la temperatura e l’umidità
relative al canale selezionato.
Indicazione:
• Nel caso di applicazione esterna del sensore remoto,
questo non deve venire direttamente esposto agli
agenti atmosferici, per es. alla pioggia.
Denominazione delle funzioni display
sull‘apparecchio principale
A
Orologio radiocontrollato
B Visualizzazione trend / tendenza
C
Numero del canale
D
Temperatura interna / esterna
E
Umidità dell'aria interna / esterna
F Visualizzazione livello batterie
G Diagrammi a barre colorate animati
H Simboli previsioni meteo
I Simbolo dell‘allarme
J Visualizzazione ora / data
Denominazione delle funzioni display sul sensore
K Visualizzazione canale
L
Simbolo della trasmissione
M Umidità dell'aria
N
Temperatura
K
A
C
B
D
L
N
J
I
H
G
F
E
M
Apparecchio principale
Sensore remoto
313508_W193_Manual_130215.indd 16 27.02.13 12:49

17 Italiano
SOLEGGIATO PARZIALMENTE NUVOLOSO NUVOLOSO PIOGGIA TEMPORALI
PREVISIONI METEO
L’unità prevede le condizioni meteo delle 12 – 24
ore successive in base alle variazioni della pressione
atmosferica. L’area di copertura è di circa 30 – 50
km. Le previsioni meteo si basano sulla variazione
della pressione atmosferica e sono corrette per il
70 – 75%. Data l’impossibilità di prevedere le condizioni atmosferiche al 100%, decliniamo qualsiasi
responsabilità per eventuali perdite imputabili ad una
previsione errata.
Per ottenere previsioni meteo accurate, è necessario
inserire le condizioni meteo correnti come impostazioni iniziali. Dopo il reset dell’unità, premere [UP] o
[DOWN] per selezionare le condizioni meteo locali
come impostazione meteo iniziale. Premere [CLOCK]
per confermare e uscire.
È inoltre possibile impostare le previsioni meteo tenendo premuto il pulsante [CLOCK] per accedere
alla modalità di impostazione. Premere più volte il
pulsante [CLOCK] per saltare l’impostazione orologio e calendario fin quando non lampeggia l’icona
relativa al meteo. Premere [UP] o [DOWN]
per selezionare le condizioni meteo locali. Premere
[CLOCK] per confermare e uscire.
Formato 12/24 ore > Hr > Min. > Anno > Formato
G/M o M/G > Mese > Data > Previsioni meteo > ESCI
NOTA
Località geografiche diverse come ad esempio zone
dell’entroterra o costiere presentano una diversa
risposta di previsioni meteo. Se le proprie previsioni
meteo indicano sempre pioggia o temporali per un
lungo periodo di tempo senza rispecchiare le effettive condizioni climatiche, è necessario applicare la
suddetta procedura di impostazione che regolerà la
precisione delle previsioni meteo
OROLOGIO RADIOCONTROLLATO
L’unità inizia a sincronizzare l’orologio dopo l’installazione della batteria/dell’adattatore o del loro reset.
In modalità normale, premere [
/UP] fin quando
non appare l’icona (A) in modo da avviare la ricer-
ca del segnale emesso dall’orologio radiocontrollato.
Se poi l’icona (A) scompare significa che il segnale
radio al momento non è disponibile. Provare con
altre località in un secondo momento. Posizionare
l’unità lontano da fonti di interferenza quali telefoni
cellulari, elettrodomestici, TV ecc.
Sullo schermo compare l’icona raffigurante l’antenna
(A) con intensità del segnale massima
qualora la
ricezione del segnale radiocontrollato sia ottimale.
L’orologio radiocontrollato si sincronizza quotidianamente verso le ore 02:03 e 03:03 circa. Ciascuna
ciclo di ricezione dura almeno 2,5 minuti e massimo
10 minuti.
TEMPERATURA E UMIDITÀ
INTERNE/ESTERNE
Il valore della temperatura (D) è indicato nella parte
in basso a sinistra del display mentre l’umidità è
visualizzata (E) nella parte in basso a destra.
Premere il pulsante [C/F] per selezionare l’unità di
misura della temperatura C/F.
Premere il pulsante [SNOOZE/CHANNEL/LIGHT]
per selezionare indoor, Ch1, Ch2, Ch3 e modalità di
visualizzazione a scorrimento canali automatico
.
DIAGRAMMI A BARRE COLORATI
I diagrammi a barre (G) costituiscono una soluzione
intuitiva per stimare con una semplice occhiata le
condizioni meteo.
La parte colorata sinistra del diagramma mostra
la temperatura interna/esterna nella modalità di
visualizzazione corrente. La parte destra indica
invece l’umidità interna/esterna. Al variare del valore,
cambia anche automaticamente il numero delle barre
colorate.
MEMORIA MASSIMA / MINIMA
Premere più volte il pulsante [MEM] per visualizzare i valori massimi e minimi di temperatura e
umidità. Per cancellare la registrazione in memoria,
tenere premuto il pulsante [MEM] mentre sullo
schermo vengono visualizzati I rispettivi valori.
313508_W193_Manual_130215.indd 17 27.02.13 12:49

Italiano 18
INDICATORE DI TREND DELLA
TEMPERATURA E UMIDITÀ
L’icona indica In aumento, Stabile e In calo se la
variazione di temperatura o di umidità è superiore
a 1 grado C (o 2 gradi F) nel giro di un’ora.
OROLOGIO E CALENDARIO
Premere [CLOCK] per alternare tra ora, calendario
e giorno della settimana.
Tenere premuto il pulsante [CLOCK] per accedere
alla modalità di impostazione dell’orologio. Utilizzando il pulsante [UP] o [DOWN] per effettuare la
regolazione e [CLOCK] per confermare, è possibile impostare in sequenza i seguenti valori:
Formato 12/24 ore > Hr > Min. > Anno > Formato
G/M o M/G > Mese > Data > Previsioni meteo > ESCI
ORA LOCALE, FUSO ORARIO MONDIALE
Tenere premuto il pulsante [ZONE] per accedere
alla modalità di impostazione del fuso orario mondiale. Premere [UP] o [DOWN] per inserire un
valore di offset dell’ora compreso tra –12 e +12 ore
(Svizzera +1)
. Premere [CLOCK] per confermare e
uscire.
Premere il pulsante [ZONE] per alternare tra la vi-
sualizzazione dell’ora locale (radiocontrollata) e il fuso
orario mondiale (zone). In caso di selezione del fuso
orario mondiale appare l’icona «ZONE». In caso di non
utilizzo del fuso orario, impostare il fuso orario su «0».
IMPOSTAZIONE DELL’ALLARME
Premere [ALARM] per visualizzare l’ora
dell’allarme dopo di che compare l’icona «AL». Premere nuovamente il pulsante per abilitare o disabilitare l’allarme. Quando l’allarme è abilitato compare
l’icona «
»(I). Tenere premuto il pulsante [ALARM]
per accedere alla modalità di impostazione
dell’ora di allarme. Premere [UP] o [DOWN] per
selezionare i valori Hr/Min desiderati quindi premere
[ALARM] per confermarne l’impostazione.
SNOOZE E RETROILLUMINAZIONE
Quando l’allarme si spegne, premere [SNOOZE/
CHANNEL/LIGHT] per attivare l’allarme snooze
dopo di che appare l’icona «Zz». Per interrompere
l’allarme per un giorno premere il tasto [ALARM] .
Premere [SNOOZE/CHANNEL/LIGHT] se si
desidera una retroilluminazione più lunga quando
l’adattatore non è collegato.
Premere [LIGHT ON/OFF] per attivare o disattivare la retroilluminazione quando l’adattatore è
collegato.
INDICAZIONE DI BATTERIA SCARICA
L’indicazione di batteria (F) scarica può essere visualizzata sia sull’unità che su tutti e 3 i canali remoti.
Sostituire le batterie e seguire la procedura di installazione descritta nel presente manuale di istruzioni.
SMALTIMENTO DELLA BATTERIA
Sostituire la batteria con una dello stesso tipo o di
tipo equivalente consigliato dal produttore. Smaltire
batterie vecchie o difettose in modo ecocompatibile
conformemente alla normativa vigente.
SPECIFICHE
Alimentazione di tensione dell‘apparecchio principale: 3 x 1,5V o con alimentatore 6,0 V
Tipo di batterie per apparecchio principale: 3 x AAA / LR03 / AM4
Intervallo di variazione della temperatura per apparecchio principale: da 0 ºC fino a +50 ºC
Intervallo dell‘umidità dell‘aria per apparecchio principale: da 20% fino a 99% RH
Temperatura di funzionamento: 0 ºC – 50 ºC
Risoluzione della visualizzazione di temperatura: 0,1 ºC
Risoluzione dell‘umidità dell‘aria: 1%
Alimentazione di tensione del sensore remoto: 2 x 1,5V
Tipo di batterie per sensore remoto: 2 x AAA / LR03 / AM4
Intervallo di variazione della temperatura per sensore remoto (W186-F): da -20 ºC fino a +60 ºC
Frequenza di trasmissione: 433 MHz
Portata (con condizioni favorevoli): 30 m
Numero di sensori remoti: 3
313508_W193_Manual_130215.indd 18 27.02.13 12:49

313508_W193_Manual_130215.indd 19 27.02.13 12:49

W193-7 - 313508.00
Tegro AG
CH-8603 Schwerzenbach
www.tegro.ch
Innen- / Aussenluftfeuchtigkeit
Indoor / outdoor humidity
Humidité atmosphérique intérieur / extérieur
Umiditá atmosferica interno / esterno
Uhranzeige
Clock display
Affi chage horloge
Visualizzazione orologio
Symbole Wettervorhersage
Wheather forecast symbols
Symboles prévisions météo
Simboli previsioni meteo
Animierte Farbgrafi k
Animated color graphs
Grafi que animé, en couleur
Diagrammi a barre colorate animati
Funkuhr
Radio controlled clock
Horloge radio pilotée
Orologio radiocontrollato
Trend- / Tendenzanzeige
Trend / tendency display
Affi chage tendance
Visualizzazione trend /
tendenza
Innen- / Aussentemperatur
Indoor / outdoor temperature
Température intérieur /
extérieur
Temperatura interno / esterno
Temperatur
Temperature
Température
Temperatura
Luftfeuchtigkeit
Humidity
Humidité atmosphérique
Umiditá atmosferica
Kanalanzeige
Channel display
Affi chage du canal
Visualizzazione canale
313508_W193_Manual_130215.indd 20 27.02.13 12:49
 Loading...