

Page 1

Gebrauchsanweisung
Akku-Scheibenentfroster – 12 V DC
Battery-operated windscreen defroster – 12 V DC
Dégivreur de vitresà accumulateur – 12 V DC
Sbrinatore percristalli a batteria – 12 V DC
Elektroniczny odmrażacz do szyb – 12VDC
Operating instructions
Mode d’emploi
Istruzioni per l’uso
Instrukcja obsługi
75 307 Model-Nr. AT 646
Hergestellt für:
INTER-UNION Technohandel GmbH
Klaus-von-Klitzing-Str. 2
76829 Landau · Germany
www.inter-union.de
Stand 05/2009
Version 1.0
D
GB
F
I
PL
Przy pomocy przycisku + i -ustawiamy godzinę, o której ma się włączyć urządzenie.
Po wprowadzeniu żądanej godziny, odczekujemy 3 sekundy, aż zaczną pulsować minuty.
Wprowadzamy minuty. Ustawienia są gotowe, jeżeli wyświetlacz przestał pulsować i
pojawił się napis „OFF AUTO”.
Przytrzymujemy przycisk „S”, na wyświetlaczu pulsuje godzina. Przy pomocy przycisku + i
-
zmieniamy godzinę. Po ustawieniu godziny odczekujemy ok. 3 sekund, aż pokażą się
pulsujące minuty. Ustawiamy je w ten sam sposób co godziny. Czas jest ustawiony jak
wyświetlacz przestanie pulsować i pokaże się napis „OFF Auto”.
Po ustawieniu czasu, należy przycisnąć przez 3 sek. przycisk „S”, aż na wyświetlaczu
pojawi się symbol „C” w celu zapisania ustawień.
Dmuchawa posiada tzw.„strażnik” akumulatora, który w trakcie zasilania urządzenia
akumulatorem, pozwala na bezproblemowy rozruch samochodu, tzn. akumulator
samochodowy nie może się rozładować.
Ponadto dmuchawa jest wyposażona w kontrolkę LED. W celu uruchomienia kontrolek, włącznik lampki LEDmusi znajdować się w pozycji „Light”. W celu wyłączenia tej
funkcji, włącznik ustawiamy w pozycji „LED”.
Wbudowane gniazdo 12V
może zasilać również inne urządzenia 12VDC.
W przypadku, kiedy dmuchawa nie funkcjonuje, prosimy o sprawdzenie następujących
ew. przyczyn.
1. Należy sprawdzić czy wszystkie styki w gnieździe 12VDC są czyste, jeżeli nie to
należy je wyczyścić.
2. Ew. należy sprawdzić, czy bezpiecznik, który jest przypisany do gniazda zapalniczki nie
jest przepalony.W razie potrzeby należy go wymienić.
3. Należy również sprawdzić, czy bezpiecznik urządzenia nie jest przepalony. W razie
potrzeby należy go wymienić.
• Żeby dmuchawa mogła zadziałać przy wyłączonej stacyjce i wyjętym kluczyku musi
być napięcie w gnieździe od zapalniczki. Jeżeli nie ma tego napięcia, należy zwrócić
się do elektryka samochodowego.
• Otworów dmuchawy Unitec nigdy nie należy przykrywać.
• Dmuchawę chronić przed wilgocią
• Nie należy otwierać dmuchawy.W środku dmuchawy brak części do naprawy.
Po otworzeniu dmuchawy, urządzenie traci gwarancję.
• W przypadku nie używania dmuchawy należy odłączyć ją od prądu.
• Dmuchawa nie nadaje się do montażu w domu, służy jedynie do postawienia w
samochodzie na desce rozdzielczej lub na podłodze samochodu.
• Prosimy o nie obsługiwanie dmuchawy w trakcie jazdy, lecz o koncentrowanie się na
ruchu drogowym.
Przed przystąpieniem do czyszczenia, urządzenie należy odłączyć od prądu, w celu
uniknięcia spięcia. Urządzenie można jedynie przecierać ściereczką.
W momencie, kiedy urządzenie stanie się bezużyteczne, nie wolno wyrzucać go do
pojemników z domowymi śmieciami, tylko poddać recyklingowi zgodnie z
obowiązującymi krajowymi przepisami w tym względzie. Akumulatory muszą zostać
poddane recyklingowi w miejscach do tego przenaczonych.
Ustawienie czasu programatora
Zapisanie ustawień czasu
Funkcje dodatkowe
Usuwanie przyczyn zakłóceń
Muszą być przestrzegane!
Czyszczenie
Recykling
1515
OFF
AUTO
75307 Bed. A5:77877 Bed. A5 28.05.2009 15:39 Uhr Seite 2
Page 2

Dieser Heizlüfter von Unitec ist sehr sorgfältig konstruiert und hergestellt, um immer
zuverlässig zu arbeiten. Bevor Sie den Heizlüfter von Unitec einbauen und benutzen,
lesen Sie bitte diese Hinweise genau durch. Sie erfahren darin alles, was Sie wissen
und beachten müssen, damit Ihnen der Heizlüfter viele Jahre lang gute Dienste leistet.
Bitte bewahren Sie diese Hinweise für später auf.
• Ersetzen Sie niemals die serienmäßige Sicherungsstärke für den Zigarettenanzünder
durch eine höhere nicht vom Fahrzeughersteller freigegebene Sicherung.
• Die Ladedauer darf nicht überschritten werden
• Nicht abgedeckt betreiben
• Mindestabstand zu anderen Geräten beachten (mindestens 20 cm)
Eingangsspannung: 12V DC
Batterie: 12V DC 5Ah
Laufzeit: bis zu 1 Stunde (im 12V DC Betrieb)/ bis zu 10 Minuten (im Akkubetrieb)
Leistung: 150 Watt
Autonetzstecker:
Ausgangsspannung: 12V DC
Ladedauer: 14-16 Stunden
Netzstecker:
Ausgangsspannung: 230V ~ AC
Ladedauer: 6-8 Stunden
Um den Heizlüfter im Akkubetrieb zu verwenden, muss er vor der Benutzung vollständig
aufgeladen werden. Bitte laden Sie den Artikel nach jeder Benutzung unverzüglich und
vollständig auf. Dabei sind die Sicherheitshinweise zu beachten.
Sie können den Akku mittels 12V DC über das Ladekabel oder mittels 230V~ AC über
Netzteil aufladen. Dazu muss das Netzteil bzw. Ladekabel mit der Ladebuchseund
einer Stromquelle verbunden werden. Während des Ladevorgangs leuchtet die rote
LED-Kontrollleuchteauf.
Sobald der Akku vollständig geladen ist, entfernen Sie den Heizlüfter vom Stromnetz.
Achtung: Während dem Ladevorgang kann der Heizlüfter nicht gestartet werden. Um den
Heizlüfter in Betrieb zu nehmen, muss das Netzteil entfernt werden.
Um den Heizlüfter im 12V DC Betrieb zu verwenden, verbinden Sie den Heizlüfter mit
der Steckdose des Zigarettenanzünders in Ihrem Fahrzeug. Verwenden Sie dazu das
Ladekabel für den dauerhaften Betrieb und die Ladebuchse B씊. Die Zündung muss auf
Dauerplus geschaltet sein um eine Einsatzzeit von bis zu einer Stunde zu erreichen.
Willkommen!
Sicherheitshinweise
Technische Daten
Vorbereitungen
für den Akkubetrieb
Vorbereitungen für
den 12 V
DC Betrieb
Bedienungsanleitung
D
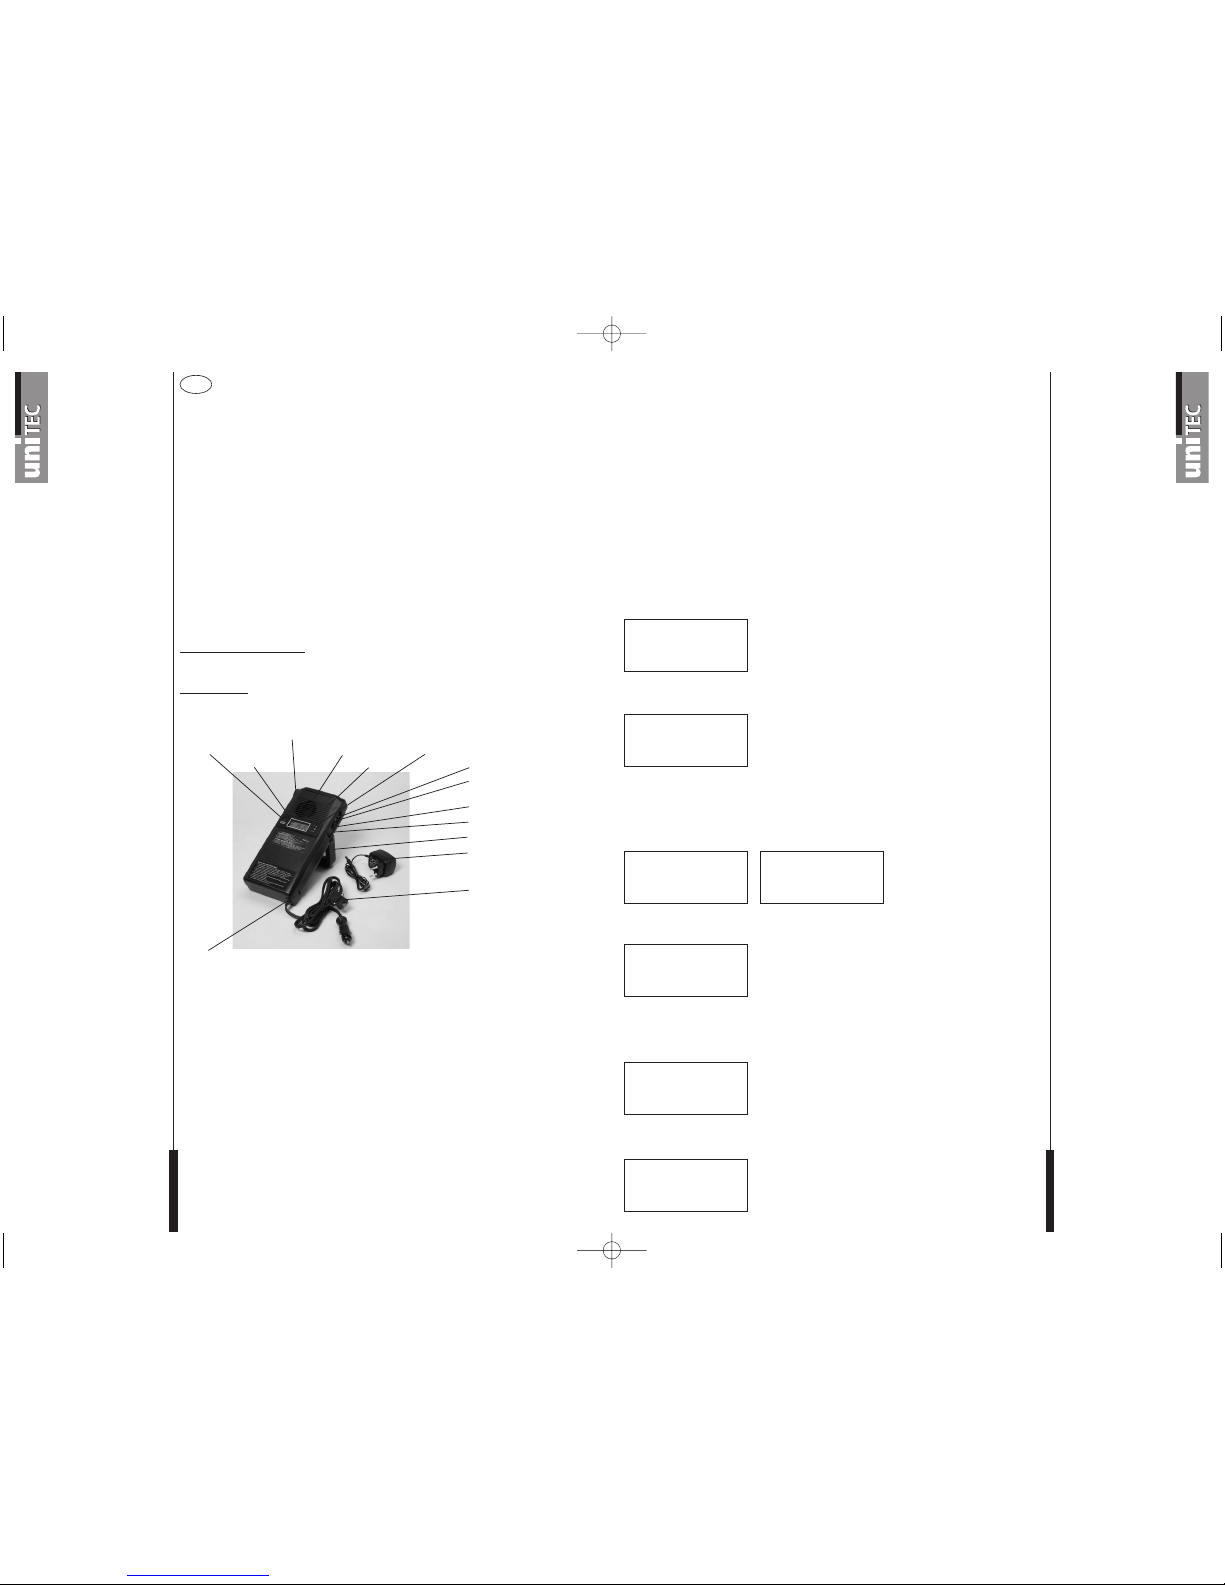
Kontrollleuchten
Display
12 V DC Steckdose
Lüftung
Leuchte
Bedientasten
Schalter Licht/LED
Ladebuchse A:
Für 12 V
DC Betrieb
Schalter EIN/AUS
쐅 Schalter Cool/Heat
쐈 Aufstellfuß
쐉 Netzteil:
Zum Aufladen des Akkus über
230 V
~ AC
씈 Anschlusskabel
(für dauerhafen Betrieb)
씉 Ladekabel:
Zum Aufladen des Akkus
über 12 V
DC
씊 Ladebuchse B:
Für 12 V
DC Betrieb
Gebrauch des
Heizlüfters
Heizlüfter manuell starten
Heizlüfter automatisch starten
Einstellen der Startzeit des
Heizlüfters
Einstellen der Abschaltzeit des Heizlüfters
Stellen Sie den Heizlüfter mit Hilfe des Aufstellfußes 쐈auf dem Armaturenbrett hinter der
Frontscheibe Ihres Fahrzeugs oder im Fußraum auf. Verbinden Sie den Netzstecker wie in
1.2 beschrieben mit der 12V DC Steckdose des Zigarettenanzünders oder verwenden
Sie den Heizlüfter im Akkubetrieb.
Wählen Sie die Schalterstellung I des Schalters EIN/AUS . Durch diese Einstellung
leuchtet die grüne Kontrollleuchte und der Heizlüfter ist einsatzbereit.
Um zwischen Kalt- und Warmluft zu wählen, betätigen Sie den Schalter Cool/Heat 쐅.
Dabei steht „Cool“ für Kaltluft und „Heat“ für Warmluft.
Nun können Sie den Heizlüfter manuell oder automatisch mit der Zeitschaltuhr starten.
Um den Heizlüfter manuell zu starten, halten Sie die Taste + 3 Sekunden gedrückt.
Auf dem Display erscheint „ON“ und der Heizlüfter ist in Betrieb.
Zum Ausschalten drücken Sie 3 Sekunden die Taste - . Auf dem Display erscheint „OFF“
und der Heizlüfter ist deaktiviert.
Um den Heizlüfter automatisch zu nutzen, halten Sie die Taste „S“ für 3 Sekunden
gedrückt. Erscheint das Symbol „C“ auf dem Display, ist der Timer gesperrt. Drücken Sie
erneut die Taste „S“ für 3 Sekunden, dadurch entsperren Sie den Timer. Das Symbol
„P“ erscheint auf dem Display und die Start-/Abschaltzeit kann eingestellt werden.
Um die Startzeit einzustellen, drücken Sie kurz die Taste + . Nun zeigt das Display „ON“
und die Anzeige blinkt auf.
Mit Hilfe der Tasten + und - kann eine Uhrzeit eingestellt werden, zu welcher der
Heizlüfter starten soll. Zuerst müssen die Stunden eingestellt werden. Nach Eingabe der
Stunden, warten Sie etwa 3 Sekunden bis die Anzeige für die Minuten blinkt. Geben Sie
nun die Minuten ein. Die Zeit ist eingestellt sobald das Display nicht mehr blinkt und „OFF
AUTO“ angezeigt wird.
Um die Abschaltzeit einzustellen, drücken Sie kurz die Taste - . Nun zeigt das Display
„OFF“ und die Anzeige blinkt auf.
1515
ON
1515
OFF
C
P
-- --
ON
1515
OFF
AUTO
1515
OFF
75307 Bed. A5:77877 Bed. A5 28.05.2009 15:39 Uhr Seite 4
Page 3

Mit Hilfe der Tasten + und - kann eine Uhrzeit eingestellt werden, zu welcher der Heizlüfter abgeschaltet werden soll. Zuerst müssen analog zur Startzeit die Stunden eingestellt
werden. Nach Eingabe der Stunden, warten Sie etwa 3 Sekunden bis die Anzeige für die
Minuten blinkt. Geben Sie nun die Minuten ein. Die Zeit ist eingestellt sobald das Display
nicht mehr blinkt und „OFF AUTO“ angezeigt wird.
Um die Uhrzeit einzustellen, drücken Sie kurz die Taste „S“. Nun blinkt Anzeige wie bereits
bei dem Einstellen der Start-/Abschaltzeit für die Stunden auf. Mithilfe der Tasten + und –
kann die Uhrzeit eingestellt werden. Nach Eingabe der Stunden, warten Sie etwa
3 Sekunden bis die Anzeige für die Minuten blinkt. Geben Sie nun die Minuten ein. Die Zeit
ist eingestellt sobald das Display nicht mehr blinkt und „OFF AUTO“ angezeigt wird.
Der letzte Schritt ist das Speichern der Eingaben, halten Sie dafür die Taste „S“ für
3 Sekunden gedrückt, bis auf dem Display das Symbol „C“ erscheint.
Der Heizlüfter verfügt über eine sogenannte Batteriewächterfunktion, die bei Autonetzbetrieb einen reibungslosen Start des Wagens gewährleistet, d.h. die Autobatterie kann
nicht entladen werden.
Des Weiteren verfügt der Heizlüfter über eine LED-Leuchte . Um diese zu aktivieren
wählen Sie bitte die Schalterstellung „Light“ des Schalters LED-Leuchte . Um die
Leuchte abzuschalten, wählen Sie bitte die Schalterstellung „LED“.
Es können zudem auch 12V DC Geräte jeglicher Art über die eingebaute 12V DC
Steckdose betrieben werden.
Der Heizlüfter funktioniert nicht!
1. Prüfen Sie, ob die Kontakte in der 12V DC-Steckdose sauber sind und reinigen
Sie diese nötigenfalls.
2. Sehen Sie am Sicherungsblock des Fahrzeugs nach, ob die Sicherung, die für die
verwendete 12V DC Steckdose zuständig ist, intakt ist. Ersetzen Sie diese
nötigenfalls.
3. Prüfen Sie, ob die Stecksicherung des Heizlüfters intakt ist. Nötigenfalls ersetzen Sie
diese.
• Auch bei ausgeschalteter Zündung und abgezogenem Zündschlüssel muss die Bord-
spannung des Zigarettenanzünders gegeben sein, damit Sie das Gerät betreiben
können. Sollte dies bei Ihrem Fahrzeug nicht der Fall sein, kann eine Fachwerkstatt den
Anschluss auf Dauerbetrieb überbrücken.
• Öffnungen des Unitec Heizlüfters immer frei halten.
• Den Unitec Heizlüfter vor Feuchtigkeit schützen.
• Den Unitec Heizlüfter nicht öffnen, es gibt in seinem Innern nichts zu reparieren. Durch
Öffnen erlischt die Garantie.
• Stets den Stecker ziehen, wenn das Gerät nicht benutzt wird.
• Der Unitec Heizlüfter ist nicht zur Montage im Innenraum geeignet sondern nur zum
aufstellen auf dem Armaturenbrett oder im Fußraum.
• Bitte bedienen Sie den Unitec Heizlüfter nicht während Sie Auto fahren, sondern
konzentrieren Sie sich auf den Straßenverkehr.
Bitte vor dem Reinigen das Gerät ausschalten und Netzstecker ziehen, um einem Kurzschluss vorzubeugen. Das Gerät nur mit einem Tuch leicht abwischen.
Entsorgen Sie dieses Produkt nach Ende der Lebensdauer nicht im Hausmüll. Nähere
Informationen erhalten Sie bei Ihrem öffentlich rechtlichen Entsorgungsträger. Entsorgen
Sie den Akku nicht im Hausmüll sondern führen Sie diesen dem Sondermüll zu.
Einstellen der Uhrzeit der
Zeitschaltuhr
Speichern der
Zeiteinstellungen
Zusatzfunktionen
Fehler / Ursachen
Unbedingt zu beachten!
Reinigung
Entsorungshinweise
Welcome!
Safety instructions
Technical details
Preparations for battery
operation
Preparations for 12 V
DC
operation
This Unitec fan heater has been very carefully designed and manufactured to work
reliably at all times. Before you install and use this Unitec fan heater, please read
through these instructions carefully. Here you will find out everything that you need to
know and observe so that your fan heater gives you many years of good service. Please
keep these instructions for later use.
• Never replace the standard fuse rating for the cigarette lighter with a higher one not
approved by the manufacturer.
• The charging time must not be exceeded
• Do not operate covered up
• Observe the minimum distance from other devices (at least 20 cm)
Input voltage: 12V DC
Vehicle battery: 12V DC 5Ah
Running time: up to 1 hour (in 12V DC mode)/ up to 10 minutes (in battery mode)
Output: 150 Watt
Car power plug:
Output voltage: 12V DC
Charging time: 14-16 hours
Mains plug:
Output voltage: 230V ~ AC
Charging time: 6-8 hours
To use the fan heater in battery mode, it must be fully charged before use. Please charge
the product fully immediately after every use. Observe the safety instructions here.
You can charge the battery with 12V DC via the charging cable or with 230V~ AC via the
mains adapter. For this, the mains adapter or charging cable must be connected to the
power jack and a power source. The red LED indicator light is lit during the charging
process.
As soon as the battery is fully charged, disconnect the fan heater from the mains.
Attention: The fan heater may not be started during the charging process. To operate the
fan heater, you must remove the mains adapter.
To use the fan heater in 12V DC mode, connect the fan heater via the cigarette lighter
socket in your vehicle. For this use the charging cable for continuous operation and power
jack B 씊. The ignition must be switched to steady plus in order to permit a period of use
of up to one hour.
1515
OFF
AUTO
Operating instructions
GB
Indicator lights
Display
12 V DC socket
Ventilation
Light
Operator buttons
Light/LED switch
Power jack A: for
12 V DC operation
ON/OFF switch
쐅 Cool/Heat switch
쐈 Stand
쐉 Mains adapter: for charging
the battery via 230 V~ AC
씈 Connection cable
(for continuous operation)
씉 Charging cable: for
charging the battery via
12 V
DC
씊 Power jack B:
for 12 V
DC operation
75307 Bed. A5:77877 Bed. A5 28.05.2009 15:39 Uhr Seite 6
Page 4

Place the fan heater on the dashboard behind your vehicle’s windscreen or in the footwell
with the aid of the stand 쐈. Connect the power plug as described in 1.2 to the 12V DC
cigarette lighter socket or use the fan heater in battery mode.
Select switch setting I on the ON/OFF switch . With this setting, the green indicator light
is lit and the fan heater is ready to use.
To choose between cool and hot air, use the Cool/Heat switch 쐅. Here “Cool” stands for
cool air and “Heat” for hot air.
Now you can start the fan heater manually or automatically with the timer switch.
To start the fan heater manually, press and hold down the + button for 3 seconds. “ON”
appears in the display and the fan heater is operating.
To switch it off, press and hold down the – button for 3 seconds. “OFF” appears in the
display and the fan heater is deactivated.
To use the fan heater in automatic mode, press and hold down the “S” button for 3
seconds. If the symbol “C” appears in the display, the timer is locked. Press and hold
down the “S” button again for 3 seconds and this will release the timer. The symbol “P”
appears in the display and the start/stop time can be set.
To set the start time, press the + button briefly. Now the display shows “ON” and flashes.
With the aid of the + and - buttons you can set a time at which the fan heater is to start.
You must first input the hours. After inputting the hours, wait about 3 seconds until the display flashes for the minutes. Now input the minutes. The time is set as soon as the display
stops flashing and “OFF AUTO” is displayed.
To set the switch-off time, press the – button briefly. Now the display shows “OFF” and
flashes.
Use of the fan heater
Starting the fan heater manually
Starting the fan heater
automatically
Setting the fan heater’s
start time
Setting the fan heater’s
switch-off time
Setting the time with the timer
switch
Saving the time settings
Additional functions
Faults / Causes
Must be observed!
Cleaning
Disposal instructions
With the aid of the + and – buttons you can set a time at which the fan heater is to be
switched off. Firstly, as with the start time, the hours must be input. After inputting the
hours, wait about 3 seconds until the display flashes for the minutes. Now input the minutes. The time is set as soon as the display stops flashing and “OFF AUTO” is displayed.
To set the time, press the “S” button briefly. Now the display flashes for the hours as
already described for setting the start/stop time. The time can be set with the + and –
buttons . After inputting the hours, wait about 3 seconds until the display flashes for the
minutes. Now input the minutes. The time is set as soon as the display stops flashing and
“OFF AUTO” is displayed.
The last step is saving the input. To do this, press and hold down the “S” button for 3
seconds until the symbol “C” appears in the display.
The fan heater has a “battery monitor” function that ensures trouble-free starting of the
vehicle in car power mode i.e. the car battery cannot be discharged.
The fan heater also has a LED light . To activate this, please select the switch position
“Light” on the LED light switch . To switch the light off, please select the switch position
“LED.”
12V DC devices of any kind may also be operated via the inbuilt 12V DC socket .
The fan heater is not working!
1. Check that the contacts in the 12V DC socket are clean and if necessary clean them.
2. Check in the vehicle’s fuse block that the fuse used for the 12V DC socket is intact.
Replace it if necessary.
3. Check that the fuse in the fan heater’s plug is intact. Replace it if necessary.
• The vehicle voltage must be present in the cigarette lighter, even when the ignition is
switched off and the ignition key removed, so that the device may be operated. If this is
not the case with your vehicle, a specialist garage can make a bypass for continuous
operation.
• Always keep the Unitec fan heater’s apertures free.
• Protect the Unitec fan heater from moisture.
• Do not open the Unitec fan heater. There is nothing to repair inside. Opening it
invalidates the guarantee.
• Always pull out the plug when the device is not in use.
• The Unitec fan heater is not suitable for installation indoors but only for installation on
the dashboard or footwell.
• Please do not operate the Unitec fan heater while you are driving but concentrate on
the traffic.
Before cleaning the device, please switch it off and pull out the car power plug in order to
prevent a short circuit. Only wipe the device lightly with a cloth.
Do not dispose of this product in the domestic waste at the end of its useful life. You can
find out more details from your official disposal body. Do not dispose of the battery in the
domestic waste but take it to the special waste disposal point.
1515
ON
1515
OFF
C
P
-- --
ON
1515
OFF
AUTO
1515
OFF
1515
OFF
AUTO
75307 Bed. A5:77877 Bed. A5 28.05.2009 15:39 Uhr Seite 8
Page 5
Ce radiateur soufflant d’Unitec a été conçu et fabriqué avec le plus grand soin pour
permettre un fonctionnement fiable à tout moment. Veuillez lire ces instructions attentivement avant de monter et d’utiliser le radiateur soufflant d’Unitec. Vous y apprendrez
tout ce que vous avez besoin de savoir et de respecter pour que le radiateur soufflant
vous rende de bons services pendant de nombreuses années. Veuillez conserver ces
instructions pour vous y référer ultérieurement.
• Ne remplacez jamais le fusible fourni en série pour l'allume-cigare par un fusible
d'intensité supérieure non homologué par le constructeur du véhicule.
• Il ne faut pas dépasser la durée de charge
• Ne pas couvrir l’appareil pendant son fonctionnement
• Respecter la distance minimale par rapport à d’autres appareils (au moins 20 cm)
Tension d’entrée : 12V DC
Batterie : 12V DC 5Ah
Durée d’utilisation : jusqu’à 1 heure (en fonctionnement 12V DC)/ jusqu’à 10 minutes
(en fonctionnement par accumulateur)
Puissance : 150 watts
Fiche alimentation voiture :
Tension de sortie : 12V DC
Durée de charge : 14-16 heures
Fiche secteur :
Tension de sortie : 230V ~ AC
Durée de charge : 6-8 heures
Pour utiliser le radiateur soufflant en fonctionnement par accumulateur, il faut le charger
complètement avant l’emploi. Veuillez charger l’appareil immédiatement et complètement
après chaque utilisation, en respectant les instructions de sécurité.
Vous pouvez charger l’accumulateur sur le 12V DC via le câble de charge ou sur le
230V~ AC via le bloc d’alimentation électrique. Pour ce faire, il faut connecter le bloc d’alimentation électrique ou le câble de charge à la prise de charge et à une source d’alimentation. Durant la charge, le voyant DEL rouge de contrôle est allumé.
Dès que l’accumulateur est complètement chargé, retirez le radiateur soufflant du réseau
électrique.
Attention :Durant la charge, il n’est pas possible de mettre en marche le radiateur soufflant.
Pour mettre le radiateur soufflant en marche, il faut retirer le bloc d'alimentation électrique.
Pour utiliser le radiateur soufflant en fonctionnement 12V DC, connectez le radiateur
soufflant à la prise de l’allume-cigare de votre véhicule. Utilisez pour cela le câble de
charge pour fonctionnement continu et la prise de charge B 씊. L’allumage doit être sur le
plus permanent pour pouvoir atteindre une durée d’utilisation d’une heure au plus.
Bienvenue !
Instructions de sécurité
Données techniques
Préparation pour le
fonctionnement par
accumulateur
Préparation pour
fonctionnement 12 V
DC
Instructions d’utilisation
F
Voyants de contrôle
Affichage
Prise de courant 12 V DC
Aération
Éclairage
Touches de commande
Interrupteur lumière/DEL
Prise de charge A : Pour
fonctionnement 12 V
DC
Interrupteur MARCHE/ARRÊT
쐅 Interrupteur Cool/Heat
쐈 Pied de montage
쐉 Bloc d’alimentation électrique:
pour charger l’accumulateur
via le 230 V
~ AC
씈 Câble de branchement
(pour fonctionnement en
continu)
씉 Câble de charge : pour
charger l’accumulateur
via le 12 V
DC
씊 Prise de charge B :
Pour fonctionnement
12 V
DC
Utilisation du radiateur
soufflant
Mise en marche manuelle du
radiateur soufflant
Mise en marche automatique
du radiateur soufflant
Réglage de l’heure de mise en
marche du radiateur soufflant
Réglage de l’heure d’arrêt du
radiateur soufflant
À l’aide du pied de montage 쐈, installez le radiateur soufflant sur le tableau de bord derrière le pare-brise de votre véhicule ou bien dans l’espace-pieds. Connectez la fiche
secteur à la prise de l’allume-cigare 12V DC de votre véhicule en suivant les instructions
sous 1.2, ou utilisez le radiateur soufflant en fonctionnement par accumulateur.
Positionnez l’interrupteur MARCHE/ARRET sur I. Le voyant vert de contrôle s’allume
alors et le radiateur soufflant est prêt à fonctionner.
Pour choisir entre l’air froid et l’air chaud, actionnez l’interrupteur Cool/Heat 쐅, en
sélectionnant « Cool » pour l’air froid et « Heat » pour l’air chaud.
Vous pouvez alors mettre le radiateur soufflant en marche, manuellement ou
automatiquement par la minuterie programmable.
Pour mettre le radiateur soufflant en marche de manière manuelle, appuyez durant 3
secondes sur la touche + . Sur l’affichage, la mention « ON » apparaît et le radiateur
soufflant est en marche.
Pour l’éteindre, appuyez durant 3 secondes sur la touche - . Sur l’affichage, la mention «
OFF » apparaît et le radiateur soufflant est désactivé.
Pour mettre le radiateur soufflant en marche de manière automatique, appuyez durant 3
secondes sur la touche « S » . Si le symbole « C » s’affiche, cela veut dire que la minuterie est bloquée. Appuyez une nouvelle fois sur la touche « S » pendant 3 secondes pour
débloquer la minuterie. Le symbole « P » s’affiche alors et il est possible de régler l’heure
de mise en marche et d’arrêt.
Pour régler l’heure de mise en marche, appuyez brièvement sur la touche + . La mention
« ON » s’affiche alors et l’affichage clignote.
Les touches + et - permettent de régler l’heure à laquelle le radiateur soufflant doit se
mettre en marche. Il faut d’abord régler l'heure. Après avoir entré l’heure, attendez environ
3 secondes jusqu’à ce que l’affichage des minutes clignote. Entrez alors les minutes. L’heure est réglée quand l’affichage ne clignote plus et que la mention « OFF AUTO » apparaît.
Pour régler l’heure d’arrêt, appuyez brièvement sur la touche - . La mention « OFF » s’affiche alors et l’affichage clignote.
1515
ON
1515
OFF
C
P
-- --
ON
1515
OFF
AUTO
1515
OFF
75307 Bed. A5:77877 Bed. A5 28.05.2009 15:39 Uhr Seite 10
Page 6

Les touches + et - permettent de régler l’heure à laquelle le radiateur soufflant doit
s’arrêter. Comme pour la mise en marche, il faut d’abord régler l'heure. Après avoir entré
l’heure, attendez environ 3 secondes jusqu’à ce que l’affichage des minutes clignote.
Entrez alors les minutes. L’heure est réglée quand l’affichage ne clignote plus et que la
mention « OFF AUTO » apparaît.
Pour régler l’heure, appuyez brièvement sur la touche « S ». L’affichage se met alors à
clignoter, tout comme pour le réglage de l’heure de mise en marche ou d’arrêt. Les touches + et – permettent de régler l’heure. Après avoir entré l’heure, attendez environ 3
secondes jusqu’à ce que l’affichage des minutes clignote. Entrez alors les minutes. L’heure est réglée quand l’affichage ne clignote plus et que la mention « OFF AUTO » apparaît.
La dernière étape consiste à mémoriser les réglages. Pour ce faire, appuyez durant 3
secondes sur la touche « S » , jusqu’à ce que le symbole « C » s’affiche.
Le radiateur chauffant dispose d’une fonction dite de „surveillance de batterie“
garantissant le démarrage sans souci de la voiture lors du fonctionnement par le circuit
d’alimentation de la voiture, car la batterie du véhicule ne peut pas se décharger.
Le radiateur soufflant dispose en outre d’un éclairage DEL . Pour l’activer, positionnez
l’interrupteur de l’éclairage DEL sur « Light ». Pour éteindre l’éclairage, positionnez
l’interrupteur sur « LED ».
Il est en outre possible de brancher tout type d’appareils 12V DC sur la prise 12V DC
incorporée.
Le radiateur soufflant ne fonctionne pas !
1. Vérifiez si les contacts dans la prise 12V DC sont propres et nettoyez-les si nécessaire.
2. Contrôlez dans la boîte à fusibles du véhicule si le fusible de la prise 12V DC utilisée
est intact. Changez-le si nécessaire.
3. Vérifiez si le coupe-circuit à broche du radiateur soufflant est intact. Changez-le si
nécessaire.
• Pour faire fonctionner l'appareil, l'allume-cigare doit être sous tension, y compris
quand l’allumage est éteint et que la clé n'est pas sur le contact. Si ce n’est pas le cas
pour votre véhicule, un garagiste peut faire dériver la connexion pour prévoir un
service continu.
• Maintenir les ouvertures du radiateur soufflant Unitec dégagées en permanence.
• Protéger le radiateur soufflant Unitec de l’humidité.
• Ne pas ouvrir le radiateur soufflant Unitec, il n’y a rien à l’intérieur qui puisse être
réparé. L'ouverture de l'appareil met un terme à la garantie.
• Toujours retirer la fiche quand l'appareil n'est pas utilisé.
• Le radiateur soufflant Unitec ne convient pas pour un montage dans l'habitacle mais
doit être installé uniquement sur le tableau de bord ou dans l'espace-pieds.
• N'actionnez pas le radiateur soufflant Unitec en conduisant mais concentrez vous sur
la route.
Avant tout nettoyage, éteindre l’appareil et retirer la fiche secteur pour éviter un
court-circuit. Essuyer l’appareil légèrement avec un chiffon, c’est tout.
À la fin de la durée de vie de ce produit, ne l‘éliminez pas avec les ordures ménagères.
Pour en savoir plus, merci de vous adresser à l’organisme de droit public compétent. N’éliminez pas l'accumulateur avec les ordures ménagères mais faites-le parvenir à un point
de collecte de déchets toxiques.
Réglage de l’heure de la
minuterie programmable
Mémorisation des
réglages horaires
Fonctions supplémentaires
Pannes / causes
À noter!
Nettoyage
Instructions pour l’élimination
Benvenuti!
Istruzioni di sicurezza
Dati tecnici
Preparativi per il funzionamento
a batteria
Preparativi per il
funzionamento 12 V
DC
Questo termoventilatore di Unitec è costruito e prodotto con molta cura affinché operi
sempre in modo affidabile. Leggere attentamente queste istruzioni prima di installare e
utilizzare il termoventilatore di Unitec. Qui è contenuto tutto ciò che è necessario sapere
e osservare affinché il termoventilatore funzioni ottimamente per molti anni. Conservare
queste istruzioni per il futuro.
• Non sostituire mai la resistenza standard del fusibile per accendisigari mediante un
fusibile più potente non autorizzato dal produttore del veicolo.
• La durata di ricarica non deve essere oltrepassata.
• Non farlo funzionare scoperto.
• Osservare la distanza minima (almeno 20 cm) dagli altri dispositivi.
Tensione d’ingresso: 12V DC
Batteria: 12V DC 5Ah
Durata: fino a 1 ora (in caso di funzionamento 12V DC) / fino a 10 minuti (in caso di
funzionamento a batteria)
Potenza: 150 Watt
Spina per auto:
Tensione d’uscita: 12V DC
Durata di ricarica: 14-16 ore
Spina elettrica:
Tensione d’uscita: 230V ~ AC
Durata di ricarica: 6-8 ore
Per utilizzare il termoventilatore con funzionamento a batteria è necessario ricaricarlo
completamente prima dell’utilizzo. Dopo ogni utilizzo ricaricarlo immediatamente e
completamente! A tal proposito devono essere osservate le istruzioni di sicurezza.
È possibile ricaricare la batteria con 12V DC mediante il cavo di ricarica oppure con
230V~ AC mediante il trasformatore. A questo scopo l'alimentatore o il cavo di ricarica
deve essere collegato alla presa di ricarica e a una fonte di corrente. Durante la
ricarica la spia di controllo a LED rossa si accende.
Scollegare il termoventilatore dalla rete elettrica non appena la batteria è completamente
carica.
Attenzione: durante la ricarica non è possibile accendere il termoventilatore. Per metterlo
in funzione è necessario scollegare l’alimentatore.
Per utilizzare il termoventilatore con il funzionamento 12V DC collegare il
termoventilatore alla presa dell’accendisigari del proprio veicolo. A tale scopo utilizzare il
cavo di ricarica per funzionamento permanente e la presa di ricarica B 씊. L’accensione
deve essere su positivo permanente al fine di raggiungere una durata d’utilizzo fino a 1 ora.
1515
OFF
AUTO
Istruzioni per l’uso
I
Spie di controllo
Display
Presa 12 V DC
Ventilazione
Spie
Tasti di comando
Interruttore spia/LED
Presa per ricarica A: per
funzionamento 12 V DC
Interruttore ON/OFF
쐅 Interruttore freddo/caldo
쐈 Piedino di posizionamento
쐉 Alimentatore: per la ricarica
della batteria mediante
230 V
~ AC
씈 Cavo di collegamento
(per funzionamento
permanente)
씉 Cavo di ricarica: per la
ricarica della batteria
mediante 12 V
DC
씊 Presa di ricarica B: per
funzionamento 12 V
DC
75307 Bed. A5:77877 Bed. A5 28.05.2009 15:39 Uhr Seite 12
Page 7

Mediante il piedino di posizionamento 쐈collocare il termoventilatore sul cruscotto dietro
il parabrezza del proprio veicolo oppure nell’area dei piedi. Collegare la spina (come descritto al punto 1.2) con la presa 12V DC dell’accendisigari oppure utilizzare il termoventilatore nel funzionamento a batteria.
Scegliere la posizione I dell’interruttore ON/OFF . Con questa impostazione la spia di
controllo verde si accende e il termoventilatore è pronto per l’uso.
Per scegliere tra aria fredda e aria calda attivare l’interruttore Cool/Heat 쐅(“Cool” è per
l’aria fredda, mentre “Heat” è per l’aria calda).„Cool“ für Kaltluft und „Heat“ für Warmluft.
A questo punto il termoventilatore può essere acceso manualmente oppure
automaticamente mediante il timer.
Per accendere manualmente il termoventilatore tenere premuto il tasto + per
3 secondi. Sul display compare “ON” e il termoventilatore è in funzione.
Per lo spegnimento premere per 3 secondi il tasto - . Sul display compare “OFF” e il termoventilatore è disattivato.
Per accendere utilizzare automaticamente il termoventilatore tenere premuto il tasto
“S” per 3 secondi. Sul display compare il simbolo “C”: il timer è bloccato. Premere
nuovamente il tasto “S” per 3 secondi in modo da sbloccare il timer. Sul display
compare il simbolo “P”: è possibile impostare l’ora di accensione/spegnimento.
Per impostare l’ora di accensione premere brevemente il tasto + . A questo punto il display mostra “ON” e l’indicazione lampeggia.
Mediante i tasti + e - è possibile impostare l’ora di accensione del termoventilatore.
Innanzitutto devono essere impostate le ore. Dopo l’immissione delle ore attendere circa 3
secondi fino a quando non lampeggia la visualizzazione dei minuti. Immettere adesso i
minuti. L’ora è impostata non appena il display ha smesso di lampeggiare e “AUTO OFF”
viene visualizzato.
Per impostare l’ora di spegnimento premere brevemente il tasto - . A questo punto il
display mostra “OFF” e l’indicazione lampeggia.
Utilizzo del
termoventilatore
Accensione manuale del
termoventilatore
Accensione automatica del
termoventilatore
Impostazione dell’ora di
accensione del
termoventilatore
Impostazione dell’ora di
spegnimento del
termoventilatore
Impostazione dell’ora del timer
Memorizzazione delle
impostazioni dell’ora
Funzioni supplementari
Anomalie / cause
Devono essere rispettate!
Pulitura
Istruzioni per lo smaltimento
Mediante i tasti + e - è possibile impostare l’ora di spegnimento del termoventilatore.
Innanzitutto devono essere impostate le ore, proprio come per l’ora di accensione. Dopo
l’immissione delle ore attendere circa 3 secondi fino a quando non lampeggia la visualizzazione dei minuti. Immettere adesso i minuti. L’ora è impostata non appena il display ha
smesso di lampeggiare e “AUTO OFF” viene visualizzato.
Per impostare l’ora premere brevemente il tasto “S”. A questo punto la visualizzazione
lampeggia proprio come nel caso dell’impostazione dell’ora di accensione/spegnimento
per le ore. Mediante i tasti + e - è possibile impostare l’ora. Dopo l’immissione delle ore
attendere circa 3 secondi fino a quando non lampeggia la visualizzazione dei minuti.
Immettere adesso i minuti. L’ora è impostata non appena il display ha smesso di lampeggiare e “AUTO OFF” viene visualizzato.
L’ultima fase è la memorizzazione delle immissioni: tenere premuto per 3 secondi il tasto
“S” fino a quando sul display non compare il simbolo “C”.
Il termoventilatore dispone di una cosiddetta funzione di controllo batteria che in caso di
funzionamento con la rete del veicolo garantisce una perfetta accensione del veicolo,
cioè la batteria del veicolo non viene scaricata.
Inoltre, dispone di una spia LED : per attivarla selezionare la posizione “Light” (spia) dell’interruttore per spia LED ; per disattivarla selezionare la posizione d’interruttore “LED”.
Attraverso la presa a 12V DC è inoltre possibile far funzionare dispositivi a 12V DC
di ogni tipo.
Il termoventilatore non funziona!
1. Controllare se i contatti nella presa a 12V DC sono puliti e se necessario pulirli.
2. Controllare sul blocco di fusibili del veicolo se il fusibile per la presa a 12V DC
utilizzata è intatto. Sostituirlo se necessario.
3. Controllare se il fusibile a innesto del termoventilatore è intatto. Sostituirlo se necessario.
• Anche in caso di accensione disattivata e di chiave dell’accensione ritirata deve
esserci la tensione di bordo dell’accendisigari al fine di poter utilizzare l’apparecchio.
In caso contrario è possibile rivolgersi a un’officina per cavallottare il collegamento su
positivo permanente.
• Lasciare sempre libere le aperture del termoventilatore di Unitec.
• Proteggere dall’umidità il termoventilatore di Unitec.
• Non aprire il termoventilatore di Unitec, poiché al suo interno non c’è nulla da riparare.
L’apertura causa l’annullamento della garanzia.
• Scollegare sempre la spina quando l’apparecchio non viene utilizzato.
• Il termoventilatore di Unitec non è adatto per il montaggio nell’abitacolo, bensì
solamente per il posizionamento sul cruscotto o nell’area dei piedi.
• Durante la guida non maneggiare il termoventilatore di Unitec, bensì concentrarsi sulla
guida.
Prima della pulitura spegnere l’apparecchio e scollegare la presa al fine di prevenire un
cortocircuito. Pulire leggermente l’apparecchio utilizzando un panno.
Al termine della sua vita non smaltire questo prodotto tra i rifiuti domestici. Per maggiori
informazioni rivolgersi al proprio gestore pubblico di rifiuti. Non smaltire la batteria tra i
rifiuti domestici, bensì tra i rifiuti speciali.
1515
ON
1515
OFF
C
P
-- --
ON
1515
OFF
AUTO
1515
OFF
1515
OFF
AUTO
75307 Bed. A5:77877 Bed. A5 28.05.2009 15:40 Uhr Seite 14
Page 8

Odmrażacz/dmuchawa Unitec jest bardzo starannie wykonana, tak aby zawsze pracowała bez zarzutu. Zanim dmuchawa zostanie zamontowana prosimy dokładnie przeczytać instrukcję obsługi. Dowiedzą się Państwo z niej wszystkiego, o czym powinniście
wiedzieć i czego przestrzegać, żeby dmuchawa mogła służyć Państwu przez wiele lat.
Prosimy o zachowanie instrukcji obsługi.
• nie wolno stosować innych bezpieczników do gniazda zapalniczki samochodowej niż
te, które dopuszcza producent samochodu
• czas ładowanie nie może być dłuższy niż przewiduje instrukcja obsługi
• nie wolno przykrywać urządzenia
• przestrzegać minimalną odległość do innych urządzeń (co najmniej 20cm)
Napięcie wejściowe: 12VDC
Akumulator: 12V DC 5Ah
Czas działania urządzenia: do 1 godziny (przy zasilaniu 12 V DC)/do 10 minut (przy
zasilaniu z akumulatora)
Moc: 150 Watt
Wtyczka samochodowa:
Napięcie wyjściowe: 12V DC
Czas ładowania: 14-16 godzin
Wtyczka do zasilania sieciowego:
Napięcie wyjściowe: 230V ~ AC
Czas ładowania: 6-8 godzin
Przed użytkowaniem urządzenia w tym trybie, należy całkowicie naładować jego
akumulator. Po każdym użytkowaniu produkt należy powtórnie całkowicie naładować.
W trakcie ładowania, prosimy o przestrzeganie wskazówek bezpieczeństwa. Akumulator
można ładować w gnieździe 12V
DC przy pomocy dołączonego przewodu lub przy
pomocy zasilacza 230V~ AC. W tym celu zasilacz lub kabel musi być podłączony do
gniazda i do źródła prądu. W trakcie ładowania świeci się lampka kontrolna LED .
W momencie, kiedy akumulator jest całkowicie naładowany, odłączamy urządzenie od
prądu.
UWAGA:W takcie ładowania nie wolno włączać urządzenia. W momencie uruchamiania,
urządzenie musi być odłączone od prądu.
W celu użytkowania urządzenia w tym trybie zasilania, należy podłączyć urządzenie do
gniazda zapalniczki samochodowej. W tym celu używamy przewodu do ciągłego zasilania
i gniazdo do ładowania B
씊
. Przy włączonej stacyjce samochodowej, urządzenie będzie
działało ok. 1 godziny.
Witamy!
Wskazówki dot.
bezpieczeństwa
Dane techniczne
Przygotowania do
zasilania akumulatorem
Przygotowania do zasilania
12 V
DC
Instrukcja obsługi
PL
Lampki kontrolne
Wyświetlacz
12 VDC gniazdo
Wentylacja
Lampka
Przyciski
Włącznik światła LED
Gniazdo do ładowania A:
do zasilania12 12 V
DC
Włącznik/wyłącznik Ein/Aus
쐅
Przełącznik zimno/ciepło
쐈
Podstawa
쐉
Zasilacz: do ładowania
akumulatorów przez
230 V
~
AC
씈
Kabel (do ciągłego
zasilania)
씉
przewód: do ładowania
akumulatorów poprzez
gniazdo 12 V
DC
씊
gniazdo do ładowania B:
do zasilania 12 V
DC
Użytkowanie urządzenia
Włączanie manualne
dmuchawy
Włączanie automatyczne
dmuchawy
Ustawienie czasu startu
dmuchawy
Ustawienie czasu wyłączenia
dmuchawy
Dmuchawę ustawiamy na desce rozdzielczej za przednią szybą lub na podłodze,
używając do tego podstawy
쐈.
Wtyczkę wkładamy do gniazda zapalniczki samochodowej 12V DC lub używamy jej w trybie zasilania akumulatorem. Wybieramy ustawienie
włącznika Ein/Aus . w pozycji I. W tym momencie włącza się zielona lampka kontrolna
i dmuchawa jest gotowa do pracy.
Przełącznik 쐅zimno/ciepło ustawiamy w zależności od potrzeb. W pozycji cool jeżeli ma
chłodzić, heat jeżeli ma grzać.
Następnie można włączyć dmuchawę manualnie lub automatycznie przy pomocy
czasowego programatora.
W celu manualnego włączenia dmuchawy, przyciskamy przez 3 sekundy przycisk +
. na
wyświetlaczu pojawi się napis „ON” oznacza to, że dmuchawa jest włączona.
W celu manualnego wyłączenia dmuchawy, przyciskamy przez 3 sekundy przycisk -
.
Na wyświetlaczu pojawi się napis „OFF” oznacza to, że dmuchawa jest wyłączona.
Przycisk „S”
trzymamy przez 3 sekundy. Jeżeli na wyświetlaczu pojawi się symbol „C”,
oznacza to że programator jest zablokowany. Należy ponownie przytrzymać przycisk „S”
przez 3 sekundy w celu odblokowania programatora. Jeżeli na wyświetlaczu pojawi się
symbol „P” oznacza to, że możemy zaprogramować włącznik czasowy.
Przytrzymujemy przycisk + . Na wyświetlaczu pojawi się napis „ON” i wyświetlacz
zacznie pulsować.
Przy pomocy przycisku + i -
ustawiamy godzinę, o której ma się włączyć odmrażacz.
W pierwszej kolejności ustawiamy godzinę. P wprowadzeniu żądanej godziny, odczekujemy 3 sekundy, aż zaczną pulsować minuty. Wprowadzamy minuty. Ustawienia są gotowe, jeżeli wyświetlacz przestał pulsować i pojawił się napis „OFF AUTO”.
W tym celu, przytrzymujemy przycisk -
. Na wyświetlaczu pojawi się napis „OFF”
i wyświetlacz zacznie pulsować.
1515
ON
1515
OFF
C
P
-- --
ON
1515
OFF
AUTO
1515
OFF
75307 Bed. A5:77877 Bed. A5 28.05.2009 15:40 Uhr Seite 16
 Loading...