

Page 1

77 108
D Auto-Kamera HD
HD car camera
Caméra auto HD
Videocamera per auto HD
Kamera samochodowa HD
Gebrauchsanweisung
Hergestellt für:
INTER-UNION Technohandel GmbH
Klaus-von-Klitzing-Str. 2
76829 Landau · Germany
www.inter-union.de
Instruction manual
Mode d’emploi
Istruzioni per l’uso
Stand 01/2014
Version 1.0
77108_BDA_120x170_131209.indd 1 09.12.13 10:57
22
♺
PAP
Instrukcja obsługi
Page 2

D Bedienungs- und Sicherheitshinweise
1
2
Gebrauchs-
anweisung
Sicherheits-
hinweise
Lieferumfang
Auto-Kamera HD
Montagehinweis
Inbetriebnahme
Gerät Ein-/Ausschalten
Achtung
Batterien aufladen
Micro SD-Karte
einlegen
Micro SD-Karte
entfernen
Bitte lesen Sie diese Bedienungsanleitung aufmerksam durch, bevor
Sie die Auto-Kamera in Betrieb nehmen. Sie enthält alle wichtigen
Informationen, die Sie benötigen, um sich mit den Funktionen vertraut
zu machen. Bewahren Sie die Anleitung für mögliche Rückfragen
während der Lebensdauer des Produktes auf und geben Sie diese
Bedienungsanleitung ggf. an andere Benutzer oder nachfolgende
Besitzer weiter.
Die Verkehrssicherheit hat jederzeit Vorrang. Der Fahrer darf sich
während der Teilnahme am Straßenverkehr nicht durch die Kamera
oder deren Bedienung ablenken lassen!
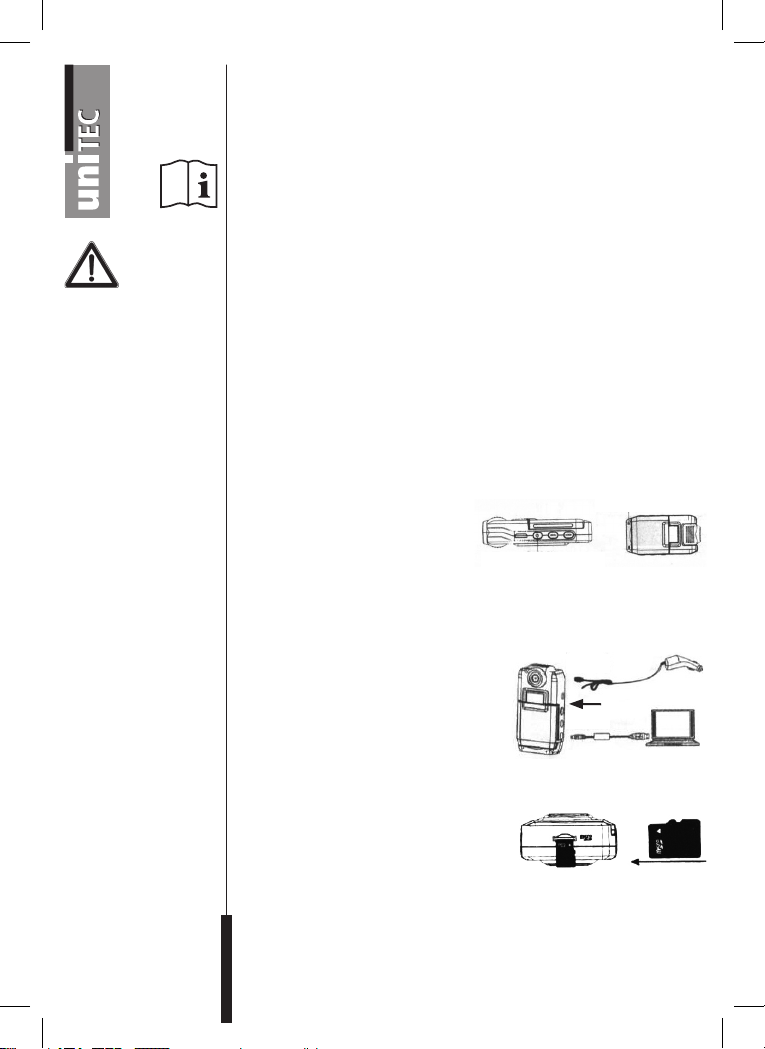
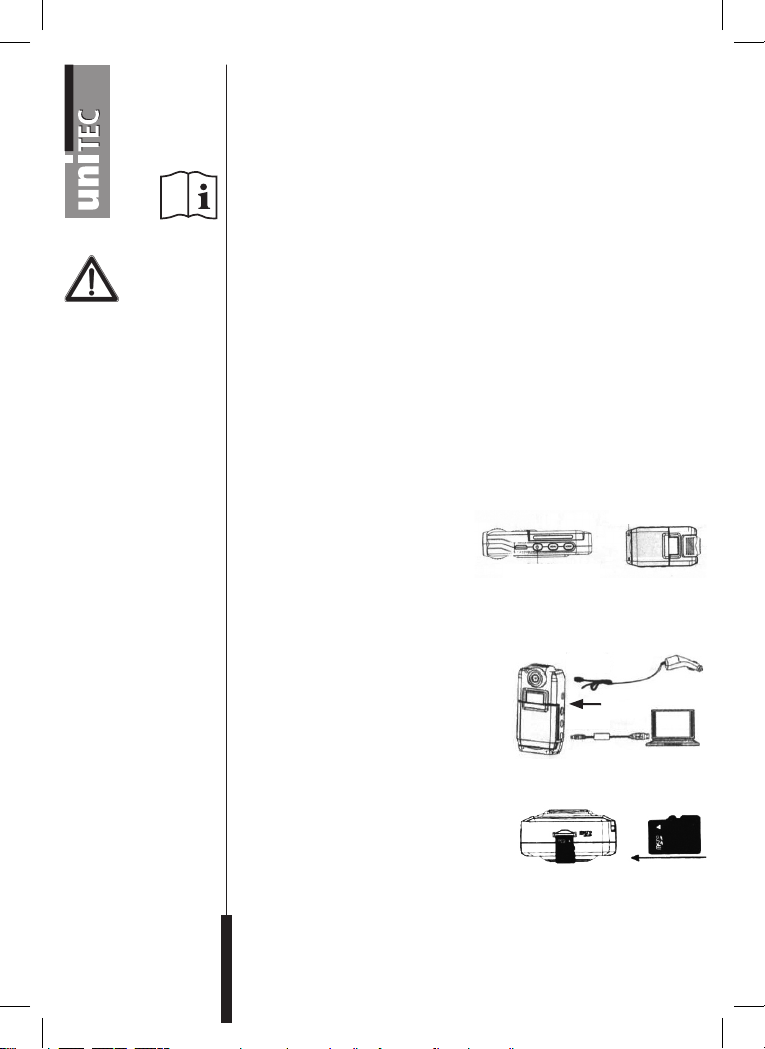
1. Saugnapfhalterung 3. USB-Ladekabel
2. 12V KFZ-Ladekabel 4. Bedienungsanleitung
Digitale Videokamera
Digitales Aufnahmegerät
Digitale Bildkamera
Die Kamera ist so anzubringen, dass das Sichtfeld des Fahrers nicht
beeinträchtigt wird.
Drücken Sie einmal die Taste ,
EIN/AUS-Kontrollleuchte (Blau)
um das Gerät einzuschalten. Die
blaue Anzeigelampe leuchtet auf.
EIN/AUS-Schalter
Drücken Sie erneut , um das Gerät
auszuschalten. Die blaue Anzeigelampe erlischt.
Die Anzeige „niedriger Batterieladestatus“ erscheint, bevor sich das
Gerät ausschaltet.
Es gibt zwei Möglichkeiten, den Akku der
Auto-Kamera HD aufzuladen.Während
des Aufladens leuchtet die rote Anzeige.
Die rote Anzeige erlischt, sobald das
Gerät voll aufgeladen ist.
1. Per USB aufladen 2. Per 12V im Auto aufladen
Setzen Sie die Micro SD-Karte am
Speicherkartenschlitz ein (siehe
Abbildung). Drücken Sie die Karte
hinein, bis Sie ein Klickgeräusch hören.
Drücken Sie einmal auf die Karte. Entnehmen Sie die Karte, sobald diese
herausspringt.
77108_BDA_120x170_131209.indd 2 09.12.13 10:57
Page 3

Durch 90° Linksdrehung lässt sich
das LCD-Display
90°
öffnen. Das LCDDisplay lässt sich auch um 90° nach
unten oder um 180° zum Objektiv hin drehen.
270°
LCD-Display
drehen
90°
Das Objektiv lässt sich ebenfalls um 180° drehen (Abbildung).
9
7 8
3
10 11 12
4
5
6
13 14 15 16
10) Ein-/Aus-Taste
11) Menü-Taste (MENU)
12) Modus-Taste (MODE)
13) Pfeiltaste RUNTER
1
2
1) LED 8) Autoständer
2) Objektiv 9) Rückstelltaste (RESET)
3) Micro SD-Speicherkartenschlitz
4) Betriebsanzeige (blau) /
Ladeanzeige (rot)
5) Mikrofon 14) Pfeiltaste HOCH
6) LCD-Display 15) Bestätigungstaste (OK)
7) Lautsprecher 16) USB-Port
Umschaltung zwischen Video-, Bild- und Wiedergabemodus.
Drücken Sie die Taste MODE, um zwischen den Modi umzuschalten.
Drücken Sie einmal die Taste MENU. Drücken Sie MENU ein weiteres
Mal, um die Option „System Setting“ (Systemeinstellung) auszuwählen.
Der Hintergrund leuchtet blau.
Formatieren: Micro SD-Karte formatieren (alle Daten
auf der Micro SD-Karte werden gelöscht).
Spracheinstellung: 1) Englisch 6) Portugiesisch
2) Französich 7) Chinesisch – Traditionell
3) Deutsch 8) Chinesisch – Vereinfacht
4) Italienisch 9) Japanisch
5) Spanisch 10) Russisch
Objektiv
drehen
Bedienelemente
Grundlegende
Funktionen des
Geräts:
Einstellungsmodus
öffnen
Werkseinstellungen
zurücksetzen: Abbrechen / Fortfahren
Lichtfrequenz: 50 Hz / 60 Hz
Verzögerte
Abschaltung: 15 Sekunden, 1 Minute, 5 Minuten
Datumseingabe: Datumsmodus / Datum / Uhrzeit
77108_BDA_120x170_131209.indd 3 09.12.13 10:57
Page 4

Videos
aufzeichnen
Drücken Sie die Taste MODE, um in den Videomodus zu gelangen.
Drücken Sie OK, um die Aufnahme zu starten. Drücken Sie die Taste
erneut, um die Aufnahme zu beenden.
Video-
einstellungen
Fotos aufnehmen
Einstellungen für
Bildaufnahmen
Einstellungen
konfigurieren
Dateien verwalten
Videowiedergabe
Drücken Sie die Taste MENU, um die Videoeinstellungen zu öffnen.
Auflösung: VGA / D1 / HD
Datum-Zeitanzeige: Aus / Datum / Datum&Zeit
Automatische Aufnahme: Aus / Ein
Audioaufnahme: Aus / Ein
Aufnahmedauer: 2 Min. / 5 Min. / 15 Min.
Drücken Sie die Taste MODE, um in den Bildmodus zu gelangen.
Drücken Sie die Taste OK, um ein Foto aufzunehmen.
Drücken Sie die Taste MENU, um die Bildeinstellungen zu öffnen.
Bildauflösung: 1.3M / VGA
Serienaufnahme: Ein / Aus
Selbstauslöser: Aus / 10 Sek. / 2 Sek. / 10+2 Sek.
Drücken Sie im Video- oder Bildmodus die Pfeiltaste HOCH, um das Bild
zu drehen und das LCD-Display auszuschalten.
Drücken Sie im Video- oder Bildmodus die Pfeiltaste RUNTER, um den
Tages-/Nachtmodus zu aktivieren. Bei schlechter Umgebungsbeleuchtung wird die LED automatisch eingeschaltet.
1. Drücken Sie die Taste MODE, um den Dateiverwaltungsmodus
zu aktivieren.
2. Das Gerät kann 2 Dateitypen verwalten – Video- und Bilddateien
3. Die neueste Datei wird auf dem LCD-Display angezeigt.
Beispiel: Falls Sie zuletzt ein Foto aufgenommen haben, wird dieses
Foto auf dem LCD-Display angezeigt.
1. Drücken Sie die Pfeiltasten HOCH/RUNTER, um die gewünschte Datei
für die Wiedergabe auszuwählen.
2. Drücken Sie OK, um die Videowiedergabe zu starten / zu beenden.
Drücken Sie während der Wiedergabe die Pfeiltaste RUNTER, um
zum Beginn des Videos zu gelangen.
3. Drücken Sie die Taste MENU, um die Wiedergabe zu beenden.
Bildwiedergabe
Wählen Sie mit den Pfeiltasten HOCH/RUNTER die gewünschte
Bilddatei aus.
Wiedergabe-
optionen
Drücken Sie während der Wiedergabe die Taste MENU, um die Wiedergabeoptionen anzuzeigen:
Löschen: Einzel/Alle/Seite (Datei auswählen)
Miniatur: Ausführen (Bilder als Miniaturansicht anzeigen)
Lautstärke: 1-8 (Während der Wiedergabe die Lautstärke einstellen)
77108_BDA_120x170_131209.indd 4 09.12.13 10:57
Page 5

1. Nach dem Anschluss des USB-Kabels an den Computer wird das
LCD-Display schwarz. Die blaue Anzeige leuchtet auf. Warten Sie
einige Sekunden.
2. Der Computer erkennt die Micro SD-Karte automatisch.
Achtung: Systemanforderungen: Windows 2000/XP/Vista/Windows 7,
MAC OS x 10.3.6 oder höher.
3. Durchsuchen oder verwalten Sie die Dateien über Ihren Computer.
4. Trennen Sie die USB-Verbindung. Schalten Sie das Gerät aus.
Hinweis: Falls das Gerät während des Betriebs abstürzen sollte,
drücken Sie die Taste RESET, um das Gerät neu zu starten.
Anschluss
am PC
Videos und
Bilder
verwalten
• Video-,Foto-undAudioaufnahmen
• AufnahmeaufmicroSD/microSDHC-Kartebis32GB
(nicht im Lieferumfang enthalten)
• VGA/HD
• Endlosschleifenaufnahme
• 2,0”Farb-LCDMonitor270°drehbar
• 180°drehbareLinse
• integriertesMikrofonundLautsprecher
• zweieingebauteLED-Leuchten
• Tag/NachtModus
• Verwacklungsschutz
• integrierterLi-ionAkku
• inkl.USB2.0Datenkabel,12VLadekabel,Saugnapfhalterung
LCD-Display 2.0LTPS (4:3)
Objektiv 140*A+ hochauflösendes Weitwinkelobjektiv
Videoauflösung VGA / D1 / HD
Videoformat AVI
Bildauflösung VGA
Bildformat JPG
TV-Modus PAL / NTSC
Frequenz 50 Hz / 60 Hz
USB-Port USB 2.0
Leistungseingang 5 V 450 mA
Leistungsausgang 12V DC
Watt Max. 1,8 W
Batterie Wiederaufladbare Li-ion-Batterie
Reinigen Sie das Gerät ausschließlich bei unterbrochener Stromzufuhr
mit einem leicht angefeuchteten, weichen Tuch. Vermeiden Sie das
Eindringen von Flüssigkeit in das Gerät.
Produktmerkmale
Technische Daten
Reinigungshinweise
Entsorgen Sie dieses Produkt nach der Lebensdauer nicht im
Entsorgungshinweis
Hausmüll, sondern in den eingerichteten Stellen zur ElektroAltgeräte-Rücknahme. Nähere Informationen erhalten Sie bei
Ihrem öffentlich rechtlichen Entsorger.
77108_BDA_120x170_131209.indd 5 09.12.13 10:57
Page 6

Operating and safety instructions
1
2
Instructions
on use
Safety
instructions
Supplied
HD car camera
Installation
instruction
Setup
Switching the device
on/off
Attention
Charging batteries
Inserting
a Micro SD card
Removing
a Micro SD card
Please read the operating instructions through carefully before using
the car camera. They contain all the important information that you
need to familiarise yourself with its functions.
Retain the instructions during the product’s working life in case of any
questions and pass the operating instructions on to any other user or
subsequent owner.
Road safety has priority at all times. The driver must not allow himself to
be distracted by the camera or its operation whilst in traffic!
1. Suction cup attachment 3. USB charging cable
2. 12 V motor vehicle charging cable 4. Operating instructions
Digital video camera
Digital recording device
Digital photo camera
The camera is to be attached in such a way that the driver’s field of
view is not adversely affected.
Press the button once to switch
ON/OFF indicator light (blue)
the device on. The blue indicator
light will come on. Press again
to switch the device off. The blue
ON/OFF button
indicator light will go out.
The“Lowbatterychargestatus”messageisdisplayedbeforethe
device switches off.
There are two ways to charge the
HD car camera battery. The red indicator
is on while the battery is being charged.
The red indicator will go out as soon as
the device is fully charged.
1. Charge via USB
2. Charge with 12 V cable in the car
Put the Micro SD card in the
memory card slot (see diagram).
Push the card in until you hear
a click.
Press the card once. Remove the card as soon as it pops out.
77108_BDA_120x170_131209.indd 6 09.12.13 10:57
Page 7

The LCD display
may be opened by
rotating it 90° to the
90°
left. The LCD
display may also be rotated 90° up
or down or by 180° to the objective lens.
270°
Rotating the
LCD display
90°
The objective lens may also be rotated 180° (diagram).
9
7 8
3
10 11 12
4
5
6
13 14 15 16
10) On/off button
11) Menu button (MENU)
12) Mode button (MODE)
13) DOWN arrow button
1
2
1) LED 8) Car stand
2) Objective lens 9) Reset button (RESET)
3) Micro SD memory
card slot
4) Operating indicator (blue) /
charging indicator (red)
5) Microphone 14) UP arrow button
6) LCD Display 15) Confirmation button (OK)
7) Loudspeaker 16) USB port
Switching between video, photo and playback modes.
Press the MODE button to switch between modes.
Press the MENU button once. Press MENU a second time to select the
“SystemSetting”option.Thebackgroundwillbelitinblue.
Formatting: Format Micro SD card (all data
on the Micro SD card will be deleted).
Language setting: 1) English 6) Portuguese
2) French 7) Chinese – Traditional
3) German 8) Chinese – Simplified
4) Italian 9) Japanese
5) Spanish 10) Russian
Restore factory
settings: Quit/Continue
Light frequency: 50 Hz / 60 Hz
Delayed
switch-off: 15 seconds, 1 minute, 5 minutes
Date input: Date mode / Date / Time
Rotating the
objective lens
Operating
elements
The device’s basic
functions:
Entering setup mode
77108_BDA_120x170_131209.indd 7 09.12.13 10:57
Page 8

Recording
videos
Video
settings
Press the MODE button to switch to video mode.
Press OK to start recording. Press the button again to stop
recording.
Press the MENU button to enter video settings.
Resolution: VGA / D1 / HD
Date & time display: Off / Date / Date&Time
Automatic recording: Off / On
Audio recording: Off / On
Recording time: 2 mins. / 5 mins. / 15 mins.
Taking photos
Setup for
taking photos
Configuring
settings
Managing files
Video replay
Displaying photos
Replay options
Press the MODE button to switch to photo mode.
Press the OK button to take a photo.
Press the MENU button to enter photo settings.
Image resolution: 1.3M / VGA
Continuous shooting: On / Off
Self-timer: Off / 10 secs. / 2 secs. / 10+2 secs.
In video or photo mode, press the UP arrow button to rotate the image
and to switch off the LCD display.
In video or photo mode, press the DOWN arrow button to activate
day/night mode. In poor ambient lighting the LED will switch on
automatically.
1. Press the MODE button to activate file management mode.
2. The device can manage 2 file types: video and photo files.
3. The most recent file is shown on the LCD display.
Example: If you last took a photo, this photo will be shown on the
LCD display.
1. Press the UP/DOWN arrow buttons to select the desired file to be
replayed.
2. Press OK, to start or end the video replay.
During replay, press the DOWN arrow button to go to the start of the
video.
3. Press the MENU button to end replay.
Select the desired photo file with the UP/DOWN arrow buttons.
Whilst replaying, press the MENU button to display the replay options:
Delete: Individual/All/Page (select file)
Thumbnail: Activate (Display images as thumbnails)
Volume: 1-8 (Adjust volume during replay)
77108_BDA_120x170_131209.indd 8 09.12.13 10:57
Page 9

1. When the USB cable is attached to a computer the LCD screen will
be black. The blue indicator will come on. Wait a few seconds.
2. The computer recognises the Micro SD card automatically.
Attention: System requirements: Windows 2000/XP/Vista/Windows 7,
MAC OS x 10.3.6 or higher.
3. Search or manage the files via your computer.
4. Remove the USB connector. Switch the device off.
Tip: If the device crashes during operation, press the RESET button to
restart the device.
Connecting
to a PC
Managing
videos and
photos
• Video,photoandaudiorecordings
•RecordingtoMicroSD/MicroSDHCcardupto32GB
(not supplied)
•VGA/HD
•Continuouslooprecording
•2.0”colourLCDmonitor,rotates270°
•Lensrotates180°
•Built-inmicrophoneandloudspeaker
•Twobuilt-inLEDlights
•Day/nightmode
•Shakeprotection
•Built-inLi-ionbattery
•Inc.USB2.0datacable,12Vchargingcable,suctioncupattachment
LCD display 2.0LTPS (4:3)
Objective lens 140*A+ high resolution wide-angle objective
lens
Video resolution VGA / D1 / HD
Video format AVI
Photo resolution VGA
Photo format JPG
TV mode PAL / NTSC
Frequency 50 Hz / 60 Hz
USB port USB 2.0
Power input 5 V 450 mA
Power output 12V DC
Wattage Max. 1.8 W
Battery Rechargeable Li-ion battery
Only clean the device when disconnected from the electricity
supply and using a slightly moistened soft cloth. Prevent liquids from
penetrating the device.
At the end of its working life do not dispose of this product in the
domestic refuse but at the designated locations for the return of
electrical and electronic devices. You can find out more from
your legally authorised disposal firm.
Product
features
Technical data
Cleaning instructions
Disposal instructions
77108_BDA_120x170_131209.indd 9 09.12.13 10:57
Page 10
Mode
1
2
d‘emploi
Consignes d’utilisation et de sécurité
Veuillez lire attentivement ce mode d’emploi avant de mettre la caméra
auto en service. Il contient toutes les informations importantes dont
vous avez besoin pour vous familiariser à ses fonctions. Conservez
le mode d’emploi pour de possibles demandes d’informations pendant
la durée de vie du produit et remettez-le éventuellement à d’autres
utilisateurs ou futurs propriétaires.
Consignes
de sécurité
Etendue de
la livraison
Caméra auto HD
Instruction
de montage
Mise en service
Marche/Arrêt
de l’appareil
Attention
Recharger
les batteries
Insérer la carte
micro SD
Retirer la carte
micro SD
La sécurité du trafic est toujours prioritaire. Le conducteur ne doit
pas se laisser distraire par la caméra ou sa commande pendant qu’il
participe au trafic !
1. Support ventouse 3. Câble de recharge USB
2. Cordon de recharge auto 12 V 4. Mode d’emploi
Caméra vidéo numérique
Enregistreur numérique
Caméra photo numérique
La caméra doit être placée de manière à ne pas entraver le champ de
vision du conducteur.
Voyant de contrôl
Appuyez une fois sur le bouton ,
MARCHE/ARRET (bleu)
pour allumer l’appareil. Le voyant
bleu s’allume. Appuyez de nouveau
sur pour éteindre l’appareil.
Bouton MARCHE/ARRET
Le voyant bleu s’éteint.
L’affichage « État de charge de batterie faible » apparait avant que
l’appareil ne s’éteigne.
Il existe deux possibilités de recharger
l’accumulateur de la caméra auto HD.
Le voyant rouge est allumé pendant le
rechargement. Le voyant rouge s’éteint
dès que l’appareil est entièrement
rechargé.
1. Recharger via USB
2. Recharger par 12 V dans l’auto
Insérez la carte micro SD dans la fente
de la carte mémoire (Voir illustration).
Enfoncez la carte jusqu’à entendre un clic.
Appuyez une fois sur la carte. Retirez la carte dès qu’elle est éjectée.
77108_BDA_120x170_131209.indd 10 09.12.13 10:57
Page 11

L’écran LCD
s’ouvre en le
faisant pivoter
90°
vers la gauche
à 90°. L’écran LCD peut aussi pivoter
d’environ 90° vers le bas ou 180° vers l’objectif.
270°
Faire pivoter
l’écran LCD
90°
L’objectif peut également pivoter d’environ 180° (Illustration).
9
7 8
3
10 11 12
4
5
6
13 14 15 16
10) Bouton Marche/Arrêt
11) Bouton menu (MENU)
12) Bouton mode (MODE)
13) Touche fléchée BAS
1
2
1) LED 8) Montant auto
2) Objectif 9) Bouton de réinitialisation (RESET)
3) Fente carte mémoire
micro SD
4) Voyant de fonctionnement
(bleu) / Voyant de charge (rouge)
5) Microphone 14) Touche fléchée HAUT
6) Ecran LCD 15) Bouton d’actionnement (OK)
7) Haut-parleur 16) Port USB
Commutation entre modes vidéo, photo et reproduction.
Appuyez sur le bouton MODE pour commuter d’un mode à l’autre.
Appuyez une fois sur le bouton MENU. Appuyez une nouvelle fois sur
MENU pour sélectionner l’option « System Setting » (Réglage système).
Le fond d’écran est bleu.
Formater: Formater carte micro SD (toutes les données
de la carte micro SD sont effacées).
Réglage de la 1) Anglais 6) Portugais
langue : 2) Français 7) Chinois – traditionnel
3) Deutsch 8) Chinois – simplifié
4) Italien 9) Japonais
5) Espagnol 10) Russe
Réinitialiser les
réglages usine : Interrompre / Continuer
Fréquence lumineuse :
50 Hz / 60 Hz
Arrêt retardé : 15 Sekunden, 1 Minute, 5 Minuten
Entrée de la date : Mode date / Date / Heure
Faire pivoter
l’objectif
Eléments
de commande
Fonctions de base de
l’appareil :
Ouvrir mode réglage
77108_BDA_120x170_131209.indd 11 09.12.13 10:57
Page 12

Enregistrer
les vidéos
Appuyez sur le bouton MODE pour accéder au mode vidéo.
Appuyez sur OK pour lancer l’enregistrement. Appuyez de nouveau sur
le bouton pour terminer l’enregistrement.
Réglages
vidéo
Enregistrer
les photos
Réglages des
enregistrements
photo
Configurer
les réglages
Gérer les fichiers
Reproduction
vidéo
Appuyez sur le bouton MENU pour ouvrir les réglages vidéo.
Résolution : VGA / D1 / HD
Affichage date/heure : Arrêt / Date / Date&heure
Enregistrement automatique : Marche / Arrêt
Enregistrement audio : Marche / Arrêt
Durée d’enregistrement : 2 min. / 5 min. / 15 min.
Appuyez sur le bouton MODE pour accéder au mode photo.
Appuyez sur le bouton OK pour enregistrer une photo.
Appuyez sur le bouton MENU pour ouvrir les réglages photo.
Résolution d’image : 1.3M / VGA
Enregistrement en série : Marche / Arrêt
Déclencheur automatique : Arrêt / 10 sec. / 2 sec. / 10+2 sec.
En mode vidéo ou photo, appuyez sur la touche fléchée HAUT pour faire
pivoter l’image et éteindre l’écran LCD.
En mode vidéo ou photo, appuyez sur la touche fléchée BAS pour
activer le mode jour/nuit. La LED est automatiquement allumée en cas
d’éclairage ambiant mauvais.
1. Appuyez sur le bouton MODE pour activer le mode de gestion des
fichiers.
2. L’appareil peut gérer 2 types de fichiers, vidéo et photo.
3. Le dernier fichier est affiché sur l’écran LCD.
Exemple : Si vous avez pris une photo en dernier, celle-ci est affichée
sur l’écran LCD.
1. Appuyez sur les touches fléchées HAUT/BAS pour sélectionner le
fichier souhaité pour la reproduction.
2. Appuyez sur OK, pour lancer / terminer la reproduction vidéo.
Appuyez sur la touche fléchée BAS pendant la reproduction pour
accéder au début de la vidéo.
3. Appuyez sur le bouton MENU pour terminer la reproduction.
Reproduction
Options de
reproduction
Appuyez sur les touches fléchées HAUT/BAS pour sélectionner
photo
le fichier photo souhaité.
Appuyez sur le bouton MENU, pendant la reproduction pour afficher
les options de reproduction :
Effacer : Individuelle/Toutes/Page (sélectionner le fichier)
Miniature : Exécuter (afficher les photos en miniature)
Volume : 1-8 (régler le volume pendant la reproduction)
77108_BDA_120x170_131209.indd 12 09.12.13 10:57
Page 13

1. L’écran LCD est noir une fois effectuée la connexion du câble USB à
l’ordinateur. Le voyant bleu s’allume. Attendez quelques secondes.
2. L’ordinateur identifie automatiquement la carte micro SD.
Attention : Exigences systèmes : Windows 2000/XP/Vista/Windows 7,
MAC OS x 10.3.6 ou plus récent.
3. Analysez ou gérez les fichiers via votre ordinateur.
4. Déconnectez la connexion USB. Arrêtez l’appareil.
Remarque : Si l’appareil se bloque pendant le fonctionnement, appuyez
alors sur le bouton RESET, pour redémarrer l’appareil.
Connexion
à l’ordinateur
Gérer les
vidéos et les
photos
• Enregistrementsvidéo,photoetaudio
•EnregistrementsurcartemicroSD/microSDHCjusqu’à32GO
(non comprise dans la livraison)
•VGA/HD
•Enregistrementenboucle
•EcrancouleurLCD2,0”pivotantà270°
•Lentillepivotantà180°
•Microphoneethaut-parleurintégrés
•DeuxlampesàLEDintégrées
•Modejour/nuit
•Protectionanti-ou
•AccuLi-ionintégré
•CâblededonnéesUSB2.0,cordonderecharge12V,
support ventouse inclus
Ecran LCD 2.0LTPS (4:3)
Objectif Objectif grand angle haute résolution 140*A+
Résolution vidéo VGA / D1 / HD
Format vidéo AVI
Résolution d’image VGA
Format d’image JPG
Mode TV PAL / NTSC
Fréquence 50 Hz / 60 Hz
Port USB USB 2.0
Entrée de puissance 5 V 450 mA
Sortie de puissance 12V DC
Watt Max. 1,8W
Batterie Batterie Li-ion rechargeable
Nettoyer l’appareil avec un chiffon doux légèrement humide uniquement
avec alimentation en courant interrompue. Evitez la pénétration de
liquide dans l’appareil.
Caractéristiques
du produit
Caractéristiques
techniques
Consignes
de nettoyage
Ne jetez pas le produit aux déchets ménagers à la fin de sa
durée de vie, mais éliminez-le dans un point de collecte aménagé
Consigne de mise au
rebut
pour la reprise des appareils électriques usagés. Consultez votre
entreprise de collecte de droit public pour plus d’informations.
77108_BDA_120x170_131209.indd 13 09.12.13 10:57
Page 14

Istruzioni d’uso e sicurezza
1
2
Istruzioni
per l’uso
Indicazioni
di sicurezza
In dotazione
Videocamera
per auto HD
Istruzioni
di montaggio
Messa in servizio
Accensione/
spegnimento
apparecchio
Attenzione
Ricarica batterie
Inserimento scheda
Micro SD
Rimozione scheda
Micro SD
Si prega di leggere con attenzione il presente manuale di istruzioni
prima di mettere in funzione la videocamera per auto. Contiene tutte
le informazioni importanti, necessarie per prendere confidenza con
le funzioni. Conservare le istruzioni per poterle consultare per tutta
la durata di utilizzo del prodotto e consegnarle eventualmente ad altri
utenti o ai successivi proprietari.
La sicurezza stradale ha sempre la precedenza. Quando si trova
nel traffico stradale il conducente non deve farsi distrarre dalla
videocamera o dal suo utilizzo!
1. Supporto a ventosa 3. Cavo di ricarica USB
2. Cavo di caricamento auto 12 V 4. Manuale operativo
Videocamera digitale
Registratore digitale
Apparecchio di ripresa per immagini digitale
Fissare la videocamera in modo da non ridurre il campo di visuale del
conducente.
Premere una volta il pulsante
Spia ON/OFF (Blu)
per accendere l’apparecchio.
L’indicatore blu si illumina.
Premere nuovamente per
Pulsante ON/OFF
spegnere l’apparecchio.
L’indicatore blu si spegne.
Prima dello spegnimento dell’apparecchio compare l’avviso
“Statodicaricadellabatteriaridotto”.
Vi sono due possibilità per ricaricare la
batteria della videocamera per auto HD.
Durante la ricarica si illumina la spia
rossa. La spia rossa si spegne appena
l’apparecchio è completamente carico.
1. Ricarica tramite USB 2. Ricarica tramite 12 V nell’auto
Inserire la scheda Micro SD
nell’alloggiamento per schede di
memoria (vedere immagine). Premere la
scheda all’interno fino a che non scatta.
Premere una volta sulla scheda. Rimuovere la scheda non appena
esce fuori.
77108_BDA_120x170_131209.indd 14 09.12.13 10:57
Page 15
Il display LCD si
apre ruotandolo
a sinistra di 90°.
90°
Il display LCD si
può ruotare anche di 90° verso il basso
o di 180° rispetto all’obiettivo.
Anche l’obiettivo si può ruotare di 180° (figura).
1
2
4
3
5
6
270°
Rotazione
display LCD
90°
Rotazione
9
obiettivo
Elementi
di comando
7 8
10 11 12
1) LED 8) Supporto per auto
2) Obiettivo 9) Tasto di azzeramento (RESET)
3) Alloggiamento per schede di
memoria Micro SD
4) Spia di funzionamento (blu) /
spia di ricarica (rossa)
5) Microfono 14) Tasto freccia SU
6) Display LCD 15) Tasto conferma (OK)
7) Altoparlante 16) Porta USB
13 14 15 16
10) Tasto on/off
11) Tasto menu (MENU)
12) Tasto modalità (MODE)
13) Tasto freccia GIÙ
Commutazione tra la modalità video, immagini e riproduzione.
Premere il tasto MODE per passare alle diverse modalità.
Premere una volta il tasto MENU. Premere ancora una volta MENU
perselezionarel’opzione“SystemSetting”(impostazionesistema).
Lo sfondo diventa blu.
Formattazione: formattare la scheda Micro SD (tutti i dati sulla
scheda Micro SD vengono cancellati).
Impostazione lingua: 1) Inglese 6) Portoghese
2) Francese 7) Cinese (tradizionale)
3) Tedesco 8) Cinese (semplificato)
4) Italiano 9) Giapponese
5) Spagnolo 10) Russo
Ripristino impostazioni
di fabbrica: interrompi / continua
Frequenza luce: 50 Hz / 60 Hz
Spegnimento
ritardato: 15 secondi, 1 minuto, 5 minuti
Immissione data: modalità data / data / ora
Funzioni di base
dell’apparecchio:
Apertura modalità
impostazione
77108_BDA_120x170_131209.indd 15 09.12.13 10:57
Page 16

Registrazione
video
Premere il tasto MODE per accedere alla modalità video.
Premere OK per avviare la registrazione. Premere nuovamente il tasto
per terminare la registrazione.
Impostazioni
video
Ripresa di foto
Impostazione per
l’acquisizione di
immagini
Configurazione
impostazioni
Gestione file
Riproduzione video
Premere il tasto MENU per aprire le impostazioni video.
Risoluzione: VGA / D1 / HD
Indicazione data/ora: off / data / data e ora
Registrazione automatica: off / on
Registrazione audio: off / on
Durata registrazione: 2 min. / 5 min. / 15 min.
Premere il tasto MODE per accedere alla modalità immagini.
Premere il tasto OK uper scattare una foto.
Premere il tasto MENU per aprire le impostazioni immagini.
Risoluzione immagini: 1.3M / VGA
Registrazione continua: on / off
Autoscatto: off / 10 sec. / 2 sec. / 10+2 sec.
In modalità video o immagini premere sul tasto freccia in SU per ruotare
l’immagine e spegnere il display LCD.
In modalità video o immagini premere sul tasto freccia in GIÙ per
attivare la modalità giorno/notte. In caso di scarsa illuminazione
dell’ambiente, il LED si accende automaticamente.
1. Premere il tasto MODE per attivare la modalità gestione file.
2. L’apparecchio può gestire 2 tipi di file: file video e immagini.
3. Il display LCD visualizza il file più recente.
Esempio: se è stata scattata una foto come ultima attività, questa foto
viene visualizzata sul display LCD.
1. Premere i tasti freccia SU/GIÙ per selezionare il file desiderato
per la riproduzione.
2. Premere OK per avviare/terminare la riproduzione video.
Durante la riproduzione premere il tasto freccia GIÙ per tornare
all’inizio del video.
3. Premere il tasto MENU per terminare la riproduzione.
Riproduzione
immagini
Opzioni di
riproduzione
Selezionare il file immagine desiderato
con i tasti freccia SU/GIÙ.
Durante la riproduzione premere il tasto MENU per visualizzare
le opzioni di riproduzione:
Cancella: uno/tutti/pagina (selezionare file)
Miniatura: esegui (visualizza le immagini con vista in miniatura)
Volume: 1-8 (impostazione del volume durante la riproduzione)
77108_BDA_120x170_131209.indd 16 09.12.13 10:57
Page 17

1. Dopo aver collegato il cavo USB al computer, il display LCD diventa
nero. La spia blu si illumina. Attendere qualche secondo.
2. Il computer riconosce automaticamente la scheda Micro SD.
Attenzione: Requisiti di sistema: Windows 2000/XP/Vista/Windows 7,
MAC OS x 10.3.6 o successivo.
3. Cercare o gestire i file tramite il computer.
4. Scollegare il cavo USB. Spegnere l’apparecchio.
Nota: Se durante l’utilizzo l’apparecchio dovesse bloccarsi, premere il
tasto RESET per riavviare l’apparecchio.
Collegamento
al PC
Gestione
video
e immagini
• Registrazionevideo,fotoeaudio
•RegistrazionesuschedamicroSD/microSDHCnoa32GB
(non in dotazione)
•VGA/HD
•Registrazioneaciclocontinuo
•MonitorLCDacolori2,0”ruotabiledi270°
•Obiettivoruotabiledi180°
•Microfonoealtoparlanteintegrati
•DueluciLEDintegrate
•Modalitàgiorno/notte
•Protezionecontroilmovimento
•Batteriaagliionidilitiointegrata
•Incl.cavodatiUSB2.0,cavodicaricamento12V,supportoaventosa
Display LCD 2.0LTPS (4:3)
Obiettivo
obiettivo grandangolare ad alta risoluzione 140*A+
Risoluzione video VGA / D1 / HD
Formato video AVI
Risoluzione immagini VGA
Formato immagini JPG
Modalità TV PAL/NTSC
Frequenza 50 Hz / 60 Hz
Porta USB USB 2.0
Ingresso potenza 5 V 450 mA
Uscita potenza 12V DC
Watt Max. 1,8W
Batteria Batteria agli ioni di litio ricaricabile
Pulire il dispositivo solamente ad alimentazione disinserita con un
panno morbido leggermente umido. Evitare che nel dispositivo penetrino
liquidi.
Caratteristiche
prodotto
Dati tecnici
Istruzioni per la
pulizia
Al termine della durata di utilizzo non smaltire il presente
prodotto con i rifiuti domestici, ma consegnarlo agli appositi
Istruzioni per
lo smaltimento
punti di raccolta per gli apparecchi elettrici usati. Per ulteriori
informazioni contattare il proprio centro di smaltimento
pubblico.
77108_BDA_120x170_131209.indd 17 09.12.13 10:57
Page 18
Instrukcja
1
2
obsługi
Wskazówki dotyczące obsługi
i wskazówki bezpieczeństwa
Przed użyciem kamery samochodowej należy dokładnie zapoznać się
z niniejszą instrukcją obsługi. Zawiera ona wszystkie ważne informacje,
które potrzebne są do zapoznania się z działaniem urządzenia. Bewahren
Instrukcję należy zachować, aby móc z niej skorzystać w przypadku
pojawienia się pytań podczas użytkowania produktu, a w przypadku
przekazania urządzenia kolejnym użytkownikom należy ją także załączyć.
Wskazówki
dotyczące
bezpieczeństwa
Zakres dostawy
Kamera
samochodowa HD
Wskazówka dotycząca
montażu
Uruchomienie
Włączanie/wyłączanie
urządzenia
Uwaga
Ładowanie baterii
Wkładanie karty
mikro SD
Wyjmowanie
karty mikro SD
Priorytetowe znaczenie ma zawsze bezpieczeństwo w ruchu ulicznym.
Kierowca, biorący udział w ruchu ulicznym, nie może dopuścić, aby jego
uwaga została odwrócona przez kamerę czy czynności związane z jej
obsługą
1. Przyssawka do zamocowania 3. Kabel USB
2. Kabel do podłączenia do samochodu 12 V 4. Instrukcja obsługi
Cyfrowa kamera wideo
Cyfrowa nagrywarka
Cyfrowy aparat fotograficzny
Kamerę należy tak zamontować, aby nie ograniczała pola
widzenia kierowcy.
Aby włączyć urządzenie, należy
nacisnąć raz przycisk . Zaświeci
się niebieska kontrolka. Aby wyłączyć
urządzenie, ponownie nacisnąć
przycisk . Gaśnie niebieska kontrolka.
Wkrótce po pojawieniu się wskazania „niski poziom baterii”
urządzenie wyłącza się.
Są dwie możliwości naładowania baterii
kamery samochodowej HD. Podczas
ładowania świeci się czerwona kontrolka.
Czerwona kontrolka gaśnie, jak tylko baterie
zostaną całkowicie naładowane.
1. Ładowanie przez USB 2. Ładowanie przez gniazdo 12 V w samochodzie
Włożyć kartę mikro SD do gniazda na
kartę (patrz rysunek). Wcisnąć kartę,
tak aby usłyszeć, że się zablokowała.
Nacisnąć kartę. Wyjąć kartę, gdy wyskoczy.
Przycisk WŁ./WYŁ
Kontrolka WŁ./WYŁ
(niebieska)
77108_BDA_120x170_131209.indd 18 09.12.13 10:57
Page 19

Poprzez obrót o 90°
w lewo można
otworzyć
wyświetlacz LCD.
90°
270°
90°
Wyświetlacz LCD można także obracać o 90°
w dół oraz o 180° w kierunku obiektywu.
Obiektyw można także obracać w zakresie 180° (rysunek).
1
2
4
3
5
6
7 8
Obracanie
wyświetlacza
LCD
Obracanie
9
obiektywu
Elementy
obsługowe
1) LED 8) Stojak
2) Obiektyw 9) Przycisk kasujący (RESET)
3) Gniazdo na kartę
mikro SD
4)
Kontrolka trybu pracy (niebieska) /
10 11 12
kontrolka ładowania (czerwona)
5) Mikrofon 14) Strzałka DO GÓRY
6) Wyświetlacz LCD 15) Przycisk potwierdzenia (OK)
7) Głośnik
Przełączanie pomiędzy trybami nagrywania filmów, robienia zdjęć
i odtwarzania. Aby przełączyć pomiędzy trybami, nacisnąć przycisk MODE.
13 14 15 16
10) Przycisk WŁ./WYŁ.
11) Przycisk menu (MENU)
12) Przycisk trybu (MODE)
13) Strzałka W DÓŁ
16) Gniazdo USB
Podstawowe funkcje
urządzenia:
Nacisnąć przycisk MENU. Ponownie wcisnąć przycisk MENU, aby wybrać
opcję „System Setting” (ustawienia systemowe). Włączy się niebieskie
Otwieranie trybu
ustawiania
podświetlenie tła.
Formatowanie: formatowanie karty mikro SD (wszystkie dane
znajdujące się na karcie mikro SD zostaną usunięte).
Ustawienie języka: 1) angielski
6) portugalski
2) francuski 7) chiński – tradycyjny
3) niemiecki
8) chiński – uproszczony
4) włoski 9) japoński
5) hiszpański 10) rosyjski
Powrót do ustawień
fabrycznych: przerywanie/kontynuacja
Częstotliwość światła: 50 Hz / 60 Hz
Opóźnione o
Wyłączenie: 15 sekund, 1 minutę, 5 minut
Wprowadzanie daty: Tryb daty / data / godzina
77108_BDA_120x170_131209.indd 19 09.12.13 10:57
Page 20

Nagrywanie
filmów
Aby przełączyć na tryb nagrywania filmu, nacisnąć przycisk MODE. Aby
rozpocząć nagrywanie, nacisnąć przycisk OK. Aby zakończyć nagrywanie,
ponownie nacisnąć przycisk.
Ustawienia
trybu
nagrywania
filmów
Fotografowanie
Ustawienia trybu
fotografowania
Konfiguracja
ustawień
Zarządzanie danymi
Odtwarzanie
filmu
Aby otworzyć menu ustawień trybu nagrywania filmów, nacisnąć przycisk
MENU.
Rozdzielczość: VGA / D1 / HD
Wskazanie daty i czasu: Wył. / data / data i czas
Automatyczne nagrywanie: wył. / wł.
Nagrywanie dźwięku: wył. / wł.
Czas nagrywania: 2 min / 5 min / 15 min
Aby przełączyć na tryb robienia zdjęć, nacisnąć przycisk MODE.
Aby zrobić zdjęcie, nacisnąć przycisk OK.
Aby otworzyć menu ustawień trybu fotografowania, nacisnąć przycisk MENU.
Rozdzielczość zdjęcia: 1.3M / VGA
Seria zdjęć: wł. / wył.
Autowyzwalacz: wył. / 10 s / 2 s / 10+2 s
W trybie nagrywania filmów lub fotografowania nacisnąć strzałkę DO GÓRY,
aby obrócić zdjęcie oraz wyłączyć wyświetlacz LCD.
W trybie nagrywania filmów lub fotografowania nacisnąć strzałkę W DÓŁ,
aby aktywować tryb dzienny/nocny. Przy złych warunkach otoczenia lampka
LED włącza się automatycznie.
1. Aby przełączyć na tryb zarządzania danymi, nacisnąć przycisk MODE.
2. Urządzenie obsługuje dwa typy danych – filmy i zdjęcia.
3. Najnowsze dane wyświetlane są na wyświetlaczu LCD.
Przykład: Jeżeli ostatnio zostało zrobione zdjęcie, będzie ono wyświetlane
na wyświetlaczu LCD.
1. Przyciskami strzałek W GÓRĘ/W DÓŁ wybrać film, który ma zostać
odtworzony.
2. Aby rozpocząć lub zakończyć odtwarzanie filmu, nacisnąć przycisk OK.
Aby przejść do początku filmu, nacisnąć podczas jego odtwarzania
strzałkę W DÓŁ.
3. Aby zakończyć odtwarzanie, nacisnąć przycisk MENU.
Wyświetlanie zdjęcia
Opcje odtwarzania
Przyciskami strzałek W GÓRĘ/W DÓŁ wybrać zdjęcie.
Aby wyświetlić opcje odtwarzania, nacisnąć podczas odtwarzania przycisk
MENU.
Kasowanie: pojedynczo/wszystko/strona (wybrać plik)
Miniatura: wykonaj (pokazywanie zdjęć w formie miniaturek)
Głośność: 1-8 (ustawianie głośności podczas odtwarzania)
77108_BDA_120x170_131209.indd 20 09.12.13 10:57
Page 21

1. Po podłączeniu kabla USB do komputera wyświetlacz LCD gaśnie.
Zaświeca się niebieska kontrolka. Odczekać kilka sekund.
2. Komputer automatycznie rozpoznaje kartę mikro SD.
Uwaga: Wymagania systemowe: Windows 2000/XP/Vista/Windows 7,
MAC OS x 10.3.6 lub nowszy.
3. Przeszukiwanie lub zarządzanie danymi za pośrednictwem komputera.
Podłączanie
do komputera
PC
Zarządzanie
filmami
i zdjęciami
4. Rozłączyć połączenie USB. Wyłączyć urządzenie.
Wskazówka: Jeżeli urządzenie wyłączy się podczas użytkowania,
aby ponownie uruchomić urządzenie, należy nacisnąć przycisk RESET.
•
nagrywanie filmów, robienie zdjęć, nagrywanie dźwięku
•
nagrywanie na karty mikro SD lub mikro SDHC do 32 GB
(nie są dostarczane wraz z urządzeniem)
•
VGA / HD
•
nagrywanie ciągłe
•
2,0” kolorowy wyświetlacz LCD z możliwością obrotu o 270°
•
soczewka z możliwością obrotu o 180°
•
zintegrowany mikrofon i głośnik
•
dwie wbudowane lampki LED
•
tryb dzienny/nocny
•
zabezpieczenie przed poruszeniem obrazu
•
zintegrowany akumulator litowo-jonowy
•
wraz z kablem USB 2.0, kabel ładujący 12 V, przyssawka do zamocowania
Wyświetlacz LCD 2.0LTPS (4:3)
Obiektyw
140*A+ obiektyw szerokokątny o dużej rozdzielczości
Rozdzielczość filmów VGA / D1 / HD
Format filmów AVI
Rozdzielczość obrazu VGA
Format obrazu JPG
Tryb TV PAL / NTSC
Częstotliwość 50 Hz / 60 Hz
Gniazdo USB USB 2.0
Moc na wejściu 5 V 450 mA
Moc na wyjściu 12V DC
W maks. 1,8 W
Bateria bateria litowo-jonowa z możliwością ładowania
Urządzenie wolno czyścić wyłącznie po wcześniejszym odłączeniu go od
zasilania, stosując lekko wilgotną, miękką ściereczkę. Nie można dopuścić,
aby ciecz odstała się do urządzenia.
Cechy
produktu
Dane techniczne
Wskazówki dotyczące
czyszczenia
Po upływie okresu żywotności nie wolno utylizować produktu wraz
z normalnymi odpadami z gospodarstwa domowego, lecz należy
oddać go do punktu zbiórki zużytych urządzeń elektronicznych.
Dokładniejsze informacje na ten temat można uzyskać
Wskazówka dotycząca
utylizacji
w miejscowym zakładzie utylizacyjnym.
77108_BDA_120x170_131209.indd 21 09.12.13 10:57
 Loading...