

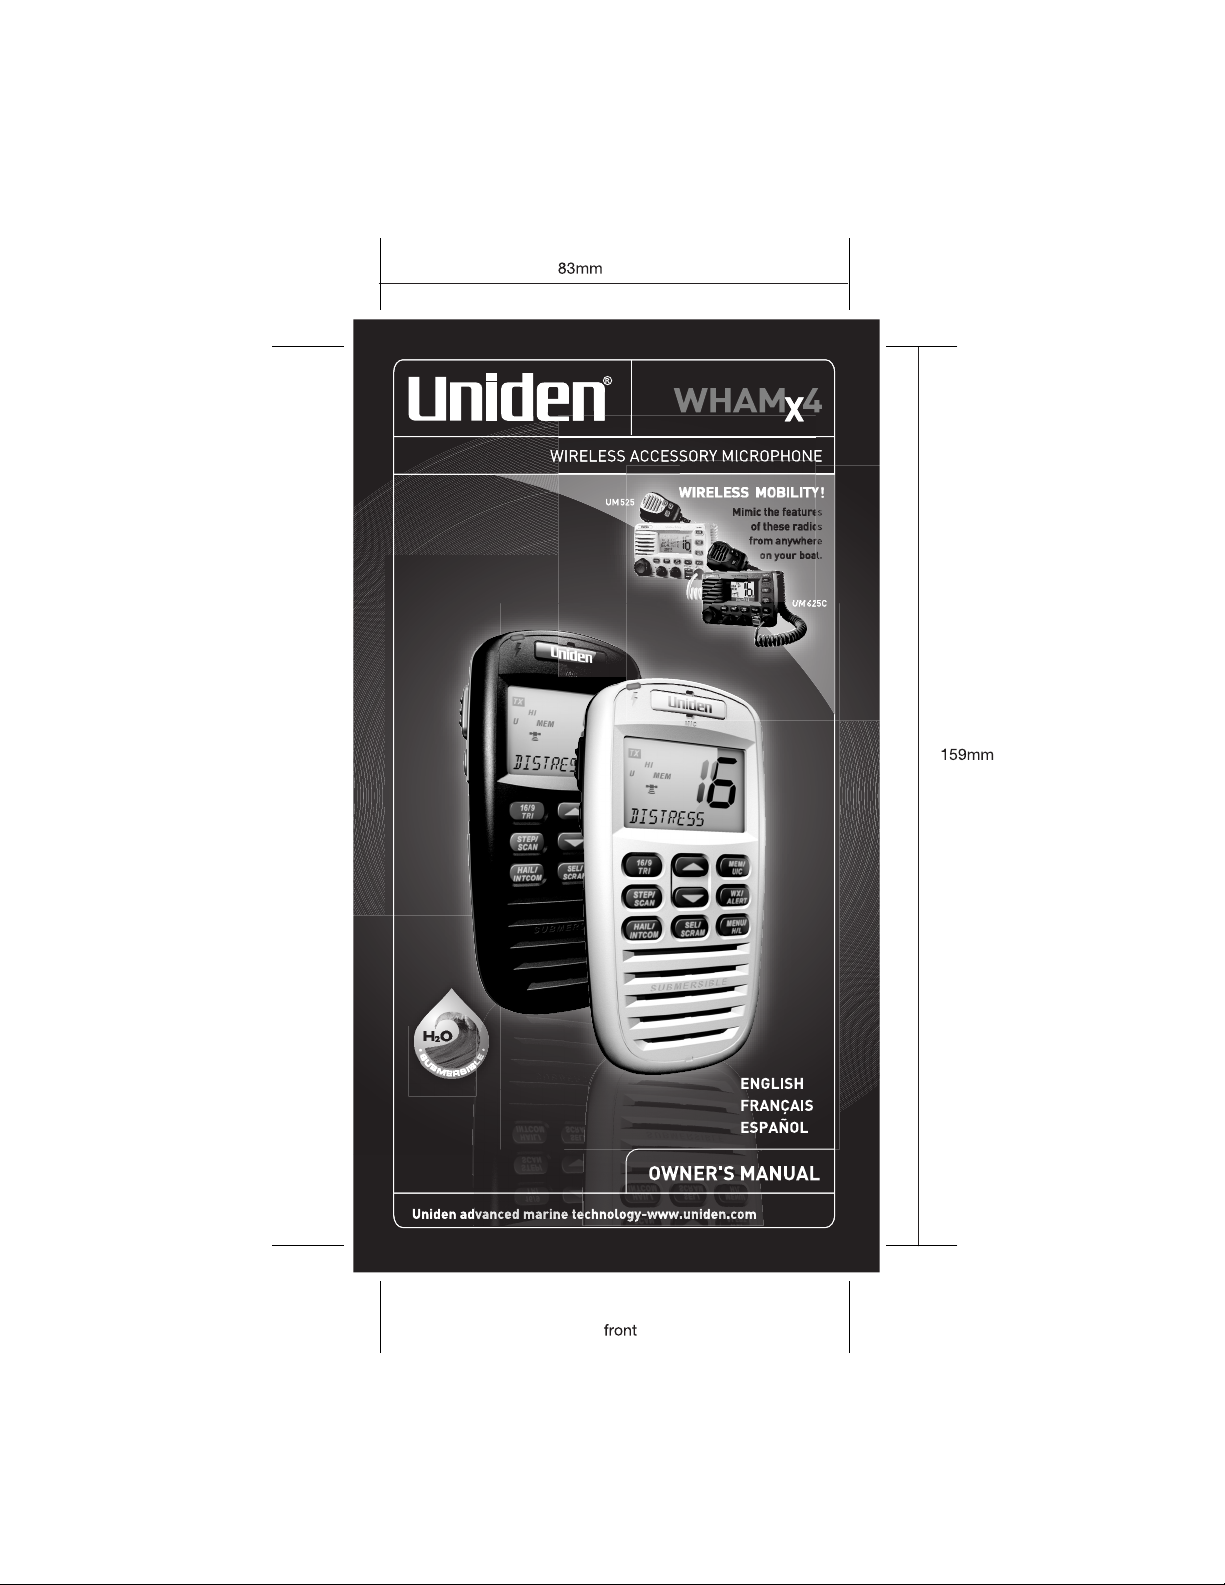
Page 1
Page 2

FCC/Industry Canada Information
FCC/Industry Canada Information
This device complies with Part 15 of the FCC Rules.
Operation is subject to the following two conditions: (1)
This device may not cause harmful interference. (2) This
device must accept any interference received, including
interference that may cause undesired operation.
Important: Changes or modifications to this unit not
expressly approved by Uniden could void your authority to
operate this unit.
The term “IC:” before the radio certification number only
signifies that Industry Canada technical specifications
were met.
Operation is subject to the following two conditions: (1) this
device may not cause interference, and (2) this device
must accept any interference, including interference that
may cause undesired operation of the device.
FCC RF Exposure Information
Warning! Read this information before using the radio.
In August 1996 the Federal Communications
Commission (FCC) of the United States with its action
in Report and Order FCC 96-326 adopted an updated
safety standard for human exposure to radio frequency
electromagnetic energy emitted by FCC regulated
transmitters.
Those guidelines are consistent with the safety
standard previously set by both U.S. and international
standards bodies. The design of the radio complies
with the FCC guidelines and these international
standards.
2
FCC/Industry Canada Information
Page 3

Warning! It is up to the user to properly operate this
radio transmitter to insure safe operation. Please
adhere to the following:
Use only the supplied or an approved antenna.
Unauthorized antennas, modifications, or attachments
could impair call quality, damage the radio, or result in
violation of FCC regulations.
Do not use the radio with a damaged antenna. If a
damaged antenna comes into contact with the skin, a
minor burn may result. Please contact your local dealer
for a replacement antenna.
Body-Worn Operation
This device was tested for typical body-worn operations
using the supplied belt clip.
To maintain compliance with FCC RF exposure
requirements, body-worn operations are restricted to the
supplied belt clip.
For hand-held operation, the radio should be held 1 inch
from the user’s face. The use of accessories that do not
satisfy these requirements may not comply with FCC RF
exposure requirements and should be avoided.
For more information about RF exposure, please visit the
FCC web site at www.fcc.gov.
FCC/Industry Canada Information
3
Page 4

Contents
Introduction .............................................................6
Contents
Supplied With Your Microphone ............................ 6
Feature Highlights ...................................................7
Understanding Your Microphone ............................7
About This Manual ...............................................7
How The Microphone’s Controls Appear
in This Manual ......................................................8
Setting Up the Microphone .....................................8
Mounting the Microphone ....................................8
Installing the Battery ............................................9
Charging the Batteries .......................................10
A Look at the Microphone ..................................11
A Look at the Display .........................................13
Basic Operation ....................................................14
Turning the Microphone On and Off ..................14
Setting the Base/Microphone ID ........................14
Adjusting the Volume and Squelch ....................14
Checking the Battery Level ................................ 14
Using Triple Watch .............................................15
Tuning Weather Channels .................................15
Using Weather Alert Mode .................................15
Using Channel Step ...........................................15
Using Channel Scan ..........................................16
Saving Channels to Memory ..............................16
Deleting Channels From Memory ......................16
Changing UIC Mode ..........................................16
Selecting Menu Items ........................................16
Displaying Time/Position/Course Info ............... 16
Using the Scrambler ..........................................17
Using the Hailer .................................................17
Using the Intercom .............................................17
Turning the Backlight On and Off .......................17
Using Keylock ....................................................17
Using Distress ....................................................17
Changing Output Transmit Power ..................... 18
4
Contents
Page 5

Resetting the Microphone ..................................18
Using Setup Options .............................................18
Using the Directory ............................................ 18
Using Channel Names ...................................... 19
Adjusting the Local Time ................................... 20
Turning Daylight Saving On or Off .................... 20
Programming a FIPS Code ............................... 21
Using Auto Channel Switch ............................... 21
Using Position Reply ..........................................22
Using a Group MMSI ..........................................22
Setting Up the Scrambler ...................................23
Using Exit .......................................................... 23
Using System Options ......................................... 23
Adjusting the Contrast ....................................... 23
Adjusting the Key Beep ..................................... 24
Adjusting the VOX Sensitivity Level .................. 24
Care and Maintenance .........................................24
Appendix ...............................................................24
Reference Information ........................................25
Three Year Limited Warranty ................................27
Contents
5
Page 6
Introduction
Your Uniden WHAMx4 2.4 GHz Wireless Microphone is
Introduction
the next generation in wireless handheld microphones,
and is compatible with new Uniden Marine radios.
It combines state-of-the-art technology with rugged durability
and ease of use. The microphone's all solid-state design
and conservatively-rated components and materials make
it an ideal choice for harsh marine environments. The
microphone's large display and backlit control buttons
make it easy to use even in extreme lighting and weather
conditions.You can use up to four WHAMx4 microphones
with the same marine radio. You should read the rest of
this Owners Manual thoroughly to acquaint yourself with
all of your microphone's features and functions. Save your
receipt as proof-of-purchase in case you ever need to
have warranty service on the microphone.
Features, specifications, and availability of optional
accessories are all subject to change without notice.
Note: Your microphone meets the stringent JIS7
waterproof specification. The supplied cradle meets the
JIS4 waterproof specification. This means that the
microphone can be submerged to a depth of 1 meter for
up to 30 minutes without incurring damage.
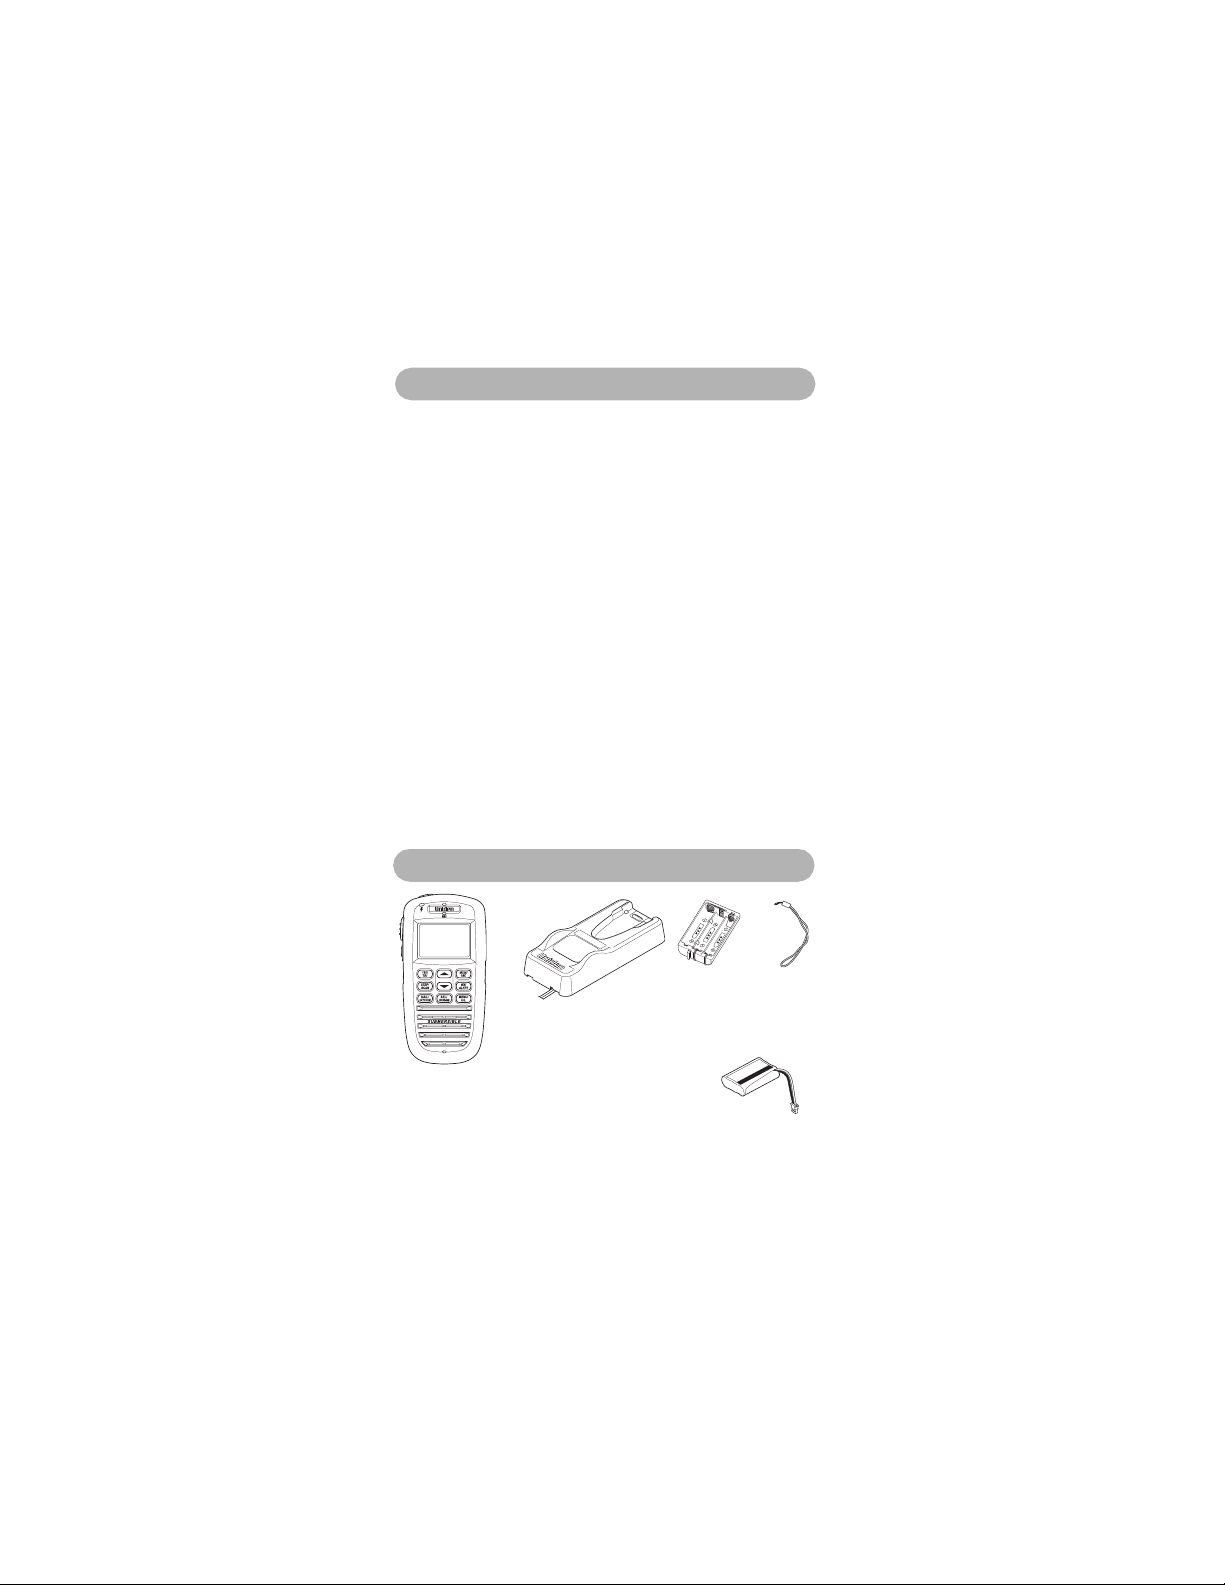
Supplied With Your Microphone
Microphone
Mounting Hardware
(not shown)
6
Cradle
(shown assembled)
Owner’s
Manual
(not shown)
Alkaline
Battery
Tr ay
Introduction
Hand
Strap
Battery
Page 7

Feature Highlights
Feature Highlights
Intercom Input - You can use the microphone to control a
radio from almost anywhere aboard your vessel, and each
WHAM x 4 user can communicate with each other. You
can also use the radio's intercom function to communicate
with each WHAM x 4 user. You can use the microphone to
call handset-to-handset, handset to radio, handset to
multiple stations including the radio, handset to second
radio, and radio to individual, group, or all handsets. You
can even use a second base radio as an intercom.
VOX - You can talk without pressing PTT when you connect
a headset to the microphone and use its microphone.
Handset Paging - You can send a tone to the
microphone, to make it easier to find it if it gets lost.
Display Backlight/Key Light Adjustment - You can
adjust the brightness of the display and the keys on the
microphone to make them easier to see in extreme
conditions.
Key Beep Volume Adjustment - You can adjust the
volume of the tone you hear when you press a key.
Battery Level Display - The microphone displays the
status of the battery.
Contrast Adjustment - You can set the microphone’s
display to make it easier to see in different conditions.
Floating Handset - The microphone floats, making it
easy to retrieve if you drop it.
Understanding Your Microphone
About This Manual
The screen displays used in this manual are representations
of what might appear when you use your microphone.
Since what you see depends on the frequencies for your
area and the settings you select, you might notice some
differences between what is in this manual and what
appears on your microphone's display. Buttons you press
and text that appears on the display appear in bold type.
Feature Highlights
7
Page 8

How The Microphone’s Controls Appear in
Understanding Your Microphone
This Manual
To help navigate the microphone's menus, the steps shown in
this manual describe the displays you see and the keys you
press or control you operate to get a desired result.
Setting Up The Microphone
Mounting the Microphone
You can mount the microphone’s cradle on any convenient
mounting surface such as a bulkhead, flying bridge, or
chart table. The mounting surface you choose must have
12V DC power available nearby. Because the cradle has no
power switch, you will need to wire it directly to a power
source such as the boat’s battery or to a power distribution
panel connection that receives power all the time.
Warning: Please keep metal objects away from the
WHAMx4 charger.
1. Connect the wires on the back of the cradle to a 12-volt
battery. You may extend this cable as necessary, but
you must observe proper polarity (i.e., red is
positive and black is negative).
2. Connect the black wire to the negative (-) battery
terminal.
3. Connect the red wire to the positive (+) battery terminal.
4. Make sure the connections are clean and tight so they
do not vibrate loose during the boat’s operation.
Occasionally clean any accumulated corrosion from the
battery terminals.
5. Use the template at the back of this
Owner ’s Manual and the supplied
mounting screws to secure the
back of the cradle to the mounting
surface, then snap the front of the
cradle onto the back.
6. Slide the microphone into the cradle to
secure it and charge its batteries.
Mounting
Screws
8
Understanding Your Microphone
Page 9

To remove the cradle from its
Setting Up the Microphone
mounting location, use a flat
screwdriver to lift up the top of the
back cover on the cradle until it
snaps off. Then remove the
mounting screws on the back
of the cradle.
Lift Here
Installing the Battery
Your microphone uses a rechargeable battery (supplied) for
power. You can also use three optional rechargeable AAA
batteries to power it.
1. Use a coin to unscrew the belt clip on
the back of the microphone.
2. Lift up the case clips on both
sides of the microphone, then
lift up the cover over the
battery compartment.
3. If you are installing AAA batteries
in the supplied battery holder,
make sure the polarity symbols (+ -)
inside the battery compartment match.
Otherwise, insert the supplied rechargeable battery’s
plug into the connector inside the battery compartment.
4. Replace the battery compartment cover.
Caution: Be sure the rubber gasket around the battery
compartment is clean and completely seals the battery
compartment. This helps keep water out of the inside
of the microphone.
5. Push down both case clips then reinstall the belt clip.
Recharge the batteries when the microphone stops
working or its range is too short.
Battery
Connector
Case Clips
Setting Up the Microphone
9
Page 10

Charging the Batteries
Before you use rechargeable batteries, you must charge
them.
The microphone has a built-in circuit that lets you
recharge batteries while they are in the microphone. To
charge the batteries, install the batteries in the
microphone then slide it into the supplied cradle.
WARNING!
Before you use rechargeable batteries for the first time,
charge them for 14 hours to bring them to a full charge.
Discharged batteries take about 14 hours to fully
recharge.
Caution: To ensure proper charging and avoid accidental
release, always firmly lock the handset into the charger.
Engine Noise Suppression
Interference from the noise generated by the electrical
systems of engines is sometimes a problem with microphones. Your microphone has been designed to be
essentially impervious to ignition noise and alternator
noise. However, in some installations it may be necessary
to take measures to further reduce the effect of noise
interference.
In severe cases of noise interference, it may be necessary
to install a noise suppression kit. Contact the dealer where
you purchased the microphone for more information.
10
Setting Up the Microphone
Page 11
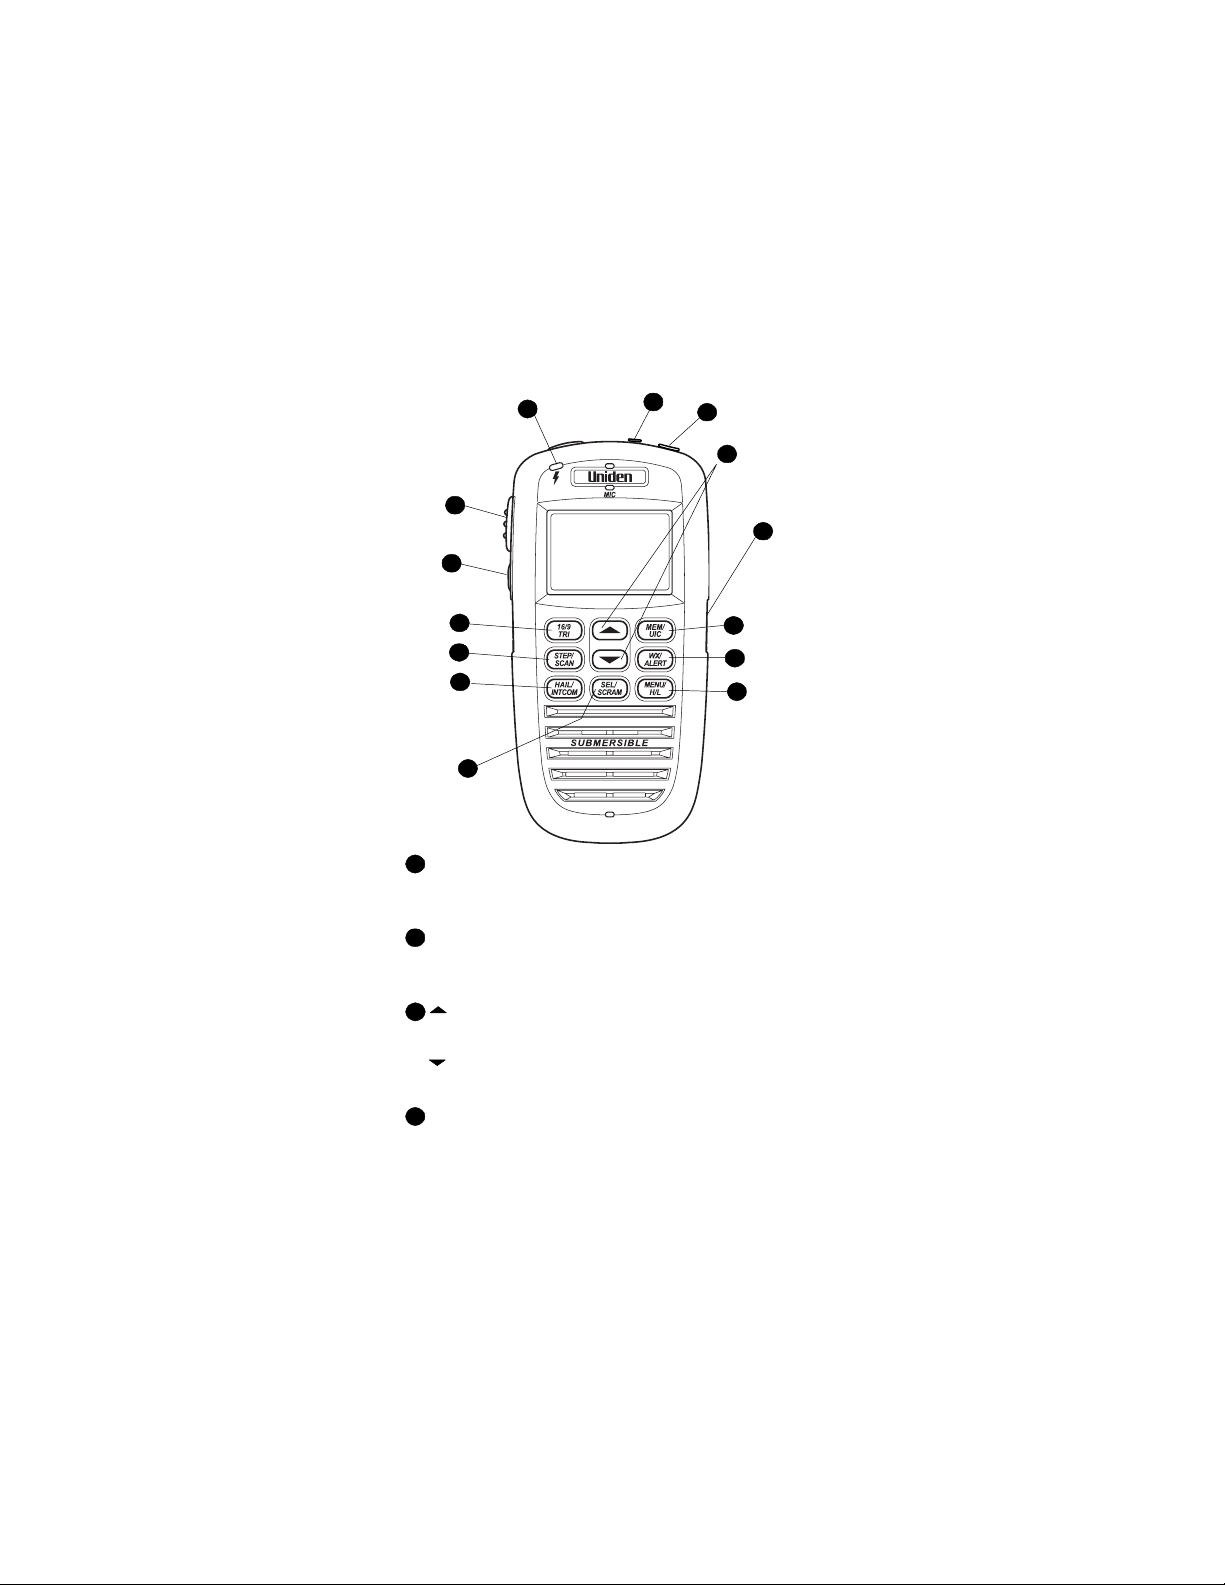
A Look at the Microphone
2
12
14
8
1
3
13
6
9
7
5
POWER/VOLUME - Hold down for 2 seconds to turn
1
10
11
4
the microphone on or off. Briefly press to select the
volume setting mode.
2
LED - The LED on the front of the microphone lights
green when the microphone is receiving a transmission,
red when it is transmitting, and orange when it is charging.
- Press to scroll up through the channels and menu
3
options. Hold down to increase scrolling speed.
- Press to scroll down through the channels and
menu options. Hold down to increase scrolling speed.
MENU HI/LO - Press to enter and exit the menu mode.
4
Hold down to change transmit power from high to low.
Hold down again to change transmit power to high.
Setting Up the Microphone
11
Page 12

SELECT/SCRAM - Press in normal channel mode to
5
display the time, date, latitude, longitude, SOG (speed
over ground), and COG (course over ground). Press in
menu mode to select menu items. Hold down to turn on
the Scrambler for the current channel.
16/9/TRIPLE WATCH - Press to tune to Channel 9
6
and Channel 16 and to use Triple Watch.
HAIL/INTERCOM - Press to turn the hailer on or off.
7
Hold down for 2 seconds to use the radio’s intercom
feature.
8
SQUELCH/BATTERY - Press to turn on the squelch
setting mode. Hold down to display the battery level.
9
STEP/SCAN - Hold down to scan through all channels
in memory.
10
MEM/UIC - Press to place the currently selected
channel in memory. Press again to delete a channel from
memory. Hold down to change UIC mode.
WX/ALERT - Press to listen to the active weather
11
channel in your area. Hold down in weather alert mode to
turn on weather alert.
12
PTT - Press to transmit.
13
DISTRESS - Hold down for 5 seconds to turn on
distress transmit. The microphone counts down during
distress. If you release DISTRESS before the countdown
is finished, distress is automatically cancelled.
LIGHT/LOCK - Repeatedly press to change the
14
display and keypad backlight level. Press again when the
backlight is set to its highest level to turn off the backlight.
Hold down for 2 seconds to turn on keylock. All keys are
locked except PTT. To unlock the keypad, press
DISTRESS, hold down LIGHT/LOCK for 2 seconds, or
turn off the microphone then turn it on again.
12
Setting Up the Microphone
Page 13

A Look at the Display
- Appears while the microphone is transmitting.
DSC - Appears when the microphone is in the DSC mode,
including receiving DSC calls. It also shows that the
microphone is connected to the main radio (by RF).
DSC blinks when the microphone is close to out of range,
or when completely out of range.
LO - Shows the transmit output power is set to 1 watt on
the output channel.
HI - Shows the transmit output power is set to 25 watts on
the output channel.
TRI - Appears when the microphone is on a working
channel or the weather channel and is watching Channel
16 and Channel 9.
U I C - Shows the channel mode (USA, INT, or CAN).
MEM - Indicates if a channel has been placed into
channel scanning memory.
WX - Appears when the microphone is in the weather mode.
- Shows that GPS is connected to the microphone.
blinks when the GPS data being received is valid.
- Appears when the weather alert channel watch is
active and blinks when the alert is activated.
- Shows when the microphone is communicating with
the main radio (by RF). blinks when another microphone
is in use.
Setting Up the Microphone
13
Page 14

Basic Operation
Turning the Microphone On and Off
Basic Operation
Hold down POWER/VOLUME for about 2 seconds. If the
main radio is turned on, the channel that appears on the
microphone is the channel currently selected on the main
radio. Hold down POWER/VOLUME for about 2 seconds
again to turn off the microphone.
Setting the Base/Microphone ID
You must set the microphone ID to the same setting as
your radio’s base ID so the microphone and radio can
communicate with each other. If you set the ID correctly,
you see similar information on both the radio’s and
microphone’s display.
1. To set the base or microphone ID briefly press MENU,
repeatedly press or until LOCAL MENU appears,
then press SELECT/SCRAM.
2. Repeatedly press or until ID SETTING appears,
then press SELECT/SCRAM.
3. Repeatedly press or to select the ID you want to set
(BASE ID or HANDSET ID). Then press SELECT/SCRAM.
4. Repeatedly press or to select the ID you want
(00-99 for BASE ID or 1-4 for HANDSET ID). Then
press SELECT/SCRAM.
Adjusting the Volume and Squelch
Briefly press POWER/VOLUME, then repeatedly press
to turn up the volume or to turn it down. Briefly press
POWER/VOLUME to turn off volume mode.
To adjust the squelch, briefly press SQUELCH/BATTERY,
then repeatedly press to turn up the squelch or to
turn it down. Briefly press PTT, 16/9/TRIPLE WATCH, or
DISTRESS to turn off squelch mode.
Checking the Battery Level
Hold down SQUELCH/BATTERY for about 2 seconds. A
number from 0-4 (0 is low, and 4 is full) appears showing
the battery level. If 0 appears, the radio does not have
enough battery power to operate. Briefly press any key to
turn off battery mode.
14
Basic Operation
Page 15

Using Triple Watch
Tune to a channel other than Channel 9 or Channel 16,
then hold down 16/9/TRIPLE WATCH for about 2 seconds.
TRI appears and the radio checks Channel 16 every 2
seconds then Channel 9 afterward, then tunes to the
original working channel, checking all 3 channels in order.
Notes:
• If the original working channel is a weather channel,
the radio automatically enters Triple Watch mode.
• If weather alert is activated (see “Tuning Weather
Channels” on Page 15), the radio tunes from the
original working channel to Channel 9 then Channel
16. The radio also checks the active weather channel
for the weather alert tone every 7 seconds.
• If one or more FIPS codes are assigned and weather
alert is activated, the SAME weather function does not
work while the radio is set to Triple Watch mode. The
radio searches only for a 1050 Hz tone.
• The radio also activates Triple Watch when channel
scan is active (see “Using Channel Step” on Page 15
for more information).
Tuning Weather Channels
Briefly press WX/Alert to tune to the active local NOAA
weather channel from any channel. The active weather
channel number and WX appear.
To change the weather channel, repeatedly press to
increase it or to decrease it. The radio always returns
to the last weather channel selected. This applies even if
the radio is turned off then turned back on again.
Using Weather Alert Mode
Hold down WX/Alert for about 2 seconds. When the radio is
in weather alert mode, flashes. If FIPS codes are programmed (see “Programming a FIPS Code” on Page 21),
flashes and the nature of the alert appears on the display.
Using Channel Step
Briefly press STEP/SCAN. The radio steps to the channel
saved into its memory each time you press STEP/SCAN
(see “Saving Channels to Memory” on Page 16).
Basic Operation
15
Page 16

Using Channel Scan
Hold down STEP/SCAN for about 2 seconds. The radio
scans all channels stored using the memory feature,
starting with the lowest channel number to the highest.
The channel numbers appear on the display.
Notes:
• TRI appears and the radio activates Triple Watch
when channel scan is active. During channel scan, the
radio automatically checks Channel 16 and Channel 9
every two seconds.
• Hold down 16/9/TRIPLE WATCH to take the radio out
of Triple Watch mode. The radio continues to scan.
Saving Channels to Memory
Briefly press MEM/UIC. The displayed channel is saved to
the radio’s memory. Once a channel has been programmed
into memory, MEM appears on the display each time the
channel number appears. You can store any channel
except a weather channel into the radio’s memory. Briefly
press MEM/UIC again to remove the channel from memory.
Deleting Channels From Memory
Tune the channel you want to delete then briefly press
MEM/UIC. MEM disappears.
Changing UIC Mode
Hold down MEM/UIC for about 2 seconds. The currentlyset UIC (USA, INT, and CAN) appears as you press MEM/UIC.
Selecting Menu Items
Briefly press SELECT/SCRAM to select menu items.
Displaying Time/Position/Course Info
Briefly press SELECT/SCRAM while a channel number
appears to display the following.
• Current Local Time
• Current Position (Latitude/Longitude)
• SOG (Current Speed Over Ground)
• COG (Current Course Over Ground)
Briefly press SELECT/SCRAM again to turn off display
mode. The current channel name appears.
16
Basic Operation
Page 17

Note: Channel mode display information always appears first.
It appears when the radio receives an incoming transmission
or when the radio is transmitting. Toggle back and forth
between the two displays by repeatedly pressing
SELECT/SCRAM from the channel display screen.
Using the Scrambler
Hold down SELECT/SCRAM for about 2 seconds. The
radio turns on Scramble mode for the selected channel.
Using the Hailer
Briefly press HAIL/INTERCOM. The radio activates its
hailer. Press PTT to use the hailer. Briefly press HAIL/
INTERCOM to turn off the hailer. Repeatedly press to
increase or to decrease the outgoing hail volume.
Briefly press POWER/VOLUME, then repeatedly press
to increase or to decrease the incoming hail volume.
Using the Intercom
Hold down HAIL/INTERCOM for about 2 seconds. The
radio activates its intercom and all available units appear
on the display. You can select any displayed unit to
communicate with.
Turning the Backlight On and Off
Repeatedly press LIGHT/LOCK to adjust the display
backlight level. Press LIGHT/LOCK when the backlight is
set to its highest level to turn off the backlight.
Using Keylock
Hold down LIGHT/LOCK for about 2 seconds to turn on
the keylock. All keys on the microphone except PTT are
locked. To turn off keylock, hold down LIGHT/LOCK for
about 2 seconds or turn the microphone off then on again.
Using Distress
To send a distress call, lift the protective tab over DISTRESS
then hold down DISTRESS for about 5 seconds. You hear
an audible countdown from 5 seconds to 0 as you hold
down DISTRESS. The radio does not send the distress
call if you release DISTRESS before the countdown is
complete.
Basic Operation
17
Page 18

Changing Output Transmit Power
Hold down MENU/H/L for about 2 seconds to change the
current output transmit power for the current channel from
high to low or low to high.
Note: Changing the output transmit power works only if it
is legal to do so on the current channel.
Resetting the Microphone
Cautions:
• Resetting the microphone does not reset the radio’s
user MMSI.
• Resetting the microphone sets all features back to
their factory settings.
To reset the microphone, turn off the microphone, then
hold down MENU/H/L while turning on the microphone.
Using Setup Options
This section details the operation of the microphone’s
setup options. You normally set these options the first
time you use the microphone.
Notes:
• The operation described in this section does not work
with Uniden's UM625 marine radio. See the UM625
Owner's Manual for more information about
connecting a WHAM x 4 microphone to that radio.
• See “Using System Options” on Page 23 for more
information about options you change more often.
Using Setup Options
Using the Directory
This option lets you set up a directory of other vessels
with DSC-capable radios. You can set up the microphone
so it displays another vessel’s MMSI and name.
To add a new directory entry:
1. Briefly press MENU. MAIN MENU appears. Then
press SELECT/SCRAM.
2. Repeatedly press or until SETUP appears, then
press SELECT/SCRAM.
3. Repeatedly press or until DIRECTORY
appears, then press SELECT/SCRAM.
18
Using Setup Options
Page 19

4. Repeatedly press or until NEW appears, then
press SELECT/SCRAM.
5. Repeatedly press or to select the first number
of the vessel’s user MMSI, then press SELECT/
SCRAM to register it.
6. Repeat Step 5 for each number in the user MMSI.
After you enter the last number, the cursor flashes at
the lower left side of the screen.
7. Repeatedly press or to select the first character
of the name you want to assign to the vessel, then
press SELECT/SCRAM to register it.
8. Repeat Step 7 for each of the name’s characters (up
to 12). If the vessel’s name is less than 12 characters,
repeatedly press SELECT/SCRAM. After you enter
the last character, YES appears.
9. Press SELECT/SCRAM to confirm the name you
entered. Otherwise, to cancel the directory entry,
repeatedly press or until NO appears then
press SELECT/SCRAM.
10. Repeat Steps 4-9 to enter another vessel in the directory.
To change an entry already in the directory:
1. Repeat Steps 1-3 above.
2. Repeatedly press or until the name of the entry
you want to change appears, then press SELECT/
SCRAM again. EDIT appears. Press SELECT/SCRAM.
The first character of the vessel’s user MMSI flashes.
3. Repeat Steps 5-9 to edit the user MMSI and vessel name.
Using Channel Names
This option lets you change the preset channel names.
For example, this might be necessary if a channel’s
authorized use has changed in your area.
1. Briefly press MENU. MAIN MENU appears. Then
press SELECT/SCRAM.
2. Repeatedly press or until SETUP appears, then
press SELECT/SCRAM.
3. Repeatedly press or until CH TAG appears,
then press SELECT/SCRAM.
Using Setup Options
19
Page 20

4. Repeatedly press or to select the preset channel name
you want to change, then press SELECT/SCRAM. EDIT
appears. Then press SELECT/SCRAM.
5. Repeatedly press or to select the first character
of the name you want to assign to the channel, then
press SELECT/SCRAM to register it.
6. Repeat Step 5 for each of the name’s characters (up to
12). If the channel’s name is less than 12 characters,
repeatedly press SELECT/SCRAM. After you enter the
last character, YES appears.
7. Press SELECT/SCRAM to confirm the channel name you
entered. Otherwise, to cancel the entry, repeatedly press
or until NO appears then press SELECT/SCRAM.
8. Repeat Steps 4-5 to change another channel name.
Adjusting the Local Time
This option lets you adjust the local time by up to one hour
for any location in North America.
1. Briefly press MENU. MAIN MENU appears. Then press
SELECT/SCRAM.
2. Repeatedly press or until SETUP appears, then
press SELECT/SCRAM.
3. Repeatedly press or until GPS SETUP appears,
then press SELECT/SCRAM.
4. Repeatedly press or until TIME ADJUST
appears, then press SELECT/SCRAM.
5. Repeatedly press or to adjust the time, then
press SELECT/SCRAM. SET appears.
6. Press SELECT/SCRAM.
Turning Daylight Saving On or Off
1. Briefly press MENU. MAIN MENU appears. Then press
SELECT/SCRAM.
2. Repeatedly press or until SETUP appears, then
press SELECT/SCRAM.
3. Repeatedly press or until GPS SETUP appears,
then press SELECT/SCRAM.
4. Repeatedly press or until DAYLITE SAV
appears, then press SELECT/SCRAM.
20
Using Setup Options
Page 21

5. Repeatedly press or until On appears (to turn
on Daylight Saving Time) or OF appears (to turn off
Daylight Saving Time) , then press SELECT/SCRAM.
Programming a FIPS Code
This option lets you add a FIPS code to the radio that will
in turn activate the radio’s Specific Area Message
Encoding (SAME) weather alert system. You can program
up to 30 FIPS codes.
To enter a new FIPS code:
1. Briefly press MENU. MAIN MENU appears. Then
press SELECT/SCRAM.
2. Repeatedly press or until SETUP appears, then
press SELECT/SCRAM.
3. Repeatedly press or until FIPS appears, then
press SELECT/SCRAM.
4. Repeatedly press or until NEW appears, then
press SELECT/SCRAM.
5. Repeatedly press or to select the first number of
the FIPS code, then press SELECT/SCRAM to register it.
6. Repeat Step 5 for each number in the FIPS code.
After you enter the last number, YES appears.
7. Press SELECT/SCRAM to confirm the FIPS code you
entered. Otherwise, to cancel the FIPS code entry,
repeatedly press or until NO appears then
press SELECT/SCRAM.
8. Repeat Steps 4-7 to enter another FIPS code.
To change an existing FIPS code:
1. Repeat Steps 1-3 in this section.
2. Repeatedly press or until the FIPS code you
want to change appears, then press SELECT/SCRAM
again. EDIT appears. Press SELECT/SCRAM. The first
number of the FIPS code flashes.
3. Repeat Steps 5-7 in this section to change the FIPS code.
Using Auto Channel Switch
This option lets you turn automatic channel change on or
off during a DSC call. You might want to do this to prevent
the radio from automatically changing channels in an
emergency situation.
Using Setup Options
21
Page 22

1. Briefly press MENU. MAIN MENU appears. Then
press SELECT/SCRAM.
2. Repeatedly press or until SETUP appears, then
press SELECT/SCRAM.
3. Repeatedly press or until AUTO CH SW appears,
then press SELECT/SCRAM.
4. Repeatedly press or until On appears (to turn on
auto channel switch) or OF appears (to turn off auto
channel switch), then press SELECT/SCRAM.
Using Position Reply
This option lets you turn automatic position reply on or off
during a DSC call. You might want to do this to prevent the
radio from automatically disclosing your position if another
radio requests it.
1. Briefly press MENU. MAIN MENU appears. Then
press SELECT/SCRAM.
2. Repeatedly press or until SETUP appears, then
press SELECT/SCRAM.
3. Repeatedly press or until POS REPLY appears,
then press SELECT/SCRAM.
4. Repeatedly press or until On appears (to turn on
auto position reply) or OF appears (to turn off auto
position reply), then press SELECT/SCRAM.
Using a Group MMSI
This option lets you set up a group MMSI, letting you
make a single call to a group of vessels.
1. Briefly press MENU. MAIN MENU appears. Then
press SELECT/SCRAM.
2. Repeatedly press or until SETUP appears, then
press SELECT/SCRAM.
3. Repeatedly press or until GROUP MMSI appears,
then press SELECT/SCRAM. ID and 0 appear, and
the second 0 flashes.
4. Repeatedly press or to select the second number
of the group MMSI, then press SELECT/SCRAM to
register it.
5. Repeat Step 4 for each number in the group MMSI.
After you enter the last number, YES appears.
22
Using Setup Options
Page 23

6. Press SELECT/SCRAM to confirm the group MMSI
you entered. Otherwise, to cancel the group MMSI
entry, repeatedly press or until NO appears
then press SELECT/SCRAM.
Setting Up the Scrambler
This option lets you use the microphone with a scrambler
installed in the radio. You must connect an optional scrambler
board to the radio to use this option.
1. Briefly press MENU. MAIN MENU appears. Then
press SELECT/SCRAM.
2. Repeatedly press or until SETUP appears, then
press SELECT/SCRAM.
3. Repeatedly press or until SCRAMBLE appears,
then press SELECT/SCRAM. A number flashes.
4. Repeatedly press or to select the scrambler code,
then press SELECT/SCRAM to register it. YES appears.
5. Press SELECT/SCRAM to confirm the scrambler
code you entered. Otherwise, to cancel the scrambler
code, repeatedly press or until NO appears
then press SELECT/SCRAM.
Using Exit
Select this option to exit setup options and return to the
channel display screen.
1. Briefly press MENU. MAIN MENU appears. Then
press SELECT/SCRAM.
2. Repeatedly press or until SETUP appears, then
press SELECT/SCRAM.
3. Repeatedly press or until EXIT appears, then
press SELECT/SCRAM.
Using System Options
This section details the operation of the microphone’s
Using System Options
system options. You normally change these options
based on local conditions and preferences.
Adjusting the Contrast
This option lets you change the microphone display’s contrast.
You can adjust the contrast only for the microphone you are
Using System Options
23
Page 24

using. This adjustment does not affect the contrast on the
main radio or other microphones.
1. Briefly press MENU, repeatedly press or until
LOCAL MENU appears, then press SELECT/SCRAM.
2. Repeatedly press or until CONTRAST appears,
then press SELECT/SCRAM.
3. Repeatedly press or to adjust the contrast. to a
comfortable viewing level, then press SELECT/SCRAM.
Adjusting the Key Beep
This option lets you turn the beep you hear when you
press the microphone’s buttons on or off.
1. Briefly press MENU, repeatedly press or until
LOCAL MENU appears, then press SELECT/SCRAM.
2. Repeatedly press or until KEY BEEP appears,
then press SELECT/SCRAM.
3. Repeatedly press or until On appears (to turn on
key beep) or OF appears (to turn off key beep), then
press SELECT/SCRAM.
Adjusting the VOX Sensitivity Level
1. To adjust the VOX sensitivity level, briefly press
MENU, repeatedly press or until LOCAL MENU
appears, then press SELECT/SCRAM.
2. Repeatedly press or until VOX LEVEL appears,
then press SELECT/SCRAM.
3. Repeatedly press or to select the level you want.
(1, 2, 3, or OFF). Then press SELECT/SCRAM.
Care and Maintenance
Care and Maintenance
Your WHAMx4 Wireless Microphone is a precision electronic
instrument and you should treat it accordingly. Due to its
rugged design, very little maintenance is required. However,
a few precautions should be observed.
• If the microphone has been damaged, you should not
transmit except in the case of an emergency.
• You are responsible for continued FCC technical
compliance of your microphone.
• You are urged to arrange for periodic performance
checks with your Uniden Marine dealer.
Care and Maintenance
Appendix
24
Page 25

Appendix
Reference Information
USA/Canadian/International Channel Frequencies
Ch. No. US CAN I NT
1”A” X
3”A” X
5”A” X
6X
7”A” X
8X
9X
10 X
11 X
12 X
13 X
14 X
15 X
16 X
17 X
18”A” X
19”A” X
20”A” X
21”A” X
22”A” X
23”A” X
24 X
25 X
26 X
27 X
28 X
61”A” X
63”A” X
64”A” X
65”A” X
66”A” X
67 X
68 X
69 X
70 X
71 X
72 X
73 X
74” X
75 X
76 X
77 X
78”A” X
79”A” X
80”A” X
81”A” X
82”A” X
83”A” X
84” X
85 X
86 X
87 X
88 X
88”A” X
1X
2X
3X
4”A” X
5”A” X
6X
7”A” X
8X
9X
10 X
11 X
12 X
13 X
14 X
15 X
16 X
17 X
18”A” X
19”A” X
20 X
21”A” X
Appendix
TX Status Full Name 12-Cha racte r Name
RX
156.0500 Simplex VESSEL TRAFFIC SYSTEM/
156.0500
156.1 500 Simp lex COAST GUA RD, GOVT ONLY C G ONLY
156.1500
156.2500 Simplex VESSEL TRAFFIC SYSTEM/
156.2500
156.3000 Simplex INTER-SHIP SAFETY SAFETY
156.3000
156.3500 Simplex COMMERCIAL COMMERCIAL
156.3500
156.4000 Simplex COMMERCIAL COMMERCIAL
156.4000
156.4500 Simplex NON COMMERCIAL NON COMMERCL
156.4500
156.5000 Simplex COMMERCIAL COMMERCIAL
156.5000
156.5500 Simplex VESSEL TRAFFIC SYSTEM VSL TRAFFIC
156.5500
156.6000 Simplex VESSEL TRAFFIC SYSTEM VSL TRAFFIC
156.6000
156.6500 Simplex, 1W BRIDGE TO BRIDGE BRDG TO BRDG
156.6500
156.7000 Simplex VESSEL TRAFFIC SYSTEM VSL TRAFFIC
156.7000
Inhib it Receive On ly ENVIRO NMEN TAL ENVIR ONME NTL
156.7500
156. 8000 Sim ple x DIST RESS, SAFETY, CALLING DIT RESS
156.8000
156.8500 Simplex, 1W GOVT MARITIME CONTROL GO VERNMENT
156.8500
156.9000 Simplex COMMERCIAL COMMERCIAL
156.9000
156.9500 Simplex COMMERCIAL COMMERCIAL
156.9500
157.0000 Simplex PORT OPERATION PORT OPERATN
157.0000
157.0500 Simplex COAST GUARD ONLY COAST GUARD
157.0500
157.1000 Simplex COAST GUARD COAST GUARD
157.1000
157.1500 Simplex COAST GUARD ONLY COAST GUARD
157.1500
157.2000 Duplex MARINE OPERATOR MAR OPERATOR
161.8000
157.2500 Duplex MARINE OPERATOR MAR OPERATOR
161.8500
157.3000 Duplex MARINE OPERATOR MAR OPERATOR
161.9000
157.3500 Duplex MARINE OPERATOR MAR OPERATOR
161.9500
157.4000 Duplex MARINE OPERATOR MAR OPERATOR
162.0000
156.0750 Simplex COAST GUARD COAST GUARD
156.0750
156.1750 Simplex VESSEL TRAFFIC SYSTEM VSL TRAFFIC
156.1750
156.2250 Simplex COMMERCIAL COMMERCIAL
156.2250
156.2750 Simplex PORT OPERATION PORT OPERATN
156.2750
156.3250 Simplex PORT OPERATION PORT OPERATN
156.3250
156.3750 Simplex, 1W BRIDGE TO BRIDGE BRDG TO BRDG
156.3750
156.4250 Simplex NON COMMERCIAL NON COMMERCL
156.4250
156.4750 Simplex NON COMMERCIAL NON COMMERCL
156.4750
Inhibit Receive Only DIGITL SELECTIVE CALLING DSC REC ONLY
156.5250
156.5750 Simplex NON COMMERCIAL NON COMMERCL
156.5750
156.6250 Simplex NON COMMERCIAL
156.6250
156.6750 Simplex PORT OPERATION PORT OPERATN
156.6750
156.7250 Simplex PORT OPERATION PORT OPERATN
156.7250
156.775 Simplex, 1W PORT OPERATION PORT OPERATN
156.775
156.825 Simplex, 1W PORT OPERATION PORT OPERATN
156.825
156.8750 Simplex, 1W PORT OPERATION
156.8750
156.9250 Simplex NON COMMERCIAL NON COMMERCL
156.9250
156.9750 Simplex COMMERCIAL COMMERCL
156.9750
157.0250 Simplex COMMERCIAL‘ COMMERC IAL
157.0250
157.0750 Simplex COAST GUARD COAST GUARD
157.0750
157.1250 Simplex COAST GUARD COAST GUARD
157.1250
157.1750 Simplex GOVERNMENT GOVERNMENT
157.1750
157.2250 Duplex MARINE OPERATOR MAR OPERATOR
161.8250
157.2570 Duplex MARINE OPERATOR MAR OPERATOR
161.8750
157.3250 Duplex MARINE OPERATOR MAR OPERATOR
161.9250
157.3750 Duplex MARINE OPERATOR MAR OPERATOR
161.9750
157.4250 Duplex MARINE OPERATOR MAR OPERATOR
162.0250
157.4250 Simplex COMMERCIAL (SHIP-SHIP) COMMERCIAL
157.4250
156.0500 Duplex MARINE OPERATOR MAR OPERATOR
160.6500
156.1000 Duplex MARINE OPERATOR MAR OPERATOR
160.7000
156.1500 Duplex MARINE OPERATOR MAR OPERATOR
160.7500
156.2000 Simplex CANADIAN COAST GUARD COAST GUARD
156.2000
156.2500 Simplex VESSEL TRAFFIC SYSTEM VSL TRAFFIC
156.2500
156.3000 Simplex INTER-SHIP SAFETY SAFETY
156.3000
156.3500 Simplex COMMERCIAL COMMERCIAL
156.3500
156.4000 Simplex COMMERCIAL COMMERCIAL
156.4000
156.4500 Simplex BOATER CALLING CHANNEL CALLING
156.4500
156.5000 Simplex COMMERCIAL COMMERCIAL
156.5000
156.5500 Simplex VESSEL TRAFFIC SYSTEM VSL TRAFFIC
156.5500
156.6000 Simplex VESSEL TRAFFIC SYSTEM VSL TRAFFIC
156.6000
156.6500 Simplex, 1W BRIDGE TO BRIDGE BRDG TO BRDG
156.6500
156.7000 Simplex VESSEL TRAFFIC SYSTEM VSL TRAFFIC
156.7000
156.7500 Simplex ENVIRONMENTAL ENVIRONMENTL
156.7500
156. 8000 Sim ple x DIST RESS, SAFETY, CALLING DIT RESS
156.8000
156.8500 Simplex, 1W STATE CONTROL STATE CNTRL
156.8500
156.9000 Simplex COMMERCIAL COMMERCIAL
156.9000
156.9500 Simplex CANADIAN COAST GUARD COAST GUARD
156.9500
157.0000 Duplex, 1W PORT OPERATION PORT OPERATN
161.6000
157.0500 Simplex CANADIAN COAST GUARD COAST GUARD
157.0500
COMMERCIAL
COMMERCIAL
(SHIP-SHIP)
(SHIP-SHIP)
VTS/COMMERCL
VTS/COMMERCL
NON COMMERCL
PORT OPERATN
25
Page 26

Ch. No. US CAN I NT
22”A” X
23 X
24 X
25 X
26 X
27 X
28 X
60 X
61”A” X
62”A” X
64 X
64”A” X
65”A” X
66”A” X
67 X
68 X
69 X
70 X
71” X
72 X
73 X
74 X
77 X
78”A” X
79”A” X
80”A” X
81”A” X
82”A” X
83” X
83”A” X
84 X
85 X
86 X
87 X
88 X
1X
2X
3X
4X
5X
6X
7X
8X
9X
10 X
11 X
12 X
13 X
14 X
15 X
16 X
17 X
18 X
19 X
20 X
21 X
22 X
23 X
24 X
25 X
26 X
27 X
28 X
60 X
61 X
62 X
63 X
64 X
65 X
66 X
67 X
68 X
69 X
70 X
71 X
72 X
73 X
74 X
77 X
78 X
79 X
80 X
81 X
82 X
83 X
84 X
85 X
86 X
87 X
88 X
RX
157.1000
161.7500
161.8000
161.8500
161.9000
161.9500
162.0000
160.6250
156.0750
156.1250
160.8250
156.2250
156.2750
156.3250
156.3750
156.4250
156.4750
156.5250
156.5750
156.6250
156.6750
156.7250
156.8750
156.9250
156.9750
157.0250
157.0750
157.1250
161.7750
157.1750
161.8250
161.8750
161.9250
161.9750
162.0250
160.6500
160.7000
160.7500
160.8000
160.8500
156.3000
160.9500
156.4000
156.4500
156.5000
156.5500
156.6000
156.6500
156.7000
156.7500
156.8000
156.8500
161.5000
161.5500
161.6000
161.6500
161.7000
161.7500
161.8000
161.8500
161.9000
161.9500
162.0000
160.6250
160.6750
160.7250
160.7750
160.8250
160.8750
160.9250
156.3750
156.4250
156.4750
156.5250
156.5750
156.6250
156.6750
156.7250
156.8750
161.5750
161.5750
161.6250
161.6750
161.7250
161.7750
161.8250
161.8750
161.9250
161.9750
162.0250
26
TX Status Full Name 12-Cha racte r Name
157.1000 Simplex CANADI AN COAST GUAR D COAST GUARD
157.1500 Duplex CANADIAN C OAST GUARD COAST GUARD
157.2000 Duplex MARINE OPERATOR MAR OPERATOR
157.2500 Duplex MARINE OPERATOR MAR OPERATOR
157.3000 Duplex MARINE OPERATOR MAR OPERATOR
157.3500 Duplex MARINE OPERATOR MAR OPERATOR
157.4000 Duplex MARINE OPERATOR MAR OPERATOR
156.0250 Duplex MARINE OPERATOR MAR OPERATOR
156.0750 Simplex CANADI AN COAST GUAR D COAST GUARD
156.1250 Simplex CANADI AN COAST GUAR D COAST GUARD
156.2250 Duplex MARINE OPERATOR MAR OPERATOR
156.2250 Simplex MARINE OPE RATOR MAR OPERATOR
156.2750 Simplex SEARCH AND RESCUE SRCH RESCUE
156.3250 Simplex, 1W PORT OPERATION PORT O PERATN
156.3750 Simplex BRIDGE TO BR IDGE BRDG TO BRDG
156.4250 Simplex NON CO MMERCIAL NO N COMMERCL
156.4750 Simplex NON CO MMERCIAL NO N COMMERCL
Inhib it Receive On ly DIGITAL SELECTIVE CALLING DSC R EC ON LY
156.5750 Simplex NON CO MMERCIAL NO N COMMERCL
156.6250 Simplex NON CO MMERCIAL NO N COMMERCL
156.6750 Simplex PORT OPE RATION PORT OPERATN
156.7250 Simplex PORT OPE RATION PORT OPERATN
156.8750 Simplex, 1W PORT OPERATION PORT O PERATN
156.9250 Simplex INTER SH IP INTER SHIP
156.9750 Simplex INTER SH IP INTER SHIP
157.0250 Simplex INTER SH IP INTER SHIP
157.0750 Simplex CANADI AN COAST GOA RD COAST GU ARD
157.1250 Simplex CANADI AN COAST GUAR D COAST GUARD
157.1750 Duplex CANADIAN C OAST GOARD COAST G OARD
157.1750 Simplex CANADI AN COAST GOA RD COAST GO ARD
157.2250 Duplex MARINE OPERATOR MAR OPERATOR
157.2750 Duplex MARINE OPERATOR MAR OPERATOR
157.3250 Duplex MARINE OPERATOR MAR OPERATOR
157.3750 Duplex MARINE OPERATOR MAR OPERATOR
157.4250 Duplex MARINE OPERATOR MAR OPERATOR
156.0500 Duplex MARINE OPERATOR MAR OPERATOR
156.1000 Duplex MARINE OPERATOR MAR OPERATOR
156.1500 Duplex MARINE OPERATOR MAR OPERATOR
156.2000 Duplex MARINE OPERATOR MAR OPERATOR
156.2500 Duplex MARINE OPERATOR MAR OPERATOR
156.3000 Simplex INTER-SHI P SAFETY SAFETY
156.3500 Duplex MARINE OPERATOR MAR OPERATOR
156.4000 Simplex COMMERCI AL (SHIP-SHIP) COMMERC IAL
156.4500 Simplex BOATER CALLING CHANNEL CALLING
156.5000 Simplex COMMERCI AL COMMER CIAL
156.5500 Simplex VESSEL TRAFFIC SYSTEM VSL TRAFFIC
156.6000 Simplex VESSEL TRAFFIC SYSTEM VSL TRAFFIC
156.6500 Simplex BRIDGE TO BR IDGE BRDG TO BRDG
156.7000 Simplex VESSEL TRAFFIC SYSTEM VSL TRAFFIC
156.7500 Simplex, 1W ENVIRONMENTAL ENVI RONMENTL
156.8000 Simplex DISTRES, SAFETY, CALLING DITRESS
156.8500 Simplex, 1W GOVT MARINE CONTROL GOVERNMEN T
156.9000 Duplex PORT OPERATION PORT OPERATN
156.9500 Duplex COMMERCIAL C OMMERCIAL
157.0000 Duplex PORT OPERATION PORT OPERATN
157.0500 Duplex PORT OPERATION PORT OPERATN
157.1000 Duplex PORT OPERATION PORT OPERATN
157.1500 Duplex MARINE OPERATOR MAR OPERATOR
157.2000 Duplex MARINE OPERATOR MAR OPERATOR
157.2500 Duplex MARINE OPERATOR MAR OPERATOR
157.3000 Duplex MARINE OPERATOR MAR OPERATOR
157.3500 Duplex MARINE OPERATOR MAR OPERATOR
157.4000 Duplex MARINE OPERATOR MAR OPERATOR
156.0250 Duplex MARINE OPERATOR MAR OPERATOR
156.0750 Duplex MARINE OPERATOR MAR OPERATOR
156.1250 Duplex MARINE OPERATOR MAR OPERATOR
156.1750 Duplex MARINE OPERATOR MAR OPERATOR
156.2250 Duplex MARINE OPERATOR MAR OPERATOR
156.2750 Duplex MARINE OPERATOR MAR OPERATOR
156.3250 Duplex MARINE OPERATOR MAR OPERATOR
156.3750 Simplex BRIDGE TO BR IDGE BRDG TO BRDG
156.4250 Simplex NON CO MMERCIAL NO N COMMERCL
156.4750 Simplex NON CO MMERCIAL NO N COMMERCL
Inhib it Receive On ly DIGITAL SELECTIVE CALLING DSC R EC ON LY
156.5750 Simplex NON CO MMERCIAL NO N COMMERCL
156.6250 Simplex NON CO MMERCIAL NO N COMMERCL
156.6750 Simplex PORT OPE RATION PORT OPERATN
156.7250 Simplex PORT OPE RATION PORT OPERATN
156.8750 Simplex PORT OPE RATION
156.9250 Duplex PORT OPERATION PORT OPERATN
156.9750 Duplex PORT OPERATION PORT OPERATN
157.0250 Duplex PORT OPERATION PORT OPERATN
157.0750 Duplex PORT OPERATION PORT OPERATN
157.1250 Duplex PORT OPERATION PORT OPERATN
157.1750 Duplex PORT OPERATION PORT OPERATN
157.2250 Duplex MARINE OPERATOR MAR OPERATOR
157.2750 Duplex MARINE OPERATOR MAR OPERATOR
157.3250 Duplex MARINE OPERATOR MAR OPERATOR
157.3750 Duplex MARINE OPERATOR MAR OPERATOR
157.4250 Duplex MARINE OPERATOR MAR OPERATOR
(SHIP-SHIP)
PORT OPERATN
Appendix
Page 27

Weather Channel Frequencies
Ch. No.
WX01
WX02
WX03
WX04
WX05
WX06
WX07
WX08
WX09
WX10
RX Frequency
162.5500
162.4000
162.4750
162.4250
162.4500
162.5000
162.5250
161.6500
161.7750
163.2750
Description (Receive On ly)
Weather Inform ation
Weather Inform ation
Weather Inform ation
Weather Inform ation
Weather Inform ation
Weather Inform ation
Weather Inform ation
Weather Inform ation
Weather Inform ation
Weather Inform ation
Three Year Limited Warranty
Three Year Limited Warranty
WARRANTOR: UNIDEN AMERICA CORPORATION (“Uniden”)
ELEMENTS OF WARRANTY: Uniden warrants, for three years, to the
original retail owner, this Uniden Product to be free from defects in materials
and craftsmanship with only the limitations or exclusions set out below.
WARRANTY DURATION: This warranty to the original user shall terminate
and be of no further effect 36 months after the date of original retail sale. The
warranty is invalid if the Product is (A) damaged or not maintained as
reasonable or necessary, (B) modified, altered, or used as part of any
conversion kits, subassemblies, or any configurations not sold by Uniden, (C)
improperly installed, (D) serviced or repaired by someone other than an
authorized Uniden service center for a defect or malfunction covered by this
warranty, (E) used in any conjunction with equipment or parts or as part of
any system not manufactured by Uniden, or (F) installed or programmed by
anyone other than as detailed by the Operating Guide for this product.
STATEMENT OF REME DY: In the event that the product does not conform to
this warranty at any time while this warranty is in effect, warrantor will repair
the defect and return it to you without charge for parts, service, or any other
cost (except shipping and handling) incurred by warrantor or its representatives in connection with the performance of this warranty. THE LIMITED
WARRANTY SET FORTH ABOVE IS THE SOLE AND ENTIRE WARRANTY
PERTAINING TO THE PRODUCT AND IS IN LIEU OF AND EXCLUDES ALL
OTHER WARRANTIES OF ANY NATURE WHATSOEVER, WHETHER
EXPRESS, IMPLIED OR ARISING BY OPERATION OF LAW, INCLUDING,
BUT NOT LIMITED TO ANY IMPLIED WARRANTIES OF MERCHANTABILITY
OR FITNESS FOR A PARTICULAR PURPOSE. THIS WARRANTY DOES
NOT COVER OR PROVIDE FOR THE REIMBURSEMENT OR PAYMENT
OF INCIDENTAL OR CONSEQUENTIAL DAMAGES. Some states do not
allow this exclusion or limitation of incidental or consequential damages so
the above limitation or exclusion may not apply to you.
LEGAL REMEDIES: This warranty gives you specific legal rights, and you
may also have other rights which vary from state to state. This warranty is
void outside the United States of America.
PROCEDURE FOR OBTAINING PERFORMANCE OF WARRANTY: If, after
following the instructions in this Operating Guide you are certain that the
Product is defective, pack the Product
carefully (preferably in its original packaging). Include evidence of original
purchase and a note describing the defect that has caused you to return it.
The Product should be shipped freight prepaid, by traceable means, or
delivered, to warrantor at:
Uniden America Corporation
Parts and Service Division
4700 Amon Carter Boulevard
Fort Worth, TX 76155
(800) 554-3988, 7:00 a.m. to 7:00 p.m., Central,
Monday through Friday
Three Year Limited Warranty
27
Page 28

Información de la FCC/IC
Este aparato cumple con la parte 15 de los reglamentos
Información de la FCC/IC
de la FCC. La operación está sujeta a dos condiciones:1)
que este aparato no cause ninguna interferencia dañina.
2) Este aparato debe aceptar cualquier interferencia
recibida, incluyendo la interferencia que pueda causar
una operación indeseada.
Importante: Los cambios o modificaciones a esta unidad
que no hayan sido aprobadas por Uniden podrían anular
la autoridad del usuario para operar el equipo.
El término "IC" delante del número de la certificación de la
radio solamente significa que se ha cumplido con los
reglamentos técnicos de Industry Canada.
Información de la FCC sobre la exposición
RF
¡Aviso! Lea esta información antes de usar la radio.
En agosto de 1996 la Comisión Federal de
Comunicaciones (FCC) de los Estados Unidos adopto
en su Report and Order FCC 96-326 una actualización
del estandarte de seguridad para la exposición de
humanos a la radio frecuencia de energía
electromagnética emitida por los transmisores
regulados por la FCC.
Estas pautas son consistentes con los estandartes de
seguridad previamente convenidos por los cuerpos de
los Estados Unidos y los internacionales. El diseño de
la radio cumple con los reglamentos de la FCC y los
estandartes internacionales.
28
Información de la FCC/IC
Page 29

¡Advertencia!
¡Aviso! Es la responsabilidad del usuario de operar
correctamente el transmisor de esta radio para
asegurar una operación segura. Por favor obedezca lo
siguiente:
Use solamente la antena aprobada suministrada.
Las antenas, acoplamientos o modificaciones no
autorizadas podrían perjudicar la calidad de la llamada,
dañar la radio, o podría resultar en la violación de las
regulaciones de la FCC.
No use la radio con una antena dañada. El contacto de
una antena dañada con la piel, podría resultar en una
pequeña quemadura. Por favor consulte con su
comerciante local para obtener una antena de
reemplazo.
Operación con el micrófono cerca del
cuerpo
Este aparato está examinado para operaciones típicas
cerca del cuerpo usando la pinza para la correa
suministrada.
Para seguir cumpliendo los requerimientos de exposición
RF de la FCC, las operaciones con el micrófono cerca del
cuerpo están restringidas a la pinza para la correa
suministrada.
Para una operación sin manos, la radio se deberá
mantener a 1 pulgada de la cara del usuario. El uso de
los accesorios que no ejecuten estos requerimientos
puede que no cumplan con los requerimientos de
exposición RF de la FCC y deberán ser evitados.
Para más información sobre la exposición RF, visite la
página web de la FCC en www.fcc.gov.
Información de la FCC/IC
29
Page 30

Contenido
Introducción ..........................................................32
Contenido
Suministrado con su micrófono ............................32
Características ...................................................... 33
El micrófono .......................................................... 33
Sobre Esta Manual ............................................33
Exhibición de los controles del micrófono
en este manual .................................................. 34
Preparación del micrófono .................................... 34
Montaje del micrófono ........................................34
Instalación de las pilas .......................................35
Carga de las pilas ..............................................36
El micrófono .......................................................37
La pantalla .........................................................39
Operaciones básicas ............................................40
Activación y desactivación del micrófono ......... 40
Ajuste del volumen y la supresión ..................... 40
El nivel de la pila ................................................40
La vigilancia triple .............................................. 40
Activación de los canales meteorológicos ........ 41
El modo de alerta meteorológica .......................41
El modo de canales paso por paso ....................41
El rastreo de los canales ....................................41
Almacenamiento de canales en la memoria ......42
Borrado de canales de la memoria ....................42
Cambio del modo UIC ........................................42
Selección de los artículos del menú ................. 42
Exhibición de la información de la hora/
de la posición/ del curso .................................... 42
El codificador .....................................................42
El hailer ..............................................................43
El intercomunicador ...........................................43
Activación y desactivación de la luz de fondo ....43
El bloqueo del teclado ........................................43
Auxilio ................................................................ 43
30
Contenido
Page 31

Cambio de la potencia de salida de
transmisión .........................................................43
Reinicialización del micrófono ............................44
Las opciones de la programación .........................44
El directorio ....................................................... 44
Los nombres de los canales ............................. 45
Ajuste de la hora local ........................................46
Activación y desactivación de la
compensación de la hora .................................. 46
Programación de un código FIPS ......................46
El cambio automático de canales ......................47
La respuesta de posición ................................... 48
El MMSI de grupo ..............................................48
Configuración del codificador .............................48
Salida ................................................................ 49
Utilización de las opciones del sistema ................49
Ajuste del contraste ............................................49
Ajuste del sonido de los botones ...................... 49
Ajuste del nivel de la sensibilidad VOX ..............50
Programación del ID de la base del micrófono . 50
Cuidado y manteniniento ......................................50
Apéndice ...............................................................51
Información de referencia .................................. 51
Garantía limitada por 3 años ................................53
Contenido
31
Page 32

Introducción
Su micrófono inalámbrico WHAMx4 de 2.4 GHz es la próxima
Introducción
generación de micrófonos inalámbricos de mano y es compatible con las nuevas radios marinas de Uniden.
Este micrófono combina tecnología moderna con durabilidad
fuerte y el uso fácil. El diseño transistorizado con componentes
compactos y materiales conservativamente evaluados es una
elección ideal para los medios ambientes marinos. Su pantalla
grande y sus botones de control retroiluminados permiten usarlo
fácilmente en extremas condiciones de luz y de tiempo.
Usted puede usar hasta cuatro micrófonos WHMAx4 con la
misma radio marina. Le recomendamos que lea este manual a
fondo para conocer todas las características y funciones del
micrófono. Guarde su recibo como prueba de la compra en
caso que su micrófono necesite el servicio garantizado.
Las características, las especificaciones y la disponibilidad de
los accesorios opcionales están sujetas a cambio sin previo
aviso.
Nota: Su micrófono cumple con las más rigurosas especificaciones de impermeabilidad JIS7. El cargador suministrado
cumple con las especificaciones de impermeabilidad JIS4. Esto
quiere decir que el micrófono puede ser sumergido a una
profundidad de 1 metro por hasta 30 minutos sin que sufra
daños. bandeja alcalina de batería
Suministrado con su micrófono
Cargador
(mostrado ensamblado)
Micrófono
Ferretería para el montaje
(no están mostradas)
32
Bandeja
para las pilas
alcalinas
Manual
del usuario
(no están mostradas)
Introducción
Correa
para la
mano
Pila
Page 33

Características
Entrada del intercomunicador - Usted puede usar el
Características
micrófono para controlar una radio desde casi cualquier parte
abordo de su navío, y cada usuario de un WHAMx4 se puede
comunicar uno con otro. Usted también puede usar la función
del intercomunicador de la radio para comunicarse con cada
usuario. Usted puede usar el WHAMx4 para llamar de un
micrófono a otro micrófono, de un micrófono a la radio, de un
micrófono a múltiples estaciones incluyendo la radio, de un
micrófono a una segunda radio, y de una radio a un individual, a
un grupo, o a todos los micrófonos. También puede usar una
segunda radio como un intercomunicador.
VOX - Cuando conecte un audífono al micrófono, usted podrá
hablar sin oprimir el botón PTT usando su micrófono.
Radiobúsqueda de un micrófono - Usted puede enviar un
tono al micrófono, para poder encontrarlo cuando se haya
perdido.
Ajuste de la luz de fondo de la pantalla y de los botones Usted puede ajustar la claridad de la pantalla y de los botones
del micrófono para poder ver mejor en condiciones extremas.
Ajustes del volumen del sonido de los botones - Usted
puede ajustar el volumen del tono que uno oye cuando se
presiona un botón.
Exhibición del nivel de la pila - El micrófono exhibe el
estado de la pila.
Ajuste del contraste - Usted puede ajustar la pantalla del
micrófono para poder ver mejor en condiciones diferentes.
Micrófono flotante - El micrófono flota cuando cae al agua
para poder recogerlo con facilidad.
El micrófono
Sobre Esta Manual
Las exhibiciones usadas en este manual son representaciones de lo que puede aparecer cuando usted use su micrófono. Como lo que usted verá dependerá de las frecuencias
para su área y de la programación que usted seleccione,
usted podrá notar algunas diferencias entre lo que está en
este manual y lo que aparecerá en la exhibición de su micrófono. Los botones que usted presione y el texto que aparecerá en la pantalla saldrán en negritas.
Características
33
Page 34

Exhibición de los controles del micrófono
en este manual
Para ayudarle a navegar por los menús del micrófono, los
pasos mostrados en este manual describen las pantallas
que usted verá, los botones que usted presionará, y los
controles de operación que usará para obtener un
resultado deseado.
Preparación del micrófono
Preparación del micrófono
Montaje del micrófono
Usted puede montar el cargador del micrófono en cualquier
superficie conveniente así como en una mampara, en un
puente de mando o en una mesa de mapas. La superficie
para el montaje que usted escoa debe tener disponible un
enchufe de 12 V CC cercano. Como el cargador no tiene
un interruptor de potencia, usted tendrá que conectarlo
directamente a una fuente de potencia, así como la batería
del navío o una conexión en el panel de distribución de
potencia que reciba corriente continua.
Aviso: Por favor mantenga objetos metálicos lejos del
cargador WHAM4x.
1. Conecte los cables detrás del cargador a una batería
de 12 voltios. Usted puede extender el cable si es
necesario, pero observe la polaridad correcta (por
ejemplo, rojo es positivo y negro es negativo).
2. Conecte el cable negro al terminal negativo (-) de la
batería.
3. Conecte el cable rojo al terminal positivo (+) de la batería.
4. Asegúrese de que las conexiones estén limpias y bien
apretadas para que no se suelten al vibrar durante la
operación del navío. Limpie ocasionalmente cualquier
corrosión acumulada en los terminales de la batería.
5. Use los tornillos para asegurar el dorso del
cargador a la superficie de
montaje, luego conecte la parte
delantera del cargador al dorso.
6. Deslice el micrófono en el cargador para
asegurarlo y cargar las pilas.
Enrosca
Montar
34
Preparación del micrófono
Page 35

Para quitar el cargador de su localidad de montaje, use un destornillador para levantar la parte delantera
de la tapa dorsal del cargador.
Luego afloje el tornillo de la tapa
dorsal.
Levanti Aqui
Instalación de las pilas
Su micrófono usa uno pilas recargables (suministradas).
Usted también puede usar tres pilas AAA
recargables opcionales.
1. Use una moneda para
destornillar la pinza de la correa
detrás del micrófono.
2. Levante las pinzas laterales
de la carcasa del micrófono.
Conector d e
bateria
3. Si está instalando pilas AAA
en el cargador suministrado, asegúrese de que los
símbolos de la polaridad
(+,-) dentro del
Pinzas de la carcasa
compartimiento de las pilas correspondan.
De otra manera, inserte el conector de las pilas
recargables suministrado en la conexión dentro del
compartimiento de estas.
4. Reponga la tapa.
Cuidado: Asegúrese de que la goma dentro del
compartimiento de las pilas esté limpia y que selle
completamente el compartimiento. Esto ayuda para
que no entre agua en el micrófono.
5. Cierre las dos pinzas y reinstale la pinza para la
correa.
Recargue las pilas cuando el micrófono no funcione o
cuando el alcance se acorte.
Preparación del micrófono
35
Page 36

Carga de las pilas
Antes de usar pilas recargables, usted las debe cargar.
El micrófono tiene un circuito integrado que le permite
recargar las pilas mientras que estas están en el micrófono. Para cargar las pilas, instale las pilas en el micrófono y luego deslícelo en el cargador.
¡AVISO!
Antes de usar las pilas recargables por primera vez,
cárguelas por 14 horas. Las pilas descargadas
necesitan unas 14 horas para cargarse totalmente.
Cuidado: Para asegurar la carga correcta y evitar que el
micrófono se suelte del cargador, insértelo firmemente.
Supresión del ruido del motor
A veces, la interferencia del ruido de impulso generado por
los sistemas eléctricos de los motores puede ser un problema para los micrófonos. Su micrófono ha sido diseñado
para ser esencialmente impenetrable por el ruido de
impulso de ignición y del ruido del alternador. Sin
embargo, en algunas instalaciones será necesario tomar
medidas para reducir más los efectos de la interferencia de
ruido. En casos severos de interferencia de ruido de
impulso, será necesario instalar un kit de supresión de
ruido. Comuníquese con el comerciante del cual usted
compró la radio para más información.
36
Preparación del micrófono
Page 37

El micrófono
12
14
2
8
1
3
13
6
9
7
5
POWER/VOLUME -Mantenga oprimido por 2 segundos
1
10
11
4
para encender el micrófono o para apagarlo. Oprima
brevemente para seleccionar el modo del ajuste del volumen.
LED - El LED delante en el micrófono se enciende en
2
verde cuando este está recibiendo una transmisión, en
rojo cuando está transmitiendo, y en naranja cuando se
está cargando.
- Oprima para desplazarse hacia arriba por los
3
canales y por las opciones del menú. Manténgalo oprimido para aumentar la velocidad del desplazamiento.
- Oprima para desplazarse hacia abajo por los
canales y las opciones del menú. Mantenga oprimido
para aumentar la velocidad del desplazamiento.
MENU HI/LO - Oprima para entrar y salir del modo del
4
menú. Mantenga oprimido para cambiar la potencia de
transmisión de alta a baja. Mantenga oprimido otra vez
para cambiar la potencia de transmisión de baja a alta.
SELECT/SCRAM - Oprima el modo normal de los
5
canales para exhibir la hora, la fecha, la latitud, la longi-
Preparación del micrófono
37
Page 38

tud, SOG (velocidad sobre tierra) y COG (curso sobre
tierra). Oprima en el modo del menú para seleccionar los
artículos del menú. Mantenga oprimido para activar el
codificador para el canal actual.
16/9/TRIPLE WATCH - Oprima para sintonizarse al
6
canal 9 y al canal 16 y para usar la vigilancia triple.
7
HAIL/INTERCOM - Oprima para activar o desactivar
el hailer. Mantenga oprimido por 2 segundos para usar la
característica del intercomunicador de la radio.
8
SQUELCH/BATTERY - Oprima para activar el modo
del ajuste de la supresión. Mantenga oprimido para exhibir el nivel de la pila.
9
STEP/SCAN - Mantenga oprimido para rastrear por
todos los canales en la memoria.
MEM/UIC - Oprima para colocar el canal actualmente
10
seleccionado en la memoria. Oprímalo otra vez para borrar un canal de la memoria. Mantenga oprimido para
cambiar al modo UIC.
WX/ALERT - Oprima para escuchar el canal meteo-
11
rológico activo en su área. Mantenga oprimido en el
modo de alerta meteorológica para activar esta alerta.
PTT - Oprima para transmitir.
12
13
DISTRESS - Mantenga oprimido por 5 segundos para
activar la transmisión de auxilio. El micrófono cuenta
hacia bajo durante el auxilio. Si suelta el botón DIS-
TRESS antes de terminar la cuenta hacia abajo, la llamada de auxilio será cancelada.
LIGHT/LOCK - Oprima repetidas veces para cambiar
14
el nivel de la luz de fondo de la pantalla y del teclado.
Oprima otra vez cuando la luz de fondo esté ajustada al
nivel más alto para apagar la luz.
Mantenga oprimido por 2 segundos para activar el bloqueo
del teclado. Todos los botones serán bloqueados excepto
PTT. Para desbloquear el teclado, oprima DISTRESS,
mantenga oprimido LIGHT/LOCK por 2 segundos, o
apague el micrófono y vuélvalo a encender.
38
Preparación del micrófono
Page 39

La pantalla
- Aparece mientras que el micrófono está transmitiendo.
DSC - Aparece cuando el micrófono está en el modo DSC
incluyendo las llamadas DSC. También enseña que el
micrófono está conectado a la radio principal (por RF).
DSC parpadea cuando el micrófono está cerca del límite
del alcance, o cuando está completamente fuera del
alcance.
LO - Enseña que la potencia de salida de la transmisión
está puesta á 1 vatio en el canal de transmisión.
HI - Enseña que la potencia de salida transmisión está
puesta á 25 vatios en el canal de transmisión.
TRI - Aparece cuando el micrófono está en un canal
activo y cuando está vigilando los canales 9/16 y el canal
meteorológico.
U I C - Enseña el modo del canal (USA, INT, o CAN).
MEM - Indica si el canal ha sido colocado en la memoria
de rastreo.
WX - Aparece cuando el micrófono está en el modo
meteorológico.
- Enseña que el GPS está conectado al micrófono.
Parpadea cuando los datos GPS recibidos son válidos.
- Aparece cuando la vigilancia de la alerta
meteorológica del canal está activada y parpadea cuando
la alerta está activada.
- Enseña cuando el micrófono se está comunicando con
la radio principal (por RF) y parpadea cuando otro
micrófono está en uso.
Preparación del micrófono
39
Page 40

Operaciones básicas
Operaciones básicas
Activación y desactivación del micrófono
Mantenga oprimido POWER/VOLUME por 2 segundos.
Si la radio principal está encendida, el canal que
aparezca en el micrófono será el canal actualmente
seleccionado en la radio principal. Mantenga oprimido
POWER/VOLUME por unos 2 segundos otra vez para
apagar el micrófono..
Ajuste del volumen y la supresión
Oprima POWER/VOLUME, y luego oprima repetidas
veces para subir el volumen y para bajarlo. Oprima
POWER/VOLUME para apagar el volumen.
Para ajustar la supresión, oprima SQUELCH/BATTERY, y
luego oprima repetidas veces para subir la supresión o
para bajarla. Oprima PTT, 16/9/TRIPLE WATCH o
DISTRESS para apagarla.
Inspección del nivel de la pila
Mantenga oprimido SQUELCH/BATTERY por unos 2
segundos. Un número del 0 al 4 aparecerá mostrando el
nivel de la pila (0 está baja y 4 está llena). Si aparece 0, la
radio no tendrá bastante potencia para operar. Oprima
brevemente cualquier botón para apagar el modo de la
pila.
La vigilancia triple
Sintonícese a otro canal que no sean los canales 9 ó 16,
y luego mantenga oprimido 16/9/TRIPLE WATCH por
unos 2 segundos. TRI aparecerá y la radio monitorizará
el canal 16 cada 2 segundos, luego el canal 9, y seguido
volverá al canal activo original.
Notas:
• Si el canal activo originalmente era el canal meteorológico, la radio entrará automáticamente en el modo
de la vigilancia triple.
• Si la alerta meteorológica está activada (consulte
"Activación de la alerta de los canales"), la radio se
sintonizará primero al canal activo original, luego al
canal 9 y después al canal 16. La radio también
inspeccionará el canal meteorológico activo cada 7
segundos por si hay un tono de alerta.
40
Operaciones básicas
Page 41

• Si hay uno o más códigos FIPS asignados y la alerta
meteorológica está activada, la función meteorológica
SAME no funcionará mientras que la radio esté
puesta en el modo de vigilancia triple. La radio
buscará solamente un tono de 1050 Hz.
• La radio también activará la vigilancia triple cuando el
rastreo de los canales esté activado (consulte "El
modo de canales paso por paso" para más
información).
Activación de los canales meteorológicos
Oprima WX/Alert para sintonizarse al canal meteorológico
NOAA local activo desde cualquier canal. El número del
canal meteorológico activo y WX aparecerá en la pantalla.
Para cambiar el canal meteorológico, oprima repetidas veces
para aumentarlo o para disminuirlo. La radio siempre
volverá al último canal meteorológico seleccionado. Esto aplicará aún cuando la radio esté apagada y se vuelva a encender.
El modo de alerta meteorológica
Mantenga oprimido WX/Alert por unos dos segundos. Cuando
la radio esté e n el modo de alerta meteoroló gica destellará.
Si los códigos FIPS están programados (consulte "Programación de un código FIPS", destellará y la naturaleza de
la alerta aparecerá en la pantalla.
El modo de canales paso por paso
Oprima STEP/SCAN. La radio pasará al próximo canal
almacenado en la memoria cada vez que presione STEP/
SCAN (consulte "Almacenamiento de canales en la memoria").
El rastreo de los canales
Mantenga oprimido STEP/SCAN por unos 2 segundos.
La radio rastreará todos los canales, comenzando con el
número más bajo hasta el más alto. Los números de los
canales aparecerán en la pantalla.
Notas:
• TRI aparecerá y la radio activará la vigilancia triple
cuando el rastreo de los canales esté activado. Durante
el rastreo de los canales, la radio investigará automáticamente los canales 16 y 9 cada dos segundos.
• Mantenga oprimido 16/9/TRIPLE WATCH para sacar
la radio del modo de la vigilancia triple. La radio
continuará con el rastreo.
Operaciones básicas
41
Page 42

Almacenamiento de canales en la memoria
Oprima MEM/UIC. El canal exhibido será guardado en la
memoria de la radio. Una vez que un canal haya sido
programado en la memoria, MEM aparecerá en la
pantalla cada vez que el número del canal aparezca.
Usted podrá guardar cualquier canal en la memoria de la
radio excepto un canal meteorológico. Oprima MEM/UIC
otra vez para quitar el canal de la memoria.
Borrado de canales de la memoria
Sintonice el canal deseado para borrarlo y luego oprima
MEM/UIC. MEM desaparecerá.
Cambio del modo UIC
Mantenga oprimido MEM/UIC por unos 2 segundos. La
programación UIC actual (USA, INT, CAN) aparecerá
cuando presione MEM/UIC.
Selección de los artículos del menú
Oprima SELECT/SCRAM para seleccionar los artículos
del menú.
Exhibición de la información de la hora/
de la posición/ del curso
Oprima SELECT/SCRAM mientras que el número del
canal aparece para exhibir lo siguiente:
• La hora local actual
• La posición actual (latitud/longitud)
• SOG (velocidad actual sobre tierra)
• COG (velocidad actual sobre tierra)
Oprima SELECT/SCRAM otra vez para apagar el modo
de la exhibición. El nombre del canal actual aparecerá.
Nota: La información de la exhibición del modo del canal
siempre aparecerá primero. Esta información aparecerá
cuando la radio reciba una transmisión entrante o cuando
la radio esté transmitiendo. Intercambie entre las dos
exhibiciones oprimiendo repetidas veces SELECT/
SCRAM desde la pantalla de exhibición de canales.
El codificador
Mantenga oprimido SELECT/SCRAM por unos 2
segundos. La radio volverá al modo del codificador para
el canal seleccionado.
42
Operaciones básicas
Page 43

El hailer
Oprima HAIL/INTERCOM. La radio activará el hailer.
Oprima PTT para usar el hailer. Oprima HAIL/INTERCOM
otra vez para apagar el hailer. Oprima repetidas veces
para subir o para bajar el volumen saliente del hailer.
Oprima POWER/VOLUME, y luego oprima repetidas veces
para subir o para bajar el volumen entrante del hailer.
El intercomunicador
Mantenga oprimido HAIL/INTERCOM por unos 2
segundos. La radio activará el intercomunicador y todas
sus unidades disponibles aparecerán en la pantalla.
Usted podrá seleccionar cualquiera unidad exhibida para
comunicarse con ella.
Activación y desactivación de la luz de
fondo
Oprima repetidas veces LIGHT/LOCK para ajustar el nivel de
la luz de fondo de la pantalla. Oprima LIGHT/LOCK cuando
la luz de fondo esté ajustada al nivel más alto para apagarla.
El bloqueo del teclado
Mantenga oprimido LIGHT/LOCK por unos 2 segundos para
activar el bloqueo del teclado. Todos los botones en el
micrófono excepto PTT serán bloqueados. Para desactivar
el bloqueo del teclado, mantenga oprimido LIGHT/LOCK por
unos 2 segundos o apague el micrófono y vuélvalo a encender.
Auxilio
Para enviar una llamada de auxilio, levante la lengüeta
protectiva sobre DISTRESS y mantenga el botón
oprimido por unos 5 segundos. Usted oirá una cuenta
hacia abajo de 5 a 0 mientras que mantiene oprimido
DISTRESS. La radio no enviará la llamada de auxilio si
usted suelta DISTRESS antes de que la cuenta hacia
abajo haya terminado.
Cambio de la potencia de salida de
transmisión
Mantenga oprimido MENU/H/L por unos 2 segundos para
cambiar la potencia de salida de transmisión del canal
actual de alta a baja o de baja a alta.
Nota: El cambio de la potencia de salida de transmisión
funcionará solamente si es legal en el canal actual.
Operaciones básicas
43
Page 44

Reinicialización del micrófono
Cuidado:
• La reinicialización del micrófono no reinicializará el
MMSI de usuario de la radio.
• La reinicialización del micrófono programará todas las
características a sus ajustes iniciales.
Para reinicializar el micrófono, apáguelo y mantenga
oprimido MENU/H/L mientras lo vuelve a encender.
Nota: Si no se recibe una llamada, el indicador de
llamada durante la ausencia aparecerá en la pantalla. Si
la radio receptora está en el modo de espera, DSC
STANDBY UNATTENDED aparecerá en la pantalla.
Las opciones de la programación
Las opciones de la programación
Esta sección detalla la operación de las opciones de
programación del micrófono. Normalmente estas
opciones se deben programar la primera vez que usted
usa el micrófono.
Notas:
• La operación descrita en esta sección no funciona
con la radio marina UM625 de Uniden. Consulte el
manual de la radio UM625 para más información
sobre la conexión de un WHAM4x con esa radio.
• Consulte "Las opciones del sistema" para más información sobre las opciones que usted cambia más frecuentemente.
El directorio
Esta opción le permite configurar un directorio de otros
navíos con radios con capacidad DSC.
Para añadir una entrada nueva:
1. Oprima brevemente MENU. El menú principal aparecerá. Luego oprima SELECT/SCRAM.
2. Oprima varias veces o hasta que SETUP
aparezca, y luego oprima SELECT/SCRAM.
3. Oprima varias veces o hasta que DIRECTORY
aparezca, y luego oprima SELECT/SCRAM.
4. Oprima varias veces o hasta que NEW
aparezca, luego oprima SELECT/SCRAM.
5. Oprima varias veces o para seleccionar el
primer número del MMSI de usuario del navío, luego
oprima SELECT/SCRAM para registrarlo.
44
Las opciones de la programación
Page 45

6. Repita el quinto paso para cada número del MMSI de
usuario. Después de insertar el último número, el cursor
destellará en la parte inferior izquierda de la pantalla.
7. Oprima varias veces o para seleccionar el
primer carácter del nombre que desea asignar al navío,
y luego oprima SELECT/SCRAM para registrarlo.
8. Repita el séptimo paso para cada carácter del nombre
(hasta 12 caracteres). Si el nombre del navío tiene
menos de 12 caracteres, oprima varias veces
SELECT/SCRAM. Después de insertar el último
carácter, la pantalla mostrará YES.
9. Oprima SELECT/SCRAM para confirmar el nombre
insertado. De otra manera, para cancelar la entrada en
el directorio, oprima varias veces o hasta que NO
aparezca en la pantalla y luego oprima SELECT/SCRAM.
10. Repita los pasos del 4-9 para insertar otro navío en el
directorio.
Para cambiar la entrada existente en el directorio:
1. Repita los pasos del 1-3 descritos arriba.
2. Oprima varias veces o hasta que el nombre de
la entrada que desea cambiar aparezca, luego oprima
SELECT/SCRAM otra vez. EDIT aparecerá en la pan-
talla. Oprima SELECT/SCRAM. El primer carácter del
MMSI de usuario del navío destellará.
3. Repita los pasos del 5-9 para corregir el MMSI de
usuario y el nombre del navío.
Los nombres de los canales
Esta opción le permite cambiar los nombres preprogramados
de los canales. Por ejemplo, esto puede ser necesario si el
uso autorizado del canal ha cambiado en su área.
1. Oprima brevemente MENU. El menú principal aparecerá. Luego oprima SELECT/SCRAM.
2. Oprima varias veces o hasta que SETUP
aparezca, y luego oprima SELECT/SCRAM.
3. Oprima varias veces o hasta que CH TAG
aparezca, y luego oprima SELECT/SCRAM.
4. Oprima varias veces o para seleccionar el nombre preprogramado del canal que desea cambiar,
luego oprima SELECT/SCRAM. EDIT aparecerá en
la pantalla. Luego oprima SELECT/SCRAM.
5. Oprima varias veces o para seleccionar el primer
carácter del nombre que desea asignar al canal,
luego oprima SELECT/SCRAM para registrarlo.
Las opciones de la programación
45
Page 46

6. Repita el quinto paso para cada carácter del nombre
(hasta 12 caracteres). Si el nombre del canal tiene
menos de 12 caracteres, oprima varias veces
SELECT/SCRAM. Después de insertar el último
carácter, la pantalla mostrará YES.
7. Oprima SELECT/SCRAM para confirmar el nombre
del canal insertado. De otra manera, para cancelar la
entrada, oprima varias veces o hasta que NO
aparezca y luego oprima SELECT/SCRAM.
8. Oprima los pasos del 4-5 para cambiar otro nombre.
Ajuste de la hora local
Esta opción le permite ajustar la hora local por hasta una
hora para cualquier localidad en Norte América.
1. Oprima varias veces MENU. El menú principal aparecerá en la pantalla. Luego oprima SELECT/SCRAM.
2. Oprima varias veces o hasta que SETUP
aparezca, luego oprima SELECT/SCRAM.
3. Oprima varias veces o hasta que GPS SETUP
aparezca, luego oprima SELECT/SCRAM.
4. Oprima varias veces o hasta que TIME ADJUST
aparezca, y luego oprima SELECT/SCRAM.
5. Oprima varias veces o para ajustar la hora, luego
oprima SELECT/SCRAM. SET aparecerá en la pantalla.
6. Oprima SELECT/SCRAM.
Activación y desactivación de la
compensación de la hora
1. Oprima brevemente MENU. El menú principal aparecerá en la pantalla. Luego oprima SELECT/SCRAM.
2. Oprima varias veces o hasta que SETUP
aparezca, luego oprima SELECT/SCRAM.
3. Oprima varias veces o hasta que GPS SETUP
aparezca, luego oprima SELECT/SCRAM.
4. Oprima varias veces o hasta que DAYLITE SAV
aparezca, luego oprima SELECT/SCRAM.
5. Oprima varias veces o hasta que ON aparezca
(para activar el cambio a la hora de verano) u OF
aparezca (para apagar el cambio a la hora de verano),
luego oprima SELECT/SCRAM.
Programación de un código FIPS
Esta opción e permite añadir un código FIPS a la radio, la
cual activará el sistema de la alerta meteorológica SAME
(Codificación del mensaje del área especifico) de la radio.
Usted puede programar hasta 30 códigos FIPS.
46
Las opciones de la programación
Page 47

Para insertar un código FIPS nuevo:
1. Oprima brevemente MENU. El menú principal aparecerá en la pantalla. Luego oprima SELECT/SCRAM.
2. Oprima varias veces o hasta que SETUP
aparezca, luego oprima SELECT/SCRAM.
3. Oprima varias veces o hasta que FIPS aparezca, y
luego oprima SELECT/SCRAM.
4. Oprima varias veces o hasta que NEW aparezca,
y luego oprima SELECT/SCRAM.
5. Oprima varias veces o para seleccionar el
primer número del código FIPS, luego oprima
SELECT/SCRAM para registrarlo.
6. Repita el quinto paso para cada número del código
FIPS. Después de insertar el último número, la pantalla mostrará YES.
7. Oprima SELECT/SCRAM para confirmar el código
FIPS insertado. De otra manera, para cancelar el
código, oprima varias veces o hasta que NO
aparezca y luego oprima SELECT/SCRAM.
8. Repita los pasos del 4-7 para insertar otro código FIPS.
Para cambiar el código FIPS existente:
1. Repita los pasos del 1-3 en esta sección.
2. Oprima varias veces o hasta que el código
deseado aparezca, luego oprima SELECT/SCRAM otra
vez. EDIT aparecerá en la pantalla. Oprima SELECT/
SCRAM. El primer número del código FIPS destellará.
3. Repita los pasos del 5-7 en esta sección ara cambiar
el código FIPS.
El cambio automático de canales
Esta opción le permite activar o apagar el cambio automático
del canal durante una llamada DSC. Usted deseará
hacer esto para prevenir que la radio cambie automáticamente los canales en una situación de emergencia.
1. Oprima brevemente MENU. El menú principal aparecerá en la pantalla. Luego oprima SELECT/SCRAM.
2. Oprima varias veces o hasta que SETUP
aparezca, luego oprima SELECT/SCRAM.
3. Oprima varias veces o hasta que AUTO CH SW
aparezca, luego oprima SELECT/SCRAM.
4. Oprima varias veces o hasta que ON (para activar el cambio automático del canal) u OFF aparezca
(para apagar el cambio automático del canal), y luego
oprima SELECT/SCRAM.
Las opciones de la programación
47
Page 48

La respuesta de posición
Esta opción le permite activar o apagar la respuesta
automática de la posición durante una llamada DSC.
Usted deseará hacer esto para prevenir que la radio envíe
automáticamente su posición cuando otro navío se lo solicite.
1. Oprima brevemente MENU. El menú principal aparecerá en la pantalla. Luego oprima SELECT/SCRAM.
2. Oprima varias veces o hasta que SETUP
aparezca, luego oprima SELECT/SCRAM.
3. Oprima varias veces o hasta que POS REPLY
aparezca, luego oprima SELECT/SCRAM.
4. Oprima varias veces o hasta que ON aparezca
(para activar la respuesta automática de la posición) u
OFF aparezca (para apagar la respuesta automática
de la posición), y luego oprima SELECT/SCRAM.
El MMSI de grupo
Esta opción le permite programar un MMSI de grupo,
para poder hacer una sola llamada a un grupo de navíos.
1. Oprima brevemente MENU. El menú principal aparecerá en la pantalla. Luego oprima SELECT/SCRAM.
2. Oprima varias veces o hasta que SETUP
aparezca, luego oprima SELECT/SCRAM.
3. Oprima varias veces o hasta que GROUP MMSI
aparezca en la pantalla, luego oprima SELECT/SCRAM.
La pantalla mostrará ID y 0, y el segundo 0 destellará.
4. Oprima varias veces o para seleccionar el
segundo número del MMSI de grupo, luego oprima
SELECT/SCRAM para registrarlo.
5. Repita el quarto paso par cada número del MMSI de
grupo. Después de insertar el último número, la pantalla mostrará YES.
6. Oprima SELECT/SCRAM para confirmar el MMSI de
grupo insertado. De otra manera, para cancelar la
entrada, oprima varias veces o hasta que la
pantalla muestre NO y luego oprima SELECT/SCRAM.
Configuración del codificador
Esta opción le permite usar el micrófono con un codificador instalado en la radio. Usted debe conectar la tarjeta
codificadora opcional con la radio para usar esta opción.
1. Oprima brevemente MENU. El menú principal aparecerá en la pantalla. Luego oprima SELECT/SCRAM.
2. Oprima varias veces o hasta que SETUP
aparezca, luego oprima SELECT/SCRAM.
48
Las opciones de la programación
Page 49

3. Oprima varias veces o hasta que SCRAMBLE
aparezca, luego oprima SELECT/SCRAM. Un número
destellará.
4. Oprima varias veces o para seleccionar el
código del codificador, luego oprima SELECT/
SCRAM para registrarlo. La pantalla mostrará YES.
5. Oprima SELECT/SCRAM para confirmar código del
codificador insertado. De otra manera, para cancelar
el código del codificador, oprima varias veces o
hasta que la pantalla muestre NO y luego oprima
SELECT/SCRAM.
Salida
Seleccione esta opción para salir de las opciones de la programación volver a la pantalla de la exhibición de los canales.
1. Oprima brevemente MENU. El menú principal aparecerá en la pantalla. Luego oprima SELECT/SCRAM.
2. Oprima varias veces o hasta que SETUP
aparezca, luego oprima SELECT/SCRAM.
3. Oprima varias veces o hasta que EXIT
aparezca, luego oprima SELECT/SCRAM.
Utilización de las opciones del sistema
Utilización de las opciones del sistema
Esta sección detalla la operación de las opciones del
sistema del micrófono. Estas opciones se cambian
normalmente basándose en las condiciones y
preferencias locales.
Ajuste del contraste
Esta opción le permite cambiar el contraste de la pantalla
del micrófono. Usted puede ajustar solamente el contraste
para el micrófono que está usando. Este ajuste no afectará
el contraste de la radio principal u de los otros micrófonos.
1. Oprima MENU, oprima repetidas veces o
hasta que LOCAL MENU aparezca, luego oprima
SELECT/SCRAM.
2. Oprima repetidas veces o hasta que CONTRAST
aparezca, luego oprima SELECT/SCRAM.
3. Oprima repetidas veces o para ajustar el
contraste a un nivel confortable, luego oprima
SELECT/SCRAM.
Ajuste del sonido de los botones
Esta opción le permite activar los sonidos que los botones
emiten cuando usted los activa o desactiva.
Utilización de las opciones del sistema
49
Page 50

1. Oprima MENU, oprima repetidas veces o
hasta que LOCAL MENU aparezca, luego oprima
SELECT/SCRAM.
2. Oprima repetidas veces o hasta que KEY
BEEP aparezca, luego oprima SELECT/SCRAM.
3. Oprima repetidas veces o hasta que ON
aparezca (para activar el cambio automático del
canal) u OF (para apagar el cambio automático del
canal), luego oprima SELECT/SCRAM.
Ajuste del nivel de la sensibilidad VOX
1. Para ajustar el nivel de la sensibilidad VOX, oprima
MENU, oprima repetidas veces o hasta que
LOCAL MENU aparezca y luego oprima SELECT/SCRAM.
2. Oprima repetida veces o hasta que VOX
LEVEL aparezca, y luego oprima SELECT/SCRAM.
3. Oprima repetidas veces o para seleccionar el
nivel deseado (1, 2, 3, u OFF). Luego oprima
SELECT/SCRAM.
Programación del ID de la base y del
micrófono
1. Para programar el ID de la base o del micrófono, oprima
MENU, oprima repetidas veces o hasta que
LOCAL MENU aparezca, luego oprima
SELECT/SCRAM.
2. Oprima repetidas veces o hasta que ID SETTING
aparezca, luego oprima SELECT/SCRAM.
3. Oprima repetidas veces o para seleccionar el
ID que desea programar (ID de la base o ID del
micrófono). Luego oprima SELECT/SCRAM.
4. Oprima repetidas veces o para seleccionar el
ID deseado (00-99 para la base ó 1-4 para el
micrófono). Luego oprima SELECT/SCRAM.
Cuidado y mantenimiento
Su micrófono inalámbrico WHAMx4 es un instrumento
electrónico de precisión y usted lo deberá tratar de acuerdo
a ello. Debido a su diseño duro, requiere poco mantenimiento.
Sin embargo, unas cuantas precauciones se deben observar.
• Si el micrófono ha sido dañado, usted no deberá
• Usted es responsable de que su radio continué
• Se le recomienda que lleve su radio periódicamente a
50
Cuidado y mantenimiento
transmitir excepto en caso de una emergencia.
cumpliendo con los requisitos de la FCC.
un agente de Uniden para ser examinada.
Cuidado y mantenimiento
Page 51

Apéndice
Información de referencia
Apéndice
Frecuencias de los Estados Unidos/
internacionales/ del Canadá
Ch. No. US CAN INT
1”A” X
3”A” X
5”A” X
6X
7”A” X
8X
9X
10 X
11 X
12 X
13 X
14 X
15 X
16 X
17 X
18”A” X
19”A” X
20”A” X
21”A” X
22”A” X
23”A” X
24 X
25 X
26 X
27 X
28 X
61”A” X
63”A” X
64”A” X
65”A” X
66”A” X
67 X
68 X
69 X
70 X
71 X
72 X
73 X
74” X
75 X
76 X
77 X
78”A” X
79”A” X
80”A” X
81”A” X
82”A” X
83”A” X
84” X
85 X
86 X
87 X
88 X
88”A” X
1X
2X
3X
4”A” X
5”A” X
6X
7”A” X
8X
9X
10 X
11 X
12 X
13 X
14 X
15 X
16 X
17 X
18”A” X
19”A” X
20 X
21”A” X
22”A” X
23 X
24 X
25 X
26 X
27 X
28 X
60 X
61”A” X
62”A” X
64 X
64”A” X
65”A” X
Apéndice
TX Status Full Name 12-Character Name
RX
156.0500 Simplex V ESSEL TRAFFIC SYSTEM/
156.0500
156.1500 Simplex CO AST GUARD, GOVT ONLY CG ONLY
156.1500
156.2500 Simplex V ESSEL TRAFFIC SYSTEM/
156.2500
156.3000 Simplex I NTER-SHIP SAFETY SAFETY
156.3000
156.3500 Simplex CO MMERCIAL COMMERCIAL
156.3500
156.4000 Simplex CO MMERCIAL COMMERCIAL
156.4000
156.4500 Simplex NO N COMMERCIAL NON COMMERCL
156.4500
156.5000 Simplex CO MMERCIAL COMMERCIAL
156.5000
156.5500 Simplex V ESSEL TRAFFIC SYSTEM VSL TRAFF IC
156.5500
156.6000 Simplex V ESSEL TRAFFIC SYSTEM VSL TRAFF IC
156.6000
156.6500 Simplex, 1WBRIDGE TO BRIDGE BRDG TO BRDG
156.6500
156.7000 Simplex V ESSEL TRAFFIC SYSTEM VSL TRAFF IC
156.7000
Inhibit Rec eive
156.7500
156.8000 Simplex DI STRESS, SAFETY, CALLING DITRESS
156.8000
156.8500 Simplex, 1WGOVT MARITIME CONTROL GOVERNMENT
156.8500
156.9000 Simplex CO MMERCIAL COMMERCIAL
156.9000
156.9500 Simplex CO MMERCIAL COMMERCIAL
156.9500
157.0000 Simplex P ORT OPERATION PORT OPERATN
157.0000
157.0500 Simplex CO AST GUARD ONLY COAST GUARD
157.0500
157.1000 Simplex CO AST GUARD COAST GUARD
157.1000
157.1500 Simplex CO AST GUARD ONLY COAST GUARD
157.1500
157.2000 Duplex MARINE OPERATOR MAR OPERATOR
161.8000
157.2500 Duplex MARINE OPERATOR MAR OPERATOR
161.8500
157.3000 Duplex MARINE OPERATOR MAR OPERATOR
161.9000
157.3500 Duplex MARINE OPERATOR MAR OPERATOR
161.9500
157.4000 Duplex MARINE OPERATOR MAR OPERATOR
162.0000
156.0750 Simplex CO AST GUARD COAST GUARD
156.0750
156.1750 Simplex V ESSEL TRAFFIC SYSTEM VSL TRAFF IC
156.1750
156.2250 Simplex CO MMERCIAL COMMERCIAL
156.2250
156.2750 Simplex P ORT OPERATION PORT OPERATN
156.2750
156.3250 Simplex P ORT OPERATION PORT OPERATN
156.3250
156.3750 Simplex, 1WBRIDGE TO BRIDGE BRDG TO BRDG
156.3750
156.4250 Simplex NO N COMMERCIAL NON COMMERCL
156.4250
156.4750 Simplex NO N COMMERCIAL NON COMMERCL
156.4750
Inhibit Rec eive
156.5250
156.5750 Simplex NO N COMMERCIAL NON COMMERCL
156.5750
156.6250 Simplex NO N COMMERCIAL
156.6250
156.6750 Simplex P ORT OPERATION PORT OPERATN
156.6750
156.7250 Simplex P ORT OPERATION PORT OPERATN
156.7250
156.775 Simplex, 1WPORT OPERATION PORT OPERATN
156.775
156.825 Simplex, 1WPORT OPERATION PORT OPERATN
156.825
156.8750 Simplex, 1WPORT OPERATION
156.8750
156.9250 Simplex NO N COMMERCIAL NON COMMERCL
156.9250
156.9750 Simplex CO MMERCIAL COMMERCL
156.9750
157.0250 Simplex CO MMERCIAL‘ COMMERCIAL
157.0250
157.0750 Simplex CO AST GUARD COAST GUARD
157.0750
157.1250 Simplex CO AST GUARD COAST GUARD
157.1250
157.1750 Simplex G OVERNMENT GOVERNMENT
157.1750
157.2250 Duplex MARINE OPERATOR MAR OPERATOR
161.8250
157.2570 Duplex MARINE OPERATOR MAR OPERATOR
161.8750
157.3250 Duplex MARINE OPERATOR MAR OPERATOR
161.9250
157.3750 Duplex MARINE OPERATOR MAR OPERATOR
161.9750
157.4250 Duplex MARINE OPERATOR MAR OPERATOR
162.0250
157.4250 Simplex CO MMERCIAL (SHIP-SHIP) COMMERCIAL
157.4250
156.0500 Duplex MARINE OPERATOR MAR OPERATOR
160.6500
156.1000 Duplex MARINE OPERATOR MAR OPERATOR
160.7000
156.1500 Duplex MARINE OPERATOR MAR OPERATOR
160.7500
156.2000 Simplex CA NADIAN COAST GUARD CO AST GUARD
156.2000
156.2500 Simplex V ESSEL TRAFFIC SYSTEM VSL TRAFF IC
156.2500
156.3000 Simplex I NTER-SHIP SAFETY SAFETY
156.3000
156.3500 Simplex CO MMERCIAL COMMERCIAL
156.3500
156.4000 Simplex CO MMERCIAL COMMERCIAL
156.4000
156.4500 Simplex B OATER CALLING CHANNEL CALLING
156.4500
156.5000 Simplex CO MMERCIAL COMMERCIAL
156.5000
156.5500 Simplex V ESSEL TRAFFIC SYSTEM VSL TRAFF IC
156.5500
156.6000 Simplex V ESSEL TRAFFIC SYSTEM VSL TRAFF IC
156.6000
156.6500 Simplex, 1WBRIDGE TO BRIDGE BRDG TO BRDG
156.6500
156.7000 Simplex V ESSEL TRAFFIC SYSTEM VSL TRAFF IC
156.7000
156.7500 Simplex E NVIRONMENTAL ENVIRONMENTL
156.7500
156.8000 Simplex DI STRESS, SAFETY, CALLING DITRESS
156.8000
156.8500 Simplex, 1WSTATE CONTROL STATE CNTRL
156.8500
156.9000 Simplex CO MMERCIAL COMMERCIAL
156.9000
156.9500 Simplex CA NADIAN COAST GUARD CO AST GUARD
156.9500
157.0000 Duplex, 1W PORT OPERATION PORT OPERATN
161.6000
157.0500 Simplex CA NADIAN COAST GUARD CO AST GUARD
157.0500
157.1000 Simplex CA NADIAN COAST GUARD CO AST GUARD
157.1000
157.1500 Duplex CANADIAN COAST GUARD COAST GUARD
161.7500
157.2000 Duplex MARINE OPERATOR MAR OPERATOR
161.8000
157.2500 Duplex MARINE OPERATOR MAR OPERATOR
161.8500
157.3000 Duplex MARINE OPERATOR MAR OPERATOR
161.9000
157.3500 Duplex MARINE OPERATOR MAR OPERATOR
161.9500
157.4000 Duplex MARINE OPERATOR MAR OPERATOR
162.0000
156.0250 Duplex MARINE OPERATOR MAR OPERATOR
160.6250
156.0750 Simplex CA NADIAN COAST GUARD CO AST GUARD
156.0750
156.1250 Simplex CA NADIAN COAST GUARD CO AST GUARD
156.1250
156.2250 Duplex MARINE OPERATOR MAR OPERATOR
160.8250
156.2250 Simplex M ARINE OPERATOR MAR OPERATOR
156.2250
156.2750 Simplex S EARCH AND RESCUE S RCH RESCUE
156.2750
COMMERCIAL
COMMERCIAL
ENVIRONMENTAL ENVIRONMENTL
Only
DIGITAL SELECTIVE CALLING DSC REC O NLY
Only
(SHIP-SHIP)
(SHIP-SHIP)
VTS/COMMERCL
VTS/COMMERCL
NON COMMERCL
PORT OPERATN
51
Page 52

Ch. No. US CAN INT
66”A” X
67 X
68 X
69 X
70 X
71” X
72 X
73 X
74 X
77 X
78”A” X
79”A” X
80”A” X
81”A” X
82”A” X
83” X
83”A” X
84 X
85 X
86 X
87 X
88 X
1X
2X
3X
4X
5X
6X
7X
8X
9X
10 X
11 X
12 X
13 X
14 X
15 X
16 X
17 X
18 X
19 X
20 X
21 X
22 X
23 X
24 X
25 X
26 X
27 X
28 X
60 X
61 X
62 X
63 X
64 X
65 X
66 X
67 X
68 X
69 X
70 X
71 X
72 X
73 X
74 X
77 X
78 X
79 X
80 X
81 X
82 X
83 X
84 X
85 X
86 X
87 X
88 X
TX Status F ull Name 12-Character Name
RX
156.3250 Simplex, 1WPORT OPERATION PORT OPERATN
156.3250
156.3750 Simplex BRIDGE TO BRIDGE BRDG TO BRDG
156.3750
156.4250 Simplex NON COMMERCIAL NON COMMERCL
156.4250
156.4750 Simplex NON COMMERCIAL NON COMMERCL
156.4750
Inhibit Receive
156.5250
156.5750 Simplex NON COMMERCIAL NON COMMERCL
156.5750
156.6250 Simplex NON COMMERCIAL NON COMMERCL
156.6250
156.6750 Simplex PORT OPERATION PORT OPERATN
156.6750
156.7250 Simplex PORT OPERATION PORT OPERATN
156.7250
156.8750 Simplex, 1WPORT OPERATION PORT OPERATN
156.8750
156.9250 Simplex INTER SHIP INTER SHIP
156.9250
156.9750 Simplex INTER SHIP INTER SHIP
156.9750
157.0250 Simplex INTER SHIP INTER SHIP
157.0250
157.0750 Simplex CANADIAN COAST GOARD COAST GUARD
157.0750
157.1250 Simplex CANADIAN COAST GUARD COAST GUARD
157.1250
157.1750 Duplex CANADIAN COAST GO ARD COAST GOARD
161.7750
157.1750 Simplex CANADIAN COAST GOARD COAST GOARD
157.1750
157.2250 Duplex MARINE OPERATOR MAR OPERATOR
161.8250
157.2750 Duplex MARINE OPERATOR MAR OPERATOR
161.8750
157.3250 Duplex MARINE OPERATOR MAR OPERATOR
161.9250
157.3750 Duplex MARINE OPERATOR MAR OPERATOR
161.9750
157.4250 Duplex MARINE OPERATOR MAR OPERATOR
162.0250
156.0500 Duplex MARINE OPERATOR MAR OPERATOR
160.6500
156.1000 Duplex MARINE OPERATOR MAR OPERATOR
160.7000
156.1500 Duplex MARINE OPERATOR MAR OPERATOR
160.7500
156.2000 Duplex MARINE OPERATOR MAR OPERATOR
160.8000
156.2500 Duplex MARINE OPERATOR MAR OPERATOR
160.8500
156.3000 Simplex INTER-SHIP SAFETY SAFETY
156.3000
156.3500 Duplex MARINE OPERATOR MAR OPERATOR
160.9500
156.4000 Simplex COMMERCIAL (SHIP-SHIP) COMMERCIAL
156.4000
156.4500 Simplex BOATER CALLING CHANNEL CALLING
156.4500
156.5000 Simplex COMMERCIAL CO MMERCIAL
156.5000
156.5500 Simplex VESSEL TRAFFIC SYSTEM VSL TRAFFIC
156.5500
156.6000 Simplex VESSEL TRAFFIC SYSTEM VSL TRAFFIC
156.6000
156.6500 Simplex BRIDGE TO BRIDGE BRDG TO BRDG
156.6500
156.7000 Simplex VESSEL TRAFFIC SYSTEM VSL TRAFFIC
156.7000
156.7500 Simplex, 1WENVIRONMENTAL ENVIRONMENTL
156.7500
156.8000 Simplex DISTRESS, SAFETY, CALLING DITRESS
156.8000
156.8500 Simplex, 1WGOVT MARINE CONTROL GOVERNMENT
156.8500
156.9000 Duplex PORT OPERATION PORT OPERATN
161.5000
156.9500 Duplex COMMERCIAL COMMERCIAL
161.5500
157.0000 Duplex PORT OPERATION PORT OPERATN
161.6000
157.0500 Duplex PORT OPERATION PORT OPERATN
161.6500
157.1000 Duplex PORT OPERATION PORT OPERATN
161.7000
157.1500 Duplex MARINE OPERATOR MAR OPERATOR
161.7500
157.2000 Duplex MARINE OPERATOR MAR OPERATOR
161.8000
157.2500 Duplex MARINE OPERATOR MAR OPERATOR
161.8500
157.3000 Duplex MARINE OPERATOR MAR OPERATOR
161.9000
157.3500 Duplex MARINE OPERATOR MAR OPERATOR
161.9500
157.4000 Duplex MARINE OPERATOR MAR OPERATOR
162.0000
156.0250 Duplex MARINE OPERATOR MAR OPERATOR
160.6250
156.0750 Duplex MARINE OPERATOR MAR OPERATOR
160.6750
156.1250 Duplex MARINE OPERATOR MAR OPERATOR
160.7250
156.1750 Duplex MARINE OPERATOR MAR OPERATOR
160.7750
156.2250 Duplex MARINE OPERATOR MAR OPERATOR
160.8250
156.2750 Duplex MARINE OPERATOR MAR OPERATOR
160.8750
156.3250 Duplex MARINE OPERATOR MAR OPERATOR
160.9250
156.3750 Simplex BRIDGE TO BRIDGE BRDG TO BRDG
156.3750
156.4250 Simplex NON COMMERCIAL NON COMMERCL
156.4250
156.4750 Simplex NON COMMERCIAL NON COMMERCL
156.4750
Inhibit Receive
156.5250
156.5750 Simplex NON COMMERCIAL NON COMMERCL
156.5750
156.6250 Simplex NON COMMERCIAL NON COMMERCL
156.6250
156.6750 Simplex PORT OPERATION PORT OPERATN
156.6750
156.7250 Simplex PORT OPERATION PORT OPERATN
156.7250
156.8750 Simplex PORT OPERATION
156.8750
156.9250 Duplex PORT OPERATION PORT OPERATN
161.5750
156.9750 Duplex PORT OPERATION PORT OPERATN
161.5750
157.0250 Duplex PORT OPERATION PORT OPERATN
161.6250
157.0750 Duplex PORT OPERATION PORT OPERATN
161.6750
157.1250 Duplex PORT OPERATION PORT OPERATN
161.7250
157.1750 Duplex PORT OPERATION PORT OPERATN
161.7750
157.2250 Duplex MARINE OPERATOR MAR OPERATOR
161.8250
157.2750 Duplex MARINE OPERATOR MAR OPERATOR
161.8750
157.3250 Duplex MARINE OPERATOR MAR OPERATOR
161.9250
157.3750 Duplex MARINE OPERATOR MAR OPERATOR
161.9750
157.4250 Duplex MARINE OPERATOR MAR OPERATOR
162.0250
DIGITAL SELECTIVE CALLING DSC REC ONLY
Only
DIGITAL SELECTIVE CALLING DSC REC ONLY
Only
(SHIP-SHIP)
Frecuencias de los canales meteorológicos
Ch. No.
WX01
WX02
WX03
WX04
WX05
WX06
WX07
WX08
WX09
WX10
RX Frequency
162.5500
162.4000
162.4750
162.4250
162.4500
162.5000
162.5250
161.6500
161.7750
163.2750
Description (R eceive Only)
Weather Inform ation (
Weather Inform ation (
Weather Inform ation (
Weather Inform ation (
Weather Inform ation (
Weather Inform ation (
Weather Inform ation (
Weather Inform ation (
Weather Inform ation (
Weather Inform ation (
PORT OPERATN
52
Apéndice
Page 53

Garantía limitada por 3 años
Garante: UNIDEN AMERICA CORPORATION ("Uniden")
Garantía limitada por 3 años
Elementos de la garantía:
Uniden garantiza por tres años, al comerciante original, que este producto,
está libre de defectos en materiales y mano de obra, con sólo las limitaciones o
exclusiones expue stas abajo.
Duración de la garantía:
Esta garantía al usuario original se terminará y no será efectiva después de
36 meses de la venta original. La garantía es inválida si el producto es (A)
dañado o no es mantenido razonablemente o necesariamente, (B) modificado, alterado, o utilizado como parte de equipos de conversión, subconjunto
o cualquier configuración que no sea vendida por Uniden, (C)instalado incorrectamente, (D) mantenido o reparado por alguien que no esté autorizado
por un centro de servicio de Uniden, para un defecto o mal funcionamiento
cubierto por esta garantía, (E) usado en cualquier conjunción con equipos o
partes o como parte de cualquier sistema que no ha sido fabricado por
Uniden, o (F) instalado o programado por cualquiera que no esté incluido en
el manual de operaciones para este producto.
Declaración de remedio:
En el evento de que el producto no cumpla en algún momento con esta
garantía mientras esté en efecto, el garante reparará el defecto y se lo
devolverá a usted, sin cobro por partes, servicio, o cualquier otro coste
(excepto por el transporte y manejo) ocasionado por el garante o sus representantes en conexión con el desempeño de esta garantía. LA GARANTÍA
LIMITADA ESTIPULADA ANTERIORMENTE ES LA GARANTÍA TOTAL Y
EXCLUSIVA PARA ESTE PRODUCTO Y SUSTITUYE Y EXCLUYE TODA
OTRA GARANTÍA, CUALQUIERA QUE SEA SU NATURALEZA, YA SEA
EXPRESA, IMPLÍCITA O QUE SURJA POR APLICACIÓN DE LA LEY,
INCLUYENDO, DE MANERA NO LIMITATIVA TODA GARANTÍA DE COMERCIABILIDAD O APTITUD PARA UN PROPÓSITO EN PARTICULAR.
ESTA GARANTÍA NO CUBRE EL REEMBOLSO NI EL PAGO DE DAÑOS
INCIDENTALES O CONSECUENTES. Algunos estados no permiten esta
exclusión o limitación de daños incidentales o consecuentes; por esta razón
la limitación expuesta arriba, tal vez no tendrá nada que ver en su caso.
Remedios legales:
Esta garantía le da específicos derechos legales, y usted puede que tenga
otros derechos que varían de estado a estado. Esta garantía es nula fuera
de los Estados Unidos de América.
Procedimiento para obtener una garantía de funcionamiento:
Si después de seguir las instrucciones en este manual de instrucciones,
usted está seguro de que el producto es defectuoso, empaque el producto
con cuidado (preferiblemente en su paquete original). Incluya evidencia de la
compra original y una nota describiendo el defecto que le ha causado devolverlo. El producto deberá ser enviado porte pagado y que se pueda trazar, o
entregado al garante en:
Uniden America Corporation
Parts and Service Division
4700 Amon Carter Blvd.
Fort Worth, Tx 76155
(800) 554-3988), 7 de la mañana hasta las 7 de la tarde, hora central, de
lunes a viernes.
Garantía limitada por 3 años
53
Page 54

Renseignements de la FCC/IC
Rens eignement s de la FCC/IC
Cet émetteur radio est conforme à l'article 15 des
Réglements de la FCC. Son fonctionnement est assujetti
aux deux conditions suivantes : (1) cet appareil ne doit
pas causer d'interférences nuisibles, et; (2) cet appareil
doit accepter toutes les interférences qu'il reçoit, incluant
les parasites pouvant nuire à son fonctionnement.
Important : Les changements apportés à cet appareil, s'ils
ne sont pas approuvés par Uniden, risquent de retirer à
son propriétaire son droit de l'utiliser.
Le terme 'IC' figurant avant le numéro d'homologation de
cet émetteur radio signifie simplement que l'appareil
répond aux spécifications techniques d'Industrie Canada.
Son fonctionnement est assujetti aux deux conditions suivantes : (1) cet appareil ne doit pas causer d'interférences
nuisibles, et ; (2) cet appareil doit accepter toutes les
interférences qu'il reçoit, incluant les parasites pouvant
nuire à son fonctionnement.
Renseignements de la FCC se rapportant à
l'exposition aux fréquences radio 'RF'
Avertissement! Veuillez lire ces renseignements avant
d'utiliser cet émetteur radio. Au mois d'août 1996, la
commission fédérale des communications (FCC) des
États-Unis, avec les mesures mises de l'avant dans son
"Rapport et ordonnance 96-326", a adopté des normes
de sécurité révisées pour l'exposition humaine à
l'énergie électromagnétique des fréquences radio, émise
par les transmetteurs réglementés par la FCC.
Ces directives sont en harmonie avec les normes de
sécurité instaurées précédemment par les agences
internationales et américaines responsables des
normes. La conception de cet émetteur radio est
conforme aux directives de la FCC et ces normes
internationales.
54
Renseignements de la FCC/IC
Page 55

Avertissement! L'utilisateur est responsable
d'utiliser adéquatement cet émetteur radio et d'en
garantir une utilisation sécuritaire. Veuillez suivre les
mesures de sécurité ci-dessous :
N'utilisez que l'antenne incluse ou une antenne
certifiée. Les antennes et fixations non autorisées ou
modifiées, risquent d'affecter la qualité des
communications, d'endommager la radio ou d'enfreindre les règlements de la FCC.
N'utilisez pas l'émetteur radio si l'antenne est
endommagée. Si une antenne endommagée entre
en contact avec la peau, une petite brûlure peut
survenir. Veuillez communiquer avec votre marchand afin de vous procurer une antenne de rechange.
Fonctionnement de l'appareil, lorsque porté
sur le corps
Cet appareil a été testé et approuvé pour le port sur le
corps à l'aide de l'attache-ceinture incluse.
Pour conserver la conformité avec les exigences de la
FCC relatives à l'exposition RF, le fonctionnement de
l'appareil lorsque porté sur le corps n'est limité qu'à
l'attache-ceinture incluse.
Pour le fonctionnement portatif, la radio doit être
maintenue à un pouce du visage de l'utilisateur.
L'utilisation d'accessoires qui ne répondent pas à ces
exigences peut ne pas être conforme aux normes de la
FCC relatives à l'exposition RF et devrait être évitée.
Pour plus de renseignements se rapportant à l'exposition
aux fréquences RF, veuillez visiter le site Web de la FCC :
www.fcc.gov.
Renseignements de la FCC/IC
55
Page 56

Table des matières
Introduction .......................................................... 58
Table des matières
Accessoires inclus avec votre microphone .......... 58
Points saillants des fonctions ............................... 59
Comprendre votre microphone ............................ 59
À propos de ce guide ........................................ 59
Comment sont illustrées les commandes du
microphone dans ce guide ................................ 60
Installer le microphone ......................................... 60
Fixer le microphone .......................................... 60
Installer les piles ............................................... 61
Charger les piles ............................................... 62
Aperçu du microphone ...................................... 63
Aperçu de l'affichage ........................................ 65
Fonctionnement de base ..................................... 66
Mettre le microphone en/hors fonction ............. 66
Ajustez le volume et le suppresseur de bruit
de fond 'Squelch’ .............................................. 66
Vérifier le niveau des piles ................................ 66
Utiliser la surveillance triple .............................. 66
Syntoniser les canaux météorologiques ........... 67
Utiliser le mode d'alerte météorologique .......... 67
Utiliser la fonction d'incrémentation des canaux .. 68
Utiliser le balayage des canaux ........................ 68
Entrer les canaux en mémoire .......................... 68
Effacer les canaux de la mémoire .................... 68
Changer le mode des canaux 'UIC' (États-Unis/
internationaux/Canada) .................................... 69
Choisir les options du menu ..............................69
Afficher les données de l'heure/position/cap .... 69
Utiliser le brouilleur ........................................... 69
Utiliser la fonction d'interpellation ..................... 69
Utiliser l'interphone ............................................70
Activer/désactiver le rétroéclairage ................... 70
Utiliser le verrouillage des touches ................... 70
Utiliser l'appel de détresse ................................ 70
56
Table des matières
Page 57

Changer la puissance de transmission à la sortie . 71
Réinitialiser le microphone ................................ 71
Utiliser les options des réglages .......................... 71
Utiliser le répertoire ........................................... 71
Utiliser les étiquettes des canaux ..................... 73
Ajuster l'heure locale ......................................... 73
Activer/désactiver l'heure d'été ......................... 74
Programmer un code 'FIPS' ('Federal Information
Processing Standard': Code des normes
fédérales du traitement des renseignements) .. 74
Utiliser la commutation automatique des canaux .. 75
Utiliser la réponse à la demande de position .... 75
Utiliser un ISMM (numéro d'identification du
service maritime mobile) de groupe .................. 76
Configurer le circuit brouilleur ‘Scrambler’ ........ 76
Utiliser l’option de QUITTER ‘EXIT’ .................. 77
Utiliser les options du système ............................ 77
Ajuster le contraste ........................................... 77
Ajuster le bip à la pression des touches ........... 78
Ajuster le niveau de sensibilité de l'émetteur
commandé par la voix 'VOX’ ............................. 78
Régler l'identification du socle/microphone ....... 78
Soin et entretien ................................................... 79
Appendice ............................................................ 79
Renseignements de référence .......................... 79
Garantie limitée de trois ans ................................ 82
Table des matières
57
Page 58

Introduction
Votre microphone sans fil 2,4 GHz WHAMx4 représente la
Introduction
prochaine génération de microphones sans fil qui tiennent
dans la main et il est compatible avec les nouvelles radios
maritimes d'Uniden. Il est une puissante combinaison de haute
technologie, de robustesse à toute épreuve et de facilité
d'utilisation. Son design est entièrement composé de circuits à
semi-conducteurs et de composants répondant aux normes de
qualité les plus strictes, ce qui le rend totalement compatible
avec l'environnement maritime des plus rudes. L'écran
surdimensionné et les touches rétroéclairées du microphone
facilitent son utilisation, même dans les conditions difficiles
d'éclairage et de météo. Vous pouvez utiliser un maximum de
quatre microphones WHAMx4 avec la même radio maritime.
Il est fortement recommandé de lire attentivement le guide
d'utilisation afin de vous familiariser avec les caractéristiques et
fonctions de votre microphone. Conservez votre facture en
lieu sûr, au cas où vous auriez besoin de service sous garantie.
Les caractéristiques, spécifications et la disponibilité des
accessoires optionnels peuvent changer sans préavis.
Remarque: Votre microphone d'Uniden répond aux normes de
submersibilité 'JIS7' les plus strictes de l'industrie japonaise.
Le socle d'accueil inclus répond aux normes d'étanchéité
'JIS4'. Ceci signifie que le microphone peut être submergé
à une profondeur d'un mètre pendant un maximum de trente
minutes, sans encourir de dommages.
Accessoires inclus avec votre microphone
Microphone
Quincaillerie
de montage
(non illustré)
58
Socle
(assemblé)
Guide
d’utilisation
(non illustré)
Plateau des
piles alcalines
Bloc-piles
Introduction
Dragonne
Page 59

Points saillants des fonctions
Entrée d'interphone - Vous pouvez utiliser le microphone pour
contrôler la radio presque n'importe où à bord de votre navire et
Points saillants des fonctions
chaque utilisateur WHAMx4 peut communiquer ensemble.
Vous pouvez également utiliser la fonction d'interphone de la
radio pour communiquer avec chaque utilisateur WHAMx4.
Vous pouvez utiliser le microphone pour appeler d'un combiné à
un autre, d'un combiné à la radio, d'un combiné à des stations
de base multiples, incluant la radio, le combiné à une deuxième
radio et la radio à un individu, un groupe ou tous les combinés.
Vous pouvez même utiliser une deuxième radio de la station de
base en tant qu'interphone.
Activation vocale 'VOX' - Vous pouvez parler sans appuyer la
touche du micro 'PTT' lorsque vous raccordez un casque
d'écoute au microphone et utilisez le microphone intégré.
Télé-signal du combiné - Vous pouvez envoyer une tonalité au
microphone afin de le retrouver facilement, au cas où vous le
perdriez.
Ajustement du rétroéclairage/éclairage des touches - Vous
pouvez ajuster la luminosité de l'affichage et des touches du
microphone afin de faciliter le visionnement dans les conditions
d'éclairage difficiles.
Ajustement du volume du bip à la pression des touches Vous pouvez ajuster le volume de la tonalité que vous entendez
lorsque vous appuyez sur une touche.
Affichage du niveau des piles - Le microphone affiche l'état
du niveau des piles.
Ajustement du contraste - Vous pouvez ajuster le contraste
de l'affichage afin de faciliter le visionnement dans les conditions d'éclairage difficiles.
Combiné flottant - Le microphone flotte, ce qui vous permet de
le récupérer facilement si vous l'échappez dans l'eau.
Comprendre votre microphone
À propos de ce guide
Les affichages des écrans de ce guide sont des représentations
de ce qui peut apparaître lorsque vous utilisez votre microphone. Puisque ce que vous voyez dépend des fréquences
offertes dans votre région et les réglages sélectionnés, vous
pourrez remarquer quelques différences entre ce qui est illustré
dans les présentes et ce qui apparaît à l'affichage de votre
microphone. Les touches sur lesquelles vous appuyez seront
illustrées en caractères gras à l'affichage.
Points saillants des fonctions
59
Page 60

Comment sont illustrées les commandes du
Installer le microphone
microphone dans ce guide
Pour vous aider à naviguer à travers les menus de la radio, les
étapes illustrées dans ce guide décrivent les affichages que vous
voyez et les touches sur lesquelles vous devez appuyer ou les
commandes que vous devez activer pour obtenir le résultat
désiré.
Installer le microphone
Fixer le microphone
Vous pouvez fixer le socle d'accueil du microphone sur toute
surface de montage convenable, telle que la cloison transversale, la passerelle haute ou la table des cartes marines. Une
source d'alimentation de 12 V CC doit être à proximité de la surface de montage que vous choisissez.
Étant donné que le socle d'accueil ne possède pas d'interrupteur de mise en marche/arrêt, vous devrez le raccorder directement à une source d'alimentation telle que la batterie du bateau
ou à une borne du tableau de distribution de puissance qui
reçoit le courant sans arrêt.
Avertissement : Veuillez éloigner les objets métalliques du
chargeur WHAMx4.
1. Raccordez les câbles situés à l'arrière du socle d'accueil
à une batterie de 12 volts. Vous pouvez prolonger le
câble au besoin, mais vous devez observer la polarité correspondante (le rouge est le positif et le noir, le négatif).
2. Raccordez le câble noir à la borne négative (-) de la batterie.
3. Raccordez le câble rouge à la borne positive (+) de la batterie.
4. Assurez-vous que les raccords sont propres et solides
afin qu'ils ne créent pas de vibrations en se desserrant
pendant le fonctionnement du bateau. Occasionnellement, nettoyez toute accumulation de la corrosion sur les
bornes de la batterie.
5. À l'aide des vis, vissez solidement l'arrière du
socle d'accueil sur la surface de montage,
puis insérez, en appliquant une
légère pression, la partie avant du
socle sur la partie arrière.
6. Glissez le microphone sur le socle afin de le
solidifier et chargez ses piles.
Vis de
montage
60
Installer le microphone
Page 61

Pour retirer le socle d'accueil de son
emplacement de montage, utilisez
un tournevis plat pour soulever la
partie supérieure du couvercle
arrière. Ensuite, desserrez la vis
sur le couvercle arrière.
Soulever ici
Installer les piles
Votre microphone est alimenté par pile rechargeable
(incluses). Vous pouvez également utiliser trois piles 'AAA'
alcalines rechargeables (optionnelles).
1. Utilisez une pièce de monnaie pour
dévisser l'attache-ceinture à l'arrière
du microphone puis soulevez les
attaches du boîtier, des deux côtés
du microphone.
Connecteur
de pile
2. Soulevez le couvercle par-dessus le
compartiment du bloc-piles
3. Si vous installez des piles
'AAA' dans le support de
piles inclus, assurez-vous
d'apparier les polarités (+/-)
à l'intérieur du compartiment. Sinon, insérez la fiche du bloc-piles
rechargeable inclus dans le connecteur, à l'intérieur
du compartiment.
4. Replacez le couvercle du compartiment des piles.
Mise en garde : Assurez-vous que la pièce de
caoutchouc à l'intérieur du compartiment des piles
soit propre et qu'elle scelle entièrement le
compartiment. Ceci empêche l'eau de pénétrer à
l'intérieur du microphone.
5. Appuyez sur les deux attaches du boîtier vers le bas,
puis réinstallez l'attache-ceinture.
Rechargez les piles lorsque le microphone cesse de
fonctionner ou si sa portée diminue.
Attaches du boîtier
Installer le microphone
61
Page 62

Charger les piles
Avant d'utiliser des piles rechargeables, vous devez les
recharger.
Le microphone est doté d'un circuit intégré qui vous permet
de recharger les piles pendant qu'elles sont dans le microphone. Pour charger les piles, installez celles-ci dans le
microphone, puis glissez-le dans le socle d'accueil inclus.
AVERTISSEMENT!
Avant d'utiliser les piles rechargeables pour la première
fois, chargez-les pendant 14 heures afin de leur donner
une pleine charge. Il faut environ 14 heures pour
recharger pleinement les piles déchargées.
Mise en garde : Afin d'assurer une charge adéquate et
éviter le retrait accidentel du combiné, verrouillez toujours
celui-ci solidement dans le chargeur.
Suppression de l'émission acoustique du
moteur
Les interférences générées par les bruits des systèmes
électriques des moteurs peuvent parfois causer des
problèmes aux microphones. Votre microphone a été
conçu pour être entièrement invulnérable aux bruits d'allumage et aux bruits d'alternateur. Toutefois, dans certaines
installations, il peut être nécessaire de prendre d'autres
mesures préventives pour réduire davantage l'effet des
interférences.
Dans les cas où les problèmes de parasites sont très
sérieux, il se peut que vous deviez installer une trousse de
suppression des bruits. Pour plus de renseignements à ce
sujet, communiquez avec le marchand qui vous a vendu le
microphone.
62
Installer le microphone
Page 63

Aperçu du microphone
2
12
14
8
1
3
13
6
9
7
5
POWER/VOLUME - Tenez cette touche enfoncée pendant
1
10
11
4
deux secondes afin de mettre le microphone en marche/arrêt.
Appuyez brièvement sur celui-ci pour choisir le mode de
réglage du volume.
2
VOYANT À DEL - Le voyant à DEL, situé à l'avant, s'allume
en vert lorsque le microphone reçoit une transmission, en
rouge lorsqu'il transmet et en orange lorsque le microphone
est en mode de recharge.
- Appuyez pour défiler vers le haut à travers les
3
canaux et les options du menu. Tenez la touche enfoncée
pour augmenter la vitesse de défilement.
- Appuyez pour défiler vers le bas à travers les canaux
et les options du menu. Tenez la touche enfoncée pour
augmenter la vitesse de défilement.
MENU HI/LO - Appuyez pour entrer dans le mode du
4
menu et pour quitter celui-ci. Tenez la touche enfoncée pour
changer la puissance de transmission de la position élevée
'HI' à faible 'LO'. Tenez-la de nouveau enfoncée pour
changer la puissance de transmission à la position élevée.
SELECT/SCRAM - Appuyez, en mode de canal normal,
5
afin d'afficher l'heure, la date, la latitude, la longitude, la
Installer le microphone
63
Page 64

vitesse sur route 'SOG' et le cap au sol 'COG'. Appuyez sur le
mode du menu afin de choisir les options du menu. Tenez la
touche enfoncée afin d'activer le brouilleur pour le canal en cours.
6
16/9/TRIPLE WATCH - Appuyez sur cette touche pour
syntoniser rapidement le canal 9 et le canal 16, ainsi que pour
utiliser la surveillance triple.
7
HAIL/INTERCOM - Appuyez pour activer ou désactiver le
dispositif d'interpellation. Tenez la touche enfoncée pendant
deux secondes afin d'utiliser la fonction d'interphone de la radio.
8
SQUELCH/BATTERY - Appuyez pour activer la com-
mande de suppression du bruit de fond 'Squelch'. Tenez la
touche enfoncée pour afficher le niveau d'alimentation des piles.
9
STEP/SCAN - Tenez la touche enfoncée afin d'effectuer
un balayage des canaux en mémoire.
10
MEM/UIC - Appuyez pour ajouter le canal en cours de
syntonisation dans la mémoire de balayage. Appuyez de
nouveau pour effacer celui-ci de la mémoire de balayage.
Tenez cette touche enfoncée pour changer le mode 'UIC'.
11
WX/ALERT - Appuyez pour entendre le canal de météo
actif dans votre région. Tenez la touche enfoncée afin de
régler la radio au mode d'alerte météo.
12
PTT - Appuyez pour envoyer une transmission.
13
DISTRESS - Tenez cette touche enfoncée pendant 5
secondes afin d'envoyer un appel de détresse. Le
microphone effectue un compte à rebours pendant l'appel de
détresse. Si vous relâchez la touche DISTRESS avant la fin
du compte à rebours, l'appel de détresse est annulé
automatiquement.
14
LIGHT/LOCK - Appuyez successivement pour changer le
niveau de rétroéclairage de l'affichage et du clavier des
touches. Appuyez de nouveau lorsque le rétroéclairage est
réglé à son niveau le plus élevé afin de désactiver le
rétroéclairage.
Tenez la touche enfoncée pendant deux secondes afin
d'activer le verrouillage des touches. Toutes les touches sont
verrouillées, à l'exception de PTT. Pour déverrouiller le
clavier des touches, appuyez sur DISTRESS, tenez enfoncée
LIGHT/LOCK pendant deux secondes ou mettez le
microphone hors fonction, puis de nouveau en marche.
64
Installer le microphone
Page 65

Aperçu de l'affichage
- Apparaît pendant que le microphone transmet.
DSC - Apparaît lorsque le microphone est en mode
d'appel sélectif numérique 'ASN', incluant la réception des
appels ASN. Il indique également que le microphone est
raccordé à la radio principale (par les fréquences RF).
L'indication DSC clignote lorsque le microphone est
presque hors de portée ou complètement hors de portée.
LO - Indique que la puissance de transmission est réglée
à 1 watt sur le canal de sortie.
HI - Indique que la puissance de transmission est réglée à
25 watts sur le canal de sortie.
TRI - Apparaît lorsque le microphone syntonise un canal
actif et qu'il surveille le canal 16 et le canal 9. Il apparaît
également si vous surveillez le canal météo.
U I C - Affiche le mode du canal (États-Unis, international
ou Canada)
MEM - Indique si un canal a été placé dans la mémoire de
balayage des canaux.
WX - Apparaît lorsque le microphone est en mode de météo.
- Indique qu'un récepteur GPS est raccordé au
microphone.
- Clignote lorsque les données GPS en cours de
réception sont valides.
- Apparaît lorsque le microphone est en communication
avec la radio principale (par fréquences radio). clignote
lorsqu'un autre microphone est en cours d'utilisation.
Installer le microphone
65
Page 66

Fonctionnement de base
Fonctionnement de base
Mettre le microphone en marche-arrêt
Appuyez sur la touche POWER/VOLUME pendant
environ 2 secondes. Si la radio principale se met en
marche, le canal qui apparaît sur le microphone est le
canal en cours de sélection sur celle-ci. Tenez de
nouveau la touche POWER/VOLUME enfoncée pendant
environ 2 secondes afin de mettre le microphone hors
fonction.
Ajuster le volume et le suppresseur de bruit
de fond 'Squelch'
Appuyez brièvement sur POWER/VOLUME, puis
successivement sur afin d'augmenter le volume ou sur
pour l e diminuer. Appuyez brièvement sur POWER/VOLUME
pour mettre le mode de volume hors fonction.
Pour ajuster le suppresseur de bruit de fond, appuyez
brièvement sur SQUELCH/BATTERY, puis successivement
sur afin d'augmenter le niveau du suppresseur ou sur
pour le diminuer. Appuyez brièvement sur PTT,
16/9/TRIPLE WATCHou sur DISTRESS pour mettre le
mode du suppresseur hors fonction.
Vérifier le niveau des piles
Maintenez la touche SQUELCH/BATTERY enfoncée
pendant environ deux secondes. Un chiffre situé entre 0
et 4 apparaîtra à l’affichage (0 signifie que le niveau est
faible et 4 signifie que le niveau est plein) indiquant le
niveau de la pile. Si 0 apparaît, la
pas suffisamment d'autonomie pour fonctionner. Appuyez
brièvement sur n'importe quelle touche puor désactiver le
mode des piles.
WHAMx4 ne possède
Utiliser la surveillance triple
Syntonisez un canal autre que le canal 9 ou 16, puis
tenez la touche 16/9/TRIPLE WATCH enfoncée pendant
environ 2 secondes; l'indication TRI apparaît et la radio
surveille le canal 16 à toutes les deux secondes, suivi du
66
Fonctionnement de base
Page 67

canal 9. Ensuite, elle syntonise le canal actif en cours, en
surveillant les trois canaux en ordre.
Remarques :
• Si le canal actif est un canal météo, la radio entre
automatiquement en mode de surveillance triple.
• Si une alerte météo est activée (voir la section
'Syntoniser les canaux météo'), la radio effectue une
syntonisation depuis le canal en cours de
fonctionnement au canal 9, puis au canal 16. La radio
vérifie également le canal météo actif à toutes les 7
secondes afin de détecter la tonalité d'alerte météo.
• Si vous assignez un ou plusieurs codes FIPS et
l'alerte météo est activée, la fonction météo 'SAME' ne
fonctionne pas pendant que la radio est réglée au
mode de surveillance triple. La radio ne recherche
que la tonalité de 1050 Hz.
• La radio active également la surveillance triple lorsque
le balayage des canaux est actif (voir 'Utiliser la
fonction d'incrémentation des canaux' pour plus de
détails à ce sujet).
Syntoniser les canaux météorologiques
Appuyez brièvement sur WX/ALERT afin de syntoniser le
canal météo local actif de la NOAA à partir de n'importe
quel canal. Le numéro du canal météo actif et l'indication
WX apparaîtront.
Pour changer le canal météo, appuyez successivement
sur afin de l'augmenter ou sur pour le diminuer.
La radio retourne toujours au dernier canal météo
sélectionné. Ceci fonctionne même si la radio est mise
hors fonction, puis de nouveau en marche.
Utiliser le mode d'alerte météorologique
Tenez la touche WX/ALERT enfoncée pendant environ 2
secondes. Lorsque la radio est en mode d'alerte météo,
l'icône clignote. Si les codes FIPS sont programmés
(voir 'Programmer un code FIPS' ), l'icône clignote et
la nature de l'alerte apparaît à l'affichage.
Fonctionnement de base
67
Page 68

Utiliser la fonction d'incrémentation des
canaux
Appuyez brièvement sur STEP/SCAN. À chaque
pression de la touche, la radio saute au prochain canal
sauvegardé dans sa mémoire (voir la section 'Entrer les
canaux en mémoire').
Utiliser le balayage des canaux
Tenez la touche STEP/SCAN enfoncée pendant environ 2
secondes. La radio effectue un balayage de tous les
canaux, en commençant par le plus petit numéro de
canal, jusqu'au plus grand. Le numéro du canal apparaît
à l'affichage.
Remarques :
• L'indication TRI apparaît et la radio active la
surveillance triple lorsque le balayage des canaux est
actif. Pendant le balayage des canaux, la radio
surveille automatiquement le canal 16 et le canal 9 à
toutes les deux secondes.
• Tenez la touche 16/9/TRIPLE WATCH enfoncée afin
de sortir la radio du mode de surveillance triple. La
radio continue son balayage.
Entrer les canaux en mémoire
Appuyez brièvement sur MEM/UIC. Le canal affiché est
sauvegardé dans la mémoire de la radio. Lorsqu'un canal
a été programmé dans la mémoire, l'indication MEM
apparaît à l'affichage chaque fois que le numéro du canal
apparaît. Vous pouvez stocker n'importe quel canal à
l'exception d'un canal météo dans la mémoire de la radio.
Appuyez de nouveau brièvement sur MEM/UIC pour
retirer le canal de la mémoire.
Effacer les canaux de la mémoire
Syntonisez le canal que vous désirez effacer, puis
appuyez brièvement sur MEM/UIC. L'indication MEM
disparaît.
68
Fonctionnement de base
Page 69

Changer le mode des canaux UIC
(États-Unis, internationaux et canadiens)
Tenez enfoncée la touche MEM/UIC pendant environ 2
secondes. Le canal UIC actuel (des États-Unis, international ou du Canada) apparaît tandis que vous appuyez
sur MEM/UIC.
Choisir les options du menu
Appuyez brièvement sur SELECT/SCRAM pour choisir
les options du menu.
Afficher les données de l'heure/position/cap
Appuyez brièvement sur SELECT/SCRAM, pendant
qu'un numéro de canal apparaît, afin d'afficher les données suivantes :
• L'heure locale actuelle
• La position actuelle (latitude/longitude)
• La vitesse sur route 'SOG'
• La trajectoire actuelle sur la route 'COG'
Appuyez de nouveau brièvement sur SELECT/SCRAM
afin de mettre le mode d'affichage hors fonction.
Remarque : Les données d'affichage du mode des
canaux apparaissent toujours en premier. Elles
apparaissent lorsque la radio reçoit une transmission
entrante ou lorsque la radio transmet.
Permutez entre les deux affichages en appuyant
successivement sur SELECT/SCRAM à partir de l'écran
d'affichage des canaux.
Utiliser le brouilleur
Tenez la touche SELECT/SCRAM pendant environ 2
secondes. La radio se met en mode de brouillage pour le
canal sélectionné.
Utiliser la fonction d'interpellation 'HAIL'
Appuyez brièvement sur HAIL/INTERCOM. La radio
active son dispositif d'interpellation. Appuyez sur PTT
pour utiliser le dispositif d'interpellation. Appuyez de
nouveau brièvement sur HAIL/INTERCOM pour désactiver le dispositif d'interpellation. Appuyez successive-
Fonctionnement de base
69
Page 70

ment sur pour augmenter ou sur pour diminuer le
volume du dispositif d'interpellation à la sortie. Appuyez
brièvement sur POWER/VOLUME, puis successivement
sur pour augmenter ou sur pour diminuer le volume
du dispositif d'interpellation à l'entrée.
Utiliser l'interphone
Tenez la touche HAIL/INTERCOM enfoncée pendant
environ 2 secondes. La radio active son interphone et
tous les appareils disponibles apparaissent à l'affichage.
Vous pouvez choisir de communiquer avec n'importe quel
appareil affiché.
Activer/désactiver le rétroéclairage
Appuyez successivement sur LIGHT/LOCK pour ajuster
le niveau de rétroéclairage de l'affichage. Appuyez sur
LIGHT/LOCK lorsque le rétroéclairage est réglé à son
niveau le plus élevé pour désactiver le rétroéclairage.
Utiliser le verrouillage des touches
Tenez la touche LIGHT/LOCK enfoncée pendant environ
2 secondes afin d'activer le verrouillage des touches.
Toutes les touches du microphone, sauf PTT, sont
verrouillées. Pour désactiver le verrouillage des touches,
tenez enfoncée la touche LIGHT/LOCK pendant 2
secondes afin de mettre le microphone hors fonction, puis
en marche de nouveau.
Utiliser l'appel de détresse
Pour envoyer un appel de détresse, soulevez la languette
protectrice qui recouvre la touche DISTRESS, puis tenez
enfoncée DISTRESS pendant environ 5 secondes. Vous
entendrez un compte à rebours audible de 5 secondes à
0, tandis que vous tenez la touche DISTRESS enfoncée.
La radio n'enverra pas l'appel de détresse si vous
relâchez la touche DISTRESS avant la fin du compte à
rebours.
70
Fonctionnement de base
Page 71

Changer la puissance de transmission à la
sortie
Tenez la touche MENU/H/L enfoncée pendant environ 2
secondes afin de changer la puissance de transmission
du canal en cours de la position élevée 'HIGH' à faible
'LOW' ou de 'LOW' à 'HIGH'.
Remarque : Vous ne pouvez changer la puissance de
transmission à la sortie que si vous pouvez le faire légalement sur le canal en cours.
Réinitialiser le microphone
Mises en garde :
• La réinitialisation du microphone ne réinitialise pas
l'ISMM de l'utilisateur.
• La réinitialisation du microphone permet de remettre
toutes les fonctions à leurs réglages d'origine.
Pour réinitialiser le microphone, mettez celui-ci hors fonction, puis tenez la touche MENU/H/L pendant que vous le
remettez en marche.
Utiliser les options des réglages
Utiliser les options des réglages
Cette section décrit le fonctionnement des options des
réglages du microphone. Vous réglez normalement ces
options lorsque vous utilisez le microphone pour la
première fois.
Remarques :
• La fonction décrite dans cette secon ne peut être
utilisée avec la radio maritime UM625 d'Uniden. Pour
de détails sur le raccord d'un microphone WHAMx4 à
cette radio, consultez le guide d'utilisation de la radio
UM625.
• Pour plus de détails sur les options que vous changez
le plus souvent, consultez la section "Utiliser les
options du système".
Utiliser le répertoire
Cette option vous permet de configurer un répertoire des
autres navires dotés de radios à capacité ASN. Vous pouvez
configurer le microphone pour qu'il affiche l'ISMM et le
nom d'un autre navire.
Utiliser les options des réglages
71
Page 72

Pour ajouter une nouvelle entrée dans le répertoire :
1. Appuyez brièvement sur MENU. MAIN MENU apparaît.
Appuyez ensuite sur SELECT/SCRAM.
2. Appuyez successivement sur ou , jusqu'à ce que
SETUP apparaisse, puis appuyez sur SELECT/SCRAM.
3. Appuyez successivement sur ou , jusqu'à ce que
DIRECTORY apparaisse, puis appuyez sur SELECT/
SCRAM.
4. Appuyez successivement sur ou , jusqu'à ce que
NEW apparaisse, puis appuyez sur SELECT/SCRAM.
5. Appuyez successivement sur ou afin de choisir
le premier numéro du ISMM de l'utilisateur du navire,
puis appuyez sur SELECT/SCRAM pour l'enregistrer.
6. Répétez l'étape 5 pour chaque numéro que contient
l'ISMM de l'utilisateur, puis appuyez sur SELECT/
SCRAM pour l'enregistrer.
7. Appuyez successivement sur ou pour choisir le
premier caractère du nom que vous désirez assigner au
navire, puis appuyez sur SELECT/SCRAM pour l'enregistrer.
8. Répétez l'étape 7 pour chaque caractère du nom
(jusqu'à 12). Si le nom du navire comporte moins de
12 caractères, appuyez successivement sur SELECT/
SCRAM. Après avoir entré le dernier caractère, l'indication YES (oui) apparaît.
9. Appuyez sur SELECT/SCRAM pour confirmer le nom
que vous avez entré. Sinon, pour annuler l'entrée du
répertoire, appuyez successivement sur ou ,
jusqu'à ce que NO apparaisse, puis choisissez
SELECT/SCRAM.
10. Répétez les étapes 4 à 9 pour entrer un autre navire
dans le répertoire.
Pour changer une entrée déjà enregistrée dans le
répertoire :
1. Répétez les étapes 1 à 3 ci-dessus.
2. Appuyez successivement sur ou , jusqu'à ce
que le nom de l'entrée que vous désirez changer
apparaisse, puis appuyez de nouveau sur SELECT/
SCRAM. L'indication EDIT apparaît. Appuyez sur
SELECT/SCRAM. Le premier caractère du ISMM de
l'utilisateur clignote.
3. Répétez les étapes 5 à 9 pour éditer l'ISMM de l'utilisateur et le nom du navire.
72
Utiliser les options des réglages
Page 73

Utiliser les étiquettes des canaux
Cette option vous permet de changer les noms des canaux
préréglés. Par exemple, ceci peut s'avérer nécessaire si
l'utilisation autorisée d'un canal a changé dans votre région.
1. Appuyez brièvement sur MENU. MAIN MENU apparaît.
Ensuite, appuyez sur SELECT/SCRAM.
2. Appuyez successivement sur ou , jusqu'à ce que
SETUP apparaisse, puis appuyez sur SELECT/SCRAM.
3. Appuyez successivement sur ou , jusqu'à ce que
CH TAG apparaisse, puis appuyez sur SELECT/SCRAM.
4. Appuyez successivement sur ou afin de choisir le
nom du canal préréglé que vous désirez changer, puis
appuyez sur SELECT/SCRAM. L'indication d'édition
EDIT apparaît. Ensuite, appuyez sur SELECT/SCRAM.
5. Appuyez successivement sur ou afin de choisir le
premier caractère du nom que vous désirez assigner au canal,
puis appuyez sur SELECT/SCRAM pour l'enregistrer.
6. Répétez l'étape 5 pour chaque caractère du nom (jusqu'à
12). Si le nom du canal comporte moins de 12 caractères,
appuyez successivement sur SELECT/SCRAM. Après
avoir entré le dernier caractère, l'indication YES (oui)
apparaît.
7. Appuyez sur SELECT/SCRAM pour confirmer le nom
du canal que vous avez entré. Sinon, pour annuler
l'entrée, appuyez successivement sur ou , jusqu'à
ce que NO apparaisse, puis choisissez SELECT/SCRAM.
8. Répétez les étapes 4 à 5 pour changer un autre nom
de canal.
Ajuster l'heure locale
Cette option vous permet d'ajuster l'heure locale avec décalage
maximum d'une heure, pour n'importe quel endroit en
Amérique du Nord.
1. Appuyez brièvement sur MENU. Le MAIN MENU
apparaît. Ensuite, appuyez sur SELECT/SCRAM.
2. Appuyez successivement sur ou , jusqu'à ce que
SETUP apparaisse, puis appuyez sur SELECT/SCRAM.
3. Appuyez successivement sur ou , jusqu'à ce que
GPS SETUP apparaisse, puis appuyez sur SELECT/
SCRAM.
4. Appuyez successivement sur ou , jusqu'à ce que TIME
ADJUST apparaisse, puis appuyez sur SELECT/SCRAM.
5. Appuyez successivement sur ou pour ajuster
l'heure, puis appuyez sur SELECT/SCRAM. L'indication
SET apparaît.
6. Appuyez sur SELECT/SCRAM.
Utiliser les options des réglages
73
Page 74

Activer/désactiver l'heure d'été
1. Appuyez brièvement sur MENU. Le MAIN MENU
apparaît. Ensuite, appuyez sur SELECT/SCRAM.
2. Appuyez successivement sur ou , jusqu'à ce que
SETUP apparaisse, puis appuyez sur SELECT/SCRAM.
3. Appuyez successivement sur ou , jusqu'à ce que
GPS SETUP apparaisse, puis appuyez sur SELECT/
SCRAM.
4. Appuyez successivement sur ou , jusqu'à ce que
DAYLITE SAV apparaisse, puis appuyez sur
SELECT/SCRAM.
5. Appuyez successivemen t sur ou , jusqu'à ce que ON
(pour activer l'heure d'été) ou OF (pour désactiver l'heure
d'été) apparaisse, puis appuyez sur SELECT/SCRAM.
Programmer un code 'FIPS' (Code des
normes fédérales du traitement des
renseignements)
Cette option vous permet d'ajouter un code FIPS à la
radio, qui en retour activera le système d'alerte météo
'SAME' ('Specific Area Message Encoding'). Vous pouvez
programmer un maximum de 30 codes FIPS.
Pour entrer un nouveau code FIPS :
1. Appuyez brièvement sur MENU. Le MAIN MENU
apparaît. Ensuite, appuyez sur SELECT/SCRAM.
2. Appuyez successivement sur ou , jusqu'à ce que
SETUP apparaisse, puis appuyez sur SELECT/SCRAM.
3. Appuyez successivement sur ou , jusqu'à ce que
FIPS apparaisse, puis appuyez sur SELECT/SCRAM.
4. Appuyez successivement sur ou , jusqu'à ce
que NEW (nouveau) apparaisse, puis appuyez sur
SELECT/SCRAM.
5. Appuyez successivement sur ou pour choisir le
premier numéro du code FIPS, puis appuyez sur
SELECT/SCRAM pour l'enregistrer.
6. Répétez l'étape 5 pour chaque numéro que contient le
code FIPS. Après avoir entré le dernier numéro, l'indication YES apparaît.
7. Appuyez sur SELECT/SCRAM pour confirmer le code
FIPS que vous avez entré. Sinon, pour annuler
l'entrée du code FIPS, appuyez successivement sur
74
Utiliser les options des réglages
Page 75

ou , jusqu'à ce que NO apparaisse, puis
appuyez sur SELECT/SCRAM.
8. Répétez les étapes 4 à 7 pour entrer un autre code FIPS.
Pour changer un code FIPS actuel :
1. Répétez les étapes 1 à 3 de cette section.
2. Appuyez successivement sur ou , jusqu'à ce que
le code FIPS que vous désirez changer apparaisse,
puis appuyez de nouveau sur SELECT/SCRAM.
L'indication EDIT apparaît. Appuyez sur SELECT/
SCRAM. Le premier numéro du code FIPS clignote.
3. Répétez les étapes 5 à 7 de cette section pour
changer le code FIPS.
Utiliser la commutation automatique des
canaux
Cette option vous permet d'activer ou de désactiver le
changement automatique des canaux pendant un appel
ASN. Vous pouvez effectuer cette fonction si vous
désirez empêcher la radio de changer automatiquement
les canaux dans une situation d'urgence.
1. Appuyez brièvement sur MENU. Le MAIN MENU
apparaît. Ensuite, appuyez sur SELECT/SCRAM.
2. Appuyez successivement sur ou , jusqu'à ce que
SETUP apparaisse, puis appuyez sur SELECT/SCRAM.
3. Appuyez successivement sur ou , jusqu'à ce
que AUTO CH SW apparaisse, puis appuyez sur
SELECT/SCRAM.
4. Appuyez successivement sur ou , jusqu'à ce
que ON (pour activer la commutation automatique des
canaux) ou OFF (pour désactiver la commutation
automatique des canaux) apparaisse, puis appuyez
sur SELECT/SCRAM.
Utiliser la réponse à la demande de position
Cette option vous permet d'activer ou de désactiver la
réponse automatique à une demande de position pendant
un appel ASN. Vous pouvez effectuer cette fonction si
vous désirez empêcher la radio de divulguer automatiquement votre position si une autre radio la demande.
1. Appuyez brièvement sur MENU. Le MAIN MENU
apparaît. Ensuite, appuyez sur SELECT/SCRAM.
2. Appuyez successivement sur ou , jusqu'à ce que
SETUP apparaisse, puis appuyez sur SELECT/SCRAM.
Utiliser les options des réglages
75
Page 76

3. Appuyez successivement sur ou , jusqu'à ce
que POS REPLY apparaisse, puis appuyez sur
SELECT/SCRAM.
4. Appuyez successivement sur ou , jusqu'à ce
que ON (pour activer la réponse automatique à une
demande de position) ou OFF (pour désactiver la
réponse automatique à une demande de position)
apparaisse, puis appuyez sur SELECT/SCRAM.
Utiliser l'ISMM de groupe
Cette option vous permet de configurer un ISMM de groupe,
ce qui vous permet de faire un appel unique à un groupe
de navires.
1. Appuyez brièvement sur MENU. Le MAIN MENU
apparaît. Ensuite, appuyez sur SELECT/SCRAM.
2. Appuyez successivement sur ou , jusqu'à ce que
SETUP apparaisse, puis appuyez sur SELECT/SCRAM.
3. Appuyez successivement sur la touche ou ,
jusqu'à ce que l'indication GROUP MMSI (ISMM de
groupe) apparaisse, puis choisissez SELECT/
SCRAM. L'identification ID et 0 apparaissent et le
deuxième 0 clignote.
4. Appuyez successivement sur la touche ou afin
de choisir le deuxième numéro du ISMM de groupe,
puis appuyez sur SELECT/SCRAM pour l'enregistrer.
5. Répétez l'étape 4 pour chaque numéro que contient
l'ISMM de groupe. Après avoir entré le dernier
numéro, l'indication YES apparaît.
6. Appuyez sur SELECT/SCRAM pour confirmer l'ISMM
de groupe que vous avez entré. Sinon, pour annuler
l'entrée ISMM de groupe, appuyez successivement
sur ou , jusqu'à ce que l'indication NO apparaisse, puis appuyez sur SELECT/SCRAM.
Configurer le circuit brouilleur 'Scrambler'
Cette option vous permet d'utiliser le microphone conjointement
avec un circuit brouilleur que vous avez préalablement
installé dans la radio. Vous devez raccorder un brouilleur
optionnel sur la radio afin de pouvoir utiliser cette option.
1. Appuyez brièvement sur MENU. Le MAIN MENU
apparaît. Ensuite, appuyez sur SELECT/SCRAM.
2. Appuyez successivement sur ou , jusqu'à ce que
SETUP apparaisse, puis appuyez sur SELECT/SCRAM.
76
Utiliser les options des réglages
Page 77

3. Appuyez successivement sur ou , jusqu'à ce
que SCRAMBLE apparaisse, puis appuyez sur
SELECT/SCRAM. Un numéro clignote.
4. Appuyez successivement sur ou pour choisir le
code du brouilleur, puis appuyez sur SELECT/
SCRAM pour l'enregistrer. L'indication YES apparaît.
5. Appuyez sur SELECT/SCRAM pour confirmer le code
du brouilleur que vous avez entré. Sinon, pour
annuler le code du brouilleur, appuyez successivement sur ou , jusqu'à ce que l'indication NO
apparaisse, puis appuyez sur SELECT/SCRAM.
Utiliser l'option de QUITTER 'EXIT'
Choisissez cette option pour quitter les options des
réglages et revenir à l'écran d'affichage des canaux.
1. Appuyez brièvement sur MENU. Le MAIN MENU
apparaît. Ensuite, appuyez sur SELECT/SCRAM.
2. Appuyez successivement sur ou , jusqu'à ce que
SETUP apparaisse, puis appuyez sur SELECT/SCRAM.
3. Appuyez successivement sur ou , jusqu'à ce que
EXIT apparaisse, puis appuyez sur SELECT/SCRAM.
Utiliser les options du système
Utiliser les options du système
Cette section décrit le fonctionnement des options du système
du microphone. Vous changez normalement ces options en
vous basant sur les conditions locales et vos préférences.
Ajuster le contraste
Cette option vous permet d'ajuster le contraste de l'affichage
du microphone. Vous pouvez ajuster le contraste uniquement
pour le microphone que vous utilisez. Ce réglage n'affecte
pas le contraste de la radio principale ni celui des autres
microphones.
Remarque : Vous ne pouvez ajuster le contraste que pour
le microphone que vous utilisez. Ce réglage n'affecte pas
le contraste de la radio principale ni des autres
microphones.
1. Appuyez brièvement sur MENU, puis successivement
sur ou jusqu'à ce que l'indication LOCAL MENU
apparaisse, puis appuyez sur SELECT/SCRAM.
2. Appuyez successivement sur ou jusqu'à ce que
l'indication CONTRAST apparaisse, puis choisissez
SELECT/SCRAM.
Utiliser les options du système
77
Page 78

3. Appuyez successivement sur ou afin d'ajuster
le contraste au niveau de visionnement qui vous
convient, puis appuyez sur SELECT/SCRAM.
Ajuster le bip à la pression des touches
Cette option vous permet d'activer ou de désactiver le bip
que l'on entend à la pression des touches du microphone.
1. Appuyez brièvement sur MENU, puis successivement
sur ou jusqu'à ce que l'indication LOCAL MENU
apparaisse, puis appuyez sur SELECT/SCRAM.
2. Appuyez successivement sur ou jusqu'à ce que
l'indication KEY BEEP apparaisse, puis choisissez
SELECT/SCRAM.
3. Appuyez successivement sur ou jusqu'à ce que
l'indication On apparaisse (afin d'activer le bip à la
pression des touches) ou sur OF (afin de désactiver le
bip à la pression des touches), puis appuyez sur
SELECT/SCRAM.
Ajuster le niveau de sensibilité de
l'émetteur commandé par la voix 'VOX'
1. Pour ajuster le niveau de sensibilité de l’émetteur
commandé par la voix ‘VOX’, appuyez brièvement sur
MENU, puis successivement sur ou jusqu'à ce
que l’indication LOCAL MENU apparaisse, puis
appuyez sur SELECT/SCRAM.
2. Appuyez successivement sur ou jusqu'à ce que
l’indication VOX LEVEL apparaisse, puis choisissez
SELECT/SCRAM.
3. Appuyez successivement sur ou afin de choisir
le niveau désiré (1, 2, 3 ou hors fonction ‘OFF’), puis
appuyez sur SELECT/SCRAM.
Régler l'identification du socle/microphone
1. Pour ajuster l'identification du socle ou du microphone, appuyez brièvement sur MENU, puis succes-
sivement sur ou jusqu'à ce que l'indication
LOCAL MENU apparaisse, puis appuyez sur
SELECT/SCRAM.
2. Appuyez successivement sur ou jusqu'à ce que
l'indication ID SETTING apparaisse, puis choisissez
SELECT/SCRAM.
3. Appuyez successivement sur ou afin de choisir
l'identification que vous désirez régler (socle 'BASE
78
Utiliser les options du système
Page 79

ID' ou combiné 'HANDSET ID'), puis appuyez sur
SELECT/SCRAM.
4. Appuyez successivement sur ou afin de choisir
l'identification que vous désirez (00-99 pour
l'identification du socle ou 1-4 pour l'identification du
combiné). Ensuite, appuyez sur SELECT/SCRAM.
Soin et entretien
Soin et entretien
Votre microphone sans fil WHAMx4 d'Uniden est un
dispositif électronique de haute précision et vous devez le
traiter avec soin. Grâce à sa fabrication robuste, cet
appareil nécessite très peu d'entretien. Toutefois, vous
devez observer certaines mesures préventives :
• Si votre microphone a été endommagé, vous ne devez
pas transmettre, sauf en cas d'urgence.
• La responsabilité de garder votre microphone
conforme aux normes techniques de la FCC vous revient entièrement.
• Vous devez demander à votre marchand/centre de
service Uniden d'effectuer périodiquement des
vérifications techniques.
Appendice
Appendice
Renseignements de référence
Fréquences des canaux des États-Unis/Canada/
Internationaux
Numéro
États
Can Int
de canal
-Unis
1”A” X
3”A” X
5”A” X
6X
7”A” X
8X
9X
10 X
11 X
12 X
13 X
14 X
15 X
16 X
17 X
18”A” X
19”A” X
20”A” X
21”A” X
22”A” X
23”A” X
24 X
25 X
26 X
27 X
28 X
61”A” X
63”A” X
64”A” X
65”A” X
66”A” X
67 X
68 X
69 X
70 X
Soin et entretien
Trans
Réception
156.0500
156.1500
156.2500
156.3000
156.3500
156.4000
156.4500
156.5000
156.5500
156.6000
156.6500
156.7000
156.7500
156.8000
156.8500
156.9000
156.9500
157.0000
157.0500
157.1000
157.1500
161.8000
161.8500
161.9000
161.9500
162.0000
156.0750
156.1750
156.2250
156.2750
156.3250
156.3750
156.4250
156.4750
156.5250
Statut Nom Complet Nom à 12 caractères
mission
156.0500 Simplex VESSEL TRAFFIC SYSTEM/
156.1500 Simplex COAST GUARD, GOVT ONLY CG ONLY
156.2500 Simplex VESSEL TRAFFIC SYSTEM/
156.3000 Simplex INTER-SHIP SAFETY SA FETY
156.3500 Simplex COMMERCIAL COMMERCIAL
156.4000 Simplex COMMERCIAL COMMERCIAL
156.4500 Simplex NON COMMERCIAL NON COMMERCL
156.5000 Simplex COMMERCIAL COMMERCIAL
156.5500 Simplex VESSEL TRAFFIC SYSTEM VSL TRAFFIC
156.6000 Simplex VESSEL TRAFFIC SYSTEM VSL TRAFFIC
156.6500 Simplex, 1WBRIDGE TO BRIDGE BRDG TO BR DG
156.7000 Simplex VESSEL TRAFFIC SYSTEM VSL TRAFFIC
Inhibit Receive
156.8000 Simplex DISTRESS, SAFETY, CALLING DITRESS
156.8500 Simplex, 1WGOVT MARITIME CONTROL GOVERNMENT
156.9000 Simplex COMMERCIAL COMMERCIAL
156.9500 Simplex COMMERCIAL COMMERCIAL
157.0000 Simplex PORT OPERATION PORT OPERATN
157.0500 Simplex COAST GUARD ONLY COAST GUARD
157.1000 Simplex COAST GUARD COAST GUARD
157.1500 Simplex COAST GUARD ONLY COAST GUARD
157.2000 Duplex MARINE OPERATOR MAR OPERATOR
157.2500 Duplex MARINE OPERATOR MAR OPERATOR
157.3000 Duplex MARINE OPERATOR MAR OPERATOR
157.3500 Duplex MARINE OPERATOR MAR OPERATOR
157.4000 Duplex MARINE OPERATOR MAR OPERATOR
156.0750 Simplex COAST GUARD COAST GUARD
156.1750 Simplex VESSEL TRAFFIC SYSTEM VSL TRAFFIC
156.2250 Simplex COMMERCIAL COMMERCIAL
156.2750 Simplex PORT OPERATION PORT OPERATN
156.3250 Simplex PORT OPERATION PORT OPERATN
156.3750 Simplex, 1WBRIDGE TO BRIDGE BRDG TO BR DG
156.4250 Simplex NON COMMERCIAL NON COMMERCL
156.4750 Simplex NON COMMERCIAL NON COMMERCL
Inhibit Receive
COMMERCIAL
COMMERCIAL
ENVIRONMENTAL ENVIRONMENTL
Only
DIGITAL SELECTIVE CALLING DSC REC ONLY
Only
VTS/COMMERC L
VTS/COMMERC L
79
Page 80

Numéro
États
Can Int
de canal
-Unis
71 X
72 X
73 X
74” X
75 X
76 X
77 X
78”A” X
79”A” X
80”A” X
81”A” X
82”A” X
83”A” X
84” X
85 X
86 X
87 X
88 X
88”A” X
1X
2X
3X
4”A” X
5”A” X
6X
7”A” X
8X
9X
10 X
11 X
12 X
13 X
14 X
15 X
16 X
17 X
18”A” X
19”A” X
20 X
21”A” X
22”A” X
23 X
24 X
25 X
26 X
27 X
28 X
60 X
61”A” X
62”A” X
64 X
64”A” X
65”A” X
66”A” X
67 X
68 X
69 X
70 X
71” X
72 X
73 X
74 X
77 X
78”A” X
79”A” X
80”A” X
81”A” X
82”A” X
83” X
83”A” X
84 X
85 X
86 X
87 X
88 X
1X
2X
3X
4X
5X
6X
7X
8X
9X
10 X
11 X
12 X
13 X
14 X
15 X
16 X
17 X
18 X
19 X
20 X
21 X
22 X
23 X
24 X
25 X
26 X
27 X
28 X
60 X
61 X
Réception
156.5750
156.6250
156.6750
156.7250
156.775
156.825
156.8750
156.9250
156.9750
157.0250
157.0750
157.1250
157.1750
161.8250
161.8750
161.9250
161.9750
162.0250
157.4250
160.6500
160.7000
160.7500
156.2000
156.2500
156.3000
156.3500
156.4000
156.4500
156.5000
156.5500
156.6000
156.6500
156.7000
156.7500
156.8000
156.8500
156.9000
156.9500
161.6000
157.0500
157.1000
161.7500
161.8000
161.8500
161.9000
161.9500
162.0000
160.6250
156.0750
156.1250
160.8250
156.2250
156.2750
156.3250
156.3750
156.4250
156.4750
156.5250
156.5750
156.6250
156.6750
156.7250
156.8750
156.9250
156.9750
157.0250
157.0750
157.1250
161.7750
157.1750
161.8250
161.8750
161.9250
161.9750
162.0250
160.6500
160.7000
160.7500
160.8000
160.8500
156.3000
160.9500
156.4000
156.4500
156.5000
156.5500
156.6000
156.6500
156.7000
156.7500
156.8000
156.8500
161.5000
161.5500
161.6000
161.6500
161.7000
161.7500
161.8000
161.8500
161.9000
161.9500
162.0000
160.6250
160.6750
80
Trans
Statut Nom Complet Nom à 12 caractères
mission
156.5750 Simplex NON COMMERCIAL NON COMMERCL
156.6250 Simplex NON COMMERCIAL
156.6750 Simplex PORT OPERATION PORT OPERATN
156.7250 Simplex PORT OPERATION PORT OPERATN
156.775 Simplex, 1WPORT OPERATION PORT OPERATN
156.825 Simplex, 1WPORT OPERATION PORT OPERATN
156.8750 Simplex, 1WPORT OPERATION
156.9250 Simplex NON COMMERCIAL NON COMMERCL
156.9750 Simplex COMMERCIAL COMMERCL
157.0250 Simplex COMMERCIAL‘ COMMERCIAL
157.0750 Simplex COAST GUARD COAST GUARD
157.1250 Simplex COAST GUARD COAST GUARD
157.1750 Simplex GOVERNMENT GOVERNMENT
157.2250 Duplex M ARINE OPERATOR MAR OPERATOR
157.2570 Duplex M ARINE OPERATOR MAR OPERATOR
157.3250 Duplex M ARINE OPERATOR MAR OPERATOR
157.3750 Duplex M ARINE OPERATOR MAR OPERATOR
157.4250 Duplex M ARINE OPERATOR MAR OPERATOR
157.4250 Simplex COMMERCIAL (SHIP-SHIP) COMMERCIAL
156.0500 Duplex M ARINE OPERATOR MAR OPERATOR
156.1000 Duplex M ARINE OPERATOR MAR OPERATOR
156.1500 Duplex M ARINE OPERATOR MAR OPERATOR
156.2000 Simplex CANADIAN COAST GUARD COAST GUARD
156.2500 Simplex VESSEL TRAFFIC SYSTEM VSL TRAFFIC
156.3000 Simplex INTER-SHIP SAFETY SAFETY
156.3500 Simplex COMMERCIAL COMMERCIAL
156.4000 Simplex COMMERCIAL COMMERCIAL
156.4500 Simplex BOATER CALLING CHANNEL CALLING
156.5000 Simplex COMMERCIAL COMMERCIAL
156.5500 Simplex VESSEL TRAFFIC SYSTEM VSL TRAFFIC
156.6000 Simplex VESSEL TRAFFIC SYSTEM VSL TRAFFIC
156.6500 Simplex, 1WBRIDG E TO BRIDG E BRD G TO BRDG
156.7000 Simplex VESSEL TRAFFIC SYSTEM VSL TRAFFIC
156.7500 Simplex ENVIRONMENTAL ENVIRONMENTL
156.8000 Simplex DISTRESS, SAFETY, CALLING DITRESS
156.8500 Simplex, 1WSTATE CONTROL STATE CNTRL
156.9000 Simplex COMMERCIAL COMMERCIAL
156.9500 Simplex CANADIAN COAST GUARD COAST GUARD
157.0000 Duplex, 1WPORT OPERATION PORT OPERATN
157.0500 Simplex CANADIAN COAST GUARD COAST GUARD
157.1000 Simplex CANADIAN COAST GUARD COAST GUARD
157.1500 Duplex CA NADIAN COAST GUARD COAST GUARD
157.2000 Duplex M ARINE OPERATOR MAR OPERATOR
157.2500 Duplex M ARINE OPERATOR MAR OPERATOR
157.3000 Duplex M ARINE OPERATOR MAR OPERATOR
157.3500 Duplex M ARINE OPERATOR MAR OPERATOR
157.4000 Duplex M ARINE OPERATOR MAR OPERATOR
156.0250 Duplex M ARINE OPERATOR MAR OPERATOR
156.0750 Simplex CANADIAN COAST GUARD COAST GUARD
156.1250 Simplex CANADIAN COAST GUARD COAST GUARD
156.2250 Duplex M ARINE OPERATOR MAR OPERATOR
156.2250 Simplex MARINE OPERATOR MAR OPERATOR
156.2750 Simplex SEARCH AND RESCUE SRCH RESCUE
156.3250 Simplex, 1WPORT OPERATION PORT OPERATN
156.3750 Simplex BRIDGE TO BRIDGE BRDG TO BRDG
156.4250 Simplex NON COMMERCIAL NON COMMERCL
156.4750 Simplex NON COMMERCIAL NON COMMERCL
Inhibit Receive
156.5750 Simplex NON COMMERCIAL NON COMMERCL
156.6250 Simplex NON COMMERCIAL NON COMMERCL
156.6750 Simplex PORT OPERATION PORT OPERATN
156.7250 Simplex PORT OPERATION PORT OPERATN
156.8750 Simplex, 1WPORT OPERATION PORT OPERATN
156.9250 Simplex INTER SHIP INTER SHIP
156.9750 Simplex INTER SHIP INTER SHIP
157.0250 Simplex INTER SHIP INTER SHIP
157.0750 Simplex CANADIAN COAST GOARD COAST GUARD
157.1250 Simplex CANADIAN COAST GUARD COAST GUARD
157.1750 Duplex CA NADIAN COAST GOARD COAST GOARD
157.1750 Simplex CANADIAN COAST GOARD COAST GOARD
157.2250 Duplex M ARINE OPERATOR MAR OPERATOR
157.2750 Duplex M ARINE OPERATOR MAR OPERATOR
157.3250 Duplex M ARINE OPERATOR MAR OPERATOR
157.3750 Duplex M ARINE OPERATOR MAR OPERATOR
157.4250 Duplex M ARINE OPERATOR MAR OPERATOR
156.0500 Duplex M ARINE OPERATOR MAR OPERATOR
156.1000 Duplex M ARINE OPERATOR MAR OPERATOR
156.1500 Duplex M ARINE OPERATOR MAR OPERATOR
156.2000 Duplex M ARINE OPERATOR MAR OPERATOR
156.2500 Duplex M ARINE OPERATOR MAR OPERATOR
156.3000 Simplex INTER-SHIP SAFETY SAFETY
156.3500 Duplex M ARINE OPERATOR MAR OPERATOR
156.4000 Simplex COMMERCIAL (SHIP-SHIP) COMMERCIAL
156.4500 Simplex BOATER CALLING CHANNEL CALLING
156.5000 Simplex COMMERCIAL COMMERCIAL
156.5500 Simplex VESSEL TRAFFIC SYSTEM VSL TRAFFIC
156.6000 Simplex VESSEL TRAFFIC SYSTEM VSL TRAFFIC
156.6500 Simplex BRIDGE TO BRIDGE BRDG TO BRDG
156.7000 Simplex VESSEL TRAFFIC SYSTEM VSL TRAFFIC
156.7500 Simplex, 1WENVIRONMENTAL ENVIRONMENTL
156.8000 Simplex DISTRESS, SAFETY, CALLING DITRESS
156.8500 Simplex, 1WGOVT MARINE CONTROL GOVERNMENT
156.9000 Duplex P ORT OPERATION PORT OPERATN
156.9500 Duplex COM MERCIAL COMMERCIAL
157.0000 Duplex P ORT OPERATION PORT OPERATN
157.0500 Duplex P ORT OPERATION PORT OPERATN
157.1000 Duplex P ORT OPERATION PORT OPERATN
157.1500 Duplex M ARINE OPERATOR MAR OPERATOR
157.2000 Duplex M ARINE OPERATOR MAR OPERATOR
157.2500 Duplex M ARINE OPERATOR MAR OPERATOR
157.3000 Duplex M ARINE OPERATOR MAR OPERATOR
157.3500 Duplex M ARINE OPERATOR MAR OPERATOR
157.4000 Duplex M ARINE OPERATOR MAR OPERATOR
156.0250 Duplex M ARINE OPERATOR MAR OPERATOR
156.0750 Duplex M ARINE OPERATOR MAR OPERATOR
(SHIP-SHIP)
(SHIP-SHIP)
DIGITAL SELECTIVE CALLING DSC REC ONLY
Only
NON COMMERCL
PORT OPERATN
Appendice
Page 81

Numéro
États
Can Int
de canal
-Unis
62 X
63 X
64 X
65 X
66 X
67 X
68 X
69 X
70 X
71 X
72 X
73 X
74 X
77 X
78 X
79 X
80 X
81 X
82 X
83 X
84 X
85 X
86 X
87 X
88 X
Trans
Réception
160.7250
160.7750
160.8250
160.8750
160.9250
156.3750
156.4250
156.4750
156.5250
156.5750
156.6250
156.6750
156.7250
156.8750
161.5750
161.5750
161.6250
161.6750
161.7250
161.7750
161.8250
161.8750
161.9250
161.9750
162.0250
Statut Nom Complet Nom à 12 caractères
mission
156.1250 Duplex MARINE OPERATOR MAR OPERATOR
156.1750 Duplex MARINE OPERATOR MAR OPERATOR
156.2250 Duplex MARINE OPERATOR MAR OPERATOR
156.2750 Duplex MARINE OPERATOR MAR OPERATOR
156.3250 Duplex MARINE OPERATOR MAR OPERATOR
156.3750 Simplex BRIDGE TO BRIDGE BRDG TO BRDG
156.4250 Simplex NON COMMERCIAL NON COMMERCL
156.4750 Simplex NON COMMERCIAL NON COMMERCL
Inhibit Receive
156.5750 Simplex NON COMMERCIAL NON COMMERCL
156.6250 Simplex NON COMMERCIAL NON COMMERCL
156.6750 Simplex PORT OPERATION PORT OPERATN
156.7250 Simplex PORT OPERATION PORT OPERATN
156.8750 Simplex PORT OPERATION
156.9250 Duplex PORT OPERATION PORT OPERATN
156.9750 Duplex PORT OPERATION PORT OPERATN
157.0250 Duplex PORT OPERATION PORT OPERATN
157.0750 Duplex PORT OPERATION PORT OPERATN
157.1250 Duplex PORT OPERATION PORT OPERATN
157.1750 Duplex PORT OPERATION PORT OPERATN
157.2250 Duplex MARINE OPERATOR MAR OPERATOR
157.2750 Duplex MARINE OPERATOR MAR OPERATOR
157.3250 Duplex MARINE OPERATOR MAR OPERATOR
157.3750 Duplex MARINE OPERATOR MAR OPERATOR
157.4250 Duplex MARINE OPERATOR MAR OPERATOR
DIGITAL SELECTIVE CALLING DSC REC ONLY
Only
(SHIP-SHIP)
Fréquences des canaux météo
Numéro
de
canal
WX01
WX02
WX03
WX04
WX05
WX06
WX07
WX08
WX09
WX10
Fréquence de
réception
162.5500
162.4000
162.4750
162.4250
162.4500
162.5000
162.5250
161.6500
161.7750
163.2750
Description (réception seul.)
Renseignem ents sur la météo
Renseignem ents sur la météo
Renseignem ents sur la météo
Renseignem ents sur la météo
Renseignem ents sur la météo
Renseignem ents sur la météo
Renseignem ents sur la météo
Renseignem ents sur la météo
Renseignem ents sur la météo
Renseignem ents sur la météo
PORT OPERATN
Appendice
81
Page 82

Garantie limitée de trois années
LE RÉPONDANT DE LA GARANTIE : LA CORPORATION UNIDEN
AMERICA (ci-après 'UNIDEN").
Garantie limitée de trois années
LES ÉLÉMENTS DE LA GARANTIE : Pendant une période de trois (3)
années, Uniden garantit à l'acheteur original que cet appareil d'Uniden sera
libre de tout défaut de pièces et de main-d'oeuvre, selon les restrictions et
exclusions décrites ci-dessous.
LA DURÉE DE LA GARANTIE : Cette garantie, qui ne s'applique qu'à
l'acheteur original, se terminera et ne sera donc plus en effet 36 mois après la
date de l'achat original dans un magasin au détail. Cette garantie sera nulle
si l'appareil est (A) endommagé ou n'a pas été maintenu en bon état suite à
un entretien raisonnable ou nécessaire, (B) modifié, altéré ou utilisé en tant
que composante d'un ensemble de conversion, d'assemblages secondaires
ou toute autre configuration qui n'est pas vendue par Uniden, (C) mal
installé, (D) réparé ou entretenu par toute autre entité qu'un centre de service
autorisé par Uniden pour n'importe quel problème ou défaillance couverts par
cette garantie, (E) utilisé conjointement avec des équipements, pièces ou en
tant que composante d'un système qui ne soit pas fabriqué par Uniden, ou
(F) installé ou programmé par d'autres personnes que celles mentionnées
dans le guide d'utilisation de cet appareil.
ÉNONCÉ DES RECOURS : Au cas où cet appareil ne serait pas conforme à
la garantie, et ce, en tout temps pendant la période de cette garantie, le
répondant s'engage à réparer le défaut et à vous retourner l'appareil sans
frais de pièces ni de main-d'oeuvre, ni sans aucun autre frais (à l'exception
des frais de port et de manutention) encouru par le répondant ou l'un de ses
représentants en rapport avec l'exécution de cette garantie. LA GARANTIE
LIMITÉE DÉCRITE CI-HAUT CONSTITUE LA SEULE ET ENTIÈRE
GARANTIE SE RAPPORTANT À L'APPAREIL ET REMPLACE ET EXCLUT
TOUTE AUTRE GARANTIE DE QUELQUE NATURE QUE CE SOIT,
QU'ELLE SOIT FORMELLE, TACITE OU SURVENANT SUITE À
L'IMPLANTATION D'UNE LOI, INCLUANT, MAIS SANS S'Y LIMITER,
TOUTES LES GARANTIES TACITES EN QUALITÉ LOYALE ET
MARCHANDE OU LES APTITUDES À UN BUT
PARTICULIER. CETTE GARANTIE NE COUVRE PAS NI NE PRÉVOIT
PAS DE PROVISIONS POUR LE REMBOURSEMENT NI LE PAIEMENT
DES DOMMAGES-INTÉRÊTS DIRECTS OU INDIRECTS. Certaines
provinces ou certains états ne permettent pas d'exclusions ni de restrictions
pour les dommages-intérêts directs ou indirects et les restrictions ou
exclusions décrites ci-dessus peuvent ne pas s'appliquer à vous.
RECOURS LÉGAUX : Cette garantie vous donne des droits légaux
spécifiques et vous pouvez avoir d'autres droits pouvant varier de province
en province. Cette garantie devient nulle à l'extérieur des États-Unis et du
Canada.
MARCHE À SUIVRE POUR HONORER LA GARANTIE : Si, après avoir
suivi les directives du guide d'utilisation, vous êtes persuadé(e) que votre
appareil est défectueux, emballez-le soigneusement (dans son emballage
d'origine, si possible). Joignez-y votre preuve d'achat et une note décrivant le
problème. Expédiez l'appareil, port payé, par l'entremise d'un service postal
certifié et assuré ou d'un courrier qui vous permette de retrouver
ultérieurement l'envoi, au répondant de la garantie, à l'adresse suivante :
Uniden America Corporation
Division des pièces et service
4700 Amon Carter Blvd.
Ft. Worth, TX 75155
(800) 235-3874, de 8h00 à 17h00, heure centrale, du lundi au vendredi.
82
Garantie limitée de trois années
Page 83

Page 84

MARK
HERE
Mounting Instructions
Instructions de montage du support de fixation encastrable
1. Cut template from this page on thick line indicated by scissors, then use
tape to affix template to mounting surface.
Caution: Find out what is in the area behind the mounting location before
drilling there. Do not let the drill bit damage wires or equipment behind the
mount ing location .
2. Use a pencil to mark mounting screw locations indicated by MARK HERE
on template.
3. Rem ove templat e then drill a p ilot hole in e ach marked l ocation. The n use the
supplied screws to sec ure the back of the cradle to the m ounting surface.
1. Cort e con unas t ijeras la plan illa marcada e n esta página , y luego péguela a la
superficie para el montaje.
Cuidado: Investig ue el área detrás de la localidad del m ontaje antes de taladrar
agujeros. No permi ta que el taladro dañe los alambre o el equipo detrás de la
localidad del montaje.
2. Use un lápiz par a marcar las u bicaciones para los tornillo s indicadas por
MARK HERE en la plantilla.
3. Quite la plantilla y luego haga un pequeño agujero en cada ubicación marcada.
Ahora, u se los torn illos suminist rados para ase gurar el dor so del cargador a l a
superficie del montaje.
1. Découpez le ga barit de cette page en suivant la ligne la plus large, tel que
l'indiqu e le symbo le du cise au. En suite, utilise z du ru ban autocol lant pour apposer
le gabarit sur la surface de montage.
Mise en garde : Trouvez ce qui se trouve derrière la surface de montage avant de
percer à cet endroi t. Ne laissez pas l a mèche de la perceuse endom mager les
câbles ni les équipemen ts se trouvant derrière l'emplacement de m ontage.
2. Utilisez un crayon à mine de plomb pour marquer l'emplacement des vis,
indiqué par les mots MARK HERE sur le gabarit.
3. Retirez le gabarit, pu is percez un trou dans chaque e ndroit marqué. Ensuite,
utilisez les vis inclu ses pour visse r l'arrière d u socle sur la surface de m ontage.
Instrucciones para el montaje
MARK
HERE
BACK OF CRADLE
LE ESPALDA DE CUNA
LE DOS DE BERCEAU
MARK
HERE
Page 85

THANK YOU FOR BUYING A UNIDEN PRODUCT.
UUZZ01360ZA
 Loading...