

Page 1

Page 2

2
Table of Contents
..........................
4
Safety Labels
....................................................
6
........................................
7
tions
......................................................
7
............................................
8
Laser Pico Projector
........................
9
.....................................................
0
................................................
......................................................
Charge Battery
...............................................
3
...........................................
4
Connect to a Video Source
............................
6
....................
6
Connecting to Other Composite (TV-out) Video
Sources
...............................................................
8
Connecting to a Laptop Computer Using the
VGA DOCK
......................................................
2
0
VGA DOCK: Computer Display Settings
............
2
2
Supported Resolutions
3
Computer Compatibility
......................................
2
3
Windows XP Disp
.............................
2
4
Windows Vista
s
6
...........................................................
2
7
Page 3

3
Advanced Controls
.........................................
2
8
8
Onscreen Menu
..................................................
2
8
....................................
2
9
9
.................................
2
9
....................
2
9
3
0
............................
3
0
................
3
Care & Maintenance
.......................................
3
3
...................................
3
.................................
3
Troubleshooting
.............................................
3
2
3
3
Customer Support
...............................................
3
3
One Year Limited Warranty
............................
3
4
Page 4
4
PLEASE READ, UNDERSTAND AND FOLLOW ALL SAFETY INFORMATION IN THIS USER
GUIDE BEFORE YOU USE THIS PROJECTOR. FAILURE TO PROPERLY SET UP, USE, AND
CARE FOR THIS PROJECTOR CAN INCREASE THE RISK OF INJURY, OR DAMAGE TO THE
PROJECTOR. KEEP THIS USER GUIDE FOR FUTURE REFERENCE.
ntended Use Statement
The ULP1000 laser pico projector is designed to operate with the Uniden-specifi ed battery and
Uniden battery charger in a normal offi ce and home environment within the following parameters:
» Operating Temperature: 10°- 30° C, ( 50° - 86° F)
» Storage Temperature: non-operating: -20°- 60° C, (-4°- 140° F) with battery
» Humidity: 10 - 85% relative humidity (without condensation)
» Altitude: -152M - 4572M (-500 - 15,000 ft.)
Indicates a potentially hazardous situation,
which if not avoided, may result in death or
serious injury and/or property damage.
AS WITH ANY BRIGHT LIGHT SOURCE, DO NOT STARE INTO THE BEAM. STARING INTO THE
BEAM COULD CAUSE EYE DISCOMFORT AND IMPAIR VISION.
AS WITH ANY PRODUCT CONTAINING LASERS, DO NOT DISASSEMBLE THE PROJECTOR
FOR ANY REASON. DISSASSEMBLING THE PROJECTOR MAY RESULT IN HAZARDOUS
LASER RADIATION EXPOSURE.
EXCEPT FOR OPENING THE BATTERY DOOR AS DIRECTED IN THIS USER GUIDE TO REPLACE
THE BATTERY, THERE ARE NO USER SERVICABLE PARTS INSIDE THE PROJECTOR.
For service or repair the product must be returned to an authorized repair facility. See Customer
Support section within this User Guide for details.
T
o avoid risks associated with laser exposure:
» Not recommended for use by children under 14 unless supervised by an adult. The ULP1000
is not a toy.
» Use of controls or adjustments or performance of procedures other than those specifi ed in this
User Guide may result in hazardous laser radiation exposure
To avoid risks associated with hazardous voltage:
» Do not modify this product in any way. Use only Uniden approved replacement components.
» Do not use the AC adapter in a wet environment.
» No not use with a damaged AC adapter. Replace damaged AC adapter prior to use.
To avoid risks associated with fi re and explosion:
» Do not immerse the projector or battery in any liquid or allow either to get wet.
» Use only AC adapter and battery provided by Uniden.
» Do not disassemble the battery or modify it in any way.
» Do not attempt to short out the battery.
WARNING
Page 5

5
» Do not expose the battery to temperatures under -20°C or above 60°C.
» Do not crush the battery.
» Do not overcharge or rapidly discharge the battery.
» Do not dispose of the battery by incineration or fi re.
» Do not expose the projector or battery to direct sunlight in a closed space such as a vehicle.
To avoid risks of other injuries:
» Do not handle a damaged or leaking battery pack.
» Do not handle a battery that has been handled in an inappropriate or dangerous manner.
To avoid risks associated with driver distraction in a moving vehicle:
» Do not use this projector in a moving vehicle in a manner that may distract the driver.
Indicates a potentially hazardous situation, which if not
avoided, may result in minor or moderate injury and/or
property damage.
» Do not point the projected image at people, vehicles, or aircraft.
» Risk of explosion if battery is replaced by an incorrect type.
» Dispose of used batteries according to the instructions contained within this guide.
To avoid risks associated with environmental contamination:
» Dispose of all system components in accordance with applicable government regulations.
To avoid risks associated with tripping and falling:
» Position the charging cord and data cables so that they can not be tripped over.
Photosensitive Seizure Warning
A very small percentage of people may experience seizures or blackouts that are triggered by
exposure to light fl ashes or certain visual images including fl ashing lights or patterns that may appear
in video games or other video images. Even people who have no history of seizures or blackouts
could experience “photosensitive epileptic seizures” while watching some video images.
Immediately stop watching projected video images and consult a physician if you experience
symptoms such as lightheadedness, altered vision, eye or face twitching, convulsions, disorientation,
confusion or momentary loss of awareness.
Taking the following precautions while watching video may help reduce the risk
of photosensitive epileptic seizures.
» Avoid use while tired or fatigued.
» Take frequent breaks.
» Look away from the screen from time to time.
» Sit further away from the projected image.
Page 6
6
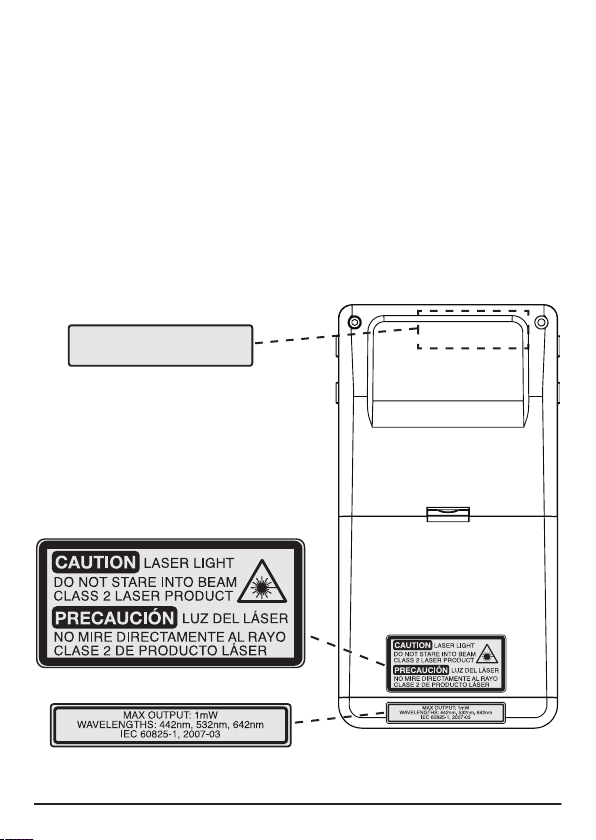
Safety Labels
The ULP1000 Laser Pico Projector is a CLASS 2 LASER PRODUCT as
defi ned in IEC 60825-1, 2007-03. The ULP1000 has been designed to be
safe for general use as a mobile projector.
IEC and CDRH Statements of Compliance
The ULP1000 complies with IEC 60825-1, 2007-03.
the ULP1000.
The following safety labels are affi xed at the factory.
THESE LABELS CONTAIN IMPORTANT SAFETY INFORMATION.
CLASS 3B VISIBLE AND INVISIBLE
CAUTION
LASER RADIATION WHEN OPEN
AVOID EXPOSURE TO THE BEAM
Page 7
7
Caution:
Changes or modifi cations to this equipment not expressly approved by
manufacturer could void the user’s authority to operate this equipment.
CE Statement
This product complies with the requirements of the Low Voltage Directive
2006/95/EC and the EMC Directive 2004/108/EC and carries the CE
mark accordingly.
The ULP1000 laser pico projector should not be placed in household waste bins.
Please check local regulations for information about the disposal of electronic products
in your area.
Made for iPod means that an electronic accessory has been designed to connect
specifi cally to iPod and has been certifi ed by the developer to meet Apple performance
standards. Apple is not responsible for the operation of this device or its compliance
with safety and regulatory standards. iPod is a trademark of Apple Inc., registered in
the U.S. and other countries.
Copyright & Trademarks
© 2009 Uniden Australia Pty Ltd/Uniden New Zealand Ltd. All rights reserved. iPod,
and Made for iPod are trademarks of Apple, Inc., registered in the U. S. and other
countries. Apple is not responsible for the operation of this device or its compliance
with safety and regulatory standards. PicoP is a trademark of Microvision, Inc.
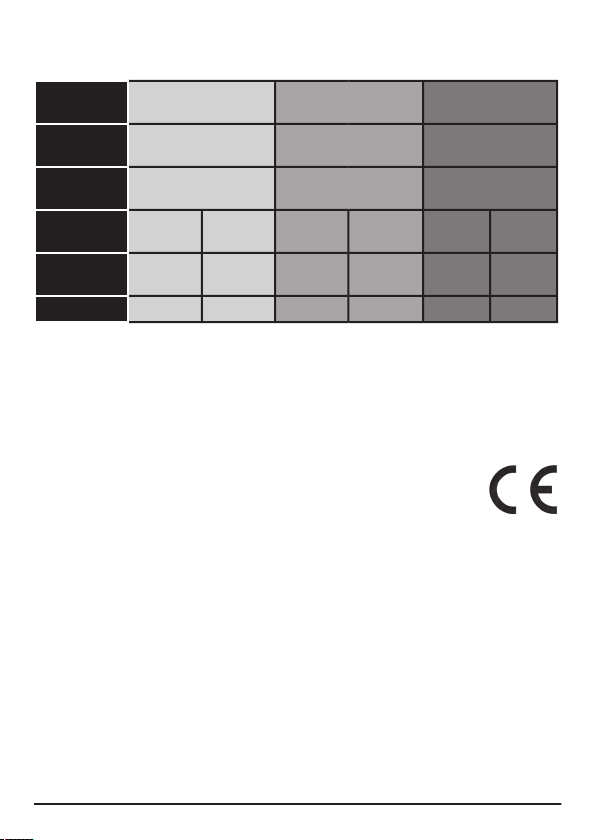
Laser
Colour
Red
Blue
Green
Laser
Type
AlGalnP
laser diode
GaN
laser diode
bled IR laser diode
Max CW
Output
90 mW
5
0 mW
60 mW
Divergence
Slow-Axis
7°,
4°,
5°,
Divergence
Fast-axis
24°,
25°,
Wavelength
635 nm
645 nm
440 nm
460 nm
526 nm
537 nm
Page 8
8
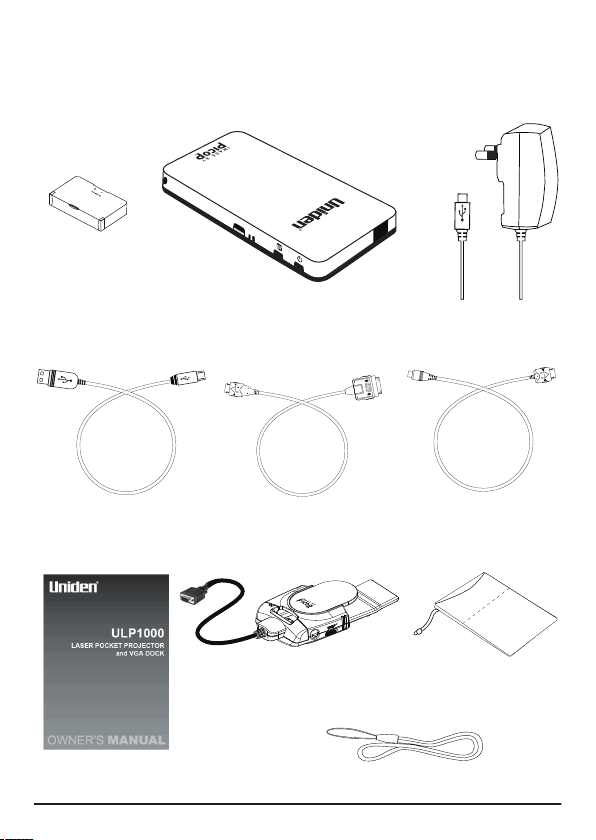
B
+ -
Wall Charger
Cable for iPod
C
omposi
te Adaptor
Storage Pouch
Owner’s Manual
Wrist Strap
VGA DOCK
Page 9
9
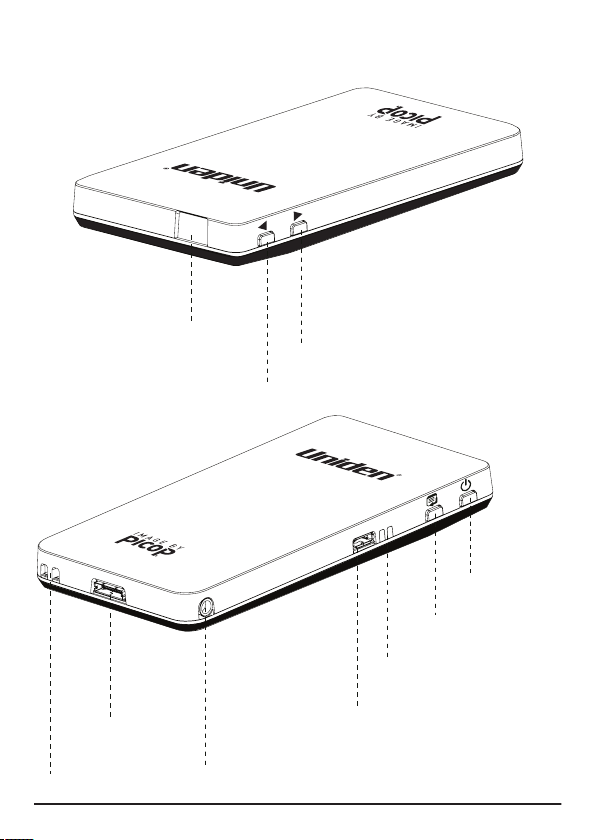
Power Button
Menu/Select Button
LED Indicators
Micro-USB/Power Input
3.5 mm Audio Jack
Video Input
Wrist Strap Holder
Window
Up/Hot Key 1
Down/Hot Key 2
Page 10

Thank you for purchasing the Uniden ULP1000 laser pico projector.
The ULP1000 projects big, bright, and colourful images that are
always in focus, yet is small enough to fi t in your pocket. Connect
the ULP1000 to a video output-capable device to spontaneously
share photos and videos, presentations and more, in a big screen
experience.
What is the PicoP® Display Engine?
The PicoP display engine is the world’s
fi rst ultra miniature laser-based projector
engine. It uses red, green and blue
and a unique, tiny mirror-like device
that “paints” the image line-by-line on
the projection surface.
Page 11
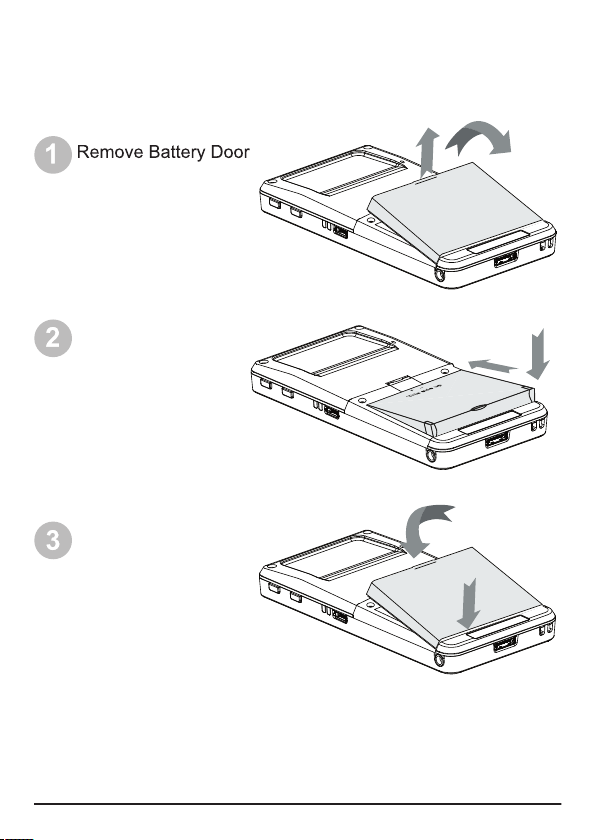
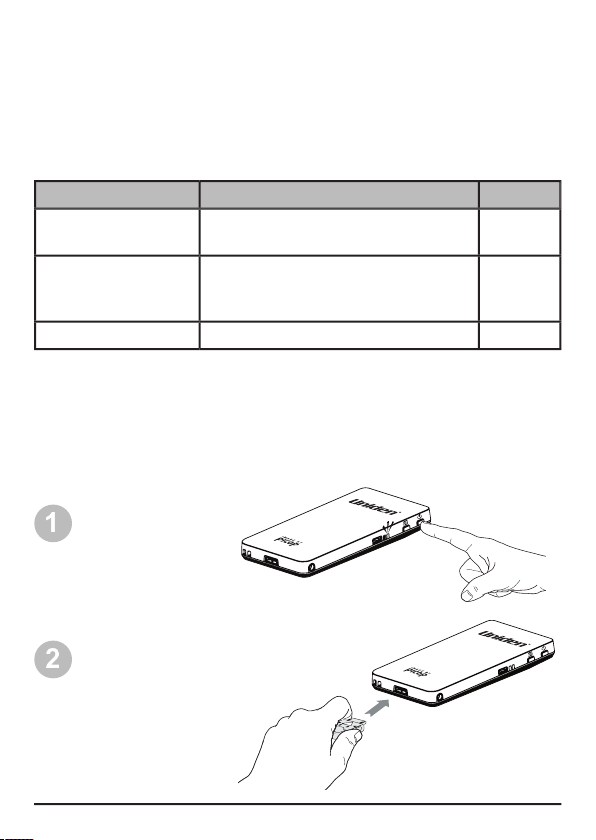
the battery.
are lined up.
2
1
1
2
2
1
Close Battery
Door
Page 12

» Allow for a minimum of 4 hours charging before fi rst time use.
» The wall charger will not charge the battery while the ULP1000 is
powered ON.
» The supplied battery is designed specifi cally for the ULP1000 and no
other battery should be used.
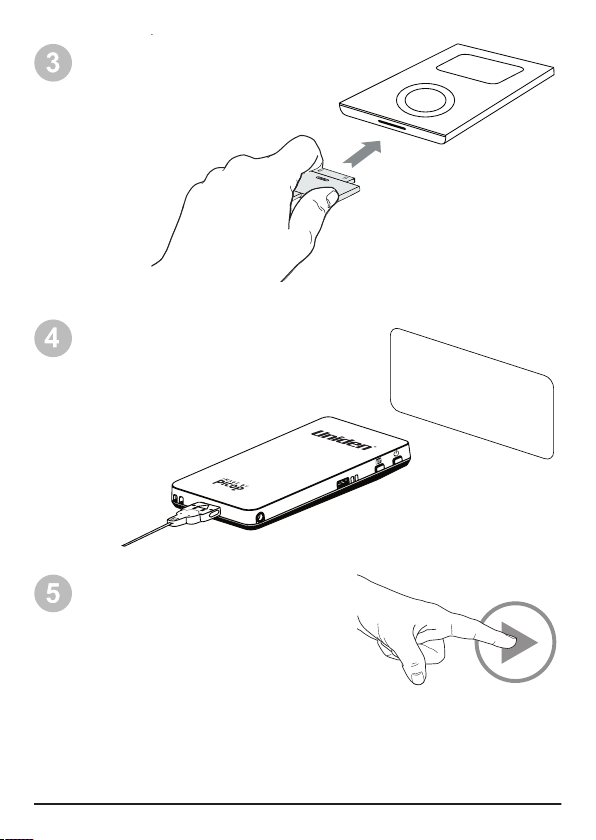
Connect To
Orange LED: Battery charging
Green LED: Battery fully charged
Page 13
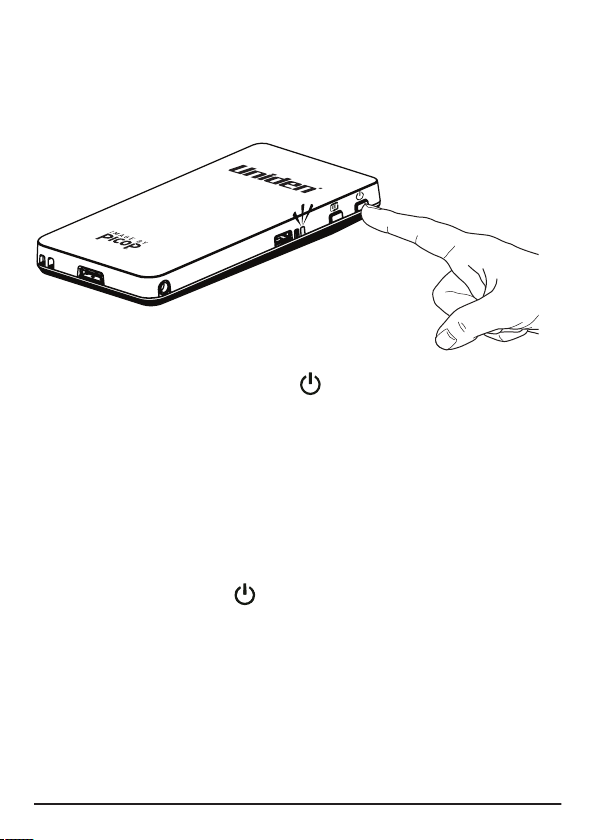
Turning OFF:
Press the button.
Turning ON:
Press and hold the button.
The blue LED will come on and the image will appear in about 15
seconds.
» During startup the image will fl ash with a series of different colours.
This is normal.
» A blinking Blue LED indicates the unit is starting up.
A solid Blue LED indicates the unit is ready for use.
Do not have the ULP1000 connected to any video device
Page 14

appearance of the image brightness. The closer to the screen
the brighter the image will appear.
There are two main factors to consider when using the ULP1000.
Ambient light
close curtains and turn lights down
to make the room dark so the
Page 15
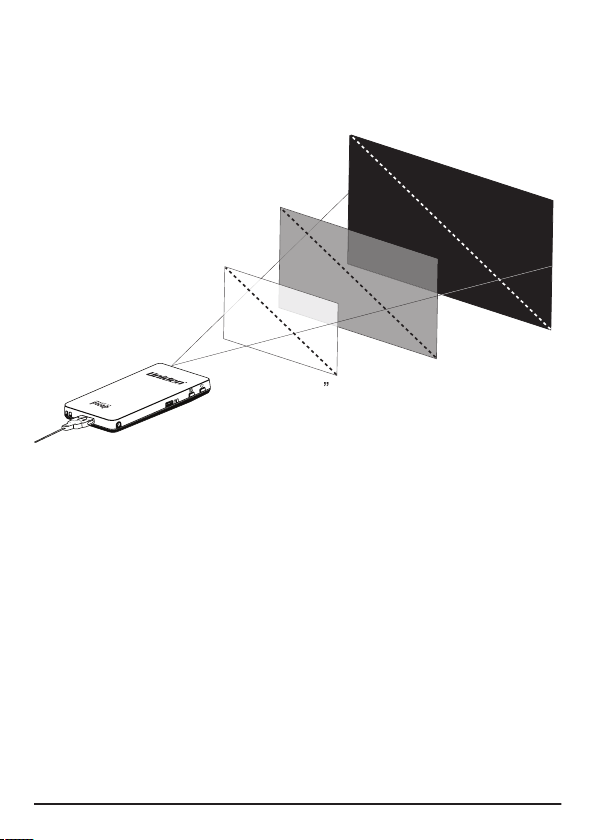
The following is a guideline of what image sizes are possible
Image diagonal is approximately equal to the distance from
the projector to the screen.
Complete Darkness
Semi-Dark
Semi-Lit
24”-36”
70”-100”
Page 16
The ULP1000 can connect to a variety of devices with TV-out such
as an iPod®, a laptop, cell phone, camera, and more.
The following describes the connectivity options available with the
Cable
Connect ULP1000 to…
iPod
iPod with Component TV-out
Yes
Video Adapter
(NTSC/PAL)
Any device with a male RCA Video
out connection
Yes
Yes
To see compatible devices with the ULP1000 visit www.uniden.com.au
Connect the cable
to the projector
Page 17
» While connected to an iPod, the Audio Jack on the iPod can also be
used.
» To see compatible devices with the ULP1000 visit www.uniden.com
Connect the cable to
the iPod (already on)
Wait to see “Ready
To Use” alert
Select Picture or Video content
and Press play on iPod
Ready To Use
Page 18

Video Sources
The ULP1000 can connect to other video sources that have
Composite (TV-out) using the included Composite adapter. To
display content, make sure the source device has TV-out set to
“ON” or “Enabled”. To learn if your video source device is capable
of TV-out and how to enable, refer to its User Guide.
Connect the adapter to the projector
Connect the Composite adapter to the yellow video RCA
connector that is connected to your TV-out device
Page 19

Page 20

20
Turn ON your ULP1000 laser pico projector.
Turn ON your laptop/computer.
Page 21
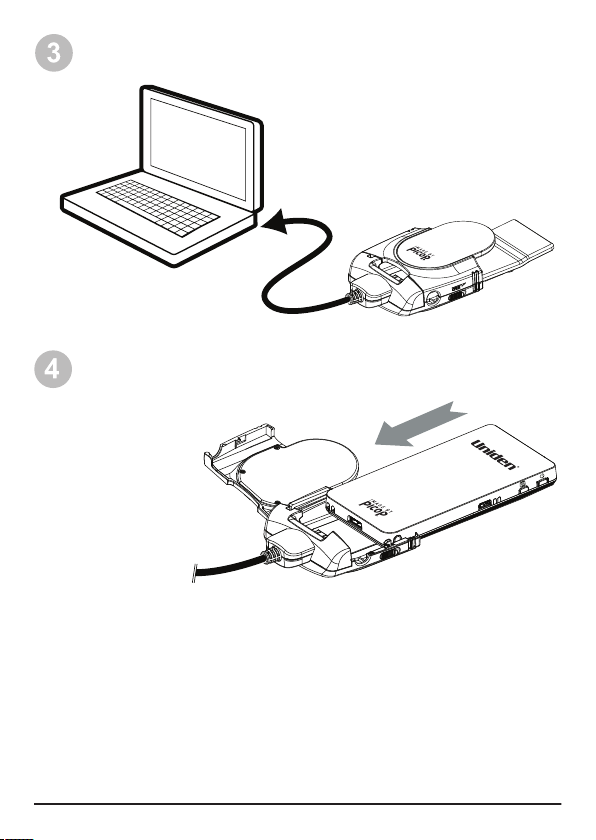
21
Connect the ULP1000 VGA DOCK to the monitor port on the
Page 22
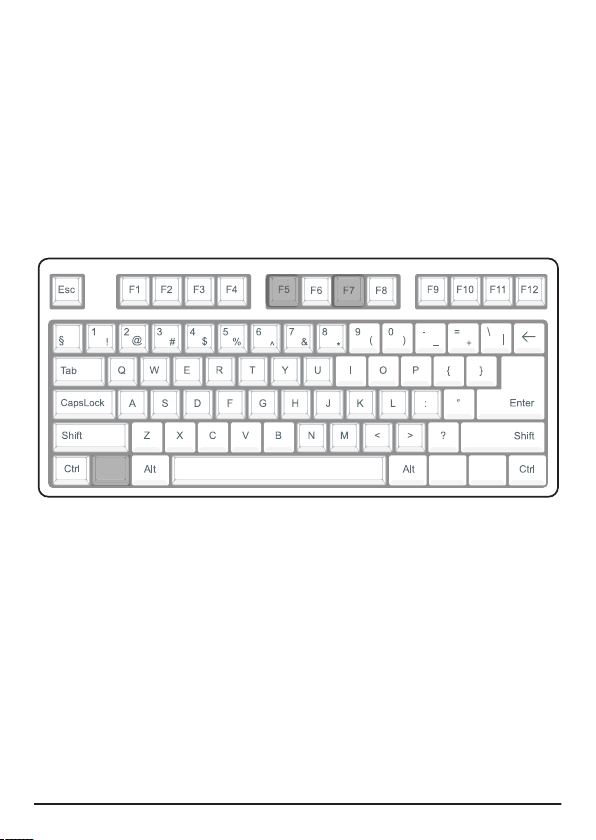
22
when a projector is connected. Usually a key combination like FN
+ F5 or a dedicated Monitor key is required to enable. Typically you
can press the FN key and the Monitor key simultaneously. Refer to
your laptop’s documentation to learn how your laptop can connect
to a projector.
VGA DOCK: Computer Display Settings
within the computer’s display settings. This can usually be found in;
Modes > Select supported mode > OK
Colour quality should be 32 or 16-bit colour
Page 23

23
All three resolutions with intuitive/easy set-up
Windows XP with Intel Graphics card - see page 24
Windows Vista PCs - see page 26
Windows 7 PCs - setup will be similar to Windows Vista setup
All MacBooks running OSX
Typically, VGA only possible with advanced user set-up
Typically, Windows XP with NVIDIA or ATI Graphics card
- refer to FAQ on our website;
www.uniden.com.au
www.uniden.co.nz
Will not connect, even after advance set-up
Typically PCs without VGA and at least 16 bit colour in “list all
the supported resolutions of the ULP1000.
The ULP1000 supports the following resolutions:
WVGA 848 X 480 (native)
WVGA2 800 x 400
VGA 640 x 480
Page 24
24
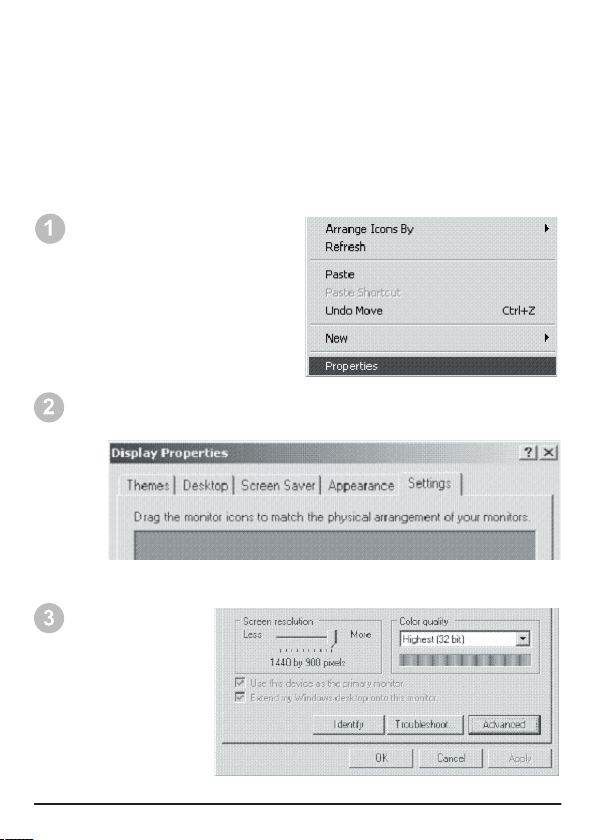
Windows XP Display Settings
(screen resolution, colour depth, and refresh rate) are supported by
your video card. With this list you can determine if expected modes
are not supported by Windows, possibly resulting in searching for
an updated driver or open your video card utility software to do the
your Desktop and choose
“Properties”.
When the “Display Properties” multi-tabbed dialog box
appears, click the “Settings” tab.
Click the
“Advanced”
Page 25

25
Click the “List All Modes” button. A “List All Modes” dialog box
will appear.
When the video card dialog
“Adapter” tab.
You can click “Cancel” on the dialog boxes to close them. Or,
click on a particular mode you wish to use, then “OK” on the
dialog boxes to change to the desired display mode.
Page 26
26
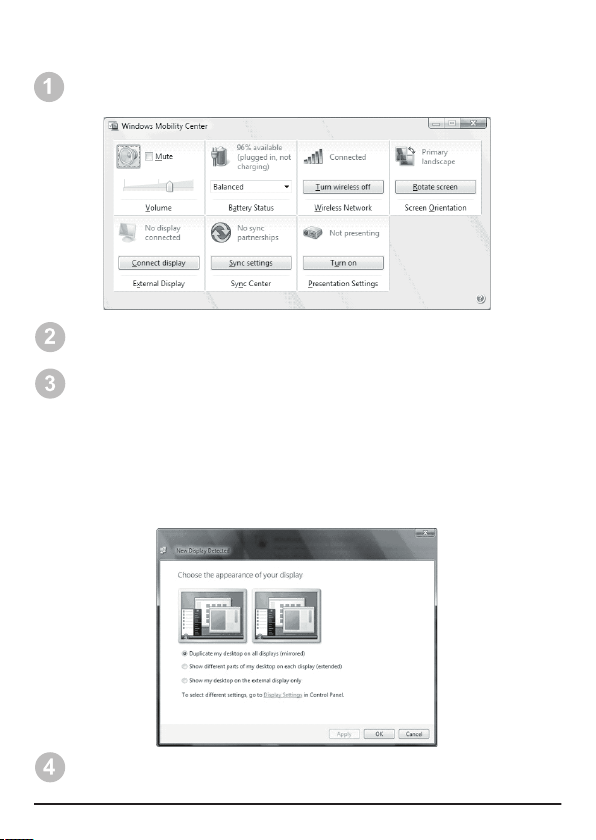
Windows Vista Display Settings
(or launch the Control Panel and click on Windows Mobility Center).
Click on the Connect Display button in the External Display area of the
Windows Mobility Center.
You may choose:
(i) Duplicate my desktop on all displays (mirrored)
– Your laptop monitor and ULP display the same content
(ii) Show different parts of my desktop on each display (extended)
– Your ULP is the extension of your laptop monitor desktop or
the other way around
(iii) Show my desktop on the external display only
– Only use the ULP to display
Then click Apply or OK to continue.
Page 27

27
(i) Select Monitor 2 in the visual or from the drop-down menu
(ii) Check the “Extend the desktop onto this monitor” box
(iii) And then click on
Apply
The screen should fl ash and the extended display is set.
You should now be able to drag a window, from one screen onto
another. If you would like to move your Start Menu onto the ULP1000,
just drag it onto the other screen. (You may need to right-click and
unlock the taskbar fi rst).
Also note that sometimes Windows will choose the lowest resolution
of the two displays, so if one of the windows looks wrong, go back
to the Display Settings and manually drag the
bar to the
correct resolutions for each monitor.
All MacBooks running OSX will be fully compatible
with the VGA DOCK.
You may click the Display
settings window to further
confi gure your display.
2 for Monitor 2.
your laptop’s display and Monitor 2 is your ULP1000 display. So, for
example, if your laptop is on the left and the ULP1000 is on the right,
drag the two boxes around so that Monitor 1 is on the left and Monitor
2 is on the right.
Page 28

28
Advanced Controls
The ULP1000 was designed as a plug-and-play device, however, some users may
want to make adjustments to the settings such as change colours, adjust aspect ratio,
and adjust brightness. The following information will help you understand how to fully
operate the ULP1000.
The ULP1000 includes two hot keys to allow
the user to quickly adjust the image depending
on the type of content being shown.
Color Mode:
Colour mode can be changed
without going into the Menu screen by press-
ing the button to change the colour mode.
Press the button to cycle through the colour
modes.
Gamma Mode:
Gamma mode can be changed
without going into the Menu screen by press-
ing on the button. Press the button to
cycle through the gamma modes.
Note:
The Color Mode hot key also includes
the ability to invert the image. Inverting the
image may improve the readability of certain
images. Also, if the content background is
predominately white, then inverting the image
(e.g., white becomes black) will extend battery
life.
The ULP1000 has an onscreen display to allow the user the ability to make advanced
changes to the projector. All settings changed by the user will remain even when
powered off.
Brightness: High
(default)
/ Medium / Low
Color Mode: Brilliant
(default)
/ Standard / Inverted / Gamma
Aspect Ratio: Widescreen
(default)
/ Normal / Zoom
System: Image Alignment / Color Alignment / Properties /
Reset Defaults
Page 29

29
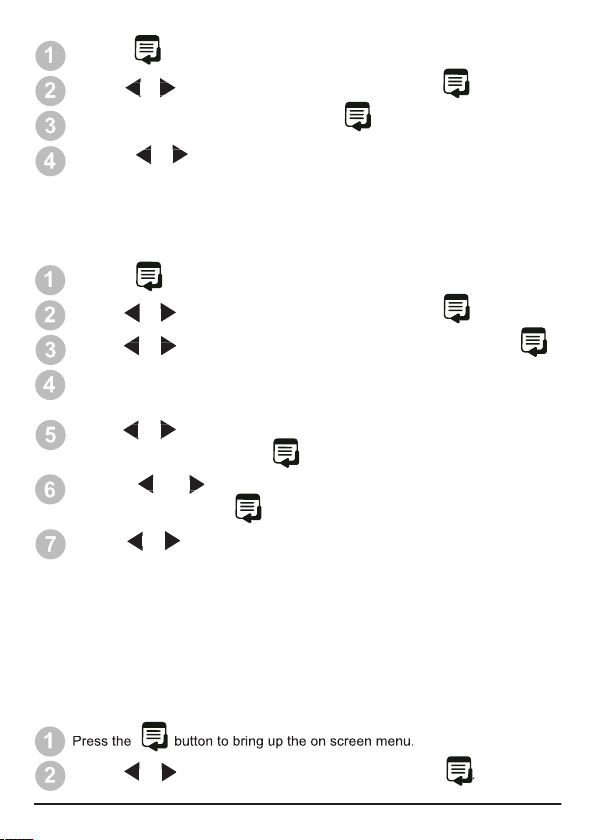
Press the button to bring up the on screen menu.
Use the or buttons to navigate to BRIGHTNESS and press .
Select the desired setting and press to accept.
Press the button to bring up the on screen menu.
Use the or buttons to navigate to ASPECT RATIO and press .
Select the desired setting and press to accept.
Press the button to bring up the on screen menu.
Use the or buttons to navigate to COLOR MODE and press .
Select the desired setting and press to accept.
The image brightness can be reduced for cl
ose distance viewing in d
a
rker
environ
ments.
The ULP1000 has 3 default colour modes.
Brilliant Colours: Bright and vivid colours.
Standard Colours: More accurate fl esh tones and grey scales.
text on white backgrounds.
The image may appear cropped or skinny. The aspect ratio may be different from the
video source device.
The image may appear to be slightly fuzzy. Adjustment of the image alignment may
be necessary.
Press the button to bring up the on screen menu.
Page 30
30
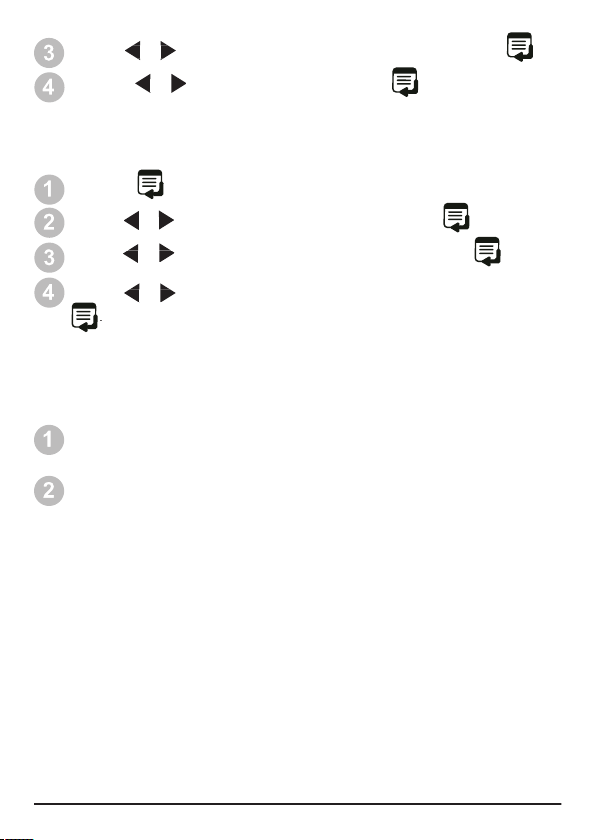
Press the button to bring up the on screen menu.
Use the or buttons to navigate to SYSTEM and press .
Navigate to IMAGE ALIGNMENT and press .
Press the or buttons to adjust the image until all vertical lines appear
sharp and clear.
Press the button to bring up the on screen menu.
Use the or buttons to navigate to SYSTEM and press .
Use the or buttons to navigate to COLOR ALIGNMENT and press .
An image of a vertical and horizontal crossed in the middle will appear in the
center of the screen.
Use the or buttons to select the desired colour (Red Adjust, Green
Adjust,
Blue Adjust) to adjust and press .
Use the or buttons to select either HORIZONTAL or VERTICAL
JUSTMENT and press .
Use the or buttons to move the selected colour until a solid white line is
visible either vertically or horizontally.
Users can adjust horizontal or vertical alignment of each individual colour (red, green,
and blue).
Note:
» When adjusting colours HORIZONTALLY use the Vertical line (top-bottom) as the
reference.
» When you exit the confi guration menu after image alignment it will take 10 seconds
for the normal image to appear.
Press the button to bring up the on screen menu.
Use the or buttons to navigate to SYSTEM and press .
To reset all user selectable settings to factory defaults.
Page 31
31
Press the button to bring up the on screen menu.
Use the or buttons to navigate to SYSTEM and press .
Use the or buttons to navigate to PROPERTIES and press .
Use the or buttons to navigate to BATTERY INFORMATION and
press
.
Keep the window clean for best image quality.
Apply a non-abrasive camera lens cleaner to a soft, dry cloth.
Lightly wipe the cleaning cloth over the window until clean.
Note:
» Do not attempt to use solvents or other harsh chemicals as it may damage the
window.
» Make sure cleaning cloth is free of dust or debris to avoid scratching the window.
Proper care should be taken to safely store and transport the projector. To store and
transport the ULP1000 use the included storage pouch. Use care and do not drop the
ULP1000 or spill liquids on it.
The audio jack on the ULP1000 works only when the Audio signal is is combined with
the Video signal. The Audio Jack is for output only.
Use the or buttons to navigate to RESET DEFAULTS and press .
Press the or buttons to select YES and press .
Page 32

32
Troubleshooting
Cause
Solution
The projector does
not turn on.
correctly. Battery not
charged.
correctly inserted. Make
sure the battery is fully
charged.
The projector col-
ours look incorrect.
lected.
Change to preferred
Colour Mode.
The projector
randomly turns off
but the Blue LED
stays on.
The projector may be
out of the recom-
mended operating
range.
well ventilated and within
the operating temperature
range. Turn off for 5 min-
utes and restart.
my iPod.
- OR –
mode.
TV-out functionality and is
enabled. Make sure the
correct for the cable be-
ing used.
The projector won’t
turn off or on and
the Blue LED stays
on.
System is frozen.
button for 20 seconds.
remove battery. Then re-
insert and turn on.
The projector
doesn’t work with
my cell phone.
have the TV-out
feature.
manufacturer’s user guide
if TV-out is available and
how to confi gure.
The image looks a
little fuzzy.
- OR -
Clean the Window,
-OR-
Adjust Image Alignment.
The green LED
keeps blinking
while charging.
The battery is not
correctly inserted in
the ULP1000.
correctly inserted into
the ULP1000.
Page 33

33
Solid Blue
Solid Orange
Solid Green
Temporary problem
Solid Red
System failure
Australia
www.uniden.com.au
www.uniden.co.nz
You can fi nd the Serial Number located under the battery.
Cause
Solution
The red LED is
blinking.
Out of operating
range. Temporary
Turn projector off.
insert and power on.
charge.
capable of holding a
charge.
The red LED is con-
stantly on even after
trying to restart.
System failure.
Contact Customer
Support.
Page 34

34
ONE YEAR LIMITED WARRANTY
WARRANTOR:
Warranty only available in original country of purchase.
warranty, its UNIDEN ULP1000 POCKET PROJECTOR (herein after
referred to as the Product), to be free from defects in materials and
craftsmanship with only the limitations or exclusions set out below.
WARRANTY DURATION
This warranty to the original retail owner only, shall terminate and be of
no further effect ONE (1) year after the date of original retail sale.
This warranty will be deemed invalid if the Product is;
(A) Damaged or not maintained as reasonable and necessary,
(B) Modifi ed, altered or used as part of any conversion kits,
subassemblies, or any confi gurations not sold by Uniden,
(C) Improperly installed,
(D) Repaired by someone other than an authorized Uniden Repair
Agent for a defect or malfunction covered by this warranty,
(E) Used in conjunction with any equipment or parts or as part of a
system not manufactured by Uniden, or
(F) Where the Serial Number label of the product has been removed
or damaged beyond recognition.
Warranty only valid in the country of original retail/sale.
This warranty covers for one (1) year, the Product and included
accessories.
Page 35

35
STATEMENT OF REMEDY:
time while this warranty is in effect, the warrantor at its discretion will
repair the defect or replace the Product and return it to you without
charge for parts or service. This warranty does not provide for
reimbursement or payment of incidental or consequential damages.
This EXPRESS WARRANTY is in addition to and does not in any
way affect your rights under the TRADE PRACTICES ACT 1974 (Cth)
(Australia) or the CONSUMER GUARANTEES ACT (New Zealand).
of original purchase (e.g. a copy of the sales docket), to the warrantor
at:
SERVICE DIVISION
345 Princes Highway, Rockdale NSW 2216
www.uniden.com.au
SERVICE DIVISION
www.uniden.co.nz
Customers in other States should ship or deliver the Product freight
pre-paid to their nearest Uniden Authorized Repair Centre (Contact
Page 36

©
2009 Uniden
Australia Pt
y
 Loading...