

Page 1
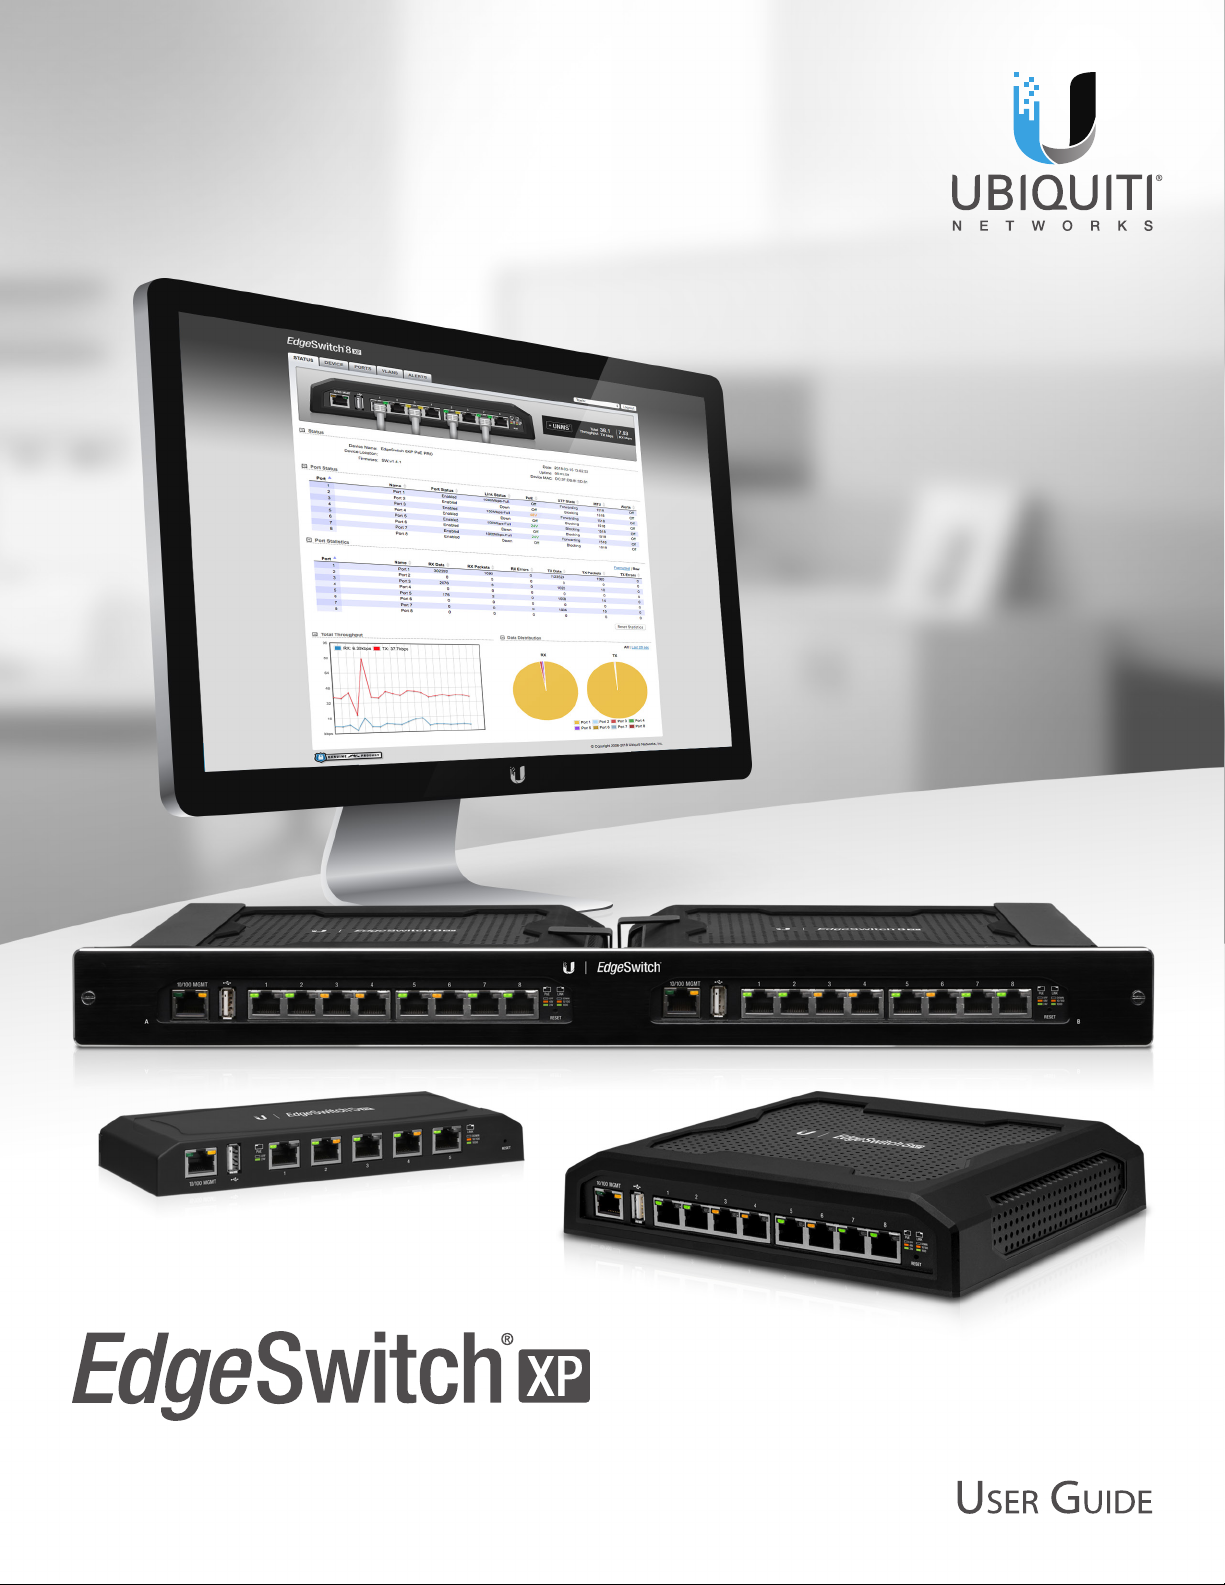
Configuration Interface
Release Version: 1.4.1
Page 2

Page 3

Table of Contents
Chapter 1: Overview ................................................1
Introduction. . . . . . . . . . . . . . . . . . . . . . . . . . . . . . . . . . . . . . . . . . . . . . . . . . . . . . . . . . . . . . . . . . . . . . 1
Configuration Interface System Requirements. . . . . . . . . . . . . . . . . . . . . . . . . . . . . . . . . . . . . 1
Hardware Overview ..............................................................1
Chapter 2: Navigation ..............................................5
Accessing the Configuration Interface ............................................5
Configuring the EdgeSwitch 16XP ................................................6
Product Verification ..............................................................6
Interface Tabs ....................................................................6
Chapter 3: Status Tab ...............................................7
Status ............................................................................8
Port Status .......................................................................8
Port Statistics .....................................................................8
Total Throughput .................................................................9
Data Distribution .................................................................9
Details for Port ...................................................................9
Table of ContentsEdgeSwitch XP User Guide
Chapter 4: Device Tab .............................................11
Firmware Update ................................................................12
Management Network Settings ..................................................12
Basic Settings ...................................................................13
Management Connection Settings ...............................................13
Services .........................................................................14
Spanning Tree Protocol ..........................................................15
Jumbo Frames. . . . . . . . . . . . . . . . . . . . . . . . . . . . . . . . . . . . . . . . . . . . . . . . . . . . . . . . . . . . . . . . . . .16
Device Discovery ................................................................16
System Accounts ................................................................16
Device Maintenance .............................................................16
Configuration Management .....................................................16
Chapter 5: Ports Tab ..............................................17
Basic Settings for Port ...........................................................18
Ping Watchdog for Port ..........................................................18
Spanning Tree Settings for Port ..................................................19
Configure Alerts for Port .........................................................19
Chapter 6: VLANs Tab .............................................21
VLANs ...........................................................................22
Trunk ...........................................................................22
Ubiquiti Networks, Inc.
i
Page 4

Table of Contents EdgeSwitch XP User Guide
Chapter 7: Alerts Tab ..............................................23
Alert Log ........................................................................23
System Log ......................................................................24
Chapter 8: Tools ...................................................25
MAC Forwarding Table ..........................................................25
Ping .............................................................................25
Traceroute ......................................................................26
Discovery .......................................................................26
Appendix A: Contact Information ..................................27
Ubiquiti Networks Support ......................................................27
ii
Ubiquiti Networks, Inc.
Page 5
Chapter 1: OverviewEdgeSwitch XP User Guide
Chapter 1: Overview
Introduction
Thank you for purchasing the Ubiquiti® EdgeSwitch® XP,
which is part of the EdgeSwitch series:
Name Model Description
EdgeSwitch 5XP ES-5XP 5-port managed switch
featuring 24VPoE
EdgeSwitch 8XP ES-8XP 8-port managed switch
featuring 24V/48V PoE
EdgeSwitch 16XP ES-16XP Two EdgeSwitch 8XP
units mounted in a rack
The EdgeSwitch is a managed switch designed to deliver
Power over Ethernet (PoE) on the 10/100/1000ports
you have configured for PoE. It also offers a variety of
features, including port monitoring, system connection
and management services, Virtual Local Area Network
(VLAN) configuration, Spanning Tree Protocol (STP), Ping
Watchdog, and alerts setup.
This User Guide is designed to provide details about
how to set up and use the Configuration Interface. This
intuitive interface allows you to conveniently manage your
EdgeSwitch using your web browser.
You can also manage your device using the Ubiquiti
Network Management System, UNMS™, which lets you
configure, monitor, upgrade, and back up your devices
using a singlesoftware application. To get started, go to:
unms.com
Note: There are additional ventilation holes on the
top and sides of the EdgeSwitch.
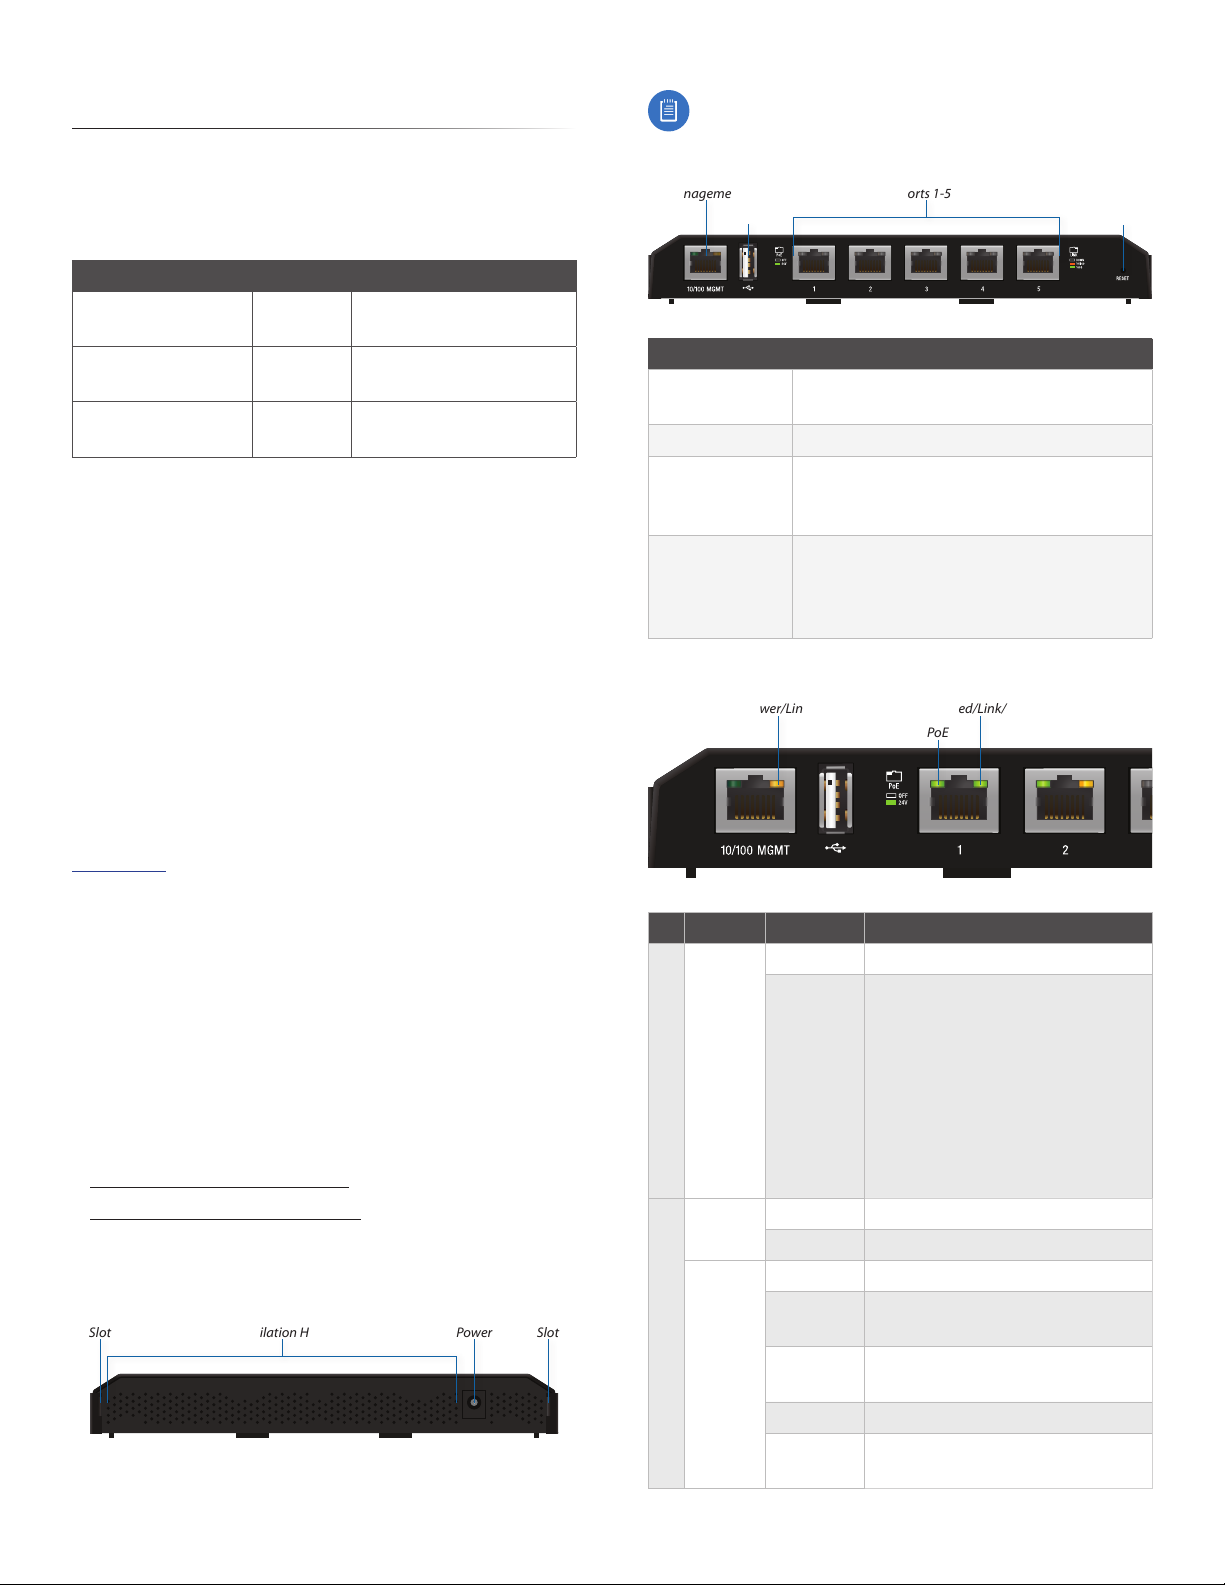
Front Panel Ports
Management
USB
Interface Description
Management
10/100 Mbps port used to access the
EdgeSwitch Configuration Interface.
USB Reserved for future use.
Ports 1-5 10/100/1000 Mbps ports for switching
and PoE (also available for management
by default).
To reset to factory defaults, press
Reset
and hold the Reset button for more
than 10seconds while the unit is
poweredon.
Ports 1-5
Front Panel LEDs
Power/Link
Speed/Link/Act
PoE
Reset
Configuration Interface System Requirements
• Linux, MacOSX, or Microsoft Windows
• Web Browser: Mozilla Firefox, Apple Safari, Google
Chrome, or Microsoft Internet Explorer
Hardware Overview
Proceed to the description for your EdgeSwitch model:
• EdgeSwitch 5XP (see below)
• “EdgeSwitch 8XP” on page 2
• “EdgeSwitch 16XP” on page 3
EdgeSwitch 5XP
Back Panel
Grounding
Slot
Ventilation Holes
Power
Grounding
Slot
LED State Status
Off No Power/No Link
After bootup, the LED indicates
power. After an initial link is
established, the LED indicates a
Power/
Link
Management
Amber
10/100 Mbps connection. If the
link terminates, the LED turns
off until a link is re-established.
If the unit reboots, the LED will
again indicate power until a
link is established.
PoE
Off No Power over Ethernet
Green 24V Power over Ethernet
Off No link
Amber Link established at
10/100Mbps
Speed/
Ports 1-5
Link/
Act
Amber
Flashing
Link activity at 10/100 Mbps
Green Link established at 1000 Mbps
Green
Flashing
Link activity at 1000 Mbps
Ubiquiti Networks, Inc.
1
Page 6
Chapter 1: Overview EdgeSwitch XP User Guide
EdgeSwitch 8XP
Back Panel
Ventilation Holes
Note: There are additional ventilation holes on the
top and sides of the EdgeSwitch.
Front Panel Ports
Management
USB
Interface Description
Management
10/100 Mbps port used to access the
EdgeSwitch Configuration Interface.
USB Reserved for future use.
Ports 1-8 10/100/1000 Mbps ports for switching
and PoE (also available for management
by default).
To reset to factory defaults, press
Reset
and hold the Reset button for more
than 10seconds while the unit is
poweredon.
Ports 1-8
Power
Reset
Front Panel LEDs
Power/Link
LED State Status
Off No Power/No Link
Power/
Link
Management
PoE
Speed/
Ports 1-8
Link/
Act
Amber
Off No Power over Ethernet
Green 24V Power over Ethernet
Amber 48V Power over Ethernet
Off No link
Amber Link established at
Amber
Flashing
Green Link established at 1000 Mbps
Green
Flashing
Speed/Link/Act
PoE
After bootup, the LED indicates
power. After an initial link is
established, the LED indicates a
10/100 Mbps connection. If the
link terminates, the LED turns
off until a link is re-established.
If the unit reboots, the LED will
again indicate power until a
link is established.
10/100Mbps
Link activity at 10/100 Mbps
Link activity at 1000 Mbps
2
Ubiquiti Networks, Inc.
Page 7
Chapter 1: OverviewEdgeSwitch XP User Guide
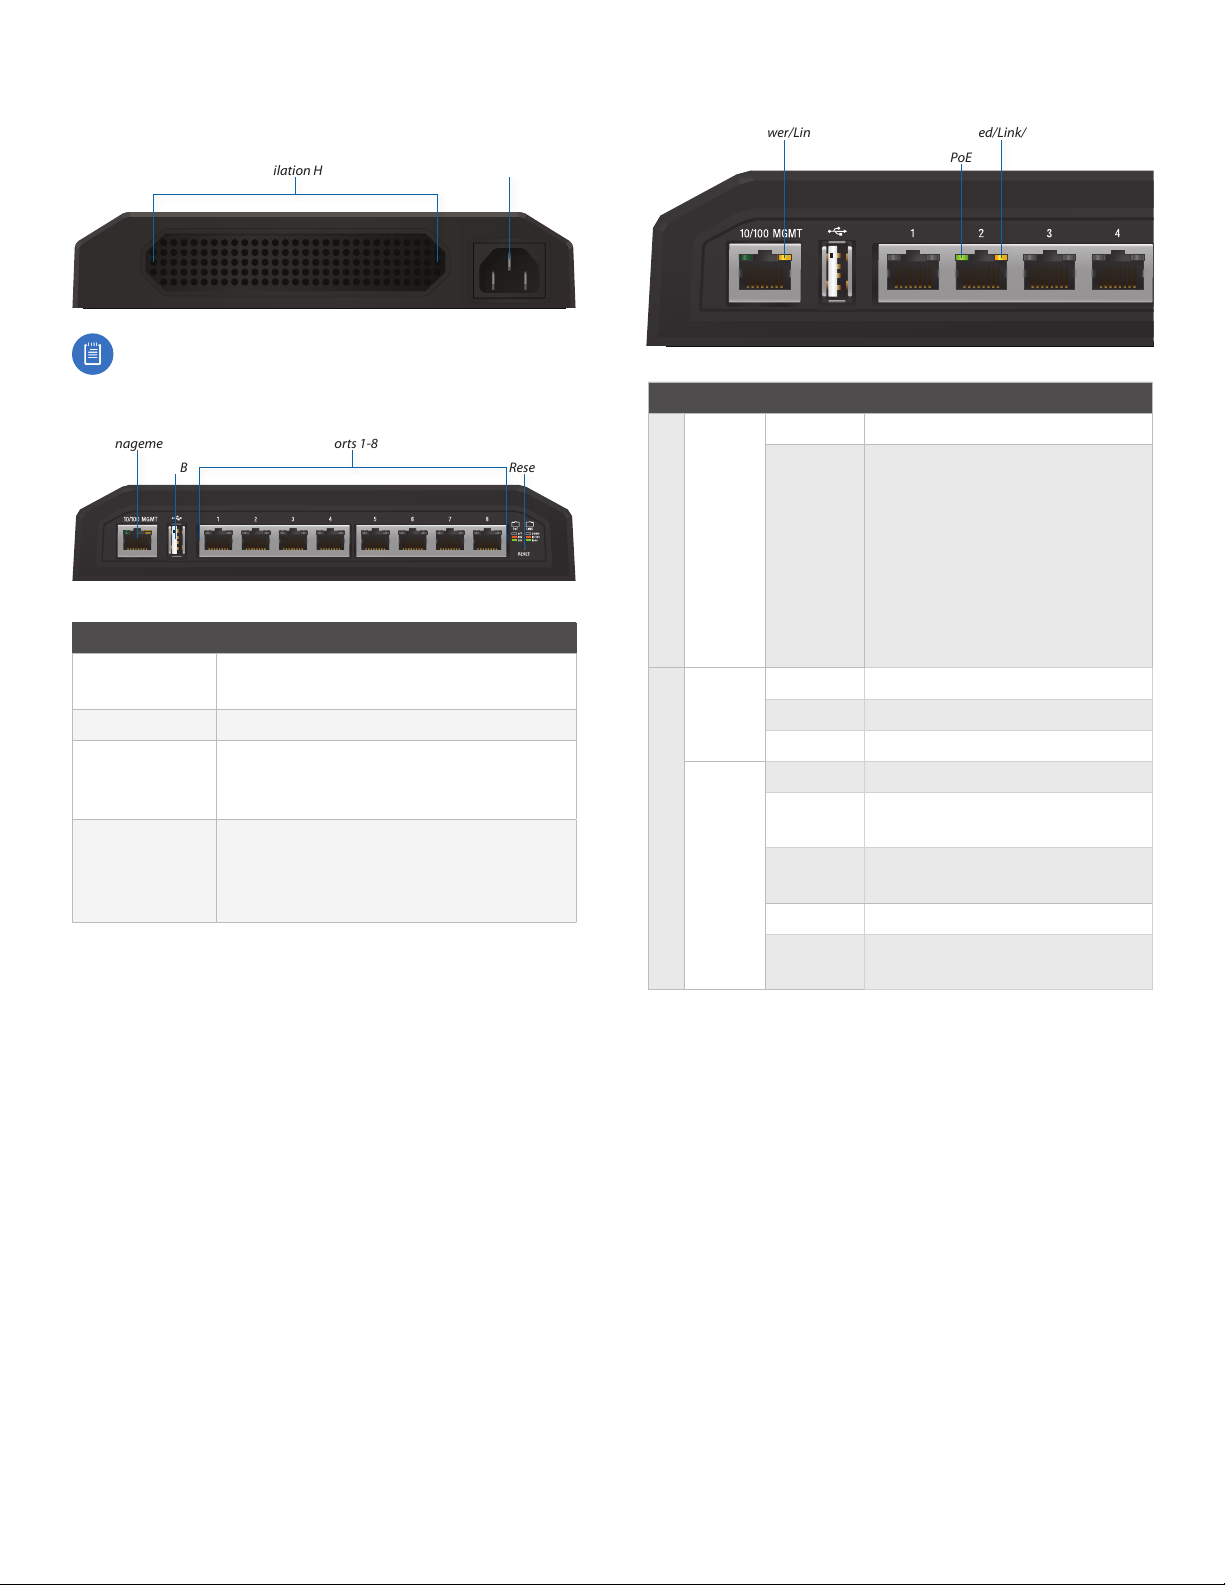
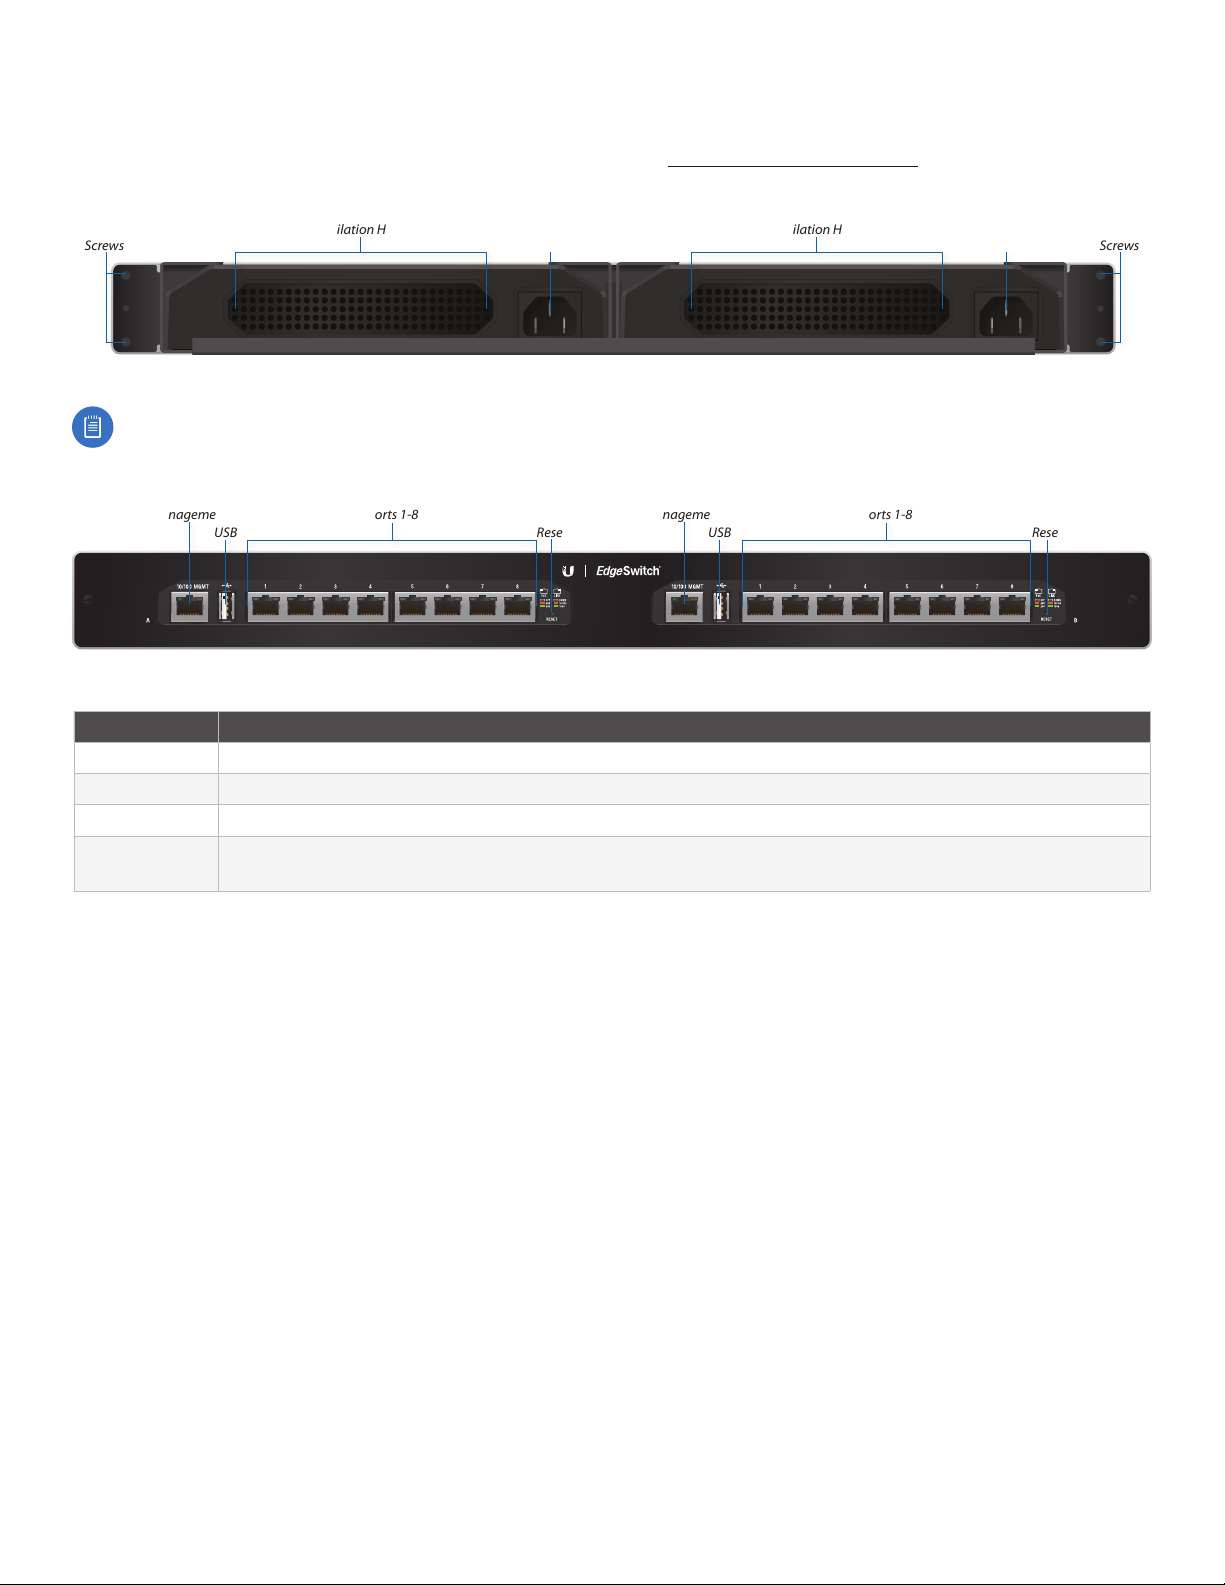
EdgeSwitch 16XP
A and B designate the two EdgeSwitch 8XP devices housed in the rack. This may be useful for the Location setting on the
Device tab in the Configuration Interface (for more information, go to “Basic Settings” on page 13).
Back Panel
Mounting
Screws
Ventilation Holes
EdgeSwitch B EdgeSwitch A
Power
Note: There are additional ventilation holes on the top and sides of the EdgeSwitch.
Front Panel Ports
Management
USB
Ports 1-8
Reset
Management Ports 1-8
USB
Ventilation Holes
Power
Mounting
Reset
Screws
EdgeSwitch A EdgeSwitch B
Interface Description
Management 10/100 Mbps port used to access the EdgeSwitch Configuration Interface.
Ports 1-8 10/100/1000 Mbps ports for switching and PoE (also available for management by default).
USB Reserved for future use.
Reset
To reset to factory defaults, press and hold the Reset button for more than 10 seconds while the unit is
powered on.
Ubiquiti Networks, Inc.
3
Page 8

Chapter 1: Overview EdgeSwitch XP User Guide
Front Panel LEDs
Power/Link
LED State Status
Off No Power/No Link
After bootup, the LED indicates
power. After an initial link is
established, the LED indicates a
Power/
Link
Management
Amber
10/100 Mbps connection. If the
link terminates, the LED turns
off until a link is re-established.
If the unit reboots, the LED will
again indicate power until a
link is established.
Off No Power over Ethernet
PoE
Green 24V Power over Ethernet
Amber 48V Power over Ethernet
Off No link
Amber Link established at
10/100Mbps
Speed/
Ports 1-8
Link/
Act
Amber
Flashing
Link activity at 10/100 Mbps
Green Link established at 1000 Mbps
Green
Flashing
Link activity at 1000 Mbps
Speed/Link/Act
PoE
4
Ubiquiti Networks, Inc.
Page 9
EdgeSwitch XP User Guide
Chapter 2: Navigation
Chapter 2: Navigation
The Configuration Interface is an advanced operating
system accessed through a simple and intuitive user
interface. The EdgeSwitch uses the Configuration Interface
for convenient configuration and management via a web
browser.
If your EdgeSwitch model is the EdgeSwitch 5XP or
EdgeSwitch 8XP, proceed to the next section, Accessing the
Configuration Interface.
If your EdgeSwitch model is the EdgeSwitch 16XP, proceed
to “Configuring the EdgeSwitch 16XP” on page 6.
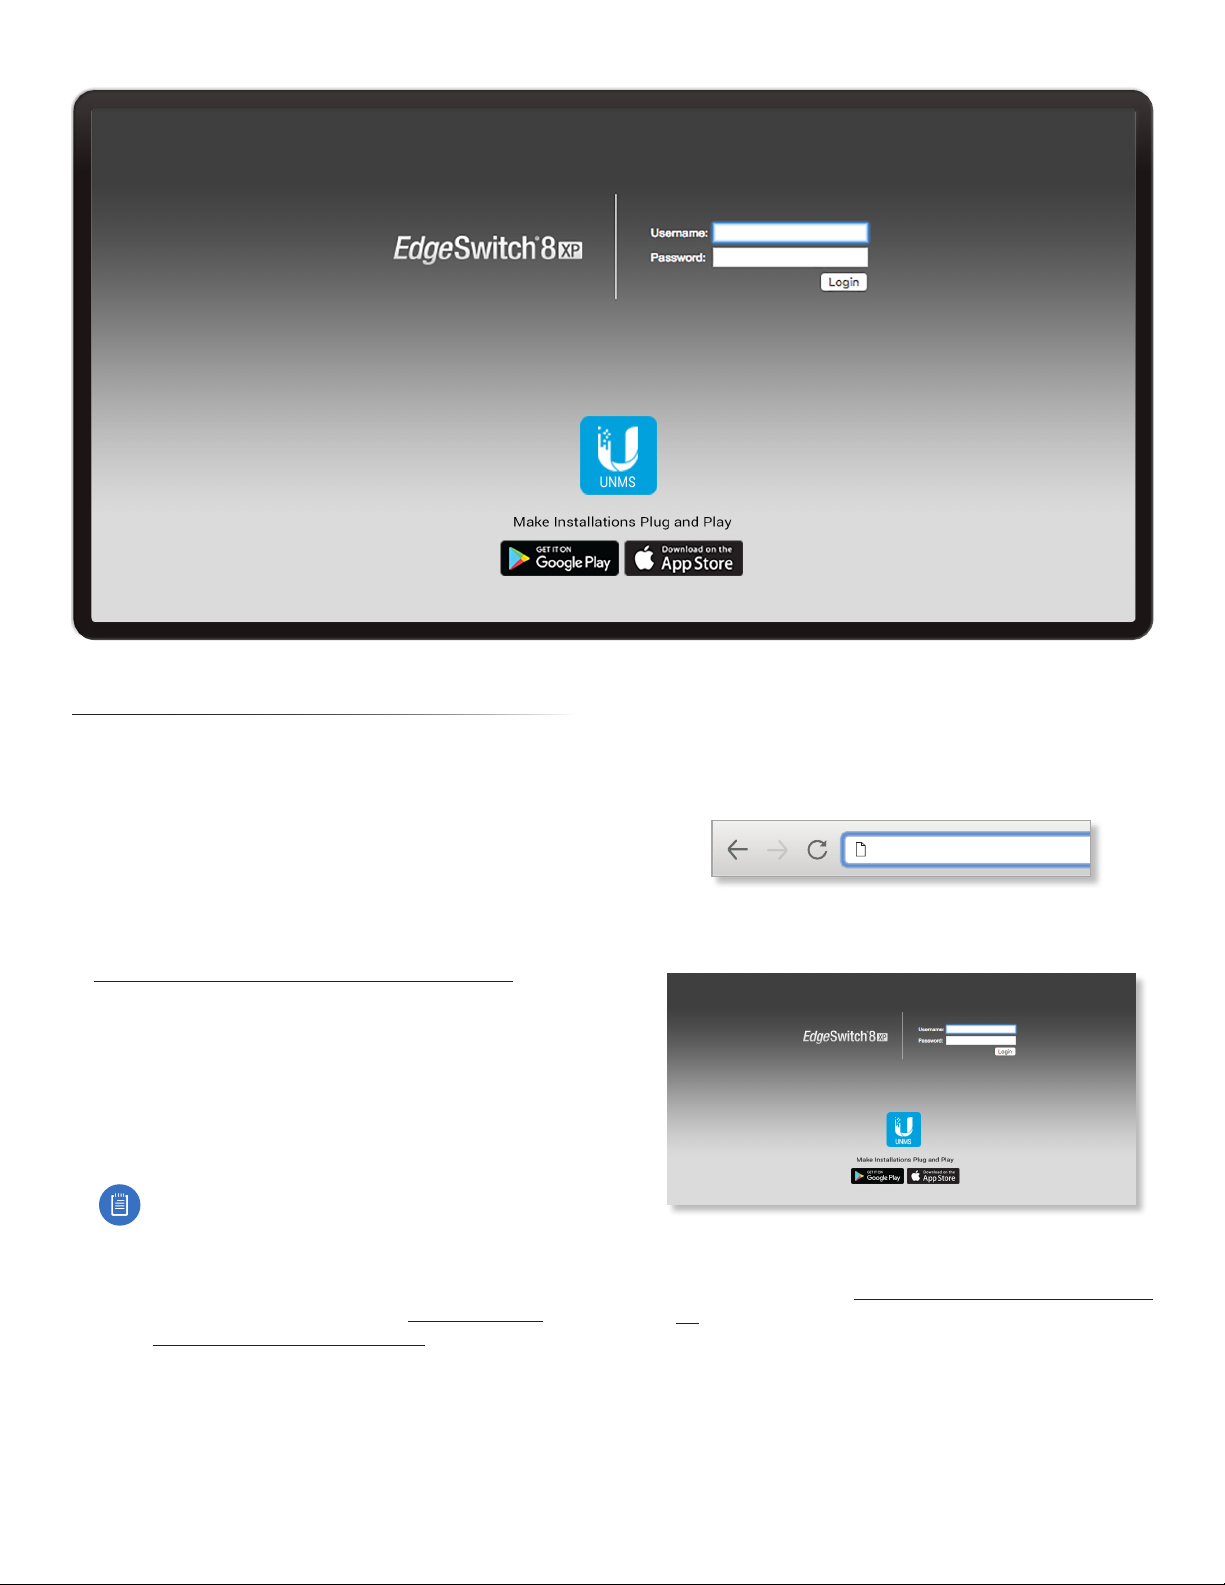
Accessing the Configuration Interface
Connect to the Configuration Interface by performing the
following steps:
1. Ensure that your computer (or other host machine) is
connected to the Management port on the EdgeSwitch.
Note: By default, you can configure the
EdgeSwitch via any port; however, we
recommend the Management port. (Access to
the Configuration Interface can be limited to the
Management port only. You can configure this
setting on the Device tab; see “Management
Network Settings” on page 12.)
2. Configure the Ethernet adapter on your host system
with a static IP address on the 192.168.1.x subnet (for
example, 192.168.1.100).
3. Launch your web browser. Type https://192.168.1.20
in the address field. Press enter (PC) or return (Mac).
https://192.168.1.20
4. The login screen will appear. Enter ubnt in the
Username and Password fields. Click Login.
5. The Configuration Interface will appear, allowing you to
customize your settings as needed. You can enable PoE
on the Ports tab; see “Basic Settings for Port” on page
18.
Ubiquiti Networks, Inc.
5
Page 10
Chapter 2: Navigation
EdgeSwitch XP User Guide
Configuring the EdgeSwitch 16XP
EdgeSwitch A and B have the same default IP address,
192.168.1.20, so you will need to change the IP address
of at least one EdgeSwitch. Follow the instructions in this
section to configure one EdgeSwitch at a time, starting
with EdgeSwitchA.
1. Ensure that your computer (or other host machine) is
connected to the Management port on the EdgeSwitch.
Note: By default, you can configure the
EdgeSwitch via any port; however, we
recommend the Management port. (Access to
the Configuration Interface can be limited to the
Management port only. You can configure this
setting on the Device tab; see “Management
Network Settings” on page 12.)
2. Configure the Ethernet adapter on your host system
with a static IP address on the 192.168.1.x subnet (e.g.,
192.168.1.100).
3. Launch your web browser. Type https://192.168.1.20
in the address field. Press enter (PC) or return (Mac).
https://192.168.1.20
6. You can enable PoE on the Ports tab and customize
additional settings as needed.
7. Disconnect the Ethernet cable from the Management
port of EdgeSwitch A and connect it to the
Management port of EdgeSwitch B. Then repeat steps
1-5 on EdgeSwitch B.
Product Verification
The Configuration Interface will verify whether a product
is genuine or counterfeit.
For a genuine EdgeSwitch, the Configuration Interface will
display a Genuine Product logo in the lower left corner of
the screen.
For any product that is not an official Ubiquiti product, the
Configuration Interface will display a counterfeit warning.
Please contact Ubiquiti at support@ubnt.com regarding
this product.
4. The login screen will appear. Enter ubnt in the
Username and Password fields. Click Login.
5. Change the Static Management IP Address to a unique
IP address on the Device tab. Click Save Changes.
Interface Tabs
The Configuration Interface contains five main tabs, each
of which provides a web-based management page to
configure a specific aspect of the EdgeSwitch. This User
Guide covers each tab with a chapter. For details on a
specific tab, refer to the appropriate chapter.
• Status The “Status Tab” on page 7 displays status
information and statistics for each port.
• Device The “Device Tab” on page 11 configures
system settings and services for the EdgeSwitch.
• Ports The “Ports Tab” on page 17 configures
settings and services for each port.
• VLANs The “VLANs Tab” on page 21 configures
Virtual Local Area Networks (VLANs) for the various
ports.
• Alerts The “Alerts Tab” on page 23 displays alerts if
alert logging is configured and system log messages if
system logging is enabled.
Each page also contains a Tools drop-down menu to
access network administration and monitoring tools:
• “MAC Forwarding Table” on page 25
• “Ping” on page 25
• “Traceroute” on page 26
• “Discovery” on page 26
6
Ubiquiti Networks, Inc.
Page 11

EdgeSwitch XP User Guide
Chapter 3: Status Tab
Chapter 3: Status Tab
The Status tab displays a summary of the link status
information, current values of the basic configuration
settings, network settings and information, and traffic
statistics.
Ubiquiti Networks, Inc.
The EdgeSwitch image displays the active LEDs and
connections. Refer to “Hardware Overview” on page
1 for more information.
7
Page 12

Chapter 3: Status Tab
EdgeSwitch XP User Guide
UNMS You can also manage your device using UNMS,
which lets you configure, monitor, upgrade, and back up
your devices using a singleapplication. Click the UNMS
button to visit: unms.com
The color of the circular icon represents the status of the
connection to UNMS.
Color Status
Connected to UNMS
Connecting to UNMS
Disabled
Total Throughput Displays the current TX and RX data
traffic values.
Port Status Place your mouse over a port to view its PoE
status, Speed setting, duplex mode, and statistics for TX
and RX throughput.
Status
Port Status
Port Displays the number of the port.
Name Displays the name of the port.
Port Status Displays the activity status of the link
connection.
Link Status Displays the speed and duplex mode of the
port. If the port is inactive, Down is displayed.
PoE Displays the status and voltage of the PoE feature.
24V is displayed in green. 48V* is displayed in orange
(*available only on the EdgeSwitch 8XP).
STP State Displays the Spanning Tree Protocol (STP)
state if STP is enabled on the Device tab. Displayed STP
states include Blocking, Learning, and Forwarding. (See
“Spanning Tree Protocol” on page 15 for more
information.)
MTU Displays the Maximum Transmission Unit (MTU),
which is the maximum packet size (in bytes) that a
network can transmit.
Alerts Displays whether alerts are set on this port.
Device Name Displays the customizable name or
identifier of the device. The Device Name (also known
as host name) is displayed in registration screens and
discovery tools.
Device Location Displays the description of the device’s
location.
Firmware Displays the firmware version of the
Configuration Interface.
Date Displays the current system date and time. The date
and time are displayed in yyyy-mm-dd hr:min:sec format.
The system date and time is retrieved from the internet
using NTP (Network Time Protocol). The NTP Client is
disabled by default on the Device tab. The device doesn’t
have an internal clock, and the date and time may be
inaccurate if the NTP Client is disabled or the device isn’t
connected to the internet.
Uptime This is the total time the device has been running
since the latest reboot (when the device was powered up)
or software upgrade. The time is displayed in days, hours,
minutes, and seconds.
Device MAC Displays the Media Access Control (MAC)
address of the device.
Port Statistics
Raw/Formatted The statistics are available in two
formats. Click the format you prefer.
• Raw Displays data totals as exact numbers of bytes.
The Raw display option is therefore more accurate than
the Formatted option, which displays data totals only to
three decimal places.
- RX/TX Packets For the EdgeSwitch 5XP only, you can
hold your mouse over the statistic to display a popup
with packet size details.
8
Ubiquiti Networks, Inc.
Page 13

EdgeSwitch XP User Guide
Chapter 3: Status Tab
- RX/TX Errors If there are errors, you can hold your
mouse over the statistic to display a popup with error
details.
• Formatted Displays data in kilobytes (KB), megabytes
(MB), gigabytes (GB), or terabytes (TB) – with an
accuracy of up to three decimal places. For example, if
1GB is displayed, it will be followed by 1.001GB (1GB +
1MB).
Port Displays the number of the port.
Name Displays the name of the port.
RX Bytes/Data Displays the amount of data received.
RX Bytes displays the amount in the Raw format (actual
number of bytes). RX Data displays the amount in
the Formatted format using one of these units of
measurement: kilobytes (KB), megabytes (MB), gigabytes
(GB), or terabytes (TB) – with an accuracy of up to three
decimal places.
RX Packets Displays the number of packets received
without errors.
RX Errors Displays the number of packets received with
errors.
TX Bytes/Data Displays the amount of data transmitted.
TX Bytes displays the amount in the Raw format (actual
number of bytes). TX Data displays the amount in
the Formatted format using one of these units of
measurement: kilobytes (KB), megabytes (MB), gigabytes
(GB), or terabytes (TB) – with an accuracy of up to three
decimal places.
TX Packets Displays the number of packets transmitted
without errors.
TX Errors Displays the number of packets transmitted
with errors.
Reset Statistics Click this button to clear the displayed
statistics and reset them to zero.
Total Throughput
By default, Total Throughput is displayed.
Total Throughput displays the current data traffic on the
EdgeSwitch in both graphical and numerical form. The
chart scale and throughput dimension (bps, kbps, Mbps)
change dynamically depending on the mean throughput
value. The statistics are updated automatically.
Data Distribution
By default, Data Distribution is displayed.
Two pie charts, RX and TX, display the data traffic allocated
among the ports of the EdgeSwitch. The pie charts are
updated automatically.
All/Last 20 sec By default, the pie charts are displayed in
All format, which is cumulative over time. To display data
distribution for the last 20 seconds, click Last 20 sec.
Details for Port
To display Packet Distribution, Packet Rate, and Throughput
for a specific port, click the port on the image. The
selected port is highlighted in blue.
Ubiquiti Networks, Inc.
9
Page 14

Chapter 3: Status Tab
EdgeSwitch XP User Guide
To return to the default view displaying Total Throughput
and Data Distribution, click Show Device Details.
Note: The EdgeSwitch 8XP does not display
Packet Distribution.
Packet Distribution
Throughput
Throughput displays the current data traffic on the port
in both graphical and numerical form. The chart scale
and throughput dimension (bps, kbps, Mbps) change
dynamically depending on the mean throughput value.
The statistics are updated automatically.
A pie chart, Packet Distribution, displays the current packet
sizes going through the port. The pie chart is updated
automatically.
Note: The EdgeSwitch 8XP does not display
Packet Distribution.
All/Last 20 sec By default, the pie chart is displayed in All
format, which is cumulative over time. To display packet
distribution for the last 20 seconds, click Last 20sec.
Packet Rate
Packet Rate displays the current packets per second rate
on the port in both graphical and numerical form. The
chart scale and packet rate dimension change dynamically
depending on the mean packet rate value. The statistics
are updated automatically.
10
Ubiquiti Networks, Inc.
Page 15

EdgeSwitch XP User Guide
Chapter 4: Device Tab
Chapter 4: Device Tab
The Device tab allows you to configure and use the
Firmware Update, Management Network Settings, Basic
Settings, Management Connection Settings, Services,
Spanning Tree Protocol, Jumbo Frames, Device Discovery,
System Account, Device Maintenance, and Configuration
Management options for the EdgeSwitch.
The EdgeSwitch image displays the active LEDs and
connections. See “Hardware Overview” on page 1
for more information.
Ubiquiti Networks, Inc.
UNMS You can also manage your device using UNMS,
which lets you configure, monitor, upgrade, and back up
your devices using a singleapplication. Click the UNMS
button to visit: unms.com
11
Page 16

Chapter 4: Device Tab
EdgeSwitch XP User Guide
The color of the circular icon represents the status of the
connection to UNMS.
Color Status
Connected to UNMS
Connecting to UNMS
Disabled
Total Throughput Displays the current TX and RX data
traffic values.
Port Status Place your mouse over a port to view its PoE
status, Speed setting, duplex mode, and statistics for TX
and RX throughput.
Revert Changes To cancel your changes, click Revert
Changes.
Test Changes To try the changes without saving them,
click Test Changes. To keep the changes, click Apply. If
you do not click Apply within 180 seconds (the countdown
is displayed), the device times out and resumes its earlier
configuration.
Save Changes To immediately save your changes, click
Save Changes.
3. The Uploaded Firmware Version is displayed. Click
Update to confirm.
If the firmware update is in process, you can close the
firmware update window, but this does not cancel the
firmware update. Please be patient, as the firmware
update routine can take three to seven minutes. You
cannot access the EdgeSwitch until the firmware update
routine is completed.
WARNING: Do not power off, do not reboot, and
do not disconnect the EdgeSwitch from the power
supply during the firmware update process as
these actions will damage the EdgeSwitch!
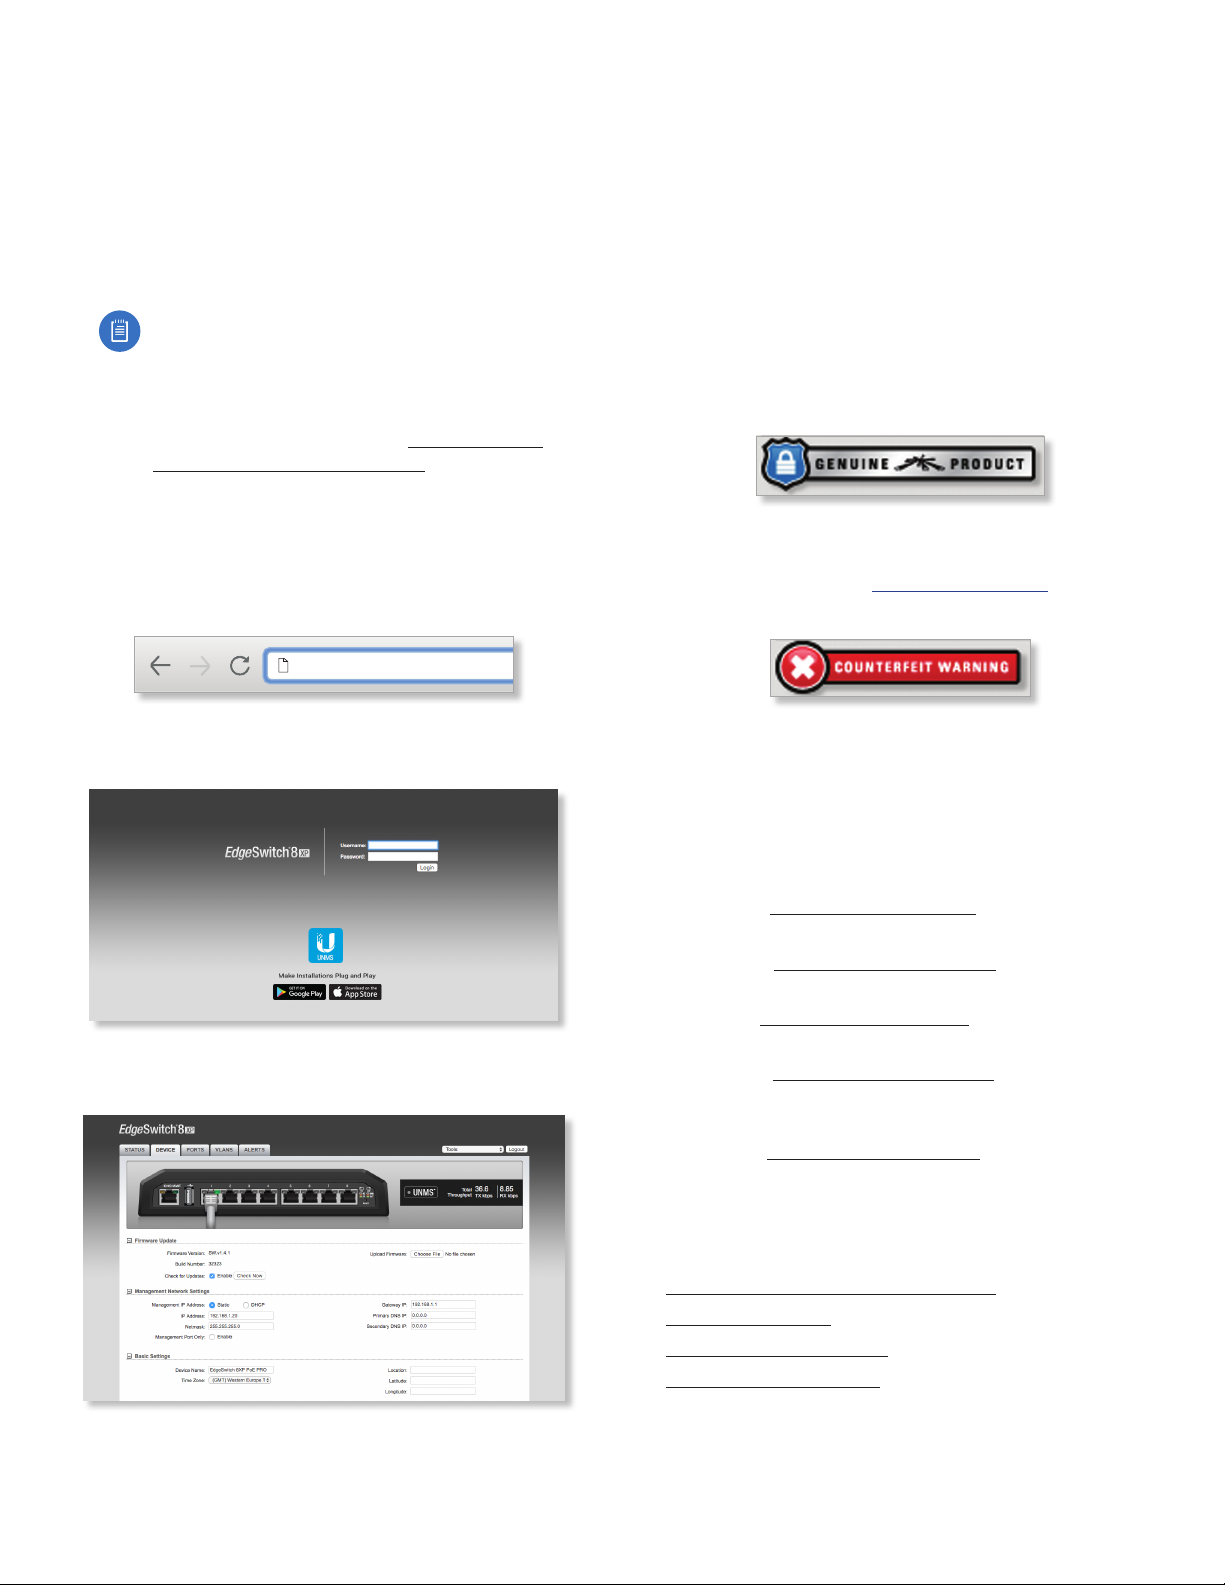
Management Network Settings
The Management Network Settings configure the IP
settings and management access of the EdgeSwitch.
The IP Address and Netmask are not mandatory for
a Layer2 device such as the EdgeSwitch; however,
they must be configured if you want to manage the
EdgeSwitch (and will not be using DHCP).
Management IP Address The EdgeSwitch can use a static
IP address or obtain an IP address from its DHCP server.
• Static Assign static IP settings to the EdgeSwitch.
Note: IP settings should be consistent with the
address space of the EdgeSwitch’s network
segment.
Firmware Update
This section manages the firmware maintenance.
Firmware Version Displays the current firmware version.
Build Number Displays the build number of the firmware
version.
Check for Updates By default, the firmware automatically
checks for updates. To manually check for an update, click
Check Now.
Update Firmware The EdgeSwitch firmware update is
compatible with all configuration settings. The system
configuration is preserved while the EdgeSwitch is
updated with a new firmware version. However, we
recommend that you click Download in the Configuration
Management section to back up your current system
configuration before updating the firmware.
Updating the firmware is a three-step procedure:
1. Click Choose File to locate the new firmware file. Select
the file and click Open.
2. Click Upload to upload the new firmware to the
EdgeSwitch.
- IP Address Specify the IP address of the EdgeSwitch.
This IP will be used for device management purposes.
The default is 192.168.1.20.
- Netmask When the netmask is expanded into its
binary form, it provides a mapping to define which
portions of the IP address range are used for the
network devices and which portions are used for
host devices. The netmask defines the address space
of the EdgeSwitch’s network segment. The default
255.255.255.0 (or “/24”) netmask is commonly used on
many Class C IP networks.
- Management Port Only By default, this option
is disabled and you can manage the EdgeSwitch
through any port. To restrict management access to
only the Management port, check this box.
Note: The Management Port Only option must
be disabled if you want traffic to flow between
the Management port and numbered ports.
Traffic will be limited to 10/100 Mbps and,
under heavy load, may cause performance
degradation of the EdgeSwitch.
12
Ubiquiti Networks, Inc.
Page 17

EdgeSwitch XP User Guide
Chapter 4: Device Tab
- Gateway IP Typically, this is the IP address of the host
router, which provides the point of connection to the
internet. This can be a DSL modem, cable modem, or
WISP gateway router. The EdgeSwitch directs packets
to the gateway if the destination host is not within the
local network. The default is 192.168.1.1.
- Primary DNS IP Specify the IP address of the primary
DNS (Domain Name System) server.
- Secondary DNS IP Specify the IP address of the
secondary DNS server. This entry is optional and used
only if the primary DNS server is not responding.
• DHCP The local DHCP server assigns a dynamic IP
address, netmask, gateway IP address, and DNS address
to the EdgeSwitch.
Note: We do not recommend the DHCP option.
The IP address may change, and you will
need to use the Discovery tool from another
Ubiquiti device or computer to discover the IP
address of the EdgeSwitch. You can also reset
the EdgeSwitch to its factory default settings.
(Press and hold the Reset button for more than
10 seconds.) Its default IP Address is reset to
192.168.1.20.
Device Name Specify the Device Name (host name),
which is the system-wide device identifier. The SNMP
agent reports it to authorized management stations. The
Device Name will be used in popular router operating
systems, registration screens, and discovery tools.
Time Zone Specify the time zone in relation to Greenwich
Mean Time (GMT). The default is (GMT) Western Europe.
Location Enter a description of the device’s location.
Latitude Enter the latitude of the device’s location in
decimal format. Use a minus sign (-) to indicate a latitude
south of the equator.
Longitude Enter the latitude of the device’s location
in decimal format. Use a minus sign (-) to indicate a
longitude west of the Prime Meridian.
Management Connection Settings
The Management Connection Settings section configures
system connection services.
Ubiquiti Network Management System
- DHCP Fallback IP Specify the IP address the
EdgeSwitch should use if a DHCP server is not found.
The default is 192.168.1.20.
- DHCP Fallback Netmask Specify the netmask the
EdgeSwitch should use if a DHCP server is not found.
The default is 255.255.255.0.
- Management Port Only By default, this option
is disabled and you can manage the EdgeSwitch
through any port. To restrict management access to
only the Management port, check this box.
Note: The Management Port Only option must
be disabled if you want traffic to flow between
the Management port and numbered ports.
Traffic will be limited to 10/100 Mbps and,
under heavy load, may cause performance
degradation of the EdgeSwitch.
Basic Settings
The Basic Settings configure the device, date, and location
settings of the EdgeSwitch.
The following Ubiquiti Network Management System
parameters can be set:
UNMS This option activates UNMS access to the device.
• UNMS URL Displays the server IP address or hostname
of the UNMS key entered on the UNMS Key screen.
• Edit Elick Edit to display the UNMS Key screen.
- Key Enter the UNMS key, which helps to secure
communication between the device andUNMS. For
more information, go to: ubnt.link/UNMS-Key
- Save Saves your changes.
- Close Discards your changes.
Telnet Server
The following Telnet Server parameters can be set:
Telnet Server This option activates Telnet access to the
device.
• Server Port Specify the TCP/IP port of the Telnet server.
The default is 23.
Ubiquiti Networks, Inc.
13
Page 18

Chapter 4: Device Tab
EdgeSwitch XP User Guide
Web Server
The following Web Server parameters can be set:
Secure Connection (HTTPS) By default, the web server
uses secure HTTPS mode.
• Secure Server Port If secure HTTPS mode is used,
specify the TCP/IP port of the web server. The default is
443.
Server Port If HTTP mode is used, specify the TCP/IP port
of the web server. The default is 80.
Session Timeout Specify the maximum timeout before
the session expires. Once a session expires, you must log
in again using the username and password. The default is
15 minutes.
SSH Server
The following SSH Server parameters can be set:
SSH Server SSH access to the device is enabled by
default.
• Server Port Specify the TCP/IP port of the SSH server.
The default is 22.
• Password Authentication By default, this option is
enabled and you must authenticate using administrator
credentials to grant SSH access to the device. If you
disable this option, then an authorized key is required.
• Authorized Keys Click Edit to import a public key file
for SSH access to the device instead of using an admin
password.
- Choose File Click Choose File to locate the new key
file. Select the file and click Open.
- Import Imports the file for SSH access.
- Enabled Enables the specific key. All the added keys
are saved in the system configuration file; however,
only the enabled keys are active on the device.
- Type Displays the type of key.
- Key Displays the key.
- Comment
- Action You have the following options:
• Add Adds a public key file.
• Edit Makes changes to a public key file. Click Save
to save your changes.
• Del Deletes a public key file.
- Save Saves your changes.
- Close Discards your changes.
You can enter a brief description of the key.
Services
The Services section configures system management
services.
SNMP Agent
Simple Network Monitor Protocol (SNMP) is an
application layer protocol that facilitates the exchange
of management information between network
devices. Network administrators use SNMP to monitor
network-attached devices for issues that warrant
attention.
The device contains an SNMP agent, which does the
following:
• Provides an interface for device monitoring using SNMP
• Communicates with SNMP management applications
for network provisioning
• Allows network administrators to monitor network
performance and troubleshoot network problems
For the purpose of equipment identification, configure the
SNMP agent with contact and location information:
SNMP Agent Enables the SNMP agent.
• SNMP Community Specify the SNMP community
string. It is required to authenticate access to
Management Information Base (MIB) objects and
functions as an embedded password. The device
supports a read-only community string; authorized
management stations have read access to all the objects
in the MIB except the community strings, but do not
have write access. The device supports SNMP v1. The
default SNMP Community is public.
• Contact Specify the contact who should be notified in
case of emergency.
• Location Specify the physical location of the device.
14
Ubiquiti Networks, Inc.
Page 19

EdgeSwitch XP User Guide
Chapter 4: Device Tab
Dynamic DNS
Domain Name System (DNS) translates domain names
to IP addresses; Each DNS server on the internet holds
these mappings in its respective DNS database. Dynamic
Domain Name System (DDNS) is a network service that
notifies the DNS server in real time of any changes in the
device’s IP settings. Even if the device’s IP address changes,
you can still access the device through its domain name.
Dynamic DNS If enabled, the device allows
communications with the DDNS server.
• Host Name Enter the host name of the DDNS server.
• Username Enter the username of the DDNS account.
• Password Enter the password of the DDNS account.
• Show Check the box to display the password
characters.
System Log
If you enable the System Log, the messages display on the
Alerts tab; see “System Log” on page 24.
NTP Client
Network Time Protocol (NTP) is a protocol for
synchronizing the clocks of computer systems over
packet-switched, variable-latency data networks. You can
use it to set the system time on the device. If the System
Log option is enabled, then the system time is reported
next to every log entry that registers a system event.
NTP Client If enabled, the device obtains the system time
from a time server on the internet.
• NTP Server Specify the IP address or domain name of
the NTP server. The default is 0.ubnt.pool.ntp.org.
Spanning Tree Protocol
For optimal performance, there should be a single
active path between two networking devices in an
Ethernet network. Spanning Tree Protocol (STP) provides
redundant paths and prevents network loops that can
create excessive traffic and slow down performance. STP
calculates the best path for network traffic; if the best path
fails, STP recalculates and finds the next best path.
System Log This option enables the registration routine
of system log (syslog) messages. By default it is enabled.
• Remote Log Enables the syslog remote sending
function. System log messages are sent to a remote
server, which is specified in the following fields:
- Remote Log IP Address The host IP address that
receives syslog messages. Properly configure the
remote host to receive syslog protocol messages.
- Remote Log Port The TCP/IP port that receives syslog
messages. 514 is the default port for the commonly
used system message logging utilities.
Every logged message contains at least a system time and
host name. Usually a specific service name that generates
the system event is also specified within the message.
Messages from different services have different contexts
and different levels of detail. Usually error, warning, or
informational system service messages are reported;
however, more detailed debug level messages can also
be reported. The more detailed the system messages
reported, the greater the volume of log messages
generated.
Status Enabled by default, STP provides redundancy
without network loops.
Version Select the version of STP to use. STP and Rapid
STP (RSTP) display the following states: Blocking, Learning,
and Forwarding. RSTP is recommended because ports can
more quickly progress to the forwarding state. When STP
is selected, the EdgeSwitch sends STP packets. The default
is RSTP.
Max Age Specify how long the EdgeSwitch saves
a configuration message received on a port. If the
EdgeSwitch does not hear any new configuration
messages after the Max Age time interval, then the
EdgeSwitch adapts and starts to reconfigure. The default is
20 seconds.
Hello Time Specify the time interval between
configuration messages transmitted by the EdgeSwitch to
other switches. The default is 2 seconds.
Forward Delay Specify how long the listening and
learning states last before the EdgeSwitch forwards traffic.
The default is 15 seconds.
Priority STP uses priority values to select a switch as the
root switch of the spanning tree. Specify the Priority value
of the EdgeSwitch. The default is 32768.
Ubiquiti Networks, Inc.
15
Page 20

Chapter 4: Device Tab
EdgeSwitch XP User Guide
Jumbo Frames
The Maximum Transmission Unit (MTU) is the maximum
packet size (in bytes) that a network interface can transmit.
A jumbo frame is a frame that is larger than the standard
Ethernet frame with an MTU of 1500. Jumbo frames are
typically used for Gigabit Ethernet connections.
Jumbo Frames Disabled by default, the EdgeSwitch does
not handle jumbo frames and drops them. If enabled, the
EdgeSwitch handles jumbo frames and forwards them.
The maximum MTU of the EdgeSwitch 5XP is 9216, and the
maximum MTU of the EdgeSwitch 8XP is 9720.
Device Discovery
Discovery Enabled by default, so the device can be
discovered by other Ubiquiti devices through the Device
Discovery tool. See “Discovery” on page 26 for details.
System Accounts
You can change the administrator password to protect
your device from unauthorized changes. We recommend
that you change the default administrator password
during the very first system setup:
Administrator Username Enter the administrator name.
Key button Click this button to change the password.
• Current Password Enter the current administrator
password. It is required to change the Password or
Administrator Username.
• New Password Enter the new password for the
administrator account.
• Verify New Password Re-enter the new password.
Note: The password length is 63 characters
maximum.
Device Maintenance
This section manages device reboot and support
information reports.
Reboot Device Initiates a full reboot cycle of the device.
Reboot is the same as the hardware reboot, which is
similar to the power-off and power-on cycle. The system
configuration stays the same after the reboot cycle
completes. Any changes that have not been applied
arelost.
Support Info This generates a support information
file that the Ubiquiti support engineers can use when
providing customer support. This file only needs to be
generated at their request.
Configuration Management
This section manages device configuration routines and
the option to reset the device to factory default settings.
The device configuration is stored in a plain text file
(.cfg). You can back up, restore, or update the system
configurationfile:
Back Up Configuration Click Download to download the
current system configuration file.
Note: We strongly recommend that you save
the configuration file in a secure location. The
configuration file includes confidential information,
such as hashed passwords.
Upload Configuration Click Choose File to locate the
new configuration file. Select the file and click Open.
We recommend that you back up your current system
configuration before uploading the new configuration.
The configuration file must match the device you are
uploading to. Behavior may be unpredictable if you mix
configuration files from different device models. For
example, upload an ES-8XP configuration file to a ES-8XP;
do NOT upload a ES-5XP configuration file to a ES-8XP.
Note: The ES-16XP is comprised of two ES-8XP
devices, so you can upload an ES-8XP configuration
file to either of the devices that make up the
ES-16XP.
• Upload Click this button to upload the new
configuration file to the EdgeSwitch. Click Apply to
confirm.
After the EdgeSwitch reboots, the settings of the
new configuration are displayed in the Configuration
Interface.
Reset to Factory Defaults Resets the EdgeSwitch to
the factory default settings. This option will reboot
the EdgeSwitch, and all factory default settings will be
restored. We recommend that you back up your current
system configuration before resetting the EdgeSwitch to
its defaults.
16
Ubiquiti Networks, Inc.
Page 21

EdgeSwitch XP User Guide
Chapter 5: Ports Tab
Chapter 5: Ports Tab
The Ports tab allows you to configure the Basic Settings,
Ping Watchdog settings, Spanning Tree Settings, and alerts
for each port of the EdgeSwitch.
The EdgeSwitch image displays the active LEDs and
connections. See “Hardware Overview” on page 1
for more information. To change a port’s settings, click the
port on the image. Then the port is highlighted in blue.
UNMS You can also manage your device using UNMS,
which lets you configure, monitor, upgrade, and back up
your devices using a singleapplication. Click the UNMS
button to visit: unms.com
The color of the circular icon represents the status of the
connection to UNMS.
Color Status
Connected to UNMS
Connecting to UNMS
Disabled
Total Throughput Displays the current TX and RX data
traffic values.
Port Status Place your mouse over a port to view its PoE
status, Speed setting, duplex mode, and statistics for TX
and RX throughput.
For each port, the Ports tab displays its Port number,
Name, Port Status, PoE status, Link Speed, Ping Watchdog,
STP status (if enabled on the Device tab), and Alerts status.
Ubiquiti Networks, Inc.
17
Page 22

Chapter 5: Ports Tab
EdgeSwitch XP User Guide
To sort the ports in a specific order, click the appropriate
column head.
PWR Cycle To power off the connected PoE device for
fiveseconds and then power it back on, click PWR Cycle.
Revert Changes To cancel your changes, click Revert
Changes.
Test Changes To try the changes without saving them,
click Test Changes. To keep the changes, click Apply. If
you do not click Apply within 180 seconds (the countdown
is displayed), the device times out and resumes its earlier
configuration.
Save Changes To immediately save your changes, click
Save Changes.
Clone Settings for All Ports After you have made
changes for the selected port, click this button to apply
the same changes to all ports. Then click Save Changes.
WARNING: The PoE setting is also cloned. Ensure that
the same PoE setting suits all ports before you clone
the settings of the selected port.
Basic Settings for Port
To manually specify the maximum transmission link speed
and duplex mode, select 100Mbps-Full, 100Mbps-Half,
10Mbps-Full, or 10Mbps-Half. Full-duplex mode allows
communication in both directions simultaneously.
Half-duplex mode allows communication in one direction
at a time, alternating between transmission and reception.
To achieve full performance with extra-long Ethernet
cables, ensure that you use CAT6-qualified cables and
interconnects.
Flow Control Enabled by default. Flow Control allows
the port to manage data rates in case the sending and
receiving devices use different data transmission rates.
Ping Watchdog for Port
Ping Watchdog is only for PoE-enabled ports. It configures
the device to continuously ping a user-defined IP address
(it can be the Internet gateway, for example). If it is
unable to ping under the user-defined constraints, then
the device will automatically turn off PoE on the port,
and then turn it back on. This option creates a kind of
“fail-proof” mechanism.
Ping Watchdog is dedicated to continuous monitoring of
the specific connection to the remote host using the Ping
tool. The Ping tool works by sending ICMP echo request
packets to the target host and listening for ICMP echo
response replies. If the specified number of replies is not
received, the tool reboots the device.
Name Enter a name for the port.
Port Status To use this port, check the box.
Note: Enabling/disabling this option only affects
datas traffic on a port. PoE functionality remains
unaffected.
PoE PoE is disabled by default on all ports. To output PoE
to the connected device, select 24V or 48V (48V available
only on the EdgeSwitch 8XP). To disable PoE, selectOff.
Note: Before enabling PoE, check the specifications
of your airMAX, UniFi, legacy, or third-party
devices to ensure they support passive PoE and
require the available amount of voltage. The
EdgeSwitch 5XP offers 24V passive PoE, and the
EdgeSwitch 8XP offers 24V or 48V passive PoE.
Link Speed, Mbps By default, Auto is enabled. The
EdgeSwitch automatically negotiates transmission
parameters, such as speed and duplex, with its
counterpart. In this process, the networked devices
first share their capabilities and then choose the fastest
transmission mode they both support.
Note: Auto applies only to speed and duplex, not
PoE.
Port Ping Watchdog Enables use of Ping Watchdog.
• IP Address to Ping Specify the IP address of the target
host to be monitored by Ping Watchdog.
• Ping Interval Specify the time interval (in seconds)
between the ICMP echo requests that are sent by Ping
Watchdog. The default value is 15 seconds.
• Startup Delay Specify the initial time delay (in seconds)
until the first ICMP echo requests are sent by Ping
Watchdog. The default value is 300 seconds.
The Startup Delay value should be at least 60 seconds
as the network interface and wireless connection
initialization takes a considerable amount of time if the
device is rebooted.
• Failure Count Specify the number of ICMP echo
response replies. If the specified number of ICMP echo
response packets is not received continuously, Ping
Watchdog will reboot the device. The default value is 3.
• Cut Power for Specify the number of seconds this port
should pause PoE (if applicable). The default value is
5seconds.
WARNING: Cutting power during a firmware
upgrade can damage your device. Ensure that you
specify a safe Ping Interval.
18
Ubiquiti Networks, Inc.
Page 23

EdgeSwitch XP User Guide
Chapter 5: Ports Tab
Spanning Tree Settings for Port
STP settings are available per port if STP is enabled on the
Device tab (see “Spanning Tree Protocol” on page 15).
Edge Port If enabled, designates this port as a port that
connects to only a host device. The host device must not
be connected to another switch or router. The Edge Port is
always in the forwarding state and never undergoes the
learning or blocking state.
Note: Ensure that the Edge Port is connected to
only a host device. If the Edge Port is connected to
a switch or router (even indirectly through a host
device), then this may cause a network loop.
Path Cost STP uses Path Cost to determine the best path
between devices. The lower the value, the higher the
ranking. In most cases, specify lower values for ports with
higher bandwidths, such as gigabit speeds, and specify
higher values for ports with lower bandwidth. You can also
specify lower values for ports you prefer to use. (Path Cost
has precedence over Priority.) The default is 0.
Priority STP uses Priority as a tiebreaker when multiple
ports have the same Path Cost value. The lower the value,
the higher the priority. If the Path Cost of multiple ports
are the same, then STP chooses the port with the highest
Priority (lowest value) as the active port (the others are
blocked). If STP detects a network loop, then a port with
higher Priority is less likely to be blocked. If multiple ports
share the highest Priority, then STP enables the port with
the lowest port ID. The Priority range is 0 (highest priority)
to 255 (lowest priority).The default is 128.
TX Bandwidth Goes Below Generates an alert when the
TX bandwidth drops below the specified minimum. Enter
the minimum in Mbps.
Configure Alerts for Port
If you configure alerts, the alerts display on the Alerts tab;
see “Alert Log” on page 23.
For each port, you can configure the following alerts:
Link Goes Up/Down Generates an alert when the link
goes up or down.
RX Bandwidth Goes Above Generates an alert when the
RX bandwidth exceeds the specified maximum. Enter the
maximum in Mbps.
RX Bandwidth Goes Below Generates an alert when the
RX bandwidth drops below the specified minimum. Enter
the minimum in Mbps.
TX Bandwidth Goes Above Generates an alert when the
TX bandwidth exceeds the specified maximum. Enter the
maximum in Mbps.
Ubiquiti Networks, Inc.
19
Page 24

Chapter 5: Ports Tab
EdgeSwitch XP User Guide
20
Ubiquiti Networks, Inc.
Page 25

EdgeSwitch XP User Guide
Chapter 6: VLANs Tab
Chapter 6: VLANs Tab
The VLANs tab configures Virtual Local Area Networks
(VLANs) and trunk ports.
The EdgeSwitch image displays the active LEDs and
connections. See “Hardware Overview” on page 1
for more information.
UNMS You can also manage your device using UNMS,
which lets you configure, monitor, upgrade, and back up
your devices using a singleapplication. Click the UNMS
button to visit: unms.com
The color of the circular icon represents the status of the
connection to UNMS.
Color Status
Connected to UNMS
Connecting to UNMS
Disabled
Total Throughput Displays the current TX and RX data
traffic values.
Port Status Place your mouse over a port to view its PoE
status, Speed setting, duplex mode, and statistics for TX
and RX throughput.
Revert Changes To cancel your changes, click Revert
Changes.
Test Changes To try the changes without saving them,
click Test Changes. To keep the changes, click Apply. If
you do not click Apply within 180 seconds (the countdown
is displayed), the device times out and resumes its earlier
configuration.
Save Changes To immediately save your changes, click
Save Changes.
Ubiquiti Networks, Inc.
21
Page 26

Chapter 6: VLANs Tab
EdgeSwitch XP User Guide
VLANs
All ports belong to VLAN1, which is enabled as a
management VLAN by default. A port can belong to more
than one VLAN.
Trunk Ports Trunk mode is enabled by default. Trunk
ports carry both untagged and tagged traffic from
multiple VLANs.
Add Create a new Virtual Local Area Network (VLAN).
• Enabled Check the box to enable the VLAN.
• Management Create the VLAN before you select this
option. Ensure that you have access via the new VLAN
before you choose to manage through this VLAN.
Trunk
You can specify an existing VLAN to be the native VLAN for
all trunk ports. Untagged frames received on trunk ports
become members of the native VLAN.
Native VLAN By default, the Native VLAN is 1. To specify a
different Native VLAN, select it from the drop-down list.
Note: Both ends of the trunk must use the same
Native VLAN.
Note: If you configure a new VLAN as
Management, then VLAN 1 is no longer the
management VLAN. If you cannot access the
new management VLAN, then you are locked out
of the Configuration Interface. (If you are locked
out, you can reset the EdgeSwitch to its factory
defaults.)
• VLAN ID Enter a unique VLAN ID from 2 to 4095.
• Comment Enter a description of this VLAN.
• Port n For each port, assign its membership status as a
tagged or untagged member of this VLAN. You can also
exclude a port from this VLAN.
- T (tag) The port belongs to this VLAN, and VLAN tags
are included on outgoing frames. Click the letter until
it becomes a “T”.
- U (untag) The port belongs to this VLAN, and VLAN
tags are excluded from outgoing frames. Click the
letter until it becomes a “U”.
- E (exclude) The port does not belong to this VLAN.
Click the letter until it becomes an “E”.
• Delete Permanently removes the VLAN. If you want to
temporarily disable the VLAN, remove the check from
the Enabled box.
22
Ubiquiti Networks, Inc.
Page 27

EdgeSwitch XP User Guide
Chapter 7: Alerts Tab
Chapter 7: Alerts Tab
The Alerts tab displays logs registering alerts or system
events.
The EdgeSwitch image displays the active LEDs and
connections. See “Hardware Overview” on page 1
for more information.
UNMS You can also manage your device using UNMS,
which lets you configure, monitor, upgrade, and back up
your devices using a singleapplication. Click the UNMS
button to visit: unms.com
The color of the circular icon represents the status of the
connection to UNMS.
Color Status
Connected to UNMS
Connecting to UNMS
Disabled
Total Throughput Displays the current TX and RX data
traffic values.
Port Status Place your mouse over a port to view its PoE
status, Speed setting, duplex mode, and statistics for TX
and RX throughput.
Alert Log
When alerts logging is configured on the Ports tab (see
“Configure Alerts for Port” on page 19), the Alert Log
lists all alerts. By default, alert logging is disabled.
Port To display entries for all ports, select All. To display
entries for a specific port, select the port number from the
drop-down list.
When alerts logging is enabled, the Select All and Clear
Selected buttons are available:
Select All To select all entries in the Alert Log, click Select
All.
Clear Selected To delete specific entries in the Alert Log,
select those entries and then click Clear.
Refresh To update the log content, click Refresh.
Search Allows you to search for specific text. Begin
typing; there is no need to press enter. The results are
filtered in real time as soon as you type two or more
characters.
Ubiquiti Networks, Inc.
23
Page 28

Chapter 7: Alerts Tab
Entries in the Alert Log include the Port number, Date, and
Message.
System Log
When system logging is enabled on the Device tab (see
“System Log” on page 15), the System Log lists all
system events. By default, system logging is enabled.
When system logging is enabled, there are two buttons
available:
Clear To delete all entries in the System Log, click Clear.
Refresh To update the log content, click Refresh.
EdgeSwitch XP User Guide
24
Ubiquiti Networks, Inc.
Page 29

EdgeSwitch XP User Guide
Chapter 8: Tools
Chapter 8: Tools
Each tab of the Configuration Interface contains network
administration and monitoring tools. Click the Tools
drop-down list at the top right corner of the page.
MAC Forwarding Table
The MAC Forwarding Table displays the MAC addresses of
the hardware devices using the EdgeSwitch.
MAC Table
Port All is the default. To view the MAC addresses of the
hardware devices using a specific port, select the port
from the drop-down list.
Search The Search field automatically filters port
numbers, VLAN IDs, and MAC addresses containing
specified numbers or letters as you enter them.
The MAC Forwarding Table reports the Port number, VLAN
ID, and MAC Address for each hardware device. To refresh
the window, click Refresh.
Ping
You can ping other devices on the network directly from
the EdgeSwitch. The Ping tool uses ICMP packets to check
the preliminary link quality and packet latency estimation
between two network devices.
Network Ping
Select Destination IP You have two options:
• Select a remote system IP from the drop-down list,
which is generated automatically.
• Select or specify manually and enter the IP address in
the field displayed below.
Packet Count Specify the number of packets to send for
the ping test. The default is 5.
Packet Size Specify the size of the packet in bytes. The
default is56.
Start Click this button to start the test.
Packet loss statistics and latency time evaluation are
displayed after the test is completed.
Ubiquiti Networks, Inc.
25
Page 30

Chapter 8: Tools
Traceroute
The Traceroute tool traces the hops from the EdgeSwitch
to a specified outgoing IP address. Use this tool to find the
route taken by ICMP packets across the network to the
destination host.
Destination Host Enter the IP address of the destination
host.
Resolve IP Addresses Select this option to resolve the IP
addresses symbolically rather than numerically.
Start Click this button to start the test.
Responses are displayed after the test is completed.
EdgeSwitch XP User Guide
Discovery
The Device Discovery tool searches for all Ubiquiti
devices on your network, specifically the subnet that the
EdgeSwitch belongs to. The Search field automatically
filters devices containing specified names or numbers as
you enter them.
Search The Search field automatically filters devices
containing specified names or numbers as you enter
them.
The Device Discovery tool reports the MAC Address,
Device Name, wireless Mode (if applicable), SSID, Product
type, Firmware version, and IP Address for each Ubiquiti
device. To access a device configuration through its web
management interface, click the device’s IP address.
To refresh the window, click Scan.
26
Ubiquiti Networks, Inc.
Page 31

EdgeSwitch XP User Guide
Appendix A: Contact Information
Ubiquiti Networks Support
Ubiquiti Support Engineers are located around the world
and are dedicated to helping customers resolve software,
hardware compatibility, or field issues as quickly as
possible. We strive to respond to support inquiries within
a 24-hour period.
Ubiquiti Networks, Inc.
685 Third Avenue, 27th Floor
New York, NY 10017 USA
www.ubnt.com
Online Resources
Support: ubnt.link/EdgeMAX-Support
Community: community.ubnt.com/edgemax
Downloads: downloads.ubnt.com/edgemax
Appendix A: Contact Information
Ubiquiti Networks, Inc.
JL060818
27
Page 32

www.ubnt.com
© 2018 Ubiquiti Networks, Inc. All rights reserved. Ubiquiti, Ubiquiti Networks, the Ubiquiti U logo, the Ubiquiti beam logo, EdgeMAX, EdgeSwitch, and UNMS
are trademarks or registered trademarks of Ubiquiti Networks, Inc. in the United States and in other countries. Apple and the Apple logo are trademarks of
Apple Inc., registered in the U.S. and other countries. App Store is a service mark of Apple Inc., registered in the U.S. and other countries. Google, Android,
Google Maps, and Google Play are trademarks of Google Inc. All other trademarks are the property of their respectiveowners.
 Loading...