

Ubiquiti EMS User Manual
Gigabit+ Powerline System with
802.3af/at or 24V Passive PoE
Models: EM-S, EM-EP, EM-KIT
Introduction
Thank you for purchasing the Ubiquiti Networks® EtherMagic™
Gigabit+ Powerline System with 802.3af/at or 24V Passive PoE.
This Quick Start Guide is designed to guide you through the
installation and also includes the warranty terms.
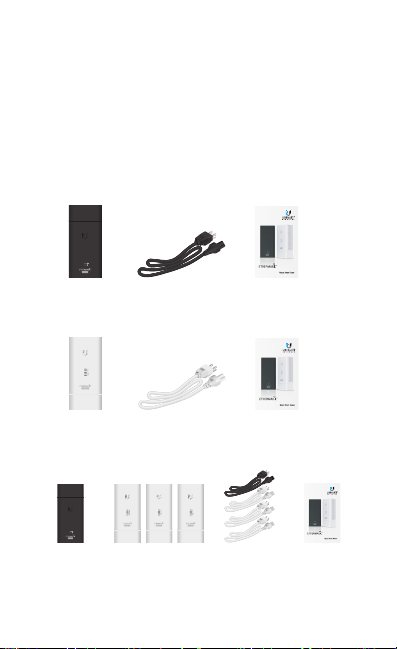
Package Contents
The package contents shown below will vary depending on
the model purchased:
EM-S
Gigabit+ Powerline
and PoE System
EtherMagic Switch Optional Power
Cord
EM-EP
EtherMagic EndPoint Optional Power
Cord
EM-KIT
(1) EtherMagic
Switch
TERMS OF USE: It is the customer’s responsibility to follow local country regulations, including
operation within legal frequency channels, output power, and indoor cabling requirements.
(3) EtherMagic
EndPoints
Model: EM-S, EM-EP
Quick Start Guide
Gigabit+ Powerline
and PoE System
Model: EM-S, EM-EP
Quick Start Guide
(4) Optional
Power Cords
Gigabit+ Powerline
and PoE System
Model: EM-S, EM-EP
Quick Start
Guide
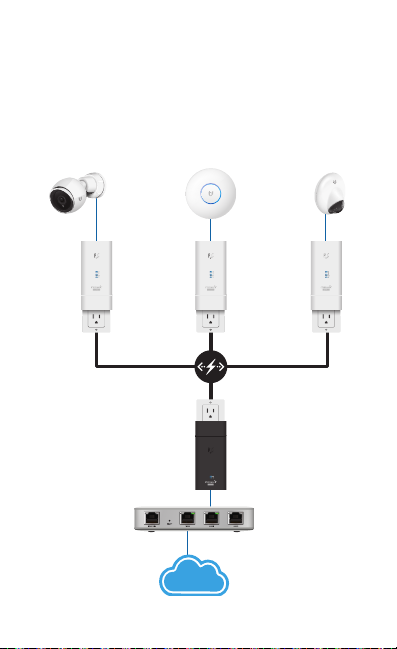
EtherMagic Overview
802.3af
802.3af
An EtherMagic Gigabit+ network consists of one EtherMagic
Switch and one or more EtherMagic EndPoints. Each EndPoint
provides 802.3af/at or 24V passive PoE, and must be paired
with a Switch to create a network. Up to 10EtherMagic
networks are supported on the same electrical circuit, and up
to 32 EndPoints may be paired with a single Switch.
24V Passive
EtherMagic
EndPoints
(Up to 32
per Switch)
Powerline Circuit
Internet
EtherMagic Network Example
EtherMagic
Switch
(Up to 10
per circuit)
DHCP Server
(Gateway)
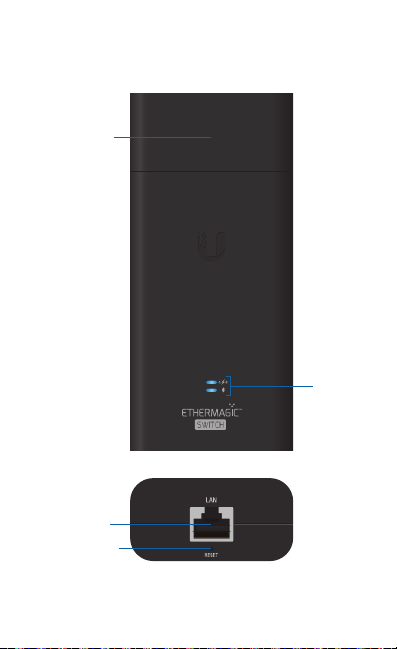
Hardware Overview
EtherMagic Switch
Wall Plug
Adapter
LAN Port
Reset Button
LEDs
Bottom View

Wall Plug Adapter Connects and mounts the Switch directly
to the power outlet. The adapter can be removed and replaced
with the included Power Cord for remote mounting.
LAN Port Gigabit Ethernet port used to connect the Switch to
the LAN and DHCP server.
Reset Button To reset the Switch to factory defaults, press
and hold the button for more than 10 seconds while the
Switch is powered on. The Switch can also be reset using the
EtherMagic app.
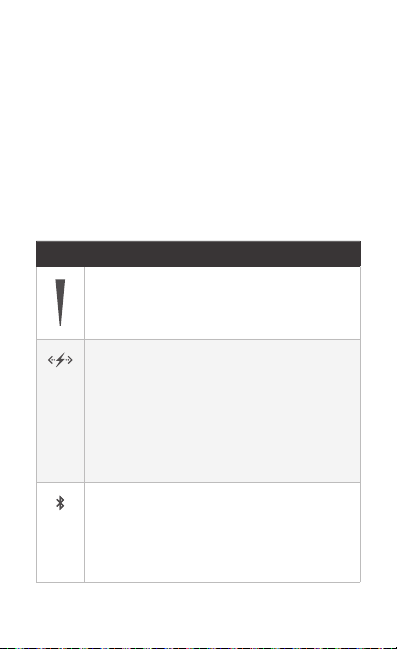
LEDs
LED Description
PLC Flashes blue for up to 120 seconds while
pairing is in progress, and lights steady blue
once paired with an EndPoint and the PLC link
is active.
Bluetooth Flashes blue during bootup and
lights steady blue when powered on and ready.
Locate Feature When the Locate action is
selected in the EtherMagic app, the LED will
flash blue for 20seconds.
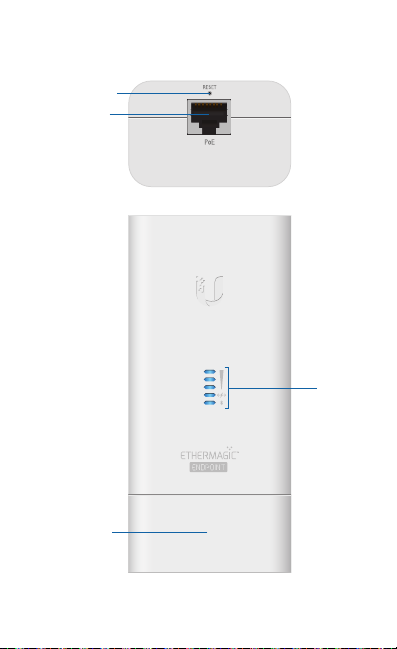
EtherMagic EndPoint
Reset Button
PoE Port
Wall Plug
Adapter
Top View
LEDs
Reset Button To reset the EndPoint to factory defaults, press
and hold the button for more than 10 seconds while the
EndPoint is powered on. The EndPoint can also be reset using
the EtherMagic app.
PoE Port 48V 802.3af/at auto-sensing or 24V passive PoE
Gigabit Ethernet port used to power and connect a device to
the EtherMagic network. 802.3af/at is the default setting. PoE
settings can be configured using the EtherMagic app.
Wall Plug Adapter Connects and mounts the EndPoint
directly to the power outlet. The adapter can be removed and
replaced with the included Power Cord for remote mounting.
LEDs
LED Description
Link Quality One LED indicates poor link
quality; Two LEDs indicate good link quality;
Three LEDs indicate excellent link quality.
PLC Flashes blue for up to 120 seconds while
pairing is in progress, and lights steady blue
once paired with the Switch and the PLC link
is active.
Locate Feature Only when paired with a
switch, the LED with flash in sync with the
Bluetooth LED when the Locate action is
selected in the EtherMagic app.
Bluetooth Flashes blue during bootup and
lights steady blue when powered on and ready.
Locate Feature When the Locate action is
selected in the EtherMagic app, the LED will
flash blue for 20seconds.
Hardware Installation
For optimal performance, connect the EtherMagic Switch and
EndPoints directly to wall outlets of the same electrical circuit.
The Switch and EndPoints can be plugged in and mounted to
the outlets directly using the Wall Plug Adapter, or plugged in
using the optional Power Cord.
WARNING: EtherMagic is for indoor use only. To reduce
the risk of fire or electric shock, do not expose the
EtherMagic modules to rain or moisture.
EtherMagic Switch Installation
1. Detach the Mounting Bracket from the Switch by sliding it
in the direction shown below.
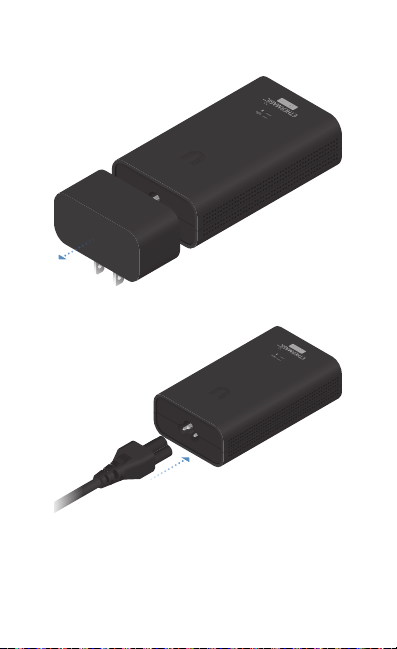
2. (Optional) If using the Power Cord:
a. Detach the Wall Plug Adapter from the Switch.
b. Connect the Power Cord.
 Loading...