

Page 1

Preset Manager
User Guide
for Mac
User Guide
Page 2

Table of Contents
Table of Contents
Intro 1
Downloading, Installing, and Setting Up Software 1
About Presets 2
Preset Types 2
Headset Modes 3
Preset & Headset Architecture 4
Presets: Selection, Saving and Loading 5
Selecting a Preset (Preset Buttons) 5
Saving/Loading 5
Downloading New Presets 5
Conguration Tab 6
Updating 6
• Firmware 6
• Voice Prompts 6
• Restore All Defaults 7
Headset Info 8
Page 3
Introducing the Preset Manager
Introducing the Preset Manager - For Mac
The Preset Manager lets you trade out your current presets for those created by Turtle Beach and your
fellow gamers. Once installed on your Mac, you can connect the Headset/Control Unit via USB and
manage your presets using the software.
Downloading the Preset Manager Software
The Preset Manager software is available as a download from our website, TurtleBeach.com
1. Navigate to the Turtle Beach Preset Community at:
turtlebeach.com/community/my-presets
2. Select your headset model
3. Select the Preset Manager for Mac
The software is compatible with OS X Version 10.6 and up.
Installing the Software
Once the le has nished downloading, navigate to its location and select it. (Note: You must be
administrator to install the tool) Before running the installation, close any programs that are running
so they will not interfere with the installation process. Follow the prompts to complete the installation.
Note: In order to install the ASE your Security & Privacy settings must congured to allow for
installation. To do this navigate to the Apple Menu -> System Preferences -> Security and Privacy->
Allow Applications downloaded from: “Anywhere”.
Setting up the Software
Connect your unit to a free USB port on your Mac. After you’ve installed the Preset Manager software,
open the Preset Manager folder in Applications and double-click the Turtle Beach icon . When rst
launching the software, the program will automatically update your headset with the latest rmware
and presets.
CAUTION: Do not disconnect the headset during this
procedure!
When the process is complete, “Default Factory Settings
Restored” will appear at the bottom of the program window.
At this point, you’re ready to use the Preset Manager with
your headset.
1
Page 4
About the Presets
About the Presets
Turtle Beach headsets use a Digital Signal Processor (DSP) to independently modify the game, chat
and microphone audio paths in the headset. The DSP settings are saved as presets, which can be
saved to your headset using the Preset Manager software.
The presets are grouped into three major categories: Global, Game, and Chat. Most headsets have
1 Global, 9 Game, and 9 Chat Presets. Headsets that support Speaker Mode offer a second set of 9
Game Presets for that mode (see below).
Preset Types
Global Preset: There is a single Global Preset on each headset that applies general tuning and level
control. This affects all audio you hear on the headset.
Game Preset: Game Presets control the “Game Audio” and allow for effects that specically apply to
the game path.
Chat Presets: Chat Presets control the “Chat” (Other people’s voice) and “Mic” (Your voice) and apply
effects only on these two audio paths.
2
Page 5

Headset Modes
Headset Modes
Some headsets may have an option for Speaker Mode. These headsets have a dedicated output for
speakers, and when in this mode have a separate bank of Game Presets you can specically tune for
speakers. You may want to have different presets due to the different HRTF applied in this mode. You
can tell if your headset is in speaker mode by the indicator on the unit itself.
Headset Mode: Normal use case for headset, using set of 9 game presets, 9 chat presets, 1 global
preset. Uses standard Surround Processing.
Speaker Mode: For use with speakers, using a different set of 9 game presets, shares chat and global
with Headset Mode. Uses speaker Surround Processing.
3
Page 6

Preset and Headset Architecture
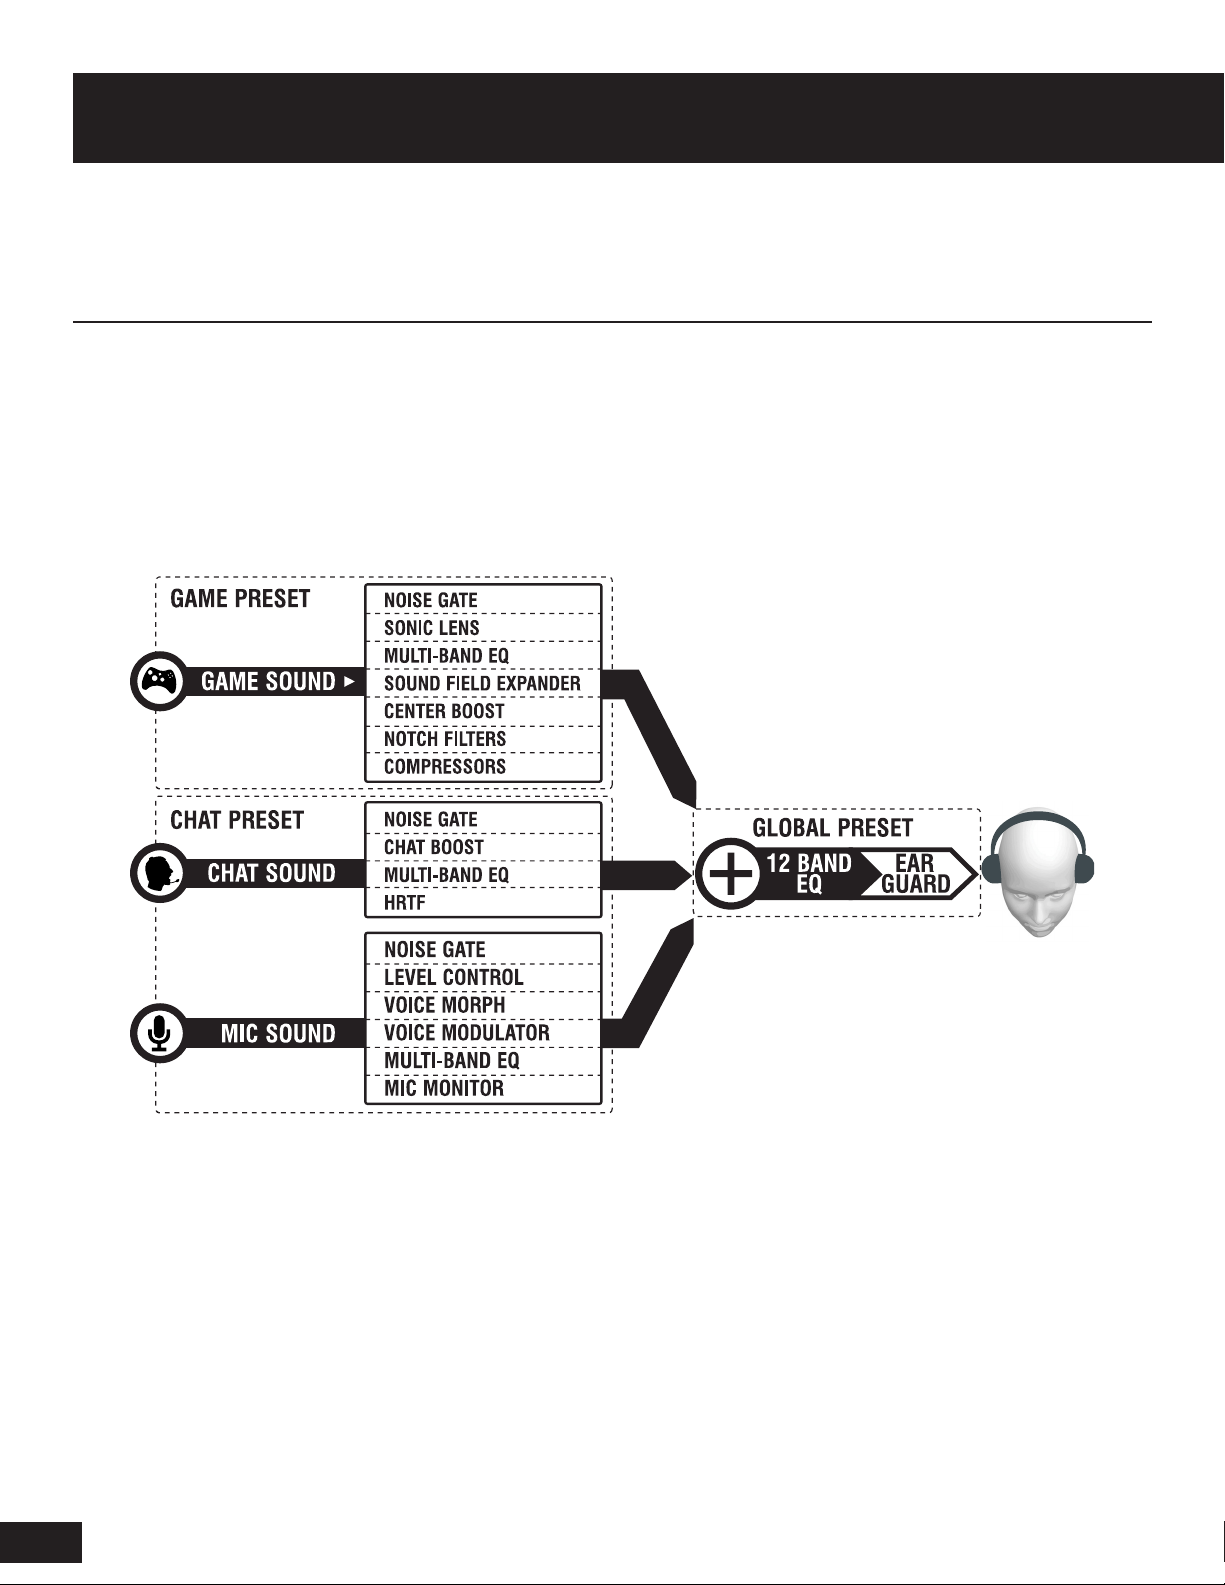
Presets and Headset Architecture
There are three categories of presets (Global, Game, and Chat) that combine to control all signal paths
in the headset. The illustration below shows the DSP signal ow and other system processing.
Noise Gates
A noise gate on each input of the three primary paths (Game, Chat, Mic) allows background noise to
be removed from that channel. For example, on the mic channel, a preset’s noise gate threshold may
be set to just above the room noise. Then the microphone channel will only pass sound that is above
the room noise (such as the sound of your voice speaking into the mic). On the chat channel, the noise
gate may be set to just above the noise level of the Xbox controller, keeping the chat channel quiet
unless voices are detected from online players.
Preset Effects
The noise gates in each channel are followed by a signal processing section with audio modiers
that are specic to the channel. The parameters within these signal-processing sections comprise a
“Preset”.
Voice Prompt Player/Tone Generator
A voice prompt or tone is triggered when certain events occur, such as pressing buttons, low
battery conditions, power on, power off, and so on. The voice prompt player output is mixed with the
channel outputs to create the master signal heard on the headset. You can change Voice Prompts by
downloading a new voice prompt le from the Turtle Beach web site. Headsets that use tones cannot
be updated to new tones.
Ear Guard™ Volume Limiter
A volume limiter precedes the headset amplier to set the maximum level of sounds sent to the
speakers. This feature is referred to as “Ear Guard” since it reduces excessive sound levels during loud
4
Page 7

Presets: Selection, Saving and Loading
sections of the game to help protect the ears. This effect is stored as part of the Global Preset.
Presets: Selection, Saving and Loading
Your headset has three types of presets (Game, Chat, Global). They are broken down separately in this
section and can each be alternated independently without affecting each other.
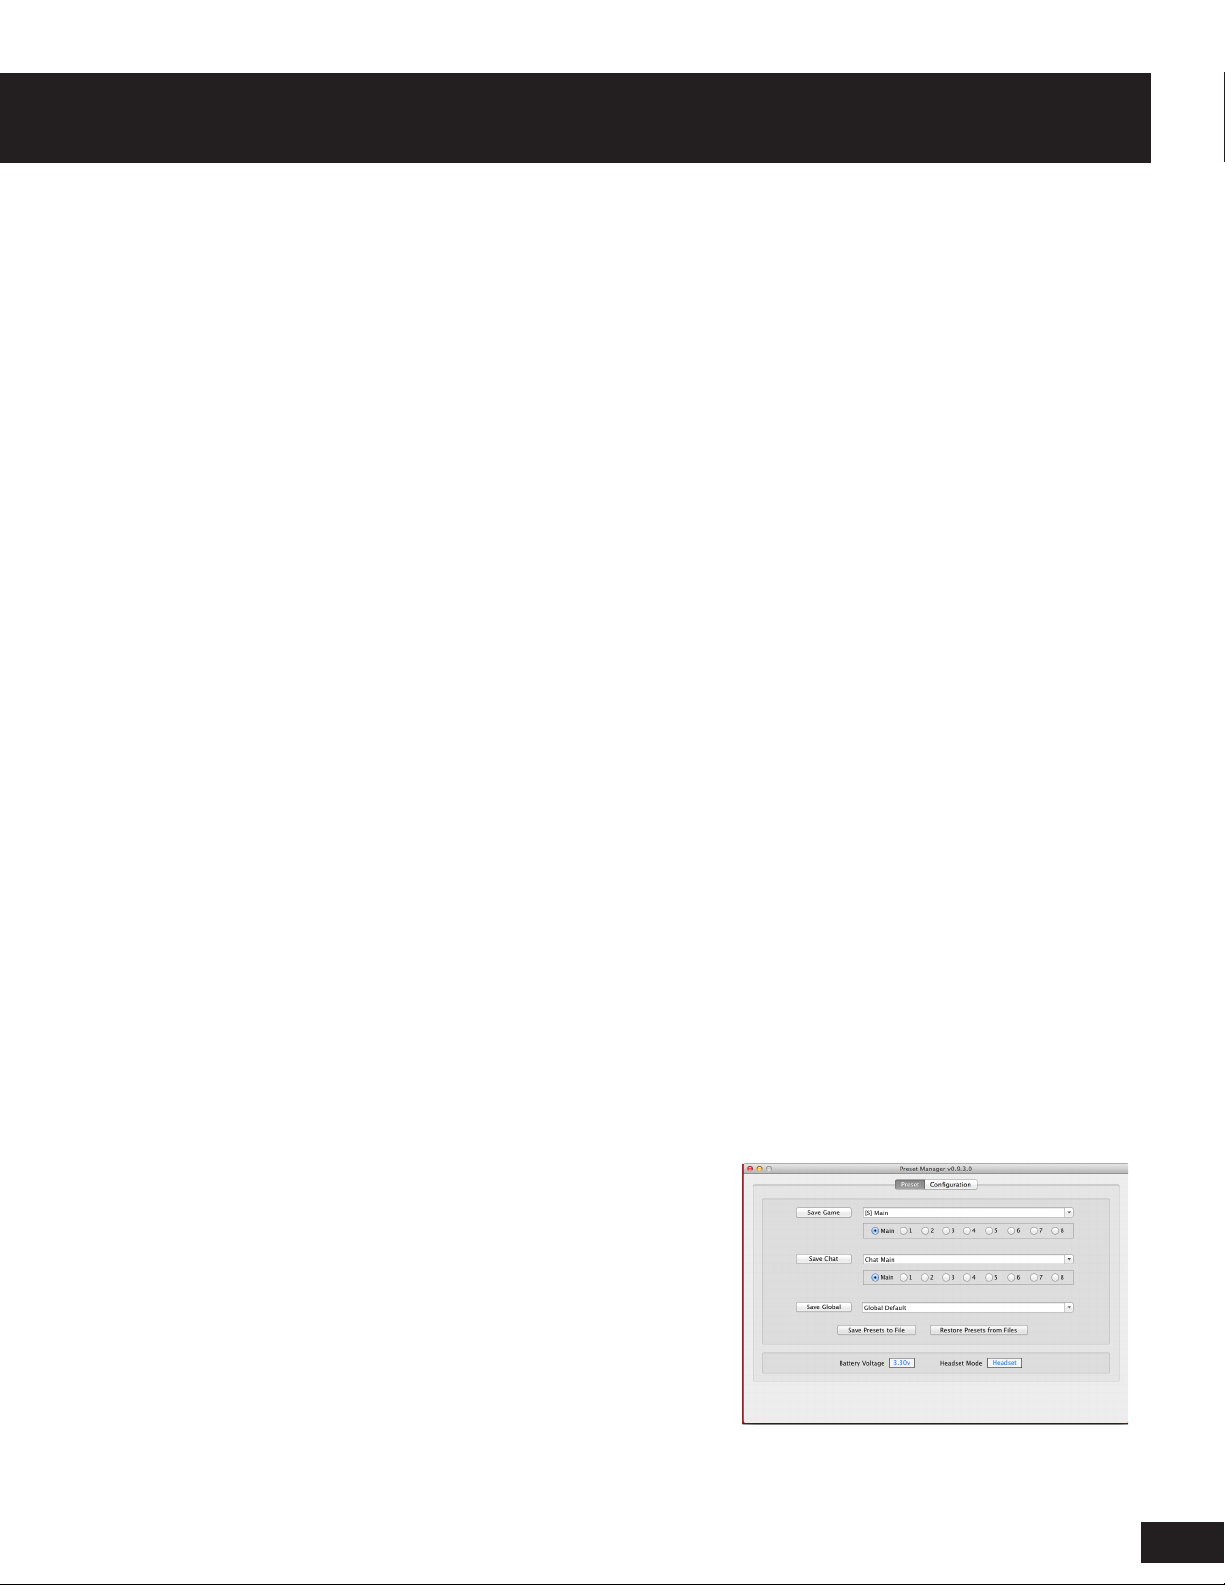
Presets Buttons
Pressing any of the 9 presets buttons (Main & 1 – 8) will select that respective preset on the headset.
This can be used instead of toggling through the presets with the buttons on the headset/controller.
Saving/Loading a Preset to the Headset
Pressing the “Save Game/Chat” button followed by pressing one of the nine preset buttons (Main or
1 – 8) will transfer your currently active preset to the selected preset location on the headset. On the
other hand, if you wanted to load a preset that you had downloaded from the Turtle Beach Preset
Community, simply select it from the drop down and then press “Save Game” (The Preset buttons will
begin to blink) followed by the slot you would like to save in.
“Save Presets to File” Button
Pressing this will save all of the presets on your headset to a single backup le on your hard drive.
“Restore Presets from File” Button
Pressing this button restores your headset from the last backup le made using “Save Presets to File”
Downloading New Presets
1. Go to TurtleBeach.com/community/my-presets and download some presets. Navigate to your
model headset and select Community Presets to download from your peers or Turtle Beach Presets to
5
Page 8

Conguration and Updates
download some of our custom presets.
2. Copy the downloaded presets to your SavedPresets folder located in Applications -> Turtle Beach.
3. On the Preset Manager, click on the pull-down box for the Game Presets and you should see the le
name you just downloaded. Select it to change the game sound based on that preset.
4. . Go back to the web site and download more Game, Chat, and Global presets. Save them all to
the SavedPresets directory and you should see them appear in the drop down boxes on the Preset
Manager software. Then listen to how each one changes the sound of the headset.
Conguration Tab
The Conguration Tab displays information about the headset and lets you update the rmware, voice
prompts and EEPROM settings.
Updating your Headset
Update Firmware
The headset operates with internal “rmware”, which is the software that makes the processor (MCU)
run. At times, we’ll release updates to the rmware to x bugs or add features, so this section makes
it easy to update it when it’s available on our web site.
To check if a rmware update is available, click the “Check for Firmware Updates” button. The Preset
Manager software will check the Turtle Beach web site for the latest rmware release and compare it
to what’s in your headset. If it’s newer, it will prompt you to download and install it.
It is important that you do not turn off the headset or remove the USB cable while the rmware is
being uploaded to the headset. Disrupting the data transfer can cause your headset to become
inoperable.
6
Page 9

Conguration and Updates
Update Voice Prompts*
The voice prompts in the headset can be replaced with a variety of others that are downloadable from
our web site. For instance, you can change from English to a foreign language, or maybe a popular
game character voice. To do this, visit Turtle Beach Preset Community, and navigate to the voice
prompts section and download the voice style of your choice.
After you’ve downloaded the new voice prompts, load them into the display area by clicking on the “…”
button, navigating to the location of the download, and clicking on the name. Once the voice prompt le
is in the display area, click on the “Update” button to upload them to the headset.
It is important that you do not turn off the headset or remove the USB cable while the voice prompt
is being uploaded to the headset. Disrupting the data transfer can cause your headset to become
inoperable.
*This Updater will only be visible for headsets that use Voice Prompts.
Update Settings
The EEPROM is memory in the headset that holds special values in addition to Presets. This includes
settings such as the volume level of the microphone, the volume of the voice prompts, etc.
“Restore All Defaults”
The “Restore All” button returns the headset back to its default settings. Clicking this button connects
to our online servers, downloads the latest les and uploads them to the headset. This includes factory
presets, voice prompts, rmware and EEPROM settings so you can undo any changes you’ve made to
the headset.
7
Page 10

Headset Info
Headset Info
Firmware Version
This eld shows the version number of the rmware loaded into the headset. Use the “Check for
Firmware” button to see if it is the latest version.
Serial Number
This eld shows the serial number of the headset, used for tracking purposes.
Date Code
This eld shows an internal code used by the factory for tracking purposes.
Version
This eld shows the version number of the Preset Manager software.
“Refresh”
Click this button to refresh all of the above data.
8
Page 11

Preset Customization
Preset Customization
Currently, if you are interested in doing extensive customization of individual presets you will want to
use the PC Version of our Preset Manager. More information on the PC Version can be found on the
Turtle Beach Preset Community.
9
 Loading...