

TurboChef Residential Single and Double Wall Oven, TDO30, DWO Gen 1, DWO, SWO Service Manual
...Page 1
TM
Accelerating the World of Cooking
TM
Service Manual
®
©2008 TurboChef Technologies, Inc.
Page 2

Page 3

For further information, call
866.447.3783
or
+1 214.379.6000
Page 4

e information contained in this manual is important for the proper installation, use, maintenance, and repair of this oven. Follow these procedures and instructions to help ensure satisfactory baking results and years
of trouble-free service.
Errors – descriptive, typographic, or pictorial – are subject to correction. Specifi cations are subject to change
without notice.
PLEASE CAREFULLY READ THIS MANUAL AND RETAIN IT FOR FUTURE REFERENCE.
©2008 TurboChef Technologies, Inc.
Page 5

Table Of Contents
Safety Instructions
Safety Precautions i
To Reduce the Risk of Fire in the Cook Cavity ii
Precautions to be Observed Before and During Servicing to Avoid Possible
Exposure to Excessive Microwave Energy ii
Grounding Instructions ii
Do Not Touch Heating Elements or Interior Surfaces of Oven ii
Power Connections ii
Self-Cleaning Oven Guidelines ii
RF Interference Considerations iii
Section 1 - Speci cations and Installation
eory of Operation 1.1
Catalytic Converter 1.1
Certifi cations 1.1
Electrical Specifi cations 1.1
Dimensions - Double Wall Oven 1.2
Dimensions - Single Wall Oven 1.2
Installation 1.3
Installation Safety Instructions 1.3
Double Wall Oven Cabinet Dimensions 1.5
Single Wall Oven Cabinet Dimensions 1.5
Installing the Oven 1.5
Section 2 - Oven Controls and Cooking - The Speedcook Oven
Speedcook Oven Controls 2.1
Cook Modes 2.2
Air-Crisp 2.2
Bake 2.2
Broil 2.2
Dehydrate 2.2
Favorites 2.2
Roast 2.3
Toast 2.3
Favorites Cooking 2.3
Cooking a Recently Prepared Dish 2.3
Cooking a ”Favorite” Dish 2.3
Using the Convection Bake Function 2.4
Using the Defrost Function 2.4
Using the Microwave Function 2.4
Basic Cooking 2.5
Mode 1: Oven Off 2.5
Mode 2: Select a Food Item 2.5
Page 6

Mode 3: Confi rm Settings 2.6
Mode 4: Preheat 2.6
Mode 5: Ready to Cook 2.6
Mode 6: Cooking 2.6
Mode 7: 80% Complete 2.6
Mode 8: 100% Complete 2.7
Mode 9: Remove Food from Oven 2.7
Adjusting a Recipe’s Cook Time 2.8
Adjusting a Cook Temperature 2.8
e Advanced Cook Mode 2.8
Saving to Favorites 2.9
Renaming a Dish (in Favorites) 2.10
Deleting a Dish (from Favorites) 2.10
Reheat Setting 2.10
Self-Clean Mode - Speedcook Oven 2.10
Section 3 - Oven Controls and Cooking - Lower Oven
(Double-Wall Oven Only)
Lower Oven Controls 3.1
Cook Modes 3.2
Bake 3.2
Broil 3.2
Convection Bake 3.2
Convection Roast 3.2
Roast 3.2
Warm Setting 3.2
Proof Setting 3.2
Basic Cooking 3.3
e Sabbath Mode 3.3
Self Clean Mode 3.4
Section 4 - Info Mode
Overview of the Info Mode 4.1
Adjusting Oven Sounds 4.1
Adjusting Display Settings 4.2
Adjusting the Oven’s Units & Measurements 4.2
Accessing Help Topics and General Cooking Information 4.2
Updating the Oven Software 4.3
Backing Up/Restoring Favorites 4.3
Accessing the Version Information 4.4
Installer Setup 4.4
Top (or Single Wall) Oven Component Tests 4.4
Bottom Oven Component Tests 4.4
Oven Confi guration 4.4
AC Voltage Confi guration 4.4
Simulation/Demo State, and printf Mask 4.4
Page 7

Section 5 - Oven Systems
Convection System - Speedcook Oven 5.1
Blower Motor (Bottom) 5.1
Blower Motor (Top) 5.1
Blower Motor Controller (BMSC) 5.1
Heater Assembly 5.1
Jetplate (Bottom) 5.1
Jetplate (Top) 5.1
Stirrer Motor and Assembly 5.1
Convection System - Lower Oven (Double Wall Oven Only) 5.2
Broil Element 5.2
Bake Element 5.2
Convection Element 5.2
Convection Fan 5.2
Speedcook Oven Door 5.2
Removing/Reinstalling the Speedcook Oven Door 5.2
Door Skin Replacement 5.3
Left Lock Motor Assembly 5.3
Right Lock Motor Assembly 5.3
Measuring RF Leakage for Microwave Safety 5.4
Halogen Light Assembly 5.5
Lower Oven Door (Double Wall Oven Only) 5.5
Removing/Reinstalling the Lower Oven Door 5.5
Halogen Bulb Replacement 5.6
Microwave System 5.6
Doubler Circuit, Voltage 5.6
High-Voltage Capacitors 5.6
High-Voltage Diode 5.6
High-Voltage Transformers 5.7
Wiring a High-Voltage Transformer 5.7
Magnetrons 5.7
Stirrer Motor and Assembly 5.7
Waveguides 5.7
Control System 5.8
Air Switch (Single Wall Oven) 5.8
Clock 5.8
Control Board 5.8
CookWheel Control 5.8
Display, Lower Oven 5.8
Attaching the Lower Display Cable 5.8
Display, Speedcook Oven 5.9
Electrical Compartment Cooling Fans 5.9
EMI Filter 5.9
Fuses 5.9
High Limit ermostats 5.9
Latch Mechanism (Lower Oven) 5.9
Light Switch, Control Panel 5.9
Page 8

M.O.V. Filter 5.9
Magnetron Cooling Fan 5.10
Magnetron ermostats 5.10
Power Supply, 12 VDC 5.10
Power Supply, 24 VDC 5.10
Relay Board (Gen 2 Oven) 5.10
Relay - K2 Monitor (Gen 1 Oven) 5.10
Relay - K3 T1 HV Transformer (Gen 1 Oven) 5.10
Relay - K4 T2 HV Transformer (Gen 1 Oven) 5.10
Relay - K5 Mag Cooling Fan (Gen 1 Oven) 5.10
Relay - K6 Right Side Door Lock (Gen 1 Oven) 5.10
Relay - K7 Left Side Door Lock (Gen 1 Oven) 5.10
Relay - K8 Preheat (Gen 1 Oven) 5.10
Relay - K9 L2 Speedcook Heating Elements 5.11
Relay - K10 Lower Door Lock (Gen 1 Oven) 5.11
Relay - K13 L2 Lower Heating Elements (Double Wall Oven Only) 5.11
RJ Cables 5.11
RTD 5.11
SD Card 5.11
Selector Switches 5.11
Solid State Relay - K1 L1 Speedcook Heating Elements 5.12
Solid State Relay - K11 Bake and Convection Elements (Double Wall Oven Only) 5.12
Solid State Relay - K12 Broil Elements: Inner and Outer (Double Wall Oven Only) 5.12
Speaker 5.12
Temperature Switch 5.12
Transformer, Clock, 12 VAC 5.12
ermostat, Cook Cavity 5.12
ermostat, Cooling Fan Control 5.12
USB Port 5.12
Connecting the USB Board (Gen 1 Oven) 5.12
Wiring Harness 5.13
Exhaust System 5.13
Catalytic Converter 5.13
Exhaust Blower 5.13
Vent Catalyst 5.13
Section 6 - Troubleshooting
Overview of Troubleshooting 6.1
Error Screens 6.1
Oven Door Open (Gen 1) 6.1
Oven Door Open (Gen 2) 6.2
Cooling Fan Failure (Gen 1) 6.2
Cooling Fan Failure (Gen 2) 6.2
Temperature Control Failure 6.2
Magnetron Failure 6.3
Magnetron Failure Troubleshooting 6.3
Blower Failure 6.3
Blower Failure Troubleshooting 6.4
Page 9

Oven Over Temperature 6.4
Component Testing and Troubleshooting 6.4
Control System 6.4
Clock Assembly 6.4
Control Board 6.4
CookWheel Control (Speedcook Oven) 6.4
EMI Filter 6.5
Oven Mode Switch (Lower Oven) 6.5
Power Supply, 12 VDC 6.5
Power Supply, 24 VDC 6.5
RTD 6.6
Transformer, 12 VAC (Gen 1) 6.6
Transformer, 12 VAC (Gen 2) 6.6
Halogen Light System 6.7
Light Switch, Control Panel (Manual) 6.7
Light Switch, Speedcook Oven (Door Actuated) 6.7
One Speedcook Oven Light is Out 6.7
Both Speedcook Oven Lights are Out 6.7
Both Speedcook Oven and Both Lower Oven Lights are Out (Double Wall Oven) 6.7
Cooling System 6.7
Cooling Fan Overview (Gen 1) 6.7
Cooling Fan Overview (Gen 2) 6.8
Troubleshooting Cooling Fans (Gen 1) 6.8
Troubleshooting Cooling Fans (Gen 2) 6.9
Air Impingement Systems 6.9
Blower Motors, Speedcook Oven 6.9
Convection Fan, Lower Oven 6.10
Microwave System 6.10
Testing a Capacitor 6.10
Testing a High-Voltage Diode 6.10
Testing a High-Voltage Transformer 6.11
Testing a Magnetron for an Open/Shorted Filament 6.11
Heating System, Speedcook Oven 6.11
Heater Element, Speedcook Oven 6.12
No Heat 6.12
Oven is Heating up Very Slowly 6.12
Testing for Control Voltage to the K1 SSR 6.12
Testing for Control Voltage to the K8 Relay (Gen 1) 6.13
Testing Relay 14 (Pre-Heat) Operation (Gen 2) 6.13
Testing for a K9 Relay that is Stuck Open 6.13
Testing for a K1 SSR that is Stuck Open 6.13
Heating System, Lower Oven 6.13
Lower Oven Heating Element Specifi cations 6.14
No Heat/Slow to Heat 6.14
Testing for Voltage to the K11 SSR 6.14
Testing for Voltage to the K12 SSR 6.14
Testing for a K11 SSR that is Stuck Open 6.15
Testing for a K12 SSR that is Stuck Open 6.15
Testing for a K13 Relay that is Stuck Open 6.15
Page 10

Section 7 - Schematics
Gen 1 Speedcook Oven Schematic 7.1
Gen 1 Bottom Oven Schematic 7.2
Gen 2 Speedcook Oven Schematic 7.3
Gen 2 Bottom Oven Schematic 7.4
Single Wall Oven Schematic 7.5
RWD/RWS Gen 2 Control Board 7.6
RWD/RWS Gen 2 Relay Board 7.7
Appendix - Replacing Oven Components
Comprehensive Table of Oven Components A.1
Component and Assembly Location, DWO Gen 1 and Gen 2 A.6
Removing the Oven A.6
Component and Assembly Location, SWO A.8
Removing the Oven A.8
Front Trim Assembly Detail A.10
Front Trim Assembly Removal A.10
Control Housing Detail A.12
Upper Electrical Compartment, DWO Gen 1 A.13
Diff erentiating Between DWO Gen 1 and DWO Gen 2 A.13
Upper Electrical Compartment, DWO Gen 2 and SWO A.16
Diff erentiating Between DWO Gen 1 and DWO Gen 2 A.16
Controls Assembly Detail, DWO Gen 1, DWO Gen 2, and SWO A.18
Mag Air Diverter Assembly Detail, DWO Gen 1, DWO Gen 2, and SWO A.20
Relay and Relay/Power Assembly Detail, DWO Gen 1, DWO Gen 2, and SWO A.21
Lower Electrical Compartment Detail, DWO Gen 1 and DWO Gen 2 A.22
Diff erentiating Between DWO Gen 1 and DWO Gen 2 A.22
Speedcook Oven Cavity Component Detail, DWO Gen 1, DWO Gen 2, and SWO A.24
Lower Oven Cavity Component Detail, DWO Gen 1 and DWO Gen 2 A.28
Page 11

READ ALL INSTRUCTIONS BEFORE USING
i
WARNING: For your safety, the information in
this manual must be followed to minimize the risk of
fi re or explosion, electric shock, or to prevent property
damage, personal injury, loss of life, or excessive
exposure to microwave energy.
Safety Precautions
When using electrical appliances, basic safety precautions should be followed, including the following:
WARNING: To reduce the risk of burns, electric
shock, fi re, injury to persons or exposure to microwave
energy:
• Read all instructions before using this appliance.
• Read and follow “Precautions to Avoid Possible
Exposure to Excessive Microwave Energy” outlined
later on page ii.
• is appliance must be grounded. See Grounding
Instructions on page ii for further details.
• Install or locate this appliance only in accordance
with the provided installation instructions. Be sure
the appliance is properly installed and grounded by a
qualifi ed technician.
• Always place oven racks in desired location while the
oven is cool. If rack must be moved while oven is
hot, DO NOT let potholder contact hot heating
element in the oven. Oversized foods or oversized
metal utensils should not be inserted in a microwave/toaster oven as they may create a fi re or risk of
electric shock.
• Some products, such as whole eggs and sealed or
unopened food containers – for example, sealed glass
jars – may explode due to a build up of pressure and
SHOULD NOT be heated in this oven.
• Use care when opening oven door – let hot air or
steam escape before removing or replacing food.
• Use only microwaveable heat-resistant cookware –
for example: Pyrex
oven cooking utensils – in the Speedcook section of
this appliance.
• is appliance should be serviced only by qualifi ed
service personnel. Contact TurboChef
Service (866-447-3783) for examination, repair, or
adjustment.
Glassware, Stoneware, standard
®
Customer
®
• Use this appliance only for its intended purpose as
described in this manual. DO NOT use corrosive
chemicals or vapors in this appliance. is oven is
specifi cally designed to heat or cook food and is not
intended for laboratory or industrial use. DO NOT
use the oven to warm or heat a room.
• DO NOT store fl ammable materials in this oven or
near surface units. DO NOT store any materials,
other than manufacturer’s recommended accessories,
in this oven when not in use.
• DO NOT attempt to repair or replace any part of
this oven unless it is specifi cally recommended in
this manual or the Use and Care Guide.
• DO NOT use aluminum foil to cover contents,
racks, or any part of the Speedcook oven. Prolonged
use can cause overheating and damage the microwave components. Use in the bottom oven of a
Double Wall oven is permissible; however, do not
lay foil on the bottom of the oven.
• DO NOT use moist or damp potholders. Moist or
damp potholders on hot surfaces may result in burns
from steam. DO NOT let potholder touch hot
heating elements. DO NOT use a towel or other
bulky cloth.
• DO NOT allow children to operate without adult
supervision. Children should not be left alone or
unattended in the area where this appliance is in use.
ey should never be allowed to sit or stand on any
part of the oven.
• DO NOT operate this appliance wearing loosefi tting or hanging garments.
• DO NOT operate this appliance if it has a damaged
cord or plug, is not working properly, or has been
damaged or dropped.
• DO NOT cover or block any openings on this
appliance. Keep oven vent ducts unobstructed.
• DO NOT store this appliance outdoors.
• DO NOT use this appliance near water – e.g., in a
wet basement or near a swimming pool.
• DO NOT use water on grease fi res. Smother fi re or
fl ame or use dry chemicals or foam extinguisher.
SAFETY INSTRUCTIONS
Page 12

SAFETY INSTRUCTIONSii
To Reduce the Risk of Fire in the Cook Cavity:
• Use only oven-suitable containers in the oven. DO
NOT use paper products in either oven.
• Remove wire twist-ties from paper or plastic bags
being placed in the oven. For oven cooking bags –
DO NOT use wire twist-ties to close the bag.
• If materials inside the oven should ignite, keep the
oven door closed, turn the oven off and shut off
power at the fuse or circuit breaker panel. If the door
is opened, the fi re may spread.
• DO NOT cook items wrapped in cling wrap or
plastic fi lm.
• DO NOT overcook food. Carefully attend to the
oven if paper, plastic, or other combustible materials
are placed inside the oven to facilitate cooking.
Precautions to be Observed Before and During
Servicing to Avoid Possible Exposure to Excessive Microwave Energy
a) DO NOT operate or allow the oven to be operated
with the door open.
b) Make the following safety checks on all ovens to be
serviced before activating the magnetron or other
microwave source, and make repairs as necessary:
(1) interlock operation, (2) proper door closing,
(3) seal and sealing surfaces (arcing, wear, and other
damage), (4) damage to or loosening of hinges and
latches, (5) evidence of dropping or abuse.
c) Before turning on microwave power for any service
test or inspection within the microwave generating
compartments, check the magnetron, wave guide or
transmission line, and cavity for proper alignment,
integrity, and connections.
d) Any defective or misadjusted components in the
interlock, monitor, door seal, and microwave
generation and transmission systems shall be
repaired, replaced, or adjusted by procedures
described in this manual before the oven is released
to the owner.
e) A microwave leakage check to verify compliance with
the Federal performance standard should be per formed on each oven prior to release to the owner.
Do Not Touch Heating Elements or Interior
Surfaces of Oven
Heating elements may be hot even though they are
dark in color. Interior surfaces of an oven become hot
enough to cause burns. During and after use, do not
touch, or let clothing or other fl ammable materials
contact heating elements or interior surfaces of oven
until they have had suffi cient time to cool.
Power Connections
To avoid potential hazards, only the manufacturer, its
service agent, or a similarly-qualifi ed person should
replace a damaged power cable. Flexible conduit,
conductors and connectors are supplied by the manufacturer. e oven must be connected using the fl exible
conduit and conductors provided.
Self-Cleaning Oven Guidelines
Clean the oven only in accordance with the guidelines
provided on this page, page 2.10, and page 3.4.
• Before self-cleaning the oven, remove broiler pan,
grid, racks, and other cookware. Clean only parts
listed in manual.
• Listen for fan – a fan noise should be heard sometime during the cleaning cycle. If not, call Customer
Service (866.447.3783) before self-cleaning again.
• DO NOT clean the door gasket. e door gasket is
essential for a good seal. Care should be taken not to
rub, damage or move the gasket.
• DO NOT use oven cleaners. No commercial cleaner
or oven liner protective coating of any kind should
be used in or around any part of the oven. Residue
from oven cleaners will damage the inside of the
oven when the self-clean mode is used.
• If the oven is malfunctioning in the self-clean mode,
turn off or disconnect the appliance from the power
supply and have it serviced by a qualifi ed technician.
• Complete instructions on the operation of the
self-clean mode can be found on pages 2.10 and 3.4.
Grounding Instructions
is appliance must be connected to a grounded,
metallic, permanent wiring system, or an equipment
grounding conductor should be run with the circuit
conductors and connected to the equipment grounding
terminal or lead on the appliance.
Page 13

iii
RF Interference Considerations
e appliance has been tested and was determined to
be in compliance with applicable portions of FCC part
18 requirements and with the protection requirements
of Council Directive 89/336/EEC on the approximation of the laws of the Member States relating to
electromagnetic compatibility at the time of manufacture. However, some equipment with sensitivity to
signals below these limits may experience interference.
If any equipment experiences interference, the following steps should be considered:
• Increase the physical distance between the sensitive
equipment and this oven.
• If the sensitive device can be grounded, do so
following accepted grounding practices.
• If battery-powered microphones are being aff ected,
ensure that the batteries are fully charged.
• Keep sensitive equipment on separate electrical
circuits if possible.
• DO NOT route intercom wires, microphone wires,
or speaker cables near the oven.
SAFETY INSTRUCTIONS
Page 14

iv SAFTEY INSTRUCTIONS
This page intentionally
left blank.
Page 15

Section 1
Speci cations and Installation
Page 16

Page 17
1.1
Theory of Operation
e TurboChef® Residential Speedcook oven
combines high-speed forced air impingement and
microwave energy to cook food up to 15 times faster
than a conventional oven. e re-circulating air
transfers heat to the food and then passes through
a catalytic converter where excess grease and odors
are removed and combusted. Simultaneously, precise
bursts of microwave energy cook the food from the
inside out. is combination of heating technologies
quickly cooks food and seals moisture to help ensure
chef-quality results in a fraction of the time.
is manual includes instructions for servicing,
troubleshooting, installing, cleaning, and operating
the TurboChef Residential double and single wall
ovens. If you have questions not addressed in this
manual, contact Technical Service (866.447.3783,
+1 214-379-6000) or your Authorized Distributor.
Catalytic Converter
e catalytic converter removes odors and grease
from the air inside the cook cavity. It is also
responsible for limiting and removing any smoke
from the cavity in case of a spill. Do not use oven
cleaner when cleaning the Speedcook oven, as the
catalyst can become damaged by the use of caustic
cleaners, resulting in a non-warranty service call.
See pages 2.10, and 3.4 for approved self-cleaning
instructions.
Certi cations
cETLus
Electrical Speci cations
Phase: Single
Frequency: 60 Hz
Current: 50 amp (DWO) / 30 amp (SWO)
Cord: 4-wire (inc. ground)
Voltage: 208 or 240 (depending on model)
Connection: 5½ ft fl ex conduit
Total Connected Power: 50 amp (DWO) / 30 amp
(SWO)
NOTE: Unit includes a 5½-ft fl ex conduit to be
used between the oven and conduit box. Connectors
are supplied by the installation electrician.
NOTE: Branch circuit MUST be protected with a
50-amp (Double Wall Oven) or 30-amp (Single Wall
Oven) over-current protector.
CAUTION: If there is a high leg in supply
voltage, ensure it is not on L2. Having it present on
L2 will damage critical 120V oven components.
SPECIFICATIONS AND INSTALLATION
Page 18
1.2 SPECIFICATIONS AND INSTALLATION
50.25˝
(1276 mm)
26.5”
(673 mm)
30” (762 mm)
30” (762 mm)
23.875” (606 mm )
23.875” (606 mm)
48.75”
(1238 mm)
25”
(635 mm)
.75” (19 mm)
.75” (19 mm)
.75” (19 mm)
28˝ (711 mm)
the wall
Single Wall / Double Wall Top Oven
Double Wall Bottom Oven
23-7/8
(606 mm)
17 -1/ 2˝
(445 mm)
˝
4 -1/4˝ (108 mm)
19 -1/ 2˝
(495 mm)
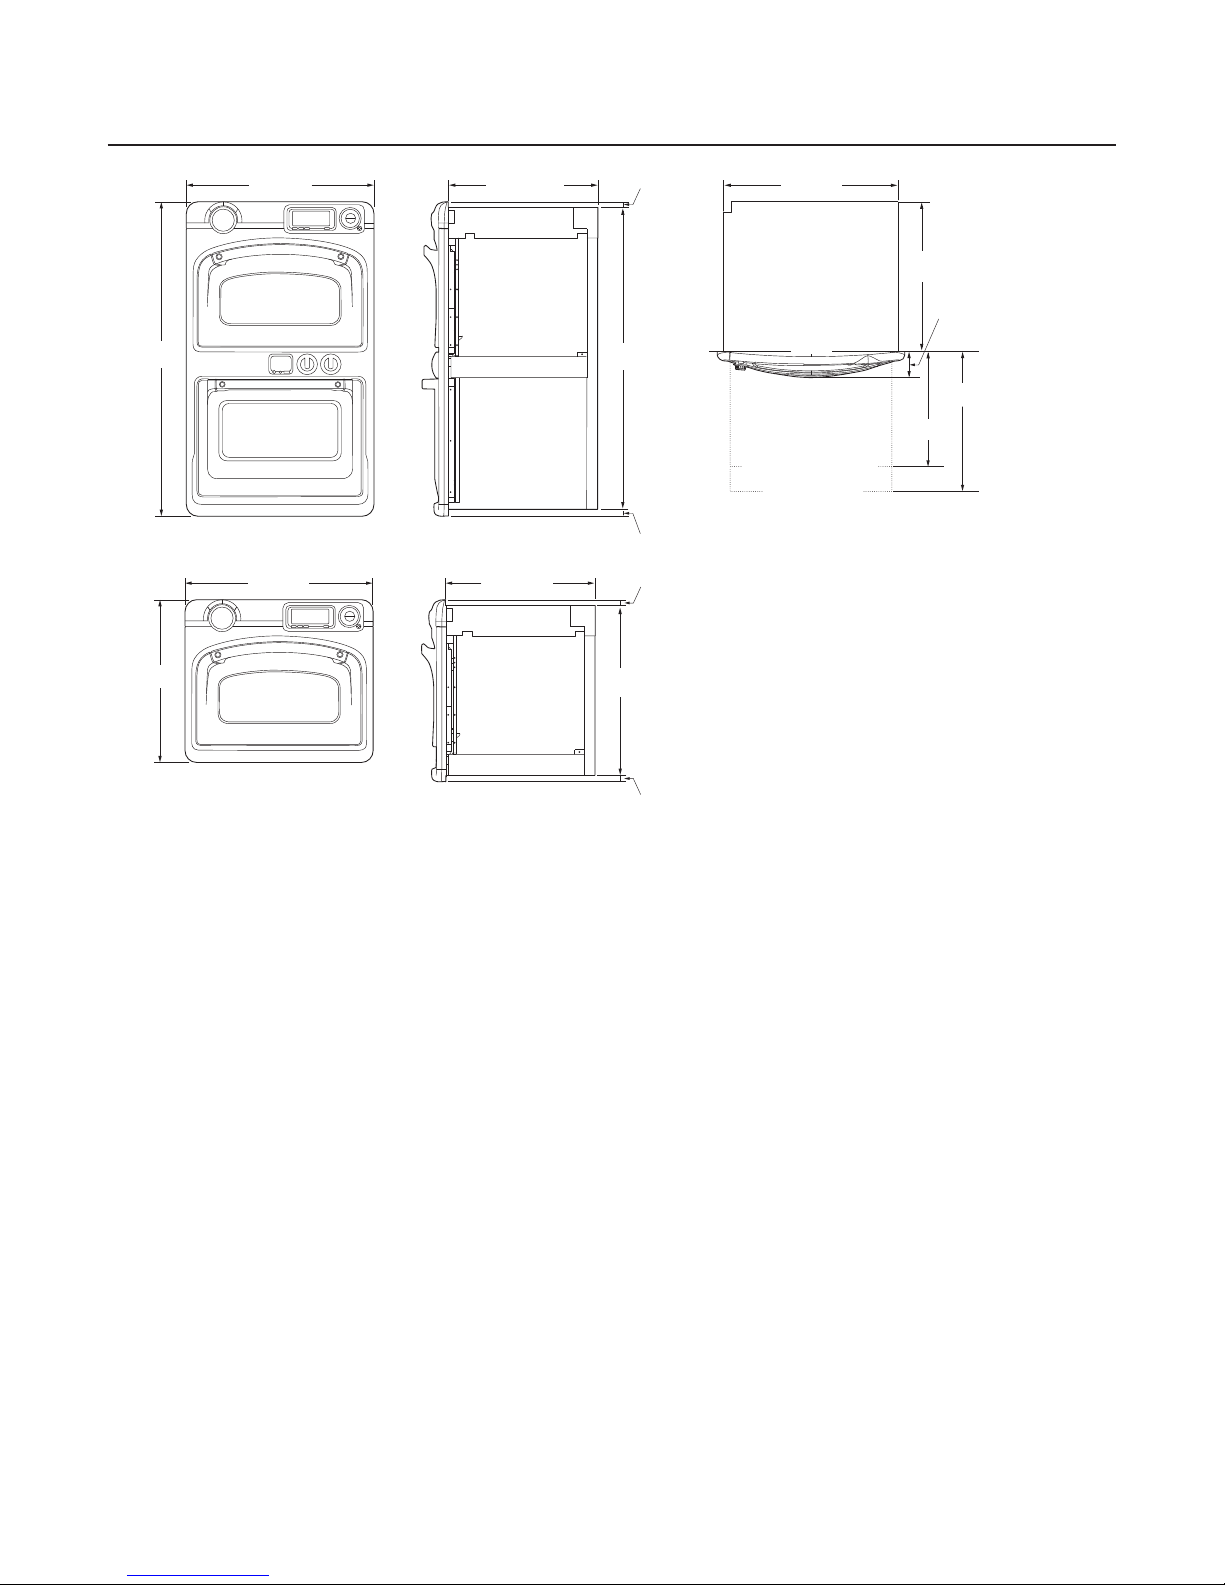
Figure 1.1: Oven Dimensions
Dimensions - Double Wall Oven
Oven Dimensions
Height: 50.25” (1276 mm)
Width: 30” (762 mm)
Depth: 23.875” (606 mm)
Depth from wall (Doors Closed): 4.25” (108 mm)
With Upper Door Open: 17.5” (445 mm)
With Lower Door Open: 19.5” (495 mm)
Weight: 410 lbs (186 kg)
Upper Cook Cavity Dimensions
Height: 12” (305 mm)
Width: 24” (610 mm)
Depth: 15” (381 mm)
Cooking Space: 2.5 ft
Lower Cook Cavity Dimensions
Height: 15.5” (394 mm)
Width: 24” (610 mm)
Depth: 17.5” (445 mm)
Cooking Space: 3.75 ft
3
(.07 m3)
3
(.106 m3)
.75” (19 mm)
Dimensions - Single Wall Oven
Oven Dimensions
Height: 26.5” (673 mm)
Width: 30” (762 mm)
Depth: 23.875” (606 mm)
Depth from wall (Door Closed): 4.25” (108 mm)
Depth from wall (Door Open): 17.5” (445 mm)
Weight: 230 lbs (105 kg)
Cook Cavity Dimensions
Height: 12” (305 mm)
Width: 24” (610 mm)
Depth: 15” (381 mm)
Cooking Space: 2.5 ft3 (.07 m3)
Page 19
1.3
Installation
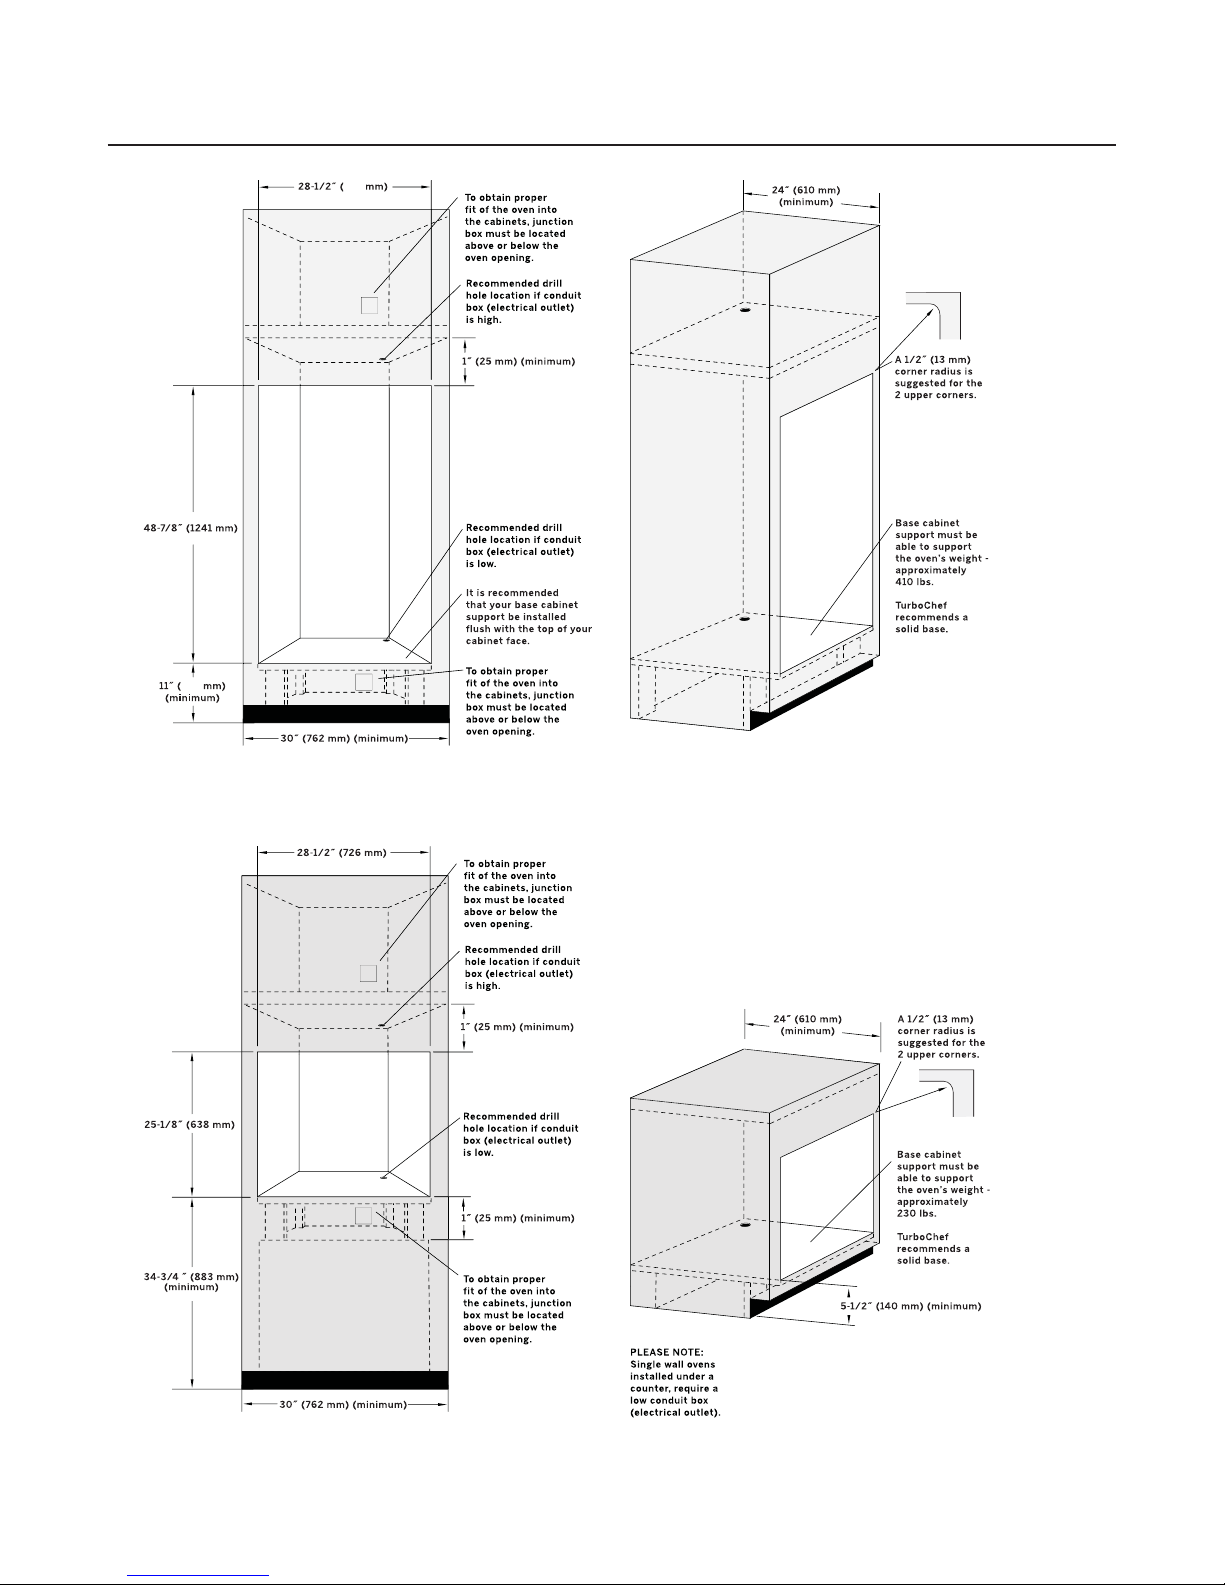
Cabinets should be cut according to dimensions on
pages 1.4 and 1.5. Failure to adhere to the Rough
Wall Opening specifi cations may cause corners of
the cabinet opening to be exposed. If the oven is
being installed near a wall or door, there should be at
least .25 in (6.35 mm) space between the wall/door
and the sides of the oven trim.
TurboChef recommends using standard 2x4 wood
support posts with a minimum of .5 in (12.7 mm)
solid base to support the oven. Support posts should
be level with the fl oor line and well secured to the
base of the cabinet. Base cabinet support must be
able to support the oven’s weight – 410 lbs (186
kg) DWO and 230 lbs (105 kg) SWO. TurboChef
strongly recommends a solid base as shown in the
illustrations on the following page.
Due to the oven frame’s overall depth, adhere to the
power supply line location shown in Figures 1.2 and
1.3 on page 1.4 to obtain a proper fi t in the cabinet.
If necessary due to a low or high conduit box, a 2”
diameter hole should be drilled where indicated to
allow the power cord to reach the power source.
NOTE: DO NOT shorten conduit. Correct conduit
before installing oven into cabinet.
e oven utilizes ambient air from the kitchen to
assist in keeping the operational components cool.
is air is drawn in through the top control panel
area through openings in the top access panel and
exhausted through an opening at the base of the
oven. Please allow a 1-inch minimum clearance
above and below these areas.
Should you have any questions or concerns about
how the cabinets are built, please contact TurboChef
Customer Service 866.447.3783 before installing the
oven.
Installation Safety Instructions
Read all installation instructions thoroughly before
installing.
CAUTION: DO NOT lift the oven by the
door handle(s). Doing so will require a door-leakage
test to be performed (see page 5.4), and could cause
the door(s) to come off or misalign, requiring repair
and/or replacement.
CAUTION: e Double Wall Oven weighs 410
lbs (186 kg), and the Single Wall Oven weighs 230
lbs (105 kg). Two or more individuals are required to
lift either oven.
CAUTION: DO NOT remove bottom wood
support rails until the oven is lifted into the cabinet.
Due to the oven’s weight, it is sometimes
necessary for installers to utilize special handling
equipment, such as hand trucks, dollies, etc. Use
of such equipment can damage the kitchen fl oor
surfaces. TurboChef recommends that all exposed
fl oor surfaces be protected by applying laminate
or plywood sheets, along with protective moving
blankets before using such equipment. Failure to
do so may result in scarring and damaging the
homeowner’s fl oors.
Installation, electrical connections, circuit
breakers, and grounding must comply with local
codes.
Ensure power is disconnected at the breaker
throughout the installation process.
is oven contains breakable components – use
extreme caution when lifting and placing it.
A minimum 1-inch clearance, to allow for proper
airfl ow, is required above the top control panel
area and below the base. Failure to maintain this
clearance may cause the oven to function
improperly.
DO NOT push on the outer frame. Doing so
could cause the door(s) to misalign, requiring
repair and/or replacement.
During installation, TurboChef recommends
removing the lower door prior to lifting the oven
from the front (Double Wall Model only.) DO
NOT remove the top door of the oven during
installation or at any other time. is door should
only be removed by an authorized service agent.
SPECIFICATIONS AND INSTALLATION
Page 20
1.4 SPECIFICATIONS AND INSTALLATION
724
(186 kg).
279
Figure 1.2: Cabinet Dimensions and Speci cations, Double Wall Oven
(105 kg).
Figure 1.3: Cabinet Dimensions and Speci cations, Single Wall Oven
(Wall Installation)
Figure 1.4: Cabinet Dimensions and Speci cations,
Single Wall Oven (Under Counter)
Page 21

1.5
Double Wall Oven Cabinet Dimensions
Cabinet
Width (min): 30” (762 mm)
Wood Fascia ickness (min): ⅜” (10 mm)
Rough Wall Opening
Height (min/max): 48⅞” (1241 mm)
Width (min/max): 28½” (726 mm)
Upper Corner Radius (preferred): ½” (13 mm)
Depth (min): 24” (610 mm)
Cabinet Base Height
Wall Installations (min): 11” (279 mm)
Wall Installations (max): 15” (381 mm)
NOTE: Failure to adhere to the rough wall opening
specs may cause corners of the cabinet opening to be
exposed.
Single Wall Oven Cabinet Dimensions
Cabinet
Width (min): 30” (762 mm)
Wood Fascia ickness (min): ⅜” (10 mm)
Installing the Oven
CAUTION: Before installing the oven, verify
voltage at the wall receptacle matches the voltage
specifi ed on the oven’s rating plate (located behind
the Speedcook oven door). Each oven is voltage
specifi c and will not function properly if supply
voltage is diff erent than intended voltage.
1. Ensure power is disconnected at the breaker.
2. Remove oven from box/crate and place on a
level surface.
NOTE: e oven is shipped with two support rails
attached to the bottom. ese rails allow the oven
to sit level and keep the bottom of the frame from
being damaged during installation. To properly place
the oven into the cabinets, these support rails must
be removed.
3. Remove all packing materials.
4. Verify the cabinet is built to the proper
specifi cations.
Rough Wall Opening
Height (min/max): 25⅛” (638 mm)
Width (min/max): 28½” (726 mm)
Upper Corner Radius (preferred): ½” (13 mm)
Depth (min): 24” (610 mm)
Cabinet Base Height
Wall Installations (min): 34¾” (883 mm)
Wall Installations (max): 38¾” (984 mm)
Under Counter Installations (min): 5½” (139 mm)
NOTE: Failure to adhere to the rough wall opening
specifi cations may cause corners of the cabinet opening to be exposed.
5. If provided, install the base slide plate (Figure
1.5, below). is plate will make installation
and future servicing of the oven easier.
SPECIFICATIONS AND INSTALLATION
.
.
.
Figure 1.5: Base Slide Plate Installation
Page 22

1.6 SPECIFICATIONS AND INSTALLATION
NOTE: You may screw or nail the base slide plate in
place if required.
NOTE: If the cabinet is not built to the proper
specifi cations, please consult with the contractor,
builder, or end user.
6. Place the oven in front of the cabinet, allowing
room to access wires.
7. Make the electrical connection. e electrical
supply should be a 4-wire single-phase AC.
Connect the red, black, white, and green
(ground) oven wires to the corresponding
colors of the electrical supply wires. Route fl ex
conduit to allow for oven removal for servicing.
NOTE: For branch circuits installed before 1996, a
3-wire hook up may be allowed. See NEC, or
qualifi ed electrician for details.
8. Place the oven into the cabinet.
WARNING: e Double Wall Oven weighs
approximately 410 lbs (186 kg), e Single Wall
Oven weighs approximately 230 lbs. (105 kg.). Each
oven requires two or more individuals to lift it.
WARNING: DO NOT push on the outer
frame. Doing so could cause door(s) to misalign,
requiring repair and/or replacement.
When the unit is lifted into the cabinet opening, the
installer must remove the support rails one at a time
to allow the oven to slide into the opening properly.
Remove each support rail by unscrewing the support
screw on either side of the rail. Supports should then
slide off the oven base.
When sliding the oven into its fi nal position, the
installer should continually pull the conduit through
the electrical drill hole for it to remain taut and not
become twisted or lodged behind the oven.
NOTE: Ovens are built voltage specifi c. A 208volt oven will not operate properly if connected to
a 240-volt source, and vice versa. Improper voltage
supplied to the oven will void the manufacturer’s
warranty and cause damage to oven components.
9. Reconnect power to the breaker.
10. Secure the oven to the cabinets:
a. Open the oven door(s).
b. Making sure the oven is fully installed
against the front of the cabinet, install two
of the supplied screws in the upper cavity,
and two in the lower cavity (lower cavity
screws only applicable to the Double Wall
Oven), through the side trim holes on either
side. e screws should engage the inner
cabinet and secure the oven in place.
11. Remove all plastic wire ties and packing
material from the top and bottom oven
cavities/racks (bottom oven cavity only
applicable to the DWO oven).
12. Verify the oven is functional and set the clock.
a. “Re-Boot” the oven after the initial
installation.
i. Advance the CookWheel on the top oven
to “Bake.”
ii. Press and hold all four buttons on the
display at the same time for two seconds.
b. e display should illuminate, the
TurboChef logo should appear, and the
oven should chime. Once this is verifi ed,
return CookWheel to the “Off ” position.
NOTE: DO NOT attempt to program any cook
programs in the top oven during installation.
c. Confi rm that the oven is set to the proper
confi guration: Double Wall Oven or Single
Wall Oven (see Oven Confi guration page 4.4).
d. Set the clock by pressing the Set Clock
Knob (top knob next to the clock). e
knob will pop out. Turn the knob left or
right to set the correct time. When the time
is set, press the knob back in to its original
position.
13. Leave all warning decals and instructional labels
on the oven for the consumer to view.
14. Ensure all paper and plastic is removed from
the cook cavity. Ensure the consumer is aware
of and has access to the provided oven literature
and operating instructions.
Page 23

Section 2
Oven Controls and Cooking The Speedcook Oven
Page 24

Page 25
2.1
123
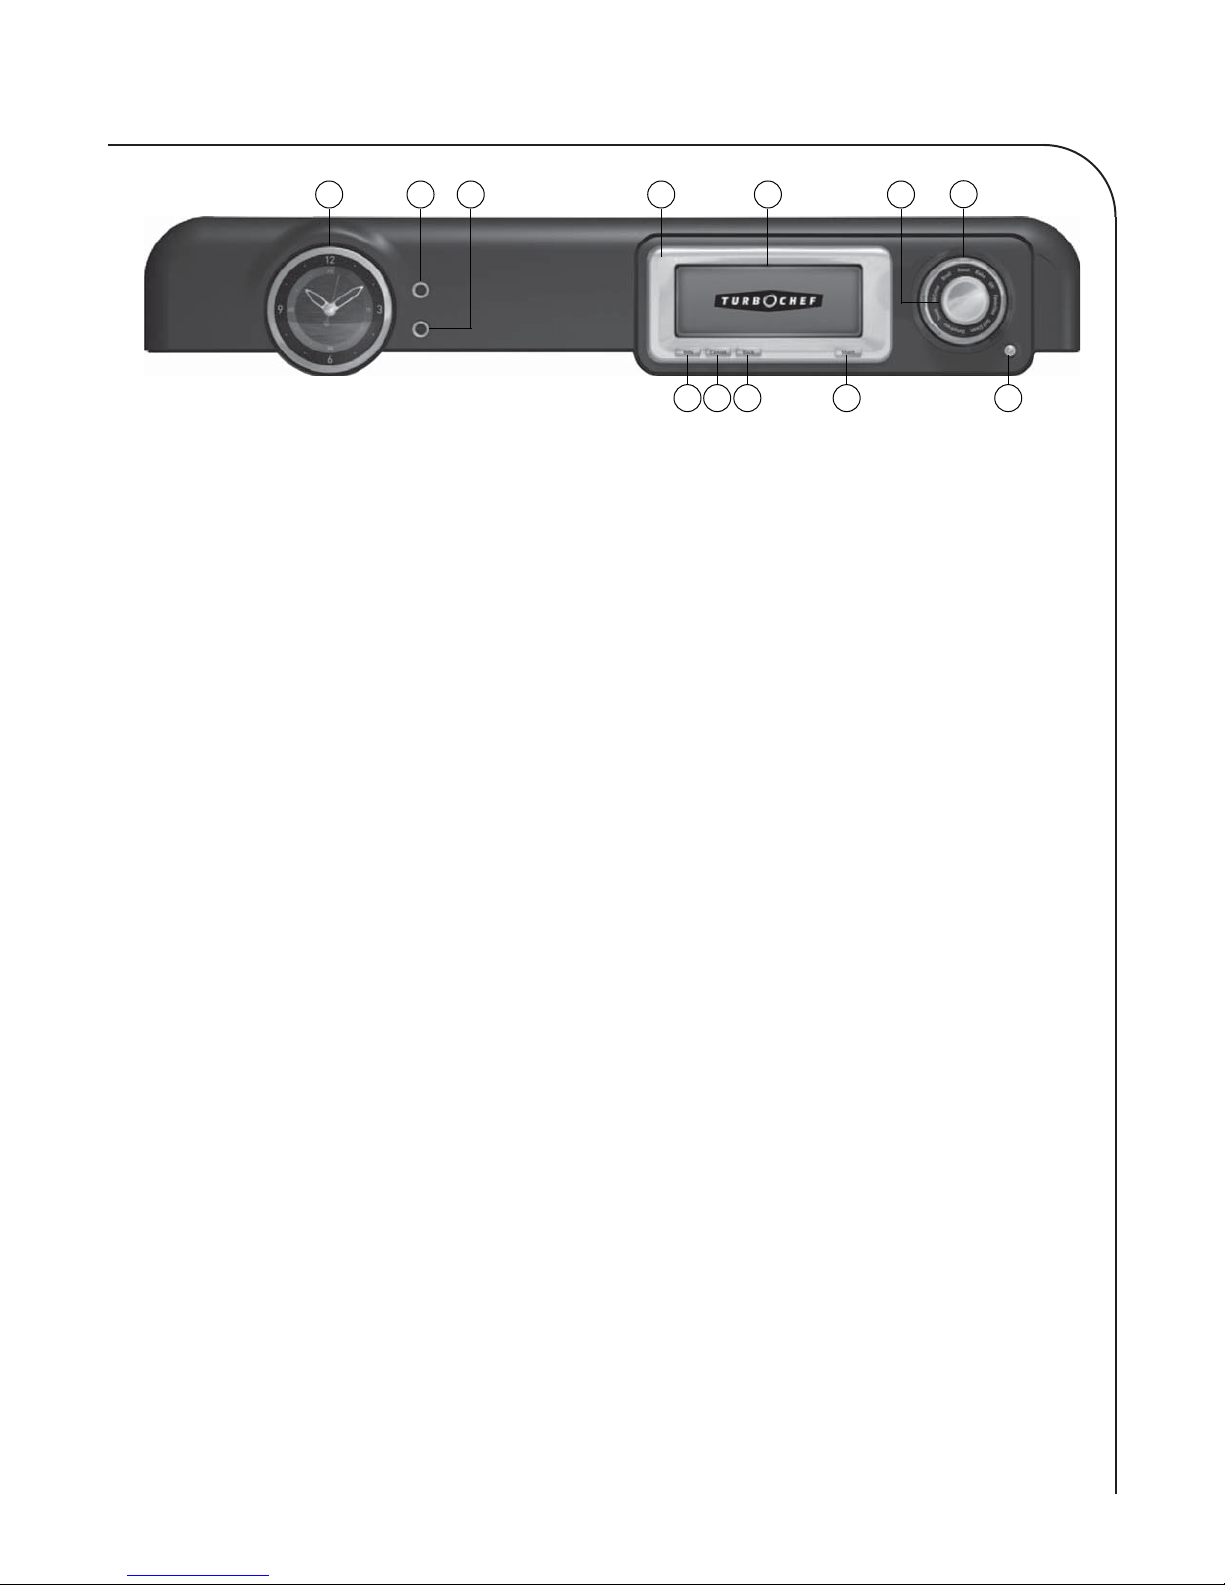
Figure 2.1: Oven Controls
Speedcook Oven Controls
1. Analog Clock and Timer
e clock and timer run with advanced electronic
control knobs. To operate, see 2. Set Clock Knob and
3. Set Timer Knob.
2. Set Clock Knob
To set the time,
1. Press knob to extend.
2. Turn knob to set time.
3. Press knob back in to original position.
7
125411610
98
7. CookWheel™ (outer knob)
Turn to select a Speedcook mode, Self-Clean, or to
turn the oven off . Modes include: Air-Crisp, Bake,
Broil, Favorites, Dehydrate, Roast, and Toast.
8. Oven Light Switch
Press to illuminate the top cook cavity.
9. Start Key
Press to select an option, begin a preheat cycle, or
initiate a cook cycle.
3. Set Timer Knob
To set the timer,
1. Press knob to extend.
2. Turn knob to set timer – up to 60 minutes.
3. Press knob back into original position.
NOTE: e timer does not begin counting down
until the knob is pressed back in. e oven will
chime four times at the end of the timer cycle.
4. Cook Navigator™
Consists of the Display (5), Start Key (9), Back Key
(10), Cancel Key (11), and Info Key (12).
5. Display
e display shows information relevant to the
current oven operation and/or user options.
6. CookWheel™ (inner knob)
Turn to navigate through the options on the display.
Press knob to select an option, begin a preheat cycle,
or initiate a cook cycle.
NOTE: Pressing the “Start” key performs the same
function as pressing in the inner CookWheel knob.
10. Back Key
Press to return to the previous screen.
11. Cancel Key
Press to terminate a cook cycle or to return to the
main screen.
12. Info Key
Press to display information on the Oven Setup
(sound, units & measurements, display, and software
updates), Help Topics, and Oven Tips.
NOTE: When the oven is in the middle of a cook
cycle, you will not be able to access the Info screen.
OVEN CONTROLS AND COOKING THE SPEEDCOOK OVEN
Page 26

2.2 OVEN CONTROLS AND COOKING THE SPEEDCOOK OVEN
Cook Modes
e Speedcook oven features seven modes that
enable the user to cook a wide variety of foods.
- Air-Crisp
- Bake
- Broil
- Dehydrate
- Favorites
- Roast
- Toast
To access Air-Crisp, Bake, Broil, Dehydrate,
Favorites, Roast, or Toast cook modes, turn the
CookWheel to the desired cook mode.
NOTE: Unlike traditional ovens or the lower double
wall oven, Speedcook oven cooking parameters will
vary signifi cantly on a cook-by-cook basis. For
troubleshooting cooking problems, see section 6 in
this manual. For information on component
measurements and testing, see section 5.
e table below details heater element activity.
Mode Convection
Fan
Preheat Off 30.8 ± 3.0 28.8 ± 3.0
All Modes Off 20.5 ± 2.0 19.2 ± 2.0
208 VAC
Value
240 VAC
Value
In the TurboChef® Speedcook Oven, the traditional
explanation of baking remains the same. However,
the hot air is moved through the cook cavity at
higher speeds than in a traditional oven. is rapid
movement of air decreases cook times while ensuring
foods bake evenly and retain more moisture.
When in the Bake mode, keep in mind that metal
cookware will provide more bottom browning while
items in glass cookware will cook a little faster. Bake
pizzas on a pizza pan or place them directly on the
oven rack. Some casseroles may need to be covered
with parchment paper to prevent over-browning.
Broil
Broiling directly exposes food to radiant heat (as
over a fi re or on top of a grill). e heat is direct and
intense, and it diff ers from baking or roasting in
that only one side of the food is exposed to the heat
source. Generally, broiled foods are quick cooking,
inherently tender, relatively lean, and not too thick.
e Broil mode on the TurboChef Speedcook Oven
will yield the same or superior results as broiling in
any traditional oven. e only real diff erence is that
your food cooks faster due to the hot air moving
through the cook cavity at increased speeds.
Cast iron grill pans, metal sheet pans, and metal
broiling pans all work well in this mode.
Air-Crisp
ink of Air-Crisp as air-frying. is mode is great
for foods that traditionally taste best when fried –
like french fries – as well as items containing any sort
of breading or stuffi ng that should toast and brown
in the cooking process – like stuff ed mushrooms.
In this mode, high temperature air moves through
the cook cavity at varying speeds to brown and crisp
the food product. Food comes out with a nice
caramelization and is lower in fat content than if it
had been deep fried. Metal sheet pans work well in
this mode.
Bake
Traditionally, baking is cooking with dry heat. Hot
air from the top and bottom of the oven envelopes
the food in a radiant dry heat, perhaps with a little
moisture from the food, which circulates as a vapor
in the oven.
Dehydrate
Considered the original form of preservation, dehydrating food removes the product’s natural moisture
by slowly drying it with a low heat. Manually, food
can be dehydrated by placing thin slices on racks
and allowing them to dry assisted only by sun or air.
To shorten the dehydrating process, the TurboChef
oven utilizes low temperature air moving at higher
speeds.
is mode is ideal for products like banana chips
and other dried fruits, as well as dried meats, like
beef jerky. Sheet pans, TurboChef tefl on screens, and
pizza pans (with or without holes) are all recommended for use with this mode.
Favorites
e Favorites mode is a tool that allows the user to
store and easily recall up to 9,999 cook settings for
the user’s favorite recipes. is mode truly allows you
Page 27

2.3
to cook any recipe quickly and easily – regardless of
whether it is a perfect match to one of the preprogrammed settings or not. In addition to any settings that the user saves, the settings for the last ten
cooks are always saved in this mode. e Favorites
mode gives the user access to Convection Bake, Defrost, and Microwave functions. To learn more about
the Favorites mode, see below.
Roast
Traditionally, roasting implies cooking food with an
open fl ame, as on a spit in front of a fi re.
Roasting and baking in an oven are essentially the
same thing, but roasting is mostly used for meats
and vegetables. In the top oven, a combination of
low and high speed air is used to brown the outside
of food while retaining moisture inside.
Roasting pans (without lids), glass casserole dishes
(with or without lids), and sheet pans all work well
with this mode. Shallow pans will allow food to
brown more. An uncovered pan without liquids will
help keep the heat dry and allow foods to brown and
crisp. Setting meats and poultry directly on a rack in
a pan keeps them from steaming in their own juices.
Toast
Toasting browns and crisps foods like bread, bagels,
and tortillas. Using high heat and high speed air, the
Toast Mode can enhance fl avor and melt cheese.
For best results, place food directly on the oven rack.
For products that may run over, like fi lled pastries,
use a metal sheet pan.
NOTE: Convection bake, defrost, and microwave
cook cycles cannot be saved to Favorites and will not
appear in “View Last Cooked (10).”
is section contains information about the
following:
- Cooking a Recently Prepared Dish
- Cooking a “Favorite” Dish
- Using the Convection Bake Mode
- Using the Defrost Mode
- Using the Microwave Mode
NOTE: If the oven does not contain some of these
options, verify it has received the most recent software upgrade. See page 4.3 for details.
NOTE: If for some reason the SD card must be
replaced, you must back up your Favorites to retain
them. See page 4.3 for more details.
Cooking a Recently Prepared Dish
e Speedcook oven automatically saves a record of
the user’s last 10 cooks, including any adjustments
made to the selected preprogrammed setting, giving
the user quick access to their most recently-used
cook settings.
OVEN CONTROLS AND COOKING THE SPEEDCOOK OVEN
To cook a recently-prepared dish,
1. Turn the CookWheel to “Favorites.”
2. Select “View Last Cooked (10).”
3. Select the dish to be cooked.
4. Select “Cook” and press start or the inner
CookWheel knob.
5. Follow the Basic Cooking steps (page 2.5),
beginning with 3.
Favorites Cooking
e Favorites mode allows the user to store and
quickly access the cook settings for their favorite
recipes and food items and gives them access to the
convection bake, defrost, and microwave modes
(for information on how to access convection bake,
defrost, and microwave functions, see page 2.4).
Cooking in the Favorites mode generally follows the
Basic Cooking process on page 2.5; however, users
must choose between cooking a recently prepared
dish, cooking a “Favorites” dish, or using the
convection bake, defrost, or microwave functions.
Cooking a ”Favorite” Dish
e Favorites mode allows the user to store and
quickly access the cook settings for your favorite
recipes and food items. To save a dish to Favorites,
see page 2.9.
To cook a “Favorite” dish,
1. Turn the CookWheel to “Favorites.”
2. Select the dish to be cooked.
3. Select “Cook” and press start or the inner
CookWheel knob.
4. Follow the Basic Cooking steps from 3.
Page 28

2.4 OVEN CONTROLS AND COOKING THE SPEEDCOOK OVEN
Using the Convection Bake Function
e Favorites mode gives the user access to the
convection bake function. When set to convection
bake, the Speedcook oven operates as a standard
convection oven with the fans running at a low
speed. e Speedcook oven’s convection bake
function creates the same cooking environment as
setting the bottom oven in the Double Wall Model
to the convection bake mode.
To use the convection bake function,
1. Turn the CookWheel to “Favorites.”
2. Select “Convection Bake” and press start or the
inner CookWheel knob.
3. Set the desired time.
4. Set the desired temperature.
5. Press start to begin preheating.
6. When preheating is complete (the oven will
chime), place food in the oven and press start.
WARNING: Inside of oven and oven door are
hot! Use extreme caution.
NOTE: Food placed in the oven will begin cooking
regardless of whether start is pressed or not.
However, when start is pressed, the timer begins
counting down.
3. Set the desired time.
4. Set the desired power level.
NOTE: For defrost applications, the power level
automatically defaults to 10% (recommended for
most foods).
5. Place food item in the oven and press start.
6. When defrosting is complete (the oven will
chime), remove the food from the oven.
WARNING: Dish and inside of oven/oven
door are hot! Use extreme caution.
NOTE: If additional time is needed, the user can
add time to the timer by pressing start.
7. When done defrosting, turn the oven off by
turning the CookWheel to Off .
Using the Microwave Function
e Favorites mode gives the user access to the
microwave function. When the microwave function
is selected, the Speedcook oven operates as a
standard microwave oven. is function should
be used primarily for applications such as popping
popcorn or boiling water.
7. When cooking is complete (the oven will
chime), remove the food from the oven.
WARNING: Dish and inside of oven/oven
door are hot! Use extreme caution.
NOTE: If additional time is needed, the user can
add time to the timer by pressing start.
8. When done cooking, turn the oven off by
turning the CookWheel to Off .
Using the Defrost Function
e Favorites mode gives the user access to the
defrost function. e defrost function should be
used to aid in the thawing of foods, especially frozen
meats and casseroles.
To use the defrost function,
1. Turn the CookWheel to “Favorites.”
2. Select “Defrost” and press start or the inner
CookWheel knob.
To use the microwave function,
1. Turn the CookWheel to “Favorites.”
2. Select “Microwave” and press start or the inner
CookWheel knob.
3. Set the desired time.
4. Set the desired power level.
5. Place food item in the oven and press start.
6. When cooking is complete (the oven will
chime), remove the food from the oven.
WARNING: Dish and inside of oven/oven
door are hot! Use extreme caution.
NOTE: If additional time is needed, the user can
add time to the timer by pressing start.
7. When done cooking, turn the oven off by
turning the CookWheel to Off .
Page 29
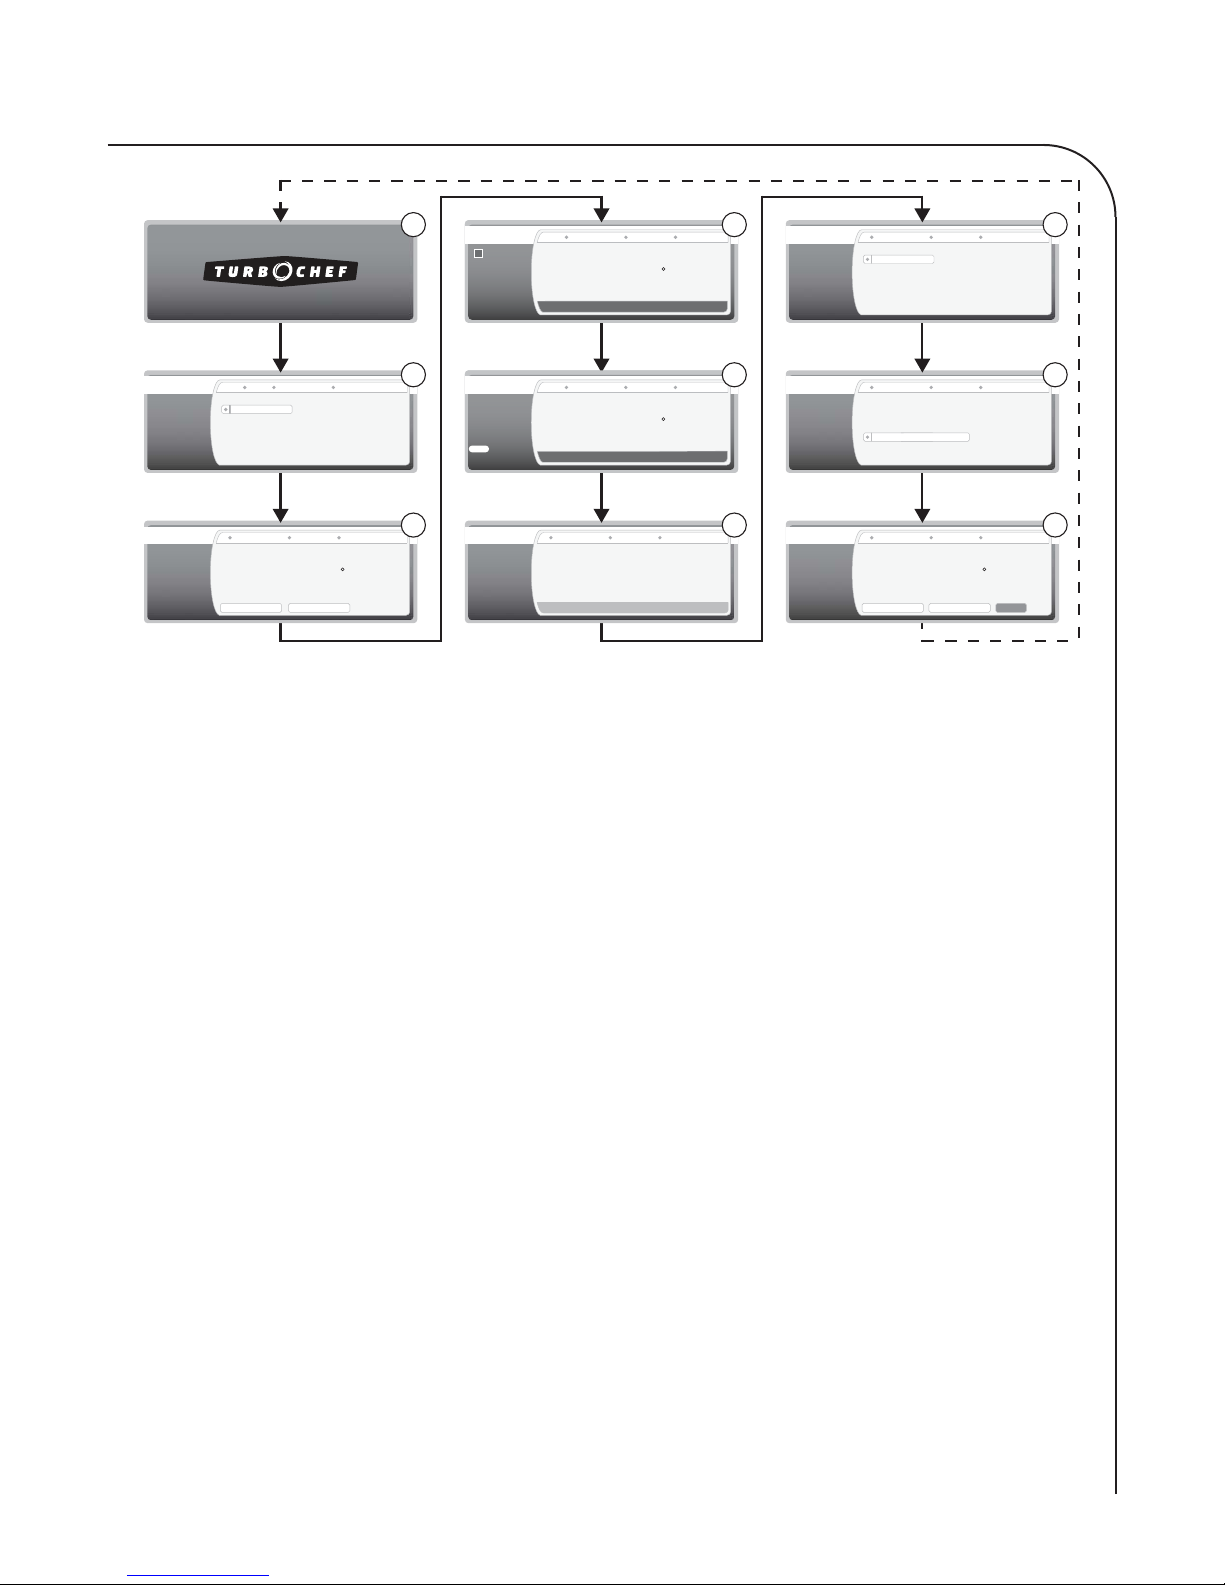
2.5
Roast
Please select
an option
Roast
To start cook
cycle, select
Begin Preheat
Meat Lamb Rack of Lamb 14 to 16 oz
1 Rack
2 Racks
... Rack of Lamb 14 to 16 oz 1 Rack
SUGGESTED SETTINGS
Cook Time Oven Temp
04:00 500
mins : secs
Adjust Settings
Begin Preheat
1
2
3
Roast
! Do not put
the dish into
the oven until
preheat is
complete.
Roast
Carefully place
dish into oven. To
begin cooking
press the
Start
button.
Roast
The oven will
remind you to
check the dish
and tone when
cooking is 80%
complete.
Lamb Rack of Lamb 14 to 16 oz 1 Rack
COOK TIME: 04:00 COOK TEMP: 500
Preheat Time Oven Temp
PREHEAT - get screenshot
03:18 347
mins : secs
Preheating, please wait to insert dish
Lamb Rack of Lamb 14 to 16 oz 1 Rack
COOK TIME: 04:00 COOK TEMP: 500
Cook Time Oven Temp
Ready to cook - get screenshot
04:00 500
mins : secs
Preheat complete, oven ready
... Rack of Lamb 14 to 16 oz 1 Rack
COOK TIME: 04:00 COOK TEMP: 500
Time Remaining
03:55
Cooking has started
Figure 2.2: Standard Operation Modes
Basic Cooking
Figure 2.2
is section explains how to cook a food item by
describing the “standard operation” modes through
which the Speedcook oven progresses.
4
5
6
Roast
Roast
Roast
Please check
your dish. Be
careful when
removing from
Oven.
... Rack of Lamb 14 to 16 oz 1 Rack
COOK TIME: 04:00 COOK TEMP: 500 TIME LEFT: 00:48
No Change
Cook Less
Brown Less
Cook and Brown Less
... Rack of Lamb 14 to 16 oz 1 Rack
COOK TIME: 04:00 COOK TEMP: 500 TIME LEFT: 00:00
Cook More
Brown More
Cook and Brown More
Done Cooking this Dish
... Rack of Lamb 14 to 16 oz 1 Rack
SUGGESTED SETTINGS
Cook Time Oven Temp
04:00 500
mins : secs
Save to Favorites Cook Another
7
8
9
Done
Mode 1: Oven O
Mode during which the oven is turned off . To begin
cooking, the user must fi rst select, using the CookWheel, one of the seven speedcook modes (AirCrisp, Bake, Broil, Dehydrate, Favorites, Roast, or
Toast).
OVEN CONTROLS AND COOKING THE SPEEDCOOK OVEN
e oven is preprogrammed with recipe settings at
the time of manufacture and is ready to operate after
installation.
NOTE: Modes are not always sequential, as shown
in Figure 2.2, above.
- 1: Oven Off
- 2: Select a Food Item
- 3: Confi rm Settings
- 4: Preheat
- 5: Ready to Cook
- 6: Cooking
- 7: 80% Complete
- 8: 100% Complete
- 9: Remove Food from Oven
Happens When...
- e user turns the CookWheel to the “Off ”
position at any time.
Goes To...
- 2 when the user turns the CookWheel to
Air-Crisp, Bake, Broil, Dehydrate, Roast, or
Toast.
- Favorites when the user turns the CookWheel
to Favorites (for more information on Favorites,
see page 2.3).
Mode 2: Select a Food Item
Mode during which the user specifi es which dish to
cook. Use the inner CookWheel knob to select the
item and item specifi cations. To make a selection,
scroll to the desired option and press the inner
CookWheel knob or start key.
Page 30

2.6 OVEN CONTROLS AND COOKING THE SPEEDCOOK OVEN
Happens When...
- e user turns the CookWheel to Air-Crisp,
Bake, Broil, Dehydrate, Roast, or Toast from
1.
- e user presses cancel from 7.
- e user selects “Done” from 9.
Goes To...
- 3 when the user selects the desired food
item and item specifi cations.
Mode 3: Con rm Settings
Mode during which the user either confi rms the
suggested cook settings, or chooses to adjust the
cook settings (for more information on adjusting
cook settings, see page 2.8).
Happens When...
- When the user selects the desired food item and
item specifi cations from 2.
Goes To...
- 4 when the user selects the “Begin
Preheat” option.
- Adjust Settings when the user selects the
“Adjust Settings” option (for more information
on adjusting cook settings, see page 2.8).
Mode 4: Preheat
Mode during which the oven preheats to the set
temperature. e oven automatically begins
counting down the remaining preheat time and
displays the current temperature. Preheating will
take approximately 8-14 minutes.
Happens When...
- e user selects the “Begin Preheat” option
from 3.
Mode 5: Ready to Cook
Mode during which the oven is ready to cook a food
item. Place the food into the oven at this time. Press
start to begin the cook cycle.
WARNING: Inside of oven and oven door are
hot! Use extreme caution.
Happens When...
- e oven has reached the set temperature. e
oven will chime, indicating it is ready to cook.
- e user selects “Cook Another“ from 9.
Goes To...
- 6 when the user presses start.
Mode 6: Cooking
Mode during which the oven cooks a food item.
NOTE: To immediately terminate cooking, turn the
CookWheel to off .
NOTE: e oven door must be completely closed
before the oven will initiate a cook cycle. If the door
is opened while the oven is cooking, the oven
displays the message “ e oven door is open. You
must close the oven door before continuing.” If
applicable, the microwave system shuts off and the
air will power down to 30%.
Happens When...
- e user presses start from 5.
Goes To...
- 7 when the cook cycle is 80% complete
(if the cook cycle exceeds 2:30).
- 8 if the cook cycle is less than 2:30.
Mode 7: 80% Complete
Goes To...
- 5 when the oven chimes, indicating that
the preheat cycle is complete.
NOTE: If the door is opened while the oven is
preheating, the oven displays the message “ e oven
door is open. You must close the oven door before
continuing.” If applicable, the air will power down
to 30%.
Mode during which the cook cycle is 80% complete.
When the cook cycle is 80% complete, a chime
sounds, the cook cycle pauses, and the user has the
option to check the food and, if desired, adjust the
cook settings. At this point in the cook cycle, the
user can choose one of the following four options:
- No Change: Select if dish is cooking to
expectations.
- Cook Less: Select if product is overcooking or
internal temperature is too high.
Page 31

2.7
- Brown Less: Select if the outside of the dish is
browning faster than desired.
- Cook and Brown Less: Select if dish is cooking
and browning more than expected, but requires
additional cooking time.
If after 30 seconds the oven has not been addressed
(door opened or inner CookWheel knob pressed),
the oven will complete the cook cycle according to
the original settings.
NOTE: For food items with a cook time of 2:30
or less, the cook cycle does not pause at the 80%
complete mark.
NOTE: If the food item is done at this time,
remove it from the oven and press cancel to end the
cook cycle. If you end the cook cycle at this point,
the cook cycle will not be recorded in “View Last
Cooked (10)” (for more information on “View Last
Cooked (10), see page 2.3).
Happens When...
- e cook cycle is 80% complete.
Goes To...
- 2 if the user presses cancel.
- 8 after 30 seconds of inactivity, or if the
user selects “No Change,” “Cook Less,” “Brown
Less,” or “Cook and Brown Less.”
Mode 8: 100% Complete
Mode during which the cook cycle is 100%
complete. At the end of a cook cycle, a chime sounds
notifying the user that the food item is done. e
user has the option to add additional cook time, if
desired. At this point in the cook cycle, the user can
choose one of the following four options:
- Cook More: Select if the outside meets expecta tions, but the inside needs to cook longer.
- Brown More: Select if the inside meets
expectations, but outside needs to cook longer.
- Cook and Brown More: Select if both the
inside and outside need to cook longer.
- Done Cooking this Dish: Select if no
adjustments are needed.
NOTE: If the user selects “Cook More,” “Brown
More,” or “Cook and Brown More,” the user can
add up to 30% of the original cook time in 5-second
increments. is can be repeated as many times as
necessary.
is option is available for 3 minutes. After 3
minutes of inactivity, the oven assumes the item is
done.
Happens When...
- e cook cycle is 100% complete.
Goes To...
- 9 if the user selects “Done Cooking this
Dish.”
- 6 if the user selects one of the “cook/
brown more” options.
Mode 9: Remove Food from Oven
Mode during which cooking is complete, and the
food item is ready to be removed from the oven. e
user has the option to “Save to Favorites,” “Cook
Another,” or “Done.”
WARNING: Dish and inside of oven/oven
door are hot! Use extreme caution.
OVEN CONTROLS AND COOKING THE SPEEDCOOK OVEN
NOTE: e display will not change until “Save to
Favorites,” “Cook Another,” or “Done” is selected or
until the oven is turned off .
Happens When...
- e user selects “Done Cooking this Dish”
from 8.
Goes To...
- 1 if the user turns the CookWheel to off .
- 2 if the user selects “Done.”
- 5 if the user selects “Cook Another.”
- Save to Favorites (see page 2.9), if the user
selects “Save to Favorites.”
NOTE: If the user selects “Cook Another,” the next
cook cycle will use the same settings as the previous
cook cycle. is includes any adjustments made at
any point during the previous cook cycle.
Page 32

2.8 OVEN CONTROLS AND COOKING THE SPEEDCOOK OVEN
Adjusting a Recipe’s Cook Time
Cook times may be altered up to 25% in either
direction of the preprogrammed time. Be aware that
preprogrammed cook times can vary signifi cantly
from traditional settings.
To adjust the cook time,
1. From 3, select “Adjust Settings”
(Figure 2.3).
2. Use the inner CookWheel knob to scroll to the
cook time and press the knob to select it
(Figure 2.4).
3. Turn the inner CookWheel knob to adjust the
cook time in 5-second increments. e
original cook time cannot be altered more
than 25% in either direction (Figure 2.5).
4. Press the inner CookWheel knob to confi rm
the new cook time.
5. Scroll to and select “Begin Preheat.”
Adjusting a Cook Temperature
Temperatures may be altered up to 25°F (14°C) in
either direction. Note that preprogrammed temperatures can vary signifi cantly from traditional settings.
To adjust a cook temperature,
1. From 3, select “Adjust Settings”
(Figure 2.3).
2. Use the inner CookWheel knob to scroll to
“Oven Temp,” press knob to select (Figure 2.6).
3. Turn the inner CookWheel knob to adjust the
temperature in 5°F (2°C) increments. e
temperature cannot be altered more than 25°F
(14°C) in either direction (Figure 2.7).
4. Press the inner CookWheel knob to confi rm
the new temperature.
5. Scroll to and select “Begin Preheat.”
The Advanced Cook Mode
In the advanced cook mode (Figures 2.8 and 2.9),
the user can adjust the airfl ow and microwave power
levels of a preprogrammed setting. In addition to
customizing an existing setting, making adjustments
in the advanced cook mode enables the user to
develop new settings from pre-existing ones. A high
level of familiarity with the oven is suggested before
attempting to make changes in this mode.
Each programmed setting is divided across four
intervals, each of which has four associated settings:
- Time: e length (run time) of an interval.
Time settings are not adjustable - only the total
cook time can be adjusted (see adjacent).
- Upper Air: Controls speed of the air coming
from the top of the oven. Adjust in 10%
increments from 0-100%.
- Lower Air: Controls speed of the air coming
from the bottom of the oven. Adjust in 10%
increments from 0-100%.
- Microwave: Controls the amount of microwave
power being used. Adjust in 10% increments
from 0-100%.
Use the inner CookWheel knob to scroll to and
select the desired setting(s).
To use the Advanced Cook Mode,
1. From 3, select “Adjust Settings”
(Figure 2.3).
Roast
To start cook
cycle, select
Begin Preheat
Figure 2.3: Adjusting Recipe Settings
Roast
! Time has
been
calculated for
best results.
Adjusting
time is not
advised.
Figure 2.4: Selecting Cook Time
... Rack of Lamb 14 to 16 oz 1 Rack
SUGGESTED SETTINGS
Cook Time Oven Temp
04:00 500
mins : secs
Adjust Settings
... Rack of Lamb 14 to 16 oz 1 Rack
Cook Time Oven Temp
0:04:00 500
hours:mins:secs
Advanced...
Begin Preheat
Begin Preheat
Roast
To adjust
time, turn
knob to the
desired time
and press to
set.
Figure 2.5: Adjusting Cook Time
Roast
! Temp has
been
calculated for
best results.
Adjusting
temp is not
advised.
Figure 2.6: Selecting Oven Temp
... Rack of Lamb 14 to 16 oz 1 Rack
Cook Time Oven Temp
03:55 500
mins:secs
Advanced...
... Rack of Lamb 14 to 16 oz 1 Rack
Cook Time Oven Temp
04:00 500
mins:secs
Advanced...
Begin Preheat
Begin Preheat
Page 33

2.9
2. Use the inner CookWheel knob to scroll to
“Advanced...” and press the knob to select it
(Figure 2.8).
3. Select the setting to be adjusted and make the
desired changes (Figure 2.9).
4. Press the inner CookWheel knob to confi rm
the new settings.
5. Select “Done” to confi rm changes or “Original
Settings” to cancel changes (Figure 2.9).
Saving to Favorites
By allowing the user to store up to 9,999 cook
settings, the Favorites mode allows the user to cook
anything quickly and easily. e user can create the
perfect cook cycle for any product by using a preprogrammed setting and making adjustments at the
80% and 100% complete points. Once the settings
are perfected, saving to favorites enables the user to
store and easily recall the perfect setting for the next
time they cook that recipe.
e user can save to favorites when:
- Cooking is paused via oven door being open
- A cook cycle is 80% or 100% complete
- Selecting a recently-cooked dish from View
Last Cooked (10).
To save a dish to favorites,
1. From any of the above listed conditions, choose
Save to Favorites.
- Turn the inner CookWheel knob to advance
the cursor to the word you wish to edit or
delete, or to select the space between words
where you want to add text.
- Press the knob to select the word or space
between words.
- To add text:
a. Use the inner CookWheel knob to scroll
left and right to select letters (A-Z),
numbers (0-9), or punctuation marks.
b. Press the inner CookWheel knob to
confi rm a character. e cursor will
move to the next space.
c. Press the back key to return to a previous
character.
d. Predictive matches appear beneath the
text being added. Use the inner cook wheel knob to scroll to and select a
match (if applicable).
e. When a word is complete, press the inner
CookWheel knob after the fi nal
character is confi rmed.
- To change or delete text:
a. Use the inner CookWheel knob to high light the word to be changed or deleted,
and press the knob to select the word.
b. A drop-down menu will appear with
“change” and “delete” as selectable
options (Figure 2.10).
c. If “change” is selected, follow the above
instructions for adding text.
OVEN CONTROLS AND COOKING THE SPEEDCOOK OVEN
NOTE: If you do not wish to rename the item being
saved, skip to step 3.
2. To rename a dish:
Roast
To adjust
temp, turn
knob to the
desired temp
and press to
set.
Figure 2.7: Adjusting Oven Temp
Roast
! This mode is
recommended
for advanced
users only.
Figure 2.8: Selecting Advanced
... Rack of Lamb 14 to 16 oz 1 Rack
Cook Time Oven Temp
03:55 495
mins:secs
Advanced...
... Rack of Lamb 14 to 16 oz 1 Rack
Cook Time Oven Temp
04:00 500
mins:secs
Advanced...
Begin Preheat
Begin Preheat
NOTE: When re-saving an existing Favorites recipe,
previous settings will be replaced with those from
the current cook cycle, including any name change.
3. Scroll to and select “Done.”
COOK TIME: 04:00 COOK TEMP: 500
Time Intervals 01:00 min 01:00 min 01:00 min 01:00 min
100%
100%
change
delete
90%
80%
100%
50%
Upper Air
Lower Air
Power
Figure 2.9: Advanced Cook Mode
Favorites
Turn inner
knob to
change the
current letter.
Push inner
knob to
select.
Figure 2.10: Changing or Deleting a Name
Last Cooked 1 Rack Save as Favorite
COOK TIME: 05:00 TEMP: 500
Mary’s 1 Rack
70%
100%
60%
50%
100%
30%
DoneOriginal Settings
Done
Page 34

2.10 OVEN CONTROLS AND COOKING THE SPEEDCOOK OVEN
Renaming a Dish (in Favorites)
At any time - and as often as the user likes - the
user may rename any of the cook settings saved in
Favorites.
To change the name of a setting stored in Favorites,
1. Turn the CookWheel to Favorites.
2. Select the dish/cook setting to be renamed.
3. Use the inner CookWheel knob to select
“Rename” (Figure 2.11).
4. Rename the selected item (see step 2 of “Saving
to Favorites, page 2.9).
5. Select Done.
Deleting a Dish (from Favorites)
Favorite settings that are no longer used or that
the user wishes to delete may be removed from the
Favorites mode.
To delete a dish from favorites,
1. Turn the CookWheel to Favorites.
2. Select the dish/cook setting to be deleted.
3. Use the inner CookWheel knob to select Delete
(Figure 2.11).
NOTE: When Delete is selected, the item/setting
is automatically deleted and the oven returns to the
initial Favorites screen, which lists all stored Favorite
settings in alphabetical order.
Self-Clean Mode - Speedcook
Oven
e Speedcook oven is self-cleaning. Using heat up
to 900°F (482°C), the oven will self-clean the inside
of the cook cavity in approximately 4.5 hours.
NOTE: For the Double Wall Oven, while one oven
is in self-clean mode the other will not be functional.
Additionally, the top and bottom ovens cannot be
self-cleaned at the same time.
NOTE: e oven door will not unlock until the
oven cavity temperature recedes below 500°F
(260°C).
To initiate a self-clean (Figure 2.12),
1. Ensure the cook cavity is empty and remove the
oven rack.
NOTE: Failure to remove the oven rack will cause
the rack to discolor.
2. Turn the CookWheel to Self-Clean.
3. Press the Start button.
4. If terminating a self-clean is required, turn the
outer CookWheel knob to Off .
During the self-clean cycle, the oven door is locked
and oven surfaces can become very hot. When the
cleaning cycle is complete and the oven has returned
to a safe temperature, the screen displays a message
and the oven sounds a tone and powers down.
Reheat Setting
Use the reheat setting to reheat leftovers. e
intended serving size is food for one individual,
or a “plate” of food.
1. Turn the CookWheel to Bake.
2. Scroll to Refrigerated Foods, Reheat.
3. Press the Start button to begin reheating.
Favorites
Please select
an option.
Figure 2.11: Rename a Dish (in Favorites) Figure 2.12: Self Clean
Rack of Lamb
Cook
Rename
Delete
WARNING: e oven is extremely hot during
self-clean. DO NOT touch or attempt to use until
self-clean is complete.
Self-clean
During self-cleaning,
the oven door will be locked.
CAUTION: HOT SURFACES
Self-cleaning is starting.
Page 35

Section 3
Oven Controls and Cooking Lower Oven (Double Wall Oven Only)
Page 36

Page 37

3.1
Figure 3.1: Lower Oven Controls (Double Wall Oven models only)
Lower Oven Controls
ese controls are only applicable to Double Wall
Oven models.
1. Display Screen
Displays the oven and meat probe temperature, as
well as the timer information.
2. Oven Mode Dial
Turn to choose the cook mode. For a list of cook
modes, see page 3.2.
3. Temperature Dial
1
456 7
2
3
5. Lock Key
When the door is locked, a graphical lock appears on
the screen. Hold for 3 seconds to engage/disengage
the door lock. Allow 5-10 seconds for lock/unlock to
engage.
NOTE: To engage the Sabbath Mode, simultaneously
press the “Lock” and “View” keys for 3 seconds. See
page 3.3 for details.
6. View Key
Press to toggle between the oven temperature, meat
probe temperature, and timer information being
displayed in the primary screen position.
Turn the dial to set the oven temperature or to select
Broil Low, Broil High, Proof, or Warm.
4. Set Timer Knob
Use to set the timer:
1. Press knob to extend.
2. Turn knob to set timer.
3. Press knob back in to original position.
e timer does not begin counting down until the
knob is pressed back in. e oven will chime four
times at the end of the timer cycle.
7. Oven Light Switch
Press to illuminate the bottom cook cavity.
OVEN CONTROLS AND COOKING THE BOTTOM OVEN
Page 38

3.2 OVEN CONTROLS AND COOKING THE BOTTOM OVEN
Cook Modes
e bottom oven (double wall only) is both a
conventional and convection oven that provides
uniform cooking throughout. e bottom oven
features fi ve cook modes.
- Bake
- Broil
- Convection Bake
- Convection Roast
- Roast
e table below details heater element activity
within each mode.
Mode Convection
Fan
Bake Off 22.3 ± 2.0 19.8 ± 2.0
Broil (High) Off 14.7 ± 2.0 13.3 ± 2.0
Broil (Low) Off 14.7 ± 2.0 13.3 ± 2.0
Convection Bake On 20.3 ± 2.0 17.5 ± 2.0
Convection Roast On 12.7 ± 2.0 11.0 ± 2.0
Roast Off 18.0 ± 2.0 15.5 ± 2.0
Bake
208 VAC
Value
240 VAC
Value
Convection Bake
Convection Bake uses the same heating elements
as Bake with the addition of a convection fan and
heater in the back of the cook cavity. is fan and
heater help heat and circulate the air evenly
throughout the chamber to produce superior
browning and crisping.
Any food cooked under the Bake mode can also
be prepared using Convection Bake and vice versa.
Items cooked under Convection Bake will cook
about 33% faster than when cooked under Bake.
Convection Roast
Convection Roast uses the same heating elements
as Roast. However, unlike Roast, Convection Roast
utilizes the convection fan and heater in the back of
the oven to help heat and circulate the air throughout the cook cavity.
Any item cooked under Roast can be prepared using
Convection Roast and vice versa. e one diff erence
is that Convection Roast uses additional heating
elements, causing it to cook about 33% faster.
Traditionally, baking is to cook with dry heat. Hot
air from the top and bottom of the oven envelopes
the food in a radiant dry heat, perhaps with a little
moisture from the food, which circulates as a vapor
in the oven.
In the bottom oven of the double wall oven, unlike
most traditional ovens, the bottom heating element
is concealed beneath the cook cavity. is feature
allows for a bigger cook cavity, easier cleaning, and
more uniform heating.
Broil
Broiling directly exposes food to radiant heat (as
over a fi re or on top of a grill). e heat is direct and
intense, and it diff ers from baking or roasting in that
only the top side of the food is exposed to the heat
source.
Generally, you broil foods that are quick cooking,
inherently tender, relatively lean, and not too thick.
Roast
Roasting in an oven is essentially the same as baking,
but roasting is used mostly for meats and vegetables.
Hot air from the top and bottom of the oven is used
to brown the outside of food while retaining
moisture inside.
In the bottom oven of the Double Wall model, the
two top heating elements provide better control and
optimized broiling and roasting.
Warm Setting
e warm setting uses heat from the top and bottom
of the oven to keep the cook cavity at 145°F (63°C),
the perfect holding temperature for food.
Proof Setting
e Proof setting uses heat from the top and bottom of the oven to keep the cook cavity at 90-105°F
(32-41°C), the perfect temperature for yeast dough
to rise. Some doughs may require moisture to proof
correctly. If moisture is needed, place a sheet pan of
water under the lower rack.
Page 39

3.3
Basic Cooking
e bottom oven, when used in combination with
the top oven, off ers the user an expanded capacity.
WARNING: Due to the concealed heating
element in the bottom oven, make sure to not cover
or line the bottom of the oven with foil.
To operate the lower oven,
1. Set the oven mode dial to one of the following:
Convection Bake, Convection Roast, Broil,
Roast, or Bake.
2. Set the oven temperature dial.
- Along with the various temperature settings,
the user could also choose Warm or Proof.
- e oven’s current temperature is displayed
as the primary information on the screen.
3. When the oven fi nishes preheating (Figure 3.2),
insert the dish.
WARNING: Inside of oven and oven door are
hot! Use extreme caution.
4. Set the timer (if desired). See page 3.1 for
instructions on how to set the timer.
NOTE: When the timer is set, the remaining cook
time is displayed as the primary information and the
oven temperature as the secondary (Figure 3.3). Press
the View key to toggle which information is
displayed as primary and secondary (Figure 3.4).
NOTE: When the meat probe is in use, the probe
temperature is displayed while the dish is cooking.
To toggle between the information displayed in the
primary, secondary, and tertiary positions on the
screen (Figure 3.5), press the View key.
5. When food has fi nished cooking, warming, or
proofi ng, carefully remove it from the oven.
The Sabbath Mode
e Sabbath Mode, available for religious faiths with
“no work” requirements on the sabbath, cooks food
over a 72 hour period. e Sabbath Mode is Star-K
certifi ed.
To use the Sabbath Mode,
1. Press the oven light switch to turn the oven
light on.
- By turning the oven light on via the switch,
the light stays on for the duration of the
time the oven is in the Sabbath Mode. If the
oven light is not turned on, the oven light
will turn on and off when the door is
opened and closed.
2. Set the oven mode dial and temperature dial
as if cooking normally.
3. Simultaneously press the Lock and View keys
for 3 seconds. e display will say “Oven
display is off when Sabbath Mode is engaged.”
is message is displayed for 10 seconds. e
display then goes black and remains black as
long as the oven is in the Sabbath Mode.
- In the Sabbath Mode, the oven’s display
will appear black, however the oven is still
active. At any time while the oven is in
the Sabbath Mode, the oven’s temperature
can be adjusted by turning the temperature
dial. ere is a 15-second delay before
any temperature change is processed. e
oven will power down after 72 hours.
NOTE: Turning the oven off or changing the cook
mode will cancel the Sabbath Mode. If there is a loss
of power while the oven is in Sabbath Mode, the
oven will not resume cooking in the Sabbath Mode
once power is restored.
OVEN CONTROLS AND COOKING THE BOTTOM OVEN
WARNING: Dish and inside of oven/oven
door are hot! Use extreme caution.
6. Turn the oven mode dial to the Off position.
175°
Preheating
Figure 3.2: Preheating
Figure 3.3: Timer Primary
350°
2:45
Timer
2:45
350°
Oven Temp
Figure 3.4: Oven Temp Primary Figure 3.5: Probe Temp Primary
350° 2:45
180°
Probe Temp
Page 40

3.4 OVEN CONTROLS AND COOKING THE BOTTOM OVEN
Self-Clean Mode
e bottom oven is self-cleaning. Using heat up to
900°F (482°C), the oven will self-clean the inside of
the cook cavity in approximately 4.5 hours.
NOTE: For the Double Wall Oven, while one oven
is in self-clean mode the other will not be functional.
Additionally, the top and bottom ovens cannot be
self-cleaned at the same time.
NOTE: e oven door will not unlock until the
oven cavity temperature is below 500°F (260°C).
To initiate a self-clean,
1. Ensure the cook cavity is empty and remove all
oven racks.
NOTE: Failure to remove the oven rack will cause
the rack to discolor. Failure to remove the roller rack
may harm the rack’s rolling mechanism.
2. Set the oven mode dial to Self-Clean.
3. Press and hold the Lock key for 3 seconds. e
self-clean will initiate.
WARNING: e oven is extremely hot during
self-clean. DO NOT touch or attempt to use until
self-clean is complete.
4. If terminating a self-clean is required, turn the
oven mode dial to Off .
5. When self-cleaning is complete, the oven will
tone and turn off automatically.
Page 41

Section 4
Info Mode
Page 42

Page 43

4.1
Overview of the Info Mode
From the Info Mode, the user can
- Adjust oven sounds
- Adjust display settings
- Adjust oven units and measurements
- Access help topics and general cooking
information
- Update oven software
- Access version information
- Access installer setup
To access the Info Mode, simply press the Info key
when the oven is off (Figure 4.1).
Adjusting Oven Sounds
e user can change the oven’s volume and
individually turn on and off the diff erent oven tones.
To adjust the speaker volume,
1. Ensure that the CookWheel is turned to off .
2. Press the Info key.
3. Scroll to and select Oven Setup.
4. Scroll to and select Sound.
5. Scroll to and select Volume.
6. Turn the inner CookWheel knob left or right
to adjust the sound (Figure 4.2).
7. Press the Start key to confi rm the adjustment.
8. Press the Back key to back out of the volume
adjustment screen and return to the main Info
Screen.
To turn on and off oven sounds,
1. Ensure that the CookWheel is turned to off .
2. Press the Info key.
3. Scroll to and select Oven Setup.
4. Scroll to and select Sound.
5. Scroll to and select Select.
6. Use the inner CookWheel knob to scroll to
and select the sound to be turned on or off
(Figure 4.3). By default, all oven sounds are
turned on.
- Preheat is Done: is sound indicates
the oven has completed the preheat cycle
and has reached the correct cooking
temperature. When this sound is turned on,
the oven will chime every fi ve minutes until
the user either cancels or starts the cook
cycle.
- 80% Cooking Reminder: is sound
indicates the cook cycle is 80% complete.
If the user chooses to not address the oven
at this point, a chime will sound at 15 and
30 seconds. After 30 seconds, the oven will
resume cooking.
- 100% Cooking Reminder: is sound
indicates the cook cycle is complete. e
oven will chime every 8 seconds until the
oven door is opened or the user selects an
adjustment option.
- Valid Selection: is sound indicates a valid
selection has been made.
- Invalid Selection: is sound indicates an
invalid selection has been made.
7. Press the Back key to exit the Select
screen and return to the main Info screen.
Figure 4.1: Oven O
Info
Figure 4.2: Adjust Volume Figure 4.3: Sound Select
Oven Setup Sound Volume
Adjust Volume
Info
Oven Setup Sound Select
Preheat is Done ON
80% Cooking Reminder ON
100% Cooking Reminder ON
Valid Selection ON
INFO MODE
Page 44

4.2 INFO MODE
Adjusting Display Settings
To adjust the brightness of the oven display(s),
1. Ensure that the CookWheel is turned to off .
2. Press the Info key.
3. Scroll to and select Oven Setup.
4. Scroll to and select Display.
5. For Double Wall Oven models only, select
“Top Oven” or “Bottom Oven” (Figure 4.4).
6. If “Top Oven” was selected, scroll to and select
“Brightness.”
7. Adjust the brightness to the desired setting by
turning the inner CookWheel knob left or right
(Figure 4.5).
8. Press Start to confi rm selection.
9. Press Back to return to previous screens.
To adjust the color of the Speedcook oven display,
1. Ensure that the CookWheel is turned to off .
2. Press the Info key.
3. Scroll to and select Oven Setup.
4. Scroll to and select Display.
5. For Double Wall Oven models only, select
Top Oven (Figure 4.4).
NOTE: e color cannot be adjusted on the bottom
oven display if Bottom Oven is selected.
6. Scroll to and select Colors.
7. Change the color to the desired setting by
turning the inner CookWheel knob left or
right (Figure 4.6).
8. Press Start to confi rm selection.
9. Press Back to return to previous screens.
Adjusting the Oven’s Units &
Measurements
e oven defaults to Fahrenheit. To change between
Fahrenheit and Celsius,
1. Ensure that the CookWheel is turned to off .
2. Press the Info key.
3. Scroll to and select “Oven Setup.”
4. Scroll to and select “Units & Measurements.”
5. Scroll to and select “Temperature.”
6. Turn the inner CookWheel knob to scroll to the
desired temperature measurement (Figure 4.7).
e arrow indicates which setting is selected.
7. Press Back to return to previous screens.
Accessing Help Topics and
General Cooking Information
e Speedcook oven comes equipped with a variety
of helpful hints that cover a range of topics. is
information is located in two places - Help Topics and
Oven Tips.
To access Help Topics or Oven Tips,
1. Ensure that the CookWheel is turned to off .
2. Press the Info key.
3. Scroll to and select either Help Topics or
Oven Tips.
4. Press Back to return to previous screens.
Info
Figure 4.4: Select Top or Bottom Oven Figure 4.6: Adjust Color
Info
Figure 4.5: Adjust Brightness Figure 4.7: Changing Temperature Units
Oven Setup Display
Top Oven
Bottom Oven
Oven Setup Display Brightness
Adjust brightness
Info
Info
Oven Setup Display Colors
Orange
Pewter
Blue
Red
... Units & Measurement
Fahrenheit
Celsius
Page 45

4.3
Updating the Oven Software
TurboChef® periodically releases software updates
(located at www.turbochef.com or call customer
service for assistance). e oven can be updated via
USB fl ash drive (not included with the oven).
CAUTION: Software updates are generation
specifi c. Installing Gen 2 software on a Gen 1 oven
(and vice versa) will disable the oven. Replace the
SD Card to restore oven operation (see page A.18).
NOTE: When the oven’s software is upgraded, any
cook settings in View Last Cooked (10) in the Favorites mode will be lost. To permanently save these
settings prior to updating software, see page 2.9.
To update the oven’s software,
1. Ensure the oven is in Favorites.
2. Press the Info key.
3. Scroll to and select Oven Setup.
4. Scroll to and select Software Update.
5. Insert the USB fl ash drive into the USB port
located on top of the oven’s control panel
(Figure 4.8).
6. Press Start or the inner CookWheel knob
to select Update Software (Figure 4.9).
NOTE: If the USB fl ash drive is not detected by the
oven, a message will appear (Figure 4.10). Ensure the
USB fl ash drive is correctly inserted and press Start
or the inner CookWheel knob to continue. e oven
will continue to display this screen until the user
selects Cancel or a USB fl ash drive is detected.
CAUTION: DO NOT press any keys or
attempt to operate the oven until the software
update completes.
Backing Up/Restoring Favorites
If for some reason the SD card must be replaced,
you must back up Favorites to retain them.
To back up favorites before SD card replacement,
1. Ensure the oven is in Favorites.
2. Press the Info key.
3. Scroll to and select Oven Setup.
4. Select “Backup/Restore Customizations.”
5. Select “Backup to your USB Drive.”
6. Insert the USB fl ash drive into the USB port
located on top of the oven’s control panel
(Figure 4.8) and select “Begin.”
NOTE: A USB extension cable (P/N: 103194) is
available for easy access to the port. Contact TurboChef customer service for more information.
Figure 4.8: Inserting USB Flash Drive
Info
Figure 4.9: Insert USB Flash Drive Screen
Info
Oven Setup Software Update
Insert USB ash drive into the
USB port located on top of the oven
control panel.
Update Software
Oven Setup Software Update
USB ash drive can not be found.
Please ensure the USB ash drive is
properly connected to the USB port.
Try Again
To restore favorites after SD card replacement,
1. Follow steps 1-4 above.
2. Select “Restore from your USB Device.”
3. Insert the USB fl ash drive into the USB port
located on top of the oven’s control panel
(Figure 4.8) and select “Begin.”
Info
Figure 4.11: Begin Update Screen
Oven Setup Software Update
Software update can take up to
10 minutes. Please do not disturb the
oven until the update is complete.
Begin Update
INFO MODE
Figure 4.10: USB Flash Drive Can Not be Found Screen
Figure 4.12: Logo Screen
Page 46

4.4 INFO MODE
Accessing the Version
Information
To access the software version number,
1. Ensure that the CookWheel is turned to off .
2. Press the info key
3. Scroll to and select Oven Setup.
4. Scroll to and select Version Information.
Installer Setup
Use the Installer Setup mode to test individual oven
components by turning them on or off and to set
diff erent confi guration settings for the oven. To
access Installer Setup:
1. From the Info Mode, select Oven Setup.
2. From Oven Setup, select Installer Setup.
3. Input the code 042259 (Figure 4.13).
Top (or Single Wall) Oven Component Tests
Select “Top Oven” to individually turn on and off
the following components (see Figure 4.14):
- Top and Bottom Blowers
- Top Heaters
- Magnetrons
- Upper Door Lock
Bottom Oven Component Tests
Oven Con guration
From the Installer Setup screen, scroll down and
select “Oven Confi guration” to confi gure the oven
for double wall or single wall (Figure 4.16).
CAUTION: If the oven is not set to the proper
confi guration, it will not operate correctly.
NOTE: If the SD card is replaced, the oven must be
reconfi gured to the correct setting.
AC Voltage Con guration
WARNING: DO NOT reconfi gure the
operating voltage of the oven to accommodate
existing voltage supply or the oven will not operate
correctly. Change this setting only if instructed by
TurboChef.
From the Installer Setup screen, scroll down and
select AC Voltage Confi guration to specify between
208 and 240 VAC (Figure 4.17).
Simulation/Demo State, and printf Mask
Simulation State, Demo State, and printf Mask are
confi gurations specifi c to manufacturer use. Do not
activate these confi gurations unless expressly
instructed by TurboChef.
NOTE: Not applicable for single wall ovens.
Select “Bottom Oven” to individually turn on and
off the following components (see Figure 4.15):
- Heaters
- Lower Door Lock
Info
Turn inner
knob to
change the
current
number. Push
inner knob to
select.
Figure 4.13: Input Password
Info
Figure 4.14: Top Oven Component Options
Oven Setup
0 4 2 2 5 9
Done
Oven Setup Installer Setup Top Oven
Top Blower
Bottom Blower
Top Heaters
Mags
Info
Figure 4.15: Bottom Oven Component Options
Info
To congure
for Single Wall
Oven, turn
knob, select
YES and press
START.
Figure 4.16: Oven Con guration
Info
To congure
oven voltage,
turn knob to
select option
and press
START.
Figure 4.17: AC Voltage Con guration
Oven Setup Installer Setup Bottom Oven
Heaters
Lock/Unlock Door
... Single Wall Oven Conguration
Double Wall Oven <--Single Wall Oven
... AC Voltage Conguration
208 Volts AC
240 Volts AC <---
Page 47

Section 5
Oven Systems
Page 48

Page 49

5.1
Convection System Speedcook Oven
e Speedcook oven convection system is designed
to rapidly heat, clean, and recirculate air into the
cook cavity. is section contains information about
the following components:
- Blower motor (bottom)
- Blower motor (top)
- Blower motor controller (BMSC)
- Heater assembly
- Jetplate (bottom)
- Jetplate (top)
- Stirrer motor and assembly
For information on accessing and removing parts,
and for part numbers, see the Appendix.
Blower Motor (Bottom)
e bottom blower motor runs on varied 3-phase
power to force the air into the upper oven cavity.
e motor is controlled by a proprietary controller.
e bottom blower motor can be tested in
(see page 4.4).
Heater Assembly
e Speedcook oven heater assembly consists of
three elements. e elements are voltage specifi c and
cannot operate properly without the correct
voltage applied. Confi rm incoming voltage matches
the oven’s specifi cations. During preheat, all three
elements are energized.
e K1 solid state relay (see page 5.12) controls L1
voltage to the two primary elements while the K8
relay (see page 5.10) controls L1 voltage to the
preheat element. e K9 relay (see page 5.11)
controls L2 voltage to all three elements.
NOTE: For 208 volt units, preheat amperage is
at 30.8 amps and once the temperature has been
reached, the operating amperage is at 20.5 amps.
NOTE: For 240 volt units, preheat amperage is
at 28.8 amps and once the temperature has been
reached, the operating amperage is at 19.2 amps.
Jetplate (Bottom)
e bottom jetplate channels air that is generated
from the bottom blower motor.
Blower Motor (Top)
e top blower motor runs on varied 3-phase power
to force the air into the upper oven cavity. e
motor is controlled by a proprietary controller.
e top blower motor can be tested in
(see page 4.4).
Blower Motor Controller (BMSC)
e blower motor controller is proprietary and will
only operate the convection motors described above.
e motor controller is controlled on command
from the control board and a 0-10VDC speed
command from the control board.
e blower motor controller can be tested in
by testing the blower motors
(see page 4.4). For additional troubleshooting, see
page 6.3.
Jetplate (Top)
e top jetplate channels air that is generated from
the top blower motor. is air passes through a
stirrer before entering the cook cavity through the
jetplate holes.
CAUTION: e top jetplate is ceramic and
may crack or break if mishandled. Be careful when
removing or reinstalling it.
Stirrer Motor and Assembly
e stirrer is responsible for evenly distributing hot
air and microwaves that are launched from the top
of the oven into the cook cavity. e stirrer is driven
by a motor that remains on during a cook cycle.
When the oven is cooling down, the stirrer motor
turns off when the cook cavity temperature recedes
below 160°F (71°C).
To visually test stirrer motor operation, go to Bake,
which will automatically turn on the stirrer, the stirrer is visible through the upper jetplate holes.
OVEN SYSTEMS
Page 50

5.2 OVEN SYSTEMS
Convection System - Lower Oven
(Double Wall Oven Only)
e lower oven convection system is designed to
rapidly heat and recirculate air into the cook cavity.
is section contains information about the
following components:
- Broil element
- Bake element
- Convection element
- Convection fan motor
For information on accessing and removing parts,
and for part numbers, see the Appendix.
Broil Element
e broil element consists of independently-operated
inner and outer elements. e inner broil element’s
L1 voltage is controlled by the K12 solid state relay’s
output “B” while the L2 voltage is controlled by the
K13 relay’s N.O. terminal. e outer broil element’s
L1 voltage is controlled by the K12 solid state relay’s
output “A” while the L2 voltage is controlled by the
K13 relay’s N.O. terminal.
For Gen 2 ovens, operation is the same through the
CookWheel, but power is received from terminal
RBJ20-2 of the relay board.
Speedcook Oven Door
is section contains information about the
following:
- Removing/reinstalling the Speedcook oven door
- Door skin replacement
- Left lock motor assembly
- Right lock motor assembly
- Measuring RF leakage for microwave safety
- Halogen light assembly
For information on accessing and removing parts,
and for part numbers, see the Appendix.
e proper fi t and adjustment of the oven door is
essential for safe and reliable oven operation.
Removing/Reinstalling the Speedcook Oven
Door
To remove or reinstall the Speedcook oven door,
follow the steps below. Refer to Figure 5.1.
Bake Element
e bake element’s L1 voltage is controlled by the
K11 solid state relay’s output “B” while the L2
voltage is controlled by the K13 relay’s N.O.
terminal.
Convection Element
e convection element’s L1 voltage is controlled by
the K11 solid state relay’s output “A” while the L2
voltage is controlled by the K13 relay’s N.O.
terminal.
Convection Fan
e convection fan motor is powered by 120 VAC
L2 voltage, which is controlled by the selector
switch’s terminal “3.” When a convection cycle
is selected, the switch to terminal 3 is closed and
the convection fan motor is supplied voltage. e
convection fan will continue to run until the selector
switch is turned to a non-convection cycle and the
switch to terminal 3 is opened.
CAUTION: DO NOT lift the oven door by
the handle. Lifting the oven door by the handle can
damage the oven door and cause it to misalign.
1. Ensure the oven has cooled to at least 160°F
(71°C).
2. To gain access to the right and left upper-hinge
pockets, remove the oven from the cabinet
approximately 7” (178 mm).
3. Remove the insulation covers (1) and
insulation (2).
4. Remove the locking screw (3) from the
receivers (one on each side).
5. Open the door completely.
6. Pull both hinge locks forward.
7. Raise the door until the hinge locks prevent the
door from closing any further.
8. Hold the door by the sides and lift the door out
of the hinge pockets.
Page 51

5.3
9. To install a new door, hold the door by the
sides and slide the door into the hinge pockets
in the same manner the door was removed.
10. Open the door completely.
11. Push both hinge locks back into their original
positions.
12. Close the door.
13. Reinstall the locking screws, insulation, and
insulation covers.
14. Ensure the door opens and closes freely.
15. Push the oven back into its original position.
16. Perform a MW leakage test (see page 5.4).
Door Skin Replacement
If the oven door skin has sustained damage or if a
new color is wanted, the door skin can be replaced
without replacing the entire door. Follow the steps
below and refer to Figure 5.2.
1. Follow the Removing/Reinstalling the Upper
Oven Door steps 1-8 (see page 5.2).
5. Follow the Removing/Reinstalling the Upper
Oven Door steps 9-16 (adjacent).
CAUTION: A microwave leakage test MUST
be performed! See page 5.4.
Left Lock Motor Assembly
e left lock motor assembly consists of a motor,
locking mechanism for the left side of the Speedcook
oven door, and three switches (primary, light, and
lock) that activate when a cam is turned while the
door closes.
e light switch controls the oven cavity light. e
light turns off when the door is closed, unless the
oven light switch (see page 2.1) is pressed.
e left lock switch closes to supply power to the
locking mechanism while the door is closed.
For Gen 1 ovens, the left (primary) interlock switch
(when closed in conjunction with the right interlock
switches) supplies power to the K3 and K4 relays,
which close and distribute power to the right and
left high-voltage transformers, allowing for microwave operation.
2. Place the oven door on a fl at surface and ensure
that all surfaces are protected from damage.
3. Remove the four phillips screws (A) from the
bottom and the two door handle bolts (B).
Retain screws (A) and bolts (B) and handle (C)
for use on replacement door skin.
4. Install the new door skin using the hardware
from step 3.
1
3
2
For Gen 2 ovens, the door switch circuit starts and
returns on the control board (primary switch = J15-7
and J15-8). Control voltage leaves the control board
to the relay board for relay operation.
C
B
A
A
OVEN SYSTEMS
Figure 5.1: Hinge Pocket
Figure 5.2: Speedcook Oven Door Detail
Page 52

5.4 OVEN SYSTEMS
Right Lock Motor Assembly
e right lock motor assembly consists of a motor,
locking mechanism for the right side of the Speedcook oven door, and three switches that activate
when a cam is turned while the door closes.
For Gen 1 ovens, when the secondary, monitor, and
lock switches are closed, the I/O control board opens
the K2 relay to prevent a direct short to the 20-amp
fuse.
e right lock switch closes to supply power to the
locking mechanism when the cam is turned while
the door is closed.
For Gen 1 ovens, the right switches (when closed in
conjunction with the primary switch) supply power
to the K3 and K4 relays, which close and distribute
power to the right and left high-voltage transformers, allowing for microwave operation.
For Gen 2 ovens, the door switch circuit starts and
returns on the control board (secondary switch =
J15-9 and 10; monitor switch = J15-5 and 6).
Control voltage leaves the control board to the relay
board for relay operation.
Measuring RF Leakage for Microwave Safety
An RF (microwave) leakage test must be performed
at the conclusion of the following service tasks:
- Door removal, replacement, and/or adjustment
- Door gasket removal, replacement, and/or
adjustment
- Waveguide removal and /or replacement
- Magnetron removal and/or replacement
- Door skin removal and replacement
WARNING: If the unit fails the microwave
leakage test (leakage greater than 5mW/cm
oven must be taken out of service immediately until
the defect is corrected. In addition, the CDRH
Regulation 21 Subpart C, 1002.20 requires that
leakage readings of over 5mW/cm
2
must be reported
to the manufacturer.
2
), the
e. Select “Top Oven.”
f. Select “Mags.” For Gen 1 ovens, the Cook Wheel must not be in the Off position.
2. Place a water load into the cook cavity (Figure
5.3). Water load must conform to the following
specifi cations:
- Volume: 275 ml ± 15 ml
- Temperature: 68°F ± 9°F (20°C ± 5°C)
- Vessel: Low form, 600 ml beaker with an
inside diameter of approximately 3.35” (85
mm) and made of Pyrex
or equivalent.
®
3. Close the oven door and turn on the
magnetrons.
4. Position the microwave survey meter as shown
in Figure 5.4.
5. Measure microwave emission:
a. Leave the magnetrons on for 60 seconds.
b. While the magnetrons are on, measure
microwave emission around the door,
moving the meter sensor at 1 inch/second.
As microwave leakage is observed moving
the sensor at 1 inch/second, note any meter
2
spike areas that come close to 5mW/cm
for
later re-measurement.
c. Replace the water load every 60 seconds
until the test is completed.
6. Once done scanning the entire door, replace the
water load.
7. Close the oven door. While the magnetrons are
on, return the meter probe to any “meter spike”
areas and allow the probe to remain in the
“spike” area for 15 seconds per area. Note the
highest reading obtained in each area.
To measure RF leakage,
1. Access the Installer Setup Mode.
a. Press the “Info” key.
b. Select “Oven Setup.”
c. Select “Installer Setup.”
d. Input the password 042259.
Figure 5.3: Water Load Placement
Page 53

2. Remove the bulb by gently pulling it out of the
socket.
3. Install the new bulb.
4. Reinstall the cover, using the tool provided with
kit RWD-3014 to tighten it.
Lower Oven Door (Double Wall
Oven Only)
is section contains information about the
following:
- Removing/reinstalling the lower oven door
- Halogen bulb replacement
5.5
Figure 5.4: Survey Meter Placement
NOTE: ere may be several places on the door
where this procedure needs to be done. If so, start
out with a fresh water load each time a new area is
measured, or if measurement of an area takes longer
than 60 seconds.
8. After each test is complete, open the oven door
and dispose of the hot water.
Halogen Light Assembly
e halogen light assembly consists of 2 lights that
are powered when the door is opened or when the
oven light switch is pressed (see page 2.1). When the
door is opened, the left side lock motor assembly’s
N.C. light switches supply power from the 12 VDC
power supply to the lights. Likewise, if the oven light
switch (see page 2.1) is pressed, power is supplied to
the left and right halogen lights as well.
CAUTION: DO NOT touch the bulb with
bare fi ngers; rather, use gloves, cloth, or tissue
when handling the bulb. If the bulb is accidentally
touched, clean it with isopropyl alcohol before
applying power.
CAUTION: To avoid burns, ensure the oven
cavity has had adequate time to cool before
performing the below procedure.
To replace a bulb in the Speedcook oven,
1. Remove the halogen light cover using the tool
provided with kit RWD-3014.
For information on accessing and removing parts,
and for part numbers, see the Appendix.
Removing/Reinstalling the Lower Oven Door
To remove or reinstall the lower oven door, follow
the steps below.
CAUTION: DO NOT lift the oven door by
the handle. Lifting the oven door by the handle can
damage the oven door and cause it to misalign.
1. Ensure the lower oven has cooled below 160°F
(71°C).
2. To gain access to the right and left lower-hinge
pockets, remove the oven from the cabinet
approximately 7” (178 mm).
3. Open the door completely.
4. Pull both hinge locks forward.
5. Raise the door until the hinge locks prevent the
door from closing any further.
6. Hold the door by the sides and lift the door out
of the hinge pockets.
7. To install a new door, hold the door by the
sides and slide the door into the hinge pockets
in the same manner the door was removed.
8. Open the door completely.
9. Push both hinge locks back into their original
positions.
OVEN SYSTEMS
Page 54

5.6 OVEN SYSTEMS
10. Close the door.
11. Ensure the door opens and closes freely.
12. Push the oven back into its original position.
Halogen Bulb Replacement
CAUTION: DO NOT touch the bulb with
bare fi ngers; rather, use gloves, cloth, or tissue
when handling the bulb. If the bulb is accidentally
touched, clean it with isopropyl alcohol before
applying power.
CAUTION: To avoid burns, ensure the oven
cavity has had adequate time to cool before
performing the below procedure.
To replace a bulb in the lower oven (use RWD-
3016),
1. Gently pry the halogen light cover from the
oven cavity wall using a fl at-surfaced object. Be
careful to not damage the porcelain coating on
the oven cavity wall.
2. Remove the bulb by gently pulling it out of the
socket.
Doubler Circuit, Voltage
e microwave system consists of a magnetron and
voltage doubler circuit. e voltage doubler circuit
consists of a special step-up transformer, a capacitor,
and a diode. Two separate transformers are
incorporated; one is the 1-10 step-up, multiplying
the incoming voltage by 10, the other is the
fi lament transformer that supplies approximately
3.5 VAC to the magnetron fi laments to warm them
before the 4000+ volts are applied. is function
extends the life of the components. e oven uses
two magnetrons, each magnetron circuit is separate
and independent.
High-Voltage Capacitors
e high-voltage capacitor works in combination
with the diode to eff ectively double the already-high
voltage from the secondary (output) winding of the
transformer. e capacitor is used to store the power
during the positive to negative swing of the
incoming AC voltage. When the oven is connected
to power, the capacitor will still have 2000+ volts
setting on the terminals. During magnetron
operation, the potential is 4000+ volts.
3. Install the new bulb.
4 Reinstall the cover, ensuring that it snaps into
place.
Microwave System
is section contains information about the
following components:
- Doubler circuit, voltage
- High-voltage capacitors
- High-voltage diodes
- High-voltage transformers
- Magnetrons
- Stirrer motor and assembly
- Waveguides
For information on accessing and removing parts,
see the Appendix.
High-Voltage Diode
e high-voltage diode works in combination with
the high-voltage capacitor to eff ectively double the
2000+ volts output voltage from the high-voltage
transformer. During magnetron operation, the
potential is 4000+ volts. is high voltage allows the
magnetron to produce the microwave energy.
e high-voltage diode is assembled by connecting
several 1000-1500 volt semiconductor diodes in a
series to increase the reverse voltage capability. In the
circuit, the high-voltage diode conducts to prevent
the fi lament voltage from becoming positive, thus as
the high-voltage winding of the transformer goes to
2400, the high-voltage capacitor is charged to 2000+
volts.
Page 55

5.7
When the high-voltage winding starts to go
toward negative, the high-voltage diode becomes
non-conducting with the charged high voltage
capacitor in series with the high-voltage winding.
When the transformer gets to its negative peak of
-2400, the voltage applied to the fi lament is negative
4000+ volts.
High-Voltage Transformers
e high-voltage transformers are ferro-resonant,
limiting fault currents and minimizing magnetron
power changes due to input voltage changes. e
high-voltage transformer supplies the high voltage
for the Voltage Doubler Circuit. For Gen 1 ovens,
they are controlled via the K3 and K4 relays. For
Gen 2 ovens, they are controlled by relays 2 and 3
on the relay board (outputs RBJ5 and RBJ4).
Wiring a High-Voltage Transformer
DANGER: Never attempt to wire or measure
the secondary voltage values of the high-voltage
transformers with the high-voltage transformers
enabled. Lethal voltage will be present.
e proper re-installation of a high-voltage
transformer is critical. Upon removing a high-voltage
transformer, make sure to note where each wire was
connected. Refer to the oven schematic (Section 7)
detailing the proper wiring.
As shown in the schematic, transformers are installed
mirror opposite and wired 180° out-of-phase. It is
essential for longevity that the high-voltage
transformers remain 180° out-of-phase. is can
be checked by placing a volt meter across terminals
T1-1 and T2-1 (primary voltage). If the meter reads
0 VAC, the high-voltage transformers are most likely
wired in-phase.
As a last check, energize the microwave system and
verify the voltages between the incoming voltage
taps on each high-voltage transformer. Taps 1 and
2 = 208V. Taps 1 and 3 = 240V. Wiring issues must
be corrected prior to returning the oven to service.
Voltage at the wall must match the transformer
confi guration.
Magnetrons
e magnetron generates microwave energy by
means of 4000+ volts supplied by the microwave
circuit. Due to the very high voltage present during
operation, the only safe way to test this component
is by a resistance test of its fi lament with the power
disconnected and the capacitors properly discharged.
e magnetron can have a good fi lament and still
not operate properly. All of the testing should be
completed on the other microwave components fi rst
before checking the magnetron. If all tests listed
in this manual are completed for the transformer,
diode, and capacitor, and all show to be within
specifi cations, the magnetron will be the defective
component.
CAUTION: Be careful to not allow debris
into the waveguides when servicing the magnetrons.
Stirrer Motor and Assembly
e stirrer is responsible for evenly distributing hot
air and microwaves that are launched from the top
of the oven into the cook cavity. e stirrer is driven
by a motor that remains on during a cook cycle.
When the oven is cooling down, the stirrer motor
turns off when the cook cavity temperature recedes
below 160°F (71°C).
To visually test stirrer motor operation, go to Bake,
which will automatically turn on the stirrer, the stirrer is visible through the upper jetplate holes.
Waveguides
e waveguides channel microwaves into the cook
cavity. To prevent the life of the magnetrons from
being shortened, be careful to not allow debris to
enter into the waveguides when servicing the
magnetrons.
OVEN SYSTEMS
Page 56

5.8 OVEN SYSTEMS
Control System
is section contains information about the
following components:
- Air switch (single wall oven)
- Clock
- Control board
- CookWheel control
- Display, lower oven
- Display, speedcook oven
- Electrical compartment cooling fans
- EMI fi lter
- Fuses
- High limit thermostats
- Latch mechanism (lower oven)
- Light switch, control panel
- M.O.V. fi lter
- Magnetron cooling fan
- Magnetron thermostats
- Power supply, 12 VDC
- Power supply, 24 VDC
- Relay board (Gen 2; see diagram on page 7.7)
- Relay - K2 monitor (Gen 1 oven)
- Relay - K3 T1 HV transformer (Gen 1 oven)
- Relay - K4 T2 HV transformer (Gen 1 oven)
- Relay - K5 mag cooling fan (Gen 1 oven)
- Relay - K6 right-side door lock (Gen 1 oven)
- Relay - K7 left-side door lock (Gen 1 oven)
- Relay - K8 preheat (Gen 1 oven)
- Relay - K9 L2 upper heating elements
- Relay - K10 lower door lock (Gen 1 oven)
- Relay - K13 L2 lower oven heating elements
- RJ Cables
- RTD
- SD Card
- Selector switches
- Solid state relay - K1 L1 Speedcook oven
heating elements
- Solid state relay - K11 lower oven bake and
convection elements
- Solid state relay - K12 lower oven broil
elements - inner and outer
- Speaker
- Temperature switch (Lower Oven)
- Transformer, clock, 12 VAC
- ermostat, cook cavity
- ermostat, fan control
- USB port
- Wiring harness
For information on accessing and removing parts,
see the Appendix.
Air Switch (Single Wall Oven)
e air switch monitors the amount of air coming
from the exhaust blower in the single wall oven. It is
a fail-safe device that communicates to the control
board whether or not the exhaust blower is working.
Clock
For Gen 1 ovens, pins 1 and 5 supply voltage to
the clock for operation from the clock transformer.
For Gen 2 ovens, pins 1 and 5 supply voltage to
the clock from terminals RBJ18-1 and RBJ18-2 on
the relay board. For all ovens, pins 2 and 3 supply
control signals to the control board, which allows
the clock to tell the control board when the speaker
needs to chime (terminal P24 on Gen 1 ovens and
terminal J21 on Gen 2 ovens).
Control Board
e control board controls each electrical component of the oven. See section 7 for schematics.
CookWheel Control
When the CookWheel is turned to any position
except “Off ” and “Favorites,” it closes its normally
open (N.O.) switch and the upper and lower cooling
fans are activated. Also, the three upper oven heating
elements receive L2 voltage and the stirrer motor activates. In any position other than “Off ” and
“Favorites” the control board also closes the relays
that supply L1 voltage to the three heating elements
in the upper oven, preheating the oven during the
selection process.
Display, Lower Oven
e lower liquid crystal display is the primary user
interface for the lower oven.
Attaching the Lower Display Cable
CAUTION: When connecting the lower display to the control board, ensure that it is connected
correctly. An incorrect connection can cause the
control board and/or the lower display to fail.
A twenty pin female connector connects the lower
display cable to the control board. e triangle on
the connector denotes pin 1. Ensure that the slot
Page 57

5.9
denoted by the triangle is placed onto pin one. For
Gen 1 ovens, the lower display cable is connected to
the control board’s P13 connector. For Gen 2 ovens,
the lower display cable is connected to the control
board’s J9 connector.
Display, Speedcook Oven
e upper liquid crystal display is the primary user
interface for the Speedcook oven. It is connected to
the control board via a ribbon cable. To ensure that
the cable is properly positioned, a red line is located
on only one side of the cable. is red line should
face downward on the upper display assembly. It
should also point left on the control board. Failure
to reattach the ribbon cable correctly could lead to a
direct short in the control board and upper display
assembly.
NOTE: In Gen 1 ovens, the upper display ribbon
cable is a ground source for the control board to the
oven frame.
Electrical Compartment Cooling Fans
Both the upper and lower electrical compartment
cooling fans are activated when either the CookWheel (top oven) or the selector switch (bottom
oven) are turned to any selection other than off .
Both fans are independently monitored by motion
sensors that will display an error message on the
display if either fan fails to function normally. It
accomplishes this by sending 5 VDC pulses to the
control board while the fan is spinning; these pulses
occur so fast that a voltmeter will register an average
reading of 2.5 VDC when the fan is spinning and
a constant 5 VDC or 0 VDC when the fan is not
spinning.
sees an open door condition. e bottom fuse is
rated 15 amps. It is wired in the circuit to protect
the low voltage components in the oven.
Gen 1 ovens also contain a 5-amp fuse located on
the right magnetron cover. is fuse is powered
by the K9 relay to provide power to the upper and
lower cooling fans.
For Gen 2 ovens, the fuses are located on the relay
board. Fuse 1 (right side) is rated to 20 amps, and
fuse 2 (left side) is rated to 15 amps (Gen 2 ovens do
not contain a 5 amp fuse).
High Limit Thermostats
e high limit thermostat is a 250 VAC, 3-pole,
manual-reset thermostat with a trip point of 572°F
(300°C). e thermostat interrupts power to the
main convection heater in the event of an abnormal
condition.
Pertaining to the double wall oven, the upper and
lower ovens have independent high limit thermostats
located in their respective upper and lower electrical
compartments.
pressing the reset button.
Reset the high-limit thermostat by
Latch Mechanism (Lower Oven)
e latch mechanism automatically locks the lower
oven door during the self-clean cycle to prevent
exposure to the extreme temperatures used to clean
the inside of the oven. e oven door can also be
locked by pressing the door lock button underneath
the lower display. It will not unlock unless the oven
temperature is below 500°F (260°C).
Light Switch, Control Panel
EMI Filter
e EMI fi lter helps suppress the amount of RF
interference emitted by the oven and interference
entering from the supply voltage.
Fuses
For Gen 1 ovens, the 15 and 20-amp fuses are
housed in a fuse block. e top fuse is rated 20 amps
and designated for the microwave system only. is
safety fuse is designed to trip if the system attempts
to operate the magnetrons when the monitor circuit
e control panel light switch (see page 2.1)
activates the lights in the Speedcook oven.
M.O.V. Filter
e M.O.V. fi lter limits voltage spikes coming into
the oven system. If a substantial voltage spike enters
the system, the M.O.V. may short as a result of protecting the system. Symptoms of a shorted M.O.V.
fi lter are accompanied by a tripped circuit breaker
that will continually trip when reset. Also look for a
burned or damaged M.O.V.
OVEN SYSTEMS
Page 58

5.10 OVEN SYSTEMS
Magnetron Cooling Fan
e magnetron cooling fans supply air to the
magnetrons. For Gen 1 ovens, they are actuated by
the K5 relay. For Gen 2 ovens, they are actuated by
relay 4 on the relay board (RBJ19-1). At the end of a
microwave cook cycle, the cooling fans will continue
to operate for an additional 2 minutes (on older versions of the control software, the magnetron cooling
fans run for an additional 5 minutes).
Magnetron Thermostats
e magnetron thermostats are wired in-series with
the input voltage of the HV transformers. ey open
at 280°F (138°C).
Power Supply, 12 VDC
e 12 VDC power supply supplies power to the
halogen oven lights.
Power Supply, 24 VDC
e 24VDC power supply supplies voltage to the
control board (and relay board for Gen 2 ovens).
Relay - K2 Monitor (Gen 1 Oven)
e K2 relay is a 30 amp, double-pole, doublethrow, class F, 24 VDC relay coil. It is used in the
magnetron circuit along with the K3 and K4 relays.
If the door is opened during a cook cycle, and the
K3 or K4 relays are still closed due to a door switch
failure, this relay will cause L1 and L2 voltage to
short circuit and blow the 20-amp fuse. e system
is designed to protect the user in the case of a
door switch failure. e K2 relay coil is supplied
with 24 VDC power except when the door is open
or oven power is disconnected.
Relay - K3 T1 HV Transformer (Gen 1 Oven)
e K3 relay is a 30 amp, double-pole, doublethrow, class F, 24 VDC relay coil. is relay sends L1
voltage to the T1 transformer.
Relay - K4 T2 HV Transformer (Gen 1 Oven)
e K4 relay is a 30 amp, double-pole, doublethrow, class F, 24 VDC relay coil. is relay sends L1
voltage to the T2 transformer.
Relay Board (Gen 2 Only)
Gen 2 ovens contain a relay board consisting of the
fuses (page 5.9), clock transformer, and all relays
described below. If any of these components fail,
except the fuses, the entire relay board must be
replaced. See page 7.7 for a schematic with test point
locations.
- Relay 1: Monitor
- Relays 2 and 3: HV transformers
- Relay 4: Magnetron cooling fan
- Relay 5: Door lock, upper left
- Relay 6: Door lock, upper right
- Relay 7: Cooling fan, upper
- Relay 8: Stirrer motor
- Relay 9: Door light, upper
- Relay 10: Door lock, lower
- Relay 11: Cooling fan, lower
- Relay 12: Convection fan
- Relay 13: Door light, lower
- Relay 14: Pre-heater
Relay - K5 Mag Cooling Fan (Gen 1 Oven)
e K5 relay is a 30 amp, double-pole, doublethrow, class F, 24 VDC relay coil. is relay activates
the magnetron cooling fan during and after
magnetron operation.
Relay - K6 Right Side Door Lock (Gen 1 Oven)
e K6 relay is a 30 amp, double-pole, doublethrow, class F, 24 VDC relay coil. is relay controls
the right side door lock motor.
Relay - K7 Left Side Door Lock (Gen 1 Oven)
e K7 relay is a 30 amp, double-pole, doublethrow, class F, 24 VDC relay coil. is relay controls
the left side door lock motor.
Relay - K8 Preheat (Gen 1 Oven)
e K8 relay is a 30 amp, double-pole, doublethrow, class F, 24 VDC relay coil. e K8 relay
controls the L1 voltage to the Speedcook oven’s
preheat element. When the CookWheel is turned to
begin the selection process, the control board sends
Page 59

5.11
24 VDC to the activating terminals of the relay. e
N.O. switch closes to send L1 voltage to the preheat
element. When the RTD registers that the oven has
reached 80% of the preset temperature, the control
board stops sending 24 VDC to the K8 relay and the
switch opens to turn off the preheat element.
Relay - K9 L2 Speedcook Heating Elements
e K9 relay is a 120 VAC single-pole, doublethrow, relay. is relay supplies L2 voltage to the
three Speedcook oven heating elements. On Gen 1
ovens, this relay also supplies L2 voltage to the upper
and lower cooling fans inline with the 5-amp fuse.
Relay - K10 Lower Door Lock (Gen 1 Oven)
e K10 relay works in conjunction with the lower
oven’s plunger light switch to activate the lower oven
lock motor. Terminal 2 on the selector switch
constantly supplies 120 VAC to the K10 relay’s
common. e control board activates the K10 relay’s
N.O. switch to the lower oven lock motor by using a
circuit inline with the plunger light switch.
is means that the K10 relay will only activate the
lower oven lock motor when the oven door is closed
(plunger pressed).
Relay - K13 L2 Lower Heating Elements
(Double Wall Oven Only)
e K13 relay is a 120 VAC single-pole, doublethrow, relay. is relay supplies L2 voltage to the
four lower oven heating elements.
RJ Cables
e RJ cables connect the control board to the
CookWheel and lower oven Mode and Temperature
switches.
RTD
e RTD uses resistance to register cook cavity
temperature. As heat increases in the oven, so does
the resistance registered in the RTD. is allows the
control board to accurately monitor the temperature
in the oven and activate/deactivate the elements as
needed. Refer to the ohms/temperature chart for
testing (page 6.5).
SD Card
e SD card, which is inserted into the control
board, stores the control software for the oven.
CAUTION: When inserting an SD card,
always ensure it is set to unlocked; otherwise the
oven will not properly save settings. DO NOT
remove the card when the oven is powered up.
Before replacing the SD card, back up Favorites to a
USB drive (page 4.3)
After replacing the SD card,
1. Restore Favorites from the USB drive (page 4.3).
2. Set the Oven Confi guration to single or double
(page 4.4).
Selector Switches
When the CookWheel or the lower oven selector
switch is turned to a setting other than off , the
switch between terminals 1 and 2 is closed. is
supplies L2 voltage to the lower cooling motor, the
activating terminal on the K13 lower heating
element relay, and the CookWheel to supply power
to the upper cooling motor. In other words,
whenever an oven is turned on, the electrical
compartment cooling fans also turn on. In Gen 1
ovens, the fans will turn off when the oven is turned
off . In Gen 2 ovens, the cooling fans will remain on
for an additional two minutes after the oven has
been turned off .
NOTE: e electrical cooling fans will also turn on
at any time regardless of the selector switch position
if the temperature within the upper electrical
compartment exceeds 140°F (60°C), or if the
temperature within the lower electrical compartment
exceeds 160°F (71°C).
In double wall ovens, the K13 N.O. closes and supplies L2 voltage to the bake, convection, inner broil,
and outer broil elements. When a convection cycle is
selected, the convection fan is also powered and will
remain on until the convection cycle is no longer
selected.
OVEN SYSTEMS
Page 60

5.12 OVEN SYSTEMS
Solid State Relay - K1 L1 Speedcook
Heating Elements
e K1 solid state relay is a 240 VAC, dual 40 amp
relay. is relay supplies L1 voltage to the Speedcook
oven’s heating elements. e control board sends
24 VDC to the K1 solid state relay to “open” and
“close” both sides of the solid state relay, which helps
ensure absolute temperature control.
Solid State Relay - K11 Bake and Convection
Elements (Double Wall Oven Only)
e K11 solid state relay is a 240 VAC, dual 40 amp
relay. is relay supplies L1 voltage to the lower
oven’s bake and convection elements (24 VDC
control voltage).
Solid State Relay - K12 Broil Elements: Inner
and Outer (Double Wall Oven Only)
e K12 solid state relay is a 240 VAC, dual 40
amp relay. is relay controls the L1 voltage to the
lower oven’s inner and outer broil elements. e
control board sends 24 VDC to the K12 SSR to
independently “open” and “close” each side of the
SSR, over 100 times per second, for absolute
temperature control.
Speaker
Thermostat, Cook Cavity
To prevent temperature from running away during
normal oven operation, each oven is monitored by
a thermostat (270°F switch for Speedcook cavity
and 280°F for the lower oven cavity in double wall
ovens). In both the single and double wall oven, the
switch(es) are wired to the control board through
P7-18 and P8-6 (Gen 1) or pins J15-18 and J15-19
(Gen 2).
Thermostat, Cooling Fan Control
e cooling fan control thermostats are normallyopen snap switches that will close if the temperature
within the upper electrical compartment exceeds
140°F (60°C), or if the temperature within the lower
electrical compartment exceeds 160°F (71°C). ey
supply voltage from the terminal block to the upper
and lower cooling fans, allowing them to operate
if they are needed after the CookWheel or selector
switch has been turned to the off position. If either
thermostat closes, both cooling fans will be powered
on.
USB Port
e USB port allows the oven operator to load
software updates from a USB drive. For instructions,
see page 4.3.
e speaker provides audible feedback to the
operator whenever a key is pressed or a task (such
as a cook cycle) is completed, etc. See page 4.1 for
adjustments.
Temperature Switch (Lower Oven)
e temperature switch uses a six-wire (RJ) cable to
communicate the temperature selection to the
control board.
Transformer, Clock, 12 VAC
e 12 VAC transformer supplies voltage to the
Speedcook oven clock. For Gen 2 ovens, the 12 VAC
transformer is located on the relay board (terminals
RBJ18-1 and 2).
Connecting the USB Board (Gen 1 Oven)
e USB board connects to the control board via
a 10-pin molex cable (for USB board location, see
page A.7). Plug one end of the molex cable into the
control board’s P25 connector, as shown in Figure
5.4. Ensure that, when facing the oven, the cable’s
red stripe is on your right.
NOTE: e picture below shows the molex cable
not completely inserted, ensure you completely
insert the molex cable.
Red Stripe
Figure 5.4: Control Board, Connecting to USB Board
Page 61

5.13
Plug the the other end of the molex cable into the
USB board as shown in Figure 5.5. Ensure that,
when facing the oven, the red stripe is on your left
and the two empty sockets are on your right.
NOTE: e picture below shows the molex cable
not completely inserted, ensure you completely
insert the molex cable.
Two Empty Sockets
Red Stripe
Figure 5.5: USB Board, Connecting to Control Board
Wiring Harness
e wire harness distributes power to the oven’s
electrical components. See section 7 for schematics.
CAUTION: e catalytic converter can be
cleaned with TurboChef
thoroughly with distilled water. Let the catalytic
converter air dry before reinstalling. If TurboChef
oven cleaner is not available, DO NOT use a
substitute. Use distilled water only.
oven cleaner and rinsed
®
Exhaust Blower
e exhaust blower is located in the bottom rear of
the single wall oven. It’s purpose is to vent the hot
air from the electrical compartment.
Vent Catalyst
In addition to the main catalytic converter, the
Speedcook oven contains an additional catalyst in
the vent tube path. is catalyst further assists in the
breakdown of grease and particulate matter before
the excess air enters the atmosphere.
Exhaust System
is section contains information about the
following components:
- Catalytic converter
- Exhaust Blower
- Vent catalyst
Catalytic Converter
e catalyst functions by substantially lowering
the combustion temperature of grease entrained in
the air path to approximately the same temperature
of the airfl ow; thus the grease burns and breaks
down into CO2 and H2O as it passes through the
catalytic converter. e catalyst will operate most
effi ciently at temperatures above 475°F (246°C).
e catalyst material is very sensitive to certain
chemical compounds. Irreversible damage can occur
if the catalyst is exposed to cleaning chemicals
containing phosphates, NaOH, silicates, Na and
Potassium Salts. ese chemicals are found in most
commercial degreasers and cleaners; therefore, only
the self-clean feature should be used.
OVEN SYSTEMS
Page 62

5.14 OVEN SYSTEMS
This page intentionally
left blank.
Page 63

Section 6
Troubleshooting
Page 64

Page 65

6.1
Overview of Troubleshooting
is section contains information pertinent to
troubleshooting issues with the TurboChef®
Residential Double Wall or Single Wall ovens.
It is divided into two main sections:
- Error Screens
- Component Testing and Troubleshooting
Within these sections, some procedures are relevant
only to specifi c oven models.
e variables are:
- Double Wall Oven: If the procedure is specifi c
to a double-wall oven, it will be in regards to the
lower oven, as the top oven is functionally
identical to the single-wall oven.
- Single Wall Oven: No procedure will be specifi c
only to a single wall oven, as it is functionally
identical to the top oven of the double-wall.
- Gen 1: e procedure will apply only to ovens
with a serial number mask of TDO######.
Note that all single-wall ovens are Gen 2.
- Gen 2: e procedure will apply only to ovens
with a serial number mask of TDO2D######
or TSO2D######.
- No designation: If there is no designation on a
procedure, then it applies to all oven types and
confi gurations.
Oven Door Open (Gen 1)
When the door is closed, two cams are rotated by
the door’s actuators to close the left and right
interlock N.O. switches. ese switches are wired
in series between P7-5 and P8-5 on the control
board to monitor the door’s position. If this circuit
is broken during the preheat or cooking cycle, or if
the monitor switch, P7-15 and P8-4, fails, this error
screen is displayed.
Possible causes:
- e door is open
- e door switch assemblies require adjustment
- Faulty left and/or right lock motor assembly
- e switch is not closing because the left and/
or right lock motor assembly has not been
installed correctly
- Faulty wiring
- Faulty control board
- Failed monitor switch
Possible components to be replaced:
- Left lock motor assembly
- Right lock motor assembly
Troubleshooting:
1. Verify whether the door is fully closed.
2. Verify the hinges on the door have been fully
inserted (see page 5.2).
For more information on part descriptions and
functions, see Section 5: Oven Systems. For
information on removing parts, see the Appendix.
Error Screens
Below are the descriptions and possible causes of the
diff erent error screens:
- Oven Door Open (Gen 1)
- Oven Door Open (Gen 2)
- Cooling Fan Failure (Gen 1)
- Cooling Fan Failure (Gen 2)
- Temperature Control Failure
- Magnetron Failure
- Blower Failure
- Oven Over Temperature
3. Test pins P8-4 and P7-15 for continuity through
the monitor switch.
4. Check to see if the hinges or actuators are bent.
5. Check to see if one of the door cams are over-
rotated, if so, correct or replace it.
6. Adjust the door switches.
Note: Figure 6.1 shows the adjustable version of
the door switch assembly. Older versions were not
adjustable. If an oven has un-adjustable switch
assemblies, contact TurboChef to order the
adjustable door switch assemblies.
- Remove the door switch covers, located on
the right and left side of the Speedcook
oven.
- Mark the original position of the
adjustment slide for reference.
TROUBLESHOOTING
Page 66

6.2 TROUBLESHOOTING
- With the door fully closed, loosen the door
switch’s adjustment screw(s).
- With a screwdriver, adjust the switches at
the triangle adjustment slot.
- When the door open message disappears,
move the slide an additional 1/32 in (.8
mm) and tighten the adjustment screw(s).
- Open and close the door to ensure that the
open door message appears only when the
door is open.
NOTE: If switches were adjusted or replaced, you
must perform a microwave leakage test (see page 5.4).
7. If adjusting the switches does not remove the
Door Open message, verify the switches are
operating correctly. If not, replace the faulty
switch(es). If they are, replace the control board.
Oven Door Open (Gen 2)
When the door is closed, the two cams in the switch
assemblies are rotated by the door actuators. ese
cams then actuate the door sensing switches. ese
switches are wired independently to the control
board; the left J15-7 and J15-8 and the right J15-9
and J15-10. If either switch is open, the error screen
is displayed.
e monitor switch can also cause this error message;
check pins J15-6 and J15-5 for continuity. All other
causes are covered in the Gen 1 listing, above.
Cooling Fan Failure (Gen 1)
A motion sensor on each of the two cooling fans sends
voltage pulses of 5 VDC to the control board. ese
pulses are created when a magnet on the
cooling fan oscillates around the sensor. If one of the
fans is not spinning for any reason, its magnet will not
oscillate and the fan’s motion sensor will not operate,
causing this error screen to be displayed.
Possible causes:
- Loose wire connection
- Faulty cooling motor
- Faulty motion sensor
- Faulty CookWheel mechanical switch
Possible components to be replaced:
- Cooling motor assembly
See pages 6.7-6.9 for further troubleshooting.
Cooling Fan Failure (Gen 2)
e Gen 2 oven upper cooling fan is identical to the
one in the Gen 1 oven; however, the single wall oven
also includes a sail switch near the bottom exhaust fan
to check fan operation. If this switch fails to close, an
error will be displayed. All other causes are covered
in Gen 1 listing, above. See pages 6.7-6.9 for further
troubleshooting.
Temperature Control Failure
Adjustment Screw Adjustment Slot
Figure 6.1: Door Switch Assembly
e control board monitors cook cavity temperature
with the use of one RTD in each oven. If the control
board loses communication with an RTD, this error
screen is displayed. See page 6.6 for the RTD testing
procedure.
Possible causes:
- Faulty wiring/loose connections
- Faulty upper or lower RTD
- Faulty control board.
Possible components to be replaced:
- RTD (upper or lower oven - both should
be tested)
- Control board
Page 67

6.3
Magnetron Failure
A current transformer located on the control board
monitors the current draw of the microwave system.
e oven uses two separate magnetron circuits, each
drawing approximately 8-9 amps. If the control board
senses 0 amps, this error screen is displayed.
Possible causes:
- Faulty K3 or K4 relay (Gen 1) or relay 2 or 3
(Gen 2; the entire relay board must be replaced)
- Faulty left or right high-voltage transformer
- Faulty left or right high-voltage capacitor
- Faulty left or right high-voltage diode
- Faulty left or right magnetron
- Faulty 20-amp fuse (Gen 2: located on relay
board as F1 fuse)
- Faulty wiring
- Faulty control board
- Faulty left or right magnetron thermostat
Possible components to be replaced:
- K3 relay (Gen 1) or relay 2 or 3 (Gen 2; the
entire relay board must be replaced)
- K4 relay (Gen 1) or relay 2 or 3 (Gen 2; the
entire relay board must be replaced)
- High voltage transformer
- High voltage capacitor
- High-voltage diode
- Magnetron
- 20 amp fuse (Gen 2: located on relay
board as F1 fuse)
- Control board
- Left or right magnetron thermostat
Magnetron Failure Troubleshooting
1. Pull the oven 11” (280 mm) from the cabinet
and remove the top front cover.
2. Place the oven in Installer Setup mode (page 4.4).
3. Place a water load in the cook cavity.
DANGER: DO NOT touch or attempt to measure the magnetrons, HV transformers, capacitors, or
any component within the microwave circuit while
the magnetrons are running. Lethal voltage will be
present.
5. Turn the magnetrons off . Depending on the
measurement, follow the below steps.
If 15-19 amps are present, verify the magnetron
cooling fans are running whenever the magnetrons
are running. e thermostats can cause the
magnetrons to shut down and reset when cool.
If 8.5-10 amps are present,
1. Check relay operation. For Gen 1, check the
control voltage from the control board at P8-13
+ P8-5, and at P8-14 + P8-5. For Gen 2,
visually check relays 2 and 3 for operation. If
they operate correctly, check the HV outputs to
each transformer at terminals RBJ-4 + RBJ-5.
2. Isolate the left and right magnetron circuits and
retest. For Gen 1 ovens, remove the brown lead
to the transformer. For Gen 2 ovens, remove
either RBJ-4 or RBJ-5.
If 0 amps are present,
1. Ensure power is reaching the oven from the wall.
2. Check the 20-amp fuse.
3. Check for incoming voltage at each transformer
when the magnetrons are energized. For Gen 1,
test voltage from the relays at the transformer.
For Gen 2, 208 or 240 VAC must be between
the blue wire at the CT coil (CT1-B) and either
terminal RBJ-5 (right) or RBJ-4 (left) on the
relay board.
Blower Failure
e control board sends voltage to the blower motor
speed controller (BMSC) to activate the blowers. If
both blowers successfully activate, a signal is sent back
to the control board to verify the system is
functioning normally. If that signal is not sent back to
the control board, this error screen is displayed.
Possible causes:
- BMSC (blower motor speed control)
- Blower motors
- Faulty control board
- Faulty wiring
- Faulty relay board (Gen 2 only)
TROUBLESHOOTING
4. Turn the magnetrons on and measure for 15-19
amps around the wire in the current transformer
loop on the control board.
Possible components to be replaced:
- BMSC
- Blower motors
- Control board
- Relay board (Gen 2 only)
Page 68

6.4 TROUBLESHOOTING
Blower Failure Troubleshooting
1. Confi rm the motor is turning freely. Check for
obstructions.
2. Test the upper motor for 0-10 VDC incoming on
- Gen 1: P10-1 and P7-17 (control board)
- Gen 2: RBJ22-5 and RBJ22-8 (relay board)
3. Test the lower motor for 0-10 VDC incoming on
- Gen 1: P10-2 and P7-19 (control board)
- Gen 2: RBJ22-6 and RBJ22-8 (relay board)
4. Check for line voltage to the motor controller
(power is supplied from the EMI fi lter).
5. Ohm-test the motors for 5.9-7.3 ohms.
Oven Over Temperature
To prevent temperature from running away during
normal oven operation, each oven cavity is monitored
by a thermostat (270°F [132°C] switch for Speedcook
cavity and 280°F [138°C] for the lower oven cavity in
double wall ovens). In both the single and double wall
oven, the switch(es) are wired to the control board
through P7-18 and P8-6 (Gen 1) or pins J15-18 and
J15-19 (Gen 2). If the ambient temperature near these
thermostats exceeds the temperatures given above, this
error screen is displayed. e thermostats are self resetting; however, the oven is disabled until both switches
are closed.
Possible causes:
- Overheated oven
- Faulty wiring
- Faulty thermostat switch
- Faulty control board
Control System
is section contains testing and troubleshooting
procedures for the following components:
- Clock assembly
- Control board
- CookWheel control (Speedcook oven)
- EMI fi lter
- Oven mode switch (lower oven)
- Power supply, 12 VDC
- Power supply, 24 VDC
- RTD
- Transformer, clock, 12 VAC (located on relay
board on Gen 2 ovens)
Clock Assembly
1. Access the upper electrical compartment.
2. Apply voltmeter probes to pins 1 and 5 on the
clock assembly.
3. If approximately 12 VAC is present, the clock
assembly is faulty and needs to be replaced. If no
voltage is present, test the 12 VAC transformer.
Control Board
1. Verify all wiring is secure and correctly
connected. See section 7 for wiring schematics.
2. Ensure the SD card is in the unlocked position
(always remove power form the oven before
removing the SD card).
3. Troubleshoot other oven components related to
the failure if applicable.
4. If required, replace the control board.
Component Testing and
Troubleshooting
is section contains the following sub-sections:
- Control system
- Halogen light system
- Cooling system
- Air impingement system
- Microwave system
- Heating system, Speedcook oven
- Heating system, lower oven
5. Fill out the tag supplied with the replacement
board (identifying the issue) and return it to
TurboChef with the bad control board.
CookWheel Control (Speedcook Oven)
1. Access the upper electrical compartment.
2. Verify the CookWheel’s switch closes and opens
normally. is test assumes that the CookWheel
is receiving voltage from the 15-amp fuse (see
page A.15 for Gen 1 location, page A.19 for
Gen 2 location). If no voltage is present, then
the lights, screens, clock, etc. will not function.
3. Disconnect the N.O. wire from the terminal.
Page 69

6.5
4. To test the switch in the open position, turn the
CookWheel to the off position.
5. Apply the probes of the voltmeter to the now-
exposed CookWheel N.O. terminal and ground.
e voltage reading should be 0 VAC.
- If voltage is present, the CookWheel
control/switch is stuck closed. Replace the
CookWheel.
- If no voltage is present, the CookWheel is
functioning properly in the open position.
6. To test the switch in the closed position, turn
the CookWheel to the Bake position.
7. Apply the probes of the voltmeter to the same
CookWheel N.O terminal and ground. e
voltage reading should be 120 VAC.
- If no voltage is present, the CookWheel is
stuck open and needs to be replaced.
- If 120 VAC is present, the CookWheel is
functioning properly in the closed position.
EMI Filter
1. Disconnect power before ohm testing.
2. Check for continuity from Line to Load tabs
(both legs). Replace if open.
3. Check for open circuit between L1 and L2 tabs
(L1 to case, L2 to case). Replace if shorted.
Oven Mode Switch (Lower Oven)
1. Access the lower electrical compartment by
removing the oven frame as shown on page A.10.
2. Verify the oven mode dial switch closes and
opens normally. is test assumes that the oven
mode dial is receiving voltage from the 15-amp
fuse. If no voltage is present the lights, LCD
screens, clock, etc. will not function.
3. Disconnect the N.O. blue wire from terminal 2.
4. Test the switch while it is open, turn the oven
mode dial to the off position.
5. Apply the probes of the voltmeter to the now-
exposed oven mode dial N.O. terminal 2 and
ground. e voltage reading should be 0 VAC.
- If voltage is present, the oven mode switch
is stuck closed. Replace the oven mode switch.
- If no voltage is present, the oven mode
switch is functioning properly in the open
position.
6. Test the switch in the closed position by turning
the oven mode dial to the Bake position.
7. Apply the probes of the voltmeter to the same
CookWheel terminal and ground. e voltage
reading should be 120 VAC.
- If no voltage is present, the oven mode
switch is stuck open and must be replaced.
- If 120 VAC is present, the oven mode
switch is functioning properly in the closed
position.
Power Supply, 12 VDC
1. Test the voltage.
- To test the upper light voltage. Test for 12
VDC at pins 1 and 4 on the power supply.
- To test for lower light voltage. Test for 12
VDC at pins 2 and 3 on the power supply.
2. If the upper or lower lights are not receiving the
correct voltage, test for 120 VAC at the blue L2
and white neutral wire terminals.
- If 120 VAC is present at the terminals,
disconnect the load wires and recheck for 12
VDC output. Investigate shorted wiring
before replacing the power supply.
- If 120 VAC is not present at the terminals,
check the 15-amp fuse/fuse block (Gen 1)
or fuse output RBJ-6 on the relay board
(Gen 2).
Power Supply, 24 VDC
1. Test the voltage.
- For Gen 1, verify voltage to the power
supply from the 15-amp fuse.
- For Gen 2, verify voltage to the power
supply from terminal RBJ-6 on the
relay board.
2. Test for 120 VAC at the terminals at the thick
blue and white wires on the left.
- If 120 VAC is not present, then probably no
oven functions are operating. Ensure the
15-amp fuse is operating correctly.
- If 120 VAC is present, continue to step 3.
3. Test for 24 VDC at the terminals at the thick
red and black wires on the right. If 24 VDC is
not present, disconnect the load wires and
recheck for 24 VDC output. Investigate
shorted wiring before replacing the power
supply.
TROUBLESHOOTING
Page 70

6.6 TROUBLESHOOTING
°F 0° +20° +40° +60° +80° +100° +120° +140° +160° +180° +200°
0°
+200°
+400°
+600°
Figure 6.2: Temperature-Ohm Chart (Fahrenheit)
°C 0° +10° +20° +30° +40° +50° +60° +70° +80° +90° +100°
0°
+100°
+200°
+300°
Figure 6.3: Temperature-Ohm Chart (Celsius)
90.03 97.39 101.74 106.07 110.38 114.68 118.97 123.24 127.50 131.74 135.97
135.94 140.18 144.38 148.57 152.74 159.90 161.04 165.17 169.29 173.39 177.47
177.47 181.54 185.60 189.64 193.67 197.69 201.69 205.67 209.64 213.60 217.54
217.54 221.47 225.38 229.28 233.17 237.04 240.90 244.74 248.57 252.38 256.18
100.00 103.90 107.79 111.67 115.54 119.40 123.24 127.07 130.89 134.70 138.50
138.50 142.29 146.06 149.82 153.58 157.31 161.04 164.76 168.46 172.16 175.84
175.84 175.91 183.17 186.82 190.45 194.07 197.69 201.29 204.88 208.45 212.02
212.02 215.57 219.12 222.65 226.17 229.67 233.17 236.65 240.13 243.59 247.04
RTD
e procedures below outline troubleshooting
procedures for the RTD in the Gen 1, Gen 2, and
Single Wall Oven.
Troubleshooting the RTD (Gen 1),
1. Turn oven power off and pull the oven 11” (280
mm) out of the cabinet.
2. Remove the top front cover.
3. Remove P9 from the control board and test the
lower RTD on pins P9-5 and P9-6 for 109
ohms at 75°F (24°C).
4. Remove P10 from the board and test the upper
sensor on pins P10-19 and P10-20 for 109
ohms at 75°F (24°C).
5. If 109 ohms (or appropriate value) are present,
replace the control board and retest. If not,
replace the appropriate RTD and retest.
Troubleshooting the RTD (Gen 2),
1. Turn oven power off and pull the oven 11” (280
mm) out of the cabinet.
2. Remove the top front cover.
Troubleshooting the RTD (Single Wall Oven),
1. Disconnect power from the oven.
2. Disconnect J15 from the control board.
3. Test the RTD on pins J15-20 and J15-21 for
109 ohms at 75°F (24°C).
4. If 109 ohms (or appropriate value) are present,
replace the control board and retest. If not,
replace the RTD and retest.
Transformer, Clock,12 VAC (Gen 1)
1. Test for 12 VAC at the terminals at the two thin
white wires.
- If 12 VAC is present, the transformer is
functioning properly.
- If no voltage is present, continue to step 2.
2. Test for 120 VAC at the terminals of the thick
white and blue wire.
- If 120 VAC is present, the transformer is
faulty and needs to be replaced.
- If no voltage is present, investigate the 15
amp fuse/fuse block.
3. Remove J16 from the control board and test the
lower RTD on pins J16-8 and J16-9 for 109
ohms at 75°F (24°C).
4. Remove J15 from the control board and test the
upper RTD on pins J15-20 and J15-21 for 109
ohms at 75°F (24°C).
5. If 109 ohms (or appropriate value) are present,
replace the control board and retest. If not,
replace the appropriate RTD and retest.
Transformer, Clock,12 VAC (Gen 2)
1. Test for 12 VAC at terminalsRBJ18-1 and
RBJ18-2 on the relay board.
- If 12 VAC is present, the transformer is
functioning properly.
- If no voltage is present, continue to step 2.
2. Test for 120 VAC at the terminals at the thick
white and blue wire.
Page 71

6.7
- If 120 VAC is present, the transformer
is faulty and the relay board needs to be
replaced.
- If no voltage is present, investigate the 15
amp fuse (F2) on the relay board.
Halogen Light System
is section contains information on the following
topics:
- Light switch, control panel
- Light switch, Speedcook oven
- One Speedcook oven light is out
- Both Speedcook oven lights are out
- Both Speedcook oven and both lower oven
lights are out (double-wall oven)
Light Switch, Control Panel (Manual)
1. Access the control panel light switch through
the upper electrical compartment.
2. Disconnect the light switch from the harness.
Separate the harness at the connection between
the blue/black wires.
1. Replace the bulb (see page 5.5).
2. If replacing the halogen bulb did not fi x the
problem, access the rear of the halogen light
assembly and disconnect the two green wires at
the wire connectors.
3. Apply the probes of the voltmeter to the two
green wires leading from the oven. e voltage
reading should be 12 VDC.
- If 12 VDC is present, the halogen light
assembly is faulty and needs to be replaced.
- If 12 VDC is not present, check all wires
and connections in the halogen light system.
Both Speedcook Oven Lights are Out
When the control panel switch is pressed and the
oven door is closed, test the control panel switch.
When the oven door is opened and the control panel
switch is not pressed, test the light switch/left lock
motor assembly.
Both Speedcook Oven and Both Lower Oven Lights
are Out (Double Wall Oven)
3. Apply the probes of the ohmmeter to the two
black wires attached to the switch.
4. Check for continuity through the switch by
manually engaging the switch.
Light Switch, Speedcook Oven (Door-Actuated)
1. Access the light switch by removing the left lock
motor assembly.
2. Disconnect wiring leading to the light switch.
3. Apply the probes of the ohmmeter to the
electrical connector still attached to the
assembly, pins 2 and 6 (purple wires).
4. Check for continuity through the switch by
manually engaging the switch.
One Speedcook Oven Light is Out
CAUTION: DO NOT touch the bulb with
bare fi ngers; rather, use gloves, cloth or tissue to hold
the bulb. If the bulb is accidentally touched, clean it
with isopropyl alcohol before applying power.
Test the 12 VDC power supply (see page 6.5 for
troubleshooting).
Cooling System
is section contains information on the following
topics:
- Cooling fan overview (Gen 1)
- Cooling Fan Overview (Gen 2)
- Troubleshooting Cooling Fans (Gen 1)
- Troubleshooting Cooling Fans (Gen 2)
Cooling Fan Overview (Gen 1)
A motion sensor on each of the two cooling fans
sends voltage pulses of 5 VDC to the control board.
If one of the cooling fans is not spinning, a cooling
fan error will be displayed.
Components that activate the cooling fans are:
- CookWheel (Speedcook oven)
- Mode knob (lower oven)
- 140°F (60°C) snap switch (Speedcook oven)
- 160°F (71°C) snap switch (lower oven)
TROUBLESHOOTING
Page 72

6.8 TROUBLESHOOTING
Possible components to be replaced:
- Cooling fan assembly
- F3 5 amp fuse (Gen 1)
- CookWheel mechanical switch
(Speedcook oven)
- Cook mode mechanical switch (lower oven)
- 140°F (60°C) snap switch (Speedcook oven)
- 160°F (71°C) snap switch (lower oven)
- Control board
- K9 Relay
Cooling Fan Overview (Gen 2)
e Gen 2 double wall oven has two cooling fans:
one for the top oven and one for the bottom oven.
e single wall oven also has two cooling fans, but
the lower cooling fan has a sail switch instead of a
hall eff ect motion sensor to check fan operation. If
the sail switch fails to close, a cooling fan error will
be displayed.
Components that activate the cooling fans are:
- CookWheel (Speedcook oven)
- Mode knob (lower double wall oven)
- 140°F (60°C) snap switch (Speedcook oven)
- 160°F (71°C) snap switch (lower oven)
- Control board when the Speedcook cavity
temperature is above 350°F (177°C) and the
Cook-Wheel is in the off position.
- Relay board
NOTE: If the CookWheel is set to “off ,” the cooling
fans will stay on for an additional 2 minutes after
the cook cavity temperature recedes below 350°F
(177°C). If the CookWheel is set to any other mode,
the fans will remain on.
NOTE: If the Speedcook cook cavity temperature
is above 350°F (177°C) or either snap switch has
closed, the cooling fans will remain on even if the
CookWheel is in the off mode.
Troubleshooting Cooling Fans (Gen 1)
If a cooling fan failure message is displayed, test the
top and bottom motor assemblies by performing the
following steps:
1. Press the Cancel button on the top display to
clear the cooling fan error message.
2. Turn the CookWheel to the off position. e
cooling fans should turn off (unless one of the
snap switches has closed). e magnetron fans
will continue to operate for two minutes.
3. Turn the CookWheel to favorites or the lower
cook mode knob to bake. You should hear the
fans running and also feel a slight amount of air
being discharged from the bottom of the oven.
4. If the fans are not operating, remove the oven
from the cabinet approximately 11” (279 mm)
and remove the top front panel.
5. Check the motion sensor signal outputs to the
control board by applying multimeter probes to
P9-7 and P9-17 for the bottom cooling fan and
P8-10 and P7-12 for the top cooling fan.
- If 2.5 VDC is present, the fan is functioning
normally. If both cooling fans register 2.5
VDC while the cooling fan failure message
is displayed, the control board is faulty and
needs to be replaced.
- If 5 VDC or 0 VDC is present, either a
cooling fan motion sensor is faulty or a
motor assembly is not functioning and
needs to be tested.
6. If neither fan is operating, check the 5 amp fuse
located on the right magnetron cover in the top
oven electrical compartment. If the fuse has not
blown, Check the operation of the Cookwheel
and the K9 relay. If the fuse has blown, continue
to step 7 before replacing fuse.
7. Troubleshoot the following potential reasons as
to why the fuse was blown:
- Does the control board reset when the
CookWheel is in the off mode?
- Was/is there a supply power surge?
- Is the cooling fan faulty?
- Is any wiring faulty?
- Is the control board faulty?
8. Remove the 5-amp fuse, turn the Cookwheel to
off , and check the single side terminal of the
fuse block for 120 VAC.
9. If voltage is present, check the control board for
24 VDC at pins P7-3 and P8-16 (K1-A), P7-3
and P8-15 (K1-B), P8-9 and P7-8 (K8). If 24
VDC is present on one or more of these test
points, replace the control board. If the 5-amp
fuse was blown and no 24 VDC found, check
the K1 and K8 relays for shorted closed condition.
10. If after performing the above steps the cooling
fans are still not functioning, completely remove
the oven from the cabinet for access.
Page 73

6.9
11. Turn the CookWheel to favorites.
12. Test the cooling fan motor assemblies by
applying voltmeter probes to the terminals on
the motor. e voltage reading should be 120
VAC.
- If 120 VAC is present and the fan is not
functioning, replace the cooling fan.
- If voltage is not detected, test the source of
the voltage at the cookwheel mechanical
switch (top oven), mode mechanical switch
(bottom oven), 15 amp fuse, and the circuit
wiring for breaks.
Troubleshooting Cooling Fans (Gen 2)
If a cooling fan failure message is displayed, test the
top and bottom cooling fan motor assemblies:
1. Turn the CookWheel to off to clear the cooling
fan error message. e cooling fans should turn
off after two minutes (unless one of the snap
switches has closed or the upper cook cavity is
above 350°F [177°C]).
2. Turn the CookWheel to favorites or the lower
mode knob to bake (double wall oven). You
should hear the fans running and also feel a
slight amount of air being discharged from the
bottom of the oven.
NOTE: e cooling fan error message will display
again after the CookWheel has been turned to
favorites for fi ve minutes. If the CookWheel is not
turned to favorites after the cooling fan error
message displays, the cooling fans will turn off after
approximately 2 minutes.
3. If the fans are not operating, remove the oven
from the cabinet approximately 11” (279 mm)
and remove the top front panel.
4. Check the motion sensor signal outputs to the
control board:
- For the double wall oven, apply multimeter
probes to J15-16 and J15-17 for the top
oven cooling fan and J16-2 and J16-3 for
the bottom oven cooling fan. If the fans are
on, 2.5 VDC should be present. A reading
of 0.0 VDC or 5.0 VDC means the cooling
fans are not rotating. Check sensor wiring
and cooling fan for operation.
- For the single wall oven, turn the
CookWheel to favorites and test pins J16-2
and J16-3 for 0 VDC at the control board.
If 0 VDC is present, then the sail switch is
activated, indicating the lower fan is
turning. If approximately 4.5 VDC is
present, either the fan is not turning or the
switch is stuck. Remove the fan to
determine the faulty part.
NOTE: Single Wall Ovens do not use a motion
sensor on the bottom fan.
5. If both fans are functioning and sending the
correct voltage to the control board, but a
cooling fan error is displayed, replace the control
board.
6. If the cooling fans do not operate properly,
check the following components:
- Cooling fan assembly (top and bottom)
- CookWheel switch (Speedcook oven)
- Mode mechanical switch (bottom oven)
- 140°F (60°C) snap switch (Speedcook oven)
- 160°F (71°C) snap switch (lower oven)
- Sail switch (single wall oven only)
- Control board
- Relay board
Air Impingement System
is section contains information on:
- Blower motors, Speedcook oven
- Convection fan, lower oven
Blower Motors, Speedcook Oven
1. Access the Speedcook oven blower motors (see
pages A.24 and A.26).
2. To test the blower motors, take an ohm
reading of each motor. Disconnect the output
from the motor controller (BMSC) and check
the ohms from phase to phase (red to black,
black to white, and red to white). All the
readings must be between 5.9 and 7.3 ohms. If
any of these readings are diff erent, replace the
motor.
- Check the resistance through the meter
leads by touching them together. Subtract
this number from the reading of the motor
TROUBLESHOOTING
Page 74

6.10 TROUBLESHOOTING
to ensure accuracy. If either motor does not
register between 5.9 and 7.3 ohms, replace
that motor and retest the oven.
3. Verify 0-10 VDC is being sent to the motor
controller.
- For Gen 1 ovens, check the control board
on P10-1 and ground for upper, check P10 2 and ground for lower.
- For Gen 2 ovens, check the relay board
terminals RBJ22-5 and RBJ22-3 for upper,
check RBJ22-6 and RBJ22-4 for lower.
- If no voltage is present, replace the control
board.
4. Verify 208/240 input to motor controller by
measuring the brown and blue wires on the
3-pin connector.
5. If all the above tests are verifi ed, replace the
motor controller.
Convection Fan, Lower Oven
1. Turn the lower oven mode dial to Convection
Bake to activate the convection fan. If the fan
does not activate immediately, turn the lower
oven off and access the convection fan motor
inside the oven (see page A.28).
CAUTION: Voltage on terminals could cause
injury. Proceed with caution.
Testing a Capacitor
DANGER: Never attempt any measurement of
the capacitors while they are enabled. Lethal voltage
will be present. Measure only in compliance with
these procedures.
To test for an open or shorted capacitor:
1. Disconnect the oven from the power source.
2. Fully discharge the capacitor.
3. Isolate the capacitor from the circuit.
4. Check for an open or shorted capacitor by
placing ohmmeter leads between the capacitor
terminals:
- Inconsistent readings = capacitor not
shorted or open.
- Constant infi nite resistance = capacitor open
- Constant very low resistance = capacitor
shorted
5. If the capacitor is not open or shorted, set the
meter to measure microfarad capacitance and
again place the leads between the capacitor
terminals. e meter reading should equal the
label value, plus or minus 10%. If not, replace
the capacitor.
To test for capacitor terminals that may be shorted
to casing:
1. Disconnect the oven from the power source.
2. Apply the voltmeter probes to the convection
fan motor’s terminals.
- If 120 VAC is not present, investigate the
oven mode dial for a loose wire to terminal
3 or a faulty switch.
- If 120 VAC is present, the convection fan
motor is faulty and needs to be replaced.
Microwave System
is section contains information on the following
topics:
- Testing a capacitor
- Testing a high-voltage diode
- Testing a high-voltage transformer
- Testing a magnetron for open/shorted fi lament
See page 6.2 for additional troubleshooting for a
magnetron failure message.
2. Fully discharge the capacitor.
3. Isolate the capacitor from the circuit.
4. Place one meter lead on a terminal and the
other on the metal jacket of the capacitor.
Infi nite resistance must be seen. Any other
reading means the capacitor should be replaced.
Testing a High-Voltage Diode
DANGER: Before replacing the high-voltage
diode, ensure the oven is removed from any power
source. Replacing this component while the oven is
plugged in can result in serious injury or death.
DANGER: Never attempt to measure high
voltage directly. Death or serious injury could result.
1. Disconnect the oven from the power source.
2. Fully discharge the capacitors.
Page 75

6.11
3. Disconnect the diode from the circuit.
4. Set the voltage meter to DC voltage and
connect it in series with the diode and a 9-volt
battery.
5. Connect one meter lead to one side of a 9-volt
battery and the other lead to one side of the
diode.
6. Connect the other side of the 9-volt battery to
the other side of the diode. DC voltage should
only be present on the meter in one direction.
7. Switch the meter leads on the diode, which will
cause the opposite reading to be visible. voltage
between 5-7 VDC should be present in only
one direction and 0-0.1 VDC in the other
direction, depending on the battery voltage.
Testing a High-Voltage Transformer
DANGER: Before replacing the transformer,
ensure the oven is removed from any power source.
Replacing this component while the oven is plugged
in can result in serious injury or death.
1. Disconnect the power source and discharge the
high-voltage capacitors.
2. Isolate the magnetron from the circuit by
removing the wires from terminals F and FA.
3. An ohmmeter connected between the fi lament
terminals (F, FA) should indicate a reading of
less than 1 ohm.
4. A continuity check between either fi lament
terminal and the magnetron chassis should
indicate an infi nite resistance (open).
CAUTION: Be careful to not allow debris into
the waveguides when servicing the magnetrons.
Heating System, Speedcook Oven
e Speedcook oven heating elements require 208240 VAC to operate.
NOTE: e elements are voltage specifi c and cannot
operate properly without the correct voltage applied.
Confi rm incoming voltage matches the oven’s
specifi cations (listed on the serial plate behind the
oven door).
DANGER: Never attempt to measure the
secondary voltage values of the transformers when
they are enabled. Lethal voltage will be present.
1. Disconnect the power source and discharge the
high-voltage capacitors.
2. Disconnect all the wires on the transformer.
3. Use an ohmmeter to check primary winding,
secondary winding, and fi lament.
- Primary Side
240 VAC: Taps 1&3 = 1.4 Ω
208 VAC: Taps 1&2 = 1.2 Ω
- Secondary Side
240 & 208 VAC: Tap 4&Casing = 70.1 Ω
- Filament
240 & 208 VAC: Red Wires = 0.1 Ω
Testing a Magnetron for an Open/Shorted Filament
DANGER: e only safe way to test a
magnetron is by a resistance test of its fi lament.
Never attempt to measure the magnetron using any
other method while the microwave system is on.
Death or serious injury could occur.
When the CookWheel is turned to any of the seven
cooking cycles (except Favorites), the control board
sends voltage to activate the relays, which supply
power to the heating elements. L1 voltage for the
two primary elements are supplied through the K1
SSR and the L1 voltage for the preheat element is
supplied through the K8 relay (Gen 1) or preheat
relay 14 (Gen 2 relay board). e L2 voltage for all
three elements is supplied from the N.O. contact on
the K9 relay.
If the oven is not heating normally, see the below
troubleshooting options and use the one that best
describes the situation.
is section contains information on the following
topics:
- Heater element, Speedcook oven
- No heat
- Oven is heating up very slowly
- Testing for control voltage to the K1 SSR
- Testing for control voltage to the K8 relay
(Gen 1)
- Testing relay 14, preheat (Gen 2)
- Testing for a K9 relay that is stuck open
- Testing for a K1 SSR that is stuck open
TROUBLESHOOTING
Page 76

6.12 TROUBLESHOOTING
Heater Element, Speedcook Oven
Remove the wire connections and apply the probes
of an ohmmeter to each element’s respective terminals. e resistance should register 23 ohms for a
240 VAC unit and 17.0 ohms for a 208 VAC unit. If
extreme resistance (a variance above 10%) is detected
the element is faulty and needs to be replaced. Ensure that the elements are at room temperature. e
temperature of the elements will change the heater’s
resistance.
No Heat
1. Turn the CookWheel to Bake to activate the
preheating process. e oven should
immediately make an audible ‘click’ when the
K9 relay closes. Wait 2-3 minutes and the oven
should heat noticeably. If no heat is present, pull
the oven out 11” (280 mm) to access the front
half of the upper electrical compartment.
2. Check the high limit switch. Press the red
button to reset the switch. If the oven is still not
heating, verify L1 (brown wires) and L2 (blue
wires) power is reaching the heater elements.
3. Turn the CookWheel to off , then disconnect the
three top brown wires from the high limit
switch and turn the CookWheel to Bake.
4. Apply the probes of the voltmeter to each of the
exposed female wire terminals and to ground. If
any of the terminals do not register 120 VAC,
check the breaker for a partial or full trip.
5. If the high limit switch is functioning
properly, apply one probe to any one of the
exposed female wire terminals and keep it there.
Apply the other probe to the three male
terminals on the high limit switch in sequence.
At least one of the three readings should register
240 VAC if the oven is heating (if this is the
case, go to Oven is Heating Up Very Slowly,
adjacent).
Oven is Heating up Very Slowly
1. Turn the CookWheel to Bake to begin
preheating. e oven should immediately make
an audible ‘click’ when the K9 relay closes.
2. After 2-3 minutes, the oven should heat
noticeably. If little heat is present, pull the oven
11” (280 mm) from the cabinet to access the
front half of the upper electrical compartment.
NOTE: If the oven is heating, the K9 relay is
functioning because it is the single source of L2
voltage to all three elements. erefore, testing
should begin with L1 voltage reaching the elements.
3. Turn the CookWheel to off , then disconnect the
three top brown wires from the high limit switch.
4. Turn the CookWheel to Bake.
5. Apply one probe of the voltmeter to any one of
the exposed female wire terminals and keep it
there. Apply the other probe to the three male
terminals on the high limit switch in sequence.
At least one of the three readings should register
240 VAC if the oven is heating at all.
6. If either of the primary elements is not receiving
240 VAC, test the K1 SSR to verify it is
receiving voltage from the control board to
activate.
7. If the preheat element is not receiving 240 VAC:
- Gen 1: Test the K8 relay for 24 VDC
from the control board to activate.
- Gen 2: Test relay 14 for 9 amps on
the relay board at RBJ10 and RBJ11.
Testing for Control Voltage to the K1 SSR
DANGER: A high-voltage capacitor is located
near this relay. Contact with the high-voltage
capacitor could result in serious injury or death.
1. Turn the CookWheel to Bake to begin the
preheat cycle.
6. If none of the elements are receiving 240 VAC,
test the K9 relay, then the K1 and K8 relays
(Gen 1) or K1 and relay 14 on the relay board
(Gen 2) to verify both are receiving control
voltage from the control board.
2. For Gen 1 ovens, apply the voltmeter
probes to P7-3 and P8-15, then to P7-3 and
P8-16 (on the control board). For Gen 2 ovens,
apply the voltmeter probes to RBJ22-7 and
RBJ22-1, RBJ22-7 and RBJ22-2 (on relay board).
e voltage reading for each should be 24 VDC.
If 24 VDC is present, the relay is receiving
voltage.
Page 77

6.13
Testing for Control Voltage to the K8 Relay (Gen 1)
DANGER: A high-voltage capacitor is located
near this relay. Contact with the high-voltage
capacitor could result in serious injury or death.
1. Turn the CookWheel to Bake to begin the
preheat cycle.
2. Apply the probes of the voltmeter to P7 – 8 and
P8 – 9 (on the control board). e voltage
reading should be 24 VDC.
- If 24 VDC is present, the relay is receiving
voltage.
- If either/both of the relays fail to receive
voltage, replace the control board and test
the oven. If both relays are receiving 24
VAC, pull the oven out of the cabinet to
test the K9, K1, and K8 relays, as well
as the heating elements.
Testing Relay 14 (Pre-Heat) Operation (Gen 2)
1. Turn the CookWheel to Bake to begin the
preheat cycle.
2. Apply the amprobe to the wire on terminal
RBJ11 and confi rm a measurement of approxi mately 9 amps is present. If 0 amps is present,
ensure the pre-heat element is not faulty by
checking the L1 voltage at terminal RBJ-10 to
ground and RBJ-11 to ground (of the relay
board). If voltage is present, continue.
verify the relay is receiving voltage from the blue
wires still attached to the relay in the upper-left
corner.
4. If voltage is present, replace the relay and test
the oven. If no voltage is present, investigate for
broken wires.
5. If the K9 relay is functioning normally, test if
both the K1 and K8 relays are stuck open.
Testing for a K1 SSR that is Stuck Open
DANGER: A high-voltage capacitor is located
near this relay. Contact with the high-voltage
capacitor could result in serious injury or death.
Before servicing:
a) Remove power from the oven.
b) Discharge the high-voltage capacitors.
c) Disconnect the primary voltage wiring of the
high-voltage transformers.
1. After completing safety instructions above,
reconnect power to the oven and turn the
CookWheel to Bake.
2. e solid state relay is unable to be checked with
an ohm test for continuity. Test for voltage
through the switch by energizing the relay and
leaving the brown wires connected, but pulled
back enough to get a meter probe on the
terminal.
NOTE: L1 voltage enters the relay board from the
high limit switch at terminal RBJ-10 and leaves
through RBJ-11.
Testing for a K9 Relay that is Stuck Open
1. Disconnect the single blue L2 wire and the three
blue L2 wires from the K9 relay.
2. Turn the CookWheel to Bake to activate the K9
relay; it should make an audible click if
functional.
NOTE: e K9 relay uses 120 VAC to activate the
coil.
3. Apply the probes of the multi-meter to the
common and N.O. terminals of the K9 relay
that are now exposed. ey should register
continuity with an ohms test. If they do not,
CAUTION: DO NOT touch the meter leads
together; this will cause the relay to short.
3. Set the meter to AC volts. A reading of 0
indicates a closed switch, and a reading of 208/
240 indicates an open switch.
4. If both relays function normally, ohm out the
heating elements and inspect the element’s
terminals.
Heating System, Lower Oven
e lower oven heating elements require 208-240
VAC to operate.
NOTE: e elements are voltage specifi c and cannot
operate properly without the correct voltage applied.
Confi rm incoming voltage matches the oven’s
specifi cations (listed on the serial plate behind the
oven door).
TROUBLESHOOTING
Page 78

6.14 TROUBLESHOOTING
When the oven mode dial is turned to any of the
seven cooking settings, the control board sends
voltage to activate the relays, which supply power to
the heating elements. L1 voltage for the bake and
convection elements are supplied through the K11
SSR and the L1 voltage for the inner and outer broil
elements is supplied through the K12 SSR. e L2
voltage for all three elements is supplied from the
N.O. contact on the K13 relay.
If the oven is not heating normally, use the below
troubleshooting option that best describes the
situation.
is section contains information on the following
topics:
- Lower oven heating element specifi cations
- No heat/slow to heat
- Testing for voltage to activate the K11 SSR
- Testing for voltage to activate the K12 SSR
- Testing for a K11 SSR that is stuck open
- Testing for a K12 SSR that is stuck open
- Testing for a K13 relay that is stuck open
NOTE: Line voltage is routed to the bottom oven
from the terminal block in the upper electrical
compartment. Brown, blue, and white wires will
be traveling together on the far left side of the oven
frame.
4. Verify that no amperage is being drawn to the
elements. If any amperage is present, the K13
relay is functioning because it is the single
source of L2 voltage to all three elements.
erefore, testing should begin with L1 voltage
reaching the elements.
5. Check the high limit switch in the lower
electrical compartment to see if it tripped.
If so, press the red button to reset the switch.
6. Use the amp-meter on the brown wire in the
upper electrical compartment again to verify
the elements are drawing current.
7. If the oven is still not heating, test for which leg
of power is not reaching the elements.
Lower Oven Heating Element Speci cations
Element Amps at
208 volts
Bake 12.8 11.0 15.4 20.5
Convection 7.4 6.5 26.5 34.5
Inner broil 9.7 9.0 20.0 25.5
Outer broil 5.2 4.6 36.5 49.5
Amps at
240 volts
Ohms at
208 volts
Ohms at
240 volts
NOTE: If the bake or convection element are not
activating, test for voltage to activate the K11 SSR.
If the inner or outer broil elements are not
activating, test for voltage to activate the K12 SSR.
No Heat/Slow to Heat
1. Turn the oven mode dial to Bake to begin
preheating. e oven should immediately make
an audible ‘click’ when the K13 relay closes.
2. After 2-3 minutes, the oven should heat
noticeably. If no heat is present, pull the oven
11” (280 mm) from the cabinet to access the
front half of the upper electrical compartment
and the left and right lower electrical
compartment access panels.
3. Using an amp-meter, test the brown wire on the
left side of the upper electrical compartment.
8. Turn the oven mode dial to off , then access the
K13 relay behind the right side lower electrical
compartment access panel.
Testing for Control Voltage to the K11 SSR
1. Turn the oven mode dial to Broil.
2. For Gen 1 ovens, apply the voltmeter probes to
P9-2 and P9-15, then to P9-2 and P9-16 (of the
control board). For Gen 2 ovens, apply
voltmeter probes to terminals RBJ17-5 and
RBJ17-2, then RBJ17-5 and RBJ17-1 (on the
relay board). e voltage reading for each should
be 24 VDC.
Testing for Control Voltage to the K12 SSR
1. Turn the oven mode dial to Bake to begin the
preheat cycle.
2. For Gen 1 ovens, apply the voltmeter probes to
P9-3 and P9-13, then to P9-3 and P9-14 (of the
control board). For Gen 2 ovens, apply
voltmeter probes to terminals RBJ17-5 and
RBJ17-3, then RBJ17-5 and RBJ17-4 (on the
relay board). e voltage reading for each should
be 24 VDC.
Page 79

6.15
Testing for a K11 SSR that is Stuck Open
1. Ensure the oven mode dial is in the off position.
2. Pull the insulated wire terminals back, but not
off , to expose the terminal on all four brown
wires of the relay.
3. Turn the oven mode dial to Bake to activate the
relay.
4. Apply the probes of the multi-meter across the
A1 and A2 terminals and B1 and B2 terminals
individually. A 208/240 reading will show an
open relay, 0 will show a closed relay.
Testing for a K12 SSR that is Stuck Open
1. Ensure the oven mode dial is in the off position.
2. Pull the insulated wire terminals back, but not
off , to expose the terminal on all four brown
wires of the relay.
3. Turn the oven mode dial to Broil to activate the
relay.
Testing for a K13 Relay that is Stuck Open
1. Disconnect the two L2 blue wires from the K13
N.O. switch and the two L2 blue wires from the
K13 common. Turn the oven mode dial to Bake
to activate the K13 relay.
2. Apply the probes of the ohmmeter to the
common and N.O. terminals of the K13 relay
that are now exposed. ey should register
continuity. If they do not, verify the relay is
receiving control voltage from the blue wires
that are still attached to the relay in the upper
left corner.
3. If control voltage is present, replace the relay
and test the oven. If no voltage is present,
investigate for broken wires.
4. If the K13 relay is receiving control voltage and
is closing normally, L2 voltage is reaching the
elements. e K11 and K12 solid state relays
will probably not both short in the open state,
so test the control board for control voltage
reaching the K11 and K12 SSR.
4. Apply the probes of the multi-meter across the
A1 and A2 terminals and B1 and B2 terminals
individually. A 208/240 reading will show an
open relay, 0 will show a closed relay.
TROUBLESHOOTING
Page 80

6.16 TROUBLESHOOTING
This page intentionally
left blank.
Page 81

Section 7
Oven Schematics
Page 82

Page 83

OVEN SCHEMATICS
7.1
1 uF
1 uF
BA
CLK
B
A
UTB
UCW
CKXF
1 uF
C
SIL
B
A
3
1
7
4
9
6
6
4
B
A
3
1
7
9
6
4
B
A
3
1
7
9
2 6
4
5
1 3
3
1
7
4
9
6
6
4
B
A
3
1
7
9
B
A
3
1
7
4
9
6
6
4
B
A
3
1
7
9
B
A
280°F
SW7
280°F
SW1
CLOCK ASSEMBLY
CT1
12
SAFETY INTERLOCK
SIR
12
OT 3
LOWER OVEN
N.C. HI-LIMIT
280°F
L280-35F
UPPER OVEN
N.C. HI-LIMIT
270°F
L250-35F
OT 2
2
6
4
5
1 3
RIGHT SIDE DOOR SWITCH/LOCK ASSEMBLY
STR
LEFT SIDE DOOR SWITCH/LOCK ASSEMBLY
FAN1
SAFETY INTERLOCK
1
COM
3
4
NO
2
LOWER BLOWER
LINE
FILTER
(Ref P/N RM34-0100)
(Ref P/N RM34-0102)
UPPER BLOWER
LINE
LOAD
LF1
VAC
J4
J5
J2
J1
P7
P8
470 Ohm
2 Watt
5 AMP
F3 FUSE
TO F3 FUSE
MAG THERMO SWITCH
MAG THERMO SWITCH
PRTD3
PRTD2
P9
TO CLOCK
ASSEMBLY
USB1
SPEAKER
To Lower Oven
Mode Knob
To Lower
Oven Display
1 TO 1 RIBBON CABLE
To Upper CookWheel
USB
RECEPTACLE
I/O CONTROL BOARD
Magnecraft
389CX-179-24VDC
PRTD4
P10
I/O BOARD CONNECTOR
I/O BOARD CONNECTOR
I/O BOARD CONNECTORS
N.O THERMAL
SWITCH
140 F
(Generation 1)
Switches depicted as “door open”
Switches depicted as “door open”
COOLING FAN
TO UPPER AND LOWER
COOLING FANS
TDO Upper Oven
Page 84

7.2 OVEN SCHEMATICS
L2
L1
FAN3
K10
HX3
K13
FAN2
SW9
LCW
HX4
COM
NO
OT2
N.O. THERMAL SWITCH
160°F OPERATION
K11
DOOR LIGHT SWITCH
1 TO 1 RIBBON CABLE
USB1
TO CLOCK
ASSEMBLY
USB
RECEPTACLE
PRTD3
PRTD2
DOOR LATCH
ASSEMBLY
LOWER COOK WHEEL
HX5
K12
HX6
C
LTB
B
A
TO FUSE F3
2700W
(Generation 1)
TDO Bottom Oven
Page 85

OVEN SCHEMATICS
7.3
1 uF
1 uF
BA
280° F
B
A
UTB
1 uF
UCW
280° F
12
C
SIL
P30
12
FAN1
CT1
SW7
SW1
SAFETY INTERLOCK
SIR
2 6
4
5
1 3
2 6
4
5
1 3
RIGHT SIDE DOOR SWITCH/LOCK ASSEMBLY
STR
LEFT SIDE DOOR SWITCH/LOCK ASSEMBLY
RELAY BOARD - REV D
SAFETY INTERLOCK
LOWER BLOWER
(Ref P/N RM34-0100)
(Ref P/N RM34-0102)
LINE
LOAD
LINE
FILTER
LF1
VAC
J4
J5
J2
J1
UPPER BLOWER
1
COM
3
4
NO
2
OT 3
P30
LOWER OVEN
N.C. HI-LIMIT
280°F
L280-35F
UPPER OVEN
N.C. HI-LIMIT
270°F
L250-35F
OT 2
P30
PRTD4
N.O. COOLING FAN THERMOSTAT
140°F OPERATION
CLK
CLOCK ASSEMBLY
01- MANUAL RESET
SPEAKER
TO CLOCK
ASSEMBLY
To Lower
Oven Display
USB
RECEPTACLE
To Upper Oven CookWheel
To Lower Oven Mode Knob
To Upper
Oven Display
I/O CONTROL BOARD
(Generation 2)
RB J15-1,2
RB J15-3,4
COOLING FAN
J21-1
J21-2
RB F2 -15A
RB F1 -20A
N.C.
N.C.
LEFT
RIGHT
Switches depicted as “door open”
Switches depicted as “door open”
“B”
“A”
20
AMP
15
AMP
1
13
1
9
1
2
TDO2 Upper Oven
Page 86

7.4 OVEN SCHEMATICS
L1
C
LTB
FAN3
B
LCW
FAN2
L2
A
K13
COM
NO
LOWER COOK WHEEL
DOOR LATCH
ASSEMBLY
HX3
HX5
HX4
K12
OT2
K11
HX6
SW9
PRTD3
PRTD2
DOOR LIGHT
SWITCH
(Generation 2)
SPEAKER
TO CLOCK
ASSEMBLY
To Lower
Oven Display
USB
RECEPTACLE
To Upper Oven CookWheel
To Lower Oven Mode Knob
To Upper
Oven Display
I/O CONTROL BOARD
RB
RB
RB
RB
RB
N.O. COOLING FAN THERMOSTAT
160°F OPERATION
RELAY BOARD - REV D
TDO2 Bottom Oven
Page 87

OVEN SCHEMATICS
7.5
1 uF
1 uF
BA
280° F
B
A
UTB
1 uF
CW
280° F
12
C
SIL
P30
12
CT1
SW7
SW1
SAFETY INTERLOCK
SIR
2 6
4
5
1 3
2 6
4
5
1 3
RIGHT SIDE DOOR SWITCH/LOCK ASSEMBLY
LEFT SIDE DOOR SWITCH/LOCK ASSEMBLY
SAFETY INTERLOCK
LOWER BLOWER
(Ref P/N RM34-0100)
(Ref P/N RM34-0102)
LINE
LOAD
LINE
FILTER
LF1
VAC
J4
J5
J2
J1
UPPER BLOWER
1
COM
3
4
NO
2
P30
OVEN HI-LIMIT
N.C.
L250-35F
OT 2
P30
PRTD4
STR
FAN1
CLK
CLOCK ASSEMBLY
01- MANUAL RESET
FAN2
(Single Wall Oven)
SPEAKER
TO CLOCK
ASSEMBLY
To Lower
Oven Display
USB
RECEPTACLE
To Upper Oven CookWheel
To Lower Oven Mode Knob
To Upper
Oven Display
I/O CONTROL BOARD
RB J15-1,2
RB J15-3,4
J21-1
J21-2
RB F2 -15A
“B”
“A”
RB F1 - 20AMP
N.C.
N.C.
LEFT
RIGHT
RELAY BOARD - REV D
270°F
N.O. COOLING FAN THERMOSTAT
140°F OPERATION
Switches depicted as “door open”
Switches depicted as “door open”
UPPER
LOWER
20
AMP
15
AMP
1
13
1
9
1
2
TSO Oven
EXHAUST
LOWER EXHAUST FAN SWITCH
Page 88

7.6 OVEN SCHEMATICS
1
2
3
4
SW1
1
2
5
2
2
6
11
2
1
3
2
4
1
9
8
16
RWD/RWS GEN 2 CONTROL BOARD
Pin-out descriptions
REV. A 9_08
J16-1 Low cooling ow sw. +24VDC
J16-2 Low cooling ow sw. status
J16-3 Low cooling ow sw. return (-)
J16-4 Low door lock status (+)
J16-5 Low door lock status return (-)
J16-6 Low door unlock status (+)
J16-7 Low door unlock return (-)
J16-8 RTD Lower (+)
J16-9 RTD Lower (-)
J16-10 RTD meat probe (+)
J16-11 RTD meat probe (-)
J16-12 Low front panel light switch (+)
J16-13 Low front panel light switch (-)
J16-14 Low door light switch (+)
J16-15 Low door light switch (-)
J16-16 Not Used
J15-13 Door lock L (+)
J15-14 Door lock L return (-)
J15-15 Up cooling ow sw. +24VDC
J15-16 Up cooling ow sw. status
J15-17 Up cooling ow sw. return (-)
J15-18 Oven over temp (+)
J15-19 Oven over temp return (-)
J15-20 RTD Upper (+)
J15-21 RTD Upper (-)
J15-22 Up front panel light switch (+)
J15-23 Up front panel light switch (-)
J15-24 Not Used
J15-1 Blower Status Upper
J15-2 Blower Status Lower
J15-3 Not used
J15-4 Not used
J15-5 Monitor (+)
J15-6 Monitor Return (-)
J15-7 Primary (+)
J15-8 Primary return (-)
J15-9 Secondary (+)
J15-10 Secondary return (-)
J15-11 Door lock R (+)
J15-12 Door lock R return (-)
J17-1 HX1 Heater
J17-2 HX2 Heater
J17-3 Convection Heater
J17-4 Bake Heater
J17-5 Broil Outer Heater
J17-6 Broil Inner Heater
J17-7 Pre heat Heater
J17-8 Blower Upper
J17-9 Blower Lower
J17-10 PWM0
J17-11 PWM1
J17-12 Door Latch 1
J17-13 Door Latch 2
J17-14 Door Latch Lower
J17-15 Convection Fan
J17-16 Mag 1
J17-17 Mag 2
J17-18 Mag Fan
J17-19 Stirrer Motor
J17-20 Door Light
J17-21 Door Light Lower
J17-22 Cooling Fan
J17-23 Cooling Fan Lower
J17-24 Spare
J17-25 Spare
J17-26 Monitor Interlock
J9 Lower Oven Display
J10 Upper Oven Display
J11 Upper Oven Mode Control
J12 Upper Oven Mode Control
J14 Lower Oven Temp Control
J13 Lower Oven Mode Control
J20 Speaker
J21 Clock assembly
J23 USB connection
T 1 Current transformer
SW1 Master board reset
J1 - 1 +24VDC (input)
J1 - 2 +24VDC (input)
J1 - 3 Ground (input)
J1 - 4 Ground (input)
Page 89

OVEN SCHEMATICS
7.7
1
1
5
4
1
2
5
1
3
1
8
2
2
6
1
11
Lower Door Light
Convection Fan
Lower Cooling Fan
Lower Door Lock
Upper Door Light
Stirrer Motor
Upper Cooling Fan
Mag Fan
Pre-Heater
1
Door Lock
15 AMP
20 AMP
HV
Transformer
HV
Transformer
Monitor
12VAC
Transformer
Upper Right
Door Lock
Upper Left
RWD/RWS GEN 2 RELAY BOARD
Pin-out descriptions
REV. B 9_08
Enable Inputs from I/O board
J21-1 HX1 Heater
J21-2 HX2 Heater
J21-3 Convection Heater
J21-4 Bake Heater
J21-5 Broil Outer Heater
J21-6 Broil Inner Heater
J21-7 Pre heat Heater
J21-8 Blower Upper
J21-9 Blower Lower
J21-10 PWM0
J21-11 PWM1
J21-12 Door Latch 1
J21-13 Door Latch 2
J21-14 Door Latch Lower
J21-15 Convection Fan
J21-16 M ag 1
J21-17 M ag 2
J21-18 M ag Fan
J21-19 Stirrer Motor
J21-20 Door Light
J21-21 Door Light Lower
J21-22 Cooling Fan
J21-23 Cooling Fan Lower
J21-24 Spare
J21-25 Spare
J21-26 Monitor I nterlock
J22-1 HX1 Heater output
J22-2 HX2 Heater output
J22-3 Upper Blower enable
J22-4 Lower Blower enable
J22-5 PWM0 0-10VDC upper
J22-6 PWM1 0-10VDC lower
J22-7 +24V (output)
J22-8 Ground
J22-9 Cooling Fan CTL
J22-10 Ground
J22-11 Door Light output
J17-1 Convection Heater (output)
J17-2 Bake Heater (output)
J17-3 Broil Outer Heater (output)
J17-4 Broil Inner Heater (output)
J17-5 +24V (output)
J17-6 Cooling Fan CTL (input from
thermostats)
J20-3 Lower Cooling Fan (HV output)
J20-2 Convection Fan (HV output)
J20-1 Lower Door Lock (HV output)
J15-1 +24V (from PS)
J15-2 +24V (from PS)
J15-3 Ground (from PS)
J15-4 Ground (from PS)
J18-1 12.6VAC (output to clock)
J18-2 Common (output to clock)
J19-1 Mag Fan (HV output)
J19-2 Door Lock Up R (HV output)
J19-3 Door Lock Up L (HV output)
J19-4 Stirrer Motor (HV output)
J19-5 Cooling Fan Up (HV output)
J1 L1 Power (input to Mags RLY 2+3 thru F1)
J2 L2 Power (input to Monitor RLY 1)
J3 L2A Power (input to F2 fuse)
J4 T1-1 Power (L1 output to HV transformer)
J5 T2-2 Power (L1 output to HV transformer)
J6 L2-B Power (output from F2 fuse)
J7 L2 Power (input for Mag fan, Door locks 1+2,
Upper cooling fan, Stirrer motor)
J9 L2 Power (input for Lower door lock, Lower
cooling fan, and Convection motor)
J10 L1 Power input (from High Limit for Preheat)
J11 L1 Power output to Preheat Heater
Page 90

7.8 OVEN SCHEMATICS
This page intentionally
left blank.
Page 91

Appendix Replacing Oven Components
Page 92

Page 93

Comprehensive Table of Oven Components
DANGER: Before removing or replacing any oven component, ensure the oven is removed from any
power source (i.e., the breaker is turned off ). Failure to do so can result in serious injury or death.
WARNING: Before removing or replacing any oven component, thoroughly read the safety instructions
found at the front of this manual and in Oven Systems (Section 5) and Troubleshooting (Section 6). Adhere to
all precautions and warnings outlined in these sections, as failure to do so could result in serious injury or death.
CAUTION: Before removing/installing any component, make sure it is disconnected from the wire
harness (where applicable).
Part Details... Locate the Part Here...
Item Part # Oven Page # Illustration #
Access Panel, EC, Lower RWD-9127 DWO Gen 1 & 2 A.22 A.17
Air Switch 102009 SWO A.8 A.2
Blade, Convection Fan 104169 DWO Gen 1 & 2 A.28 A.25
Blower Motor Controller 100446 All A.24 A.23
Blower Motor, Lower RWD-9042 All A.24 A.23
Blower Motor, Upper RWD-9040 All A.24 A.23
Blower, Dual 104164 All A.14, A.16 A.7, A.9
Blower, Exhaust 104190 SWO A.8 A.2
Bracket, Capacitor 104198 DWO Gen 1 A.14 A.7
Bracket, Control Assembly RWD-9367 All A.12 A.5
Bracket, Convection Fan RWD-9238 DWO Gen 1 & 2 A.28 A.25
Bracket, Display, Lower RWD-9142 DWO Gen 1 & 2 A.11 A.4
Bracket, Fuse and Terminal Block RWD-9391 DWO Gen 1 A.14 A.8
Bracket, Relay Attachment, Gen 1 RWD-9126 DWO Gen 1 A.22 A.17
Bracket, Relay Attachment, Gen 2 RWD-9126 DWO Gen 2 A.22 A.18
Cable, Display, L.V., DWO RWD-9427 DWO Gen 1 & 2 A.6 None
Cable, Display, Upper RWD-9438 All A.14, A.16 None
Cable, Interconnect, Relay Board RWD-9542 DWO Gen 2 & SWO A.16 None
Cable, Ribbon, 6” 104208 DWO Gen 1 A.6 None
Capacitor, H.V. 100213 All A.14, A.20 A.7, A.13, A.14
Catalytic Converter RWD-9066 All A.24 A.23
Clock Assembly RWD-9253 All A.12 A.5
Clock Ring Gasket RWD-9450 All A.12 A.5
Clock Transformer 104139 DWO Gen 1 A.18 A.10
Control Board, Gen 1 RWD-3003 DWO Gen 1 A.18 A.10
Control Board, Gen 2 RWD-3015 DWO Gen 2 & SWO A.18 A.11
Control Housing Assembly N/A All A.11 A.3, A.4
Control Housing, Upper RWD-9046 All A.12 A.5
Controls Assembly N/A DWO Gen 1 A.14 A.7
Controls Assembly, Gen 2 N/A DWO Gen 2 & SWO A.16 A.9
Convection Fan 104158 DWO Gen 1 & 2 A.28 A.25
Convection Fan Assembly N/A DWO Gen 1 & 2 A.28 A.24
A.1
APPENDIX REPLACING OVEN COMPONENTS
Page 94

A.2 APPENDIX REPLACING OVEN COMPONENTS
Part Details... Locate the Part Here...
Item Part # Oven Page # Illustration #
CookWheel Knob, Inner RWD-9378 All A.12 A.5
CookWheel Knob, Outer RWD-9377 All A.12 A.5
CookWheel Support Plate RWD-9455 All A.11, A.12 A.4, A.5
CookWheel Switch Assembly RWD-9256 All A.12 A.5
Cooling Fan, EC, Lower 104125 DWO Gen 1 & 2 A.22 A.17
Cooling Fan, EC, Upper 104114 All A.14, A.16 A.7, A.9
Cord, Power RWD-9412 All A.14, A.16 None
Cover, Back, DWO RWD-9184 DWO Gen 1 & 2 A.6 A.1
Cover, Back, SWO RWS-9018 SWO A.8 A.2
Cover, Bake Element RWD-9242 DWO Gen 1 & 2 A.28 A.24
Cover, Blower Motors RWD-9280 All A.24 A.23
Cover, Door Switch RWD-9359 All A.24 A.22
Cover, Hinge Pocket RWD-9472 All A.24 A.21
Cover, Hinge Pocket, Lower RWD-9149 DWO Gen 1 & 2 A.28 A.24
Cover, Meat Probe RWD-9128 DWO Gen 1 & 2 A.28 A.24
Cover, Motor End RWD-9282 All A.24 A.23
Cover, Rear, Lower Oven RWD-9225 DWO Gen 1 & 2 A.28 A.24
Cover, Waveguide RWD-9164 All A.24 A.21
De ector, Broiler RWD-9235 DWO Gen 1 & 2 A.28 A.24
Dial, Oven Mode RWD-9379 DWO Gen 1 & 2 A.11 A.4
Dial, Temperature RWD-9380 DWO Gen 1 & 2 A.11 A.4
Diode, H.V. 100481 All A.14, A.20 A.7, A.13, A.14
Display Assembly, Upper, TFT RWD-9294 All A.12 A.5
Display, Lower RWD-9295 DWO Gen 1 & 2 A.11 A.4
Diverter RWD-9283 All A.24 A.22
Diverter, Vent Outlet RWD-9584 DWO Gen 2 & SWO A.6, A.11 A.1, A.3
Door Receiver 104123 All A.24, A.28 A.22, A.24
Door Sensing Switch 104229 DWO Gen 1 & 2 A.6 A.1
Door Skin, Replacement RWD-3004-X All A.6, A.8 A.1, A.2
Door Switch, LHS RWD-9187 All A.24 A.21
Door Switch, RHS RWD-9186 All A.24 A.21
Door, Lower RWD-3021 DWO Gen 1 & 2 A.6 A.1
Door, Speedcook Oven RWD-3019-X All A.6, A.8 A.1, A.2
Door, Speedcook Oven, Inner RWD-3022 All A.6, A.8 A.1, A.2
Duct, Mag Cooling, LHS RWD-9374 All A.14, A.16 A.7, A.9
Duct, Mag Cooling, RHS RWD-9373 All A.14, A.16 A.7, A.9
Electrical Compartment, Lower, Gen 1 N/A DWO Gen 1 A.6 A.1
Electrical Compartment, Lower, Gen 2 N/A DWO Gen 2 A.6 A.1
Electrical Compartment, SWO N/A SWO A.8 A.2
Electrical Compartment, Upper, Gen 1 N/A DWO Gen 1 A.6 A.1
Electrical Compartment, Upper, Gen 2 N/A DWO Gen 1 A.6 A.1
Element, Bake, Concealed (208V) RWD-9464 DWO Gen 1 & 2 A.28 A.24
Element, Bake, Concealed (240V) RWD-9354 DWO Gen 1 & 2 A.28 A.24
Element, Broil (208V) RWD-9462 DWO Gen 1 & 2 A.28 A.24
Page 95

Part Details... Locate the Part Here...
Item Part # Oven Page # Illustration #
Element, Broil (240V) RWD-9351 DWO Gen 1 & 2 A.28 A.24
Element, Convection (208V) RWD-9463 DWO Gen 1 & 2 A.28 A.24
Element, Convection (240V) RWD-9353 DWO Gen 1 & 2 A.28 A.24
EMI Filter 104211 All A.14, A.16 A.7, A.9
Front Trim, DWO N/A DWO Gen 1 & 2 A.6 A.1
Front Trim, SWO N/A SWO A.8 A.2
Fuse Block 104183 DWO Gen 1 A.14 A.8
Fuse Holder 100579 DWO Gen 1 A.14 A.7
Fuse, 5 Amp 100635 DWO Gen 1 A.14 A.7
Fuse, 15 Amp, Gen 1 100601 DWO Gen 1 A.14 A.8
Fuse, 15 Amp, Gen 2 100602 DWO Gen 2 & SWO A.18 A.11
Fuse, 20 Amp, Gen 1 100599 DWO Gen 1 A.14 A.8
Fuse, 20 Amp, Gen 2 100603 DWO Gen 2 & SWO A.18 A.11
Handle, Lower Oven RWD-9224 DWO Gen 1 & 2 A.6 A.1
Handle, Speedcook Oven RWD-9011 All A.6, A.8 A.1, A.2
Harness, Clock, Gen 2 RWD-9543 DWO Gen 2 & SWO A.16 None
Harness, Failsafe, Microwave RWD-9555 DWO Gen 1 A.6 None
Harness, Fuse, Cooling Fan RWD-9553 DWO Gen 1 A.6 None
Harness, H.V., Lower Oven, Gen 2 RWD-9539 DWO Gen 2 A.22 None
Harness, L.V., Clock RWD-9437 DWO Gen 1 A.14 None
Harness, L.V., Lower Oven, Gen 2 RWD-9541 DWO Gen 2 A.22 None
Harness, L.V., Upper Oven, Gen 2 RWD-9540 DWO Gen 2 & SWO A.16 None
Harness, Lower Oven RWD-9408 DWO Gen 1 A.22 None
Harness, Power, Lower, DWO RWD-9429 DWO Gen 1 & 2 A.22 None
Harness, Power, Motor Controller RWD-9559 DWO Gen 2 & SWO A.16 None
Harness, Single RWS-9002 SWO A.8 None
Harness, Upper Oven RWD-9407 DWO Gen 1 A.14 None
Harness, Wire, Gen 2 RWD-9538 DWO Gen 2 & SWO A.16 None
Heater Cover Plate RWD-9156 All A.14, A.16 A.8, A.9
Heater, Upper Oven (208V) RWD-9394 All A.24 A.23
Heater, Upper Oven (240V) RWD-9065 All A.24 A.23
High Limit Switch 102075 All A.14, A.16, A.22 A.8, A.9, A.17
Hinge Pocket, Lower, LHS RWD-9119 DWO Gen 1 & 2 A.28 A.24
Hinge Pocket, Lower, RHS RWD-9118 DWO Gen 1 & 2 A.28 A.24
Hinge Pocket, LHS RWD-9098 All A.24 A.22
Hinge Pocket, RHS RWD-9097 All A.24 A.22
Jetplate, Lower RWD-9576 All A.24 A.22
Jetplate, Upper RWD-3017 All A.24 A.22
Lamp, Halogen, Lower Oven RWD-3016 DWO Gen 1 & 2 A.28 A.24
Lamp, Halogen, Upper Oven RWD-3014 All A.24 A.22
Latch Mechanism RWD-9366 All A.22 A.17
Light Switch 104141 All A.11, A.12 A.4, A.5
M.O.V. Filter RWD-9490 All A.14, A.21 A.8, A.16
Mag Air Diverter Assembly, Gen 1 N/A DWO Gen 1 A.14 A.8
A.3
APPENDIX REPLACING OVEN COMPONENTS
Page 96

A.4 APPENDIX REPLACING OVEN COMPONENTS
Part Details... Locate the Part Here...
Item Part # Oven Page # Illustration #
Mag Air Diverter Assembly, Gen 2 N/A DWO Gen 2 & SWO A.16 A.9
Magnetron 104154 All A.14, A.16 A.8, A.9
Microwave Stirrer Assembly RWD-9275 All A.24 A.21
Outer Frame, DWO RWD-3006 DWO Gen 1 & 2 A.11 A.4
Outer Frame, SWO RWS-9005 SWO A.11 A.3
Oven, Lower N/A DWO Gen 1 & 2 A.6 A.1
Oven, Speedcook, DWO, Gen 1 N/A DWO Gen 1 & 2 A.6 A.1
Oven, Speedcook, DWO, Gen 2 N/A DWO Gen 1 & 2 A.6 A.1
Oven, Speedcook, SWO N/A SWO A.8 A.2
Panel, Convection, Porcelain RWD-9575 DWO Gen 1 & 2 A.28 A.24
Plate, Convection Fan RWD-9237 DWO Gen 1 & 2 A.28 A.25
Power Supply (12VDC) 104128 All A.18 A.12
Power Supply (24VDC) 104166 All A.18 A.12
Power Supply Assembly N/A All A.18 A.10, A.11
Power Supply Mounting Plate RWD-9262 All A.18 A.12
Rack RWD-9167 All A.24 A.22
Rack Guide RWD-9385 DWO Gen 1 & 2 A.28 A.24
Rack, Lower Oven RWD-9384 DWO Gen 1 & 2 A.28 A.24
Rack, Roller, Lower Oven RWD-9383 DWO Gen 1 & 2 A.28 A.24
Receptacle, Meat Probe 104159 DWO Gen 1 & 2 A.28 A.24
Relay Assembly N/A DWO Gen 1 A.14 A.7
Relay Board RWD-9545-FRU DWO Gen 2 & SWO A.18 A.11
Relay, K1 101281 All A.21 A.15, A.16
Relay, K2 101273 DWO Gen 1 A.21 A.15
Relay, K3 101273 DWO Gen 1 A.21 A.15
Relay, K4 101273 DWO Gen 1 A.21 A.15
Relay, K5 101273 DWO Gen 1 A.21 A.15
Relay, K6 101273 DWO Gen 1 A.21 A.15
Relay, K7 101273 DWO Gen 1 A.21 A.15
Relay, K8 101273 DWO Gen 1 A.21 A.15
Relay, K9 104179 All A.20, A.21 A.13, A.16
Relay, K10 104202 DWO Gen 1 A.22 A.19
Relay, K11 101281 DWO Gen 1 & 2 A.22 A.19, A.20
Relay, K12 101281 DWO Gen 1 & 2 A.22 A.19, A.20
Relay, K13 104179 DWO Gen 1 & 2 A.22 A.19, A.20
Relay/Power Assembly N/A DWO Gen 2 & SWO A.16 A.9
RTD RWD-9364 All A.24, A.28 A.21, A.24
SD Card, Gen 1 RWD-9500 DWO Gen 1 A.18 A.10
SD Card, Gen 2 RWD-9562 DWO Gen 2 & SWO A.18 A.11
Separator, Convection Fan RWD-9223 DWO Gen 1 & 2 A.28 A.24
Snubber, Electrical RWD-9497 All A.14, A.16, A.22, A.28 A.7, A.9, A.17, A.25
Speaker 104214 All A.12, A.18 A.6, A.10
Stand-O , Broil Element RWD-9215 DWO Gen 1 & 2 A.28 A.24
Stand-O , Rear, Lower RWD-9130 DWO Gen 1 & 2 A.28 A.24
Page 97

Part Details... Locate the Part Here...
Item Part # Oven Page # Illustration #
Stirrer Motor, Gear 104174 All A.14, A.16 A.7, A.9
Stirrer Motor, Hub 104175 All A.14, A.16 A.7, A.9
Stirrer Shaft RWD-9070 All A.24 A.21
Stirrer, Coupling Hub 104133 All A.24 A.21
Stirrer, Coupling Spider Insert 104134 All A.24 A.21
Stirrer, Shaft Support RWD-9077 All A.24 A.21
Stirrer, Stud Plate RWD-9072 All A.24 A.21
Support, Rack, LHS RWD-9165 All A.24 A.22
Support, Rack, RHS RWD-9166 All A.24 A.22
Switch Assembly, Mode RWD-9257 DWO Gen 1 & 2 A.11 A.4
Switch Assembly, Temperature RWD-9258 DWO Gen 1 & 2 A.11 A.4
Terminal Block 104145 All A.14, A.21, A.22 A.8, A.16, A.17, A.18
Thermostat, 140F, Close on Rise 102087 All A.20 A.13, A.14
Thermostat, 160F, Close on Rise 104236 DWO Gen 1 & 2 A.22 A.17
Thermostat, 270F, Open on Rise 104228 All A.8, A.24 A.2, A.23
Thermostat, 280F, Open on Rise 104167 All A.14, A.17, A.22 A.7, A.17, A.9
Top Cover, Front RWD-9356 All A.6, A.8 A.1, A.2
Top Cover, Rear RWD-9355 All A.6, A.8 A.1, A.2
Transformer, H.V. 104137 All A.14, A.17 A.8, A.9
USB Port, Gen 1 RWD-9453 DWO Gen 1 A.6 A.1
USB Port, Gen 2 103193 DWO Gen 2 & SWO A.6, A.8 A.1, A.2
Wire, Canada, Black RWD-9531 DWO Gen 1 A.22 None
Wire, Canada, Orange RWD-9530 DWO Gen 1 A.22 None
Wire, Canada, Short RWD-9529 DWO Gen 1 A.22 None
Wire, H.V., Capacitor/Diode RWD-9435 All A.14, A.17 None
Wire, H.V., Capacitor Magnetron RWD-9434 DWO Gen 1 A.14 None
Wire, H.V., Capacitor/Transformer RWD-9433 All A.14, A.17 None
Wire, H.V., Ground, Diode RWD-9436 All A.14, A.17 None
Wire, L.V., P7, P8, & P10, Conn., Upper Oven RWD-9431 DWO Gen 1 A.14 None
Wire, L.V., P9 Conn., DWO RWD-9430 DWO Gen 1 A.22 None
Wire, Light Jumper, Lower Switch RWD-9489 DWO Gen 1 & 2 A.6 None
Wire, Switch, Lower RWD-9428 DWO Gen 2 A.22 None
Wire, Switch, Lower, Gen 1 RWD-9596 DWO Gen 1 A.6 None
Wire, Switch, Upper, Gen 1 RWD-9597 DWO Gen 1 A.14 None
Wire, Upper Switch RWD-9432 DWO Gen 2 & SWO A.17 None
A.5
APPENDIX REPLACING OVEN COMPONENTS
Page 98

A.6 APPENDIX REPLACING OVEN COMPONENTS
Component and Assembly Location, DWO Gen 1 and Gen 2
DANGER: Before removing or replacing any oven component, ensure the oven is removed from any
power source (i.e., the breaker is turned off ). Failure to do so can result in serious injury or death.
WARNING: Before removing or replacing any oven component, thoroughly read the safety instructions
found at the front of this manual and in Oven Systems (Section 5) and Troubleshooting (Section 6). Adhere to
all precautions and warnings outlined in these sections, as failure to do so could result in serious injury or death.
CAUTION: Before removing/installing any component, make sure it is disconnected from the wire
harness (where applicable).
Removing the Oven
In order to remove the oven from the wall, the two mounting screws (P/N: 104184), located on the inside of
the Speedcook oven’s outer trim, must be removed (additionally, some older DWO oven models have 2
cabinet screws in the lower oven’s outer trim). e oven may be safely pulled away from the wall approximately
11” (280 mm) to remove the front top cover, lower EC access panel, and the door switch covers. Any further
removal requires the oven to be fully removed from the wall and placed upon a cart capable of supporting
approximately 410 lbs (186 kg).
Item Description Item Part # Hardware Description Hardware Part Number(s)
Cable, Display, L.V., DWO RWD-9427 None None
Cable, Ribbon, 6” 104208 None None
Cover, Back, DWO RWD-9184 Screw, SH MTL, #8 x 1/2 Serrated PHTRH 101688 (x19)
Diverter, Vent Outlet RWD-9584 None None
Door Sensing Switch 104229 Screw, SH MTL, #8 x 1/2 Serrated PHTRH 101688 (x3)
Door Skin, Replacement RWD-3004-X None None
Door, Lower RWD-3021 None None
Door, Speedcook Oven RWD-3019-X
Door, Speedcook Oven, Inner RWD-3022 None None
Electrical Compartment, Lower,
Gen 1 (see pages A.22-A.23)
Electrical Compartment, Lower,
Gen 2 (see pages A.22-A.23)
Electrical Compartment, Upper,
Gen 1 (see pages A.13-A.15)
Electrical Compartment, Upper,
Gen 2 (see pages A.16-A.17)
Front Trim, DWO
(see pages A.10-A.11)
Handle, Lower Oven RWD-9224 Bolt, Handle, Lower Oven RWD-9457 (x2)
Handle, Speedcook Oven RWD-9011 Bolt, Handle, Speedcook Oven RWD-9458 (x2)
Harness, Failsafe, Microwave RWD-9555 None None
Harness, Fuse, Cooling Fan RWD-9553 None None
Oven, Lower
(see pages A.28-A.29)
N/A None None
N/A None None
N/A None None
N/A None None
N/A
N/A None None
Screw, SH MTL, #8 x 1/2 Serrated PHTRH
Cover, Hinge Pocket
Screw, #8-32 x 3/8, PPH, THD-Forming, PLT
Screw, #8 x 3/8 PH MOD TRUSS CRES
Screw, SH MTL, #8 x 1/2 Serrated PHTRH
Screw, #8 x 2.00 PH MOD TRUSS SS
101688 (x4)
RWD-9472 (x2)
104227 (x2)
101682 (x16)
101688 (x4)
104184 (x2)
Page 99

Item Description Item Part # Hardware Description Hardware Part Number(s)
A.7
Oven, Speedcook, DWO, Gen 1
(see pages -A.25)
Oven, Speedcook, DWO, Gen 2
(see pages -A.25)
Top Cover, Front RWD-9356 Screw, SH MTL, #8 x 1/2 Serrated PHTRH 101688 (x7)
Top Cover, Rear RWD-9355 Screw, SH MTL, #8 x 1/2 Serrated PHTRH 101688 (x11)
USB Port, Gen 1 RWD-9453 Screw, 6-32 x .38, PFH, 100DEG, SS 101430 (x2)
USB Port, Gen 2 103193
Wire, Light Jumper, Lower
Switch
Wire, Switch, Lower, Gen 1 RWD-9596 None None
Top Cover, Front
USB Port, Gen 1 / Gen 2
N/A None None
N/A None None
Screw, SH MTL, #8 x 1/2 Serrated PHTRH
Bracket, USB, Strap
RWD-9489 None None
Top Cover, Rear
Electrical Compartment, Upper, Gen 1 / Gen 2
101688 (x2)
RWS-9026
Oven, Speedcook, DWO, Gen 1 / Gen 2
Handle, Speedcook Oven
Door, Speedcook Oven, Inner
Front Trim, DWO
Door, Speedcook oven
Door Skin, Replacement
Handle, Lower Oven
Door, Lower
Cover, Back, DWO
Electrical Compartment, Lower, Gen 1 / Gen 2
Door Sensing Switch
Oven, Lower
APPENDIX REPLACING OVEN COMPONENTS
Figure A.1: Component and Assembly Location, DWO Gen 1 and Gen 2
Diverter, Vent Outlet
Page 100

A.8 APPENDIX REPLACING OVEN COMPONENTS
Component and Assembly Location, SWO
DANGER: Before removing or replacing any oven component, ensure the oven is removed from any
power source (i.e., the breaker is turned off ). Failure to do so can result in serious injury or death.
WARNING: Before removing or replacing any oven component, thoroughly read the safety instructions
found at the front of this manual and in Oven Systems (Section 5) and Troubleshooting (Section 6). Adhere to
all precautions and warnings outlined in these sections, as failure to do so could result in serious injury or death.
CAUTION: Before removing/installing any component, make sure it is disconnected from the wire
harness (where applicable).
Removing the Oven
In order to remove the oven from the wall, the two mounting screws (P/N: 104184), located on the inside of
the Speedcook oven’s outer trim, must be removed. e oven may be safely pulled away from the wall
approximately 11” (280 mm) to remove the front top cover, lower EC access panel, and the door switch
covers. Any further removal requires the oven to be fully removed from the wall and placed upon a cart
capable of supporting approximately 230 lbs. (105 kg.).
Item Description Item Part # Hardware Description Hardware Part Number(s)
Air Switch 102009 Screw, 4-40 x 5/8, PPH, SS 101550 (x2)
Blower, Exhaust 104190 Screw, SH MTL, #8 x 1/2 Serrated PHTRH 101688 (x2)
Cover, Back, SWO RWS-9018 Screw, SH MTL, #8 x 1/2 Serrated PHTRH 101688 (x11)
Door Skin, Replacement RWD-3004-X None None
Door, Speedcook Oven RWD-3019-X
Door, Speedcook Oven, Inner RWD-3022 None None
Electrical Compartment, SWO
(see pages A.16-A.17)
Front Trim, SWO
(see pages A.10-A.11)
Handle, Speedcook Oven RWD-9011 Bolt, Handle, Speedcook Oven RWD-9458 (x2)
Harness, Single RWS-9002 None None
Oven, Speedcook, SWO
(see pages -A.25)
Thermostat, 270F, Open on Rise 104228 Screw, #6 x 1/2, PPHD, DRL-PT, SS 101687 (x2)
Top Cover, Front RWD-9356 Screw, SH MTL, #8 x 1/2 Serrated PHTRH 101688 (x7)
Top Cover, Rear RWD-9355 Screw, SH MTL, #8 x 1/2 Serrated PHTRH 101688 (x11)
USB Port, Gen 2 103193
N/A None None
N/A
N/A None None
Screw, SH MTL, #8 x 1/2 Serrated PHTRH
Cover, Hinge Pocket
Screw, #8-32 x 3/8, PPH, THD-Forming, PLT
Screw, #8 x 3/8 PH MOD TRUSS CRES
Screw, SH MTL, #8 x 1/2 Serrated PHTRH
Screw, #8 x 2.00 PH MOD TRUSS SS
Screw, SH MTL, #8 x 1/2 Serrated PHTRH
Bracket, USB, Strap
101688 (x4)
RWD-9472 (x2)
104227 (x2)
101682 (x16)
101688 (x4)
104184 (x2)
101688 (x2)
RWS-9026
 Loading...