


Operating Instructions
ChefComm Pro ®
ChefComm LimitedTM
© 2008 TurboChef Technologies, Inc.
DOC-1055 / Rev C / December 2008
For further information, call 1-800-90TURBO
or
+1 214-379-6000
DOC-1055 / Rev C / December 2008
Errors – descriptive, typographic, or pictorial – are subject to correction. Specifications are subject to change without notice.
Please read this manual carefully and retain it for future reference.
Table of Contents
Items italicized below apply only to ChefComm Pro® and are not available in ChefComm Limited TM.
Setup
Installation |
1 |
Detailed Step 1: Expand the Installation Files |
1 |
Detailed Step 2: Install ChefComm Pro |
1 |
Detailed Step 3: Install the USB Smart Card Reader Drivers |
1 |
Setting up a Black Box |
2 |
Building/Modifying a Menu
Splash Screen Options |
3 |
Specifying “New Menu Configuration” (or Oven Type) |
3 |
Creating a New Oven Type |
3 |
Creating a New Menu |
4 |
Opening an Existing Menu |
4 |
Opening a TCM (Legacy) File |
5 |
Editing the Cook Temperature |
5 |
Renaming a Food Group |
5 |
Menu Preview |
5 |
Renaming a Recipe |
6 |
Editing Recipe Settings |
6 |
Moving/Copying Recipes |
7 |
Deleting a Recipe from a Menu |
7 |
Undo/Redo Features |
7 |
Comparing Two Menus |
8 |
Saving a Menu |
8 |
Printing a Menu |
9 |
Saving a Menu as a PDF File |
9 |
Importing/Exporting a Menu
Importing a Menu from a Smart Card |
10 |
Exporting a Menu to a Smart Card |
10 |
Exporting Oven Firmware Updates |
10 |
Importing a Menu via RS-232 |
11 |
Exporting a Menu via RS-232 |
11 |
Importing a Menu from a Mapped Drive (i5 Only) |
12 |
Exporting a Menu to a Mapped Drive (i5 Only) |
12 |
Building/Modifying a Cookbook
Creating a Local Cookbook |
13 |
Deleting a Local Cookbook |
13 |
Sharing a Local Cookbook |
13 |
Filtering Cookbook Recipes |
13 |
Removing a Recipe from a Local Cookbook |
14 |
Editing a Cookbook Recipe |
14 |
User Preferences
Changing the Default “New Menu Configuration” |
15 |
Changing the Temperature Display |
15 |
Auto-Save |
15 |
Checking for Updates/Auto-Update |
15 |
Troubleshooting
Troubleshooting: USB Smart Card Reader |
16 |
Troubleshooting: 9-Pin Serial RS-232 (Black Box) |
16 |
Troubleshooting: Menu Compare |
16 |
Troubleshooting: ChefComm Won’t Allow Menu to be Opened |
16 |
Troubleshooting: ChefComm Won’t Allow Menu to be Saved |
17 |
Troubleshooting: The Update is not Working |
17 |
Troubleshooting: Recipe Edit |
18 |

Installation
1.Before plugging in the USB smart card reader/ writer, insert the installation CD.
2.When your computer launches the installation wizard, follow the steps on your screen to install ChefComm.
3.Plug in the USB smart card reader. Your computer should automatically install the drivers.
NOTE: If your computer does not automatically install the drivers, it may launch a hardware setup wizard. Follow the steps on your screen. If the smart card reader is not working when you begin using ChefComm, go to your device manager and update your smart card reader drivers, pointing your system to the installation CD. For additional help, contact your IT department or call 800-90TURBO (+1 214-379-6000) and request ChefComm support.
NOTE: If your installation CD is an older version, it may not automatically launch the installation wizard. Follow the detailed Steps 1, 2, and 3 below.
Detailed Step 1: Expand the Installation Files
If the CD does not automatically launch the installation wizard, the setup files must be unzipped to ensure proper installation. Launching the files from a viewer will leave critical steps incomplete.
1.Open the contents of the CD in a file browser.
2.The installation CD contains two zipped files: one titled “ChefComm.Setup.zip,” and another titled “SCRx31_inst_English_V8.06.zip.” Copy these files to a local or network drive (e.g., C:\).
Figure 1: Extracting the Zipped Files
3.Right-click the file for expansion options (Figure 1) or use your preferred application.
NOTE: If no options to extract or expand are available, you may need to install additional software. For help, contact your IT department.
Detailed Step 2: Install ChefComm Pro
1.Expand the setup files (Step 1). A file titled ChefComm.Setup.msi will appear in the specified location.
2.Double-click the file ChefComm.Setup.msi to launch the installation wizard.
3.Follow the instructions provided in the installation wizard.
4.Once installation completes, open ChefComm by going to Start > Programs and selecting it.
NOTE: before installing ChefComm Pro, you may be required to install .NET Framework files. If so, you will receive a prompt and a link to retrieve the required files.
Detailed Step 3: Install the USB Smart Card
Reader Drivers
The drivers provided on the installation CD must be installed for the USB smart card reader/writer to function properly.
If you are operating Windows XP®:
1.After expanding the file (Step 1), a folder titled “SCR531 English” will appear in the specified location.
2.Double-click the folder to open it.
3.Double-click the file setup.exe and follow the instructions on your screen for installing the USB smart card reader/writer.
4.When the setup process is complete, restart your computer.
If you are operating Windows Vista®, you will probably need to configure your smart card reader drivers from your device manager (depending on security settings). For additional help, contact your IT department or call 800-90TURBO (+1 214- 379-6000) and request ChefComm support.
1
PUT ES
2SE TUP
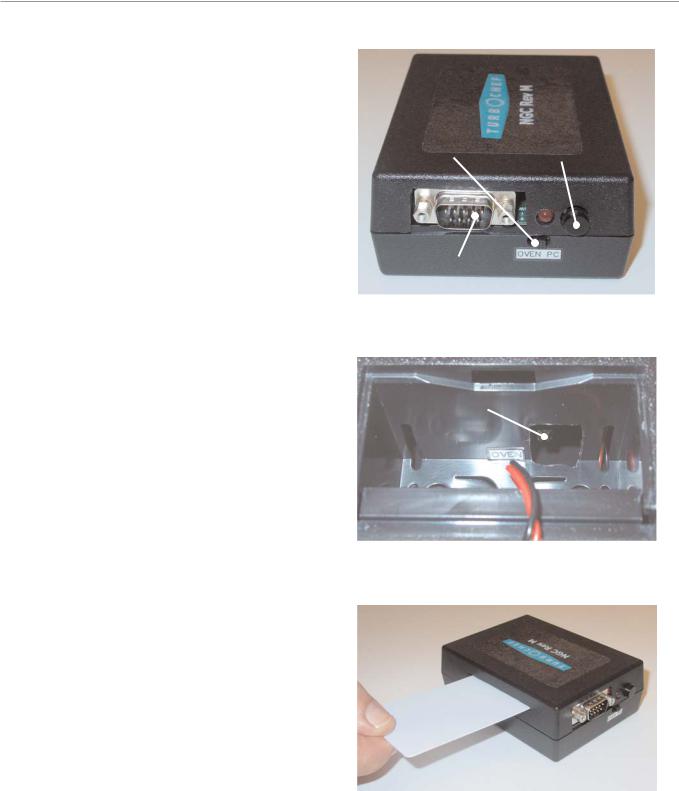
Setting Up a Black Box
1.Connect the black box to your computer via 9-pin RS-232 connector cable. See Figure 2 for port location on box.
2.Set the front switch (Figure 2) to PC.
3.Open the battery compartment and verify the read/write switch (Figure 3) is set to Oven.
4.Insert a smart card as shown in Figure 4.
NOTE: Whenever importing/exporting a menu to and from ChefComm via RS-232 (see page 11 for more details), press and hold the synchronization button (Figure 2) until ChefComm confirms that the import/export was successful.
OVEN/PC Synchronization
Switch Button
RS-232 Port
Figure 2: Black Box Front
Read/Write Switch
Figure 3: Read/Write Switch (Battery Removed for Clarity)
Figure 4: Insert Card Chip-First, with Chip Facing Down
 Loading...