

Page 1

4
All-Purpose Battery Charger TLG 500 B1
KOMPERNASS GMBH
BURGSTRASSE 21 · D-44867 BOCHUM
www.kompernass.com
ID-Nr.: TLG 500 B1-07/11-V3
IAN: 68599
ALL-PURPOSE BATTERY
CHARGER
Operating instructions
UNIVERZÁLIS AKKUTÖLTŐ
Használati utasítás
UNIVERZÁLNÍ
NABÍJEČKA BATERIÍ
Návod k obsluze
UNIVERSALAKKULADEGERÄT
Bedienungsanleitung
UNIWERSALNA
ŁADOWARKA
Instrukcja obsługi
UNIVERZALNI
POLNILEC BATERIJ
Navodila za uporabo
UNIVERZÁLNA
NABÍJAČKA
Návod na obsluhu
Page 2
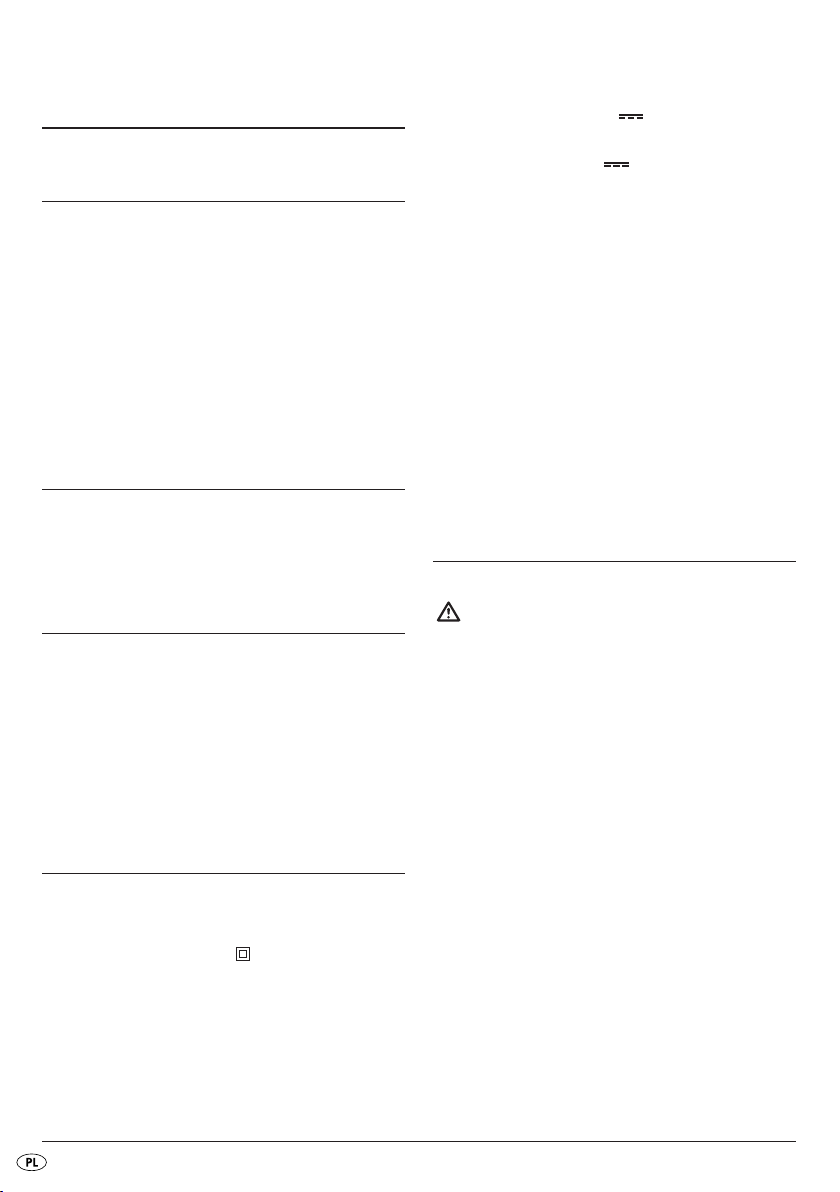
TLG 500 B1
1
5
2
3
6
4
1
2
3
Page 3

CONTENT PAGE
Intended Use 2
Items supplied 2
Description of the appliance 2
Technical data 2
Safety instructions 2
Commissioning 4
Charging batteries 4
Calculating the average charging time . . . . . . . . . . . . . . . . . . . . . . . . . . . . . . . . . . . . . . . . . .5
Automatic charging control/Retention charging . . . . . . . . . . . . . . . . . . . . . . . . . . . . . . . . . . .5
Timer control . . . . . . . . . . . . . . . . . . . . . . . . . . . . . . . . . . . . . . . . . . . . . . . . . . . . . . . . . . . . . . .5
Troubleshooting 6
Cleaning 6
Disposal 6
Warranty & Service 7
Importer 7
Read the operating instructions carefully before using the device for the first time and preserve this booklet
for later reference. Pass this manual on to whoever might acquire the device at a future date.
- 1 -
Page 4
ALL-PURPOSE BATTERY
CHARGER
Intended Use
Output voltages:
4 x 1.4 V
(Charging slots 1-4)
2 x 9 V
(Charging slots 5-6)
The Battery Charger is intended exclusively for:
• for the charging of rechargeable Ni-Cd and
Ni-MH batteries of the sizes AAA / AA / C / D
and 9 V Block with standard commercial design
capacity.
• for charging both fast and standard
rechargeable batteries.
• domestic use only, it is not intended for
commercial use.
Items supplied
• Battery Charger
• Operating manual
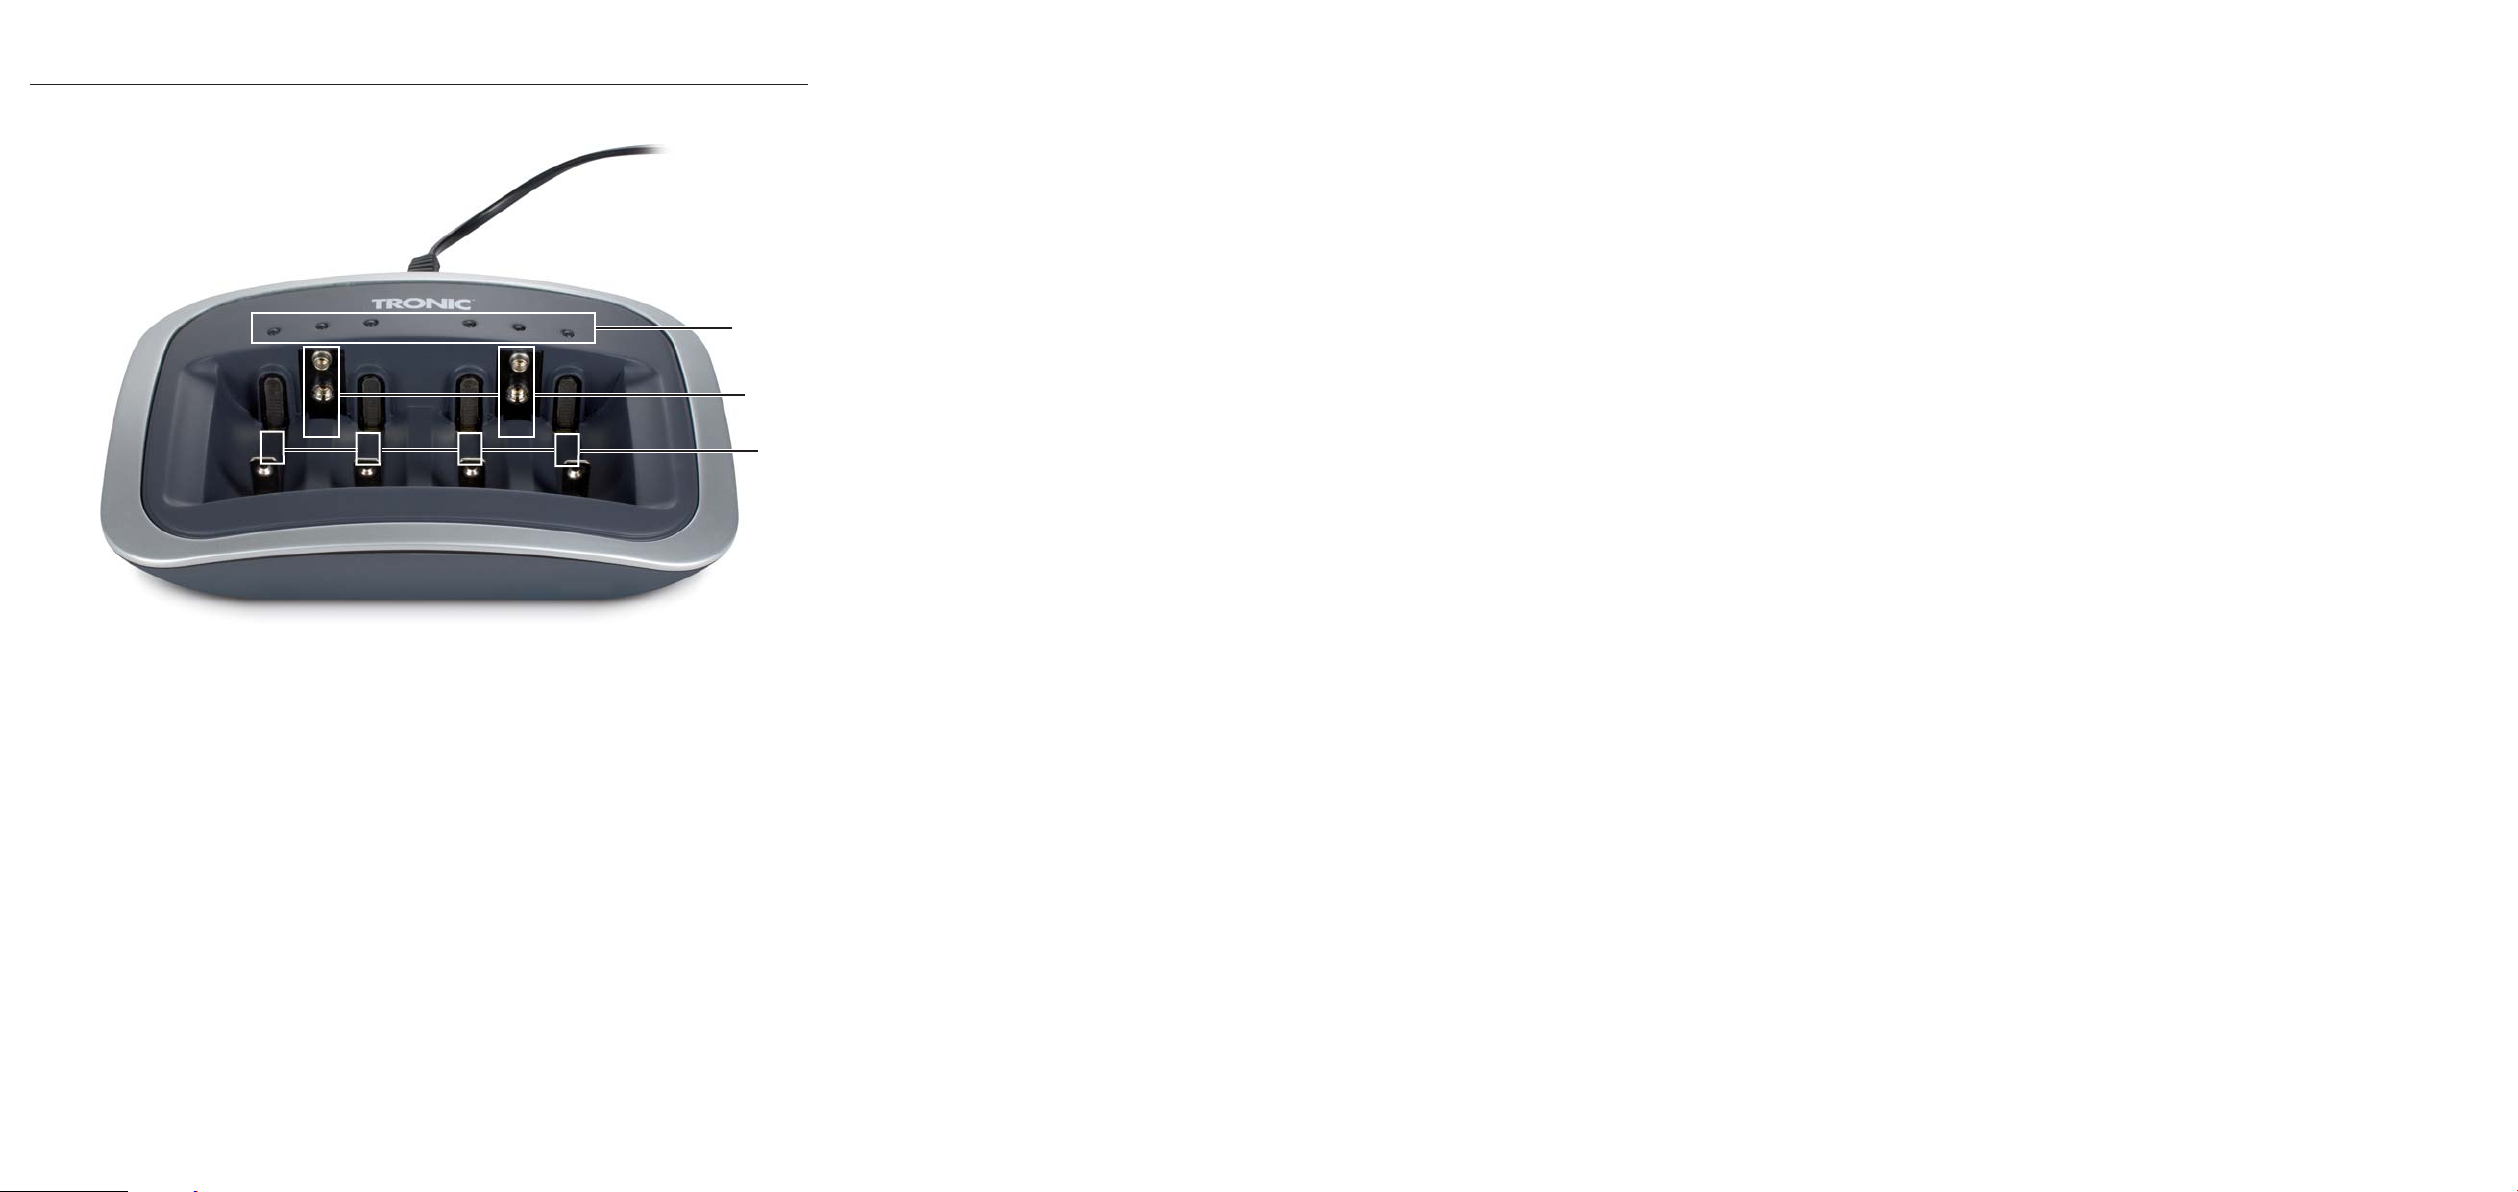
Description of the appliance
1LEDs (Operating status indicators)
q
Charging slots for 9 V Block batteries
w
(Charging slots 5 and 6; see fold-out side)
Charging slots for AAA / AA / C / D batteries
e
(Charging slots 1 to 4; see fold-out side)
Technical data
Input Voltage: 100 - 240 V
60/50 Hz
Power consumption : 150 mA
Protection class: II /
Operating temperature: 0 ° C - 25 ° C
Storage temperature: -20 ° C - 50 ° C
Output: max. 3.34 VA
~
Charging currents:
1000 mA (with 1-2 batteries)
500 mA (with 3-4 batteries)
2 x 30 mA (at 9 V battery)
Maximum design capacities:
AAA: 900 mAh
AA: 2500 mAh
C: 4000 mAh
D: 4500 mAh
9 V block: 200 mAh
Safety instructions
Fire hazard!
Do not place the Battery Charger:
• where it would be subject to direct sunlight.
It could happen that the Battery Charger overheats and becomes irreparably damaged.
• in close adjacency to sources of heat. This includes for example ovens, fan heaters and similar
appliances, as well as the ventilation openings
of electrical devices. The Battery Charger could
be irreparably damaged.
• in damp environments or in the vicinity of water.
Moisture could permeate into the Battery Charger.
There would then be the danger of receiving an
electric shock and or causing a fire!
• Only charge rechargable batteries of the types
„Ni-Cd“ and „Ni-MH“. NEVER recharge batteries
of other types or non-rechargable batteries.
These are not suitable for recharging. Batteries
not suitable for recharging can overheat and
explode. It could irreparably damage the
Battery Charger and the inserted batteries.
There is also a risk of personal injury!
- 2 -
Page 5
Danger of electrical shock!
Do not place the Battery Charger:
• in the close vicinity of water, e. g. baths and
swimming pools. Should water permeate into the
Battery Charger, the appliance could be irreparably damaged.
• Remove the power cable from the plug socket
before cleaning the Battery Charger. You can
thus avoid an electric shock. Should water or
moisture permeate the Battery Charger despite
observing all precautions, immediately remove
the power cable from the plug socket.
This device suitable only for use indoors.
Injury hazard!
• Always store batteries out of the reach of
children! There is a danger that children could
swallow batteries! Due to the poisonous content
of batteries there is a danger to life!
• When charging batteries never leave the
Battery Charger unsupervised.
• The batteries could become hot during charging.
NEVER touch hot batteries! There is a risk of
being burnt! After charging batteries, first of all
remove the power cable of the Battery Charger
from the plug socket. Then allow the batteries to
cool down before removing them from the
Battery Charger.
• Should the power cable be defective, immediately arrange for it to be replaced by a service
partner to avoid the risk of injury.
• The Battery Charger does not contain any userserviceable components. Should you open the
housing of the Battery Charger, the warranty
expires! Should repairs be needed, contact one
of our service partners in your area.
• No liability or warranty will be accepted for
damage caused by opening the appliance
housing, repairs attempted by non-qualified
persons or improper use of the Battery Charger!
• Leakage of battery acids can occur, especially
with old batteries. You should remove all batteries
from the Battery Charger if you do not intend to
use it for an extended period. You can thus
protect the Battery Charger from leaking battery
acids.
• This appliance is not intended for use by persons
(including children) with reduced physical, sensorial or mental capabilities, or lack of experience
and knowledge, unless they have been given
supervision or instruction concerning use of the
appliance by a person responsible for their
safety.
• Children should be supervised to ensure that
they do not play with the appliance.
Dealing with rechargable batteries
• Do not use damaged (corroded) batteries.
• Should batteries leak, avoid skin contact with
them. This leads to skin irritation.
• Should a battery leak into the Battery Charger,
clean it with a dry cloth. Wear protective gloves!
- 3 -
Page 6
Commissioning
• Before taking the Battery Charger into use, check
that all items are complete/available and free of
visible damage.
• Place the Battery Charger on a straight, level,
scratch and slip resistant surface.
Notice:
This appliance is equipped with non-slip rubber feet.
As furniture surfaces may be made of a variety of
materials and are treated with many different types
of cleaning agents, it cannot be completely ruled
out that some substances contain ingredients which
may corrode the rubber feet and soften them.
If possible, place an anti-slip material under the device.
• Compare the technical data with that of your
current mains power supplier. If they are the
same, connect the power cable to a mains
power socket. The LEDs now light up red and
green. The Battery Charger is now ready for use.
Charging batteries
Danger!
Charge exclusively rechargable batteries of the
types „Ni-Cd“ and „Ni-MH“.
NEVER recharge batteries of other types or nonrechargable batteries. These are not suitable for
recharging. They could irreparably damage the
Battery Charger and the inserted batteries. There is
also the danger of a fire as well as an explosion!
Notice:
Ensure that the batteries are inserted into the
charging slots in accordance with their polarities.
Otherwise, the batteries will not be charged.
• Insert the batteries into the charging slots.
• Press the 9 V Block batteries into the charging
slot until they audibly engage.
Between 1-6 batteries can be loaded individually:
• 4 x Type C or Type D in the charging slots 1 to 4,
or
• 4 x Type AA or AAA in the charging slots 1 to 4,
with additionally 2 x Type 9 Volt Block batteries
in the charging slots 5 and 6.
• The charging process now begins. The Battery
Charger has an LED for each charging slot. The
LEDs of the charging slots indicate the charge
state of the battery they contain.
• In the first 5 seconds, the Battery Charger
performs a quick capacity test:
- The LED of the charging slot glows green:
Capacity over 90 %.
- The LED of the charging slot blinks green:
Capacity between 80 % - 90 %.
- The charging bay LED lights up red:
The capacity is between 70 % - 80 %
- The charging bay LED blinks red:
The capacity is under 70 %.
Notice:
If the charging bay LED blinks red for longer than
5 seconds the rechargeable battery is not correctly
inserted into the charging bay or the battery is defective.
When the capacity of the battery is determined,
charging process starts.
- 4 -
Page 7

The various indicators have the following meanings:
- The LED blinks red and green every second
(Not for 9V Block batteries):
The rechargeable batteries are alternately charged and discharged.. (Refresh-Function: Older
batteries or those that have been stored for a long
period will be refreshed.).
- The LED flashes red and green in a 1/2 second
rhythm (not applicable to 9V rechargeable
batteries):
If the rechargeable batteries do not have to be
refreshed (refresh function), conditional on the
length of storage or the age, the following process
takes place: the rechargeable batteries are discharged to minimize the memory effect.
- The LED glows red constantly:
The rechargeable batteries are charged with the
maximum charge current.
- The LED glows green constantly:
The batteries are fully charged and the Battery
Charger has switched over to trickle charge.
Warning!
The batteries could become hot during charging.
NEVER touch hot batteries! There is a danger of
being burnt!
• Remove the power cable of the Battery Charger
from the plug socket and allow the batteries to
cool down.
Afterwards you can remove the charged batteries
from the Battery Charger.
Calculating the average charging time
Dependant on the type, age and remaining battery
charge, hence the charging process takes different
lengths of time. The average charging times can be
calculated using the following formula.
Note, however, that the times calculated are only
indicative.
Current time (Min.) =
Capacity of t
Charging current of the appliance (mA)
he batter
y (mAh) x 1,5 x 60
Automatic charging control/
Retention charging
This Battery Charger controls the charging time for
rechargable batteries of the types Ni-Cd and Ni-MH
separately. This control is based on the –Δ U
(„minus Delta U“) calculation.
In mathematics, with Delta Δ differences are
described.
„Minus Delta U“ in this case means a negative
voltage difference.
This charge identification makes itself useful in the
following effects:
Should a battery be charged with a constant current,
its voltage rises continuously. When the battery is
full, its voltage reaches a maximum and falls lightly
with further current flow. This light fall in voltage is
recognised by the charging electronics and the
charge process is terminated. The Battery Charger
automatically switches to „Retention charging“.
This means that the batteries are no longer being
charged with continuous power, but with short power
impulses instead. This counteracts the process of
self-discharge, thus retaining the batteries in a fully
charged condition.
Timer control
In addition, this Battery Charger is fitted with a timer
control, which after 15 hours automatically switches
over to trickle charge. This serves as additional
protection against overcharging should the charge
terminating device not respond, due to a possibly
defective battery.
- 5 -
Page 8
Troubleshooting
The Battery Charger displays no functions
• Check to see if the power cable is correctly
inserted into the power socket.
• Check to see if the power socket is „live“. To do
this, connect a different, functioning electrical
appliance to the socket.
The inserted batteries are not being charged
• Check that the batteries are being inserted in
accord with their polarity.
• Check that batteries suitable for charging have
been inserted into the Battery Charger. Suitable
for charging are exclusively rechargable Ni-Cd
and Ni-MH batteries of the types AAA/AA/C/D
and 9 V Block batteries.
• Remove the power cable from the power socket
and allow the appliance to cool down, as the
temperature monitoring has possibly activated
itself. Temperature monitoring ensures that the
charging process is broken off as soon as a battery reaches an excessively high temperature.
Important!
Do not use aggressive or abrasive cleaning agents,
as these can damage the upper surfaces.
Clean the housing of the Battery Charger only with
a dry cloth. For stubborn soiling use a slightly damp
cloth.
Under no circumstances use moisture to clean the
interior of the charger. Instead, use a soft and clean
brush to clean the insides.
Disposal
Do not dispose of the appliance in your
normal domestic waste. This product is
subject to the European guideline
2002/96/EC.
Dispose of the appliance through an approved
dis-posal centre or at your community waste facility.
Observe the currently applicable regulations.
In case of doubt, please contact your waste disposal
centre.
Other malfunctions
Make contact with one of our service partners close
to you if:
• the malfunction cannot be corrected as
described above,
• or, when operating the Battery Charger, other
malfunctions occur.
Cleaning
Danger!
Disconnect the power cable before cleaning. There
is the risk of receiving an electric shock! Ensure that
moisture cannot penetrate into the device during cleaning!
Battery disposal!
Batteries may not be disposed of with normal
domestic waste. All consumers are statutorily obliged
to dispose of batteries at the collection point in their
community/district or with the original supplier.
The purpose of this obligation is to ensure that
batteries can be disposed of in an environmentally
friendly manner. Only dispose of batteries when
they are fully discharged.
Dispose of all packaging materials in an
environmentally responsible manner.
- 6 -
Page 9

Warranty & Service
Importer
The warranty for this appliance is for 3 years from
the date of purchase. The appliance has been manufactured with care and meticulously examined before delivery. Please retain your receipt as proof of
purchase. In the event of a warranty claim, please
make contact by telephone with our Service Department. Only in this way can a post-free despatch for
your goods be assured.
The warranty covers only claims for material and
manufacturing defects, but not for transport damage, for wearing parts or for damage to fragile components, e.g. buttons or batteries. This product is for
private use only and is not intended for commercial
use. The warranty is void in the case of abusive and
improper handling, use of force and internal tampering not carried out by our authorized service
branch. Your statutory rights are not restricted in
any way by this warranty.
The warranty period will not be extended by repairs
made under warranty. This applies also to replaced
and repaired parts. Any damage and defects extant
on purchase must be reported immediately after unpacking the appliance, at the latest, two days after
the purchase date. Repairs made after the expiration of the warranty period are subject to payment.
KOMPERNASS GMBH
BURGSTRASSE 21
44867 BOCHUM, GERMANY
www.kompernass.com
Service Great Britain
Tel.: 0871 5000 720 (£ 0.10/Min.)
E-Mail: kompernass@lidl.co.uk
IAN 68599
Service Ireland
Tel.: 1890 930 034
(0,08 EUR/Min., (peak))
(0,06 EUR/Min., (off peak))
E-Mail: kompernass@lidl.ie
IAN 68599
- 7 -
Page 10

- 8 -
Page 11

SPIS TREŚCI STRONA
Cel zastosowania 10
Zakres dostawy 10
Opis urządzenia 10
Dane techniczne 10
Wskazówki bezpieczeństwa 10
Uruchomienie 12
Ładowanie akumulatorów 12
Obliczanie średniego czasu ładowania . . . . . . . . . . . . . . . . . . . . . . . . . . . . . . . . . . . . . . . .13
Automatyczna kontrola ładowania/ładowanie konserwacyjne . . . . . . . . . . . . . . . . . . . . . .13
Sterowanie zegarowe . . . . . . . . . . . . . . . . . . . . . . . . . . . . . . . . . . . . . . . . . . . . . . . . . . . . . .13
Usuwanie usterek 14
Czyszczenie 14
Utylizacja 14
Gwarancja i serwis 15
Importer 15
Przed pierwszym użyciem urządzenia należy dokładnie przeczytać niniejszą instrukcję obsługi i zachować ją na
przyszłość. W przypadku przekazania urządzenia osobom trzecim należy przekazać im także instrukcję.
- 9 -
Page 12
UNIWERSALNA
ŁADOWARKA
Cel zastosowania
Napięcia wyjściowe:
4 x 1,4 V
(kieszenie ładowania 1-4)
2 x 9 V
(kieszenie ładowania 5-6)
Ładowarka jest przeznaczona wyłącznie do następujących zadań:
• do ładowania akumulatorów Ni-Cd i Ni-MH o
rozmiarach AAA/AA/C/D i 9 V o dostępnych
w handlu pojemnościach.
• Służy do ładowania szybkoładowalnych oraz
konwencjonalnych akumulatorków
• do prywatnego, domowego użytku.
Zakres dostawy
• Ładowarka do akumulatorków
• Instrukcja obsługi
Opis urządzenia
Diody (wskazanie stanu pracy)
q
Kieszenie do ładowania akumulatorów 9 V
w
(kieszenie 5 i 6; Patrz strona rozkładana)
Kieszenie do ładowania akumulatorów typu
e
AAA/AA/C/D (kieszenie od 1 do 4; Patrz
strona rozkładana)
Dane techniczne
Napięcie wejściowe: 100–240 V ~60/50 Hz
Pobór prądu: 150 mA
Klasa ochrony: II /
Temperatura robocza: 0°C - 25°C
Temperatura
przechowywania: -20°C - 50°C
Moc wyjściowa: maks. 3,34 VA
Prądy ładowania:
1000 mA (przy 1-2 akumulatorach)
500 mA (przy 3-4 akumulatorach)
2 x 30 mA (przy akumulatorach 9 V)
Maks. pojemności pomiarowe:
AAA: 900 mAh
AA: 2500 mAh
C: 4000 mAh
D: 4500 mAh
9 V blokowy: 200 mAh
Wskazówki bezpieczeństwa
Niebezpieczeństwo pożaru!
Nie stawiaj ładowarki:
• w miejscach narażonych na bezpośrednie działanie promieni słonecznych. Ciepło promieni słonecznych mogłoby doprowadzić do przegrzania ładowarki i jej trwałego uszkodzenia.
• w bezpośrednim sąsiedztwie źródeł gorąca.
Są nimi np. piece, farelki lub inne podobne
urządzenia oraz otwory wentylacyjne innych
urządzeń. Ciepło odprowadzane przez
urządzenia mogłoby doprowadzić do
przegrzania ładowarki i jej trwałego
uszkodzenia.
• w wilgotnym otoczeniu lub w pobliżu wody.
W przeciwnym razie do środka ładowarki
może przedostać się woda. Istnieje zagrożenie
porażenia prądem elektrycznym i spowodowania pożaru!
- 10 -
Page 13
• Do ładowania nadają się wyłącznie akumulatory „Ni-Cd” i „Ni-MH”. Nie próbuj nigdy
ładować akumulatorów innych typów ani
baterii jednorazowego użytku. Nie nadają
się one do ładowania. Akumulatory
nieprzystosowane do ładowania mogą się
przegrzać i wybuchnąć. Ładowarka oraz znajdujące się w niej akumulatory mogą ulej trwałemu uszkodzeniu. Zagrożenie
odniesienia obrażeń!
Zagrożenie porażenia prądem!
Nie stawiaj ładowarki:
• w bezpośrednim sąsiedztwie wody, np. na
wannie lub na brzegu basenu. Przedostanie się
wody do środka ładowarki może doprowadzić
do jej trwałego uszkodzenia.
• Przed przystąpieniem do czyszczenia wyciągnij
kabel ładowarki z gniazdka zasilania. Dzięki
temu unikniesz zagrożenia porażenia prądem
elektrycznym. Jeśli mimo zastosowania
wszelkich możliwych środków ostrożności
do środka ładowarki przedostanie się woda
lub wilgoć, wyciągnij natychmiast wtyczkę z
gniazdka zasilania.
Urządzenie jest przeznaczony wyłącznie do
używania wewnątrz pomieszczeń.
Niebezpieczeństwo skaleczenia!
• Akumulatory przechowuj zawsze w miejscu
niedostępnym dla dzieci! Dzieci mogą przez
nieostrożność połknąć akumulator! Znajdujące
się w środku akumulatorów związki trujące
stanowią śmiertelne zagrożenie!
• Podczas trwania ładowania nigdy nie zostawiaj
ładowarki bez nadzoru.
• Akumulatory podczas ładowania mogą się nagrzać do wysokiej temperatury. Nigdy nie dotykaj
gorących akumulatorów! Dotknięcie gorącego
akumulatora grozi poparzeniem! Po zakończeniu
ładowania najpierw wyciągnij wtyczkę kabla ładowarki z gniazdka, a następnie odczekaj do
ostygnięcia akumulatorów i wyjmij je z ładowarki.
• Aby uniknąć zagrożeń spowodowanych
uszkodzonym kablem sieciowym, jego wymianę
powierzaj zawsze autoryzowanemu serwisowi.
• Ładowarka nie zawiera żadnych elementów,
które nadawałyby się do konserwacji przez
użytkownika. Samodzielne otwarcie
obudowy ładowarki powoduje unieważnienie
gwarancji! W celu dokonania naprawy należy
zwrócić się do najbliższego punktu serwisowego producenta.
• Producent nie ponosi odpowiedzialności/
nie uznaje gwarancji w przypadku szkód
spwodowanych otwarciem obudowy, próbami
naprawiania ładowarki przez niewykwalifikowane osoby lub użytkowaniem niezgodnym z
przeznaczeniem!
• W przypadku ładowania starszych akumulatorów występuje zwiększone zagrożenie kwasu.
Dlatego w przypadku dłuższych przerw w używaniu ładowarki wyjmuj wszystkie akumulatory.
W ten sposób uchronisz ładowarkę przed uszkodzeniami spowodowanymi wylaniem kwasu.
• Nie zezwalaj na użytkowanie tostera przez
osoby (w tym dzieci) upośledzone umysłowo
lub fizycznie lub nie posiadające odpowiedniej
wiedzy i doświadczenia w bezpiecznym użytkowaniu urządzeń, bądź jeśli nie zostały one
uprzednio odpowiednio poinstrowane lub
przeszkolone.
• Poinformuj dzieci o zagrożeniach związanych
z użytkowaniem urządzenia i nie pozwól
dzieciom bawić się urządzeniem.
Korzystanie z akumulatorów
• Nigdy nie używaj uszkodzonych
(skorodowanych) akumulatorów.
• W przypadku wylania kwasu z akumulatorów,
unikaj kontaktu ze skórą. Kwas wywołuje
podrażnienia skóry.
• Rozlany kwas z akumulatora wytrzyj z powierzchni ładowarki suchą szmatką. Diody
trzykrotnie pulsują żółtym światłem. Załóż
rękawice ochronne!
- 11 -
Page 14
Uruchomienie
• Przed przystąpieniem do uruchomienia sprawdź, czy w opakowaniu znajdują się wszystkie
elementy zestawu, oraz czy podczas transportu
nie doszło do uszkodzenia ładowarki.
• Ustaw ładowarkę na równym, płaskim i stabilnym
podłożu.
Wskazówka
Urządzenie posiada antypoślizgowe gumowe nóżki. Ponieważ powierzchnie mebli wykonywane są z
różnych materiałów i do ich pielęgnacji stosowane
są różne środki nie można całkowicie wykluczyć, iż
niektóre środki zawierają substancje mogące niszczyć nóżki. W stosownym przypadku pod nóżki urządzenia należy podłożyć antypoślizgową podkładkę.
• Porównaj dane techniczne z napięciem dostępnym w sieci elektrycznej. Jeżeli napięcia będą
się zgadzały, podłącz kabel sieciowy do gniazdka. Diody zapalają się raz na czerwono i na
zielono. Ładowarka jest gotowa do pracy.
Ładowanie akumulatorów
Niebezpieczeństwo!
Do ładowania nadają się wyłącznie akumulatory
„Ni-Cd” i „Ni-MH”. Nie próbuj nigdy ładować akumulatorów innych typów ani baterii jednorazowego
użytku. Nie nadają się one do ładowania. Ładowarka oraz znajdujące się w niej akumulatory
mogą ulej trwałemu uszkodzeniu. Występuje zagrożenie spowodowania pożaru oraz wybuchu!
Wskazówka:
Podczas wkładania akumulatorów do kieszeni
ładowarki zwracaj uwagę na prawidłowe
rozmieszczenie biegunów. Odwrotne włożenie akumulatora do ładowarki uniemożliwi jego
naładowanie.
• Włóż akumulatory do odpowiednich kieszeni
ładowarki.
• Akumulatory 9 V włóż do kieszeni ładowarki i
wciśnij aż do zatrzaśnięcia.
Możesz ładować niezależnie 1–6 akumulatorów:
• 4 x typu C lub typu D w kieszeniach 1–4,
lub
• 4 x typu AA lub AAA w kieszeniach 1–4, z dodatkowymi 2 x akumulatorami typu 9 V w kieszeniach 5–6.
• Rozpoczyna się ładowanie. W ładowarce znajduje się dioda przy każdej kieszeni. Diody zajętych kieszeni pokazują stan naładowania poszczególnych akumulatorów.
• W ciągu pierwszych 5 sekund ładowarka wykonuje szybki test pojemności:
- Dioda kieszeni zapala się na zielono:
Pojemność powyżej 90 %.
- Dioda kieszeni miga na zielono:
Pojemność między 80 % - 90 %.
- - Dioda w kieszeni ładowania świeci na czerwono:
pojemność w zakresie 70 % - 80 %.
- Dioda w kieszeni ładowania miga na czerwono:
pojemność poniżej 70 %.
Wskazówka:
Gdy dioda w kieszeni ładowania będzie migała na
czerwono dłużej niż 5 sekund, akumulator jest nieprawidłowo włożony lub uszkodzony.
Po ustaleniu pojemności akumulatorów rozpoczyna
się ładowanie.
- 12 -
Page 15

Poszczególne wskazania mają następujące znaczenia:
- Dioda miga co sekundę na czerwono i zielono
(Nie dotyczy akumulatorów 9 V):
Akumulatory są naprzemiennie ładowane i rozładowywane. (Funkcja Refresh: regeneracja starszych lub nieużywanych przez dłuższy czas akumulatorów.)
- Dioda miga co 1/2 sekundy na czerwono i zielono (nie dotyczy akumulatorów blokowych 9 V):
Gdy nie będzie konieczności wykonania odświeżania akumulatora, w przypadku ich długiego składowania lub zestarzenia (funkcja Refresh), będzie miał miejsce następujący proces:
rozładowanie akumulatorów w celu ograniczenia efektu pamięci.
- Dioda zapala się na stałe na czerwono:
Ładowanie akumulatorów maksymalnym prądem ładowania.
- Dioda zapalona przez cały czas na zielono:
Ładowanie akumulatorów zakończyło się i ładowarka przełącza się na funkcję podtrzymywania
stanu naładowania.
Ostrzeżenie!
Akumulatory podczas ładowania mogą się nagrzać
do wysokiej temperatury. Nigdy nie dotykaj gorących
akumulatorów! Zagrożenie odniesienia obrażeń!
• Kabel sieciowy ładowarki wyciągnij z gniazdka
i odczekaj do ostygnięcia urządzenia.
Następnie naładowane akumulatory możesz wyjąć
z ładowarki.
Obliczanie średniego czasu ładowania
W zależności od typu, wieku i stanu naładowania
akumulatorów, ładowanie może trwać różną długość czasu. Średnie czasy ładowania można obliczyć
za pomocą następującego wzoru.
Należy jednakże pamiętać, że chodzi tu o orientacyjne wartości.
Czas ładowania (min.) =
P
ojemn. ak
Prąd ładowania urządzenia (mA)
umulatora (mAh) x 1,5 x 60
Automatyczna kontrola ładowania/
ładowanie konserwacyjne
Ta ładowarka steruje czasem ładowania oddzielnie
w przypadku akumulatorów typu Ni-Cd i Ni-MH.
Sterowanie to opiera się na metodzie –Δ U
(„minus Delta U”).
W matematyce symbolem delta Δ określa się
różnice.
„Minus Delta U” w tym przypadku oznacza ujemną
różnicę napięć.
To rozpoznawanie zakończenia ładowania
wykorzystuje następujący efekt:
Napięcie prądu w przypadku ładowania akumulatora prądem stałym ciągle wzrasta. Po pełnym
naładowaniu akumulatora, napięcie uzyskuje
wartość maksymalną i w przypadku dalszego
przewodzenia prądu nieznacznie spada. Ten niewielki spadek napięcia jest wykrywany przez układ
elektroniczny ładowania powodując zakończenie ładowania. Ładowarka przełącza się automatycznie
na „ładowanie konserwacyjne”. Oznacza to, iż do
ładowania akumulatorków nie jest używany prąd
stały, lecz krótkotrwałe impulsy prądu. Zapobiega
to samorozładowaniu akumulatorków i utrzymuje je
w stanie pełnego naładowania.
Sterowanie zegarowe
Ładowarka została wyposażona w funkcję sterowania zegarowego, które po upływie 15 godzin automatycznie przełącza się na ładowanie podtrzymujące. Funkcja ta stanowi dodatkową ochronę przed
przeładowaniem, gdyby – z powodu np. uszkodzenia akumulatorów – nie zadziałało rozpoznawanie
zakończenia ładowania.
- 13 -
Page 16
Usuwanie usterek
Ładowarka nie wskazuje żadnej funkcji
• Sprawdź, czy kabel sieciowy został podłączony
prawidłowo do gniazdka.
• Sprawdź, czy w gniazdku sieciowym płynie
prąd. W tym celu podłącz do gniazdka inne
urządzenie elektryczne.
Akumulatory po włożeniu do ładowarki
nie ładują się
• Sprawdź, czy akumulatory zostały włożone
zgodnie z rozmieszczeniem biegunów.
• Sprawdź typ akumulatorów włożonych do
ładowarki. Do ładowania nadają się
wyłącznie akumulatory Ni-Cd i Ni-MH
typów AAA/AA/C/D i 9 V.
• Wyciągnij kabel z gniazdka sieciowego i
odczekaj do ostygnięcia urządzenia, ponieważ
prawdopodobnie uruchomiła się funkcja kontroli
temperatury. Układ monitorowania temperatury
powoduje przerwanie procesu ładowania przy
zbytnim rozgrzaniu akumulatorka.
Pozostałe usterki w działaniu
Skontaktuj się z najbliższym autoryzowanym
serwisem, jeśli:
• nie po zastosowaniu opisanych sposobów naprawy nie można usunąć usterek w działaniu
• lub jeśli podczas użytkowania ładowarki
wystąpią inne usterki.
Czyszczenie
Niebezpieczeństwo!
Przed przystąpieniem do czyszczenia zawsze najpierw
wyjmij wtyczkę z gniazdka sieciowego. Występuje
niebezpieczeństwo porażenia prądem elektrycznym!
Podczas czyszczenia zwróć uwagę, by do środka
urządzenia nie przedostała się wilgoć!
Uwaga!
Nie używaj żrących ani szorujących środków czyszczących, które mogłyby uszkodzić powierzchnie obudowy.
Obudowę ładowarki czyść wyłącznie suchą szmatką.
Do usunięcia trudno zmywalnych zabrudzeń użyj
lekko zwilżonej szmatki.
Nigdy nie czyść wnętrza kieszeni ładowania na
mokro. Do czyszczenia używaj czystego pędzelka
o miękkim włosiu.
Utylizacja
Urządzenia nie należy wyrzucać wraz
z normalnymi odpadami domowymi.
Niniejszy produkt podlega działaniom,
przewidziamyn w przepisach dyrektywy europejskiej 2002/96/EC.
Urządzenie należy usuwać w akredytowanych zakładach utylizacji odpadów lub komunalnych zakładach utylizacji odpadów.
Należy przestrzegać aktualnie obowiązujących
przepisów. W razie pytań i wątpliwości odnośnie
zasad utylizacji należy skontaktować się z najbliższym zakładem utylizacji odpadów.
Usuwanie akumulatorów
Akumulatorów nie można wyrzucać do śmieci wraz
z pozostałymi odpadami domowymi. Każdy użytkownik jest ustawowo zobowiązany do
składowania zużytych akumulatorów / baterii w
odpowiednich punktach zbiórki, wyznaczanych
przez władze miasta lub oddawania ich do punktu
handlowego.
- 14 -
Page 17
Ten przepis ma na celu ochronę środowiska naturalnego przed niekontrolowanym usuwaniem szkodliwych odpadów, jakimi są zużyte akumulatory i
baterie.
Należy zwracać wyłącznie całkowicie
rozładowane akumulatory / baterie.
Materiał opakowaniowy należy przekazywać do utylizacji zgodnie z przepisami o
ochronie środowiska.
Serwis Polska
Tel.: 22 397 4996
E-Mail: kompernass@lidl.pl
IAN 68599
Importer
KOMPERNASS GMBH
BURGSTRASSE 21
44867 BOCHUM, GERMANY
Gwarancja i serwis
Urządzenie objęte jest 3-letnią gwarancją, licząc
od daty zakupu. Urządzeniezostało starannie wyprodukowane i poddane skrupulatnej kontroli przed
wysyłką. Paragon należy zachować jako dowód
dokonania zakupu. W przypadku roszczeń gwarancyjnych należy skontaktować się telefonicznie z
serwisem. Tylko w ten sposób można zagwarantować bezpłatną wysyłkę zakupionego produktu.
Gwarancja obejmuje wyłącznie wady materiałowe
i fabryczne, natomiast nie obejmuje szkód powstałych podczas transportu, części ulegających zużyciu ani uszkodzeń części łatwo łamliwych/podatnych na uszkodzenia mechaniczne, np. wyłączników,
akumulatorów. Produkt przeznaczony jest wyłącznie do użytku domowego, a nie do zastosowań profesjonalnych.
Gwarancja traci ważność w przypadku niewłaściwego używania urządzenia, używania niezgodnego z przeznaczeniem, użycia siły lub ingerencji w
urządzenie dokonywanej poza naszymi autoryzowanymi punktami serwisowymi. Niniejsza gwarancja nie ogranicza ustawowych praw nabywcy urządzenia.
Okres gwarancji nie ulega wydłużeniu o czas trwania usługi gwarancyjnej. Dotyczy to również wymienionych i naprawionych części. Szkody i wady zauważone już w chwili zakupu należy zgłosić od razu
po rozpakowaniu, nie później niż po upływie dwóch
dni od daty zakupu. Po upływie okresu gwarancyjnego wszystkie naprawy będą wykonywane płatnie.
www.kompernass.com
- 15 -
Page 18

- 16 -
Page 19

TARTALOMJEGYZÉK OLDALSZÁM
Rendeltetés 18
A csomag tartalma 18
A készülék leírása 18
Műszaki adatok 18
Biztonsági utasítások 18
Üzembe vétel 20
Az akkumulátorok töltése 20
Az átlagos töltési idő kiszámítása . . . . . . . . . . . . . . . . . . . . . . . . . . . . . . . . . . . . . . . . . . . . .21
Automatikus töltésellenőrzés/fenntartó töltés . . . . . . . . . . . . . . . . . . . . . . . . . . . . . . . . . . . . .21
Időzítő vezérlés . . . . . . . . . . . . . . . . . . . . . . . . . . . . . . . . . . . . . . . . . . . . . . . . . . . . . . . . . . .21
Működési zavarok elhárítása 22
Tisztítás 22
Ártalmatlanítás 22
Garancia és szerviz 23
Gyártja 23
Az első használat előtt figyelmesen olvassa el a használati utasítást majd későbbi használatra tegye el.
A készülék harmadik személy részére történő továbbadásakor adja át a leírást is.
- 17 -
Page 20

UNIVERZÁLIS
AKKUTÖLTŐ
Rendeltetés
Az elemtöltő kizárólag az alábbi célokra használható:
• Hagyományos kapacitású újratölthető
AAA/AA/C/D és 9 V Ni-Cd és Ni-MH akkuk
töltésére.
• gyorsan töltődő, valamint nem gyorsan töltődő
elemek újratöltésére.
• magán és nem pedig kereskedelmi használatra.
A csomag tartalma
• Akkutöltő
• Használati útmutató
Kimeneti feszültségek:
4 x 1,4 V
(1-4. töltőhéj)
2 x 9 V
(5-6. töltőhéj)
Töltőáramlatok:
1000 mA (1-2 akku esetén)
500 mA (3-4 akku esetén)
2 x 30 mA (9 V akku esetén)
Maximális bemérési kapacitás:
AAA: 900 mAh
AA: 2500 mAh
C: 4000 mAh
D: 4500 mAh
9 V-Block: 200 mAh
Biztonsági utasítások
A készülék leírása
LED-ek (üzemi állapot kijelző)
q
töltőrekesz a 9 V-os blokkhoz
w
( 5-ös és 6-os töltőrekesz; Lásd a kihajtható oldalt.)
AAA/AA/C/D típusú elemekhez való töltőrekesz
e
(1–4-es töltőrekesz; Lásd a kihajtható oldalt.)
Műszaki adatok
Bemeneti feszültség: 100–240 V~60/50Hz
Áramfelvétel: 150 mA
Védelmi osztály: II /
Üzemelési hőmérséklet: 0°C - 25°C
Tárolási hőmérséklet: -20°C - 50°C
Kimeneti teljesítmény: max. 3,34 VA
Tűzveszély!
Ne helyezze az elemtöltőt:
• olyan helyre, mely közvetlen napsugárzásnak
van kitéve. Máskülönben az elemtöltő túlhevülhet és helyrehozhatatlan kár keletkezhet benne.
• hőforrás közvetlen közelébe. Ilyennek számít
pl. a kályha, hőlégfúvó és hasonló készülékek,
valamint más elektromos készülékek szellőzőnyílásai. Máskülönben az elemtöltőben helyrehozhatatlan kár keletkezhet.
• nedves környezetbe vagy víz közelébe. Máskülönben nedvesség juthat be az elemtöltőbe.
Elektromos áramütés vagy tűz veszélye áll fenn!
• Kizárólag újratölthető „Ni-Cd“ és „Ni-MH“ típusú elemet töltsön. Soha ne töltsön más típusú elemet vagy nem újratölthető elemet. Ezek nem alkalmasak az újratöltésre. A nem tölthető elemek
túlhevülhetnek és felrobbanhatnak. Az elemtöltő
és a behelyezett elemek helyrehozhatatlanul
megsérülhetnek. Balesetveszélyes!
- 18 -
Page 21

Áramütés veszélye!
Ne helyezze az elemtöltőt:
• víz közvetlen közelébe, pl. fürdőkád vagy úszómedence mellé. Ha víz jut az elemtöltőbe, akkor
a készülék helyrehozhatatlanul megsérülhet.
• Mielőtt tisztítaná az elemtöltőt, húzza ki a vezetékét a konnektorból. Ily módon elkerülheti az
elektromos áramütés veszélyét. Ha elővigyázatossága ellenére mégis víz/nedvesség kerülne
az elemtöltőbe, húzza ki a csatlakozót a konnektorból.
A készülék csak beltéri használatra alkalmas.
Sérülésveszély!
• Az elemeket mindig gyermekektől jól elzárt helyen tartsa! Fennállhat annak a veszélye, hogy a
gyerekek lenyelik az elemet! Az elem mérgező
összetétele miatt életveszély áll fenn!
• Az elem töltése közben soha ne hagyja az
elemtöltőt felügyelet nélkül.
• Az elemek töltés közben felforrósodhatnak.
Soha ne érintse meg a forró elemeket! Máskülönben fennáll a veszélye, hogy megégeti magát! Töltés után ezért először húzza ki a konnektorból az elemtöltő vezetékét. Végezetül hagyja
lehűlni az elemeket, mielőtt kivenné őket az
elemtöltőből.
• Ha a vezeték megsérült, a veszélyek elkerülése
érdekében azonnal cseréltesse ki szervizpartnerünkkel.
• Az elemtöltő nem tartalmaz olyan alkatrészeket,
amelyeket a felhasználónak karban kellene tartania. Amennyiben kinyitja az elemtöltő burkolatát, úgy megszűnik a garancia! Meghibásodás
esetén forduljon a közelében található szervizhez.
• A burkolat felnyitásából, nem szakember által
végrehajtott javítási kísérletből, vagy az elemtöltő nem rendeltetésszerű használatából eredő károkért nem vállalunk felelősséget!
• Különösképp régi elemeknél fordulhat elő, hogy
kifolyik az elemsav. Ezért vegyen ki minden elemet, ha hosszabb ideig nem használja az elemtöltőt. Így védheti az elemtöltőt a kifolyó elemsav
okozta károktól.
• Ne engedje, hogy a készüléket olyan személyek
(ideértve a gyermekeket is) használják, akiket testi, érzékszervi vagy lelki képességeik vagy tapasztalatuk és ismeretük hiánya megakadályoznának abban, hogy biztonságosan használják a
készüléket, ha felügyelet nélkül vannak, vagy ha
előtte nem világítosották fel őket a készülék
használatáról.
• Világosítsa fel a gyermekeket a készülékről és
annak veszélyeiről, hogy ne játsszanak vele.
Az újratölthető elemek kezelése
• Ne használjon sérült (rozsdás) elemet.
• Ha kifolyna az elemsav, vigyázzon, hogy ne
érjen hozzá a bőréhez. A kifolyt sav irritálhatja
a bőrt.
• Ha kifolyna valamelyik elem az elemtöltőben,
száraz ronggyal tisztítsa meg. Viseljen közben
kesztyűt!
- 19 -
Page 22

Üzembe vétel
• Üzembehelyezés előtt ellenőrizze, hogy a csomag tartalma hiánytalan-e és hogy nincsenek-e
esetleg látható sérülések rajta.
• Helyezze az elemtöltőt sima, egyenes, karcolásálló és csúszásmentes felületre.
Tudnivalók:
A készülék csúszásmentes gumilábakkal van felszerelve. Mivel a bútorok felülete a lehető legkülönbözőbb anyagból készülhet, és különböző ápolószerrel kezeljük őket, nem zárható ki teljesen, hogy
ezen anyagok olyan összetevőket tartalmazhatnak,
amelyek roncsolják a gumitalpat és felpuhítják.
Szükség esetén helyezzen csúszásmentes alátétet a
készülék talpa alá.
• Hasonlítsa össze a műszaki adatokat az áramhálózat üzemeltetőjének műszaki adataival. Ha
az adatok megegyeznek, csatlakoztassa a hálózati kábelt egy dugaszoló aljzathoz. A LED-ek
egyszer pirosan és zölden világítanak. Az elemtöltőt ezzel üzemkész.
Az akkumulátorok töltése
Megjegyzés:
Ügyeljen rá, hogy az elemeket polaritásuknak megfelelően helyezze be a töltőmélyedés rekeszeibe.
Máskülönben az elemek nem töltődnek fel.
• Helyezze be az elemeket a töltőrekeszbe.
• Nyomja bele a 9 V-os elemeket a töltőrekeszbe,
amíg azok hallhatóan bepattannak a helyükre.
Igénytől függően 1–6 akkut lehet vele tölteni:
• 4 db „C” vagy „D” típusút az 1-4. töltőhéjban,
vagy
• 4 db „AA” vagy „AAA” típusút az 1-4. töltőhéjban, plusz 2 db 9 V akkut az 5-6. töltőhéjban.
• Megkezdődik a töltés. Az elemtöltő mindegyik
töltőhéjhoz külön LED-del rendelkezik. Az adott
töltőhéjak LED-je jelzik ki az egyes akkuk töltési
szintjét.
• Az elemtöltő az első 5 másodpercben kapacitásvizsgáló gyorstesztet hajt végre:
- A töltőhéj LED-je zölden világít:
90% feletti kapacitás.
- A töltőhéj LED-je zölden villog:
80% - 90% közötti kapacitás
- A töltőhéj LED-je pirosan világít:
A kapacitás 70% - 80% közötti.
- A töltőhéj LED-je pirosan villog:
A kapacitás 70% alatti.
Veszély!
Kizárólag újratölthető „Ni-Cd“ és „Ni-MH“ típusú
elemet töltsön. Soha ne töltsön más típusú elemet
vagy nem újratölthető elemet. Ezek nem alkalmasak
az újratöltésre. Máskülönben helyrehozhatatlanul
megsérülhetnek az elemtöltő és a behelyezett elemek. Tűz- vagy robbanásveszély állhat fenn!
Megjegyzés:
Ha a töltőhéj LED-e 5 másodpercnél hosszabb ideig
pirosan világít, az akku nincs megfelelően behelyezve vagy el van romolva.
Ha megállapította az akku kapacitását, megkezdődik a töltés.
- 20 -
Page 23

A különböző kijelzések az alábbi jelentéssel bírnak:
- A LED másodperces ütemben pirosan és zölden
világít (nem 9V-blokk akkukhoz):
Az akkuk felváltva töltenek és kisülnek. (frissítő
funkció: a régebbi vagy hosszabb időre félretett
akkukat újra frissíti)
Azonban vegye figyelembe, hogy a kiszámított idő
csak irányérték.
töltési idő (percben) =
az elem k
a készülék töltőárama (mA)
apacitása (mAh) x 1,5 x 60
- A LED 1/2 másodperces ütemben pirosan és
zölden villog (nem vonatkozik a 9V-os elemekre):
Ha az akkukat hosszabb tárolás vagy élettartamuk miatt nem kell felfrissíteni, (Refresh funkció),
az alábbi folyamat zajlik le: az akkuk kisülnek,
hogy csökkentsék a Memory hatást.
- A LED folyamatosan pirosan világít:
Az akkuk maximális töltőárammal töltődnek. .
- A LED folyamatosan zölden világít:
Az akkuk teljesen fel vannak töltődve és az
elemtöltő fenntartó töltésre kapcsol át.
Figyelmeztetés!
Az elemek töltés közben felforrósodhatnak. Soha
ne érintse meg a forró elemeket! Megégetheti magát!
• Húzza ki a konnektorból az elemtöltő vezetékét
és hagyja lehűlni az elemeket.
Ezután ki lehet venni az elemtöltőből az újratöltött
elemeket.
Az átlagos töltési idő kiszámítása
Az akku típusától, életkorától és fennmaradó töltési
szintjétől függően a töltés különböző ideig tart. Az
átlagos töltési időt az alábbi képlet segítségével lehet kiszámolni.
Automatikus töltésellenőrzés/
fenntartó töltés
Az elemtöltő külön szabályozza az Ni-Cd és a NiMH újratölthető elemek töltési idejét. Ez a vezérlés
a –Δ U („mínusz Delta U“) eljáráson alapszik.
Delta Δ-vel jelöljük a matematikában a
különbözeteket.
A „Minus Delta U“ ebben az esetben negatív
feszültségkülönbözetet jelent.
Ez a töltésfelismerés az alábbi hatást használja fel:
Ha az elem konstans árammal töltődik, feszültsége
folyamatosan nő. Ha az elem tele van, feszültsége
eljut egy maximum értékre, de a további áramátadás esetén újra csökken. A töltési elektronika felismeri ezt az enyhe feszültségcsökkenést és a töltés
befejeződik. Az elemtöltő automatikusan „fenntartó
töltésre“ kapcsol át. Ez azt jelenti, hogy a készülék
az elemeket nem tartós árammal, hanem rövid áramimpulzusokkal tölti. Ezáltal a kisülés ellen hat és
az akkukat teljes töltési állapotban tartja.
Időzítő vezérlés
A elemtöltő ezenkívül még időzítő funkcióval is rendelkezik, mely 15 óra után magától fenntartó töltésre
vált át. Ez plusz védelmet biztosít a túltöltés ellen,
amennyiben a töltés befejezésének felismerése esetlegesen hibás akku miatt nem reagál.
- 21 -
Page 24

Működési zavarok elhárítása
Az elemtöltő nem működik
• Ellenőrizze, hogy a vezeték megfelelően van-e
bedugva a konnektorba.
• Ellenőrizze, hogy a konnektorban van-e áram.
Erre a célra csatlakoztasson ehhez a konnektorhoz egy másik működőképes elektromos
készüléket.
A behelyezett elemek nem töltődnek fel.
• Ellenőrizze, hogy az elemek polaritásuknak
megfelelően vannak-e behelyezve.
• Ellenőrizze, hogy az elemtöltőbe töltésre alkalmas elemeket helyezett-e be.Töltésre kizárólag
újratölthető AAA/AA/C/D típusú és 9 V-os NiCd és Ni-MH blokkelem alkalmas.
• Húzza ki a konnektorból a hálózati csatlakozót
és hagyja lehűlni a készüléket, mivel előfordulhat,
hogy bekapcsolt a hőmérséklet-ellenőrzés.
A hőmérsékletellenőrzés arról gondoskodik,
hogy a töltési folyamat azon nyomban megszakadjon, ha az elem túl magas hőmérsékletet ér el.
Egyéb működési zavarok
Forduljon az Önhöz közel eső szervizpartnereink
egyikéhez, amennyiben:
• a működési zavarok nem háríthatók el a fent
ködési leírtaknak megfelelően
• vagy ha az elemtöltő üzemeltetése közben más
működési zavarok lépnének fel.
Tisztítás
Veszély!
Tisztítás előtt mindig húzza ki a csatlakozót! Elektromos áramütés veszélye áll fenn! Ügyeljen arra, hogy
tisztításkor ne kerüljön nedvesség a készülékbe!
Figyelem!
Ne használjon erős, vagy súroló tisztítószert, mert
ez megtámadhatja a készülék felületét.
Az elemtöltő burkolatát csak száraz ronggyal tisztítsa. Makacs szennyeződés esetén enyhén nedves
rongyot használjon.
Semmiképpen ne tisztítsa nedvesen a töltőhéjak belsejét. Tisztításhoz ehelyett használjon tiszta és puha
ecsetet.
Ártalmatlanítás
Semmi esetre se dobja a készüléket a
háztartási hulladékba. Jelen termékre
a 2002/96/EC számú európai utasítás
rendelkezési vonatkoznak.
A készüléket engedélyeztetett hulladékgyűjtő
helyen vagy a helyi hulladékeltávolító üzemnél
tudja kidobni.
Vegye figyelembe az érvényben lévő idevonatkozó
előírásokat. Ha kérdése merülne fel, vegye fel a
kapcsolatot a hulladékfeldolgozó vállalattal.
Az elemek eltávolítása
Az elemeket nem szabad a háztartási hulladékba
dobni. Valamennyi fogyasztót törvény kötelezi arra,
hogy az elemeket/akkumulátorokat a helyi/kerületi
vagy a kereskedelemben található gyűjtőhelyen
adja le.
Ez a kötelezettség azt a célt szolgálja, hogy az
elhasznált elemek környezetbarát módon kerüljenek
kiselejtezésre.
Csak a kimerült elemeket/akkumulátorokat adja vissza.
A csomagolóanyagot juttassa környezetvédő ártalmatlanítóhelyre.
- 22 -
Page 25

Garancia és szerviz
Gyártja
A készülékre 3 év garanciát adunk a vásárlás dátumától számítva. A készüléket gondosan gyártottuk,
és szállítás előtt lelkiismeretesen ellenőriztük. Kérjük,
a vásárlás igazolására őrizze meg a pénztári blokkot.
Kérjük, garanciaigény esetén vegye fel a kapcsolatot telefonon az Ön közelében lévő szervizzel.
Csak ebben az esetben garantálhatjuk, hogy ingyen tudja beküldeni az árut.
A garancia csak anyag- és gyártási hibára vonatkozik, nem pedig szállítási kárra, kopásra vagy törékeny részek (pl. kapcsoló vagy elem) sérülésére. A termék kizárólag magánhasználatra, nem üzleti
használatra készült.
A garancia érvényét veszti visszaélésszerű vagy
szakavatatlan kezelés, erőszak alkalmazása vagy
olyan beavatkozások esetén, amelyeket nem engedélyeztetett szervizelő üzleteink hajtottak végre. Az
ön törvényes jogait ez a garancia nem korlátozza.
A garanciaidő nem hosszabbodik a jótállással. Ez
a kicserélt vagy javított alkatrészekre is érvényes.
Az esetlegesen már a megvételkor meglévő károkat
és hiányosságokat azonnal kicsomagolás után, legkésőbb két nappal a vétel dátumától számítva jelezni kell. A garanciális idő lejárta után esedékes javítások térítéskötelesek.
KOMPERNASS GMBH
BURGSTRASSE 21
44867 BOCHUM, GERMANY
www.kompernass.com
Szerviz Magyarország
Tel.: 0640 102785
E-Mail: kompernass@lidl.hu
IAN 68599
- 23 -
Page 26

- 24 -
Page 27

KAZALO VSEBINE STRAN
Namen uporabe 26
Obseg dobave 26
Opis naprave 26
Tehnični podatki 26
Varnostni napotki 26
Zagon 28
Polnjenje baterij 28
Izračun povprečnega časa polnjenja . . . . . . . . . . . . . . . . . . . . . . . . . . . . . . . . . . . . . . . . . . .29
Avtomatična kontrola polnjenja/ohranitev polnjenja . . . . . . . . . . . . . . . . . . . . . . . . . . . . . . .29
Upravljanje s časovnikom . . . . . . . . . . . . . . . . . . . . . . . . . . . . . . . . . . . . . . . . . . . . . . . . . . .29
Odprava motenj v delovanju 30
Čiščenje 30
Odstranitev 30
Garancija in servis 31
Proizvajalec 31
Pred prvo uporabo ta navodila skrbno preberite in jih shranite za poznejšo uporabo. Ob predaji naprave
tretji osebi zraven priložite tudi navodila za uporabo.
- 25 -
Page 28

UNIVERZALNI
POLNILEC BATERIJ
Namen uporabe
Polnilec za baterije je namenjen izključno:
• za polnjenje Ni-Cd- in Ni-MH-akumulatorjev velikosti AAA/AA/C/D in 9-V akumulatorjev v bloku,
primernih za polnjenje, s trgovsko običajnimi
nazivnimi kapacitetami.
• za polnjenje akumulatorjev za hitro polnjenje in
normalno polnjenje.
• za privatno, nekomercialno uporabo.
Izhodne napetosti:
(polnilni jaški 1–4) 4 x 1,4 V
(polnilni jaški 5–6) 2 x 9 V
Tokovi za polnjenje:
1000 mA (pri 1–2 akum.)
500 mA (pri 3–4 akum.)
2 x 30 mA (pri 9-V akum.)
Maksimalne nazivne kapacitete:
AAA: 900 mAh
AA: 2500 mAh
C: 4000 mAh
D: 4500 mAh
9V blok: 200 mAh
Obseg dobave
• Polnilnik za baterije
• Navodila za uporabo
Opis naprave
q LED lučke (prikaz stanja delovanja)
w Polnilna okenca za 9 V blok
(polnilnI okenci 5 in 6; glejte razklopno stran)
e Polnilna okenca za AAA/AA/C/D
(polnilna okenca 1 do 4; glejte razklopno stran)
Tehnični podatki
Vhodna napetost: 100–240 V
60/50 Hz
Vhodna moč: 150 mA
Razred zaščite: II /
Obratovalna temperatura: 0 °C – 25 °C
Temperatura shranjevanja: –20 °C – 50 °C
Izhodna moč: maks. 3,34 VA
~
Varnostni napotki
Nevarnost požara!
Polnilca za baterije ne postavljajte:
• na kraje, ki so izpostavljeni direktnemu sončnemu
sevanju. Drugače se lahko polnilec za baterije
pregreje in nepopravljivo poškoduje.
• v neposredno bližino virov toplote. K temu
štejejo npr. peči, kaloriferji in podobne naprave
ter prezračevalne odprtine drugih električnih naprav. Drugače se polnilec za baterije lahko nepopravljivo poškoduje.
• na vlažna območja ali v bližino vode. Drugače
lahko v polnilec za baterije vdre vlaga. Obstaja
nevarnost električnega udara in požara!
• Polnite izključno baterije z možnostjo polnjenja
tipa „Ni-Cd“ in „Ni-MH“. Nikoli ne polnite baterij drugega tipa ali baterij, ki se jih ne da polniti. Te niso namenjene polnjenju. Baterije, ki niso
namenjene polnjenju, se lahko segrejejo in eksplodirajo. Polnilec za baterije in vložene baterije se lahko nepopravljivo poškodujejo. Obstaja
nevarnost poškodb!
- 26 -
Page 29

Nevarnost zaradi električnega
udara!
Polnilca za baterije ne postavljajte:
• v neposredno bližino vode, npr. ob kopalne kadi
ali plavalne bazene. Če v polnilec za baterije
teče voda, se naprava lahko nepopravljivo poškoduje.
• Pred čiščenjem polnilca za baterije omrežni vtič
potegnite iz vtičnice. Tako se izognete električnemu udaru. Če bi kljub vsej previdnosti v polnilec
za baterije vdrla voda/vlaga, takoj potegnite
omrežni vtič iz vtičnice.
Naprava je primerna le za uporabo
v notranjih prostorih.
Nevarnost poškodbe!
• Baterije zmeraj hranite izven dosega otrok!
Obstaja nevarnost, da bi otroci baterije lahko
pojedli! Zaradi strupenih sestavin baterij obstaja
smrtna nevarnost!
• Polnilca za baterije med polnjenjem baterij nikoli
ne pustite nenadzorovanega.
• Baterije se pri polnjenju lahko segrejejo. Nikoli
se ne dotikajte vročih baterij! Drugače obstaja
nevarnost opeklin! Po polnjenju zaradi tega
najprej potegnite omrežni kabel polnilca za baterije iz vtičnice. Baterije potem pustite, da se ohladijo, preden jih vzamete iz polnilca za baterije.
• Če je omrežni kabel pokvarjen, ga dajte
zamenjati pri našem partnerskem servisu, da
se izognete nevarnostim.
• Polnilec za baterije ne vsebuje delov, ki bi jih
uporabnik lahko vzdrževal. Če pride do odprtja
ohišja polnilca za baterije, garancija preneha! V
primeru popravila se obrnite na enega od naših
partnerskih servisov v svoji bližini.
• Za poškodbe zaradi odpiranja ohišja, poskusov
popravil s strani nekvalificiranega osebja ali
zaradi nepredvidene uporabe polnilca za baterije ne prevzamemo odgovornosti/jamstva!
• Še posebej pri starih baterijah lahko pride do
iztekanja kisline. Baterije torej vzemite ven, če
polnilca za baterije dlje časa ne uporabljate.
Tako zaščitite polnilec pred poškodbami zaradi
iztekanja baterijske kisline.
• Naprave naj ne uporabljajo osebe (vključno z
otroci), čigar fizične, zaznavne ali mentalne sposobnosti ali pomanjkanje izkušenj in znanja ne
omogočajo varne uporabe naprave, če jih niste
prej o njej poučili ali jim uporabo pokazali.
• Otroke poučite o napravi in njenih nevarnostih,
da se z njo ne bodo igrali.
Rokovanje z baterijami za polnjenje
• Ne uporabljajte poškodovanih (korodiranih)
baterij.
• Če bi baterije iztekle, se izognite stiku s kožo.
Ta privede do iritacij kože.
• Če je baterija iztekla v polnilcu za baterije, tega
očistite s suho krpo. Nosite rokavice!
- 27 -
Page 30

Zagon
• Pred zagonom preverite popolnost obsega dobave ter morebitne vidne poškodbe.
• Polnilec za baterije postavite na ravni, gladki podlagi, ki je zaščitena pred praskami in nedrseča.
Napotek:
Ta naprava je opremljena z nedrsečimi gumijastimi
podstavki. Ker so površine pohištva iz različnih materialov in se obdelujejo z različnimi sredstvi za
nego, ni mogoče v celoti izključiti, da katere od teh
snovi ne vsebuje sestavin, ki bi nagrizle in zmehčale
gumijaste podstavke. Po potrebi pod podstavke naprave položite nedrsečo podlago.
• Primerjajte tehnične podatke s podatki vašega
električnega omrežja. Če se podatki ujemajo,
omrežni kabel priključite na vtičnico. LED-lučke
enkrat zasvetijo v rdeči in zeleni barvi. Polnilnik
akumulatorjev je sedaj pripravljen za obratovanje.
Polnjenje baterij
Nevarnost!
Polnite izključno baterije na polnjenje tipa
„Ni-Cd“ in „Ni-MH“. Nikoli ne polnite baterij drugega tipa ali baterij, ki se jih ne da polniti. Te niso namenjene polnjenju. Drugače se lahko polnilec za
baterije in vložene baterije/akumulatorji nepopravljivo poškodujejo. Obstaja nevarnost požara ter eksplozije!
Napotek:
Pazite, da baterije v predalčke polnilnih okenc
vstavite ustrezno njihovi polarnosti. Drugače se baterije ne bodo polnile.
• Baterije vstavite v polnilna okenca.
• Baterije tipa 9 V blok potisnite v polnilna
okenca, dokler se slišno ne zaskočijo.
Napolnite lahko od 1 do 6 akumulatorjev:
• 4 x tip C ali tip D v polnilnih jaških 1 do 4,
ali
• 4 x tip AA ali AAA v polnilnih jaških 1 do 4,
z dodatno 2 x tip 9-V akumulatorji v polnilnih
jaških 5 in 6.
• Postopek polnjenja se sedaj začne. Polnilnik akumulatorjev ima po eno LED-lučko za vsak predal
v polnilnem jašku. LED-lučke prikazujejo stanje
polnjenja posameznih akumulatorjev v polnilnih
jaških.
• V prvih 5 sekundah polnilnik akumulatorjev izvede hitri test kapacitete:
- LED-lučka polnilnega jaška sveti zeleno:
kapaciteta nad 90 %.
- LED-lučka polnilnega jaška utripa zeleno:
kapaciteta med 80 % - 90 %.
- LED-luãka polnilnega ja‰ka sveti rdeãe:
kapaciteta med 70–80 %.
- LED-luãka polnilnega ja‰ka utripa rdeãe:
kapaciteta pod 70 %.
Napotek:
Če LED-lučka polnilnega jaška utripa rdeče dlje kot
5 sekund, akumulator ni pravilno vstavljen v polnilni
jašek ali pa je okvarjen.
Ko naprava ugotovi kapaciteto akumulatorjev, se
začne postopek polnjenja.
- 28 -
Page 31

Različni prikazi imajo naslednji pomen:
- LED-lučka v sekundnem taktu utripa rdeče in
zeleno (ni za 9V akumulatorje v bloku):
akumulatorji se izmeniãno praznijo in polnijo.
(funkcija Refresh: starejši ali dolgo časa hranjeni
akumulatorji se ponovno napolnijo do konca.)
Pri tem upoštevajte, da gre pri izračunanih časih le
za orientacijske vrednosti.
Čas polnjenja (min.) =
K
Tok polnjenja naprave (mA)
ta baterije (mAh) x 1,5 x 60
apacite
- LED-lučka v 1/2-sekundnem taktu utripa rdeče in
zeleno (ne pri 9V akum. v bloku):
če akumulatorjev ni treba osvežiti (s funkcijo Refresh), zaradi dolgotrajnega hranjenja ali starosti, poteka naslednji postopek: akumulatorji se
spraznijo, da se zmanjša učinek spomina.
- LED-lučka neprekinjeno sveti rdeče:
akumulatorji se polnijo z maksimalnim napajalnim tokom.
- LED-lučka neprekinjeno sveti zeleno:
Akumulatorji so v celoti napolnjeni in polnilnik akumulatorjev se preklopi na ohranjanje polnjenja.
Opozorilo!
Baterije se pri polnjenju lahko segrejejo. Nikoli se ne
dotikajte vročih baterij! Obstaja nevarnost opeklin!
• Omrežni kabel polnilca za baterije potegnite iz
vtičnice in počakajte, da se baterije ohladijo.
Napolnjene baterije potem lahko vzamete iz polnilca za baterije.
Izračun povprečnega časa polnjenja
Postopek polnjenja je odvisen od tipa, starosti in
stanja preostale polnosti akumulatorjev in lahko traja različno dolgo. Povprečni čas polnjenja lahko izračunate s pomočjo naslednje formule.
Avtomatična kontrola polnjenja/
ohranitev polnjenja
Ta polnilec za baterije ločeno upravlja čas polnjenja
baterij tipa Ni-Cd in Ni-MH. To upravljanje ima za
osnovo postopek –Δ U („minus delta U“).
Z znakom delta Δ v matematiki označujemo
diference.
„Minus delta U“ v tem primeru pomeni negativno
napetostno diferenco.
To prepoznavanje končanja polnjenja je možno
zaradi sledečega učinka:
Ko baterijo polnimo s konstantnim tokom, njena
napetost čedalje bolj narašča. Ko je baterija polna,
napetost doseže svoj vrhunec in ob nadaljevanju
dovajanja toka ponovno rahlo upade. Ta rahel
upad napetosti polnilna elektronika prepozna in
polnjenje se zaključi. Polnilec za baterije se
avtomatično preklopi v „ohranitev polnjenja“. To
pomeni, da se akumulatorji ne polnijo več s trajnim
tokom, temveč s kratkimi tokovnimi impulzi. Tako se
preprečuje samoizpraznitev in akumulatorji se ohranjajo v stanju celotne napolnjenosti.
Upravljanje s časovnikom
Polnilnik ima tudi upravljanje s časovnikom, ki čez
15 ur samodejno preklopi v ohranjanje polnjenja.
To služi kot dodatna zaščita pred prenapolnitvijo,
če prepoznavanje konca polnjenja zaradi morebitnih okvarjenih akumulatorjev ne deluje.
- 29 -
Page 32

Odprava motenj v delovanju
Čiščenje
Polnilec za baterije ne kaže znakov delovanja
• Preverite, ali je omrežni kabel pravilno vtaknjen
v vtičnico.
• Preverite, ali ima vtičnica tok. V ta namen na to
vtičnico priključite drugo napravo, ki deluje.
Vstavljene baterije se ne polnijo
• Preverite, ali so baterije vstavljene ustrezno
njihovi polarnosti.
• Preverite, ali ste v polnilec vstavili baterije, ki so
primerne za polnjenje. Za polnjenje so priemrne
izključno baterije Ni-Cd in
Ni-MH tipa AAA/AA/C/D in 9 V blok.
• Omrežni kabel potegnite iz vtičnice in počakajte,
da se naprava ohladi, ker je bil morebiti sprožen
nadzor temperature. Nadzor temperature poskrbi zato, da se postopek polnjenja prekine, kakor
hitro kateri od akumulatorjev doseže previsoko
temperaturo.
Druge motnje v delovanju
Obrnite se na enega od naših partnerskih servisov v
svoji bližini, če
• se motenj v delovanju ne da odpraviti, kot je
opisano, ali
• pri obratovanju polnilca za baterije pride do
drugih motenj pri delovanju.
Nevarnost!
Pred vsakim čiščenjem omrežni vtič potegnite iz vtičnice. Obstaja nevarnost električnega udara! Pazite,
da pri čiščenju v napravo ne vdre vlaga!
Pozor!
Ne uporabljajte agresivnih ali grobih čistil, ki bi lahko poškodovala površino naprave.
Ohišje polnilnika akumulatorjev čistite izključno s
suho krpo. Pri trdovratni umazaniji uporabite rahlo
navlaženo krpo.
Notranjost polnilnih jaškov ne čistite s pomočjo vlage.
Za čiščenje namesto tega uporabljajte čist, mehak
čopič.
Odstranitev
Naprave v nobenem primeru ne
odvrzite v običajne hišne smeti.
Ta proizvod je podvržen evropski
Direktivi 2002/96/EC.
Napravo oddajte pri podjetju, registriranem za
predelavo odpadkov, ali pri svojem komunalnem
podjetju za predelavo odpadkov.
Upoštevajte trenutno veljavne predpise. V primeru
dvoma se obrnite na svoje podjetje za predelavo
odpadkov.
Odstranitev baterij!
Baterije se ne smejo odstranjevati skupaj z gospodinjskimi odpadki. Vsak potrošnik je po zakonu
dolžan baterije/akumulatorje oddati na zbiralnem
mestu svoje občine/svoje četrti ali v trgovini.
Ta obveznost prispeva k ekološkemu odstranjevanju
baterij. Baterije/akumulatorje oddajajte le v
izpraznjenem stanju.
Embalažo oddajte za okolju primerno
odstranitev.
- 30 -
Page 33

Garancija in servis
1. S tem garancijskim listom jamčimo Kompernass
GmbH, da bo izdelek v garancijskem roku ob
normalni in pravilni uporabi brezhibno deloval in
se zavezujemo, da bomo ob izpolnjenih spodaj
navedenih pogojih odpravili morebitne pomanjkljivosti in okvare zaradi napak v materialu ali izdelavi oz. po svoji presoji izdelek zamenjali ali
vrnili kupnino.
2. Garancijski rok za proizvod je 3 leta od dneva
nabave.
3. Kupec je dolžan okvaro javiti pooblaščenemu ser-
visu oz. se informirati o nadaljnih postopkih na
zgoraj navedeni telefonski številki. Svetujemo vam,
da pred tem natančno preberete navodila o sestavi in uporabi izdelka.
4. Kupec je dolžan pooblaščenemu servisu predlož-
iti garancijski list in račun, kot potrdilo in dokazilo
o nakupu.
5. V primeru, da proizvod popravlja nepooblaščeni
servis ali oseba, kupec ne more uveljavljati zahtevkov iz te garancije.
6. Vzroki za okvaro oz. nedelovanje izdelka morajo
biti lastnosti stvari same, in ne vzroki, ki so zunaj
proizvajalčeve oz. prodajalčeve sfere. Kupec ne
more uveljavljati zahtevkov iz te garancije, če se
ni držal priloženih navodil za sestavo in uporabo
izdelka ali, če je izdelek kakorkoli spremenjen ali
nepravilno vzdrževan.
7. Jamčimo servisiranje in rezervne dele za dobo, ki
je minimalno zahtevana s strani zakonodaje.
8. Obrabni deli oz. potrošni material so izvzeti iz
garancije.
9. Vsi potrebni podatki za uveljaljanje garancije
se nahajajo na dveh ločenih dokumentih
(garancijski list, račun).
Proizvajalec
KOMPERNASS GMBH
BURGSTRASSE 21
44867 BOCHUM, GERMANY
www.kompernass.com
Prodajalec:
Lidl d.o.o.k.d., Žeje pri Komendi 100,
SI-1218 Komenda
Servis Slovenija
Tel.: 080080917
E-Mail: kompernass@lidl.si
IAN 68599
- 31 -
Page 34

- 32 -
Page 35

OBSAH STRANA
Účel použití 34
Obsah dodávky 34
Popis přístroje 34
Technické údaje 34
Bezpečnost 34
Uvedení do provozu 36
Nabíjení akumulátorů 36
Výpočet průměrné doby nabíjení . . . . . . . . . . . . . . . . . . . . . . . . . . . . . . . . . . . . . . . . . . . . . .37
Automatická kontrola nabíjení/udržovací nabíjení . . . . . . . . . . . . . . . . . . . . . . . . . . . . . . . .37
Řízení časovačem . . . . . . . . . . . . . . . . . . . . . . . . . . . . . . . . . . . . . . . . . . . . . . . . . . . . . . . . . .37
Odstraňování poruch 38
Čištění 38
Likvidace 38
Záruka & servis 39
Dovozce 39
Před prvním použitím si pozorně přečtěte návod k obsluze a uschovejte jej pro pozdější potřebu. Při předávání
zařízení třetím osobám předejte i tento návod.
- 33 -
Page 36

UNIVERZÁLNÍ
NABÍJEČKA BATERIÍ
Účel použití
Nabíječka je určená výhradně k těmto účelům:
• k nabíjení dobíjecích baterií Ni-Cd a Ni-MH velikosti AAA/AA/C/D a 9 V baterií s obvyklými
jmenovitými kapacitami.
• pro nabíjení rychlonabíjecích i běžných
nabíjecích akumulátorů.
• k soukromému, nikoliv obchodnímu využití.
Obsah dodávky
• Nabíječka baterií
• Návod k obsluze
Popis přístroje
diody LED (Ukazatel provozního stavu)
q
nabíjecí prohlubně na 9 V blok
w
(nabíjecí prohlubně 5 a 6; viz rozložitelnou stránku)
nabíjecí prohlubně na typ AAA/AA/C/D
e
(nabíjecí prohlubně 1 a 4; viz rozložitelnou stránku)
Technické údaje
Vstupní napětí: 100–240 V ~60/50 Hz
Spotřeba: 150 mA
Třída ochrany: II /
Provozní teplota: 0°C - 25°C
Teplota uskladnění: -20°C - 50°C
Výstupní výkon: max. 3,34 VA
Výstupní napětí:
4 x 1,4 V
(nabíjecí pole pro vložení baterie 1-4)
2 x 9 V
(nabíjecí pole pro vložení baterie 5-6)
Nabíjecí proudy:
1000 mA (při 1-2 bateriích)
500 mA (při 3-4 bateriích)
2 x 30 mA (při 9V bateriích)
Maximální domezovací kapacity:
AAA: 900 mAh
AA: 2500 mAh
C: 4000 mAh
D: 4500 mAh
9 V blok: 200 mAh
Bezpečnost
Nebezpečí popálení!
Nabíječku nestavte:
• na místa, která jsou vystavena přímému slunečnímu
svitu. V opačném případě se může nabíječka
akumulátorů přehřát a nenávratně poškodit.
• do bezprostřední blízkosti zdrojů tepla. Mezi ně
patří např. kamna, topné ventilátory a podobné
přístroje, ale také větrací otvory jiných elektrikkých přístrojů. V opačném případě se může
nabíječka nenávratně poškodit.
• do vlhkého prostředí nebo do blízkosti vody.
Jinak může do nabíječky proniknout vlhkost. Hrozí nebezpečí úrazu elektrickým proudem a nebezpečí požáru!
• Nabíjejte pouze akumulátory, které jsou určeny
k opakovanému nabíjení, typu „Ni-Cd“ a
„Ni-MH“. Nikdy nenabíjejte akumulátory jiného
typu nebo akumulátory, které nejsou určeny pro
nabíjení. Nejsou vhodné ani do této
rychlonabíječky.
Akumulátory, které nejsou určeny k opakovanému
nabíjení, se mohou přehřát a explodovat.
V opačném případě se nabíječka akumulátorů a
vložené akumulátory mohou nenávratně poškodit. Hrozí nebezpečí poranění!
- 34 -
Page 37

Nebezpečí úrazu elektrickým
proudem!
Nabíječku nestavte:
• do bezprostřední blízkosti vody, např. van nebo
bazénů. Pokud do nabíječky akumulátorů nateče
voda, může se přístroj nenávratně poškodit.
• Před čištěním nabíječky akumulátorů vytáhněte síťový kabel ze zásuvky. Tak se vyhnete zásahu
elektrickým proudem. Pokud by navzdory vší
opatrnosti voda/vlhkost pronikla do nabíječky
akumulátorů/síťového adaptéru, okam-žitě vytáhněte síťovou zástrčku ze zásuvky.
Přístroj je vhodný pouze pro použití ve
vnitřních prostorách.
Nebezpečí poranění!
• Akumulátory vždy uchovávejte mimo dosah dětí!
Hrozí nebezpečí, že děti akumulátory spolknou!
Vzhledem k tomu, že akumulátory obsahují
jedovaté látky, hrozí nebezpečí ohrožení života!
• Nabíječku akumulátorů během nabíjení akumulátorů nikdy neponechávejte bez dozoru.
• Akumulátory se během nabíjení mohou zahřívat.
Nikdy se nedotýkejte horkých akumulátorů!
V opačném případě hrozí nebezpečí popálenin!
Proto po ukončení nabíjení nejprve vytáhněte
síťový kabel nabíječky akumulátorů ze zásuvky.
Následně nechte akumulátory vychladnout a
teprve poté je vyjměte z nabíječky akumulátorů.
• Pokud je síťový kabel poškozený, nechejte ho
hned vyměnit u servisního partnera, abyste
zamezili nebezpečí.
• Nabíječka neobsahuje součásti, na nichž by uživatel musel provádět údržbu. Otevřete-li kryt nabíječky, zanikne záruka! V případě opravy se
obraťte na naše nejbližší servisní partnery.
• Za škody vzniklé otevřením krytu, pokusy o opravu
nekvalifikovanými pracovníky nebo za škody
vzniklé použitím nabíječky k jinému než určenému účelu se nepřebírá žádné ručení/žádná záruka!
• Zejména u starých akumulátorů může dojít k
tomu, že z baterií vyteče kyselina. Proto vyjměte
všechny akumulátory, pokud nabíječku akumulátorů delší dobu nepoužíváte. Chráníte tak nabíječku akumulátorů před škodami způsobenými vyteklou kyselinou z baterií.
• Nikdy nenechte přístroj obsluhovat osoby (včetně
dětí), jejichž fyzické, senzorické nebo mentální
schopnosti či nedostatek zkušeností a znalostí
jim znemožňují bezpečné používání přístroje,
pokud předtím nebyly instruovány nebo nad
sebou nemají dohled.
• Vysvětlete dětem funkci přístroje a rizika práce
s ním, aby si s přístrojem nehrály.
Zacházení s nabíjecími bateriemi
• Nepoužívejte žádné poškozené (zkorodované)
akumulátory.
• Pokud akumulátory vytečou, zamezte kontaktu
s pokožkou. Kontakt s pokožkou vede k jejímu
podráždění.
• Pokud vyteče akumulátor v nabíječce, očistěte ji
suchým hadříkem. Použijte ochranné rukavice!
- 35 -
Page 38

Uvedení do provozu
• Před uvedením do provozu zkontrolujte, zda
je zboží kompletní a zda nevykazuje viditelná
poškození.
• Nabíječku akumulátorů umístěte na rovný, plochý podklad, který neklouže a je odolný proti
poškrábání.
Poznámka:
Dbejte na to, aby byly akumulátory vloženy do
nabíjecích přihrádek v souladu se svou polaritou.
V opačném případě se akumulátory nenabijí:
• Vložte akumulátory do nabíjecích přihrádek.
• Zatlačte akumulátory typu 9V blok do nabíjecích prohlubní, až slyšitelně zaklapnou.
Upozornění:
Tento přístroj je vybaven protiskluzovými gumovými
nožkami. Jelikož je povrch nábytku vyroben z různých materiálů a ošetřován nejrůznějšími prostředky, nelze zcela vyloučit, že některé z těchto látek
obsahují složky, které by mohly gumové nožky poškodit či narušit jejich strukturu. Proto případně pod
nožky přístroje vložte neklouzavou podložku.
• Technické parametry porovnejte s parametry
svého síťového rozvodu. Pokud souhlasí, připojte
síťový kabel do zásuvky. LED diody zasvítí jednou červeně a zeleně. Nabíječka baterií je nyní
připravena k provozu.
Nabíjení akumulátorů
Nebezpečí!
Nabíjejte pouze akumulátory, které jsou určené k
opakovanému nabíjení, typu „Ni-Cd“ a „Ni-MH“.
Nikdy nenabíjejte akumulátory jiného typu nebo
akumulátory, které nejsou určeny pro nabíjení.
Nejsou vhodné ani do této rychlonabíječky. V opačném případě se nabíječka akumulátorů a vložené
akumulátory mohou nenávratně poškodit. Hrozí nebezpečí požáru a výbuchu!
Samostatně lze nabíjet 1–6 ks baterií:
• 4 x typ C nebo typ D v nabíjecích polích pro
vložení baterie 1 až 4,
nebo
• 4 x typ AA nebo AAA v nabíjecích polích pro vložení baterie 1 až 4, a dodatečně 2 x 9 V baterie
v nabíjecích polích pro vložení baterie 5 a 6.
• Nyní začne probíhat proces nabíjení. Nabíječka
je vybavena pro každý oddíl vybavena kontrolní
LED diodou, umístěnou v nabíjecím poli. LED diody příslušných nabíjecích polí udávají stav nabití
jednotlivých baterií.
• V prvních 5 vteřinách provede nabíječka rychlý
test kapacity:
- svítí-li LED dioda u nabíjecího pole zeleně:
kapacita více než 90 %.
- bliká-li LED dioda u nabíjecího pole zeleně:
kapacita mezi 80 % - 90 %.
- LED v nabíjecím prostoru svítí ãervenû:
Kapacita je mezi 70 % - 80 %.
- LED v nabíjecím prostoru blikají ãervenû:
Kapacita je pod 70 %.
Poznámka:
Pokud blikají LED nabíjecího prostoru déle, než 5
sekund červeně, není akumulátor do nabíjecího
prostoru správně vsazen nebo je vadný.
Jakmile je zjištěna kapacita baterií, začne proces
nabíjení.
- 36 -
Page 39

Různé indikace mají následující význam:
- bliká-li LED dioda v sekundovém taktu červeně a
zeleně, (neplatí pro 9V akumulátorový blok):
Akumulátory se stfiídavû nabijí a vybijí. (Funkce
Refresh: Starší nebo dlouho skladované akumulátory jsou regenerovány.)
Vezměte však prosím v úvahu, že se u vypočítaných
dob jedná pouze o orientační hodnoty.
Doba nabíjení (min.) =
k
apacita ak
Nabíjecí proud spotřebiče (mA)
umulátoru (mAh) x 1,5 x 60
- bliká-li LED dioda v 1/2 sekundovém taktu
červeně a zeleně (neplatí pro 9V blokové
akumulátory):
Pokud je nutné, obnovit baterie ne z důvodu
dlouhého skladování nebo věku (funkce refresh),
proběhne následující proces: Akumulátory se
vybijí pro snížení memory efektu.
- svítí-li LED dioda nepřetržitě červeně:
Akumulátory se nabijí na maximální nabíjecí
proud.
- svítí-li LED dioda nepřetržitě zeleně, pak jsou
baterie úplně nabity a nabíječka přepne na
udržovací dobíjení.
Výstraha!
Akumulátory se během nabíjení mohou zahřívat.
Nikdy se nedotýkejte horkých akumulátorů! Hrozí
nebezpečí popálenin!
• Síťový kabel nabíječky akumulátorů vytáhněte
ze zásuvky a akumulátory nechte vychladnout.
Poté můžete nabité akumulátory vyjmout z nabíječky.
Výpočet průměrné doby nabíjení
Nabíjecí proces baterie je různě dlouhý, a to v
závislosti na typu, stáří a zbytkovém nabití baterie.
Průměrné doby nabíjení můžete vypočítat pomocí
níže uvedeného vzorce.
Automatická kontrola nabíjení/udržovací
nabíjení
Tato nabíječka řídí odděleně dobu nabíjení pro nabíjecí baterie typu Ni-Cd a Ni-MH. Toto řízení vychází
z metody –Δ U („minus Delta U“).
Pomocí delta Δ se v matematice označují rozdíly.
„Minus delta U“ znamená v tomto případě
negativní rozdíl napětí.
Tato detekce konce nabíjení využívá následujícího
efektu:
Pokud se akumulátor nabíjí konstantním proudem,
napětí stále roste. Když je akumulátor plný, dosáhne
jeho napětí však maxima a při dalším toku proudu
opět mírně opadne. Tento mírný pokles napětí
rozezná nabíjecí elektronika a nabíjení se ukončí.
Nabíječka se automaticky přepne do režimu „udržovací nabíjení“. To znamená, že akumulátory už
nejsou nabíjeny trvalým proudem, nýbrž krátkými
proudovými rázy. Tím je zabráněno samočinnému
vybíjení akumulátorů a akumulátory jsou udržovány
ve stavu úplného nabití.
Řízení časovačem
Nabíječka je dodatečně vybavena řízením pomocí
časovače, které po 15 hodinách automaticky přepne
do udržovacího dobíjení. Tato funkce slouží jako
dodatečná ochrana proti nadměrnému nabití v
případě, že identifikace ukončení nabíjení nereaguje
z důvodu eventuálně defektní baterie.
- 37 -
Page 40

Odstraňování poruch
Čištění
Nabíječka neukazuje žádnou funkci
• Zkontrolujte, zda je síťový kabel správně
zastrčen do zásuvky.
• Přezkoumejte, zda zásuvka vede proud. Pro
tento účel zapojte do této zásuvky jiný funkční
elektrický přístroj.
Vložené akumulátory se nenabíjejí
• Zkontrolujte, zda byly akumulátory vloženy
v souladu se svou polaritou.
• Zkontrolujte, zda byly do nabíječky akumulátorů
vloženy akumulátory určené k nabíjení. K nabíjení nabíjecích akumulátorů Ni-Cd a Ni-MH velikostí AAA/AA/C/D a 9 V blok.
• Vytáhněte síťovou zástrčku ze sítě a nechte přístroj vychladnout, protože je možné, že byla deaktivována funkce kontroly teploty. Kontrola teploty zajišťuje, že se nabíjení přeruší, pokud
akumulátor dosáhne příliš vysoké teploty.
Jiné poruchy
Obraťte na našeho nejbližšího servisního partnera,
pokud:
• se porucha funkce nedá odstranit zde popsaným
způsobem
• nebo pokud se při provozu nabíječky akumulátorů vyskytnou jiné poruchy funkcí.
Nebezpečí!
Síťovou zástrčku vytáhněte ze zásuvky před každým
čištěním. Hrozí nebezpečí úrazu elektrickým proudem! Dbejte na to, aby při čištění do přístroje nevnikla vlhkost!
Pozor!
Nepoužívejte silné nebo abrazivní čisticí prostředky,
protože by tyto mohly poškodit povrch.
Nabíječku čistěte výlučně suchým hadříkem. Pro těžko
odstranitelné znečištění použijte mírně navlhčený hadřík. Vnitřní prostor nabíjecích polí pro vkládání baterií nečistěte v žádném případě vlhkým hadříkem.
Použijte místo toho čistý a měkký štětec.
Likvidace
V žádném případě nevyhazujte přístroj
do běžného domovního odpadu. Tento
výrobek musí plnit ustanovení evropské
směrnice 2002/96/EC.
Zlikvidujte přístroj prostřednictvím firmy na likvidaci
s příslušným povolením nebo zařízení na likvidaci
komunálního odpadu.
Dodržujte aktuální platné předpisy. V případě
pochybností kontaktujte příslušnou firmu, která
se zabývá likvidací odpadu.
Likvidace baterií!
Baterie se nesmí v žádném případě házet do běžného domovního odpadu. Každý spotřebitel
má ze zákona povinnost odvezdat baterie/akumulátory v komunální sběrně ( v obci nebo v městské
části) nebo v prodejně.
To napomáhá tomu, aby mohlo dojít k ekologické
likvidaci abterií. Baterie/akumulátory odevzdávejte
vždy ve vybitém stavu.
Veškeré obalové materiály nechte zlikvidovat
v souladu s ekologickými předpisy.
- 38 -
Page 41

Záruka & servis
Dovozce
Na tento přístroj platí tříletá záruka od data zakoupení. Přístroj byl vyroben s nejvyšší pečlivostí a před
odesláním prošel výstupní kontrolou. Uschovejte si,
prosím, pokladní
lístek jako doklad o nákupu. V případě uplatňování
záruky kontaktujte telefonicky
Vaší servisní službu. Pouze tak může být zajištěno
bezplatné zaslání Vašeho zboží.
Záruka se vztahuje pouze na chyby materiálu nebo
výrobní závady, ale ne na škody,vzniklé při přepravě, ne na součásti, podléhající rychlému opotřebení
nebo na poškození křehkých dílů, jako jsou např.
spínače nebo akumulátory. Výrobek je určen pouze
pro privátní použití, ne průmyslové.
Při nesprávném a neodborném využívání, při použití
násilí a při zásazích, které nebyly provedeny našimi
autorizovanými servisními provozovnami, záruční
nároky zanikají.
Vaše práva vyplývající ze zákona touto zárukou
nejsou omezena.
Záruční doba se zárukou neprodlouží. Toto platí
také pro náhradní díly a opravené součásti. Případné škody a vady, existující už při koupi, se musí hlásit ihned po vybalení, nejpozději však
do dvou dnů od data nákupu. Po uplynutí záruční
doby se provedené opravy musí zaplatit.
KOMPERNASS GMBH
BURGSTRASSE 21
44867 BOCHUM, GERMANY
www.kompernass.com
Servis Česko
Tel.: 800143873
E-Mail: kompernass@lidl.cz
IAN 68599
- 39 -
Page 42

- 40 -
Page 43

OBSAH STRANA
Účel použitia 42
Obsah dodávky 42
Popis prístroja 42
Technické údaje 42
Bezpečnostné pokyny 42
Uvedenie do prevádzky 44
Nabíjanie akumulátorov 44
Výpočet približnej doby nabíjania . . . . . . . . . . . . . . . . . . . . . . . . . . . . . . . . . . . . . . . . . . . . .45
Automatická kontrola nabíjania/Udržiavacie nabíjanie . . . . . . . . . . . . . . . . . . . . . . . . . . . .45
Ovládanie časovačom . . . . . . . . . . . . . . . . . . . . . . . . . . . . . . . . . . . . . . . . . . . . . . . . . . . . . .45
Odstraňovanie porúch 46
Čistenie 46
Likvidácia 46
Záruka a servis 47
Dovozca 47
Pred prvým použitím si pozorne prečítajte návod na používanie a uschovajte si ho pre prípadné ďalšie
použitie. Pri odovzdávaní prístroja tretej osobe odovzdajte prístroj spolu s návodom.
- 41 -
Page 44

UNIVERZÁLNA
NABÍJAČKA
Účel použitia
Výstupné napätie:
4 x 1,4 V
(nabíjacie šachty 1 - 4)
2 x 9 V
(nabíjacie šachty 5 - 6)
Nabíjačka akumulátorov je určená výlučne:
• na nabíjanie Ni-Cd a Ni-MH akumulátorov
veľkosti AAA/AA/C/D a 9 V blok.
• na nabíjanie akumulátorov schopných rýchlonabíjania aj akumulátorov, ktoré nie sú schopné
rýchlonabíjania.
• na súkromné, nekomerčné použitie.
Obsah dodávky
• Nabíjačka akumulátorov
• Návod na používanie
Popis prístroja
LEDy (indikátor prevádzkového stavu)
q
Nabíjacia šachta na 9 V blok
w
(nabíjacie šachty 5 a 6; pozri roztvárateľnú
stranu)
Nabíjacie šachty pre typ AAA/AA/C/D
e
(nabíjacie šachty 1 až 4; pozri roztvárateľnú
stranu)
Technické údaje
Vstupné napätie: 100–240 V~50/60 Hz
Spotreba: 150 mA
Trieda ochrany: II /
Prevádzková teplota: 0°C - 25°C
Skladovacia teplota: -20°C - 50°C
Výstupný výkon: max. 3,34 VA
Nabíjacie prúdy:
1000 mA
(pri počte 1 - 2 akumulátory)
500 mA
(pri počte 3 - 4 akumulátory)
2 x 30 mA
(pri 9 V akumulátoroch)
Maximálne kapacity dimenzovania:
AAA: 900 mAh
AA: 2500 mAh
C: 4000 mAh
D: 4500 mAh
9 V blok: 200 mAh
Bezpečnostné pokyny
Nebezpečenstvo požiaru!
Neklaďte nabíjačku akumulátorov:
• na miesta vystavené priamemu slnečnému svetlu.
Inak sa môže nabíjačka akumulátorov prehriať a
neopraviteľne poškodiť.
• do bezprostrednej blízkosti zdrojov tepla. K nim
patria napr. vyhrievacie ventilátory, piecky a
podobné prístroje, ale aj vetracie otvory iných
elektrických zariadení. Inak sa môže nabíjačka
akumulátorov neopraviteľne poškodiť.
• do vlhkého prostredia ani do blízkosti vody. Inak
sa môže vlhkosť dostať do nabíjačky akumulátorov. Hrozí nebezpečenstvo úrazu elektrickým
prúdom a požiaru!
- 42 -
Page 45

• Nabíjajte výlučne akumulátory typov „Ni-Cd“ a
„Ni-MH“. Nikdy nenabíjajte akumulátory iných
typov alebo nedobíjateľné batérie. Tieto nie sú
vhodné na nabíjanie. Akumulátory, ktoré nie
sú vhodné na nabíjanie, sa môžu prehriať a
vybuchnúť. Pritom sa môžu nabíjačka akumulátorov a vložené akumulátory neopraviteľne poškodiť. Hrozí nebezpečenstvo poranenia!
Nebezpečenstvo úrazu
elektrickým prúdom!
Neklaďte nabíjačku akumulátorov:
• do bezprostrednej blízkosti vody, napr. na vaňu
alebo bazén. Ak sa voda dostane do nabíjačky
akumulátorov, môže sa prístroj neopraviteľne poškodiť.
• Pred čistením nabíjačky akumulátorov vytiahnite
sieťovú šnúru zo zásuvky. Tým zabránite úrazu
elektrickým prúdom. Ak sa napriek všetkej opatrnosti dostane voda alebo vlhkosť do nabíjačky
akumulátorov, ihneď vytiahnite sieťovú zástrčku
zo zásuvky.
Prístroj je vhodný na používanie len v interiéri.
Riziko poranenia!
• Akumulátory uchovávajte vždy mimo dosahu
deti! Hrozí nebezpečenstvo, že deti prehltnú
akumulátory! Kvôli jedovatým látkam, ktoré sú v
akumulátoroch, im hrozí smrteľné
nebezpečenstvo!
• Nikdy nenechávajte nabíjačku akumulátorov počas nabíjania akumulátorov bez dozoru.
• Akumulátory sú pri nabíjaní horúce. Nikdy sa
nedotýkajte horúcich akumulátorov! Inak hrozí
nebezpečenstvo popálenia! Preto po nabití
najprv vytiahnite sieťový kábel nabíjačky akumulátorov zo zásuvky. Následne nechajte akumulátory vychladnúť predtým, než ich vyberiete z nabíjačky.
• Keď je sieťová šnúra poškodená, nechajte ju
v odbornom servise ihneď vymeniť, aby ste sa
vyhli ohrozeniu.
• Nabíjačka akumulátorov neobsahuje žiadne diely, ktoré by mohol užívateľ opravovať. Pri otvorení krytu nabíjačky akumulátorov stráca záruka
platnosť! V prípade opravy sa obráťte na nášho
najbližšieho servisného partnera.
• Za škody spôsobené otvorením telesa, pokusmi
o opravu vykonanými nekvalifikovaným personálom alebo používaním nezodpovedajúcim
určeniu nabíjačky akumulátorov nepreberáme
žiadnu záruku!
• Predovšetkým pri starých akumulátoroch môže
dôjsť k vytečeniu ich obsahu. Preto pri dlhšom
nepoužívaní nabíjačky akumulátorov z nej vyberte všetky akumulátory. Tým ochránite nabíjačku pred poškodením vytečenými tekutinami.
• Nedovoľte, aby prístroj obsluhovať také osoby
(vrátane detí), ktorých fyzické, senzorické alebo
mentálne schopnosti, prípadne nedostatok skúseností a znalostí neumožňujú bezpečné používanie prístroja, ak ste ich predtým nepoučili alebo
na ne nedohliadli.
• Vysvetlite deťom všetko o prístroji a nebezpečenstvách jeho používania, aby sa s ním nehrali.
Zaobchádzanie s akumulátormi
• Nepoužívajte žiadne poškodené (skorodované)
akumulátory.
• V prípade vytečenia akumulátorov sa vyhnite
kontaktu s pokožkou. Vedie k podráždeniu
pokožky.
• Ak akumulátor v nabíjačke akumulátorov vytečie, vyčistite ju suchou handrou. Používajte pritom
rukavice!
- 43 -
Page 46

Uvedenie do prevádzky
• Pred uvedením do prevádzky skontrolujte obsah
dodávky z hľadiska jej úplnosti a prípadného
viditeľného poškodenia.
• Postavte nabíjačku akumulátorov na rovný, plochý, poškrabaniu a pošmyknutiu odolný podklad.
Pokyny:
Tento prístroj je vybavený protišmykovými gumovými nožičkami. Pretože povrchoví plochy nábytku bývajú zhotovené z rôznych materiálov, a majú sa
ošetrovať rôznymi údržbovými prostriedkami, nedá
sa celkom vylúčiť, že niektoré z týchto materiálov
obsahujú látky, ktoré napádajú a zmäkčujú tieto gumové nožičky. V prípade potreby podložte pod nožičky prístroja protišmykovú podložku.
• Porovnajte technické údaje s údajmi poskytova-
teľa elektrickej energie. Ak sú zhodné, zasuňte
sieťový kábel do zásuvky. Kontrolky s diódami
LED zasvietia jedenkrát červeno a zeleno. Teraz
je nabíjačka akumulátorov pripravená.
Nabíjanie akumulátorov
Nebezpečenstvo!
Nabíjajte výlučne akumulátory typov „Ni-Cd“
a „Ni-MH“. Nikdy nenabíjajte akumulátory iných typov alebo nedobíjateľné batérie. Tieto nie sú vhodné na nabíjanie. Inak sa môžu nabíjačka akumulátorov a vložené akumulátory neopraviteľne poškodiť.
Hrozí nebezpečenstvo požiaru a výbuchu!
Upozornenie:
Dajte pozor na to, aby boli akumulátory vložené do
šácht so správnou polaritou. Inak sa akumulátory
nenabijú.
• Vložte akumulátory do nabíjacích šácht.
• Vtlačte akumulátory typu 9 V blok do nabíjacích
šácht, až počuteľne zaklapnú.
Individuálne sa dá nabíjať 1–6 akumulátorov:
• 4 kusy veľkosti C alebo D v nabíjacích šachtách
1 až 4,
alebo
• 4 kusy veľkosti AA alebo AAA v nabíjacích šachtách 1 až 4, navyše s dvoma kusmi 9 V akumulátorov v nabíjacích šachtách 5 a 6.
• Teraz začne nabíjanie. Nabíjačka akumulátorov
má samostatné kontrolné svetlo LED pre každý
oddiel v nabíjacej šachte. Kontrolné svetlá LED
príslušnej nabíjacej šachty ukazujú stav nabitia
jednotlivých akumulátorov.
• V priebehu prvých 5 sekúnd vykoná nabíjačka
akumulátorov rýchly test kapacity vložených akumulátorov:
- Kontrolka LED nabíjacej šachty svieti zeleno:
Kapacita je nad 90 %.
- Kontrolka LED nabíjacej šachty bliká zeleno:
Kapacita je medzi 80 % a 90 %.
- LED nabíjacej šachty svieti červeno: Kapacita
medzi 70 % - 80 %.
- LED nabíjacej šachty bliká červeno:
Kapacita pod 70 %.
Upozornenie:
Ak bliká LED nabíjacej šachty dlhšie ako 5 sekúnd
červeno, nie je akumulátor správne vložený do nabíjacej šachty alebo je vložený chybne.
Ak je kapacita akumulátora stanovená, začne nabíjanie.
- 44 -
Page 47

Rôzne údaje majú tento význam:
- Kontrolka LED bliká v sekundových intervaloch
červeno a zeleno (Nie pre 9 V akumulátory
veľkosti doštičkovej batérie):
Akumulátory sa nabíjajú a vybíjajú striedavo.
(Funkcia občerstvenia: Staršie alebo dlhšiu dobu
skladované akumulátory sa znova občerstvia.)
- Kontrolka LED bliká v polsekundových intervaloch červeno a zeleno (nie pre 9 V blokové
akumulátory):
Ak sa akumulátory, podmienene dlhým skladovaním alebo vekom, musia renovovať (regeneračná funkcia), uskutoční sa nasledovný proces:
Akumulátory sa vybijú, aby sa znížil pamäťový
efekt.
- Kontrolka LED svieti trvale červeno:
Akumulátory sa nabijú s maximálnym nabíjacím
prúdom.
- Kontrolka LED svieti trvale zeleno:
Akumulátory sú úplne nabité a nabíjačka akumulátorov sa prepne do režimu udržiavacieho dobíjania.
Pozor!
Akumulátory sú pri nabíjaní horúce. Nikdy sa
nedotýkajte horúcich akumulátorov! Hrozí
nebezpečenstvo popálenia!
• Vytiahnite sieťový kábel nabíjačky akumulátorov
zo zásuvky a nechajte akumulátory vychladnúť.
Potom vyberte nabité akumulátory z nabíjačky akumulátorov.
Výpočet približnej doby nabíjania
V závislosti od typu, veku a zvyškového stavu nabitia akumulátorov trvá nabíjanie rôzne dlho. Približné doby nabíjania si môžete vypočítať pomocou
nasledujúceho vzorca.
Majte však pritom na mysli, že pri vypočítaných dobách ide len o smerné hodnoty.
Nabíjacia doba (min) =
K
apacita ak
Nabíjací prúd prístroja (mA)
umulátora (mAh) x 1,5 x 60
Automatická kontrola nabíjania/
Udržiavacie nabíjanie
Táto nabíjačka akumulátorov samostatne riadi nabíjaciu dobu akumulátorov Ni-Cd a Ni-MH. Riadenie
nabíjacej doby prebieha podľa algoritmu –Δ U
(„mínus delta U“).
Označenie delta Δ predstavuje v matematike rozdiel.
„Mínus delta U“ znamená v tomto prípade záporný
rozdiel napätia.
Tento spôsob zisťovania konca nabíjania využíva
nasledujúci efekt:
Ak sa akumulátor nabíja konštantným prúdom,
jeho napätie stále stúpa. Ak je však akumulátor
plne nabitý, dosiahne jeho napätie maximum a pri
ďalšom nabíjaní mierne poklesne. Tento mierny
pokles napätia nabíjacia elektronika zistí a ukončí
nabíjanie. Nabíjačka akumulátorov sa automaticky
prepne na „udržiavacie nabíjanie“. To znamená, že
akumulátory sa už nenabíjajú trvalým prúdom, ale
krátkymi prúdovými impulzmi. Tento postup pôsobí
proti samovybíjaniu a akumulátory sa udržia v plne
nabitom stave.
Ovládanie časovačom
Táto nabíjačka má navyše aj ovládanie časovačom,
ktoré po 15 hodinách automaticky prepne do režimu
udržiavacieho dobíjania. Toto slúži ako dodatočná
ochrana pre prebíjaním v prípade, že by zisťovanie
konca nabíjania zlyhalo pre príp. chybný akumulátor.
- 45 -
Page 48

Odstraňovanie porúch
Nabíjačka akumulátorov nefunguje
• Presvedčite sa, či je sieťový kábel správne
zasunutý do zásuvky.
• Skontrolujte, či je v sieťovej zásuvke napätie.
Za tým účelom pripojte do tejto zásuvky iný,
fungujúci spotrebič.
Vložené akumulátory sa nenabijú
• Skontrolujte, či sú akumulátory vložené so
správnou polaritou.
• Skontrolujte, či ste do nabíjačky vložili akumulátory vhodné na nabíjanie. Na nabíjanie sú vhodné výlučne Ni-Cd a Ni-MH akumulátory veľkosti
AAA/AA/C/D a 9 V blok.
• Vytiahnite sieťový kábel zo zásuvky a nechajte
prístroj vychladnúť, lebo sa možno spustila
tepelná ochrana. Kontrola teploty slúži na to,
aby sa proces nabíjania prerušil v prípade, že
akumulátor dosiahne príliš vysokú teplotu.
Iné poruchy
Obráťte sa na nášho najbližšieho servisného
partnera, ak …
• sa poruchy nadajú odstrániť opísaným
spôsobom
• alebo sa pri prevádzke nabíjačky akumulátorov
prejavia iné poruchy.
Čistenie
Pozor!
Nepoužívajte žiadne agresívne čistiace prostriedky,
pretože môžu poškodiť povrchové časti prístroja.
Teleso nabíjačky akumulátorov čistite výlučne suchou handričkou. Pri odolávajúcom znečistení použite mierne navlhčenú handričku.
V žiadnom prípade nečistite vnútrajšok nabíjacích
šácht vlhkou handrou. Namiesto toho použite na
čistenie mäkký, čistý štetec.
Likvidácia
Prístroj v žiadnom prípade nevyhadzujte
do normálneho domového odpadu.
Tento výrobok podlieha európskej
smernici 2002/96/EC.
Zlikvidujte prístroj v príslušnom zariadení (firme)
na likvidáciu odpadu.
Dodržte aktuálne platné predpisy. V prípade
pochybností sa obráťte na zariadenia na likvidáciu
odpadu.
Likvidácia batérií
Batérie sa nesmú vyhadzovať do bežného
domového odpadu. Každý spotrebiteľ je zo zákona
povinný odovzdať batérie a akumulátory na
zbernom mieste v obci, časti mesta alebo
v obchode.
Táto povinnosť slúži na to, aby sa batérie mohli
zlikvidovať ekologickým spôsobom. Batérie
a akumulátory odovzdajte vo vybitom stave.
Nebezpečenstvo!
Pred každým čistením vytiahnite sieťovú zástrčku.
Hrozí nebezpečenstvo úrazu elektrickým prúdom!
Dajte pozor na to, aby sa pri čistení nedostala do
nabíjačky žiadna tekutina!
Všetok baliaci materiál zlikvidujte
ekologickým spôsobom.
- 46 -
Page 49

Záruka a servis
Dovozca
Na tento prístroj máte trojročnú záruku od dátumu
nákupu. Prístroj bol starostlivo vyrobený a pred expedíciou dôkladne vyskúšaný. Uschovajte si, prosím, účtenku ako dôkaz o nákupe. V prípade uplatňovania záruky sa spojte s opravovňou telefonicky.
Len tak sa dá zabezpečiť bezplatné zaslanie tovaru.
Záruka platí len na chyby materiálu a výroby, nie
na poškodenia spôsobené prepravou, opotrebením
ani na poškodenia krehkých častí, ako sú spínače
alebo akumulátory.
Výrobok je určený výlučne na súkromné používanie
a nie na komerčné účely.
Záruka prestáva platiť pri zaobchádzaní nezodpovedajúcom účelu, pri neprimeranom zaobchádzaní,
pri používaní násilia a pri zásahoch, ktoré neurobil
nami autorizovaný servis. Práva vyplývajúce zo zákona nie sú touto zárukou obmedzené.
Záručná doba sa nepredlžuje o dobu trvania záručných opráv. To platí aj na vymenené alebo opravené diely. Prípadné poškodenia a nedostatky zistené
už pri nákupe musíte ohlásiť ihneď po vybalení, najneskoršie však do dvoch dní od dátumu zakúpenia.
V prípade opráv spadajúcich do obdobia po uplynutí záručnej doby ste povinní uhradiť vzniknuté
náklady.
KOMPERNASS GMBH
BURGSTRASSE 21
44867 BOCHUM, GERMANY
www.kompernass.com
Servis Slovensko
Tel.: 0850 232001
E-Mail: kompernass@lidl.sk
IAN 68599
- 47 -
Page 50

- 48 -
Page 51

INHALTSVERZEICHNIS SEITE
Verwendungszweck 50
Lieferumfang 50
Gerätebeschreibung 50
Technische Daten 50
Sicherheitshinweise 50
Inbetriebnahme 52
Akkus aufladen 52
Berechnung der durchschnittlichen Ladezeit . . . . . . . . . . . . . . . . . . . . . . . . . . . . . . . . . . . . .53
Automatische Ladekontrolle/Erhaltungsladung . . . . . . . . . . . . . . . . . . . . . . . . . . . . . . . . . . .53
Timersteuerung . . . . . . . . . . . . . . . . . . . . . . . . . . . . . . . . . . . . . . . . . . . . . . . . . . . . . . . . . . . .53
Funktionsstörungen beheben 54
Reinigen 54
Entsorgen 54
Garantie und Service 55
Importeur 55
Lesen Sie die Bedienungsanleitung vor der ersten Verwendung aufmerksam durch und heben Sie diese für
den späteren Gebrauch auf. Händigen Sie bei Weitergabe des Gerätes an Dritte auch die Anleitung aus.
- 49 -
Page 52

UNIVERSALAKKULADEGERÄT
Verwendungszweck
Das Akku-Ladegerät ist ausschließlich bestimmt:
• zum Aufladen von wiederaufladbaren Ni-Cdund Ni-MH-Akkus der Größen AAA/AA/C/D
und 9 V-Block mit handelsüblichen Bemessungskapazitäten.
• zum Aufladen von schnellladefähigen, sowie
nicht schnellladefähigen Akkus.
• zum privaten, nicht kommerziellen Gebrauch.
Ladeströme:
1000 mA (bei 1-2 Akkus)
500 mA (bei 3-4 Akkus)
2 x 30 mA (bei 9 V Akkus)
Maximale Bemessungskapazitäten:
AAA: 900 mAh
AA: 2500 mAh
C: 4000 mAh
D: 4500 mAh
9 V-Block: 200 mAh
Sicherheitshinweise
Lieferumfang
• Akku-Ladegerät
• Bedienungsanleitung
Gerätebeschreibung
q LEDs (Betriebszustandsanzeige)
w Ladeschächte für 9V-Block
(Ladeschächte 5 und 6; siehe Ausklappseite)
e Ladeschächte für Typ AAA/AA/C/D
(Ladeschächte 1 bis 4; siehe Ausklappseite)
Technische Daten
Eingangsspannung: 100– 240 V~60/50 Hz
Stromaufnahme: 150 mA
Schutzklasse: II /
Betriebstemperatur: 0°C - 25°C
Lagertemperatur: -20°C - 50°C
Ausgangsleistung: max. 3,34 VA
Ausgangsspannungen:
4 x 1,4 V
(Ladeschächte 1-4)
2 x 9 V
(Ladeschächte 5-6)
Brandgefahr!
Stellen Sie das Akku-Ladegerät nicht:
• an Orten auf, die direkter Sonnenstrahlung ausgesetzt sind. Anderenfalls kann das Akku-Ladegerät überhitzen und irreparabel beschädigt
werden.
• in unmittelbarer Nähe von Hitzequellen auf.
Dazu zählen z. B. Öfen, Heizlüfter und ähnliche
Geräte sowie Belüftungsöffnungen anderer elektrischer Geräte. Anderenfalls kann das Akku-Ladegerät irreparabel beschädigt werden.
• in feuchten Umgebungen oder in der Nähe von
Wasser auf. Anderenfalls kann Feuchtigkeit in
das Akku-Ladegerät eindringen. Es besteht die
Gefahr eines elektrischen Schlages und eines
Brandes!
• Laden Sie ausschließlich wiederaufladbare Akkus
der Typen „Ni-Cd“ und „Ni-MH“. Laden Sie
niemals Akkus anderen Typs oder nicht-wiederaufladbare Batterien auf. Diese sind nicht zum
Aufladen geeignet. Nicht ladefähige Akkus
können überhitzen und explodieren. Es können
das Akku-Ladegerät und die eingelegten Akkus
irreparabel beschädigt werden. Es besteht Verletzungsgefahr!
- 50 -
Page 53

Gefahr durch elektrischen Schlag!
Stellen Sie das Akku-Ladegerät nicht:
• in unmittelbarer Nähe von Wasser auf, z. B. an
Badewannen oder Swimmingpools. Läuft Wasser
in das Akku-Ladegerät, kann das Gerät irreparabel beschädigt werden.
• Ziehen Sie vor dem Reinigen des Akku-Ladegerätes das Netzkabel aus der Steckdose. So vermeiden Sie einen elektrischen Schlag. Sollte trotz aller Vorsicht Wasser/Feuchtigkeit in das
Akku-Ladegerät eindringen, ziehen Sie sofort den
Netzstecker aus der Steckdose.
Das Gerät ist nur für die Verwendung in
Innenräumen geeignet.
Verletzungsgefahr!
• Bewahren Sie Akkus immer außerhalb der Reichweite von Kindern auf! Es besteht die Gefahr, dass
Kinder Akkus verschlucken! Aufgrund der giftigen
Inhaltsstoffe der Akkus besteht Lebensgefahr!
• Lassen Sie das Akku-Ladegerät während des Aufladens von Akkus niemals unbeaufsichtigt.
• Die Akkus können beim Aufladen heiß werden.
Berühren Sie niemals heiße Akkus! Anderenfalls
besteht die Gefahr von Verbrennungen! Ziehen
Sie daher nach dem Aufladen zunächst das
Netzkabel des Akku-Ladegerätes aus der Steckdose. Lassen Sie die Akkus anschließend abkühlen,
bevor Sie sie aus dem Akku-Ladegerät entnehmen.
• Wenn das Netzkabel defekt ist, lassen Sie es
durch einen Servicepartner sofort austauschen,
um Gefährdungen zu vermeiden.
• Das Akku-Ladegerät enthält keine Teile, die vom
Benutzer gewartet werden können. Wird das
Gehäuse des Akku-Ladegerätes geöffnet, so erlischt die Garantie! Wenden Sie sich im Falle einer Reparatur an einen unserer Servicepartner
in Ihrer Nähe.
• Für Schäden durch Öffnen des Gehäuses,
Reparaturversuche durch nicht qualifiziertes
Fachpersonal oder nicht bestimmungsgemäße
Verwendung des Akku-Ladegerätes wird keine
Haftung/Gewährleistung übernommen!
• Insbesondere bei alten Akkus kann es zum
Auslaufen von Batteriesäure kommen. Entnehmen
Sie daher alle Akkus, wenn Sie das Akku-Ladegerät längere Zeit nicht benutzen. So schützen Sie
das Akku-Ladegerät vor Schäden durch auslaufende Batteriesäure.
• Dieses Gerät ist nicht dafür bestimmt, durch
Personen (einschließlich Kinder) mit eingeschränkten physischen, sensorischen oder geistigen
Fähigkeiten oder mangels Erfahrung und/oder
mangels Wissen benutzt zu werden, es sei denn,
sie werden durch eine für ihre Sicherheit zuständige Person beaufsichtigt oder erhielten von ihr
Anweisungen, wie das Gerät zu benutzen ist.
• Kinder sollten beaufsichtigt werden, um sicherzustellen, dass sie nicht mit dem Gerät spielen.
Umgang mit Akkus
• Benutzen Sie keine beschädigten (korrodierten)
Akkus.
• Wenn die Akkus auslaufen, vermeiden Sie
Hautkontakt. Das führt zu Hautirritationen.
• Ist ein Akku im Akku-Ladegerät ausgelaufen, reinigen Sie es mit einem trockenen Tuch. Tragen
Sie Handschuhe!
- 51 -
Page 54

Inbetriebnahme
• Überprüfen Sie vor der Inbetriebnahme den
Lieferumfang auf Vollständigkeit und eventuell
sichtbare Beschädigungen.
• Stellen Sie das Akku-Ladegerät auf einem geraden, ebenen, kratzfesten und rutschsicheren
Untergrund auf.
Hinweis:
Achten Sie darauf, die Akkus entsprechend ihrer
Polarität in die Fächer der Ladeschächte einzulegen.
Anderenfalls werden die Akkus nicht aufgeladen.
• Setzen Sie die Akkus in die Ladeschächte ein.
• Drücken Sie die Akkus Typ 9 V-Block in die
Ladeschächte, bis sie hörbar einrasten.
Hinweis:
Dieses Gerät ist mit rutschfesten Gummifüßen ausgestattet. Da Möbeloberflächen aus den verschiedenen
Materialien bestehen und mit unterschiedlichsten
Pflegemitteln behandelt werden, kann es nicht völlig
ausgeschlossen werden, dass manche dieser Stoffe
Bestandteile enthalten, die die Gummifüße angreifen
und aufweichen. Legen Sie gegebenenfalls eine
rutschfeste Unterlage unter die Füße des Gerätes.
• Vergleichen Sie die technischen Daten mit denen
Ihres Stromnetzbetreibers. Bei Übereinstimmung,
schließen Sie das Netzkabel an eine Steckdose
an. Die LEDs leuchten einmal rot und grün auf.
Das Akku-Ladegerät ist jetzt betriebsbereit.
Akkus aufladen
Gefahr!
Laden Sie ausschließlich wiederaufladbare Akkus
der Typen „Ni-Cd“ und „Ni-MH“. Laden Sie niemals
Akkus anderen Typs oder nicht-wiederaufladbare
Batterien auf. Diese sind nicht zum Aufladen geeignet. Anderenfalls können das Akku-Ladegerät und
die eingelegten Akkus/Batterien irreparabel beschädigt werden. Es besteht die Gefahr eines Brandes
sowie Explosionsgefahr!
Es können individuell 1–6 Akkus geladen werden:
• 4 x Typ C oder Typ D in den Ladeschächten
1 bis 4,
oder
• 4 x Typ AA oder AAA in den Ladeschächten
1 bis 4, mit zusätzlich 2 x Typ 9 Volt-Akkus in
den Ladeschächten 5 und 6.
• Der Ladevorgang beginnt nun. Das Akku-Ladegerät besitzt je eine LED für jedes Fach im Ladeschacht. Die LEDs der jeweiligen Ladeschächte zeigen den Ladezustand der einzelnen Akkus an.
• In den ersten 5 Sekunden führt das Akku-Ladegerät einen Kapazitätsschnelltest durch:
- Die LED des Ladeschachts leuchtet grün:
Kapazität über 90 %.
- Die LED des Ladeschachts blinkt grün:
Kapazität zwischen 80 % - 90 %.
- Die LED des Ladeschachts leuchtet rot:
Kapazität zwischen 70 % - 80 %.
- Die LED des Ladeschachts blinkt rot:
Kapazität unter 70 %.
Hinweis:
Blinkt die LED des Ladeschachts länger als 5 Sekunden rot, ist der Akku nicht richtig in den Ladeschacht
eingelegt oder defekt.
Ist die Kapazität der Akkus festgestellt, beginnt der
Ladevorgang.
- 52 -
Page 55

Die verschiedenen Anzeigen haben folgende
Bedeutungen:
- Die LED blinkt im Sekundentakt rot und grün
(nicht für 9V-Block Akkus):
Die Akkus werden abwechselnd geladen und
entladen. (Refresh-Funktion: Ältere oder lange
gelagerte Akkus werden wieder aufgefrischt.)
- Die LED blinkt im 1/2-Sekundentakt rot und grün
(nicht für 9V-Block Akkus):
Wenn die Akkus nicht, bedingt durch lange Lagerung oder das Alter, aufgefrischt werden müssen (Refresh-Funktion), findet folgender Prozess
statt: Die Akkus werden entladen, um den
Memory-Effekt zu verringern.
- Die LED leuchtet durchgehend rot:
Die Akkus werden mit dem maximalen Ladestrom geladen.
- Die LED leuchtet durchgehend grün:
Die Akkus sind vollständig geladen und das
Akku-Ladegerät schaltet auf Erhaltungsladung um.
Warnung!
Die Akkus können beim Aufladen heiß werden.
Berühren Sie niemals heiße Akkus! Es besteht
Verbrennungsgefahr!
• Ziehen Sie das Netzkabel des Akku-Ladegerätes
aus der Steckdose und lassen Sie die Akkus
abkühlen.
Anschließend können Sie die geladenen Akkus aus
dem Akku-Ladegerät entnehmen.
Berechnung der durchschnittlichen
Ladezeit
Abhängig von Typ, Alter und Restladezustand der
Akkus dauert der Aufladevorgang unterschiedlich
lange. Die durchschnittlichen Ladezeiten können Sie
mit Hilfe nachstehender Formel berechnen.
Beachten Sie jedoch, dass es sich bei den
berechneten Zeiten nur um Richtwerte handelt.
Ladezeit (Min.) =
K
apazität des Akk
Ladestrom des Gerätes (mA)
us (mAh) x 1,5 x 60
Automatische Ladekontrolle/
Erhaltungsladung
Dieses Akku-Ladegerät steuert die Ladezeit für
Akkus vom Typ Ni-Cd und Ni-MH separat.
Dieser Steuerung liegt das –
Verfahren zugrunde.
Mit dem Delta
Mathematik Differenzen.
„Minus Delta U“ bedeutet in diesem Fall eine
negative Spannungsdifferenz.
Diese Ladeschlusserkennung macht sich folgenden
Effekt zu nutze:
Wird ein Akku mit konstantem Strom geladen, steigt
seine Spannung immer weiter an. Ist ein Akku voll,
so erreicht seine Spannung jedoch ein Maximum
und fällt bei weiterem Stromfluss wieder leicht ab.
Dieser leichte Spannungsabfall wird von der Ladeelektronik erkannt und die Ladung wird beendet.
Das Akku-Ladegerät schaltet automatisch auf „Erhaltungsladung“. Das heißt, die Akkus werden nicht
mehr mit Dauerstrom, sondern mit kurzen Stromimpulsen geladen. Dadurch wird der Selbstentladung
entgegengewirkt und die Akkus werden in einem
vollständigen Ladezustand gehalten.
Δ bezeichnet man in der
Δ U („minus Delta U“)
Timersteuerung
Zusätzlich verfügt das Akku-Ladegerät über eine
Timersteuerung, welche nach 15 Stunden automatisch in die Erhaltungsladung wechselt. Dies dient
als zusätzlicher Schutz vor Überladung, falls die
Ladeschlusserkennung aufgrund eines evtl. defekten
Akkus nicht reagiert.
- 53 -
Page 56

Funktionsstörungen beheben
Das Akku-Ladegerät zeigt keine Funktion
• Überprüfen Sie, ob das Netzkabel richtig in die
Steckdose eingesteckt ist.
• Überprüfen Sie, ob die Steckdose Strom führt.
Schließen Sie dazu ein anderes, funktionstüchtiges
Elektrogerät an diese Steckdose an.
Die eingelegten Akkus werden nicht aufgeladen
• Überprüfen Sie, ob die Akkus entsprechend ihrer
Polarität eingelegt wurden.
• Überprüfen Sie, ob Sie zum Aufladen geeignete
Akkus in das Akku-Ladegerät eingelegt haben.
Zum Aufladen geeignet sind ausschließlich ladefähige Ni-Cd- und Ni-MH-Akkus der Typen
AAA/AA/C/D und 9 V-Block.
• Ziehen Sie das Netzkabel aus der Steckdose
und lassen Sie das Gerät abkühlen, da eventuell
die Temperaturüberwachung ausgelöst wurde.
Die Temperaturüberwachung sorgt dafür, dass
der Ladevorgang abbricht, sobald ein Akku eine
zu hohe Temperatur erreicht.
Andere Funktionsstörungen
Wenden Sie sich bitte an einen unserer Servicepartner
in Ihrer Nähe, falls:
• sich die Funktionsstörungen nicht wie beschrieben
beheben lassen
• oder beim Betrieb des Akku-Ladegerätes andere
Funktionsstörungen auftreten.
Reinigen
Gefahr!
Ziehen Sie vor jeder Reinigung den Netzstecker.
Es besteht die Gefahr eines elektrischen Schlages!
Achten Sie darauf, dass bei der Reinigung keine
Feuchtigkeit in das Gerät eindringt!
Achtung!
Verwenden Sie keine aggressiven oder scheuernden
Reinigungsmittel, da diese die Gehäuseoberfläche
angreifen können.
Reinigen Sie das Gehäuse des Akku-Ladegerätes
ausschließlich mit einem trockenen Tuch. Benutzen
Sie bei hartnäckigen Verschmutzungen ein leicht
angefeuchtetes Tuch.
Reinigen Sie das Innere der Ladeschächte keinesfalls
feucht. Benutzen Sie zum Säubern stattdessen einen
sauberen, weichen Pinsel.
Entsorgen
Werfen Sie das Gerät keinesfalls in den
normalen Hausmüll. Dieses Produkt
unterliegt der europäischen Richtlinie
2002/96/EC.
Entsorgen Sie das Gerät über einen zugelassenen
Entsorgungsbetrieb oder über Ihre kommunale
Entsorgungseinrichtung.
Beachten Sie die aktuell geltenden Vorschriften.
Setzen Sie sich im Zweifelsfall mit Ihrer Entsorgungseinrichtung in Verbindung.
Batterien/Akkus entsorgen
Batterien/Akkus dürfen nicht im Hausmüll entsorgt
werden. Jeder Verbraucher ist gesetzlich verpflichtet, Batterien/Akkus bei einer Sammelstelle seiner
Gemeinde / seines Stadtteils oder im Handel abzugeben. Diese Verpflichtung dient dazu, dass
Batterien/Akkus einer umweltschonenden Entsorgung zugeführt werden können. Geben Sie Batterien/Akkus nur im entladenen Zustand zurück.
Führen Sie alle Verpackungsmaterialien
einer umweltgerechten Entsorgung zu.
- 54 -
Page 57

Garantie und Service
Sie erhalten auf dieses Gerät 3 Jahre Garantie ab
Kaufdatum. Das Gerät wurde sorgfältig produziert
und vor Anlieferung gewissenhaft geprüft.
Bitte bewahren Sie den Kassenbon als Nachweis
für den Kauf auf. Bitte setzen Sie sich im Garantiefall mit Ihrer Servicestelle telefonisch in Verbindung.
Nur so kann eine kostenlose Einsendung Ihrer Ware
gewährleistet werden.
Die Garantieleistung gilt nur für Material- oder
Fabrikationsfehler, nicht aber für Transportschäden,
Verschleißteile oder für Beschädigungen an zerbrechlichen Teilen, z. B. Schalter oder Akkus. Das
Produkt ist lediglich für den privaten und nicht für
den gewerblichen Gebrauch bestimmt.
Bei missbräuchlicher und unsachgemäßer Behandlung, Gewaltanwendung und bei Eingriffen, die
nicht von unserer autorisierten Service-Niederlassung vorgenommen wurden, erlischt die Garantie.
Ihre gesetzlichen Rechte werden durch diese
Garantie nicht eingeschränkt.
Die Garantiezeit wird durch die Gewährleistung
nicht verlängert. Dies gilt auch für ersetzte und reparierte Teile. Eventuell schon beim Kauf vorhandene
Schäden und Mängel müssen sofort nach dem
Auspacken gemeldet werden, spätestens aber zwei
Tage nach Kaufdatum. Nach Ablauf der Garantiezeit anfallende Reparaturen sind kostenpflichtig.
Service Deutschland
Tel.: 01805772033 (0,14 EUR/Min. aus dem dt.
Festnetz, Mobilfunk max. 0,42 EUR/Min.)
E-Mail: kompernass@lidl.de
IAN 68599
Service Österreich
Tel.: 0820 201 222 (0,15 EUR/Min.)
E-Mail: kompernass@lidl.at
IAN 68599
Service Schweiz
Tel.: 0842 665566 (0,08 CHF/Min.,
Mobilfunk max. 0,40 CHF/Min.)
E-Mail: kompernass@lidl.ch
IAN 68599
Importeur
KOMPERNASS GMBH
BURGSTRASSE 21
44867 BOCHUM, GERMANY
www.kompernass.com
- 55 -
 Loading...