

Page 1

A
KOMPERNASS GMBH · BURGSTRASSE 21 ·
D-44867 BOCHUM
www.kompernass.com
ID-Nr.: KH5010-12/2008-V3
TELEPHONE AMPLIFIER
KH 5010
TELEPHONE AMPLIFIER
Operating instructions
PUHELIMEN KUULOKKEEN
ÄÄNENVAHVISTIN
Käyttöohje
TELEFONLURFÖRSTÄRKARE
Bruksanvisning
Page 2
KH 5010
1
2
6
3
4
0
5
7
9 8
Page 3

Index Page
Intended use 2
Safety instructions 2
Technical data 6
Description of the device 7
Items supplied 7
Unpacking 7
Connection to the telephone 8
Establishing the power supply 8
Operation 10
Automatic switch-off 11
Troubleshooting 11
Cleaning and storage 12
Disposal 12
Warranty and service 13
Importer 15
- 1 -
Page 4
TELEPHONE AMPLIFIER KH 5010
Read these operating instructions carefully before using the
device for the first time and preserve this booklet for later reference. Pass this booklet on to whoever might acquire the
device at a future date.
Intended use
This telephone amplifier is intended for the amplification of incoming telephone audio signals in conjunction with a telephone.
This device is not suitable for utilisation with cordless telephones.
This device is intended for domestic use only and may not be
used for commercial or industrial applications.
Safety instructions
Risk of personal injury!
• This device is not intended for use by individuals (including
children) with restricted physical, physiological or intellectual
abilities or deficiences in experience and/or knowledge
unless they are supervised by a person responsible for their
safety or receive from this person instruction in how the device is to be used.
- 2 -
Page 5

• Children should be supervised to ensure that they do not
play with the device.
• Turn the sound volume level down before placing the receiver
against your ear. Then increase the sound volume level as
required. Avoid a continuous or unnecessary exposure to
high sound volume levels. This could lead to hearing damage.
Risk of electric shock
• Connect the power adapter only to correctly installed and
earthed mains power sockets. Check that the electricity
type and mains voltage matches the information given on
the power adapter type plate.
• Use a stabilised power adapter with an output voltage of
7 V supplying at least100 mA. When connecting a
power adapter, ensure that the polarity of the barrel connector concurs with that at the jack socket.
• Do not operate the device if the mains adapter possibly
being used, the adapter's power cable or the device itself is
damaged. To avoid potential risks, arrange for the device
to be checked and, if necessary, repaired by a qualified
specialist.
• Do not expose the device to rain and never use it in a humid
or wet environment.
• ALWAYS grasp the mains adapter directly when removing it
from a mains power socket. Do NOT pull on the cable.
- 3 -
Page 6
• Do NOT place any objects on the cable of the power adapter
and ensure that it cannot become snagged or trapped.
• NEVER make a knot in the power cable and do NOT bind it
together with other cables. Lay the power cable such that no
one can step on or stumble over it.
Damage to the device!
• Do not place the device on slanting surfaces, otherwise it
could slide off and become damaged in the resulting fall.
• Do not place the device at locations exposed to direct sunlight. If you do, it may overheat and become irreparably
damaged.
Interaction with batteries
Risk of explosion!
Do not throw batteries into a fire. Do not recharge the batteries.
• Never open batteries, never solder or weld batteries.
Never short-circuit batteries. The risk of explosions and injuries exists!
• Remove the batteries if you do not intend to use the device
for an extended period of time.
• Regularly check the condition of the battery. Leaking batteries
can cause damage to the device.
- 4 -
Page 7

• Always replace batteries with ones of the same type.
• Wear protective gloves in the event of having to remove a
leaking battery. Clean the battery compartment and the
battery contacts with a dry cloth.
• Keep batteries away from children. Children can put batteries
into their mouths and swallow them. If a battery is swallowed
IMMEDIATELY seek medical assistance.
Note:
Take note that the rubber pads on the device could leave traces
on painted, sensitive or treated surfaces. If possible place an
anti-slip material under the pads of the device.
- 5 -
Page 8

Technical data
This device satisfies the fundamental requirements and other
relevant regulations of the EMC Directive 2004/108/EC.
Power supply:
Battery operation: 9V Block battery, 6F22/6LR61
Operation with power adapter (stabilised):
Input voltage: 230 V ~/ 50 Hz
Output voltage: 7 V , 100 mA /
Signal amplification: max. 30 dB
Plug type: 4P4C, RJ-9
Dimensions (L x D x H): 105 x 65 x 25 mm
Weight: 73 g
RJ Connectors describes the designs of plugs and sockets, as
well as their contact configurations, for telecommunication
cable installations. Most RJ Connectors are based on modular
connections, and are also designated colloquially as Western
plugs resp. sockets. A further form of designation is that of the
number of possible contact positions (“P” for Positions) and the
actually fitted contacts (“C” for Contacts).
(not supplied)
(not supplied)
- 6 -
Page 9
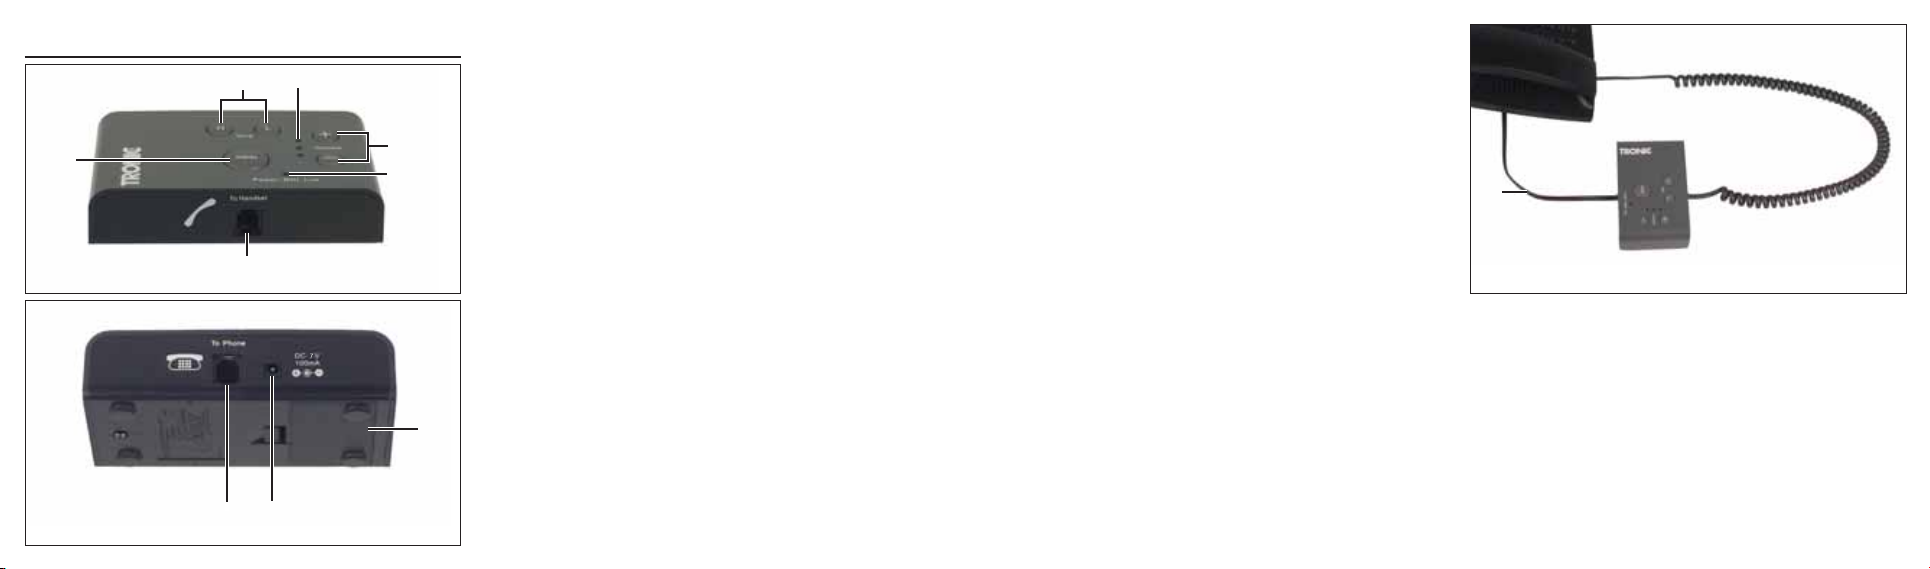
Description of the device
1 Button Tone H/L
2 Sound volume LEDs
3 Button Volume -/+
4 Operation LED
5 Socket To Handset
6 Button MEM
7 Battery compartment cover
8 Connection socket for power adapter 7V , 100 mA/
9 Socket To Phone
0 4P4C/RJ-9 Connector cable
Items supplied
• Telephone amplifier
• 4P4C/RJ-9 Connector cable
• Operating Instructions
Unpacking
Take the telephone amplifier from its packaging.
Remove all transport restraints and packaging materials.
- 7 -
Page 10
Connection to the telephone
Note:
Connect the telephone amplifier with the telephone BEFORE
effecting a connection to the power source. Ensure that you
FIRST connect the receiver to the telephone amplifier and
THEN the telephone amplifier to the telephone!
1. Remove the plug of the receiver cable from the receiver
socket on your telephone.
2. Insert the plug of the receiver cable into the socket To
Handset 5 on the telephone amplifier.
3. Insert one end of the 4P4C/RJ-9 connection cable 0 into
the socket To Phone 9 on the telephone amplifier and
connect the other end with the receiver socket on the
telephone.
Establishing the power supply
Battery operation
You can operate the device with a battery (not supplied).
1. Open the cover of the battery compartment 7 on the
underside of the telephone amplifier.
- 8 -
Page 11

2. Insert a 9V block battery into the battery compartment.
Pay heed to the correct polarity. To make battery exchanges easier, ensure that the black textile strip is located
underneath the battery.
3. Close the battery compartment. The battery compartment
lid 7 must audibly engage.
Note:
In the event of weak batteries, the Operation LED 4 on the
device blinks when the receiver is on the cradle. In this case,
renew the batteries.
Connecting the mains adapter
You can also operate the device with a power adapter (not
supplied) that accords to the specifications given in the section
“Technical data”.
1. For this, insert the plug of the power adapter into the
connection socket
2. Then insert the power adapter into a correctly installed
mains power socket supplying 230 V ~/ 50 Hz.
on the device.
8
- 9 -
Page 12
Operation
Adjusting the volume.
The sound volume is adustable to 8 levels.
• During a telephone call press the button Volume - 3
several times to reduce the sound level, respectively the
button Volume + 3 to increase the sound level.
At the levels 7 and 8 all three sound volume LEDs 2 glow.
At the levels 1 and 2 no sound volume LED 2 is glowing.
Warning:
Turn the sound volume level down before placing the receiver
against your ear. Press the button Volume - 3 several times until
just one sound volume LED 2 is glowing.
Sound adjustment
• During a telephone call press the button Tone H 1 once to
amplify the treble, resp. the button Tone L 1 to amplify the
bass.
Saving the settings
On lifting the receiver up, the sound volume is pre-set to level 4
and the modulation to treble.
• Should you wish to save a different basic setting, first of all
adjust the desired sound volume.
- 10 -
Page 13
• Press and hold the button MEM 6 for about two seconds.
The setting for the sound volume is now saved and can be recalled at any time by pressing the button MEM 6.
Automatic switch-off
The device switches itself off automatically, approx 5 seconds
after the receiver is placed on the cradle.
Note:
If your telephone is operated via an interphone system, it can
happen that the automatic switch off does not function. In this
case the battery must be removed, so as to prevent its discharge.
Troubleshooting
The LEDs do not glow.
- The battery is discharged or not correctly inserted.
- The telephone amplifier is not correctly connected.
• Check the battery and, if need be, exchange it.
• Check the connections.
No sound.
- The sound volume is set to the minimum.
- The telephone amplifier is not correctly connected.
- 11 -
Page 14
• Increase the sound volume.
• Check the connections.
Returning the device to factory settings.
Remove the battery from the battery compartment and reinsert
it after about 2 minutes.
Cleaning and storage
• Store the device at a dry and frost-free location.
• If you do not intend to use the device for an extended
period, remove the battery from the battery compartment
• Clean the device with a soft, dry cloth.
• Do not use chemical or abrasive cleaning agents. These could
damage the housing.
Disposal
Do not dispose of the device in your normal domestic
waste. This product is subject to the provisions of
European Directive 2002/96/EC.
Dispose of the device through an approved waste disposal centre or at your community waste facility. Observe the
currently applicable regulations.
In case of doubt, please contact your waste disposal centre.
- 12 -
Page 15

Disposal of batteries/accumulators
Used batteries/rechargeable batteries may not be disposed
of in household waste. Every consumer is statutorily obliged to
dispose of batteries at a collection site of his community/city
district or at a retail store.
The purpose of this obligation is to ensure that batteries are
disposed of in a non-polluting manner. Only dispose of batteries
when they are fully discharged.
Dispose of the packaging materials in an environmentally responsible manner.
Warranty and service
You receive a 3-year warranty for this device as of the purchase
date. The device has been manufactured with care and meticulously examined before delivery. Please retain your receipt
as proof of purchase.
In the case of a warranty claim, please contact our service
department by telephone. Only in this way can a post-free
despatch for your goods be assured.
The warranty covers only claims for material and manufacturing defects, not for consumables, wear parts or for damage
to fragile components, e.g. buttons and batteries. This product
is for private use only and is not intended for commercial applications.
- 13 -
Page 16

In the event of misuse and improper handling, use of force and
interference not carried out by our authorized service branch,
the warranty will become void.. Your statutory rights are not
restricted in any way by this warranty.
DES Ltd
Units 14-15
Bilston Industrial Estate
Oxford Street
Bilston
WV14 7EG
Tel.: 0870/787-6177
Fax: 0870/787-6168
e-mail: support.uk@kompernass.com
Irish Connection
Harbour view
Howth
Co. Dublin
Tel: 00353 (0) 87 99 62 077
Fax: 00353 18398056
e-mail: support.ie@kompernass.com
- 14 -
Page 17

Importer
KOMPERNASS GMBH
BURGSTRASSE 21
D-44867 BOCHUM
www.kompernass.com
- 15 -
Page 18

- 16 -
Page 19

Sisällysluettelo Sivu
Määräystenmukainen käyttö 18
Turvaohjeet 18
Tekniset tiedot 22
Laitteen kuvaus 23
Toimituslaajuus osat 23
Purkaminen pakkauksesta 23
Liittäminen puhelimeen 24
Jännitesyötön luominen 24
Käyttö 25
Automaattinen sammutus 26
Vianetsintä 27
Säilytys ja puhdistaminen 28
Hävittäminen 28
Takuu ja huolto 29
Maahantuoja 30
- 17 -
Page 20

PUHELIMEN KUULOKKEEN
ÄÄNENVAHVISTIN KH 5010
Lue käyttöohje ennen ensimmäistä käyttökertaa huolellisesti
läpi ja pidä sitä lähettyvillä myös myöhemmässä käytössä.
Jos myyt laitteen, anna ohje myös seuraavalle omistajalle.
Määräystenmukainen käyttö
Puhelimen kuulokkeen äänenvahvistin on suunniteltu puhelimen
kuulokkeen signaalin vahvistamiseen puhelimen yhteydessä.
Laite ei sovellu käytettäväksi langattomien puhelinten kanssa.
Tämä laite on tarkoitettu ainoastaan yksityiskäyttöön, eikä sitä
saa käyttää ammatti- tai teollisuustarkoituksiin.
Turvaohjeet
Loukkaantumisvaara!
• Tätä laitetta ei ole tarkoitettu sellaisten henkilöiden (mukaan
lukien lapset) käyttöön, joiden rajoitetut, fyysiset, aistilliset
tai henkiset kyvyt tai kokemuksen ja/tai tiedon puute estävät
käytön, lukuun ottamatta tilanteita, joissa heitä valvoo turvallisuudesta vastaava henkilö tai joissa he ovat saaneet
tältä ohjeita laitteen käytöstä.
- 18 -
Page 21

• Lapsia on valvottava ja on varmistettava, että he eivät leiki
laitteella.
• Säädä äänenvoimakkuus alas, ennen kuin asetat kuulokkeen
korvalle. Säädä äänenvoimakkuus sitten suuremmaksi
tarpeen mukaan. Vältä kaikkea pysyvää tai tarpeetonta
korkeille äänenvoimakkuustasoille altistumista. Tästä voi
olla seurauksena kuulovaurioita.
Sähköiskun vaara!
• Liitä verkkoadapteri ainoastaan määräysten mukaisesti
asennettuun pistorasiaan Verkkojännitteen on vastattava
verkkoadapterin tyyppikilven tietoja.
• Käytä vakautettua verkkoadapteria, jonka lähtöjännite on
7 V ja joka toimittaa vähintään 100 mA. Varmista
verkkoadapteria liitettäessä, että holkkipistokkeen napaisuus
vastaa laitteen liitäntäholkin napaisuustietoa.
• Älä käytä laitetta, jos mahdollisesti käytetty verkkoadapteri,
sen johto tai itse laite on vaurioitunut. Anna pätevän ammattihenkilöstön tarkistaa ja tarvittaessa korjata laite vaarojen välttämiseksi.
• Älä jätä laitetta sateeseen tai käytä sitä koskaan kosteassa
tai märässä ympäristössä.
• Koske aina suoraan verkkoadapteriin irrottaessasi sitä pistora-
siasta. Älä vedä johdosta.
• Älä aseta mitään verkkoadapterin johdon päälle ja varmista,
ettei johto jää puristuksiin.
- 19 -
Page 22

• Älä koskaan tee virtajohtoon solmua, äläkä sido sitä yhteen
toisten johtojen kanssa. Sijoita verkkoadapterin johto niin, että
kukaan ei astu sen päälle tai kompastu siihen.
Laitteen vauriot!
• Älä aseta laitetta kalteville pinnoille, muuten se voi liukua
alas, pudota lattialle ja vahingoittua.
• Älä sijoita laitetta paikkaan, jossa se altistuu suoralle aurin-
gonvalolle. Muutoin laite saattaa ylikuumentua ja vaurioitua käyttökelvottomaksi.
Paristojen käsittely
Räjähdysvaara!
Älä heitä paristoja tuleen. Älä lataa paristoja uudelleen.
• Älä koskaan avaa paristoja, älä koskaan juota tai hitsaa
paristoja. Älä koskaan oikosulje paristoja. On olemassa
räjähdyksen ja loukkaantumisen vaara!
- 20 -
Page 23

• Jos laite on pidempään käyttämättä, poista paristo.
• Tarkasta paristo säännöllisesti. Vuotavat paristot saattavat
aiheuttaa laitevaurioita.
• Vaihda aina paristot samantyyppisiin paristoihin.
• Jos paristot ovat vuotaneet, käytä suojakäsineitä. Puhdista
paristokotelo ja paristoliitännät kuivalla liinalla.
• Paristoja ei saa jättää lasten käsiin. Lapset saattavat pistää
paristot suuhunsa ja niellä ne. Jos paristo on joutunut nieluun,
hakeudu välittömästi lääkärin hoitoon.
Ohje:
Huomaa, että laitteen kumijalat saattavat jättää jälkiä maalatuille,
herkille tai käsitellyille pinnoille. Aseta tarvittaessa laitteen jalkojen
alle liukumaton alusta.
- 21 -
Page 24

Tekniset tiedot
Tämä laite on tarkastettu ja hyväksytty EMC-direktiivin 2004/
108/EC perustavien vaatimusten ja muiden asianmukaisten
määräysten vastaavuuden varalta.
Jännitelähde:
Paristokäyttö: 9V-lohkoparisto, 6F22/6LR61
Käyttö verkkoadapterilla (vakautettu):
Tulojännite: 230 V ~ / 50 Hz
Lähtöjännite: 7 V , 100 mA /
Signaalin vahvistaminen: kork. 30 dB
Pistoketyyppi: 4P4C, RJ-9
Mitat (P x L x K): 105 x 65 x 25 mm
Paino: 73 g
RJ-pistokeliitännät kuvaavat pistokkeiden ja holkkien rakennemuotoja sekä niiden käyttöä televiestintäjohdotuksissa. Useimmat
RJ-pistokeliitännät perustuvat modulaaripistokkeisiin ja niitä
nimitetään puhekielessä myös Western-pistokkeiksi tai -holkeiksi.
Toinen mahdollinen nimitystapa on mahdollisten liitäntäpositioiden
("P" = positio) ja todella käytettävien liitäntöjen ("C") lukumäärä.
(ei sisälly toimitukseen)
(ei sisälly toimitukseen)
- 22 -
Page 25

Laitteen kuvaus
1 Painikkeet Tone H/L
2 Äänenvoimakkuuden merkkivalot
3 Painikkeet Volume -/+
4 Käytön merkkivalo
5 Liitäntä kuulokkeeseen
6 Painike MEM
7 Paristolokeron kansi
8 Liitäntäkohta verkkoadapterille 7V , 100 mA/
9 Liitäntä puhelimeen
0 4P4C/RJ-9- liitäntäjohto
Toimituslaajuus osat
• Puhelimen kuulokkeen äänenvahvistin
• 4P4C/RJ-9-liitäntäjohto
• Käyttöohje
Purkaminen pakkauksesta
Poista puhelimen kuulokkeen äänenvahvistin pakkauksesta.
Poista kaikki kuljetusvarmistimet ja pakkausmateriaalit.
- 23 -
Page 26

Liittäminen puhelimeen
Huomaa:
Liitä ensin puhelimen kuulokkeen äänenvahvistin puhelimeen
ennen sen kytkemistä virtalähteeseen. Varmista, että liität aina
ensin kuulokkeen puhelimen kuulokkeen äänenvahvistimeen ja
sitten äänenvahvistimen puhelimeen!
1. Ota kuulokejohdon pistoke puhelimesi kuulokepistokkeesta.
2. Liitä kuulokejohdon pistoke puhelimen kuulokkeen äänen-
vahvistimen kuulokeliitäntään 5.
3. Liitä 4P4C/RJ-9-liitäntäjohdon
lokkeen äänenvahvistimen puhelinliitäntään
toinen pää puhelimen kuulokeliitäntään.
yksi pää puhelimen kuu-
0
9
ja liitä
Jännitesyötön luominen
Paristokäyttö
Voit käyttää laitetta yhdellä paristolla (ei sisälly toimitukseen).
1. Avaa tätä varten puhelimen kuulokkeen äänenvahvistimen
pohjassa oleva paristokotelon kansi 7.
2. Aseta paristokoteloon 9V:n lohkoparisto. Varmista oikea
napaisuus. Varmista, että musta kangassuikale sijaitsee paristojen alla. Näin paristojen vaihtaminen on helpompaa.
3. Sulje paristokotelo. Paristokotelon kannen 7 on lukituttava
kuuluvasti paikoilleen.
- 24 -
Page 27

Huomaa:
Jos paristo on heikko, laitteen käytön merkkivalo 4 vilkkuu,
kun kuuloke on paikoillaan. Vaihda tässä tapauksessa paristo.
Verkkoadapterin liittäminen
Voit käyttää laitetta verkkoadapterilla (ei sisälly toimitukseen),
joka vastaa kohdassa "Tekniset tiedot" ilmoitettuja vaatimuksia.
1. Liitä tätä varten verkkoadapterin pistoke laitteessa olevaan
liitäntäholkkiin
2. Liitä sitten verkkoadapteri asianmukaisesti liitettyyn verkko-
pistorasiaan (230 V ~/ 50 Hz).
8
.
Käyttö
Äänenvoimakkuuden säätäminen
Äänenvoimakkuutta voidaan säätää 8 tasolla.
• Paina puhelun aikana useaan kertaan painiketta
Volume - 3 alentaaksesi äänenvoimakkuutta tai painiketta
Volume + 3 lisätäksesi äänenvoimakkuutta.
Tasoilla 7 ja 8 palavat kaikki kolme äänenvoimakkuuden
merkkivaloa 2. Tasoilla 1 ja 2 ei pala yhtään äänenvoimak-
kuuden merkkivaloa 2.
- 25 -
Page 28

Huomio:
Säädä äänenvoimakkuus alas, ennen kuin asetat kuulokkeen
korvalle. Paina tätä varten useamman kerran painiketta
Volume - 3, kunnes enää yksi äänenvoimakkuuden merkkivalo
2 palaa.
Äänen säätäminen
• Paina puhelun aikana kerran painiketta Tone H 1 vahvis-
taaksesi korkeita ääniä tai painiketta Tone L 1 vahvis-
taaksesi syviä ääniä.
Asetusten tallentaminen
Kuuloketta nostettaessa on äänenvoimakkuus esiasetettu tasolle 4
ja korkeiden äänten vahvistukselle.
• Jos haluat tallentaa toisen perusasetuksen, säädä ensiksi halu-
amasi äänenvoimakkuus.
• Pidä painiketta MEM 6 painettuna noin kahden sekunnin
ajan.
Äänenvoimakkuuden asetus on nyt tallennettu ja se voidaan
kutsua esiin koska tahansa painiketta MEM 6 painamalla.
Automaattinen sammutus
Kun kuuloke asetetaan paikoilleen, laite kytkeytyy automaattisesti
pois päältä noin 5 sekunnin kuluttua.
- 26 -
Page 29

Huomaa:
Jos puhelintasi käytetään tilaajavaihteen kautta, automaattinen
sammutus ei joissakin tapauksissa toimi. Tässä tapauksessa
paristo on poistettava laitteen ollessa pois käytöstä. Näin sen
purkautuminen estetään.
Vianetsintä
Merkkivalot eivät pala.
- Paristo on tyhjä tai asetettu paikoilleen väärin päin.
- Puhelimen kuulokkeen äänenvahvistinta ei ole liitetty oikein.
• Tarkista paristo ja vaihda se tarvittaessa.
• Tarkista liitännät.
Ei ääntä.
- Äänenvoimakkuus on asetettu minimiinsä.
- Puhelimen kuulokkeen äänenvahvistinta ei ole liitetty oikein.
• Lisää äänenvoimakkuutta.
• Tarkista liitännät.
Palauta laite takaisin toimitustilaansa.
Ota paristo paristokotelosta ja aseta se takaisin paikoilleen
noin 2 minuutin kuluttua.
- 27 -
Page 30

Säilytys ja puhdistaminen
• Säilytä laitetta kuivassa tilassa pakkaselta suojattuna.
• Jos et käytä laitetta pidempään aikaan, poista paristo paris-
tokotelosta.
• Puhdista laite kuivalla, pehmeällä liinalla.
• Älä käytä kemiallisia tai hankaavia puhdistusaineita. Ne voivat
vaurioittaa laitteen koteloa.
Hävittäminen
Älä missään tapauksessa heitä laitetta tavallisen
talousjätteen sekaan. Tämä tuote on eurooppalaisen
direktiivin 2002/96/EC mukainen.
Hävitä laite hyväksytyn jätteenhuoltoyrityksen tai
kunnallisen jätehuollon kautta. Noudata voimassa olevia
määräyksiä.
Ota epävarmoissa tapauksissa yhteyttä jätelaitokseesi.
Paristojen/akkujen hävittäminen
Paristoja/akkuja ei saa hävittää kotitalousjätteiden seassa.
Jokaisella käyttäjällä on lakisääteinen velvollisuus luovuttaa
paristot/akut kuntansa/kaupunginosansa tai kaupan keräilypisteeseen.
Tämän velvoitteen tarkoituksena on varmistaa paristojen ja
akkujen ympäristöystävällinen hävittäminen. Palauta
paristot/akut ainoastaan purkautuneina.
- 28 -
Page 31

Hävitä kaikki pakkausmateriaalit ympäristöystävällisellä
tavalla.
Takuu ja huolto
Laitteen takuu on 3 vuotta ostopäivästä. Laite on valmistettu
huolella ja tarkastettu perusteellisesti ennen toimitusta. Säilytä
ostokuitti tositteeksi ostosta.
Ota takuutapauksessa puhelimitse yhteyttä lähimpään huoltopisteeseen. Vain näin voidaan taata tuotteesi maksuton lähettäminen huoltoon.
Takuu koskee ainoastaan materiaali- ja valmistusvirheitä, ei
kuitenkaan kuluvia osia tai herkästi vaurioituvien osien, esim.
kytkinten tai akkujen vaurioita. Tuote on tarkoitettu ainoastaan
yksityiseen käyttöön. Tuotetta ei siten saa käyttää ammatillisiin
tarkoituksiin. Väärä tai asiaton käyttö, väkivallan käyttö ja muiden kuin valtuutetun huoltopisteen suorittamat korjaukset aiheuttavat takuun raukeamisen. Tämä takuu ei rajoita kuluttajan lakisääteisiä oikeuksia.
- 29 -
Page 32

Kompernass Service Suomi
Tel.: 010 30 935 80
(Soittamisen hinta lankaliittymästä: 8,21 snt/puh + 5,9 snt/min /
Matkapuhelimesta: 8,21 snt/puh + 16,90 snt/min)
e-mail: support.fi@kompernass.com
Maahantuoja
KOMPERNASS GMBH
BURGSTRASSE 21
D-44867 BOCHUM
www.kompernass.com
- 30 -
Page 33

Innehållsförteckning Sidan
Föreskriven användning 32
Säkerhetsanvisningar 32
Tekniska data 35
Beskrivning 36
Leveransens innehåll 36
Uppackning 37
Ansluta till telefon 37
Upprätta spänningsförsörjning 37
Användning 38
Automatisk frånkoppling 40
Åtgärda fel 40
Förvaring och rengöring 41
Kassering 41
Garanti och service 42
Importör 43
- 31 -
Page 34

TELEFONLURFÖRSTÄRKARE KH 5010
Läs igenom bruksanvisningen noga innan du börjar använda
apparaten och spara den för senare bruk. Lämna över bruksanvisningen tillsammans med apparaten om du överlåter den
till någon annan person.
Föreskriven användning
Telefonlurförstärkaren ska användas för att förstärka ljudet i luren
på en fast telefon. Den är inte avsedd att användas tillsammans
med bärbara telefoner. Apparaten är endast avsedd för privat
bruk och får inte användas yrkesmässigt eller industriellt.
Säkerhetsanvisningar
Risk för personskador!
• Den här apparaten ska inte användas av personer (inklusive
barn) med begränsad fysisk, sensorisk eller mental förmåga
eller bristande erfarenhet och kunskap om de inte först
övervakats eller instruerats av någon ansvarig person.
• Håll uppsikt över barnen så att de inte leker med apparaten.
• Sänk volymen innan du sätter luren mot örat. Anpassa sedan
ljudstyrkan efter behov. Undvik långvarig och onödig exponering för höga ljudnivåer. Det kan leda till hörselskador.
- 32 -
Page 35

Risk för elchocker!
• Anslut bara en nätadapter till ett godkänt eluttag. Nätspän-
ningen måste överensstämma med angivelsen på nätadapterns typskylt.
• Använd bara en stabiliserad nätadapter med en utspän-
ning på 7 V som ger minst 100 mA. Försäkra dig om
att den ihåliga kontaktens polaritet överensstämmer med
angivelsen på apparatens uttag när du ansluter en nätadapter.
• Koppla inte på inte apparaten om en nätadapter eller dess
kabel eller apparaten själv är skadad. Låt kvalificerad fackpersonal kontrollera och reparera den om det behövs för
att inte utsätta dig för onödiga risker.
• Utsätt aldrig apparaten för regn och använd den aldrig
i fuktiga eller våta utrymmen.
• Ta alltid tag i själva nätadaptern när du ska dra ut den ur
uttaget. Dra inte i kabeln.
• Ställ inga föremål på en nätadapters kabel och akta så att
den inte kläms fast någonstans.
• Gör aldrig några knutar på kabeln och bind inte ihop den
med andra kablar. Lägg kabeln till en nätadapter så att ingen
kan trampa på eller snubbla över den.
- 33 -
Page 36

Risk för skador på apparaten!
• Ställ inte apparaten på lutande underlag, då kan den glida
ner och falla i golvet så att den skadas.
• Ställ inte apparaten i direkt solljus. Då kan den överhettas
och bli totalförstörd.
Handskas med batterier
Explosionsrisk!
Kasta aldrig in batterier i en eld. Ladda aldrig upp batterier
(som inte är uppladdningsbara).
• Öppna, löd eller svetsa aldrig batterier. Kortslut aldrig
batterier. Då finns risk för explosion och personskador!
• Ta ut batteriet om du inte ska använda apparaten under
en längre tid.
• Kontrollera batteriet regelbundet. Läckande batterier kan
skada apparaten.
• Byt alltid till batterier av samma typ.
• Om batteriet läcker ska du ta på skyddshandskar. Rengör
batterifacket och batterikontakterna med en torr trasa.
• Små barn får inte handskas med batterier. De kan stoppa
dem i munnen och svälja dem. Om någon råkar svälja ett
batteri måste man genast uppsöka en läkare.
- 34 -
Page 37

Observera:
Tänk på att apparatens gummifötter kan göra märken på
lackerade, känsliga eller behandlade ytor. Lägg ett halkfritt
underlag under apparatens fötter om det behövs.
Tekniska data
Den här apparaten uppfyller de grundläggande kraven och
övriga relevanta föreskrifter i EMC-direktiv 2004/108/EC.
Spänningsförsörjning:
Batteridrift: 9V blockbatteri, 6F22/6LR61
Drift med nätadapter (stabiliserad):
Inspänning: 230 V ~ / 50 Hz
Utspänning : 7 V , 100 mA /
Signalförstärkning: max. 30 dB
Kontakttyp: 4P4C, RJ-9
Mått (L x B x H): 105 x 65 x 25 mm
Vikt: 73 g
RJ-kopplingar kallas modeller av kontakter, uttag och deras
kontaktbeläggningar som används till kablar för telekommunikation. De flesta RJ-kopplingar baseras på modularkontakter
och brukar i folkmun också kallas westernkontakter och -uttag.
(ingår inte)
(ingår inte)
- 35 -
Page 38

Ytterligare en typ av beteckning är antalet möjliga kontaktpositioner (“P” för Positions) och det faktiska antalet bestyckade
kontakter (“C” för Contacts).
Beskrivning
1 Knappar Tone H/L
2 Volymlampor
3 Knappar Volume -/+
4 Driftlampa
5 Uttag To Handset
6 Knapp MEM
7 Lock till batterifack
8 Uttag för nätadapter 7V , 100 mA/
9 Uttag To Phone
0 4P4C/RJ-9 anslutningskabel
Leveransens innehåll
• Telefonlurförstärkare
• 4P4C/RJ-9 anslutningskabel
• Bruksanvisning
- 36 -
Page 39

Uppackning
Ta upp telefonlurförstärkaren ur förpackningen.
Ta bort alla transportskydd och allt förpackningsmaterial.
Ansluta till telefon
Observera:
Koppla först telefonlurförstärkaren till telefonen innan du kopplar på spänningsförsörjningen. Kom ihåg att alltid först ansluta
luren till telefonlurförstärkaren och sedan telefonlurförstärkaren
till telefonen!
1. Dra ut kontakten till telefonlurens kabel ur uttaget på tele-
fonluren.
2. Sätt kabelns kontakt i uttaget To Handset 5 på tele-
fonlurförstärkaren.
3. Sätt den ena änden av anslutningskabel 4P4C/RJ-9
uttaget To Phone
koppla den andra änden till uttaget på telefonluren.
på telefonlurförstärkaren och
9
0
i
Upprätta spänningsförsörjning
Batteridrift
Apparaten kan drivas med ett batteri (ingår inte i leveransen).
1. Öppna locket till batterifacket 7 på förstärkarens undersida.
- 37 -
Page 40

2. Lägg in ett 9V-blockbatteri i batterifacket. Se till så att poler-
na ligger rätt. Kontrollera att den svarta textilremsan ligger
under batteriet, så blir det lättare att byta batteri sedan.
3. Stäng batterifacket. Det ska höras att locket 7 klickar fast.
Observera:
Om batteriet börjar bli urladdat blinkar apparatens driftlampa
4 när luren ligger på. Byt i så fall batteriet.
Ansluta nätadapter
Apparaten kan också drivas med en nätadapter (ingår inte i
leveransen) som motsvarar specifikationerna i "Tekniska data".
1. Sätt nätadapterns kontakt i motsvarande uttag
raten.
2. Sätt sedan nätadaptern i ett godkänt eluttag med 230 V ~/
50 Hz.
8
på appa-
Användning
Ställa in volym
Volymen kan ställas in i 8 steg.
• Tryck upprepade gånger på knappen Volume - 3 under
ett telefonsamtal för att minska volymen eller på knappen
Volume + 3 för att öka den.
- 38 -
Page 41

På läge 7 och 8 lyser alla tre volymlamporna 2. På läge
1 och 2 lyser ingen volymlampa 2.
OBS:
Minska volymen innan du sätter luren till örat. Tryck då flera gånger på knappen Volume - 3 tills bara en av volymlamporna 2
lyser.
Ställa in ljud
• Tryck en gång på knappen Tone H 1 under ett telefon-
samtal för att öka diskanten och på knappen Tone L 1 för
att öka basen.
Spara inställningar
När du lyfter luren är volymen inställd på steg 4 och diskanten
är förstärkt.
• Om du vill spara andra grundinställningar ställer du först in
önskad volym.
• Håll knappen MEM 6 inne i ungefär 2 sekunder.
Den nya inställningen har nu sparats och kan tas fram när som
helst om du trycker på knappen MEM 6.
- 39 -
Page 42

Automatisk frånkoppling
När luren ligger på stängs apparaten av automatiskt efter
ca 5 sekunder.
Observera:
Om din telefon är kopplad till en växel kan det hända att den
automatiska frånkopplingen inte fungerar i vissa fall. Då måste
man ta ut batteriet för att det inte ska laddas ur när apparaten
inte används.
Åtgärda fel
Lamporna lyser inte.
- Batteriet är urladdat eller ligger med polerna åt fel håll.
- Telefonlurförstärkaren är inte rätt ansluten.
• Kontrollera batteriet och byt om det behövs.
• Kontrollera anslutningarna.
Det kommer inget ljud.
- Volymen är inställd på minimum.
- Telefonlurförstärkaren är inte rätt ansluten.
• Öka volymen.
• Kontrollera anslutningarna.
- 40 -
Page 43

Återställ apparaten till leveranstillståndet.
Ta ut batteriet ur batterifacket och lägg tillbaka det efter ca
2 minuter.
Förvaring och rengöring
• Förvara apparaten frostfritt på ett torrt ställe.
• Ta ut batteriet om du inte ska använda apparaten under
en längre tid.
• Torka av apparaten med en torr, mjuk trasa.
• Använd inga kemiska eller slipande rengöringsmedel. Då kan
höljets yta skadas.
Kassering
Apparaten får absolut inte kastas bland de vanliga
hushållssoporna. Produkten faller under den europeiska riktlinjen 2002/96/EC.
Lämna in den till ett företag som har tillstånd att ta
hand om den här typen av uttjänta apparater eller till din
kommunala avfallsanläggning. Följ gällande föreskrifter.
Kontakta din avfallsanläggning om du har några frågor.
Kassera batterier
Vanliga batterier och uppladdningsbara batterier får inte kastas
bland hushållssoporna. Den som använder någon typ av batterier är skyldig enligt lag att lämna in dem till ett insamlings-
- 41 -
Page 44

ställe i sin kommun eller stadsdel eller lämna tillbaka dem till
återförsäljaren.
Den här bestämmelsen är till för att batterier ska kunna kasseras
utan att skada miljön. Lämna bara in urladdade batterier för
återvinning/destruktion.
Lämna in allt förpackningsmaterial till miljövänlig
återvinning.
Garanti och service
För den här apparaten lämnar vi tre års garanti från och med
inköpsdatum. Den här apparaten har tillverkats med omsorg
och genomgått en noggrann kontroll innan leveransen. Var
god bevara kassakvittot som köpbevis.
Vi ber dig kontakta vår kundtjänst per telefon vid garantifall.
Bara då kan du skicka in produkten utan kostnad.
Garantin gäller bara för material- och fabrikationsfel och täcker
inte förslitningsdelar eller skador på ömtåliga delar, som t ex
knappar och batterier. Produkten är endast avsedd för privat
bruk och får inte användas yrkesmässigt. Vid missbruk och felaktig behandling, användande av våld och vid ingrepp som
inte gjorts av vår auktoriserade servicefilial upphör garantin
att gälla. Den lagstadgade garantin begränsas inte av denna
garanti.
- 42 -
Page 45

Kompernass Service Sverige
Tel.: 0770 93 00 35
e-mail: support.sv@kompernass.com
Kompernass Service Suomi
Tel.: 010 30 935 80
(Soittamisen hinta lankaliittymästä: 8,21 snt/puh + 5,9 snt/min /
Matkapuhelimesta: 8,21 snt/puh + 16,90 snt/min)
e-mail: support.fi@kompernass.com
Importör
KOMPERNASS GMBH
BURGSTRASSE 21
D-44867 BOCHUM
www.kompernass.com
- 43 -
 Loading...