

Page 1
4 C
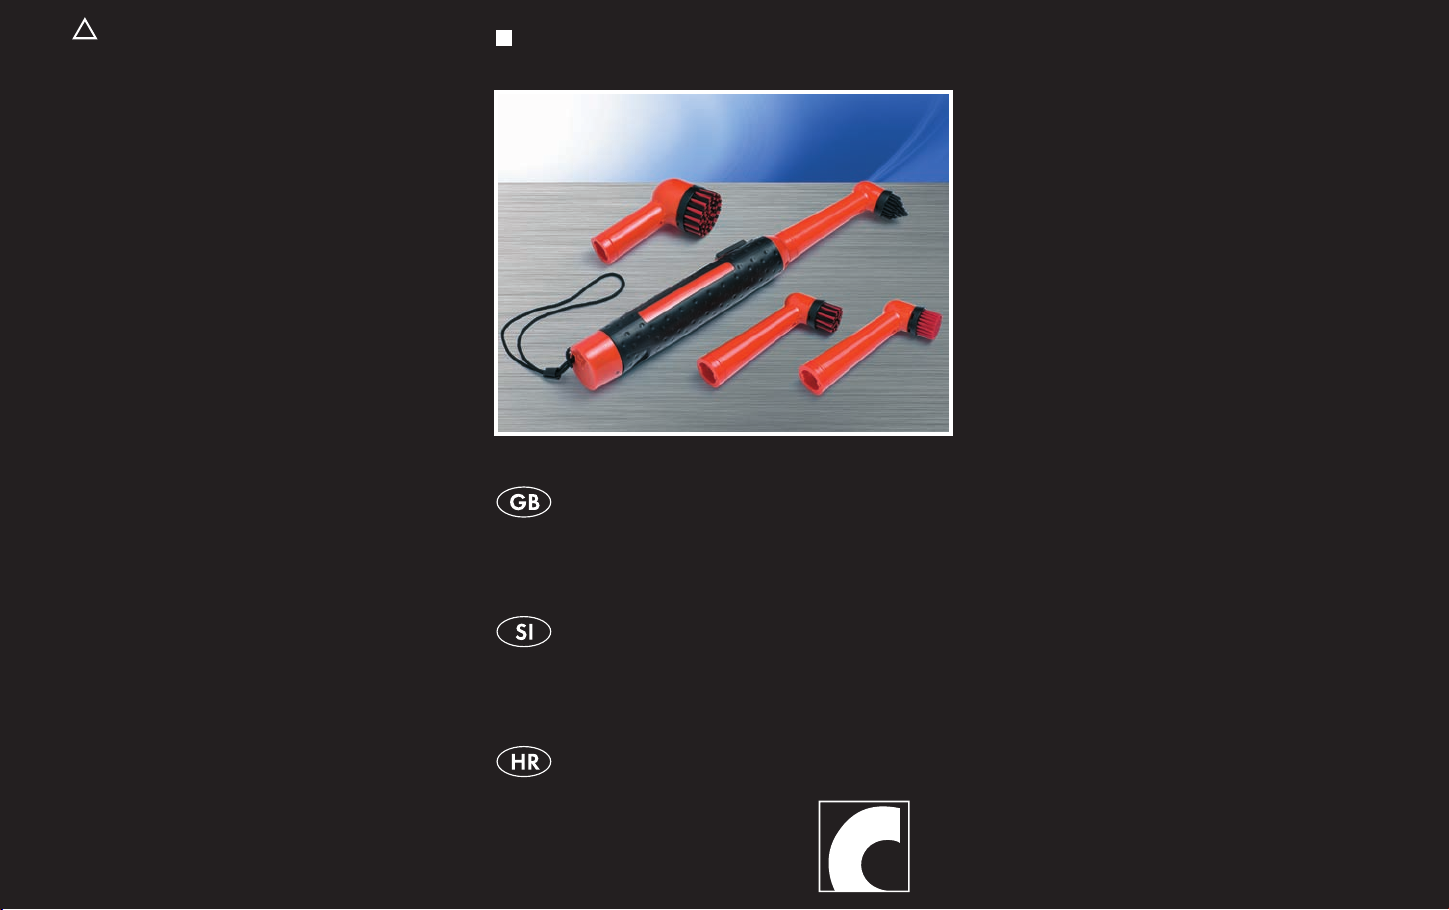
ELECTRIC CLEANING BRUSH
KH 4214
ELECTRIC CLEANING BRUSH
Operating manual
KOMPERNASS GMBH
BURGSTRASSE 21 • D-44867 BOCHUM
www.kompernass.com
ID-NR.: KH4214-09/03-V3
ELEKTRIÈNA ÈISTILNA KRTAÈA
Navodila za uporabo
ELEKTRIÈNA ÈETKA ZA ÈIŠÆENJE
Upute za uporabu
Page 2
KH 4214
e e
q
w
r
t
y
e e
u
Page 3
INDEX PAGE
Intended Usage 2
Items supplied 2
Technical Data 2
Safety instructions 2
The device components 4
Setting up the device 4
Cleaning and care 7
Disposal 7
CE Conformity 8
Importer / Service 8
Read these operating instructions carefully before
using the device for the rst time and preserve this
booklet for later reference. Pass this booklet on to
whoever might acquire the device at a future date.
- 1 -
Page 4
Intended Usage
This device is intended for the cleaning of objects,
and especially for cleaning dicult to reach places. It is not suitable for commercial or industrial
applications or for personal hygiene. No warranty
will be granted for damages resulting from improper use of the device!
Items supplied
1 Brush drive/Hand element
4 Brush attachments
4 Batteries
1 Operating manual
Technical Data
Battery driven, 4 x 1.5V Batteries, AA, Mignon
Safety type: IPX4
Safety instructions
Do not permit children to handle electrical •
devices without supervision, as they cannot correctly assess the possible risks of injury.
•
This device is not intended for use by individuals (including children) with restricted physical,
physiological or intellectual abilities or deciencies in experience and/or knowledge unless
they are supervised by a person responsible for
their safety or receive from this person instruction in how the device is to be used. Children
should be supervised to ensure that they do not
play with the device.
- 2 -
Page 5
Risk of explosion!
Do not throw batteries into a re or subject them •
to high temperatures.
•
Do not recharge batteries and do not short-
circuit them.
•
Never open batteries, never solder or weld batteries. The risk of explosions and injuries exists!
Information regarding the handling
of batteries
•
Regularly check the condition of the batteries.
Leaking batteries can cause damage to the
device.
•
Always change all batteries at the same time
and always use batteries of the same type.
•
If you do not intend to use the device for an ex-
tended period, remove the batteries.
•
In the event of the batteries leaking, put on pro-
tective gloves and then clean the battery compartment and the contacts with a dry cloth.
Risk of injury
Leaking battery acid can cause inammation of •
the skin. Should battery acid make contact with
the skin, rinse the aected area with copious
amounts of water. If the liquid comes into contact with your eyes, rinse them thoroughly with
clean water, do not rub them and immediately
consult a doctor.
- 3 -
Page 6
Keep batteries well away from children. Chil-•
dren can put batteries into their mouths and
swallow them. If a battery is swallowed medical
assistance must be sought immediately.
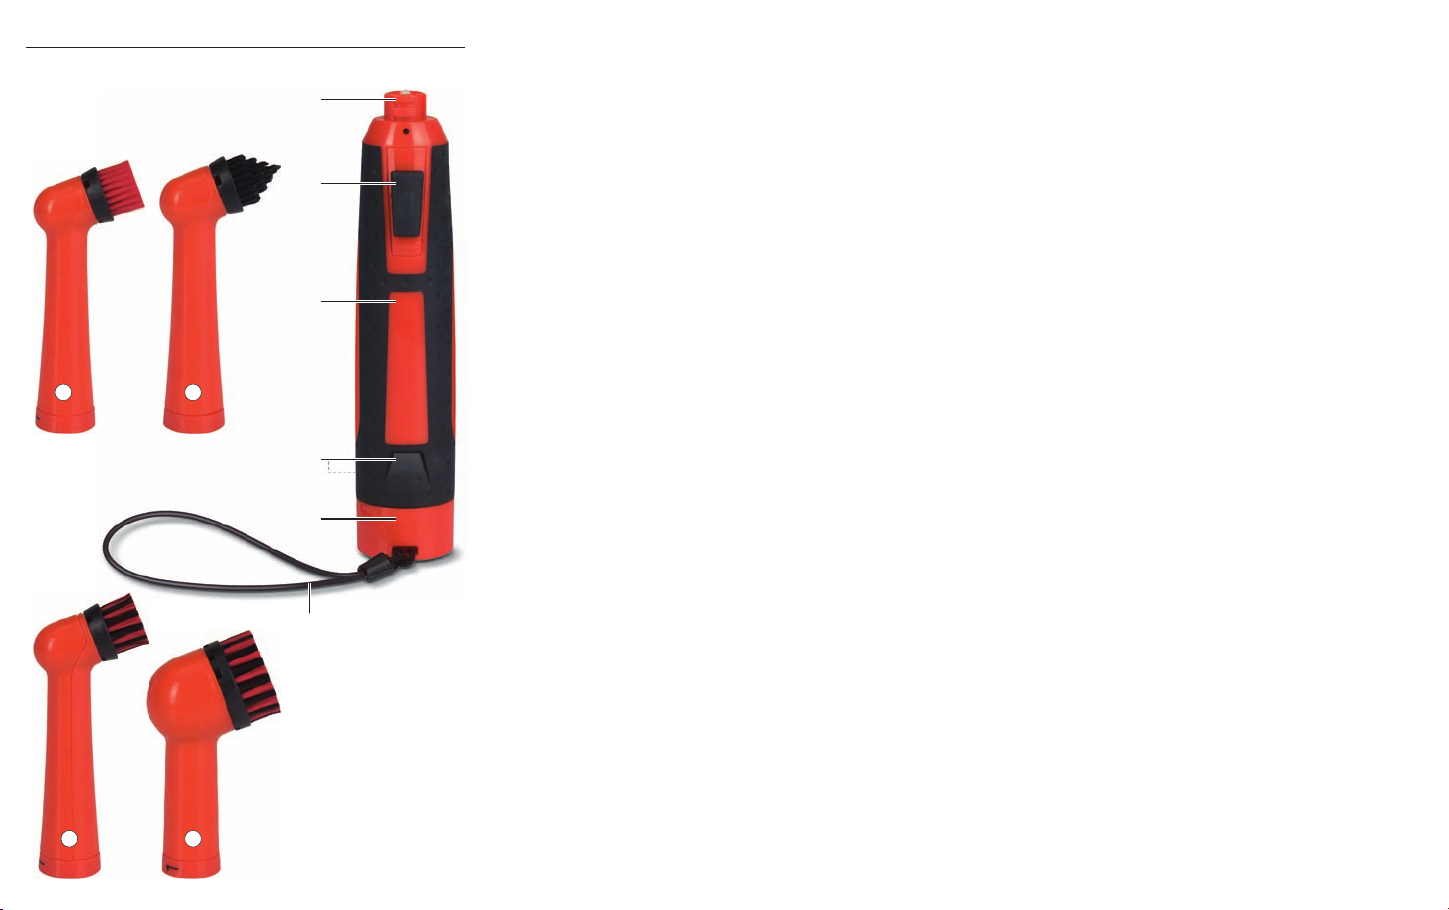
The device components
q Flange for brush attachments
w On/O switch
e Brush attachments
r Brush drive/Hand element
t Pressure area of the battery compartment
opener
y
Battery compartment cover
u Wrist cord
Setting up the device
Take all device components out of the carton and
remove all packaging and adhesive foils.
Open the battery compartment by pressing on
>
the pressure area of the battery compartment
opener t and then removing the battery compartment cover y from the device.
>
Insert 4 x 1.5V batteries, size AA Mignon, into
the battery compartment as per the markings
shown on the side of the separator in the bat-
tery compartment.
> y.
Replace the battery compartment cover
Thereby, the two point markings, on the battery
compartment cover and on the battery compartment, must lie one above the other.
- 4 -
Page 7
> Select a suitable brush attachment e, the
choice criteria being the type of soiling that has
to be removed and its positioning resp. extent:
• A brush attachment e with red/black bristles
is ideal for removing stubborn soiling, for exam-
ple, on door hinges and under vehicle bonnets.
• For less stubborn soiling, use the brush attachment e with red bristles, as these are softer
and thus more suitable for the cleaning of
chrome, leather and smooth surfaces, without
scratching them.
• For soiling at dicult to reach locations use
the brush attachment e with conically shaped
bristles, for example, for the cleaning of ventila-
tion slots.
> e onto the
Place the selected brush attachment
ange q for the brush attachments, such that
the slots on the attachment glide onto the guide
tracks on the ange q.
> e clockwise
Then turn the brush attachment
through approx. 45° to secure it rmly to the
ange. The arrow symbol on the brush attachment e must then point towards the black spot
on the ange q.
>
If required, place a suitable cleaning agent
onto the bristles and then bring the device into
position at the location to be cleaned. For stub-
born soiling, especially on cars and motorbikes,
a solvent may be necessary.
- 5 -
Page 8
CAUTION
Particles of dirt and/or cleaning agent may be
widely scattered by the rotating bristles. When
using this device, protect your eyes with a pair of
safety glasses! Take care not to soil your clothing.
When you press on the On/O switch
> w, the
bristles rotate for as long as you hold the On/
O switch w down.
> w in the direc-
If you slide the On/O switch
tion of the brush attachment e, the bristles will
rotate continuously.
>
For dicult application situations, or if there is
a risk that the device could fall into a dicult to
reach location, you should pass your working
hand through the wrist cord u before starting
to use the device.
>
To stop the bristle rotation, slide the On/O
switch w back into its start position.
> e, rst turn it
To remove a brush attachment
anti-clockwise through approx. 45° then re-
move it.
>
Should the performance of the device diminish,
this means the batteries are depleted. Replace
them with new batteries of the same type.
- 6 -
Page 9

Cleaning and care
Never submerse the device or its
components in water or other uids! Do not
allow any liquids to penetrate into the housing.
This could damage the device or cause a short
circuit.
After use, clean the brush attachments
> e with
water and a mild detergent.
Cleaning the Brush drive/Hand element r:
Clean the housing with a slightly damp
cloth Never use petrol, solvents or detergents,
they can damage plastics!
Disposal
Do not dispose of the device in your
normal domestic waste. This product
is subject to the provisions of European Directive 2002/96/EC.
Cleaning brush
•
Arrange for the product, or parts of it, to be
disposed of by a professional waste disposal
company or by your communal waste facility.
•
Observe the currently applicable regulations.
In case of doubt, please contact your waste
disposal centre.
Batteries/rechargeable batteries
Used batteries/rechargeable batteries may not
•
be disposed of in household waste.
- 7 -
Page 10

Batteries/rechargeable batteries can contain •
toxic substances which may damage the environment. Therefore, dispose of the batteries/
rechargeable batteries in accordance with statutory regulations.
•
Every consumer is statutorily obliged to dispose
of batteries/rechargeable batteries at a community collection centre in their district or to
a dealer. The purpose of this obligation is to
ensure that batteries are disposed of in a non-
polluting manner.
•
Only dispose of batteries when they are fully
discharged.
Dispose of packaging materials in an environmentally responsible manner.
CE Conformity
This device has been tested and approved regard-
ing conformance with the fundamental requirements and other relevent regulations of the EMV
Directive 2004/108/EC.
Importer / Service
KOMPERNASS GMBH
BURGSTRASSE 21
44867 BOCHUM, GERMANY
www.kompernass.com
- 8 -
Page 11

KAZALO VSEBINE STRAN
Predvidena uporaba 10
Vsebina kompleta 10
Tehnični podatki 10
Varnostni napotki 10
Deli naprave 12
Priprava na uporabo 12
Čiščenje in nega 15
Odstranitev 15
Skladnost CE 16
Uvoznik/servis 16
Pred prvo uporabo ta navodila skrbno preberite
in jih shranite za poznejšo uporabo. Pri izročanju
naprave tretji osebi je treba predati tudi ta navodila.
- 9 -
Page 12

Predvidena uporaba
Ta izdelek služi čiščenju predmetov, še posebej
na težko dostopnih mestih. Ni primeren za obrtno
ali industrijsko uporabo ali za nego telesa. Za
škodo, ki nastane zaradi nepredvidene uporabe
naprave, ne prevzamemo nobene odgovornosti!
Vsebina kompleta
1 pogon za ščetke/ročni del
4 nastavki s ščetko
4 baterije
1 navodila za uporabo
Tehnični podatki
Napajanje z baterijami, 4 x baterije 1,5V, AA,
Mignon
Vrsta zaščite: IPX4
Varnostni napotki
Otrokom ne dovolite nenadzorovanega roko-•
vanja z izdelkom, ker morebiti ne znajo zmeraj
pravilno oceniti nevarnosti poškodb.
•
Ta izdelek ni namenjen temu, da bi ga uporabljale osebe (tudi otroci ne) z omejenimi zičnimi, zaznavnimi ali duševnimi sposobnostmi ali
s pomanjkljivimi izkušnjami in/ali znanjem, razen pod nadzorom osebe, ki je zanje odgovorna ali jim je dala navodila v zvezi z uporabo
izdelka. Otroke je treba nadzorovati, da se z
izdelkom ne bi igrali.
- 10 -
Page 13

Nevarnosteksplozije!
Baterij ne vrzite v ogenj ali jih izpostavite viso-•
kim temperaturam.
•
Baterij ne polnite in jih nikoli ne zvežite na
kratko.
•
Baterij nikoli ne odpirajte, spajkajte ali varite.
Obstaja nevarnost eksplozije in poškodb!
Napotkizarokovanjezbaterijami
Baterije redno preverjajte. Iztekajoče baterije •
lahko povzročijo poškodbe naprave.
•
Baterije po potrebi zmeraj zamenjajte vse naenkrat in nikoli ne vstavljajte istočasno baterij
različnega tipa.
•
Če naprave dlje časa ne uporabljate, baterije
vzemite ven.
•
Pri izteklih baterijah uporabljajte zaščitne rokavice in predalček za baterije ter baterijske
kontakte očistite s suho krpo.
Nevarnostpoškodb
Kislina, ki izteka iz baterije, lahko razdraži •
kožo. Če pride v stik s kožo, mesto sperite z
veliko vode. Če tekočina zaide v oči, jih temeljito sperite z veliko vode, ne drgnite in pojdite
takoj k zdravniku.
- 11 -
Page 14

Baterije ne smejo zaiti v otroške roke. Otroci •
bi baterije lahko dali v usta in jih pogoltnili. Če
pride do zaužitja baterije, je treba takoj poiskati zdravniško pomoč.
Deli naprave
q Prirobnica za nastavek s ščetko
w Stikalo za vklop/izklop
e Nastavki s ščetko
r Pogon za ščetke/ročni del
t Odpiralni nastavek predalčka za baterije
y Pokrov predalčka za baterije
u Zanka
Priprava na uporabo
Najprej iz embalaže vzemite vse dele kompleta
in z njih odstranite vse embalažne materiale.
Odprite predalček za baterije, tako da priti-
>
snete na površino odpiralnega nastavka predalčka za baterije t in pokrov predalčka za
baterije y potegnete z naprave.
>
V predalček za baterije vstavite 4 x 1,5V baterije velikosti AA, Mignon, v skladu z načrtom
na pregradi v predalčku za baterije.
> y ponovno na-
Pokrov predalčka za baterije
mestite. Pri tem se morata obe točkovni oznaki
na pokrovu predalčka za baterije in na predalčku za baterije nahajati ena nad drugo.
- 12 -
Page 15

Izberite nastavek s ščetko > e, ustrezen umaza-
niji za odstranitev in kraju, kjer se ta nahaja,
oziroma njeni razširjenosti:
• Nastavek s ščetko e z rdečimi/črnimi ščetinami je primeren za odstranjevanje trdovratne
umazanije, kot npr. na vratnih tečajih ali pod
pokrovom motorja.
• V primeru lažje umazanije uporabite nastavek s ščetko e z rdečimi ščetinami, ker so
te bolj mehke, na primer za čiščenje kroma,
usnja in gladkih površin brez praskanja.
• Pri umazaniji na težko dostopnih mestih
uporabite nastavek s ščetko e s konično oblikovanimi ščetinami, npr. za čiščenje prezračevalnih rež.
> e tako namestite na
Želeni nastavek s ščetko
prirobnico q za nastavek s ščetko, da utori
nastavka zdrsnejo na vodilo na prirobnici q.
> e obrnite za pribl.
Potem nastavek s ščetko
45° v smeri urnega kazalca, da ga pritrdite
na prirobnico. Simbol puščice na nastavku s
ščetko e mora potem kazati na črno piko na
prirobnici q.
>
Na ščetke nanesite čistilno sredstvo, primerno
za postopek čiščenja, in napravo položite na
mesto za čiščenje. Pri trdovratni umazaniji,
posebej pri avtomobilih in motornih kolesih, je
pogosto potrebno topilo.
- 13 -
Page 16

Previdno!
Zaradi vrtečih ščetin lahko pride do izmeta delcev umazanije ali čistilnih sredstev. Pri uporabi te
naprave si oči zavarujte z zaščitnimi očali! Pazite,
da si ne umažate oblačil.
Če pritisnete stikalo za vklop/izklop
> w, se
bodo ščetke vrtele tako dolgo, dokler držite
stikalo za vklop/izklop w pritisnjeno.
> w v smeri
Potisnite stikalo za vklop/izklop
nastavka s ščetko e, da se bodo ščetine vrtele
trajno.
>
V primeru težjih situacij uporabe ali če bi naprava lahko na težko dostopnem mestu padla
dol, z roko, s katero boste uporabljali napravo, sezite skozi zanko u, preden napravo
začnete uporabljati.
> w potisnite nazaj v
Stikalo za vklop/izklop
izhodiščni položaj, da prekinete vrtenje.
> e tega naj-
Za odstranitev nastavka s ščetko
prej obrnite za pribl. 45° v nasprotni smeri
urnega kazalca, potem ga snemite.
>
Če bi moč naprave pojemala, so baterije izrabljene. Takšne baterije zamenjajte s svežimi
baterijami istega tipa.
- 14 -
Page 17

Čiščenje in nega
Delov naprave nikoli ne potopite pod
vodo ali druge tekočine! Ne dovolite, da
bi v ohišje zašle tekočine. To bi napravo
poškodovalo ali povzročilo kratek stik.
Po uporabi očistite
> nastavke s ščetko e z vodo
in blagim čistilom.
Čiščenje pogona za ščetke/ročnega dela r:
Površino ohišja očistite z rahlo
navlaženo krpo. Nikoli ne uporabljajte
bencina, topil ali čistil, ki nagrizejo umetno
snov!
Odstranitev
Naprave nikakor ne odvrzite
v običajne gospodinjske odpadke.
Za ta izdelek velja evropska direktiva 2002/96/EC.
Ščetka za čiščenje
•
Izdelek ali njegove dele oddajte pri registriranem podjetju za odstranjevanje odpadkov ali
pri najbližjem komunalnem podjetju.
•
Upoštevajte trenutno veljavne predpise.
V primeru dvoma se obrnite na svoje podjetje
za predelavo odpadkov.
Baterije/akumulatorji
Baterij in akumulatorjev ni dovoljeno odvreči v
•
gospodinjske odpadke.
- 15 -
Page 18

Baterije/akumulatorji lahko vsebujejo strupene •
snovi, ki so škodljive za okolje. Zato baterije
obvezno odstranite v skladu z veljavnimi zakonskimi določili.
•
Vsak potrošnik je po zakonu dolžan, baterije/
akumulatorje oddajati na ustreznem zbirališču
v svoji občini/četrti ali v trgovini. Ta obveza
služi temu, da se baterije/akumulatorji lahko
oddajo za okolju prijazno odstranjevanje.
•
Baterije/akumulatorje oddajajte samo prazne.
Vse embalažne materiale oddajte v reciklažo.
Skladnost CE
Ta izdelek je bil preizkušen in ima potrdilo
o izpolnjevanju temeljnih zahtev in drugih
ustreznih predpisov Direktive o elektromagnetni
združljivosti 2004/108/EC.
Uvoznik/servis
KOMPERNASS GMBH
BURGSTRASSE 21
44867 BOCHUM, NEMČIJA
www.kompernass.com
- 16 -
Page 19

SADRŽAJ STRANA
Upotreba u skladu sa namjenom 18
Obim isporuke 18
Tehnički podaci 18
Sigurnosne upute 18
Dijelovi uređaja 20
Puštanje uređaja u rad 20
Čišćenje i održavanje 23
Zbrinjavanje 23
CE-Konformitet 24
Uvoznik / Servis 24
Upute za rukovanje prije prve upotrebe pažljivo
pročitajte i sačuvajte ih za kasnije korištenje. Ukoliko uređaj dajete trećim osobama, priložite i ove
upute.
- 17 -
Page 20

Upotrebauskladusanamjenom
Ovaj proizvod služi za čišćenje predmeta, posebno na teško pristupačnim mjestima. On nije
prikladan za komercijalnu ili industrijsku uporabu
ili za održavanje tjelesne higijene. Za štete, koje
nastaju uslijed nenamjenske uporabe uređaja, ne
preuzima se nikakvo jamstvo!
Obimisporuke
1 Pogon za četku / ručni dio
4 Nastavka sa četkom
4 Baterije
1 Upute za uporabu
Tehničkipodaci
Baterijski pogon, 4 x 1,5V-baterije, AA, Mignon
Vrsta zaštite: IPX4
Sigurnosneupute
Ne dopustite djeci da bez nadzora rukuju sa •
ovim proizvodom - jer ona moguće opasnosti
od ozljeđivanja ne mogu uvijek ocijeniti na
pravi način.
•
Ovaj proizvod nije namijenjen da bude korišten
od strane osoba (uključujući djecu) sa ograničenim zičkim, senzoričnim i mentalnim sposobnostima ili sa pomanjkanjem iskustva i/ili znanja,
osim ako one stoje pod nadzorom osobe zadužene za njihovu sigurnost ili osobe od koje
primaju naputke o načinu rukovanja sa proizvodom. Djeca trebaju biti nadzirana, kako bi bilo
osigurano da se ne igraju sa proizvodom.
- 18 -
Page 21

Opasnostodeksplozije!
Baterije ne bacajte u vatru i ne izlažite ih viso-•
kim temperaturama.
•
Ne vršite ponovno punjenje baterija i nikada
ne premostite baterije u kratki spoj.
•
Nikada ne otvarajte baterije, ne vršite lemljenje ili varenje baterija.
Postoji opasnost od eksplozije i od ozljeđivanja!
Napomeneuvezirukovanjasa
baterijama.
•
U redovnim vremenskim razmacima kontrolirajte baterije. Baterije, koje cure, mogu uzrokovati
oštećenje uređaja.
•
Uvijek izvršite zamjenu svih baterija istovremeno i nikada ne miješajte baterije različitog tipa.
•
Kada uređaj ne koristite duže vrijeme, izvadite
baterije.
•
U slučaju iscurjelih baterija navucite zaštitne rukavice i očistite pretinac za baterije i baterijske
kontakte sa suhom krpom.
Opasnostodozljede
Baterijska kiselina, koja izlazi iz baterije, može •
dovesti do nadražaja kože. U slučaju kontakta
sa kožom isperite sa velikom količinom vode.
Ako tekućina dospije u oči, temeljito isperite sa
vodom, ne ribajte i odmah potražite liječničku
pomoć.
- 19 -
Page 22

Baterije ne smiju dospjeti u dječje ruke. •
Djeca bi baterije mogla staviti u usta i progutati. Ukoliko je došlo do gutanja baterije, neizostavno mora biti zatražena liječnička pomoć.
Dijeloviuređaja
q Flanš za nastavak sa četkom
w Prekidač Uklj/Isklj
e Nastavci sa četkom
r Pogon za četku / ručni dio
t Potisne površine otvarača pretinca za baterije
y Poklopac pretinca za baterije
u Ručna omča
Puštanjeuređajaurad
Prvo sve dijelove uređaja izvadite iz pakiranja
i odstranite sve materijale ambalaže.
Otvorite pretinac za baterije tako, što ćete pri-
>
tisnuti potisne površine otvarača pretinca t
i zatim poklopac pretinca za baterije y povlačenjem skinuti sa uređaja.
>
Postavite 4 x 1,5V- baterije veličine AA, Mignon u pretinac za baterije u skladu sa položajnim nacrtom, koji se nalazi na bočnom dijelu razdvojnog elementa u pretincu za baterije.
> y pono-
Zatim poklopac pretinca za baterije
vo postavite. Pritom moraju dvije oznake na
poklopcu pretinca za baterije i na samom
pretincu ležati jedna iznad druge.
- 20 -
Page 23

Ovisno o vrsti nečistoće, koja treba biti uklo- >
njena i položaja nečistoće odaberite jedan
prikladan nastavak sa četkom e:
• Nastavak sa četkom e sa crveno/crnim čekinjama prikladan je za uklanjanje tvrdokornih
nečistoća, kao npr. na šarnirima vrata ili pod
poklopcem motora.
• Kod manje tvrdokornih nečistoća koristite
nastavak sa četkom e sa crvenim čekinjama,
jer su one mekše. Sa ovim nastavkom možete
npr. čistiti krom, kožu i glatke površine, bez da
ostavite ogrebotine.
• Kod onečišćenja na teško pristupačnim
mjestima koristite nastavak sa četkom e sa konično oblikovanim čekinjama, npr. za čišćenje
ventilacijskih otvora.
> e tako
Postavite željeni nastavak sa četkom
na anš q za nastavak, da utori nastavka
mogu u vodilice anša q ukliznuti.
> e za ca.
Zatim okrenite nastavak sa četkom
45° u smjeru kazaljke na satu, kako biste ga
na anšu blokirali. Simbol strelice na nastavku
sa četkom e onda mora biti usmjeren u pravcu crne točke na anšu q.
>
Po potrebi na čekinje nanesite sredstvo za
čišćenje prikladno za postupak čišćenja, te
uređaj postavite na mjesto koje želite očistiti. U
slučaju tvrdokornih onečišćenja, posebno kod
automobila ili motocikala, često će biti potrebno korištenje otapala.
- 21 -
Page 24

Oprez!
Rotirajuće čekinje mogu bacati čestice nečistoće
ili sredstva za čišćenje. Zaštitite oči zaštitnim naočalama, dok radite sa ovim uređajem! Obratite
pažnju na to, da odjeću ne zaprljate.
Ako pritisnete prekidač Uklj/Isklj
> w, čekinje će
rotirati sve dok prekidač Uklj/ISklj w držite.
> w u smjeru nastav-
Gurnite prekidač Uklj/Isklj
ka sa četkom e, ako želite da čekinje trajno
rotiraju.
>
U situacijama sa težom primjenom, ili kada bi
uređaj na teško dostupnom mjestu mogao pasti, radnu ruku biste trebali provući kroz ručnu
omču u prije nego što uređaj koristite.
> w natrag u početni
Gurnite prekidač Uklj/Isklj
položaj, kako biste rotiranje zaustavili.
> e skinuli, prvo
Da biste nastavak sa četkom
ga okrenite za ca. 45° u smjeru protivnom
kazaljci sata, a zatim ga skinite.
>
Ukoliko učinak uređaja počne opadati, to znači da su baterije ispražnjene. U tom slučaju
baterije zamijenite svježim baterijama jednakog tipa.
- 22 -
Page 25

Čišćenjeiodržavanje
Dijelove uređaja nikada ne uronite
u vodu ili druge tekućine! Osim toga ne
dopustite da
tekućine dospiju u kućište uređaja. To bi
oštetilo uređaj ili izazvalo kratki spoj.
> nastavke sa četkom
Nakon uporabe očistite
e u vodi i blagom sredstvu za čišćenje.
Čišćenje pogona/ručnog dijela r:
Površinu kućišta očistite pomoću blago
navlažene krpe. Nikada ne koristite benzin,
otapala ili sredstva za čišćenje agresivna za
plastične materije!
Zbrinjavanje
Uređaj nikako ne bacajte u obično
kućno smeće. Ovaj proizvod podliježe europskoj smjernici 2002/96/EC.
Četka za čišćenje
•
Proizvod ili njegove dijelove zbrinite preko
autorizirane ustanove za zbrinjavanje otpada
ili preko Vaše komunalne ustanove za zbrinjavanje.
•
Obratite pažnju na aktualno važeće propise.
U slučaju dvojbe se povežite sa Vašom mjesnom ustanovom za zbrinjavanje.
Baterije/akumulatori
Baterije/akumulatori ne smiju biti zbrinuti za-
•
jedno sa kućnim smećem.
- 23 -
Page 26

Baterije/akumulatori mogu sadržavati otrovne •
tvari, koje su štetne za okoliš. Iz tog razloga
baterije/akumulatore obavezno zbrinite u
skladu sa zakonskim propisima.
•
Svaki potrošač je zakonski obavezan, da baterije/
akumulatore predaje na sabirnom mjestu
njegove općine, njegovog dijela grada ili u
trgovini. Ova obaveza služi za to, da baterije/
akumulatori mogu biti zbrinuti na način neškodljiv za okoliš.
•
Baterije/akumulatore vratite isključivo u ispražnjenom stanju.
Sve materijale ambalaže zbrinite tako, da
budu reciklirani na način neškodljiv za okoliš.
CE-Konformitet
Ovaj uređaj je ispitan i odobren u pogledu odgovaranja osnovnim zahtjevima i drugim relevantnim
propisima smjernice EMV (smjernice za elektromagnetnu podnošljivost) 2004/108/EC.
Uvoznik/Servis
Uvoznik za HR: LIDL Hrvatska d.o.o.k.d.,
p.p. 61, 10020 Novi Zagreb
Proizvođač:
KOMPERNASS GMBH
BURGSTR.21, D-44867 BOCHUM,
www.kompernass.com
- 24 -
 Loading...