

Page 1
Technology Technical
Note No. 4
South Dakota
Trimble GeoXT/ ArcPad User Guide
SOUTH DAKOTA TECHNICAL GUIDE NOTI CE SD-325
SECTION I – REFERENCE LIST - TECHNICAL NOTES – TECHNOLOGY – PAGE 1 OF 12 OCTOBER 2011
Page 2

Table of Contents
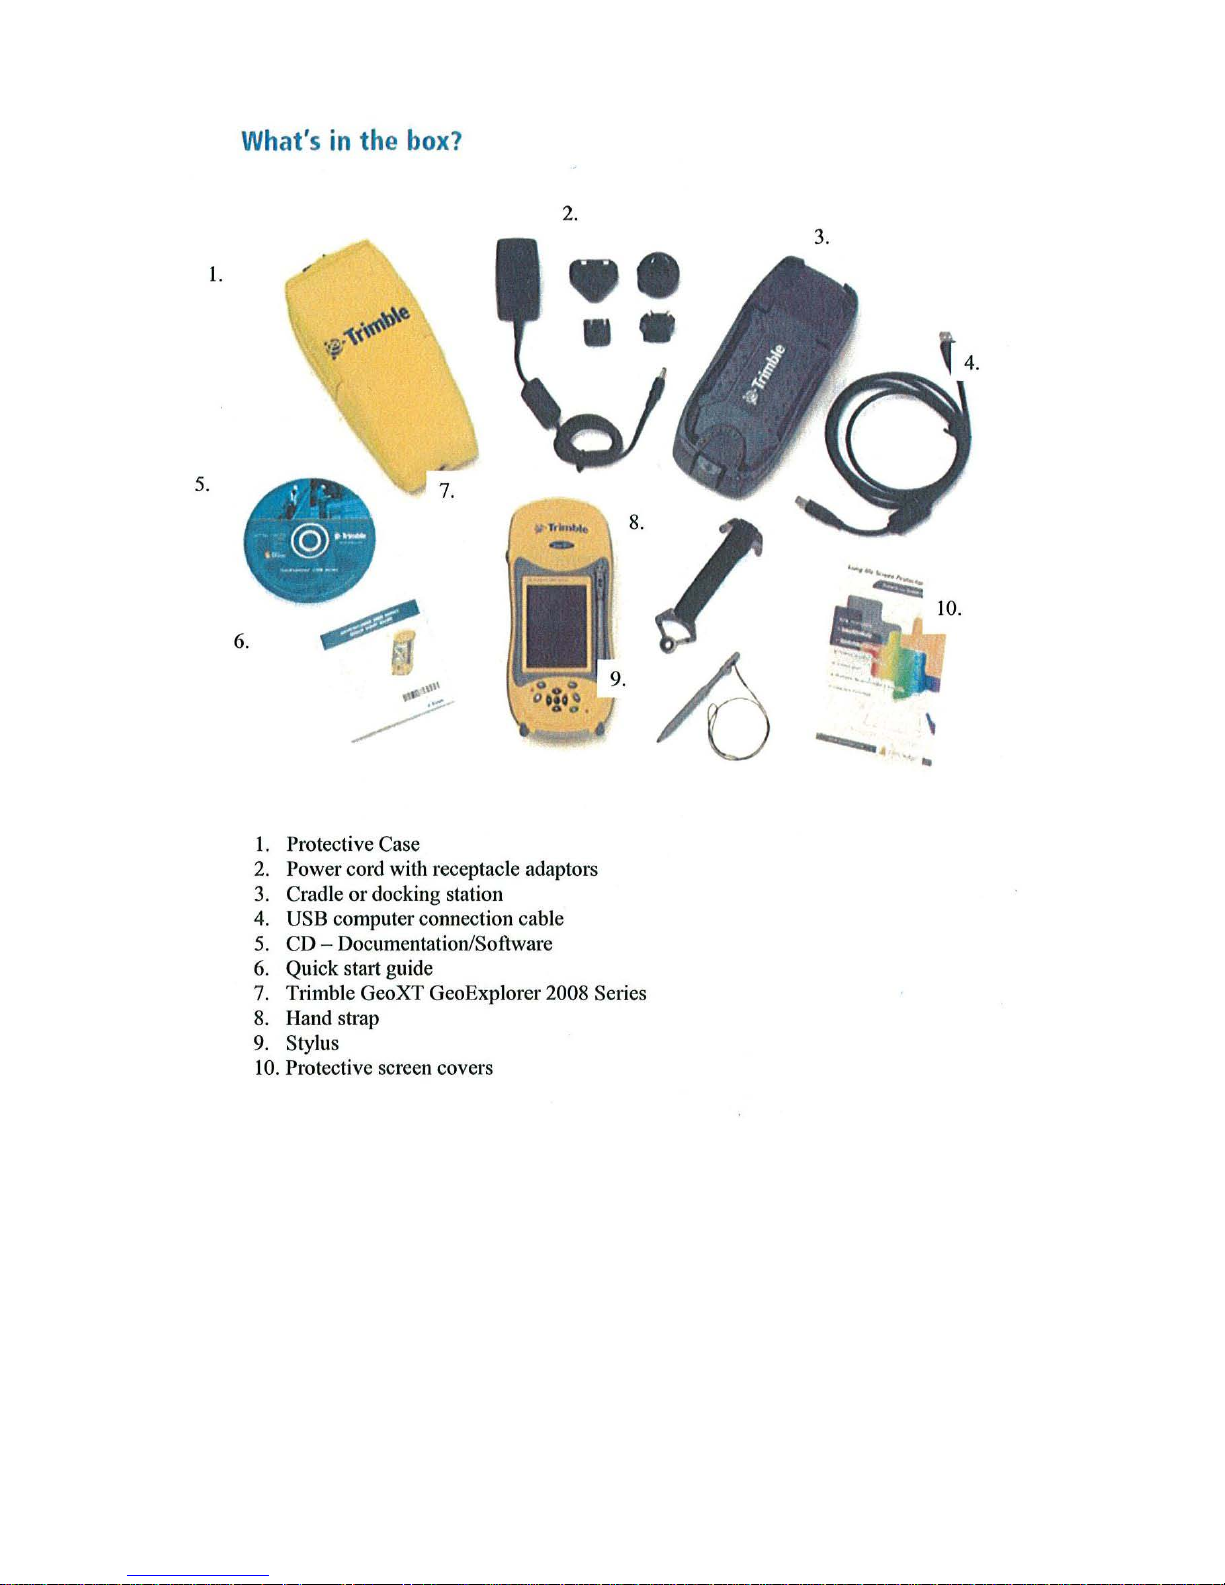
What’s in the box
Getting Started
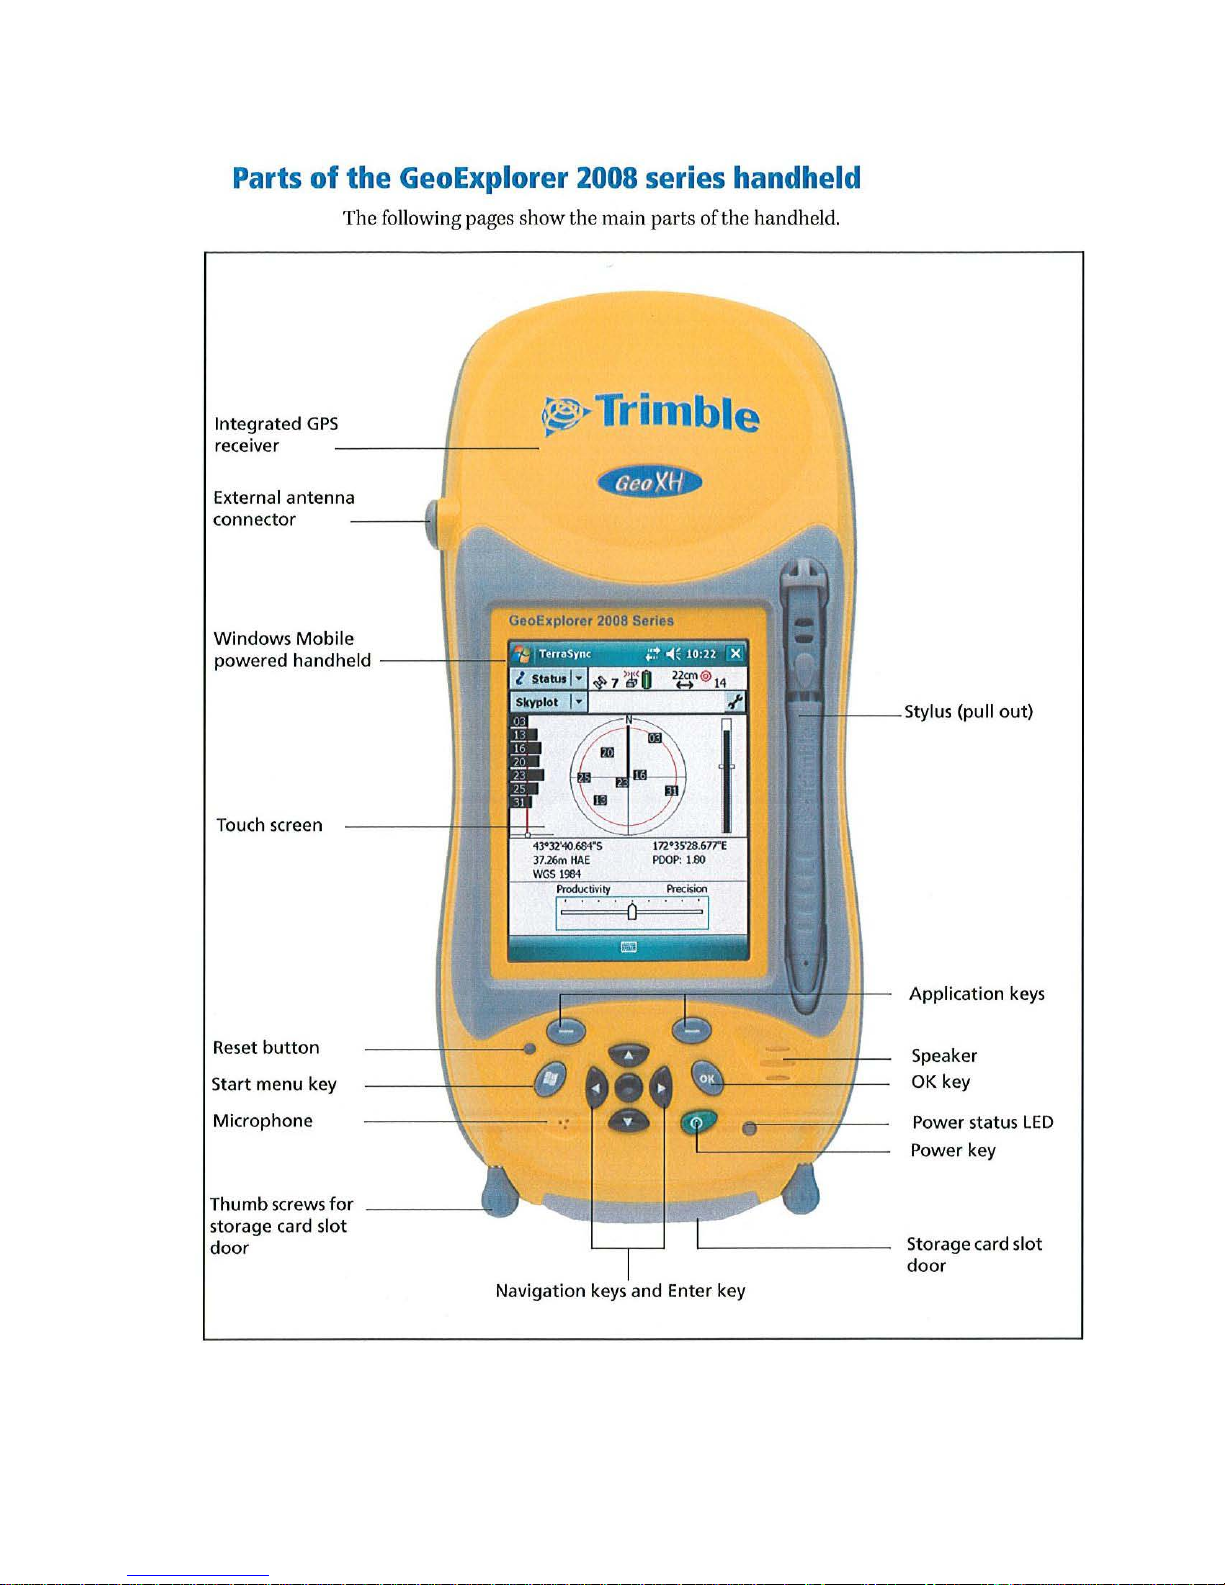
Intro to GeoXT and Basic Operations
Suspend Mode
Resetting the Handheld
Storing Data
Device Lock
Backlight
Using the Stylus (drawing box for selection)
Power up, Standby Mode, Power Down
Step-By-Step Instructions for Data Collection (Points, Lines, Polygons)
Preparing, Checking Out and Check ing in Geodatabase GIS Data to/from the
Trimble GeoXT 2008 Controller
Trimble Ge oExplorer 2008 Fact Sheet
Powering the Handheld
Activating Keyboard
Active Sync Software
ArcPad on the GeoXT
SOUTH DAKOTA TECHNICAL GUIDE NOTI CE SD-325
SECTION I – REFERENCE LIST - TECHNICAL NOTES – TECHNOLOGY – PAGE 2 OF 12 OCTOBER 2011
Page 3
SOUTH DAKOTA TECHNICAL GUIDE NOTI CE SD-325
SECTION I – REFERENCE LIST - TECHNICAL NOTES – TECHNOLOGY – PAGE 3 OF 12 OCTOBER 2011
Page 4
Getting Started
SOUTH DAKOTA TECHNICAL GUIDE NOTI CE SD-325
SECTION I – REFERENCE LIST - TECHNICAL NOTES – TECHNOLOGY – PAGE 4 OF 12 OCTOBER 2011
Page 5

Powering the Handheld
When charging the battery, put the unit in the suspend mode or turn off the handheld.
If the battery becomes hotter than maximum temperature allowed, charging is
automatically suspended until the battery cools and then charging automatically restarts.
(This may take up to 1 hour.)
Flashing orange light means there is a battery charge fault. May need to call for
assistance.
Note – The battery life can be significantly shortened if power is constantly supplied to
the handheld.
Suspend Mode
Set the handheld to automatically enter Suspend Mode when idle.
Suspend Mode – When you press the Power button to turn off the handheld, the
handheld goes into Suspend mode.
- This is a low-power mode that maintains the main memory contents and keeps
applications running but does not allow you to operate any of the handheld’s
function.
- To turn on the handheld when it is in Suspend mode, press the Power key.
The handheld is ready for operation. There may be a delay of up to 30
seconds while the integrated GPS receiver automatically reactivates.
You can configure the handheld to automatically enter Suspend mode when it has
been idle for a specified time. By default, the handheld is set to enter Suspend
mode if the handheld if not used for three minutes.
To change the time to enter Suspend mode:
1. Tap the battery icon in the title bar of the Today screen. The
Power control appears.
2. Tap the Advanced tab.
3. From the On battery power option, select the Turn off device if not used
for check box and then select the idle time format the drop-down list.
4. Tap OK.
SOUTH DAKOTA TECHNICAL GUIDE NOTI CE SD-325
SECTION I – REFERENCE LIST - TECHNICAL NOTES – TECHNOLOGY – PAGE 5 OF 12 OCTOBER 2011
Page 6

Resetting the Handheld
Performing a soft reset
A soft reset is similar to restarting a computer. A soft reset saves data and closes all open
applications and then restarts the handheld. All data and settings are retained after a soft
reset.
To perform a soft reset, use the tip of the stylus to lightly press the Reset button.
Alternatively, press the Power key for one second until the Power menu appears and then
tap the Soft Reset button.
Performing a hard reset
A hard reset retains settings and data that you have previously saved on the handheld.
However, any unsaved data may be lost.
Note – Perform a hard reset only if a soft reset does not resolve the problem.
To perform a hard reset, press and hold the Power button as you use the tip of the stylus
to lightly press the Reset button.
Storing Data
As an alternative to internal storage, data can be saved to a removable card. An SD card
was provided with each unit. This card should not have to be removed. The data can be
transferred using Active Sync to your computer.
Device Lock
Use the Device Lock option on the Today screen to lock the screen and keypad while the
handheld remains turned on.
To lock the device, tap Device unlocked in the Today screen. The Today screen shows
Device locked, and Unlock appears in the left corner of the menu bar.
Once the handheld is locked, the screen and most of the keys do not respond until the
handheld is unlocked. The exceptions are the Power key and the Reset button, which
always respond. Communication with the external devices such as a GPS receiver is not
interrupted by locking the handheld. An example of this use is you could lock the device
to safely transport it between features, while keeping the connection to the GPS receiver
so you can continue recording the GPS positions.
To unlock the device, tap the Unlock notification in the left corner of the Today screen
menu bar and then tap Unlock.
SOUTH DAKOTA TECHNICAL GUIDE NOTI CE SD-325
SECTION I – REFERENCE LIST - TECHNICAL NOTES – TECHNOLOGY – PAGE 6 OF 12 OCTOBER 2011
Page 7

Backlight
The backlight makes the screen easier to read in low light, but uses extra power. Use the
Backlight control to configure power-saving settings for the backlight. To open the
Backlight control:
• Tap Windows icon/Settings / System / Backlight.
To set the backlight to automatically turn off:
1. To automatically turn off the backlight when the handheld is idle and is using
battery power, tap the Battery Power tab. Select the Turn off backlight check
box and then select a time from the drop-down list.
2. To automatically turn off the backlight when the handheld is idle and is
using external power, tap the External Power tab. Select the Turn off
backlight check box and then select a time from the drop-down list.
3. Tap OK.
To change the brightness:
1. Tap the Brightness tab.
2. Tap and drag the slider control to the left to make the backlight darker, or to
the right to make the backlight brighter.
3. Tap OK.
Using the Stylus
To interact with the handheld, use the stylus to tap on the touch screen.
Actions you can perform with the stylus are as follows:
Tap – Touch the screen once with the stylus to open items and select options
SOUTH DAKOTA TECHNICAL GUIDE NOTI CE SD-325
SECTION I – REFERENCE LIST - TECHNICAL NOTES – TECHNOLOGY – PAGE 7 OF 12 OCTOBER 2011
Page 8

Tap and hold – Tap and hold the stylus on an item to see a list of actions available
for that item. On the pop-up menu that appears, tap the action you want to
perform
Drag – Hold the stylus on the screen and drag across the screen to select text and
images. Drag in a list to select multiple items.
Activating Keyboard
Use the Input Panel button to type or write on the screen.
The Input Panel button automatically appears in the menu bar of any application.
To display the currently selected input panel, tap a text box in the application, or tap the
Input Panel button.
To select an input panel, tap the Input Selector arrow next to the Input Panel button and
then tap the input panel you want to use.
Using the on-screen keyboard
To enter characters, use the stylus to tap the keys on the keyboard. When finished
entering text in a field, tap (Tab) to accept the text you have entered and then move to the
next field.
To enter special characters, tap (123) to display keyboards containing numbers and
symbols. To switch back to the main keyboard, tap (123) again.
To hide the keyboard, tap the keyboard icon again.
Tip –To make the keys larger, tap the Input Selector arrow and then tap Options. In the
Input method list, select Keyboard and then tap Large Keys.
Power Up, Standby Mode, Power Down
1. To power the unit up or put in Suspend mode, press briefly (less than one second) tap
on the green power button or to turn off the handheld (put it into Suspend mode).
2. To Power the unit down (shutdown), press the green power button till the power menu
appears.
SOUTH DAKOTA TECHNICAL GUIDE NOTI CE SD-325
SECTION I – REFERENCE LIST - TECHNICAL NOTES – TECHNOLOGY – PAGE 8 OF 12 OCTOBER 2011
Page 9
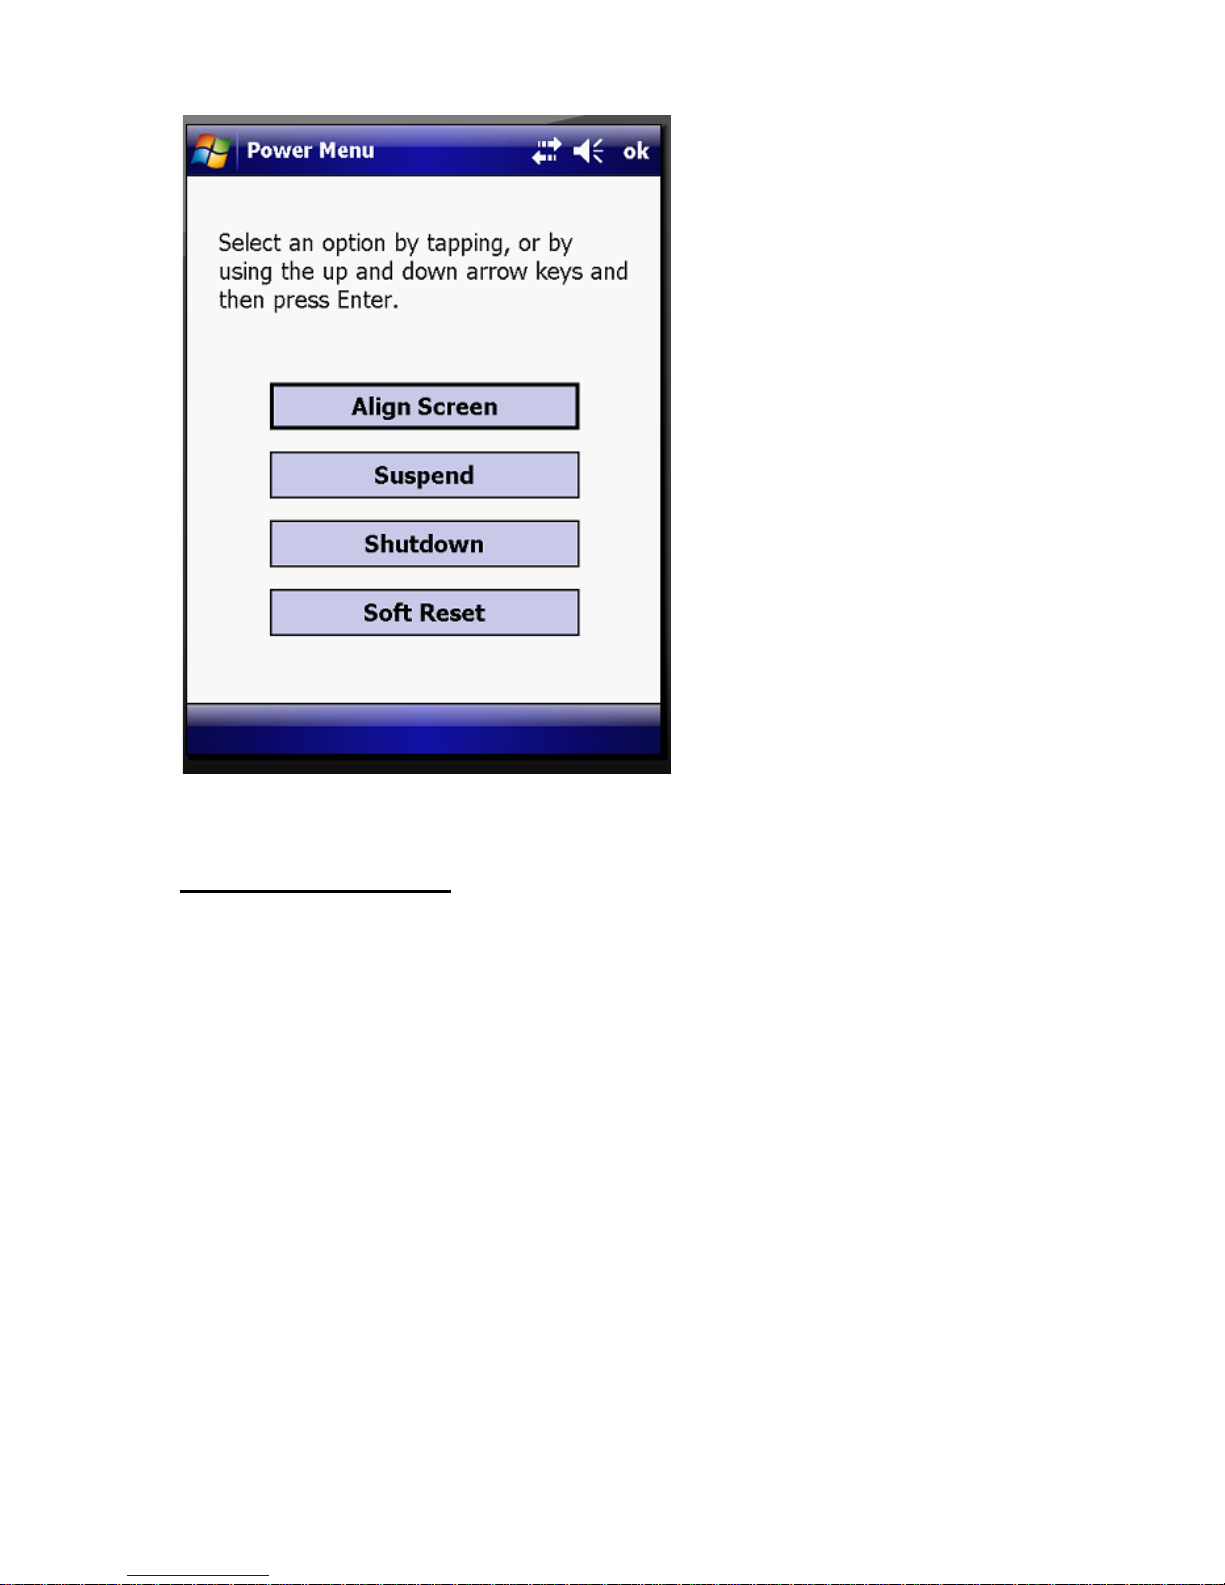
3. Tap on Shutdown to power the unit off.
ActiveSync Software
ActiveSync synchronizes information between the Trimble and the computer for
transferring data. You can use the Windows Explorer feature in either program to move
files from your computer to your device and back.
To activate ActiveSync:
1. Hook the USB data cable between the Trimble cradle and the computer.
2. Go to Programs – click on Microsoft Active Sync. The following screen should
appear:
*Note – For laptop users, the USB data cable between the cradle and computer must be
connected directly to the computer, not the docking station.
SOUTH DAKOTA TECHNICAL GUIDE NOTI CE SD-325
SECTION I – REFERENCE LIST - TECHNICAL NOTES – TECHNOLOGY – PAGE 9 OF 12 OCTOBER 2011
Page 10

Hit cancel on the setup wizard screen.
The following screen should appear:
Now you should be synchronized and able to communicate between the Trimble and the
computer.
ArcPad on the GeoXT
Each Trimble has ArcPad 8.0, Service Pack 2 customized software loaded. This will be
the software we will use to collect the data.
SOUTH DAKOTA TECHNICAL GUIDE NOTI CE SD-325
SECTION I – REFERENCE LIST - TECHNICAL NOTES – TECHNOLOGY – PAGE 10 OF 12 OCTOBER 2011
Page 11

Appendix A
Official Natural Resources Conservation Service (NRCS)
Policy in South Dakota (SD) for
Using Trimble GeoXT 2008 Global Positioning System
(GPS)
Unit to Certify Conservation Practices
PROCEDURES
Background
The Trimble GeoXT 2008 series GPS units have shown to have high level of
accuracy for geographic information system (GIS) data collection. Trimble units
properly used by trained personnel can meet current NRCS spot-checking
tolerances for practice c er ti fica t ion.
Area Measurements
Trimble GPS units can be used to measure any area for prac ti ce c er ti fica ti on as it
has reliable accuracy within one to three meters when the Positional Arelution of
Precision (PDOP) is at or below 5.0. The GeoXT is geared toward maintaining
precise GIS databases by delivering submeter accuracy.
Length Measurements
Trimble GPS units can be used to measur e a ny length for practice certi fica ti on on
slopes less than 15 percent provided the accuracy level calculated by the GPS
unit has a PDOP at or below 5.0. If slopes exceed 15 per c e nt f or a porti on o f the
measurement, the steeper slope lengths must be measured by conventional
methods, such as tapes or measuring wheels.
Verification of GPS Data for Practice Certification
All area and length measurements obtained from the Trimble unit s for practice
certification must be downloaded into Common Computing Environment (CCE)
approved GIS software for verification of the proper location of the conservation
practice. Trimble data (position poi nts) us ed for pract ic e certification will be
stored in a Customer folder in Customer Service Toolkit (CST) for that
cooperator. When CST and Trimble equipment are used to certify a
conservation practice, the Conservation Practice Certification Template shall be
used to document certifica ti on o f all conservation practices.
Use of Digital Orthophotography or Other Georectified Imagery for Prac tice
Certification
Areas that are very WELL-DEFINED (visually) on Digital Orthophotography or
other georectified imagery can be digitized and measured using CST for practice
certification. The view scale shall be 1:7920 (1 inch = 660 feet) or less.
SOUTH DAKOTA TECHNICAL GUIDE NOTI CE SD-325
SECTION I – REFERENCE LIST - TECHNICAL NOTES – TECHNOLOGY – PAGE 11 OF 12 OCTOBER 2011
Page 12

GPS Practice Certification
Only those employees that hav e rec eived Trimble training will be allowed to use
CST and GPS equipment to certify a conservation practice.
Approved GPS Platform
The state conservationist will approve Trimble GeoXT platforms (hardware and
software) that are acce ptable for practice certifica ti on.
Please see General Manual, Title 450, Part 407.12, Subpart B, dated July 2006,
for official NRCS policy.
SOUTH DAKOTA TECHNICAL GUIDE NOTI CE SD-325
SECTION I – REFERENCE LIST - TECHNICAL NOTES – TECHNOLOGY – PAGE 12 OF 12 OCTOBER 2011
 Loading...